Showing 379 items
matching north road railway station
-
 Melbourne Tram Museum
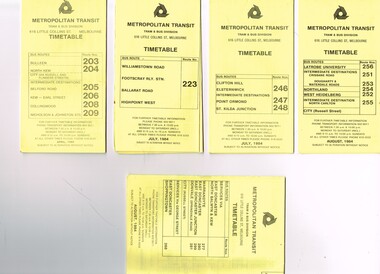
Ephemera - Timetable/s, Metropolitan Transit Authority (MTA), "MMTB Bus Timetables", 1984
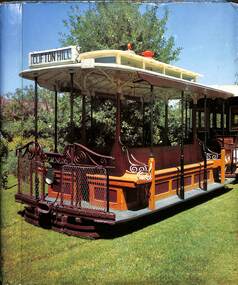
Set of 5 Metropolitan Transit Bus timetables, folded sheets, generally 8 or 10 sections, providing timetables for specific routes, day of week giving information on tram times at specific time points, route map, sections and fares and organisation address - 616 Little Collins St. Melbourne. All printed on yellow paper unless noted otherwise. .1 - Route 203, 204, 205, 206, 208. 209 - Bulleen, North Kew, Belford Road, Kew, Collingwood and Nicholson and Johnson St - City - April 1984 .2 - Route 223 - Williamstown Road, Footscray Railway Station, Ballarat Road and Highpoint West - July 1984 .3 - Route 246, 247, 248 - Clifton Hill, Elsternwick, Point Ormond and St Kilda Junction - July 1984 .4 - Route 256, 251, 253, 254, 252, 255 - Latrobe University, Northland, West Heidelberg - City - Aug./ 1984 .5 - Route 277, 280, 299. 281 and 268 - services via East Doncaster, North Balwyn and Kew - Warrandyte, Donvale, Shoppingtown - August 1984trams, tramways, metropolitan transit, timetables, melbourne, fares, buses, footscray, latrobe university, northland, heidelberg, warrandyte, doncaster, donvale, bulleen, north kew, williamstown rd, highpoint, clifton hill, elsternwick, point ormond, st kilda junction -
 Melbourne Tram Museum
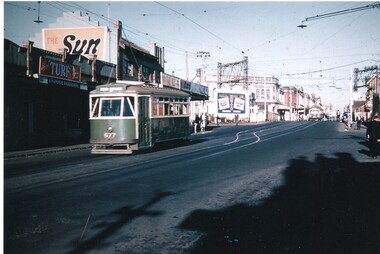
Photograph - Colour Print, Keith Stodden, 1959
Colour print of X1 class tram No. 677 eastbound in Glenhuntly road, just prior to the Elsternwick station level crossing. Shows the railway overhead structures, shops on the north side of the road with signs for Turf tobacco, The Sun, The Age, the Rex?? and an advertisement board for Hoyts. Photo shows the crossover just before the level crossing. From a slide by Keith Stodden. Printed on Fujichrome Crystal Archive paper.On rear in black ink "Elsternwick 1959 from slide by Keith M. Stodden"trams, tramways, elsternwick, glenhuntly rd, x1 class, level crossings, tram 677 -
 Melbourne Tram Museum
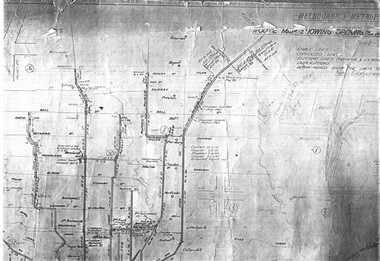
Drawing, Melbourne & Metropolitan Tramways Board (MMTB), "Plan of Tramway System - showing route mileage of electric tramways", Late 1960's
Set of 9 A3 photocopy of a drawing - of a dyeline print that had been mounted onto a cloth backing and had been kept up to date with regard to extensions and closures or opening and closing - titled - "Plan of Tramway System - showing route mileage of electric tramways" - Principal Junctions and intersections shown diagrammatically. Map of system shown at 40 chains to the inch. Copy of Drawing No. P6050. Shows crossovers, signal cabins, automatic points, closed cable tram lines in the city area, Port Melbourne, roads, railways and stations. Has extensions to Mill Park up to April 1987. Shows the Port Melbourne, North Melbourne (Spencer and Abbotsford Sts) and Collingwood cable lines, the Footscray system lines and the Point Ormond lines. See also Reg Item 1561 for a late 1960's print and 3642 for a 1941 version.trams, tramways, mmtb, trackwork, tramways, junction, map -
 Melbourne Tram Museum
Slide - Set of 4, Vic Solomons, Jun. 1970
Slide - set of 4 - 35mm - Kodachrome cardboard mounts. .1 - Tram 808 at the Spencer St stop at the corner of Bourke St with Spencer St Station in the background. Note the route and destination - at the time when North Balwyn and Burwood Routes were combined on Sundays am and evening - and passengers changed at Hawthorn Bridge. Route 74. Has a Fosters Lager advertisement. .2 - As above, tram approaching the stop with the Spencer St station car park in the background. .3 - tram 1005 leaving the Bourke St terminus, taken after .4 .4 - tram 1005 at the Bourke St terminus with tram 838 crossing in the background, has the Station building, Carlyon's Hotel and the Tramways Building. Note the Bundy clock, tram stop signage and safety zone. Route 96. The grey box by the Bundy Clock is thought to be a correspondence box for the satchels that were transported between the depots and head office. Photographed by Vic Solomons June 1970 (based on date stamped on slide)trams, tramways, bourke st, spencer st, railways, stations, route 74, north balwyn, burwood, route 96, letters, mails, tram 808, tram 1005, tram 838 -
 Melbourne Tram Museum
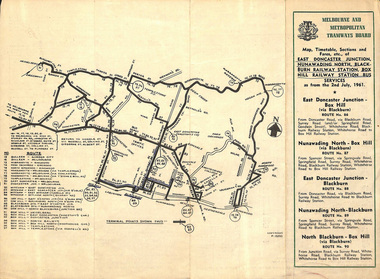
Ephemera - Timetable, Melbourne & Metropolitan Tramways Board (MMTB), East Doncaster Junction, Nunawading North, Jul, 1961
Timetables for specific routes, day of week giving information on tram times at specific time points, route map, sections and fares and organisation address - 616 Little Collins St. Melbourne. 2nd July 1961 1 - East Doncaster Junction, Nunawading North, Blackburn Railway Station, Box Hill Railway Station- Mitcham - Ringwood. 2 - Doncaster Junctioin - Melbourne - route 81 with many supplementary routes - July 1961 3 - Bulleen - City - Garden City routes 15 and 16 - July 1961Demonstrates and early MMTB timetable for bus routes which included extensive details of services.Set of 3 MMTB Bus timetable, folded sheets with maps.Bus routes underlined in blue inktrams, tramways, timetables, tickets, bus services, fares, mmtb, doncaster, ringwood, mitcham, bulleen, garden city, route 15, route 16, route 81 -
 Melbourne Tram Museum
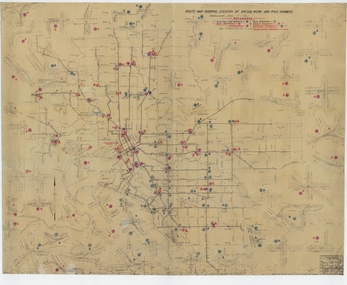
Drawing, Melbourne & Metropolitan Tramways Board (MMTB), "Route Map showing location of special work and pole numbers" "substations", late 1942
Map of the system shown at two inches = 1 mile. Drawing No. P5799. Shows crossovers, track layouts at junctions, signal cabins roads, railways, and stations. Originally signed by Perway Engineer - 20/12/1940, though originally drawn in 1922. The plan shows the lines to Maribyrnong Munitions works along Cordite Ave and Wests Road and the track from Moonee Ponds to Union Road, opened in July 1941, and the extension to Essendon Airport built in 1942, but not the Queen St North Essendon substation. Shows underground cables, tram and bus depot, workshop locations, and substation locations and their priority.Yields information about the MMTB substation locations in 1942.Drawing - dyeline cloth backed print - titled - "Route Map showing location of special work and pole numbers" and subtitled - "Substations". trams, tramways, mmtb, trackwork, tramways, junction, map, world war 2, substation -
 Melbourne Tram Museum
Photograph - Black & White Photograph/s, c1890
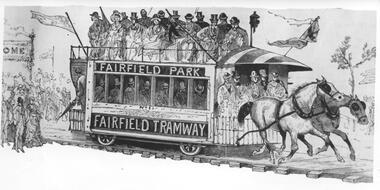
Black and white photograph of an illustration of the Fairfield Horse Tram. The illustration is from The Australasian Sketcher with Pen and Pencil (Melbourne, Vic. : 1873 - 1889), No 188 Vol XIIL, 14/1/1885. The magazine was owned by the Argus. The drawing is from a series of sketches at one of the Saturday land sales. The tramcar is numbered 1 and has signage Fairfield Park and Fairfield Tramway. The tramway was operated by Charles Henry James in an attempt to sell land developed by him north of the Fairfield railway station. The tramway operated from 20/12/1884 until its closure in 1890. Stamped on the back "...The Argus...negative No X2656"trams, tramways, argus, fairfield, horse trams, tram 1 -
 Melbourne Tram Museum
Photograph - Black and White Swanston St 1931/32, 1931/32
Photograph of a busy Swanston St taken from the Swanston St/ St Kilda Road overbridge at Flinders St Railway Station looking north. In the background is St Paul's Cathedral. Has W2 442 (East Coburg, Route 1), northbound, W2 586 and another W2 southbound. Note the crowded trams and people leaning on the drop bars that "closed" the tram off on the wrong or "off side" side and decorative "flower pots" in the street between Little Flinders and Collins St. Tram 442 later became the first Melbourne Restaurant tram.Demonstrates a busy streetscape and Yields information about the use of the Flinders / Swanston St in the early 1930's.Black and White photograph of Swanston St looking north from Batman Ave 1931/32Has the stamp of the "Abbotsford Photographics" on the rear and "1931/32" in inktrams, tramways, st pauls cathedral, st kilda road, swanston street, w2 class, tram 442, tram 586, route 1 -
 Melbourne Tram Museum
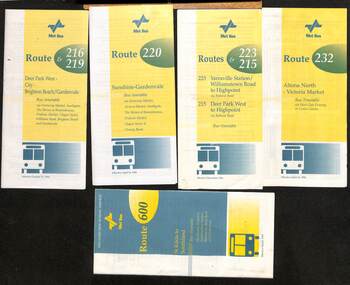
Ephemera - Timetable - Met Bus - set of 5, The Met, 1996/97
Set of 5 Met Bus timetables - all with a route map on the rear. 1 - Routes 216 and 219, Deer Park West - City - Brighton Beach/Gardenvale - dated 27/10/1996 2 - route 220 - Sunshine - Gardenvale - dated 14/4/1996 3 - Routes 223 and 215 - Yarraville Station to Highpoint and Deer Park West to Highpoint - dated Dec. 1996 4 - Route 232 - Altona North - Victoria Market via West Gate Freeway and Crown Casino - dated 14/4/1996 - this service effectively combined the two railway tram routes. 5 - Route 600 - St Kilda to Southland via Elwood, Brighton, Sandringham, Black Rock and Cheltenham - dated March 1997Yields information about some of the Met Bus services in 1996 and 1997.Set of five Met Bus timetables, DL size, printed in two colours.maps, bus services, route 216, route 219, route 220, route 223, route 215, route 232, route 600, met bus -
 Melbourne Tram Museum
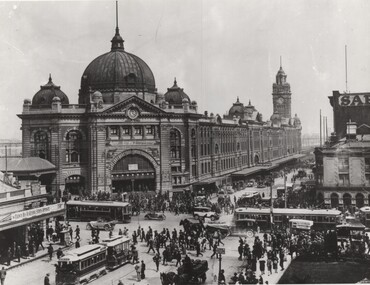
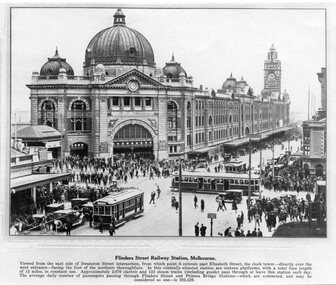
Photograph - Black and White photograph, Flinders St station cable and electric trams, c1926
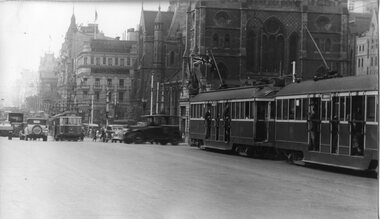
Photograph of the intersection of Flinders and Swanston Sts featuring the Flinders St Station building - c1926?? features a very busy intersection cable trams (No. 17 west bound in Flinders St), tram 160 north bound in Swanston, two W class trams, other cable trams, many motor cars, horse drawn vehicles, cyclist and pedestrians. Note the standing zone in Flinders St. In photo are Young and Jacksons Hotel, Bacchus Marsh Concentrated Milk table cream, and numerous signs on the railway station. See Reg Item 5272 for the photo on a Greetings Card and 103 for a framed photographic print.Yields information about the intersection of Flinders and Swanston St c1926 - after the conversion of Swanston St.Black and white photograph with notes on the rear. Two copies held.Has "1926 Brimson VicRail" in ink along lower edge on rear and "H4505" in the middle of the print back.trams, tramways, flinders st, swanston st, cable trams, flinders st station -
 Melbourne Tram Museum
Newspaper, The Age, "Transport past gets $400,000 polish", 15/2/1995
Newspaper cutting from The Age, titled "Transport past gets $400,000 polish", about the expenditure on heritage transport infrastructure following a grant from Heritage Victoria. Includes the tramway poles in Dandenong Road, Peel St North Melbourne and railway station. Quotes Mr Brown, Transport Minister and Rohan Storey of the National Trust. Dated 15/2/1995.. Has a photo looking along Dandenong Road from an over bridge. Story by Bruce Tobin, Photo Michael Clayton-Jones.trams, tramways, overhead, heritage victoria, grants, poles, national trust -
 Melbourne Tram Museum
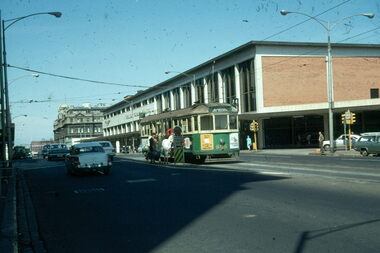
Photograph - Black & White Photograph/s, Flinders St Railway Station Melbourne, c1975
Photo shows Flinders St Railway Station with a W class tram heading north, a G class on the east side of Swanston St and a four wheel car waiting on the west side. Very busy view with many pedestrians. Photographed at 1215, possibly a Saturday. See item 7218 for a enlarged version of the G class tram.Yields information about Flinders Station, mid to late 1920sBlack & White Photograph of a postcard made by the TMSV Sales.trams, tramways, flinders st, swanston st, w class, flinders st station, g class -
 Melbourne Tram Museum
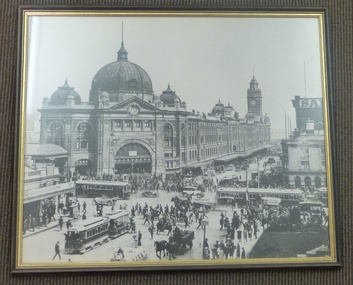
Print - Framed Print, Glen Waverley Picture Framing, 1970's?
Framed, glazed, black and white photograph of the intersection of Flinders and Swanston St Melbourne, looking towards Flinders St railway station. Timber frame, painted brown and gold, with brown paper lining on rear. Has brown string stapled at rear on both sides for hanging. In the central bottom of the rear is "Glen Waverley Picture Framing, sticker, 698 High St Road, Glen Waverley with a 7 digit phone number. Photo c1926?? features a very busy intersection cable trams (No. 17 west bound in Flinders, tram 160 north bound in Swanston, two W class trams, other cable trams, many motor cars, horse drawn vehicles, cyclist and pedestrians. Note the standing zone in Flinders St. In photo are Young and Jacksons Hotel, Bacchus Marsh Concentrated Milk table cream, and numerous signs on the railway station. See Reg Item 5272 for the photo on a Greetings Card and 5217 for a photographic print.on rear top "Donated to Hawthorn Tram Museum Feb 1912 Ron Scholten" in ink.trams, tramways, flinders st station, swanston st, flinders st, melbourne, cable trams -
 Melbourne Tram Museum
Photograph - Digital Image, Kevin O'Reilly, Kew Junction from the north east, towards the city, c1930's
Image from CD (Compact Diskette for use in computers) - see Reg Item 135. Image titled "Kew Junction' on CD, of looking Kew Junction from the north east, towards the city, shows the Kew railway station precinct. Has a inbound W class tram picking up passengers at the Kew Post Office. A summer day. Possibly late 1920's, early 1930's.trams, tramways, kew, kew junction, kew post office, high st -
 Melbourne Tram Museum
Photograph - Digital Image, Kevin O'Reilly, series of three images of the Hawthorn Bridge over the Yarra, c1930, c1930's
Image from CD (Compact Diskette for use in computers) - see Reg Item 135. A series of three images of the Hawthorn Bridge over the Yarra, c1930, during the era with problems with the bridge. See separate article for more details. Richmond 6, Richmond, Richmond 3 on the CD as original files. .1 - Looking from the south west, at the Hawthorn bridge with the temporary wooden bridge being constructed on the south side. Has the cable tram depot in the photo and part of the Burnley racing course. Temporary track on the north side of the steel bridge and crossings can be seen. .2 - Looking along Bridge Road to the east with Hawthorn Bridge in the middle of the photograph. Shows the industrial and residential areas, Hawthorn Railway Station and part of the Burnley Race course, the cable tram depot building. W class tram in Church St Hawthorn and W class tram crossing the bridge on the north side temporary track. Note the cable tram used as a shelter on the north east corner of the bridge. .3 - Looking south along River St towards Bridge Road, with the Yarra River and Hawthorn Bridge on the left side of the photograph. Shows the industry in the area at the time, wool and skin Merchants, north side of the cable depot, housing and the outlook to the river!trams, tramways, hawthorn, yarra river, burnley, richmond, hawthorn bridge -
 Melbourne Tram Museum
Photograph - Digital Image, Kevin O'Reilly, Royal Park looking east over the Royal Park Hospital, mid 1920's
Image from CD (Compact Diskette for use in computers) - see Reg Item 135. Image titled "Royal Park 2" on CD, of looking east over the Royal Park Hospital in the north west corner of the Royal Park itself. Has the West Coburg tram line in the photograph in the top quarter. The Royal Park railway station and cutting can be seen in the top right hand corner of the photograph. Possibly late 1920's given the construction of the Royal Park tram line was completed through the park in 1925.trams, tramways, royal park, west coburg -
 Melbourne Tram Museum
Photograph - Digital Image, Kevin O'Reilly, looking north west over the Victorian Railways Head Office in Spencer St, Late 1920's
Image from CD (Compact Diskette for use in computers) - see Reg Item 135. Image titled "Spencer" on CD, of looking north west over the Victorian Railways Head Office in Spencer St with Collins St and the Spencer St station in the top of the photo. Has cable trams in Spencer St and a cable tram set being shunted in Collins St. The top floor of the VR head office has been added (1922). Possibly late 1920's.trams, tramways, victorian railways, spencer st, collins st, cable trams -
 Melbourne Tram Museum
Album - Compiled by David Frost - VR trams etc, David Frost, 2005
Page 1 - postcards and notes on the Alf Twentyman's preserved cars. 2 - VR tram 41 at Bendigo 2001 and two VR tram tickets 3 - VR 41 at Sandringham station - night photo 4 & 5 - VR 41 at Bendigo 6 & 7 - VR 41 at Bendigo 8 & 9 - photo copies of VR railway - tram tickets 10 - 11 - photo copies of VR railway - tram tickets and photo of VR 41 at North Bendigo. 12 - Photo of David Frost selling a ticket to David Vendy, Mayor of Ballarat at the time - July 2002 13 & 14 Two Melbourne tram postcards and tram tickets 15 - 18 - Four Peter Gerasimon greeting cards featuring Melbourne trams, 19 - Ballarat tramway postcard and cable saloon trailer 171 being loaded for Portland - July 2002. 20 - three photos of David Frost at Bylands rear cover - photos of VR 41 and VR 53 at Bendigo.Illustrates the work of David Frost and his interest in VR trams.Photo Album - 10 heavy card sheets with plastic sheets over each, white plastic ring bound, covered with a large photograph of Alf Twentyman's cable cars at Northcote. See 3086 for an unused version.cable cars, vr trams, alf twentyman, david frost, vr 41, bendigo, tickets, postcards, peter gerasimon, trams, tramways -
 Ballarat Tramway Museum
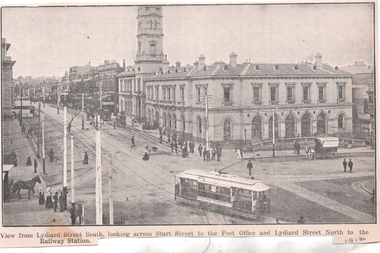
Photograph - Illustration, WTP, "View from Lydiard Street South looking across Sturt St", c1907
Illustration of the intersection of Sturt St and Lydiard St Nth with the Ballarat Post Office being the primary feature. Has an ESCo tram turning from Sturt St into Lydiard St. Shows the trackwork at this location and has several horse-drawn vehicles in the photograph. Note the building in the road space on the left-hand side of the photograph. The caption along the bottom edge "View from Lydiard Street South looking across Sturt Street to the Post Office and Lydiard Street North to the Railway Station. On the rear has an item about Ballarat itself and its history. See also item 6245 for a postcard of this view. Yields information about the post office corner at the time of the opening of the tramway and demonstrates printing techniques.Black and white Illustration cut from a journaltramways, trams, sturt st, esco, post office, lydiard st north