Showing 149 items
matching division in battle
-
 Federation University Historical Collection
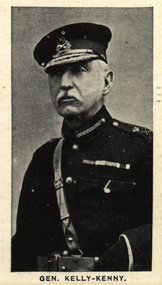
Photograph (black & White), General Sir Thomas Kelly-Kenny - South Africa Forces
As well as his army positions, Kelly-Kenny was very interested in politics in his native County Clare. In the Second Anglo-Boer War he was , as a Lieutenant-General, General Officer Commanding the 6th Division of the South African field forces. He was twice mentioned in dispatches and received the Queen's South African Medal with four clasps. He was involved in the relief of Kimberley, the battles of Paardeberg, Poplar Grove and Driefontein. Lieutenant-General Kitchener was appointed commander and over-ruled Kelly-Kenny's plan to besiege Cronji and bombard his force from a safe distance. Kitchener ordered an assault on the Boer trenches. The result was "Bloody Sunday" - an unnecessary sacrifice of hundreds of lives on the British side. Kelly-Kenny was involved in the engagements at Poplar Grove and Driefontein where the 6th Division distinguished itself. These were viewed as key to destroying the Boer morale and winning the war. General Kelly-Kenny was a close friend of King Edward VII. Appointments made, at the insistence of the King, were often challenged. Due to his loyalty and abilities Kelly-Kenny was appointed Knight Commander of the Order of the Bath and received a knighthood in a private audience. Once again others tried to have him moved from the War Office but the King intervened again and he remained in his position. He was conferred with the Knight Grand Cross of the Order of the Bath (1904), Grand Cross of the Red Eagle (1905 - Germany), Grand Cross of the Rising Sun (1906 - Japan) and on his return to Britain he received the Knight Grand Cross of the Royal Victorian Order (1906) Individual image taken from photographed poster of tobacco and cigarette cards.kell-kenny, county clare, lieutenant-general, kimberley, queen's south african medal, paardeberg, poplar grove, driefontein, kitchener, bloody sunday, cronji, boer war, trenches, knight commander of the order of the bath, war office, king, king edward vii, knight grand cross of the order of the bath, grand cross of the red eagle, grand cross of the rising sun, knight grand cross of the royal victorian order -
 Federation University Historical Collection
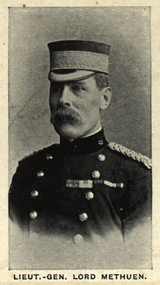
Photograph (black & White), Lieutenant-General Lord Methuen - South Africa
Paul Sanford Methuen became deputy adjutant-general in South Africa in 1888. He was promoted to major general in 1890 and succeeded his father as 3rd baron in 1891. He was promoted to Lieutenant General in 1898 and was given the command of the 1st Division on the outbreak of the Second Boer War. He suffered both defeats and successes during the war - the greatest defeat was at the Battle of Magersfontein, one of three defeats in "Black Week", which led to the dispatch of Lord Roberts to South Africa. During his career he was awarded Knight Grand Cross of the Order of the Bath, Knight Grand Cross of the Order of St Michael and St George and Knight Grand Cross of the Royal Victorian Order.Individual image from photographed poster of tobacco and cigarette cards.lord methuen, south africa, adjutant-general, major general, lieutenant general, second boer war, "black week", battle of magersfontein, lord roberts, knight grand cross of the order of the bath, knight grand cross of the order of st michael and st george, knight grand cross of the royal victorian order -
 Federation University Historical Collection
Photograph (black & White), General Sir Charles Warren - South Africa
General Sir Charles Warren was an officer in the British Royal Engineers. He was one of the earliest European archaeologists ofthe Holy Land. Much of his military service was spene in British South Africa. Previously he was police chief, the Head of the London Metropolitan Police during the Jack the Ripper murders. In 1876, the Colonial Office appointed him special commissioner to survey the boundary between Griqualand West and the Orange Free State. For this work he was made a Companion of the Order of St Michael and St George in 1877. He was appointed special commissioner to investigate "native questions" in Bechuanaland and commanded the Northern Border Expedition troops in quelling the rebellion there. In 1879 he became Administrator of Griqualand West. The town Warranton in the Northern Cape Province of South Africa is named after him. In 1882 the Admiralty sent him to Sinai to discover what had happened to Professor Edward Palmer's archaeological expedition. He discovered the members had been robbed and murdered, located their remains and brought their killers to justice. For this he was created a Knight Commander of the Order of St Michael and St George in 1883 , also Knight of Justice of the Order of St John of Jerusalem and in 1884 elected a Fellow of the Royal Society. In 1884 Warren was sent as HM Special Commissioner to command a military expedition to Bechuanaland, to assert British sovereignty in the face of encroachments from Germany and the Transvaal and to suppress the Boer freebooter states of Stellaland and Goshen, which were backed by the Transvaal and were stealing land and cattle from the local Tswana tribes. This became known as the Warren Expedition and achieved its aims without bloodshed. Warren was recalled and in 1885 was made Knight Grand Cross ofthe Order of St Michael and St George. In 1885 Warren stood for election for Parliament but lost the vote. In 1886 he was appointed Commissioner of Police of the Metropolis following Sir Edmund Henderson's resignation. Criticised continually for his decisions and actions he resigned in November 1888. Prior to this time he was appointed Knight Commander of the Order of the Bath, January 1888. On the outbreak of the Boer War in 1899 he returned to service and commanded the 5th Division of the South African Field Force. In January 1990, Warren bungled the second attempted relief of Ladysmith at Tugela River. At the Battle of Spion Kop, January 1990 he had operational command and his failure of judgement, delay and indecision despite his superior forces culminated in the disaster. It has been said that Warren was "perhaps the worst" of the British generals in the Boer War and certainly the most "preposterous". Redvers Buller in a letter to his wife described him as "a duffer", responsible for him losing him "a great chance". Warren was recalled to Britain in August 1900 and never again commanded troops in the field. Individual image from photographed poster of tobacco and cigarette cards.holy land, sir charles warren, british royal engineers, archaeologist, british south africa, london metropolitan police, jack the ripper, colonial office, commissioner, griqualand west, orange free state, companion of the order of st michael and st george, bechuanaland, northern border expedition, warrenton, sinai, professor edward palmer, knight commander of the order of st michael and st george, knight of justice of the order of st johnof jerusalem, fellow of the royal society, knight grand cross of the order of st michael and st george, boer war, redvers buller, knight commander of the order of the bath -
 Federation University Historical Collection
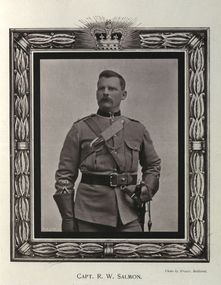
Photograph - black and white, Captain Robert Westrup Salmon, 1900
Robert Westrup Salmon was born at Daisy Hill, Victoria in 1862. He joined the ranks of the Mounted Rifles in 1883 and obtained a commission as Lieutenant in 1892. He became Captain of the first contingent to South Africa. At the Battle of Jasfontein he had command of a division of Mounted Infantry and was highly complimented for the skilful manner in which he handled his men. His position in the camp at the time of his death was Staff-Captain. He died of enteric fever (typhoid) at Naauwpoort in the Orange Free State, on 16 March 1900.Digital portrait from "In Memory of the Gallant Officers and Men of Victoria in Transvaal War, 1899-1900".robert salmon, daisy hill, mounted rifles, lieutenant, first contingent, south africa, jasfontein, naauwpoort, orange free state -
 Red Cliffs Military Museum
Collage, Collage of WW1 photos of E. H. Rowe, 1st April, 2001 (exact)
This is part of the E.H. Rowe Collection.A brown wooden frame, containing 7 photos and a history of Ernest Henry Rowe. The frame has a small plaque on the bottom front.Photos from left-top to bottom: (.1) 1 Australian Divisional Headquarters- Orderlies, Grooms & Police- Derna Camp - Egypt 1914/ (.2) Two Pals and Ernie Rowe -Pyramids, Egypt, 1914/ (.3) Morning fatigues- Derna Camp- Egypt, 1914/ Main Photo: (.4) Officer Cadet Ernest Henry Rowe/ Queens College, Oxford, England/ October 1917./ Top right to bottom: (.5) Recovering at Al Hayat Hospital- Egypt after being wounded at Lone Pine Battle, Gallipoli, in August 1915./ (.6) The boy from the Bush- heading to France with Engineers- 1916./ (.7) The Sphynx and Pyramids - Egypt - 1914/ Plaque: To The Red Cliffs R.S.L. / from/ The Rowe Family of Red Cliffs/ 1st April, 2001. camp, australian, ww1, 1, gallipoli, henry, egypt, ernest, rowe, derna, divisional, headquarters, queens, college, oxford, lone, pine -
 Australian Commando Association - Victoria
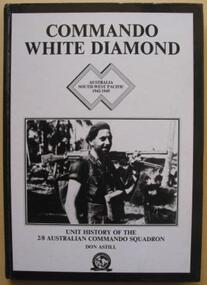
Book, Commando White Diamond: Unt History of the 2/8th Australian Commando Squadron
The detailed history of the No.8 Independent Commando Company during World War II. Plastic protective cover over the book. The 2/8th Independent Company was formed at Wilson’s Promontory, Victoria, in July 1942 and travelled to Yandina, in Queensland, in September. While the other seven independent companies saw action in the islands off Australian and in New Guinea, the 2/8th spent most of the next two years based at Adelaide River, in the Northern Territory. While it was in the Territory, the independent companies underwent a series of reorganisations and the name of the 2/8th was changed from the 2/8th Independent Company to the 2/8th Cavalry (Commando) Squadron. This name was later simplified to just commando squadron. In July 1944, after years of waiting, the squadron left the Territory and sailed from Townsville to Lae, via Milne Bay. While at Lae, the squadron received an intake of 70 men from the 2/8th from the 2/3rd, 2/5th and 2/6th Cavalry (Commando) Squadrons, many of whom were veterans of the earlier New Guinea campaigns. Their experience was no doubt a useful reserve that would have been called upon during the 2/8th’s subsequent campaign in Bougainville. Others though, were able to implement some of their commando training when a small group from the 2/8th they made a secret landing on New Britain. Towards the end of the 1944 the 5th Division was preparing to make a landing at Jacquinot Bay in New Britain. Part of these preparations included landing a small group of officers from the division at Jacquinot Bay to make a secret reconnaissance of the potential landing site. As Jacquinot Bay was still in Japanese controlled territory, ‘C’ Troop from the 2/8th provided the protection for the reconnaissance party by establishing a position on the beach and by patrolling the surrounding country. Everything went well and the 5th Division later landed at Jacquinot Bay in November. The squadron too was on the move, and in October it sailed to Torokina, the main Australian base on Bougainville, where it joined the II Australian Corps. The campaign on Bougainville was dived into three areas, the Central, Northern and Southern Sectors. The 2/8th served in the latter two areas. The 2/8th made the first move of the Australian campaign in the Northern Sector, by patrolling from Torokina to Kuraio Mission and Amun once a week. The squadron did this from the second week of November unit the second week of December. The 2/8th was then transferred to the Southern Sector. The main battle for Bougainville was fought in the Southern Sector, as the 3rd Division advanced towards Buin – the main Japanese base on the island. As the division’s infantry brigades advanced along the coast, the 2/8th’s task was to protect their flank by conducting forward reconnaissance patrols, harassing the Japanese with raids and ambushes and conducting a form of guerrilla warfare. The squadron had a long campaign. For nine months, from the end of December until August 1945, the troopers were in action the whole time. After securing the Jaba River, they moved inland, first to Sovele Mission, then the villages of Opai, Nihero and Morokaimoro. They had reached Kilipaijino by the end of the war. Each village taken became a patrol base. Patrols were usually limited to two sections, although up to six sections could be operating at a time. Patrols generally lasted four to six days, but nine-day patrols were not unknown. The squadron collected and collated track information, terrain reports and located the enemy. Once patrols had gathered information, they were free to make a ‘strike’ against the Japanese by setting an ambush or taking a prisoner. These raids were very effective, as they forced the Japanese to deploy troops to their rear areas, removing men from the front created by the infantry. Following Japan’s surrender and the end of the war, the ranks of the squadron thinned quickly as men were discharged or were transferred to other units. For those who were left, the squadron returned to Australia at the end of December. In mid January 1946, at Liverpool, the 2/8th Commando Squadron was disbanded.non-fictionThe detailed history of the No.8 Independent Commando Company during World War II. Plastic protective cover over the book. The 2/8th Independent Company was formed at Wilson’s Promontory, Victoria, in July 1942 and travelled to Yandina, in Queensland, in September. While the other seven independent companies saw action in the islands off Australian and in New Guinea, the 2/8th spent most of the next two years based at Adelaide River, in the Northern Territory. While it was in the Territory, the independent companies underwent a series of reorganisations and the name of the 2/8th was changed from the 2/8th Independent Company to the 2/8th Cavalry (Commando) Squadron. This name was later simplified to just commando squadron. In July 1944, after years of waiting, the squadron left the Territory and sailed from Townsville to Lae, via Milne Bay. While at Lae, the squadron received an intake of 70 men from the 2/8th from the 2/3rd, 2/5th and 2/6th Cavalry (Commando) Squadrons, many of whom were veterans of the earlier New Guinea campaigns. Their experience was no doubt a useful reserve that would have been called upon during the 2/8th’s subsequent campaign in Bougainville. Others though, were able to implement some of their commando training when a small group from the 2/8th they made a secret landing on New Britain. Towards the end of the 1944 the 5th Division was preparing to make a landing at Jacquinot Bay in New Britain. Part of these preparations included landing a small group of officers from the division at Jacquinot Bay to make a secret reconnaissance of the potential landing site. As Jacquinot Bay was still in Japanese controlled territory, ‘C’ Troop from the 2/8th provided the protection for the reconnaissance party by establishing a position on the beach and by patrolling the surrounding country. Everything went well and the 5th Division later landed at Jacquinot Bay in November. The squadron too was on the move, and in October it sailed to Torokina, the main Australian base on Bougainville, where it joined the II Australian Corps. The campaign on Bougainville was dived into three areas, the Central, Northern and Southern Sectors. The 2/8th served in the latter two areas. The 2/8th made the first move of the Australian campaign in the Northern Sector, by patrolling from Torokina to Kuraio Mission and Amun once a week. The squadron did this from the second week of November unit the second week of December. The 2/8th was then transferred to the Southern Sector. The main battle for Bougainville was fought in the Southern Sector, as the 3rd Division advanced towards Buin – the main Japanese base on the island. As the division’s infantry brigades advanced along the coast, the 2/8th’s task was to protect their flank by conducting forward reconnaissance patrols, harassing the Japanese with raids and ambushes and conducting a form of guerrilla warfare. The squadron had a long campaign. For nine months, from the end of December until August 1945, the troopers were in action the whole time. After securing the Jaba River, they moved inland, first to Sovele Mission, then the villages of Opai, Nihero and Morokaimoro. They had reached Kilipaijino by the end of the war. Each village taken became a patrol base. Patrols were usually limited to two sections, although up to six sections could be operating at a time. Patrols generally lasted four to six days, but nine-day patrols were not unknown. The squadron collected and collated track information, terrain reports and located the enemy. Once patrols had gathered information, they were free to make a ‘strike’ against the Japanese by setting an ambush or taking a prisoner. These raids were very effective, as they forced the Japanese to deploy troops to their rear areas, removing men from the front created by the infantry. Following Japan’s surrender and the end of the war, the ranks of the squadron thinned quickly as men were discharged or were transferred to other units. For those who were left, the squadron returned to Australia at the end of December. In mid January 1946, at Liverpool, the 2/8th Commando Squadron was disbanded. -
 Australian Commando Association - Victoria
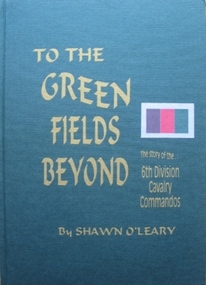
Book - 6th Div, Shawn OLeary, To The Green Fields Beyond:The story of the 6th Division Cavalry Commandos
The comprehensive history of the 6th Australian Division Cavalry Commandos – a (now out of print) reprint of one of the rarer Armoured unit history books. This is the story of one of Australia’s most famous fighting regiments during World War II. As an armoured cavalry unit it fought the Italians and Germans in the sands of the African desert and the Vichy French in the mountains of Syria. Later as a dismounted commando unit it fought the Japanese in the terrifying jungles of New Guinea. The heroism of the men in its ranks and the actions in which they engaged are portrayed in a way which makes battle deeds leap realistically from the pages. “To The Green Fields Beyond” is a documented and detailed book which is of value to everyone who is interested in Australia’s story. Seldom before has such a contribution been made to record of our national history. The book has been approved and sponsored by the Australian War Memorial. The 6th Division Cavalry Regiment was formed in November 1939 and, just two months later, was sent overseas to the Middle East in January 1940. Arriving in Egypt, the regiment immediately went to Palestine, where it joined the rest of the 6th Division and trained using machine-gun carriers and, from October, six old Vickers light tanks. At the end of the year the regiment moved into the Western Desert, where it joined British forces ready for the major offensive to commence on 9 December. Two days later the regiment became the first unit of the 2nd Australian Imperial Force (AIF) to go into action when one of its squadron fought a sharp action against the Italians holding Garn el Grein and Fort Maddalina on 11 and 12 December. By 21 December British forces had captured Sidi Barrrani and the desert was now open for the 6th Division’s advance along the Libyan coast. On 3 January 1941 the division attacked and captured the Italian fort of Bardia. The regiment’s A Squadron, under the command of Major Denzil Macarthur-Onslow, who went on to command the 4th Armoured Brigade, supported the attack. Tobruk was the next Italian fort to be captured, with the regiment again in support and covering the 19th Brigade’s advance. The regiment, though, was under-equipped and without its full compliment of vehicles, using only machine gun carriers. To compensate for this, A Squadron was parity re-equipped with captured Italian light tanks, which had large kangaroos painted on the hulls and turrets to distinguish them from enemy vehicles. After Tobruk, the regiment was used as part of the advance guard in the capture of Derna and then Benghazi. In April the unit moved to Helwan, where it was equipped with Vickers light tanks and machine-gun carriers, and operated with British troops in capturing Sollum. Towards the end of May the regiment moved to Palestine, where it came under the command of the 7th Division for the imminent invasion of Syria. The regiment experienced its heaviest fighting during the Syrian campaign, which began on 7 June. A Squadron was attached to the 21st Brigade and advanced along the coast, where the rugged hills made it difficult to manoeuvre the tanks and carriers. The squadron was relieved by one of the 9th Division Cavalry Regiment’s squadrons on 13 and 14 June. C Squadron, meanwhile, was with the 25th Brigade, and advanced along the Rosh Pinna road, engaging strong enemy defences at Fort Khirbe. C Squadron was relieved by B Squadron, which was later attacked by Vichy French tanks that were supported by heavy artillery and machine-gun fire, which forced the Australians to withdrawal. Always willing or needing to improvise during the campaign, A and B Squadrons both operated three captured French R35 Renault light tanks, while C Squadron provided personnel for a horse troop, quickly nicknamed the “Kelly Gang”, to patrol the high, rugged hills near the Mardjayoun–Banis Road. The regiment remained in Syria as part of the occupation force and returned to Australia in March 1942. It was sent to the Adelaide River, in the Northern Territory, and then later to Murgon, in Queensland. In 1943 and 1944 divisional cavalry regiments were reorganised into cavalry (commando) regiments. In January 1944 the 6th Division Cavalry Regiment became the 2/6th Cavalry (Commando) Regiment. The regiment lost its vehicles and became the administrative headquarters for the 2/7th, 2/9th, and 2/10th Commando Squadrons. The regiment remained with the 6th Division and participated in the Aitpae–Wewak campaign, in New Guinea, during 1945. Includes Nominal Rollnon-fictionThe comprehensive history of the 6th Australian Division Cavalry Commandos – a (now out of print) reprint of one of the rarer Armoured unit history books. This is the story of one of Australia’s most famous fighting regiments during World War II. As an armoured cavalry unit it fought the Italians and Germans in the sands of the African desert and the Vichy French in the mountains of Syria. Later as a dismounted commando unit it fought the Japanese in the terrifying jungles of New Guinea. The heroism of the men in its ranks and the actions in which they engaged are portrayed in a way which makes battle deeds leap realistically from the pages. “To The Green Fields Beyond” is a documented and detailed book which is of value to everyone who is interested in Australia’s story. Seldom before has such a contribution been made to record of our national history. The book has been approved and sponsored by the Australian War Memorial. The 6th Division Cavalry Regiment was formed in November 1939 and, just two months later, was sent overseas to the Middle East in January 1940. Arriving in Egypt, the regiment immediately went to Palestine, where it joined the rest of the 6th Division and trained using machine-gun carriers and, from October, six old Vickers light tanks. At the end of the year the regiment moved into the Western Desert, where it joined British forces ready for the major offensive to commence on 9 December. Two days later the regiment became the first unit of the 2nd Australian Imperial Force (AIF) to go into action when one of its squadron fought a sharp action against the Italians holding Garn el Grein and Fort Maddalina on 11 and 12 December. By 21 December British forces had captured Sidi Barrrani and the desert was now open for the 6th Division’s advance along the Libyan coast. On 3 January 1941 the division attacked and captured the Italian fort of Bardia. The regiment’s A Squadron, under the command of Major Denzil Macarthur-Onslow, who went on to command the 4th Armoured Brigade, supported the attack. Tobruk was the next Italian fort to be captured, with the regiment again in support and covering the 19th Brigade’s advance. The regiment, though, was under-equipped and without its full compliment of vehicles, using only machine gun carriers. To compensate for this, A Squadron was parity re-equipped with captured Italian light tanks, which had large kangaroos painted on the hulls and turrets to distinguish them from enemy vehicles. After Tobruk, the regiment was used as part of the advance guard in the capture of Derna and then Benghazi. In April the unit moved to Helwan, where it was equipped with Vickers light tanks and machine-gun carriers, and operated with British troops in capturing Sollum. Towards the end of May the regiment moved to Palestine, where it came under the command of the 7th Division for the imminent invasion of Syria. The regiment experienced its heaviest fighting during the Syrian campaign, which began on 7 June. A Squadron was attached to the 21st Brigade and advanced along the coast, where the rugged hills made it difficult to manoeuvre the tanks and carriers. The squadron was relieved by one of the 9th Division Cavalry Regiment’s squadrons on 13 and 14 June. C Squadron, meanwhile, was with the 25th Brigade, and advanced along the Rosh Pinna road, engaging strong enemy defences at Fort Khirbe. C Squadron was relieved by B Squadron, which was later attacked by Vichy French tanks that were supported by heavy artillery and machine-gun fire, which forced the Australians to withdrawal. Always willing or needing to improvise during the campaign, A and B Squadrons both operated three captured French R35 Renault light tanks, while C Squadron provided personnel for a horse troop, quickly nicknamed the “Kelly Gang”, to patrol the high, rugged hills near the Mardjayoun–Banis Road. The regiment remained in Syria as part of the occupation force and returned to Australia in March 1942. It was sent to the Adelaide River, in the Northern Territory, and then later to Murgon, in Queensland. In 1943 and 1944 divisional cavalry regiments were reorganised into cavalry (commando) regiments. In January 1944 the 6th Division Cavalry Regiment became the 2/6th Cavalry (Commando) Regiment. The regiment lost its vehicles and became the administrative headquarters for the 2/7th, 2/9th, and 2/10th Commando Squadrons. The regiment remained with the 6th Division and participated in the Aitpae–Wewak campaign, in New Guinea, during 1945. Includes Nominal Rollww2, australian commandos, australian special forces, world war 2 -
 National Vietnam Veterans Museum (NVVM)
Film - Film, DVD, Vietnam combat: the Battle for Khe Sanh; the 4th Infantry Division; the Big Picture. Vol. 2
Documentary on the US involvement in the Vietnam War.vietnam war, 1961-1975 - participation, american, vietnam war, 1961-1975 - battle for khe sanh -
National Vietnam Veterans Museum (NVVM)
Film - Film, DVD, Vietnam War Volume 2: the battle for Khe Sanh; the 4th Infantry Division etc
Series of 5 Film, DVD's on the USA's involvement in the Vietnam Warvietnam war, 1961-1975 - participation, american -
 Monbulk RSL Sub Branch
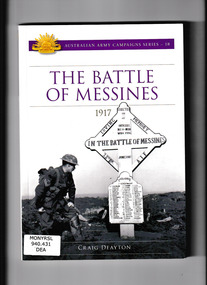
Book, Craig Deayton, The battle of Messines : 1917, 2017
... into the line alongside the battle-scarred 4th Australian Division ...On 7 June 1917, the British Second Army launched its attack on Messines Ridge, detonating 19 giant mines beneath the German front-line positions. By the end of the day, one of the strongest positions on the Western Front had fallen, a place of such importance that the Germans had pledged to hold it at any cost. It was the greatest British victory in three years of war. The first two years of the First World War had represented an almost unending catalogue of disaster for the Australians. Messines was not only their first real victory, it was also the first test in senior command for Major General John Monash who commanded the newly formed 3rd Division and would later be hailed as Australia's greatest soldier. Messines was a baptism of fire for the 3rd Division which came into the line alongside the battle-scarred 4th Australian Division, badly mauled at Bullecourt just six weeks earlier in one of the worst defeats of the war. The fighting at Messines would descend into unimaginable savagery, a lethal and sometimes hand-to-hand affair of bayonets, clubs, bombs and incessant machine-gun fire, described by one Australian as '72 hours of Hell'. After their string of bloody defeats over 1915 and 1916, Messines would be the ultimate test for the Australians. Collapse summaryIndex, bibliography, ill (col), p.172.non-fictionOn 7 June 1917, the British Second Army launched its attack on Messines Ridge, detonating 19 giant mines beneath the German front-line positions. By the end of the day, one of the strongest positions on the Western Front had fallen, a place of such importance that the Germans had pledged to hold it at any cost. It was the greatest British victory in three years of war. The first two years of the First World War had represented an almost unending catalogue of disaster for the Australians. Messines was not only their first real victory, it was also the first test in senior command for Major General John Monash who commanded the newly formed 3rd Division and would later be hailed as Australia's greatest soldier. Messines was a baptism of fire for the 3rd Division which came into the line alongside the battle-scarred 4th Australian Division, badly mauled at Bullecourt just six weeks earlier in one of the worst defeats of the war. The fighting at Messines would descend into unimaginable savagery, a lethal and sometimes hand-to-hand affair of bayonets, clubs, bombs and incessant machine-gun fire, described by one Australian as '72 hours of Hell'. After their string of bloody defeats over 1915 and 1916, Messines would be the ultimate test for the Australians. Collapse summary world war 1914-1918- campaigns - western front, battles of messines - australian participation - 1917 -
 Monbulk RSL Sub Branch
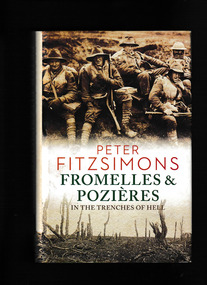
Book, Peter Fitzsimons, Fromelles and Pozières : in the trenches of hell, 2015
In the Trenches of Hell On 19 July 1916, 7000 Australian soldiers - in the first major action of the AIF on the Western Front - attacked entrenched German positions at Fromelles in northern France. By the next day, there were over 5500 casualties, including nearly 2000 dead - a bloodbath that the Australian War Memorial describes as 'the worst 24 hours in Australia's entire history. Just days later, three Australian Divisions attacked German positions at nearby Pozi�res, and over the next six weeks they suffered another 23,000 casualties. Of that bitter battle, the great Australian war correspondent Charles Bean would write, 'The field of Pozi�res is more consecrated by Australian fighting and more hallowed by Australian blood than any field which has ever existed . . .' Yet the sad truth is that, nearly a century on from those battles, Australians know only a fraction of what occurred. This book brings the battles back to life and puts the reader in the moment, illustrating both the heroism displayed and the insanity of the British plan. With his extraordinary vigour and commitment to research, Peter FitzSimons shows why this is a story about which all Australians can be proud. And angry.Index, bibliography, notes, ill (maps), p.816.In the Trenches of Hell On 19 July 1916, 7000 Australian soldiers - in the first major action of the AIF on the Western Front - attacked entrenched German positions at Fromelles in northern France. By the next day, there were over 5500 casualties, including nearly 2000 dead - a bloodbath that the Australian War Memorial describes as 'the worst 24 hours in Australia's entire history. Just days later, three Australian Divisions attacked German positions at nearby Pozi�res, and over the next six weeks they suffered another 23,000 casualties. Of that bitter battle, the great Australian war correspondent Charles Bean would write, 'The field of Pozi�res is more consecrated by Australian fighting and more hallowed by Australian blood than any field which has ever existed . . .' Yet the sad truth is that, nearly a century on from those battles, Australians know only a fraction of what occurred. This book brings the battles back to life and puts the reader in the moment, illustrating both the heroism displayed and the insanity of the British plan. With his extraordinary vigour and commitment to research, Peter FitzSimons shows why this is a story about which all Australians can be proud. And angry.world war 1914-1918 - campaigns - western front, world war 1914-1918 - australian participation - fromelles and pozieres -
 Monbulk RSL Sub Branch
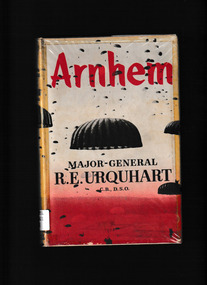
Book, RE Urquhart, Arnhem, 1958
... -and-the-dandenong-ranges great britain - army - 1st airborne division battle ...Major-General Urquhart commanded the 1st British Airborne Division in Operation Market Garden, the greatest airbone assault of World War II, the struggle to capture Arnhem and win control of the bridge across the lower Rhine. The story of the 1st Airborne Division at Arnhem involved not only an Airborne Corps of three Divisions but also the bulk of the British 2nd Army in Europe. Gen. Urquhart has told the story of those fateful nine days clearly, frankly and, despite the terrible circumstances, not without humour.Index, maps, ill, p.239.non-fictionMajor-General Urquhart commanded the 1st British Airborne Division in Operation Market Garden, the greatest airbone assault of World War II, the struggle to capture Arnhem and win control of the bridge across the lower Rhine. The story of the 1st Airborne Division at Arnhem involved not only an Airborne Corps of three Divisions but also the bulk of the British 2nd Army in Europe. Gen. Urquhart has told the story of those fateful nine days clearly, frankly and, despite the terrible circumstances, not without humour. great britain - army - 1st airborne division, battle of arnhem 1944 -
 Monbulk RSL Sub Branch
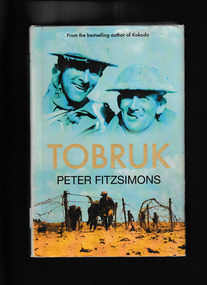
Book, Harper Collins, Tobruk, 2006
Peter FitzSimons, Australia's most beloved popular historian, focuses on one of the seminal moments in Australian history: the Battle of tobruk in 1941, in which more than 15 000 Australian troops - backed by British artillery - fought in excruciating desert heat through eight long months, against Adolf Hitler's formidable Afrika Korps. During the dark heart of World War II, when Hitler turned his attention to conquering North Africa, a distracted and far-fl ung Allied force could not give its all to the defence of Libya. So the job was left to the roughest, toughest bunch that could be mustered: the Australian Imperial Force. the AIF's defence of the harbour city of tobruk against the Afrika Korps' armoured division is not only the stuff of Australian legend, it is one of the great battles of all time, as against the might of General Rommel and his Panzers, the Australians relied on one factor in particular to give them the necessary strength against the enemy: mateship. Drawing on extensive source material - including diaries and letters, many never published before - this extraordinary book, written in Peter FitzSimons' highly readable style, is the definitive account of this remarkable chapter in Australia's historyIndex, bibliography, notes, ill, maps, p.580.non-fictionPeter FitzSimons, Australia's most beloved popular historian, focuses on one of the seminal moments in Australian history: the Battle of tobruk in 1941, in which more than 15 000 Australian troops - backed by British artillery - fought in excruciating desert heat through eight long months, against Adolf Hitler's formidable Afrika Korps. During the dark heart of World War II, when Hitler turned his attention to conquering North Africa, a distracted and far-fl ung Allied force could not give its all to the defence of Libya. So the job was left to the roughest, toughest bunch that could be mustered: the Australian Imperial Force. the AIF's defence of the harbour city of tobruk against the Afrika Korps' armoured division is not only the stuff of Australian legend, it is one of the great battles of all time, as against the might of General Rommel and his Panzers, the Australians relied on one factor in particular to give them the necessary strength against the enemy: mateship. Drawing on extensive source material - including diaries and letters, many never published before - this extraordinary book, written in Peter FitzSimons' highly readable style, is the definitive account of this remarkable chapter in Australia's historyworld war 1939 – 1945 – campaigns – north africa, siege of tobruk -
 Monbulk RSL Sub Branch
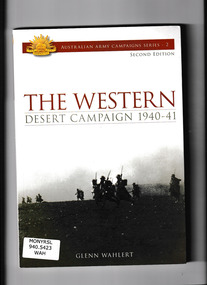
Book, Army History Unit, The Western Desert campaign 1940-41, 2009
The North African campaign has been studied in detail over the years but much of the study has been dedicated to the battles between the British Eighth Army and Rommel's Afrika Korps. There has been little serious study of Wavell's campaign against Italian forces in 1940-41, nor of the role played by the Australian Sixth Division.Index, bibliography, maps, p.96.non-fictionThe North African campaign has been studied in detail over the years but much of the study has been dedicated to the battles between the British Eighth Army and Rommel's Afrika Korps. There has been little serious study of Wavell's campaign against Italian forces in 1940-41, nor of the role played by the Australian Sixth Division.world war 1939 – 1945 – campaigns – north africa, libya - campaigns - 1940-1941 -
 Monbulk RSL Sub Branch
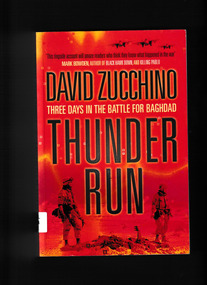
Book, : Atlantic Books, Thunder run : three days in the battle for Baghdad, 2004
In one of the boldest gambles in modern military history, just three battalions and fewer than a thousand men launched a violent thrust of tanks and Bradley Fighting Vehicles into the heart of a city of 5 million people and, in three bloody days of combat, ended the Iraqi war. Thunder Run is the story of the surprise assault on Baghdad - one of the most decisive battles in American combat history - by the Spartan Brigade, the Second Brigade of the Third Infantry Division (MechanizedNotes, maps, p.325.non-fictionIn one of the boldest gambles in modern military history, just three battalions and fewer than a thousand men launched a violent thrust of tanks and Bradley Fighting Vehicles into the heart of a city of 5 million people and, in three bloody days of combat, ended the Iraqi war. Thunder Run is the story of the surprise assault on Baghdad - one of the most decisive battles in American combat history - by the Spartan Brigade, the Second Brigade of the Third Infantry Division (Mechanizediraq war 2003, iraq war - us involvement -
 Monbulk RSL Sub Branch
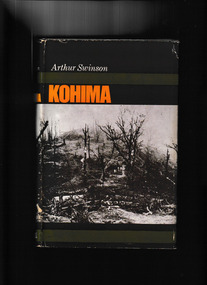
Book, Cassell, Kohima, 1966
On 7 March 1944 Tokyo announced that the Japanese invasion of British India had begun. By mid-month, the Japanese 31st Division had crossed the Chindwin River in northern Burma, advancing on a wide front towards Imphal and Kohima. In bitter jungle fighting from early April, the British Fourteenth Army under Field Marshal Slim held the Japanese assault on Kohima Ridge. By late June the Japanese were in headlong retreat. Kohima ranks for strategic importance with Alamein, Midway and Stalingrad. The increasing dominance of Allied airpower in the region in the aftermath of the battle was a major factor.Index, bibliography, ill, maps, p.275.non-fictionOn 7 March 1944 Tokyo announced that the Japanese invasion of British India had begun. By mid-month, the Japanese 31st Division had crossed the Chindwin River in northern Burma, advancing on a wide front towards Imphal and Kohima. In bitter jungle fighting from early April, the British Fourteenth Army under Field Marshal Slim held the Japanese assault on Kohima Ridge. By late June the Japanese were in headlong retreat. Kohima ranks for strategic importance with Alamein, Midway and Stalingrad. The increasing dominance of Allied airpower in the region in the aftermath of the battle was a major factor. kohima - siege - 1944, world war 1939-1945 - land operations - india -
 Monbulk RSL Sub Branch
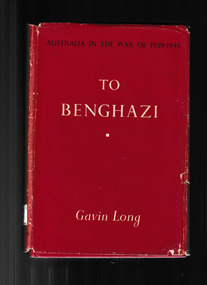
Book, Australian War Memorial, To Benghazi, 1952
Between the wars A second A.I.F. The volunteers To the Middle East After the fall of France Victory at Sidi Barrani Before Bardia The battle of Bardia The capture of Tobruk The engagement at Derna Beda Fomm and Benghazi The capture of Giarabub Appendixes : 1. The A.I.F. in the United Kingdom ; 2. The 6th Division's operation order for the capture of Bardia ; 3. Abbreviations ; 4. A.I.F. colour patches, 1941.Index, ill, maps, p.336.non-fictionBetween the wars A second A.I.F. The volunteers To the Middle East After the fall of France Victory at Sidi Barrani Before Bardia The battle of Bardia The capture of Tobruk The engagement at Derna Beda Fomm and Benghazi The capture of Giarabub Appendixes : 1. The A.I.F. in the United Kingdom ; 2. The 6th Division's operation order for the capture of Bardia ; 3. Abbreviations ; 4. A.I.F. colour patches, 1941. world war 1939-1945 - campaigns - north africa, world war 1939-1945 - australian involvement -
 Victorian Interpretive Projects Inc.
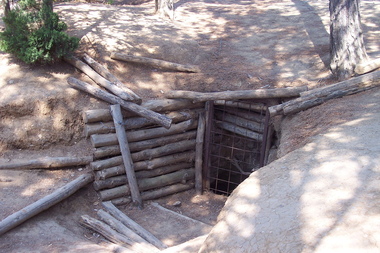
Photograph - Colour, Gaida Stevens, World War One Tunnel Entrance, Lone Pine, Gallipoli, 2015, 2015
Lone Pine was an action that featured one of the most famous assaults of the Gallipoli campaign. The attack was planned as a diversion for the Australian and New Zealand units that were to breakout from the Anzac perimeter by capturing the heights of Chunuk Bair and Hill 971. At 5.30 pm on 6 August 1915, the Australian artillery barrage lifted and from concealed trenches in no man’s land the 1st Australian Brigade charged towards the Turkish trenches. The troops paused on reaching the Turkish trenches, finding that many were covered by timber roofs. Some fired, bombed and bayoneted from above, some found their way inside and others ran on past to the open communications and support trenches behind. Others advanced as far as "the Cup" which was where Turkish support units were located and from where the Turks counter-attacked. By nightfall, most of the enemy front line was in Australian hands and outposts had been established in former Turkish communication trenches. The Australian Engineers dug a safe passage across no man’s land so that reinforcements could enter the captured positions without being exposed to Turkish fire. Having captured the Turkish trenches, the Australians now tried to hold what they had taken while the Turks desperately and determinedly tried to throw the Australians out. From nightfall on 6 August until the night of 9 August a fierce battle ensued underground in the complex maze of Turkish tunnels. The Australians succeeded in drawing the whole of the immediate Turkish reserve. Six Australian battalions suffered nearly 2,300 killed and wounded at Lone Pine. Seven Australians were awarded the Victoria Cross, the highest number ever awarded to an Australian division for one action.(http://www.awmlondon.gov.au/battles/lone-pine)Entrance to a tunnel at Lone Pine, Gallipoli. gallipoli, world war one, tunnel, mmm -
National Vietnam Veterans Museum (NVVM)
Film - Film, DVD, Vietnam War, Vol. 2: The Battle for Khe Sanh; The 4th Infantry Division; the big picture, 2009
... : The Battle for Khe Sanh; The 4th Infantry Division; the big picture ...united states. army. infantry division, 4th., united states. army. infantry division, 25th., khe sanh, battle of (vietnam : 1968) -
 National Vietnam Veterans Museum (NVVM)
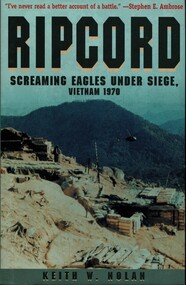
Book, Nolan, Keith W, Ripcord: Screaming Eagles Under Seige, Vietnam 1970, 2000
I.ve never read a better account of a battle.I.ve never read a better account of a battle. 1961-1975 - united states, vietnamese conflict, 1961-1975 - regimental histories - united states, united states. army. airborne division, 101st., 155mm howitzer, a battery, 2d battalion, 11th field artillery -
 National Vietnam Veterans Museum (NVVM)
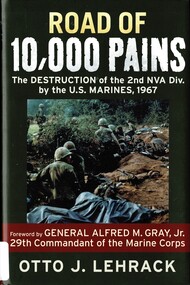
Book, Lehrack, Otto J, Road of 10,000 Pains: The Destruction of the 2nd NVA Division by the U.S. Marines, 1967
The first comprehensive oral history of the bloodiest campaign in Vietnam.The first comprehensive oral history of the bloodiest campaign in Vietnam.que son valley, battle of, 1967., united states. marine corps. division, 1st - history, vietnam war, 1961 - 1975, personal narratives, american, route 534, nva -
 National Vietnam Veterans Museum (NVVM)
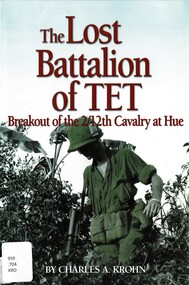
Book, Krohn, Charles A, The Lost Battalion of TET: Breakout of the 2/12th Cavalry at Hue, 2008
... Cavalry Division 2/12th Cavalry Battle of Hue Tet Offensive ...A young soldier's duty is to fight, and an old soldier's duty is to remember.A young soldier's duty is to fight, and an old soldier's duty is to remember.vietnam war - 1961-1975 - regimental histories - united states., united states. army. air cavalry division, 2/12th cavalry, battle of hue, tet offensive -
 National Vietnam Veterans Museum (NVVM)
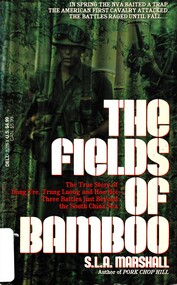
Book, Marshall, S.L.A, The Fields of Bamboo: The True Story of Dong Tre, Trung Luong and Hoa Hoi - Three Battles Just Beyond the South China Sea, 1971
It began and ended with a trap. The first one nearl led a green Special Forces captain into a slaughter, the last cost the life of a heroic lietuenant. Between the two raged some of the fiercest infantry fighting of the Vietnam WarIt began and ended with a trap. The first one nearl led a green Special Forces captain into a slaughter, the last cost the life of a heroic lietuenant. Between the two raged some of the fiercest infantry fighting of the Vietnam Waraustralia - armed forces - biography, vietnam war, personal narratives - australian, vietnamese conflict, 1961-1971 - personal narratives, australian, battle of dong tre, battle of trung luong, battle of hoa hoi, 1st cavalry division, 101st screaming eagles, nva -
 City of Ballarat
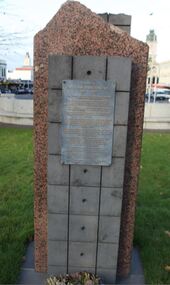
Artwork, other - Public Artwork, William Dunstan VC Memorial, 1995
The Dunstan Memorial is a minimal form of rough-cut bluestone and sheet granite in memory of Ballarat born soldier, William Dunstan, who served with honour in Gallipoli, WWI. His unit successfully defended a post despite being seriously wounded. He and one mate were the only survivors of the 10 men defending the trench and all were awarded the Victoria Cross. Following the war Dunstan worked as manager and director of the Herald and Weekly Times.The memorial is of historical significance to the people BallaratThis is a minimal form of rough-cut bluestone and sheet granite in memory of Ballarat born soldier who served with honor in Gallipoli. His unit successfully defended a post despite being seriously wounded. He and one mate were the only survivors of the 10 men defending the trench and all were awarded the Victoria Cross. In honour of William Dunstan, VC 1895-1957. William Dunstan was born in Ballarat East and educated at Golden Point State School. Shortly after the outbreak of the First World War, 19 year old Dunstan enlisted in the 7th Battalion, 2nd Brigade, 1st Division of the Australian Imperial Forces. Within 3 weeks he was posted to Gallipoli and was immediately embroiled in the Battle of Lone Pine. Early on the morning of 9th August, 1915, Dunstan and 10 other men were defending a trench captured from the Turks. The enemy launched repeated counter attacks and suffered heavy casualties. Only 3 surviving Australians remained and were rebuilding the blown-up barricade of sandbags when the Turks launched a final vicious assault to regain the trench. Struggling to defend their position, the three Australians resorted to catching the Turkish hand bombs and throwing them back at the enemy or smothering those that landed with Turkish great-coats. Hand bombs killed a 10th defender and wounded both Dunstan and his only remaining companion. Again the Turks were driven back and this time the two wounded Australians were left alone until later relieved and hospitalised. As a result of the intensity of the fighting and the tenacity of the 3 defenders, each was awarded Victoria Crosses for their most conspicuous bravery. Following the war, Dunstan enjoyed a successful career to become the Managing Director of the Herald and Weekly Times. He died in Melbourne aged 62 and is remembered with respect by the citizens of Ballarat.first world war, wwi, william dunstan, conflict, war -
 Wangaratta RSL Sub Branch
Photograph
The Battle of Tarakan was the first stage in the Borneo campaign of 1945. It began with an amphibious landing by Australian forces on 1 May, code-named Operation Oboe One. While the battle ended with success for the Allied forces over the Japanese defenders, this victory is generally regarded as having not justified its costs. 225 Australian soldiers of the 26th Brigade, 9th Division, 2nd Australian Imperial Force were once buried here. They were killed in the Battle of Tarakan (1 May - 21 June 1945) or died due to their wounds until 15 August 1945.The 2/24th Battalion was an infantry battalion of the Australian Army, which served during World War II .A unit of all-volunteers, it was formed in July 1940 from primarily Victorian volunteers and was known as "Wangaratta's Own" because of the time the battalion spent in the town during its formative period prior to deployment overseas. It served in North Africa in 1941–1942 as part of the 26th Brigade, which was assigned to the 7th Division, before being reassigned to the 9th Division. In early 1943, the battalion returned to Australia and later took part in campaigns against the Japanese in New Guinea in 1943–1944 and Borneo in 1945, before being disbanded in 1946. The 2/24th suffered the highest number of casualties of any 2nd AIF infantry battalion. The Unit was granted the Freedom of the City by the Rural City of Wangaratta in 1996 and one of the first, if not the first, to receive this type of honour. Reproduced black and white photograph of a monument/cenotaph and lawn grave sites with white crosses.Handwritten on rear - Tarakan Cemetery2/24th battalion, wangaratta, tarakan -
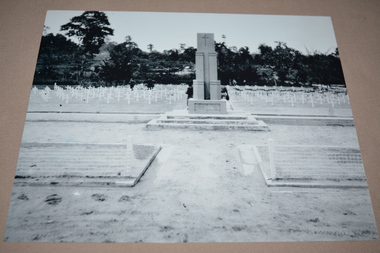
 Wangaratta RSL Sub Branch
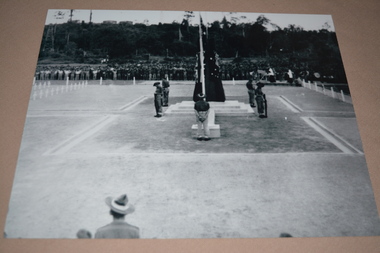
Photograph
September 30,1945 - The official dedication service and unveiling of the Cenotaph at Tarakan War Cemetery The Battle of Tarakan was the first stage in the Borneo campaign of 1945. It began with an amphibious landing by Australian forces on 1 May, code-named Operation Oboe One. While the battle ended with success for the Allied forces over the Japanese defenders, this victory is generally regarded as having not justified its costs. 225 Australian soldiers of the 26th Brigade, 9th Division, 2nd Australian Imperial Force were once buried here. They were killed in the Battle of Tarakan (1 May - 21 June 1945) or died due to their wounds until 15 August 1945.The 2/24th Battalion was an infantry battalion of the Australian Army, which served during World War II .A unit of all-volunteers, it was formed in July 1940 from primarily Victorian volunteers and was known as "Wangaratta's Own" because of the time the battalion spent in the town during its formative period prior to deployment overseas. It served in North Africa in 1941–1942 as part of the 26th Brigade, which was assigned to the 7th Division, before being reassigned to the 9th Division. In early 1943, the battalion returned to Australia and later took part in campaigns against the Japanese in New Guinea in 1943–1944 and Borneo in 1945, before being disbanded in 1946. The 2/24th suffered the highest number of casualties of any 2nd AIF infantry battalion. The Unit was granted the Freedom of the City by the Rural City of Wangaratta in 1996 and one of the first, if not the first, to receive this type of honour. Reproduced black and white photograph of monument/cenotaph and catafalque party2/24th battalion, tarakan, cenotaph -
 Wangaratta RSL Sub Branch
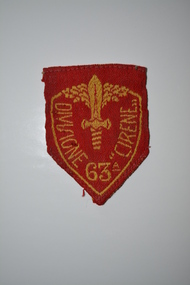
Badge
Uniform cloth badge of the 63A Infantry Division "Cirene" of the Italian Army. The 63rd Infantry Division Cirene was an auto-transportable infantry division of the Italian Army during World War II. The Cirene Division was formed 1 October 1937 and destroyed 5 January 1941 in Bardia. The Australians captured Bardia on 5 January, 1941, taking 45,000 prisoners and 462 guns for a loss of 130 dead and 326 wounded of their own.The 63rd Infantry Division Cirene was an auto-transportable infantry division of the Italian Army during World War II. The Cirene Division was formed 1 October 1937 and destroyed 5 January 1941 in Bardia. small red cloth with gold thread insigniaDivisione 63A "Cirene"battle of bardia, ww2, italian army -
 8th/13th Victorian Mounted Rifles Regimental Collection
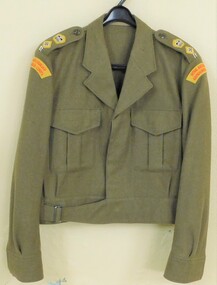
Uniform - Battle dress Hunter
Following service with 8/13 Victorian Mounted Rifles, Lieutena t Colonel served as Staff Officer Grade 1 (Armour) (SOI Armd) on Headquarters 3rd Divisional Field Force Group until retirement. The 'R' insignia denote an officer on the retired list.Khaki battle dress jacket with Royal Australian Armoured Corps (RAAC) shoulder flashes, lieutenant colonel badges of rank and silver 'R' on epaulettes.hunter, raac, retired, uniform -
 Kyneton RSL Sub Branch
WW1 Medals
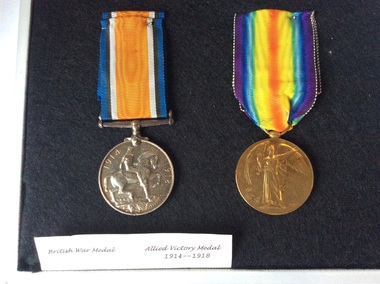
Pte Simmons was born in Kyneton. Died at the battle of Fromelles, July 1916.Fromelles. The battle of Fromelles on 19 July 1916 was a bloody initiation for Australian soldiers to warfare on the Western Front. Soldiers of the newly arrived 5th Australian Division, together with the British 61st Division, were ordered to attack strongly fortified German front line positions near the Aubers Ridge in French Flanders. The attack was intended as a feint to hold German reserves from moving south to the Somme where a large Allied offensive had begun on 1 July. The feint was a disastrous failure. Australian and British soldiers assaulted over open ground in broad daylight and under direct observation and heavy fire from the German lines. Over 5,500 Australians became casualties. Almost 2,000 of them were killed in action or died of wounds and some 400 were captured. This is believed to be the greatest loss by a single division in 24 hours during the entire First World War. Some consider Fromelles the most tragic event in Australia’s history. www.awm.gov.au/articles/encyclopedia/fromelles Two WW1 War service medals with ribbons in a white presentation case. With black clothe lining. On the rim of each medal is: 4899Pte N T Simmons 59 Bn AIF The medals are labelled British War Medal and Allied Victory Medal 1914- 1918. On the inside of the lid is card inscribed: Posthumus award to 4899 Pte N T Simmons 59 Bn AIF. ww1 medals, british war medal, allied victory medal 1914- 1918, n t simmons, fromelles -
 Kew Historical Society Inc
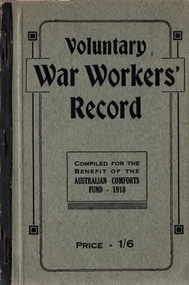
Booklet, Australian Comforts Fund (Victorian Divsion), Voluntary War Workers Record, 1918
... to the Australian 'fit' fighting men in all the battle zones. They became...' fighting men in all the battle zones. They became divisions ...The Australian Comforts Fund was established in August 1916 to co-ordinate the activities of the state based patriotic funds, which were established earlier in World War I. Mainly run by women, they provided and distributed free comforts to the Australian 'fit' fighting men in all the battle zones. They became divisions of the Australian Comforts Fund. The Council of the Fund comprised two delegates from New South Wales, Victoria and Queensland and one from the states of Western Australia, South Australia and Tasmania. The Executive headquarters was located in Sydney. It ceased operation on 10 April 1920 and was reconstituted in World War II in June 1940 and ceased operation again on 27 June 1946. The state bodies in World War I were: New South Wales: the 'Citizens' 'War Chest' Fund; Queensland Patriotic Fund; South Australia: League of Loyal Women; Tasmania: 'On Active Service Fund'; Australian Comforts Fund, Victorian Division; Victoria League of Western Australia. During World War II the state bodies were called : The Lord Mayor's Patriotic and War Fund of New South Wales; the Australian Comforts Fund, Victorian Division; the Australian Comforts Fund, Queensland Division; the Australian Comforts Fund, Tasmanian Division; the Fighting Forces Comforts Fund SA Inc; the Victoria League Camp Comforts Fund ( W A ) Australian Comforts Fund commissioners conducted its activities in the field, holding honorary rank as officers of the Army or Air Force.World War 1 publication for the home front with Kew listingsVoluntary War Workers Record, compiled for the benefit of the Australian Comforts Fund - 1918. Price - 1/6. the publication includes sections on Kew.australian comforts fund, australian comforts fund (victoria)