Showing 2446 items
matching black bridge
-
 Melbourne Tram Museum
Photograph - Set of 15 Black & White Photograph/s, Melbourne & Metropolitan Tramways Board (MMTB), 1950's
Series of 15 black and white photographs of the track works to reconstruct tram lines showing various methods and works during the 1960's. .1 - Jackhammers concrete out around wooden sleepers - the rails have been bolted to them. .2 - Excavated track or temporary track next to newly relaid track - Hawthorn Road by Caulfield Park? .3 - Partly completed work - nearest track relaid, second track still has wood blocks? and then a temporary track. .4 - Excavated previously concreted and bolted track. Appears to be new rail. .5 - Compacting a new track bed with work laying track in the background. .6 - Rail being craned into position onto small concrete blocks - Nicholson St North Fitzroy at Church St - the church is now Melbourne City Mission Palliative care centre. 1955/56 - construction of the replacement track. Note the Hail bus stop sign on the corner. .7 - Thermite welding being set up. .8 - after a Thermite welding joint completed. .9 - track reading for pouting concrete, with a rebuilt track alongside and temporary track on the other side. .10 - ditto .11 - Concrete being poured .12 - ditto - could be Maribyrnong Road bridge replacement. .13 - Screeding off the concrete - possibly Nicholson St North Fitzroy .14 - completed surface - location as above .15 - completed surface with cloth covers to assist the concrete being cured. Has a MMTB hut and two worker amenity buses alongside. - location as above.Some photos have pencil marks on rear.trams, tramways, trackwork, rails, track materials, track repairs, sleepers, equipment, concrete, welding, nicholson st, new tramway, buses -
 Melbourne Tram Museum
Photograph - Set of 3 Black & White Photograph/s, Melbourne & Metropolitan Tramways Board (MMTB), 1954
Series of 3 black and white photographs of:- .1 - construction of the trackwork for the new Maribyrnong River Bridge, has the temporary track on the left hand side of the photograph. Has the Express Freight Transport building in the background. .2 - as above, appears that the track on the northern side is almost completed. An Inspector is standing watching the work. This work was completed mid 1967. .3 - construction of trackwork possibly the curve from Gordon St to run alongside now River St. This work was undertaken during 1954.Some photos have pencil marks on rear.trams, tramways, trackwork, rails, track materials, track repairs, sleepers, equipment, maribyrnong river bridge, bridges, gordon st, river st, footscray -
 Melbourne Tram Museum
Photograph - Black & White Photograph/s, Keith Kings, 20/09/1994 12:00:00 AM
Photograph, Black and White, Photo of the formal launch of Hawthorn Tramways Trust No. 8 (HTT) a Princes Bridge on 20/9/1994 by the Minister for Transport, Alan Brown, following the completion of the work by the PTC at Preston Workshops.In ink on the rear: Keith Kings stamp and number 365-25 "TMSV / PTC, Society Tram restored as HTT No. 8, ready to be "launched" by Mr. A. Brown, Minister for Transport, at Batman Ave Terminus 20/9/1994"trams, tramways, batman ave, htt, restoration, tram 8 -
 Melbourne Tram Museum
Document - Typed Notes, Special excursions to Black Rock and Beaumaris, c1930
Special excursions to Black Rock and Beaumaris on Saturdays, Sundays and Wednesdays Extract from a newspaper Typed transcript from an unidentified newspaper describing ticketing arrangements for trains and trams for travel to Black Rock and Beaumaris. Special Beaumaris circular tickets, issued at all stations, Spencer St to Brighton Beach, and Prince's Bridge to Caulfield.trams, tramways, tickets, black rock, beaumaris -
 Melbourne Tram Museum
Postcard, SEMCO, "Princes Bridge Melbourne", mid 1900's?
Divided back postcard featuring a hand coloured black and white photograph of a view looking from Flinders St towards Government House, c1900, or from the roof of the Flinders St Station which could be under construction. Embossed Photograph enclosed within an artists palette, surrounded by roses. Note the buildings between the bridge and Government house - a former asylum? Card from the SEMCO Series Box 545 GPO Melbourne. Addressed to Miss V Hall of Blackwood.trams, tramways, princes bridge, cable trams, flinders st, flinders st station -
 Melbourne Tram Museum
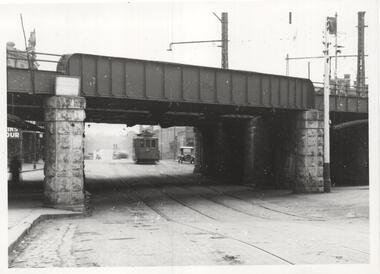
Photograph - Black & White Photograph/s, LWR, c1920
Copy photographs . Photograph, Black and White of MMTB tram F46 about to pass under the railway bridge at Caulfield. Photo is very poor copy. Has the Caulfield loop junction in the foreground.In ink on the rear: " Melbourne Probably F46, under railway bridge at Caulfield, About 1920." Has KSK number LWR5 and ADV322trams, tramways, f class, pmtt, bridges, caulfield, tram 46 -
 Melbourne Tram Museum
Photograph - Black & White Photograph/s, LWR, c1920
... the bluestone bridge pillars. Photograph Black & White Photograph/s LWR ...Copy photographs . Photograph, Black and White of MMTB probably an "O" class tram about to pass under the Swan St railway bridge early 1920's. Shows the original bridge beams, the track layout and dips in the roadway. Shows the bluestone bridge pillars.In ink on the rear: " Melbourne Probably an "O" class car in Swan St. Richmond, looking west at Railway bridge." Has KSK number LWR7 and ADV320trams, tramways, o class, mmtb, bridges, swan st, richmond, railways -
 Melbourne Tram Museum
Photograph - Black & White Photograph/s, late 1910's
Photograph, Black and White, of two Tilling Stevens double deck buses Registered Nos 13975 and 13976, Nos. 1 and 2 at the Southern end of Princes Bridge, c1914. Operated by Motorbus Services Limited. Have destination of St Kilda Beach via Swanston St, St Kilda Rd Fitzroy St Esplanade. On the side of the bus is an advertisement for "Abbotsford Ale". Print has the title "Off to St Kilda". See Reg Item 5276 for a photo of 10 company buses.In ink on the rear: "Melbourne - Tilling Stevens double deck buses Registered No. s 13975 and 13976, Nos. 1 and 2 at the Southern end of Princes Bridge, Probably 1910's." KSK print numbers LWR-10 and in pencil H2601.trams, tramways, buses, private bus companies, tilling stevens -
 Melbourne Tram Museum
Album - Photo Album, Brian Weedon, Tramway photos, 1970 to 1980's
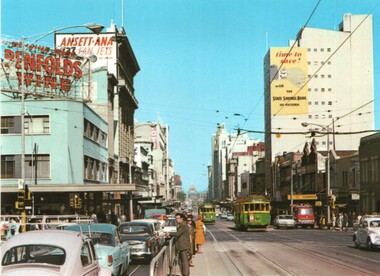
Photo Album - green card slip case containing heavy grey card covers front and rear, front protective page and 12 photo pages with adhesive surface and clear plastic sheet cover - on cardboard sheet bound by a heavy white comb binder marked "Photo Album" on the front inside cover. Each page has scanned to a pdf file. Page 1 - newspaper cutting and two photos of Ballarat No. 27 completing 1,000,000 miles. Item from "A Place in the Sun" written by Keith Dunstan. Photo of tram 27 by the Ballarat Courier. Date of Photo. 29/6/1968, taken prior to the TMSV Tour of that date. Black and white photograph of a group of the passengers on No. 27 during the celebration of the tram reaching 1,000,000 (million) miles in Ballarat. Glenys George, Brian Weedon, John Fitzsimons, Graeme Turnball, Paul Nicholson, Barry George and Kevin Clark. Page 2 - black and white photograph of Geelong Nos 2, 8, 4, 1 and another 4 wheel tramcar and a open cab motor bus photographed within the interior of Geelong depot, prior to 1924. From notes provided by David O'Neill, 12/2003, advises that bus driver is either Bill Hamaling or Charles Stafford. Gentlemen next to No. 8 could be Vic Phipps. Page 3 - Black and White photograph of Geelong No. 7 - c1912, soon after opening with driver, conductor and passengers. Shows the magnetic brake shoe. Page 4 - Black and White photograph of Geelong Cross bench tram No. 11 in Corio Tce, now Brougham St outside Marks Hotel. Tram has the destination of Newtown. Page 5 - Black and White photograph - T 180, showing "Pyrotechnic Fty" possibly on No. 9 Road at Malvern Depot Page 6 - Black and White photograph of L 105 prior to any modifications - see also Reg Item 2498 for another print. - ditto - interior view show off centre seats in the drop centre. Page 7 - Black and White photographs of W308 and W1 419 - - see also Reg Item 3422 for another print. Page 8 - Black and White photograph of W3 665 Page 9 - Black and White photograph of W4 670 - - see also Reg Item 3154 for another print. - ditto Interior view. Page 10 - Black and White photograph of SW6 850 with the dash canopy lighting - as built. - ditto Interior view - - see also Reg Item 674 and 3426 for another prints. Page 11 - not used. Page 12 - Black and White photographs of Y469 and X2 674 (This tram was later renumbered 680 - see page 30 of Destination City 5th Edition). - - see also Reg Item 3161 an d 3427 respectively for another prints. Page 13 - Black and White photographs of Y1 611 and an interior view - - see also Reg Item 3160 for another print. Page 14 - Set of 6 colour prints of Bendigo 28 decorated as the 1968 Myer Christmas tram, Birney 23 and 29. Page 15 - Set of 4 colour prints of Bendigo 3, 17, 6 and 17, Page 16 - Colour print of traffic and trams on Princes Bridge with Batman Ave terminus in the view. - Postcard of Swanston St looking south just north of Lonsdale St with W2 432 and another W2. See 3558.1 for a loose copy of the postcard - NuColorVue No. BP 1060-1 - titled on rear "A view towards the Shrine during peak traffic" Has signs advertising Penfolds Wines, Ansett-ANA, State Savings Bank and Foys. Page 17 - Set of two colour postcards - W2 405 and another tram southbound in St Kilda Road with the Prince Henry hospital in the background and Bourke St with W7 1026 and other trams in the view. Page 18 - Set of two photographs of W2's in Collins St at Spring St, with No. 512 in the view. Page 19 - View looking across the Gardens with two W2 class trams in Macarthur St. - W2 637 at corner of Collins and Exhibition St - see also Reg Item 1999 for another print. Page 20 - set of three colour photographs - W2 303 in bound on St Kilda Road, destination City, Route 4D, see also Reg Item 324 - W7 965 turning from Queens Road into St Kilda Road at St Kilda Junction. - W4 671 at South Melbourne Depot. Page 21 - not used Page 22 - MMTB Bus 702 Mark VI MMTB Freighter body and W7 1035 Page 23 - not used Page 24 - SEC coal locomotive 108 at night. Most photographs are MMTB Official. Listed 22-5-2019trams, tramways, melbourne, geelong, ballarat, bendigo, postcards, l class, interiors, new trams, mmtb, t class, w class, w1 class, w3 class, w4 class, sw6 class, y class, x2 class, princes bridge, batman ave, swanston st, st kilda rd, bourke st, collins st, macarthur st, st kilda junction, w7 class, buses, secv, tram 27, tram 2, tram 8, tram 1026, tram 4, tram 1, tram 11, tram 105, tram 308, tram 419, tram 665, tram 670, tram 850, tram 469, tram 674, tram 611, tram 23, tram 29, tram 17, tram 3, tram 6, tram 28, tram 405, tram 29, tram 432, tram 1017, tram 512, tram 303, tram 965, tram 671, tram 1035, tram 637 -
 Melbourne Tram Museum
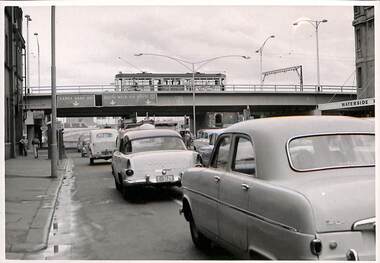
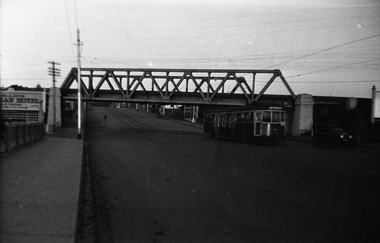
Photograph - Set of 6 Black & White Photograph/s, 1959 to 1960
Set of 6 photographs of the Flinders St flyover over Kings St, soon after opening with tramcars and motor vehicles on the streets and bridge. Has the Waterside Hotel on the right side of the photographs. Has the pedestrian crossing traffic lights in the views. Don Storey's tramway history notes - http://www.classicaustraliantv.com/Gunzel.htm accessed 23/6/2019 notes that for 1959 - Temporary track on a new flyover in Flinders Street at King Street was brought into use; the permanent track was completed on June 26, 1960.Photos were contained within an envelope marked "Secretary Head Office MMTB (616 Lt Collins St) and "Please do not fold.trams, tramways, king st, flinders st, bridges, traffic lights -
 Melbourne Tram Museum
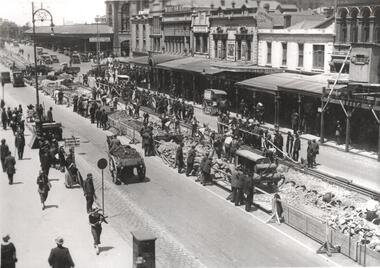
Photograph - Black & White Photograph/s, Melbourne & Metropolitan Tramways Board (MMTB), Dec 1925 or Jan 1926
Black and white photograph of the conversion of the Flinders St end of Swanston Street from cable trams to electric trams. Note the signs advising passengers to go to Princes Bridge for buses, horse drawn vehicles with excavated spoil, air compressor, the cable tram slot rail supporting yokes. In the background is the Flinders St Station. Photo from the Collection of the Department of Infrastructure now with the Public Records Office - image number H101. Note: this photo is now out of copyright and was not an original VR photograph, but one copied from another source and collected as their Heritage series.Has Department of Infrastructure copy right stamp on rear and number "H243" in ink on rear and "2-4"trams, tramways, swanston st, cable trams, trackwork, new tramway, flinders st, conversion -
 Melbourne Tram Museum
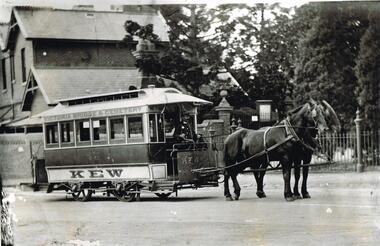
Photograph - Black & White Photograph/s, Melbourne Tramway & Omnibus Co. Limited, c1900
Black and white photograph of a horse tram at the Kew Cemetery terminus with a uniformed MTOC. employee, two horses and the Cemetery buildings in the background. Has Victoria Bridge & Cemetery written on the side of the tram. 2nd copy added with different crop. Photo from the Collection of the Department of Infrastructure now with the Public Records Office - image number H1. Note: this photo is now out of copyright and was not an original VR photograph, but one copied from another source and collected as their Heritage series. From an email from Rod Atkins 29/7/2019: This Stevenson six widow saloon horse tram No 46 is fairly standard. The horse cars did not have wheel skirts like the cable trams 6 and 8 window cars. Sitting at the terminus in High Street at Parkhill Road at the gates of the Boroondara General Cemetery ready for its return trip to Richmond. The tram is being run one man. Note the location of gates, pay as you enter the front step. The driver has a conductors bag around his neck and waist. No conductor present in the photo. His uniform is classic Company issue. He is wearing a Tunic and vest! And early issue cap with a white band. Date: around circa 1900 as the clock tower, brick wall and cast iron fence are all in place and the car number is faded out. I have seen a photo of a tram there with no clock tower from around the opening of the line.Has part of the Department of Infrastructure copy right stamp on rear and number in ink on rear and "1-5"trams, tramways, horse trams, kew, mto co, cemetery, uniforms -
 Melbourne Tram Museum
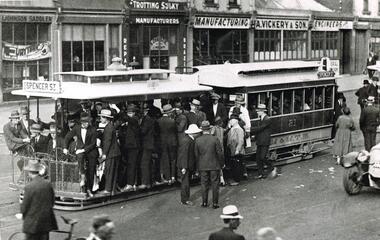
Photograph - Black & White Photograph/s, mid 1920's
Black and white photograph of a very crowded cable tram set inbound in Bridge Road, c1925, lettered M&MTB" with the destination of Spencer St with many men crowding onto the tram. Alongside the tram is the front of a motor vehicle. Cable tram 81? In the background is a number of shops - L. Johnson Saddler, S. Christie and J Hogan (?) Trotting Sulky Manufacturers and A. Vickery & Son Manufacturing Engineers, Photo from the Collection of the Department of Infrastructure now with the Public Records Office - image number H212. Note: this photo is now out of copyright and was not an original VR photograph, but one copied from another source and collected as their Heritage series. Note from Rod Atkins 29/7/2019: The tram is full because the crowd as discharged from the racecourse so most likely taken on a Saturday. A few of buildings are still there today on the north side. Date 1920’s 2nd copy from Keith Kings added 6/8/2020 - see images i2 and i3.Has Department of Infrastructure copy right stamp on rear and number "H 212" in ink on rear and "1-10"trams, tramways, bridge rd, spencer st, cable trams, tram 81 -
 Melbourne Tram Museum
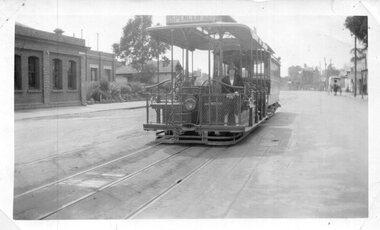
Photograph - Set of 4 Black & White Photograph/s, Don Schulz, mid 1920's
Series of four Black and White Photographs cable trams in Melbourne at the Bridge Road terminus or city during the mid 1920's/ .1 - Bridge road terminus with the car house or depot on the left hand side with the destination of Spencer St. .2 - Gripman possibly checking his watch with a depot worker? stepping off the tram. .3 - family stepping off the tram with cable trailer 368 in the view - Elizabeth St, near Flinders St? See Brian Weedon's notes re the photo and the trailer. .4 - As for .1 - with an X marked above the lady and a very large motor car passing. Printed on Kodak Paper. Adam Chandler advised by email 5/8/2020: " note there's a destination box fitted to the grip - from memory, these started to be used from the mid-1920s with the dummy and trailer repaints into the brown colour? That also looks to be either a 1925 or 26 Buick - the "moustache" shape at the top of the front radiator grille and the distinctly angled lower sash of the windscreen are further hints. Given the Richmond line closed in 1927 for conversion I'd say some time between 1924 and 29 June 1927." Also see image i5.pdf for further notes regarding the photographs and the Bridge Road tram depot building - use the original pdf file to read. Image i6, has had the "X" removed - done by Darren Hutchesson.On rear in ink in each print, "Cable car Melbourne" and "286 Anzac Hy/Marion Rd Adelaide SA, collection of late Don Schultz"trams, tramways, cable trams, bridge road, flinders st, richmond depot, hawthorn bridge, tram 368 -
 Melbourne Tram Museum
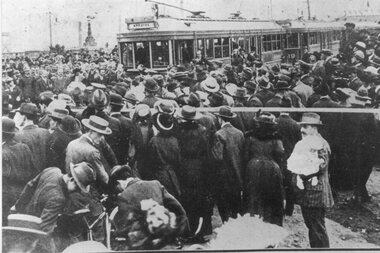
Photograph - Black & White Photograph/s, 6/04/1916 12:00:00 AM
Black and White Photograph of the opening of the Hawthorn Tramways Trust tramway to Princes Bridge 6/4/1916. Shows three bogie trams and the large crowd. Printed on Kodak Paper.On rear in ink a description - see image i2 and KSK number "S-A-1097"trams, tramways, htt, opening, princes bridge, new tramway -
 Melbourne Tram Museum
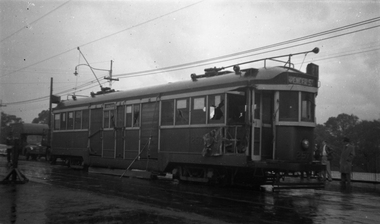
Negative, Wal Jack, c1955
Black and white negative, by Wal Jack, of W2 257 after a collision with a large vehicle. Has part of the front saloon stowed in, footboard and grab handles torn away. Tram has the destination of Spencer St, route 27?. Appears to be in Bridge Road with the river in the background - see also Reg Item 5171 for another photo in Wellington Parade, near Simpson St Photo Wal Jack on a very wet day. Dated 20/4/1951 in the Ray Pearson Album, photographed in Wellington Parade.trams, tramways, w2 class, wellington parade, accidents, route 27, tram 257 -
 Melbourne Tram Museum
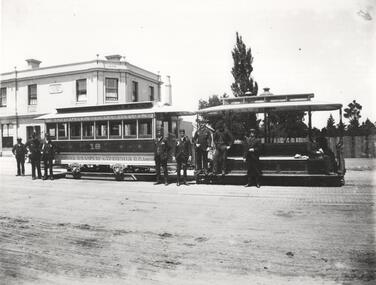
Photograph - Black and White photograph, c1890
Black and white photograph of a cable car set, c1890 at the Bridge Road Richmond line terminus with the Bridge Road Hotel in the background. Has a group of 10 cable tram employees in uniform standing alongside the tram, lettered and detailed decoration on the trailer - No. 18 "Not to be reproduced with permission from the National Library of Australia".On rear in ink "Tram car Melbourne" and a label "Not to be reproduced with permission from the National Library of Australia"trams, tramways, richmond, bridge road, crews, mto co, cable trams, tram 18 -
 Melbourne Tram Museum
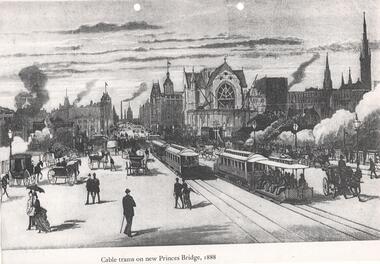
Photograph, "Cable trams on new Princes Bridge, 1888", 1885
Illustration on an A4 sheet of cable trams and other vehicles travelling over Princes Bridge, 1888. Has St Paul's Cathedral under construction and extensive smoke from steam locomotives travelling under the bridge. Looks north along Swanston St. Photo print also held.Demonstrates an artists view of a busy scene of Princes Bridge.Photocopy and black and white print. Two copies held.trams, tramways, princes bridge, swanston st, cable trams -
 Melbourne Tram Museum
Negative, Wal Jack collection, 1940's
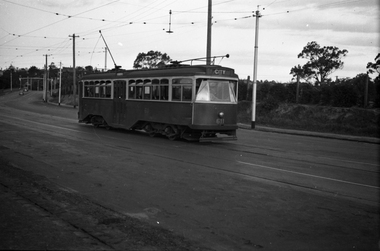
Black and white negative by Wal Jack of W4 670 (Maribyrnong River, route 54), passing under the rail over bridge for the Coburg railway line in Racecourse Road, Flemington. Tram about to cross the Moonee Ponds Creek bridge. Tram number identified on print in album. Photo undated, c1940.trams, tramways, racecourse road, w4 class, route 54, tram 670 -
 Melbourne Tram Museum
Negative, Wal Jack, c1941
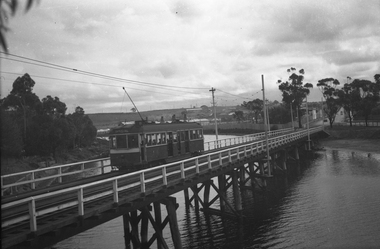
Black and white negative, by Wal Jack, of W2 392 (from information in the Wal Jack Album) crossing the Swan St or Wallen St bridge over the Yarra River. Photo not dated, in the Wal Jack album.trams, tramways, swan st, wallen road, bridges, w2 class, yarra river, tram 392 -
 Melbourne Tram Museum
Negative, Wal Jack, 10/02/1941 12:00:00 AM
Black and white negative, by Wal Jack, of No.Y1 611 inbound in Swan St Richmond or Burnley after crossing the Yarra River bridge. Photo dated 10-2-1941 in the Wal Jack album along with details of the location.trams, tramways, swan st, y1 class, burnley, tram 611 -
 Melbourne Tram Museum
Negative, Wal Jack, 19/01/1941 12:00:00 AM
Black and white negative, by Wal Jack, of W2 238 (Hawthorn Route 27) and W2 625 (Spencer St?, Route 40) at Hawthorn Bridge Junction, Church St and Burwood Road, Hawthorn. In the background is the Hawthorn West Primary School. Photo dated 19-1-1941 in the Wal Jack album along with details of the location.trams, tramways, hawthorn bridge, church st, burwood road, route 40, route 27, w2 class, tram 238, tram 625 -
 Melbourne Tram Museum
Negative, Wal Jack, 1943-44
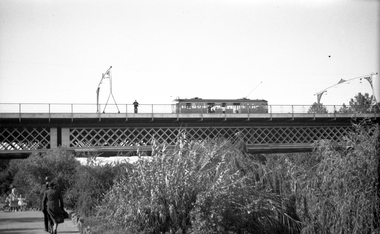
Black and white negative, by Wal Jack, of W5 832, showing Special B, crossing the Maribyrnong River Bridge westbound with a number of passengers. The tram only bridge has been duplicated during September 1943. Photo not dated in the Wal Jack album, c1943 - 44trams, tramways, w5 class, special b, maribyrnong river bridge, maribyrnong rd, world war 2, tram 832 -
 Melbourne Tram Museum
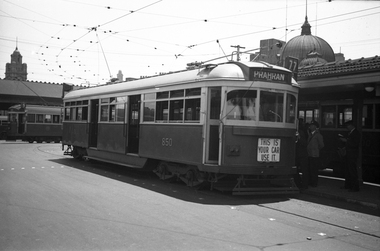
Negative, Wal Jack collection, 1939
Black and white negative by Wal Jack of SW6 class 850 at the Princes Bridge terminus. The tram entered service 31/3/1939. Photo c1940. The microphone can be seen in the front window. Note no windscreen wiper. Tram running a route 77, Prahran. Has tail lights and dash canopy lighting with the sign "This is you car use it" underneath. The front number can just be seen. In Swanston St and adjacent are W2's. Other photos of the tram in the album are dated 1939, possibly late 1939 given it appears to a summer's day.trams, tramways, shelters, princes bridge, sw6 class, dash canopy lights, new tramcars, batman ave, tram 850 -
 Melbourne Tram Museum
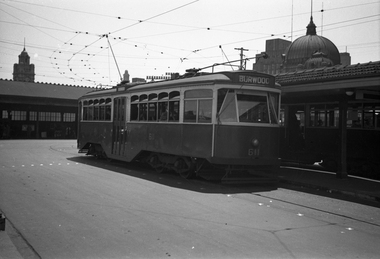
Negative - Set of 2, Wal Jack, c1940
Set of two Black and white negatives by Wal Jack of Y1 611 (Burwood) at Princes Bridge terminus, Batman Ave. Has Flinders St Station in the background. Photo c1940.trams, tramways, y1 class, batman ave, princes bridge, burwood, tram 611 -
 Melbourne Tram Museum
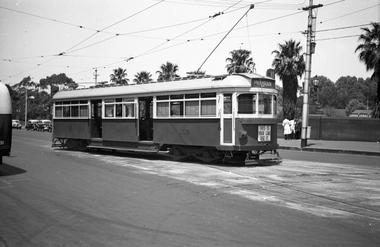
Negative, Wal Jack, 1939
Black and white negative by Wal Jack of SW6 850 (Prahran, route 77), leaving the Batman Ave terminus at Princes Bridge. Has tail lights and dash canopy lighting with the sign "This is you car use it" underneath. The front number can just be seen. Note the parked taxis and drivers on the south side of the roadway. See also Reg Item 5244 for a photo of the tram at the terminus.trams, tramways, princes bridge, sw6 class, dash canopy lights, new tramcars, batman ave, tram 850 -
 Melbourne Tram Museum
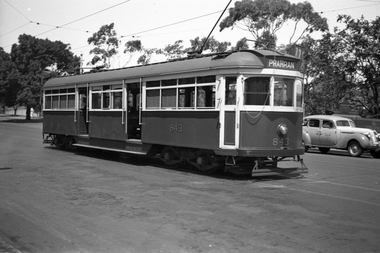
Negative, Wal Jack, 1939
Black and white negative by Wal Jack of SW5 843 (Prahran, route 77), leaving the Batman Ave terminus at Princes Bridge.trams, tramways, princes bridge, batman ave, sw5 class, tram 843 -
 Melbourne Tram Museum
Album - Robert Thomson Slide Collection, "Melbourne 1965 April Box 2"
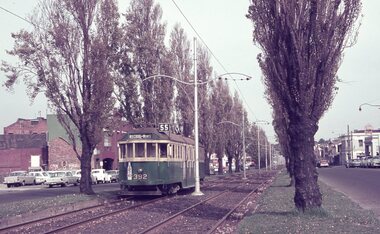
Photo - see pdf file for further information. Number Brief Description RT137 Peel St - tram 392 - "West Coburg via William St" - route 55 RT138 Batman Avenue - tram 954 - "Prahran" - route 77 RT139 Batman Avenue - tram 388 - "Wattle Park Elgar Rd" - route 70 RT140 Elizabeth Street - tram 949 - "North Coburg" - route 19 RT141 East Coburg Ter - tram 668 - "South Melb Beach" - route 1 RT142 Royal Pde Jct - tram 764 - "North Coburg" - route 19, Haymarket, Hotel Gresham RT143 High st - tram 979 - "City Spencer St" - route 90, Clifton Hill RT144 High St - tram 1036 - "East Preston" - route 88, Clifton Hill RT145 tram 52 - "Footscray" - route 82, Maribyrnong River bridge reconstruction RT146 tram 802 - "City via North Melb" - route 57, tram 599, West Maribyrnong - Maribyrnong River bridge reconstruction RT147 tram 52 - "Footscray" - route 82 Raleigh Road, near Rosamond Road RT148 tram 52 - "Footscray" - route 82 at Moonee Ponds, Ascot Vale Road Demonstrates the work of Robert Thomson in photography, collection and/or production of slidesAssembled album in a black presentation folder of 12 colour slides, collected or produced by Robert Thomson. All photographs have been scanned and placed on the Museum's G drive. A list of all photographs with details has been compiled. melbourne, tramways, trams -
 Melbourne Tram Museum
Album - Robert Thomson Slide Collection, "Melbourne 14/9/91 to 21/9/91 16.11.1997 to 23.11.1997"
Photo - see pdf file for further information. Number Brief Description RT229 1997, Carlisle St, tram 129 - "Kew - Cotham Rd" - route 69 & tram 905 - "St Kilda Beach" - route 16 RT230 1997, Dandenong Rd, tram 86 - "Melbourne" - route 69 RT231 1997, Victoria Pde, tram 856 - "City Circle" - route 00 RT232 1997, Spring St, tram 909 - "City Circle" - route 00 RT233 1997, Swanston St, tram 982 - "University" - route 72 RT234 1997, Swanston St, tram 949 - "Glen Iris" - route 6 & tram 852 - "St Kilda Beach" - route 16 RT235 1997, Swanston St, tram 845 - "University" - route 16 RT236 1997, Swanston St, tram 951 - "?" - route 8 RT237 1997, Flinders St, tram 925 - "City Circle" - route 00 7 tram 2034 - "City La Trobe St" RT238 1997, Tram Defect, tram 98 RT239 1997, Flinders St Station, tram 785 - "?" - route 8 RT240 1997, Flinders St Station, tram 211 - "Moreland" - route ? RT241 Bourke St, tram 2059 - "City Spencer St"- route 87 RT242 St Georges Rd Preston, tram 1003 - "Preston" via St Georges Rd"- route 9 RT243 West Preston Terminus - tram 943 - "St Kilda Beach" - route 10 RT244 Princes Bridge , tram 950 - "City" - route 72 RT245 1997 Port Melb Ter, tram 265 - "Mont Albert" - route 109 RT246 1997 Port Melb Terminus RT247 1997 Port Melb Terminus, tram 285 - "Mont Albert" - route 109 RT248 North Balwyn Terminus, tram 244 - "City Lonsdale St" - route 48 RT249 1997 Bourke St mall, tram 2127 - "Bundoora RMIT" - route 86 RT250 1997 Bourke St mall, tram 2028 - "St Kilda Beach" - route 96 RT251 1997 Batman Ave, tram 239 - "Princes Bridge" - route 70 RT252 1997 Batman Ave Ter, tram 233 - "Wattle Park" - route 70 RT253 Princes Bridge , tram 960 - "City" - route 64 RT254 Swanston St at Flinders St, tram 776 - "Glen Iris" - route 6 & tram 809 - "Toorak" - route 8 RT255 Swanston St at Bourke St, tram 978 - "City" - route 64 RT256 Bourke St at Swanston St, tram 112 - "City" - route 86 RT257 South Melbourne Beach terminus, tram 818, - "East Coburg" - route 1 RT258 Carlisle St, tram 925 - "Kew Cotham Rd" - route 69 RT259 Acland St Terminus, tram 2018 - "East Brunswick" - route 98 RT260 St Kilda Rd Princes Bridge, "St Kilda Beach" - route 15 RT261 Batman Avenue Terminus, tram 24 "Special" & tram 22 - "Wattle park Elgar Rd" - route 70 RT262 Acland St Terminus, tram 646 - "City" - route 16 RT263 Bundoora Terminus - tram 2023 - "Bundoora" - route 86 Demonstrates the work of Robert Thomson in photography, collection and/or production of slidesAssembled album in a black presentation folder of 35 colour slides, collected or produced by Robert Thomson. All photographs have been scanned and placed on the Museum's G drive. A list of all photographs with details has been compiled. melbourne, tramways, trams -
 Melbourne Tram Museum
Album - Robert Thomson Slide Collection - box 15
Photo - see pdf file for further information. Number Date Brief Description RT341 14-4-1974 PCC1041 at Wattle Park RT342 17-4-1974 St Kilda Road Extension – was High St and Brighton Road RT343 31-3-1975 PCC 1041 at Moonee Ponds Junction RT344 1989 SW6 914 Truganini Road, single line RT345 Jan 90 Z59 westbound in La Trobe St route 89 RT346 Apr 89 W 380 Albert Road with A283 on St Kilda line over bridge (Tours database provides a date of 25-6-1989 for an ARHS tour) RT347 1989 Truganini Rd duplication work RT348 1989 Truganini Rd duplication work RT349 1989 Truganini Rd duplication work’ RT350 Jan 90 SW5 763 Balaclava Junction RT351 Apr 1989 W2 533 Overhead test car Victoria Parade and B class RT352 Apr 1989 W2 533 overhead test car Port Melbourne line RT353 Apr 1989 ditto at Port Melbourne station RT354 Jan 1990 11W scrubber in William St RT355 1986 Transport Art tram SW5 731 - Painted by Lesley Dumbrell RT356 Apr 89 SW6 869 leaving Malvern depot RT357 Apr 89 W1 431 on tour – Truganini Road RT358 Apr 89 W1 431 at East Brighton terminus RT359 Apr 89 W380 and W1 431 on tour Albert Road South Melbourne RT360 Apr 89 W1 431 East Malvern Darling Road RT361 c1989 L 104 William St and Z95 at La Trobe St RT362 c1989 L 104 Peel St RT363 Jan 1990 SW6 921 Balaclava Junction RT364 Apr 1989 B2 2007 Victoria Parade RT365 Apr 1989 B2 2007 Mont Albert terminus RT366 Apr 1989 B2 2007 Bundoora line Plenty Road RT367 Apr 1989? Z3 209 and B2 200) at Bundoora terminus RT368 Apr 1989? B2 2009 and Z2 111 at Bundoora terminus RT369 Apr 1989 W5 839 and W1 431 Truganini Road RT370 Apr 1989 W1 380 Albert Road and B2 on over bridge RT371 Apr 1989 SW6 923 Dandenong Road Demonstrates the work of Robert Thomson in photography, collection and/or production of slidesAssembled album in a black presentation folder of 30 colour slides, collected or produced by Robert Thomson. A list of all photographs with details has been compiled. melbourne, tramways, trams, tram 1041, wattle park, st kilda road, tram 914, tram 59, truganini road, tram 380, st kilda light rail, tram 283, tram 763, balaclava junction, tram 533, port melbourne, tram 11w, william st, transporting art, tram 869, tram 431, tram 104, east malvern, east brighton, peel st, victoria parade, mont albert, bundoora, tram 2007, tram 209, tram 2009, tram 111, tram 839, albert road, tram 923, dandenong road