Showing 101 items matching cohn
-
 Dutch Australian Heritage Centre Victoria
WWII Identity Cards, 1941 saw the introduction of Identity Cards
When the German Government imposed ID cards on the Dutch population they employed the collaborator and expert designer Jacob Lentz who claimed they were impossible to forge. The Jewish ones showed a black J on both front and back. However, a Jewish woman living in the Netherlands, Alice Cohn, did learn how to replicate them and thus saved numerous Jewish lives.These items are significant insofar as all Dutch citizens over the age of 15 were obliged to carry ID on their persons at all times.Proof of Identity cards issued by the Dutch Government under orders of the German occupying forces. Inside each folder are the owner's full name; DOB; address; occupation; fingerprints and Date of Issue.a) Photograph and signature of male - J.W.W. v. Alphen. Stamp: Gemeente (Municipality) Rotterdam. Inside cover: R29 No.487892. DOB: Sept.20 1890. b) Photograph and signature of female - H. v. Alphen. Stamp: Gemeente (Municipality) 's-Gravenhage. Inside cover: G41 No.003830. DOB: 12 July, 1920. -
 Ballarat Tramway Museum
Slide - 35mm slide/s, Travis Jeffrey, c1962
Agfa plastic mount (blue base, white cover) with a photo of Bendigo No. 5 in the crossing loop at Myrtle St. loop, with No. 24 leaving the crossing loop for Charing Cross. No. 24 has a Cohns Drink advertisement on the front dash panel and two roof advertisements. Tram has destination of Golden Square. In the background is the Sacred Heart Cathedral . Photo taken c1962."BES 24" in penciltramways, trams, bendigo, golden square, myrtle st, tram 5, tram 24 -
 Ballarat Tramway Museum
Photograph - Black & White Photograph/s, Ron Hann, Jan. 1963
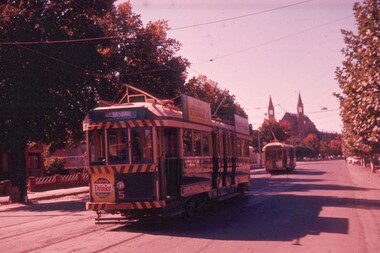
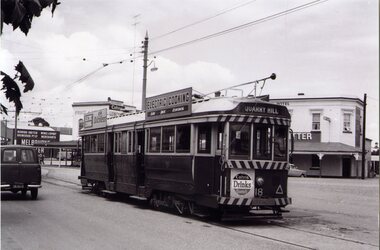
Yields information about the interior of Bendigo tram depot, is storage area and two Birney trams.Black and white print on laser print paper - of Bendigo 18 at the Eaglehawk terminus 1/1963. Photo by Ron Hann. Tram has a Cohn's Drink advertisement on the front dash panel, two SEC roof advertisements and the destination of Quarry Hill. In the background are a hotel and a liquor store, both advertising Melbourne Bitter. Printed on Fujifilm, Fujicolor Crystal Archive for Frontier"Has label "Reference 6/214/26 Photo by Ron Hann" and another label "Eaglehawk Bendigo 01.63"trams, tramways, eaglehawk, hotels, tram 18 -
 Ballarat Tramway Museum
Photograph - Black & White, Bendigo 12 leaving Charing Cross, late 1950's
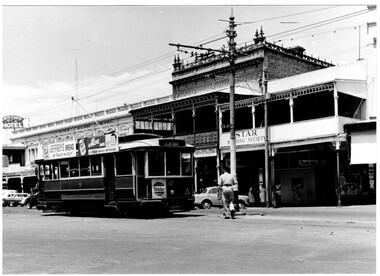
Black and White photograph, of Bendigo12 with destination of Golden Square, leaving Charing Cross in High St, during the mid to late 1950's. Tram has roof adverts for Jeffreys Bread, Alva Jams and a Cohn's Drink ad on the front drivers panel. In the background are the City Club Hotel and Start Building Society buildings. Printed on Fujichrome paper. Two copies held."TMSV Sales" stamp on rear. On rear of in ink 'HTT1 = MM107 = BED 19, Renumbered 12"trams, tramways, bendigo, charing cross, high st, tram 12 -
 Ballarat Tramway Museum
Photograph - Black & White Photograph/s, early 1950's
Black and white photograph of Bendigo 2 leaving the Eaglehawk terminus on its way to Quarry Hill, late 1960's or early 1970's. In the view is the Town Hall Hotel - Melbourne bitter, J Best's milk bar and fruit shop advertising Cohn's Lemonade, Peters Ice cream, a Holden station wagon with Craven A Filter cigarettes, and Ashman's dry cleaning shop.trams, tramways, bendigo, high st, eaglehawk, tram 2 -
 Williamstown High School
Smithy program 2003, Snap Printing, Smithy, 2003
This program was created to accompany the school production of Smithy, held at Altona Civic Theatre, August 14 -16, 2003. The production was directed by Michael Waugh. Assistant director - Lyn Renwood. Stage Manager - Annie Rodoni. "Smithy" logo designed and created by Ben Moore, front cover artwork and design by Ben Moore, Michael Waugh, Lyn Redwood and Andrew Cohn. "Graffiti wall" graphic designed and created by Lyn Redwood.An A4 stapled publication. Front and back covers are colour. 8 p. : ill.williamstown high school, michael waugh, ben moore, lyn renwood, andrew cohn, school production, smithy, program -
 City of Greater Bendigo - Civic Collection
Artwork, other - Label, Harry Tulloch, Glover & Runting, c 1910
In an era when drinking beer was considered safer than drinking water, pubs were prolific and the centre of social and commercial life in Bendigo. (Bridgfoot,J. Taverns to Temperance: Pubs in Bendigo). While the Cohn Brothers and their 'tied hotels' and were one of the most successful brewers in the district, many smaller brewers also existed and the industry was a major source of employment. C.J. Glover or Charles Runting appear to have been in one of those.Oval beer bottle label. Multi coloured print featuring images of hops, a glass of ail, the Bendigo Coat of Arms and various font styles.Glover & Runting / Tonic Ale / Manufacturers / Chapel St / Bendigo / Vic Australiamaking a nation, city of bendigo commerce -
 Ballarat Tramway Museum
Slide - 35mm slide/s, Travis Jeffrey, c1962
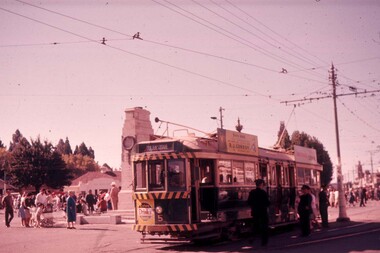
Agfa plastic mount (blue base, white cover) with a photo of Bendigo No. 5 at Charing Cross near the end of the double line with the Cenotaph in the background. Tram has the destination of Golden Square, a Cohns Drinks advertisement on the front panel and a R.J. Conroy roof advertisement. Three SEC Tramway personnel standing by the side of the tram. Many people standing in the background - Easter Fair or similar event. Photo taken c1962."BES 26" in penciltramways, trams, bendigo, charing cross, celebrations, tram 5 -
 Ballarat Tramway Museum
Photograph - Black & White Photograph/s, Ron Hann, Jan. 1963
Yields information about the North Bendigo terminus, the level crossing and roof advertisements on the tramcar.Black and white print on heavy matt photographic paper of Bendigo 19 at the North Bendigo terminus, with the conductor walking back to the tram, c1963. The tram has an "Electric Cook" roof advertisement and "Cohns Drinks" advertisement on the front dash panel. 2nd copy - laser print - with date etc on rear - added 22/2/2010, copy from Ron Hann. Printed on Fujifilm, Fujicolour Crystal Archive for Frontier"On rear in pencil "North Bendigo 1963" 2nd copy has label "Reference 6/212/30" Photo by Ron Hann" and another label "Bendigo North 01.63"tramways, trams, bendigo, north bendigo, tram 19 -
 Ballarat Tramway Museum
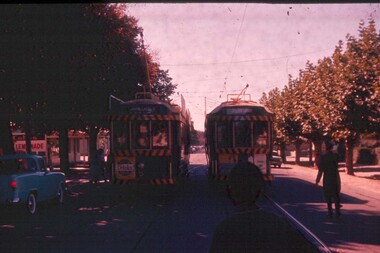
Slide - 35mm slide/s, Travis Jeffrey, c1962
Agfa plastic mount (blue base, white cover) with a photo of Bendigo No. 5 and No. 24 crossing at Myrtle St. loop. No. 5 has destination of Charing Cross and a Cohns Drinks Advertisement on front panel. No. 24 has destination of Golden Square. On the front dash panel is advertisement for Huttons Hams and a Streets Ice-cream advertisement. Note the empty roof advertisement panel on No. 24 - refer to Reg. Item 2632, which shows the tram at Golden Square."BES 21" in penciltramways, trams, bendigo, golden square, myrtle st, tram 5, tram 24 -
 Bendigo Historical Society Inc.
Domestic object - Bottle
Joseph Reed was born in 1875 and came to Bendigo in 1900 after gaining experience at an aerated water factory in Melbourne. He built a new factory in Long Gully in 1906. He formed a partnership with his brother in 1908. By 1911 sales of aerated water were dropping dramatically so the brothers began making tomato sauce and moved into new premises - the old Bruce Cordial Factory in Bridge Street, Bendigo. Following Joseph's death, his share of the business was taken over by his son . The company was bought out in 1966 by Cohns.Small glass bottle smaller than full size REED BROS CRYSTAL CORDIAL WORKS BENDIGO. THIS BOTTLE IS THE PROPERTY OF REED BROS BENDIGObottle, glass, reed bros. -
 Ballarat Tramway Museum
Slide - 35mm slide/s, Travis Jeffrey, c1962
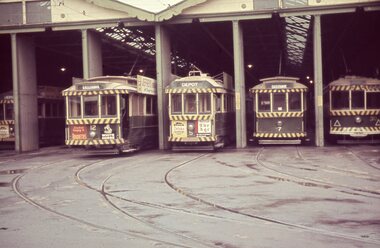
Agfa plastic mount (blue base, white cover) with a photo of four trams standing at the front of Bendigo tram depot. Trams 12, 5, 7 and 30 are featured. Possibly taken on the same day as Reg. item 2611 to 2614, ground in front of depot partly wet and No. 30 showing depot, possibly having run into the depot. Advertisements on the trams feature SEC Briquettes, Whitehorse Whiskey, Cohns Soft Drinks and The Age newspaper. No. 12 has a "Jefferies" road advertisement."BES 5" in penciltramways, trams, bendigo, depot, tram 30, tram 7, tram 5, tram 12 -
 Glen Eira Historical Society
Book - St. Clement’s Church of England, Elsternwick
2 copies of ‘Our First 100 Years Saint Clement's Elsternwick’, a 48 page book on the history of the church. Includes early photos of church, church members, interior of church, church furniture, nine stained glass windows and photographs of Rev. John Hislop, Rev. H. B. Macartney, Rev. H. W. H. Adeney, Rev. George Sproule, Rev. Hugh H. Gardner, Rev. Alfred Ernest Albert Britten, Rev. John Henry Frewin, Rev. Karl Egbert Hamilton, Rev. Colin J. Cohn, Rev. George Tooth, Rev. John Rowse. Includes photographs.st. clement’s church of england, st. clement’s anglican church, elsternwick, covey joan, moore alison, parkinson stephen, hislop john rev., allman beatrice, cohn colin, frewin nell, morris phyllis, hayman miriam e., kirke clarice, rowse john rev., tooth george rev., foundation stone, stanley st., manses, macartney h. b. rev., adeney h. w. h. rev, sproule george rev., oak avenue, gardner hugh h. rev., britten alfred ernest albert rev., frewin john henry rev., patterson nellie, moore mary elizabeth, hamilton karl egbert, hamilton mrs. karl, britten alfred mrs., cohn charlotte, cohn lottie, tooth brenda, stanley street, rowse kay, roselea street, caulfield south, anglican church, sunday schools, religious groups, clergy, davies j. h., mccombie street, caulfield grammar school, st. mary’s caulfield, carre-riddell t. w., stained glass, organs -
 Ballarat Tramway Museum
Photograph - Black & White Photograph/s, early 1960's
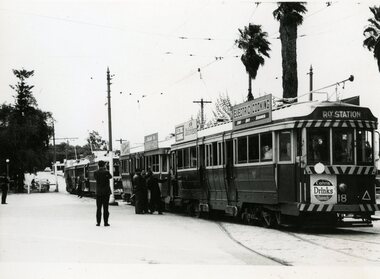
Black and White print of Bendigo SECV Bendigo tram 18 and four other trams (two bogies and two Birneys) at Eaglehawk tram terminus on a tour. Tram has dash canopy lights, but no large white strip under the drivers windows. Photo not dated but appears to be during early 1960's. Tram 18 has destination of "Railway Station", also has a white disk indicating a tram in a convoy. Also has a good photo of the "Cohn's Drinks Quench" advertisement on the front dash panel, as well as two SEC roof ads.trams, tramways, eaglehawk, bendigo, tram tours, high st, specials, tram 18 -
 Ballarat Tramway Museum
Photograph - Black & White Photograph/s, Bendigo tram 21 in Pell Mall, late 1950's
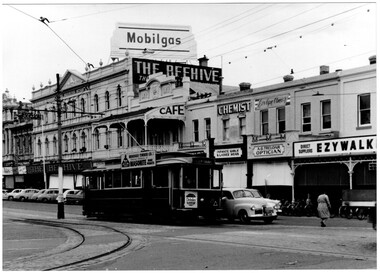
Black and White photograph, of Bendigo 21 with the destination of Golden Square, in the Pall Mall, approaching Charing Cross, during the mid to late 1950's. Tram has a roof advert for Bendigo Timber Co. Masonite and a Cohn's Drink ad on the front of the tram. In the background are roof advert for Mobilgas on the Beehive Building, Ezywalkin building, A. G. Treloar Optician and Evlyn Amer? shop for Infants Girls and Ladies Wear. There is a large number of Holden motor cars in the photos along with bicycles parked by the Ezywalkin shop. Printed on Fujichrome paper. Two copies held."TMSV Sales" stamp on rear. On rear of in ink "MMTB 188, Bendigo 21"trams, tramways, bendigo, charing cross, pall mall, tram 21 -
 Ballarat Tramway Museum
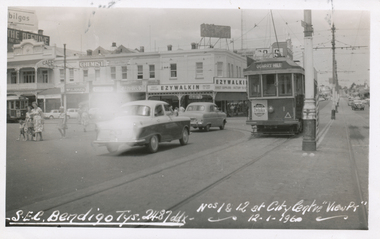
Photograph - Black & White Photograph/s, 12/01/1960 12:00:00 AM
Black and White print contained within the Wal Jack Bendigo and Geelong Album, see Reg Item 5003 for more details. Photo, commercially produced?, of Bogie tram No. 1 and single trucker No. 12 at Charing Cross 12-1-1960, with the details of the photo written onto the negative and printed. Tram 1 has the destination of Quarry Hill and has a Cohn's drink advertisement on the rear panel. In the background are: The Beehive, Ezywalkin, Wm Jones Chemist, A. G. Relearn Optician, .Mobilgas. Note the advertisement Plume? over the Ezywalkin store has been blanked out. trams, tramways, bendigo, charing cross, secv, pall mall, tram 1, tram 12 -
 Ballarat Tramway Museum
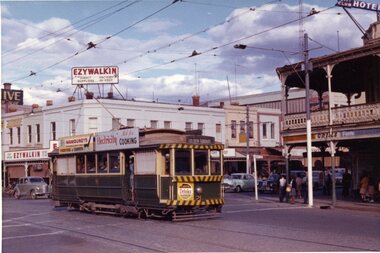
Photograph - Colour Photograph/s, 21/11/1962 12:00:00 AM
Colour print of Bendigo SECV Bendigo tram 21, leaving Charing Cross for Golden Square. On Kodacolor paper with a Kodak red ink stamp on rear. Tram has dash canopy lights, but no large white strip under the drivers windows. Tram has a good load of passengers on it, with all blinds drawn, showing destination "Golden Square". Fitted with roof ads "Electricity best for Cooking" and an ad Mamouneys - Furniture and Carpets. A Cohn's drinks ad is on the front dash panel. Photo has the Ezywalkin store in background and the City Club Hotel in the right hand side of the photo. Photo dated 21.11.1962.On rear top left hand corner "21 / 21.11.62" in very wavy handwriting, typical of an aged person.charing cross, bendigo, golden square, tram 21 -
 Bendigo Military Museum
Administrative record - RSL ROSTER EASTER FAIR 1978, Bendigo RSL Sub Branch, March 1978
The Bendigo Easter Carnival was a Fund Raiser for the Bendigo Sub Branch for many years. The list of names of the volunteers there are many who were tireless workers for the Sub Branch over many years. Name in red pen. David Patterson refer Cat No 8070.Roster, paper, 4 pages stapled together, the 3/4th pages are fold out. Page 1 is a letter from the Secretary Bendigo RSL Sub Branch detailing the dates and places for RSL Volunteers to man the gates at the Easter Fair and events around town. Page 2 is a list of Volunteers names, dates & places ie Art Show at the Memorial Hall, Football at the QEO, Crowning ceremony at White Hills Technical School. Pages 3/4 details names, dates to man the entrance gates to the Easter Fair ie Park Road, Barnard Street, Fernery Gate and Cohns Gate.Page 1, "Returned Services League Bendigo Sub Branch - President D.J. Paterson - Secretary J.K. Barnes - Memorial Hall - Phone 434013 - March 1978. In red pen on page 1. "David Paterson"brsl, smirsl, easter, -
 Ballarat Tramway Museum
Slide - 35mm slide/s - set of 5, Noel Simons, 19/11/1962 12:00:00 AM
Set of 5 transparencies taken on 19/11/1962 on Kodak mounts. 1186.1 - Bendigo 21 bound for Golden Square at Charing Cross with The Beehive buildings and shops in Pall Mall in the background. Trams has an ad for Cohns drinks on front bumper, SEC Best for Cooking roof ad. and Mamouney's furniture roof ad. Two women passengers boarding. 1186.2 - Bendigo 26 crossing Pall Mall from Mitchell St. bound for Eaglehawk with "Ezywalkin" shop in background. Tram has an SEC 'Electric Cooking' roof ad and a 'Streets Ice cream' ad on front dash. 1186.3 - Bendigo 7 arriving at the Charing Cross stop, bound for North Bendigo. Has a Huttons dash panel ad, a Castrol roof ad. Buildings as for 1186.1. Passengers waiting at the stop. 1186.4 - Bendigo 19 leaving Charing Cross for Golden Square with City Club Hotel alongside and other buildings as for 1186.1 in the background. Tram has Briquettes ad on front dash and SEC 'Electric Cooking' roof ad. 1186.5 - Bendigo 21in High St. at corner of Short St. heading for Charing Cross. Destination half way between Depot and Railway Station. Tram has ads for Cohns Drinks on dash panel, SEC 'Cook with Electricity' and a Sandhurst Milk roof ads.Information written on in black ink and date stamped in purple ink. 1186.1 - "No. 21 in Pall Mall at Charing Cross, Bendigo" 1186.2 - "No. 26 arriving at Alexandra Fountain, Charing Cross, Bendigo" 1186.3 - "No. 7 in Pall Mall at Charing Cross, Bendigo" 1186.4 - "No. 19 in High St., Bendigo, leaving Charing Cross for Golden Square" 1186.5 - "No. 21 in High St. Bendigo, at corner of Short St." tramways, trams, bendigo, charing cross, pall mall, high st., tram 7, tram 19, tram 21, tram 26 -
 Ballarat Tramway Museum
Photograph - Black & White Photograph/s, early 1960's
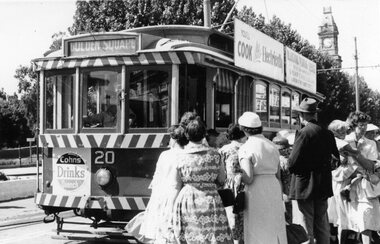
Black and White print of an SECV Bendigo tram 20 at Charing Cross terminus for the Golden Square route loading passengers. Trams has dash canopy lights, but no large white strip under the drivers windows. Photo not dated but appears to be at during early 1960's. Tram showing destination of "Golden Square", has "Cohn's Drinks Quench" ad on front dash panel, SEC Roof ad "You'll Cook better electrically" and "B.J. Osborn Plumbing Service" roof ad. Has Bendigo Post Office clock tower in background. Tram off loading passengers while others are waiting to get on. Good photo for people.trams, tramways, charing cross, bendigo, golden square, tram 20 -
 Ballarat Tramway Museum
Photograph - Digital image Set of 20, 1971-72
Set of 22 digital images of Bendigo Tramways, 1972 at or before closure while on a tram tour by Stuart Lodington. .1 - No. 7 arriving at North Bendigo .2 - No. 5 departing Charing Cross along View St, with a Firestone tyres in the background. .3 - front view of a tram in View St with a blurred background image. .4 - No. 24 showing Eaglehawk destination .5 - No 26 and 3 in View St, with the Armstrong Tyre Service building in the background and signs for T&G and Cohn's Drinks. .6 - ditto .7 - No. 3 arriving at Charing Cross from Eaglehawk in View St, with a Quarry Hill destination. .8 - No. 3 and 18 at Charing Cross. .9 - No. 24 on the Quarry Hill line. .10 - No 26 in View St, with the Armstrong Tyre Service building in the background and signs for T&G and Cohn's Drinks. .11 - ditto, with fountain in view, Colonial Mutual building and a newsagent with a Herald sign on the building. .12 - No. 7 at North Bendigo terminus .13 - ditto with pole being reversed. .14 - No. 18 at Quarry Hill terminus with Northern Terrazzo sign in the background. .15 - No. 24 at Quarry Hill terminus .16 - No. 18 arriving at Charring Cross, with Fountain Plaza and Bendigo Pharmacy in the background. .17 - No. 3 and 18 at Charing Cross. .18 - No. 7 at North Bendigo terminus with pole being placed on the overhead. .19 - No. 26 in View St inbound, with Sandhurst Trustees sign in the background. .20 - No. 6 leaving Charing Cross in Pall Mall with Myer and other buildings in the background. .21 - No. 7 at North Bendigo .22 - Single trucker with two roof Advertisements crossing View St with fountain in view, Colonial Mutual building and a newsagent with a Herald sign on the building.trams, tramways, bendigo, eaglehawk, quarry hill, north bendigo, charing cross, view st, tram 7, tram 5, tram 24, tram 26, tram 5, tram 3, tram 18, tram 6 -
 Bendigo Historical Society Inc.
Document - Amy Huxtable Memorial Committee - Correspondence and Newspaper Vale Article, 1993
Amy Huxtable was born at Cheltenham in 1918, to Robert Henry Huxtable and Violet A Dagg. Her father was an installer for an oil company and travelled the State. taking his family with him. She completed her education at the Bendigo High School and later attended the Bendigo Business College, becoming an expert shorthand writer. Her first position was as a copy writer with Radio 3BO, in the mid 1930s. She worked with an advertising agency in Melbourne and then with the Age,newspaper. In 1953, Miss Huxtable was appointed temporarily to succeed Miss E B Millane as social editress of the Bendigo Advertiser, during the latter's absence abroad. In 1956, Amy travelled abroad and on her return in 1957 was appointed permanently as Women's editor, a position she held for twenty-three ears. During her early years with The Advertiser she wrote under the name Toora, but in later years her own name became widely known. Miss Huxtable was well known both in her professional capacity and through a interest and involvement in community activites. She was life governor of the Bendigo Hospital, the Bendigo Home for the Aged, and Mirridong Home for the Blind, she was a member of Soroptimist International and the Business and Professional Women's Club. Amy was also a tireless worker for the spastic society and a strong supporter of the YWCA. When Amy Huxtable died at Mt AJvernia Hospital on 16 January 1980 Mayor Campbell ordered the city flag to be flown at half-mast. "Lowering the flag is the least we can do for such a lady" Cr Campbell said. Douglas Lockwood, editor of the Bendigo Advertiser said, "She was a devot d colleague who gave her craft and her newspaper the kind of service which identified a rare and generous spirit." She was a true professional who decided to make Bendigo her home. More than 300 people packed St Paul's Church for her funeral ervice the bell tolled as the casket was carried from the church. At a ceremony in the Conservatory Gardens on No ember 22 1981 The Amy Huxtable Memorial Committee presented to the City of Bendigo, a garden seat in memory of the late Miss Huxtable. This Bendigo manufactured seat was a fitting tribute to one ofBendigo's most loved and esteemed citizens. All Miss Huxtable's Advertiser articles were microfilmed and presented to the Library by the above committee. Amy Huxtable Memorial Committee - Correspondence and Newspaper Vale Article Bendigo Advertiser Article 23/10/1993 entitled: "Vale Amy: a rare individual" 2808.13e Photo of Amy from the article 2808.13a, 2808.13b, 2808.13c: The Article describe her life and contributions to Bendigo. 2808.13d - 12 pages of Correspondence and committee records. Page 1 Letter from the the committee to the art gallery 14/9/1993 re event happening (Presentation of the Ola Cohn works as funded by excess money before the committee "winds up" the letter encloses a list of whom the committee consider should be invited to the event). Page 2 List of people as above with adresses Page 3 Invitation to the above event from the art gallery 7/9/1993 Page 4 From the art gallery 29/9/1993 enclosing some factual notes on Amy Huxtable to be confirmed and added to by the committee if need be. Page 5 From the art gallery 20/10/1993 to the committee, a copy of an article written for the Bendigo Advertiser - for comments. Page 6 From the art gallery 29/1/1993 - thanking the Chairperson of the committee Miss Norma Young for her speech at the reception for the Amy Huxtable Memorial - Ola Cohn Works. Page 7 From Norma Young back to the art gallery 3/11/1993, thank you for the combined work of the gallery and the memorial committee Page 8 Another thank you letter to the art gallery committee of management 3/11/1993. Page 9 -12 Speech as given by Norma Young, chairperson of the committee to the reception at the art gallery.history, amy huxtable, bendigo, amy huxtable memorial committee, bendigo art gallery ola cohn works -
 Bendigo Historical Society Inc.
Postcard - German Lutheran Church
1. PAstor Friedrich Leypoldt was born in Stuttgart, Germany in 1844 and came to Australia in 1869 and became pastor of the Bendigo Lutheran church. He married Elise Julia Buddee in 1870. He served as pastor for 60 years. On the occasion of his 25th anniversary he was presented with 80 sovereigns raised by donations from the German community and other Bendigo citizens. He died 1/1/1932 and is buried in the Lutheran section of the White Hills Cemetery. 2. Mr Henry Iser was born in Hamburg, Germany in 1854 and emigrated to Australia in the late 1880's. He had various positions before travelling to Sydney to take up a position on the island of Yap in the Carolina group, Micronesia. Ill health caused his return to Bendigo where he was an accountant, firstly for Lyceum Grocery Store and then Cohn Brothers Brewery. He brought his fiancée, Caroline Collen from Germany and they married in 1888.When his brother-in-law Willem Humme became ill, Henry joined him at his timber yard and ironmongery, eventually being made a partner. Thus, today's Hume and Iser was born. Henry Iser died in 1932.Black and white postcard of the German Lutheran Church in Bendigo with a photo of pastor Rev. F. Leypoldt. The postcard is addressed to Mrs. H. Iser, Linetta Bramble St. Bendigo from Alise Leypoldt 1905. The writing is in German. Part of the Barker's family collection.german lutheran, rev. leypoldt -
 Ballarat Tramway Museum
Slide - 35mm slide/s, Noel Simons, 21/11/1962 12:00:00 AM
Set of 17 transparencies taken on 21/11/1962 on Kodak mounts. 1188.1 - Bendigo No. 11 at Depot Junction McCrae and Arnold St. with driver/conductor changing points. 1188.2 - Bendigo No. 4 at Charing Cross, side on photo, with City Club Hotel and Alexandra Fountain in the background. Tram has Castrol and SEC 'Electric Cooking' ads. 1188.3 - Bendigo No. 4 climbing View St. after tram has passed photographer. Tram has Streets Ice Cream and Cohns Soft Drinks ad on rear dash panel. In the background are the buildings in View St., including the Princess Theatre. Tram has destination of Eaglehawk. 1188.4 - Trams 2 and 4 crossing at the California Gully or Thorpe St Loop. 1188.5 - Bendigo 4 in Mt Korong Road. Tram inbound with destination of Quarry Hill, just leaving Garden Gully Loop. 1188.6 - Bendigo 4 and 17 crossing at the Hayes St. or Iron Bark Gully Loop. No. 17 bound for Eaglehawk, No. 4, Quarry Hill. 17 has two SEC roof ads and a white horse whiskey ad. 1188.7 - No. 17 bound for Eaglehawk, soon after leaving California Gully. Has large mullock heap in background. 1188.8 - Bendigo 2 and 17 crossing at the Thorpe St. or California Gully Loop. Has butchers shop in background. 1188.9 - Bendigo 17 at the Eaglehawk terminus. Has destination of Quarry Hill. In background is the hotel and shops at the terminus, showing ads for "Melbourne Bitter". Tram has two SEC 'Electric Cooking' ads. Driver and conductor about to assist two lady passengers with a pram and baby. 1188.10 - No. 17 at Eaglehawk terminus, awaiting departure. Has Eaglehawk Town Hall and Post Office in background. Tram has a Whitehorse Whiskey ad on the front dash panel. 1188.11 - No. 3 in High St. Eaglehawk, with destination of Eaglehawk. Has the shops on the south side of High St. in the background, including the Eaglehawk fish shop. Tram has two roof ads, one an SEC roof ad, and Cohns Drinks and Streets Ice cream ads on front dash panel. 1188.12 - as above, but after tram has passed photographer. Note the centre of the road poles. 1188.13 - No. 2 outbound for Eaglehawk at the intersection of Mt. Korong Road and the Calder Highway. Photo taken after the tram has passed the photographer. Has an Ampol service station in the background. 1188.14 - No. 11 leaving the Bendigo depot, crossing the bridge, with the Scrubber car in the background. 1188.15 - No. 21 at the North Bendigo terminus. Tram has destination of Golden Square and Cohns drink ad on front dash and two roof ads on side. 1188.16 - No. 11 on Golden Square route, in High St. at intersection with Old High St. 1188.17 - No. 11 at the Golden Square terminus, conductor turning the pole. Hotel on the left side of the photo. Note the road works barrier and red flag behind the tram. Slide has an end of roll mark on the right hand side of the image.Information written on in black ink and date stamped on purple ink. 1188.1 - "Birney car No. 11 in McCrae St. at Cnr of Arnold about to run into depot, Bendigo" 1188.2 - "No. 4 at Alexandra Fountain, Charing Cross Bendigo" 1188.3 - "No. 4 climbing the View St. Hill from Charing Cross, Bendigo (Eaglehawk Route)" 1188.4 - "No. 4 and 2 at Thorpe St. Loop, California Gully" 1188.5 - "No. 4 in Mt Korong Rd., Long Gully, Near Havilah Rd. (Bendigo) (Eaglehawk Route)" 1188.6 - "Nos. 17 and 4 crossing on Hayes St. Loop, Ironbark, Bendigo" 1188.7 - "No. 17 soon after leaving California Gully (Eaglehawk Route)" 1188.8 - "No.2 and 17 crossing on Thorpe St. Loop, California Gully (Eaglehawk Route)" 1188.9 - "No. 17 at Eaglehawk terminus" 1188.10 - "No. 17 at Eaglehawk terminus" 1188.11 - "No. 3 in High St. Eaglehawk" 1188.12 - "No. 3 nearing Eaglehawk terminus" 1188.13 - "No. 2 in Mt. Korong Rd., Ironbark. Calder highway on left (Eaglehawk route) 1188.14 - "Birney car No. 11 leaving Bendigo depot. Scrubber car at rear" 1188.15 - "No. 21 at North Bendigo Terminus" 1188.16 - "Birney car No. 11 in High St. Bendigo at intersection with Old High Street (Golden Square Route)" 1188.17 - "Birney Car No. 11 at Golden Square terminus, High St., Bendigo". tramways, trams, bendigo, depot junction, charing cross, view st., eaglehawk, north bendigo, golden square, tram 2, tram 3, tram 4, tram 11, tram 17, tram 21, tram scrubber -
 Bendigo Historical Society Inc.
Document - Correspondence, 1962
South African (Boer) War Memorial Bendigo The monument commemorates those who died in service or were killed in action while serving in the South African (Boer) War. It is a bronze statue of a soldier on a granite base. There was a large assemblage on the afternoon of 11th November, when the ceremony of unveiling the soldiers' memorial statue was performed by Brigadier-General Gordon in the presence of a muster of branches of the defence forces. The statue, which is in bronze, is mounted on a massive granite base, on the foot of which is the following inscription: — "Bendigo's tribute to the memory of the Australian soldiers who, in the South African war of 1899 - 1902 gave their lives for Queen and Empire. The statue was modelled by Mr.J. Walker, a young Bendigonian, who has been studying for two or three years under Mr. A. T. Woodward art instructor at the local school of mines. Leader (Melbourne), 19 November 1904. Ola Cohn recalled in her autobiography meeting John Walker as a sculpture student at the Bendigo School of Mines and that he had later received the commission for the Boer War Memorial although she neglects to mention its location. John Walker worked as a sculptor in both Bendigo and West Brunswick before turning to chicken farming in the Bendigo suburb of White Hills. John Walker born in Bendigo and first studied sculpture at the Bendigo School of Art. Walker then went to England to study at the Royal College of Art London, and in Paris at the Collarossi and Julian Academies. The photo of A. T. Pattinson was taken by George Leake Massingham, a professional photographer, who had seven children, one of whom died at birth. After arriving in Australia from England, he established himself as a travelling photographer, an occupation he continued after his marriage. He travelled throughout country Queensland, Victoria and New South Wales, setting up studios along the way. The family ended up moving with him, travelling to Sydney, Narrandera, Bendigo, Newtown, Geelong and Deniliquin.Correspondence re Boer War Memorial Bendigo Boer War Memorial Bendigo Letters and photo from and to Mrs Wilson, eldest daughter of Mr Arthur T. Pattinson who was a model for the Boer War sculpture. 10570.1a A restored black and white photo of Trooper Arthur T. Pattinson by BHS Volunteers 10570.1b The original photo as sent by Mrs Wilson to Harold Curnow (Bendigo Historical Society) in 1962. The photo is mount on heavy brown cardboard and has an old catalogue number of "P680" inscribed on it. The cardboard is torn and held together with sticky tape. On the front in italics is printed G.L. Massingham, Bendigo. 10570.1c Notes on the rear of the photo from Mrs Wilson state "that the photo is of Arthur T. Pattinson (Rusty), an Australian Light Horse trooper who served in the Boer War. The Boer War Memeorial in Pall Mall Bendigo represents a trooper on guard. The sculpture was Jack Walker who used Pattinson as a model; and it is regarded as an excellent likeness." 10570.1d A letter from Harold Curnow back to Mrs Wilson on Jan 4th 1963 acknowledging receipt of the photo and a letter received, noting the significance of the historical information. 10570.1e Handwritten letter 29/11/1962 from Mrs Wilson to Mr Curnow introducing herself as Mr Pattinson's eldest daughter and answering the letter he wrote to her father. She mentions the bad health of her parents. Arthur modelled for the statue at least two to three times per week in a studio on the top floor of a building in Bull St. He was the original model to the best of her knowledge. Another model possibly Mr P. Handmear may have sat as a model for renovations (*). The rifle was a light horse rifle issued to Pattinson as he was still serving in 1904. Arthur and Handmear were boys together and very close. * Note - the plaster model was repaired prior to casting in metal. 10570.1f An obituary notice : 18/11/64 "On Nov 17 at Frankston, Emma, wife of the late A. T. Pattinson (Rusty), late of Bendigo. 10570.1g Letter Nov 20th 1962 from Harold Curnow to Mr Arthur T. Pattinson, Kent St., Mornington, Vic. The Letter Below: "Dear Mr Pattinson, Last week your brother, Brit., whom I have known for many yers, supplied the Bendigo Advertiser with some interesting information regarding your role as the model for the late Jack Walker when he was making the statue for the Boer War Memorial here. Yesterday however, another claimant to the distinction of being the model was advanced in the Bendigo Advertiser by Mr Richard Marshall, of Moran Street, Bendigo who said that the soldier's model was Phillip Handmear. I understand that your brother has sent the newspaper cuttings on to you. When he called to see me yesterday, he suggested that I write to you for further particulars. Can you recall the discussion you had with Jack Walker when he approached you about acting as the model and do you remember how many times you posed for him, and whether the work was done in the house, in the yard, or in one of the outbuildings at Moran Street? In short, any details at all. At this point in time we are considering an interesting facet in Bendigo's history, so any seemingly unimportant incidents could really be useful if we knew about them. Have you any old newspaper cuttings mentioning your name in connection with the memorial? Do you remember and remarks that passed between you and Jack walker during the long sessions you must have put in on this work? This could be very important. And do tyou recall where the rifle cam from? Did you or Jack Walker borrow it from the military authorities? Back in 1934 Jack Walker recalled having had to pull the plaster model down and remake it when he discovered it was slightly off-balance and was slowly toppling forward. He told me he had to get his model to pose again. Do you know anything about this? Could it have been that he got Mr. Handmear in for the final stage of the work? That, of course, would apply only if you were not available. Incidentally, I never heard of Mr Hardmear until I saw his name in yesterday's "Advertiser". In any case I intended contacting your brother or you to enquire whether any member of your fmily has an old photograph of you in your Boer War uniform, that is, one taken about the time of or just after the Boer War. I am sure that members of the Bendigo Branch of the Royal Historical Society would be most interested to see it. I hope you will have the time and inclination to consider the many points I have raised in this letter because the subject has aroused a lot of interest in Bendigo. Hoping you are well and quite as active as you wish, I remain, with all good wishes, Yours sincerely, Harold Curnow". history, soldiers' memorial bendigo, boer war memorial bendigo, arthur pattinson, john (jack walker) -
 Ballarat Tramway Museum
Slide - 35mm slide/s - set of 17, Noel Simons, 20/11/1962 12:00:00 AM
Set of 17 transparencies taken on 20/11/1962 on Kodak mounts. 1187.1 - Bendigo No. 2 at the Quarry Hill terminus, showing destination of Quarry Hill. Has Cohns Drinks and Streets Ice Cream ads on dash panel, a SEC 'electric cooking' roof ad and another roof ad. Shows the Y terminus at this location, but tram standing just before it. Overhead in position. 1187.2 - as above, but closer up. 1187.3 - as above, but from the north side, showing cemetery in the background. 1187.4 - Bendigo No.3 at Eaglehawk terminus. Tram showing destination of Quarry Hill. Has the various buildings at Eaglehawk in the background including the Foodland store. Has Streets Ice cream and White Horse Whiskey ads on the dash panel. 1187.5 - Bendigo No. 18 at Garden Gully crossing loop, in bound, with destination of Eaglehawk. Passengers waiting for an Eaglehawk tram at the stop. Has a white horse whiskey ad on dash panel and SEC roof ads. Conductor standing in doorway looking out. 1187.6 - Bendigo No. 7 inbound in Nolan St. at cnr of McCrae St. showing destination of Golden Square. Has Streets Ice cream ad on dash panel and a Castrol Roof ad. 1187.7 - Bendigo No. 19 at the North Bendigo terminus with railway level crossing in background. Tram has a Cohns Drinks ad and an SEC 'Electric Cooking' roof ad. 1187.8 - Bendigo No. 2 at the Quarry Hill terminus, looking back into Bendigo, showing destination of Eaglehawk. 1187.9 - Bendigo No. 21 in McCrae St, near Nolan St outbound for North Bendigo. Photo taken after tram has passed photographer. 1187.10 - Bendigo Nos. 4 and 26 at Charing Cross in View St. with fountain alongside and the Beehive, Ezywalkin Buildings in the background. No. 26 has a Sandhurst Milk and SEC 'Electric Cooking' roof ad. 1187.11 - close up of 22E maximum traction truck and folded footstep. 1187.12 - Bendigo No. 19 at Charing Cross terminus, after tram has passed photographer, showing destination of North Bendigo, with the Beehive building in the background and passengers boarding tram. 1187.13 - Bendigo No. 11, turning from View St. into Pall Mall, showing Special with the conductor holding point bar. Has the Beehive and Ezywalkin Buildings in the background. 1187.14 - No. 7 at Charing Cross terminus, in Pall Mall, bound for Golden Square. Has the Beehive and Ezywalkin buildings in the background and passengers waiting at the tram stop. 1187.15 - No. 18 at the Charing Cross terminus, bound for Eaglehawk. Has the Beehive and Ezywalkin buildings in the background and passengers waiting at the tram stop. Also has the 'Safety Zone' sign in the photograph. 1187.16 - No. 2 at Quarry Hill terminus, night or dusk photo. Tram showing destination of Depot. 1187.17 - No. 26 at Charing Cross, night photo. Tram has destination of Quarry Hill, but is on the line for Eaglehawk. Photo looks along Mitchell St. Also shows Safety Zone sign. Information written on in black ink and date stamped on purple ink. 1187.1 - "No. 2 at Quarry Hill terminus Bendigo" 1187.2 - "No. 2 at Quarry Hill terminus Bendigo" 1187.3 - "No. 2 at Quarry Hill terminus Bendigo" 1187.4 - "No. 3 at Eaglehawk terminus" 1187.5 - "No. 18 in Mt Korong Road, Long Gully at cnr of Havilah Road (Eaglehawk Route)" 1187.6 - "No. 7 in Nolan St. Bendigo, at Cnr of McCrae St., near lake Weeroona, (North Bendigo Route)' 1187.7 - "No. 19 at North Bendigo terminus" 1187.8 - "No. 2 at Quarry Hill terminus" 1187.9 - "No. 21 in McCrae St. Bendigo, near Nolan St. (North Bendigo Route) 1187.10 - "4 and 26 at Alexandra Fountain, Charing Cross Bendigo" 1187.11 - "Truck of Bogie Car, Bendigo Tramways" 1187.12 - "No. 19 in Pall Mall at Charing Cross, Bendigo" 1187.13 - "Birney car No. 11 entering Pall Mall from View St. at Charing Cross Bendigo" 1187.14 - "No. 7 in Pall Mall at Charing Cross, Bendigo" 1187.15 - "No. 18 at Alexandra Fountain, Charing Cross, Bendigo" 1187.16 - "No. 2 at Quarry Hill terminus, Bendigo" 1187.17 - "No. 26 at Alexandra Fountain, Charing Cross, Bendigo" tramways, trams, bendigo, quarry hill, eaglehawk, north bendigo, maximum traction, night photo, tram 2, tram 3, tram 4, tram 7, tram 11, tram 18, tram 19, tram 21, tram 26 -
 Ballarat Tramway Museum
Photograph - Colour Photograph/s, 23/11/1962 12:00:00 AM
967.1 - Colour postcard size print of SEC Bendigo trams 4 and 17 at a crossing Loop on the Eaglehawk line. Photo dated 21.11.1962. Printed on AGFA paper. Both trams fitted with dash canopy lighting, but no large white strip under the driver's windows. 17 showing destination of "Eaglehawk", has two SEC ads on the side re Electric Cook and a White Horse whiskey ad on front panel. Tram 4 showing destination of "Quarry Hill", has two ad panels on roof and two ads on front panel including one Cohn's' Drinks. 967.2 - Colour postcard size print of SEC Bendigo tram 26 in Mitchell St. crossing Hargreaves St. heading for Charing Cross. Photo dated 21.11.1962. Printed on AGFA paper. Trams fitted with dash canopy lighting, but no large white strip under the driver's windows. Has two roof ads and one ad on rear drivers panel. In background of photo are the buildings along Mitchell St. looking down along Mitchell St and into View St. Has Plaza theatre sign in photo above tram. On right hand side, is a van marked "Carrier M. Slattery". Tram has destination of "Quarry Hill" in rear box. 967.3 - Colour postcard size print of SEC Bendigo tram 19 on the North Bendigo line. Photo dated 21.11.1962. Printed on AGFA paper. Trams fitted with dash canopy lighting, but no large white strip under the driver's windows. Has destination "Nth Bendigo" and SEC roof ads and drivers panel ad for Briquettes.On rear top left hand corner "21.11.62" in very wavy handwriting typical of an aged person.bendigo, eaglehawk, mitchell st., north bendigo, tram 4, tram 17, tram 26, tram 19 -
 Ballarat Tramway Museum
Photograph - Digital image Set of 20, 1971-72
Set of 20 digital images of Bendigo Tramways, 1972 at or before closure while on a tram tour by Stuart Lodington. .1 - No. 29 at the North Bendigo terminus .2 - No. 29 just past the Bendigo end of the double track in High St Eaglehawk, with a BP dealer in the background. .3 - Night photo of No. 18 at a terminus, showing "Eaglehawk" .4 - ditto .5 - Night photo of No. 24 at Eaglehawk with Leo A Hughes Photographer in the background. The Tram has "Johnnie Walker whiskey" roof adverts. .6 - No. 29 outbound in Thunder St with a train passing over the bridge in the background. .7 - view from the front window of a tram on the Eaglehawk line with a large "display event float" in the foreground and tram approaching a crossing loop. .8 - No. 29 at North Bendigo .9 - view of High St Eaglehawk looking east from the terminus, showing the track and centre poles. .10 - No. 29 outbound on the North Bendigo line turning from either Nolan St or Caledonia St, running a special. .11 - No. 7 departing North Bendigo for Golden Square. .12 - No. 3 and 18 at Charing Cross. No. 3 has two SEC roof Advertisements .13 - No. 7 at North Bendigo with the trolley pole being reversed. .14 - No. 24 at Quarry Hill with Northern Terrazzo in the background with the driver alongside .15 - No. 7 and No.6 at Charing Cross with the Beehive buildings in the background. .16 - No. 7 at North Bendigo terminus .17 - ditto .18 - No. 24 at Quarry Hill with Northern Terrazzo in the background with the conductor alongside. .19 - ditto .20 - No. 26 and other bogie tram in View St near Charing Cross with the Armstrong Tyre Service building and signs for Cohn's Drinks and T&G in the view.trams, tramways, bendigo, eaglehawk, quarry hill, golden square, depot, north bendigo, charing cross, tram 29, tram 18, tram 24, tram 3, tram 7, tram 6, tram 26 -
 Ballarat Tramway Museum
Slide - 35mm slide/s - set of 12, Noel Simons, 28 Feb. 1972
Set of 12 transparencies taken on 28/2/1972 on Kodak mounts. 1207.1 - Bendigo 26 and 2 at Charing Cross. 26 en route for Eaglehawk, 2 for Quarry Hill. Has the Colonial Mutual Life, Armstrong Tyre Service, and Australian Mutual Provident Society buildings and a Cohns Drinks ad. in the background. 1207.2 - as for 1207.1 but with Alexandra fountain in the foreground. 1207.3 - No. 2 in Mitchell St. heading for Quarry Hill. Photo taken after tram has passed photographer. Has buildings on either side of Mitchell St. in the background, including the Plaza Theatre. 1207.4 - No. 6 en route for Golden Square departing Charing Cross. Has the RACV and ANZ bank in the background. 1207.5 - No. 2 crossing Pall Mall to enter Charing Cross ex Quarry Hill, with the Fountain Plaza in the background. 1207.6 - No. 6 arriving Charing Cross ex Golden Square with No. 21 alongside. No. 21 has the SEC ad. 'Everything's fine in my all electric kitchen.' Has the City Family Hotel and the Fountain Plaza shopping centre in the background. 1207.7 - No. 5 at Charing Cross en route for Quarry Hill with No. 2 behind. No. 2 has two SEC roof ads, 'Everything s fine in my all electric kitchen' and 'Electricity best for cooking'. RACV building in the background. Tram crews are discussing the day in the front of the tram. 1207. 8 - No. 21 in High St. Bendigo with the Cathedral in the background. No. 21 has two SEC roof ads, 'Everything's fine in my all electric kitchen' and 'Electricity best for cooking'. 1207.9 - No. 6 in High St. Bendigo with the Cathedral in the background. 1207.10 - No. 6 in High St. Bendigo, just past Wattle St. Photo taken after the tram has passed the photographer from within the Highway Car Sales yard. 1207.11 - No. 26 bound for Eaglehawk at the end of the double track in View St., note signal contactors, tram stop and section signs mounted on pole. 1207.12 - No. 26 turning from View St. into Barnard St.Information written on in blue ink and date stamped on purple ink. 1207. 1- "Nos. 26 and 2 at Charing Cross." 1207.2 - "Nos. 26 and 2 at Charing Cross." 1207.3 - "No. 2 in Mitchell St. just after leaving Charing Cross." 1207.4 - "No.6 leaving Charing Cross for Golden Square." 1207.5 - "No. 2 arriving at Charing Cross from Quarry Hill." 1207.6 - "No. 21 waits at Charing Cross as No. 6 arrives from Golden Square." 1207.7 - "No 5 at Charing Cross with No. 2 lurking behind." 1207.8 - "No. 21 in High St. at cnr of Wattle St." 1207.9 - "No. 6 in High St. at cnr of Wattle St." 1207.10 - "No. 6 in High St. between Wattle and Vine Sts." 1207.11 - "No. 26 at end of double track in View St. near Barnard. St. 1207.12 - "No. 26 seen at dusk turning from View St. into Barnard St."tramways, trams, bendigo, charing cross, high st, view st., tram 2, tram 5, tram 6, tram 21, tram 26 -
 Ballarat Tramway Museum
Photograph - Black & White Photograph/s set of 19, Mar. 1972
Set of 19 black and white prints, all 89mm square of Bendigo trams, date machine printed on print is "Mar 1972". 981.1 - Tram 21 at North Bendigo terminus, with level crossing in background. Has destination "Golden Square" and two SEC roof ads. 981.2 - tram 2? at Eaglehawk, with destination "Depot", two SEC roof ads and "Leo A. Hughes Photographer" on side of building in background. 981.3 - tram 2? at Eaglehawk, side on view. 981.4 - tram 26 at Quarry Hill terminus looking back into city. 981.5 - tram 7 en route to North Bendigo at the site of the Bridge St. loop. Has a Peters Ice Cream truck and Sandhurst Fruit Juices truck on right side of photograph. 981.6 - tram 2 at Quarry Hill terminus. 981.7 - tram 2? at one of the loops on the Eaglehawk line, inbound? 981.8 - bogie tram at Charing Cross with fountain in background. Side on view looking south. 981.9 -trams 7 and 21 on Golden Square/North Bendigo line with bogie tram in background, at Charing Cross. Same as item 972. 981.10 - bogie tram at Charing Cross - has buildings in south west corner in background, including Colonial Mutual Life and an advertisement for the Herald newspaper. 981.11 - trams 25, 7 and two other trams at Charing Cross. 981.12 - trams 2 and 26 and three others at Charing Cross. 981.13 - tram 25 at Golden Square terminus, with Rodda's Golden Square Hotel in the background. Tram showing destination of "Nth Bendigo" 981.14 - tram 24, showing "Special" on depot access track. Has two Johnnie Walker roof ads on side. 981.15 - as above, but tram on bridge outside depot. 981.16 - trams 25 and 28 at depot 981.17 - tram 24 showing "Special" on depot access track with a single truck car in background. 981.18 - trams 2 and 26 at Charing Cross. Has advertisements for "Armstrong Tyre Service" and "Cohn's drinks" on buildings in background. 981.19 - Bendigo 2 at location?, about to enter a loop or double track section. Has hotel in background. On rear of each photo in the top left hand corner is a print number 1 to 19 in ink and location notes, generally "Bendigo"trams, tramways, charing cross, bendigo, golden square, quarry hill, tram 2, tram 21, tram 7, tram 24, tram 26