Showing 259 items matching " alexandra fountain"
-
 Bendigo Historical Society Inc.
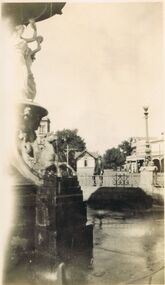
Photograph - PHOTO ALEXANDRA FOUNTAIN, AAND SHELTER FROM THE ELEMENTS FOR CAB DRIVERS AND TRAM EMPLOYEES
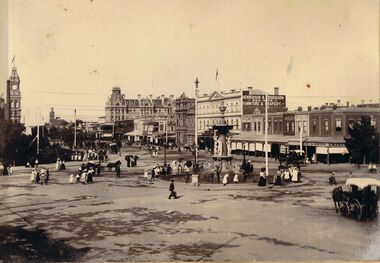
... PHOTO ALEXANDRA FOUNTAIN, AAND SHELTER FROM THE ELEMENTS...Alexandra fountain... of the Alexandra fountain in the left foreground and a shelter from... BENDIGO Streetscape charing cross Alexandra fountain shelter shed ...Black and white photo showing a small portion of the Alexandra fountain in the left foreground and a shelter from the elements for cab drivers and tram staff. Man standing at the fence of the fountain on the south side.bendigo, streetscape, charing cross, alexandra fountain, shelter shed. -
 Bendigo Historical Society Inc.
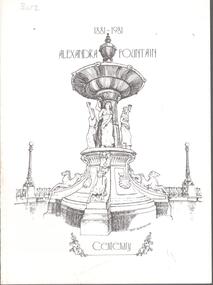
Document - CENTENARY OF ALEXANDRA FOUNTAIN (1881-1981) - SOUVENIR CARD
... CENTENARY OF ALEXANDRA FOUNTAIN (1881-1981) - SOUVENIR CARD...Alexandra Fountain...Souvenir Card celebrating the Centenary of the Alexandra...COTTAGE Miners Alexandra Fountain Charing Cross Centenary ...Souvenir Card celebrating the Centenary of the Alexandra Fountain (1881 - 1981). Comprises cover design by Ian Granville, a salutation by Ric Norris, a brief description of the opening and a 19th century illustration of the fountainIssued by the Royal Historical Society of Victoria, Bendigo Branchcottage, miners, alexandra fountain, charing cross, centenary -
 Bendigo Historical Society Inc.
Negative - ALEXANDRA FOUNTAIN, CITY FAMILY HOTEL, VIEW POINT
... ALEXANDRA FOUNTAIN, CITY FAMILY HOTEL, VIEW POINT... alexandra fountain...Negative of line drawing of Alexandra fountain... BENDIGO Streetscape view point alexandra fountain Bendigo City ...Negative of line drawing of Alexandra fountain in foreground, City Family Hotel in background, on RH side View Point. On LH side, hansom cabs lined up alongside Bendigo Creek. Man standing leaning on fence around fountain. Appears to be late 1800's ? Negative is damaged with patches of damage.bendigo, streetscape, view point, alexandra fountain, bendigo city family hotel, alexandra fountain, hansom cab -
 Bendigo Historical Society Inc.
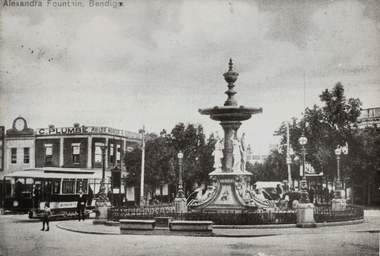
Photograph - ALEXANDRA FOUNTAIN, BENDIGO, c.1903
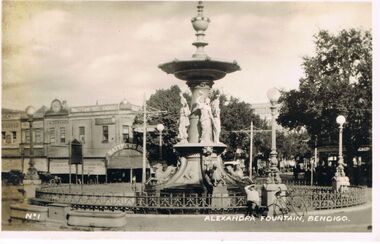
... ALEXANDRA FOUNTAIN, BENDIGO...alexandra fountain... of Alexandra Fountain. Inscriptions: in photo - on sign - C Plumbe... PLACE Streetscape alexandra fountain Black and white photograph ...Black and white photograph, mounted on black card of Alexandra Fountain. Inscriptions: in photo - on sign - C Plumbe - tailor, mercer and outfitter, on two storey building opposite fountain. Tram in leflt foreground.place, streetscape, alexandra fountain -
 Bendigo Historical Society Inc.
Photograph - VIEWS OF BENDIGO : NO. 1 : ALEXANDRA FOUNTAIN, BENDIGO : UNDATED, C1620/30's
... VIEWS OF BENDIGO : NO. 1 : ALEXANDRA FOUNTAIN, BENDIGO...alexandra fountain... are missing. The label No. 1 is in the bottom left corner, Alexandra... BENDIGO Streetscape alexandra fountain Bendigo streetscape. Views ...Views of Bendigo. No. 1 of a series of sixteen black and white photographs of Bendigo. Nos. 6 and 7 in the series are missing. The label No. 1 is in the bottom left corner, Alexandra Fountain, Bendigo on the right. A business called Matthew Bros. is on the Mitchell St corner. Undated, but vintage cars suggest a date around the 1920s/30s??bendigo, streetscape, alexandra fountain, bendigo streetscape. views of bendigo. alexandra fountain. -
 Bendigo Historical Society Inc.
Postcard - ELAINE ROBB COLLECTION: ALEXANDRA FOUNTAIN, BENDIGO
... ELAINE ROBB COLLECTION: ALEXANDRA FOUNTAIN, BENDIGO...alexandra fountain...Hand coloured postcard: image shows Alexandra Fountain... BENDIGO Streetscape alexandra fountain Hand coloured postcard ...Hand coloured postcard: image shows Alexandra Fountain, Bendigo. On Rh side, view up View Street, tram on tracks. Three men standing around fountain. Could be late 1890's.bendigo, streetscape, alexandra fountain -
 Bendigo Historical Society Inc.
Document - PROPOSED PROGRAMME FOR ALEXANDRA FOUNTAIN CENTENARY CELEBRATIONS 5TH JULY 1981, 05/07/1981
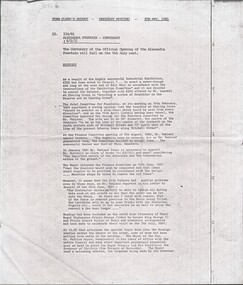
... PROPOSED PROGRAMME FOR ALEXANDRA FOUNTAIN CENTENARY...Alexandra Fountain...Proposed Programme for Alexandra Fountain Centenary... DOCUMENT Newspaper Alexandra Fountain Proposed Programme ...Proposed Programme for Alexandra Fountain Centenary Celebrations 5th July 1981. Town Clerk's Report to the Ordinary Meeting of Council 4th May 1981 re proposed activities of a centenary celebration. The Bendigo Branch of the Royal Historical Society of Victoria has expressed interest in such a celebration and ''would cooperate fully’ ‘A suggested program and arrangements is given along with an expectation of the cost. Motion was passed. The foreword to this document gives some detail of the history of the Alexandra Fountain (taken from a newspaper report of earlier days - but not cited).document, newspaper, alexandra fountain -
 Bendigo Historical Society Inc.
Photograph - ALEXANDRA FOUNTAIN, VIEW POINT, BENDIGO
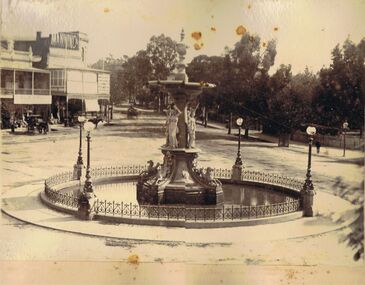
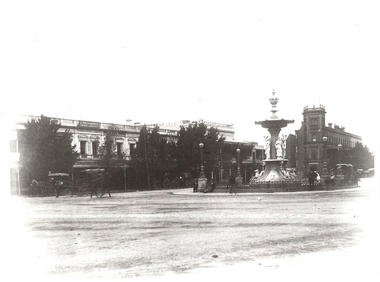
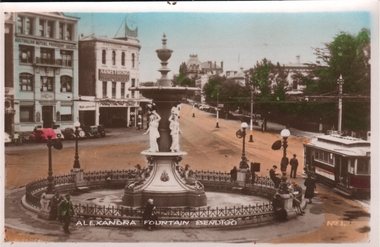
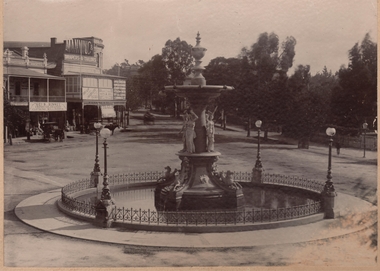
... ALEXANDRA FOUNTAIN, VIEW POINT, BENDIGO...alexandra fountain...Sepia image mounted on board: image shows Alexandra... BENDIGO Streetscape alexandra fountain Bendigo Sandhurst Alexandra ...Sepia image mounted on board: image shows Alexandra Fountain, View Point, Bendigo, looking towards View Street. Fountain surrounded by wrought iron fence. Fountain is not running. Horse drawn cab standing in front of buildings on back LH side. On buildings, Manning & Co., Bisset, importer drapery, clothing, millinery. No tram line in View Street.bendigo, streetscape, alexandra fountain, bendigo, sandhurst, alexandra fountain, view point, manning & co., bisset -
 Bendigo Historical Society Inc.
Photograph - ALEXANDRA FOUNTAIN, 1890's
... ALEXANDRA FOUNTAIN...alexandra fountain...black and white copy: Alexandra Fountain, City Family... PLACE Building alexandra fountain black and white copy ...black and white copy: Alexandra Fountain, City Family Hotel, Holdsworth Chemist, shops along Pall Mall, horse drawn cabs, View Point. 'View Point/Alexander (sic) Fountain '537' in white bottom left.place, building, alexandra fountain -
 Bendigo Historical Society Inc.
Postcard - CHARING CROSS/ALEXANDRA FOUNTAIN, BENDIGO
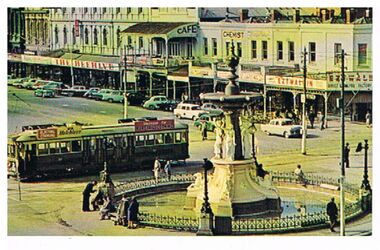
... CHARING CROSS/ALEXANDRA FOUNTAIN, BENDIGO... Alexandra Fountain... and Pall Mall. Alexandra Fountain in foreground, tram behind... BENDIGO Streetscape charing cross Bendigo Alexandra Fountain tram ...Postcard, coloured, streetscape view of Charing Cross and Pall Mall. Alexandra Fountain in foreground, tram behind heading towards View Street. Cars parallel parked along street in Pall Mall. The Beehive, Ezywalkin, stores in image.bendigo, streetscape, charing cross, bendigo, alexandra fountain, tram, ezywalkin, beehive, tram, charing cross -
 Bendigo Historical Society Inc.
Photograph - ALEXANDRA FOUNTAIN, BENDIGO
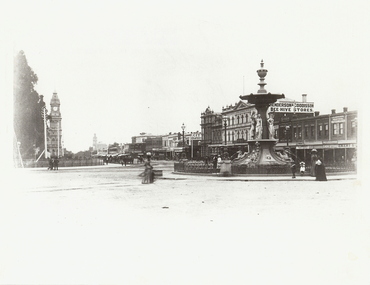
... ALEXANDRA FOUNTAIN, BENDIGO...alexandra fountain...Sepia image: image, mounted on board, Alexandra Fountain... BENDIGO Streetscape alexandra fountain Bendigo Sandhurst Alexandra ...Sepia image: image, mounted on board, Alexandra Fountain at Charing Cross, looking north up Pall Mall. On LH side of image, Post Office tower visible, hansom cabs in forefront. Shops along Pall Mall on RH side: Emery & Gibson, Henderson & Goodisson, Beehive, Furniture and Drapery. People in image - women wearing long dresses, hats, men in suits.bendigo, streetscape, alexandra fountain, bendigo, sandhurst, alexandra fountain, hansom cab, post office, henderson & dodisson -
 Bendigo Historical Society Inc.
Photograph - STEAM TRAM AT ALEXANDRA FOUNTAIN, approx 1901
... STEAM TRAM AT ALEXANDRA FOUNTAIN...alexandra fountain... at the Alexandra Fountain, Charing Cross C 1900. Beehive store... PLACE Streetscape alexandra fountain black and white photograph ...black and white photograph of steam trams and trailers at the Alexandra Fountain, Charing Cross C 1900. Beehive store in background. 'Henderson and Goodison, Beehive - furniture and drapery' J.T. Hill Tailor ' 'Confidence - Curls Tobacco' sign visible on top of trams.place, streetscape, alexandra fountain -
 Bendigo Historical Society Inc.
Photograph - ALEXANDRA FOUNTAIN
... ALEXANDRA FOUNTAIN...alexandra fountain.... Written on bottom in white pen: 'Alexandra Fountain, Bendigo... BENDIGO Streetscape alexandra fountain Colour photo. Alexandra ...Colour photo. Alexandra fountainlooking at view court and view street, several cars parked, A tram can be seen at bottom right near the fountain, various people around the fountain. Written on bottom in white pen: 'Alexandra Fountain, Bendigo' and 'No 1'bendigo, streetscape, alexandra fountain -
 Bendigo Historical Society Inc.
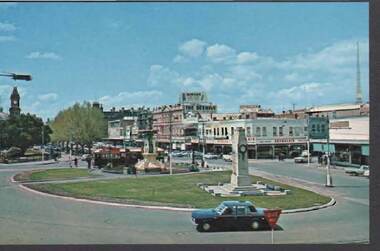
Postcard - ALEXANDRA FOUNTAIN AND WAR MEMORIAL, CHARING CROSS, BENDIGO
... ALEXANDRA FOUNTAIN AND WAR MEMORIAL, CHARING CROSS, BENDIGO... Alexandra Fountain...Postcard: image shows War Memorial on RH side, Alexandra... Ezywalkin War Memorial Alexandra Fountain Postcard: image shows War ...Postcard: image shows War Memorial on RH side, Alexandra Fountain in centre, tram in bakcground, cars on street. The Beehive building and Ezywalkin are on RH side of Pall Mall. . Postcard is stuck fast to backing board from album, unable to determine maker.bendigo, streetscape, charing cross, bendigo, pall mall, beehive, ezywalkin, war memorial, alexandra fountain -
 Bendigo Historical Society Inc.
Postcard - ALEXANDRA FOUNTAIN LOOKING SOUTH TO MITCHELL STREET
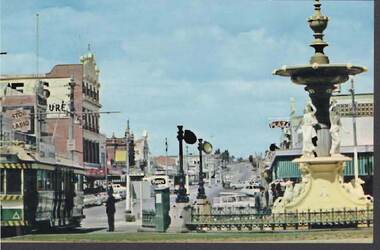
... ALEXANDRA FOUNTAIN LOOKING SOUTH TO MITCHELL STREET... Alexandra Fountain.... Alexandra Fountain on RH side, tram on LH side. Cars parked... Alexandra Fountain tram Colour Postcard: Mitchell Street from ...Colour Postcard: Mitchell Street from Charing Cross. Alexandra Fountain on RH side, tram on LH side. Cars parked and on Mitchell Street. Plaza Theatre sign visible. On back: Nu color Vue, Bendigo, Victoria. BE 24 1950's ?bendigo, streetscape, charing cross, bendigo, mitchell street, alexandra fountain, tram -
 Bendigo Historical Society Inc.
Postcard - ALEXANDRA FOUNTAIN, WAR MEMORIAL, BENDIGO
... ALEXANDRA FOUNTAIN, WAR MEMORIAL, BENDIGO... Alexandra Fountain...Colour postcard: Alexandra Fountain and War memorial... BENDIGO Streetscape pall mall Bendigo Pall Mall Alexandra Fountain ...Colour postcard: Alexandra Fountain and War memorial in centre, surrounded by circular lawn garden. Pall Mall and Mitchell Streets intersection in middle ground. Tram behind fountain. Car in immediate foreground. Ezywalkin sign on corner building, The Beehive behind. Possibly 1960's ?bendigo, streetscape, pall mall, bendigo, pall mall, alexandra fountain -
 Bendigo Historical Society Inc.
Photograph - LESLIE JOHN BAGUST COLLECTION: ALEXANDRA FOUNTAIN, 1940
... LESLIE JOHN BAGUST COLLECTION: ALEXANDRA FOUNTAIN...bendigo alexandra fountain... of Alexandra Fountain Bendigo in 1940. Image taken on the corner... BENDIGO Tourism bendigo alexandra fountain Leslie John Bagust ...Leslie John Bagust Collection. Black & White Photograph of Alexandra Fountain Bendigo in 1940. Image taken on the corner of Pall Mall and Mitchell Street looking north. Matthew Bros. Department store on the corner. Tram Line running all the way up Mitchell Street.bendigo, tourism, bendigo alexandra fountain -
 Bendigo Historical Society Inc.
Photograph - ALEXANDRA FOUNTAIN, 1960's
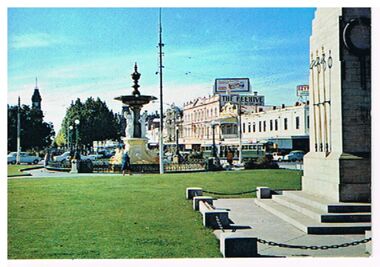
... ALEXANDRA FOUNTAIN...alexandra fountain...Hand tinted photo: view of Alexandra Fountain... PLACE Streetscape alexandra fountain F.T. Kennedy Hand tinted ...Hand tinted photo: view of Alexandra Fountain and cenotaph looking north on Pall Mall. Photo includes War Memorial on left hand side, Beehive Building on RH side, Post Office clock is visible above trees on LH side. Tram proceeding southward along Pall Mall.F.T. Kennedyplace, streetscape, alexandra fountain -
 Bendigo Historical Society Inc.
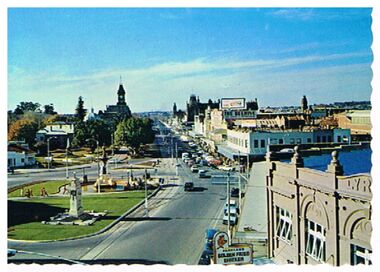
Postcard - ALEXANDRA FOUNTAIN, CENOTAPH, POST OFFICE, PALL MALL, LYRIC THEATRE
... ALEXANDRA FOUNTAIN, CENOTAPH, POST OFFICE, PALL MALL, LYRIC... Alexandra Fountain.... On back ' Bendigo, Victoria. Overlooking the Cenotaph, Alexandra... ALEXANDRA FOUNTAIN, CENOTAPH, POST OFFICE, PALL MALL, LYRIC THEATRE ...Postcard, color. Image shows view north down Pall Mall. Cenotaph in foreground, Baby Health Centre on LH side. Parklake Golden Fried Chicken bottom RH side in front of Lyric Theatre. On back ' Bendigo, Victoria. Overlooking the Cenotaph, Alexandra Fountain and Post Office, Pall Mall. Nu Color Vue.Nu Color Vuebendigo, streetscape, pall mall, cenotaph, pall mall, alexandra fountain, post office, parklake golden fried chicken, lyric theatre -
 Ballarat Tramway Museum
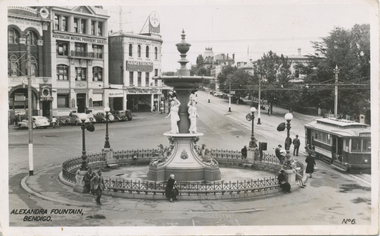
Postcard, Valentine & Sons Publishing Co, Valentines Series Postcard, No 6 of the Alexandra Fountain, Bendigo
... Valentines Series Postcard, No 6 of the Alexandra Fountain... Alexandra Fountain.... Valentines Series Postcard, No 6 of the Alexandra Fountain, Bendigo... Charing Cross Alexandra Fountain tram 22 Black and White postcard ...Black and White postcard contained within the Wal Jack Bendigo and Geelong Album, see Reg Item 5003 for more details. Valentines Series Postcard, No 6 of the Alexandra Fountain, Bendigo. Charing Cross. Has a single trucker in the photo with the destination of Eaglehawk. In the back ground is the Australian Mutual Provident Society Building, Colonial Mutual Life building and Armstrong tyre service building. On rear of card is Valentine's name with space for written notes and stamps. Has a handwritten message to Wal Jack from Roy Field of Sydney, dated 21-6-1949 and 1d and 1/2 stamps. trams, tramways, bendigo, charing cross, alexandra fountain, tram 22 -
 Bendigo Historical Society Inc.
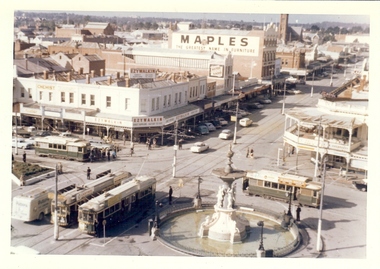
Photograph - BASIL MILLER COLLECTION: TRAMS AT ALEXANDRA FOUNTAIN, BENDIGO, 1960's
... BASIL MILLER COLLECTION: TRAMS AT ALEXANDRA FOUNTAIN...Alexandra Fountain...Colour photo of 4 trams taken at Alexandra Fountain... Alexandra Fountain Mitchell Street High Street Colour photo of 4 ...BHS CollectionColour photo of 4 trams taken at Alexandra Fountain, Bendigo. Two trams entering from View Street, one tram entering from Pall Mall, another entering intersection from High Street. Possibly photo was taken from high vantage point - City Family Hotel. "Maples" and 'Ezywalkin' advertising signs on Mitchell Street buildings. basil miller, bendigo tramways, charing cross, alexandra fountain, mitchell street, high street -
 Bendigo Historical Society Inc.
Photograph - ALEXANDRA FOUNTAIN
... ALEXANDRA FOUNTAIN...alexandra fountain...Black and white photograph. Alexandra Fountain, Pall Mall... PLACE Streetscape alexandra fountain photograph photography ...Black and white photograph. Alexandra Fountain, Pall Mall, Post Office, 2nd Shamrock Hotel. Bendigo School of Mines, Beehive Stores, Fence along Pall Mall. Horse cabs along Pall Mall. Men, women and children. Women wearing full length dresses. Inscriptions: in image - 'Henderson & Goodisson', 'City Drapery', 'Melbourne Cash Store', J Edwards Practical Watchmaker', ':Emery', 'A Lannduff', Karl Van Damme'. On back - rubber stamp, purple 'Royal Historical Society of Vic, Bendigo Branch, Dudley House, 60 View Street, Bendigo'.place, streetscape, alexandra fountain, photograph, photography, bendigo, alexandra fountain, pall mall, shamrock hotel, bendigo school of mines, beehive store, bendigo post office, bendigo clock, bendigo post office clock, bendigo citizens -
 Bendigo Historical Society Inc.
Document - ALEXANDRA FOUNTAIN - OPENING & CENTENARY, 1881 & 1981
... ALEXANDRA FOUNTAIN - OPENING & CENTENARY...Alexandra Fountain... of the Alexandra Fountain by Prince's Albert and George. (b) Town... DOCUMENT official celebrations Alexandra Fountain Construction ...Photocopies of documents. Two photocopies of Council Meeting extracts. (a) Typed up extract from council minutes dated 1st and 2nd July 1881describing procedures for the opening of the Alexandra Fountain by Prince's Albert and George. (b) Town Clerk's report of Council Meeting minutes dated 4 May 1981, the centenary of the fountain opening. Includes a section on the history of the construction of the fountain.Bendigo Councildocument, official celebrations, alexandra fountain, construction, opening, prince albert & george, centenary -
 Bendigo Historical Society Inc.
Photograph - BASIL MILLER COLLECTION: ALEXANDRA FOUNTAIN AND 2 TRAMS, 1912
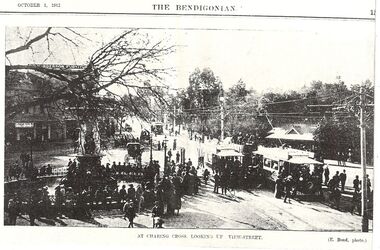
... BASIL MILLER COLLECTION: ALEXANDRA FOUNTAIN AND 2 TRAMS...Alexandra Fountain... 1st, 1912. Alexandra Fountain on left, two trams on right... PERSON Individual basil miller Alexandra Fountain trams tramways ...Photocopy of image from The Bendigonian, page 15, October 1st, 1912. Alexandra Fountain on left, two trams on right .Photo taken from Fountain looking west up View St . Large group of people around fountain. Hansom cabs in distance. Building on LH side has ( unclear initials ) Henderson Furniture sign above roof. On bottom of photo ' At Charing Cross looking up View Street' ( E. Bond, photo ).person, individual, basil miller, alexandra fountain, trams, tramways, miller, basil, bendigonian, view street, bendigo, sandhurst -
 Bendigo Historical Society Inc.
Photograph - ALEXANDRA FOUNTAIN
... ALEXANDRA FOUNTAIN...alexandra fountain... Alexandra Fountain, View Point, Bendigo, looking towards View Street... BENDIGO Streetscape alexandra fountain Black and white photogrraph ...Black and white photogrraph mounted on board: image shows Alexandra Fountain, View Point, Bendigo, looking towards View Street. Fountain surrounded by wrought iron fence. Fountain is not running. Horse drawn cab standing in front of buildings on back left hand side. On building closer to View street sign Manning & Co. Drapers & Tailors on the other building the sign Geo Bisset, importer drapery, clothing, millinery. No tram line in View Street.bendigo, streetscape, alexandra fountain -
 Ballarat Heritage Services
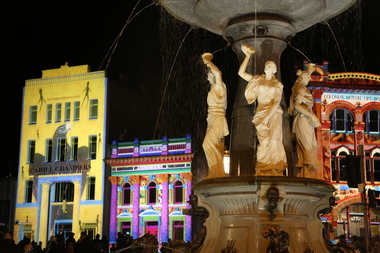
Photograph - Colour, Clare Gervasoni, Charing Cross Bendigo during White Night Bendigo, Featuring the Alexandra Fountain, 2018, 01/09/2018
... the Alexandra Fountain, 2018... Bendigo, and featuring the Alexandra Fountain.... the Alexandra Fountain. Charing Cross Bendigo during White Night Bendigo ...Charing Cross buildings illuminated during White Night Bendigo, and featuring the Alexandra Fountain.white night bendigo, charing cross -
 Ballarat Heritage Services
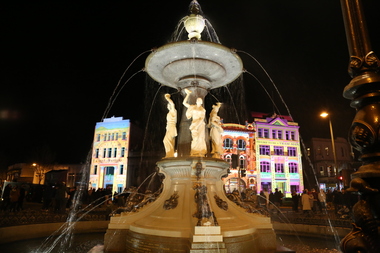
Photograph - Colour, Clare Gervasoni, Charing Cross Bendigo during White Night Bendigo, Featuring the Alexandra Fountain, 2018, 01/09/2018
... the Alexandra Fountain, 2018... Bendigo, and featuring the Alexandra Fountain.... the Alexandra Fountain. Charing Cross Bendigo during White Night Bendigo ...Charing Cross buildings illuminated during White Night Bendigo, and featuring the Alexandra Fountain.white night bendigo, charing cross -
 Bendigo Historical Society Inc.
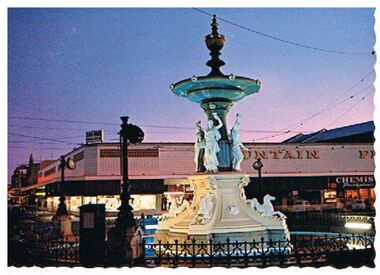
Postcard - ALEXANDRA FOUNTAIN, BENDIGO
... ALEXANDRA FOUNTAIN, BENDIGO...Postcard, color. Image shows Alexandra Fountain and Plaza... Fountain and Plaza Fountain at sunset. Postcard ALEXANDRA FOUNTAIN ...Postcard, color. Image shows Alexandra Fountain and Plaza Fountain at sunset.Nu Color Vuecottage, miners -
 Bendigo Historical Society Inc.
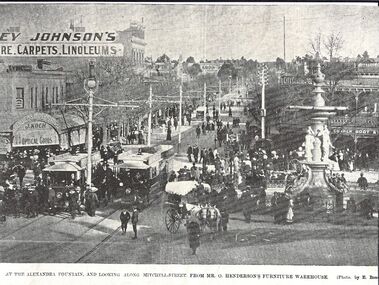
Photograph - BASIL MILLER COLLECTION: ALEXANDRA FOUNTAIN, CROWD AND 2 TRAMS
... BASIL MILLER COLLECTION: ALEXANDRA FOUNTAIN, CROWD AND 2... of Alexandra Fountain. Caption under image 'At Alexandra Fountain... The Bendigonian, 2 Trams to left of Alexandra Fountain. Caption under ...Photocopy of image from The Bendigonian, 2 Trams to left of Alexandra Fountain. Caption under image 'At Alexandra Fountain and looking along Mitchell St from Mr O Henderson's Furniture Warehouse. (Photo by E Bond)'.person, individual, basil miller -
 Bendigo Historical Society Inc.
Postcard - CARWARDINE COLLECITON: ALEXANDRA FOUNTAIN BENDIGO
... CARWARDINE COLLECITON: ALEXANDRA FOUNTAIN BENDIGO...Sepia postcard. Written on bottom ' Alexandra Fountain... Sepia postcard. Written on bottom ' Alexandra Fountain, Bendigo ...Sepia postcard. Written on bottom ' Alexandra Fountain, Bendigo' Image shows Alexandra Fountain with View Point buildings in background. Tram on RH side. People walking around base of fountain. Early 1900's ? Receipt number 355/16Printed in Saxonybendigo, business, carwardine soap and candle