Showing 49 items matching " route 89"
-
 Flagstaff Hill Maritime Museum and Village
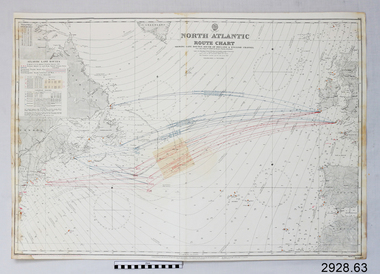
Document - Navigation Chart, North Atlantic : Route Chart showing Lane Routes South of Ireland & English Channel
British Admiralty Navigation Chart - North Atlantic : Route Chart showing Lane Routes South of Ireland & English Channelwarrnambool, shipwrecked-coast, flagstaff-hill, flagstaff-hill-maritime-museum, maritime-museum, shipwreck-coast, flagstaff-hill-maritime-village, shipwrecked-artefact, navigation chart, british admiralty navigation chart, british admiralty, north atlantic route chart, north atlantic -
 Flagstaff Hill Maritime Museum and Village
Deadeye, circa 1873
This example of a sailing ship’s ‘dead-eye’ is from the wreck of the LOCH ARD, which sank near Port Campbell in 1878. The vessel was an iron hulled clipper ship constructed for the Loch Line in 1873. It was part of a fleet of similar merchant ships owned by that company, which specialised in bringing passengers and goods from London via the Great Circle route to Melbourne, and returning to Britain via Cape Horn with the colony’s wool clip. Deadeyes were a common feature of sailing ship technology in the nineteenth century. They were a simple, cheap, and hard-wearing device that, in conjunction with another deadeye, provided an effective means of levering, or tightening, attached ropes and stays. Lower deadeyes were fixed to the sides of the ship by an encircling metal collar (inset in a flattish groove chiselled around the outer circumference of the disc), which was bolted to iron bars attached to the hull (called chain-plates). Upper deadeyes were looped by a strong hemp or wire rope (inset in a rounded groove carved around the outer circumference of the disc), which was joined to the bottom ends of the rigging which reached up to secure the masts into position (called shrouds or stays). Connecting a Lower deadeye to its corresponding Upper deadeye was a rope (called a lanyard) which looped up and down through the three “eyes” of each disc, to form a pulley system. The hitching of the two deadeyes with a looped lanyard provided the means of tightening, or loosening, the tension on the mast rigging ― essentially by pulling against the chain-plates bolted to the outside of the hull. It was a procedure that could be performed by sailors at sea and in emergencies. For example, after a gale the stays may have stretched and the masts worked loose, requiring retightening. Or, in the extreme circumstance of shipwreck, the lanyards might need to be released on the weather side, so that the masts fall away from the stricken vessel. HISTORY OF THE LOCH ARD The LOCH ARD belonged to the famous Loch Line which sailed many ships from England to Australia. Built in Glasgow by Barclay, Curdle and Co. in 1873, the LOCH ARD was a three-masted square rigged iron sailing ship. The ship measured 262ft 7" (79.87m) in length, 38ft (11.58m) in width, 23ft (7m) in depth and had a gross tonnage of 1693 tons. The LOCH ARD's main mast measured a massive 150ft (45.7m) in height. LOCH ARD made three trips to Australia and one trip to Calcutta before its final voyage. LOCH ARD left England on March 2, 1878, under the command of Captain Gibbs, a newly married, 29 year old. She was bound for Melbourne with a crew of 37, plus 17 passengers and a load of cargo. The general cargo reflected the affluence of Melbourne at the time. On board were straw hats, umbrella, perfumes, clay pipes, pianos, clocks, confectionary, linen and candles, as well as a heavier load of railway irons, cement, lead and copper. There were items included that intended for display in the Melbourne International Exhibition in 1880. The voyage to Port Phillip was long but uneventful. At 3am on June 1, 1878, Captain Gibbs was expecting to see land and the passengers were becoming excited as they prepared to view their new homeland in the early morning. But LOCH ARD was running into a fog which greatly reduced visibility. Captain Gibbs was becoming anxious as there was no sign of land or the Cape Otway lighthouse. At 4am the fog lifted. A man aloft announced that he could see breakers. The sheer cliffs of Victoria's west coast came into view, and Captain Gibbs realised that the ship was much closer to them than expected. He ordered as much sail to be set as time would permit and then attempted to steer the vessel out to sea. On coming head on into the wind, the ship lost momentum, the sails fell limp and LOCH ARD's bow swung back. Gibbs then ordered the anchors to be released in an attempt to hold its position. The anchors sank some 50 fathoms - but did not hold. By this time LOCH ARD was among the breakers and the tall cliffs of Mutton Bird Island rose behind the ship. Just half a mile from the coast, the ship's bow was suddenly pulled around by the anchor. The captain tried to tack out to sea, but the ship struck a reef at the base of Mutton Bird Island, near Port Campbell. Waves broke over the ship and the top deck was loosened from the hull. The masts and rigging came crashing down knocking passengers and crew overboard. When a lifeboat was finally launched, it crashed into the side of LOCH ARD and capsized. Tom Pearce, who had launched the boat, managed to cling to its overturned hull and shelter beneath it. He drifted out to sea and then on the flood tide came into what is now known as LOCH ARD Gorge. He swam to shore, bruised and dazed, and found a cave in which to shelter. Some of the crew stayed below deck to shelter from the falling rigging but drowned when the ship slipped off the reef into deeper water. Eva Carmichael had raced onto deck to find out what was happening only to be confronted by towering cliffs looming above the stricken ship. In all the chaos, Captain Gibbs grabbed Eva and said, "If you are saved Eva, let my dear wife know that I died like a sailor". That was the last Eva Carmichael saw of the captain. She was swept off the ship by a huge wave. Eva saw Tom Pearce on a small rocky beach and yelled to attract his attention. He dived in and swam to the exhausted woman and dragged her to shore. He took her to the cave and broke open case of brandy which had washed up on the beach. He opened a bottle to revive the unconscious woman. A few hours later Tom scaled a cliff in search of help. He followed hoof prints and came by chance upon two men from nearby Glenample Station three and a half miles away. In a state of exhaustion, he told the men of the tragedy. Tom returned to the gorge while the two men rode back to the station to get help. By the time they reached LOCH ARD Gorge, it was cold and dark. The two shipwreck survivors were taken to Glenample Station to recover. Eva stayed at the station for six weeks before returning to Ireland, this time by steamship. In Melbourne, Tom Pearce received a hero's welcome. He was presented with the first gold medal of the Royal Humane Society of Victoria and a £1000 cheque from the Victorian Government. Concerts were performed to honour the young man's bravery and to raise money for those who lost family in the LOCH ARD disaster. Of the 54 crew members and passengers on board, only two survived: the apprentice, Tom Pearce and the young woman passenger, Eva Carmichael, who lost all of her family in the tragedy. Ten days after the LOCH ARD tragedy, salvage rights to the wreck were sold at auction for £2,120. Cargo valued at £3,000 was salvaged and placed on the beach, but most washed back into the sea when another storm developed. The wreck of LOCH ARD still lies at the base of Mutton Bird Island. Much of the cargo has now been salvaged and some was washed up into what is now known as LOCH ARD Gorge. Cargo and artefacts have also been illegally salvaged over many years before protective legislation was introduced. One of the most unlikely pieces of cargo to have survived the shipwreck was a Minton porcelain peacock - one of only nine in the world. The peacock was destined for the Melbourne International Exhibition in 1880. It had been well packed, which gave it adequate protection during the violent storm. Today, the Minton peacock can be seen at the Flagstaff Hill Maritime Museum in Warrnambool. From Australia's most dramatic shipwreck it has now become Australia's most valuable shipwreck artefact and is one of very few 'objects' on the Victorian State Heritage Register. The shipwreck of the LOCH ARD is of State significance. Victorian Heritage Register S417. Flagstaff Hill’s collection of artefacts from LOCH ARD is significant for being one of the largest collections of artefacts from this shipwreck in Victoria. It is significant for its association with the shipwreck, which is on the Victorian Heritage Register (VHR S417). The collection is significant because of the relationship between the objects, as together they have a high potential to interpret the story of the LOCH ARD. The LOCH ARD collection is archaeologically significant as the remains of a large international passenger and cargo ship. The LOCH ARD collection is historically significant for representing aspects of Victoria’s shipping history and its potential to interpret sub-theme 1.5 of Victoria’s Framework of Historical Themes (living with natural processes). The collection is also historically significant for its association with the LOCH ARD, which was one of the worst and best known shipwrecks in Victoria’s history. A reasonably well-preserved ship’s deadeye with rust-stained wire loop-rope still attached. It retains portions of its original hemp cord and hessian wrapping. The flat sides of this thick wooden disc have three holes drilled through in a triangular configuration. The artefact is from the shipwreck of the LOCH ARD (1878). The survival of the loop-rope (wire cable) indicates it was an Upper Deadeye, connected to the shrouds (mast rigging).flagstaff hill, warrnambool, shipwrecked coast, flagstaff hill maritime museum, maritime museum, shipwreck coast, flagstaff hill maritime village, great ocean road, loch line, loch ard, captain gibbs, eva carmichael, tom pearce, glenample station, mutton bird island, loch ard gorge, deadeye, rigging -
 Flagstaff Hill Maritime Museum and Village
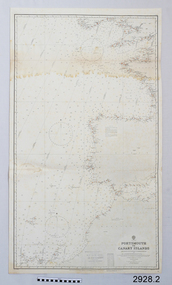
Document - Navigation Chart, Portsmouth to Canary Islands, CA. 1928
Navigation charts are drawn by professional hydrographers and describe the geography of land and water, enabling a water based navigator on board vessels such as ships to safely negotiate between ports locally and around the world. They are drawn to a particular standard with common symbols noting landmarks. The charts are used in conjunction with other navigational instruments and tools to calculate the vessel’s exact location and a safe route to its destination.The set of charts and their chart are of significance as examples of equipment and documents used to navigate the oceans of the world, particularly to Australia. Migration to Australia is an important part of this country's history.British Admiralty Navigation Chart - Portsmouth to Canary Islands - printed on rectangular white paper. Published in London by the British Admiralty in 1928.warrnambool, shipwreck coast, flagstaff hill, flagstaff hill maritime museum, flagstaff hill maritime village, chart, map, navigate, navigation, location, vessel, 1928, british admiralty, hydrographer, geography, admiralty chart, portsmouth, canary islands -
 Flagstaff Hill Maritime Museum and Village
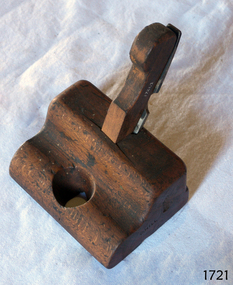
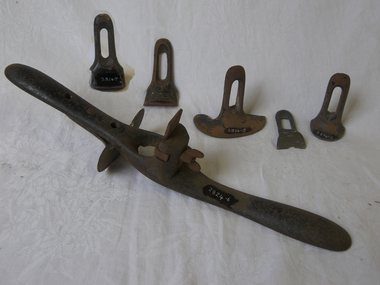
Tool - Router Plane, A Mathieson & Son, Mid 19th to early 20th centuries
The subject router is commonly referred to disparagingly as the ‘old woman’s tooth’ or ‘hag’s tooth.’ It is a router that houses a plough plane iron instead of a purpose made shoe-type cutting iron. They work fine but rarely give the type of clean surface required for veneer inlays. These types of tools are adjusted by the same hammer-tap tapping method used generally on wooden-bodied planes on the iron or plane body. These tools are effective and practical when used in general carpentry and joinery. Company History: The firm of Alexander Mathieson & Sons was one of the leading makers of hand tools in Scotland. Its success went hand in hand with the growth of the shipbuilding industries on the Firth of Clyde in the nineteenth century and the emergence of Glasgow regarded as the "second city of the Empire". It also reflected the firm's skill in responding to an unprecedented demand for quality tools by shipyards, cooperage's and other industries, both locally and far and wide. The year 1792 was deemed by the firm to be that of its foundation it was in all likelihood the year in which John Manners had set up his plane-making workshop on Saracen Lane off the Gallowgate in the heart of Glasgow, not far from the Saracen's Head Inn, where Dr Johnson and James Boswell had stayed on their tour of Scotland in 1773. Alexander Mathieson (1797–1851) is recorded in 1822 as a plane-maker at 25 Gallowgate, but in the following year at 14 Saracen's Lane, presumably having taken over the premises of John Manners. The 1841 national census described Alexander Mathieson as a master plane-maker at 38 Saracen Lane with his son Thomas Adam working as a journeyman plane-maker. In 1849 the firm of James & William Stewart at 65 Nicolson Street, Edinburgh was taken over and Thomas was put in charge of the business, trading under the name Thomas A. Mathieson & Co. as plane and edge-tool makers. Thomas's company acquired the Edinburgh edge-tool makers Charles & Hugh McPherson and took over their premises in Gilmore Street. The Edinburgh directory of 1856/7 the business is recorded as being Alexander Mathieson & Son, plane and edge-tool makers at 48 Nicolson Street and Paul's Work, Gilmore Street. The 1851 census records indicate that Alexander was working as a tool and plane-maker employing eight men. Later that year Alexander died and his son Thomas took over the business. Under the heading of an edge-tool maker in the 1852/3 (Post-Office Glasgow Annual Directory) the firm is now listed as Alexander Mathieson & Son. By the early 1850s, the business had moved to 24 Saracen Lane. The directory for 1857/8 records that the firm had moved again only a few years later to East Campbell Street, also off the Gallowgate, and that through further diversification was also manufacturing coopers' and tinmen's tools. The ten-yearly censuses log the firm's growth and in 1861 Thomas was a tool manufacturer employing 95 men and 30 boys; in 1871 he had 200 men working for him and in 1881 300 men. By 1899 the firm had been incorporated as Alexander Mathieson & Sons Ltd, even though only Alexander's son Thomas appears ever to have joined the firm. A vintage tool made by a well-known firm made for other firms and individuals that worked in wood. The tool was used for making timber veneers or smoothing a trench in a piece of timber that was then used in some form of cabinet manufacture or wood working enterprise. A significant item from the mid to late 19th century that today is sought after by collectors. It gives us a snapshot of how furniture was made predominately by hand and with tools that were themselves hand made and required considerable skill in their use. Old Woman's Tooth Router Mathieson. Single iron cut down from a larger plane iron. Has Marked A Mathieson & Son also stamped inscription on side G Hill. (owner)flagstaff hill, warrnambool, flagstaff hill maritime museum, maritime museum, shipwreck coast, flagstaff hill maritime village, great ocean road, plane, old woman's tooth, router, hag's tooth router, cabinet making, woodworking tools, a mathieson & sons, cabinet tool makers -
 Flagstaff Hill Maritime Museum and Village
Tool - Router
Router; Patent, Adjustable Circular Quirk or Grooving Router. All metal. It has six fences.flagstaff hill, warrnambool, shipwrecked coast, flagstaff hill maritime museum, maritime museum, shipwreck coast, flagstaff hill maritime village, great ocean road, router, hand router, circular router -
 Flagstaff Hill Maritime Museum and Village
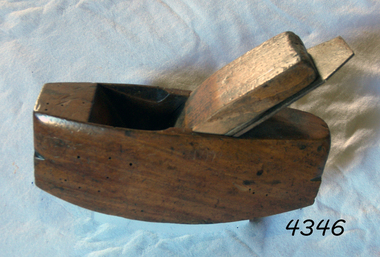
Tool - Smoothing Wood Plane, John Welsh & Co, 1845-1850
A vintage tool made by a obscure early 19th century woodworking Scottish tool maker. This item would have been made commercially for firms and individuals that worked in wood and needed a tool that could produce a flat smooth finish to timber. These tools were used before routers and spindle moulders came into use in the late 19th and early 20th centuries before this time to produce a decorative moulding or to smooth a piece of furniture timber, door trims etc. had to be accomplished using hand tools and in particular one of these types of planes. The subject item is a smoothing plane Known as a Coffin Plane due to its shape. Traditionally wood planes were blocks of wear resistant hardwood, often beech or maple, which were worked to the shape of the intended moulding or had a flat blade use for achieving a flat and smooth finish to timber. The blade, or iron was likewise formed to the intended moulding profile or for smoothing and secured in the body of the plane with a wooden wedge. A traditional cabinetmakers shop might have many, perhaps hundreds, of moulding and flat bladed planes for a full range of work to be performed. Large crown mouldings required planes of six or more inches in width, which demanded great strength to push and often had additional peg handles on the sides, allowing the craftsman's apprentice or other worker to pull the plane ahead of the master who guided it. All we known about John Welsh is that he was a tool maker and possibly a retailer that operated a business in Dundee Scotland between 1845-1850. This is the only record we have to date that he existed and is from the Master Catalogue of Scottish woodworking tool makers. His tools in particular moulding planes are well sought after by collectors of vintage tools due to their rarity. A significant tool from the mid to late 19th century that today is quite rare and sought after by collectors. It gives us a snapshot of how furniture and other decorative finishes were created on timber by the use of hand tools. Tools that were themselves handmade shows the craftsmanship used during this time not only to make a tool such as the subject item but also the craftsmanship needed to produce a decorative finish that was needed to be made for any timber item. Wood Plane Rounded base, blade attached. Owner J Huband Marked J Welsh, Dundee maker and "J Huband" (Owner)flagstaff hill, warrnambool, shipwrecked coast, flagstaff hill maritime museum, maritime museum, shipwreck coast, flagstaff hill maritime village, great ocean road, plane, compass plane, j welsh, j huband -
 Flagstaff Hill Maritime Museum and Village
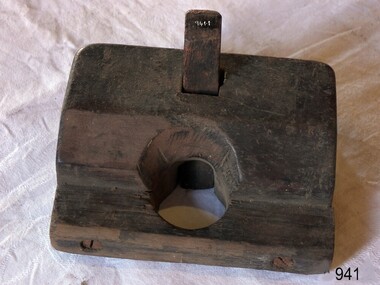
Tool - Router Plane, Late 19th to early 20th Century
Router planes are not the same as modern power routers. The simplest answer is that a router plane is a chisel held at adjustable vertical depths in a block of wood or metal. An antique-style router plane is mainly used for levelling out the bottoms of dado joints, mortises, and when installing hinges, inlays, and tenon cheeks, and similar other uses. There are three main categories or styles of router planes the earliest type of these is affectionately referred to as an "old woman's tooth", or "Grandma's Tooth". These planes can be as simple as a block of wood with the iron wedged in, and some have wedges with brass thumbscrews. Most of these router planes were shop-made tools their bottom flat so they can ride along the top of the wood, and the iron is adjusted to the desired depth by moving it up and down with your fingers.An interesting vintage joinery tool used before mechanical routers with early examples often sought after by collectors today. The subject item was probably made in a joinery workshop for a specific need in regards to producing a specific type of profile. As a result, even though the item appears to be quite old it has no makers mark, age and provenance are unknown.Router Plane Old Woman's Tooth pattern wooden stopper for holding the blade in place. Noneflagstaff hill, warrnambool, shipwrecked-coast, flagstaff-hill, flagstaff-hill-maritime-museum, maritime-museum, shipwreck-coast, flagstaff-hill-maritime-village -
 Flagstaff Hill Maritime Museum and Village
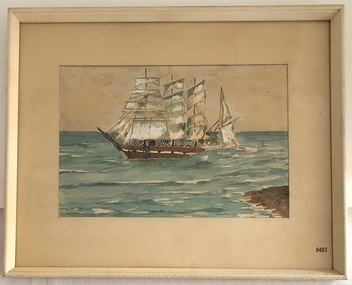
Painting - Watercolour painting, Early 20th century
FALLS of HALLADALE - History The Falls of Halladale was a four-masted sailing ship built-in 1886 in Glasgow, Scotland, for the long-distance cargo trade and was mostly used for Pacific grain trade. She had a sturdy construction, built to carry maximum cargo and maintain full sail in heavy gales. She was one of the last of the ‘windjammers’ that sailed the Trade Route and one of the first vessels to include fore and aft lifting bridges, which kept the crew safe and dry in as they moved around the decks in stormy conditions. She was owned by Wright, Breakenridge & Co of Glasgow and was one of several Falls Line ships, all of which were named after waterfalls in Scotland. On 4th August 1908, with new sails, 29 crew, and 2800 tons of cargo, the Falls of Halladale left New York, bound for Melbourne and Sydney via the Cape of Good Hope. The cargo on board was valued at £35,000 and included 56,763 tiles of American slate roofing tiles, 5,673 coils of barbed wire, 600 stoves, 500 sewing machines, 6,500 gallons of oil, 14,400 gallons of benzene, plumbing iron, 117 cases of crockery and glassware and many other manufactured items. The Falls of Halladale had been at sail for 102 days when, at 3 am on the of 14th November 1908, under full sail in calm seas with a six knots breeze behind and misleading fog along the coast, the great vessel rose upon an ocean swell and settled on top of a submerged reef near Peterborough on south-west Victoria’s coast. The ship was jammed on the rocks and began filling with water. The crew launched the two lifeboats and all 29 crew landed safely on the beach over 4 miles away at the Bay of Islands. The postmistress at Peterborough, who kept a watch for vessels in distress, saw the stranding and sent out an alert to the local people. A rescue party went to the aid of the sailors and the Port Campbell rocket crew was dispatched, but the crew had all managed to reach shore safely by the time help arrived. The ship stayed in full sail on the rocky shelf for nearly two months, attracting hundreds of sightseers who watched her slowly disintegrate until the pounding seas and dynamiting by salvagers finally broke her back, and her remains disappeared back into deeper water. The valuable cargo was largely lost, despite two salvage attempts in 1908-09 and 1910. Further salvage operations were made from 1974-1986, during which time 22,000 slate tiles were recovered with the help of 14 oil drums to float them, plus personal artefacts, ship fittings, reams of paper and other items (a list of items held at Flagstaff Hill Maritime Village is included below). The Court of Marine Inquiry in Melbourne ruled that the foundering of the ship was entirely due to Captain David Wood Thomson’s navigational error, not to technical failure of the Clyde-built ship. The shipwreck is a popular site for divers, about 300m offshore and in 3 – 15m of water. Some of the original cargo can be seen at the site, including pieces of roof slate and coils of barbed wire.The Falls of Halladale shipwreck is listed on the Victorian Heritage Register (No. S255). She was one of the last ships to sail the Trade Routes. She is one of the first vessels to have fore and aft lifting bridges. She is an example of the remains of an International Cargo Ship and also represents aspects of Victoria’s shipping industry. The wreck is protected as a Historic Shipwreck under the Commonwealth Historic Shipwrecks Act (1976).Watercolour painting behind glass, framed in the Art Deco style - stippled cream painted wood. There are some age marks under the glass. The painting depicts the Falls of Halladale with its stern under water. The back of the painting contains facts about the shipwreck handwritten in a similar style to the artist’s signature. The artist’s signature is not clear enough to identify. Inscription on the back: Pasted on typed text: Peterborough Handwriting: Falls of Halladale 2085 tons 4 masted iron barque wrecked Saturday November 14th 1908 Captain Thomson crew of 28 !st mate F Pearson 2nd mate T Griffinflagstaff hill, warrnambool, flagstaff hill maritime museum & village, maritime museum, maritime village, shipwreck coast, 1908 shipwreck, falls of halladale, peterborough, peterborough shipwreck, great ocean road, captain thomson, 1880s sailing ship, cargo vessel, 1st mate f pearson, 2nd mate t griffin, watercolour painting -
 Flagstaff Hill Maritime Museum and Village
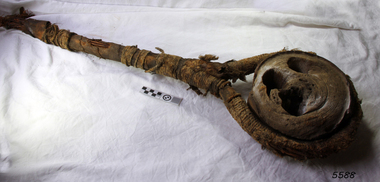
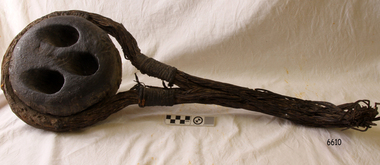
Deadeye, circa 1873
This example of a sailing ship’s ‘dead-eye’ is from the wreck of the LOCH ARD, which sank near Port Campbell in 1878. The vessel was an iron hulled clipper ship constructed for the Loch Line in 1873. It was part of a fleet of similar merchant ships owned by that company, which specialised in bringing passengers and goods from London via the Great Circle route to Melbourne, and returning to Britain via Cape Horn with the colony’s wool clip. Deadeyes were a common feature of sailing ship technology in the nineteenth century. They were a simple, cheap, and hard-wearing device that, in conjunction with another deadeye, provided an effective means of levering, or tightening, attached ropes and stays. Lower deadeyes were fixed to the sides of the ship by an encircling metal collar (inset in a flattish groove chiselled around the outer circumference of the disc), which was bolted to iron bars attached to the hull (called chain-plates). Upper deadeyes were looped by a strong hemp or wire rope (inset in a rounded groove carved around the outer circumference of the disc), which was joined to the bottom ends of the rigging which reached up to secure the masts into position (called shrouds or stays). Connecting a Lower deadeye to its corresponding Upper deadeye was a rope (called a lanyard) which looped up and down through the three “eyes” of each disc, to form a pulley system. The hitching of the two deadeyes with a looped lanyard provided the means of tightening, or loosening, the tension on the mast rigging ― essentially by pulling against the chain-plates bolted to the outside of the hull. It was a procedure that could be performed by sailors at sea and in emergencies. For example, after a gale the stays may have stretched and the masts worked loose, requiring retightening. Or, in the extreme circumstance of shipwreck, the lanyards might need to be released on the weather side, so that the masts fall away from the stricken vessel. The shipwreck of the LOCH ARD is of State significance. Victorian Heritage Register S417.A well-preserved ship’s deadeye with wire loop rope still attached. The original tar coating for water-proofing still remains, colouring the entire artefact black. It is wrapped in hessian cloth and hemp cord and is currently in storage under secure and stable conditions. This deadeye was recovered from the wreck of the LOCH ARD. The artefact is a typical deadeye, comprising a thick round wooden disc, pierced by 3 similarly sized and shaped holes from one flat side through to the other, in a triangle formation. The survival of the wire cable loop-rope suggests it was an Upper Deadeye, connected to the shrouds (mast rigging). Previous number PWO 2388.flagstaff hill, warrnambool, shipwrecked-coast, flagstaff-hill, flagstaff-hill-maritime-museum, maritime-museum, shipwreck-coast, flagstaff-hill-maritime-village, deadeye, loch ard, rigging -
 Flagstaff Hill Maritime Museum and Village
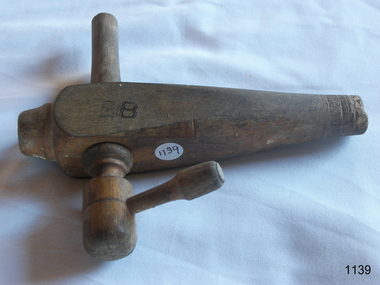
Functional object - Barrel Spigot, H Gage, Early 20th century
Ancient Greek and Roman first used spigots in their bathhouses for obtaining water from aqueducts, routing it into pipes and buildings, and finally into their tubs or baths. The subject spigot or tap in Flagstaff collection was used in wine, beer, or spirits barrels to dispense the liquid contained within. A spigot definition is a device that controls the flow of liquid from a container. As mentioned earlier the Greeks and Romans created theirs for use in plumbing water later spigots were adapted to use in barrels or casks. An item still in use today in wine and beer barrels to dispense liquid and although spigots today are made from differing materials other than wood their function has not changed over the centuries.Wooden barrel spigotMarked "H Gage Maker Melbourne" on the side & 2B marked in black flagstaff hill, warrnambool, flagstaff-hill-maritime-museum, maritime-museum, shipwreck-coast, flagstaff-hill-maritime-village, barrel spigot, cask tap, h gage melbourne, coopering accessories -
 Flagstaff Hill Maritime Museum and Village
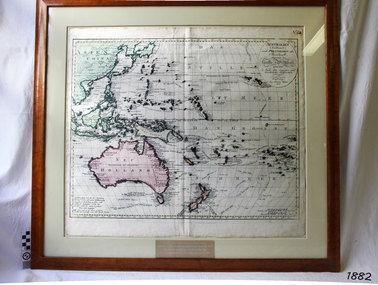
Map, Australien (Sudland) auch Polynesien oder Inselwelt, insgemein der funfte Welltheil, c.1990
This map is a reprint of Johann (Johannes) Walch’s “Australien (Sudland) auch Polynesien oder Inselwelt, insgemein der funfte Welltheil”, published in 1802. It shows Australia, New Zealand, South East Asia and the Pacific Islands shows a large number of places names, many of which have changed since the map was drawn. The map includes the routes and dates of the voyages of Tasman, Cook, Bougainville, Carteret, Byron, and others up to 1802. The shapes of the lands on this early map show that some of the areas had not yet been charted. The map was donated to Flagstaff Hill Maritime Village in April 1990 by the Group Study Exchange Team from Rotary District 233, Sweden. It was framed and presented by Rotary District 978 and presented by Barry Lange, the Governor of District 978 in 1989-90. (District 978, Geelong East, is now District 9780.) Johann (Johannes) Walch Johann Walch, painter and engraver, was born in 1757. He was well known for creating miniature portraits. He gained his training in Geneva, Venice and Rome. His publications include atlases and sheet maps, many of which were reprinted after his death in 1816. This reprint of an 1802 is significant for its historical and geographical contant, showing the voyages of many early explorers to the southern regions of the world including Australia. It also shows the early names used for countries and towns and is a valuable reference to historical interpretation. The map itself is a fine example of hand drawn and hand coloured maps of the early 19th century, the method of production, detail included, layout, symbols and so forth.Map, reprint of Johann (Johannes) Walch’s “Australien (Sudland) auch Polynesien oder Inselwelt, insgemein der funfte Welltheil “, first published by in Ausburg in 1802. The image on this Map No 5B, shows Australia and the south Pacific. The timber framed, glass covered, printed and coloured map was created in two sections and joined. Brass plaque at base of map states that the map was presented to Flagstaff Hill by Rotary International in April 1990. Feint lines used for aligning lettering can be seen on the map and there are large erased letters such as a “D” and “S” that are almost obscured.Plague “ROTARY INTERNATIONAL / THE MAP WAS DONATED BY THE GROUP STUDY EXCHANGE TEAM / FROM ROTARY DISTRICT 233 SWEDEN IN APRIL 1990 / AND WAS FRAMED AND PRESENTED BY ROTARY DISTRICT 978 / BARRY LANGE – GOVERNOR DISTRICT 978 1989/90” Stamped on back “ELLIMINOOK FRAMES / MRS. JILL FALKINER / ELLIMINOOK / BIRREGURRA, VIC. 3242 / PHONE: (052) 36 2080” flagstaff hill, warrnambool, shipwrecked coast, flagstaff hill maritime museum, maritime museum, shipwreck coast, flagstaff hill maritime village, great ocean road, australien (sudland) auch polynesien oder inselwelt, insgemein der funfte welltheil, johann (johannes) walch, cartographer johann (johannes) walch, ausburg publisher johann (johannes) walch, johann (johannes) walch map number 5b, 1802 map of australia and south pacific, rotary international group study exchange team, rotary district 233 sweden, elliminook frames, voyages of tasman, voyages of cook, voyages of bougainville, voyages of carteret, voyages of byron, barry lange, painter of miniature portraits johann (johannes) walch -
 Ballarat Tramway Museum
Album, Brian Andrews, UR1 - 300 Photo - Bendigo, Ballarat trams, 1968
Album compiled by the photographer containing generally 89 x 124mm of: • Bendigo – 151 black and white prints • Ballarat – 119 black and white prints and some colour • Melbourne – 20 colour and black and white prints - featuring Queensway, the Hump, Royal Park, route 82, Dandenong Road, Glenferrie Road, Barkers Road and Hawthorn Bridge. • Rome, Hong Kong and Toronto – 14 prints See items 8638 to 8642 for negatives of the Ballarat and Bendigo photos and related image files held on the BTM Demonstrates the work of the photographer.Album - heavy plastic covered covers, with 100 sewn and glued paper sheets each side with three plastic sleeves for photographs with a negative pocket page at the rear. See list of btm8637 - Ballarat list.doc for a location listing of the Ballarat photographs.trams, tramways, ballarat, bendigo, melbourne, hong kong, toronto, rome, brian andrews -
 Bendigo Military Museum
Photograph - 4th Field Survey Squadron deployed on Operation NERIGHT, Queensland & Northern Territory, 1989
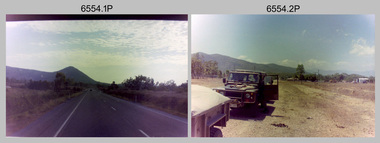
This is a set of 19 photographs taken in 1989 during 4th Field Survey Squadron’s deployment on Operation NERIGHT 89 in Queensland and the Northern Territory. It was a two-part operation in 1989 with work conducted in the areas of Camooweal and Weipa. Part 1 was the field completion of topographic maps conducted near Camooweal QLD, along the Barkley Highway on the border between NT and QLD, from the 12th of September to the 20th of October 1989. A Bell Kiowa LOH helicopter from 162 Recce Sqn supported topographic field completion. Operation NERIGHT 89 Part 2 was the acquisition of mapping control by GPS field parties utilising Texas Instruments TI4100 Global Positioning System receivers around Weipa on Cape York Peninsula from the 22nd of September to the 22nd of October 1989. Part 2 Two Bell UH-1H Iroquois helicopters from RAAF’s 35 Squadron were principally used to deploy GPS field parties. Identification photography of control points was taken by air camera operators in AAAvn Pilatus Porter aircraft from 173 Gen Spt Sqn fitted with an RC10 aerial camera. The two parts of the operation were conducted concurrently. This is a set of 19 photographs taken in 1989 during 4th Field Survey Squadron’s deployment on Operation Neright in Queensland & the Northern Territory. The colour photographs are on 35mm negative film and are part of the Army Survey Regiment’s Collection. The photographs were scanned at 96 dpi. .1) to .3) - Photo, colour, 1989. En-route to areas of survey operations. .4) to .5) - Photo, colour, 1989. Unidentified personnel relax next to river/waterhole. .6) - Photo, colour, 1989. Two Bell UH-1H Iroquois helicopters from RAAF’s 35 SQN utilised in the movement of GPS parties. .7) to .9) - Photo, colour, 1989. Unidentified soldier practices repelling from a UH1H Iroquois helicopter. .10) - Photo, colour, 1989. Inside the cockpit of a UH1H Iroquois helicopter. .11) - Photo, colour, 1989. Field Party camp with GPS equipment in foreground. Unidentified soldier prepares a meal. .12) - Photo, colour, 1989. GPS antenna plumbed over a survey ground mark. Witness post on left. .13) & .14) - Photo, colour, 1989. Unknown Cape York Peninsula beaches. .15) & .16) - Photo, colour, 1989. Dramatic fire next to base camp. .17) - Photo, colour, 1989. Aboriginal rock art at unknown location. .18) - Photo, colour, 1989. Aboriginal rock art at unknown location. L to R: unidentified, SPR Andrew Quin. .19) - Photo, colour, 1989. Aboriginal rock art at unknown location. LT Chris Topovsek..1P to .19P – There are no personnel identified. ‘1989 OP NERIGHT’ annotated on negative sleeve.royal australian survey corps, rasvy, 4 fd svy sqn, op neright 89 -
 Melbourne Tram Museum
slide - Colour - Melbourne Trams, David Verrier, August 1989
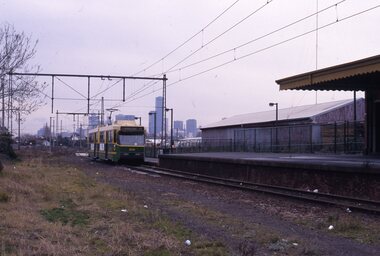
1 - B2 2014 arriving Port Melbourne - showing Exhibition Route 111 - the tram stop is on the north side of the former railway platform at this time. 2- headon photo - shows the undeveloped nature of the background. 3 - W6 996 Spencer St with A2 288 behind - both trams running route 48 - note the Outward Parcels Office building and the VR Head Office. 4 - A2 288 and Z16 - as above 5 - Z16 as above - Route 75, showing East Burwood 6 - Z57 at La Trobe University terminus, route 87 7 - Z3 113 and Z1 9, both running route 86 - Bundoora - in High St 8 - Z3 186 at Bundoora terminus, with many people at the bus stop interchange.Yields information about Melbourne tram operations in Sept 1999Set of eight white / grey plastic slides, marked "CS System" and date stamped 08/89tramways, z3 class, b2 class, port melbourne, route 109, tram 2013, route 111, spencer st, tram 288, tram 996, route 48, w6 class, a2 class, z class, tram 16, route 75, tram 113, tram 9, bundoora, high st, la trobe university, tram 186 -
 Melbourne Tram Museum
slide - Colour - Melbourne Trams, David Verrier, August 1989
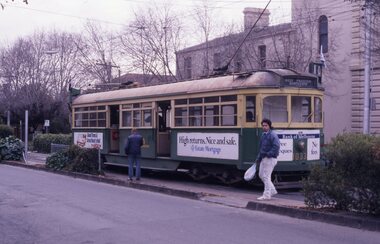
1 - W7 1033, South Melbourne / St Kilda terminus in Park St. showing route 10. Has Bank of Melbourne and Estate Mortgage adverts. 2 - B2 2012 (route 96) , Fitzroy Street, St Kilda 3 - SW6 858 (route 16), Fitzroy St St Kilda. Has Bank of Melbourne adverts. 4 - Elizabeth St terminus from Flinders Lane, looking south. 5 - Z3 156 (route 19), arriving Elizabeth St terminus at Flinders St 6 - Z3 176 crossing Park St, Parkville, West Coburg, route 68. 7 - Z3 217 near zoo, about to pass under the railway over bridge - route 68 8 - Z3 129, ditto inbound. Yields information about Melbourne tram operations in Sept 1999Set of eight white / grey plastic slides, marked "CS System" and date stamped 08/89tramways, z3 class, b2 class, park st, south melbourne beach, route 10, w7 class, tram 1033, tram 2012, fitzroy st, tram 858, route 16, route 96, elizabeth street, flinders st, tram 156, route 19, tram 176, parkville, route 68, tram 217, tram 129 -
 Melbourne Tram Museum
Pamphlet, Yarra Trams, "On some route numbers you will see an 'a' or 'd' ", c2012
Pamphlet - folded DL full colour printed on gloss paper, titled "On some route numbers you will see an 'a' or 'd' " advising passengers of the letters that could appear on tramcar route number - 'a' - altered, 'd' - depot. Notes that some route numbers are not published, gave an example of route 33, 51 or an 89. Printed c 2012 Two copies held.trams, tramways, route numbers, destination indicators, tramcars, depot -
 Melbourne Tram Museum
Newspaper, The Age, “App to curb crowding on public transport”, 6/10/2020 12:00:00 AM
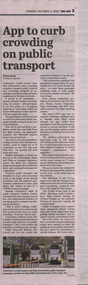
Newspaper clippings titled: “App to curb crowding on public transport” by Timna Jacks Newspaper clipping from the Age 6/10/2020 Trial of new technology designed to encourage social distancing on public transport for buses and trains. Article also refers to government announcement on proposed spending on tram rolling stock. $26M to be spent on life extension works for A and Z-class trams. Works will maintain electrical, braking and traction systems on trams running on 17 routes across Melbourne, about 1/3 of the city's fleet. Government has ordered 50 E-class trams since 2015, with 89 of total order of 100 trams now in use. 111 Z-class 3 trams and 69 A-class trams are still in use. PTUA spokesman Daniel Bowen comments on need for maintenance of older trams and calls for newer, air conditioned trams.trams, tramways, a class, e class, z3 class, myki, ptua, covid-19 -
 Melbourne Tram Museum
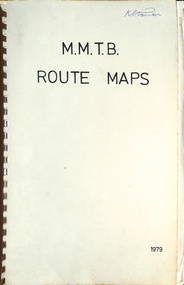
Map, Melbourne & Metropolitan Tramways Board (MMTB), MMTB Route Maps, 1979
Series of colour maps for various tram and bus routes, dated 1979. Also contained, not scanned are letters, reports, and specifications for printing these maps for use in shelters etc. Some have the Transport Information Centre telephone printed on them. Some are finished with a plastic laminate finish on either one or both sides. Show the major cross streets, parks, schools, other tram routes, major stop numbers, and railway lines. See also item 3909 for another example of these. Trams 1 - City route guide - R9/77 - showing all route numbers and destinations that passed through the CBD. 2 - Bourke St tram routes - R4/77 - East Brunswick Blyth St and East Preston Tyler St and intermediate routes, routes 95, 96, 97, 90, 89 and 88. 3 - Malvern, East Malvern, Carnegie, and East Brighton Tram Routes (from St Kilda Junction) - R1/79 - shows routes 5, 3, 67, 66, 61, 62, and 64. 4 - Elizabeth St tram routes - R12/77 - Essendon Airport, West Maribyrnong, North Coburg lines, routes 50, 58, 60, 54, 57, 52. 49, 59, 18, 20 and 19 5 - Flinders St tram routes - R5/78 - North Balwyn, East Burwood, routes 48, 40, 41, Hartwell, 28, 74 and 75 6 - Kew - St Kilda Beach - R1/79 - Route 69. 7 - Mont - Albert City - R11/77, shows routes 43. 47. 45. 44 8 - St Kilda Rd Tram Routes R12/77 - details South Melbourne Beach, route 1 and route 2 and St Kilda Beach routes 15, 16, and 55 otherwise shows where the various routes branch off St Kilda Road 9 - Batman Ave tram routes - R9/77 - Wattle Park, North Richmond and Prahran - routes 70, 71, 78 and 79. 10 - Footscray - Moonee Ponds - R3/81 - Route 82 11 - Swanston St tram guide - R1/79 - lists all routes and route numbers that branch or cross Swanston St between Grattan St and St Kilda Junction. 12 - Toorak Camberwell and Glen Iris tram route with Camberwell Junction and Malvern Town Hall, R1/79, routes 8, 7, 6, 72, and 73 shown. 13 - West Preston - Beach tram routes - R12/77 - routes 10, 11, 9 and 12, 14 - William St tram routes - R12/77 - Route 55, 56, and 63 - South Melbourne Depot and Domain. Buses 1 - Footscray, Sunshine, Deer Park, Nth Altona & Fishermans Bend - R2/79 2 - Box Hill bus routes to Templestowe, Heidelberg & East Kew - R6/78 - notes superseded by R3/82 3 - Plan of Russell St Melbourne bus departure bays. 4 - Box Hill, Mitcham & Ringwood bus routes to East Doncaster & Warrandyte - R3/82 5 - City - Warrandyte & East Doncaster bus routes - R3/82 & R6/78 6 - Bulleen - City - Port Melbourne - Garden City Bus route - R6/78 7 - North Altona - City bus route - 11/78 8 - Clifton Hill - Elsternwick - R2/79 9 - La Trobe - Northland - West Heidelberg - City Bus Service via East Freeway - 11/79 and R3/81 10 - Box Hill, Mitcham & Ringwood Bus Routes to East Doncaster & Warrandyte - R10/84 - with the Metropolitan Transit logo.Yields information about tram and bus routes in late 1970s early 1980s.Book - brown comb binding, card and clear plastic covers containing both bound and unbound maps and documents.K C Painter on front cover in ink.tramways, mmtb, tram routes, maps, bus routes, route numbers, routes, route guide -
 Melbourne Tram Museum
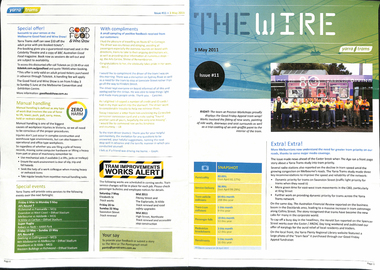
Magazine, Yarra Trams, "The Wire", 5/2011 to 1/2015
0 - No 9 - 1/4/2011 - Rhinos on skateboards, Did you know, Spencer St works, .1 - No. 11 of 3/5/2011 with the revised Yarra trams logo, traffic priority, work over Easter in Spencer St at Bourke and Collins St, Good Friday appeal, safety, passenger feedback and future works. .2 - No. 13 - 31/5/2011 - new uniform, cleaning, CEPR, trackwork - Fitzroy St, Northcote, Rhino, Carlton Control. .3 - No. 14 - 15/6/2011 - Haymarket Roundabout, accessibility, maintenance, CSE. 3a - No. 16 - 19/7/2011 - Managers on the move, Trevor Jones, Yarra's vision, Richard Ch'ng and Rhino update. .4 - No. 17 - 2/8/2011 - High St Westgarth trackwork, Swanston St, IMF CEO visit .5 - No. 18 - 16/8/2011 - Performance benchmarks met, Preston Workshops, repairs to 3018, tram signal priority. .6 - No . 19 - 30/8/2011 - New E class trams, routes "a" or "d", TramTracker in shelters, police, fare evasion .7 - No. 20 - 15/9/2011 - Football trams, Superstops, Bridge Road, Rhinos. .8 - No. 21 - 27/9/2011 - CEO's journey to work, accessibility, increased patronage, E class. .8a - No. 22 - 11/10/2011 - Minister Mulder visit, E class, Customer experience, Elizabeth Kerdelhue Corporate Affairs Director, flood indicator in Wellington Parade, Keolis - Orleans and PTV coming your way. .9 - No. 23 - 25/10/2011 - forthcoming royal visit, opening for Footscray Road extension, Rhinos, Stockholm .10 - No. 24 - 8/11/2011- Royal visit, photos, Z3 158, route 86 works in High St. (see htd5043i21 for a image from an unknown newspaper of the actual event - features Z3 158.) .11 - No. 25 - 22/11/2011 - new staff guide, Gold Coast tram line, Macarthur St, overhead, fund raising, route numbering update. .12 - No. 26 - 6/12/2011 - Swanston St Superstops, Newmarket bridge strikes, rhinos. .13 - No. 27 - 20/12/2011 - Christmas carnival, Lenny Bates, portable crossover, uniforms. .14 - No. 28 - 17/1/2012 - Passing of Len Bates, Myki, Gardiner railway station. 14a - No. 29 - 31/1/2012 - Southbank depot, patronage, myki, think like a passenger, fatigue management, .15 - No. 30 - 15/2/2012 - visit of Keolis, SNCF people, list of Executive leadership team with photos, Swanston St works, Myki introduction. .16 - No. 31 - 29/2/2012 - patronage up, tram postage stamps, Myki, rhinos. .17 - No. 32 - 14/3/2012 - St Kilda Rd trackwork, fund raising, Southbank Depot extensions, Myki, driving conditions, grand prix. .18 - No. 33 - 30/3/2012 - introduction of the PTV, end of MetLink and Transport Ticketing Authority, changes in management structure, trackwork, Gold Coast tramway and Keolis. .19 - No. 34 - Dr Jake - Royal children's Hospital super stop, route 96 - Premium line. .20 - No. 35, 2/5/2012 - Revision of Rules, trackwork in St Kilda Road and Elizabeth St, Myki, safety - Zero Harm. .21 - No. 69 - 25/9/2013 - Passengers paying their way, E class update, Mal Ashworth retires, progress report, feedback, new chime on trams. .22 - No. 70 - 9/10/2013 - Art comes alive, tram 925, driver simulator at Preston Workshops, E class project, 90th Glen Huntly. .23 - No. 83 - 23/4/2014 - Screen time for trams, new PIDs on B class, assistance animals, Operations Centre, Preston Workshops, Electrical log sheets to SLV. .24 - No. 89 - 23/7/2014 - punctuality, refresh of network map (fold-out map), women drivers. .25 - No. 97 - 19/11/2014 - Revitalising route 96, Keolis news, free tram zone, guide dogs. .26 - No. 99 - 17/12/2014 - Accessibility week, new uniform top for CSE's, free tram zone, world trade centre stop upgrade, heat stress, Art tram 158. .27 - No. 100 - 14/1/2015 - Route 96 complete, New Years eve free travel, fare compliance, patronage down, .28 - No. 12 - 16/5/2011 - Gold coast tramway, performance dashboard, tramworks and the rhino .29 - No. 16 - 19/7/2011 - Depot managers, tevor jones, record patronage, vision, rhino .30 - No. 17 - 2/8/2011 - High St Westgarth works, Duncan Smith, David Clarke Training, Swanston St works, and Preston Workshops . .32 - No. 39 - 28/6.2012 - maintenance, Emmanual Sorin, transformation, fare evasion, and Combino in Potsdam. .33 - No. 105 - 25/3/2015 - Grand Prix, Elgin and Lygon upgrade, Camberwell Junction, PTV hub, overhead.Demonstrates Yarra trams staff newsletters.Set of 33 Yarra Trams internal newsletter "The Wire", All A4, printed in full colour. All four pages unless noted otherwise, full colour, performance snapshot on front cover.trams, tramways, yarra trams, traffic control, trackwork, spencer st, fund raising, operations, rhinos, carlton control, high st, haymarket, preston workshops, e class, route numbers, bridge road, wellington parade, ptv, royal visit, footscray road, new tramway, gold coast, macarthur st, swanston st, superstops, newmarket, gardiner, burke road, level crossings, railway squares, myki, metlink, tickets, route 96, rules, st kilda road, elizabeth st, tram 158, tram 925, glen huntly depot, simulator, b class, opeations centre, art trams, patronage