Showing 732 items matching " tram 24"
-
 Ballarat Tramway Museum
Photograph - Digital image Set of 20, 16/04/1972 12:00:00 AM
... ... tram 24...Set of 22 digital images of Bendigo Tramways, of the last running day of the Eaglehawk to Quarry Hill line 16 April 1972, .1 - No. 3 and 24 crossing at Long Gully .2 - No. 3 turning at the Cricket ground, Barnard and View Sts, inbound to the City and Quarry Hill .3 - No. 3 in bound to the City and Quarry Hill, Long Gully area .4 - No. 18 inbound to the City and Quarry Hill crossing the railway bridge from Eaglehawk. .5 - Manchester Loop .6 - No. 18 inbound to the City and Quarry Hill crossing the railway bridge from Eaglehawk. .7 - No. 18 about to enter Jobs Gully Loop .8 - No. 3 about to turn at the Cricket ground, Barnard and View Sts inbound to the City and Quarry Hill .9 - No. 3 turning at the Cricket ground, Barnard and View Sts, inbound to the City and Quarry Hill .10 - No. 18 at Eaglehawk terminus with the Mechanics Institute in the background. .11 - No. 3 in bound, Ironbark area. .12 - No. 3 at Long Gully Loop .13 - No. 3 outbound to Eaglehawk. .14 - No. 18 at Eaglehawk with German circus banner on tram .15 - No. 18 on the Eaglehawk line at Jobs Gully Loop .16 - No. 24 outbound to Eaglehawk at Taylor St .17 - No. 18 inbound to the City and Quarry Hill crossing the railway bridge from Eaglehawk. .18 - No. 3 at Manchester Loop .19 - No. 18 at Eaglehawk terminus .20 - No. 18 at Eaglehawk with German circus banner on tram .21 - bogie tram at Long Gully Loop. .22 - No. 24 outbound to Eaglehawk at Taylor St...Ballarat Tramway Museum South Gardens Reserve Wendouree Parade Ballarat Ballarat goldfields Trams tramways Bendigo Eaglehawk Long Gully Jobs Gully Manchester Loop tram 24 tram 18 tram 3 Set of 22 digital images of Bendigo Tramways, of the last running day of the Eaglehawk to Quarry Hill line 16 April 1972, .1 - No. 3 and 24 crossing at Long Gully .2 - No. 3 turning at the Cricket ground, Barnard and View Sts, inbound to the City and Quarry Hill .3 - No. 3 in bound to the City and Quarry Hill, Long Gully area .4 - No. 18 inbound to the City and Quarry Hill crossing the railway bridge from Eaglehawk. .5 - Manchester Loop .6 - No. 18 inbound to the City and Quarry Hill crossing the railway bridge from Eaglehawk. .7 - No. 18 about to enter Jobs Gully Loop .8 - No. 3 about to turn at the Cricket ground, Barnard and View Sts inbound to the City and Quarry Hill .9 - No. 3 turning at the Cricket ground, Barnard and View Sts, inbound to the City and Quarry Hill .10 - No. 18 at Eaglehawk terminus with the Mechanics Institute in the background. .11 - No. 3 in bound, Ironbark area. .12 - No. 3 at Long Gully Loop .13 - No. 3 outbound to Eaglehawk. .14 - No. 18 at Eaglehawk with German circus banner on tram .15 - No. 18 on the Eaglehawk line at Jobs Gully Loop .16 - No. 24 outbound to Eaglehawk at Taylor St .17 - No. 18 inbound to the City and Quarry Hill crossing the railway bridge from Eaglehawk. .18 - No. 3 at Manchester Loop .19 - No. 18 at Eaglehawk terminus .20 - No. 18 at Eaglehawk with German circus banner on tram .21 - bogie tram at Long Gully Loop. .22 - No. 24 outbound to Eaglehawk at Taylor St Photograph Digital image Set of 20 ...Set of 22 digital images of Bendigo Tramways, of the last running day of the Eaglehawk to Quarry Hill line 16 April 1972, .1 - No. 3 and 24 crossing at Long Gully .2 - No. 3 turning at the Cricket ground, Barnard and View Sts, inbound to the City and Quarry Hill .3 - No. 3 in bound to the City and Quarry Hill, Long Gully area .4 - No. 18 inbound to the City and Quarry Hill crossing the railway bridge from Eaglehawk. .5 - Manchester Loop .6 - No. 18 inbound to the City and Quarry Hill crossing the railway bridge from Eaglehawk. .7 - No. 18 about to enter Jobs Gully Loop .8 - No. 3 about to turn at the Cricket ground, Barnard and View Sts inbound to the City and Quarry Hill .9 - No. 3 turning at the Cricket ground, Barnard and View Sts, inbound to the City and Quarry Hill .10 - No. 18 at Eaglehawk terminus with the Mechanics Institute in the background. .11 - No. 3 in bound, Ironbark area. .12 - No. 3 at Long Gully Loop .13 - No. 3 outbound to Eaglehawk. .14 - No. 18 at Eaglehawk with German circus banner on tram .15 - No. 18 on the Eaglehawk line at Jobs Gully Loop .16 - No. 24 outbound to Eaglehawk at Taylor St .17 - No. 18 inbound to the City and Quarry Hill crossing the railway bridge from Eaglehawk. .18 - No. 3 at Manchester Loop .19 - No. 18 at Eaglehawk terminus .20 - No. 18 at Eaglehawk with German circus banner on tram .21 - bogie tram at Long Gully Loop. .22 - No. 24 outbound to Eaglehawk at Taylor Sttrams, tramways, bendigo, eaglehawk, long gully, jobs gully, manchester loop, tram 24, tram 18, tram 3 -
 Ballarat Tramway Museum
Photograph - Black & White Photograph/s, Keith Kings, 3/09/1967 12:00:00 AM
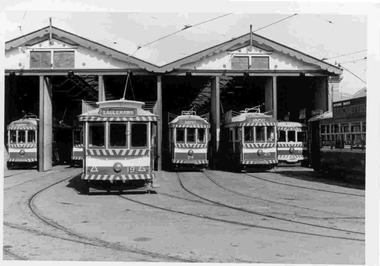
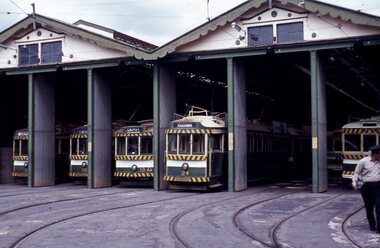
... ... tram 24...Photograph of SEC Bendigo tram depot with tram car nos (left to right) 4, 19, 24, 25 and 28. Two other trams in photo, but numbers not visible. ...Ballarat Tramway Museum South Gardens Reserve Wendouree Parade Ballarat Ballarat goldfields trams tramways Bendigo Depot tram 4 tram 19 tram 24 tram 25 tram 28 Stamp in top left hand corner and handwritten number with "K.S. ...Black and White photograph contained with Reg. Item 1902 - Photo Album from Keith Kings to Les Denmead 1970. Photograph of SEC Bendigo tram depot with tram car nos (left to right) 4, 19, 24, 25 and 28. Two other trams in photo, but numbers not visible. Most trams have destination of "Depot" showing, except 19, which is showing "Eaglehawk". Photo taken 3/9/1967. Keith Kings No. 12-27 Scanning: i - image file, p - presentation file, b - back of photograph.Stamp in top left hand corner and handwritten number with "K.S. Kings No. 12-27 Copyright reserved". In blue ink "Bendigo / Depot / 3/9/67" and stamped on the back of the prints in black ink "ll 411A and -2.6.70", possibly indicating date of print manufacture.trams, tramways, bendigo, depot, tram 4, tram 19, tram 24, tram 25, tram 28 -
 Ballarat Tramway Museum
Slide - 35mm slide/s - set of 23, Noel Simons, 26/02/1972 12:00:00 AM
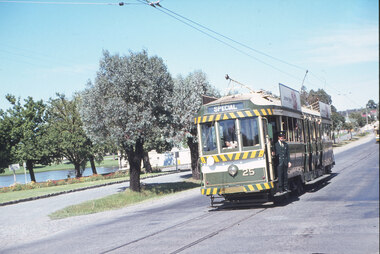
... ... tram 24...Photo taken after tram has passed photographer. 1205.9 - No. 24 (showing 'special') and No. 20 (showing 'Long Gully') at Bendigo Depot. 1205.10 - No. 24 on a special charter, leaving Bendigo depot. ...Fire Station Depot Charing Cross tram 5 tram 7 tram 20 tram 21 tram 24 tram 25 tram 28 tram 29 Information written on in blue ink and date stamped on purple ink. 1205.1 - "No. 25 at Fire Station Loop High Street, Golden Square." 1205.2 - "Nos. 25 and 21 crossing at Fire Station Loop, near Golden Square." 1205.3 - "Nos. 25 and 21 crossing at Fire Station Loop, near Golden Square." 1205.4 - "No. 25 at Golden Square terminus." 1205.5 - "No. 25 at Golden Square terminus." 1205.6 - "Nos. 7 and 25 crossing at Myrtle St. ...Set of 23 transparencies taken on 26/2/1972 on Kodak mounts. 1205.1 - Bendigo No. 25 on a special tour at Fire Station Loop, en route to Golden Square. 1205.2 - No. 21 and 25 crossing at Fire Station Loop, note photographers on the ground. No. 21 bound for North Bendigo. 1205.3 - as for 1205.3, but with trams departing loop and fire station in the background. 1205.4 - No. 25 at Golden Square Hotel with 'Rodda's Golden Square Hotel' in the background. Tram on a special tour, but showing destination of North Bendigo. 1205.5 - as for 1205.4 - but showing special. Has the end of the track in the photograph. 1205.6 - Nos. 7 and 25 (on a special tour) crossing at Myrtle St. Loop. 1205.7 - No. 7 leaving Myrtle St. loop with the mine poppet head in the background. Photo taken after tram has passed photographer. (Print made of this slide 10/2001 for use in the Gold Gold Gold exhibition of 10/2001 - See Reg. item 1979. 1205.8 - No. 25 entering depot. Tram showing 'special'. Tennis court on right has players. Photo taken after tram has passed photographer. 1205.9 - No. 24 (showing 'special') and No. 20 (showing 'Long Gully') at Bendigo Depot. 1205.10 - No. 24 on a special charter, leaving Bendigo depot. Tram has two 'Johnnie Walker' roof ads. 1205.11 - Bendigo depot with 29, 25 and a bogie car inside the depot doors. 1205.12 - As for 1205.11, but with 28 and 29. 1205.13 - No. 24 standing at front entrance of Bendigo depot with No. 20 in the background. 1205.14 - No. 24 running out into McCrae St showing special, with conductor on front step. 1205.15 - No. 24 in Caledonia St. at corner of Thunder St with the Gasworks in the background. 1205.16 - No. 5 en route for Quarry Hill at Charing cross with No. 26 (en route for Eaglehawk) about to arrive. Has former crossover at this location in the foreground. Has the Ezywalkin building in the background. 1205.17 - No. 5 and 26 at Charing Cross, with the Alexandra Fountain in the foreground and the Beehive and Ezywalkin buildings in the background. No.26 has two SEC roof ads. 1205.18 - Charing Cross looking along Pall Mall with trams 7 and 21 and 26 in the picture. 1205.19 - Charing Cross, with 21 departing for Golden Square and No. 5 heading for Quarry Hill. Has the Ezywalkin and the Beehive buildings in the background. 1205.20 - as for 1205.19, but a few moments later. Adjacent pole has a "NO ROAD" letter in reflectors vertically. 1205.21 - Charing Cross with Nos. 25, 21, 26 and 7, looking south from Pall Mall end. 1205.22 - No. 24 crossing Mitchell St. en route for Golden Square, showing 'special' with the Beehive and Ezywalkin buildings in the background. 1205.23 - Charing Cross with Nos. 24, 21 and 7 in the photo and Fountain Plaza in the background. Print of 1205.7 - stored in box D1.Information written on in blue ink and date stamped on purple ink. 1205.1 - "No. 25 at Fire Station Loop High Street, Golden Square." 1205.2 - "Nos. 25 and 21 crossing at Fire Station Loop, near Golden Square." 1205.3 - "Nos. 25 and 21 crossing at Fire Station Loop, near Golden Square." 1205.4 - "No. 25 at Golden Square terminus." 1205.5 - "No. 25 at Golden Square terminus." 1205.6 - "Nos. 7 and 25 crossing at Myrtle St. Loop." 1205.7 - "No. 7 leaving Myrtle St. Loop." 1205.8 - "No 25, entering Bendigo Depot." 1205.9 - "Nos. 20 and 24 at Bendigo Depot." 1205.10 - "No. 24 at Bendigo Depot." 1205.11 - "Nos. 25 and 29 at Bendigo Depot." 1205.12 - "Birney cars 29 and 28 at Bendigo Depot." 1205.13 - "No. 24 (with 20 beyond) at Bendigo Depot." 1205.14 - "No. 24 entering McCrae St. from Arnold St." 1204.15 - "No. 24 in Caledonia St. at cnr of Thunder St." 1204.16 - "No. 5 waits at Charing Cross as No. 26 arrives from Quarry Hill. Note remains of crossover abandoned on relocation in 1965." 1204.17 - "Nos. 5 and 26 at Charing Cross." 1204.18 - "Nos. 26, 7 and 21 at Charing Cross (No. 5 just visible behind No. 26)." 1204.19 - "No. 21 leaves Charing Cross for Golden Square as No. 5 starts off for Quarry Hill." 1204.20 - "No. 21 swings onto the single track Golden Square line as No. 5 heads into Mitchell St. towards Quarry Hill." 1204.21 - "Nos. 25, 21 and 26 watch No. 7 arrive at Charing Cross from Golden Square." 1204.22 - "No. 24 at Charing Cross crossing Mitchell St." 1204.23 - "Nos. 24, 21 and 7 at Charing Cross."tramways, trams, bendigo, golden square, myrtle st., fire station, depot, charing cross, tram 5, tram 7, tram 20, tram 21, tram 24, tram 25, tram 28, tram 29 -
 Ballarat Tramway Museum
Slide - 35mm slide/s - set of 20, Eldon Hogan, 22/05/1971 12:00:00 AM
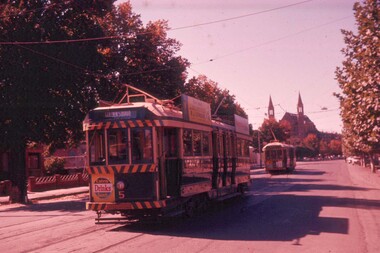
... ... tram 24...Tramways trams Bendigo Lake Weeroona Pall Mall Golden Square Eaglehawk Quarry Hill tram 25 tram 30 tram 29 tram 5 tram 18 tram 19 tram 24 tram 25 Set of 20 35mm Agfa colour blue and white plastic mount slide - featuring photos taken during an Association of Railway Enthusiasts Tour by Eldon Hogan. ...Set of 20 35mm Agfa colour blue and white plastic mount slide - featuring photos taken during an Association of Railway Enthusiasts Tour by Eldon Hogan. Folder had the date "22/5/1971" on it. Scanned on the Canon scanner at the depot 15/12/2005 at the time of the installation of the scanner. .1 - No. 25 in Nolan St with Lake Weeroona in the background. .2 - Three Birneys at the Depot junction, 30 and 29 with Conoles Hotel, McCrae St in the background. .3 - No. 5 in front of the Shamrock Hotel, Pall Mall .4 - No. 29 in front of the Shamrock Hotel with Stonemasons sign in the background. .5 - No. 18 ditto .6 - No. 30 and another Birney at the Quarry Hill terminus .7 - No. 24 southbound High St at the Violet St intersection with a "Mine Open" sign in the foreground and the Cathedral in the background. .8 - No. 19 at the Golden Square terminus, with the Golden Square Hotel in the background. .9 - No. 29 - side on view, North Bendigo line? Thunder St? .10 - No. 30 crossing the railway overbridge, inbound from Eaglehawk with a number of photographers in the foreground. .11 - No. 29? ditto .12 - No. 5 outbound - side on view, Thunder St, North Bendigo line? .13 - No. 29 and 30 at the intersection of High St and Brazier St with Church or School hall in the background. .14 - ditto .15 - ditto .16 - No. 25 and the two Birneys at the Eaglehawk terminus. .17 - No. 29 and two other trams at ditto .18 - No. 30 and 19 adjacent to the Lake View Hotel, McCrae St .19 - No. 5 and 25 crossing on the Eaglehawk Line, Ironbark? .20 - No. 29 at Quarry Hilltramways, trams, bendigo, lake weeroona, pall mall, golden square, eaglehawk, quarry hill, tram 25, tram 30, tram 29, tram 5, tram 18, tram 19, tram 24, tram 25 -
 Ballarat Tramway Museum
Slide - 35mm slide/s - set of 5, 1970's
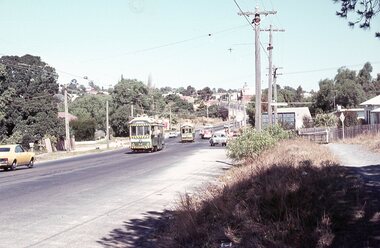
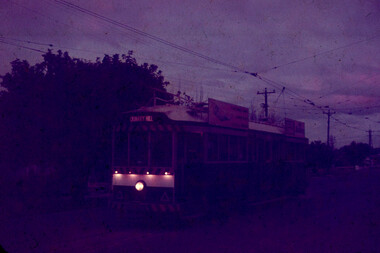
... ... tram 24...trams. Each slide along the top edge has the details while the bottom edge, has a number in the details area. 2599.1 - No. 9420, No. 24 at Quarry Hill - photo at dusk, poor quality, has surface damage all over slide. 2599.2 - No. 9421, ditto 2599.3 - No. 10132, No. 19 in Bendigo Trust operation colours at intersection of McCrae St & Nolan St, some surface damage around the top and bottom edges. ...Tramways trams Bendigo Pall Mall Bendigo Trust Nolan St tram 24 tram 19 tram 25 In blue ink on each slide; number as above in bottom edge. 2599.1 and .2 - "No. 24 Quarry Hill" 2599.3 & .5 - "No. 19 Nth Bendigo" 2599.4 - "No. 25 Nth Bendigo" Series of five 35mm slides in a yellow colour "Peter Fox Collins St. ...Series of five 35mm slides in a yellow colour "Peter Fox Collins St. Melbourne" cardboard mounts, of view of Bendigo trams. Each slide along the top edge has the details while the bottom edge, has a number in the details area. 2599.1 - No. 9420, No. 24 at Quarry Hill - photo at dusk, poor quality, has surface damage all over slide. 2599.2 - No. 9421, ditto 2599.3 - No. 10132, No. 19 in Bendigo Trust operation colours at intersection of McCrae St & Nolan St, some surface damage around the top and bottom edges. Has Gillies Pies roof advertisement. Tram has destination of North Bendigo. 2599.4 - No. 10133, No. 25, High St, south of Charing Cross - some surface damage around the top and bottom edges. Tram has roof advertisements for "Gas" and "Myers". Has destination of Joss House 2599.5 - No. 10134, No. 19, Pall Mall, some slight surface damage. Tram has destination of Golden Square and has a roof advertisement for Sandhurst Milk and one other company. In blue ink on each slide; number as above in bottom edge. 2599.1 and .2 - "No. 24 Quarry Hill" 2599.3 & .5 - "No. 19 Nth Bendigo" 2599.4 - "No. 25 Nth Bendigo"tramways, trams, bendigo, pall mall, bendigo trust, nolan st, tram 24, tram 19, tram 25 -
 Melbourne Tram Museum
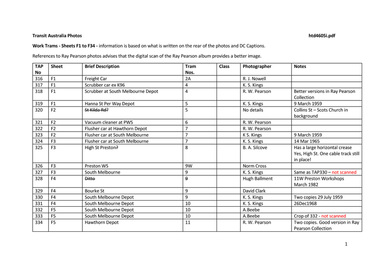
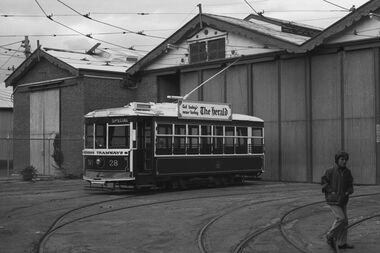
Album - Photo Album, Transit Australia Publishing, "TAP - Part F - Work Trams", 1950's to 1990's
... ... tram 24...Melbourne Tram Museum 8 Wallen Road Hawthorn melbourne Trams tramways Transit Australia Destination City Tramcars Depots Work Trams tram 2A tram 4 tram 5 tram 6 tram 7 tram 8 tram 9W tram 11W tram 9 tram 10 tram 11 tram 16 tram 17 tram 209 tram 18 tram 19 tram 20 tram 30 tram 190 tram 198 tram 199 tram 206 tram 267 tram 485 tram 544 tram 890 tram 24 tram 5 tram 6 tram 233 tram 533 tram 15 tram 221 tram 485 Photo Album - titled "TAP - Part F - Work Trams Sheets F1 to F34", from Transit Australia Publishing. ...Photo Album - titled "TAP - Part F - Work Trams Sheets F1 to F34", from Transit Australia Publishing. Photos used in the Destination City and other publications series. For a detailed list of photographs see htd4605i.pdf. For individual photo images see: \dbtext\hawthtramcoll\photo collections\TAP-, images TAP316 to TAP395. TAP316_2A_Preston_c1927_GJNowell.jpg TAP317_4_Preston_KSKings.jpg TAP318_4_SouthMelbourne_RayPearson.jpg TAP319_5_SouthMelbourne_9Mar1959KeithKings.jpg TAP320_5_CollinsSt.jpg TAP321_First6_Preston_RayPearson.jpg TAP322_7_HawthornDepot_RayPearson.jpg TAP323_7_SouthMelbourne_KeithKings_9Mar1959.jpg TAP324_7_SouthMelbourne_KeithKings_14Mar1965.jpg TAP325_8_HighSt-Preston_BASilcove.jpg TAP326_9W_Preston_NormCross_1979.jpg TAP328_11W_Preston_HughBallment_Mar1982.jpg TAP329_9_BourkeSt_2Sep1969_DavidClark.jpg TAP330_9_SouthMelbourne_KeithKings_29Jul1959.jpg TAP331_10_SouthMelbourne_KeithKings_26Dec1968.jpg TAP332_10_SouthMelbourne_ABeebe.jpg TAP334_First11_Hawthorn_RayPearson.jpg TAP335_11W_Bundoora_28Aug1995_HughWaldron.jpg TAP336_16_Preston_28Sep1961_KeithKings.jpg TAP337_17_HannaSt_29Jan1960_KeithKings.jpg TAP338_17_GleferrieRd_DavidClark_30Jul1969.jpg TAP339_209-18_Preston_RayPearson.jpg TAP340_18_Preston_Mar1948_JackRichardson.jpg TAP341_19_FlemingtonRd_4Jun1970_DavidClark.jpg TAP342_19_HannaSt-perway-yard_ABeebe.jpg TAP343_20_SouthMelbourne-perway-yard_27Mar1964_KeithKings.jpg TAP344_30_DogCar_Camberwell_PWDuckett.jpg TAP345_190_Camberwell_JBStranger.jpg TAP346_198_Preston_27Dec1968_KeithKings.jpg TAP347_199_Preston_15Aug1959_KeithKings.jpg TAP348a_199_HannaSt-perway_ABeebe.jpg TAP348_199_HannaSt-perway_ABeebe.jpg TAP349_206_Preston_1Nov1949_KeithKings.jpg TAP350_267_SouthMelbourne_30Jan1967_KeithKings.jpg TAP351_485_SouthMelbourne_9Mar19641967_KeithKings.jpg TAP352_533_lightrail_DaleBudd.jpg TAP353_890_HawthornDepot_27Apr1992_RJMarsh.jpg TAP354_9-7-8_HannaSt-perway_ABeebe.jpg TAP355_2Grinder_StKildaRd_ABeebe.jpg TAP356_2Grinder_HannaSt-perway_9Mar1959_KeithKings.jpg TAP357_3Grinder_HannaSt-perway_c1960_KeithKings.jpg TAP358_3Grinder_HannaSt-perway_9Mar1959_KeithKings.jpg TAP359_BallastTrailer-24_Preston_PTC.jpg TAP360_BallastTrailer-24_DandenongRd_12April1964_KeithKings.jpg TAP361_BallastTrailer-24_Aerodrome_CharlesCraig.jpg TAP362_LongBallastTrailer_Preston_Mar1948_ABeebe.jpg TAP363-exHTT-trailer_Dwg-R115_KeithKings.jpg TAP364-exNMETLCo-trailer_Dwg-R1452_KeithKings.jpg TAP365-exPMTT-cleaner_Dwg-549_KeithKings.jpg TAP366_3_Preston_1932_RayPearson.jpg TAP367_5_StKildaRd-at-CityRd_WJohnWebster.jpg TAP368_(Second-6_Preston_c1961_PTC.jpg TAP369_7-HighSt-StKilda_Feb1959_JimSeletto.jpg TAP370a_7_SouthMelbourne_1950s_JohnBeckett.jpg TAP370_7_SouthMelbourne_1950s_LMarshallWood.jpg TAP371_7_SouthMelbourne_WJohnWebster.jpg TAP372_7_StKildaRd-into-ParkSt_Feb1978_GaryDavey.jpg TAP373_8_SwanstonSt_LindsayCrow.jpg TAP374_8_StKildaRd-at-CityRd_WJohnWebster.jpg TAP375_8_Preston_MMTB.jpg TAP376_8_PrincesBridge_1954_JimSeletto.jpg TAP377_16W_Preston_1980_RayMarsh.jpg TAP378_First16_Preston_1930s_RayPearson.jpg TAP379_17_ColdbloRd_WJohnWebster.jpg TAP380_17_HannaSt_RayPearson.jpg TAP381_19_Preston_RayPearson.jpg TAP382_233_LineMarker_PTC.jpg TAP383_533_TestTram_MMTB.jpg TAP384_Grinder3_ChapelSt-at-Carlisle_1969_JeffBounds.jpg TAP386_Second6_HighSt_c1962_PTC.jpg TAP387_11_HighSt-StKildaRd_JimSeletto.jpg TAP388_15_PrestonWorkshops_1966_JimSeletto.jpg TAP389_17_SouthMelbourneDepot_DaleBudd.jpg TAP390_221_Derail-trainer_SouthMelbourneDepot_NormCross.jpg TAP391_485-trailer_JimSeletto.jpg TAP392_485-dropcentre_DaleBudd.jpg TAP393_Grinder_SouthMelbourneDepot_MMTB.jpg TAP394_Grinder3_Preston_PTC.jpg TAP395_Trailer-20_Preston_NormCross.jpgtrams, tramways, transit australia, destination city, tramcars, depots, work trams, tram 2a, tram 4, tram 5, tram 6, tram 7, tram 8, tram 9w, tram 11w, tram 9, tram 10, tram 11, tram 16, tram 17, tram 209, tram 18, tram 19, tram 20, tram 30, tram 190, tram 198, tram 199, tram 206, tram 267, tram 485, tram 544, tram 890, tram 24, tram 5, tram 6, tram 233, tram 533, tram 15, tram 221, tram 485 -
 Ballarat Tramway Museum
Negative, Bruce Herbert, "Bendigo and Ballarat Trams (AETA Convention) 30 Mar 1975", 30/03/1975 12:00:00 AM
... tram 28 tram 19 tram 30 tram 18 tram 24 tram 3 tram 12 tram 17 tram Scrubber...Bendigo photos: 1 - No. 28 at the depot 2 - ditto 3 - 24 and another bogie tram in side the depot 4 - No. 3? ...Trams tramways BTPS Ballarat AETA Bendigo Bendigo Trust Depot McCrae St tram 28 tram 19 tram 30 tram 18 tram 24 tram 3 tram 12 tram 17 tram Scrubber Negative folder - made by ROW1 International of West Germany containing 40 No. 35 mm negatives of the AETA 1975 Convention visit to Ballarat and Bendigo on 30-3-1975. 17 photos of Ballarat and 23 of Bendigo. ...Negative folder - made by ROW1 International of West Germany containing 40 No. 35 mm negatives of the AETA 1975 Convention visit to Ballarat and Bendigo on 30-3-1975. 17 photos of Ballarat and 23 of Bendigo. Bendigo photos: 1 - No. 28 at the depot 2 - ditto 3 - 24 and another bogie tram in side the depot 4 - No. 3? inside the depot 5 - 12, scrubber - 17 and two bogie trams 6 - scrubber and other bogie trams. 7 - general view with 24 and other bogie trams 8 - ditto 9 - Four trams at the Gold Mine, lead by 28. 10 - 19 at the Gold Mine 11 - single trucker with "tram tours" sign on the front 12 - 28 and two other cars at the Joss House, North Bendigo 13 - 19 and two other cars at the Joss House 14 - 30 at depot junction and loop 15 - 28 and 18 16 - 18 in the loop 17 - 28 and 18 McCrae St 18 - 28, 18 and 30 ditto 19 - 19 20 - No. 18 and 28 in Pall Mall with The Beehive in the background. Outside the building is an American Doughnut Kitchen van. The junction trackwork for the Eaglehawk lines remain in position. 21 - No. 30 northbound, with the City Family Hotel and other shops in the background. 22 - ditto and the cenotaph, 23 - B74 on a train at Spencer St. trams, tramways, btps, ballarat, aeta, bendigo, bendigo trust, depot, mccrae st, tram 28 tram 19 tram 30 tram 18 tram 24 tram 3 tram 12 tram 17 tram scrubber -
 Melbourne Tram Museum
Slide - Set of 2, Keith Caldwell, 1/11/1978 12:00:00 AM
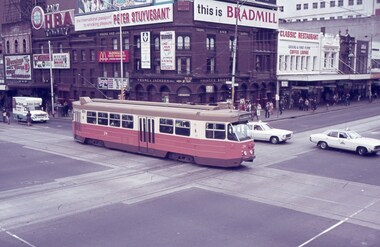
... ... tram 24...Melbourne Tram Museum 8 Wallen Road Hawthorn melbourne Trams tramways Flinders St Swanston St Z class Route 48 Route 74 Burwood tram 24 tram 65 tram 629? .1 - has "1-11-78" written in red ink. ...Set of 2 Agfa colour slide, blue and white plastic mount, photo by Keith Caldwell 1/11/1978 of : .1 - Z24 in Flinders St, crossing Swanston St. The tram is bound for Burwood Middleborough Road, route 75. Note the two taxis doing hook turns. .2 - Z65, Route 74, Burwood and W2 629? route 48, North Balwyn. In the background is the Young and Jacksons Princes Bridge Hotel, Portmans, Classic Restaurant Coffee Lounge, and many advertisements including HBA, Peter Stuyvesant, McDonalds, Bradmill, Tattslotto, and Mocopan Coffee. Also in the photo is a policeman on point duty, cars doing a hook turn and a large paper / magazine stand on the wall of Young and Jacksons..1 - has "1-11-78" written in red ink.trams, tramways, flinders st, swanston st, z class, route 48, route 74, burwood, tram 24, tram 65, tram 629? -
 Ballarat Tramway Museum
Slide - 35mm slide/s - set of 10, Eldon Hogan, mid 1960's to early 1970's
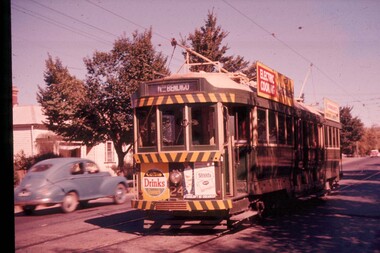
... ... tram 24...in the background. .5 - No. 26 at ditto, outbound for Golden Square. .6 - No. 24, High St Bendigo, with the Cathedral in the background. Tram has two Johnnie Walker Whiskey roof advertisements. .7 - Three trams, Pall Mall, Charing Cross, with the Beehive building in the background. ...Tramways trams Bendigo tram 18 tram 24 tram 26 tram 21 tram 29 Set of 10 Agfa Plastic mounted slides - from the Eldon Hogan collection - possibly on an ARE Bendigo tours - mid 1960's (black destination rolls) and late 1960's or early 1970's. ...Set of 10 Agfa Plastic mounted slides - from the Eldon Hogan collection - possibly on an ARE Bendigo tours - mid 1960's (black destination rolls) and late 1960's or early 1970's. Scanned on the Canon scanner at the depot 15/12/1971 at the time of the installation of the scanner. .1 - No. 24 in bound along High St Bendigo with the discovery of gold monument in the foreground, Golden Sq route. .2 - ditto .3 - No. 26 outbound at the above location. .4 - No. 24 at the corner of Short St and High St, with the Technical college building? in the background. .5 - No. 26 at ditto, outbound for Golden Square. .6 - No. 24, High St Bendigo, with the Cathedral in the background. Tram has two Johnnie Walker Whiskey roof advertisements. .7 - Three trams, Pall Mall, Charing Cross, with the Beehive building in the background. Trams have SEC roof advertisement. .8 - ditto with Coca Cola ad on the Beehive building, turning around. .9 - No. 29 and a bogie tram at the Golden Square terminus with Billy Rodda's Golden Square Hotel in the background. Just past the tram is a large truck carrying boxes. .10 - Nos, 18, a bogie tram, 21 and 29 at the Quarry Hill terminus. tramways, trams, bendigo, tram 18, tram 24, tram 26, tram 21, tram 29 -
 Ballarat Tramway Museum
Slide - 35mm slide/s - set of 11, Eldon Hogan, mid 1960's to early 1970's
... ... tram 24...Scanned on the Canon scanner at the depot 15/12/1971 at the time of the installation of the scanner. .1 - front of depot -26, 19, 24, 29 and 28 amongst those present. .2 - ditto .3 - 24 departing depot .4 - 26 at Eaglehawk .5 - No. 5 turning from Pall Mall into Mitchell St with town hall in background. .6 - No. 5 using crossover in Mitchell St - with Maples, CBA Bank, Astor, Homecrafts, Roger David shops or signs in the background. .7 - ditto .8 - bogie car at Charing Cross with the Fountain Plaza shopping centre in the background. .9 - Charing Cross, with the fountain in the foreground, The Beehive and three trams in the view. .10 - No. 24 outbound, Golden Square line crossing the bridge over the creek, adjacent to the discovery of Gold Monument. .11 - ditto. ...Tramways trams Bendigo Eaglehawk Depot Charing Cross Golden Square tram 26 tram 19 tram 24 tram 29 tram 28 tram 26 tram 5 Set of 11 Agfa Plastic mounted slides - from the Eldon Hogan collection - possibly on an ARE Bendigo tours - mid 1960's (black destination rolls) and late 1960's or early 1970's. ...Set of 11 Agfa Plastic mounted slides - from the Eldon Hogan collection - possibly on an ARE Bendigo tours - mid 1960's (black destination rolls) and late 1960's or early 1970's. Scanned on the Canon scanner at the depot 15/12/1971 at the time of the installation of the scanner. .1 - front of depot -26, 19, 24, 29 and 28 amongst those present. .2 - ditto .3 - 24 departing depot .4 - 26 at Eaglehawk .5 - No. 5 turning from Pall Mall into Mitchell St with town hall in background. .6 - No. 5 using crossover in Mitchell St - with Maples, CBA Bank, Astor, Homecrafts, Roger David shops or signs in the background. .7 - ditto .8 - bogie car at Charing Cross with the Fountain Plaza shopping centre in the background. .9 - Charing Cross, with the fountain in the foreground, The Beehive and three trams in the view. .10 - No. 24 outbound, Golden Square line crossing the bridge over the creek, adjacent to the discovery of Gold Monument. .11 - ditto. tramways, trams, bendigo, eaglehawk, depot, charing cross, golden square, tram 26, tram 19, tram 24, tram 29, tram 28, tram 26, tram 5 -
 Ballarat Tramway Museum
Functional object - Conductor Bell Geelong - Presentation engraved, State Electricity Commission of Victoria (SECV), 1956
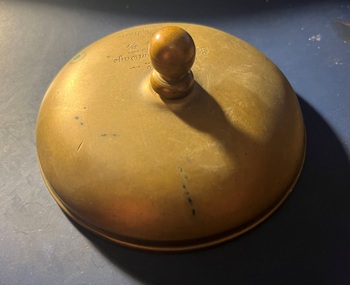
... Presentation to D J Irwin, the Depot Foreman at Geelong following the operation of the last tram No. 4 on 24 March 1956. Mr Irwin subsequently became the Depot Foreman in Ballarat. ...Engraved "SEC Geelong Tramways Pres to D J Irwin D/F by BTS J Moore, Last tram 24-3-1956"...Geelong Depot Foreman closure Conductors Bell D J Irwin J M Moore Engraved "SEC Geelong Tramways Pres to D J Irwin D/F by BTS J Moore, Last tram 24-3-1956" Part of conductors bell - brass fitted with a brass threaded knob. ...Presentation to D J Irwin, the Depot Foreman at Geelong following the operation of the last tram No. 4 on 24 March 1956. Mr Irwin subsequently became the Depot Foreman in Ballarat. Would appear that the threaded knob is not part of the original conductor's bell as it does not fully screw into the bell housing. See item 9810 for the presentation of other bells to Councils.Demonstrates a presentation to depot staff at the time of the closure of the Geelong system.Part of conductors bell - brass fitted with a brass threaded knob.Engraved "SEC Geelong Tramways Pres to D J Irwin D/F by BTS J Moore, Last tram 24-3-1956"geelong, depot foreman, closure, conductors bell, d j irwin, j m moore -
 Ballarat Tramway Museum
Photograph - Ballarat tran 24 - Wilson St, Bob Lilburn, 12/65
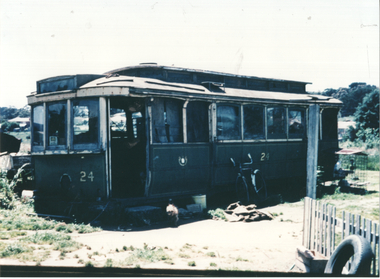
... ...tram 24...Yields information about the disposal of Ballarat tram 24. Tramcars trams scrapped trams tram 24 Set of two colour prints - one on Agfa and the other on Kodak Royal paper. ...Photo of SEC Ballarat No. 24 after its disposal following a significant accident in 1954. See item 5535. Received in an envelope marked "24 Wilson St Ballarat East 12/65" in R. Lilburn handwriting. See also item 6607 for another photograph of c1973.Yields information about the disposal of Ballarat tram 24.Set of two colour prints - one on Agfa and the other on Kodak Royal paper.tramcars, trams, scrapped trams, tram 24 -
 Ballarat Tramway Museum
Photograph - SECV Geelong 24 at Eastern Park, c1950
... ...tram 24...Black and white print of SECV Geelong 24 at Eastern Park with a school boy in shorts and wearing a cap turning the trolley pole, while the motorman/conductor boards the tram for its return trip to the City. ...Yields information about Geelong tram 24 and the Eastern Park tram terminus. tramways Geelong tram 24 Eastern Park motorman On rear in ink "last run 25/10/51" and in pencil "19/7/50? ...Black and white print of SECV Geelong 24 at Eastern Park with a school boy in shorts and wearing a cap turning the trolley pole, while the motorman/conductor boards the tram for its return trip to the City. There is a Pay as you enter sign by the front door. The tram was withdrawn from service on 25/10/1951. Photo c1950, photographer unknown, possibly the same date as that of item 10542.Yields information about Geelong tram 24 and the Eastern Park tram terminus.Black and white photograph, digital print on Kodak Royal Paper - two copies held.On rear in ink "last run 25/10/51" and in pencil "19/7/50? E Park"tramways, geelong, tram 24, eastern park, motorman -
 Ballarat Tramway Museum
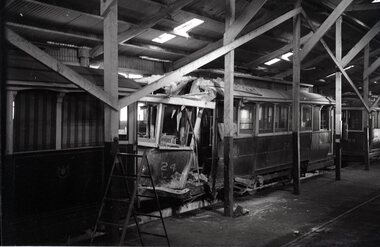
Negative, Wal Jack, May. 1954
... ... tram 24...Negative and Digital images of the Wal Jack Ballarat Negative file of No. 24 after the tram ran into the Bucks Head Hotel 8/5/1954 - shows the nature of the damage. ...Trams tramways Accidents Depot tram 24 Negative and Digital images of the Wal Jack Ballarat Negative file of No. 24 after the tram ran into the Bucks Head Hotel 8/5/1954 - shows the nature of the damage. ...Yields information about trams severely damaged during accidents and the Bucks Head Hotel.Negative and Digital images of the Wal Jack Ballarat Negative file of No. 24 after the tram ran into the Bucks Head Hotel 8/5/1954 - shows the nature of the damage. Tram 14 is in the background. See Reg Item 3861 for the accidenttrams, tramways, accidents, depot, tram 24 -
 Ballarat Tramway Museum
Negative - SECV Geelong 24 Glenleith Ave and Melbourne Road, Wal Jack, mid 1940's
... ... tram 24...Negative and Digital images of the Wal Jack Geelong Negative file of Geelong No. 24 rounding the double track curve from Glenleith Ave into Melbourne Road. On the corner is V. H. Rodgers Butchers building remains in 2020. The tram...Yields information about Geelong 24, and the corner of Glenleith Ave and Melbourne Road. Trams tramways Geelong Melbourne Road Glenleith Ave North tram 24 Negative Negative SECV Geelong 24 Glenleith Ave and Melbourne Road. ...Negative and Digital images of the Wal Jack Geelong Negative file of Geelong No. 24 rounding the double track curve from Glenleith Ave into Melbourne Road. On the corner is V. H. Rodgers Butchers building remains in 2020. The tram has the destination of North and has the new style of lining. Photo mid 1940's.Yields information about Geelong 24, and the corner of Glenleith Ave and Melbourne Road.Negativetrams, tramways, geelong, melbourne road, glenleith ave, north, tram 24 -
 Ballarat Tramway Museum
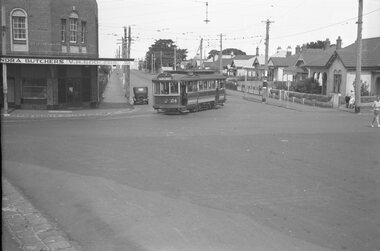
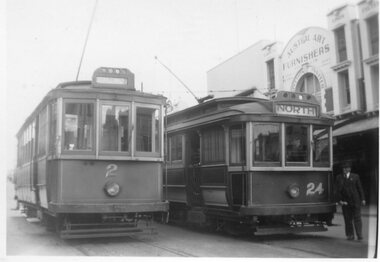
Photograph - Black & White Photograph/s, Jack Stranger, Jun. 1947
... ... tram 24...Ballarat Tramway Museum South Gardens Reserve Wendouree Parade Ballarat Ballarat goldfields Yields information about the appearance of two of Geelong's tram in 1947. tramways trams Geelong Moorabool St tram 2 tram 24 On rear in green ink "SEC Geelong Birney Nos. 2 (original stock) 24 (ex M&MTB ex HTT) / June 1947 J. ...Yields information about the appearance of two of Geelong's tram in 1947.Black and white photograph of Geelong 2 - destination of Belmont and No. 24, destination North, in Moorabool St with the Austral Arts Furnishers store in the background. Photograph by Jack Strager June 1947.On rear in green ink "SEC Geelong Birney Nos. 2 (original stock) 24 (ex M&MTB ex HTT) / June 1947 J. Stanger photo."tramways, trams, geelong, moorabool st, tram 2, tram 24 -
 Ballarat Tramway Museum
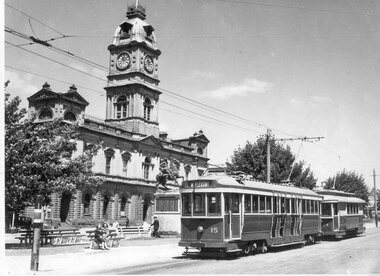
Photograph - Black & White Photograph/s, State Electricity Commission of Victoria (SECV), 1945
... ... tram 24...Black and white photo print of Ballarat No. 15 and No. 24, soon after the arrival of the bogie trams in Ballarat, late 1945 with the Town Hall, Sturt St, in the Background. ...Ballarat Tramway Museum South Gardens Reserve Wendouree Parade Ballarat Ballarat goldfields Yields information about the introduction of bogie trams into Ballarat late 1945 and the street scene with the Ballarat Town Hall in the background. tramways trams Bogie Trams Town Hall Sturt St tram 15 tram 24 In top left hand corner "34)" and "SECV" in bottom right hand corner. ...Yields information about the introduction of bogie trams into Ballarat late 1945 and the street scene with the Ballarat Town Hall in the background.Black and white photo print of Ballarat No. 15 and No. 24, soon after the arrival of the bogie trams in Ballarat, late 1945 with the Town Hall, Sturt St, in the Background. Has two ladies sitting on a seat near the tram, the stop pole, a trammie walking in front of the war memorial. No. 15 has the destination of Mt Pleasant. 4291.1 - Cropped image of the original photograph. Added 28/11/2013. From Donation of Ron Scholten. In box 71. See also Reg Item 3805.In top left hand corner "34)" and "SECV" in bottom right hand corner.tramways, trams, bogie trams, town hall, sturt st, tram 15, tram 24 -
 Ballarat Tramway Museum
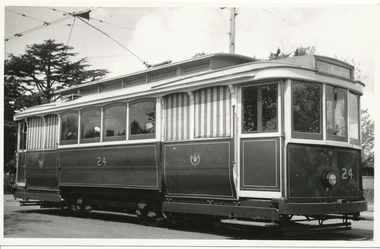
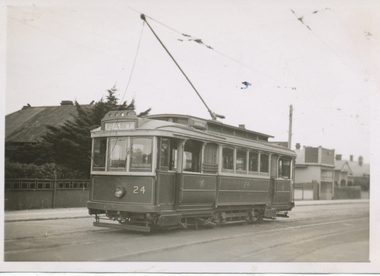
Photograph - Black & White Photograph/s, 1948?
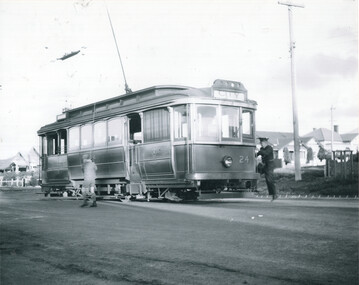
... ... tram 24...Black and white photograph of the Ballarat 24 - 3/4 front on view, late 1948? Appears to have been photographed at Victoria St terminus. Tram...Trams tramways Victoria St Overhead tram 24 In pencil, "Ballarat late 1940's (late 1940's crossed out) and 1948? ...Yields information about the appearance of SEC tram No. 24 in late 1940's - the best photograph so far of this tram.Black and white photograph of the Ballarat 24 - 3/4 front on view, late 1948? Appears to have been photographed at Victoria St terminus. Tram has the destination of Gardens via Sturt St. Note the pan in the overhead to assist the trolley pole positioning at night. Negative of photograph held. Printed on Agfa Bravira paper. Negative scanned at hi res 4/6/2020 and image updated added as i4.In pencil, "Ballarat late 1940's (late 1940's crossed out) and 1948? written in and in bottom left hand corner "ex M?"trams, tramways, victoria st, overhead, tram 24 -
 Ballarat Tramway Museum
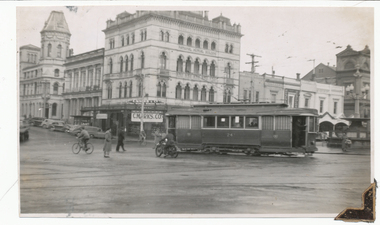
Photograph - Digital image, 1938
... ... tram 24...trams. Photographer and source details not provided by Roger. See btm6302doc.pdf Image of No. 24 and two other single truckers at the City terminus, 1938. ...Trams tramways Sturt St Lydiard St Nth City tram 24 Digital Copy of a photograph sourced by Roger Greenwood as part of his work on the production of a Video Tape on Ballarat's trams. ...Yields information about the appearance and the use of ESCo tram 24 and other single truckers late 1930's and the appearance of the north side of Sturt St near Lydiard St north.Digital Copy of a photograph sourced by Roger Greenwood as part of his work on the production of a Video Tape on Ballarat's trams. Photographer and source details not provided by Roger. See btm6302doc.pdf Image of No. 24 and two other single truckers at the City terminus, 1938. Tram has the destination of Lydiard St North. Shows the appearance of the trams at the time. Has a number of passengers on board. In the background is the ANZ building, Post Office and Whitesides Tailors and Mercers.trams, tramways, sturt st, lydiard st nth, city, tram 24 -
 Ballarat Tramway Museum
Document - Tramcar Record - SEC No. 24, Wal Jack, 1950's
... ...tram 24...Handwritten note on foolscap lined sheet outlining the history of Ballarat Tramcar No. 24, who built for, date to Ballarat, painting and other changes to the tramcar as compiled by Wal Jack. Part of a series on each SEC Ballarat operated tramcar, except for the ESCo trams. ... tramways Ballarat Tramcars Tramcars Of Ballarat tram 24 Handwritten note on foolscap lined sheet outlining the history of Ballarat Tramcar No. 24, who built for, date to Ballarat, painting and other changes to the tramcar as compiled by Wal Jack. ...Tramcar record for SEC Ballarat No. 24, builder, system location, short history and work in Ballarat.Yields information about the history of individual tramcars in Ballarat.Handwritten note on foolscap lined sheet outlining the history of Ballarat Tramcar No. 24, who built for, date to Ballarat, painting and other changes to the tramcar as compiled by Wal Jack. Part of a series on each SEC Ballarat operated tramcar, except for the ESCo trams. Contained within Reg Item 5507 - Foolscap binder with green covers, black binding edge and metal clips.trams, tramways, ballarat, tramcars, tramcars of ballarat, tram 24 -
 Ballarat Tramway Museum
Photograph - Digital image, 28/12/1943 12:00:00 AM
... ... tram 24...Digital image from the Wal Jack Ballarat Album of Ballarat No. 24 in Barkly St, Ballarat East, outbound to Mt Pleasant - 28-12-1943. Note the truck in the background. Tram...Trams tramways Mt Pleasant Barkly St tram 24 Bottom right hand corner "T358" within the Wal Jack stamp. ...Yields information about the operation of the Mt Pleasant route and housing in 1943.Digital image from the Wal Jack Ballarat Album of Ballarat No. 24 in Barkly St, Ballarat East, outbound to Mt Pleasant - 28-12-1943. Note the truck in the background. Tram has the destination of Mt Pleasant. See image i2 for rear of photograph. See image i3 for hi res scan of print. See image i4 for hi res scan of negativeBottom right hand corner "T358" within the Wal Jack stamp. "SEC Ballarat Tramways No. 24 in Barkly St, Ballarat East 28-12-43. (bound for Mt Pleasant"trams, tramways, mt pleasant, barkly st, tram 24 -
 Ballarat Tramway Museum
Photograph - Digital image, Wal Jack, 15/08/1951 12:00:00 AM
... ... tram 24...Trams tramways Sturt St Lydiard St Governors tram 24 On rear of photograph in ink "SEC Ballarat No. ...Yields information about the alterations made to service trams during a visit of a Governor to Ballarat.Digital image from the Wal Jack Ballarat Album of a photograph of No. 24 ex Mt Pleasant on old curve into Lydiard St North from Sturt St, during period, Sturt St south side was closed between Lydiard and Dawson Sts to all traffic during visit of NSW Governor - Sir John Northcote to City Hall Reception - 15-8-1951. Has a number of pedestrians bicycle and one motor cycle in the view. See image i2 for rear of photograph. See image i3 for hi res scan of print. See image i4 for hi res scan of negativeOn rear of photograph in ink "SEC Ballarat No. No. 24 ex Mt Pleasant on old curve into Lydiard St North from Sturt St, during period, Sturt St south side was closed between Lydiard and Dawson Sts to all traffic during visit of NSW Governor - Sir John Northcote to City Hall Reception - 15-8-1951. 11AM". Has W. Jack stamp in top right hand corner and the number T18/PC written in.trams, tramways, sturt st, lydiard st, governors, tram 24 -
 Ballarat Tramway Museum
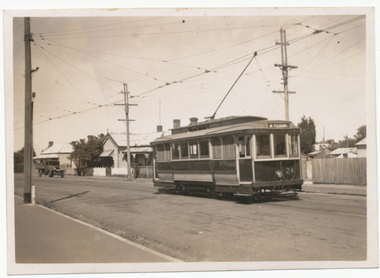
Photograph - Black & White Photograph/s, Neville Gower, 5/07/1996 12:00:00 AM
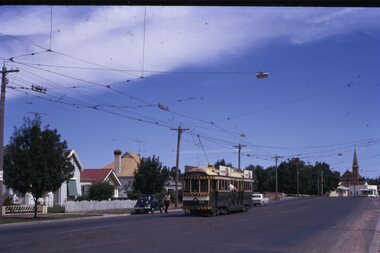
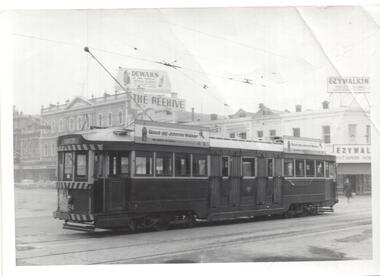
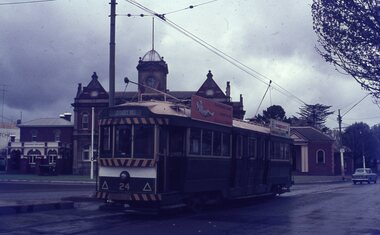
... ...Tram 24...Ballarat Tramway Museum South Gardens Reserve Wendouree Parade Ballarat Ballarat goldfields Trams Tramways Bendigo Charing Cross Tram 24 On rear 'AM 5/7/65' & 'Bendigo' Black & white photo of Bendigo No. 24 with Quarry Hill destination, waiting at Charing Cross. ...Black & white photo of Bendigo No. 24 with Quarry Hill destination, waiting at Charing Cross. Photo taken am 5/7/1965, prior to painting white strip above headlights. Has two Johnny Walker ads. With 'The Beehive' buildings in background. On Kodak photographic paper. Reimaged 17/7/2019.On rear 'AM 5/7/65' & 'Bendigo'trams, tramways, bendigo, charing cross , tram 24 -
 Ballarat Tramway Museum
Photograph - SECV Geelong No. 24 in Aberdeen St, Leon Marshall Wood, 29/03/1948
... ... tram 24...Photo of No. 24 in Aberdeen St, 29-3-1948. Wal's album notes that the tram is in the new colour (all green) scheme. ...Trams tramways Geelong Aberdeen St East tram 24 Has on the rear in ink "Aberdeen St, Geelong 29-3-48" and the L. ...Black and White print contained within the Wal Jack Bendigo and Geelong Album, see Reg Item 5003 for more details. Photo of No. 24 in Aberdeen St, 29-3-1948. Wal's album notes that the tram is in the new colour (all green) scheme. Printed on Velox Paper. Tram has the destination of East. Note the "Pay as you enter" sign.Yields information about Geelong 24 and Aberdeen St.Black and white photograph with photographer's notes on the rear.Has on the rear in ink "Aberdeen St, Geelong 29-3-48" and the L. M. Wood copyright stamp.trams, tramways, geelong, aberdeen st, east, tram 24 -
 Ballarat Tramway Museum
Photograph - Black & White Photograph/s, CLC, 1950
... ... tram 24...Black and White photograph of Geelong No. 24 at the West terminus. Tram has the destination of East. ...Trams tramways Geelong East West tram 24 On the rear in pencil "With compliments by General Manager of the Wombat Hill Railway, Printed by the Public Relations Publicity Dept Wombat Hill railway, Geelong No. 24 West terminus about 1950." ...Yields information about Geelong trams in the late 1940's on the Chilwell - East - West lines.Black and White photograph of Geelong No. 24 at the West terminus. Tram has the destination of East. About 1954. Photo by CLC - General Manager of the Wombat Hill Railway,On the rear in pencil "With compliments by General Manager of the Wombat Hill Railway, Printed by the Public Relations Publicity Dept Wombat Hill railway, Geelong No. 24 West terminus about 1950." Has the Keith Kings number "CLC-8" in top right hand corner.trams, tramways, geelong, east, west, tram 24 -
 Ballarat Tramway Museum
Slide - 35mm slide/s, Travis Jeffrey, c1962
... ... tram 24...Note the empty roof advertisement panel on No. 24 - refer to Reg. Item 2632, which shows the tram at Golden Square....Tramways trams Bendigo Golden Square Myrtle St tram 5 tram 24 "BES 21" in pencil Agfa plastic mount (blue base, white cover) with a photo of Bendigo No. 5 and No. 24 crossing at Myrtle St. loop. ...Agfa plastic mount (blue base, white cover) with a photo of Bendigo No. 5 and No. 24 crossing at Myrtle St. loop. No. 5 has destination of Charing Cross and a Cohns Drinks Advertisement on front panel. No. 24 has destination of Golden Square. On the front dash panel is advertisement for Huttons Hams and a Streets Ice-cream advertisement. Note the empty roof advertisement panel on No. 24 - refer to Reg. Item 2632, which shows the tram at Golden Square."BES 21" in penciltramways, trams, bendigo, golden square, myrtle st, tram 5, tram 24 -
 Ballarat Tramway Museum
Slide - 35mm slide/s, Travis Jeffrey, c1962
... ... tram 24...Agfa plastic mount (blue base, white cover) with a photo of Bendigo No. 24 at Golden Square terminus. Tram has destination of North Bendigo. ...Tramways trams Bendigo Golden Square tram 24 "BES 22" in pencil Agfa plastic mount (blue base, white cover) with a photo of Bendigo No. 24 at Golden Square terminus. ...Agfa plastic mount (blue base, white cover) with a photo of Bendigo No. 24 at Golden Square terminus. Tram has destination of North Bendigo. On the front dash panel is advertisement for Cohns Soft drinks and Streets Ice Cream. Roof advertisements for SEC, Electric Cooking and another one. Note empty advert racks on the left hand side of the tramcar."BES 22" in penciltramways, trams, bendigo, golden square, tram 24 -
 Ballarat Tramway Museum
Slide - 35mm slide/s, Travis Jeffrey, c1962
... ... tram 24...No. 24 has a Cohns Drink advertisement on the front dash panel and two roof advertisements. Tram...Tramways trams Bendigo Golden Square Myrtle St tram 5 tram 24 "BES 24" in pencil Agfa plastic mount (blue base, white cover) with a photo of Bendigo No. 5 in the crossing loop at Myrtle St. loop, with No. 24 leaving the crossing loop for Charing Cross. ...Agfa plastic mount (blue base, white cover) with a photo of Bendigo No. 5 in the crossing loop at Myrtle St. loop, with No. 24 leaving the crossing loop for Charing Cross. No. 24 has a Cohns Drink advertisement on the front dash panel and two roof advertisements. Tram has destination of Golden Square. In the background is the Sacred Heart Cathedral . Photo taken c1962."BES 24" in penciltramways, trams, bendigo, golden square, myrtle st, tram 5, tram 24 -
 Ballarat Tramway Museum
Slide - 35mm slide/s, Travis Jeffrey, c1962
... ... tram 24...Agfa plastic mount (blue base, white cover) with a photo of Bendigo No. 24 in the crossing loop at Myrtle St. loop. Tram has destination of North Bendigo. ...Tramways trams Bendigo Golden Square Myrtle St tram 24 "BES 23" in pencil Agfa plastic mount (blue base, white cover) with a photo of Bendigo No. 24 in the crossing loop at Myrtle St. loop. ...Agfa plastic mount (blue base, white cover) with a photo of Bendigo No. 24 in the crossing loop at Myrtle St. loop. Tram has destination of North Bendigo. On the front dash panel is advertisement for Cohns Soft drinks and Streets Ice Cream. Roof advertisements for SEC, Electric Cooking and another one."BES 23" in penciltramways, trams, bendigo, golden square, myrtle st, tram 24 -
 Ballarat Tramway Museum
Slide - 35mm slide/s, Travis Jeffrey, late 1960's or early 1970's
... ... tram 24...Agfa plastic mount (blue base, white cover) with a photo of Bendigo 24 at the Eaglehawk terminus, with the Eaglehawk Town Hall / Post Office in the background. Tram...Tramways trams Bendigo Eaglehawk tram 24 "BES 32" in pencil Agfa plastic mount (blue base, white cover) with a photo of Bendigo 24 at the Eaglehawk terminus, with the Eaglehawk Town Hall / Post Office in the background. ...Agfa plastic mount (blue base, white cover) with a photo of Bendigo 24 at the Eaglehawk terminus, with the Eaglehawk Town Hall / Post Office in the background. Tram has the destination of Quarry Hill and roof advertisements for SEC "Everything's under control in my all electric kitchen" and one for Mamouney's Furniture Company. Photo taken late 1960's early 1970's."BES 32" in penciltramways, trams, bendigo, eaglehawk, tram 24