Showing 707 items
matching tramway crossings
-
 Ballarat Tramway Museum
Photograph - Black & White Photograph/s, Len Millar, 1969
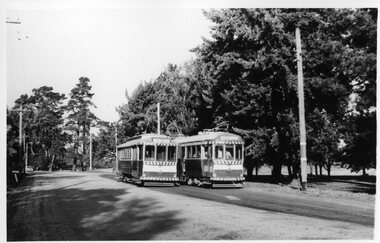
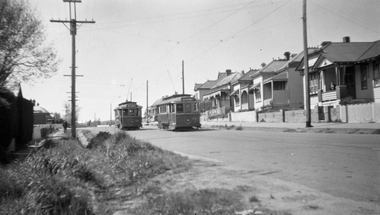
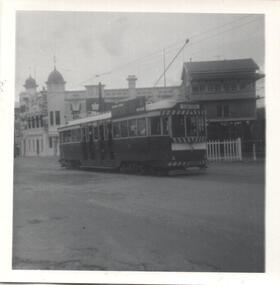
Yields information about the tram services in Ballarat in particular Wendouree Parade.Black and white photograph on card paper of SEC trams 21 and 38, crossing at depot loop, or Barrett Ave in Wendouree Parade 1969. Photo by Len Millar. Detailed notes on rear in ink and pencil by Len Millar and Keith Kings - see image i2.trams, tramways, wendouree parade, depot loop, barrett ave, tram 38, tram 21 -
 Ballarat Tramway Museum
Negative, Wal Jack, mid 1940's
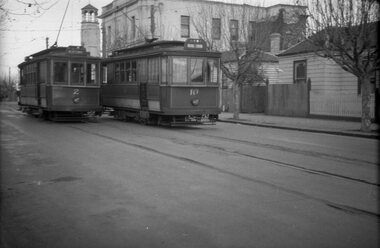
Negative and Digital images of the Wal Jack Geelong Negative file of Geelong trams 2 and 10 crossing at the Retreat Rd loop in Pakington St, just north of Aphasia St. Tram 2 - has destination of Newtown and 10, East. In the background is 271 Pakington St - City of Newtown and Chilwell offices, in 2020, a Residential property. Photo mid 1940's. trams, tramways, geelong, pakington st, aphasia st, tram 2, tram 10 -
 Ballarat Tramway Museum
Negative, Wal Jack, late 1940's
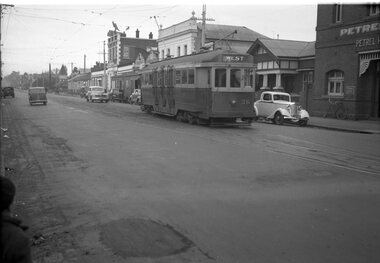
Negative and Digital images of the Wal Jack Geelong Negative file of Geelong 36 in Pakington St near the corner with Collins St, leaving the crossing loop, heading for West. Has the Petrel Hotel in the background. Photo late 1940's. trams, tramways, geelong, pakington st, west, tram 36 -
 Ballarat Tramway Museum
Negative, Wal Jack, mid to late 1940's
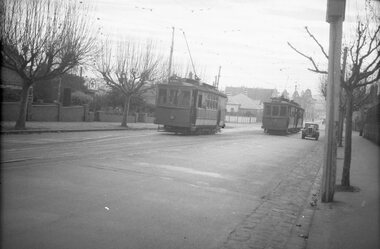
Negative and Digital images of the Wal Jack Geelong Negative file of the Geelong 3? (East) and 5 (Newtown) and another car following crossing at the Retreat Road crossing loop? (Not sure here) in Pakington St. Photo mid to late 1940's. trams, tramways, geelong, pakington st, tram 5? tram 3 -
 Ballarat Tramway Museum
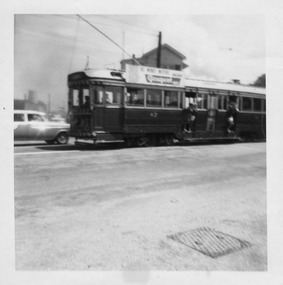
Negative, Wal Jack, Ballarat No. 20 (Mt Pleasant) and No. 26 (Gardens) crossing at the Grant St loop, 3-10-1953
Print - see 8991 - gives details on the rear - Football grand final 3-10-1953. Wal notes that it was the first time he had seen trams crossing at the loop.Yields information about the Grant St loop on the Mt Pleasant line.Negative and Digital images of the Wal Jack Ballarat Negative file of Ballarat No. 20 (Mt Pleasant) and No. 26 (Gardens) crossing at the Grant St loop in Barkly St, Mt Pleasant.trams, tramways, grant st, barkly st, mt pleasant, tram 20 -
 Ballarat Tramway Museum
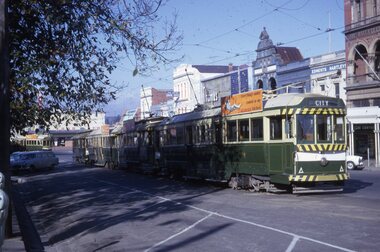
Slide - 35mm slide/s, 3/03/1968 12:00:00 AM
35mm colour slide - Kodak white cardboard of a line up of trams in Lydiard St North, Sunday 3/3/1968, looking towards the railway level crossing from the Seymour St loop. Has trams 41, 34, 43, 36, 40, 11, 20, 11, 39, 37 and 21 over crossing. Special service for the Vintage Train.In ink "Ballarat Sunday 3/3/68, Lydiard St North towards railway xing from loop, 41, 34, 43, 36, 40, 11, 20, 11, 39, 37 and 21 over crossing, as specials for passengers off "The Vintage Train"" and KSK stamp with number "19-1"tramways, trams, seymour st, lydiard st nth, tours, vintage train, tram 41, tram 34, tram 43, tram 36 -
 Ballarat Tramway Museum
Photograph - Digital image, Mal Rowe, 29/06/1968 12:00:00 AM
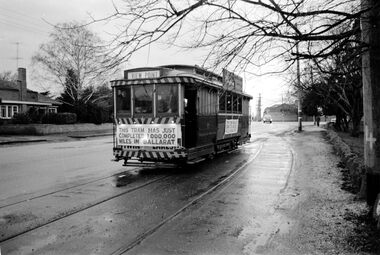
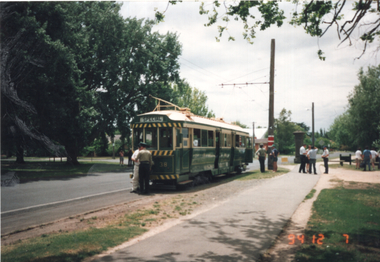
Yields information about the purported achievement of tram 27 reaching 1,000,000 miles and the TMSV Tour and the Lake View loop, showing its relationship with the Ballarat A power station and the removed set of points that were used to construct 0 road at the SEC depot in 1956.Digital image of a Black and white photograph of Tram 27 at the Lake View Loop in Wendouree Parade during the celebrations of the tram completing its "millionth" mile in Ballarat on Saturday 29 June 1968. Note that the south end points of the loop have been removed. The Ballarat A Power station fence is in the background. Tram showing "Special", has banner "This tram has just completed 1,000,000 (million) miles in Ballarat" on the front of the tram during the TMSV Celebratory tour. See also Reg Items 1878 and 7990 to 7995 for other photos of the day by Mal Rowe. Note: A review of the tram car mileages by Dave Macartney, showed that it was actually 900,000, due to a carryover error.trams, tramways, tmsv, million miles, lake view, wendouree parade, crossing loop, ballarat a power station, tram 27 -
 Ballarat Tramway Museum
Slide - 35mm slide/s - set of 3, Les Fordham, Aug. 1967
Yields information about tram operations in Wendouree Parade during August 1967.Set of 3 Kodachrome white cardboard mount 35mm slides - dated August 1967 taken by Les Fordham. .1 - trams 32 (Victoria St) and 30 ( (Gardens Via Drummond North) crossing at the depot loop or Barrett Ave loop in Wendouree Parade. .2 - tram in the loop, about to leave - blurry can't read the number. .3 - tram 30 entering the loop, the red signal light is illuminated. The tram stop pole appears to be recently painted.tramways, trams, depot loop, barrett ave, tram stops, signals, tram 30, tram 32 -
 Ballarat Tramway Museum
Slide - 35mm slide/s, Les Fordham, Aug. 1967
Yields information about the tram services and the use of the City Loop.Kodachrome white cardboard mount 35mm slides - dated August 1967 taken by Les Fordham of four trams (two bogies and two single truckers) lead by No. 41 with another bogie crossing Grenville St. In the background is the Dickens food store, Union Hotel, Thomas Jewellery and Edments Hartleys sports store.tramways, trams, sturt st, city loop, grenville st, tram 41 -
 Ballarat Tramway Museum
Photograph - Digital image, W. J. Llewelyn, 1/01/1970 12:00:00 AM
Yields information about the intersection of Sturt and Lydiard St.Digital images of tram 43 crossing Lydiard St in Sturt St, with destination of Gardens via Sturt St West. Has the T&G sign, Mechanics Institute and the Unicorn Hotel in the view. Photo by Chris Phillips. Image dated 1/1/1970 - to be confirmed. trams, tramways, sturt st, lydiard st, city, tram 43 -
 Ballarat Tramway Museum
Negative, Bruce Herbert, "Bendigo and Ballarat Trams (AETA Convention) 30 Mar 1975", 30/03/1975 12:00:00 AM
Negative folder - made by ROW1 International of West Germany containing 40 No. 35 mm negatives of the AETA 1975 Convention visit to Ballarat and Bendigo on 30-3-1975. 17 photos of Ballarat and 23 of Bendigo. Ballarat photos: 1 - 40 at the Wendouree Parade crossing loop showing trams stop signage and AETA members standing at the front of the tram. 2 - distant view of 27 in the loop and the "wide roadway" 3 - view of 40 northbound about to nearing loop with various cars in the view. 4 - 40 about to enter loop with 27 in background. 5 - 40 and 27 at loop 6 - 40 at St Aidans Drive 7 - 14 and 27 at loop with 40 in the background 8 - 27 leaving loop 9 - 14 leaving loop 10 - General view showing cars and 40 in the loop, looking north. 11 - as for 1 12 - ditto 13 - 40 northbound, 27 southbound at loop 14 - 27 at loop 15 - 26, 14 and 28 at depot including 1 road. 16 - ditto with people viewing the trams - shows the overhead on 1 road. 17 - X41 and B80 on train at Spencer St, probably the train the group travelled on. trams, tramways, btps, ballarat, aeta, bendigo, bendigo trust, wendouree parade, depot, gardens loop, motor vehicles, tram 40 tram 27 tram 26 tram 14 tram 28 -
 Ballarat Tramway Museum
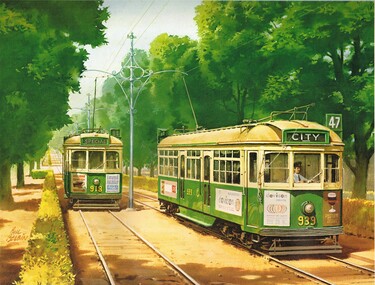
Document - Calendar, Comeng Rolling Stock Division and Phil Belbin, 1984
testCalendar - large wall with clear plastic sheet - spiral wire bound at top issued by Comeng Rolling Stock division of ANI Corporation in 1985. Features 6 paintings by Phil Belbin. 1 - (Jan - Feb) NSW 8029 leading the southbound Intercapital Daylight out of the Bowral tunnel. 2 - (Mar - Apr) - trams 939 and 918 - Victoria Parade reserved track. 3 - (May - Jun) - South African Railways Blue Train 4 - (Jul - Aug) - VR S300 and 301 5 - (Sep - Oct) - QR 1298 on the Sunlander crossing a 2' gauge cane steam loco. 6 - (Nov - Dec) - Commonwealth Railways - Rawlina - Transcontinental train leaving Rawlinna - with the Tea and Sugar Train. For details of the artist see - https://en.wikipedia.org/wiki/Phil_Belbin (accessed 2-1-2018). See btm7022note from Bruce Belbin his son re use of the image. tramways, trams, art work, painting, victoria parade, railways -
 Ballarat Tramway Museum
Photograph - Digital image Set of 2, Chris Phillips, c1970
Yields information about the use of trams in the vicinity of Hospital Corner.Set of two digital images of trams at Hospital corner, c1970 by Chris Phillips.. .1 - No 39 inbound in Sturt St, about to cross Drummond St. Has the Hospital in the background and the tram stop. Tram has the destination of Mt Pleasant. .2 - No. 17 crossing Sturt St from Drummond St South. Has the destination of Lydiard St North. Has the buildings on the corner and the various directional signs in the view. Tram has a SEC roof advert - everything's under control in my all electric kitchen. Ritchie's food and liquor store in the background.trams, tramways, hospital corner, sturt st, drummond st, tram 39, tram 17 -
 Ballarat Tramway Museum
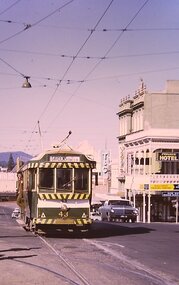
Photograph - Digital image, Chris Phillips, c1971
... Ballarat Tramway Museum South Gardens Reserve Wendouree ...Yields information about the tram track and trams at the Urquhart St crossing loop,Digital images of tram 17, destination Sebastopol entering the Bell St loop ??? to be checked.trams, tramways, sebastopol, tram 17 -
 Ballarat Tramway Museum
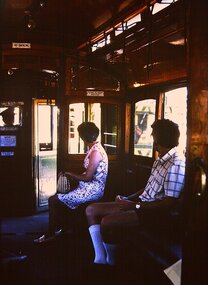
Photograph - Digital image, Chris Phillips, c1970
... the interior view of a tram when crossing another tram. Trams tramways ...Yields information about the interior view of a tram when crossing another tram.Digital images of an interior photo within a tram, crossing another tram at a loop. Has two people in summer clothing. Photo by Chris Phillips, c1970.trams, tramways, interiors, ballarat -
 Ballarat Tramway Museum
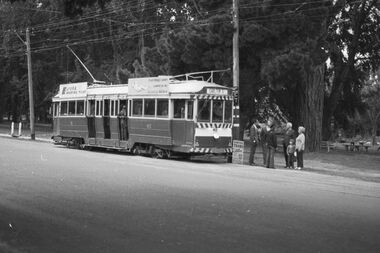
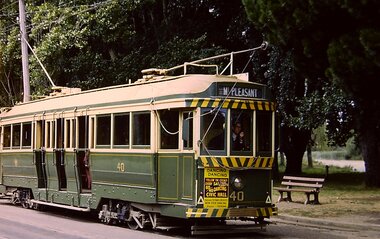
Photograph - Digital image, Chris Phillips, early 1960's
Yields information about the SEC Ballarat tramway, c1960 in Wendouree Parade at a crossing loop and crews.Digital image of No. 40, early 1960's at a Crossing Loop in Wendouree Parade, possibly depot loop with Lake Wendouree in the background. Driver appears to be smoking a pipe. Tram has the destination of Mt Pleasant and a dash canopy advert for Dancing at the Civic Hall.trams, tramways, lake wendouree, wendouree parade, civic functions, tram 40 -
 Ballarat Tramway Museum
Photograph - Digital image, Chris Phillips, c1970
Yields information about the tram operations at the Lydiard St level crossing and the Ballarat Railway Station.Digital image of No. 32 crossing the Lydiard St North level crossing at Ballarat Railway Station . Tram has the destination Lydiard St North. In the background is the station building, clock tower and the signal gantry. On the right hand side is Reids Coffee Palace.trams, tramways, lydiard st north, level crossings, ballarat railway station, tram 32 -
 Ballarat Tramway Museum
Photograph - Digital image, Chris Phillips, c1970
... . Trams tramways Level Crossings Lydiard St North Railway Station ...Yields information about the tram operations in Lydiard St North and the type of trams used.Digital image, black and white, of No. 42 in Lydiard St, north bound, waiting at the railway gates with the signal box in the background. Out of focus.trams, tramways, level crossings, lydiard st north, railway station, tram 42 -
 Ballarat Tramway Museum
Photograph - Digital image, Chris Phillips, c1970
... level crossings. Trams tramways Level Crossings Lydiard St North ...Yields information about the tram and railway operations in Lydiard St North at the railway level crossings.Digital image, black and white, of a bogie tram waiting at the Ballarat station level crossing for a locomotive (K class) to cross.trams, tramways, level crossings, lydiard st north, ballarat railway station, railways -
 Ballarat Tramway Museum
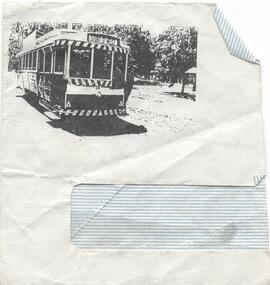
Drawing - Illustration/s, Printed on an envelope Ballarat 14, 1980's?
Demonstrates illustrating an envelope with a image of a tram. Source not known.Illustration on part of a lined window envelope of Ballarat Tram 14 at the Wendouree Parade Gardens crossing loop. Tram has the destination of Sturt St West. Appears to have been photocopied onto the envelope. Purpose not known.trams, tramways, envelopes, wendouree parade, gardens loop -
 Ballarat Tramway Museum
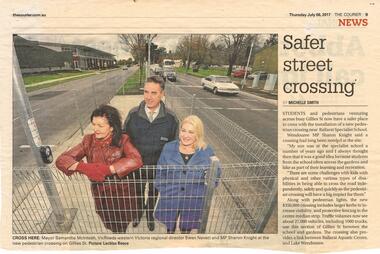
Newspaper, The Courier Ballarat, "Safer Street Crossing", 6/07/2017 12:00:00 AM
Newspaper clipping from The Courier, 6/7/2017 titled "Safer Street Crossing" about the installation of a set of traffic lights at the rear of the Museum Depot. Photo looking north along Gillies St. Included in the photo is Samantha McIntosh, VicRoads Ewen Nevett and MP Sharon Knight. Tram depot in the background. Note the traffic light installation resulted (a bit of accident and good talking by Neville Britton) of a crossing into the depot. Was not included in the drawings.gillies st, traffic lights, ballarat specialist school -
 Ballarat Tramway Museum
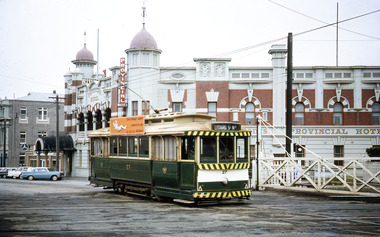
Photograph - Black & White Photograph/s, Ray Jackson, c1970
... tramway operations at the Ballarat station level crossing. Trams ...Yields information about tramway operations at the Ballarat station level crossing.Black and white photograph of tram 36? crossing the Lydiard St railway crossing with signal box and Provincial Hotel in the background. Tram has the destination of Sebastopol. c1970. trams, tramways, lydiard st north, level crossings, railway station, tram 36? -
 Ballarat Tramway Museum
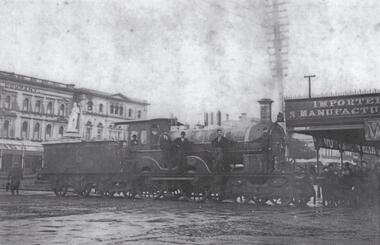
Document - Photocopy, Phoenix Foundry AA class 4-4-0 locomotive
Yields information and demonstrates the use of the railway line that connected the Phoenix Foundry and the railway yards at Ballarat and how it crossed the tram line.Photocopy of a Black and white photograph of a Phoenix Foundry AA class 4-4-0 locomotive, 1893c, crossing Sturt St at Armstrong St from the locomotive works om the way to be painted at a siding near the railway station. Has the Snows store in the background and the Poet Thomas Moore statue in the background. Photo from the Butrims and Macartney book on the Phoenix Foundry. trams, tramways, phoenix foundry, locomotives, sturt st, statues, armstrong st -
 Ballarat Tramway Museum
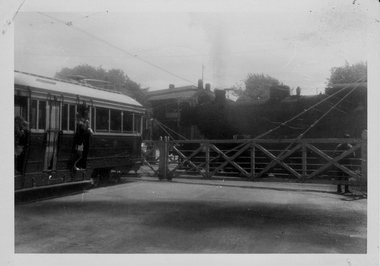
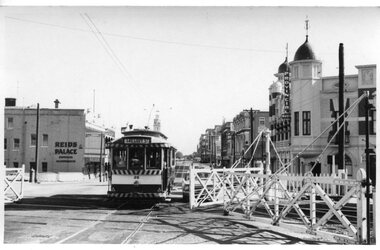
Photograph - Black and White - Lydiard St level crossing, A T Miles, 30/1/1968
... . Tramways trams Lydiard St North Level crossing Gregory St. tram 26 ...Black and White - set of two photographs taken at the Lydiard St level crossing with the gates. Taken by A T Miles 30/1/1968. 1 - tram 26 (Gregory St), north bound passing as the gates were opened. 2 - tram 14 (City), passing south bound through the crossing. Tram has a Cinzano roof advert.Yields information about the Lydiard St level crossing.Set of two Photographs - black and white print with notes on rear. A T Miles stamp and location and date notes.tramways, trams, lydiard st north, level crossing, gregory st., tram 26, tram 14 -
 Ballarat Tramway Museum
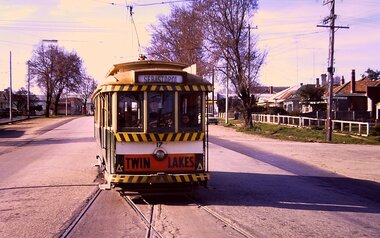
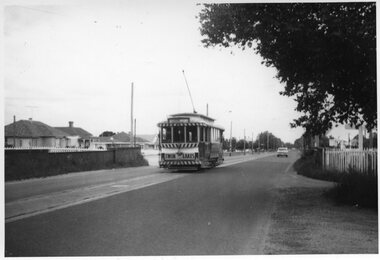
Photograph - Black and White - tram 11 Victoria St, A T Miles, 26/11/1969
Black and White - tram 11 in Victoria St crossing over the Eureka line bridge - former Buninyong railway line. Taken by A T Miles 26/11/1969. The tram has a Twin Lakes advert on the front. The destination has been changed for the return trip to the Gardens via Sturt St West.Yields information about services to Victoria St.Photograph - black and white print with notes on rear. A T Miles stamp and location and date notes.tramways, trams, tram 11, victoria st, eureka line, bridge, buninyong -
 Ballarat Tramway Museum
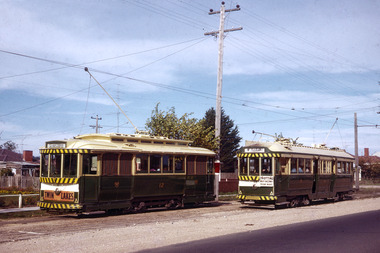
Photograph - Set of 7 - SEC 48 hour strike and Ballarat trams, A T Miles, 27/11/1969
Set of 7 photos of trams returning to the depot or in the depot at the time of a 48-hour strike by the SEC. Taken by A T Miles 27/11/1969. 1 - Tram 43 at depot junction returning to the depot 2 - Tram 34 at depot junction 3 - Tram 34 running into the depot with tram 21 alongside and two crew standing by the gate. 4 - Tram 17 crossing Wendouree Parade 5 - The depot gates are closed. 6 - All the trams are in - including 18 as the Santa tram, 35 and 21. 7 - All the doors are closed.Yields information about trams returning to the depot at the time of a 48 hour strike by the SEC in 1969.Photograph - black and white print with notes on rear - set of 7A T Miles stamp and location and date notes.tramways, trams, strike, sec depot, tram 43, industrial issues -
 Ballarat Tramway Museum
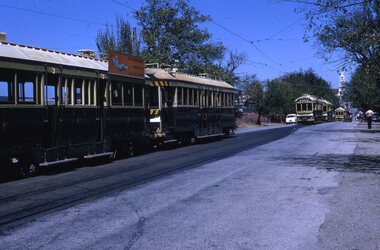
Photograph - Colour prints - trams 661 and 38 Wendouree Parade, 7-12-1994
Set of six colour prints of a tram tour on 7-12-1994 of trams 661 and 38. 1 - Tram 38 running a Special service at St Aidans Drive 2 - Trams 38 and 661 crossing at Gardens Loop 3 - Trams 38 and 661 at St Aidans Drive 4 - Trams 38 and 661 at St Aidans Drive 5 - Tram 661 arriving St Aidans Drive 6 - St Aidans Drive with tram 38 and the "Warning oncoming trams" signYields information about tram operations by the Ballarat Tramway Preservation Society.Set of 6 colour prints printed on Kodak paper.tramways, trams, btps, tram 38, tram 661, wendouree parade, signs -
 Ballarat Tramway Museum
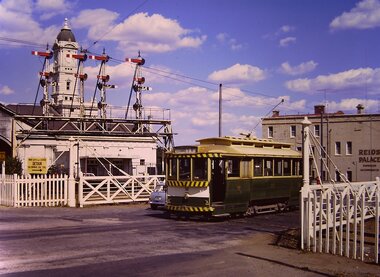
Photograph - Digital Image, Peter Knife, Tram 27 Lydiard St at Level crossing, 3/12/1966
Digital image of Tram 27 Lydiard St North at the Level crossing, with destination of Lydiard St Nth with white letters on a black roll. Has the Provincial Hotel in the background. Photo by Peter Knife 3/12/1966. Yields information about Ballarat's trams in December 1966.Digital image of a colour slide.tramways, tramcars, ballarat, tram 27, level crossing, lydiard st nth -
 Ballarat Tramway Museum
Photograph - Digital Image, Peter Knife, Trams 12 and 38 crossing Grey St loop, 10/5/1969
Digital image of Trams 12 and 38 crossing Grey St loop. Tram 38 has the unusual destination for this line of Mt Pleasant, a Bray raceway trotting auxiliary board. Photo by Peter Knife 10/5/1969. Yields information about Ballarat's trams in May 1969.Digital image of a colour slide.tramways, tramcars, ballarat, tram 38, albert st, sebastopol, tram 12, grey st loop -
 Ballarat Tramway Museum
Photograph - Digital Image, Peter Knife, Tram 36 outbound in Lydiard St Nth, 20/10/1970
Digital image of Tram 36 outbound in Lydiard St Nth - side on view crossing an intersection. The conductor can be seen selling tickets, leaning against the drop centre bulkhead. Photo by Peter Knife 20/10/1970. Yields information about Ballarat's trams in October 1970.Digital image of a colour slide.tramways, tramcars, ballarat, lydiard st nth, conductors, tram 36