Showing 39 items
matching australian army - soldiers - western australia
-
 Australian Army Museum of Western Australia
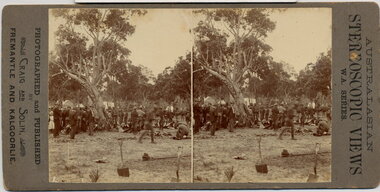
Stereographic Image, 1900
The 1st Contingent departed Fremantle on 7 November 1899 and returned on 29 December 1900. The 2nd Contingent departed 3 February 1900 and returned 8 December 1900. Due to the shortage of khaki material, the 1st Contingent uniforms wore their blue militia tunics, blue puttees and a dark blue puggaree on departure. An Anglo Boer War Service of Reconciliation is held annually on the first Sunday in June at the "Fallen Soldiers" (Boer War) Memorial in Kings Park attended by descendants and representative of all combatant nations. The date selected is the closest Sunday to the date of signing of the Treaty or Peace of Vereeniging (31 May 1902). The culmination of the service is the laying of the Emily Hobhouse wreath.Unique series of stereoscopic images showing both the 1st and 2nd West Australian Mounted Infantry Contingents to the Anglo Boer War. Images contain details of uniforms, accoutrements, camp life, civic honours and departure.Untitled [Issue of Harness at Karrakatta Camp]. Published in Australian Stereoscopic Views, WA Series, Photographed and published by Craig and Solin, Fremantle and KalgoorliePhotographed and published by Craig and Solin, Fremantle and Kalgoorliestereoscope, boer war, south africa, capetown -
 Australian Army Museum of Western Australia
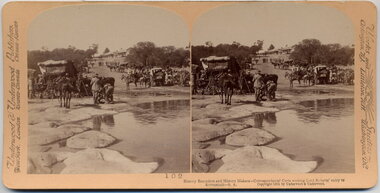
Stereographic Image, 1900
The 1st Contingent departed Fremantle on 7 November 1899 and returned on 29 December 1900. The 2nd Contingent departed 3 February 1900 and returned 8 December 1900. Due to the shortage of khaki material, the 1st Contingent uniforms wore their blue militia tunics, blue puttees and a dark blue puggaree on departure. An Anglo Boer War Service of Reconciliation is held annually on the first Sunday in June at the "Fallen Soldiers" (Boer War) Memorial in Kings Park attended by descendants and representative of all combatant nations. The date selected is the closest Sunday to the date of signing of the Treaty or Peace of Vereeniging (31 May 1902). The culmination of the service is the laying of the Emily Hobhouse wreath.Unique series of stereoscopic images showing both the 1st and 2nd West Australian Mounted Infantry Contingents to the Anglo Boer War. Images contain details of uniforms, accoutrements, camp life, civic honours and departure.Decorations High Street Fremantle. Departure 2nd WA Contingent. Published in Australian Stereoscopic Views, WA Series, Photographed and published by Craig and Solin, Fremantle and KalgoorliePhotographed and published by Craig and Solin, Fremantle and Kalgoorliestereoscope, boer war, south africa, capetown -
 Australian Army Museum of Western Australia
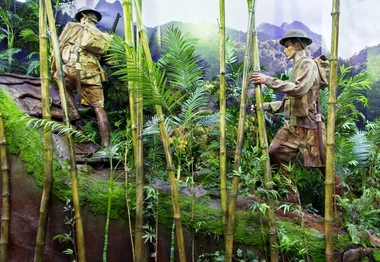
Diorama, 2015
This diorama is the central feature in the World War 2 Gallery - South West Pacific area. Soldiers are shown still wearing khaki uniforms including shorts. Details include helmet, .303 SMLE rifles, small pack and fighting order. Japanese "Woodpecker" machine gun is show abandoned beside the track.1:1 scale diorama showing Australian patrol advancing up the Kokoda Track in light fighting order circa August 1942.kokoda -
 Australian Army Museum of Western Australia
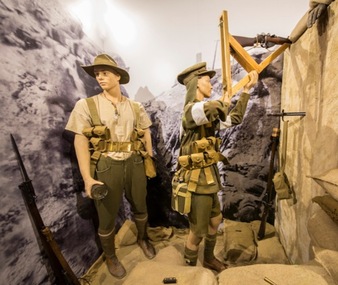
Diorama, 2015
This diorama is the central feature in the World War 1 Gallery - 1915 sequence. Soldiers are shown local adoption to issue uniforms including shorts, sun protection and recognition patches. Local innovations including jam-tin bombs, periscope rifle and evacuation rifle are portrayed.This diorama attempts to convey the difficult conditions found at Gallipoli and the ingenuity of soldiers to adapt to local conditions. This diorama contrasts with the adjacent which shows the official uniform as worn by 11 Battalion AIF at the time of landing on 25 April 1915.1:1 scale diorama showing Australian trench at Gallipoli August 1915gallipoli -
 Australian Army Museum of Western Australia
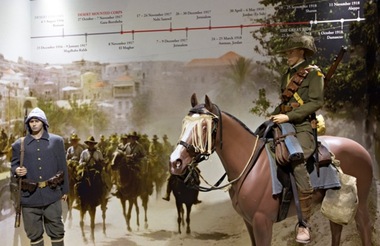
Diorama, 2015
This diorama is the central feature in the World War 1 Gallery - Middle East Campaigns sequence and shows typical uniforms and accoutrements of the Australian Light Horse and Ottoman infantry.This diorama attempts to convey the conditions experienced and the country traversed during "The Great Ride"1:1 scale diorama showing mounted trooper of 10th Australian Light Horse Regiment in Palestine 1918 and dismounted Ottoman soldiergaza, beersheba, light horse -
 Australian Army Museum of Western Australia
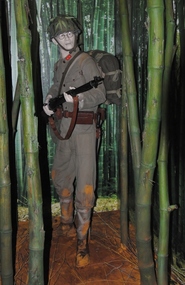
Diorama, 2015
This diorama is the introductory feature in the World War 2 Gallery - South West Pacific area. A private soldier is shown cautiously advancing down a jungle track outflanking Allied defensive positions1:1 scale diorama showing soldier of Imperial Japanese Army advancing through jungle in Malaya January 1942fall of singapore, 8th australian division -
 Australian Army Museum of Western Australia
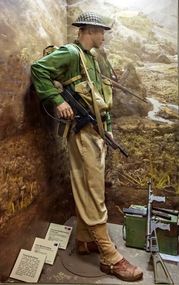
Diorama, 2015
This diorama is the introductory feature in the World War 2 Gallery - New Guinea and Islands area. A private soldier is shown in mixture of green and khaki uniforms, US style long leggings, long trousers with Thompson and Owen guns.The diorama shows the gradual introduction of green uniform elements and recognition of passive anti malaria measures (long sleeve and long pants)1:1 scale diorama showing soldier of Australian soldier of the 7th Division at the time of the advance into the Markham and Ramu Valleys, September 1943ramu, markham, shaggy ridge, 7th division, 9th division -
 Melbourne Legacy
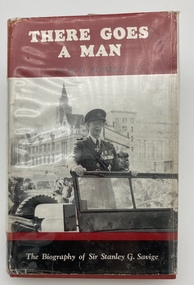
Book, There Goes A Man. The Biography of Sir Stanley G Savige, 1959
The detailed biography of Lieutenant-General Sir Stanley Savage.Red cloth bound copy of W B Russell's biography of Legatee Savige with a paper dust jacket with photosnon-fictionThe detailed biography of Lieutenant-General Sir Stanley Savage. history, w b russell, biography -
 Bendigo Military Museum
Photograph - 4th Field Survey Squadron – Operation MIZMAZE 92, Kimberley region, Western Australia, 1992
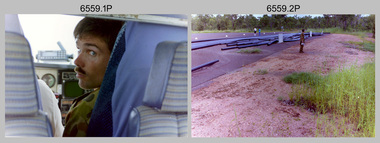
This is a set of 40 photographs taken in 1992 during 4th Field Survey Squadron’s deployment on Operation MIZMAZE 92 in the Kimberley region of Western Australia from the 13th of May to the 14th of July 1992. The area of operations was Wyndham, Halls Creek and Sandfire Flat. It was a two-part operation involving the field completion of topographic maps and the acquisition of mapping control by GPS field parties utilising Texas Instruments TI4100 Global Positioning System receivers. Survey parties conducted field checking of topographic maps and GPS control acquisition in Perentie 110 Series Survey variant FFR Land Rovers. Three Bell Kiowa LOH helicopters provided by 162 Recce Sqn supported field checking and limited deployment of GPS surveys parties. C-l30 Hercules from 36 Sqn supported deployment and extraction of personnel and equipment to and from from the AO. A Cessna 404 Titan Ambassador from Vee-H Aviation was used as the Wild RC10 camera platform for aerial photography acquisition.This is a set of 40 photographs taken in 1992 during 4th Field Survey Squadron’s deployment on Operation MIZMAZE 92 in the Kimberley region of Western Australia. The colour photographs are on 35mm negative film and are part of the Army Survey Regiment’s Collection. The photographs were scanned at 96 dpi. .1) - Photo, colour, 1992. CAPT Craig Hersant. .2) - Photo, colour, 1992. Unidentified officer/soldier. .3) & .4) - Photo, colour, 1992. Aboriginal rock art - Wandjina Gunduran, Donkey Creek. .5) - Photo, colour, 1992. Aboriginal rock art - Track Wandjinas, Donkey Creek. .6) & .7) - Photo, colour, 1992. CAPT Craig Hersant. .8) - Photo, colour, 1992. Kimberley region topography. CPL Glen Weatherell. .9) - Photo, colour, 1992. Unidentified personnel .10) - Photo, colour, 1992. Supermarket at unknown location. .11) to .13) - Photo, colour, 1992. Caravan park at unknown location. .14) - Photo, colour, 1992. Old bridge at Fitzroy Crosssing. .15) & .16) - Photo, colour, 1992. Survey party in Perentie 110 Series Land Rover. .17) & .18) - Photo, colour, 1992. Kimberley region topography. .19) - Photo, colour, 1992. Kimberley region topography. CPL Glen Weatherell. .20) - Photo, colour, 1992. Kimberley region topography, possibly the Bungle Bungles. .21) - Photo, colour, 1992. Kimberley region topography. SGT Frank Downie. .22) - Photo, colour, 1992. Kimberley region topography: the Bungle Bungles. .23) - Photo, colour, 1992. Kimberley region topography: the Bungle Bungles. .24) - Photo, colour, 1992. Kimberley region topography: the Bungle Bungles. SPR Neil Pedler. .25) & .26) - Photo, colour, 1992. Kimberley region topography: the Bungle Bungles. .27) - Photo, colour, 1992. Kimberley region topography. .28) - Photo, colour, 1992. Survey party with Perentie 110 Series Land Rover. .29) - Photo, colour, 1992. Kimberley region topography. .30) - Photo, colour, 1992. Survey party outside Perentie 110 Series Land Rover. .31) & .32) - Photo, colour, 1992. Survey party operating TI4100 GPS Receiver next to Perentie 110 Series Land Rover. SGT Eddie Jacobs. .33) & .34) - Photo, colour, 1992. Survey party operating TI4100 GPS Receiver next to Perentie 110 Series Land Rover. Unidentified surveyor. .35) - Photo, colour, 1992. Kimberley region topography. Hand water pump at well. .36) - Photo, colour, 1992. Survey party in Perentie 110 Series Land Rover. .37) - Photo, colour, 1992. Kimberley region topography. CPL Glen Weatherell. .38) - Photo, colour, 1992. Kimberley region topography viewed from Bell Kiowa LOH helicopter. .39) & .40) - Photo, colour, 1992. Unidentified surveyor field checking a preliminary map in a Bell Kiowa LOH helicopter..1P to .40P – There are no personnel identified. ‘1992 OP MIZMAZE annotated on negative sleeve.royal australian survey corps, rasvy, 4 fd svy sqn, op mizmaze 92