Showing 165 items
matching barkly gardens
-
 Ballarat Tramway Museum
Photograph - Black & White Photograph/s, Len Millar, 1969
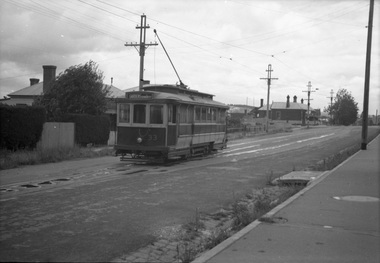
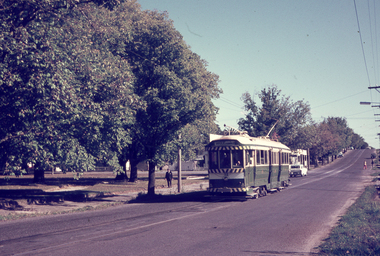
Yields information about the tram services in Ballarat in particular the Mt Pleasant line.Black and white photograph on card paper of SEC tram 17 in Barkly St, opposite Gladstone Reserve, just before the Mt Pleasant terminus. Note the tram destination has been changed for the return trip. Dated 1969. Photo by Len Millar.Detailed notes on rear in ink and pencil by Len Millar and Keith Kings - see image i2.trams, tramways, mt pleasant, barkly st, tram 17 -
 Ballarat Tramway Museum
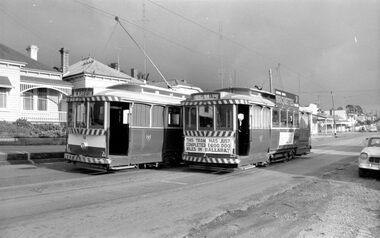
Negative, Wal Jack, Ballarat No. 20 (Mt Pleasant) and No. 26 (Gardens) crossing at the Grant St loop, 3-10-1953
Print - see 8991 - gives details on the rear - Football grand final 3-10-1953. Wal notes that it was the first time he had seen trams crossing at the loop.Yields information about the Grant St loop on the Mt Pleasant line.Negative and Digital images of the Wal Jack Ballarat Negative file of Ballarat No. 20 (Mt Pleasant) and No. 26 (Gardens) crossing at the Grant St loop in Barkly St, Mt Pleasant.trams, tramways, grant st, barkly st, mt pleasant, tram 20 -
 Ballarat Tramway Museum
Pamphlet, Peter Lambert, "Discover Historic Mount Pleasant - A guide to historic sites in Mount Pleasant", May. 2019
Pamphlet - 24 pages - full colour DL centre stapled, titled "Discover Historic Mount Pleasant - A guide to historic sites in Mount Pleasant" with map showing the various sites. Includes photographs of the Mt Pleasant tram terminus and the tram mural. See Reg item 7987.trams, tramways, mt pleasant, trams, history, heritage, barkly st -
 Ballarat Tramway Museum
Photograph - digital Images, Warren Doubleday
Set of 6 digital images featured on the building on the south west corner of Barkly and Cobden Sts, the Mount Pleasant tram terminus. Taken 12/11/2020 .1 - general view .2 - view of the main panel with interpretative panels. .3 and .4 - view of the interpretative panels with credits - includes photo turned into a mural by Bob Wilson. .5 - map panel .6 - pamphlet box.trams, tramways, mount pleasant terminus, barkly st, history, heritage, interpretation -
 Ballarat Tramway Museum
Photograph - Digital image, Mal Rowe, 29/06/1968 12:00:00 AM
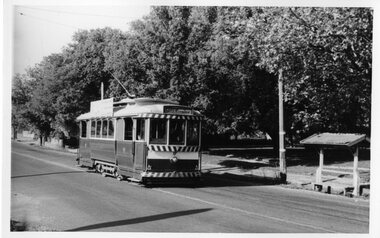
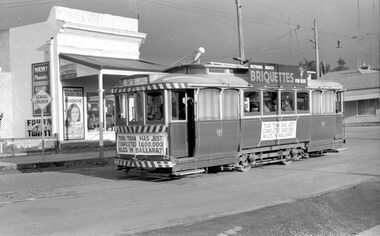
Yields information about the purported achievement of tram 27 reaching 1,000,000 miles and the TMSV Tour, and the Mt Pleasant terminus.Digital image of a Black and white photograph of Tram 27 at the Mt Pleasant terminus, Barkly and Cobden St during the celebrations of the tram completing its "millionth" mile in Ballarat on Saturday 29 June 1968 In the background is the milk bar with a Peters Ice Cream cone, adverts for Four'N Twenty Pies, Vincent's Headache powders, Briquettes and Phoenix Strawberry Mallows. Tram showing "Special", has banner "This tram has just completed 1,000,000 (million) miles in Ballarat" on the front of the tram during the TMSV Celebratory tour. See also Reg Items 1878 and 7990 to 7995 for other photos of the day by Mal Rowe. Note: A review of the tram car mileages by Dave Macartney, showed that it was actually 900,000, due to a carryover error.trams, tramways, tmsv, million miles, mt pleasant, barkly st, tram 27 -
 Ballarat Tramway Museum
Photograph - Digital image, Mal Rowe, 29/06/1968 12:00:00 AM
Yields information about the purported achievement of tram 27 reaching 1,000,000 miles and the TMSV Tour.Digital image of a Black and white photograph of Tram 27 and 18 using the Grant St loop, Barkly St Mt Pleasant during the celebrations of the tram completing its "millionth" mile in Ballarat on Saturday 29 June 1968 Tram showing "Special", has banner "This tram has just completed 1,000,000 (million) miles in Ballarat" on the front of the tram during the TMSV Celebratory tour. See also Reg Items 1878 and 7990 to 7995 for other photos of the day by Mal Rowe. Note: A review of the tram car mileages by Dave Macartney, showed that it was actually 900,000, due to a carryover error.trams, tramways, tmsv, million miles, grant st, barkly st, tram 27, tram 18 -
 Ballarat Tramway Museum
Photograph - Digital image, Wal Jack, 1/01/1970 12:00:00 AM
Yields information about the Mt Pleasant terminus and tram operations c1970.Digital images of two trams at the Mt Pleasant terminus. Tram 14 has just arrived with passengers leaving. In front is another single trucker with passengers - possibly a charter - this tram has a Twin Lakes sign. Photo by Chris Phillips. Image dated 1/1/1970 - to be confirmed. In the background is the Milk bar with a Robur Tea, Women's Weekly, a cigarette advert and Coca Cola advert. trams, tramways, mt pleasant, barkly st, tram 14 -
 Ballarat Tramway Museum
Photograph - Digital image, Chris Phillips, c1970
Yields information about the tram track and trams using the Grant St Loop on the Mt Pleasant line.Digital image of No.14? leaving the Grant St loop, on the Mt Pleasant line, Barkly St. The tram has the destination of City. Photo by Chris Phillips, c1970.trams, tramways, grant st, barkly st, mt pleasant, tram 14? -
 Ballarat Tramway Museum
Photograph - Digital image, Chris Phillips, c1970
Yields information about the tram operations in Barkly St Mt Pleasant and the type of trams used.Digital image, black and white, of No. 13 in Barkly St with a Mt Pleasant destination.trams, tramways, mt pleasant, barkly st, tram 13 -
 Ballarat Tramway Museum
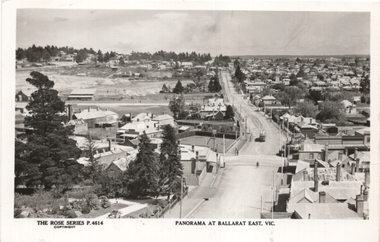
Postcard, Rose Stereograph Co, "Panorama at Ballarat East Vic", c1916
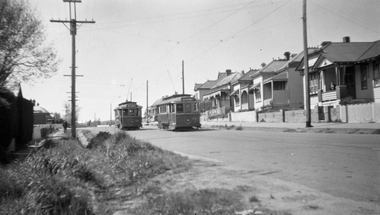
Photo looks west from the Ballarat Fire Station (East) tower, and has a good view looking along Barkly St. Shows the crossing loop between Eastwood and Main St with one tram in the view. Wal has dated the photo as 1914 in his album notes. On rear Wal Jack has written "Looking up Barkly St towards Mt Pleasant. Photo taken from Ballarat Fire Station about 1914-1916 period. Old type tram from Mt Pleasant about to turn into Main St. Note old passing loop behind tram. Loop removed to top of rise in centre background. Old Ballarat East Gardens on left and council yards, showing big tin shed in centre of picture. Locality much altered today." See item 5127 for a digital image.Yields information about the buildings and scene looking west from the Fire Station tower along Barkly St. East BallaratPostcard Black and white - Rose Series No P4614, Divided back. No publishers details on rear.See image 2 for Wal Jack's notes.tramways, trams, esco, ballarat east, barkly st -
 Ballarat Tramway Museum
Slide - 35mm slide/s, Dave Simpson, late 1960's early 1970's
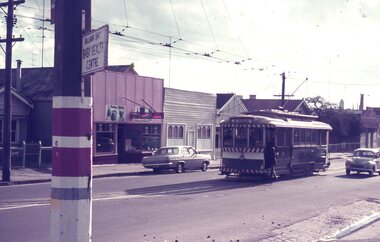
Yields information about Main Road, just before the intersection with Barkly St.One 35mm slide Anscochrome white plastic mounts of No. 13 with the destination of Mt Pleasant in Main Road, just before the intersection with Barkly St. with "Fish and Chips" shop in the background. Has a Tarax advert on the shop. (This shop was subsequently rebuilt with a car park next door, but is (27-8-16) now closed. In the foreground is a painted tram stop on a pole with a direction sign for the Ballarat East Baby Health Centre.tramways, trams, main road, mt pleasant, tram 13 -
 Ballarat Tramway Museum
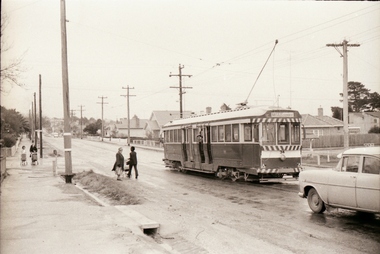
Negative - Set of 3, Campbell Duncan, 2/07/1971 12:00:00 AM
Yields information about tram operations and the street views on the Mt Pleasant line.Set of 3 photographs taken on 28/2/1971 by Campbell Duncan of trams on the Mt Pleasant line. .1 - tram - inbound - 34 to Gardens, at a rather wintry wet stop in Barkly St with passengers alighting and boarding. .2 - No. 34 at the Mt Pleasant terminus .3 - 34 inbound, soon after leaving the terminus.trams, tramways, mt pleasant, barkly st, tram 34 -
 Ballarat Tramway Museum
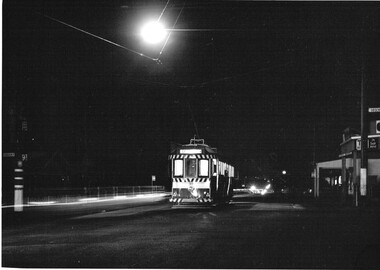
Photograph - Black & White Photograph/s set of 2, Charles Craig, 1971
Yields information about the appearance and use of the Mt Pleasant terminus at night.Set of two black and white photographs of No. 39 at the Mt Pleasant terminus, Barkly St. Have the shop at the terminus and the directional sign to the Observatory in the view, along with the tram stop pole. Adverts for TV week and Peter's Ice Cream are visible on the shop. Photo by Charles Craig - during August 1971 as one of the photos has the new bus stop sign in the view. trams, tramways, mt pleasant, barkly st, night photo, tram stops, bus stops, tram 39 -
 Ballarat Tramway Museum
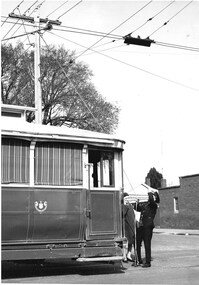
Photograph - Black & White Photograph/s, Charles Craig, 1971
Has a strong association with the crewman and demonstrates the work in placing a trolley pole on the overhead.Black and white photographs of the conductor (or motorman) placing the trolley pole of a single trucker on the overhead, shielding his eyes, at the Mt Pleasant terminus, corner of Cobden and Barkly Streets. A lady in a hat is speaking to him. Photo shows the trolley pole positioning device in the overhead. Possibly No. 30, see Reg item 6803. Photo by Charles Craig, probably August 1971.trams, tramways, trolley poles, mt pleasant, conductors, tram 30 -
 Ballarat Tramway Museum
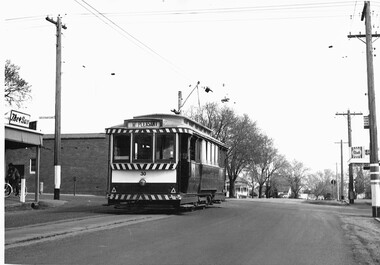
Photograph - Black & White Photograph/s, Charles Craig, 1971
Yields information about the Mt Pleasant terminus just before the closure of the SEC operated system,Black and white photographs of No. 30 at the Mt Pleasant terminus, with the shops on each corner in the view. Adverts for The Sun, Streets Ice Cream. Pole on the right hand side has a "Car Stop Here" and "End of Section" sign. Tram has the destination of Mt. Pleasant. Photo by Charles Craig, probably August 1971.trams, tramways, barkly st, mt pleasant, signs, tram 30 -
 Ballarat Tramway Museum
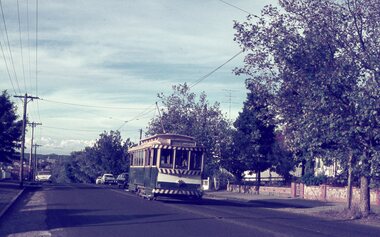
Slide - 35mm slide/s - set of 2, Keith Caldwell, 16/03/1963 12:00:00 AM
Yields information about 12 and the Barkly St Mt Pleasant route.Set of two Agfa colour slides, white cardboard mount, photo by Keith Caldwell on 16/3/1963 of: .1 - Tram 12 in Barkly St, with destination of Mt Pleasant. Tram has adverts for Dancing at Civic Hall and Whitehorse Whiskey on the front dash panel. .2 - on the return trip - has the same adverts. In ink "16.3.63"tramways, trams, mt pleasant, barkly st, tram 12 -
 Ballarat Tramway Museum
Slide - 35mm slide/s, Keith Caldwell, 1963
Yields information about tram 14 and the intersection of Barkly St and Main St with the Ballarat Fire Station in the background.Agfa colour slides, white cardboard mount, photo by Keith Caldwell during 1963 of: Tram 14 turning from Main St into Barkly St on its way to Mt Pleasant. In the background is the Ballarat Fire Station and a Milk Bar advertising Apples, Capstan cigarettes, The Sun and Four and Twenty Pies.tramways, trams, mt pleasant, main st, barkly st, tram 14 -
 Ballarat Tramway Museum
Negative, Wal Jack, mid 1940's
Yields information about Ballarat 's 33 in use at the Barkly St loop on the Mt Pleasant line.Negative and Digital image of the Wal Jack Ballarat Negative file of No. 33 inbound in Barkly St Mt Pleasant at the Grant St loop. The tram has the destination of Gardens via Drummond North on a wet day mid 1940's. Could be the same date as 5156 - another wet day 1-1-1945.trams, tramways, mt pleasant, barkly st, tram 33 -
 Ballarat Tramway Museum
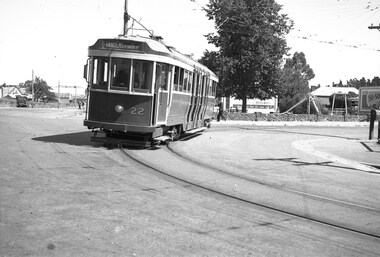
Negative, Wal Jack, late 1945 early 1946
Yields information about the corner of Main St and Barkly St and the first bogie trams that came to Ballarat.Negative and Digital image of the Wal Jack Ballarat Negative file of bogie car, 22 at the corner of Main Road and Barkly St. Tram has the destination of Gardens via Drummond Nth. late 1945 early 1946 trams, tramways, main road, mt pleasant, barkly st, tram 22 -
 Ballarat Tramway Museum
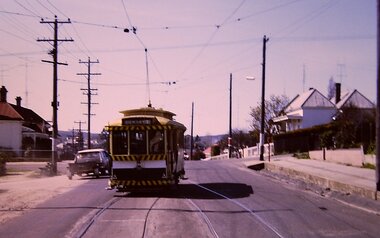
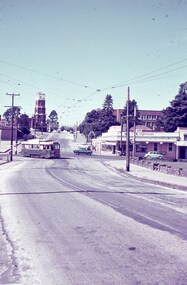
Slide - 35mm slide/s, Robert Thomson, May. 1968
Yields information about Ballarat's trams during 1968 and Barkly St Mt Pleasant.Kodachrome cardboard mount, colour slide of No. 31 in Barkly St Mt Pleasant, with the destination of Gardens via Drummond North. Has a Twin Lakes advert."5/68" in ink.tramways, trams, mt pleasant, barkly st, tram 31 -
 Ballarat Tramway Museum
Slide - 35mm slide/s, Robert Thomson, 28/04/1965 12:00:00 AM
Yields information about Ballarat's trams during 1965 and the Mt Pleasant line.AGFA blue / white plastic mount, colour slide of No. 37 inward bound in Barkly St Mt Pleasant, with the destination of Gardens via Drummond North. In the background is Pearce Park and a Caltex Service Station. Dated 28.4.1965"28.4.1965" in ink.tramways, trams, barkly st, mt pleasant, tram 37 -
 Ballarat Tramway Museum
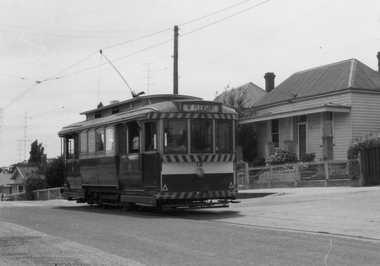
Slide - 35mm slide/s, Robert Thomson, 5/04/1969 12:00:00 AM
Yields information about Ballarat's trams during 1969, the Mt Pleasant line.AGFA blue / white plastic mount, colour slide of No. 35 outward bound in Barkly St Mt Pleasant, alongside Pearce Park. Tram has the destination of Mt Pleasant."5.4.1969" in ink.tramways, trams, mt pleasant, barkly st, tram 35 -
 Ballarat Tramway Museum
Slide - 35mm slide/s, Robert Thomson, 5/04/1969 12:00:00 AM
Yields information about Ballarat's trams during 1969, the Mt Pleasant line.AGFA blue / white plastic mount, colour slide of No. 38 inward bound in Barkly St Mt Pleasant, alongside Pearce Park. Tram has the destination of Gardens via Drummond North. The driver has the controller at the full parallel position."5.4.1969" in ink.tramways, trams, mt pleasant, barkly st, tram 38 -
 Ballarat Tramway Museum
Slide - 35mm slide/s, Robert Thomson, 11/04/1971 12:00:00 AM
Yields information about Ballarat's trams during 1971 and the Mt Pleasant line.AGFA blue / white plastic mount, colour slide of No. 18 inward bound in Barkly St Mt Pleasant. Tram has the destination of Gardens via Drummond North."11.4.1971" in ink.tramways, trams, mt pleasant, barkly st, tram 18 -
 Ballarat Tramway Museum
Slide - 35mm slide/s, Robert Thomson, 11/04/1971 12:00:00 AM
Yields information about Ballarat's trams during 1971, the Mt Pleasant lineAGFA blue / white plastic mount, colour slide of No. 41 in Barkly St Mt Pleasant. Tram has the destination of Mt Pleasant. In the background is the Ballarat Fire Station and a Milk Bar advertising Peters Ice Cream, The Age and Escort Cigarettes."11.4.1971" in ink.tramways, trams, mt pleasant, barkly st, tram 41 -
 Ballarat Tramway Museum
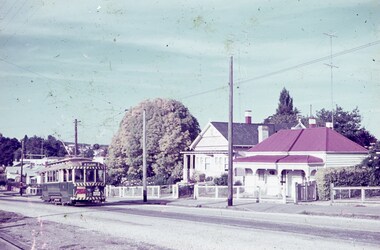
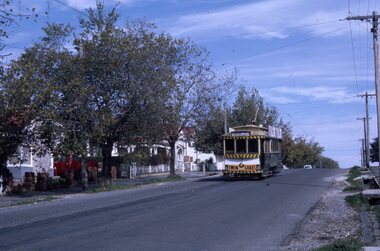
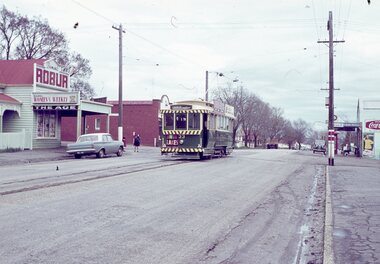
Slide - 35mm slide/s, Robert Thomson, c1964
Yields information about Ballarat's trams during 1964c, the Mt Pleasant terminus.AGFA blue / white plastic mount, colour slide of No. 33 at the Mt Pleasant terminus, c1964. In the background are the shops advertising Robur Tea, Women's Weekly, The Age, and coca Cola. The tram has a Twin Lakes sign. image i2 - cleaned up by PCW - 22-9-2022tramways, trams, mt pleasant, barkly st, tram 33 -
 Ballarat Tramway Museum
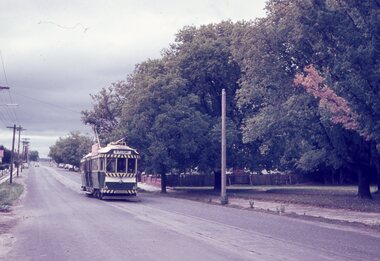
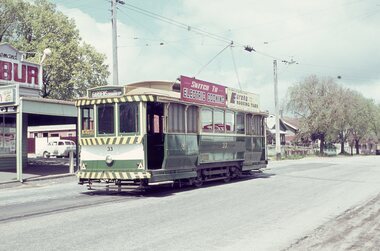
Slide - 35mm slide/s, Robert Thomson, c1966
Yields information about Ballarat's trams during 1966c, the Mt Pleasant terminus.AGFA blue / white plastic mount, colour slide of No. 33 at the Mt Pleasant terminus, c1966 - still has the white on black destination roll. In the background are the shops advertising Robur Tea, Women's Weekly, The Age, and Coca Cola. The tram has Eureka Roofing and Electric Cooking roof adverts.tramways, trams, mt pleasant, barkly st, tram 33 -
 Ballarat Tramway Museum
Photograph - Colour Photograph/s, Austin Brehaut, Mar. 1999
Set of 23 photographs taken by Austin Brehaut during March and April 1999 of power poles along the former tram routes that still have signs of the former tram stops. An accompanying note (scanned) written by Austin Brehaut is reproduced below in Other Information - see related documents. 1096.1 - Sturt St at Doveton St., south (down) side. .2 - Drummond St. Sth (east side) outside St. Patrick's School between Dana and Eyre St. .3 - Drummond St. Sth, cnr Urquhart St. (east side) .4 - Drummond St. Sth, cnr South St. (east side) .5 - Drummond St. Sth, cnr Sebastopol St. (east side) .6 - Drummond St. Sth, cnr Latrobe St. (east side) .7 - Drummond St. Sth, cnr Darling St. .8 - Sturt St. cnr Ripon St. (North East side) .9 - Ripon St. Nth, cnr Sussex St. .10 - Ripon St. Nth, cnr Mair St. (South West Corner) .11 - Ripon St. Nth, cnr Mair St. (North East Corner) .12 - Macarthur St. cnr Burbank St. (up side) .13 - Lydiard St. Nth, cnr Clarendon St. (east side) .14 - Lydiard St. Nth, cnr Howard St. (west side) .15 - Lydiard St. Nth, cnr Gregory St. (west side) .16 - Lydiard St. Nth, cnr Howitt St. (west side) .17 - Lydiard St. Nth, near Walker St., (east side) .18 - Lydiard St. Nth, cnr Landsborough St. (east side) .19 - Barkly St. cnr Main Road (up side) .20 - Barkly St. near Haymes Cres (down side) .21 - Barkly St., near Young St. (down side) .22 - Barkly St, Cameron St (up side) .23 - Barkly St., at Cobden St. terminus (west side) .1 - April 99, .2 > .10, 9/3/99, .11 > .18 - March 1999, .19 > .23 - April 1999. See also Reg. Item 768.1 > 768.6 for another group of tram stop photos in Drummond St. in 1997. On Fujifilm paper.On rear of each photo in blue ink is location at date at the top of the photo and in the bottom right hand corner - initials "APB"tram stops, power poles, barkly st., lydiard st. nth, ripon st., sturt st., drummond st. sth -
 Ballarat Tramway Museum
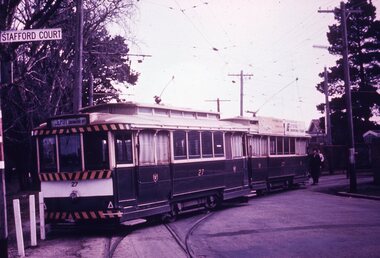
Slide - 35mm slide/s - set of 7, Noel Simons, 1970's
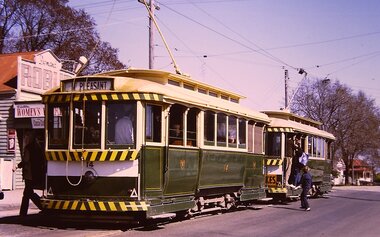
Set of 7 transparencies taken undated (appear to be 1970 or 71) on PAKON mounts. Also possibly copy slides as quality is poorish. 1175.1 - No. 27 has derailed at Depot, across Wendouree Parade, and No. 33 appears to be about to try and tow it back on. Wendouree Parade totally blocked. Adjacent pole has tram stop sign and has "Stafford Court" street sign mounted on it. 1175.2 - No. 43 at corner of Drummond St. South and Dana Street, with destination Lydiard St. North. 1175.3 - No. 42 (Mt Pleasant) and 21 (Gardens via Sturt St. West) crossing at Gardens Loop. 1175.4 - No. 42 bound for Lydiard St. Nth at intersection with Macarthur St. Shows the retaining wall for the cutting on the east side of Lydiard St. Nth. 1175.5 - No. 43 at corner of Lydiard St and Sturt St., at city terminus showing "Special" and tram 35 adjacent to Post Office in Lydiard St. Nth. Photo shows the small tram stop pole at this location and Post Office building. 1175.6 - No. 39 and 26 and 27 at the Mt Pleasant terminus. Near closure as a bus stop sign has been positioned on the west side of the road. No. 39 showing destination of "Gardens via Sturt St. West" 1175.7 - Nos 21 and 34 crossing at the Grant St. loop in Barkly St. 21 has destination of Mt Pleasant, while 34, - Gardens via Sturt St. West"All information on typed small white labels, on the top of the slides using black ink. 1175.1 - "27 derailed and 33 at depot" 1175.2 - "43 at cnr Drummond & Dana Sts" 1175.3 - "21 and 42 Gardens Terminus" 1175.4 - "42 at cnr Macarthur & Lydiard" 1175.5 - "43 & 35 at Post Office" 1175.6 - "39, 26 and 27 at Mt Pleasant" 1175.7 - "21 & 34 at Grant St"tramways, trams, wendouree parade, depot, accidents, derailments, drummond st. sth, gardens loop, post office, mt pleasant, grant st., tram 21, tram 26, tram 27, tram 33, tram 35, tram 42, tram 43 -
 Ballarat Tramway Museum
Slide - 35mm slide/s, Noel Simons, 21/11/1962 12:00:00 AM
Set of 17 transparencies taken on 21/11/1962 on Kodak mounts. 1188.1 - Bendigo No. 11 at Depot Junction McCrae and Arnold St. with driver/conductor changing points. 1188.2 - Bendigo No. 4 at Charing Cross, side on photo, with City Club Hotel and Alexandra Fountain in the background. Tram has Castrol and SEC 'Electric Cooking' ads. 1188.3 - Bendigo No. 4 climbing View St. after tram has passed photographer. Tram has Streets Ice Cream and Cohns Soft Drinks ad on rear dash panel. In the background are the buildings in View St., including the Princess Theatre. Tram has destination of Eaglehawk. 1188.4 - Trams 2 and 4 crossing at the California Gully or Thorpe St Loop. 1188.5 - Bendigo 4 in Mt Korong Road. Tram inbound with destination of Quarry Hill, just leaving Garden Gully Loop. 1188.6 - Bendigo 4 and 17 crossing at the Hayes St. or Iron Bark Gully Loop. No. 17 bound for Eaglehawk, No. 4, Quarry Hill. 17 has two SEC roof ads and a white horse whiskey ad. 1188.7 - No. 17 bound for Eaglehawk, soon after leaving California Gully. Has large mullock heap in background. 1188.8 - Bendigo 2 and 17 crossing at the Thorpe St. or California Gully Loop. Has butchers shop in background. 1188.9 - Bendigo 17 at the Eaglehawk terminus. Has destination of Quarry Hill. In background is the hotel and shops at the terminus, showing ads for "Melbourne Bitter". Tram has two SEC 'Electric Cooking' ads. Driver and conductor about to assist two lady passengers with a pram and baby. 1188.10 - No. 17 at Eaglehawk terminus, awaiting departure. Has Eaglehawk Town Hall and Post Office in background. Tram has a Whitehorse Whiskey ad on the front dash panel. 1188.11 - No. 3 in High St. Eaglehawk, with destination of Eaglehawk. Has the shops on the south side of High St. in the background, including the Eaglehawk fish shop. Tram has two roof ads, one an SEC roof ad, and Cohns Drinks and Streets Ice cream ads on front dash panel. 1188.12 - as above, but after tram has passed photographer. Note the centre of the road poles. 1188.13 - No. 2 outbound for Eaglehawk at the intersection of Mt. Korong Road and the Calder Highway. Photo taken after the tram has passed the photographer. Has an Ampol service station in the background. 1188.14 - No. 11 leaving the Bendigo depot, crossing the bridge, with the Scrubber car in the background. 1188.15 - No. 21 at the North Bendigo terminus. Tram has destination of Golden Square and Cohns drink ad on front dash and two roof ads on side. 1188.16 - No. 11 on Golden Square route, in High St. at intersection with Old High St. 1188.17 - No. 11 at the Golden Square terminus, conductor turning the pole. Hotel on the left side of the photo. Note the road works barrier and red flag behind the tram. Slide has an end of roll mark on the right hand side of the image.Information written on in black ink and date stamped on purple ink. 1188.1 - "Birney car No. 11 in McCrae St. at Cnr of Arnold about to run into depot, Bendigo" 1188.2 - "No. 4 at Alexandra Fountain, Charing Cross Bendigo" 1188.3 - "No. 4 climbing the View St. Hill from Charing Cross, Bendigo (Eaglehawk Route)" 1188.4 - "No. 4 and 2 at Thorpe St. Loop, California Gully" 1188.5 - "No. 4 in Mt Korong Rd., Long Gully, Near Havilah Rd. (Bendigo) (Eaglehawk Route)" 1188.6 - "Nos. 17 and 4 crossing on Hayes St. Loop, Ironbark, Bendigo" 1188.7 - "No. 17 soon after leaving California Gully (Eaglehawk Route)" 1188.8 - "No.2 and 17 crossing on Thorpe St. Loop, California Gully (Eaglehawk Route)" 1188.9 - "No. 17 at Eaglehawk terminus" 1188.10 - "No. 17 at Eaglehawk terminus" 1188.11 - "No. 3 in High St. Eaglehawk" 1188.12 - "No. 3 nearing Eaglehawk terminus" 1188.13 - "No. 2 in Mt. Korong Rd., Ironbark. Calder highway on left (Eaglehawk route) 1188.14 - "Birney car No. 11 leaving Bendigo depot. Scrubber car at rear" 1188.15 - "No. 21 at North Bendigo Terminus" 1188.16 - "Birney car No. 11 in High St. Bendigo at intersection with Old High Street (Golden Square Route)" 1188.17 - "Birney Car No. 11 at Golden Square terminus, High St., Bendigo". tramways, trams, bendigo, depot junction, charing cross, view st., eaglehawk, north bendigo, golden square, tram 2, tram 3, tram 4, tram 11, tram 17, tram 21, tram scrubber