Showing 203 items
matching bus line
-
 Kiewa Valley Historical Society
Book - Lions Club, Lions Club of Upper Kiewa Valley Celebrating Fifty Years of Service to the Community, 2014
The Upper Kiewa Valley Lions Club has served the Kiewa Valley for 50 years - raising money for the community. Its biggest success was the 'Snack Bar', a food outlet at Falls Creek, selling hot pies and coffee. From 1964 in a caravan, to 1965 - 1971 in a bus the snack bar operated, until it was sold in 1989. The book also outlines their other projects and office bearers.The Upper Kiewa Valley Lions Club involved local people and local events giving an insight into the development of the area over the last 50 years. Yellow soft covered book fastened by 2 staples. Deep yellow line outlines the cover with black print of title and date. Thick black "50" with Lions logo in green is enclosed by the 0 (in the 50). Back cover - also outlined with a deep yellow line. On the top middle is "50" including the logo surrounded by the "0" and underneath the words "We Serve".On page 9 "Ian Howley 2010/11"lions club, upper kiewa valley, 50 years, service club, community, snack bar at falls creek, conquestathon -
 Federation University Historical Collection
Document - Document - Letter, Ballarat Junior Technical School: Correspondence related to the enrolment of student,1952
Letter from Mrs McDonald requesting her son be enrolled at BJTS for the following year. Understands date has passed for enrolments. Knows there are a number of students from Meredith wishing to come. Would it be possible for the Bus to come to Meredith. Already goes to Elaine, four miles away. Mr Garner explains it is too late to enrol. School is full. Suggests he does Grade VII and then make application before October 1953. Ballarat High School Principal arranges bus travel..1: Lined writing paper - blue ink .2: Cream page, typed.1: Signature of Mrs Les McDonald ballarat junior technical school, head master, l garner, mrs l mcdonald, son, enrol at bjts, meredith, grade vii, ballarat high school, principal, october 31 -
 Greensborough Historical Society
Newspaper Clipping, Diamond Valley Leader, Buses on line in February, 24/01/2018
... victoria buses replace trains Hurstbridge rail line News article 1 ...Buses will continue to replace trains on the Hurstbridge line next month.News article 1 page, black text.public transport victoria, buses replace trains, hurstbridge rail line -
 Greensborough Historical Society
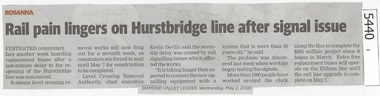
Newspaper Clipping, Diamond Valley Leader, Rail pain lingers on Hurstbridge line after signal issue, 02/05/2018
Frustrated commuters face another week boarding replacement buses after a last-minute delay to the re-opening of the Hurstbridge line was announced.News article 1 page, black text.level crossing removal project, rosanna station, hurstbridge rail line -
 Federation University Historical Collection
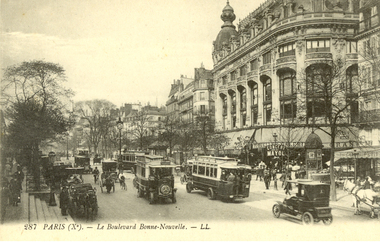
Postcard - black and white, Paris - Le Boulevard Bonne-Nouvelle, c1910
This item most probably dates from the World War One era. Boulevard de Bonne Nouvelle in the 9th district of the city of Paris.Buses and cars travel along a Paris street lined with buildings.chatham-holmes family collection, paris, bus, car, horse, world war one, paris, france -
 Flagstaff Hill Maritime Museum and Village
Painting - Maritime painting, C. W. Veale, Loch Ard, c. 1978
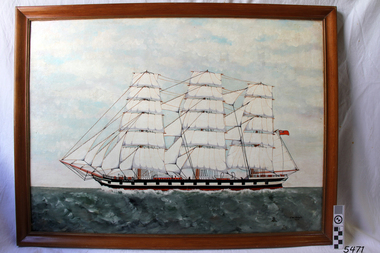
This painting is believed to have been created by an amateur artist C W Veale of Colac, who established an early bus service in about 1923, known at the time as the Blue Bus Service, which operated from Colac. This service was available for special trips within the Colac region. The Blue Bus Service became very popular with travellers to Lorne via the Deans Marsh Road. The label on the back of the painting comments on whether the ship would be in full sail at the time of the wreck. History of the Loch Ard: The Loch Ard got its name from "Loch Ard" a loch that lies to the west of Aberfoyle, and the east of Loch Lomond. It means "high lake" in Scottish Gaelic. The vessel belonged to the famous Loch Line which sailed many vessels from England to Australia. The Loch Ard was built in Glasgow by Barclay, Curle & Co. in 1873, the vessel was a three-masted square-rigged iron sailing ship that measured 79.87 meters in length, 11.58 m in width, and 7 m in depth with a gross tonnage of 1693 tons with a mainmast that measured a massive 45.7 m in height. Loch Ard made three trips to Australia and one trip to Calcutta before its fateful voyage. Loch Ard left England on March 2, 1878, under the command of 29-year-old Captain Gibbs, who was newly married. The ship was bound for Melbourne with a crew of 37, plus 17 passengers. The general cargo reflected the affluence of Melbourne at the time. Onboard were straw hats, umbrellas, perfumes, clay pipes, pianos, clocks, confectionery, linen, and candles, as well as a heavier load of railway irons, cement, lead, and copper. There were other items included that were intended for display in the Melbourne International Exhibition of 1880. The voyage to Port Phillip was long but uneventful. Then at 3 am on June 1, 1878, Captain Gibbs was expecting to see land. But the Loch Ard was running into a fog which greatly reduced visibility. Captain Gibbs was becoming anxious as there was no sign of land or the Cape Otway lighthouse. At 4 am the fog lifted and a lookout aloft announced that he could see breakers. The sheer cliffs of Victoria's west coast came into view, and Captain Gibbs realised that the ship was much closer to them than expected. He ordered as much sail to be set as time would permit and then attempted to steer the vessel out to sea. On coming head-on into the wind, the ship lost momentum, the sails fell limp and Loch Ard's bow swung back towards land. Gibbs then ordered the anchors to be released in an attempt to hold their position. The anchors sank some 50 fathoms - but did not hold. By this time the ship was among the breakers and the tall cliffs of Mutton Bird Island rose behind. Just half a mile from the coast, the ship's bow was suddenly pulled around by the anchor. The captain tried to tack out to sea, but the ship struck a reef at the base of Mutton Bird Island, near Port Campbell. Waves subsequently broke over the ship and the top deck became loosened from the hull. The masts and rigging came crashing down knocking passengers and crew overboard. When a lifeboat was finally launched, it crashed into the side of Loch Ard and capsized. Tom Pearce, who had launched the boat, managed to cling to its overturned hull and shelter beneath it. He drifted out to sea and then on the flood tide came into what is now known as Loch Ard Gorge. He swam to shore, bruised and dazed, and found a cave in which to shelter. Some of the crew stayed below deck to shelter from the falling rigging but drowned when the ship slipped off the reef into deeper water. Eva Carmichael a passenger had raced onto the deck to find out what was happening only to be confronted by towering cliffs looming above the stricken ship. In all the chaos, Captain Gibbs grabbed Eva and said, "If you are saved Eva, let my dear wife know that I died like a sailor". That was the last Eva Carmichael saw of the captain. She was swept off the ship by a huge wave. Eva saw Tom Pearce on a small rocky beach and yelled to attract his attention. He dived in and swam to the exhausted woman and dragged her to shore. He took her to the cave and broke the open case of brandy that had washed up on the beach. He opened a bottle to revive the unconscious woman. A few hours later Tom scaled a cliff in search of help. He followed hoof prints and came by chance upon two men from nearby Glenample Station three and a half miles away. In a complete state of exhaustion, he told the men of the tragedy. Tom then returned to the gorge while the two men rode back to the station to get help. By the time they reached Loch Ard Gorge, it was cold and dark. The two shipwreck survivors were taken to Glenample Station to recover. Eva stayed at the station for six weeks before returning to Ireland by steamship. In Melbourne, Tom Pearce received a hero's welcome. He was presented with the first gold medal of the Royal Humane Society of Victoria and a £1000 cheque from the Victorian Government. Concerts were performed to honour the young man's bravery and to raise money for those who lost families in the disaster. Of the 54 crew members and passengers on board, only two survived: the apprentice, Tom Pearce, and the young woman passenger, Eva Carmichael, who lost her family in the tragedy. Ten days after the Loch Ard tragedy, salvage rights to the wreck were sold at auction for £2,120. Cargo valued at £3,000 was salvaged and placed on the beach, but most washed back into the sea when another storm developed. The wreck of Loch Ard still lies at the base of Mutton Bird Island. Much of the cargo has now been salvaged and some items were washed up into Loch Ard Gorge. Cargo and artefacts have also been illegally salvaged over many years before protective legislation was introduced in March 1982. One of the most unlikely pieces of cargo to have survived the shipwreck was a Minton majolica peacock- one of only nine in the world. The peacock was destined for the Melbourne 1880 International Exhibition. It had been well packed, which gave it adequate protection during the violent storm. Today the Minton peacock can be seen at the Flagstaff Hill Maritime Museum in Warrnambool. From Australia's most dramatic shipwreck it has now become Australia's most valuable shipwreck artefact and is one of very few 'objects' on the Victorian State Heritage Register.The shipwreck of the Loch Ard is of significance for Victoria and is registered on the Victorian Heritage Register ( S 417). Flagstaff Hill has a varied collection of artefacts from Loch Ard and its collection is significant for being one of the largest accumulation of artefacts from this notable Victorian shipwreck of which the subject items are a small part. The collection's objects give us a snapshot of how we can interpret the story of this tragic event. The collection is also archaeologically significant as it represents aspects of Victoria's shipping history that allows us to interpret Victoria's social and historical themes of the time. Through is associated with the worst and best-known shipwreck in Victoria's history.Painting in brown-stained wooden frame. Depicts three-masted vessel 'Loch Ard' in full sail on moderate seas. Ship has figurehead, figures on board, and a Union Jack flag on red background. Ship's hull is black with white stripe, and is red on waterline. Ship's name is on hull. Artist C. W. Veale, painted in 1978, signed on bottom right. Label on back of painting has typed description of the Loch Ard and a comment.Signature "C W Veale / 1978" Text on hull "LOCH ARD" Label on back; " "LOCH ARD" / The clipper ship Loch Ard was wrecked on the 1st June 1878. / Of 54 people on board only two survived : Eva Carmichael and Tom Pearce. / Pearce became hero of the wreck for saving Miss Carmichael. / This picture shows the Loch Ard in full sail in moderate seas. / When approaching Cape Otway from the west, she would be in rough water and would presumably not be in full sail."flagstaff hill maritime museum, colac bus services, blue bus service, cw veale, loch ard paintings, loch ard, veale, warrnambool, great ocean road, eva carmichael, tom pearce, thomas pearce, cape otway, cargo ship 1878 -
 Ballaarat Mechanics' Institute (BMI Ballarat)
Buses line up near Station Lydiard St Nth
... station Buses line up near Station Lydiard St Nth ...This photograph is from the Max Harris Collection held by the Ballaraat Mechanics' Institute. Please contact BMI for all print and usage inquiries.ballarat, buses, railway station -
Port Melbourne Historical & Preservation Society
Document - Scrapbook, Holiday, Newcastle to Melbourne and return, 1954
Scrapbook of Norma Marie Davis, regarding holiday Newcastle to Melbourne and returntransport - bus, norma marie davis, general motors-holden, gmh, orient line, bonds tours, federal hotel -
 Tramway Heritage Centre
Photograph Album (part of), Ray Pearson's Photo Album - Trams of Victorian Railways, Ballarat, Bendigo, Geelong
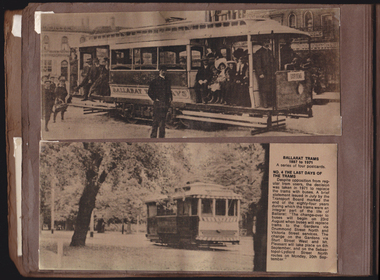
Page 4 of Ray Pearson's Photo Album. Brown card page with two metallic look postcards (landscape format) placed on page using clear plastic photo corners. Both postcard images depict trams in Ballarat. Both postcards have come loose of two of their photo corners (top and bottom on the left) and are not secure on the page.Printed text to back of postcard at top: BALLARAT TRAMS / 1887 to 1971 / A series of four postcards. / NO. 2 EARLY ELECTRIC TRAMS / Electric trams first ran in / Ballarat on 18th Aigust, 1905. / Twelve of the horse trams were / converted to electric cars by lengthening them at both ends. / Eight of the remaining horse / trams were used as trailers to / the motor cars. / The electric trams were / given a secret trial during the / previous night to the opening / date, but the drivers clanged / the gongs so much that it / brought people out of their / beds in night attire. They / formed an unofficial guard of / honour around Wendouree / Parade. / The trams were gaily decor- / ated for Opening Day. As the / line of cars came down Camp / Hill (Sturt Street) filled with / local dignitaries, the brakes on / the last car failed and it crashed / into the one in front. The win- / dows of both cars were / smashed, and the occupants / who had been sitting in state / made an undignified exit. / Seating accommodation was / from 32 to 36. Six small electric / trams were purchased from the / Sydney Tramways in 1905 and / were converted to a similar / pattern to the 12 re-built / Ballarat horse trams. In 1906 / two open summer cars with / open cross seats (popularly / called toast racks) / were intro- / duced. These trams were packed at week-ends with / families en route to picnic by / the lake. A fine printed vertical line runs down the centre of the blank writing space to the left of the body text. Above is written: POSTCARD Printed text to right of image on bottom postcard: BALLARAT TRAMS / 1887 to 1971 / A series of four postcards. / NO. 4 THE LAST DAYS OF THE TRAMS / Despite opposition from reg- / ular tram users, the decision / was taken in 1971 to replace / the trams with buses. A brief / statement issued in July by the / Transport Boar marked the / end of the eighty-four years / during which the trams were an / integral part of the life of / Ballarat: “The change-over to / buses will begin on 23rd / August when buses will replace / trams to the Gardens via / Drummond Street North and / Victoria Street services. The / change on the Gardens via / Sturt Street West and Mt. / Pleasant will take place on 6th / September, and on the Sebas- / topol-Lydiard Street North / routes on Monday, 20th Sep- / tember.” A fine printed vertical line runs down the centre of the blank writing space to the left of the body text. Above is written: POSTCARDpostcard, ballarat trams, ballarat tramways, vintage trams, tram postcard, electric trams -
 Hume City Civic Collection
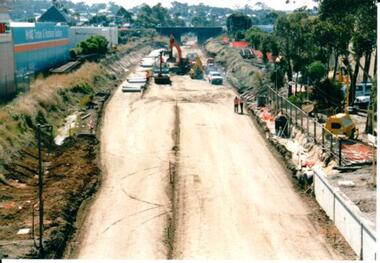
Photograph, 21/04/2005
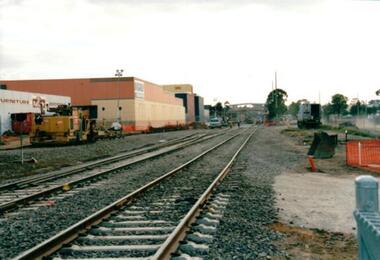
This photograph was taken during the upgrade of the Bendigo Railway line at the Sunbury Station in 2005. The upgrade took twelve months to complete and during this time bus services replaced the trains for commuters along Bendigo line.A coloured photograph of the construction on the site of the Sunbury Railway Station. The old railway lines have been removed and the bluestone road over rail bridge can be seen with excavation equipment in front of it. Concrete sleepers which replaced the old sleepers are on the LHS of the photograph.railways, bendigo line, railway stations, bridges, bluestone bridges, sunbury railway station, george evans collection -
 Hume City Civic Collection
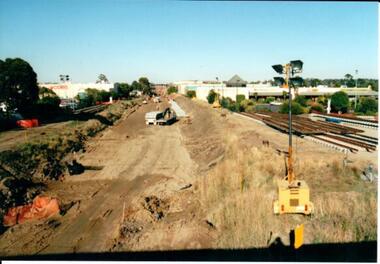
Photograph, 21/04/2005
This photograph was taken during the upgrade of the Bendigo Railway line at Sunbury Station. The upgrade of the line took over twelve months to complete and bus services replaced the train service during that time.A coloured photograph of construction on the site of the Sunbury Railway Station. The photograph has been taken from the Macedon Street bridge and is looking south towards Station Street. The old rail tracks have been removed and excavation work is in progress to make way for the new tracks. The new rail lines have been placed on the side of the track on the RHS of the photograph.railways, bendigo line, railway stations, bridges, sunbury railway station, george evans collection -
 Hume City Civic Collection
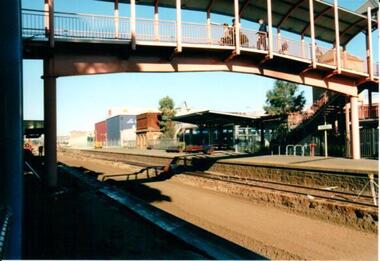
Photograph, 21/04/2005
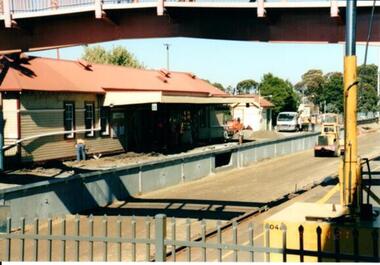
This photograph was taken during the upgrade of the Bendigo Railway line at Sunbury Station. The upgrade of the line took twelve months to complete and during that time buses replaced the train services.A coloured photograph of construction on the site of the Sunbury Railway Station. The photograph shows the pedestrian bridge and the platform for the Bendigo trains before the bluestone wall was removed and the platform was narrowed.railways, bendigo line, railway stations, bridges, sunbury railway station, george evans collection -
 Hume City Civic Collection
Photograph, 21/04/2005
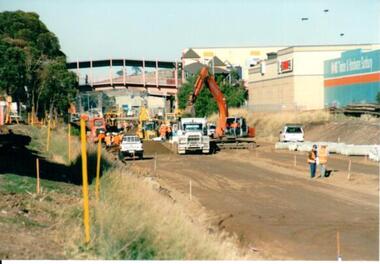
This photograph was taken during the upgrade of the Bendigo Railway line at Sunbury Station. The upgrade took twelve months to complete and during that time bus services replaced the trains.A coloured photograph of construction on the site of the Sunbury Railway Station. The photograph was taken near the Station Street level crossing and is looking north towards the Sunbury Station. The new tracks have been put into place.railways, bendigo line, railway stations, bridges, sunbury railway station, george evans collection -
 Hume City Civic Collection
Photograph, 21/04/2005
... the upgrade of the line took place buses replaced the train services.... when the upgrade of the line took place buses replaced ...This photograph was taken during the upgrade of the Bendigo Railway line at Sunbury Station. For the twelve months when the upgrade of the line took place buses replaced the train services.A coloured photograph of construction on the site of the Sunbury Railway Station. The photograph was taken from the Macedon Street end of the station platform and shows the excavation taking place to allow for the placement of the new rail tracks.railways, bendigo line, railway stations, bridges, sunbury railway station, george evans collection -
 Hume City Civic Collection
Photograph, 21/04/2005
This photograph was taken during the upgrade of the Bendigo Railway line at Sunbury Station. The upgrade took twelve months to complete and during that time bus services replaced the trains.A coloured photograph of construction on the site of the Sunbury Railway Station. The photograph has been taken from the Macedon Street bridge looking south towards the station and the pedestrian bridge over the railway tracks. On the tracks the old railway lines have been removed and storm water pipes are being put into position before the new lines are to be laid.railways, bendigo line, railway stations, bridges, sunbury railway station, george evans collection -
 Hume City Civic Collection
Photograph, 21/04/2005
This photograph was taken during the upgrade of the Bendigo Railway line at Sunbury Station. The upgrade took twelve months to complete and during that time buses replaced the trains.A coloured photograph of construction on the site of the Sunbury Railway Station. The photograph was taken from the Bendigo platform and shows the concrete wall which replace the bluestone foundations on the Melbourne side of the station. A workman is on the platform working on the new surface.railways, bendigo line, railway stations, bridges, sunbury railway station, george evans collection -
 Hume City Civic Collection
Photograph, 21/04/2005
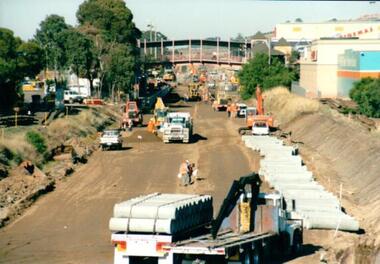
This photograph was taken during the upgrade of the Bendigo Railway line at Sunbury Station. The upgrade of the rail track took over twelve months to complete and during that time buses replaced the train services.A coloured photograph of construction on the site of the Sunbury Railway Station. The photograph has been taken from the end of the Melbourne platform and shows the various pieces of machinery, which included an excavator, a fork lift and trucks, that were used in the work on the line.railways, bendigo line, railway stations, bridges, sunbury railway station, george evans collection -
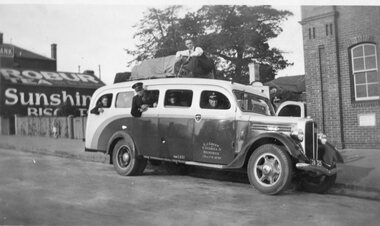 Stawell Historical Society Inc
Photograph, Salvation Army Group -- 4 Photos
... . Green. Brunswick. Fourth photo of a Group lined up beside bus..... Green. Brunswick. Fourth photo of a Group lined up beside bus ...Salvation Army. Four small photos. Two showing brass band march down Main Street Stawell. A bandsman in a bus labelled F. Green. Brunswick. Fourth photo of a Group lined up beside bus.Four small black & white photos on white card. Two showing brass band marching along Main St. Stawell. Third photo showing three bandsmen in a bus and one on top. name on the bus F.J. Green. Brunswick. The fourth photo shows a group of Salvation Army people lined up beside a larger bus. Name on bus sign is not decipherable. F.J. Green. Grunswick.stawell religion -
Whitehorse Historical Society Inc.
Article, Bus routes reach the end of the line, 1/07/2014 12:00:00 AM
Commuter calls for Transdev to reconsider changes to scrapped Routes 201, 286 and 303 have been ignored.Commuter calls for Transdev to reconsider changes to scrapped Routes 201, 286 and 303 have been ignored.Commuter calls for Transdev to reconsider changes to scrapped Routes 201, 286 and 303 have been ignored.bus services, public transport users association of victoria, public transport -
 Whitehorse Historical Society Inc.
Photograph, Mitcham Railway Station
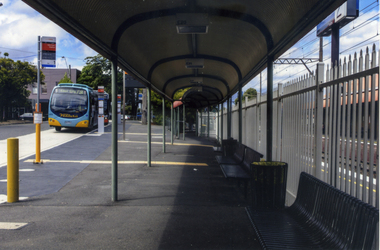
Coloured photograph of a Venture bus pulling into the bus stop on the south side of Mitcham Railway Station.Behind the bus is a building which is the start of a large industrial estate that runs alongside the railway line to Rooks Road, Nunawading - 2012mitcham railway station, transport -
 Whitehorse Historical Society Inc.
Photograph, Nunawading Railway Station, 1/06/2009
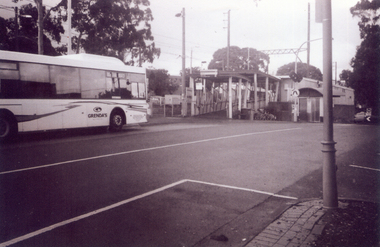
One of a collection of photographs taken of the Nunawading Railway Station prior to the lowering of the railway line and building of the new railway station on the western side of Springvale Road so that the Springvale Road Rail Crossing can be eliminated.Black & white photograph of he precinct surrounding the Nunawading Station and the Springvale Road Railway crossing. This photograph is of the southern entrance from Station Street. Note the Grenda Bus|See NP 3545 to NP3567for the complete set of photographsnunawading railway station, springvale road nunawading, redevelopment of railway line/springvale road., station street nunawading -
 Mt Dandenong & District Historical Society Inc.
Photograph, Pupils of Mt Dandenong School Lined Up For the Swimming Bus 1938, 1938
Pupils from Mt Dandenong State School lined up in front of bus that will take them to a swimming lesson at Lilydale Baths. Mr M Morris, Headmaster, on the left. Taken in 1938.On back of photograph: Pupils with M. Morris of Mt Dandenong School going to Lilydale Baths for swimming lessons. 1938?bus, mt dandenong school, school children, swimming lessons, swimming, lilydale baths, mr m f morris -
 Ballarat Tramway Museum
Photograph - Digital image, Mal Rowe, Aug. 1971
Yields information about the conversion from electric trams to buses along the Mt Pleasant line in August 1971.Digital image of tram 27 in Barkly St Mt Pleasant. A man on the left hand side is putting up a bus stop sign from his Holden Ute. Taken by Mal Rowe August 1971. Tram has a Twin Lakes sign.trams, tramways, barkly st, mt pleasant, bus stops, closure, tram 27 -
 Ballarat Tramway Museum
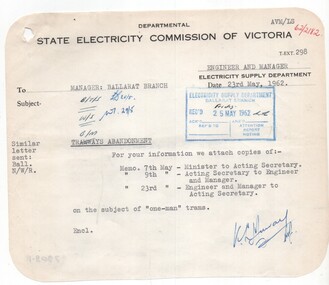
Administrative record - Memorandum, State Electricity Commission of Victoria (SECV), One-man trams, May. 1962
Yields information about the approach of the SEC to one man trams, the history, issues and impacts on the costs of operation., Yields information about the approach of the SEC to one man trams, the history, issues and impacts on the costs of operation.Set of three memorandum concerning the operation of one-man trams. All with rounded corners. .1 - Memo dated 23/5/1962, forwarding various documents re one-man trams. .2 - Report to the Acting Secretary (TRB?) - looking at the use of one-man trams in order to have economies, issues, problems with traffic, problems of one door in use, safety, costs of duplication, savings, cheaper to run buses. .3 - Report - looks at the history of one-man trams, ESCo, fare boxes, post war, unions, bogie trams, and the Eaglehawk line. trams, tramways, closure, letters, one man trams, unions, history, fare boxes, esco -
 Ballarat Tramway Museum
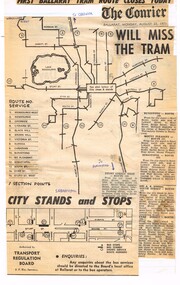
Newspaper, The Courier Ballarat, "First Ballarat Tram Route closes Today", Aug. 1971
Yields information about the extent of the Ballarat bus services that replaced the tram services in 1971 and their extent.Newspaper cuttings, composite, glued to a ruled or line foolscap sheet with the heading ""First Ballarat Tram Route closes Today", the Courier banner Monday 23/8/1971 (the day after the actual first closure) and a map or advertisement authorised by the Transport Regulation Board of the Ballarat bus routes, details, section points and detailed description of six routes. Would appear to have been compiled from at least two issues of The Courier, possibly by Tom Murray.ballarat, buses, bus routes, map -
 Ballarat Tramway Museum
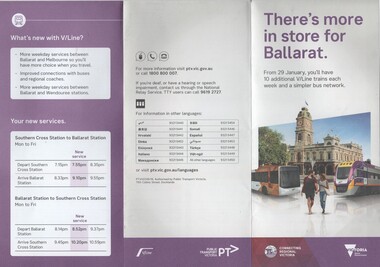
Pamphlet, Public Transport Corporation (PTC), "There's more in store for Ballarat", Jan. 2017
Set of two pamphlets distributed at the time of the introduction of revised routing of Ballarat bus services and the introduction of further trains on the Ballarat line - and the opening of Caroline Springs Station on 29.1.2017. .1 - 6 fold to DL size from an A3 sheets - titled "There's more in store for Ballarat", colour on white paper showing the new Ballarat bus network map, discontinued routes, additional train services and a summary of changes. .2 - a grab rail pamphlet listing the new bus routes for use on the buses - piece of heavy card with a round top and a slit to enable it to be placed on a grab rail within the bus itself. Two copies of each held.trams, tramways, ballarat public transport, buses, ptv, public transport victoria, timetables -
 Ballarat Tramway Museum
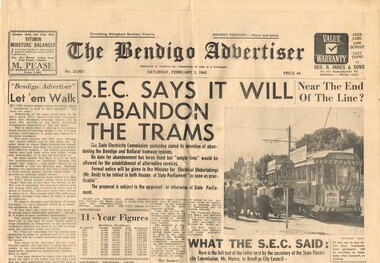
Newspaper, Bendigo Advertiser, "SEC Says it will abandon the trams" "Near the end of the Line?" "Let 'em Walk", "What the SEC Said", "Lost City Without Trams", 3/02/1962 12:00:00 AM
Yields information about the 1962 proposal of the SEC to closure the Bendigo tramway system and notes the impact on the city, with references to Ballarat and Geelong.Newspaper - The Bendigo Advertiser, Saturday 3/2/1962, 14 broad sheet pages, with the main headline ""SEC Says it will abandon the trams" about the notice given in Parliament the previous day by the Minister for Electrical Undertakings Mr. Reid following notice by the SEC. Includes the text of a letter to the City of Bendigo, by the Secretary of the SEC, Mr. D. H. Munro. Has an editorial titled "Let 'em Walk", a photo of the No. 2 en route to Eaglehawk at Charing Cross and further article reporting on comments from four civic leaders "Lost City Without Trams". Quotes two local MLA's - L. W. Galvin, C.P. Stoneham, Cr. W. Mathrick of Eaglehawk and the K.H. Gordon,Chamber of Commerce. Notes impact on the city, Ballarat and Geelong bus system. See Reg Item 6950 for the Ballarat The Courier Report. Full copy of the newspaper collected for style and adverts - has a Briquette advert on page 14.sec, closure, bendigo, parliament, eaglehawk, geelong, ballarat -
 Ballarat Tramway Museum
Photograph - Digital image Set of 28, Mal Rowe, 21/09/2019 12:00:00 AM
Set of 28 digital images of the 2019 Tramcar Showcase by Mal Rowe on 21/9/2019. .1 - View looking south from depot junction showing the track replacement pending the final asphalt layer. .2 - looking north towards depot junction .3 - 27 crossing Wendouree Parade .4 - 14 crossing with John Phillips ex MMTB Mk III Bus in the background. .5 - 13on the access track. .6 - 8 on the depot fan .7 - Cavalcade line up lead by 26 .8 - ditto .9 - group photo being arranged .10 - Cavalcade line up lead by 26 .11 - ditto .12 - 28 returning to the depot. .13 - ditto .14 - 27 returning to the depot on the access track. .15 - 18 ditto .16 - 18 ditto .17 - 13 ditto .18 - 13 ditto .19 - 18 ditto .20 - 40 running in with Mk III bus in the background .21 - 40 on the access track .22 - ditto .23 - 38 on the access track .24 - close up of the 22E truck .25 - depot fan in general. .26 - 14 on the access track .27 - 38 on the access track .28 - 38 dittotrams, tramways, btm, tramcar showcase, events, cavalcade, wendouree parade, trackwork, buses, 22e trucks, depot, tram 13, tram 38, tram 26, tram 14, tram 8, tram 27, tram 14, tram 28, tram 18, tram 27, tram 38, tram 40, tram 671 -
 Ballarat Tramway Museum
Photograph - Black & White Photograph/s - set of 5 - tram operations on the Victoria St, Richard Gilbert, c August 1971
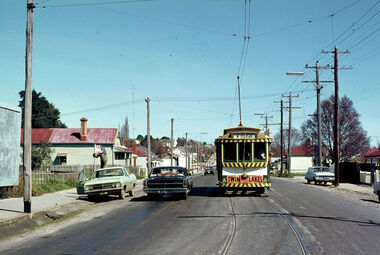
Yields information about the appearance of the Victoria St line shortly before the closure of the Victoria St line. Series of 5 Black and white photographs of tram operations on the Victoria St line prior to its closure in August 1971. .1 - View of the Victoria St terminus as you arrive in Ballarat from Melbourne, with the divided highway and a tram warning sign. Has a tram at the terminus. .2 - Tram 39, running a special tour with St Alipius church in the background. A new bus stop sing has been positioned. Another tram has departed the King St loop. .3 - No. 13, (Gardens via Sturt St West and a Twin Lakes sign) entering the King St loop. .4 - No. 31 (to Gardens crossing No. 39) at the King St loop. .5 - No. 31 leaving Stones Corner for Victoria St with Stones Corner building in the background along with the Caltex service station and Viscount Ambassador caravans.trams, tramways, victoria st, king st, stones corner, tram 39, tram 13, tram 31 -
Ballarat Tramway Museum
Newspaper, The Courier Ballarat, "End of the Line for Ballarat Trams", "Buses by mid-1971", "Union Plans Fight", 8/07/1970 12:00:00 AM
... employed in Ballarat, and general details. "End of the Line ...Newspaper clipping from The Courier of Ballarat of Wednesday July 8, 1970, part of front page reporting that a privately owned bus service seems certain to replace Ballarat trams by the middle of next year. Government expected to abolish Ballarat and Bendigo trams at the September sittings of Parliament. The Mayor Cr. Mills said he would be disappointed if the Government did not act immediately to abolish the trams. Notes the Government now has a majority in both houses, large financial loss from tram operation, Labour and Union opposition, Council considers the equipment out of date. Quotes Mayor, Cr. Mills, Quotes Secretary of Tramways Employees' Union - Mr. E. R. Courtney, Save Our Trams Committee, 100 men employed in Ballarat, and general details.In top right corner on red ink, circled is a name - not known.trams, tramways, closure, tramway employees' union, bus replacement, cr. mills