Showing 142 items
matching ceramic bowl
-
 Mont De Lancey
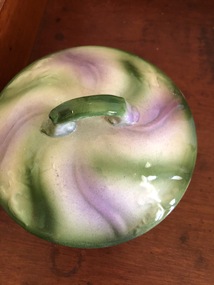
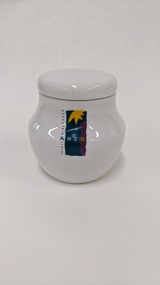
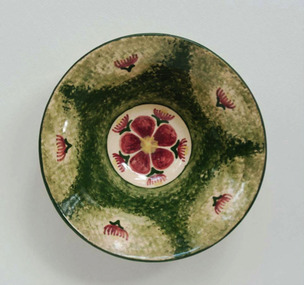
Soap Dish, Grimwade's
... White and green ceramic bowl with white, green and lilac.... Soap dishes White and green ceramic bowl with white, green ...Part of toilette set, from home of Wandin Sebire.White and green ceramic bowl with white, green and lilac lid. The lid has four embossed leaf designs on it.soap dishes -
 Southern Sherbrooke Historical Society Inc.
Mixing Bowl
... Ceramic Bowl originally belonging to Cheryl Kellett. Size... to that time. baking kitchen "12" at the bottom. Ceramic Bowl ...Belonged to Cheryl Kellett and donated to Susan Heywood-Downard for the Southern Sherbrooke Historical Society. Unknown history prior to that time.Ceramic Bowl originally belonging to Cheryl Kellett. Size 12 with a small "lip" at one edge for easy pouring of contents."12" at the bottom.baking, kitchen -
 Flagstaff Hill Maritime Museum and Village
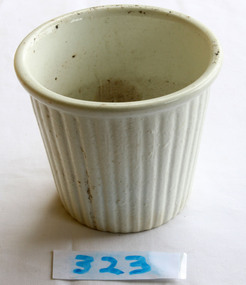
Domestic object - Pudding Mould
... White ceramic pudding bowl with fluted decoration... Flagstaff-Hill-Maritime-Village Puddings Ceramics White ceramic ...One of the first documented mentions of pudding can be found in Homer's Odyssey where a blood pudding roasted in a pig's stomach is described. This original meaning of a pudding as a sausage is retained in black pudding, which is a blood sausage originating in the United Kingdom and Ireland made from pork or beef blood, with pork fat or beef suet, and a cereal. Another early documented recipe for pudding is a reference to asida, found in a tenth century Arabic cookbook by Ibn Sayyar al-Warraq called Kitab al-Ṭabīḫ (Arabic: كتاب الطبيخ, The Book of Dishes). It was described as a thick pudding of dates cooked with clarified butter (samn). A recipe for asida was also mentioned in an anonymous Hispano-Muslim cookbook dating to the 13th century. In the 13th and 14th centuries, in the mountainous region of the Rif along the Mediterranean coast of Morocco, flour made from lightly grilled barley was used in place of wheat flour. A recipe for asida that adds argan seed oil was documented by Leo Africanus (c. 1465–1550), the Arab explorer known as Hasan al-Wazan in the Arab world. According to the French scholar Maxime Rodinson, asida were typical foods among the Bedouin of pre-Islamic and, probably, later times. In the United Kingdom and some of the Commonwealth countries, the word pudding can be used to describe both sweet and savoury dishes. Unless qualified, however, the term in everyday usage typically denotes a dessert; in the United Kingdom, pudding is used as a synonym for a dessert course. Puddings had their 'real heyday...', according to food historian Annie Gray, '...from the seventeenth century onward'. It is argued that 'the future of the boiled suet pudding as one of England's national dishes was assured only when the pudding cloth came into use' and although puddings boiled in cloths may have been mentioned in the medieval era, one of the earliest mentions is in 1617 in a recipe for Cambridge pudding, a pudding cloth is indicated; 'throw your pudding in, being tied in a fair cloth; when it is boiled enough, cut it in the midst, and so serve it in'. The pudding cloth is said, according to food historian C. Anne Wilson, to have revolutionised puddings. 'The invention of the pudding-cloth or bag finally severed the link between puddings and animal guts. Puddings could now be made at any time, and they became a regular part of the daily fare of almost all classes. Recipes for them proliferated.' https://en.wikipedia.org/wiki/PuddingPuddings and pudding making have evolved over the years, and continue to do so. White ceramic pudding bowl with fluted decoration on the outside.flagstaff hill, warrnambool, shipwrecked-coast, flagstaff-hill, flagstaff-hill-maritime-museum, maritime-museum, shipwreck-coast, flagstaff-hill-maritime-village, puddings, ceramics -
 Bendigo Historical Society Inc.
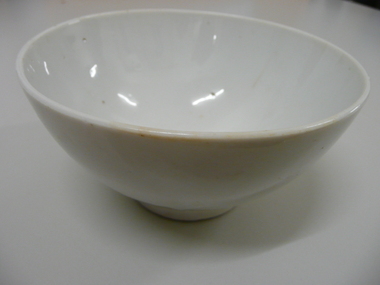
Domestic Object - WHITE BOWL
... White glazed ceramic rice bowl with small foot.... glazed ceramic rice bowl with small foot. Domestic Object WHITE ...White glazed ceramic rice bowl with small foot.Made in Japandomestic equipment, food consumption, bowls -
 Ballarat Heritage Services
Ceramic - Artwork - Ceramics, Float Bowl by Ian F. Cook
... A ceramic float bowl with leaf and gum blossom design. ... blossom A ceramic float bowl with leaf and gum blossom design ...Ian F. COOK Studio potter in Geelong.A ceramic float bowl with leaf and gum blossom design. ian cook, ceramics, studio pottery, ian f. cook, australian studio ceramics, gum blossom -
 Wodonga & District Historical Society Inc
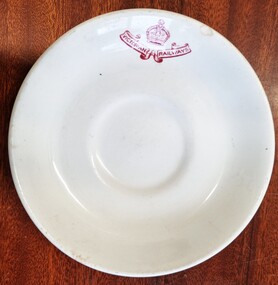
Functional object - Victorian Railways Bowl, Grindley Hotel Ware, May 1954
... A white ceramic bowl bearing a red emblem of Victorian... 5 - 54 A white ceramic bowl bearing a red emblem ...The Grindley Hotel Ware Co Ltd was located in Stoke-on-Trent, England with its business name being registered in May 1908. The product name "Duraline" came into use c1933. From 1932 ware was marked with the month and year of manufacture. Thus the numbers 5-54 underneath this item indicate that it was manufactured in May 1954. Mr. Loftus Henry Moran, born in Winchelsea, Victoria, was well-known in the tea trade, originally working with Griffiths Bros Ltd. He started his own business, Loftus Moran Pty Ltd in 1909. Loftus Moran's company imported chinaware from Britain and sold it into the Australian market. They specialised in supplying to hotels, businesses and institutions.This item is representative of chinaware used throughout hospitality venues and public institutions throughout Australia.A white ceramic bowl bearing a red emblem of Victorian Railways. The mark of the maker Grindley Hotel Ware and the Victorian supplier, Loftus & Moran Pty, Ltd is underneath the bowl.On front: Victorian Railways On Back: "DURALINE" /SUPER VITRIFIED/ GRINDLEY HOTELWARE CO./ ENGLAND LOFTUS MORAN PTY. LTD. / MELBOURNE 5 - 54duraline, victorian railways, grindley hotel ware -
 Flagstaff Hill Maritime Museum and Village
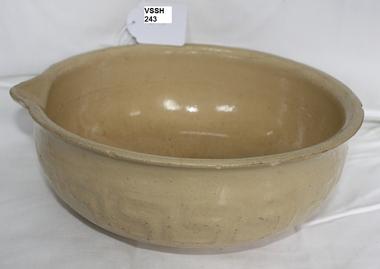
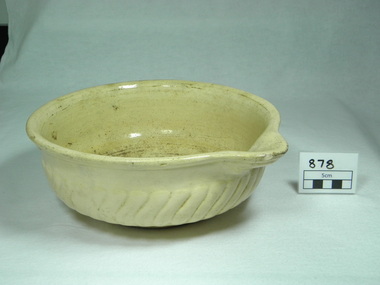
Container - Bowl, Late 19th or early 20th Century
... Plain cream ceramic bowl with flat bottom inside. Shiny... Ceramics None. Plain cream ceramic bowl with flat bottom inside ...Human beings appear to have been making their own ceramics for at least 26,000 years, subjecting clay and silica to intense heat to fuse and form ceramic materials. The earliest found so far were in southern central Europe and were sculpted figures, not dishes. The earliest known pottery was made by mixing animal products with clay and baked in kilns at up to 800°C. While actual pottery fragments have been found up to 19,000 years old, it was not until about ten thousand years later that regular pottery became common. An early people that spread across much of Europe is named after its use of pottery, the Corded Ware culture. These early Indo-European peoples decorated their pottery by wrapping it with rope, while still wet. When the ceramics were fired, the rope burned off but left a decorative pattern of complex grooves on the surface. The invention of the wheel eventually led to the production of smoother, more even pottery using the wheel-forming technique, like the pottery wheel. Early ceramics were porous, absorbing water easily. It became useful for more items with the discovery of glazing techniques, coating pottery with silicon, bone ash, or other materials that could melt and reform into a glassy surface, making a vessel less pervious to water. https://en.wikipedia.org/wiki/CeramicThe discovery and development of ceramics in numerous shapes, form and materials, revolutionised the world.Plain cream ceramic bowl with flat bottom inside. Shiny glaze fades to flat texture towards base. Possibly hand thrown pottery. No backstamp. Bad crazing and staining.None.flagstaff hill, warrnambool, shipwrecked-coast, flagstaff-hill, flagstaff-hill-maritime-museum, maritime-museum, shipwreck-coast, flagstaff-hill-maritime-village, ceramics -
 National Vietnam Veterans Museum (NVVM)
Domestic Object, Bowl
... Ceramic food bowl, grey glaze with blue Asian pattern... Ceramic food bowl, grey glaze with blue Asian pattern Bowl ...Ceramic food bowl, grey glaze with blue Asian patternfood bowl, pinnaroo -
 Blacksmith's Cottage and Forge
Bowl, mixing
... Round, cream-coloured, ceramic mixing bowl with pouring lip..., cream-coloured, ceramic mixing bowl with pouring lip, fluted ...Mixing bowls of this design were a common item in Austrailan kitchens in the late 19th and early 20th centuries. Women worked largely in the kitchen producing three meals daily for their families and, on farms, for the workers or casual labourers.Local significance for the history of women's work, especially the domestic duties of baking and cooking. Round, cream-coloured, ceramic mixing bowl with pouring lip, fluted design.baking, cakes, mixing bowl, kitchenware, women s work, domestic utensils, home cooked meals -
 City of Kingston
Ceramic - Moorabbin Arts Centre sugar bowl, Royal Porcelain Kingdom of Thailand, c. 1990
... White ceramic sugar bowl with lid and Moorabbin Arts Centre... / Microwave - safe White ceramic sugar bowl with lid and Moorabbin ...Sugar bowl belonging to a set produced for use at the Moorabbin Arts Centre (now Kingston Arts).White ceramic sugar bowl with lid and Moorabbin Arts Centre logo on front.Marked on base: Royal Porcelain / Kingdom of Thailand / Oven to Table / Dishwasher - safe / Microwave - safeephemera, crockery, tableware, moorabbin arts centre -
 Orbost & District Historical Society
sugar bowl
... sugar-bowl ceramic domestic-items container... gippsland sugar-bowl ceramic domestic-items container Small ceramic ...Small ceramic blue and white sugar bowl. Decorated with blue flowers and green leaves.sugar-bowl ceramic domestic-items container -
 Flagstaff Hill Maritime Museum and Village
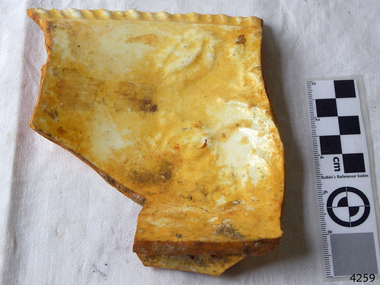
Domestic object - Wash Basin fragment
... Fragment of ceramic wash bowl from the wreck...-village schomberg wash bowl Fragment of ceramic wash bowl from ...When the ship Schomberg was launched in 1855, she was considered the most perfect clipper ship ever to be built. James Blaine’s Black Ball Line had commissioned her to be built for their fleet of passenger liners. At a cost of £43,103, the Aberdeen builders designed her to sail faster than the quick clippers designed by North American Donald McKay. She was a three masted wooden clipper ship, built with diagonal planking of British oak with layers of Scottish larch. This luxury vessel was designed to transport emigrants to Melbourne in superior comfort. She had ventilation ducts to provide air to the lower decks and a dining saloon, smoking room, library and bathrooms for the first class passengers. At the launch of Schomberg’s maiden voyage, her master Captain ‘Bully’ Forbes, drunkenly predicted that he would make the journey between Liverpool and Melbourne in 60 days. Schomberg departed Liverpool on 6 October 1855 with 430 passengers and 3000 tons cargo including iron rails and equipment intended the build the Geelong Railway and a bridge over the Yarra from Melbourne to Hawthorn. The winds were poor as Schomberg sailed across the equator, slowing her journey considerably. She was 78 days out of Liverpool when she ran aground on a sand-spit near Peterborough, Victoria, on 27 December; the sand spit and the currents were not marked on Forbes’s map. Overnight, the crew launched a lifeboat to find a safe place to land the ship’s passengers. The scouting party returned to Schomberg and advised Forbes that it was best to wait until morning because the rough seas could easily overturn the small lifeboats. The ship’s Chief Officer spotted SS Queen at dawn and signalled the steamer. The master of the SS Queen approached the stranded vessel and all of Schomberg’s passengers were able to disembark safely. The Black Ball Line’s Melbourne agent sent a steamer to retrieve the passengers’ baggage from the Schomberg. Other steamers helped unload her cargo until the weather changed and prevented the salvage teams from accessing the ship. Local merchants Manifold & Bostock bought the wreck and cargo, but did not attempt to salvage the cargo still on board the ship. They eventually sold it on to a Melbourne businessman and two seafarers. After two of the men drowned when they tried to reach Schomberg, salvage efforts were abandoned.32 In 1975, divers from Flagstaff Hill, including Peter Ronald, found an ornate communion set at the wreck. The set comprised a jug, two chalices, a plate and a lid. The lid did not fit any of the other objects and in 1978 a piece of the lid broke off, revealing a glint of gold. As museum staff carefully examined the lid and removed marine growth, they found a diamond ring, which is currently on display in the Great Circle Gallery.33 Flagstaff Hill also holds ship fittings and equipment, personal effects, a lithograph, tickets and photograph from the Schomberg. Most of the artefacts were salvaged from the wreck by Peter Ronald, former director of Flagstaff Hill. The Schomberg, which is on the Victorian Heritage Register (VHR S612), has great historical significance as a rare example of a large, fast clipper ship on the England to Australia run, carrying emigrants at the time of the Victorian gold rush. She represents the technical advances made to break sailing records between Europe and Australia. Flagstaff Hill’s collection of artefacts from the Schomberg is significant for its association with the shipwreck, The collection is primarily significant because of the relationship between the objects, as together they have a high potential to interpret the story of the Schomberg. It is archaeologically significant as the remains of an international passenger Ship. It is historically significant for representing aspects of Victoria’s shipping history and for its association with the shipwreck and the ship, which was designed to be fastest and most luxurious of its day Fragment of ceramic wash bowl from the wreck of the Schomberg. Has iron stains. Artefact Reg No S/66.flagstaff hill, warrnambool, shipwrecked-coast, flagstaff-hill, flagstaff-hill-maritime-museum, maritime-museum, shipwreck-coast, flagstaff-hill-maritime-village, schomberg, wash bowl -
 Flagstaff Hill Maritime Museum and Village
Domestic object - Bowl, Late 19th or early 20th Century
... Bowl white ceramic. Crack on side. Badly stained.... Mixing Bowl Food Preparation Kitchen Equipment Ceramic Backstamp ...The Process of Making Pottery Decorating, Firing, Glazing, Making, Technical There is a rhythm and flow to clay. It can’t be done all at once! Even the making process! It can take weeks to get everything done, especially if you can only work on your pottery once a week! Even though we have three hour classes, it’s often just not enough time! Here is an overview of some of the processes so you have a bit more grasp on some of the technical stuff! Step One – Design There are SO many ideas out there for making stuff in clay! From delicate porcelain jewellery, through to heavy sculptural work and everything in between. Deciding your direction is sometimes not that easy – when you first start, try everything, you will naturally gravitate to the style that you enjoy! The options and variations are endless and can get a wee bit overwhelming too! Check in with me before you start to ensure your ideas will work, what order you might do things, how you could achieve the look you are seeking and any other technical data required! Step Two – Making Clay is thixotropic. This means that as you work with it, the clay first gets sloppier and wetter, before is begins to dry in the atmosphere. For most things, you simply can’t do all parts of the project at once. An example of work order might look like: Get last weeks work out from the shelves Prepare clay for today’s work – roll your clay, prepare balls for throwing, make the first stage of a pinch pot) Clean up last week’s work and put it on the shelf for bisque firing Check that you have any glazing to do – and do enough of it that you will have time to finish your main project Do the next step of your next project – there might be a further step that can’t be complete immediately, in that case, wrap your work well and put onto the shelves. Letting your work rest for a while can really help keep your work clean and professional looking. Many things require bagging under plastic to keep it ready for work the next week – put your name on the outside of the bag so you can find your work easily. We have stickers and markers. Consider how you want to decorate your work – coloured slip can be applied at a fairly wet stage (remembering that it will make your work even wetter!). Trying to apply slip to dry clay won’t work! If you want to do sgraffito – you will need to keep the work leather hard (a state of dryness where you can still work the clay with a little effort and a little water and care). Step Three – Drying Most of the time your work can go into the rack uncovered to let it dry out for the following week. If you want to continue forming or shaping you will need to double bag your work – put your work on a suitable sized bat and put the bat in a bag so the base of the bag is under the bat, then put another bag over the top of the work and tuck the top of the bag under the bat. If you want to trim (or turn) your thrown work the following week, it should also be double bagged. If your work is large, delicate, or of uneven thicknesses, you should lightly cover your work for drying. When considering the drying process, bare in mind the weather, humidity and wind! The hotter and dryer, the faster things dry and work can dry unevenly in the shelves – this can lead to cracking – another time to lightly cover your work for drying. Step Four – Trimming and Cleaning Up Your work is dry! It is called greenware now and it is at it’s most fragile! Handle everything with two hands. I often refer to soft hands – keep everything gentle and with your fingers spread as much as possible. Try to not pick up things like plates too much, and always with both hands! Before your work can be bisque fired it should be “cleaned up”. You work won’t go into the kiln if it has sharp edges – when glazed, sharp edges turn into razor blades! Use a piece of fly wire to rub the work all over – this will scratch a little so be light handed. Use a knife or metal kidney to scrape any areas that require a bit more dynamic treatment than the fly wire offers! Finally, a very light wipe over with a slightly damp sponge can help soften and soothe all of your edges and dags! Trimming thrown work: If you are planning to trim (or turn) your thrown work (and you should be), make sure you bag it well – your work should be leather hard to almost dry for easiest trimming. Use this step to finish the work completely – use a metal kidney to polish the surface, or a slightly damp sponge to give a freshly thrown look. Wipe the sponge around the rim after trimming, and check the inside of the pot for dags! Trimming slip cast work: Usually I will trim the rims of your work on the wheel the following day to make that stage easier, however you will still need to check your work for lumps and bumps. Last but not least – check that your name is still clearly on the bottom of your work. Step Five – Bisque Firing When the work is completely dry it can go into the bisque kiln. The bisque kiln is fired to 1000°C. This process burns off the water in the clay as well as some of the chemically bound water. The structure of the clay is not altered that much at this temperature. Inside the bisque kiln, the work is stacked a little, small bowl inside a larger bowl and onto a heavy plate. Smaller items like decorations or drink coasters might get stacked several high. Consideration is paid to the weight of the stack and shape of the work. A bisque kiln can fire about one and a half times the amount of work that the glaze kiln can fire. The firing takes about 10 hours to complete the cycle and about two days to cool down. Once it has been emptied the work is placed in the glaze room ready for you to decorate! Step Six – Glazing Decorating your work with colour can be a lot of fun – and time consuming! There are three main options for surface treatment at this stage: Oxide Washes Underglazes Glazes Washes and underglazes do not “glaze” the work – It will still need a layer of glaze to fully seal the clay (washes don’t need glaze on surfaces not designed for food or liquid as they can gloss up a little on their own). Underglazes are stable colourants that turn out pretty much how they look in the jar. They can be mixed with each other to form other colours and can be used like water colours to paint onto your work. Mostly they should have a clear glaze on top to seal them. Oxides are a different species – the pink oxide (cobalt) wash turns out bright blue for instance. They don’t always need a glaze on top, and some glazes can change the colour of the wash! The glazes need no other “glaze” on top! Be careful of unknown glaze interactions – you can put any combination of glaze in a bowl or on a plate, but only a single glaze on the outside of any vertical surface! Glazes are a chemical reaction under heat. We don’t know the exact chemicals in the Mayco glazes we use. I can guess by the way they interact with each other, however, on the whole, you need to test every idea you have, and not run the test on a vertical surface! Simply put, glaze is a layer of glass like substance that bonds with the clay underneath. Clay is made of silica, alumina and water. Glaze is made of mostly silica. Silica has a melting point of 1700°C and we fire to 1240°C. The silica requires a “flux” to help it melt at the lower temperature. Fluxes can be all sorts of chemicals – a common one is calcium – calcium has a melting point of 2500°C, however, together they both melt at a much lower temperature! Colourants are metal oxides like cobalt (blue), chrome (green through black), copper (green, blue, even red!), manganese (black, purple and pink) iron (red brown), etc. Different chemicals in the glaze can have dramatic effects. for example, barium carbonate (which we don’t use) turns manganese bright pink! Other elements can turn manganese dioxide brown, blue, purple and reddish brown. Manganese dioxide is a flux in and of itself as well. So, glazes that get their black and purple colours, often interact with other glazes and RUN! Our mirror black is a good example – it mixes really well with many glazes because it fluxes them – causes them to melt faster. It will also bring out many beautiful colours in the glazes because it’s black colouring most definitely comes from manganese dioxide! Glaze chemistry is a whole subject on it’s own! We use commercial Mayco glazes on purpose – for their huge range of colour possibilities, stability, cool interactions, artistic freedom with the ability to easily brush the glazes on and ease of use. We currently have almost 50 glazes on hand! A major project is to test the interactions of all glazes with each other. That is 2,500 test tiles!!!! I’m going to make the wall behind the wheels the feature wall of pretty colours! Step Seven – Glaze (Gloss or sometimes called “Glost”) Firing Most of the time this is the final stage of making your creation (but not always!) The glaze kiln goes to 1240°C. This is called cone 6, or midrange. It is the low end of stoneware temperatures. Stoneware clays and glazes are typically fired at cone 8 – 10, that is 1260 – 1290°C. The energy requirement to go from 1240°C to 1280°C is almost a 30% more! Our clay is formulated to vitrify (mature, turn “glass-like”) at 1240°, as are our glazes. A glaze kiln take around 12 hours to reach temperature and two to three days to cool down. Sometimes a third firing process is required – this is for decoration that is added to work after the glaze firing. For example – adding precious metals and lustres. this firing temperature is usually around 600 – 800°C depending upon the techniques being used. There are many students interested in gold and silver trims – we will be doing this third type of firing soon! After firing your work will be in the student finished work shelves. Remember to pay for it before you head out the door! There is a small extra charge for using porcelain clay (it’s more than twice the price of regular clay), and for any third firing process! Once your work has been fired it can not turn back into clay for millennia – so don’t fire it if you don’t like it! Put it in the bucket for recycling. https://firebirdstudios.com.au/the-process-of-making-pottery/ The bowl is an example of kitchenware used in the 19th century and still in use today.Bowl white ceramic. Crack on side. Badly stained.Backstamp very faint and unable to be read.flagstaff hill, warrnambool, shipwrecked-coast, flagstaff-hill, flagstaff-hill-maritime-museum, maritime-museum, shipwreck-coast, flagstaff-hill-maritime-village, mixing bowl, food preparation, kitchen equipment, ceramic -
 Flagstaff Hill Maritime Museum and Village
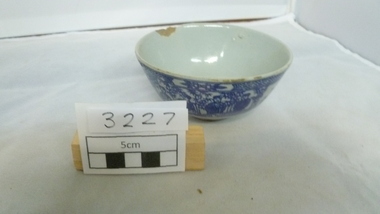
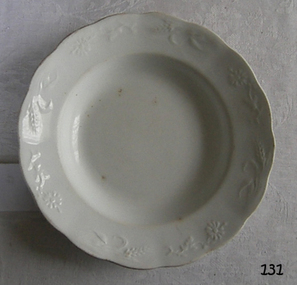
Ceramic - Dish, Johnson Bros, Circa 1883 (very early Mark)
... Bowl white ceramic decorative with floral decoration around... Bros England" & crest of lion and unicorn Bowl white ceramic ...Johnson Brothers were a British tableware manufacturer and exporter that was noted for its early introduction of "semi-porcelain" tableware. It was among the most successful of the Staffordshire potteries which produced tableware, much of it exported from the 1890s through the 1960s. They were also important manufacturers of large bathroom ceramics. The company was founded in 1883, but from 1968 to 2015 it operated as a part of the Wedgwood Group. However, after the Wedgwood Group was acquired by Fiskars in 2015, the production of Johnson Brothers was discontinued. The company's name derives from the names of the company's founders. The four original "Johnson Brothers" were Alfred, Frederick, Henry, and Robert. Their father married the daughter of a master potter, Alfred Meakin. In 1883, Alfred and Frederick Johnson began production at defunct pottery, known as the Charles Street Works, that they had purchased at a bankruptcy sale in Hanley, Stoke-on-Trent. At first, they specialised in the manufacture of durable earthenware, which they called "White Granite". The success of this venture led to rapid expansion. In 1888, the Rev. Henry Johnson joined them, followed ten years later by a fourth brother, Robert Johnson. Having established a solid reputation producing basic "whiteware", the company developed a product known as "semi-porcelain", a range of pottery that had the characteristics of fine china, but the durability of ironstone ware. This kind of tableware soon became very popular in the United States due to its durability and low cost. In 1889, the Hanley pottery was opened, later the Alexander pottery, and in 1891 the Imperial Works Pottery. In 1896, the Trent Sanitary Works was opened for the production of non-tableware products, and Alfred Johnson left the business to establish his pottery. By 1898, Robert Johnson had relocated to New York City to manage Johnson Brothers' rapid expansion into the North American market. An item that gives a snapshot into the emerging market for tableware that was reasonably priced and serviceable. The company produced "whiteware" but the innervation of the pottery line called semi-porcelain changed the industry. This allowed potteries to produce fashionable pottery items that were affordable to all social classes of the time. Bowl white ceramic decorative with floral decoration around lip. On base, "Royal Ironside China, Johnson Bros England" & crest of lion and unicorn flagstaff hill, warrnambool, shipwrecked coast, flagstaff hill maritime museum, flagstaff hill maritime village, great ocean road, bowl, china bowl, lion and unicorn crest, table ware, kitchen ware, white ware, johnson brothers -
 Flagstaff Hill Maritime Museum and Village
Domestic object - Bowl, J & G Meakin, Late 19th or early 20th Century
... Bowl; white ceramic, round and tapering inwards towards... Ceramic On base, 'Ironstone China Reg SOL 391413' with symbol Bowl ...The Process of Making Pottery Decorating, Firing, Glazing, Making, Technical There is a rhythm and flow to clay. It can’t be done all at once! Even the making process! It can take weeks to get everything done, especially if you can only work on your pottery once a week! Even though we have three hour classes, it’s often just not enough time! Here is an overview of some of the processes so you have a bit more grasp on some of the technical stuff! Step One – Design There are SO many ideas out there for making stuff in clay! From delicate porcelain jewellery, through to heavy sculptural work and everything in between. Deciding your direction is sometimes not that easy – when you first start, try everything, you will naturally gravitate to the style that you enjoy! The options and variations are endless and can get a wee bit overwhelming too! Check in with me before you start to ensure your ideas will work, what order you might do things, how you could achieve the look you are seeking and any other technical data required! Step Two – Making Clay is thixotropic. This means that as you work with it, the clay first gets sloppier and wetter, before is begins to dry in the atmosphere. For most things, you simply can’t do all parts of the project at once. An example of work order might look like: Get last weeks work out from the shelves Prepare clay for today’s work – roll your clay, prepare balls for throwing, make the first stage of a pinch pot) Clean up last week’s work and put it on the shelf for bisque firing Check that you have any glazing to do – and do enough of it that you will have time to finish your main project Do the next step of your next project – there might be a further step that can’t be complete immediately, in that case, wrap your work well and put onto the shelves. Letting your work rest for a while can really help keep your work clean and professional looking. Many things require bagging under plastic to keep it ready for work the next week – put your name on the outside of the bag so you can find your work easily. We have stickers and markers. Consider how you want to decorate your work – coloured slip can be applied at a fairly wet stage (remembering that it will make your work even wetter!). Trying to apply slip to dry clay won’t work! If you want to do sgraffito – you will need to keep the work leather hard (a state of dryness where you can still work the clay with a little effort and a little water and care). Step Three – Drying Most of the time your work can go into the rack uncovered to let it dry out for the following week. If you want to continue forming or shaping you will need to double bag your work – put your work on a suitable sized bat and put the bat in a bag so the base of the bag is under the bat, then put another bag over the top of the work and tuck the top of the bag under the bat. If you want to trim (or turn) your thrown work the following week, it should also be double bagged. If your work is large, delicate, or of uneven thicknesses, you should lightly cover your work for drying. When considering the drying process, bare in mind the weather, humidity and wind! The hotter and dryer, the faster things dry and work can dry unevenly in the shelves – this can lead to cracking – another time to lightly cover your work for drying. Step Four – Trimming and Cleaning Up Your work is dry! It is called greenware now and it is at it’s most fragile! Handle everything with two hands. I often refer to soft hands – keep everything gentle and with your fingers spread as much as possible. Try to not pick up things like plates too much, and always with both hands! Before your work can be bisque fired it should be “cleaned up”. You work won’t go into the kiln if it has sharp edges – when glazed, sharp edges turn into razor blades! Use a piece of fly wire to rub the work all over – this will scratch a little so be light handed. Use a knife or metal kidney to scrape any areas that require a bit more dynamic treatment than the fly wire offers! Finally, a very light wipe over with a slightly damp sponge can help soften and soothe all of your edges and dags! Trimming thrown work: If you are planning to trim (or turn) your thrown work (and you should be), make sure you bag it well – your work should be leather hard to almost dry for easiest trimming. Use this step to finish the work completely – use a metal kidney to polish the surface, or a slightly damp sponge to give a freshly thrown look. Wipe the sponge around the rim after trimming, and check the inside of the pot for dags! Trimming slip cast work: Usually I will trim the rims of your work on the wheel the following day to make that stage easier, however you will still need to check your work for lumps and bumps. Last but not least – check that your name is still clearly on the bottom of your work. Step Five – Bisque Firing When the work is completely dry it can go into the bisque kiln. The bisque kiln is fired to 1000°C. This process burns off the water in the clay as well as some of the chemically bound water. The structure of the clay is not altered that much at this temperature. Inside the bisque kiln, the work is stacked a little, small bowl inside a larger bowl and onto a heavy plate. Smaller items like decorations or drink coasters might get stacked several high. Consideration is paid to the weight of the stack and shape of the work. A bisque kiln can fire about one and a half times the amount of work that the glaze kiln can fire. The firing takes about 10 hours to complete the cycle and about two days to cool down. Once it has been emptied the work is placed in the glaze room ready for you to decorate! Step Six – Glazing Decorating your work with colour can be a lot of fun – and time consuming! There are three main options for surface treatment at this stage: Oxide Washes Underglazes Glazes Washes and underglazes do not “glaze” the work – It will still need a layer of glaze to fully seal the clay (washes don’t need glaze on surfaces not designed for food or liquid as they can gloss up a little on their own). Underglazes are stable colourants that turn out pretty much how they look in the jar. They can be mixed with each other to form other colours and can be used like water colours to paint onto your work. Mostly they should have a clear glaze on top to seal them. Oxides are a different species – the pink oxide (cobalt) wash turns out bright blue for instance. They don’t always need a glaze on top, and some glazes can change the colour of the wash! The glazes need no other “glaze” on top! Be careful of unknown glaze interactions – you can put any combination of glaze in a bowl or on a plate, but only a single glaze on the outside of any vertical surface! Glazes are a chemical reaction under heat. We don’t know the exact chemicals in the Mayco glazes we use. I can guess by the way they interact with each other, however, on the whole, you need to test every idea you have, and not run the test on a vertical surface! Simply put, glaze is a layer of glass like substance that bonds with the clay underneath. Clay is made of silica, alumina and water. Glaze is made of mostly silica. Silica has a melting point of 1700°C and we fire to 1240°C. The silica requires a “flux” to help it melt at the lower temperature. Fluxes can be all sorts of chemicals – a common one is calcium – calcium has a melting point of 2500°C, however, together they both melt at a much lower temperature! Colourants are metal oxides like cobalt (blue), chrome (green through black), copper (green, blue, even red!), manganese (black, purple and pink) iron (red brown), etc. Different chemicals in the glaze can have dramatic effects. for example, barium carbonate (which we don’t use) turns manganese bright pink! Other elements can turn manganese dioxide brown, blue, purple and reddish brown. Manganese dioxide is a flux in and of itself as well. So, glazes that get their black and purple colours, often interact with other glazes and RUN! Our mirror black is a good example – it mixes really well with many glazes because it fluxes them – causes them to melt faster. It will also bring out many beautiful colours in the glazes because it’s black colouring most definitely comes from manganese dioxide! Glaze chemistry is a whole subject on it’s own! We use commercial Mayco glazes on purpose – for their huge range of colour possibilities, stability, cool interactions, artistic freedom with the ability to easily brush the glazes on and ease of use. We currently have almost 50 glazes on hand! A major project is to test the interactions of all glazes with each other. That is 2,500 test tiles!!!! I’m going to make the wall behind the wheels the feature wall of pretty colours! Step Seven – Glaze (Gloss or sometimes called “Glost”) Firing Most of the time this is the final stage of making your creation (but not always!) The glaze kiln goes to 1240°C. This is called cone 6, or midrange. It is the low end of stoneware temperatures. Stoneware clays and glazes are typically fired at cone 8 – 10, that is 1260 – 1290°C. The energy requirement to go from 1240°C to 1280°C is almost a 30% more! Our clay is formulated to vitrify (mature, turn “glass-like”) at 1240°, as are our glazes. A glaze kiln take around 12 hours to reach temperature and two to three days to cool down. Sometimes a third firing process is required – this is for decoration that is added to work after the glaze firing. For example – adding precious metals and lustres. this firing temperature is usually around 600 – 800°C depending upon the techniques being used. There are many students interested in gold and silver trims – we will be doing this third type of firing soon! After firing your work will be in the student finished work shelves. Remember to pay for it before you head out the door! There is a small extra charge for using porcelain clay (it’s more than twice the price of regular clay), and for any third firing process! Once your work has been fired it can not turn back into clay for millennia – so don’t fire it if you don’t like it! Put it in the bucket for recycling. https://firebirdstudios.com.au/the-process-of-making-pottery/This bowl was made by renowned pottery company J & G Meakin of England. The firm was established in the mid-1800's. The bowl is an example of kitchenware used in the 19th century and still in use today.Bowl; white ceramic, round and tapering inwards towards base. Made by J and G Meakin England.On base, 'Ironstone China Reg SOL 391413' with symbolflagstaff hill, flagstaff hill maritime museum and village, warrnambool, maritime museum, maritime village, great ocean road, shipwreck coast, mixing bowl, food preparation, j & g meakin, pottery, stoke-on-trent, kitchen equipment, ceramic -
 Flagstaff Hill Maritime Museum and Village
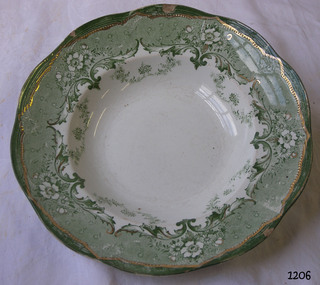
Bowl
... Bowl ceramic with decorative floral design around rim...-museum shipwreck-coast flagstaff-hill-maritime-village Bowl ...Bowl ceramic with decorative floral design around rim in green and gold. Bowl area is white. "Verona 5 ways England" stamped on back. Has several chips.flagstaff hill, warrnambool, shipwrecked-coast, flagstaff-hill, flagstaff-hill-maritime-museum, maritime-museum, shipwreck-coast, flagstaff-hill-maritime-village -
 Ballarat Heritage Services
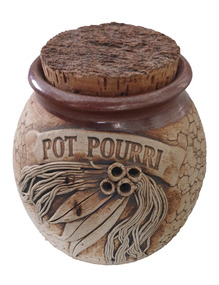
Ceramic - Ceramics, Ceramic Pot Pouri Canister by Wartook Pottery, c1990
... Hand thrown ceramic bowl with 'Gum Leaf' design... wood Hand thrown ceramic bowl with 'Gum Leaf' design ...Graham WOOD Wartook Pottery was set up in the early 70s by Graham Wood, and was sucessful for nearly 25 years. It then moved to Halls Gap (The Grampians, Victoria), and the name was changed to Jimmy's Creek Pottery in 1998. The pottery conitnued under that name until 2003. when cheap imports hurt the business. Hand thrown ceramic bowl with 'Gum Leaf' design and the words 'pot pouri'. According to decorator Wendy McGuiness all decoration was made and applied by hand - an extremely time consuming activity. Texture to the body of each piece was created by using a piece of coral. Tenmoku glaze was applied to the top of the pieces, with iron oxide to the main body. This was the first of the Wartook range that sold commercially from around 1987 all over Australia. At the height of production Wartook Pottery had 5 employees, including a new wheel potter (who was adept at creating the pieces as Graham had done before). Additional ranges were still hand thrown, but with a floral wreath (slip cast) applied to the top of each pot, as well as a range that used decals for decoration. australian landscape pottery, les macleman, ceramics, landscape, graham wood -
 Ballarat Heritage Services
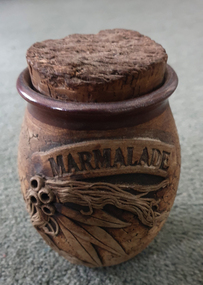
Ceramic - Ceramics, Ceramic Marmelade Canister by Wartook Pottery, c1990
... Hand thrown ceramic bowl with 'Gum Leaf' design... wood Hand thrown ceramic bowl with 'Gum Leaf' design ...Graham WOOD Wartook Pottery was set up in the early 70s by Graham Wood, and was sucessful for nearly 25 years. It then moved to Halls Gap (The Grampians, Victoria), and the name was changed to Jimmy's Creek Pottery in 1998. The pottery conitnued under that name until 2003. when cheap imports hurt the business. Hand thrown ceramic bowl with 'Gum Leaf' design and the words 'pot pouri'. According to decorator Wendy McGuiness all decoration was made and applied by hand - an extremely time consuming activity. Texture to the body of each piece was created by using a piece of coral. Tenmoku glaze was applied to the top of the pieces, with iron oxide to the main body. This was the first of the Wartook range that sold commercially from around 1987 all over Australia. At the height of production Wartook Pottery had 5 employees, including a new wheel potter (who was adept at creating the pieces as Graham had done before). Additional ranges were still hand thrown, but with a floral wreath (slip cast) applied to the top of each pot, as well as a range that used decals for decoration. australian landscape pottery, les macleman, ceramics, landscape, graham wood -
 Ballarat Heritage Services
Ceramic - Ceramics, Ceramic Coffee Canister by Wartook Pottery, c1990
... Hand thrown ceramic bowl with 'Gum Leaf' design... wood Hand thrown ceramic bowl with 'Gum Leaf' design ...Graham WOOD Wartook Pottery was set up in the early 70s by Graham Wood, and was sucessful for nearly 25 years. It then moved to Halls Gap (The Grampians, Victoria), and the name was changed to Jimmy's Creek Pottery in 1998. The pottery conitnued under that name until 2003. when cheap imports hurt the business. Hand thrown ceramic bowl with 'Gum Leaf' design and the words 'coffee'. According to decorator Wendy McGuiness all decoration was made and applied by hand - an extremely time consuming activity. Texture to the body of each piece was created by using a piece of coral. Tenmoku glaze was applied to the top of the pieces, with iron oxide to the main body. This was the first of the Wartook range that sold commercially from around 1987 all over Australia. At the height of production Wartook Pottery had 5 employees, including a new wheel potter (who was adept at creating the pieces as Graham had done before). Additional ranges were still hand thrown, but with a floral wreath (slip cast) applied to the top of each pot, as well as a range that used decals for decoration. australian landscape pottery, les macleman, ceramics, landscape, graham wood -
 Flagstaff Hill Maritime Museum and Village
Domestic object - Bowl
... Bowl white ceramic plain that has two sets of edging around... Kitchen Equipment Ceramic Bowl white ceramic plain that has two ...The Process of Making Pottery Decorating, Firing, Glazing, Making, Technical There is a rhythm and flow to clay. It can’t be done all at once! Even the making process! It can take weeks to get everything done, especially if you can only work on your pottery once a week! Even though we have three hour classes, it’s often just not enough time! Here is an overview of some of the processes so you have a bit more grasp on some of the technical stuff! Step One – Design There are SO many ideas out there for making stuff in clay! From delicate porcelain jewellery, through to heavy sculptural work and everything in between. Deciding your direction is sometimes not that easy – when you first start, try everything, you will naturally gravitate to the style that you enjoy! The options and variations are endless and can get a wee bit overwhelming too! Check in with me before you start to ensure your ideas will work, what order you might do things, how you could achieve the look you are seeking and any other technical data required! Step Two – Making Clay is thixotropic. This means that as you work with it, the clay first gets sloppier and wetter, before is begins to dry in the atmosphere. For most things, you simply can’t do all parts of the project at once. An example of work order might look like: Get last weeks work out from the shelves Prepare clay for today’s work – roll your clay, prepare balls for throwing, make the first stage of a pinch pot) Clean up last week’s work and put it on the shelf for bisque firing Check that you have any glazing to do – and do enough of it that you will have time to finish your main project Do the next step of your next project – there might be a further step that can’t be complete immediately, in that case, wrap your work well and put onto the shelves. Letting your work rest for a while can really help keep your work clean and professional looking. Many things require bagging under plastic to keep it ready for work the next week – put your name on the outside of the bag so you can find your work easily. We have stickers and markers. Consider how you want to decorate your work – coloured slip can be applied at a fairly wet stage (remembering that it will make your work even wetter!). Trying to apply slip to dry clay won’t work! If you want to do sgraffito – you will need to keep the work leather hard (a state of dryness where you can still work the clay with a little effort and a little water and care). Step Three – Drying Most of the time your work can go into the rack uncovered to let it dry out for the following week. If you want to continue forming or shaping you will need to double bag your work – put your work on a suitable sized bat and put the bat in a bag so the base of the bag is under the bat, then put another bag over the top of the work and tuck the top of the bag under the bat. If you want to trim (or turn) your thrown work the following week, it should also be double bagged. If your work is large, delicate, or of uneven thicknesses, you should lightly cover your work for drying. When considering the drying process, bare in mind the weather, humidity and wind! The hotter and dryer, the faster things dry and work can dry unevenly in the shelves – this can lead to cracking – another time to lightly cover your work for drying. Step Four – Trimming and Cleaning Up Your work is dry! It is called greenware now and it is at it’s most fragile! Handle everything with two hands. I often refer to soft hands – keep everything gentle and with your fingers spread as much as possible. Try to not pick up things like plates too much, and always with both hands! Before your work can be bisque fired it should be “cleaned up”. You work won’t go into the kiln if it has sharp edges – when glazed, sharp edges turn into razor blades! Use a piece of fly wire to rub the work all over – this will scratch a little so be light handed. Use a knife or metal kidney to scrape any areas that require a bit more dynamic treatment than the fly wire offers! Finally, a very light wipe over with a slightly damp sponge can help soften and soothe all of your edges and dags! Trimming thrown work: If you are planning to trim (or turn) your thrown work (and you should be), make sure you bag it well – your work should be leather hard to almost dry for easiest trimming. Use this step to finish the work completely – use a metal kidney to polish the surface, or a slightly damp sponge to give a freshly thrown look. Wipe the sponge around the rim after trimming, and check the inside of the pot for dags! Trimming slip cast work: Usually I will trim the rims of your work on the wheel the following day to make that stage easier, however you will still need to check your work for lumps and bumps. Last but not least – check that your name is still clearly on the bottom of your work. Step Five – Bisque Firing When the work is completely dry it can go into the bisque kiln. The bisque kiln is fired to 1000°C. This process burns off the water in the clay as well as some of the chemically bound water. The structure of the clay is not altered that much at this temperature. Inside the bisque kiln, the work is stacked a little, small bowl inside a larger bowl and onto a heavy plate. Smaller items like decorations or drink coasters might get stacked several high. Consideration is paid to the weight of the stack and shape of the work. A bisque kiln can fire about one and a half times the amount of work that the glaze kiln can fire. The firing takes about 10 hours to complete the cycle and about two days to cool down. Once it has been emptied the work is placed in the glaze room ready for you to decorate! Step Six – Glazing Decorating your work with colour can be a lot of fun – and time consuming! There are three main options for surface treatment at this stage: Oxide Washes Underglazes Glazes Washes and underglazes do not “glaze” the work – It will still need a layer of glaze to fully seal the clay (washes don’t need glaze on surfaces not designed for food or liquid as they can gloss up a little on their own). Underglazes are stable colourants that turn out pretty much how they look in the jar. They can be mixed with each other to form other colours and can be used like water colours to paint onto your work. Mostly they should have a clear glaze on top to seal them. Oxides are a different species – the pink oxide (cobalt) wash turns out bright blue for instance. They don’t always need a glaze on top, and some glazes can change the colour of the wash! The glazes need no other “glaze” on top! Be careful of unknown glaze interactions – you can put any combination of glaze in a bowl or on a plate, but only a single glaze on the outside of any vertical surface! Glazes are a chemical reaction under heat. We don’t know the exact chemicals in the Mayco glazes we use. I can guess by the way they interact with each other, however, on the whole, you need to test every idea you have, and not run the test on a vertical surface! Simply put, glaze is a layer of glass like substance that bonds with the clay underneath. Clay is made of silica, alumina and water. Glaze is made of mostly silica. Silica has a melting point of 1700°C and we fire to 1240°C. The silica requires a “flux” to help it melt at the lower temperature. Fluxes can be all sorts of chemicals – a common one is calcium – calcium has a melting point of 2500°C, however, together they both melt at a much lower temperature! Colourants are metal oxides like cobalt (blue), chrome (green through black), copper (green, blue, even red!), manganese (black, purple and pink) iron (red brown), etc. Different chemicals in the glaze can have dramatic effects. for example, barium carbonate (which we don’t use) turns manganese bright pink! Other elements can turn manganese dioxide brown, blue, purple and reddish brown. Manganese dioxide is a flux in and of itself as well. So, glazes that get their black and purple colours, often interact with other glazes and RUN! Our mirror black is a good example – it mixes really well with many glazes because it fluxes them – causes them to melt faster. It will also bring out many beautiful colours in the glazes because it’s black colouring most definitely comes from manganese dioxide! Glaze chemistry is a whole subject on it’s own! We use commercial Mayco glazes on purpose – for their huge range of colour possibilities, stability, cool interactions, artistic freedom with the ability to easily brush the glazes on and ease of use. We currently have almost 50 glazes on hand! A major project is to test the interactions of all glazes with each other. That is 2,500 test tiles!!!! I’m going to make the wall behind the wheels the feature wall of pretty colours! Step Seven – Glaze (Gloss or sometimes called “Glost”) Firing Most of the time this is the final stage of making your creation (but not always!) The glaze kiln goes to 1240°C. This is called cone 6, or midrange. It is the low end of stoneware temperatures. Stoneware clays and glazes are typically fired at cone 8 – 10, that is 1260 – 1290°C. The energy requirement to go from 1240°C to 1280°C is almost a 30% more! Our clay is formulated to vitrify (mature, turn “glass-like”) at 1240°, as are our glazes. A glaze kiln take around 12 hours to reach temperature and two to three days to cool down. Sometimes a third firing process is required – this is for decoration that is added to work after the glaze firing. For example – adding precious metals and lustres. this firing temperature is usually around 600 – 800°C depending upon the techniques being used. There are many students interested in gold and silver trims – we will be doing this third type of firing soon! After firing your work will be in the student finished work shelves. Remember to pay for it before you head out the door! There is a small extra charge for using porcelain clay (it’s more than twice the price of regular clay), and for any third firing process! Once your work has been fired it can not turn back into clay for millennia – so don’t fire it if you don’t like it! Put it in the bucket for recycling. https://firebirdstudios.com.au/the-process-of-making-pottery/ This bowl is an example of kitchenware used in the 19th century and still in use today.Bowl white ceramic plain that has two sets of edging around lip. Inside bowl has plaster designed to look like cooking mixture.flagstaff hill, warrnambool, shipwrecked-coast, flagstaff-hill, flagstaff-hill-maritime-museum, maritime-museum, shipwreck-coast, flagstaff-hill-maritime-village, kitchen equipment, ceramic -
 Melbourne Tram Museum
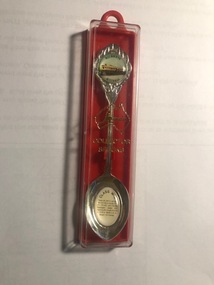
Souvenir - Teaspoon, Randa, Melbourne W2 tram, c1990
... with the details of the type of tram set in a ceramic piece in the bowl... in a ceramic piece in the bowl of the spoon. Made by Randa in Australia ...Souvenir tea spoon featuring Melbourne W2 tram with the details of the type of tram set in a ceramic piece in the bowl of the spoon. Made by Randa in Australia. Contained within a clear/red plastic case.trams, tramways, teaspoons, sales items, w2 class -
 Duldig Studio museum + sculpture garden
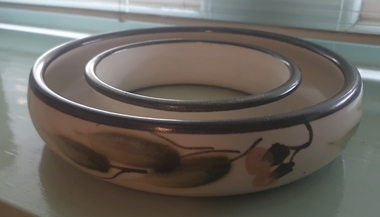
Ceramic, Karl Duldig, Gumnut Bowl by Karl Duldig c.1948, c. 1948
... Karl Duldig’s ceramic bowl is a particularly interesting... Malvern melbourne Karl Duldig’s ceramic bowl is a particularly ...Karl Duldig’s ceramic bowl is a particularly interesting example of Karl’s ability to creatively respond to a new environment with a fresh visual repertoire, in this case, the flowering Eucalyptus in a design reminiscent of traditional European folk art. The bowl is an excellent example of the utilitarian and decorative studio pottery produced by Karl and his wife Slawa Horowitz-Duldig between 1944 and 1960. Clay was an important medium for Karl. When he was forced to flee Austria for Switzerland, working with clay became a convenient medium; and he continued to expand his use of clay in Singapore. In Australia his work in clay extended from domestic hand-made pottery to public sculptures and architectural reliefs. In 1944 Duldig purchased a kiln, which was installed in the garage of the family’s St. Kilda flat, soon after a pottery wheel was acquired. It was the beginning of a cottage industry that supplemented the family income during the war years and beyond. Duldig initially sold his decorative ceramic wares through a local florist in St. Kilda, and subsequently through shops such as the Chez Nous French Art Shop (Howey Place) and Light and Shade (Royal Arcade), and the Primrose Pottery shop in Collins Street. The Primrose Pottery shop was an extremely important commercial outlet, and hub, for emerging artists, potters and designers from 1929 until 1974. Its proprietors Edith and Betty MacMillan worked closely with their suppliers, commissioning and taking items on consignment. In the post war period important Melbourne studio potters such as Allan Lowe, Arthur Boyd, John Perceval and Neil Douglas exhibited and sold domestic wares in the Primrose Pottery shop. The Duldigs studio pottery provides a counterpoint to the ceramics produced at Arthur Merric Boyd Pottery in Murrumbeena, which was established in 1944 by Arthur Boyd, John Perceval and Peter Herbst. The emphasis on painterly decoration was important and the AMB potters also produced simple household wares decorated with Australian flora and wildlife, for example Neil Douglas also made small bowls decorated with the fairy wrens, lyrebirds, gumnuts and eucalypts. Ann Carew 2016The Duldig Studio’s collection of ceramics has national aesthetic and historic significance. It contains a representative sample of works of art in ceramics created by Karl Duldig during his lifetime, including small sculptures, as well as functional and novelty items for the tourist market during the 1956 Melbourne Olympic Games. The artist’s working methods and the development of his practice are comprehensively demonstrated in the collection. This in-situ collection demonstrates the philosophy of the Vienna Secession and its inheritors that handcrafted, simple functional domestic wares might enrich both the lives of the maker and the user. This bowl is part of a collection of ceramics that has national historic significance in providing a rich illustration of an immigrant and artistic experience, and touching on the themes of settlement adaptation of artistic practice. The collection is also associated with places of cultural and historical significance in Melbourne such as the Primrose Pottery Shop, and the story of Australian studio ceramics in the post-war years. Ann Carew 2016Cream earthenware bowl with flowering gum motif and sponged green background.Duldig in script incised under. -
 Numurkah & District Historical Society
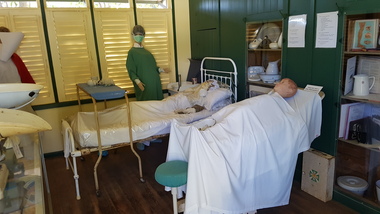
Isolation Ward Medical Displays - overview
... ceramic bowl Shelf Two – North end of Isolation Ward 1 x small... 2 x ceramic urinals 1 x ceramic bowl Shelf Two – North ...Shelf One – North End of Isolation Ward 1 x slipper enamel bedpan 1 x enamel pan with spout 1 x stainless steel bedpan 1 x stainless steel urinal 2 x ceramic urinals 1 x ceramic bowl Shelf Two – North end of Isolation Ward 1 x small enamel kidney dish 2 x slipper ceramic bedpans 1 x enamel wash-bowl & jug Shelf Three – North end of Isolation Ward 1 X dry Steriliser Shelf Four – North end of Isolation Ward 1 X steam Steriliser Shelf One – South end of Isolation Ward 1 x nurse’s dictionary Domestic Medical Practice Book Doctor and Specialist Book Aids to Gynaecological Nursing Book Foundations of Anatomy & Physiology Book 2 x thermometers 1 x stainless steel swab bowl 1 x ophthalmoscope 1 x stainless bowl & bandages 1 x scissors/ tweezers kit 1 x large operating scissors & 1 x operating tweezers 1 x camode pot 1 x sigmoidoscope 3 x plessors Shelf Two – South end of Isolation Ward 1 x ceramic jug Kaarimba Ladies Auxiliary History of Num. Dist. Health Nursing Certificates & Notebooks – Winifred Smith Shelf Three – South end of Isolation Ward Nursing Certificates & Notebooks – Winifred Smith Shelf Four – South end of Isolation Ward 1 x white enamel bucket 1 x enamel bowl Glass Cabinet: Premature Babies Book Handbook of Paediatrics Various health brochures 1 x enamel potty, dry liners, nappy pins 1 x infant welfare leather case 2 x breast pump 2 x dippers Medical Items placed around the room 1 x kidney dish with syringes & bandage 1 x stethoscope 1 x catheters 1 x oxygen tubing 1 x hospital bed (pre-dates 1950’s eg from local private hospital) 1 x operating table and 1 x theatre stool (original Numurkah Hospital 1950’s) 1 x heart table 1 x dental chair, mouthwash dish & stand 3 x wooden crutches 1 x early dentist chair 1 x Infant Welfare Centre sign hospital, medical equipment -
 Ringwood and District Historical Society
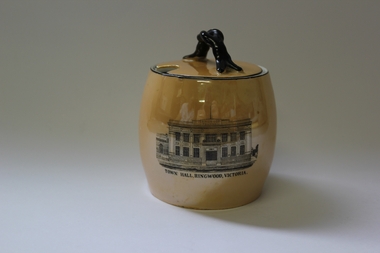
Ceramic - Sugar/Jam Bowl, Royal Sydney China, Ringwood Town Hall commemorative jar, c. 1950s
... Sugar/Jam Bowl with lid. Ceramic. Colour brown/cream... Town Hall commemorative jar. Ceramic Sugar/Jam Bowl Royal ...Sugar/Jam Bowl with lid. Ceramic. Colour brown/cream. Picture of Town Hall Ringwood on the side. Lid has a black handle and an indent for spoon.Town Hall Ringwood, Victoria. on the bottom of the bowl there is the following:; /Royal Sydney China/ Made in/ CZECHOSLOVAKIA/ RKG/ 34/ -
 Bendigo Military Museum
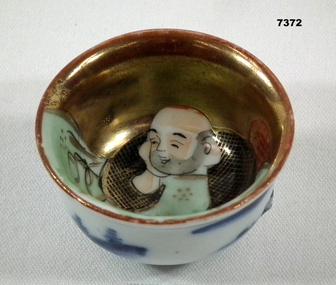
Ceramic - CEREMONIAL BOWL
... . Ceramic CEREMONIAL BOWL ...Small bowl, possibly a finger bowl used for ceremonies. Item in collection of "Richard William McGILVERY" RAAF. Refer Cat No. 7287P for his service details, photos and awards.Small bowl, outside white with blue images of Japanese country side. Inside picture of Asian man sitting on a chair looking at a green cloth covering half of the inside. Other half gold background.Japanese symbol on bottom.bowl, souvenir, richard william mcgilvery -
 Bendigo Military Museum
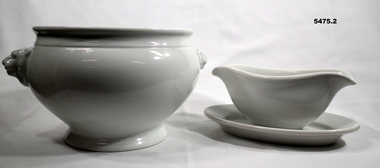
Ceramic - SOUP TUREEN & GRAVY BOAT, ROSENTHAL, C1940
“The items were left behind by the Ss units stationed in Nijmegen, Arnhem, Holland’ The pottery was made at the Rosenthal pottery which was taken over by Germany. Soup Tureen- pottery round bowl with white glaze, with pottery handles in the shape of a lion’s head. Gray Boat - pottery oval shaped pitcher with attached tray, with white glaze. Long lip on both ends of gravy boat. .1) Base of Tureen, makers stamp, black ink, German Eagle with Swastika “F1. UV./ Rosenthal” .2) Base of gravy boat, makers stamp, green ink, German Eagle with Swastika “F1. U.V. 1940 BOHEMIA pottery, german, ww2 -
 Flagstaff Hill Maritime Museum and Village
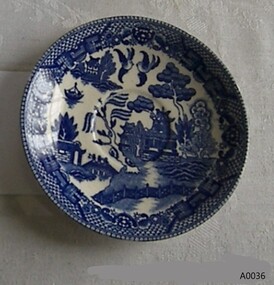
Ceramic - Bowl, Broadhurst Staffordshire Ironstone Pottery, 1950s - 1960s
... produce, Ceramic, Pottery Small ironstone willow pattern bowl ...Broadhurst China was established in 1862 the firm was based at the Crown Pottery, Longton, Staffordshire until 1870 where James Broadhurst made a range of gold and silver lusterwares. In 1870 the firm moved to the Portland Pottery at Fenton, Staffordshire and continued to produce good quality earthenware. In 1897 "& Sons" was added to the company name and "Ltd" from C.1922. The full name, James Broadhurst & Sons Ltd. appears from 1957. In 1984 James Broadhurst & Sons Ltd became Churchill Tableware Ltd.Items made around 1950s or slightly later that are now collectors items made by one of the founders of ironstone pottery in England.Small ironstone willow pattern bowlThe back is stamped "WILLOW BROADHURST STAFFORDSHIRE IRONSTONE Made in England Detergent and Dishwasher Proof" Mass produce, Ceramic, Potteryironstone pottery, staffordshire pottery, flagstaff hill museum, crockery, dinner set, willow pattern -
 Flagstaff Hill Maritime Museum and Village
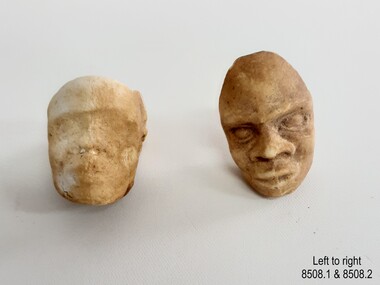
Leisure object - Tobacco Pipe Heads, circa 1869
These tobacco pipe heads are one of a group of artefacts in the McCulloch Collection that were recovered from the shipwreck Victoria Tower and were donated together. The pipe heads could have been from the ship's cargo or amongst a passenger’s personal belongings. The stems of the clay pipes would be easily broken during the 100 or so years that they were under the sea. There are other tobacco pipes in our collection that were recovered from the Victoria Tower. The object is now one of the shipwreck artefacts in Flagstaff Hill’s Mc Culloch Collection, which includes items recovered from the wrecks of the Victoria Tower (wrecked in 1869) and Loch Ard (wrecked in 1878). They were salvaged by a diver in the early 1970s from the southwest coast of Victoria. Advanced marine technology had enabled divers to explore the depths of the ocean and gather its treasures before protective legislation was introduced by the Government. The artefacts were donated to Queensland’s Department of Environment and Heritage Protection (EHP) by a passionate shipwreck lover and their locations were verified by Bruce McCulloch. In 2017 the Department repatriated them to Flagstaff Hill where they joined our vast collection of artefacts from Victoria’s Shipwreck Coast. The Victoria Tower: - The three-masted iron clipper ship was built in 1869 in Liverpool, England, as a passenger and cargo ship for the Australian trade. She was named after one of the two towers of the British Houses of Parliament and owned by the White Star line. The Victoria Tower sailed under the command of Captain Kerr from Liverpool towards Melbourne on her maiden voyage. She carried 34 passengers and 16 crew plus a general cargo including bottled beer, slates, iron pipes and hardware. She was almost at her destination when she was wrecked on 17th October 1869 at Point Impossible, west of Thompsons Creek, Breamlea. The wreck is a very popular diving site.The artefact is an example of cargo or personal items on board a ship in 1869. It provides a reference point for classifying and dating similar items. The artefact is significant for its association with the clipper ship Victoria Tower, which is listed on the Victorian Heritage Register as S698. The Victoria Tower is recorded as the most intact historic shipwreck accessible between Point Lonsdale and Cape Otway. The Victoria Tower is one of only seven shipwrecks in Victoria that have had more than 100 objects recovered from them reported as a result of the Commonwealth Amnesty held in 1993-94.Tobacco pipe heads, two(2); bowls of white unglased clay tobacco pipes. Pipe bowls are each decorated with the image of a Negro slave head moulded into it and facing away from the smoker. The pipe heads have no stems. Both have a vertical line down the centre of the face, broad nostrils sunken eyes, recessed hair. 8508.1 - features are worn but the ear is distinct, forehead bare, eyes sunken. The bowl is complete. 8508.2 - features are distinct, eyes closed, thick broad lips. The back section of the bowl is missing. The items were recovered from the wreck of the ship Victoria Tower.white star line, victorian heritage register, clipper ship, victoria tower, captain kerr, shipwreck victoria tower, migrant ship 1869, cargo ship 1869, iron clipper, british clipper ship, 1869, cargo imported to australia, pipe heads, clay pipe fragments, pipe, ceramic pipe, clay pipe, smoker’s pipe, smoking accessory, tobacco pipe, smoker's pipe, personal effects, tobacco, smoking pipe, smoking tool, smoking habit, smoker, tobacco smoker, tobacco pipe heads -
 Flagstaff Hill Maritime Museum and Village
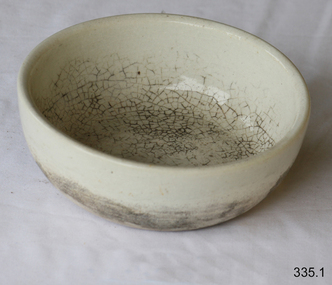
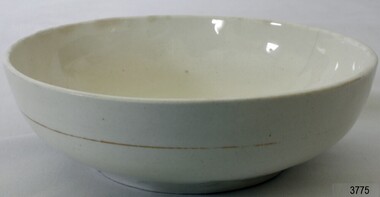
Ceramic - Bowl, Prior to 1950
... White earthenware bowl Ceramic Bowl ...A mass produced utilitarian item made for domestic use no history or manufacturing provenance currently available. Over 1500 pottery firms have operated in Stoke-on-Trent since the early 1700's - Some lasted only a few years and some for well over 200 years. Some potters built and owned their own works. Many others were tenants in works built by others and a succession of potters occupied the same works. It was also a common practice for a works to be split between two different pottery companies or for a larger manufacturer to let out a smaller section of his works to a potter who would make wares which were not of interest to the pot works owner. Some potters purchased 'blanks' from other manufacturers and put their own decoration on them some items have two back stamps some have no marks at all. This adds to the confusion and frustration of trying to trace details of a particular manufacturer such as the subject item.Item at this time cannot be associated with an historical event, person or place, provenance is unknown, item assessed as a collection asset given it was produced before 1950.White earthenware bowlNoneflagstaff hill museum, shipwreck coast, ironstone pottery, earthenware, bowl -
 Flagstaff Hill Maritime Museum and Village
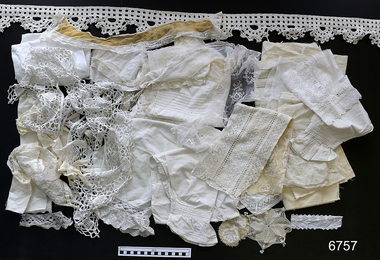
Linen, late 1800's
This item is one of many 19th century items donated to Flagstaff Hill Maritime Village by the Giles Family, and known as the “Giles Family Collection”. Henry Giles was born at Tower Hill, Victoria in 1858 and worked as a labourer on the Warrnambool Breakwater. His wife, Mary Jane, was born in 1860 at Cooramook and worked as a student teacher at Mailor’s Flat Secondary School. The Giles family lived at The Maam, Wangoom in the late 19th century, before moving to New South Wales in 1895, where Henry built bridges. Henry died in 1933 and Mary Jane died seven years later. Flagstaff Hill holds a number of objects associated with the Giles family, which were donated by Flagstaff Hill volunteers Vera and Aurelin Giles (Henry and Mary Jane’s daughter and granddaughter respectively). These are predominantly located in the Lighthouse Keeper’s Cottage and include: Living room • Cloths (made by Vera Giles) • Portraits of Mary and Henry Giles • 1 x dresser • Covers on dresser • 1 x bellows Baby’s room • 1 x blessing (in the baby’s room) • 1 x picture of boy and girl • 1 x rocking chair • 1 x cushion (made by V Giles) • 1 x chest (belonging to Mary Jane Giles’s mother, Jane Fleming who migrated to Australia from Ireland in 1843) • 1 x chest cover • Bed materials Bedroom • 1 x knitted bedspread and cushion cover (knitted by V Giles) • Pillow shams and covers (Mrs Catherine King) • Pillow cases (Mary Giles) • 1 x wash stand (Mary Giles) • Towels (lace knitted by Aurelin Giles) • 1 x washstand cover • 1 x white ceramic dog • Shaving items • 1 x dressing table mirror • 1 x dressing table cover (made by Aurelin Giles) • 1 x framed motto • 2 x texts • 1 x settee (sofa) • 1x wardrobe (Vera Giles donated the wardrobe in the Lighthouse Keeper’s Cottage to Flagstaff Hill. According to Aurelin Giles, it was originally owned by William Swinton junior and was later given to a friend of the Giles family.) Kitchen • Settee covers (made by V Giles) • 1 x sideboard • 1 x butter churner • 2 x pictures • 1 x white cheese dome • 1 x wash-up tray • 2 x jugs • 1 x vegetable bowl and dish • 1 x willow pattern dinner set • Glass butter and jam dishes. The Giles family collection has social significance at a local level, because it illustrates the level of material support the Warrnambool community gave to Flagstaff Hill when the Museum was established.Calico bag of assorted fabrics, trims and sewn pieces (originally donated together with sewing machine). Items include clothing, lace, tablecloth, tray cloth, collars, oversleeves, trims, jug cover, lace inserts. (part of the Giles Collection)flagstaff hill, warrnambool, shipwrecked-coast, flagstaff-hill, flagstaff-hill-maritime-museum, maritime-museum, shipwreck-coast, flagstaff-hill-maritime-village, linen, fabric, dressmaking, sewing materials, 19th century sewing, 19th century fashion, giles family, 19th century hand craft, henry giles, tower hill, cooramook, warrnambool breakwater, mailor’s flat, wangoom, 19th century clothing, 19th century linen, 19th century handcraft