Showing 218 items
matching city hotel, ballarat
-
 City of Ballarat Libraries
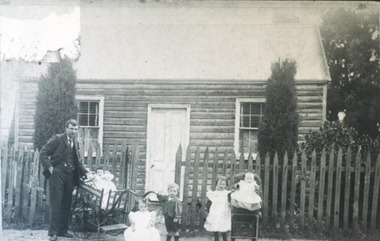
Photograph, Young & Tyson families at their cottage, Allendale circa 1904
Young Tyson family outside their weatherboard cottage. The Young's owned a hotel on Creswick Road.young tyson, allendale, house, housing -
 City of Ballarat Libraries
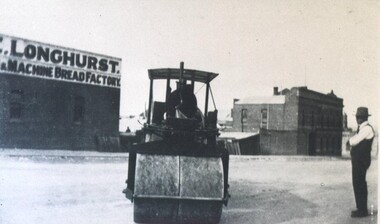
Photograph, Jelbart Road Roller & Longhurst Bakery circa 1930s
Jelbart Road Roller in Doveton Street North. In the background is the Longhurst Bakery which became The Highlander Pub, then the Peter Lalor and now the Pub with Two Names.jelbart, road roller, ballarat, manufacturing, doveton street north, longhurst bakery, highlander, hotels, pubs, peter lalor, pub with two names -
 City of Ballarat Libraries
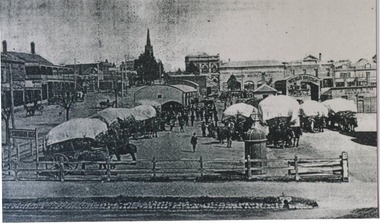
Photograph, Haymarket, Ballarat circa 1906
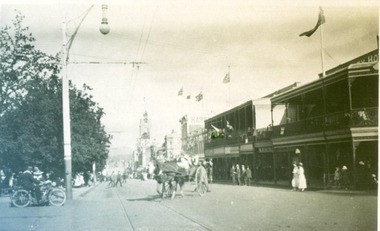
Ballarat Haymarket circa 1906 viewed from the corner of Armstrong Street North and Mair Streets. This is the site of the Civic Hall. The Royal Highlander Hotel can be seen in the background. haymarket, commerical, ballarat, mair street, armstrong street, royal highlander, hotels, markets -
 City of Ballarat Libraries
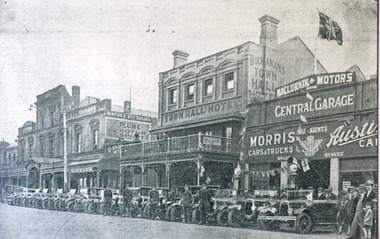
Photograph, Chauffeurs line up along Armstrong Street North, Ballarat circa 1919
Chauffeurs line up next to Morris Austin cars outside of Maclurain Motors Central Garage. Other businesses seen in the photo are Mathers Tailors and the Buchanan's Town Hall Hotel.armstrong street north, ballarat, commerical, automotive, morris austin, maclurain motors, central garage, mathers tailors, buchanan's town hall hotel -
 City of Ballarat Libraries
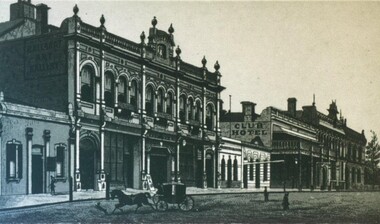
Photograph, Academy of Music, Art Gallery Association & Club Hotel
The view is taken from the cnr of Lydiard & Sturt Street circa 1870-1880 from the Premier Album of Ballarat Views. The Academy of Music is now Her Majesty's Theatre.academy of music, ballarat art gallery, club hotel, streetscape, her majesty's, hotel, entertainment, premier album of ballarat views -
 City of Ballarat Libraries
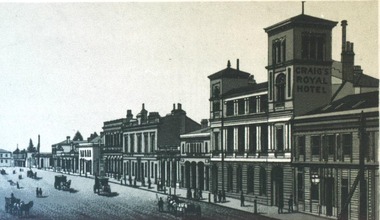
Photograph, Craig's Royal Hotel & commerical buildings
Lydiard Street South circa 1870-1880 from the Premier Album of Ballarat Views.craig's royal hotel, streetscape, hotel, commercial, premier album of ballarat views, lydiard street south -
 City of Ballarat Libraries
Photograph, View the Unicorn Hotel of Sturt and Camp Streets
The State Bank and Library buildings and telegraph can be seen. This sketch comes from from the Premier Album of Ballarat Views circa 1870-1880.unicorn hotel, state bank, library, building, streetscape, ballarat, telegraph, premier album of ballarat views -
 City of Ballarat Libraries
Photograph, The Corner, Sturt Street
The Corner was where the Ballarat Stock Exchange was housed where groups would gather each day. Also pictured are the Unicorn Hotel, the Mechanics' Institute and Grevilles Hotel. This sketch comes from from the Premier Album of Ballarat Views circa 1870-1880.corner, buildings, commerical, public, hotel, sturt street, premier album of ballarat views -
 City of Ballarat Libraries
Photograph, Boy Scouts Celebratory Arch for Ballarat Centenary Celebrations 1938
The arch was erected on the corner of Main Road and Barkly Street. The building could be the Sir Henry Barkly Hotel. centenary, boy scouts, ballarat, barkly street, main road -
 City of Ballarat Libraries
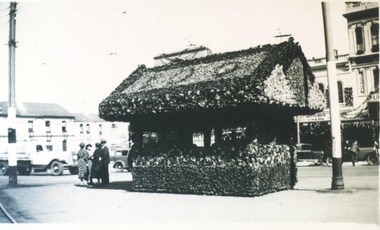
Photograph, Tram Shelter during Ballarat Centenary Celebrations 1938
Tram Shelter decorated for Centenary Celebrations 1938. Located in Sturt Street. The Union Hotel and Butler's Cake Shop can be seen in the background.building, public, tram, transport, centenary, ballarat, hotel, commercial -
 City of Ballarat Libraries
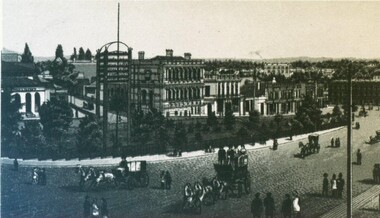
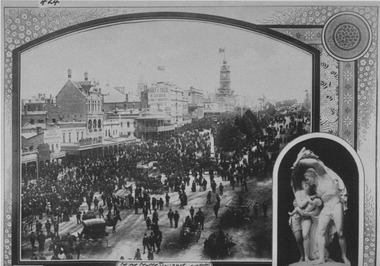
Photograph, 8 Hours Day Procession, Ballarat circa 1893
This procession was conducted in Sturt Street. The picture insert is of the statue 'Flight from Pompeii'. Some of the buildings seen in the photo are Mechanics Institute, Town Hall and the Unicorn Hotel.celebrations, 8 hours day, streetscape, buildings, commerical, public, town hall, mechanics' institute, unicorn hotel, statue, flight from pompeii, sturt street, ballarat -
 City of Ballarat Libraries
Photograph, Academy of Music and Craig's Hotel Tower, Ballarat circa 1891
The Academy of Music became what is now Her Majesty's Theatre. This view is from the Town Hall Tower looking south east.building, public, hotel, academy of music, her majesty's theatre, craig's hotel, streetview -
 City of Ballarat Libraries
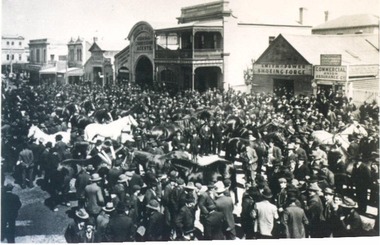
Photograph, Annual Horse Parade, Ballarat circa 1910
This horse parade was held on Doveton Street North. Buildings in the background include Tattersal's Hotel and Smith & Power Shoeing Forge.building, public, streetview, commerical, hotel, horses, tattersal's hotel, smith & power, doveton street north -
 City of Ballarat Libraries
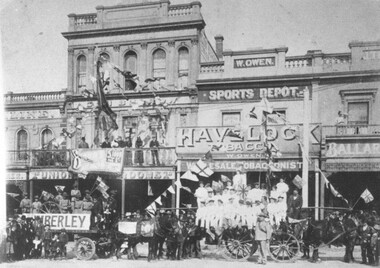
Photograph, Boer War Celebrations, Ballarat circa 1902
The parade was held in Sturt Street near Grenville Street. In the background can be seen the Union Hotel, Owens Sports Store, and Kline's Bakery.building, commercial, hotel, celebrations, boer war, sturt street, owens sport store, kline's bakery -
 City of Ballarat Libraries
Photograph, Golden City Hotel, Ballart circa 1916
The Golden City Hotel still stands on the corner of Sturt and Dawson Streets. Notice the horse-drawn carriage and the motorbike.golden city hotel, building, commerce, hotel, public, streetscape, sturt street, dawson street -
 City of Ballarat Libraries
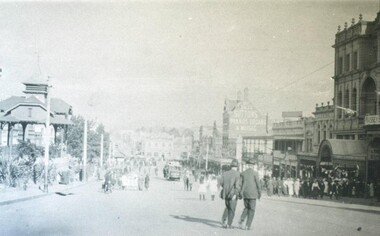
Photograph, Camp Street Gardens, Ballart circa 1916
Located in Sturt Street, the Titanic Bandstand, Mechanics' Institute and Sutton's can be seen.streetscape, public, commercial, hotel, titanic bandstand, mechanics' institute, suttons, sturt street, camp street gardens. -
 City of Ballarat Libraries
Card Box Photographs, View south along Lydiard Street North from Sturt Street, Ballarat 1899
Taken from Sturt Street, this photo shows Cobb's Corner and Craig's Hotel.lydiard street north, ballarat, sturt street, streetscape, cobb's corner, craig's hotel, streetlamp, buildings -
 City of Ballarat Libraries
Photograph - Card Box Photographs, Views looking east and west along Bridge Street, Ballarat c1915
East and west views along Bridge Street. Buildings along the streets include Cowdell Tonner & Ellis and the Bucks Head Hotel. This comes from the Ballarat Homecoming publication.bridge street, ballarat, streetscape, buildings, cowdell tonner & ellis, bucks head hotel, public, commerical, hotel, ballarat homecoming -
 City of Ballarat Libraries
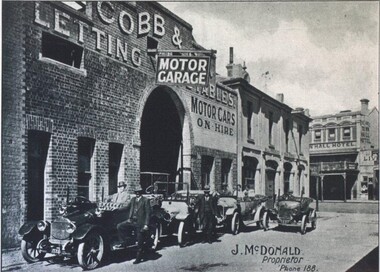
Photograph - Card Box Photographs, J. McDonald Motor Garage, Ballarat c1915
The garage was located in Bath Lane and was once the Cobb & Co. Letting Stables. Adam Lindsay Gordon lived in a cottage behind the stables. The Town Hall Hotel can be seen in the background. This was in the Ballarat Homecoming publication.j.mcdonald, motor garage, bath lane, cobb & co, adam lindsay gordon, town hall hotel, building, vehicle, commercial, ballarat, ballarat homecoming -
 City of Ballarat Libraries
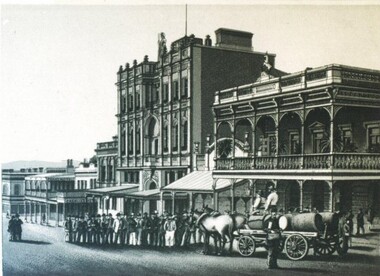
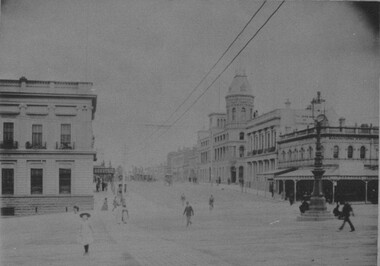
Photograph - Card Box Photographs, Criterion Hotel, Ballarat 1872
The Criterion Hotel was situated on the corner of Sturt and Doveton Street North. This photo was taken facing NNW from the Town Hall Tower.criterion hotel, commercial, hotel, ballarat, town hall tower, sturt street, doveton street north -
 City of Ballarat Libraries
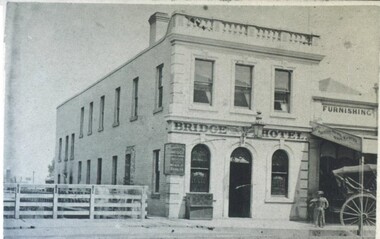
Photograph - Card Box Photographs, Bridge Hotel, Ballarat c1870
The Bridge Hotel was located in Bridge Street. The timber paling fence stopped people falling off the bridge. Next to the hotel was the premises of Wheeler & Wilson Sewing Machines.bridge hotel, wheeler & wilson, building, commercial, hotel, ballarat, bridge -
 City of Ballarat Libraries
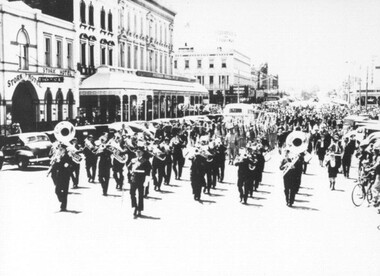
Photograph - Card Box Photographs, Marching Band, Ballarat c1940
This is possibly the Airforce Band marching along Armstrong Street North. The Stork Hotel can be seen on the left side of the picture.ballarat, marching band, entertainment, parade, stork hotel, building, commerical, public, armstrong street north -
 City of Ballarat Libraries
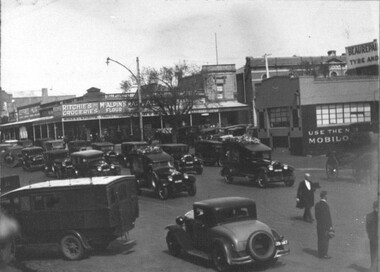
Photograph - Card Box Photographs, Funeral Procession, Ballarat circa 1931
The procession passes the south west corner of Mair and Armstong Street North. This was a double funeral for two boys who drowned in Sebastopol. Funeral Director Hugh Evans Snr walks before the hearses. Businesses in the background include Robert Ritches Grocer, the Plough & Harrow Hotel and an advertisement for Beaurepaire Mobilo.h. evans & son, hugh evans snr, funeral procession, advertising, building, mair street, armstrong street north, robert ritches grocer, plough & harrow hotel, beaurepaire mobilo, commerical, vehicle, ballarat, sebastopol -
 City of Ballarat Libraries
Photograph - Card Box Photographs, Ladies Highland Pipe Band
The Ladies Highland Pipe Band pass the City Brigade Hotel on the corner of Sturt and Raglan Streets on the occasion of the Queen's visit 1954.ladies highland pipe band, city brigade hotel, sturt street, raglan street, queen's visit, public building, hotel, celebration, ballarat -
 City of Ballarat Libraries
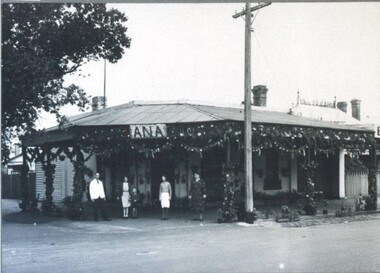
Photograph - Card Box Photographs, D'Angri' Corner Shop Exterior 1938
The D'Angri Corner Shop was once the Commercial Hotel. The veranda could have been added when the hotel was converted into a shop. In this photo, it is decorated for the Ballarat Centenary Celebrations. From the left is W. D'Angri Senior, Lillian D'Angri (Pyers), Norm D'Angri, Vi D'Angri (Irwin) and Mrs C.L. D'Angri.d'angril corner shop, commerical hotel, ballarat centenary celebrations, sturt street, ascot street, w. dangri, lillian d'angri, norm d'angri, vi d'angri, c.l. d'angri, commerical, building -
 City of Ballarat Libraries
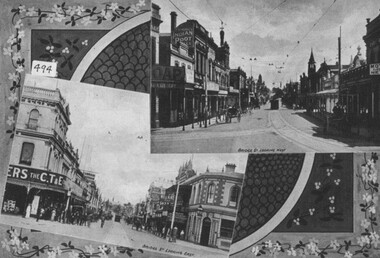
Photograph - Card Box Photographs, Corner of Sturt Street and Lydiard Street North circa 1880
sturt street, lydiard street north, ballarat, alex marks, craigs royal hotel, cobbs corner, streetscape, buildings, public buildings, commerical, streetlamp, flegeltaub -
 City of Ballarat Libraries
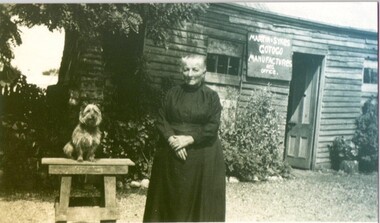
Photograph - Card Box Photographs, Mary Ellen Sykes outside soap factory circa 1939
The Darling Street factory was located next to the Coles Family Hotel. The building was formerly a detached kitchen. Signboard reads 'Martin & Sykes GOTOGO Reg Off'.ellen sykes, darling street, coles family hotel, manufacturing, person, building, commerical, ballarat -
 City of Ballarat Libraries
Photograph - Card Box Photographs, Rear of the Ballarat Banking Co. building circa 1920
Liddon Thomas sits out the back of the Ballarat Banking Co. building. Possibly the George Hotel on the left.liddon thomas, ballarat banking co., building, commerical, george hotel, lydiard street north, person -
 City of Ballarat Libraries
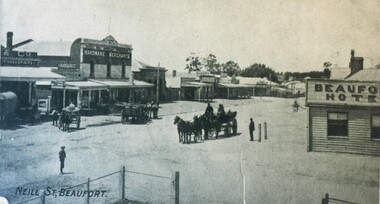
Postcard - Card Box Photographs, View of Neill Street, Beaufort circa 1900
Some of the businesses along the street include the Beaufort Hotel, hardware store, bakery and a general store that sells the Argus. beaufort, neill street, postcard, beaufort hotel, commerical, vehicle -
 City of Ballarat Libraries
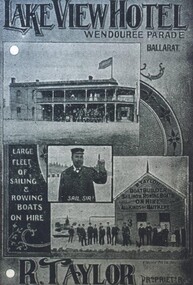
Photograph - Card Box Photographs, Advertisement for Lake View Hotel 1916. From Citizens & Sports publication
The Lake View Hotel is located on Wendouree Parade. The proprietor was R. Taylor. The advertisement also shows the hire of sailing and rowing boats. lake view hotel, wendouree parade, r. taylor, advertising, boatshed, vehicle, boats, ballarat