Showing 62 items
matching day signal
-
 Flagstaff Hill Maritime Museum and Village
Equipment - Distant Signal, 1897-1931
... codes marine safety signal flags day shape daymark day symbol ...This three-dimensional Distant Signal is part of a Flagstaff Signal set of ball, cone and drum shapes. It has been woven and then fabricated with strong metal swivel fittings and loops for suspending from a high point on a flagstaff at a signal station or on a ship’s masthead. The cane signal was constructed to withstand all weather and to be visible from a long distance. The gaps between the woven cane allow air to pass through, minimising possible swaying. Similar sets were made from rope or fabric. Warrnambool's Flagstaff was erected in 1854. Its primary use was to display visual signals that could convey messages between land and sea. It was also used to notify the local population of the approach of ships. One of the popular signalling codes in use in the early-to-mid 1800s was the Marryat’s Code but there were others in use as well; there was no one standard code. In 1857 the International Marine Conference adopted an International Code of Signals as a standard communications system for all vessels that could be understood in many different languages. The Normanby Advertiser reported on June 5th 1857 a query from the Post Master General as to whether the request of the Chief Harbour Master would be carried out, in that Warrnambool would receive a new flagstaff and a set of Marryatt’s signal flags. The Table of Codes was published, showing how to use combinations of these flags to send messages. The Code was revised in 1887 to cover situations where distance, light, wind and weather conditions affected the visibility of the flags and prevented clear communication. The first report of the International Code of Signals Committee of 1897 warned signalmen not to rely on ordinary semaphore flags and introduced a Distant Signal Code using either particular semaphore flags or the three-dimensional shapes of a ball, cone and drum that aligned with the semaphore flag shapes of a circle, pennant and square. International Code of Signals In 1931, after World War I’s experiences in using signal codes, the International Code of Signals conference in Washington revised and published the rules for the conduct of signalling. One of the changes was that “the use of the Distant Signals and of fixed semaphore was abandoned”. It is of interest to know that modern marine law in many countries insists that a set of Day Shapes must be carried onboard vessels of a certain size. These highly visible geometric shapes are used at sea in daylight to communicate messages between vessels. They are used in a similar way to the Distant Signals, in that different combinations of shapes represent different messages. The set of shapes includes a ball, cylinder, cone and diamond. The shapes are hung between the top of the vessel’s foremast and the front of the vessel. They are only coloured black and are about 1.5 metres high. The vertical line of shapes can mean messages such as Boat not under command, Fishing, and Under sail and power.Distant Signals were an important means of marine communication from the late 1880s to the early 1930s, including during World War I. They were an advancement to the International Shipping Codes and safety. The cane signals’ shapes appear to be the same from whatever direction they are viewed, removing confusion about the message they convey. The same shapes continue to be used today for the sets of Day Shapes used as marine navigational signals that are mandatory on certain-sized vessels.Distant Signal Ball, part of a Flagstaff signal set. A round woven cane ball, painted black, with a metal rod passing through the centre. The rod has a loop at each end, then a concave, octagonal metal plate that rests on the outside surface of the ball, serving as a washer. The rod has swivels at each end.distant signal, flagstaff signal, signal station, masthead signal, communications, marine technology, signals, marine signals, flaghoists, international marine conference, international code of signals, signal codes, marine safety, signal flags, day shape, daymark, day symbol, navigation, warrnambool flagstaff, 1854, 1857 1931, 1887, 1897 -
 Flagstaff Hill Maritime Museum and Village
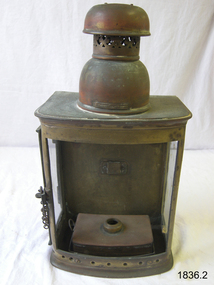
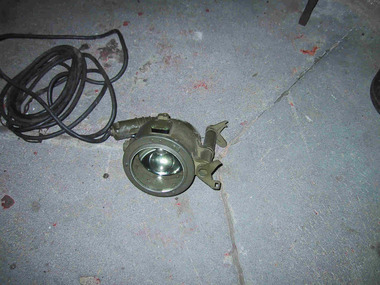
Functional object - Marine Lamp, William W M Mc Geoch Ltd, 1910 to 1925
In 1832 William McGeoch & Co., Ltd was established, by William McGeoch senior at 113 Argyle St Glasgow as hardware merchants and exporters, and later were manufacturers of lamps and electrical fittings for ship, railway and domestic use. In the 1900s the company had expanded and had offices at 28 West Campbell Street Glasgow with a factory and warehouse located at the Warwick Works, 46 Coventry Rd, Birmingham. In 1922 the company had expanded and were employing 400 to 500 people. William seniors three sons had joined their father in establishing the business around 1888. The business was run by William McGeoch senior with Williams three sons Alexander, William and Andrew also taking an active part in the day to day running of the company. The company had expanded to such a degree that they were now manufacturing a variety of ships' hardware. This included metal cabin furnishings, signal lamps, ships' oil and candle lamps, motor lamps, switches, switchboards, electrical accessories and fittings. In 1982 William McGeoch & Co., Ltd was acquired by Bowthorpe Holdings Ltd.A lamp made by a significant manufacturer of marine equipment that made fittings for many famous ships including the Titanic.Marine oil Lamp with glass panels. Front panel missing. Access through glass panel door at side flat metal back. Metal fuel reservoir and no burner. Metal rounded chimney on top. Embossed McGeogh Maker Glasgowwarrnambool, flagstaff-hill, flagstaff-hill-maritime-museum, maritime-museum, shipwreck-coast, flagstaff-hill-maritime-village, lamp, ships lamp, wm mc geoch ltd, hardware merchants, ships outfitters -
 Federation University Historical Collection
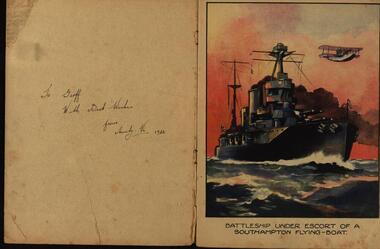
Booklet, United Services: A Story Book with Eighteen Coloured Plates, c1932
The Geoff mentioned in the inscription is Geoff Biddington.Children's book with colour and black and white illustrations.Inside front cover "To Geoff With Best Wishes From Aunty Vi 1932army, airforce, navy, armed service, royal marines, sailors, naval aircraft carrier, signalling, submarine, royal horse guards, military band, drum major, argyll and sutherland highlanders, royal artillery, machine gunners, tanks, bridge building, the piper, whippet tank, airmen, armstrong whitworth atlas machine, hawlker fury aeroplance, super-marine napier, schneider racing aeroplane, fairet iiif sea-plane, hawker hart day bomber, parachute jumping, schneifer trophy sea-plane, bristol bulldogs, iris flying-boat, geoff biddington, uniforms -
 Australian Commando Association - Victoria
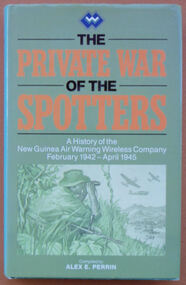
Book, The Private War of the Spotters: A history of the New Guinea Air Warning Wireless Company, February 1942-April 1945
The history of the New Guinea Air Warning Wireless Company. This reprinted version contains a map of the dispositions of Spotting Stations August 1943, additional MID awards listed and some additions to the nominal roll. The New Guinea Air Warning Wireless Company was formed in Port Moresby in late January 1942 and was granted “Separate Independent Establishment” status in October 1943. The company’s “founding father” was Major Don Small, who had witnessed Japanese air raids on Rabaul and realised that having lacked an effective early-warning system around New Britain meant that the defenders were taken by surprise. At the time, gaps had also appeared in the coast-watching communications network because the territory administration ordered the withdrawal of civilian wireless operators when Japan entered the war. The first influx of men into the company consisted largely of volunteers from the 39th Infantry Battalion, which was stationed at Port Moresby. Initial training was rudimentary, hasty, and was sometimes even carried out on en route to a new station. The first party of company personnel, or “spotters”, left Port Moresby as early as 1 February 1942, bound for the strategically important Samarai area, at the tip of Papua. In the first month of the company’s existence 16 spotter stations were established on the coast of Papua and in the mountains around Port Moresby. At the end of 1942 there were 61 operational stations being run by 180 men. The company’s high-water mark was in late 1944, by which time over 150 stations had been set up in Papua and New Guinea behind enemy lines. On 3 February 1942 the company issued its first air warning in Papua, when spotters at Tufi saw Japanese aircraft about to attack Port Moresby for the first time. The following month the company was responsible for the first Japanese killed in action in Papua by Australian ground forces, when spotters from Gona engaged the crew of a downed Japanese bomber. And in July 1942 the station at Buna signalled Port Moresby with news of the Japanese landings in Papua, marking the beginning of the Kokoda campaign. The dangers involved in the company’s work had also been made clear by this time. In July 1942 a party of spotters attempting to set up a station at Misima Island, off Milne Bay, was intercepted by a Japanese destroyer, resulting in the company’s first operational losses. Anticipating the direction of the campaign as a whole, the company’s focus moved north and north-west over the three years of its existence. In May 1942 a network was set up in the Wau area in association with the activities of Kanga Force. As part of the Wau network, spotter Ross Kirkwood audaciously constructed an observation post overlooking the Japanese airstrip at Salamaua. Kirkwood’s position was photographed by Damian Parer on the understanding that the pictures would not be published. They nevertheless appeared in a Sydney newspaper. The day after the publication of the photographs the observation post was attacked by the Japanese and Kirkwood was lucky to escape. In June 1944 the company’s headquarters were moved to Nadzab. By that time, spotter stations existed behind Japanese lines, as far north as Hollandia, and the company began to train Americans to perform similar work in the Philippines. In early 1945 the company moved to Balcombe, Victoria, where its members were posted to other units of the Australian Corps of Signals.gray plasticnon-fictionThe history of the New Guinea Air Warning Wireless Company. This reprinted version contains a map of the dispositions of Spotting Stations August 1943, additional MID awards listed and some additions to the nominal roll. The New Guinea Air Warning Wireless Company was formed in Port Moresby in late January 1942 and was granted “Separate Independent Establishment” status in October 1943. The company’s “founding father” was Major Don Small, who had witnessed Japanese air raids on Rabaul and realised that having lacked an effective early-warning system around New Britain meant that the defenders were taken by surprise. At the time, gaps had also appeared in the coast-watching communications network because the territory administration ordered the withdrawal of civilian wireless operators when Japan entered the war. The first influx of men into the company consisted largely of volunteers from the 39th Infantry Battalion, which was stationed at Port Moresby. Initial training was rudimentary, hasty, and was sometimes even carried out on en route to a new station. The first party of company personnel, or “spotters”, left Port Moresby as early as 1 February 1942, bound for the strategically important Samarai area, at the tip of Papua. In the first month of the company’s existence 16 spotter stations were established on the coast of Papua and in the mountains around Port Moresby. At the end of 1942 there were 61 operational stations being run by 180 men. The company’s high-water mark was in late 1944, by which time over 150 stations had been set up in Papua and New Guinea behind enemy lines. On 3 February 1942 the company issued its first air warning in Papua, when spotters at Tufi saw Japanese aircraft about to attack Port Moresby for the first time. The following month the company was responsible for the first Japanese killed in action in Papua by Australian ground forces, when spotters from Gona engaged the crew of a downed Japanese bomber. And in July 1942 the station at Buna signalled Port Moresby with news of the Japanese landings in Papua, marking the beginning of the Kokoda campaign. The dangers involved in the company’s work had also been made clear by this time. In July 1942 a party of spotters attempting to set up a station at Misima Island, off Milne Bay, was intercepted by a Japanese destroyer, resulting in the company’s first operational losses. Anticipating the direction of the campaign as a whole, the company’s focus moved north and north-west over the three years of its existence. In May 1942 a network was set up in the Wau area in association with the activities of Kanga Force. As part of the Wau network, spotter Ross Kirkwood audaciously constructed an observation post overlooking the Japanese airstrip at Salamaua. Kirkwood’s position was photographed by Damian Parer on the understanding that the pictures would not be published. They nevertheless appeared in a Sydney newspaper. The day after the publication of the photographs the observation post was attacked by the Japanese and Kirkwood was lucky to escape. In June 1944 the company’s headquarters were moved to Nadzab. By that time, spotter stations existed behind Japanese lines, as far north as Hollandia, and the company began to train Americans to perform similar work in the Philippines. In early 1945 the company moved to Balcombe, Victoria, where its members were posted to other units of the Australian Corps of Signals.world war ii, special operations, new guinea, new guinea air warning wireless company -
 Flagstaff Hill Maritime Museum and Village
Functional object - Ship's nail in wood, Ca. 1855
This ship's nail in a wood sample was part of the construction of the ship SCHOMBERG. About the SCHOMBERG- James Blaine’s Black Ball Line had commissioned the luxury sailing ship, Schomberg, to be built for its fleet of passenger liners The three-masted wooden ship was launched in 1855, designed by the Aberdeen builders to sail faster than the quick clippers designed by North American Donald McKay. The material used for the diagonal planking was British oak with layers of Scottish larch. The Schomberg’s master Captain ‘Bully’ Forbes commanded the ship on its maiden journey between Liverpool and Melbourne, departing on 6 October 1855 with 430 passengers and 3000 tons of cargo including iron rails and equipment intended the build the Geelong Railway and a bridge over the Yarra from Melbourne to Hawthorn. After sailing for 78 days she ran aground on a sand spit at Curdies Inlet near Peterborough, Victoria, on 27 December 1835. At dawn on the next day, the ship’s Chief Officer signalled a passing steamer, SS Queen, for help and all of Schomberg’s passengers were able to disembark safely. The passengers’ baggage and some of the cargo were later collected from the Schomberg. Local merchants Manifold & Bostock bought the wreck and the remaining cargo but did not attempt to salvage the cargo that was still on board. They eventually sold it and after two of the men drowned in the salvage efforts the job was abandoned. In 1975, divers from Flagstaff Hill, including former Director, Peter Ronald, explored the Schomberg wreck site and recovered many artefacts that are now on display at the Museum.The ship's nail in a wood sample is significant for its connection with the Schomberg, which is on the Victorian Heritage Register (VHR S612), has great historical significance as a rare example of a large and fast clipper ship that sailed on the England-to-Australia run, carrying emigrants at the time of the Victorian gold rush. She represents the technical advances made to break sailing records between Europe and Australia. Flagstaff Hill’s collection of artefacts from the Schomberg is significant for its association with the shipwreck. The collection is primarily significant because of the relationship between the objects, as together they can interpret the story of the ship, Schomberg. It is archaeologically significant as the remains of an international passenger Ship. It is historically significant for representing aspects of Victoria’s shipping history and for its association with the shipwreck and the ship, which was designed to be the fastest and most luxurious of its day.Ship's nail in a wood sample. The object was recovered from the wreck of the SCHOMBERG.flagstaff hill, warrnambool, maritime village, maritime museum, shipwreck coast, great ocean road, schomberg, clipper ship, black ball line, 1855 shipwreck, aberdeen clipper ship, captain forbes, peterborough shipwreck, ss queen, ship's nail, ship's wood, wood sample, ship construction -
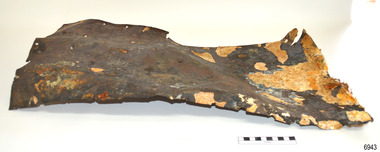 Flagstaff Hill Maritime Museum and Village
Functional object - Copper Sheathing, Ca. 1855
This sheet of copper sheathing or Muntz metal has been recovered from the site of the wrecked ship Schomberg. It has been damaged by the reaction of the metals to the sea, it has encrustations from the sea such as sand, and another damage has caused the edges to break away or fold over. Early sailing ships had a problem of the timber hulls being eaten through by the marine animals called Teredo Worms, sometimes called ‘sea worms’ or ‘termites of the sea’. The worms bore holes into wood that is immersed in seawater and the bacteria inside the worms digest the wood. Early shipbuilders applied coatings of tar, was, lead or pitch onto the timber to prevent this. In the 18th and 19th centuries, the outsides of ships’ hulls were encased in either copper sheathing or Muntz metal, which is a combination of 60 per cent copper and 40 per cent zinc. The ships would be re-metalled periodically to ensure the sheathing would remain effective. In more recent times the ships are protected with a toxic coating. About the SCHOMBERG- James Blaine’s Black Ball Line had commissioned the luxury sailing ship, Schomberg, to be built for its fleet of passenger liners The three-masted wooden ship was launched in 1855, designed by the Aberdeen builders to sail faster than the quick clippers designed by North American Donald McKay. The material used for the diagonal planking was British oak with layers of Scottish larch. The Schomberg’s master Captain ‘Bully’ Forbes commanded the ship on its maiden journey between Liverpool and Melbourne, departing on 6 October 1855 with 430 passengers and 3000 tons of cargo including iron rails and equipment intended the build the Geelong Railway and a bridge over the Yarra from Melbourne to Hawthorn. After sailing for 78 days she ran aground on a sand spit at Curdies Inlet near Peterborough, Victoria, on 27 December 1835. At dawn on the next day, the ship’s Chief Officer signalled a passing steamer, SS Queen, for help and all of Schomberg’s passengers were able to disembark safely. The passengers’ baggage and some of the cargo were later collected from the Schomberg. Local merchants Manifold & Bostock bought the wreck and the remaining cargo but did not attempt to salvage the cargo that was still on board. They eventually sold it and after two of the men drowned in the salvage efforts the job was abandoned. In 1975, divers from Flagstaff Hill, including former Director, Peter Ronald, explored the Schomberg wreck site and recovered many artefacts that are now on display at the Museum.The copper sheathing is significant for its connection with the Schomberg, which is on the Victorian Heritage Register (VHR S612), has great historical significance as a rare example of a large and fast clipper ship that sailed on the England-to-Australia run, carrying emigrants at the time of the Victorian gold rush. She represents the technical advances made to break sailing records between Europe and Australia. Flagstaff Hill’s collection of artefacts from the Schomberg is significant for its association with the shipwreck. The collection is primarily significant because of the relationship between the objects, as together they can interpret the story of the ship, Schomberg. It is archaeologically significant as the remains of an international passenger Ship. It is historically significant for representing aspects of Victoria’s shipping history and for its association with the shipwreck and the ship, which was designed to be the fastest and most luxurious of its day.Copper sheathing; rectangular sheet of copper, shaped for use on a ship's hull, buckled, with fibres protruding from one edge. The object was recovered from the wreck of the SCHOMBERG.flagstaff hill, warrnambool, maritime village, maritime museum, shipwreck coast, great ocean road, schomberg, clipper ship, black ball line, 1855 shipwreck, aberdeen clipper ship, captain forbes, peterborough shipwreck, ss queen, ship construction, copper sheating, sheathing, sea worm, muntz, muntz metal, copper sheathing, teredo worms, sea worms, sea termites, shipbuilding -
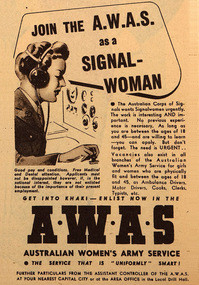
 St Kilda Historical Society
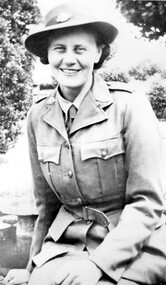
Photograph, Patricia Agnes Penrose OAM, 7 May 1993
Patricia Agnes Penrose (nee Rattray) OAM Convenor Australian Women's Army Service, Royal Australian Corps of Signals. She was awarded the OAM in the Australia Day 1993 Honours List for 'service to veterans and to the community'. She passed away at home on June 27, 2006. Colour photograph unmountedInvestiture of Patricia Agnes Penrose with the Order of Australia medal by his Excellency the Governor of Victoria, the Honorable Richard E McGarvie, at Government House Melbourne, 7 May 1993. Photo taken at reception given afterwardspatricia agnes penrose oam, patricia penrose, australian women's army service, royal australian corps of signals -
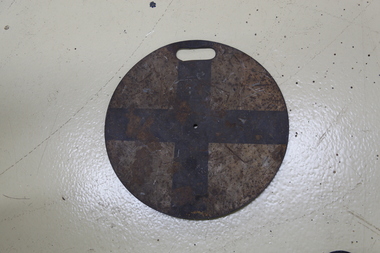 Puffing Billy Railway
Train Destination Disc
Train Destination Disc Until the 1980s Melbourne suburban trains used a system of discs by day, and illuminated market lights by night, to indicate their destination. Placed on the front of trains to advise a Signalman in the Signal Box the destination of the train. This disk was used on NK1 the Whitfield Motor when it was used by Puffing Billy Railway Info from the diagrams from the 1953 Victorian Railways General Appendix. Black + is Lilydale, Belgrave other Destination Disks were Disks Williamstown Black II Newport Workshops Red = Changed in 76 to Black + Newport-Altona shuttle Red X Werribee Red X St Albans Black X Upfield Black = Broadmeadows Originally Red X changed in 1976 to Red = Epping Black II Hurstbridge Red X Lilydale, Belgrave Black + Alamein Black X Glen Waverley Black = Dandenong Black II Frankston Red = Sandringham Red X St Kilda Originally Black II changed in 1976 to Red X Port Melbourne Red X changed in 1976 to Black X Flinders St - Spencer St Local Red II Showgrounds Red = plus extra white disk on opposite front disk bracket; if only one event, Display Large White 1 and yellow side disk with set number. If two events, second event special trains flip this disk and show large Black Disk with white numeral 2 Race Special Red = plus extra white disk on opposite front disk bracket; if only one event, Display Large White 1 and yellow side disk with set number. If two events, second event special trains flip this disk and show large Black Disk with white numeral 2 For example, Flemington Race trains and Caulfield Race trains on the same day. Flemington carries Red = and White 1 and yellow set number on the side Caulfield carries Red = and Black 2 with yellow set number disc on the side. There was one disc which was never to be used in normal traffic, that was the "Red Cross"; it was reserved for Red Cross trains only.Historic - Victorian Railways - Destination Disk - Black cross - Lilydale, Belgrave Lines This disk was used on NK1 the Whitfield Motor when it was used by Puffing Billy Railway Train Destination Disc Round tin sign painted white with a black cross on white background and a mounting bracket on the rear. Placed on the front of trains prior to the mid 1970s to advise a Signalman in the Signal Box the destination of the train. Black Cross puffing billy, destination disc, victorian railways, lilydale, belgrave lines -
 Dandenong/Cranbourne RSL Sub Branch
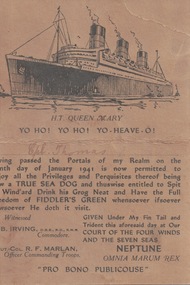
Humorous Card from H.T. Queen Mary, 1941
VX 27898 Corporal Thomas John Morris Thomas (Tom Thomas) donated several items to Cranbourne RSL. He served in the Australian Corp Signals in WWII both in Australia and overseas. He was born at Womerah on 9/11/1906 and died at Koo Wee Rup 16/06/1984. He enlisted at Yarram on 1/7/1940 and was discharged at Royal Park on 9/3/1945.Brown card with black line drawing of a cruise liner, the H.T Queen Mary. Black printed text beneath."H.T. QUEEN MARY / YO HO! YO HO! YO-HEAVE-O! / Cpl Thomas (handwritten) / having passed the Portals of my Realm on the Tenth day of January 1941 is now permitted to enjoy all the Privileges and Perquisites thereof being now a TRUE SEA DOG and thuswise entitled to Spit to Wind'ard Drink his Grog Neat and Have the Full Freedom of FIDDLER'S GREEN whensoever ifsoever howsoever He doth it visit. / Witnessed / R. B. IRVING, O.B.E., R.D., R.N.R. / Commodore / LIEUT-COL. R. F. MARLAN / Officer Commanding Troops. / GIVEN Under My Fin Tail and Trident this aforesaid day at Our COURT OF THE FOUR WINDS AND THE SEVEN SEAS / NEPTUNE / OMNIA MARUM REX / PRO BONO PUBLICOUSE" ht queen mary, queen mary, wwii, omnia marum rex -
 Australian Army Museum of Western Australia
Poem
SIGNALWOMEN An appreciation by an instructor (Sgt J.F. Larkins). Presented to Signalwoman Ruth Franklin after training in Melbourne 1942. After training, Ruth served on Rottnest Island as a communicator in the Plotting Room, Oliver Hill “Join the Corps of Signals”, the clarion call went forth, “Volunteer for the A.W.A.S. and let another man go north.” So you came into the Signals, in Australia’s hour of need, And let a thousand men go up the line, to meet the yellow breed. Where the lazy Yarra flows, through the green Victorian glade, They formed a school of Signals, to teach you in our trade, And the Old Ones, they were cynical, their tones were full of Jeers, “Women in the Signals! What rot!” But their moans have turned to cheers. You were tossed into the melting pot, that is an Australian Army camp. There weren’t many comforts, there were no electric lamps, There weren’t many blankets, it was cold in those tin huts, But the A.W.A.S. came up smiling; you had good Australian GUTS. The hours were long and wearisome, you were given lots of work, But we didn’t find a loafer, we knew not one to shirk. We made the pace a hard one, sometimes there were tears, But you lasses learned as much in months, as we men absorbed in years. You’re in the ARMY now; you all wear the Rising Sun, Sometimes you’ll be unhappy, but stick till the job is done. Time there will be, when the nerves are frayed, and all you do is bungle, Just feel the badge on your tunic, and remember your mates in the jungle. We wish you luck, and God-speed you on your way, And wherever war may scatter us, we’ll look forward to the day, When the final battle’s over and you’ve sent your last G.B., And the DIGGERS and the A.W.A.S. march in the parade of VICTORY. GB (Golf Bravo) is the sign off God Bless [G] DAH DAH DIT [B] DAH DI DI DIT Transcription of poem by Signals instructor Sgt JF Larkins presented to Signal Woman Ruth Franklin during Training in 1943. Read during 75th anniversary commemoration of proofing of Oliver Hill Battery, Rottnest Island. Computer printed on A4 bond paper. -
 Moorabbin Air Museum
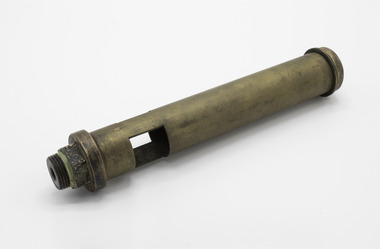
Audio (Item) - Microphone Throat T-30-V U.S. Army Signal Corps.(QTY 2X)
File No.295-DAY-44 .Stock No.2B1630V. With Instruction Sheet. Manufactured by Shure Brothers Chicago U.S.A. -
 Ballarat Tramway Museum
Slide - 35mm slide/s - set of 12, Noel Simons, 28 Feb. 1972
Set of 12 transparencies taken on 28/2/1972 on Kodak mounts. 1207.1 - Bendigo 26 and 2 at Charing Cross. 26 en route for Eaglehawk, 2 for Quarry Hill. Has the Colonial Mutual Life, Armstrong Tyre Service, and Australian Mutual Provident Society buildings and a Cohns Drinks ad. in the background. 1207.2 - as for 1207.1 but with Alexandra fountain in the foreground. 1207.3 - No. 2 in Mitchell St. heading for Quarry Hill. Photo taken after tram has passed photographer. Has buildings on either side of Mitchell St. in the background, including the Plaza Theatre. 1207.4 - No. 6 en route for Golden Square departing Charing Cross. Has the RACV and ANZ bank in the background. 1207.5 - No. 2 crossing Pall Mall to enter Charing Cross ex Quarry Hill, with the Fountain Plaza in the background. 1207.6 - No. 6 arriving Charing Cross ex Golden Square with No. 21 alongside. No. 21 has the SEC ad. 'Everything's fine in my all electric kitchen.' Has the City Family Hotel and the Fountain Plaza shopping centre in the background. 1207.7 - No. 5 at Charing Cross en route for Quarry Hill with No. 2 behind. No. 2 has two SEC roof ads, 'Everything s fine in my all electric kitchen' and 'Electricity best for cooking'. RACV building in the background. Tram crews are discussing the day in the front of the tram. 1207. 8 - No. 21 in High St. Bendigo with the Cathedral in the background. No. 21 has two SEC roof ads, 'Everything's fine in my all electric kitchen' and 'Electricity best for cooking'. 1207.9 - No. 6 in High St. Bendigo with the Cathedral in the background. 1207.10 - No. 6 in High St. Bendigo, just past Wattle St. Photo taken after the tram has passed the photographer from within the Highway Car Sales yard. 1207.11 - No. 26 bound for Eaglehawk at the end of the double track in View St., note signal contactors, tram stop and section signs mounted on pole. 1207.12 - No. 26 turning from View St. into Barnard St.Information written on in blue ink and date stamped on purple ink. 1207. 1- "Nos. 26 and 2 at Charing Cross." 1207.2 - "Nos. 26 and 2 at Charing Cross." 1207.3 - "No. 2 in Mitchell St. just after leaving Charing Cross." 1207.4 - "No.6 leaving Charing Cross for Golden Square." 1207.5 - "No. 2 arriving at Charing Cross from Quarry Hill." 1207.6 - "No. 21 waits at Charing Cross as No. 6 arrives from Golden Square." 1207.7 - "No 5 at Charing Cross with No. 2 lurking behind." 1207.8 - "No. 21 in High St. at cnr of Wattle St." 1207.9 - "No. 6 in High St. at cnr of Wattle St." 1207.10 - "No. 6 in High St. between Wattle and Vine Sts." 1207.11 - "No. 26 at end of double track in View St. near Barnard. St. 1207.12 - "No. 26 seen at dusk turning from View St. into Barnard St."tramways, trams, bendigo, charing cross, high st, view st., tram 2, tram 5, tram 6, tram 21, tram 26 -
 Ballarat Tramway Museum
Film - Movie Film & Box, Kodak, 1960
Yields information in movie film format of Ballarat trams in 1960, how the system operated and was used by people., Yields information in movie film format of Ballarat trams in 1960, how the system operated and was used by people.Movie film - 8mm, approx. 30mins, with leader strip on a plastic reel, within a black and white plastic box, titled "Ballarat No. 1. 1960". Has been transferred to DVD - see Reg item 4100 as Segment No. 2. Made by Ben Parle. Also transferred to DVD by Rod Cook Oct. 2015, via Roger Greenwood for use in his DVD, "The City of Ballarat Trams, Gardens & Gold" of 2016. See Reg Item 6883. Synopsis: based on time. 0:00 View of typed introduction, noting that this is a pictorial record of Ballarat. 0:10 Title “The Tramways of Ballarat 1960, Part 1” 0:16 13, showing “View Point” at Stones Corner, Bridge St, east end, with trolley pole being turned, while another single trucker heads out towards Mt Pleasant. 0:25 13 leaving Stones Corner, short approach and then longer trailing shot of the tram going towards the City in Bridge St. 0:44 View out of front of tram in Bridge St heading towards the City, with cars in the photo, then passing through city Loop, no trams in the loop and running up to Lydiard St Nth and crossing the road. 1:22 Running up Sturt St from Armstrong St, passes over Dawson St X-over and up to the next intersection, Lyons St. 1:54 Title “The View Point Line” 1:59 19 inbound, in Ripon St, from crossing Mair St, towards camera and then passing away and turning into Sturt St. 2:49 View of a “Warning Oncoming Trams” sign 2:52 19 in Ripon St, going to View Point, crossing Webster St towards camera, then going away through the disconnected Victoria Ave loop, pass the “Warning Oncoming Trams” sign. Note very windy scene with people running across roads. 3:17 19 in Wendouree Parade, in bound, though showing destination View Point, going away from the camera, past the View Point Hotel. 3:39 19 coming towards camera near Excerpt or Devon St and then going away towards the terminus. 4:04 19 at the terminus, stationary, with a single trucker 3?, passing from Macarthur St into Wendouree Parade, behind 19. 4:20 33 coming towards camera in Wendouree Parade from St Aidans Drive, stopping to pick up passenger at Forest St and then going away towards the City, photographed from near the depot, on a wet and windy day. 4:54 35 in Wendouree Parade, coming towards the Camera from St Aidans Drive and then going away with the Gardens Loop area in the background. Tram stops at stop to let a passenger off. 5:28 21 leaving Gardens Loop for the City via the Depot, green light in signal can be seen. 5:43 28?, closely followed by 26 turn from Drummond St South into Sturt St. 6:18 Scene opens with shot of “Sebastopol” destination on a bogie tram. 6:21 Title “The Sebastopol Line” 6:24 21 turning from Sturt St into Drummond St Sth with destination of Bell St and then going away from the camera. 6:55 38 in Drummond St Sth, coming towards the camera and then passing the camera with Sturt St just in the view. 7:10 21, showing Gregory St, in Drummond St Sth, approaching and then going away, entering the Urquhart St Loop, 7:39 34 in Drummond St Sth (location check required (Latrobe?)), approaches camera, picks up passengers and the goes away. 8:09 39 at ? Street, turns from Drummond St Sth into Skipton St, after picking up and setting down passengers, bound for Sebastopol 8:55 35 inbound in Skipton St passes through the Bell Street Loop, and then goes away from the camera. 9:33 42 outbound in Skipton St, approaches the camera, passes and then crosses over the half the road into Albert St. 10:00 39 inbound in Albert St – location? 10:31 34 outbound for Sebastopol, approaches camera and just starts to pass by. 10:36 34 in Grey St crossing loop, crosses 42 inbound. 10:59 39 outbound in Albert St, with shopping centre in bound, approaches camera, passes and then crosses over Albert St. Mid morning scene. 11:39 39 inbound, Albert St south, approaches camera and then passes and the crosses over Albert St. 12:16 41 outbound in Albert St passes the camera, and pulls into the terminus with the conductor getting out on the back bumper to pull the pole down as the tram stops and a passenger walks into the Royal Hotel. 12:39 Title “The Lydiard Street North Line” 12:44 Filmed from the Hotel balcony, 21 inbound in Lydiard St Nth passes over Mair St, stops while 33 passes in the other direction. 13:18 With the red light showing on the Seymour St loop signal, 33 inbound for Sebastopol stops and picks up many passengers, passes the camera and runs past the VRI building in the background and through the loop. Possibly filmed on a Sunday given the ladies dresses and quieter streets. 14:01 30 outbound, passes the camera and stops at Macarthur St. Filmed alongside the brick wall of the cutting. 14:28 30 inbound arrives, passes through the Gregory St loop and then proceeds past the camera, making a stop to pick up passengers. 15:14 28 in Lydiard St Nth – location?, approaches and goes away from the camera, north of Gregory St. 15:34 28 ditto location? 15:53 21 arrives at the terminus with passengers getting on and off. 16:11 View of the a vertical positioned “End of Section” sign on a pole at the terminus and then lifting the camera to see the timetable board and the stop sign. 16:33 31 in Bridge St passing Morseheads and then turning into Sturt St, stops at the Grenville St stop, while another single trucker comes down to the stop from the City. 16:58 31 outbound in Bridge St, with destination of Victoria St. 17:14 Title “The Victoria Street Line” 17:18 31 outbound to Victoria St from Stones Corner. Starts with an overhead shot, shows clock at the Caltex service station,. 17:37 31 inbound approaching Bakery Hill and then descending to the junction after it passes camera. 18:09 25 climbing outbound in Victoria St, passing the camera, to then pass through the King St loop. 18:47 25 inbound in Victoria St, passing the camera, then pass through the King St loop, with St Alypius Church in the background. 19:36 14 approaching the rail bridge in Victoria St and stopping at the 2nd last stop to left of passengers. 20:01 14 leaving the terminus and approaching the camera and the a short sequence going away, to the next stop to pick up quite a few passengers. 20:14 “Trams Stop Here” sign, metal wrap around on a steel pole. 20:16 Title “The Mount Pleasant Line” 20:21 11 inbound in Main St, with a passenger leaping off the tramcar and another getting off just before the junction. 20:45 11 passes the junction and then proceeds away from the camera in Bridge St. 21:04 30 outbound in Main St, then turns into Barkly St, a bus (Eclipse Motors) passes in Main St just before the sequence ends. 21:31 30 inbound near Steinfield St. (exact location?) 21:49 25 approaches the camera, then proceeds away and passes through the Grant St. loop. 22:29 25 inbound, windy day, between Grant and Cobden, (exact location?), with a horse drawn bread van in the view and the breadman walking behind the tram as it passes. 23:02 11 outbound in Barkly St, (exact location?) 23:37 11 inbound in Barkly St (exact location?) 23:44 Mt Pleasant terminus signage 23:50 30 approaches the terminus and then stops with the conductor alighting turning the pole, passengers getting on and off and the driver appearing at the other end. 24:32 Title “The Gardens Via Sturt St. West Line” 24:35 21 outbound in Sturt St near Raglan St, approaches and passes the Camera. 25:09 12, showing City Oval, approaches and passes the camera, outbound near Windermere St. 25:33 13 showing View Point, goes away from the camera – location? 25:44 12 comes from St. West, inbound passes the camera and then stop as the next stop next Talbot St? 26:21 Short sequence of a “Warning Oncoming Trams” sign 26:28 42 inbound in Sturt St West, just before Ripon St, view coming towards camera and then going away to cross Ripon St. 27:10 34 passes through the Parker St loop 27:25 35 or 39 inbound past the college in Sturt St West 28:04 41 outbound at the Russell St curve, passes away from the camera. 28:11 35? inbound passes away from the camera through the Victoria Park or Morrison St loop, swinging out into the roadway. 28:29 View of timetable sign at Hamilton Ave. 28:37 35 turning from Sturt St West into Hamilton Ave, can see the conductor changing over the barrier rails. 29:11 42 inbound, crosses another bogie tram (35?) at Carlton St loop then passes the camera and goes past the Olympic rings monument. 29:42 12 approaches the Carlton St gates. 30:07 12 outbound, crosses a bogie tram in the loop with both trams then leaving the loop. 30:20 Title “End of Part One” Written labels giving title information on outside of box.trams, tramways, ballarat, sebastopol, lydiard st north, victoria st, mt pleasant, sturt st west -
 Ballarat Tramway Museum
Photograph - B&W print of donated negative, John Webster, 11/4/1953
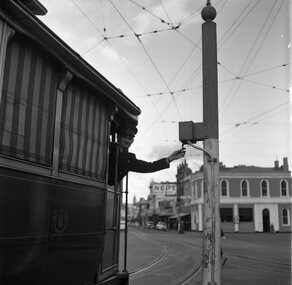
Yields information about the Bucks Head Hotel and demonstrates the way the signals were set in Bridge St for either the Mt Pleasant or Victoria St routesBlack and digital white print from a scan of a donated negative of a driver leaning out from a single trucker to set the switch on the signal for either the Victoria St or Mt Pleasant routes. Has the Bucks Head Hotel in the background. Shows the pole the signal controller or switch was mounted on. Black and White print made from scan of negative. Original Negative stored with Negatives. Image rescanned from copy neg and updated 31/5/2020. See On this basis, the envelope and marking matches that of Reg Item 4158, photo of No. 40, by John Webster and assumed taken on the same day as Item 4157, 4158, 4168, 4178 - 11/4/1953. Contained within Envelope No. 33.On left hand side of the negative in ink is "EI 35".tramways, trams, sturt st, grenville st, signals, bridge st -
 Ballarat Tramway Museum
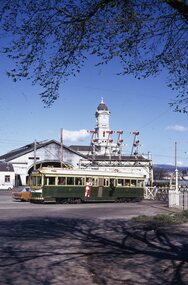
Slide - 35mm slide/s - set of 6, Campbell Duncan, 19/09/1971 12:00:00 AM
Yields information about the operations of the Ballarat Tramway system on the last day of SEC tramway operations in Ballarat.Set of 6 Kodak - Kodachrome slides - cardboard mounts - all taken on 19/9/1971, last day of operations prior to closure of the SEC operated tramway. .1 - Tram 40, waits at the level crossing gates - the gates are being opened. In the background is the station building and the signal gantry. Tram has the destination of Sebastopol. .2 - No. 42, with destination of Lydiard St north, northbound in Lydiard St, with railway station buildings and VRI in the background. .3 - No. 35 on inbound, Lydiard St North. .4 - No. 35, on inbound service, leaving Skipton St loop with another bogie in the background. .5 - No. 39 on inbound service, Albert St Sebastopol with the Sebastopol boundary sign and Binks Ford in the background. Tram has an everything under control in my all electric kitchen roof advert. .6 - No. 42, with destination of Sebastopol, Albert St Sebastopol.In ink on slide: .1 - Sun 19 Sept 71 - up Lydiard St Nth waits for gates to be opened after fast goods. .2 - Sun 19 Sept 1971, down Lydiard St Nth near VRI. .3 - Sun 19 Sept 1971, Up Lydiard St Nth .4 - Sun 19 Sept 1971, Up Sebastopol (supplementary service) has just crossed down in Skipton St near Drummond St. .5 - Sun 19 Sept 1971, Up Sebas at Ballarat / Sebastopol boundary. .6 - Sun 19 Sept 1971, c5.30pm down Sebas in Sebas shire.tramways, trams, lydiard st nth, railway station, level crossings, skipton st, albert st, sebastopol, closure, last day, tram 40, tram 42, tram 35, tram 39 -
 Ballarat Tramway Museum
Newspaper, The Courier Ballarat, "Collector's item - relic of early days on trams", 23/09/1971 12:00:00 AM
Yields information about on the Ballarat tramway staff's being shown at a local meeting after closure of the SEC operated Ballarat Tramway systemNewspaper cutting from The Courier, Thursday 23/9/1971, titled "Collector's item - relic of early days on trams" with Mrs Loyalo Hill and Mrs R Drury looking at one of the brass staffs or Section staff, used by ESCo and SEC up to 1936 at a meeting of the Ballarat turf Club the previous day. Notes that the staff is for the Victoria Park Loop to Carlton St loop - see item 4896 for the actual item.staff, safeworking, tramway staffs, sec, signals, esco -
 Ballarat Tramway Museum
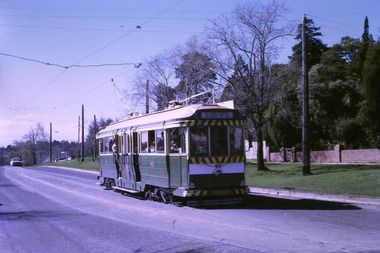
Photograph - Digital image Set of 9, Tony Smith, 19/09/1971 12:00:00 AM
Yields information about Ballarat Tramways and trams prior to the closure of the tramway system.Set of 9 digital images of Ballarat trams prior to closure, scanned from original slides by Tony Smith, 1971 prior to closure of the system. This set of slides appears to be the last day of operations - 19/9/1971 .1 - 40 south bound in Lydiard St Nth, at the Gregory St Loop. .2 - 40 after passing through the loop .3 - 42, north bound in Lydiard St. North at Macarthur St. .4 - 42 southbound at the Railway station level crossing with the Kennedy Murray Pty Ltd General Carriers building at the station yard in the background. .5 - 42 southbound in Lydiard St North after crossing the railway - taken from the signal box (B) with Reids Palace in the background and the Provincial Hotel. .6 - 35 northbound after passing through the level crossing. .7 - bogie tram crossing the tracks with Ballarat Railway Station in the background. .8 - bogie tram entering the double track section in Lydiard St with Reids Palace in the background. Note the new bus stop bay. .9 - 35 and another bogie in Sturt St, with the Town Hall, Golden Star Chinese Cafe and Georges Fish & Chip shop in the background.trams, tramways, lydiard st nth, gregory st, level crossings, ballarat railway station, sturt st, closure, tram 40, tram 42, tram 35 -
 Otway Districts Historical Society
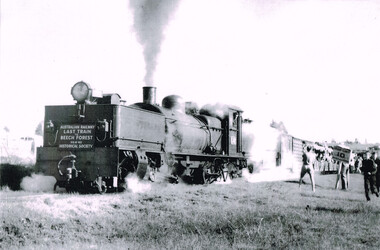
Photograph, Ray Jude, Tulloh: last passenger train to Beech Forest, 30 June 1962
The last train ran to Beech Forest on 30 June 1962. It had a particularly motley look: 180 passengers were loaded into a series of NU goods wagons hastily fitted with temporary seats and, given the time of year, tarpaulin covers. The G42 locomotive had patched-up repairs and cannibalised G41 parts. Intending travellers faced up to the trip with some trepidation but the train made it with no problems. On this cold, gloomy day when it got back to Colac it signalled the end of narrow gauge operations in the Otway Ranges.B/W. Locomotive G42 with the sign "Australian Railway Historical Society, Last Train to Beech Forest, 30-6-62", an NC guard's van, a NU louvred van and many NQR open wagons, at a photostop near Tulloh. Several passengers taking photos while the driver is waiting to proceed.colac; beech forest; railway; tulloh; -
 Clayton RSL Sub Branch
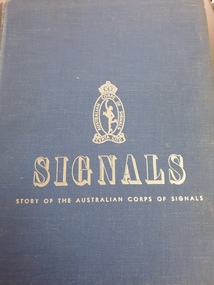
Hard cover non-fiction book, Australian War Memorial, SIGNALS Story of the Australian Corps of Signals, 1944
"Signals" is an outline of the achievements of the Australian Corps of Signals over the years from the campaigns in the Middle East to the present day of the victories in New Guinea.The rise of the Australian Signal Corpsblue hard cover non-fiction book -
 8th/13th Victorian Mounted Rifles Regimental Collection
Photograph
Robin Ellison was a signals Sergeant on HQ and Mick butler was an AFV crewman.Cambrai Day is celebrated annually by Armoured Corps regiments of the British Commonwealth. It marks the anniversary of the Battle of Cambrai in November 1917 when a force of more than 400 British Mark IV Tanks broke the defences of the German Hindenburg Line, It was the first large-scale, effective use of tanks in warfare. Cambrai turned from a battle of great success to failure, but it heralded a new type of warfare and changed the nature of the battlefield forever.The gathering at Buna Barracks Albury, Beersheba Barracks Wangaratta, Bapaume Barracks Benalla and Salamaua Barracks Cobram on 30 November 1986 was the inaugural meeting of the 8th/13th Victorian Mounted Rifles Regimental Association.Colour photograph of Sergeant Robin Ellison and lance Corporal Mick Butler taken at Buna Barracks Albury at a Cambrai Day gathering of former members of 8/13 Victorian Mounted Rifles, 30 November 1986. -
 Surrey Hills Historical Society Collection
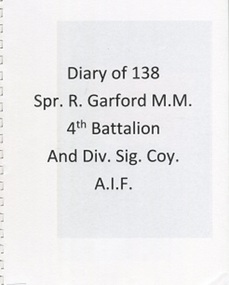
Book, Diary of 138 Spr. R Garford M.M. Battalion and Div.Sig.Coy A.I.F
By arrangment with local and family history librarian, Myra Dowling, this diary was transcribed by Sandra Dexter from the original, which was donated to the City of Boroondara Library Service following the Boroondara Remembers project in 2015. It is a day-to-day account of a soldier's experience going to fight in World War 1, 1914-1919. Robert Thomas Garford (SERN 1138) was born in Fitzroy in 1892. He was aged 23 and living in Camberwell when he enlisted on 14 September 1914. He embarked from Melbourne on board HMAT A38 Ulysses on 22 December 1914. He was a sapper with the 2nd Divisional Signal Company. He was awarded a Military Medal: 'At CLERY, near MT.ST. QUENTIN, on the 31st of August 1918, this soldier was engaged as a linesman at the Brigade Forward Station. Throughout the day forward lines were repeatedly broken by enemy shell fire. Despite this Sapper FARFORD [sic], with very conspicuous coolness patrolled the lines from end to end repairing one break after another. His untiring efforts were responsible for the constant maintenance of communications from the Brigade Station to the Battalions.' Source: 'Commonwealth Gazette' No. 115, 10 October 1919. He returned to Australia 3 December 1918. He married Annie Christina Devine in 1941. They lived at 16 York Street, Surrey Hills and later 17 Blackburn Street, Surrey Hills. He died 30 May 1969 at Surrey Hills and is buried in Box Hill Cemetery: P-A-0054.A day to day account of a soldier's experience going to fight in World War 1, 1914-1919world war, 1914-1918, diaries and journals, (mr) (sapper) r garford, box hill cemetery, robert thomas garford -
 Surrey Hills Historical Society Collection
Photograph, Doris Wright, member of the Australian Women's Army Service
Doris Lilian Wright of 214 Union Road was a milliner but joined the Australian Women's Army Service (AWAS) in the early war years. The Women’s Australian National Service (WANS) was inaugurated in 1940. Training for members of the WANS included air raid drills, first aid, basic military drills, and even shooting, signalling, and mechanics. AWAS on formed on 13 August 1941 with the objective of releasing more men into forward areas. The Army was particular with its recruiting and four references were required; another stipulation was that teeth were in good condition. Doris was located at Elwood. Their training area was along the foreshore and one day to their great surprise there were crowds of American Marines – "the cream of the American Army". These were the first Americans to arrive in Australia to strengthen the defence of the country. The Americans soon went north and the AWAS went off to Balcombe on the Mornington Peninsula. At this time there were no uniforms for the girls only ‘giggle’ dresses – of a non-descript colour. They were not expected to appear in public in these and wore civilian dress. Japan had just entered the war and there were more urgent demands on restricted supplies. The formal uniforms eventually arrived.A black and white photograph of a lady in an army uniform and wearing a hat.union road, surrey hills, uniforms, clothing and dress, (miss) doris wright, australian women's army service -
 Port Fairy Historical Society Museum and Archives
Instrument - Whistle, c.1920
Whistle used to mark lunch time and finish of day shifts at the Glaxo Factory from the 1920's to the 1980'sThis Glaxo factory whistle played a significant role in the fabric of the populace of Port Fairy signalling lunch time and end of the working day from 1929 to 1980. Cylindrical Brass Steam Whistle with square openings in either side and thread on basecommerce, signals, glaxo, glaxo - welcome, glaxo smith kline, milk factory, glaxo wellcome, gsk, pharmaceutical -
 Carlton Football Club
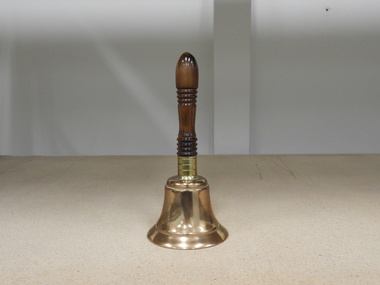
Hand Held Bell, Hand Held Bell with a small inscription on the inside
The bell was used for Trade Week to signify "time's up" at Optus Oval. Prior to this it was used to let Alan Espie's children on their Wandin property to come home.Why Al chimes in for Carlton Tony De Bolfo, Carlton Media Feb 20, 2014 11:05AM Alan Espie with the famous bell. (Photo: Carlton Football Club) Alan Espie with the famous bell. (Photo: Carlton Football Club) Related Etched into the rim of the bell Alan Espie has rung at every trade week gathering since 1994 is a touching quote attributed to his grandson. Dear Pa, May you always ring true blue, Love Harry Just thinking about that inscription often brings big Al to tears. The story of the Espie bell has its origins at the old family property at Wandin in the picturesque Yarra Valley, in the days when the Espies’ kids were at the neighboring creek fossicking for local platypus. “If they got too far away we’d ring an old cowbell,” Espie recalled, “and years later, my daughter Jo brought me this replacement bell from some second-hand naval place”. “Not long after Shane (O’Sullivan) asked me to officiate at trade week and that’s when the bell came into vogue.” A permanent fixture at trade week, Espie would ring the bell to signal the opening of trading when club recruiters gathered – initially within the confines of the Carlton Heroes Stand at Visy Park, more recently at Etihad Stadium. In those early days at Carlton he caused a stir as bell ringer, drawing curious responses from officiating journalists, recruiters and coaches alike. “I even remember (Kevin) Sheedy asking me if I was selling muffins,” he recalled. Then, when trade day was relocated to Etihad, Espie’s daughter thought it appropriate to get the bell inscribed. “Because the bell was leaving Carlton, Jo got it inscribed on my grandson’s behalf, because he was only four or five then. When I saw what was inscribed I was tearful,” Espie said. “The bell is very important to me, particularly at this time, because Jo is battling health problems at the moment, my grandson is autistic and she’s fought like hell to get him through.” Espie joined Carlton’s Under 19 committee on the eve of the senior Premiership season of 1979 and managed the club’s junior squads, the Bert Deacon Squad included. “I worked very closely with Geoff Southby, ‘Swan’ McKay and Trevor Keogh when they were coaching the Under 19s and I was recruiting as well,” he said. “In 1981 and ’82 I forward scouted for ‘Parko’ (David Parkin) and later on I did the same for ‘Wallsy’ (Robert Walls). After that I coordinated recruiting in central Victoria and it was nothing for me to do 25,000ks a year in my own car – and I loved every minute of it.” Espie’s passion for Carlton and empathy for its wartime players Bert Deacon, Ollie Grieve and Jack “Chooka” Howell can be sourced to his childhood years. His grandparents lived not far from the old ground on Wilson Street “and that’s how I got in for the ’45 Grand Final”. “My uncle, who had just got back from the war, grabbed a ladder from Wilson Street and set it up against the barbed wire fence at the ground. I climbed the ladder and caught my arm on the barbed wire, but I got over the top and saw the game while I straddled the fence,” Espie said. “What I saw was what you would today call ‘spotfires’ and I reckon it took football 20 years to get rid of it.” Today, Espie continues to ring in the yearly trade talk days at AFL headquarters (with the notable exception of 2012 when he was hospitalized), but he’s in no doubt as to where the bell belongs. “This bell has had nothing to do with Wandin but everything to do with Carlton - and with the 150th year of the club I think the bell stays here (at Visy Park). I still hope to ring the bell for the AFL this year, but at least I’ll know where it is,” Espie said. “I’ve told Jo about this and she tells me Harry’s rapt, because he’s a big Carlton supporter and he’s so happy his name is on the bell.”Wooden handle attached to a brass bell."Dear Pa, may you always ring true blue, Love Harry" -
 Parks Victoria - Wilsons Promontory Lightstation
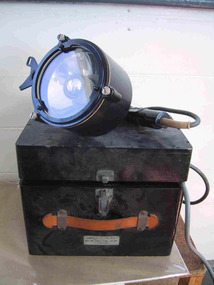
Lamp, Aldis
The lamps were pioneered by the British Navy in the late nineteenth century and introduced by the Royal Australian Navy after 1918, and continue to be used to the present day. Manufactured in 1960, the Wilsons Promontory lamp was provided to the lighthouse by the Department of Shipping for signalling ships but was also used for communicating with Cliffy Island, 18 nautical miles away. This type of lamp was renowned for its brilliant light, and lightkeepers from the two lightstations ‘used to practice their signalling with each other, as its effective use was reliant on precise positioning of the scope which is located on top of the lamp’. The inside of the case is imprinted with ‘RAN (Royal Australian Navy), and details on the lamp include a serial number, the date of 1960 and the initials of the Department of Transport, which at that time incorporated the Commonwealth Lighthouse Service. Another Aldis lamp and case with a date of 1960 is held at Cape Nelson and third lamp and case is at Point Hicks; (date unconfirmed but possibly 1943). A fourth lamp and case formerly at Cape Schanck disappeared from the collection sometime between 1995 and 2003.Aldis lamp and case (WPLS 0003.2; likely provenance) The lamps are not rare in museum collections however the Wilsons Promontory example has a confirmed provenance to the lightation and has first level contributory significance as a fine example of the Aldis lamps that were distributed to lightstations throughout Victoria and Australia.1. Handheld black signaling lantern with trigger mechanism. Glass front with inner reflective disc. Black electrical cord is attached with a two pronged plug at the end. 2. Black painted wooden box for transporting lantern. brass catch, leather handle. Grey electrical cord inside plus transformer. Hinged lid. The Aldis lamp is portable, hand held visual signalling lamp with trigger mechanism and inner reflective disk used for optical communication via Morse code. The concave mirror is tilted to focus the light into pulse signals. Larger versions of the lamp are fixed on ships or pedestals and have shutters in front of the device that are opened and closed to transmit signals. Wilsons Promontory’s black metal Aldis lamp and attached electrical cord has a black painted wooden carrying case with metal clasp and leather hand grip.1. On trigger;"AP16413" Around V shaped protrusion attached to lamp "AP197873 / AEI .LTD 59" Beneath screw on face;"AD16415" Inside lamp, under glass;"ADMIRALTY PATTERN 16409 / 5 INCH HAND SIGNALING LANTERN SERIAL No. 212 Year 1960 / AEI PTY LTD SYDNEY" •2. Box. On brass plate below handle."ADMIRALTY PATTERN 16409 / BOX FOR TRANSPORTING LANTERN / PATTERN 16409" Inside box on side of metal insert attached to inside of box;"EXTRA LOW VOLTAGE TRANSFORMER / MADE BY / M.Brodribb, Melbourne/ cat & APP / No v/QR / 1811A / 50 / 60 va / CONT. 55 c / RATIO 240, 12 V TAPS " Top of metal box on sticker;"C of A / D.O.T 143076 / 12 V 5A" On Bakelite plug on metal box;"EXTRA LOW VOLTAGE" -
Canterbury History Group
Photograph - Canterbury in 1909, Empire Day celebrations, 1909
Black and white photograph of Canterbury Gardens with the Rotunda decorated for Empire Day 1909canterbury, canterbury road, canterbury gardens, canterbury station, signal boxes, maling road, empire day -
 Parks Victoria - Cape Nelson Lightstation
Instrument - Lamp, Aldis
This portable, hand held visual signaling lamp, with trigger mechanism and inner reflective disk, was used for optical communication via Morse code, with the concave mirror tilted to focus the light into pulse signals. Larger versions of these lamps are fixed on ships or pedestals and have shutters in front of the light that are opened and closed to transmit signals. Smaller hand held versions like the Cape Nelson example have a concave mirror that is tilted to focus the light into pulse signals, and despite their size the lamps were renowned for their brilliant light. Invented by Arthur C W Aldis (1878‐1953) and pioneered by the British navy in the late nineteenth century, they continue to be used to the present day. Details on the Cape Nelson lamp include a serial number, a date of 1960 and the initials of the Department of Transport, which at that time incorporated the Commonwealth Lighthouse Service. Another lamp of the same date which is held at Wilsons Promontory was provided to the lighthouse by the Department of Shipping for signaling ships but was also used for communicating with Cliffy Island, 18 nautical miles away. Point Hicks also has an Aldis lamp and an associated case, which is painted an army green colour. A fourth lamp and case formerly at Cape Schanck disappeared from the collection sometime between 1995 and 2003. These types of lamps are not rare in museum collections.These types of lamps are not rare in museum collections however the Cape Nelson example has a reliable provenance to the lightstation and has first level contributory significance as a fine example of the Aldis lamps that were distributed to lightstations throughout Victoria and Australia.This object is comprised of a black metal encased Aldis lamp with electrical cord and associated wooden carrying case with metal clasp and red leather hand grip. yes -
 Parks Victoria - Point Hicks Lightstation
Lamp, Aldis
This portable, hand held visual signalling lamp was used for optical communication via Morse code. It comprises the metal encased Aldis lamp with electrical cord and its associated green-painted, hinged wooden carrying case, which has a metal clasp and leather hand grip. Larger versions of these lamps are fixed on ships or pedestals and have shutters on the front that are opened and closed to transmit signals. Smaller hand held versions like the Point Hicks example have a concave mirror that is tilted to focus the light into pulse signals via a trigger. The lamps were pioneered by the British navy in the late nineteenth century and continue to be used to the present day.317 Details on the Point Hicks lamp include a serial number and other information. Another Aldis lamp and case remaining at Cape Nelson Lightstation dates to 1960 and has the initials of the Department of Transport, which at that time incorporated the Commonwealth Lighthouse Service. Wilsons Promontory also has an Aldis lamp and case that dates from around the same year. A lamp formerly at Cape Schanck has disappeared. The Aldis lamp and associated case at Point Hicks has first level contributory significance for its historic values and provenance to the lightstation. PHLS0007.1 Hand held signal light. Painted metal trigger with attached black electrical leads with battery terminals at end. Inscriptions on metal of lantern. PHLS0007.2 Hinged lid, wooden box painted army green to house signal light. Metal plate with inscription on front of box.PHLS0007.1 "D^D / LANTERN PORTABLE SIGNALLING / ADMIRALITY No 5110D / SERIAL No 5482 YEAR 943 / AMALGAMATED WIRELESS / A ASA LTD / 9792-100" •PHLS0007.2 "20 K4 transporting lantern / admirality pattern no 91108" -
 Wodonga & District Historical Society Inc
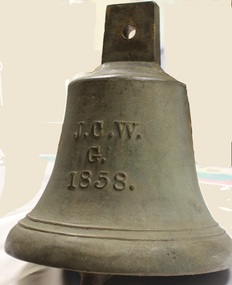
Functional object - Gordon Family Orchard Bell
The Gordons were architects and were associated with many buildings still standing in Albury and Wodonga, St Patrick's Church and the de Kerilleau Homestead among them. They established Vermont Orchard on 74 acres to the south of the Wodonga settlement. Here they grew fruit and nuts for the domestic and export market. The enterprising family also set about transforming some of the land by clearing it, creating streets and making general improvements. It was the biggest subdivision in Wodonga at the time. The 234 allotments in the Wodonga Estate were put up for sale by auction in May 1890. A total of 200 people were said to have attended. Gordon, William, Charles and Vermont streets in Wodonga are named after the family. This bell was used at the Vermont orchard to signal the beginning and end of the working day, as well as lunch breaks.The Gordon Family orchard bell is made of cast iron. It includes the inscription "J. C. W../G./1858." This is thought to represent the initials of John Gordon and sons Walter Joseph and Charles Goodwin Sylvester Gordon. There is some conjecture about this due to the date "1858". John was born in London, England in 1823 and died in 1880. Walter is generally accepted to have been born in 1857 and died 1903. In one family tree Charles is recorded as being born on 28 January 1858 but his birth was registered in 1860. The mystery of the date is therefore not fully resolved.On one side of the bell "J. C. W../G./1858."gordon family wodonga, gordon and gordon architects, vermont wodonga -
 Ballarat Tramway Museum
Slide - Set of 9, Warren Doubleday, Ballarat - last weekday of full operations, 20/8/1971
Photos taken on the last weekday of full operations by the SECV in Ballarat prior to the first closure of the Victoria St line on 22/8/1971. 1 - trams 33, 13, 30, and 12 in the City loop. Has the Dickins food store, Thomas Jewellers, Gear Chemist, Patersons stores in the view. 2 - tram 37 running a Special passing the trams above in the City Loop. Also has the Hartley's and the T& G buildings in the view. 3 - tram 27 descending the Lydiard St hill about to pass the Titanic Bandstand. 4 - tram 35 turns from Sturt St into Lydiard St north with the Town Hall in the background. 5 - tram 27, Victoria St inbound in Wendouree Parade near Haddon St. Has the tram stop shelter in the view. 6 - tram 39 climbing the Lydiard St North hill. 7 - tram 32 in bound in Sturt St west passing a 40mph speed limit sign. 8 - trams 21 and 34 crossing at the Grant St loop on the Mt Pleasant line. 9 - tram 37 inbound in Lydiard St North with the Ballarat Station building in the background and the signal gantry.Yields information about the last full week day of SEC Tramway operations in Ballarat and has a strong association with the archivist. Set of 9 Kodachrome colour slides - cardboard mountsHave the photographer's slide numbers written on them.trams, tramways, closure, sturt st, lydiard st, tram 13, tram 30, tram 12, tram 37, tram 43