Showing 96 items matching "hand mirror"
-
 Mont De Lancey
Mirror, c1930's
... Hand-painted mirror with floral design - white flowers...-and-dandenong-ranges Handmade by E.J.; Quayle. mirrors Hand-painted ...Handmade by E.J.; Quayle.Hand-painted mirror with floral design - white flowers etched onto mirror with green leaves. Has red velvet border.mirrors -
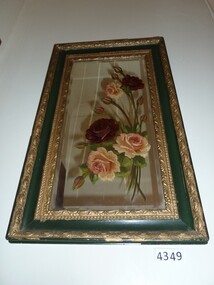 Stawell Historical Society Inc
Memorabilia - Realia
... Mirror (Hand oil painted Roses) with Green and Gold Wooden... grampians Stawell Mirror (Hand oil painted Roses) with Green ...Mirror (Hand oil painted Roses) with Green and Gold Wooden Framestawell -
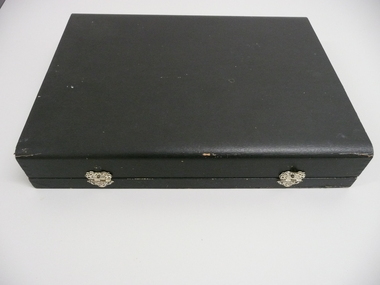 Bendigo Historical Society Inc.
Accessory - BOXED DRESSING TABLE SET
... wooden hand mirror, wooden brush with handle, comb, nail buffer... wooden hand mirror, wooden brush with handle, comb, nail buffer ...Black wooden case silk lined with diamond shape bevelled edge mirror set in li, compartments for grooming aids including wooden hand mirror, wooden brush with handle, comb, nail buffer, nail cleaner & boot button hook, all have black wooden handles and nickel plated decoration. Contains small card reading Andrew.G.Williamson Jewellery, Fancy Goods, and Stationery. 186-192 York Street Belfast Private Address 32 Cedar Avenue Belfast.Made In United Statespersonal effects, hairdressing, dressing table set -
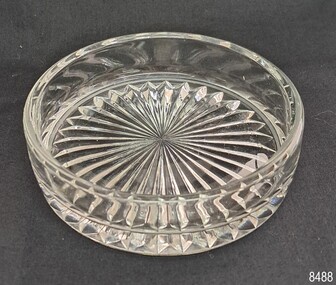 Flagstaff Hill Maritime Museum and Village
Domestic object - Pin Dish, Mid 20th century
... often featured a variety of objects such as combs, brushes, hand..., brushes, hand mirrors, perfume bottles, cosmetics, nail buffers ...Dressing tables have been around since the beginning of the seventeenth century. However, it wasn't until the early to mid-20th century that middle-class homes included them in their furniture. They were often a matching part of a bedroom suite. Dressing tables often featured a variety of objects such as combs, brushes, hand mirrors, perfume bottles, cosmetics, nail buffers, ring holders, jewellery trinket boxes, trays and pin bowls or pin trays. The latter were small shallow containers used for storing hat pins, hair pins, safety pins, and perhaps earrings. They were made of various materials including glass, metal and ceramic.This pin bowl represents an era in the early-to-mid 20th century when matching dressing table accessories were popular and affordable to middle-class women. They were marketed as gifts and sometimes included perfumed soap and powder.Pin dish, round, cut glass, slightly convex sides without a pattern. Thick heavy, concave base with a concertina fold pattern.flagstaff hill maritime village, shipwreck coast, flagstaff hill, warrnambool, flagstaff hill museum and village, domestic object, dressing table, dressing table tray, glass tray, pin tray, pin bowl, dressing table accessory -
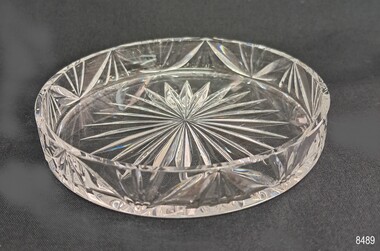 Flagstaff Hill Maritime Museum and Village
Domestic object - Pin Bowl, Mid 20th century
... often featured a variety of objects such as combs, brushes, hand..., brushes, hand mirrors, perfume bottles, cosmetics, nail buffers ...Dressing tables have been around since the beginning of the seventeenth century. However, it wasn't until the early to mid-20th century that middle-class homes included them in their furniture. They were often a matching part of a bedroom suite. Dressing tables often featured a variety of objects such as combs, brushes, hand mirrors, perfume bottles, cosmetics, nail buffers, ring holders, jewellery trinket boxes, trays and pin bowls or pin trays. The latter were small shallow containers used for storing hat pins, hair pins, safety pins, and perhaps earrings. They were made of various materials including glass, metal and ceramic.This pin bowl represents an era in the early-to-mid 20th century when matching dressing table accessories were popular and affordable to middle-class women. They were marketed as gifts and sometimes included perfumed soap and powder.Pin bowl; a light weight, round bowl with straight sides featuring a cut glass pattern, and a flat base with a star design.flagstaff hill maritime village, shipwreck coast, flagstaff hill, warrnambool, flagstaff hill museum and village, domestic object, dressing table, dressing table tray, glass tray, pin tray, pin bowl, dressing table accessory -
 Whitehorse Historical Society Inc.
Domestic object - Dressing Table Set, c1900
... .1 rectangular cream coloured tray .2 oval shaped hand... in England' .1 rectangular cream coloured tray .2 oval shaped hand ...belonged to Dorothy Meaghers' motherdonated by Ray Meagher who was a councillor 1972-1979. He was also chairman of works committee 1974-76, and Mayor of Nunawading 1976-77. Rays' wife Dorothy was on lake committee and supported the extension of the lake reserve. Ray was also a local builder.1 rectangular cream coloured tray .2 oval shaped hand mirror with handle, coloured cream .3 narrow oblong cream coloured brush .4 oblong cream brush .5 rounded square cream powder container with raised bump on each side .6 lid for powder container with raised bumps on each side square shape .7square handkerchief with farm animals- blue edged .8 round pink coloured powder puff, dark pink. .9 round pink coloured powder puff, light pink. .10 round circle of nylon meshon cream container 'made in England'personal effects-toilet requisites, cosmetics -
 Glenelg Shire Council Cultural Collection
Photograph - Photograph - Ship Fittings, n.d
... of 'Harpic' - large container of hand cleanser with pump; mirror... of 'Harpic' - large container of hand cleanser with pump; mirror ...Port of Portland Authority ArchivesBack: 'WASHROOM' - blue biroport of portland archives -
 Flagstaff Hill Maritime Museum and Village
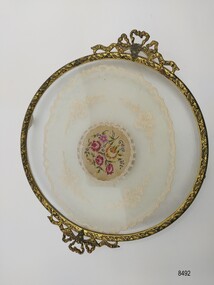
Domestic object - Dressing table tray, Mid 20th century
... featured a variety of objects such as combs, brushes, hand mirrors..., brushes, hand mirrors, perfume bottles, cosmetics, nail buffers ...Dressing tables (also known as Vanity Tables in the U.S.A.) have been around since the beginning of the seventeenth century, however it wasn't until the early to mid 20th century that they began to be found in the homes of the middle class and they were often a matching part of a bedroom suite. Dressing tables often featured a variety of objects such as combs, brushes, hand mirrors, perfume bottles, cosmetics, nail buffers, ring holders, jewellery and trinket boxes and trays. The origins of this tray are unknown however its design is reminiscent of trays (and Dressing Table Sets) produced by two English firms in the mid 20th century - "Delina" and "Regent of London". A paper (written by the Warwickshire Industrial Archeology Society) notes that the products items produced by "Regent of London" in the 1940's "satisfied a demand for previously unattainable items, offered to the general public aching for change after wartime privations, post war austerity and years of having to 'make do and mend'." This tray is composed of several decorative elements and materials. The metal border is gilt brass with two filigree bow handles, the main part of the tray is two pieces of circular glass and the encased doily is a mix of embroidered net and petit point. It was suggested in the paper written by the Warwickshire Industrial Archeological Society that the different pieces would have probably been produced elsewhere and brought to the factory to be assembled into the finished product. This vanity or dressing table tray is significant as it is a rare example of an accessory available to and used by women in the mid 20th century. It is also significant as an example of an everyday household item which would have been a valued possession and was made in a style that reflected the importance placed on it to be decorative as well as functional.Round footed dressing table tray with a gilt brass border, filigree bow handles and an embroidered net and petit point doily encased in glass. The gilt border is decorated with a stylized leaf design on the side and a floral design on the top. The petit point embroidery in the center is of five flowers in pink, mauve and yellow surrounded by buds and leaves.vanity tray, dressing table tray, glass tray, gilt brass, petit point, embroidery, net embroidery, doily, filigree, brass tray, flagstaff hill maritime village, shipwreck coast, flagstaff hill, warrnambool, flagstaff hill museum and village, domestic object, dressing table -
 Warrnambool and District Historical Society Inc.
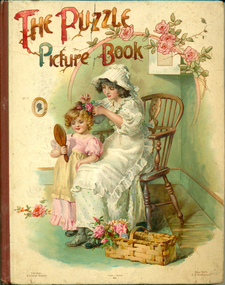
Book - Book: The Puzzle Picture Book, Ernest Nister, The Puzzle Picture Book, 1900
... hand mirror. A woven straw basket with pink roses sits... apron. She is looking in a brown wooden-backed hand mirror ...The book, awarded to Ethel Henderson in 1903, from Christ Church, Warrnambool is an example of a Sunday School prize given to children attending Sunday School at the time. Christ Church Anglican Church was one of the early churches in Warrnambool.The Puzzle Picture Book is a rare 'movable' children's book from 1900. It contains 6 chromolithic dissolving scenes (also called slats/transformations). It is unusual due to its educational content. It was published by Ernest Nister in London, E F Dutton & Co in USA and is also thought to have been published in German under the title 'Ueberraschungen Aller Art'. [source: The Little Book Store]Child's picture book with full colour cover depicting a mother dressed in long white spotted dress, white apron, white bonnett and black button-up shoes, sitting on a wooden armchair while dressing a young girl's hair with pink flowers. The girl is dressed in a pink frock with puffed sleeves and frill around the hem, and cream apron. She is looking in a brown wooden-backed hand mirror. A woven straw basket with pink roses sits on the floor. A framed silhouette picture is on the wall. The title is in a display typeface mimicking rose stems; a swag of pink roses decorates the top right hand corner. The publishers' names are printed on the bottom left and right hand corners at the bottom, and the printer in the centre. The inside cover has a book plate. The title page shows two boys arguing over the book. The verses are by Clifton Bingham, the pen and ink illustrations by Hilda K. Robinson. The story has a monochrome page with rhymes opposite a colour page with cut-out boxes showing four small pictures, each with a question. By pulling the tab at the bottom of the page the answer to the questions is revealed. There are six chromolithic 'dissolving scenes'.Book plate: Christ Church. Sunday School, Warrnambool. 1st Prize Girls Class II. Awarded to Ethel Henderson. S M George Vicar. Warrnambool, May 1903children's picture books, ethel henderson, children's picture books, puzzle books, christ church anglican church, sunday school prizes, ernest nister london, warrnambool, ethel henderson, e f dutton & co new york -
 Mont De Lancey
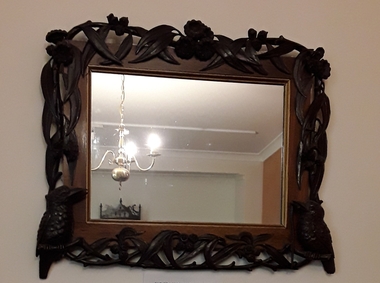
Functional object - Mirror, Franz Streizel, Unknown
... This hand carved framed mirror is part of a special bequest...-and-dandenong-ranges This hand carved framed mirror is part of a special ...This hand carved framed mirror is part of a special bequest to the Mont De Lancey Museum of hand carved furniture and items made by Mr Franz Striezel by his grandaughter Mrs Dorothy Adamson. Dorothy was a friend of Nella Lord (nee Sebire). Dorothy passed away in 2007. It was to be known as The Franz Striezel Collection. Franz Streizel came from Germany in 1886 and was one of the three recognised craftsmen (Art Carvers) in Australia who contributed to the wood carvings in public buildings and honour boards throughout Australia. The National Gallery at their request had two small panels and a tobacco jar (some of his work), donated by Mrs D Adamson. They considered these pieces highly valuable.An elaborately carved wooden framed mirror with two carved kookaburras, one with a lizard in its beak as well as some Australian flora - eucalyptus leaves, flowers and gumnuts around the edges of the frame.mirrors, functional objects, wall mirrors, objects -
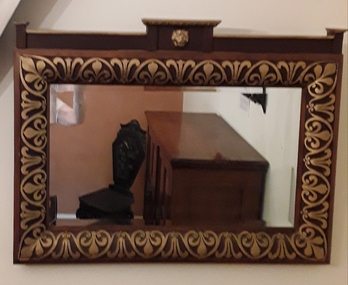 Mont De Lancey
Functional object - Mirror, Franz Streizel, Unknown
... This hand carved framed mirror is part of a special bequest...-and-dandenong-ranges This hand carved framed mirror is part of a special ...This hand carved framed mirror is part of a special bequest to the Mont De Lancey Museum of hand carved furniture and items made by Mr Franz Striezel by his grandaughter Mrs Dorothy Adamson. Dorothy was a friend of Nella Lord (nee Sebire). Dorothy passed away in 2007. It was to be known as The Franz Striezel Collection. Franz Streizel came from Germany in 1886 and was one of the three recognised craftsmen (Art Carvers) in Australia who contributed to the wood carvings in public buildings and honour boards throughout Australia. The National Gallery at their request had two small panels and a tobacco jar (some of his work), donated by Mrs D Adamson. They considered these pieces highly valuable.A rectangular beautifully carved wooden framed mirror featuring a gold painted carved lion head at the top and gold painted crest shaped ornamentation around the edges of the frame.mirrors, functional objects, wall mirrors, objects -
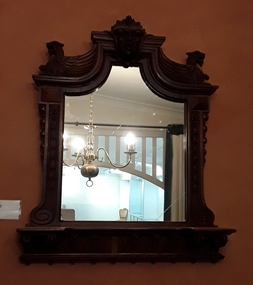 Mont De Lancey
Functional object - Mirror, Franz Streizel, Unknown
... This hand carved framed mirror is part of a special bequest...-and-dandenong-ranges This hand carved framed mirror is part of a special ...This hand carved framed mirror is part of a special bequest to the Mont De Lancey Museum of hand carved furniture and items made by Mr Franz Striezel by his grandaughter Mrs Dorothy Adamson. Dorothy was a friend of Nella Lord (nee Sebire). Dorothy passed away in 2007. It was to be known as The Franz Striezel Collection. Franz Streizel came from Germany in 1886 and was one of the three recognised craftsmen (Art Carvers) in Australia who contributed to the wood carvings in public buildings and honour boards throughout Australia. The National Gallery at their request had two small panels and a tobacco jar (some of his work), donated by Mrs D Adamson. They considered these pieces highly valuable.An ornately hand carved rectangular wooden framed mirror with a shelf at the bottom and a carved ancient Egyptian style head in the middle of the frame at the top. There are two carved gargoyles on each top side. The mirror glass is shaped.mirrors, functional objects, wall mirrors, objects -
 Warrnambool and District Historical Society Inc.
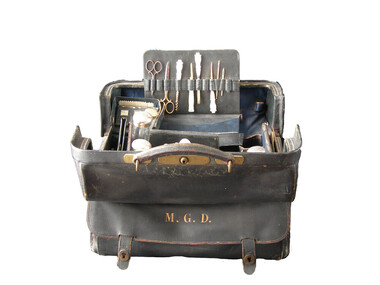
Domestic object - Dressing bag, Mary Glass Dickson, Circa1885
... silver handled hand mirror. 321.25 Hairbrush wooden handled... backed 321.24 Mirror silver handled hand mirror. 321.25 Hairbrush ...John Glass Cramond 1829 and James Dickson 1831-1910 were founders of a large drapery store. Both were Scots and both came separately to Australia in 1852. Cramond initially came for gold but soon opened a store in St Kilda with a post Office attached and he was the first post master there. Dickson was a farmer’s son but became a draper and while he was unsuccessful on the Bendigo diggings and then returned to Melbourne where he met Cramond and soon after they opened a store on Lonsdale Street. They opened their business in Warrnambool in 1855 as a general store with groceries, drapery and ironmongery. Both partners were involved with the community and James Dickson was an original director of the Warrnambool Woollen Mill 1909 and the Warrnambool Cheese and butter factory. He also served on the committee of management of Warrnambool Base Hospital. This case was a wedding gift from James Dickson Jnr to his wife Mary Glass Cramond on the occasion of their wedding. This item has significance on a number of levels. It belonged to a member of one of Warrnambool’s earliest pioneering families and it marks the occasion when the two families of Cramond and Dickson were linked through the marriage of James Dickson jnr and Mary Glass Cramond. The firm played a significant part in the development of the city and traded for nearly 150 years. It therefore has social significance to Warrnambool. The item is well provenance with the case initialed and items within the case monogrammed. The case and its items are aesthetically quite beautiful as well as being typical of travelling or dressing cases of the more well to do, of the time. Mappin & Webb were manufacturers of some standing with the Mappin name appearing in manufacturing as early as 1775.The company has held a royal warrant as silversmiths since 1897 to the present day and as crown jeweler since 2012. Throughout this time, they have manufactured quality items for the luxury market. It provides an insight into the way ladies travelled and the items which they considered essential. This consists of a black leather with leather handle attached with brass fittings. Middle opening with side pocket on one side with metal catches. Inside has removable sections for holding the numerous containers and items belonging to the case. Interior of the case is dark blue satin. The items contained within the case are as follows: 321.1 Luggage case 321.2 Glass bottle rectangular, silver monogrammed lid, empty. 321.3 Tall round glass bottle, silver monogrammed lid, empty. 321.4 Small glass bottle with pink powder, silver monogrammed lid. 321.5 Small multi sided bottle with stopper and brass hinged lid. 321.6 Tall round bottle with silver monogrammed lid. 321.7 Tall thin multi sided bottle with brass lid. 321.8 Cream coloured monogrammed jar cotton wool inside. 321.9 Clothes brush rectangular cream back. 321.10.1Glove stretcher bone coloured .10.2 Case black leather. 321.11.1 hair comb cream with silver edge .11.2 Case black leather 321.12 Hair brush cream handle 321.13Spatula cream monogrammed 321.14 Mirror, silver round with handle. 321.15 Writing compendium .1 Case black leather .2 Pen with nib .3 Lead pencil .4 Navy satin covered blotting book 321.16 Inkwell glass bottle in small black leather case. 321.17 Match striker in leather case. 321.18 Mirror in black leather case rectangular 321.19 Small case for visiting cards. 321.20Sewing kit rectangular, contains threads and needles pkts x 3 321.21Container, small, hinged tortoise shell patterned. 321.22.1 Manicure set .2 Scissors small .3 Scissors large .4Corkscrew with Mother of pearl handle .5 Pocket knife with Mother of pearl handle .6Tweezers with Mother of pearl handle .7 File with Mother of pearl handle .8 Fine hook Mother of pearl handle .9 Bodkin .10 Bodkin 321.23 Hairbrush oval silver backed 321.24 Mirror silver handled hand mirror. 321.25 Hairbrush wooden handled with Mother of pearl inlay. 321.26 Cylinder, silver with removable lid and small phial of iodine labelled Felton’s pocket iodine. 321.27 Phial small glass with gold decorations. 321.28 Inhaler with insert 321.29 Thimble, metal. 321.30 Silver backed hair brush 321.31 silver backed clothes brushEngraved on side pocket: M.G.D. Mappin and Webb Sheffield and London. Some of the items are monogrammed as per the list above. A number of the glass bottles have lids hallmarked Mappin & Webb London and Sheffield makers stamped inside lid with hall marks history of warrnambool, cramond and dickson, mary glass cramond, dressing bag, woman's toiletry bag 1880 -
 Eltham District Historical Society Inc
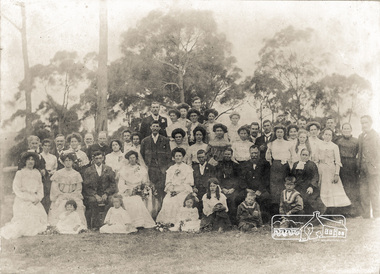
Photograph, Wedding of Sarah Ann Bird (b.1881) to Edward Ernest Pepper (b.1874) held at the Bird family home of "View Hill', Eltham, 1904, 1904
... knife; Mr J. H. Kilpatrick, hand painted mirror; Mrs Kerwin... knife; Mr J. H. Kilpatrick, hand painted mirror; Mrs Kerwin ...Sarah Bird 4th from left (seated) and Edward Pepper on her left (standing). George Bird, 2nd from right (seated). George Bird her great-grandfather and Sarah Bird and Edward Pepper, her grandparents. [from Evelyn Observer and Bourke East Record, morning edition, 18 November 1904, p. 3:] ORANGE BLOSSOM. The marriage of Miss Sarah A. Bird, eldest daughter of Mr George Bird, of "View Hill," Eltham, to Mr Ernest Edward Pepper, of Diamond Creek, was celebrated at the residence of the bride's parents on Wednesday, 9th November, 1904. The ceremony took place at 4 p.m. and was performed by the Rev Percey Knight, B.A., of Alphington. The bride entered the drawing room with her father who gave her away, and the Wedding March, was nicely played by Miss Wild. The bride was prettily dressed in creme voile nicely tucked and gathered, trimmed with guipure lace and silk ruching, sprays of orange blossom, wreath and veil, and she carried a shower bouquet. Her travelling dress was a very pretty blue. The brides-maids were Miss Ethel Barker dressed in pale green voile trimmed with creme guipure lace and silk ruching; and Miss Button in creme voile, guipure lace, silk ruching; both carried pretty bouquets. The groomsmen were Mr Lorimer, of Diamond Creek, and Mr George Bird, brother of the bride. Between forty and fifty relatives and friends partook of a bountifully provided and nicely laid out breakfast. The usual toasts were honored, and congratulations were freely tendered "to the happy couple". The decorations were very tastefully executed by Miss Beatrice Nelson, and Mr Sayers. The evening was very pleasantly spent in singing, recitations, games, and other suitable pastimes, while others "tipped the light fantastic toe". About 10 p.m., "while all was merry as a marriage bell", the bride and bridegroom departed secretly "to cheat surprise and prying eyes". The presents were numerous and handsome:– Parents of the bride, sewing machine; Miss A. Bird, silver breakfast cruet; Miss N. Bird, bread board and knife; Master A. Bird, pair glass dishes; Master R. Bird, pair photo frames; Mr Sayers, tea set; Miss Kidd, silver jam dish and spoon; Miss Wilkinson, carpet; Mr J. Kilpatrick, cheque; Mr W. Kilpatrick, clock; Miss Kilpatrick, silver butter knife; Mr J. H. Kilpatrick, hand painted mirror; Mrs Kerwin, pictures; Mrs Gilsenan, the handsome wedding cake; Mrs Nelson, Japanese occasional table; Misses Nelson, jugs and candlestick; Mrs Bunker, silver cruet stand; Miss Bunker, hand-painted vases; Miss E. Bunker, epergne; Mr E. Bunker, crumb tray and brush; Miss Jessie Gilsenan, cake stand; Mr Harold Gilsenan, auger basin and ornaments; Mr Lorimer, silver breakfast cruet; Mr A. Collins and Miss Jones, epergne; Miss Cassie Sweeney, jardiniere; Miss Ida and Ollie Cooper, silver butter dish; Miss Mills, large vases; Misses M. and F. Shillinglaw, handsome oak clock; Misses C. and E. Shillinglaw, pair large pictures; Mr Lucas and Miss Sutton, silver butter dish and knife, and silver jam dish and spoon; Miss M. and A. Short, teapot, cheese dish, and tumblers; Mr and Mrs J. Anderson, butter dish; Miss Williams, pen tray; Miss Griffiths, vases; Mr I. Hill, cheque; Miss Wild, biscuit barrel; Mr, Mrs and Miss Brown, trifle bowl and crystal jug; Mrs Weller, water jug and glasses; Mrs Hadfield, pair glass dishes and butter dish; Mr and Mrs Blackney, photo frames; Mr Wilson, beaded basket pin cushion; Mr Linsy, cheque; Mrs Linsy, fruit dish; Mrs Stebbing, pair candle sticks; Mrs Blanchard, pictures.Digital copy of framed sepia photographanderson, bird, blanchard, blackney, bunker, collins, cooper, edward ernest pepper, george bird, george bird jnr, gilsenan, griffiths, hadfield, hill, jones, kerwin, kidd, kilpatrick, linsy, mills, nelson, sarah ann bird, sayers, shillinglaw, short, stebbing, sutton, sweeney, view hill, wedding, weller, wild, wilkinson, williams, wilson, brown, lesley mitchell (nee pepper) collection -
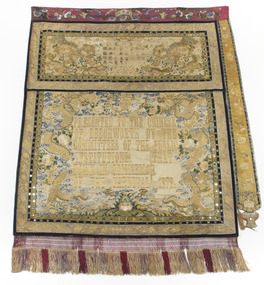 The Beechworth Burke Museum
Textile - Banner, c1872
This banner was one of five banners gifted to the Beechworth Chinese community in recognition of their support of the Hospital and Benevolent Asylum in 1875, from the Carnival Committee. These banners had been purchased in China by a social envoy from Beechworth then presented to the Chinese community during the Beechworth Fine Arts Exhibition in May of that same year, by Donald Fiddes, President of the Ovens District Hospital. The Burke Museum's Chinese Collection presents the history of Chinese settlement in Beechworth from 1856 and its involvement in local community affairs in the second half of the 19th century. In settling in the area they formed their own community with distinctive Chinese cultural traditions, forming their own 'camps' with laid out streets, housing a Temple, Chinese Theatre and restaurants, hotels, stores, gambling houses and dwellings. Members of the Chinese community took an active interest in town affairs and were generous donors to the appeal to build the Ovens District Hospital in 1856/7. The vibrant colours and dynamic graphics of the silk embroidered Chinese banners were a highlight of Beechworth Charitable processions that took place in the main street. Two of the Chinese banners were conserved for the Burke Museum in 2006 by Carol Campbell of Phoenix Conservation Services with funding from Victoria’s Heritage Grants. In 2015, with the enormous support of the Copland Foundation and fundraising activities by the Friends of the Bur Museum Committee, conservation of the third banner was undertaken by Artlab Australia in Adelaide.The banners display traditional Chinese textile techniques and are visually beautiful and very rare and are considered of local and national significance, with the potential to be deemed internationally significant.The banner has a narrow fuchsia embroidered top border, a wider embroidered panel depicting 2 dogs with embroidered Chinese text and a larger lower panel with the embroidered text “PRESENTED TO THE CHINESE OF BEECHWORTH BY THE COMMITEES OF THE PUBLIC INSTITUTIONS (missing) THAT TOWN IN COMMEMOR (missing) OF THE CARNIVAL 1873” The 2 lower panels have narrow decorative borders decorated with mirrors and extensive embroidery. There is an additional embroidered tab running along the right hand edge. The bottom edge has a wide knotted fringe. The back is lined with fabric decorated with a painted scene. Refer Attachment 1 quote ARTLAB AustPRESENTED TO THE CHINESE / OF BEECHWORTH BY THE / COMMITEES OF THE PUBLIC / INSTITUTIONS THAT / TOWN IN COMMEMOR / OF THE CARNIVAL 1873beechworth, burke museum, chinese, benevolent asylum, ovens district hospital, beechworth carnival processions, carnival, processions, beechworth chinese community, beechworth fine arts exhibition, donald fiddes -
Frankston RSL Sub Branch
Memorabilia - Level, Abney
Square gunsight telescope.An Abney level and clinometer, is an instrument used in surveying which consists of a fixed sighting tube, a movable spirit level that is connected to a pointing arm, and a protractor scale. An internal mirror allows the user to see the bubble in the level while sighting a distant target. It can be used as a hand-held instrument or mounted on a Jacob's staff for more precise measurement, and it is small enough to carry in a coat pocket -
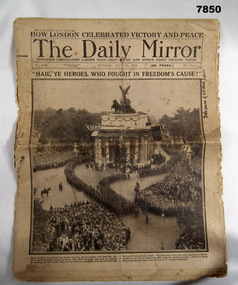 Bendigo Military Museum
Newspaper - THE DAILY MIRROR 21.7.1919, The Daily Mirror, C. July 1919
This Newspaper "How London celebrated Victory and Peace" was sent home by W.H. Field No 18440 AAMC who was still in London at the time. Off the 20 pages 6 are full page of the Victory Parade. Refer Cat No 7848 for W.H Fields service details.Newspaper, "The Daily Mirror", 20 pages No 4908, all print in black, contents range from full page photos of the "Victory March in London 19.7.1919", articles, cartoons, lots of Womens fashion adds, price was one penny.Hand written on front page in black pen, "Take care of all these papers"victory, newspaper, parade, malone collection -
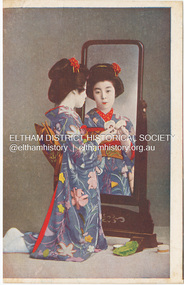 Eltham District Historical Society Inc
Photograph - Postcard, Geisha Sakae looking into a mirror applying makeup, c.1905 to c.1920s
The text on reverse translates Kikaha toilet department. There is also the printed image of a swallow on the back, which suggests that it was taken by the S. N. Banshiudo Studio in Shiba Park, Tokyo. Geisha Sakae was an extremely popular postcard model shortly after the Russo-Japanese war 1904-05, people used to line up early in the morning whenever a new postcard was released at the postcard shop in Ginza. The beauty of her gait was so widely admired that her walk inspired many of the leading Onnagata (male Kabuki actors in female roles) of the day. She went on to marry Ichikawa Sadanji II, one of the most popular Kabuki actors in Japan, who worked hard to promote new plays and revive long-forgotten classical dramas. [Ref: https://www.flickr.com/photos/blue_ruin_1/8448420741] During the Russo-Japanese War (1904–05), the Japanese government sent postcards of beautiful Japanese women, bijin ehagaki (美人絵葉書), to soldiers to motivate them. Publishers continued to print them well into the 1920s. [Ref: Duits, Kjeld (February 21, 2022). 1910s: Geisha Postcards, OLD PHOTOS of JAPAN. Retrieved on March 31, 2024 (GMT) from https://www.oldphotosjapan.com/photos/883/vintage-geisha-postcards-early-20th-century] See also: Sakae さかえ - Meiji / Taishō Era Geisha https://www.flickr.com/groups/1988804@N22/pool/ The photochrom process Photochroms are not photographs but actual prints, produced using 6 to 15 colors and the lithography printing process. The technique was invented by the Swiss Hans Jakob Schmid during the 1880s. The fascinating aspect of these prints is that they are created from black and white photographs. It required quite some work and talent to create these images. The photographer would usually make notes about the colors in the image he shot. These enabled a painter to create a painting that served as a color guide for the litho stone maker. This artisan would then create multiple exposures of the original black-and-white negative, changing the exposure time, development settings, and using dodge and burn techniques to create the required set of 6 to 15 stones that would each be used to print one specific color. By combining all these colors you get the prints [Ref: https://www.prepressure.com/printing/history/photochrome-prints]This item, a souvenir from Japan from between the wars (circa 1923) was brought home to Research, Victoria by Bill Teagle who was serving in the Royal Australian Navy (1919-1945). Bill Teagle's sister Violet Amelda Teagle had married Theodore (Curly) Feldbauer in 1933. Bill's brother-in-law Curly was taken as a Prisoner of War by the Japanese and died at Sandakan in March 1945. The family did not learn of Curly’s death till months later and Bill's sister, Violet, herself could never forgive the Japanese for what happened to Curly. Curly is remembered on the Eltham Roll of Honour Board and his son, Albert Feldbauer (Bill’s nephew and youngest child of the children of the soldier fathers attending a school in the district), was given the honour of turning the first sod for the Eltham War Memorial Infant Welfare Centre Building. Despite this, the family maintained this cherished souvenir from a time of previous foreign friendship with Japan. The item was possibly given by Bill Teagle to his sister Margaret Rose (formerly Ingram) who later married Richard Edward (Eddie) Fielding in early 1948. (Eddie had been engaged to someone else before he went to war, but his fiancée broke it off before his return to Australia.) It was cared for by the Teagle/Fielding family for approximately one hundred years. It is of particular significance given the family's connection to the Eltham War Memorial and the significance of that memorial to the local community and represents that despite the horrors of war, former friends then foes can become friends again.tom fielding collection, geisha sakae, japanese postcard, postcard -
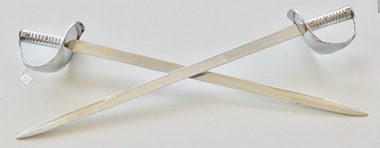 Lara RSL Sub Branch
Cutlass chrome pair of, 1804 Chromed cutlass pair
Windlass, an ISO accredited sword maker and official supplier to MOD UK and the RN.good example of Navy cutlass swords2 x British Naval Cutlass 1804 - Chromed These highest quality blades are manufactured by Windlass, an ISO accredited sword maker and official supplier to MOD UK and the RN. Each blade is fold forged from a single billet of high-carbon steel, then hardened and tempered. Hand assembled and ground, each is then fully chrome plated for a mirror finish. 1. Blade near the hilt has on one side crossed sword and scabbard, obverse has a J. On the basket are N an arrow WD followed by an L. 2. Blade near the hilt has on one side crossed sword and scabbard, obverse has a inscribed 9 and stamped C6. On the basket are N an arrow WD followed by an L.navy, cutlass -
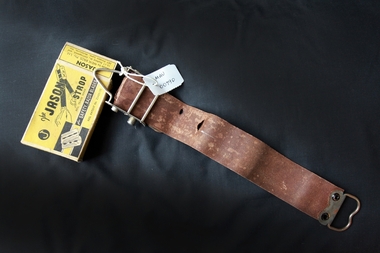 City of Moorabbin Historical Society (Operating the Box Cottage Museum)
Personal Effects, leather strop 'Jason', c1940
A razor strop (or razor strap) is a flexible strip of leather or canvas used to straighten and polish the blade of a straight razor, a knife, or a woodworking tool like a chisel. Unlike honing or sharpening a blade, in which a whetstone removes metal bent out of alignment from the blade's edge, stropping the blade re-aligns the indentations without removing any material. The strop may be a hanging strop or a hand-held paddle. Various abrasive compounds may be applied to the strop to aid in polishing the blade while stropping to obtain a mirror-like finish. The properties of the compound applied will alter the polishing result. Jeweller's rouge is a very fine abrasive compound. The green Chromium(III) oxide compound is most often used as an abrasive compound. Sprays containing diamond particles are another option. Stropping is primarily done with straight razors, used for shaving, as these are the thinnest blades in everyday use, and require stropping at each use, due to the thinness of the blade Two points are key to stropping: Draw the blade spine-first along the strop. By contrast, honing is done edge-first. When you turn the blade at the end of a stroke, turn it over the spine, so the edge moves away from the strop and faces you, and the spine rests on the strop. This preserves the edge – if the blade is turned over with the edge against the strop, this will roll the blade edge, defeating the purpose of stropping As the use of safety razors increased in popularity this 'Jason' strop prolonged the life of each razor blade thus making them economical.A leather 'Jason' strop, for sharpening safety shaving razor blades, with box. Top of Box: J / The JASON / STROP/ Reg. Trade Mark / for SAFETY RAZOR BLADES / Reg. Patent No. 25435/35 ; Back : How to operate the JASON STROP ( instructions) Side: JASON / Razor Strop Dressing / A keen smooth blade will always be assured by the / occasional use of JASON RAZOR STROP DRESSING/ Side: FIFTY SHAVES WITH ONE BLADE ! / by using - JASON and JASON / Razor Blade Strop Razor Blade Dressing. End: JASON / Made by MEIK BROS. Pty. Ltd. / 15-17 Bedford St., Collingwood, and / 287 Flinders Lane, Melbourne, Vic. End: JASON / SAFETY RAZOR BLADE STROP.safety razors, the jason strop, shaving equipment, personal effects, strops, meik bros pty ltd, gillette, collingwood melbourne -
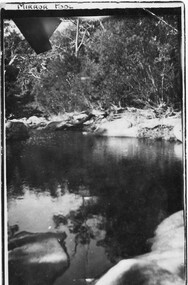 Halls Gap & Grampians Historical Society
Postcard - B/W
... . The pool was called "Mirror Pool" SCENERY Hand written "A Happy New ...The location of the photo was in the vicinity of Myrtlebank, upper Halls Gap. The pool was called "Mirror Pool"Photo shows large pool of water bordered by the sandy banks of a creek (Fyans Creek).Hand written "A Happy New Year to all PS this is close to where we live Typed Post card, correspondence, Address only Kodak, Australia. 'Mirror Pool" written in ink in top, left border of photo.scenery -
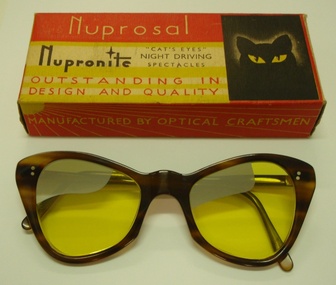 The Cyril Kett Optometry Museum
Spectacles, Nupro, 1950 (estimated)
These night driving spectacles are in a shape of frame fashionable for ladies in the 1950's. The position of the lens silvering shows that these are designed for use in right hand drive cars. These were an expensive item in their day. Their excellent condition and original cardboard box suggest that they may be unsold new old stock.No other example of these Nupronite night driving spectacles is known in any Australian collection.Boxed Nupronite night driving spectacles. Yellow flat plano glass lenses with silver mirror finish in wearer's upper right field of each lens (to minimise glare of oncoming lights). Tortoise-shell look cat's eye frame. In original cardboard box.On box:'Nuprosal/ Nupronite/ "CAT'S EYES" NIGHT DRIVING SPECTACLES OUTSTANDING IN DESIGN AND QUALITY/ MANUFACTURED BY OPTICAL CRAFTSMEN/ MADE IN ENGLAND BY NUPRO LONDON/ MODEL:CAT'S EYES/ LENSES:SUPER/ COLOUR:AUTUMN LEAF'. Price added by hand '2 pound 17/6'spectacles, glare, night driving, eye protection -
 Flagstaff Hill Maritime Museum and Village
Domestic object - Bowl, Late 19th or early 20th Century
The Process of Making Pottery Decorating, Firing, Glazing, Making, Technical There is a rhythm and flow to clay. It can’t be done all at once! Even the making process! It can take weeks to get everything done, especially if you can only work on your pottery once a week! Even though we have three hour classes, it’s often just not enough time! Here is an overview of some of the processes so you have a bit more grasp on some of the technical stuff! Step One – Design There are SO many ideas out there for making stuff in clay! From delicate porcelain jewellery, through to heavy sculptural work and everything in between. Deciding your direction is sometimes not that easy – when you first start, try everything, you will naturally gravitate to the style that you enjoy! The options and variations are endless and can get a wee bit overwhelming too! Check in with me before you start to ensure your ideas will work, what order you might do things, how you could achieve the look you are seeking and any other technical data required! Step Two – Making Clay is thixotropic. This means that as you work with it, the clay first gets sloppier and wetter, before is begins to dry in the atmosphere. For most things, you simply can’t do all parts of the project at once. An example of work order might look like: Get last weeks work out from the shelves Prepare clay for today’s work – roll your clay, prepare balls for throwing, make the first stage of a pinch pot) Clean up last week’s work and put it on the shelf for bisque firing Check that you have any glazing to do – and do enough of it that you will have time to finish your main project Do the next step of your next project – there might be a further step that can’t be complete immediately, in that case, wrap your work well and put onto the shelves. Letting your work rest for a while can really help keep your work clean and professional looking. Many things require bagging under plastic to keep it ready for work the next week – put your name on the outside of the bag so you can find your work easily. We have stickers and markers. Consider how you want to decorate your work – coloured slip can be applied at a fairly wet stage (remembering that it will make your work even wetter!). Trying to apply slip to dry clay won’t work! If you want to do sgraffito – you will need to keep the work leather hard (a state of dryness where you can still work the clay with a little effort and a little water and care). Step Three – Drying Most of the time your work can go into the rack uncovered to let it dry out for the following week. If you want to continue forming or shaping you will need to double bag your work – put your work on a suitable sized bat and put the bat in a bag so the base of the bag is under the bat, then put another bag over the top of the work and tuck the top of the bag under the bat. If you want to trim (or turn) your thrown work the following week, it should also be double bagged. If your work is large, delicate, or of uneven thicknesses, you should lightly cover your work for drying. When considering the drying process, bare in mind the weather, humidity and wind! The hotter and dryer, the faster things dry and work can dry unevenly in the shelves – this can lead to cracking – another time to lightly cover your work for drying. Step Four – Trimming and Cleaning Up Your work is dry! It is called greenware now and it is at it’s most fragile! Handle everything with two hands. I often refer to soft hands – keep everything gentle and with your fingers spread as much as possible. Try to not pick up things like plates too much, and always with both hands! Before your work can be bisque fired it should be “cleaned up”. You work won’t go into the kiln if it has sharp edges – when glazed, sharp edges turn into razor blades! Use a piece of fly wire to rub the work all over – this will scratch a little so be light handed. Use a knife or metal kidney to scrape any areas that require a bit more dynamic treatment than the fly wire offers! Finally, a very light wipe over with a slightly damp sponge can help soften and soothe all of your edges and dags! Trimming thrown work: If you are planning to trim (or turn) your thrown work (and you should be), make sure you bag it well – your work should be leather hard to almost dry for easiest trimming. Use this step to finish the work completely – use a metal kidney to polish the surface, or a slightly damp sponge to give a freshly thrown look. Wipe the sponge around the rim after trimming, and check the inside of the pot for dags! Trimming slip cast work: Usually I will trim the rims of your work on the wheel the following day to make that stage easier, however you will still need to check your work for lumps and bumps. Last but not least – check that your name is still clearly on the bottom of your work. Step Five – Bisque Firing When the work is completely dry it can go into the bisque kiln. The bisque kiln is fired to 1000°C. This process burns off the water in the clay as well as some of the chemically bound water. The structure of the clay is not altered that much at this temperature. Inside the bisque kiln, the work is stacked a little, small bowl inside a larger bowl and onto a heavy plate. Smaller items like decorations or drink coasters might get stacked several high. Consideration is paid to the weight of the stack and shape of the work. A bisque kiln can fire about one and a half times the amount of work that the glaze kiln can fire. The firing takes about 10 hours to complete the cycle and about two days to cool down. Once it has been emptied the work is placed in the glaze room ready for you to decorate! Step Six – Glazing Decorating your work with colour can be a lot of fun – and time consuming! There are three main options for surface treatment at this stage: Oxide Washes Underglazes Glazes Washes and underglazes do not “glaze” the work – It will still need a layer of glaze to fully seal the clay (washes don’t need glaze on surfaces not designed for food or liquid as they can gloss up a little on their own). Underglazes are stable colourants that turn out pretty much how they look in the jar. They can be mixed with each other to form other colours and can be used like water colours to paint onto your work. Mostly they should have a clear glaze on top to seal them. Oxides are a different species – the pink oxide (cobalt) wash turns out bright blue for instance. They don’t always need a glaze on top, and some glazes can change the colour of the wash! The glazes need no other “glaze” on top! Be careful of unknown glaze interactions – you can put any combination of glaze in a bowl or on a plate, but only a single glaze on the outside of any vertical surface! Glazes are a chemical reaction under heat. We don’t know the exact chemicals in the Mayco glazes we use. I can guess by the way they interact with each other, however, on the whole, you need to test every idea you have, and not run the test on a vertical surface! Simply put, glaze is a layer of glass like substance that bonds with the clay underneath. Clay is made of silica, alumina and water. Glaze is made of mostly silica. Silica has a melting point of 1700°C and we fire to 1240°C. The silica requires a “flux” to help it melt at the lower temperature. Fluxes can be all sorts of chemicals – a common one is calcium – calcium has a melting point of 2500°C, however, together they both melt at a much lower temperature! Colourants are metal oxides like cobalt (blue), chrome (green through black), copper (green, blue, even red!), manganese (black, purple and pink) iron (red brown), etc. Different chemicals in the glaze can have dramatic effects. for example, barium carbonate (which we don’t use) turns manganese bright pink! Other elements can turn manganese dioxide brown, blue, purple and reddish brown. Manganese dioxide is a flux in and of itself as well. So, glazes that get their black and purple colours, often interact with other glazes and RUN! Our mirror black is a good example – it mixes really well with many glazes because it fluxes them – causes them to melt faster. It will also bring out many beautiful colours in the glazes because it’s black colouring most definitely comes from manganese dioxide! Glaze chemistry is a whole subject on it’s own! We use commercial Mayco glazes on purpose – for their huge range of colour possibilities, stability, cool interactions, artistic freedom with the ability to easily brush the glazes on and ease of use. We currently have almost 50 glazes on hand! A major project is to test the interactions of all glazes with each other. That is 2,500 test tiles!!!! I’m going to make the wall behind the wheels the feature wall of pretty colours! Step Seven – Glaze (Gloss or sometimes called “Glost”) Firing Most of the time this is the final stage of making your creation (but not always!) The glaze kiln goes to 1240°C. This is called cone 6, or midrange. It is the low end of stoneware temperatures. Stoneware clays and glazes are typically fired at cone 8 – 10, that is 1260 – 1290°C. The energy requirement to go from 1240°C to 1280°C is almost a 30% more! Our clay is formulated to vitrify (mature, turn “glass-like”) at 1240°, as are our glazes. A glaze kiln take around 12 hours to reach temperature and two to three days to cool down. Sometimes a third firing process is required – this is for decoration that is added to work after the glaze firing. For example – adding precious metals and lustres. this firing temperature is usually around 600 – 800°C depending upon the techniques being used. There are many students interested in gold and silver trims – we will be doing this third type of firing soon! After firing your work will be in the student finished work shelves. Remember to pay for it before you head out the door! There is a small extra charge for using porcelain clay (it’s more than twice the price of regular clay), and for any third firing process! Once your work has been fired it can not turn back into clay for millennia – so don’t fire it if you don’t like it! Put it in the bucket for recycling. https://firebirdstudios.com.au/the-process-of-making-pottery/ The bowl is an example of kitchenware used in the 19th century and still in use today.Bowl white ceramic. Crack on side. Badly stained.Backstamp very faint and unable to be read.flagstaff hill, warrnambool, shipwrecked-coast, flagstaff-hill, flagstaff-hill-maritime-museum, maritime-museum, shipwreck-coast, flagstaff-hill-maritime-village, mixing bowl, food preparation, kitchen equipment, ceramic -
 Flagstaff Hill Maritime Museum and Village
Domestic object - Bowl
The Process of Making Pottery Decorating, Firing, Glazing, Making, Technical There is a rhythm and flow to clay. It can’t be done all at once! Even the making process! It can take weeks to get everything done, especially if you can only work on your pottery once a week! Even though we have three hour classes, it’s often just not enough time! Here is an overview of some of the processes so you have a bit more grasp on some of the technical stuff! Step One – Design There are SO many ideas out there for making stuff in clay! From delicate porcelain jewellery, through to heavy sculptural work and everything in between. Deciding your direction is sometimes not that easy – when you first start, try everything, you will naturally gravitate to the style that you enjoy! The options and variations are endless and can get a wee bit overwhelming too! Check in with me before you start to ensure your ideas will work, what order you might do things, how you could achieve the look you are seeking and any other technical data required! Step Two – Making Clay is thixotropic. This means that as you work with it, the clay first gets sloppier and wetter, before is begins to dry in the atmosphere. For most things, you simply can’t do all parts of the project at once. An example of work order might look like: Get last weeks work out from the shelves Prepare clay for today’s work – roll your clay, prepare balls for throwing, make the first stage of a pinch pot) Clean up last week’s work and put it on the shelf for bisque firing Check that you have any glazing to do – and do enough of it that you will have time to finish your main project Do the next step of your next project – there might be a further step that can’t be complete immediately, in that case, wrap your work well and put onto the shelves. Letting your work rest for a while can really help keep your work clean and professional looking. Many things require bagging under plastic to keep it ready for work the next week – put your name on the outside of the bag so you can find your work easily. We have stickers and markers. Consider how you want to decorate your work – coloured slip can be applied at a fairly wet stage (remembering that it will make your work even wetter!). Trying to apply slip to dry clay won’t work! If you want to do sgraffito – you will need to keep the work leather hard (a state of dryness where you can still work the clay with a little effort and a little water and care). Step Three – Drying Most of the time your work can go into the rack uncovered to let it dry out for the following week. If you want to continue forming or shaping you will need to double bag your work – put your work on a suitable sized bat and put the bat in a bag so the base of the bag is under the bat, then put another bag over the top of the work and tuck the top of the bag under the bat. If you want to trim (or turn) your thrown work the following week, it should also be double bagged. If your work is large, delicate, or of uneven thicknesses, you should lightly cover your work for drying. When considering the drying process, bare in mind the weather, humidity and wind! The hotter and dryer, the faster things dry and work can dry unevenly in the shelves – this can lead to cracking – another time to lightly cover your work for drying. Step Four – Trimming and Cleaning Up Your work is dry! It is called greenware now and it is at it’s most fragile! Handle everything with two hands. I often refer to soft hands – keep everything gentle and with your fingers spread as much as possible. Try to not pick up things like plates too much, and always with both hands! Before your work can be bisque fired it should be “cleaned up”. You work won’t go into the kiln if it has sharp edges – when glazed, sharp edges turn into razor blades! Use a piece of fly wire to rub the work all over – this will scratch a little so be light handed. Use a knife or metal kidney to scrape any areas that require a bit more dynamic treatment than the fly wire offers! Finally, a very light wipe over with a slightly damp sponge can help soften and soothe all of your edges and dags! Trimming thrown work: If you are planning to trim (or turn) your thrown work (and you should be), make sure you bag it well – your work should be leather hard to almost dry for easiest trimming. Use this step to finish the work completely – use a metal kidney to polish the surface, or a slightly damp sponge to give a freshly thrown look. Wipe the sponge around the rim after trimming, and check the inside of the pot for dags! Trimming slip cast work: Usually I will trim the rims of your work on the wheel the following day to make that stage easier, however you will still need to check your work for lumps and bumps. Last but not least – check that your name is still clearly on the bottom of your work. Step Five – Bisque Firing When the work is completely dry it can go into the bisque kiln. The bisque kiln is fired to 1000°C. This process burns off the water in the clay as well as some of the chemically bound water. The structure of the clay is not altered that much at this temperature. Inside the bisque kiln, the work is stacked a little, small bowl inside a larger bowl and onto a heavy plate. Smaller items like decorations or drink coasters might get stacked several high. Consideration is paid to the weight of the stack and shape of the work. A bisque kiln can fire about one and a half times the amount of work that the glaze kiln can fire. The firing takes about 10 hours to complete the cycle and about two days to cool down. Once it has been emptied the work is placed in the glaze room ready for you to decorate! Step Six – Glazing Decorating your work with colour can be a lot of fun – and time consuming! There are three main options for surface treatment at this stage: Oxide Washes Underglazes Glazes Washes and underglazes do not “glaze” the work – It will still need a layer of glaze to fully seal the clay (washes don’t need glaze on surfaces not designed for food or liquid as they can gloss up a little on their own). Underglazes are stable colourants that turn out pretty much how they look in the jar. They can be mixed with each other to form other colours and can be used like water colours to paint onto your work. Mostly they should have a clear glaze on top to seal them. Oxides are a different species – the pink oxide (cobalt) wash turns out bright blue for instance. They don’t always need a glaze on top, and some glazes can change the colour of the wash! The glazes need no other “glaze” on top! Be careful of unknown glaze interactions – you can put any combination of glaze in a bowl or on a plate, but only a single glaze on the outside of any vertical surface! Glazes are a chemical reaction under heat. We don’t know the exact chemicals in the Mayco glazes we use. I can guess by the way they interact with each other, however, on the whole, you need to test every idea you have, and not run the test on a vertical surface! Simply put, glaze is a layer of glass like substance that bonds with the clay underneath. Clay is made of silica, alumina and water. Glaze is made of mostly silica. Silica has a melting point of 1700°C and we fire to 1240°C. The silica requires a “flux” to help it melt at the lower temperature. Fluxes can be all sorts of chemicals – a common one is calcium – calcium has a melting point of 2500°C, however, together they both melt at a much lower temperature! Colourants are metal oxides like cobalt (blue), chrome (green through black), copper (green, blue, even red!), manganese (black, purple and pink) iron (red brown), etc. Different chemicals in the glaze can have dramatic effects. for example, barium carbonate (which we don’t use) turns manganese bright pink! Other elements can turn manganese dioxide brown, blue, purple and reddish brown. Manganese dioxide is a flux in and of itself as well. So, glazes that get their black and purple colours, often interact with other glazes and RUN! Our mirror black is a good example – it mixes really well with many glazes because it fluxes them – causes them to melt faster. It will also bring out many beautiful colours in the glazes because it’s black colouring most definitely comes from manganese dioxide! Glaze chemistry is a whole subject on it’s own! We use commercial Mayco glazes on purpose – for their huge range of colour possibilities, stability, cool interactions, artistic freedom with the ability to easily brush the glazes on and ease of use. We currently have almost 50 glazes on hand! A major project is to test the interactions of all glazes with each other. That is 2,500 test tiles!!!! I’m going to make the wall behind the wheels the feature wall of pretty colours! Step Seven – Glaze (Gloss or sometimes called “Glost”) Firing Most of the time this is the final stage of making your creation (but not always!) The glaze kiln goes to 1240°C. This is called cone 6, or midrange. It is the low end of stoneware temperatures. Stoneware clays and glazes are typically fired at cone 8 – 10, that is 1260 – 1290°C. The energy requirement to go from 1240°C to 1280°C is almost a 30% more! Our clay is formulated to vitrify (mature, turn “glass-like”) at 1240°, as are our glazes. A glaze kiln take around 12 hours to reach temperature and two to three days to cool down. Sometimes a third firing process is required – this is for decoration that is added to work after the glaze firing. For example – adding precious metals and lustres. this firing temperature is usually around 600 – 800°C depending upon the techniques being used. There are many students interested in gold and silver trims – we will be doing this third type of firing soon! After firing your work will be in the student finished work shelves. Remember to pay for it before you head out the door! There is a small extra charge for using porcelain clay (it’s more than twice the price of regular clay), and for any third firing process! Once your work has been fired it can not turn back into clay for millennia – so don’t fire it if you don’t like it! Put it in the bucket for recycling. https://firebirdstudios.com.au/the-process-of-making-pottery/ This bowl is an example of kitchenware used in the 19th century and still in use today.Bowl white ceramic plain that has two sets of edging around lip. Inside bowl has plaster designed to look like cooking mixture.flagstaff hill, warrnambool, shipwrecked-coast, flagstaff-hill, flagstaff-hill-maritime-museum, maritime-museum, shipwreck-coast, flagstaff-hill-maritime-village, kitchen equipment, ceramic -
 Flagstaff Hill Maritime Museum and Village
Domestic object - Bowl, J & G Meakin, Late 19th or early 20th Century
The Process of Making Pottery Decorating, Firing, Glazing, Making, Technical There is a rhythm and flow to clay. It can’t be done all at once! Even the making process! It can take weeks to get everything done, especially if you can only work on your pottery once a week! Even though we have three hour classes, it’s often just not enough time! Here is an overview of some of the processes so you have a bit more grasp on some of the technical stuff! Step One – Design There are SO many ideas out there for making stuff in clay! From delicate porcelain jewellery, through to heavy sculptural work and everything in between. Deciding your direction is sometimes not that easy – when you first start, try everything, you will naturally gravitate to the style that you enjoy! The options and variations are endless and can get a wee bit overwhelming too! Check in with me before you start to ensure your ideas will work, what order you might do things, how you could achieve the look you are seeking and any other technical data required! Step Two – Making Clay is thixotropic. This means that as you work with it, the clay first gets sloppier and wetter, before is begins to dry in the atmosphere. For most things, you simply can’t do all parts of the project at once. An example of work order might look like: Get last weeks work out from the shelves Prepare clay for today’s work – roll your clay, prepare balls for throwing, make the first stage of a pinch pot) Clean up last week’s work and put it on the shelf for bisque firing Check that you have any glazing to do – and do enough of it that you will have time to finish your main project Do the next step of your next project – there might be a further step that can’t be complete immediately, in that case, wrap your work well and put onto the shelves. Letting your work rest for a while can really help keep your work clean and professional looking. Many things require bagging under plastic to keep it ready for work the next week – put your name on the outside of the bag so you can find your work easily. We have stickers and markers. Consider how you want to decorate your work – coloured slip can be applied at a fairly wet stage (remembering that it will make your work even wetter!). Trying to apply slip to dry clay won’t work! If you want to do sgraffito – you will need to keep the work leather hard (a state of dryness where you can still work the clay with a little effort and a little water and care). Step Three – Drying Most of the time your work can go into the rack uncovered to let it dry out for the following week. If you want to continue forming or shaping you will need to double bag your work – put your work on a suitable sized bat and put the bat in a bag so the base of the bag is under the bat, then put another bag over the top of the work and tuck the top of the bag under the bat. If you want to trim (or turn) your thrown work the following week, it should also be double bagged. If your work is large, delicate, or of uneven thicknesses, you should lightly cover your work for drying. When considering the drying process, bare in mind the weather, humidity and wind! The hotter and dryer, the faster things dry and work can dry unevenly in the shelves – this can lead to cracking – another time to lightly cover your work for drying. Step Four – Trimming and Cleaning Up Your work is dry! It is called greenware now and it is at it’s most fragile! Handle everything with two hands. I often refer to soft hands – keep everything gentle and with your fingers spread as much as possible. Try to not pick up things like plates too much, and always with both hands! Before your work can be bisque fired it should be “cleaned up”. You work won’t go into the kiln if it has sharp edges – when glazed, sharp edges turn into razor blades! Use a piece of fly wire to rub the work all over – this will scratch a little so be light handed. Use a knife or metal kidney to scrape any areas that require a bit more dynamic treatment than the fly wire offers! Finally, a very light wipe over with a slightly damp sponge can help soften and soothe all of your edges and dags! Trimming thrown work: If you are planning to trim (or turn) your thrown work (and you should be), make sure you bag it well – your work should be leather hard to almost dry for easiest trimming. Use this step to finish the work completely – use a metal kidney to polish the surface, or a slightly damp sponge to give a freshly thrown look. Wipe the sponge around the rim after trimming, and check the inside of the pot for dags! Trimming slip cast work: Usually I will trim the rims of your work on the wheel the following day to make that stage easier, however you will still need to check your work for lumps and bumps. Last but not least – check that your name is still clearly on the bottom of your work. Step Five – Bisque Firing When the work is completely dry it can go into the bisque kiln. The bisque kiln is fired to 1000°C. This process burns off the water in the clay as well as some of the chemically bound water. The structure of the clay is not altered that much at this temperature. Inside the bisque kiln, the work is stacked a little, small bowl inside a larger bowl and onto a heavy plate. Smaller items like decorations or drink coasters might get stacked several high. Consideration is paid to the weight of the stack and shape of the work. A bisque kiln can fire about one and a half times the amount of work that the glaze kiln can fire. The firing takes about 10 hours to complete the cycle and about two days to cool down. Once it has been emptied the work is placed in the glaze room ready for you to decorate! Step Six – Glazing Decorating your work with colour can be a lot of fun – and time consuming! There are three main options for surface treatment at this stage: Oxide Washes Underglazes Glazes Washes and underglazes do not “glaze” the work – It will still need a layer of glaze to fully seal the clay (washes don’t need glaze on surfaces not designed for food or liquid as they can gloss up a little on their own). Underglazes are stable colourants that turn out pretty much how they look in the jar. They can be mixed with each other to form other colours and can be used like water colours to paint onto your work. Mostly they should have a clear glaze on top to seal them. Oxides are a different species – the pink oxide (cobalt) wash turns out bright blue for instance. They don’t always need a glaze on top, and some glazes can change the colour of the wash! The glazes need no other “glaze” on top! Be careful of unknown glaze interactions – you can put any combination of glaze in a bowl or on a plate, but only a single glaze on the outside of any vertical surface! Glazes are a chemical reaction under heat. We don’t know the exact chemicals in the Mayco glazes we use. I can guess by the way they interact with each other, however, on the whole, you need to test every idea you have, and not run the test on a vertical surface! Simply put, glaze is a layer of glass like substance that bonds with the clay underneath. Clay is made of silica, alumina and water. Glaze is made of mostly silica. Silica has a melting point of 1700°C and we fire to 1240°C. The silica requires a “flux” to help it melt at the lower temperature. Fluxes can be all sorts of chemicals – a common one is calcium – calcium has a melting point of 2500°C, however, together they both melt at a much lower temperature! Colourants are metal oxides like cobalt (blue), chrome (green through black), copper (green, blue, even red!), manganese (black, purple and pink) iron (red brown), etc. Different chemicals in the glaze can have dramatic effects. for example, barium carbonate (which we don’t use) turns manganese bright pink! Other elements can turn manganese dioxide brown, blue, purple and reddish brown. Manganese dioxide is a flux in and of itself as well. So, glazes that get their black and purple colours, often interact with other glazes and RUN! Our mirror black is a good example – it mixes really well with many glazes because it fluxes them – causes them to melt faster. It will also bring out many beautiful colours in the glazes because it’s black colouring most definitely comes from manganese dioxide! Glaze chemistry is a whole subject on it’s own! We use commercial Mayco glazes on purpose – for their huge range of colour possibilities, stability, cool interactions, artistic freedom with the ability to easily brush the glazes on and ease of use. We currently have almost 50 glazes on hand! A major project is to test the interactions of all glazes with each other. That is 2,500 test tiles!!!! I’m going to make the wall behind the wheels the feature wall of pretty colours! Step Seven – Glaze (Gloss or sometimes called “Glost”) Firing Most of the time this is the final stage of making your creation (but not always!) The glaze kiln goes to 1240°C. This is called cone 6, or midrange. It is the low end of stoneware temperatures. Stoneware clays and glazes are typically fired at cone 8 – 10, that is 1260 – 1290°C. The energy requirement to go from 1240°C to 1280°C is almost a 30% more! Our clay is formulated to vitrify (mature, turn “glass-like”) at 1240°, as are our glazes. A glaze kiln take around 12 hours to reach temperature and two to three days to cool down. Sometimes a third firing process is required – this is for decoration that is added to work after the glaze firing. For example – adding precious metals and lustres. this firing temperature is usually around 600 – 800°C depending upon the techniques being used. There are many students interested in gold and silver trims – we will be doing this third type of firing soon! After firing your work will be in the student finished work shelves. Remember to pay for it before you head out the door! There is a small extra charge for using porcelain clay (it’s more than twice the price of regular clay), and for any third firing process! Once your work has been fired it can not turn back into clay for millennia – so don’t fire it if you don’t like it! Put it in the bucket for recycling. https://firebirdstudios.com.au/the-process-of-making-pottery/This bowl was made by renowned pottery company J & G Meakin of England. The firm was established in the mid-1800's. The bowl is an example of kitchenware used in the 19th century and still in use today.Bowl; white ceramic, round and tapering inwards towards base. Made by J and G Meakin England.On base, 'Ironstone China Reg SOL 391413' with symbolflagstaff hill, flagstaff hill maritime museum and village, warrnambool, maritime museum, maritime village, great ocean road, shipwreck coast, mixing bowl, food preparation, j & g meakin, pottery, stoke-on-trent, kitchen equipment, ceramic -
Federation University Historical Collection
Object, Citizen Watch Co. Ltd, Hand Held Television - small backlight unit, 1986
CITIZEN 06TA: One of the most common Handheld-TVs with a "Solar Projection System" - A mirror reflects the picture from the LCD for viewing. Shown with and without the optional backlight-unit 92TA. 65 mm passive matrix LCD (European versions: 130 * 160 = 20,800 dots, US version: 146 * 160 = 23,360 dots), 190 grams with 4 AAA-size batteries. (http://www.guenthoer.de/e-mini.htm) Small grey analogue television. When the unit is open the image is reflected by a mirror. With the change to digital signals this unit would not work without a settop box. Serial No. 8C6 88053\model No 06TA-OG DC 6V - 0.3W Batt. Supp: 15v x 4 -
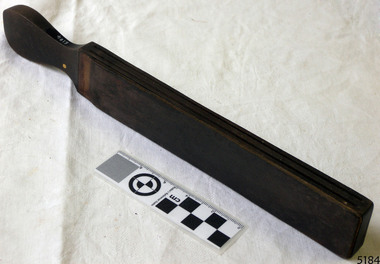
 Flagstaff Hill Maritime Museum and Village
Razor Strop
This razor strop is made like a leather strap. ABOUT STROPS Straight razors and cut throat razors were the major tools for shaving before the safety razor was invented in the 1880’s and even today specialty shaving shops still sell the straight razors. Along with the razor, the process of shaving would commonly involve lathering up shaving soap using a shaving brush with boar bristles. Men could own several razors and rotate them through the week and some shops sold the razors in a set, a razor for each day of the week. Straight razors could require stropping more than once during the shaving of a heavy beard, and stropping would also be performed at the end of each shave. Honing would only be performed two or three times a year, preserving the blade’s edge. A lot of skill was needed to hone and strop the blades of these early razors and the methods to do so were a large part of the curriculum in Barber colleges. The razor would be sharpened on a grinding wheel then honed on sharpening stone and finally finished using a strop. Straight edge razors would usually be sold unfinished and that process would be completed by the customer. A razor strop, usually made from leather, thick canvas or light timber, would be used to straighten and polish the straight razor for shaving. Strops could also be used to polish other blades such as knives, small metal tools and chisels. Sometimes an abrasive polishing compound is also used to give a mirror finish. Some strops, such as this one in our Collection, are designed to be used while hanging from a nail or peg, while others are hand held. To use the strop draw the spine of the blade down along the strop with the blade following, without putting any pressure on the blade. At the end of the stroke, rotate the blade over its spine then draw the spine along the strop again so that the edge moves away from the top. The finer grade of leather strap is used to give the final finish. Double Swing Razor Strop. Use for honing razors.flagstaff hill, warrnambool, shipwrecked-coast, flagstaff-hill, flagstaff-hill-maritime-museum, maritime-museum, shipwreck-coast, flagstaff-hill-maritime-village, strop, swing razor strop, barber's equipment, shaving equipment, personal accessory -
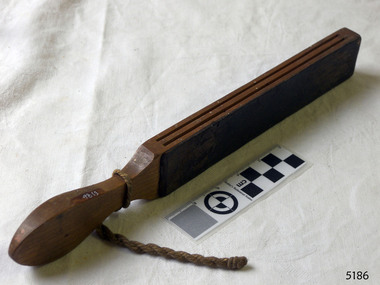
 Flagstaff Hill Maritime Museum and Village
Paddle Strop
This razor strop is called a paddle strop. ABOUT STROPS Straight razors and cut throat razors were the major tools for shaving before the safety razor was invented in the 1880’s and even today specialty shaving shops still sell the straight razors. Along with the razor, the process of shaving would commonly involve lathering up shaving soap using a shaving brush with boar bristles. Men could own several razors and rotate them through the week and some shops sold the razors in a set, a razor for each day of the week. Straight razors could require stropping more than once during the shaving of a heavy beard, and stropping would also be performed at the end of each shave. Honing would only be performed two or three times a year, preserving the blade’s edge. A lot of skill was needed to hone and strop the blades of these early razors and the methods to do so were a large part of the curriculum in Barber colleges. The razor would be sharpened on a grinding wheel then honed on sharpening stone and finally finished using a strop. Straight edge razors would usually be sold unfinished and that process would be completed by the customer. A razor strop, usually made from leather, thick canvas or light timber, would be used to straighten and polish the straight razor for shaving. Strops could also be used to polish other blades such as knives, small metal tools and chisels. Sometimes an abrasive polishing compound is also used to give a mirror finish. Some strops, such as this one in our Collection, are designed to be used while hanging from a nail or peg, while others are hand held. To use the strop draw the spine of the blade down along the strop with the blade following, without putting any pressure on the blade. At the end of the stroke, rotate the blade over its spine then draw the spine along the strop again so that the edge moves away from the top. The finer grade of leather strap is used to give the final finish. Wooden paddle strop, (or raxor strop or cushion strop). Strop has two leather sides, numbered 1 and 2, on a slotted paddle. Marked on handle “Hamon”. Sides are numbered 1 and 2. Has two slits in body of strop. "Hamon" stamped on handle. "Hamon" stamped on handle. flagstaff hill, warrnambool, shipwrecked-coast, flagstaff-hill, flagstaff-hill-maritime-museum, maritime-museum, shipwreck-coast, flagstaff-hill-maritime-village, wooden strop, paddle strop, strop, razor strop, shaving accessory, barber's equipment, personal grooming -
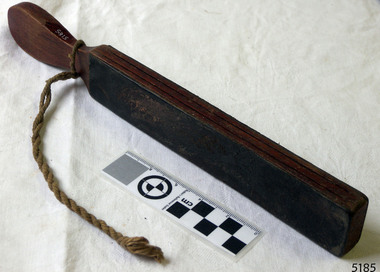 Flagstaff Hill Maritime Museum and Village
Paddle Strop
This razor strop is called a paddle strop. ABOUT STROPS Straight razors and cut throat razors were the major tools for shaving before the safety razor was invented in the 1880’s and even today specialty shaving shops still sell the straight razors. Along with the razor, the process of shaving would commonly involve lathering up shaving soap using a shaving brush with boar bristles. Men could own several razors and rotate them through the week and some shops sold the razors in a set, a razor for each day of the week. Straight razors could require stropping more than once during the shaving of a heavy beard, and stropping would also be performed at the end of each shave. Honing would only be performed two or three times a year, preserving the blade’s edge. A lot of skill was needed to hone and strop the blades of these early razors and the methods to do so were a large part of the curriculum in Barber colleges. The razor would be sharpened on a grinding wheel then honed on sharpening stone and finally finished using a strop. Straight edge razors would usually be sold unfinished and that process would be completed by the customer. A razor strop, usually made from leather, thick canvas or light timber, would be used to straighten and polish the straight razor for shaving. Strops could also be used to polish other blades such as knives, small metal tools and chisels. Sometimes an abrasive polishing compound is also used to give a mirror finish. Some strops, such as this one in our Collection, are designed to be used while hanging from a nail or peg, while others are hand held. To use the strop draw the spine of the blade down along the strop with the blade following, without putting any pressure on the blade. At the end of the stroke, rotate the blade over its spine then draw the spine along the strop again so that the edge moves away from the top. The finer grade of leather strap is used to give the final finish. Wooden strop, paddle strop design (sometimes called razor strop). Has leather attached to one side. Has two slits in body of strop. flagstaff hill, warrnambool, shipwrecked-coast, flagstaff-hill, flagstaff-hill-maritime-museum, maritime-museum, shipwreck-coast, flagstaff-hill-maritime-village, strop, paddle strop, personal effects, shaving equipment, razor strop, barber's equipment -
 Flagstaff Hill Maritime Museum and Village
Paddle Strop
This razor strop is called a paddle strop. ABOUT STROPS Straight razors and cut throat razors were the major tools for shaving before the safety razor was invented in the 1880’s and even today specialty shaving shops still sell the straight razors. Along with the razor, the process of shaving would commonly involve lathering up shaving soap using a shaving brush with boar bristles. Men could own several razors and rotate them through the week and some shops sold the razors in a set, a razor for each day of the week. Straight razors could require stropping more than once during the shaving of a heavy beard, and stropping would also be performed at the end of each shave. Honing would only be performed two or three times a year, preserving the blade’s edge. A lot of skill was needed to hone and strop the blades of these early razors and the methods to do so were a large part of the curriculum in Barber colleges. The razor would be sharpened on a grinding wheel then honed on sharpening stone and finally finished using a strop. Straight edge razors would usually be sold unfinished and that process would be completed by the customer. A razor strop, usually made from leather, thick canvas or light timber, would be used to straighten and polish the straight razor for shaving. Strops could also be used to polish other blades such as knives, small metal tools and chisels. Sometimes an abrasive polishing compound is also used to give a mirror finish. Some strops, such as this one in our Collection, are designed to be used while hanging from a nail or peg, while others are hand held. To use the strop draw the spine of the blade down along the strop with the blade following, without putting any pressure on the blade. At the end of the stroke, rotate the blade over its spine then draw the spine along the strop again so that the edge moves away from the top. The finer grade of leather strap is used to give the final finish. Wooden strop, paddle strop design (sometimes called razor strop). Has leather attached to one side. Sides are numbered 1 and 2. Has two slits in body of strop. Stamped Hamon Paris France. "Hamon Paris France. "flagstaff hill, warrnambool, shipwrecked-coast, flagstaff-hill, flagstaff-hill-maritime-museum, maritime-museum, shipwreck-coast, flagstaff-hill-maritime-village, paddle strop, strop, shaving equipment, personal effects, barber's equipment, personal grooming accessory