Showing 70 items
matching hour glass
-
 Flagstaff Hill Maritime Museum and Village
Tool - Torch, 1935-1960
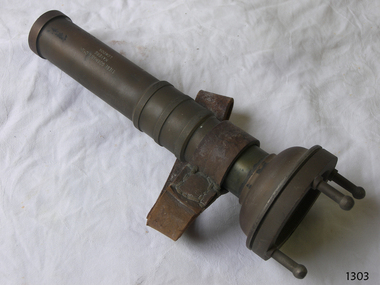
Diver's Submarine Electric Torches were first developed to give illumination for close examination work. They have to be self-contained, the older ones are powered by an accumulator type battery which could be recharged. Some models were fitted with a switch to turn the light off saving on the battery power. The lens is of a convex type and magnifies the light. Sometimes there was a protective grill across the glass or prongs to protect the glass from an impact. When fully charged the battery would last about seven hours. Torches are made from non-ferrous metal so as not to corrode in their watery environment. Siebe Gorman & Co Ltd has been producing hand-held, battery-powered, submarine electric torches for divers and the Ministry of Defence (MOD) since the 1920s. In 1961, the famous diving manufacturer C.E. Heinke merged with Siebe Gorman, and for a short while, torches were made with the combined 'Siebe Heinke' inscription. However, this linked inscription was later dropped, with a return to the Siebe Gorman name tag. Date of manufacture for these torches can be determined by their Admiralty Pattern (AP) number that was used to identify a particular item and were for naval stores use. Before NATO stock coding became more widely used, earlier MOD torches often have a simple four-digit group of AP numbers such as AP4456 or AP4458. In 1975 Siebe Gorman moved from their Neptune Works at Chessington in Surrey to a new location at Cwmbran in Wales and by this time their manufacture of diving equipment had declined. (For additional historic company information on Siebe & Gorman see notes section this document.)The item is significant as it gives us a snapshot into marine history and the development of diving equipment generally, especially that used for salvage operations before and during WW2. The company that made the torch Siebe Gorman was a leading inventor, developer and innovator of marine equipment with its early developments in helmets, compressors and other diving equipment. Items that are today eagerly sought after for maritime collections around the world. The items that have been donated to the Flagstaff Hill collection give us an insight as to how divers operated and the dangers they faced doing a very necessary and dangerous job.Divers torch, brass with glass lens , screw on piece with three lugs attached. Leather wrist strap attached & loose contact spring inside."Siebe Gorman and Co Ltd, Makers, London." Has A.P.4456 stamped on front faceflagstaff hill, warrnambool, shipwrecked-coast, flagstaff-hill, flagstaff-hill-maritime-museum, maritime-museum, shipwreck-coast, flagstaff-hill-maritime-village -
 Flagstaff Hill Maritime Museum and Village
Domestic object - Plate
The Process of Making Pottery Decorating, Firing, Glazing, Making, Technical There is a rhythm and flow to clay. It can’t be done all at once! Even the making process! It can take weeks to get everything done, especially if you can only work on your pottery once a week! Even though we have three hour classes, it’s often just not enough time! Here is an overview of some of the processes so you have a bit more grasp on some of the technical stuff! Step One – Design There are SO many ideas out there for making stuff in clay! From delicate porcelain jewellery, through to heavy sculptural work and everything in between. Deciding your direction is sometimes not that easy – when you first start, try everything, you will naturally gravitate to the style that you enjoy! The options and variations are endless and can get a wee bit overwhelming too! Check in with me before you start to ensure your ideas will work, what order you might do things, how you could achieve the look you are seeking and any other technical data required! Step Two – Making Clay is thixotropic. This means that as you work with it, the clay first gets sloppier and wetter, before is begins to dry in the atmosphere. For most things, you simply can’t do all parts of the project at once. An example of work order might look like: Get last weeks work out from the shelves Prepare clay for today’s work – roll your clay, prepare balls for throwing, make the first stage of a pinch pot) Clean up last week’s work and put it on the shelf for bisque firing Check that you have any glazing to do – and do enough of it that you will have time to finish your main project Do the next step of your next project – there might be a further step that can’t be complete immediately, in that case, wrap your work well and put onto the shelves. Letting your work rest for a while can really help keep your work clean and professional looking. Many things require bagging under plastic to keep it ready for work the next week – put your name on the outside of the bag so you can find your work easily. We have stickers and markers. Consider how you want to decorate your work – coloured slip can be applied at a fairly wet stage (remembering that it will make your work even wetter!). Trying to apply slip to dry clay won’t work! If you want to do sgraffito – you will need to keep the work leather hard (a state of dryness where you can still work the clay with a little effort and a little water and care). Step Three – Drying Most of the time your work can go into the rack uncovered to let it dry out for the following week. If you want to continue forming or shaping you will need to double bag your work – put your work on a suitable sized bat and put the bat in a bag so the base of the bag is under the bat, then put another bag over the top of the work and tuck the top of the bag under the bat. If you want to trim (or turn) your thrown work the following week, it should also be double bagged. If your work is large, delicate, or of uneven thicknesses, you should lightly cover your work for drying. When considering the drying process, bare in mind the weather, humidity and wind! The hotter and dryer, the faster things dry and work can dry unevenly in the shelves – this can lead to cracking – another time to lightly cover your work for drying. Step Four – Trimming and Cleaning Up Your work is dry! It is called greenware now and it is at it’s most fragile! Handle everything with two hands. I often refer to soft hands – keep everything gentle and with your fingers spread as much as possible. Try to not pick up things like plates too much, and always with both hands! Before your work can be bisque fired it should be “cleaned up”. You work won’t go into the kiln if it has sharp edges – when glazed, sharp edges turn into razor blades! Use a piece of fly wire to rub the work all over – this will scratch a little so be light handed. Use a knife or metal kidney to scrape any areas that require a bit more dynamic treatment than the fly wire offers! Finally, a very light wipe over with a slightly damp sponge can help soften and soothe all of your edges and dags! Trimming thrown work: If you are planning to trim (or turn) your thrown work (and you should be), make sure you bag it well – your work should be leather hard to almost dry for easiest trimming. Use this step to finish the work completely – use a metal kidney to polish the surface, or a slightly damp sponge to give a freshly thrown look. Wipe the sponge around the rim after trimming, and check the inside of the pot for dags! Trimming slip cast work: Usually I will trim the rims of your work on the wheel the following day to make that stage easier, however you will still need to check your work for lumps and bumps. Last but not least – check that your name is still clearly on the bottom of your work. Step Five – Bisque Firing When the work is completely dry it can go into the bisque kiln. The bisque kiln is fired to 1000°C. This process burns off the water in the clay as well as some of the chemically bound water. The structure of the clay is not altered that much at this temperature. Inside the bisque kiln, the work is stacked a little, small bowl inside a larger bowl and onto a heavy plate. Smaller items like decorations or drink coasters might get stacked several high. Consideration is paid to the weight of the stack and shape of the work. A bisque kiln can fire about one and a half times the amount of work that the glaze kiln can fire. The firing takes about 10 hours to complete the cycle and about two days to cool down. Once it has been emptied the work is placed in the glaze room ready for you to decorate! Step Six – Glazing Decorating your work with colour can be a lot of fun – and time consuming! There are three main options for surface treatment at this stage: Oxide Washes Underglazes Glazes Washes and underglazes do not “glaze” the work – It will still need a layer of glaze to fully seal the clay (washes don’t need glaze on surfaces not designed for food or liquid as they can gloss up a little on their own). Underglazes are stable colourants that turn out pretty much how they look in the jar. They can be mixed with each other to form other colours and can be used like water colours to paint onto your work. Mostly they should have a clear glaze on top to seal them. Oxides are a different species – the pink oxide (cobalt) wash turns out bright blue for instance. They don’t always need a glaze on top, and some glazes can change the colour of the wash! The glazes need no other “glaze” on top! Be careful of unknown glaze interactions – you can put any combination of glaze in a bowl or on a plate, but only a single glaze on the outside of any vertical surface! Glazes are a chemical reaction under heat. We don’t know the exact chemicals in the Mayco glazes we use. I can guess by the way they interact with each other, however, on the whole, you need to test every idea you have, and not run the test on a vertical surface! Simply put, glaze is a layer of glass like substance that bonds with the clay underneath. Clay is made of silica, alumina and water. Glaze is made of mostly silica. Silica has a melting point of 1700°C and we fire to 1240°C. The silica requires a “flux” to help it melt at the lower temperature. Fluxes can be all sorts of chemicals – a common one is calcium – calcium has a melting point of 2500°C, however, together they both melt at a much lower temperature! Colourants are metal oxides like cobalt (blue), chrome (green through black), copper (green, blue, even red!), manganese (black, purple and pink) iron (red brown), etc. Different chemicals in the glaze can have dramatic effects. for example, barium carbonate (which we don’t use) turns manganese bright pink! Other elements can turn manganese dioxide brown, blue, purple and reddish brown. Manganese dioxide is a flux in and of itself as well. So, glazes that get their black and purple colours, often interact with other glazes and RUN! Our mirror black is a good example – it mixes really well with many glazes because it fluxes them – causes them to melt faster. It will also bring out many beautiful colours in the glazes because it’s black colouring most definitely comes from manganese dioxide! Glaze chemistry is a whole subject on it’s own! We use commercial Mayco glazes on purpose – for their huge range of colour possibilities, stability, cool interactions, artistic freedom with the ability to easily brush the glazes on and ease of use. We currently have almost 50 glazes on hand! A major project is to test the interactions of all glazes with each other. That is 2,500 test tiles!!!! I’m going to make the wall behind the wheels the feature wall of pretty colours! Step Seven – Glaze (Gloss or sometimes called “Glost”) Firing Most of the time this is the final stage of making your creation (but not always!) The glaze kiln goes to 1240°C. This is called cone 6, or midrange. It is the low end of stoneware temperatures. Stoneware clays and glazes are typically fired at cone 8 – 10, that is 1260 – 1290°C. The energy requirement to go from 1240°C to 1280°C is almost a 30% more! Our clay is formulated to vitrify (mature, turn “glass-like”) at 1240°, as are our glazes. A glaze kiln take around 12 hours to reach temperature and two to three days to cool down. Sometimes a third firing process is required – this is for decoration that is added to work after the glaze firing. For example – adding precious metals and lustres. this firing temperature is usually around 600 – 800°C depending upon the techniques being used. There are many students interested in gold and silver trims – we will be doing this third type of firing soon! After firing your work will be in the student finished work shelves. Remember to pay for it before you head out the door! There is a small extra charge for using porcelain clay (it’s more than twice the price of regular clay), and for any third firing process! Once your work has been fired it can not turn back into clay for millennia – so don’t fire it if you don’t like it! Put it in the bucket for recycling. https://firebirdstudios.com.au/the-process-of-making-pottery/Ceramics have evolved over thousands of years.White earthenware dinner plate. Crazing evident all over.Backstamped ‘Made in England S LTD’flagstaff hill, warrnambool, shipwrecked-coast, flagstaff-hill, flagstaff-hill-maritime-museum, maritime-museum, shipwreck-coast, flagstaff-hill-maritime-village, ceramics, tableware -
 Flagstaff Hill Maritime Museum and Village
Domestic object - Plate, Johnson Bros
The Process of Making Pottery Decorating, Firing, Glazing, Making, Technical There is a rhythm and flow to clay. It can’t be done all at once! Even the making process! It can take weeks to get everything done, especially if you can only work on your pottery once a week! Even though we have three hour classes, it’s often just not enough time! Here is an overview of some of the processes so you have a bit more grasp on some of the technical stuff! Step One – Design There are SO many ideas out there for making stuff in clay! From delicate porcelain jewellery, through to heavy sculptural work and everything in between. Deciding your direction is sometimes not that easy – when you first start, try everything, you will naturally gravitate to the style that you enjoy! The options and variations are endless and can get a wee bit overwhelming too! Check in with me before you start to ensure your ideas will work, what order you might do things, how you could achieve the look you are seeking and any other technical data required! Step Two – Making Clay is thixotropic. This means that as you work with it, the clay first gets sloppier and wetter, before is begins to dry in the atmosphere. For most things, you simply can’t do all parts of the project at once. An example of work order might look like: Get last weeks work out from the shelves Prepare clay for today’s work – roll your clay, prepare balls for throwing, make the first stage of a pinch pot) Clean up last week’s work and put it on the shelf for bisque firing Check that you have any glazing to do – and do enough of it that you will have time to finish your main project Do the next step of your next project – there might be a further step that can’t be complete immediately, in that case, wrap your work well and put onto the shelves. Letting your work rest for a while can really help keep your work clean and professional looking. Many things require bagging under plastic to keep it ready for work the next week – put your name on the outside of the bag so you can find your work easily. We have stickers and markers. Consider how you want to decorate your work – coloured slip can be applied at a fairly wet stage (remembering that it will make your work even wetter!). Trying to apply slip to dry clay won’t work! If you want to do sgraffito – you will need to keep the work leather hard (a state of dryness where you can still work the clay with a little effort and a little water and care). Step Three – Drying Most of the time your work can go into the rack uncovered to let it dry out for the following week. If you want to continue forming or shaping you will need to double bag your work – put your work on a suitable sized bat and put the bat in a bag so the base of the bag is under the bat, then put another bag over the top of the work and tuck the top of the bag under the bat. If you want to trim (or turn) your thrown work the following week, it should also be double bagged. If your work is large, delicate, or of uneven thicknesses, you should lightly cover your work for drying. When considering the drying process, bare in mind the weather, humidity and wind! The hotter and dryer, the faster things dry and work can dry unevenly in the shelves – this can lead to cracking – another time to lightly cover your work for drying. Step Four – Trimming and Cleaning Up Your work is dry! It is called greenware now and it is at it’s most fragile! Handle everything with two hands. I often refer to soft hands – keep everything gentle and with your fingers spread as much as possible. Try to not pick up things like plates too much, and always with both hands! Before your work can be bisque fired it should be “cleaned up”. You work won’t go into the kiln if it has sharp edges – when glazed, sharp edges turn into razor blades! Use a piece of fly wire to rub the work all over – this will scratch a little so be light handed. Use a knife or metal kidney to scrape any areas that require a bit more dynamic treatment than the fly wire offers! Finally, a very light wipe over with a slightly damp sponge can help soften and soothe all of your edges and dags! Trimming thrown work: If you are planning to trim (or turn) your thrown work (and you should be), make sure you bag it well – your work should be leather hard to almost dry for easiest trimming. Use this step to finish the work completely – use a metal kidney to polish the surface, or a slightly damp sponge to give a freshly thrown look. Wipe the sponge around the rim after trimming, and check the inside of the pot for dags! Trimming slip cast work: Usually I will trim the rims of your work on the wheel the following day to make that stage easier, however you will still need to check your work for lumps and bumps. Last but not least – check that your name is still clearly on the bottom of your work. Step Five – Bisque Firing When the work is completely dry it can go into the bisque kiln. The bisque kiln is fired to 1000°C. This process burns off the water in the clay as well as some of the chemically bound water. The structure of the clay is not altered that much at this temperature. Inside the bisque kiln, the work is stacked a little, small bowl inside a larger bowl and onto a heavy plate. Smaller items like decorations or drink coasters might get stacked several high. Consideration is paid to the weight of the stack and shape of the work. A bisque kiln can fire about one and a half times the amount of work that the glaze kiln can fire. The firing takes about 10 hours to complete the cycle and about two days to cool down. Once it has been emptied the work is placed in the glaze room ready for you to decorate! Step Six – Glazing Decorating your work with colour can be a lot of fun – and time consuming! There are three main options for surface treatment at this stage: Oxide Washes Underglazes Glazes Washes and underglazes do not “glaze” the work – It will still need a layer of glaze to fully seal the clay (washes don’t need glaze on surfaces not designed for food or liquid as they can gloss up a little on their own). Underglazes are stable colourants that turn out pretty much how they look in the jar. They can be mixed with each other to form other colours and can be used like water colours to paint onto your work. Mostly they should have a clear glaze on top to seal them. Oxides are a different species – the pink oxide (cobalt) wash turns out bright blue for instance. They don’t always need a glaze on top, and some glazes can change the colour of the wash! The glazes need no other “glaze” on top! Be careful of unknown glaze interactions – you can put any combination of glaze in a bowl or on a plate, but only a single glaze on the outside of any vertical surface! Glazes are a chemical reaction under heat. We don’t know the exact chemicals in the Mayco glazes we use. I can guess by the way they interact with each other, however, on the whole, you need to test every idea you have, and not run the test on a vertical surface! Simply put, glaze is a layer of glass like substance that bonds with the clay underneath. Clay is made of silica, alumina and water. Glaze is made of mostly silica. Silica has a melting point of 1700°C and we fire to 1240°C. The silica requires a “flux” to help it melt at the lower temperature. Fluxes can be all sorts of chemicals – a common one is calcium – calcium has a melting point of 2500°C, however, together they both melt at a much lower temperature! Colourants are metal oxides like cobalt (blue), chrome (green through black), copper (green, blue, even red!), manganese (black, purple and pink) iron (red brown), etc. Different chemicals in the glaze can have dramatic effects. for example, barium carbonate (which we don’t use) turns manganese bright pink! Other elements can turn manganese dioxide brown, blue, purple and reddish brown. Manganese dioxide is a flux in and of itself as well. So, glazes that get their black and purple colours, often interact with other glazes and RUN! Our mirror black is a good example – it mixes really well with many glazes because it fluxes them – causes them to melt faster. It will also bring out many beautiful colours in the glazes because it’s black colouring most definitely comes from manganese dioxide! Glaze chemistry is a whole subject on it’s own! We use commercial Mayco glazes on purpose – for their huge range of colour possibilities, stability, cool interactions, artistic freedom with the ability to easily brush the glazes on and ease of use. We currently have almost 50 glazes on hand! A major project is to test the interactions of all glazes with each other. That is 2,500 test tiles!!!! I’m going to make the wall behind the wheels the feature wall of pretty colours! Step Seven – Glaze (Gloss or sometimes called “Glost”) Firing Most of the time this is the final stage of making your creation (but not always!) The glaze kiln goes to 1240°C. This is called cone 6, or midrange. It is the low end of stoneware temperatures. Stoneware clays and glazes are typically fired at cone 8 – 10, that is 1260 – 1290°C. The energy requirement to go from 1240°C to 1280°C is almost a 30% more! Our clay is formulated to vitrify (mature, turn “glass-like”) at 1240°, as are our glazes. A glaze kiln take around 12 hours to reach temperature and two to three days to cool down. Sometimes a third firing process is required – this is for decoration that is added to work after the glaze firing. For example – adding precious metals and lustres. this firing temperature is usually around 600 – 800°C depending upon the techniques being used. There are many students interested in gold and silver trims – we will be doing this third type of firing soon! After firing your work will be in the student finished work shelves. Remember to pay for it before you head out the door! There is a small extra charge for using porcelain clay (it’s more than twice the price of regular clay), and for any third firing process! Once your work has been fired it can not turn back into clay for millennia – so don’t fire it if you don’t like it! Put it in the bucket for recycling. https://firebirdstudios.com.au/the-process-of-making-pottery/Ceramics have evolved over thousands of years.A white earthenware side plate with a gadroon edge. Has water marks and chips on front.‘Johnson Bros England Reg No 15587’flagstaff hill, warrnambool, shipwrecked-coast, flagstaff-hill, flagstaff-hill-maritime-museum, maritime-museum, shipwreck-coast, flagstaff-hill-maritime-village, johnson bros, ceramics, tableware -
 Flagstaff Hill Maritime Museum and Village
Domestic object - Plate, Alfred Meakin
The Process of Making Pottery Decorating, Firing, Glazing, Making, Technical There is a rhythm and flow to clay. It can’t be done all at once! Even the making process! It can take weeks to get everything done, especially if you can only work on your pottery once a week! Even though we have three hour classes, it’s often just not enough time! Here is an overview of some of the processes so you have a bit more grasp on some of the technical stuff! Step One – Design There are SO many ideas out there for making stuff in clay! From delicate porcelain jewellery, through to heavy sculptural work and everything in between. Deciding your direction is sometimes not that easy – when you first start, try everything, you will naturally gravitate to the style that you enjoy! The options and variations are endless and can get a wee bit overwhelming too! Check in with me before you start to ensure your ideas will work, what order you might do things, how you could achieve the look you are seeking and any other technical data required! Step Two – Making Clay is thixotropic. This means that as you work with it, the clay first gets sloppier and wetter, before is begins to dry in the atmosphere. For most things, you simply can’t do all parts of the project at once. An example of work order might look like: Get last weeks work out from the shelves Prepare clay for today’s work – roll your clay, prepare balls for throwing, make the first stage of a pinch pot) Clean up last week’s work and put it on the shelf for bisque firing Check that you have any glazing to do – and do enough of it that you will have time to finish your main project Do the next step of your next project – there might be a further step that can’t be complete immediately, in that case, wrap your work well and put onto the shelves. Letting your work rest for a while can really help keep your work clean and professional looking. Many things require bagging under plastic to keep it ready for work the next week – put your name on the outside of the bag so you can find your work easily. We have stickers and markers. Consider how you want to decorate your work – coloured slip can be applied at a fairly wet stage (remembering that it will make your work even wetter!). Trying to apply slip to dry clay won’t work! If you want to do sgraffito – you will need to keep the work leather hard (a state of dryness where you can still work the clay with a little effort and a little water and care). Step Three – Drying Most of the time your work can go into the rack uncovered to let it dry out for the following week. If you want to continue forming or shaping you will need to double bag your work – put your work on a suitable sized bat and put the bat in a bag so the base of the bag is under the bat, then put another bag over the top of the work and tuck the top of the bag under the bat. If you want to trim (or turn) your thrown work the following week, it should also be double bagged. If your work is large, delicate, or of uneven thicknesses, you should lightly cover your work for drying. When considering the drying process, bare in mind the weather, humidity and wind! The hotter and dryer, the faster things dry and work can dry unevenly in the shelves – this can lead to cracking – another time to lightly cover your work for drying. Step Four – Trimming and Cleaning Up Your work is dry! It is called greenware now and it is at it’s most fragile! Handle everything with two hands. I often refer to soft hands – keep everything gentle and with your fingers spread as much as possible. Try to not pick up things like plates too much, and always with both hands! Before your work can be bisque fired it should be “cleaned up”. You work won’t go into the kiln if it has sharp edges – when glazed, sharp edges turn into razor blades! Use a piece of fly wire to rub the work all over – this will scratch a little so be light handed. Use a knife or metal kidney to scrape any areas that require a bit more dynamic treatment than the fly wire offers! Finally, a very light wipe over with a slightly damp sponge can help soften and soothe all of your edges and dags! Trimming thrown work: If you are planning to trim (or turn) your thrown work (and you should be), make sure you bag it well – your work should be leather hard to almost dry for easiest trimming. Use this step to finish the work completely – use a metal kidney to polish the surface, or a slightly damp sponge to give a freshly thrown look. Wipe the sponge around the rim after trimming, and check the inside of the pot for dags! Trimming slip cast work: Usually I will trim the rims of your work on the wheel the following day to make that stage easier, however you will still need to check your work for lumps and bumps. Last but not least – check that your name is still clearly on the bottom of your work. Step Five – Bisque Firing When the work is completely dry it can go into the bisque kiln. The bisque kiln is fired to 1000°C. This process burns off the water in the clay as well as some of the chemically bound water. The structure of the clay is not altered that much at this temperature. Inside the bisque kiln, the work is stacked a little, small bowl inside a larger bowl and onto a heavy plate. Smaller items like decorations or drink coasters might get stacked several high. Consideration is paid to the weight of the stack and shape of the work. A bisque kiln can fire about one and a half times the amount of work that the glaze kiln can fire. The firing takes about 10 hours to complete the cycle and about two days to cool down. Once it has been emptied the work is placed in the glaze room ready for you to decorate! Step Six – Glazing Decorating your work with colour can be a lot of fun – and time consuming! There are three main options for surface treatment at this stage: Oxide Washes Underglazes Glazes Washes and underglazes do not “glaze” the work – It will still need a layer of glaze to fully seal the clay (washes don’t need glaze on surfaces not designed for food or liquid as they can gloss up a little on their own). Underglazes are stable colourants that turn out pretty much how they look in the jar. They can be mixed with each other to form other colours and can be used like water colours to paint onto your work. Mostly they should have a clear glaze on top to seal them. Oxides are a different species – the pink oxide (cobalt) wash turns out bright blue for instance. They don’t always need a glaze on top, and some glazes can change the colour of the wash! The glazes need no other “glaze” on top! Be careful of unknown glaze interactions – you can put any combination of glaze in a bowl or on a plate, but only a single glaze on the outside of any vertical surface! Glazes are a chemical reaction under heat. We don’t know the exact chemicals in the Mayco glazes we use. I can guess by the way they interact with each other, however, on the whole, you need to test every idea you have, and not run the test on a vertical surface! Simply put, glaze is a layer of glass like substance that bonds with the clay underneath. Clay is made of silica, alumina and water. Glaze is made of mostly silica. Silica has a melting point of 1700°C and we fire to 1240°C. The silica requires a “flux” to help it melt at the lower temperature. Fluxes can be all sorts of chemicals – a common one is calcium – calcium has a melting point of 2500°C, however, together they both melt at a much lower temperature! Colourants are metal oxides like cobalt (blue), chrome (green through black), copper (green, blue, even red!), manganese (black, purple and pink) iron (red brown), etc. Different chemicals in the glaze can have dramatic effects. for example, barium carbonate (which we don’t use) turns manganese bright pink! Other elements can turn manganese dioxide brown, blue, purple and reddish brown. Manganese dioxide is a flux in and of itself as well. So, glazes that get their black and purple colours, often interact with other glazes and RUN! Our mirror black is a good example – it mixes really well with many glazes because it fluxes them – causes them to melt faster. It will also bring out many beautiful colours in the glazes because it’s black colouring most definitely comes from manganese dioxide! Glaze chemistry is a whole subject on it’s own! We use commercial Mayco glazes on purpose – for their huge range of colour possibilities, stability, cool interactions, artistic freedom with the ability to easily brush the glazes on and ease of use. We currently have almost 50 glazes on hand! A major project is to test the interactions of all glazes with each other. That is 2,500 test tiles!!!! I’m going to make the wall behind the wheels the feature wall of pretty colours! Step Seven – Glaze (Gloss or sometimes called “Glost”) Firing Most of the time this is the final stage of making your creation (but not always!) The glaze kiln goes to 1240°C. This is called cone 6, or midrange. It is the low end of stoneware temperatures. Stoneware clays and glazes are typically fired at cone 8 – 10, that is 1260 – 1290°C. The energy requirement to go from 1240°C to 1280°C is almost a 30% more! Our clay is formulated to vitrify (mature, turn “glass-like”) at 1240°, as are our glazes. A glaze kiln take around 12 hours to reach temperature and two to three days to cool down. Sometimes a third firing process is required – this is for decoration that is added to work after the glaze firing. For example – adding precious metals and lustres. this firing temperature is usually around 600 – 800°C depending upon the techniques being used. There are many students interested in gold and silver trims – we will be doing this third type of firing soon! After firing your work will be in the student finished work shelves. Remember to pay for it before you head out the door! There is a small extra charge for using porcelain clay (it’s more than twice the price of regular clay), and for any third firing process! Once your work has been fired it can not turn back into clay for millennia – so don’t fire it if you don’t like it! Put it in the bucket for recycling. https://firebirdstudios.com.au/the-process-of-making-pottery/Ceramics have evolved over thousands of years.Earthenware dessert plate, cream colour. Made by Alfred Meakin, England. Backstamped ‘Alfred Meakin England’. flagstaff hill, warrnambool, shipwrecked-coast, flagstaff-hill, flagstaff-hill-maritime-museum, maritime-museum, shipwreck-coast, flagstaff-hill-maritime-village, alfred meakin, ceramics, earthenware, kitchenware -
 Flagstaff Hill Maritime Museum and Village
Domestic object - Jug
The Process of Making Pottery Decorating, Firing, Glazing, Making, Technical There is a rhythm and flow to clay. It can’t be done all at once! Even the making process! It can take weeks to get everything done, especially if you can only work on your pottery once a week! Even though we have three hour classes, it’s often just not enough time! Here is an overview of some of the processes so you have a bit more grasp on some of the technical stuff! Step One – Design There are SO many ideas out there for making stuff in clay! From delicate porcelain jewellery, through to heavy sculptural work and everything in between. Deciding your direction is sometimes not that easy – when you first start, try everything, you will naturally gravitate to the style that you enjoy! The options and variations are endless and can get a wee bit overwhelming too! Check in with me before you start to ensure your ideas will work, what order you might do things, how you could achieve the look you are seeking and any other technical data required! Step Two – Making Clay is thixotropic. This means that as you work with it, the clay first gets sloppier and wetter, before is begins to dry in the atmosphere. For most things, you simply can’t do all parts of the project at once. An example of work order might look like: Get last weeks work out from the shelves Prepare clay for today’s work – roll your clay, prepare balls for throwing, make the first stage of a pinch pot) Clean up last week’s work and put it on the shelf for bisque firing Check that you have any glazing to do – and do enough of it that you will have time to finish your main project Do the next step of your next project – there might be a further step that can’t be complete immediately, in that case, wrap your work well and put onto the shelves. Letting your work rest for a while can really help keep your work clean and professional looking. Many things require bagging under plastic to keep it ready for work the next week – put your name on the outside of the bag so you can find your work easily. We have stickers and markers. Consider how you want to decorate your work – coloured slip can be applied at a fairly wet stage (remembering that it will make your work even wetter!). Trying to apply slip to dry clay won’t work! If you want to do sgraffito – you will need to keep the work leather hard (a state of dryness where you can still work the clay with a little effort and a little water and care). Step Three – Drying Most of the time your work can go into the rack uncovered to let it dry out for the following week. If you want to continue forming or shaping you will need to double bag your work – put your work on a suitable sized bat and put the bat in a bag so the base of the bag is under the bat, then put another bag over the top of the work and tuck the top of the bag under the bat. If you want to trim (or turn) your thrown work the following week, it should also be double bagged. If your work is large, delicate, or of uneven thicknesses, you should lightly cover your work for drying. When considering the drying process, bare in mind the weather, humidity and wind! The hotter and dryer, the faster things dry and work can dry unevenly in the shelves – this can lead to cracking – another time to lightly cover your work for drying. Step Four – Trimming and Cleaning Up Your work is dry! It is called greenware now and it is at it’s most fragile! Handle everything with two hands. I often refer to soft hands – keep everything gentle and with your fingers spread as much as possible. Try to not pick up things like plates too much, and always with both hands! Before your work can be bisque fired it should be “cleaned up”. You work won’t go into the kiln if it has sharp edges – when glazed, sharp edges turn into razor blades! Use a piece of fly wire to rub the work all over – this will scratch a little so be light handed. Use a knife or metal kidney to scrape any areas that require a bit more dynamic treatment than the fly wire offers! Finally, a very light wipe over with a slightly damp sponge can help soften and soothe all of your edges and dags! Trimming thrown work: If you are planning to trim (or turn) your thrown work (and you should be), make sure you bag it well – your work should be leather hard to almost dry for easiest trimming. Use this step to finish the work completely – use a metal kidney to polish the surface, or a slightly damp sponge to give a freshly thrown look. Wipe the sponge around the rim after trimming, and check the inside of the pot for dags! Trimming slip cast work: Usually I will trim the rims of your work on the wheel the following day to make that stage easier, however you will still need to check your work for lumps and bumps. Last but not least – check that your name is still clearly on the bottom of your work. Step Five – Bisque Firing When the work is completely dry it can go into the bisque kiln. The bisque kiln is fired to 1000°C. This process burns off the water in the clay as well as some of the chemically bound water. The structure of the clay is not altered that much at this temperature. Inside the bisque kiln, the work is stacked a little, small bowl inside a larger bowl and onto a heavy plate. Smaller items like decorations or drink coasters might get stacked several high. Consideration is paid to the weight of the stack and shape of the work. A bisque kiln can fire about one and a half times the amount of work that the glaze kiln can fire. The firing takes about 10 hours to complete the cycle and about two days to cool down. Once it has been emptied the work is placed in the glaze room ready for you to decorate! Step Six – Glazing Decorating your work with colour can be a lot of fun – and time consuming! There are three main options for surface treatment at this stage: Oxide Washes Underglazes Glazes Washes and underglazes do not “glaze” the work – It will still need a layer of glaze to fully seal the clay (washes don’t need glaze on surfaces not designed for food or liquid as they can gloss up a little on their own). Underglazes are stable colourants that turn out pretty much how they look in the jar. They can be mixed with each other to form other colours and can be used like water colours to paint onto your work. Mostly they should have a clear glaze on top to seal them. Oxides are a different species – the pink oxide (cobalt) wash turns out bright blue for instance. They don’t always need a glaze on top, and some glazes can change the colour of the wash! The glazes need no other “glaze” on top! Be careful of unknown glaze interactions – you can put any combination of glaze in a bowl or on a plate, but only a single glaze on the outside of any vertical surface! Glazes are a chemical reaction under heat. We don’t know the exact chemicals in the Mayco glazes we use. I can guess by the way they interact with each other, however, on the whole, you need to test every idea you have, and not run the test on a vertical surface! Simply put, glaze is a layer of glass like substance that bonds with the clay underneath. Clay is made of silica, alumina and water. Glaze is made of mostly silica. Silica has a melting point of 1700°C and we fire to 1240°C. The silica requires a “flux” to help it melt at the lower temperature. Fluxes can be all sorts of chemicals – a common one is calcium – calcium has a melting point of 2500°C, however, together they both melt at a much lower temperature! Colourants are metal oxides like cobalt (blue), chrome (green through black), copper (green, blue, even red!), manganese (black, purple and pink) iron (red brown), etc. Different chemicals in the glaze can have dramatic effects. for example, barium carbonate (which we don’t use) turns manganese bright pink! Other elements can turn manganese dioxide brown, blue, purple and reddish brown. Manganese dioxide is a flux in and of itself as well. So, glazes that get their black and purple colours, often interact with other glazes and RUN! Our mirror black is a good example – it mixes really well with many glazes because it fluxes them – causes them to melt faster. It will also bring out many beautiful colours in the glazes because it’s black colouring most definitely comes from manganese dioxide! Glaze chemistry is a whole subject on it’s own! We use commercial Mayco glazes on purpose – for their huge range of colour possibilities, stability, cool interactions, artistic freedom with the ability to easily brush the glazes on and ease of use. We currently have almost 50 glazes on hand! A major project is to test the interactions of all glazes with each other. That is 2,500 test tiles!!!! I’m going to make the wall behind the wheels the feature wall of pretty colours! Step Seven – Glaze (Gloss or sometimes called “Glost”) Firing Most of the time this is the final stage of making your creation (but not always!) The glaze kiln goes to 1240°C. This is called cone 6, or midrange. It is the low end of stoneware temperatures. Stoneware clays and glazes are typically fired at cone 8 – 10, that is 1260 – 1290°C. The energy requirement to go from 1240°C to 1280°C is almost a 30% more! Our clay is formulated to vitrify (mature, turn “glass-like”) at 1240°, as are our glazes. A glaze kiln take around 12 hours to reach temperature and two to three days to cool down. Sometimes a third firing process is required – this is for decoration that is added to work after the glaze firing. For example – adding precious metals and lustres. this firing temperature is usually around 600 – 800°C depending upon the techniques being used. There are many students interested in gold and silver trims – we will be doing this third type of firing soon! After firing your work will be in the student finished work shelves. Remember to pay for it before you head out the door! There is a small extra charge for using porcelain clay (it’s more than twice the price of regular clay), and for any third firing process! Once your work has been fired it can not turn back into clay for millennia – so don’t fire it if you don’t like it! Put it in the bucket for recycling. https://firebirdstudios.com.au/the-process-of-making-pottery/The form of the jug has been in use for many centuries.Stoneware jug. Two tone brown glaze with pierced lip behind spout. Spout chipped.None.flagstaff hill, warrnambool, shipwrecked-coast, flagstaff-hill, flagstaff-hill-maritime-museum, maritime-museum, shipwreck-coast, flagstaff-hill-maritime-village, jug, ceramic jug -
 Federation University Historical Collection
Electrical Instrument, N E Polyphase Watt-hour Meter: No. C619490, c1930
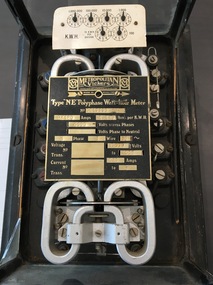
This is a three phase meter meaning it may have been used at the Ballarat School of Mines or a commercial building. Homes are only one phase meters. It would have been attached to the wall - possibly within a box. The rods on the bottom would be the securing points - these are removable.Black base on 6 long screw in rods - removable. These used to attach meter to wall or box. Glass sides (longer sides missing) Three phase watt-hour meterBlack plate on front with full details and makers information.three phase meter, polyphase meter, metropolitan vickers, united kingdom, commercial use, screw-in rods -
 City of Moorabbin Historical Society (Operating the Box Cottage Museum)
Newsletter, City of Moorabbin Historical Society Feb 2011, February 2011
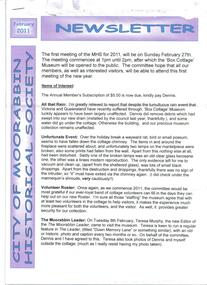
The City of Moorabbin Historical Society was formed c 1960 by a group of Moorabbin residents who were concerned that the history of the area should be preserved. A good response to a call for items related to the historical area of Moorabbin Shire brought donations of a wide variety of artefacts which are now preserved by the current members of CMHS at Box Cottage Museum . Helen Stanley, Secretary of CMHS, began producing a Newsletter for members in April 2007 to provide current information and well researched items of historical interestHelen Stanley has produced a bi-monthly Newsletter, 2007 - 2013, for the members of the City of Moorabbin Historical Society that contains well researched interesting historical items, notification of upcoming events, current advice from Royal Australian Historical Society , Museums Australia Victoria and activities of Local Historical Societies. The Newsletter is an important record of the activities of the CMHS and this month Celebrates the 50th Anniversary of CMHS. The puzzle around the naming of the suburb McKinnon tells the story of Daniel, Donald and Laughlin MacKinnon. 5 x A4 paper printed on 1 side Issue 20 of the bi-monthly, City of Moorabbin Historical Society Newsletter produced by Society member and Secretary, Mrs Helen Stanley in February 2011. Notice for meeting February 27th and the Subscription $5 is due. Despite the recent heavy rain the Cottage and grounds were unaffected, however an possum / rat appears to have entered the Cottage via the Chimney and caused the breakage of 2 glass kerosene lamps that were on the mantelpiece and lots of droppings before escaping. Teresa Murphy, editor of ‘The Moorabbin Leader’ Newspaper, visited Box Cottage and discussed a proposed regular feature ‘Down Memory Lane’. Volunteers are requested for Open Days, and are reminded of the Visitors’ Book, Children’s Treasure Hunt Cards and the Volunteer Hours Record. Accompanying it is the Story of Daniel MacKinnon b Glasgow arrived Port Phillip 1839 died 1889, his son Donald MacKinnon b 1859 Terang, Victoria – 1932 and Laughlan MacKinnon b1817 Isle of Skye -1888 no relation to eitherCITY of MOORABBIN HISTORICAL SOCIETY / FEBRUARY 2011 NEWSLETTER city of moorabbin historical society, stanley helen, mackinnon daniel, mackinnon donald, mackinnon laughlin, melbourne, moorabbin, brighton, cheltenham, ormond, bentleigh, mckinnon, market gardeners, pioneers, early settlers, moorabbin shire, box cottage museum, city of moorabbin, box william, glen eira historical society, the moorabbin leader newspaper, murphy teresa, the argus newspaper -
 Coal Creek Community Park & Museum
Cough Mixture, post 1934 (ref. AGM logo)
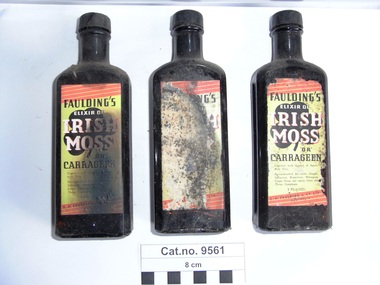
TROVE : Newcastle Morning Herald and Miners' Advocate (NSW : 1876 - 1954) , Sat 3 May 1902 , Page 10, Advertising Wholesale Agents F.H. Faulding and Co. Ltd., 16 O'Connell St, Sydney. Three amber glass rectangular bottles with black Bakelite screw tops, containing a dark liquid. Front paper bottle label printed in red, yellow, black and white, Rear paper label black printed on white and applied in an a cartouche impressed on the bottle. Embossed on the base of all three bottles 'AGM' logo (post 1934 version) and 'V42'. On the side at the base of item 1 of 3 numeral '1', on the side at the base of item 2 of 3 numeral '5', on the side at the base of item 3 of 3 numeral '4', Front paper label : 'FAULDING'S ELIXIR OF IRISH MOSS OR CARRAGEEN TOGETHER WITH OXYMEL OF SQUILLS WITH TOLI recommended For Colds, Coughs, Influenza, Bronchitis, Whooping Cough, Croup, and similar Chest and Throat Complaints. 3 FL. OZS. F.H.FAULDING & CO TTD AUSTRALIA'. Rear paper label : 'DIRECTIONS Adult dose two teaspoonfuls in water, hourly until relief is obtained. Children from one to four years old, 10 drops in lukewarm water every four hours; from four to seven years, 20 drops in water every four hours; seven to fifteen years, 1 teaspoon in water every two hours. F. H. FAULDING & CO LTD. ADELAIDE, PERTH, SYDNEY, MELBOURNE, BRISBANE, LONDON'.irish moss, carrageen, elixir, medicine, influenza, whooping cough, bronchitis -
 Coal Creek Community Park & Museum
Cough Mixture, 1906-1990 (ref. Trademark registration)
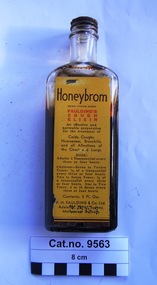
'Honeybrom' Trade mark 205, was first registered by F H Faulding in Australia ( Class 5: Chemical substances prepared for use in medicine and pharmacy), on 2 July 1906 and removed from the register on 2 July 1990. URL https://search.ipaustralia.gov.au/trademarks/search/view/205?q=honeybrom Rectangular clear glass bottle for screw top, but with only cork lining of top remaining, with a yellow label printed in dark brown and red, containing a dark brown viscous liquid.One base to one side 'A121' and on the other side '1960' or '19, symbol,0'. Paper label : 'Honeybrom REGD. TRADEMARK FAULDING'S COUGH ELIXIR An effective and agreeable preparation for the treatment of Colds, Coughs, Hoarseness, Bronchitis, and all Affections of the Chest and Lungs. DOSE: Adults : 1 teaspoonful every three or four hours. Children - Seven to Twelve Years : 1/2 of a teaspoonful every three or four hours. Two to Seven Years : 1/4 of a teaspoon every three or four hours. One to Two Years : 5 to 10 drops every three or four hours. Contents : 3 Fl. Ozs. F.H. Faulding & Co Ltd. Adelaide, Perth, Sydney, Melbourne, Brisbane'.bottle, moulded glass. -
 Australian Gliding Museum
Machine - Glider – Sailplane, 1963
The Skylark 4, the final in the Slingsby Skylark series, dates from 1961. The design heralded a trend towards the use of plastics in the construction of gliders. Slingsby incorporated GRP (glass reinforced plastic) panels to achieve a streamlined fuselage nose and cockpit area while retaining the more traditional wood techniques for the rest of the aircraft. Another notable feature was the smooth wing surface that was obtained using a Gaboon ply skin across the ribs. Best glide performance of 1:33 was found to be comparable with the early full GRP glider designs. The Museum’s example (VH-GTB – C/N 1382) was built in 1963 and originally owned by Chuck Bentson of the UK. It was brought to Australia in 1967 by Jeremy Picket-Heaps and flown at various places including Benalla, Cooma and Gundaroo. In 1970 the glider was transferred to the New England Soaring Club. Many flights were made from Armidale and Bellata in Northern New South Wales. On one occasion, the glider was kept aloft for 8 hours 45 minutes and on another the pilot took it around a 500 kilometre triangle in nearly 8 hours. In 1980 it was sold to Ralph (“Feathers”) Crompton and was flown extensively in South Australia until 1988. The final owner before the glider was given to the Museum in 2004 was Ross Dutton of Melbourne. The last recorded flight occurred in 1992. The glider at that point had logged over 2000 hours flying time from about 2000 launches. The airframe is currently being restored to flying condition. Technically this aircraft represents the state of the art at the stage that sailplane design was changing from traditional wood construction to composites (GRP) The Slingsby Skylark 4 is high wing single seat sailplane of mainly wooden construction with plywood and fabric covering. However, the cockpit and forward part of the fuselage consists of glass reinforced plastic which was innovative at the time that the type was designed. The cockpit provides for a semi reclining position for the pilot protected with a full Perspex canopy. The wings are made up of a centre section with constant chord and tapered wing tips. The aircraft has a conventional arrangement for the tail stabiliser / control surfaces. The sailplane bears construction number 1382 and is registered in Australia as VH-GTBaustralian gliding, glider, sailplane, skylark, slingsby, bentson, picket-heaps, crompton, new england soaring club, dutton -
 Bendigo Historical Society Inc.
Domestic Object - JAMES MURRAY AND CO. ONE HANDED CLOCK
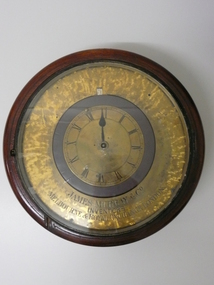
Wall clock in a round cedar case with a single black stationery hour hand and moving brass dial, black Roman numerals surrounded by a brass outer ring with a stippled look, brass bezel painted black with flat glass, 1 side and 1 bottom inspection doors, top hook for hanging, front of clock secured to case with wooden pegs. Brass pendulum with bob. Time only Fusee chain driven movement. Dial engraved 'James Murray & Co Inventors Melbourne & Royal Exchange London.James Murray & Co Inventors Melbourne & Royal Exchange Londonhorology, clocks, one handed, horology-clocks-james murray & co -
 Bendigo Historical Society Inc.
Document - FRAMED: VALENTINE CARD, 1870
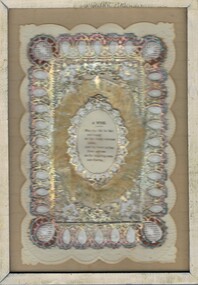
Valentine Card under glass in a thin wooden frame, a Wish in centre printed on silk reads 'May thy life be fair and happy, as the lovely summer hours, and thy heart as free from sadness, as the laughing summer flowers', bordered by silver & gold filigree on white backing fringing around wish, markings or inscriptions read 'Old ''Valentine'' Card', 'To Aunty Janey', Donated by Mr Atkinson related to Mary Reibydocument, valentine card, valentine card, card, wish -
 National Vietnam Veterans Museum (NVVM)
Functional object - Wrist watch
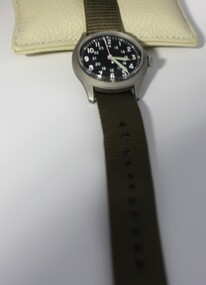
Standard issue Army wrist watch, commonly called a "Mickey Mouse" watch. This item was specifically made for Australian military use in 1970. A silver metal wrist watch with a glass cover over a round black face with white numbers for both 24 and 12 hour markings. The hands and 5-minute marks glow in the dark. Watch has wind up motion. Army issue green nylon band has a black clasp.Back: Watch. Wrist general purpose. MIL-W-46374A HAMILTON fsn6645-00-952-3767 Armymilitary issue, watch, 1200hr 2400hr watch, wrist watch, vietnam -
 Stawell Historical Society Inc
Functional object - Realia, Ceramic & Glass Lantern Bases, c1879 to 1900
From Home of Frank Heal of Lacelles Street. Now 24 Hour Gym J. Veal Blacksmith rehoused opposite Old Fire Station 1878-1900One Blue Ceramic Lantern Base with Dark Blue Floral One Glass Lantern Base with two ridged edges -
 Bendigo Historical Society Inc.
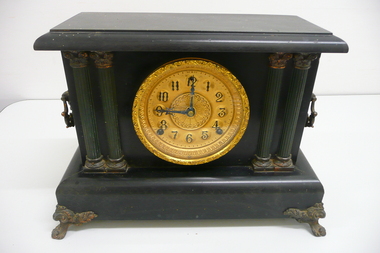
Functional object - BLACK MANTLE CLOCK
Black wooden mantle clock with pendulum bob, made in U.S.A. by the Sessions Clock Company, mounted on ornate metal feet with metal handles on each end, four faux marble columns in green with metal tops & bases. Round gold dial with black numerals and hands, brass bezel with flat glass. 8 day time and strike, chiming the hours on a gong and half hour on a bell. Original paper label on back with manufacturers details and operating instructions.The Sessions Clock Cohorology, clocks, mantle -
 Bendigo Historical Society Inc.
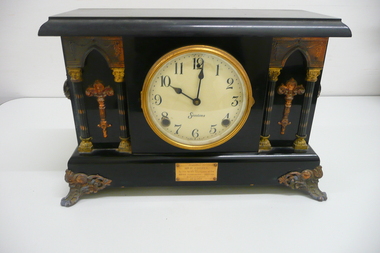
Functional object - WIEGARD COOPER COLLECTION: BLACK MANTLE CLOCK, 1926
Object. Black wooden mantle clock with pendulum bob made in U.S.A by the Sessions Clock Company, mounted on ornate metal feet, and decorated with four columns supporting Gothic arches, with torch like ornamentation between them and an ornate handle on each end. Round white enamel dial with black numerals & hands, a brass bezel with convex glass. 8 day running with gong strike on hour & half hour. Brass plaque on front reads presented to Mr.P.Cooper by his fellow employees of the Water Commission Bendigo on his retirement 30.6.1926.Sessions Made in U.S.Ahorology, clocks, mantle -
 Queenscliffe Maritime Museum
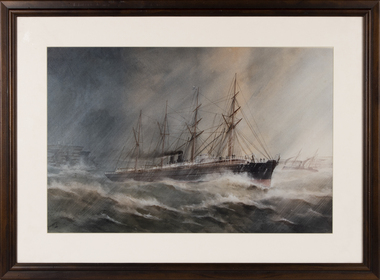
Print - Reproduction print, framed, AV Gregory, Ormus 1887
In 1883 The Orient Steam Navigation Co. Ltd., of London signed a contract with the Government of New South Wales, Australia to carry emigrants from the United Kingdom. The Company would be paid £15 per head for up to four hundred persons and £14 and 10 Shillings for numbers between four and six hundred persons per voyage.A reproduction print of a painting by AV Gregory of the vessel Ormus, 1887. The print is mounted under glass and framed in a dark brown timber frame.rms ormuz, reproduction print -
 Kew Historical Society Inc
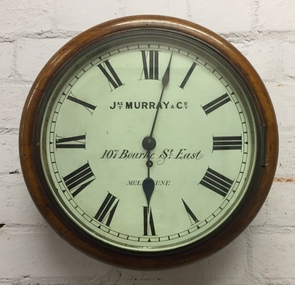
Functional object, Jas Murray & Co, Wall Clock & Key, 1860s
The clock was purchased from Jas Murray & Co. of 107 Bourke Street East, Melbourne by Francis Barnard. James Murray & Co were well known clock and watchmakers operating from premises in London with branches in Calcutta and Melbourne. They were watchmakers and jewellers in Melbourne from 1860 to 1888. Francis Barnard established Barnard’s Pharmacy on the corner of Bulleen Road (later renamed High Street) and Cotham Road in 1857. In the early 1860s, after purchasing the clock, he placed it in his pharmacy where it could be seen by passers by. When he relocated across the road to 49 Bulleen Road (now 167 High St.) in 1880 he took the clock to the new premises. He maintained the accuracy of the clock so that local residents consulted it for the correct time, even after the Post Office building with its clock tower was opened in 1888. When Francis Barnard retired, his son took over the pharmacy. In 1925, the Barnard Pharmacy was sold to David Paton. The Paton’s were at first puzzled why people constantly peered in the door until they realised that the timepiece was the drawcard. When David Paton died in 1941, his widow sold the pharmacy but took the clock with her to her new florist shop at 145 High Street. When Mrs Paton retired in 1953, she took the clock to her home in Boronia. In 1973 her daughter donated the clock to the Kew Historical Society.Significant locally to Kew as an example of a timepiece that was used by the local community during the 19th century to tell the time.Barnard’s clock is a typical wall clock of the nineteenth century, variants of which could be seen in shops, offices, public buildings and stations. It has a mahogany case with a moulded wooden bezel encasing a hinged brass bezel housing the glass face which protects the dial and hands when working. The clock face has an off-white hand painted tin dial with black painted Roman numerals. The hands are black painted metal; the hour hand has a wide spade shaped point whilst the minute hand is much thinner. ‘Jas Murray & Co’ is painted above the centre, with ‘107 Bourke Street East’ and ‘Melbourne’ below, with the key hole in between. The clock movement is a fuse chain attached to a brass mainspring barrel which powers the pendulum for eight days. This is housed within a rectangular wooden casing with a convex curved base housing a hinged door giving access to the pendulum which is attached to the back of the clock by four wooden pegs.Jas Murray & Co / 107 Bourke St East / Melbournefrancis barnard, f g a barnard, high street - kew (vic), pharmacies - kew (vic), clocks, paton's pharmacy --- kew (vic.), bulleen road -- kew (vic.) -
Kew Historical Society Inc
Journal, The Kewriosity Sheet Vol.3 No.5 : November 1981
Have you an hour to spare? [Meals on Wheels; Kew Community Bus] / p1. Kew Library extended opening hours / p1. Apology [Citizens Advice Bureau] / p1. Historic local church celebrates its 125th anniversary [Kew Baptist Church] / p1&3. Hyde Park Fellowship [Hyde Park Church] / p2. 65th Church anniversary [Hyde Park Methodist Chuch] / p2. What's doing in Kew for November / p2&3. Mayoral neighbourhood gathering [Cr Martin Solomons] / p3. Christmas special [East Kew Uniting Church] / p3. The [1867] Great Feast in Kew / Elizabeth Mackie p4. The Lioness Club of Kew / p4. Fete [Rossboume House School] / p4. Fourth Kew Scouts [4th Kew Scouts; Glass Creek Scout Hall] / p4. La Verna Open Day / p4.The Kewriosity Sheet (1979-83) was first published in the City of Kew (Victoria) in June 1979 as a two-sided 'community newssheet'. It aimed to: 'share news about Kew happenings and Kew people, and to exchange ideas about living in Kew'. Later issues gradually evolved into a 4-page, quarto sized publication. The Kewriosity Sheet was superseded by the Kew Council publication 'Kewriosity' (1983-1994).non-fictionHave you an hour to spare? [Meals on Wheels; Kew Community Bus] / p1. Kew Library extended opening hours / p1. Apology [Citizens Advice Bureau] / p1. Historic local church celebrates its 125th anniversary [Kew Baptist Church] / p1&3. Hyde Park Fellowship [Hyde Park Church] / p2. 65th Church anniversary [Hyde Park Methodist Chuch] / p2. What's doing in Kew for November / p2&3. Mayoral neighbourhood gathering [Cr Martin Solomons] / p3. Christmas special [East Kew Uniting Church] / p3. The [1867] Great Feast in Kew / Elizabeth Mackie p4. The Lioness Club of Kew / p4. Fete [Rossboume House School] / p4. Fourth Kew Scouts [4th Kew Scouts; Glass Creek Scout Hall] / p4. La Verna Open Day / p4. community publications --- kew (vic.), the kewriosity sheet, newsletters - kew (vic.) -
 Glen Eira City Council History and Heritage Collection
Kuraburn bottle
This Kuraburn Bottle is part of a Sanax First Aid Case which was used at the the former Carnegie Senior Citizens' Centre. The centre was located at 314 Neerim Road, Carnegie. When the Neerim Road facility closed, its activities were moved to the Carnegie Library and Community Centre. For Occupational Health and Safety reasons, Council no longer maintains first aid kits at senior citizens' centres. Clear glass bottle with two paper labels on narrow side. One red, green, white and black label with Sanax branding, one red and white label at base of bottle with address and contact details. Black plastic screw-top lid with a section missing. Bottle has been decanted however some residue remains. Small cork stopper contained within bottle."Sanax" KURABURN / FOR THE TREATMENT / OF BURNS / SCALDS AND / SUNBURN / THE SANAX CO. / 849-51 NEPEAN HIGHWAY / MOORABIN / TEL XU 2651 / Left side of label: Directions: Dab on lightly, and repeat in two hours if necessary. Applied early, it prevents blistering. Right side of label: Allow to dry on the skin before putting on wearing apparel, to avoid staining the clothes. 223-5 BAY ROAD, / SANDRINGHAM, S.8 / VICTORIA / Phone: 98-1604 -
 Department of Energy, Environment and Climate Action
Fuel Mincer
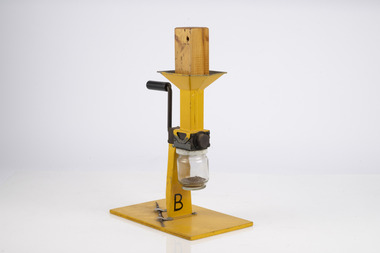
Used to mince fuel samples to measure moisture content Representative samples of fuel such as bark, leaves, twigs etc were minced and the moisture measured The availability of fuel to burn depends largely on its moisture content. When it exceeds 20-25% not much will burn, whereas 12-15% is generally ideal for fuel reduction burning, but if the moisture content drops as low as 7-10% virtually everything will ignite, and fire behaviour becomes extreme. During the afternoon of the Ash Wednesday bushfires on 16 February 1983 fuel moisture contents were recorded at Stawell as low as 2.7%. Fine fuels like leaves and bark can rapidly absorb moisture after a shower of rain, or from the air when the Relative Humidity (RH) is high, and the temperature is low. Conversely, they can also dry out very quickly. So even though the overall fuel quantity in the forest doesn’t change, the fine fuel availability can increase rapidly from zero after rain to many tonnes per hectare as the fuel dries out. This can happen over a few hours on hot and windy days. Heavy fuels like logs on the ground take longer to dry out. Fuel mincer Made at Altona as an alternative design to the commercial Spong Mincer With wooden plug to push fuel into the mincer and glass jar to collect sampleforests commission victoria (fcv), bushfire, forest measurement -
 Department of Energy, Environment and Climate Action
Electric Fuel Mincer
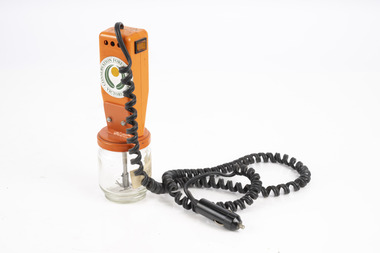
Used to mince fuel samples to measure moisture content Representative samples of fuel such as bark, leaves, twigs etc were minced and the moisture measured The availability of fuel to burn depends largely on its moisture content. When it exceeds 20-25% not much will burn, whereas 12-15% is generally ideal for fuel reduction burning, but if the moisture content drops as low as 7-10% virtually everything will ignite, and fire behaviour becomes extreme. During the afternoon of the Ash Wednesday bushfires on 16 February 1983 fuel moisture contents were recorded at Stawell as low as 2.7%. Fine fuels like leaves and bark can rapidly absorb moisture after a shower of rain, or from the air when the Relative Humidity (RH) is high, and the temperature is low. Conversely, they can also dry out very quickly. So even though the overall fuel quantity in the forest doesn’t change, the fine fuel availability can increase rapidly from zero after rain to many tonnes per hectare as the fuel dries out. This can happen over a few hours on hot and windy days. Heavy fuels like logs on the ground take longer to dry out. Battery operated Fuel mincer. Plugs into 12 volt car cigarette lighter socket Adaption using parts from commercial food processor Made at Altona as an alternative design to the commercial Spong Mincer Glass jar to collect sampleforests commission victoria (fcv), bushfire, forest measurement -
 Flagstaff Hill Maritime Museum and Village
Instrument - Fob watch, 1814
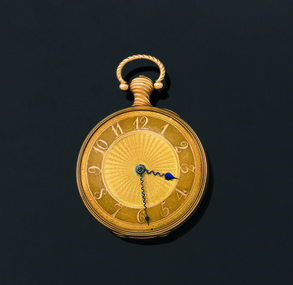
Watchmaker History: James McCabe was born in 1748. He was the son of Patrick McCabe, a notable watchmaker from Lurgan in County Armagh, Ireland. James McCabe immigrated to London in 1775 and established his business in Bells Building, Fleet Street, on 2nd April 1781. He was made an Honorary Freeman of the Clockmakers Company. The House of McCabe was renowned for the sheer variety of its designs, and the creativity and prestige of its manufacture were celebrated and revered by owners worldwide. These pieces remain highly collectable today and fetch increasingly higher prices at auction houses worldwide. Watch association with the Loch Ard: The watch was saved from the sea when discovered on the body of Mrs Rebecca Carmichael from Dublin and handed to Eva Carmichael, the only family member to survive the fatal wreck of the Loch Ard on 1st June 1878. Eva gifted the watch to her husband, Thomas Achilles Townsend when they married in 1884; his name is engraved on the rear movement cover. The watch was held by the family until 2011 when they decided to bring the watch, to Australia for auction. At this time the watch was in the possession of Eva Carmichael's grandson, Robert Townsend. Given its connection with the Loch Ard shipwreck, it was purchased at auction by Flagstaff Hill Maritime Village on 25th October 2011 to add to its Loch Ard collection and is currently referred to as the Carmichael watch. It is now on display alongside the Minton Peacock, which also survived the Loch Ard shipwreck, and other artefacts from the collection. James McCabe was originally a Belfast watchmaker who had moved his business to London. At the time James McCabe was much esteemed for producing fine watches and clocks, especially for export to India. Only the best watches were inscribed “James McCabe” and many with highly decorated cases were intended for the Indian market. Contemporary newspaper accounts of the watch's discovery echoed a Carmichael family tradition that the watch had been intended as a gift from the City of Dublin to King George IV to mark his planned visit to the city in 1821, however, there is no evidence to support this theory. Dr Evory Carmichael, according to some accounts, bought this watch from a nobleman for about £100 at some point and so it travelled with him on his final fateful journey to Australia. Today we can only guess at the actions of Mrs Carmichael in the chaos and darkness of the pre-dawn shipwreck. Perhaps the two items that were found on her body, the watch and a locket, were items that reminded her of those she held most dear, her husband and her family. When Mrs Carmichael's body was washed ashore the watch was found secreted in the waistband of her dress. In its own right the watch is of artistic and monetary value and is a rare and beautiful object depicting watch making in the early 19th century. It is a historically significant object in it’s own right and there is additional importance, surviving a significant event in the maritime history of Victoria. The wreck of the Loch Ard, Victoria's greatest maritime disaster has also been declared an event of National Significance because of its strong connection to Australia's immigration and maritime history. The watch, together with the Loch Ard Peacock, make up the two most significant shipwreck artefacts in Australia. Both of these items are of great social significance to not only local people but the wider Australian community. Funding for the watches purchase came from six local trusts and one anonymous citizen and is now on permanent display. Both these artefacts symbolise and helps to interpret the stories of survival along the Shipwreck Coast. Fob Watch, known as the "Carmichael Watch" or the "Loch Ard Watch". 1814 fob pocket watch belonging to the Carmichael family, recovered from the wreck of the Loch Ard. Fob watch (or pocket watch)and winding key, made by James McCabe and Son, of Cornhill, London. The watch is in excellent condition and its design is decorative and intricate. The gold face is covered by glass. The gold rear cover is hinged over a silver inner cover that includes the winding hole. The watch has a knob with a swinging ring from which it can be hung. The dial of the gold watch face is textured and has raised Arabic numerals and every minute is marked around the perimeter by a dot, with the 5-minute dots slightly larger. The numerals and dots are a different coloured gold than the rest of the face. The centre of the face has a wavy pattern fanning out to the base of the numerals. The hour and minute hands are of a dark colour. The stems of the hands are a wavy shape and finish with spade shaped tips; the tip of the hour hand is larger than that of the minute hand. The hour hand reaches to the base of the numerals and the minute hand is long enough to rest between the minute dots. The back of the watch is decorated with a detailed design on a textured gold background. The design is embossed in coloured metals; gold, silver, greenish-gold and pink. In the centre is a dove resting on leaves of a pot plant that sits on a silver circular base. Another dove is flying above it, and their beaks touch together. On the right of the base of the pot plant is a dog resting on its hind legs, body facing away from the plant and head twisted around to look at the birds. On the sides of this design and meeting at the base are sprigs of leaves and buds. Around this central design is a rope-like border. Around the perimeter of the case is a border of leaves and budding stems. The inside of this cover has embossed hallmarks, numbers and etched markings indicating that the watch is 18 carat gold, made by James McCabe, assayed in London in 1814 and the case may have been made by Daniel Willmott, case maker. The silver inner workings cover has a full name beautifully engraved on it. There is a winding hole that accesses a square-ended lever for the key to fit over. The handle of the watch is a twisted gold knob with a hollow ‘D’-shaped swinging ring attached to the end of it. This knob also has a hallmark.On the silver inner workings cover “Thomas Achilles Townshend” is engraved, underscored by a thin, delicately decorated line. On the gold handle is the logo of a crown with “18”’ next to it. Inside the gold rear case is stamped “DW’. Under that is etched “JAN 77 II”. Underneath this are 3 logos; a logo “leopard, crowned”’, a logo “ crown on top of 18”, and a logo “T”. Under these 3 symbols is part of a stamp that could possibly be “IMC”. Under this is “ ’ 5 9 4 ”. Other numbers, symbols and letters are etched into this case including “15001”, “2/5/19”. Others are difficult to read.warrnambool, shipwrecked coast, shipwreck coast, flagstaff hill, flagstaff hill maritime museum, flagstaff hill maritime village, maritime museum, shipwrecked artefact, shipwreck artefact, carmichael, townshend, townsend, carmichael watch, loch ard watch, pocket watch, loch ard, 1st june 1878, james mccabe, thomas walker, robert townshend, loch ard gorge, great ocean road, victoria., memorial headstone -
 Wangaratta RSL Sub Branch
Document - Framed Document, Instrument of Surrender of Japanese Forces, C1945
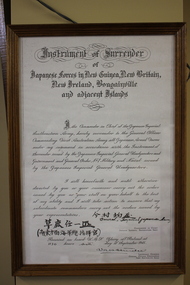
With the Japanese cities of Hiroshima and Nagasaki destroyed by atomic weapons, the will of the Japanese leadership was tested Emperor Showa of Japan announced his intention to surrender to the Allies unconditionally over public radio on 15 Aug 1945. The date of Japan's formal surrender was 2 Sep 1945, and it took place aboard American battleship Missouri in Tokyo Bay. There were other surrender ceremonies including that on Sept 6 1945. At 0900 hours, sloop HMS Hart picked up Hitoshi Imamura and Jinichi Kusaka at Kabanga Bay, who would sign the surrender documents aboard HMS Glory at 1127 hours which surrendered 139,000 remaining personnel at Rabaul plus all forces in Australian territory in the South Pacific. The surrender of Imperial Japan was announced on August 15 and formally signed on September 2, 1945, bringing the hostilities of World War II to a close. The surrender ceremony at Rabaul, New Britain took place on 6 Sep 1945 aboard the British carrier HMS Glory surrendering 139,000 remaining personnel at Rabaul plus all forces in Australian territory in the South Pacific. Light brown frame with glass, of a black and white photocopy. Script is very ornate and has Japanese lettering at the bottom. Instument of Surrender of Japanese Forces in New Guinea, New Britain, New Ireland, Bougainville and adjacent Islands. I the Commander in Chief of the Japanese Imperial Southeastern Army, hereby surrender to the General Officer Commanding First Australian Army all Japanese Armed Forces under my command in accordance with the Instrument of Surrender issued by the Japanese Imperial General Headquarters and Government and General Order No.1 Military and Naval issued by the Japanese imperial General Headquarters. I will henceforth and until otherwise directed by you or your successor carry out the orders issued by you or your staff on your behalf to the best of my ability and I will take action to ensure that my subordinate commanders carry out the orders issued by your representatives. Commander in Chief Japanese Imperial Southeastern Army. Received on board H.M.S. Glory off Rabaul at 1130 hours sixth day of September 1945. Lieutenant General General Officer Commanding First Australian Army.wwii, world war 2, imperial japanese army, japanese army, surrender, rabaul -
 Bendigo Military Museum
Photograph - Bones Day - Army Survey Regiment Versus RAAF School of Radio, Laverton, c1970s
These seven photographs were taken at Bones Day, an annual sports competition between the Army Survey Regiment and the RAAF School of Radio c1970s. The two units took turns each year to host the event and on this occasion was held at the RAAF School of Radio, Laverton. The day competition usually comprised basketball, cross country, golf, sailing, squash, softball, tennis, touch football, rifle shooting, tug-of-war and volleyball. The “big bone” trophy comprising a large bone from a beast housed inside a wooden framed glass case, was awarded to the winner of the day competition. The evening competition often included darts, carpet bowls, hookey, quoits and billiards/snooker. The “little bone” (a mounted chicken bone) was the consolation trophy awarded to the winner of the evening competition. The 3-hour bus trip for the visiting unit on their return was typically very raucous. The history of the Bones Day competition is best described in the booklet titled - Bones of Contention Souvenir Program. 1965. Refer to Item 6267.These seven photographs were taken at Bones Day, an annual sports competition between the Army Survey Regiment and the RAAF School of Radio at Laverton, Victoria c1970s. The photographs are on 35mm negative film. They are part of the Army Survey Regiment’s Collection. The photographic negatives were scanned at 96 dpi. There are additional photos taken at the time that have not been scanned. .1) - Photo, black & white, c1970s, L to R: Unknown, Heather Slater and unidentified RAAF personnel. .2) & .3) - Photo, black & white, c1970s, Bill Friswell playing snooker. .4) & .5) - Photo, black & white, c1970s, Bus trip back to Bendigo. Gordon Lowery, unidentified personnel. .6) - Photo, black & white, c1970s, Bus trip back to Bendigo. L to R: Peter Tieman (asleep), Phil Batchelder (Batchelor?), background Bill Friswell (at rear), Steve Gloster, Gordon Lowery (standing), Graham Bradtke, Andy Covington, Greg Towne, TJ Wicker, Roger Pearson (asleep), unidentified personnel. .7) - Photo, black & white, c1970s, Bus trip back to Bendigo. L to R: Peter Tieman (asleep), Phil Batchelder (Batchelor?), background Bill Friswell (at rear), Gordon Lowery (standing), Graham Bradtke, Greg Towne, TJ Wicker, Roger Pearson (asleep), unidentified personnel.1P to .7P – No personnel are identified.royal australian survey corps, army svy regt, rasvy, army survey regiment, raaf school of radio, asr, bones day -
 Bendigo Military Museum
Photograph - Bones Day - Army Survey Regiment Versus RAAF School of Radio, 1969
These two photographs were taken at Bones Day, an annual sports competition between the Army Survey Regiment and the RAAF School of Radio in 1969. The two units took turns each year to host the event and on this occasion was held at the RAAF School of Radio, Laverton. The day competition usually comprised basketball, cross country, golf, sailing, squash, softball, tennis, touch football, rifle shooting, tug-of-war and volleyball. The “big bone” trophy comprising a large bone from a beast housed inside a wooden framed glass case, was awarded to the winner of the day competition. The evening competition often included darts, carpet bowls, hookey, quoits and billiards/snooker. The “little bone” (a mounted chicken bone) was the consolation trophy awarded to the winner of the evening competition. The 3-hour bus trip for the visiting unit on their return was typically very raucous. The history of the Bones Day competition is best described in the booklet titled - Bones of Contention Souvenir Program. 1965. Refer to Item 6267. The winner of the two trophies in 1969 is not known. MAJ Donald Ridge was probably on this occasion was the 2IC of the Army Headquarters Survey Regiment, He was subsequently promoted to the rank of LTCOL was the CO of the unit from 1972 to 1973; and continued as the CO of the renamed Army Survey Regiment from 1974 to 1975. He served from 1946 to 1975.These two photographs were taken at Bones Day, an annual sports competition between the Army Survey Regiment the RAAF School of Radio in 1969. The photographs were printed on photographic paper and are part of the Army Survey Regiment’s Collection. They were scanned at 300 dpi. .1) - Photo, black & white, 1969. L to R: Unidentified CO or representative from the RAAF School of Radio, MAJ Don Ridge. .2) - Photo, black & white, 1969. L to R: MAJ Don Ridge, unidentified CO or representative from the RAAF School of Radio..1P to .9P – no annotationsroyal australian survey corps, rasvy, army survey regiment, army svy regt, fortuna, asr, bones day, raaf school of radio -
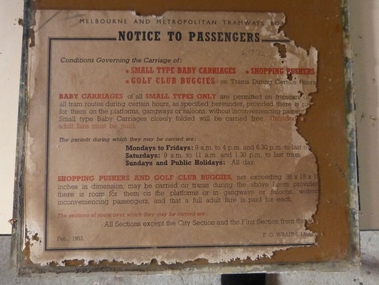 Melbourne Tram Museum
Poster, Melbourne & Metropolitan Tramways Board (MMTB), "Notice to Passengers - Conditions Governing the Carriage of Small type baby carriages, shopping pushers, golf club buggies on trams during Certain Hours", Feb. 1953
Poster - white sheet of paper, titled "Notice to Passengers - Conditions Governing the Carriage of Small type baby carriages, shopping pushers, golf club buggies on trams during Certain Hours". Signed by F. G. Wraith as Manager. Dated Feb. 1953. Provides details of times, fares and where on the system. Poster has been adhered to a sheet of glass that was backed with a sheet of brown paper. The glass was used in the driver's bulkhead of a W class tram.trams, tramways, mmtb, prams, tickets -
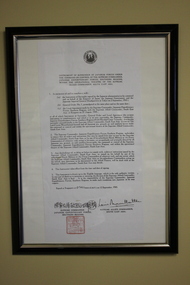 Wangaratta RSL Sub Branch
Document - Framed photocopy of Instrument of Surrender of Japanese Forces Singapore
The Instrument of Surrender signed at Singapore by Admiral Lord Louis Mountbatten for the Allies and General Itagaki for the Japanese. During his time as Supreme Allied Commander of the Southeast Asia Theatre, Lord Mountbatten's command oversaw the recapture of Burma. A personal high point was the receipt of the Japanese surrender in Singapore when British troops returned to the island to receive the formal surrender of Japanese forces in the region led by General Itagaki on 12 September 1945, codenamed Operation Tiderace. General Itagaki was convicted of war crimes and executed inn 1948.The surrender of Imperial Japan was announced on August 15 and formally signed on September 2, 1945, bringing the hostilities of World War II to a close.Following the war, Mountbatten was known to have largely shunned the Japanese for the rest of his life out of respect for his men killed during the war, and as per his will, Japan was not invited to send diplomatic representatives to his funeral in 1979,Black frame with silver insert with glass of a photocopy of the Instrument of Surrender of the Japanese Forces. Script is in black on white paper with a red square seal at the bottom left, mounted on cream board.Instrument of surrender of Japanese Forces under the command or control of the Supreme Commander, Japanese Expeditionary forces, southern regions within the operational theatre of the Supreme Allied Commander, South East Asia. Signed at Singapore at 0341 hours (G.M.T.) on 12 September, 1945.wwii, world war 2, imperial japanese forces, surrender, singapore, japanese army -
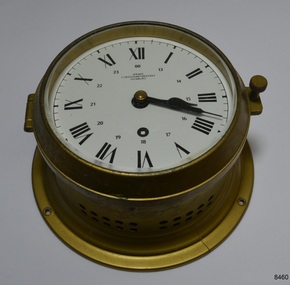 Flagstaff Hill Maritime Museum and Village
Instrument - Chronometer or Marine Clock
This chronometer was made around 1936 and has been on display at Flagstaff Hill for over 40 years as part of the exhibit of the ‘Reginald M’, an Australian-built, 19ss, coastal trader vessel. A chronometer is an accurate mechanical instrument used for measuring time. It is constructed carefully to remain stable even under the changing conditions of seafaring life such as temperature, humidity and air pressure. The Master or Navigator of a ship could use the chronometer and the positions of celestial bodies to calculate the ship’s latitude at sea. In 1905 the business Chronometerwerke GmbH was formed in Frankfurt, Germany, to supply the country with high-quality mechanical chronometers and ship clocks for their maritime trade, making the country independent of other international suppliers such as those in England. In 1938 the firm was renamed Wempe Chronometerwerke. The business continues today. Its products now include its well-known chronometers, battery-powered ship clocks, ship’s bell clocks, barometers, barographs, thermometers, hygrometers, comfort meters to measure temperature and humidity, and wristwatches. The company also performs chronometer testing facilities for the State’s Weights and Measures office. The article written by Givi in July 2022 “The Basics of Marine Meteorology – a Guide for Seafarers” refers to the weather’s signs and patterns being repeated over and over, and the recording of these observations helps forecasters predict changes in the weather. The chronometer is an example of a mechanical navigational marine instrument in use in the early to the mid-20th century. The maker is significant as part of a German government initiative to be self-sufficient in the production of good quality marine technology. This chronometer is significant as part of the exhibit, the Australian-built vessel, 1922 coastal trader ‘Reginald M’, listed on the Australian Register of Historic Vessels and on display for over 40 years.Marine chronometer or marine clock, brass case, glass cover, Roman numerals, 24-hour numbers beside them. Two black hands, a keyhole for winding and ventilation holes in the side. The base has a collar with four machined mounting holes. Inscriptions are on the clock’s face."Made in Germany" and "WEMPE / CHRONOMETERWERKE / HAMBURG"flagstaff hill, flagstaff hill maritime museum and village, warrnambool, maritime museum, maritime village, great ocean road, shipwreck coast, marine meteorology, horology, chronometer, marine technology, latitude, marine navigation, mechanical instrument, scientific instrument, ship clock, chromometerwerke gmbh, wempe chronometerwerke, marine clock -
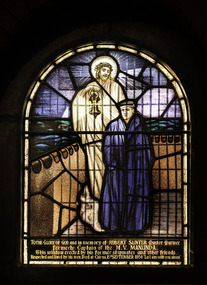 Mission to Seafarers Victoria
Artwork, other - Stained glass window, Brooks Robinson & Co, Light of the World (Christ Looking After the Seaman), 1935
This window, in memory of Captain Robert Sunter, was unveiled on the 14 February 1936 performed by Mr R. H. Martin, chief officer of the Manunda. The funds were raised by the crew of the ship Manunda. It was made after "In the anxious hours of waiting" by G M Langley, a print donated by the Godfrey sisters and also located in the St Peter chapel.Arched stained glass window in a restraint colour scheme made after the print "In the anxious hours of waiting" depicting a sailor guided by the light held by Jesus. The image of the sailor appears to be a portrait of Captain Robert Sunter.To the Glory of God and in memory of Robert Sunter Master Mariner, formerly Captain of the M.V. Manunda. This window erected by his former shipmates and other friends. Respected and loved by his men. Died at Cairns 15th September 1934 “Lo I am with you alway”altar, st peter chapel, flinders street, mission to seafarers, seamen's mission, mission to seamen, st peter, sailors, seamen, anchor, stained glass windows, win, memorial chapel, hope, captain robert sunter, padre frank leslie oliver