Showing 42 items matching "timber samples"
-
 Creswick Campus Historical Collection - University of Melbourne
Unknown - Radiata Pine core from veneer production, Veneer production - Radiata Pine core
... Timber sample. Teaching resource.... specimen Timber sample. Teaching resource. Victorian School ...Veneer production radiata pine specimenWood SpecimenVictorian School of Forestry Reference Collectiontimber sample. teaching resource. -
Creswick Campus Historical Collection - University of Melbourne
Sample
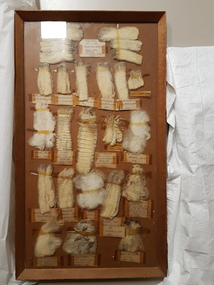
... 11 samples Papua New Guinea timbers in card covers... Building 719 Creswick goldfields 11 samples Papua New Guinea ...11 samples Papua New Guinea timbers in card covers with genus species information. Set in cardboard box with faux wood grain print.Wood Specimens -
Creswick Campus Historical Collection - University of Melbourne
Sample
... Timber sample. Teaching Resource.... Building 719 Creswick goldfields sundry veneer samples Timber ...sundry veneer samplesWood Specimenstimber sample. teaching resource. -
 National Wool Museum
Memorabilia - Wool sample display, 1963
Display board was once property of Port Macquarie Historical Society & Museum, but they de-accessioned it in 2016 before donating it to the National Wool Museum. Reason for de-accession was that it no longer fit with their collection aims, nor was it relevant to their location. Item appears to have been made in 1963, or at least using wool samples from 1963. Wool samples were grown by a S.F. PICKER at 'BIGGA' in New South Wales. No further information was given by donor.Light brown timber framed display board with glass cover. Light brown backing board with 25 wool samples taped to the board, each with a paper lable with printed text. Main label reads -WORLD RECORD PRICE / 1963...468d / SUPER FINE MERINO. / COUNT. 74/80. / GROWN BY. / S.F. PICKER. BIGGA. / N.S.W.-wool samples, wool sorting, wool breading -
 Bendigo Military Museum
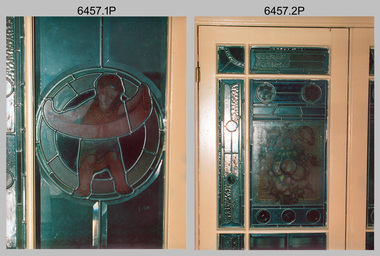
Photograph - Army Survey Regiment - Fortuna Interior, Bendigo, c1985
This set of 22 photographs was taken inside Army Survey Regiment’s Fortuna Villa circa 1985. The photos feature some of Fortuna Villa’s interior. Unfortunately, the magnificent array of colours and hand-painted features of Fortuna’s leadlight windows are not highlighted with light transmission, as the photographer did not take the photos in the daytime. See item 6456.30P, for photos of Fortuna Villa’s exterior and The Army Survey Regiment’s out-buildings that were taken at the same time.This set of 22 photographs was taken inside Army Survey Regiment’s Fortuna Villa circa 1985. The colour photographs were printed on photographic paper and are part of the Army Survey Regiment’s Collection. The photographs were scanned at 300 dpi. .1) & .2) - Photo, colour, c1985. Fortuna Villa – Reception/Music Room leadlight windows. .3) - Photo, colour, c1985. Fortuna Villa – Entrance foyer door and leadlight windows. .4) - Photo, colour, c1985. Fortuna Villa – Entrance foyer vaulted ceiling. .5) - Photo, colour, c1985. Fortuna Villa – Dressing Room bay leadlight windows. .6) - Photo, colour, c1985. Fortuna Villa – Dressing Room wood panel wardrobe (concealed marble bath inside). .7) - Photo, colour, c1985. Fortuna Villa – Main bathroom’s solid cedar toilet chest and water pitcher set. .8) to .14) - Photo, colour, c1985. Fortuna Villa – Drawing Room bay leadlight windows. .15) to .16) - Photo, colour, c1985. Fortuna Villa – Cupola stairway leadlight windows. .17) - Photo, colour, c1985. Fortuna Villa – Dining/ballroom doorway with velvet wallpaper. .18) - Photo, colour, c1985. Fortuna Villa – Dining/ballroom. .19) - Photo, colour, c1985. Fortuna Villa – Billiard room’s timber vaulted ceiling. .20) & .21) - Photo, colour, c1985. Fortuna Villa – Top floor nursery samples of original wallpaper. .22) - Photo, colour, c1985. Fortuna Villa – Top floor ballroom/gymnasium’s elaborate vaulted ceiling.There are brief descriptions on a note behind each photograph.royal australian survey corps, rasvy, army survey regiment, army svy regt, fortuna, asr -
Clunes Museum
Plant specimen - WOODEN BLOCK
Block of wood (hemlock), the top half is "dressed" to show how timber is prepared. Typically, the flitch beam is made up of a vertical steel plate sandwiched between two wood beams, the three layers being held together with bolts. Typed onto cardboard pinned onto wooden block; Hemlock Bought in flitches Milled Clunes Sawmills Used for building finisheshemlock, clunes sawmills, flitch, sample -
 Bendigo Historical Society Inc.
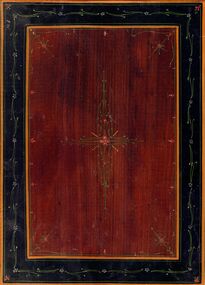
Memorabilia - HARRIS COLLECTION: TIMBER PANEL
BHS CollectionTimber panel, stained and decorated. Work sample from the last Bendigo coachworks Company. The main part of the panel is brown with a large flowery design in the middle, there are small flowers all around a small green band runs around and at the four corners a larger flower, there is a larger yellow band and another small green one followed by a large black band all along the black band more flower designs and another small green band, the panel is completed by another yellow band. The initial F. W. are on the outside black band. On the back the inscription ''Sample of gig and buggy lining done in 1969 by the last of the fully trained people in Bendigo'' written by John Ellison, Kangaroo Flat. Also the name Phillip is written on the back. from George Harris estateephemera, mementoes, timber panel -
 Melbourne Tram Museum
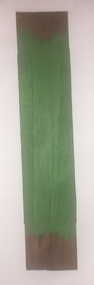
Functional object - Material sample, Norm Cross, Samco Strong Machinery Pty Ltd, "Celastic Roof Covering", c1970
Material sample of "Celastic Roof covering" - a woven cloth type material, light grey which was used in the tramway rooves by the MMTB c1970? 1 - piece of timber - 73mm wide x 363 long to which the material has been applied and one side and edges painted MMTB green colour. 2 - piece of Celastic material, 125W x 330 long 3 - Hand written note by Norm Cross, undated, on the source of the material, costs, and how it was applied - 188H x 123W.trams, tramways, tramcars, materials, workshops, paint, overhauls -
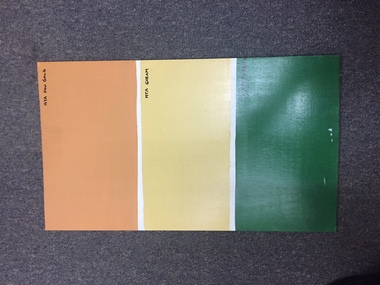 Melbourne Tram Museum
Document - Paint Sample, Instruction, Yarra Trams, "Class W8 finishing instructions", Jul. 2012
.1 - sheet of three ply timber which has been painted with three different colours - MTA New Gold, MTA Cream and MTA Panel Green. .2 - Photocopy of an A4 sheet titled "RWC Work Instruction - class W8 Finishing Specifications", dated 25/7/2012 listing the Dulux Formulas for the above colours and MTA Dorian Grey, Bogie black and safety yellow. Not known if these are the actual colours being used on the trams being rebuilt as W8 by Bendigo Tramways.trams, tramways, paint, w8 class, colour schemes -
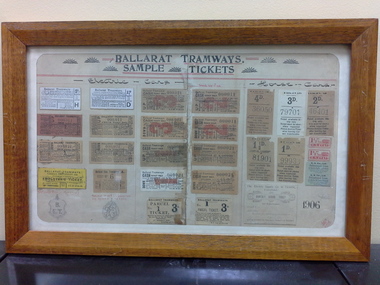 Ballarat Tramway Museum
Ephemera - Framed tickets, Electric Supply Co. of Vic (ESCo), "Ballarat Tramways - Sample tickets", 1906, 1966
Demonstrates and yields information about the ESCo tickets of 1906, shows the variety of tickets and passes used.Framed - wooden surround, glass, set of 26 actual tickets and two sketches of passes, timber backing board with the title "Ballarat Tramways - Sample tickets", dated 1906. Sets out the various tickets used by ESCo at the time and most likely used as a training aid for new conductors on both the electric and horse trams. Not to be displayed in light or hung up, that is display with care as fading is likely. See history of the object for details of the frame etc. Image i1 - as received from the City of Ballarat i2 - as repaired by by Kosnar's Picture framing. i3 - close up on the writing on the rear of the backing sheet i4 - detailed (1200dpi) image of the tickets. - 26.6 M i5 - image of the rear as received i6 - ditto - 600 dpi (Suitable for e-mail) - 7.2Mb See Reg Item 1846 for the newspaper clipping of Les Denmead handing the framed set of tickets to the City of Ballarat on 21/9/1971. Tickets comprise: Electric Tram Top Row: 2d - white - letter H - strip ticket requiring a trip ticket of the same value to be issued. 1 1/2d - white letter D - strip ticket requiring a trip ticket of the same value to be issued. 3d - off white, number 000,021 - Cash Adult - Up 2d - off white, number 000011 - Cash Adult - Up 2nd row 2d - check ticket - light red paper - number 000,011 - Up 1 1/2d - off white paper, number 000,011 - Up 3d - off white, number 000,021 - Cash Adult - Down 2d - off white, number 000011 - Cash Adult - Down 3rd row 2d - check ticket - off white paper - number 000,021 - Down 1 1/2d - check ticket - off white paper - number 000,021 - Down 1d - off white - number 000009 cash - child Up ticket 2d - off white - number 000021 cash - child Up ticket 4th row Employees only ticket - yellow, strip ticket School ticket - off white strip ticket - No. 6 1d - off white - number 000021 cash - child Down ticket 2d - off white - number 000021 cash - child Down ticket 5th row Drawing of Employees Bronze Medallion Drawing of pass issued to City Councillors and Officers of the Company Parcel ticket - No. 1 - 3d - to be attached to the parcel Parcel ticket - No. 1 - 3d - issued to the sender Horse Tram tickets 1st row 4d - off white paper - 36050 3d - white paper - 79701 2d - off white paper - 46401 2nd row 1 1/2d - off white - 81901 1d - off white - 99933 two 1 1/2 strip ticket - red two 4d daily return ticket - blue paper strip ticket 3rd row Monthly School ticket Sheet dated 6-9-06 with the initials SHS. "on the inside of the frame object was "Restored (?) and framed by Keith Russell Anderson, SEC Ballarat 26 Aug.1966"trams, tramways, tickets, esco, city of ballarat -
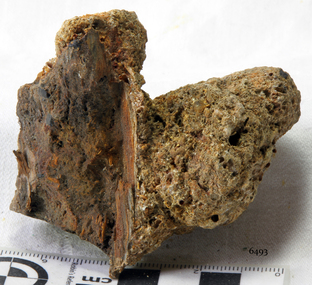
 Flagstaff Hill Maritime Museum and Village
Wood encrustation, 1855
The object is a mass of small shipwreck debris that has been concreted together by sediment and marine growth. It was retrieved from the wreck-site of the SCHOMBERG, which ran aground near the mouth of the Curdies River near Peterborough in 1855. The conglomerate of preserved wood impressions, rusted metal pieces, a small square of copper alloy, and black glass-like stones, presents too disjointed a collection to provide information on their purpose or function on the ship. The natural and gradual process of limestone accretion is a significant feature of the wreck-site, which was rediscovered by fishermen and skindivers in 1973. In his book “Exploring Shipwrecks of Western Victoria”, experienced diver and former director at Flagstaff Hill, Peter Ronald writes that the SCHOMBERG’s “triple layered wooden hull has disintegrated almost without trace…The turbulent shallow waters have promoted particularly heavy marine growth which tend to disguise the wreckage…the most prominent feature being a corroded mass of railway iron…Close inspection reveals small artefacts firmly embedded in the marine concretion which…is quite literally as hard as iron”. The huge oblong mass of concretion that now distinguishes the site covers the remains of this heavy cargo. A contemporary account of the SCHOMBERG’s fate (told by two of her passengers to the Melbourne Argus) alleges the ship “was overloaded, drawing over 25 feet when she left, and the cargo was chiefly iron and plant for the Geelong Railway”. The SCHOMBERG was a 2,000 ton clipper ship, specifically designed for the Australian immigration trade (back-loading wool for Britain’s mills), and constructed in Hall’s shipyard in Aberdeen, Scotland. She was owned by the Black Ball Line and launched in 1855. Alexander Hall & Son were renowned builders of sleek and fast 1,000 ton clippers for the China trade (opium in, tea out) and were keen to show they could also outclass the big North American ships built by Donald Mackay. Consequently the SCHOMBERG was ‘overbuilt’. Her hull featured five ‘skins’ of Scotch Larch and Pitch Pine overlaying each other in a diagonal pattern against a stout frame of British Oak. Oak has been favoured by builders of wooden ships for centuries. Its close, dense grain made it harder to work, but also gave it great strength and durability. In addition, the lateral spread of its branches supplied a natural curvature for the ribs of a vessel’s hull, as well as providing the small corner or curved pieces (‘knees’ and ‘elbows’) that fit them together. The shape and texture of this wood sample suggests a dense hardwood like Oak. The timber has been cut off at one end since its recovery from the sea, exposing a smooth and almost shiny surface. Seasoned English Oak has a similar light brown colour and tight grained finish. At the launch the SCHOMBERG’s 34 year old master, Captain ‘Bully’ Forbes, had promised Melbourne in 60 days, "with or without the help of God." James Nicol Forbes was born in Aberdeen in 1821 and rose to fame with his record-breaking voyages on the famous Black Ball Line ships; MARCO POLO and LIGHTNING. In 1852 in the MARCO POLO he made the record passage from London to Melbourne in 68 days. There were 53 deaths on the voyage but the great news was of the record passage by the master. In 1954 Captain Forbes took the clipper LIGHTNING to Melbourne in 76 days and back in 63 days, this was never beaten by a sailing ship. He often drove his crew and ship to breaking point to beat his own records. He cared little for the comfort of the passengers. On this, the SCHOMBERG’s maiden voyage, he was going to break records. SCHOMBERG departed Liverpool on her maiden voyage on 6 October 1855 flying the sign “Sixty Days to Melbourne”. She departed with 430 passengers and 3000 tons cargo including iron rails and equipment intended to build the Melbourne to Geelong Railway and a bridge over the Yarra from Melbourne to Hawthorn. She also carried a cow for fresh milk, pens for fowls and pigs, 90,000 gallons of water for washing and drinking. It also carried 17,000 letters and 31,800 newspapers. The ship and cargo was insured for $300,000, a fortune for the time. The winds were poor as she sailed across the equator, slowing SCHOMBERG’s journey considerably. Land was first sighted on Christmas Day, at Cape Bridgewater near Portland, and Captain Forbes followed the coastline towards Melbourne. Forbes was said to be playing cards when called by the Third Mate Henry Keen, who reported land about 3 miles off, Due in large part to the captain's regarding a card game as more important than his ship, it eventually ran aground on a sand spit near Curdie's Inlet (about 56 km west of Cape Otway) on 26 December 1855, 78 days after leaving Liverpool. The sand spit and the currents were not marked on Forbes’s map. Overnight, the crew launched a lifeboat to find a safe place to land the ship’s passengers. The scouting party returned to SCHOMBERG and advised Forbes that it was best to wait until morning because the rough seas could easily overturn the small lifeboats. The ship’s Chief Officer spotted SS QUEEN at dawn and signalled the steamer. The master of the SS QUEEN approached the stranded vessel and all of SCHOMBERG’s passengers and crew were able to disembark safely. The SCHOMBERG was lost and with her, Forbes’ reputation. The Black Ball Line’s Melbourne agent sent a steamer to retrieve the passengers’ baggage from the SCHOMBERG. Other steamers helped unload her cargo until the weather changed and prevented the salvage teams from accessing the ship. Later one plunderer found a case of Wellington boots, but alas, all were for the left foot! Local merchants Manifold & Bostock bought the wreck and cargo, but did not attempt to salvage the cargo still on board the ship. They eventually sold it on to a Melbourne businessman and two seafarers. In 1864 after two of the men drowned when they tried to reach SCHOMBERG, salvage efforts were abandoned. Parts of the SCHOMBERG were washed ashore on the south island of New Zealand in 1870, nearly 15 years after the wreck. The wreck now lies in almost 9 metres of water. Although the woodwork is mostly disintegrated the shape of the ship can still be seen due to the remaining railway irons, girders and the ship’s frame. A variety of goods and materials can be seen scattered about nearby. Flagstaff Hill holds many items salvaged from the SCHOMBERG including a ciborium (in which a diamond ring was concealed), communion set, ship fittings and equipment, personal effects, a lithograph, tickets and photograph from the SCHOMBERG. One of the SCHOMBERG bells is in the Warrnambool Library. This object is listed on the Shipwreck Artefact Register, No S/49, and is significant because of its association with the ship SCHOMBERG. The SCHOMBERG collection as a whole is of historical and archaeological significance at a State level, listed on the Victorian Heritage Register VHR S612. Flagstaff Hill’s collection of artefacts from the SCHOMBERG is significant for its association with the Victorian Heritage Registered shipwreck. The collection is primarily significant because of the relationship between the objects, as together they have a high potential to interpret the story of the SCHOMBERG. The SCHOMBERG collection is archaeologically significant as the remains of an international passenger ship. The shipwreck collection is historically significant for representing aspects of Victoria’s shipping history and its potential to interpret sub-theme 1.5 of Victoria’s Framework of Historical Themes (living with natural processes). The collection is also historically significant for its association with the shipwreck and the ship, which was designed to be fastest and most luxurious of its day. The SCHOMBERG collection meets the following criteria for assessment: Criterion A: Importance to the course, or pattern, of Victoria’s cultural history. Criterion B: Possession of uncommon, rare or endangered aspects of Victoria’s cultural history. Criterion C: Potential to yield information that will contribute to an understanding of Victoria’s cultural history. The object is an aggregate of limestone sediment that formed at the wreck-site of the SCHOMBERG (1855). It is an irregularly shaped conglomerate of sand, shell-grit and marine worm casings from the ocean floor, but also incorporates an assortment of manufactured metal pieces and pipe fittings (corroded with red rust), a small rectangular piece of copper sheet, some ‘petrified’ wood remains (hardened and a soft brown colour), and pieces of black shiny stone (roughly cube shaped and possibly glass or porcelain remnants). There is an impression left in the stone of a joist or plank end but the original timber that the sediment formed around has since been dispersed by the sea.flagstaff hill, warrnambool, shipwrecked-coast, flagstaff-hill, flagstaff-hill-maritime-museum, maritime-museum, shipwreck-coast, flagstaff-hill-maritime-village, schomberg, shipwreck timber, alexander hall and son, shipwreck debris, black ball line, 1855 shipwreck, aberdeen clipper ship, captain forbes, peterborough shipwreck, ss queen -
 Flagstaff Hill Maritime Museum and Village
Wood sample, 1855
The artefact is a piece of ship’s timber from the wreck-site of the SCHOMBERG, a vessel which collided with the Peterborough reef on her maiden voyage in December 1855. This small wooden remnant of the disaster has been concreted on one side by the accrual of marine sediment while submerged. The build-up of sediment over the remains of the vessel is typical of the site as a whole. This artefact illustrates the reclaiming power of the ocean and the gradual disappearance of timber constructed vessels that have come to grief along this coastline (for example, the THISTLE in 1837, and the CHILDREN in 1838). The SCHOMBERG was a 2,000 ton clipper ship, specifically designed for the Australian immigration trade (back-loading wool for Britain’s mills), and constructed in Hall’s shipyard in Aberdeen, Scotland. She was owned by the Black Ball Line and launched in 1855. Alexander Hall & Son were renowned builders of sleek and fast 1,000 ton clippers for the China trade (opium in, tea out) and were keen to show they could also outclass the big North American ships built by Donald Mackay. Consequently the SCHOMBERG was ‘overbuilt’. Her hull featured five ‘skins’ of Scotch Larch and Pitch Pine overlaying each other in a diagonal pattern against a stout frame of British Oak. Oak has been favoured by builders of wooden ships for centuries. Its close, dense grain made it harder to work, but also gave it great strength and durability. In addition, the lateral spread of its branches supplied a natural curvature for the ribs of a vessel’s hull, as well as providing the small corner or curved pieces (‘knees’ and ‘elbows’) that fit them together. The shape and texture of this wood sample suggests a dense hardwood like Oak. The timber has been cut off at one end since its recovery from the sea, exposing a smooth and almost shiny surface. Seasoned English Oak has a similar light brown colour and tight grained finish. At the launch the SCHOMBERG’s 34 year old master, Captain ‘Bully’ Forbes, had promised Melbourne in 60 days, "with or without the help of God." James Nicol Forbes was born in Aberdeen in 1821 and rose to fame with his record-breaking voyages on the famous Black Ball Line ships; MARCO POLO and LIGHTNING. In 1852 in the MARCO POLO he made the record passage from London to Melbourne in 68 days. There were 53 deaths on the voyage but the great news was of the record passage by the master. In 1954 Captain Forbes took the clipper LIGHTNING to Melbourne in 76 days and back in 63 days, this was never beaten by a sailing ship. He often drove his crew and ship to breaking point to beat his own records. He cared little for the comfort of the passengers. On this, the SCHOMBERG’s maiden voyage, he was going to break records. SCHOMBERG departed Liverpool on her maiden voyage on 6 October 1855 flying the sign “Sixty Days to Melbourne”. She departed with 430 passengers and 3000 tons cargo including iron rails and equipment intended to build the Melbourne to Geelong Railway and a bridge over the Yarra from Melbourne to Hawthorn. She also carried a cow for fresh milk, pens for fowls and pigs, 90,000 gallons of water for washing and drinking. It also carried 17,000 letters and 31,800 newspapers. The ship and cargo was insured for $300,000, a fortune for the time. The winds were poor as she sailed across the equator, slowing SCHOMBERG’s journey considerably. Land was first sighted on Christmas Day, at Cape Bridgewater near Portland, and Captain Forbes followed the coastline towards Melbourne. Forbes was said to be playing cards when called by the Third Mate Henry Keen, who reported land about 3 miles off, Due in large part to the captain's regarding a card game as more important than his ship, it eventually ran aground on a sand spit near Curdie's Inlet (about 56 km west of Cape Otway) on 26 December 1855, 78 days after leaving Liverpool. The sand spit and the currents were not marked on Forbes’s map. Overnight, the crew launched a lifeboat to find a safe place to land the ship’s passengers. The scouting party returned to SCHOMBERG and advised Forbes that it was best to wait until morning because the rough seas could easily overturn the small lifeboats. The ship’s Chief Officer spotted SS QUEEN at dawn and signalled the steamer. The master of the SS QUEEN approached the stranded vessel and all of SCHOMBERG’s passengers and crew were able to disembark safely. The SCHOMBERG was lost and with her, Forbes’ reputation. The Black Ball Line’s Melbourne agent sent a steamer to retrieve the passengers’ baggage from the SCHOMBERG. Other steamers helped unload her cargo until the weather changed and prevented the salvage teams from accessing the ship. Later one plunderer found a case of Wellington boots, but alas, all were for the left foot! Local merchants Manifold & Bostock bought the wreck and cargo, but did not attempt to salvage the cargo still on board the ship. They eventually sold it on to a Melbourne businessman and two seafarers. In 1864 after two of the men drowned when they tried to reach SCHOMBERG, salvage efforts were abandoned. Parts of the SCHOMBERG were washed ashore on the south island of New Zealand in 1870, nearly 15 years after the wreck. The wreck now lies in almost 9 metres of water. Although the woodwork is mostly disintegrated the shape of the ship can still be seen due to the remaining railway irons, girders and the ship’s frame. A variety of goods and materials can be seen scattered about nearby. Flagstaff Hill holds many items salvaged from the SCHOMBERG including a ciborium (in which a diamond ring was concealed), communion set, ship fittings and equipment, personal effects, a lithograph, tickets and photograph from the SCHOMBERG. One of the SCHOMBERG bells is in the Warrnambool Library. The SCHOMBERG collection as a whole is of historical and archaeological significance at a State level, listed on the Victorian Heritage Register VHR S612. Flagstaff Hill’s collection of artefacts from the SCHOMBERG is significant for its association with the Victorian Heritage Registered shipwreck. The collection is primarily significant because of the relationship between the objects, as together they have a high potential to interpret the story of the SCHOMBERG. The SCHOMBERG collection is archaeologically significant as the remains of an international passenger ship. The shipwreck collection is historically significant for representing aspects of Victoria’s shipping history and its potential to interpret sub-theme 1.5 of Victoria’s Framework of Historical Themes (living with natural processes). The collection is also historically significant for its association with the shipwreck and the ship, which was designed to be fastest and most luxurious of its day. The SCHOMBERG collection meets the following criteria for assessment: Criterion A: Importance to the course, or pattern, of Victoria’s cultural history. Criterion B: Possession of uncommon, rare or endangered aspects of Victoria’s cultural history. Criterion C: Potential to yield information that will contribute to an understanding of Victoria’s cultural history. A piece of wood, concreted in sediment, from the wreck of the SCHOMBERG (1855). The limestone accretion includes sand, shell grit and marine worm casings. The exposed surface of the wood is broken and worn smooth along the grain. One end of the timber has been cut or sawn off across the grain, presenting a smooth and shiny surface.flagstaff hill, warrnambool, shipwrecked-coast, flagstaff-hill, flagstaff-hill-maritime-museum, maritime-museum, shipwreck-coast, flagstaff-hill-maritime-village, wood segment, schomberg, shipwreck timber, alexander hall and son, limestone concretion, oak-framed hull