Showing 599 items
matching wendouree west
-
 Ballarat Tramway Museum
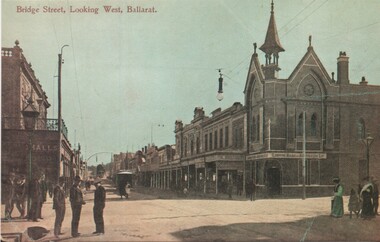
Postcard - copy, WTP, "Bridge Street looking west, Ballarat"
Bridge St looking West from Peel St. Has a bank on the corner and an tram in the distance. Card dates the view as early 1900's. Card reproduced for Sovereign Hill Gold Mining Township by Rose Stereograph Co. of Glen Waverley c2000. Divided back type with caption, production and the Rose Co. symbol on the rear. Illustration of the same image added 4-1-2024 - by WTP & Co.Yields information about the appearance of Bridge St following the introduction of electric trams in 1905 and has a strong association with the work of Sovereign Hill and Rose Stereograph Co.Postcard reproduction - part sepia coloured and hand coloured. Second copy printed coloured illustration on plain paper.trams, tramways, bridge st, ballarat, esco, rose postcards -
 Ballarat Tramway Museum
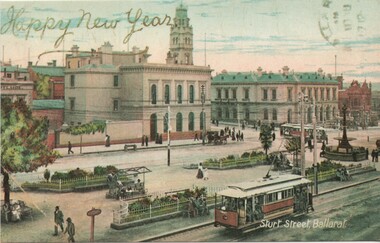
Postcard - copy, "Sturt Street looking E., Ballarat" and "Happy New Years", c2000
Yields information about the appearance of Sturt St following the introduction of electric trams in 1905 and has a strong association with the work of Sovereign Hill and Rose Stereograph Co.Postcard reproduction - coloured - of an ESCo tram near the intersection of Armstrong St. and Sturt St. travelling west along the south side of Sturt Street with the Post Office and bank buildings on the corner of Sturt and Lydiard Sts in the view. Photo appears to be taken soon after opening of the electric trams, ESCo tram has destination board on the front dash of the tram. Card reproduced for Sovereign Hill Gold Mining Township by Rose Stereograph Co. of Glen Waverley c2000. Divided back type with caption, production and the Rose Co. symbol on the rear.trams, tramways, sturt st, ballarat, esco, rose postcards -
 Ballarat Tramway Museum
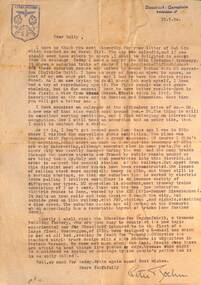
Letter - from Peter Boehm Dusseldorf to Wal Jack, Peter Boehm, 1950
Wal Jack had an extensive range of correspondents throughout Australia and the world who often provided him with detailed drawings and notes on various tramway systems. The letter from a resident of Dusseldorf West Germany, details the author's travels, issues post World War 2, photos, enlargers, a visit to Koln or Cologne, war damage, photos of Russian tramcars, tramcars in use, the interurban line to Bonn and his forthcoming visit to "Dusseldor fer Waggonfabrik" which became the Duewag factory. A web search shows that the author published at least one book on trams.Demonstrates some of the correspondence that Wal Jack received from around the world.Letter typed on A4 paper with sender's stamp and address with a pencil sketch on the rear. letters, wal jack, railways, tramways, dusseldorf, duewag, koln, colongne -
 Ballarat Tramway Museum
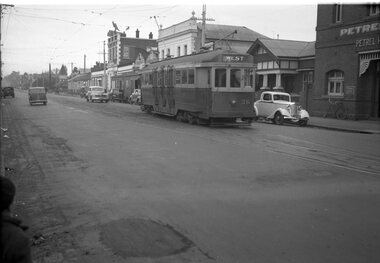
Negative, Wal Jack, late 1940's
Negative and Digital images of the Wal Jack Geelong Negative file of Geelong 36 in Pakington St near the corner with Collins St, leaving the crossing loop, heading for West. Has the Petrel Hotel in the background. Photo late 1940's. trams, tramways, geelong, pakington st, west, tram 36 -
 Ballarat Tramway Museum
Negative - Set of 2, Wal Jack, mid to late 1940's
Set of two Negatives and Digital images of the Wal Jack Geelong Negative file of the Geelong 33 at the Beach terminus. The tram has the destination of West. The MESCo built power station is in the background. Photo mid to late 1940's. trams, tramways, geelong, beach, power station, tram 33 -
 Ballarat Tramway Museum
Negative, Wal Jack, mid to late 1940's
Negative and Digital images of the Wal Jack Geelong Negative file of two trams including No. 27 at the intersection of Ryrie and Moorabool streets, with shoppers and cars. No. 27 has the destination of West. In the background is Donald Chemist. Note the set of bar traffic lights at this location. Photo mid to late 1940's. trams, tramways, geelong, ryrie st, moorabool st, traffic lights, tram 27 -
 Ballarat Tramway Museum
Negative, Wal Jack, mid to late 1940's
Negative and Digital images of the Wal Jack Geelong Negative file of Geelong 20 at the Beach terminus. The tram has the destination of West. In the background are some of the buildings of the Power Station Photo mid to late 1940's. trams, tramways, geelong, beach, tram 20 -
 Ballarat Tramway Museum
Negative, Wal Jack, mid to late 1940's
Negative and Digital images of the Wal Jack Geelong Negative file of Geelong 17 at West terminus in Pakington St. Note the shelter and phone box that appear in Reg Item 7829. On the left is the Telegraph Hotel building and in the background is a shop advertising Robur Tea. Photo mid to late 1940's. trams, tramways, geelong, west, pakington st, tram 17 -
 Ballarat Tramway Museum
Negative, Wal Jack, mid to late 1940's
Negative and Digital images of the Wal Jack Geelong Negative file of Geelong 35 outbound in Pakington St to West, with the Geelong North or Geelong Locomotive depot in the background. Photo mid to late 1940's. trams, tramways, geelong, west, pakington st, railways, tram 35 -
 Ballarat Tramway Museum
Negative, Wal Jack, early 1950's
Negative and Digital images of the Wal Jack Ballarat Negative file of Geelong 21 at the West terminus with the Telegraph Hotel in the background. The tram has the destination of East in the rear canopy and the West in the side destination. The adjacent pole has the End of section sign and the painted markings.trams, tramways, geelong, west, signs, tram 21 -
 Ballarat Tramway Museum
Ephemera - Ticket/s, State Electricity Commission of Victoria (SECV), "Tickets used on the last runs of the Mt Pleasant & Gardens via Sturt St runs of the Ballarat Tramways", 1970
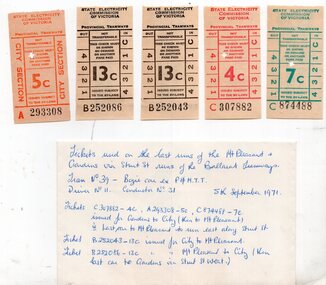
Demonstrates arrangements made by the TMSV to record the closure of the SEC Ballarat system in 1971 and has a strong association with the donor's activities at the time.Set of five tickets contained within an envelope titled "Tickets used on the last runs of the Mt Pleasant & Gardens via Sturt St runs of the Ballarat Tramways". Noted that it was tram 39, driver No. 11 and Conductor 31 on Sunday 5/9/1971 Describes each ticket, with number and use.. Contains one 5c City Section, two 13c, one 4c and 1 7c. See image for details. trams, tramways, mt pleasant, sturt st west, tickets, closure -
 Ballarat Tramway Museum
Photograph - digital Images, Warren Doubleday
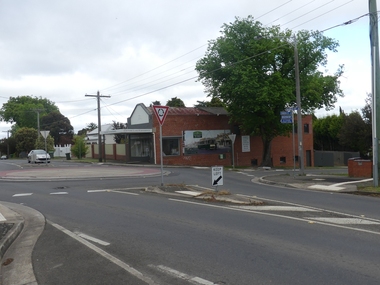
Set of 6 digital images featured on the building on the south west corner of Barkly and Cobden Sts, the Mount Pleasant tram terminus. Taken 12/11/2020 .1 - general view .2 - view of the main panel with interpretative panels. .3 and .4 - view of the interpretative panels with credits - includes photo turned into a mural by Bob Wilson. .5 - map panel .6 - pamphlet box.trams, tramways, mount pleasant terminus, barkly st, history, heritage, interpretation -
 Ballarat Tramway Museum
Slide - 35mm slide/s, Les Fordham, Aug. 1967
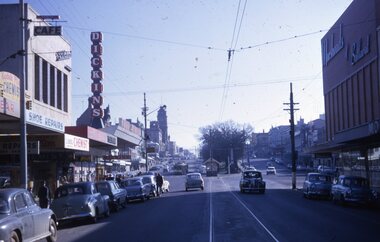
Yields information about the appearance of Bridge St looking west into Sturt St.Kodachrome white cardboard mount 35mm slides - dated August 1967 taken by Les Fordham of a view looking along Bridge St into Sturt St showing trams in the city loop, the Grenville St shelter and buildings on either side of the street. In the background is the Dickins Food store sign and Morseheads of Ballarat store.tramways, trams, sturt st, city loop, grenville st, bridge st, shelters -
 Ballarat Tramway Museum
Slide - 35mm slide/s - set of 3, Les Fordham, Aug. 1967
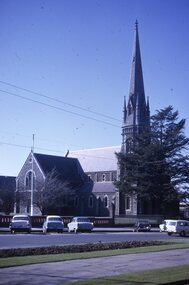
Set of 3 Kodachrome white cardboard mount 35mm slides - dated August 1967 taken by Les Fordham. .1 - St Andrew Kirk or church .2 - Town Hall, with a tram just in the view showing Sturt St West .3 - ditto with bogie tram at the tram stop.tramways, trams, town hall, sturt st, st andrews kirk -
 Ballarat Tramway Museum
Document - Form/s, List, State Electricity Commission of Victoria (SECV), "Tram times for Sunday 2-3-58", "Application for permission to exchange duties", 1958
Demonstrates preparation of notes for tram operations and an actual use of the form used for change of shifts by crewsList - hand written sheet on the rear of the application form listing tram times from Lydiard St / Outer termini to city and the last trams, titled "Tram times for Sunday 2-3-58" Lists trams for Victoria St, Mt Pleasant, Sebastopol, Lydiard St North, Gardens via Sturt St West and Drummond North. Written in ink. Form - duplicated form S35 - "Application for permission to exchange duties", dated 19-2-58, for A Thompson (No. 63) to swap with C. Goldsmith (No. 39) on 22-2-58. Signed by both parties and authorised by the Traffic Inspector. Both in ink and pencil. Was attached to Reg Item 8027 trams, tramways, rosters, employees, forms, shifts, inspectors -
 Ballarat Tramway Museum
Photograph - Digital image, W. J. Llewelyn, 1/01/1970 12:00:00 AM
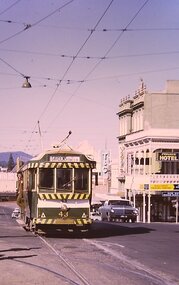
Yields information about the intersection of Sturt and Lydiard St.Digital images of tram 43 crossing Lydiard St in Sturt St, with destination of Gardens via Sturt St West. Has the T&G sign, Mechanics Institute and the Unicorn Hotel in the view. Photo by Chris Phillips. Image dated 1/1/1970 - to be confirmed. trams, tramways, sturt st, lydiard st, city, tram 43 -
 Ballarat Tramway Museum
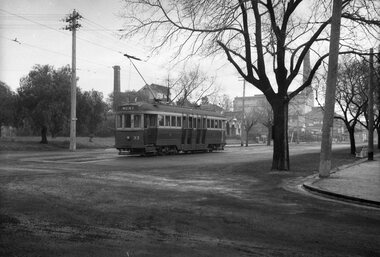
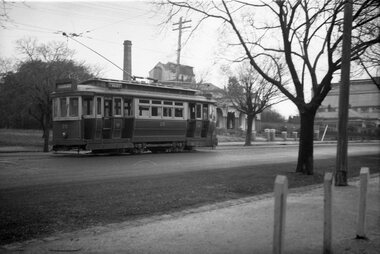
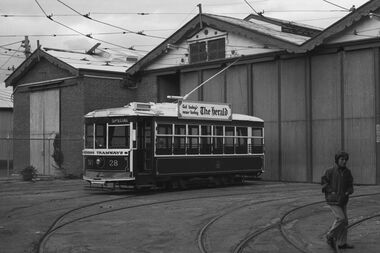
Negative, Bruce Herbert, "Bendigo and Ballarat Trams (AETA Convention) 30 Mar 1975", 30/03/1975 12:00:00 AM
Negative folder - made by ROW1 International of West Germany containing 40 No. 35 mm negatives of the AETA 1975 Convention visit to Ballarat and Bendigo on 30-3-1975. 17 photos of Ballarat and 23 of Bendigo. Ballarat photos: 1 - 40 at the Wendouree Parade crossing loop showing trams stop signage and AETA members standing at the front of the tram. 2 - distant view of 27 in the loop and the "wide roadway" 3 - view of 40 northbound about to nearing loop with various cars in the view. 4 - 40 about to enter loop with 27 in background. 5 - 40 and 27 at loop 6 - 40 at St Aidans Drive 7 - 14 and 27 at loop with 40 in the background 8 - 27 leaving loop 9 - 14 leaving loop 10 - General view showing cars and 40 in the loop, looking north. 11 - as for 1 12 - ditto 13 - 40 northbound, 27 southbound at loop 14 - 27 at loop 15 - 26, 14 and 28 at depot including 1 road. 16 - ditto with people viewing the trams - shows the overhead on 1 road. 17 - X41 and B80 on train at Spencer St, probably the train the group travelled on. trams, tramways, btps, ballarat, aeta, bendigo, bendigo trust, wendouree parade, depot, gardens loop, motor vehicles, tram 40 tram 27 tram 26 tram 14 tram 28 -
 Ballarat Tramway Museum
Negative, Bruce Herbert, "Bendigo and Ballarat Trams (AETA Convention) 30 Mar 1975", 30/03/1975 12:00:00 AM
Negative folder - made by ROW1 International of West Germany containing 40 No. 35 mm negatives of the AETA 1975 Convention visit to Ballarat and Bendigo on 30-3-1975. 17 photos of Ballarat and 23 of Bendigo. Bendigo photos: 1 - No. 28 at the depot 2 - ditto 3 - 24 and another bogie tram in side the depot 4 - No. 3? inside the depot 5 - 12, scrubber - 17 and two bogie trams 6 - scrubber and other bogie trams. 7 - general view with 24 and other bogie trams 8 - ditto 9 - Four trams at the Gold Mine, lead by 28. 10 - 19 at the Gold Mine 11 - single trucker with "tram tours" sign on the front 12 - 28 and two other cars at the Joss House, North Bendigo 13 - 19 and two other cars at the Joss House 14 - 30 at depot junction and loop 15 - 28 and 18 16 - 18 in the loop 17 - 28 and 18 McCrae St 18 - 28, 18 and 30 ditto 19 - 19 20 - No. 18 and 28 in Pall Mall with The Beehive in the background. Outside the building is an American Doughnut Kitchen van. The junction trackwork for the Eaglehawk lines remain in position. 21 - No. 30 northbound, with the City Family Hotel and other shops in the background. 22 - ditto and the cenotaph, 23 - B74 on a train at Spencer St. trams, tramways, btps, ballarat, aeta, bendigo, bendigo trust, depot, mccrae st, tram 28 tram 19 tram 30 tram 18 tram 24 tram 3 tram 12 tram 17 tram scrubber -
 Ballarat Tramway Museum
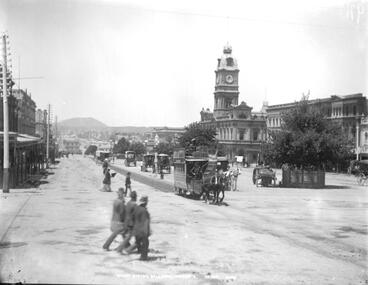
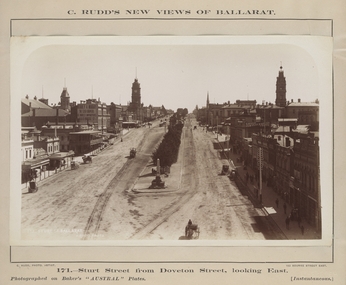
Photograph - Digital image, Fred Hardie, Sturt St Ballarat, horse tram heading west, 1892
Yields information about the appearance of Sturt St and the horse trams c1892Digital image from the George Washington Wilson and Co. photographic collection held by the University of Aberdeen - see related documents for information and their website for reproduction permissions. It notes that Fred Hardie was sent to Australia in 1892. There are some 41 Ballarat images available on the website. Sturt St Ballarat, horse tram heading west, with a number of pedestrians near the tram on the north side of the street with the Town Hall in the background. GB 0231 MS 3792/D1907 - taken at the intersection of Doveton St. Has a number of horse cabs in the background. See: https://www.abdn.ac.uk/special-collections/about-george-washington-wilson-383.php - accessed 29-12-2017.trams, tramways, sturt st, horse trams, horse cabs, doveton st -
 Ballarat Tramway Museum
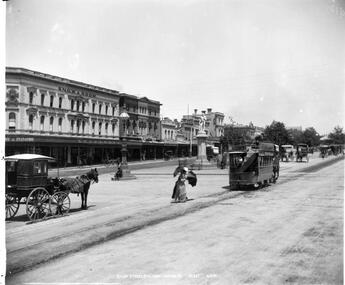
Photograph - Digital image, Fred Hardie, Sturt St Ballarat, horse tram No. 4 heading west, 1892
Yields information about the appearance of Sturt St and the horse trams c1892Digital image from the George Washington Wilson and Co. photographic collection held by the University of Aberdeen - see related documents for information and their website for reproduction permissions. It notes that Fred Hardie was sent to Australia in 1892. There are some 41 Ballarat images available on the website. Sturt St Ballarat, horse tram No. 4 heading west, with a lady near the tram on the north side of the street with the Snow and Room (Snows) in the background. GB 0231 MS 3792/A0186 - taken at the intersection of Armstrong St. Has a number of horse cabs in the background and one of the large street lights at the intersection. See: https://www.abdn.ac.uk/special-collections/about-george-washington-wilson-383.php - accessed 29-12-2017.trams, tramways, sturt st, horse trams, horse cabs, armstrong st, tram 4 -
 Ballarat Tramway Museum
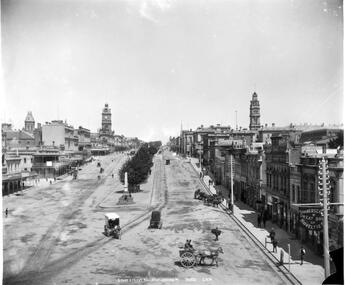
Photograph - Digital image, Fred Hardie, turt St Ballarat, looking west from Grenville, 1892
Yields information about the appearance of Sturt St and the horse tram track near Grenville St c1892Digital image from the George Washington Wilson and Co. photographic collection held by the University of Aberdeen - see related documents for information and their website for reproduction permissions. It notes that Fred Hardie was sent to Australia in 1892. There are some 41 Ballarat images available on the website. Sturt St Ballarat, looking west from Grenville St towards the Post Office and Town Hall. Shows the horse tram track and the median strip - photo number GB 0231 MS 3792/A2811. Has a number of horse cabs in the background, the 8-hour monument. In the bottom right-hand corner, has the "Summerscales Great shop of Novelties". In the centre of the photograph is a horse tram turning from Lydiard St north into Sturt St. See: https://www.abdn.ac.uk/special-collections/about-george-washington-wilson-383.php - accessed 29-12-2017.trams, tramways, sturt st, horse trams, horse cabs, grenville st -
 Ballarat Tramway Museum
Photograph - Digital image, Charles Rudd, c1890?
Yields information about the appearance of Sturt St following the introduction of the horse trams.Digital image from the State Library of Victoria website image No. H39558/12, a Charles Rudd photograph showing a view from the Nicholl and Alan building looking west along Sturt St. Shows the buildings along either side of Sturt St and a horse tram descending the hill. Very little other traffic in the photograph. Has signs for "C. Huck - The Queen's studio photo" and "Morrey and Murray", the Cash Drapers on the Ballarat Mechanics Institute building. Note the caption of the photograph is incorrect. See image btm7019i2.pdf for the SLV link - correct as of 31-12-17. See image i2 for a more detailed photograph.trams, tramways, grenville st, sturt st, horse trams -
 Ballarat Tramway Museum
Photograph - Digital image, Chris Phillips, c1970
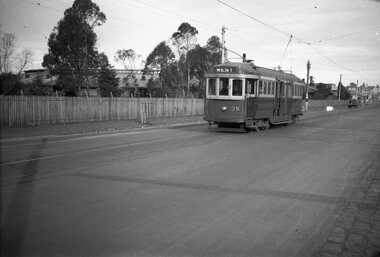
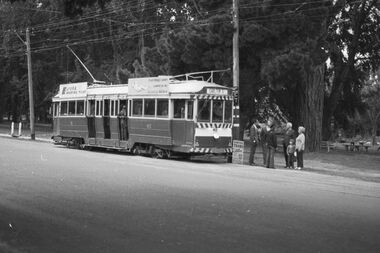
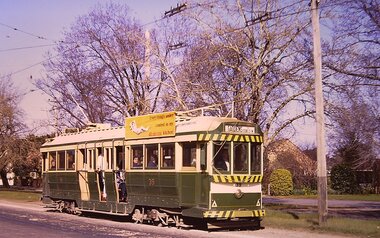
Yields information about the tram track and trams in the Gardens area.Digital images of tram 18 in Wendouree Parade, with destination of Gardens via Sturt St West - possibly near Carlton St. Photo by Chris Phillips, c1970trams, tramways, gardens, wendouree parade, tram 18 -
 Ballarat Tramway Museum
Photograph - Digital image, Chris Phillips, c1970
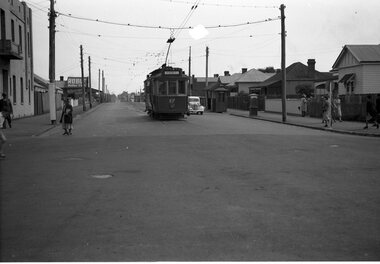
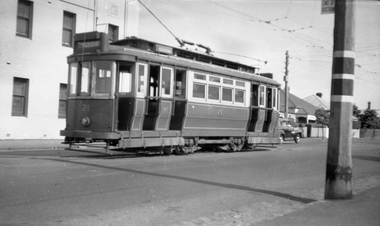
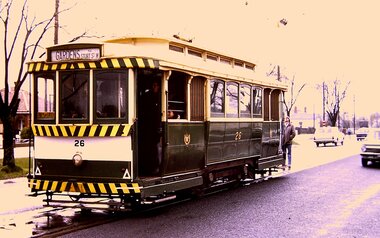
Yields information about the tram operations in Victoria St.Digital image of No. 26 in Victoria St, near the King St loop on a wet day. Tram has the destination of Gardens via Sturt St West. Person standing behind the tramcar looking up - the trolley pole may have be dewired.trams, tramways, victoria st, tram 26 -
 Ballarat Tramway Museum
Photograph - Digital image, Chris Phillips, c1970
Yields information about the tram operations in Sturt St West.Digital image of No. 39 in the Victoria Park loop or Russell St loop, Sturt St West, with destination of Gardens via Sturt St West. Has a SEC roof advert - Everything's under control in my all electric kitchen.trams, tramways, sturt st west, victoria park, russell st, tram 39 -
 Ballarat Tramway Museum
Photograph - Digital image, Chris Phillips, late 1950's?
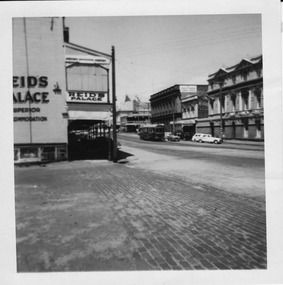
Yields information about the tram operations in Lydiard St North during the 1950's and the appearance of the buildings.Digital image, black and white, of a bogie tram north bound in Lydiard St North with the various buildings on the west side of the street - 1950's photo, prior to the installation of the lights on the tramcars. Has Reid's Coffee Palace in the photograph. Taken from the Railway Station entry.trams, tramways, lydiard st north, tram 13 -
 Ballarat Tramway Museum
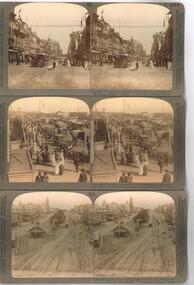
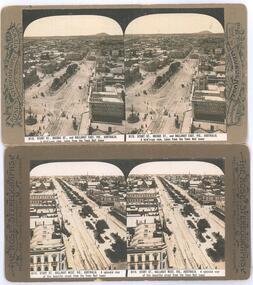
Photograph - Black & White Photograph/s, Underwood & Underwood, 1908
Yields information about the appearance of the intersection of Sturt and Grenville St looking west and tram operations.Photographic reproduction - sepia coloured of a three stereo pair images with details on the sides. Originals made by Underwood and Underwood of Arlington New Jersey and Westwood New Jersey USA. Not dated, c1908 Printed on A4 size ink-jet printer. Set of three: 1 - Collins St at Swanston St looking west - tram has the destination of Victoria Bridge - image number (10)-10238 2 - Princes Bridge, looking south with many people on the bridge, including market stalls, horse drawn vehicles and cable trams. Has the Wirths Circus building and ?? Stationers and Printers building in the background. 3 - Sturt St from Grenville St with 3 ESCo trams in the photograph along with the Town Hall, the tramway shelter. The Mechanics Institute Building has the "Talk W to W Coltman" sign on it. Image no. - (34)-10262.trams, tramways, melbourne, cable trams, collins st, swanston st, princes bridge, sturt st, esco, shelters -
 Ballarat Tramway Museum
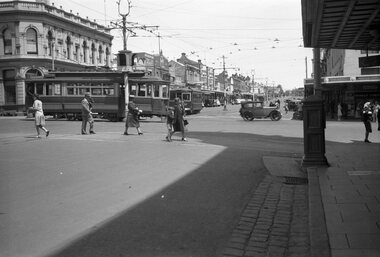
Photograph - Black & White Photograph/s, Rose Stereograph Co, c1905
Yields information about the appearance of the intersection of Sturt and Lydiard St and Sturt St itself looking west, showing the tram track arrangements.Photographic reproduction - sepia coloured of two stereo pair images with details on the sides. Originals made by the Rose Stereoscopic of Melbourne. Printed on A4 size ink-jet printer. Set of two: 1 - Sturt St and the Lydiard St intersection, electric trams looking east from the Town Hall. Shows Mount Warrenheip. Shows the roof of a tram in the bottom edge and a tram in Bridge St. Has the National Mutual building in the view, advertising the Commercial Union Fire (insurance) and Doepel and Chandler. Another building advertiser is "Carlton Ales" Image No. 8112 2 - Sturt St looking west from the Town Hall tower. Has one tram in the distance. Shows the layout of the Sturt St central median strip.trams, tramways, sturt st, lydiard st, stereo photograph, grenville st, esco, bridge st, town hall -
 Ballarat Tramway Museum
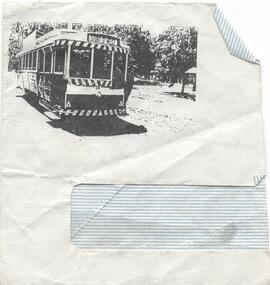
Drawing - Illustration/s, Printed on an envelope Ballarat 14, 1980's?
Demonstrates illustrating an envelope with a image of a tram. Source not known.Illustration on part of a lined window envelope of Ballarat Tram 14 at the Wendouree Parade Gardens crossing loop. Tram has the destination of Sturt St West. Appears to have been photocopied onto the envelope. Purpose not known.trams, tramways, envelopes, wendouree parade, gardens loop -
 Ballarat Tramway Museum
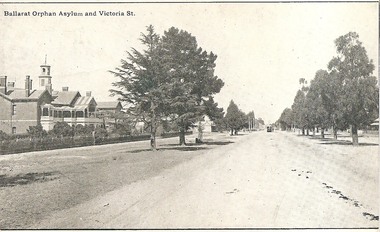
Postcard, Ballarat Orphan Asylum and Victoria St
Yields information about the corner of the Victoria St terminus at the Orphanage and the relationship to the tramway.Digital Image of the Ballarat Orphan Asylum and Victoria St looking west with a tram at the terminus and the tramway overhead poles. Titled "Ballarat Orphan Asylum and Victoria St" From the Facebook group of old time photographs of yesterday. Probably taken soon after the tramway opened in 1905.trams, tramways, victoria st, orphanage, esco, postcards, tram 1 ?