Showing 399 items
matching nth garden
-
 Ballarat Tramway Museum
Photograph - Digital image Set of 10, Tony Smith, 1971
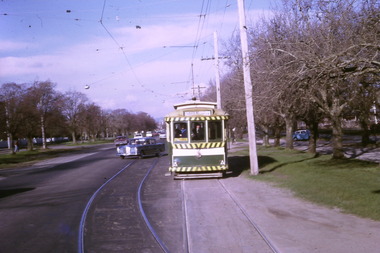
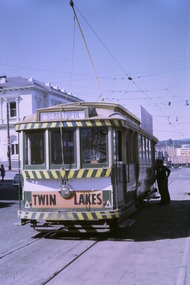
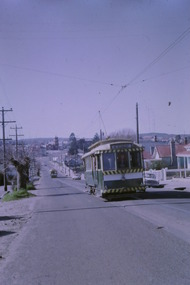
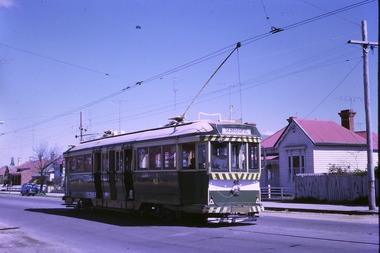
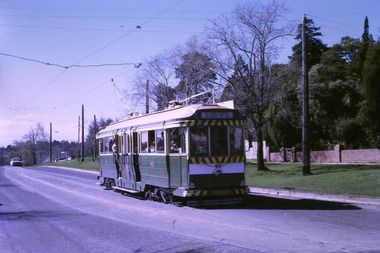
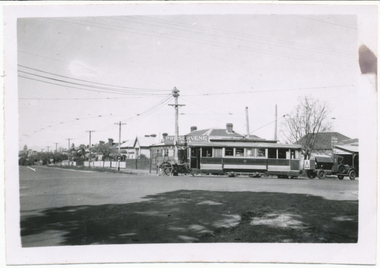
Yields information about Ballarat Tramways and trams prior to the closure of the tramway system.Set of 10 digital images of Ballarat trams prior to closure, scanned from original slides by Tony Smith, 1971 prior to closure of the system. .1 - 13 at the Parker St loop, Sturt St west waiting for another tram to arrive - Mercedes Benz car pull out around the stationary tramcar. .2 - 13 and another single trucker at the City terminus, north side of Sturt St. Note the conductor in the distance with a point bar about to hop onto the tram turning into Lydiard St North. Has the Post Office in the background. .3 - 26 arriving at the City stop, with the Mechanics Institute and Cooks Provide Hotel in the background. Tram has destination of Gardens via Drummond St North. .4 - 33 and 12 in Lydiard St Nth at Sturt St. 33 (Lydiard St Nth), 12 (Sebastopol). Has the post office and other buildings in the background .5 - 12 and 26 at city stop, south side with Town Hall and Myers in the background. 12 has destination of Sebastopol. .6 - 12 at intersection of Drummond St and Sturt St with Mobil petrol station in background and ad for Marshall batteries. Has the tram stop sign on the left hand side. Tram has destination of Sebastopol and a Twin Lakes sign. .7 - 30 northbound in Drummond St south at Sturt St about to turn into Sturt St. Has destination of Lydiard St Nth. Has the Southern Cross hotel in the background. .8 - 31 turning from Drummond St North into Sturt St, en route to Victoria St with the Shell service station in the background. Hospital Corner. Tram has roof advertisements for Johnnie Walker whisky. .9 - 30 and 31 (from above photos) in Sturt St. .10 - Tony Smith standing on the doorstep of 26 at Mt Pleasant terminus. Has the store in the background with The Sun and Robur tea adverts. trams, tramways, parker st loop, sturt st west, sturt st, conductors, drummond st, hospital corner, mt pleasant, tram 13, tram 26, tram 12, tram 30, tram 33 -
 Ballarat Tramway Museum
Photograph - Digital image Set of 10, Tony Smith, 5/09/1971 12:00:00 AM
Yields information about Ballarat Tramways and trams prior to the closure of the tramway system.Set of 10 digital images of Ballarat trams prior to closure, scanned from original slides by Tony Smith, 1971 prior to closure of the system. This set of slides, possibly on the last weekend of Mt Pleasant services - closure took place on 5/9/1971. . .1 - 30 rounding the curve from Lydiard St Nth to Sturt St. Tram has destination of Sebastopol. IN the background is the Commonwealth bank and the SEC cabinet switch isolator on the corner. .2 - 13 and another single trucker at the City terminus, north side with Racey's store and the SEC offices in the background. 13 has a Twin Lakes sign and the destination of Victoria St. .3 - 26 (Mt Pleasant) and 27 at the city terminus, with many passengers. Has the town hall in the background. .4 - 14 turning from Sturt St into Lydiard St (destination does not appear to be Lydiard St nth - City Oval?) with the ANZ bank in the background. A number of passengers waiting at the tram stop. .5 - 14 in Sturt St west near Pleasant St, at City Oval, with the pole being reversed by a "Bounds". Tram has the destination of City Oval. .6 - 13 west bound (showing Mt Pleasant) at Pleasant and Sturt St, with the VicRoads (CRB) offices and St Peters Anglican church in the background. .7 - 13 and 14 in Sturt St west, opposite City Oval (see .5 and .6) - trams reversing. .8 - 13 and 14 at Grenville St, about to cross into Bridge St from Sturt St. .9 - 14 at ditto - both trams for Mt Pleasant. Has the Patersons furniture store in the background. .10 - 30 eastbound in Sturt St, near Armstrong St with the Crockers store in the background. Tram showing "Special"trams, tramways, sturt st, electrical switching, city oval, lydiard st, pleasant st, grenville st, tram 30, tram 13, tram 26, tram 14 -
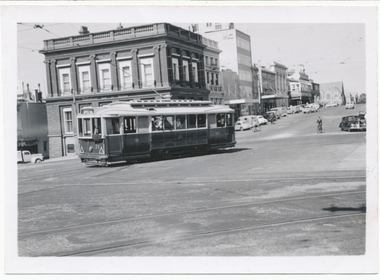
 Ballarat Tramway Museum
Photograph - Digital image Set of 10, Tony Smith, 5/09/1971 12:00:00 AM
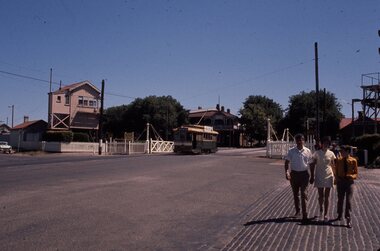
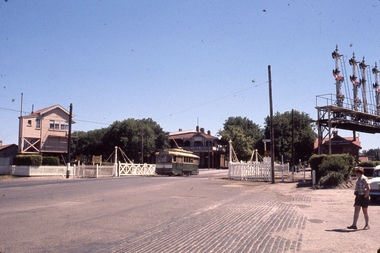
Yields information about Ballarat Tramways and trams prior to the closure of the tramway system.Set of 10 digital images of Ballarat trams prior to closure, scanned from original slides by Tony Smith, 1971 prior to closure of the system. This set of slides, possibly on the last weekend of Mt Pleasant services - closure took place on 5/9/1971. . .1 - 17 at the City terminus, north side. Tram showing the destination of Sebastopol and has a Twin Lakes sign. .2 - 26 at the city terminus, south side with Geommola's Pharmacy and Kodak Film advert and Town Hall in the background. .3 - 43 at the City terminus, north side, with destination of Mt Pleasant. Has a number of men at the tram stop. .4 - 14 leaving Bridge St, crossing Grenville St into Sturt St, with destination of City. Has the Dickins and Woolworths Big W store in the background. .5 - 43 at Mt Pleasant terminus with conductor boarding the tram. Tram has destination of Gardens via Sturt St West. In the background is the corner store with adverts for The Sun, Womens Weekly, Coca Cola and Robur Tea. .6 - 43 and 26 Barkly St, about to arrive at the Grant St loop. Both trams inbound. .7 - 43, 26 and 27 at Grant St loop. .8 - 12 (Lydiard St Nth) and another bogie tram at the city terminus north with the Town Hall in the background. .9 - 39 outbound in Barkly St to Mt Pleasant - note the new bus stop signs on either side of the tram. 10 - 27 (City) and 26 turning from Barkly St into Main St with the Ampol petrol station, a general store advertising Escort cigarettes and The Age in the background . On the right hand side is a fish and chips shop advertising crays and drinks.trams, tramways, sturt st, city, grenville st, bridge st, mt pleasant, barkly st, grant st, main st, closure, tram 17, tram 26, tram 43, tram 14, tram 12, tram 27, tram 39 -
 Ballarat Tramway Museum
Photograph - Digital image Set of 10, Tony Smith, 5/09/1971 12:00:00 AM
Yields information about Ballarat Tramways and trams prior to the closure of the tramway system.Set of 10 digital images of Ballarat trams prior to closure, scanned from original slides by Tony Smith, 1971 prior to closure of the system. This set of slides, possibly on the last weekend of Mt Pleasant services - closure took place on 5/9/1971. .1 - 13 outbound in Barkly St, Mt Pleasant - with another single trucker and the Ballarat Fire Station in the background. .2 - Bogie tram and single trucker at Grant St Loop. Has the Mobile service station on the right hand side. Note the family sitting on the steps of a house on the left side watching proceedings. .3 - 14 (Mt Pleasant) and 39 ditto. .4 - 27? and 39 crossing at the Morrison St loop. .5 - 14 and another single trucker at Mt Pleasant terminus. Has the corner store in the background with adverts for Robur Tea, Womens Weekly and Coca Cola. .6 - 39 and two single truckers at the Mt Pleasant terminus. .7 - View looking south along Ripon St from Mair St, with power station buildings on the right hand side. Shows the power distribution poles on the street. .8 - Scrubber tram on 0 road with tennis court alongside. .9 - 40 running special in Wendouree Parade, near the Haddon St intersection. .10 - 40 turning from Macarthur St into Drummond St Nth.trams, tramways, mt pleasant, barkly st, grant st, victoria park, sturt st west, ripon st, view st, depot, wendouree parade, drummond st nth, macarthur st, closure, tram 14, tram 39, tram 13, tram 26, tram scrubber, 40 -
 Ballarat Tramway Museum
Photograph - Digital image Set of 10, Tony Smith, 19/09/1971 12:00:00 AM
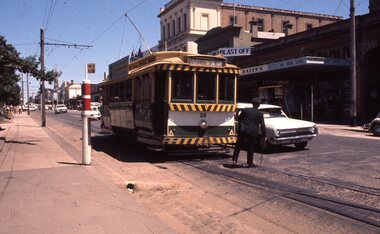
Yields information about Ballarat Tramways and trams prior to the closure of the tramway system.Set of 10 digital images of Ballarat trams prior to closure, scanned from original slides by Tony Smith, 1971 prior to closure of the system. This set of slides appears to be the last day of operations - 19/9/1971 .1 - 40 in Drummond St Nth. near Macarthur St, showing Sebastopol. .2 - 35 turning from Drummond St north into Sturt St with the Southern Cross hotel in the background. Note the shoes in the overhead. .3 - 42 in Drummond St North, showing Special, nearing Sturt St. .4 - 42 turning into Sturt St, with the Shell Service station on the left. .5 - 42 reversing on the Lydiard St Nth crossover with the post office in the background. Tram showing Sebastopol. .6 - 39 reversing at Grenville St, tram showing Special. Has the Dickins and the Gasometer in the background. the conductor adjusting the trolley ropes. .7 - 39 running from Bridge St into Sturt St - as above. .8 - 34 and 39? parked in the City Loop. Has Patersons furniture, Gear Chemist and Edments stores in the background. .9 - 43 showing special at the Sturt and Lydiard St stop with 39? about to leave Lydiard St Nth. Has the post office in the background. .10 - 40 at the Lydiard St North terminus, with passengers boarding. Cemetery gates in the background.trams, tramways, drummond st nth, macarthur st, sturt st, closure, lydiard st nth, grenville st, city loop, closure, tram 40, tram 35, tram 42, tram 39, tram 34 -
 Ballarat Tramway Museum
Photograph - Digital image Set of 9, Tony Smith, 19/09/1971 12:00:00 AM
Yields information about Ballarat Tramways and trams prior to the closure of the tramway system.Set of 9 digital images of Ballarat trams prior to closure, scanned from original slides by Tony Smith, 1971 prior to closure of the system. This set of slides appears to be the last day of operations - 19/9/1971 .1 - 40 south bound in Lydiard St Nth, at the Gregory St Loop. .2 - 40 after passing through the loop .3 - 42, north bound in Lydiard St. North at Macarthur St. .4 - 42 southbound at the Railway station level crossing with the Kennedy Murray Pty Ltd General Carriers building at the station yard in the background. .5 - 42 southbound in Lydiard St North after crossing the railway - taken from the signal box (B) with Reids Palace in the background and the Provincial Hotel. .6 - 35 northbound after passing through the level crossing. .7 - bogie tram crossing the tracks with Ballarat Railway Station in the background. .8 - bogie tram entering the double track section in Lydiard St with Reids Palace in the background. Note the new bus stop bay. .9 - 35 and another bogie in Sturt St, with the Town Hall, Golden Star Chinese Cafe and Georges Fish & Chip shop in the background.trams, tramways, lydiard st nth, gregory st, level crossings, ballarat railway station, sturt st, closure, tram 40, tram 42, tram 35 -
 Ballarat Tramway Museum
Slide - 35mm slide/s, Chas Bevan, 19/12/1970 12:00:00 AM
Yields information about the Lydiard St railway gates area and the buildings at the time.Colour slide - 35mm - of Ballarat single trucker No. 11? crossing the railway tracks in Lydiard St North with the B single box and Victoria House in the background. Photo taken by Chas Bevan on Saturday 19-12-1970."Ballarat trams 19-12-70 Lydiard St Nth"tramways, trams, lydiard st nth, railway crossing, tram 11 -
 Ballarat Tramway Museum
Slide - 35mm slide/s, Chas Bevan, 19/12/1970 12:00:00 AM
Yields information about the Lydiard St railway gates area and the buildings at the time.Colour slide - 35mm - of Ballarat single trucker (No. 26?) crossing the railway tracks in Lydiard St North, north bound with the B single box and Victoria House in the background. Photo taken by Chas Bevan on Saturday 19-12-1970."Ballarat trams 19-12-70 Lydiard St Nth"tramways, trams, lydiard st nth, railway crossing, tram 266 -
 Ballarat Tramway Museum
Slide - 35mm slide/s, Chas Bevan, c1970
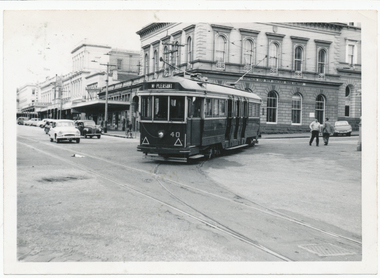
Yields information about the city junction between Sturt and Lydiard St north and demonstrates the operation at this point by a driver.Colour slide - 35mm - of Ballarat No. 28 at the junction between Sturt St and Lydiard St North, with the driver changing points for Lydiard St North. The tram has the destination for Lydiard St North. Shows the SEC offices in the background, Racey's store, the small tram stop sign and end of section sign and the motor traffic at this point. Photo by Chas Bevan."Ballarat trams" in ink.tramways, trams, lydiard st nth, sturt st, motormen, drivers, city, tram 28 -
 Ballarat Tramway Museum
Slide - 35mm slide/s, Chas Bevan, 19/12/1970 12:00:00 AM
Yields information about No. 13 and the general scene at the City area, corner of Lydiard and Sturt Sts.Colour slide - 35mm - of Ballarat No. 13 and another single trucker at the junction between Sturt St and Lydiard St North. No. 13 has the destination for Mt Pleasant. Shows the SEC offices in the background, Racey's store, the small tram stop sign and end of section sign and the motor traffic at this point. Photo by Chas Bevan 19-12-1970."Ballarat trams 19-12-70 Lydiard St xing of West H'way" in ink.tramways, trams, lydiard st nth, sturt st, tram 13 -
 Ballarat Tramway Museum
Photograph - Black & White Photograph/s, mid to late 1950's
Yields information about Lydiard St Nth area and a group of school boys posing for the photographer.Black and white photograph of Ballarat 34 at the Lydiard St North terminus with a group of school boys in uniform posing for the photographer. The tram has the destination of Sebastopol. Photographer unknown - see history of object. See Keith Kings, The Bendigo Tramways, re the fitting of reflective tape in 1956, page 59.In the rear in pencil - "Ballarat"trams, tramways, lydiard st nth, tram 34 -
 Ballarat Tramway Museum
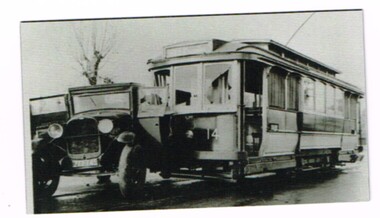
Postcard, Ballarat Tramway Museum (BTM), SEC Ballarat No. 14 - collision
Black and white photograph / postcard of a collision, accident, between SEC Ballarat No. 14 and a motor truck at the intersection of Drummond St. North and Webster St. May or June 1939. Official SEC photo, there are other photos of this collision in the collection. See Reg Items 580, 1019, 1365 and 1366 and 3904 for larger prints of these photographs of these photographs and further details. See also Reg Item 6211 for a fridge magnet version. Printed in Ballarat by???. On the rear has the words "Ballarat Tramway Museum / Historic Collection No. 1, Photo copyright Wal Jack 1962" Has a divided back with a 8mm thick black line on the right hand side. The tramcar body card shows it was repaired following an accident June 1939. (Note added 2-2-19). trams, tramways, ballarat, drummond st nth, accidents, tram 28 -
 Ballarat Tramway Museum
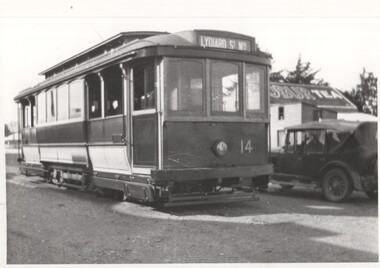
Domestic Object - Fridge Magnet, Ballarat Tramway Museum (BTM), 2015
Fridge magnet with a photograph of a collision, accident, between SEC Ballarat No. 14 and a motor truck at the intersection of Drummond St. North and Webster St. May or June 1939. Official SEC photo, there are other photos of this collision in the collection. See Reg Items 580, 1019, 1365 and 1366 and 3904 for larger prints of these photographs of these photographs and further details. See also Reg Item 6211 for a fridge magnet version. The tramcar body card shows it was repaired following an accident June 1939. (Note added 2-2-19). trams, tramways, ballarat, drummond st nth, accidents, fridge magnet -
 Ballarat Tramway Museum
Photograph - Black & White Photograph/s, late 1930's or early 1940's
Yields information about the appearance of tram No. 14, during the late 1930's or early 1940's at the Sebastopol tram terminus and the buildings in the background.Black and white photograph of Ballarat trams 14 at the Sebastopol tram terminus, during the late 1930's or early 1940's. The tram has the destination of Lydiard St North. A motor car with a soft roof is parked alongside the tram. In the background is a building with a Robur Tea roof advertisement. Note the tram step is folded up, pay as you enter sign and the tram has a lower cream painted panel. On rear has an Ian Barkla Collection stamp, giving location as Ballarat, Neg. No.1650, SEC Tram No. 14 written in black felt pen.trams, tramways, lydiard st nth, tram 14 -
 Ballarat Tramway Museum
Photograph - Black & White Photograph/s, late 1940's or 1950's
Yields information about the appearance of tram No. 26 crossing the railway level crossing in Lydiard St Nth and the railway features at this location.Black and white photograph of Ballarat tram No. 26 crossing the Railway level crossing in Lydiard St Nth. The tram has the destination of Grey St Sebastopol. In the background is the railway level crossing gates, the goods shed and the signal gantry. Two copies held.On rear in ink (Lloyd's hand writing) - "Ballarat, Lydiard St railway crossing, 27-2-1954, ARHS neg."trams, tramways, lydiard st nth, railway crossing, grey st, tram 26 -
 Ballarat Tramway Museum
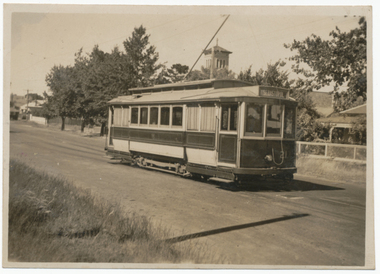
Photograph - Black & White Photograph/s, Lloyd Rogers, early 1960's
Yields information about the appearance of tram No. 14 in Albert St Sebastopol, early 1960's.Black and white photograph of Ballarat tram No. 14 north bound in Albert St. Sebastopol, before crossing to the east side of Albert St. The tram has the destination of Lydiard St Nth and has a Twin Lakes sign. Photo early 1960's prior to the change of the destination rolls to a black on white roll.trams, tramways, sebastopol, albert st, tram 14 -
 Ballarat Tramway Museum
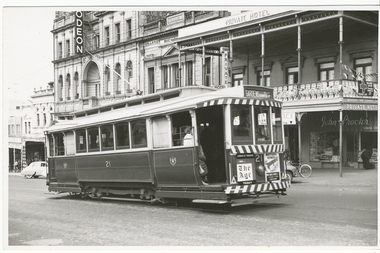
Photograph - Black & White Photograph/s, Lloyd Rogers, 21/03/1962 12:00:00 AM
... the Sturt St hill. Has the destination of Gardens via Drummond Nth... the destination of Gardens via Drummond Nth. Dated 21/3/1962. Printed ...Yields information about the appearance of tram No. 21 and the Mechanics Institute in the early 1960's.Black and white photograph of Ballarat tram No. 21 climbing the Sturt St hill. Has the destination of Gardens via Drummond Nth. Dated 21/3/1962. Printed on Agfa Gevaert paper in a postcard format. The tram has an Mutual Home and The Age advertisements on the front dash panel. In the background is the Ballarat Mechanics Institute building with The Odeon sign on the front of the building and Cooks Private Hotel. Photo by Lloyd Rogers.In ink "Car 21, Sturt St, Ballarat 21/3/1962. and the number "3/25". In the top left hand corner "ex A'alide 10?"trams, tramways, sturt st, tram 21 -
 Ballarat Tramway Museum
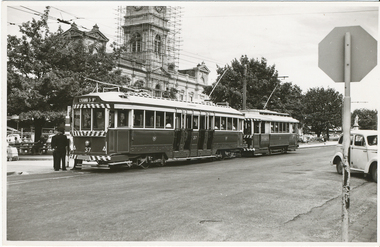
Photograph - Black & White Photograph/s, Lloyd Rogers, 21/03/1962 12:00:00 AM
Yields information about the appearance of SEC trams early 1960's in Sturt near Lydiard Sts and the streetscape.Black and white photograph of Ballarat trams 37 and 31 at Sturt and Lydiard Sts. Dated 21/3/1962. Printed on Agfa Gevaert paper in a postcard format. No. 37 has the destination of Lydiard St Nth. The Town hall is in the background with scaffolding around the town section. Photo by Lloyd Rogers.In ink "Cars 37 & 21 in Sturt St near Lydiard St 21/3/1962 and 1/25"trams, tramways, sturt st, lydiard st, tram 37, tram 31 -
 Ballarat Tramway Museum
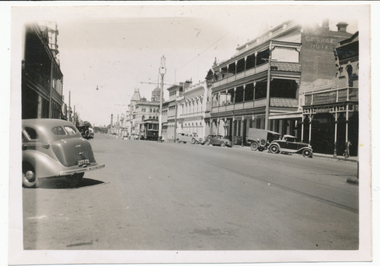
Postcard, WTP, "Post Office - Ballarat", c1907
View of the intersection of Sturt St and Lydiard St Nth with the Ballarat Post Office being the primary feature. Has an ESCo tram turning from Sturt St into Lydiard St. Shows the trackwork at this location and has several horse-drawn vehicles in the photograph. Note the building in the road space on the left hand side of the photograph. Postmarked Coleraine, 12/9/1908. Has a red 1d stamp. For a similar image see items 8244 and 9008.Demonstrates postcard printing c1908 and has a strong association with the sender and receiver.Black and white postcard - divided back used. Has initials "WTP" in bottom right hand corner.On the rear is a short message from C Kelso to Miss Ruth Waters, of Hill View, Nareen.trams, tramways, post office, sturt st, lydiard st nth, esco -
 Ballarat Tramway Museum
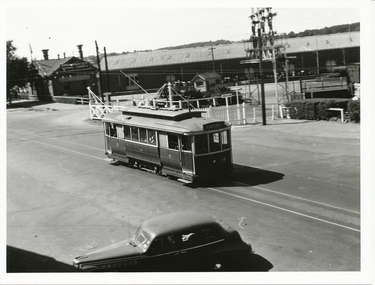
Photograph - Black & White Photograph/s, 14/03/1954 12:00:00 AM
Yields information about the appearance of SEC trams in the mid 1950'ss at the Railway level crossing and the streetscape.Black and white photograph of Ballarat tram No. 14 crossing the railway level crossing in Lydiard St Nth - 14-3-1954. Tram has the destination of Sebastopol. In the background is Ballarat Goods Shed, the signal gantry and the Kennedy & Co. General Carriers building.On rear in ink "ARHS Photo, Ballarat, 14-3-1954"trams, tramways, level crossings, lydiard st north, railway station, tram 14 -
 Ballarat Tramway Museum
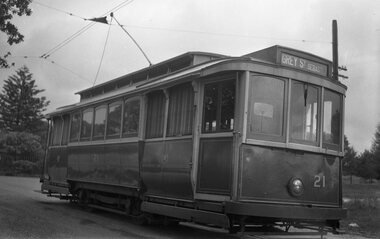
Negative, mid 1940's
Yields information about the appearance of SEC tram No. 21 in the mid 1940's.Black and white negative of No. 21, at the Lydiard St North terminus? (No buildings in background) Tram has the destination of Grey St Sebastopol. Note the pan in the overhead to assist the trolley pole positioning at night. Negative scanned at hi res 4/6/2020 and image updated.trams, tramways, lydiard st nth, overhead, tram 21 -
 Ballarat Tramway Museum
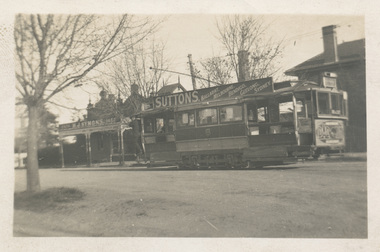
Photograph - Digital image, Wal Jack, ESCo 6 in Macarthur St, 1930's?
Photograph of ESCo No. 6 at the Drummond St North terminus in Macarthur St. Has a shop for H.J. Symons in the background. Tram has advertisements for Suttons, Ballarat, Melbourne, Bendigo, Geelong and Sydney and an ad for "DAD" on the front dash panel. Original Printed on matt paper.Yields information about ESCo trams in the 1920's or 1930's and Macarthur St. area.Digital image from the Wal Jack Ballarat Album.trams, tramways, esco, drummond st nth, macarthur st, tram 6 -
 Ballarat Tramway Museum
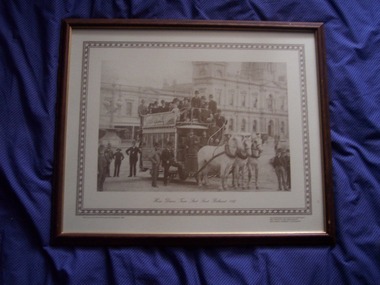
Photograph - Framed Print, Harris House of Photography, 1988
Demonstrates the way the Australian Bi-Centenary and other celebrations were carried out with souvenir prints.Framed print of a horse drawn tram (3 horses) see Reg Item 699 at the corner of Sturt and Lydiard St, within a wooden frame, with non-reflective glazing. The print by the Harris House of Photography has been mounted onto a piece of Masonite. On rear are picture hanging metal loops and a wire hanging strip. In the bottom right hand corner of the print are "Celebrating Australia's Bi Centenary / Ballaarat's 150th Anniversary / Ballaarat's Tramways Centenary" and in the bottom left hand corner "Reproduced by Harris House of Photography 1988".trams, tramways, horse trams, sturt st, lydiard st nth, ballaarat tramway company, town hall -
 Ballarat Tramway Museum
Photograph - Digital image, Wal Jack, 5/04/1958 12:00:00 AM
Yields information the appearance of the SEC tramcar No. 21, and the south east corner of Sturt and Lydiard Streets in 1958 and an AETA tour.Digital image from the Wal Jack Ballarat Album of trams No. 21 turning from Lydiard St into Sturt St while on an AETA tour special, 5 April 1958. Has the AETA sign on the rear of the tram. In the background are the Commonwealth Bank, the MLC building. Includes a number of cyclists in the photograph. See image i2 for rear of photograph. See image i3 for hi res scan of print. See image i4 for hi res scan of negativeon rear of photo in ink, "SEC Ballarat, No. 21 as AETA Special turning into Sturt St from Lydiard St Nth, 5-4-58." in the top right hand corner is the Wal Jack stamp with number "T246" written intrams, tramways, sturt st, lydiard st, aeta, tram 21 -
 Ballarat Tramway Museum
Photograph - Digital image, Wal Jack, 28/12/1943 12:00:00 AM
Yields information the appearance of SEC No. 21 and the streetscape in Lydiard St Loop near Gregory St in 1943.Digital image from the Wal Jack Ballarat Album of No. 21 entering the Gregory St passing loop, Lydiard St North, 28-12-43. Has the St. Columbia's catholic church spire in the background. Tram has the destination of Sebastopol. Note Neg Number T357 the same as for Reg item 5161. See image i2 for rear of photograph. See image i3 for hi res scan of print. See image i4 for hi res scan of negative on rear of photo in ink, "SEC Ballarat Tramways No. 21 (ex Adelaide No. 10) in Wendouree Parade, entering Gregory St loop, Lydiard St North 28-12-1943". Has the Wal Jack copyright stamp in the bottom right hand corner with the number "T357" in it.trams, tramways, lydiard st nth, gregory st, tram 21 -
 Ballarat Tramway Museum
Photograph - Digital image, Wal Jack, 18/02/1940 12:00:00 AM
Yields information about Lydiard St North at the time of the removal of the centre poles.Digital image from the Wal Jack Ballarat Album of a photograph looking south from Mair St along Lydiard St North prior to the removal of the centre poles, with No. 31 in the distance. A number of parked cars in the view. Has a light streak on the left hand side and the George Hotel. Wal's album notes "No. 31 in Lydiard St 18/2/40 central poles removed next day." See image i2 for rear of photograph. See image i3 for hi res scan of print. See image i4 for hi res scan of negativeOn rear of photograph in ink "T136 Ballarat No. 31 in Lydiard St a week before centre standards were removed. Photo W. Jack"trams, tramways, lydiard st nth, poles, tram 31 -
 Ballarat Tramway Museum
Photograph - Digital image, 15/10/1940 12:00:00 AM
Yields information about the Macarthur and Drummond Sts intersection during 1940 and the trams in used and the welding truck.Digital image from the Wal Jack Ballarat Album of a photograph of No. 12 turning from Macarthur St into Drummond St north. Has a shop advertising Preservene Soap in the background and the old welding truck with a warning sign on the back at the rear of the tram. Shows the houses in Drummond St North prior the trees growing. Photo taken 15-10-1940. See image i2 for rear of photograph. See image i3 for hi res scan of print. See image i4 for hi res scan of negativeOn rear of photograph in ink "Ballarat No. 12 turning out of Macarthur St in Drummond St 15-10-40. Note old "Beam" welding unit.trams, tramways, macarthur st, drummond st nth, welding, tram 12 -
 Ballarat Tramway Museum
Photograph - Digital image, Wal Jack, 25/04/1959 12:00:00 AM
Yields information about No. 40, tramway centre and special arrangements for events.Digital image from the Wal Jack Ballarat Album of a photograph of No.40 turning from Lydiard St North into Sturt St to run to Mount Pleasant on 25-4-1959, rearranged working due to the Anzac day March. Has the ANZ bank in the background. Wal's album notes say the tram used the Lydiard St crossover. See image i2 for rear of photograph. See image i3 for hi res scan of print. See image i4 for hi res scan of negativeOn rear of photograph in ink "SEC Ballarat No. 40 turning out of Lydiard St Nth into Sturt St, during Anzac Day march 25-4-59" with W. Jack stamp in the top right hand corner and number "T249". trams, tramways, anzac day, lydiard st, sturt st, special workings, tram 40 -
 Ballarat Tramway Museum
Photograph - Digital image, Alwyn Marshall, 1960
Yields information about the appearance of No. 32, Lydiard St North and Macarthur St intersection in 1960.Digital image from the Wal Jack Ballarat Album of a photograph of No 32 southbound in Lydiard St at the intersection with Macarthur St. Has a Milk Bar - shop on the right hand side and the photograph shows the cutting wall on the east side of the street after the intersection. Photo by Alwyn Marshall. Possibly printed by Wal Jack as it has his handwriting on the rear. See image i2 for rear of photograph.On rear of photograph in ink "SEC, Ballarat No. 32 to Sebastopol in Lydiard St Nth at Macarthur St 1960 A. Marshal Photo."trams, tramways, lydiard st nth, macarthur st, tram 32 -
 Ballarat Tramway Museum
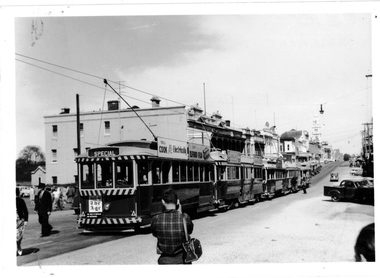
Photograph - Digital image, Wal Jack, 7/04/1962 12:00:00 AM
Yields information about the trams used and how they were arranged at the railway station for a major tour group visit in 1962.Digital image from the Wal Jack Ballarat Album of a photograph of the ten trams to be used for the ARHS visit to Ballarat 7-4-62. Ten trams used as listed in the inscriptions below. No. 20 the lead tram, has an SEC roof Advertisements, Ilford Film and The Age advert on the back dash panel. See image i2 for rear of photograph. See image i3 for hi res scan of print. See image i4 for hi res scan of negativeOn rear of photograph in ink "SEC, Ballarat ARHS Specials to Gardens (10 trams) No. 20, 31, 31, 38 in order, others 14, 28, 33, 35, 36,37 from Railway level crossing Lydiard St Nth 7-4-62" and Wal Jack stamp in top right hand corner with number "T1265" written in.trams, tramways, arhs, tours, lydiard st nth, railway station, tram 20