Showing 493 items
matching metal blade
-
 Flagstaff Hill Maritime Museum and Village
Domestic object - Bowl, Late 19th or early 20th Century
The Process of Making Pottery Decorating, Firing, Glazing, Making, Technical There is a rhythm and flow to clay. It can’t be done all at once! Even the making process! It can take weeks to get everything done, especially if you can only work on your pottery once a week! Even though we have three hour classes, it’s often just not enough time! Here is an overview of some of the processes so you have a bit more grasp on some of the technical stuff! Step One – Design There are SO many ideas out there for making stuff in clay! From delicate porcelain jewellery, through to heavy sculptural work and everything in between. Deciding your direction is sometimes not that easy – when you first start, try everything, you will naturally gravitate to the style that you enjoy! The options and variations are endless and can get a wee bit overwhelming too! Check in with me before you start to ensure your ideas will work, what order you might do things, how you could achieve the look you are seeking and any other technical data required! Step Two – Making Clay is thixotropic. This means that as you work with it, the clay first gets sloppier and wetter, before is begins to dry in the atmosphere. For most things, you simply can’t do all parts of the project at once. An example of work order might look like: Get last weeks work out from the shelves Prepare clay for today’s work – roll your clay, prepare balls for throwing, make the first stage of a pinch pot) Clean up last week’s work and put it on the shelf for bisque firing Check that you have any glazing to do – and do enough of it that you will have time to finish your main project Do the next step of your next project – there might be a further step that can’t be complete immediately, in that case, wrap your work well and put onto the shelves. Letting your work rest for a while can really help keep your work clean and professional looking. Many things require bagging under plastic to keep it ready for work the next week – put your name on the outside of the bag so you can find your work easily. We have stickers and markers. Consider how you want to decorate your work – coloured slip can be applied at a fairly wet stage (remembering that it will make your work even wetter!). Trying to apply slip to dry clay won’t work! If you want to do sgraffito – you will need to keep the work leather hard (a state of dryness where you can still work the clay with a little effort and a little water and care). Step Three – Drying Most of the time your work can go into the rack uncovered to let it dry out for the following week. If you want to continue forming or shaping you will need to double bag your work – put your work on a suitable sized bat and put the bat in a bag so the base of the bag is under the bat, then put another bag over the top of the work and tuck the top of the bag under the bat. If you want to trim (or turn) your thrown work the following week, it should also be double bagged. If your work is large, delicate, or of uneven thicknesses, you should lightly cover your work for drying. When considering the drying process, bare in mind the weather, humidity and wind! The hotter and dryer, the faster things dry and work can dry unevenly in the shelves – this can lead to cracking – another time to lightly cover your work for drying. Step Four – Trimming and Cleaning Up Your work is dry! It is called greenware now and it is at it’s most fragile! Handle everything with two hands. I often refer to soft hands – keep everything gentle and with your fingers spread as much as possible. Try to not pick up things like plates too much, and always with both hands! Before your work can be bisque fired it should be “cleaned up”. You work won’t go into the kiln if it has sharp edges – when glazed, sharp edges turn into razor blades! Use a piece of fly wire to rub the work all over – this will scratch a little so be light handed. Use a knife or metal kidney to scrape any areas that require a bit more dynamic treatment than the fly wire offers! Finally, a very light wipe over with a slightly damp sponge can help soften and soothe all of your edges and dags! Trimming thrown work: If you are planning to trim (or turn) your thrown work (and you should be), make sure you bag it well – your work should be leather hard to almost dry for easiest trimming. Use this step to finish the work completely – use a metal kidney to polish the surface, or a slightly damp sponge to give a freshly thrown look. Wipe the sponge around the rim after trimming, and check the inside of the pot for dags! Trimming slip cast work: Usually I will trim the rims of your work on the wheel the following day to make that stage easier, however you will still need to check your work for lumps and bumps. Last but not least – check that your name is still clearly on the bottom of your work. Step Five – Bisque Firing When the work is completely dry it can go into the bisque kiln. The bisque kiln is fired to 1000°C. This process burns off the water in the clay as well as some of the chemically bound water. The structure of the clay is not altered that much at this temperature. Inside the bisque kiln, the work is stacked a little, small bowl inside a larger bowl and onto a heavy plate. Smaller items like decorations or drink coasters might get stacked several high. Consideration is paid to the weight of the stack and shape of the work. A bisque kiln can fire about one and a half times the amount of work that the glaze kiln can fire. The firing takes about 10 hours to complete the cycle and about two days to cool down. Once it has been emptied the work is placed in the glaze room ready for you to decorate! Step Six – Glazing Decorating your work with colour can be a lot of fun – and time consuming! There are three main options for surface treatment at this stage: Oxide Washes Underglazes Glazes Washes and underglazes do not “glaze” the work – It will still need a layer of glaze to fully seal the clay (washes don’t need glaze on surfaces not designed for food or liquid as they can gloss up a little on their own). Underglazes are stable colourants that turn out pretty much how they look in the jar. They can be mixed with each other to form other colours and can be used like water colours to paint onto your work. Mostly they should have a clear glaze on top to seal them. Oxides are a different species – the pink oxide (cobalt) wash turns out bright blue for instance. They don’t always need a glaze on top, and some glazes can change the colour of the wash! The glazes need no other “glaze” on top! Be careful of unknown glaze interactions – you can put any combination of glaze in a bowl or on a plate, but only a single glaze on the outside of any vertical surface! Glazes are a chemical reaction under heat. We don’t know the exact chemicals in the Mayco glazes we use. I can guess by the way they interact with each other, however, on the whole, you need to test every idea you have, and not run the test on a vertical surface! Simply put, glaze is a layer of glass like substance that bonds with the clay underneath. Clay is made of silica, alumina and water. Glaze is made of mostly silica. Silica has a melting point of 1700°C and we fire to 1240°C. The silica requires a “flux” to help it melt at the lower temperature. Fluxes can be all sorts of chemicals – a common one is calcium – calcium has a melting point of 2500°C, however, together they both melt at a much lower temperature! Colourants are metal oxides like cobalt (blue), chrome (green through black), copper (green, blue, even red!), manganese (black, purple and pink) iron (red brown), etc. Different chemicals in the glaze can have dramatic effects. for example, barium carbonate (which we don’t use) turns manganese bright pink! Other elements can turn manganese dioxide brown, blue, purple and reddish brown. Manganese dioxide is a flux in and of itself as well. So, glazes that get their black and purple colours, often interact with other glazes and RUN! Our mirror black is a good example – it mixes really well with many glazes because it fluxes them – causes them to melt faster. It will also bring out many beautiful colours in the glazes because it’s black colouring most definitely comes from manganese dioxide! Glaze chemistry is a whole subject on it’s own! We use commercial Mayco glazes on purpose – for their huge range of colour possibilities, stability, cool interactions, artistic freedom with the ability to easily brush the glazes on and ease of use. We currently have almost 50 glazes on hand! A major project is to test the interactions of all glazes with each other. That is 2,500 test tiles!!!! I’m going to make the wall behind the wheels the feature wall of pretty colours! Step Seven – Glaze (Gloss or sometimes called “Glost”) Firing Most of the time this is the final stage of making your creation (but not always!) The glaze kiln goes to 1240°C. This is called cone 6, or midrange. It is the low end of stoneware temperatures. Stoneware clays and glazes are typically fired at cone 8 – 10, that is 1260 – 1290°C. The energy requirement to go from 1240°C to 1280°C is almost a 30% more! Our clay is formulated to vitrify (mature, turn “glass-like”) at 1240°, as are our glazes. A glaze kiln take around 12 hours to reach temperature and two to three days to cool down. Sometimes a third firing process is required – this is for decoration that is added to work after the glaze firing. For example – adding precious metals and lustres. this firing temperature is usually around 600 – 800°C depending upon the techniques being used. There are many students interested in gold and silver trims – we will be doing this third type of firing soon! After firing your work will be in the student finished work shelves. Remember to pay for it before you head out the door! There is a small extra charge for using porcelain clay (it’s more than twice the price of regular clay), and for any third firing process! Once your work has been fired it can not turn back into clay for millennia – so don’t fire it if you don’t like it! Put it in the bucket for recycling. https://firebirdstudios.com.au/the-process-of-making-pottery/ The bowl is an example of kitchenware used in the 19th century and still in use today.Bowl white ceramic. Crack on side. Badly stained.Backstamp very faint and unable to be read.flagstaff hill, warrnambool, shipwrecked-coast, flagstaff-hill, flagstaff-hill-maritime-museum, maritime-museum, shipwreck-coast, flagstaff-hill-maritime-village, mixing bowl, food preparation, kitchen equipment, ceramic -
 Flagstaff Hill Maritime Museum and Village
Domestic object - Bowl
The Process of Making Pottery Decorating, Firing, Glazing, Making, Technical There is a rhythm and flow to clay. It can’t be done all at once! Even the making process! It can take weeks to get everything done, especially if you can only work on your pottery once a week! Even though we have three hour classes, it’s often just not enough time! Here is an overview of some of the processes so you have a bit more grasp on some of the technical stuff! Step One – Design There are SO many ideas out there for making stuff in clay! From delicate porcelain jewellery, through to heavy sculptural work and everything in between. Deciding your direction is sometimes not that easy – when you first start, try everything, you will naturally gravitate to the style that you enjoy! The options and variations are endless and can get a wee bit overwhelming too! Check in with me before you start to ensure your ideas will work, what order you might do things, how you could achieve the look you are seeking and any other technical data required! Step Two – Making Clay is thixotropic. This means that as you work with it, the clay first gets sloppier and wetter, before is begins to dry in the atmosphere. For most things, you simply can’t do all parts of the project at once. An example of work order might look like: Get last weeks work out from the shelves Prepare clay for today’s work – roll your clay, prepare balls for throwing, make the first stage of a pinch pot) Clean up last week’s work and put it on the shelf for bisque firing Check that you have any glazing to do – and do enough of it that you will have time to finish your main project Do the next step of your next project – there might be a further step that can’t be complete immediately, in that case, wrap your work well and put onto the shelves. Letting your work rest for a while can really help keep your work clean and professional looking. Many things require bagging under plastic to keep it ready for work the next week – put your name on the outside of the bag so you can find your work easily. We have stickers and markers. Consider how you want to decorate your work – coloured slip can be applied at a fairly wet stage (remembering that it will make your work even wetter!). Trying to apply slip to dry clay won’t work! If you want to do sgraffito – you will need to keep the work leather hard (a state of dryness where you can still work the clay with a little effort and a little water and care). Step Three – Drying Most of the time your work can go into the rack uncovered to let it dry out for the following week. If you want to continue forming or shaping you will need to double bag your work – put your work on a suitable sized bat and put the bat in a bag so the base of the bag is under the bat, then put another bag over the top of the work and tuck the top of the bag under the bat. If you want to trim (or turn) your thrown work the following week, it should also be double bagged. If your work is large, delicate, or of uneven thicknesses, you should lightly cover your work for drying. When considering the drying process, bare in mind the weather, humidity and wind! The hotter and dryer, the faster things dry and work can dry unevenly in the shelves – this can lead to cracking – another time to lightly cover your work for drying. Step Four – Trimming and Cleaning Up Your work is dry! It is called greenware now and it is at it’s most fragile! Handle everything with two hands. I often refer to soft hands – keep everything gentle and with your fingers spread as much as possible. Try to not pick up things like plates too much, and always with both hands! Before your work can be bisque fired it should be “cleaned up”. You work won’t go into the kiln if it has sharp edges – when glazed, sharp edges turn into razor blades! Use a piece of fly wire to rub the work all over – this will scratch a little so be light handed. Use a knife or metal kidney to scrape any areas that require a bit more dynamic treatment than the fly wire offers! Finally, a very light wipe over with a slightly damp sponge can help soften and soothe all of your edges and dags! Trimming thrown work: If you are planning to trim (or turn) your thrown work (and you should be), make sure you bag it well – your work should be leather hard to almost dry for easiest trimming. Use this step to finish the work completely – use a metal kidney to polish the surface, or a slightly damp sponge to give a freshly thrown look. Wipe the sponge around the rim after trimming, and check the inside of the pot for dags! Trimming slip cast work: Usually I will trim the rims of your work on the wheel the following day to make that stage easier, however you will still need to check your work for lumps and bumps. Last but not least – check that your name is still clearly on the bottom of your work. Step Five – Bisque Firing When the work is completely dry it can go into the bisque kiln. The bisque kiln is fired to 1000°C. This process burns off the water in the clay as well as some of the chemically bound water. The structure of the clay is not altered that much at this temperature. Inside the bisque kiln, the work is stacked a little, small bowl inside a larger bowl and onto a heavy plate. Smaller items like decorations or drink coasters might get stacked several high. Consideration is paid to the weight of the stack and shape of the work. A bisque kiln can fire about one and a half times the amount of work that the glaze kiln can fire. The firing takes about 10 hours to complete the cycle and about two days to cool down. Once it has been emptied the work is placed in the glaze room ready for you to decorate! Step Six – Glazing Decorating your work with colour can be a lot of fun – and time consuming! There are three main options for surface treatment at this stage: Oxide Washes Underglazes Glazes Washes and underglazes do not “glaze” the work – It will still need a layer of glaze to fully seal the clay (washes don’t need glaze on surfaces not designed for food or liquid as they can gloss up a little on their own). Underglazes are stable colourants that turn out pretty much how they look in the jar. They can be mixed with each other to form other colours and can be used like water colours to paint onto your work. Mostly they should have a clear glaze on top to seal them. Oxides are a different species – the pink oxide (cobalt) wash turns out bright blue for instance. They don’t always need a glaze on top, and some glazes can change the colour of the wash! The glazes need no other “glaze” on top! Be careful of unknown glaze interactions – you can put any combination of glaze in a bowl or on a plate, but only a single glaze on the outside of any vertical surface! Glazes are a chemical reaction under heat. We don’t know the exact chemicals in the Mayco glazes we use. I can guess by the way they interact with each other, however, on the whole, you need to test every idea you have, and not run the test on a vertical surface! Simply put, glaze is a layer of glass like substance that bonds with the clay underneath. Clay is made of silica, alumina and water. Glaze is made of mostly silica. Silica has a melting point of 1700°C and we fire to 1240°C. The silica requires a “flux” to help it melt at the lower temperature. Fluxes can be all sorts of chemicals – a common one is calcium – calcium has a melting point of 2500°C, however, together they both melt at a much lower temperature! Colourants are metal oxides like cobalt (blue), chrome (green through black), copper (green, blue, even red!), manganese (black, purple and pink) iron (red brown), etc. Different chemicals in the glaze can have dramatic effects. for example, barium carbonate (which we don’t use) turns manganese bright pink! Other elements can turn manganese dioxide brown, blue, purple and reddish brown. Manganese dioxide is a flux in and of itself as well. So, glazes that get their black and purple colours, often interact with other glazes and RUN! Our mirror black is a good example – it mixes really well with many glazes because it fluxes them – causes them to melt faster. It will also bring out many beautiful colours in the glazes because it’s black colouring most definitely comes from manganese dioxide! Glaze chemistry is a whole subject on it’s own! We use commercial Mayco glazes on purpose – for their huge range of colour possibilities, stability, cool interactions, artistic freedom with the ability to easily brush the glazes on and ease of use. We currently have almost 50 glazes on hand! A major project is to test the interactions of all glazes with each other. That is 2,500 test tiles!!!! I’m going to make the wall behind the wheels the feature wall of pretty colours! Step Seven – Glaze (Gloss or sometimes called “Glost”) Firing Most of the time this is the final stage of making your creation (but not always!) The glaze kiln goes to 1240°C. This is called cone 6, or midrange. It is the low end of stoneware temperatures. Stoneware clays and glazes are typically fired at cone 8 – 10, that is 1260 – 1290°C. The energy requirement to go from 1240°C to 1280°C is almost a 30% more! Our clay is formulated to vitrify (mature, turn “glass-like”) at 1240°, as are our glazes. A glaze kiln take around 12 hours to reach temperature and two to three days to cool down. Sometimes a third firing process is required – this is for decoration that is added to work after the glaze firing. For example – adding precious metals and lustres. this firing temperature is usually around 600 – 800°C depending upon the techniques being used. There are many students interested in gold and silver trims – we will be doing this third type of firing soon! After firing your work will be in the student finished work shelves. Remember to pay for it before you head out the door! There is a small extra charge for using porcelain clay (it’s more than twice the price of regular clay), and for any third firing process! Once your work has been fired it can not turn back into clay for millennia – so don’t fire it if you don’t like it! Put it in the bucket for recycling. https://firebirdstudios.com.au/the-process-of-making-pottery/ This bowl is an example of kitchenware used in the 19th century and still in use today.Bowl white ceramic plain that has two sets of edging around lip. Inside bowl has plaster designed to look like cooking mixture.flagstaff hill, warrnambool, shipwrecked-coast, flagstaff-hill, flagstaff-hill-maritime-museum, maritime-museum, shipwreck-coast, flagstaff-hill-maritime-village, kitchen equipment, ceramic -
 Flagstaff Hill Maritime Museum and Village
Domestic object - Bowl, J & G Meakin, Late 19th or early 20th Century
The Process of Making Pottery Decorating, Firing, Glazing, Making, Technical There is a rhythm and flow to clay. It can’t be done all at once! Even the making process! It can take weeks to get everything done, especially if you can only work on your pottery once a week! Even though we have three hour classes, it’s often just not enough time! Here is an overview of some of the processes so you have a bit more grasp on some of the technical stuff! Step One – Design There are SO many ideas out there for making stuff in clay! From delicate porcelain jewellery, through to heavy sculptural work and everything in between. Deciding your direction is sometimes not that easy – when you first start, try everything, you will naturally gravitate to the style that you enjoy! The options and variations are endless and can get a wee bit overwhelming too! Check in with me before you start to ensure your ideas will work, what order you might do things, how you could achieve the look you are seeking and any other technical data required! Step Two – Making Clay is thixotropic. This means that as you work with it, the clay first gets sloppier and wetter, before is begins to dry in the atmosphere. For most things, you simply can’t do all parts of the project at once. An example of work order might look like: Get last weeks work out from the shelves Prepare clay for today’s work – roll your clay, prepare balls for throwing, make the first stage of a pinch pot) Clean up last week’s work and put it on the shelf for bisque firing Check that you have any glazing to do – and do enough of it that you will have time to finish your main project Do the next step of your next project – there might be a further step that can’t be complete immediately, in that case, wrap your work well and put onto the shelves. Letting your work rest for a while can really help keep your work clean and professional looking. Many things require bagging under plastic to keep it ready for work the next week – put your name on the outside of the bag so you can find your work easily. We have stickers and markers. Consider how you want to decorate your work – coloured slip can be applied at a fairly wet stage (remembering that it will make your work even wetter!). Trying to apply slip to dry clay won’t work! If you want to do sgraffito – you will need to keep the work leather hard (a state of dryness where you can still work the clay with a little effort and a little water and care). Step Three – Drying Most of the time your work can go into the rack uncovered to let it dry out for the following week. If you want to continue forming or shaping you will need to double bag your work – put your work on a suitable sized bat and put the bat in a bag so the base of the bag is under the bat, then put another bag over the top of the work and tuck the top of the bag under the bat. If you want to trim (or turn) your thrown work the following week, it should also be double bagged. If your work is large, delicate, or of uneven thicknesses, you should lightly cover your work for drying. When considering the drying process, bare in mind the weather, humidity and wind! The hotter and dryer, the faster things dry and work can dry unevenly in the shelves – this can lead to cracking – another time to lightly cover your work for drying. Step Four – Trimming and Cleaning Up Your work is dry! It is called greenware now and it is at it’s most fragile! Handle everything with two hands. I often refer to soft hands – keep everything gentle and with your fingers spread as much as possible. Try to not pick up things like plates too much, and always with both hands! Before your work can be bisque fired it should be “cleaned up”. You work won’t go into the kiln if it has sharp edges – when glazed, sharp edges turn into razor blades! Use a piece of fly wire to rub the work all over – this will scratch a little so be light handed. Use a knife or metal kidney to scrape any areas that require a bit more dynamic treatment than the fly wire offers! Finally, a very light wipe over with a slightly damp sponge can help soften and soothe all of your edges and dags! Trimming thrown work: If you are planning to trim (or turn) your thrown work (and you should be), make sure you bag it well – your work should be leather hard to almost dry for easiest trimming. Use this step to finish the work completely – use a metal kidney to polish the surface, or a slightly damp sponge to give a freshly thrown look. Wipe the sponge around the rim after trimming, and check the inside of the pot for dags! Trimming slip cast work: Usually I will trim the rims of your work on the wheel the following day to make that stage easier, however you will still need to check your work for lumps and bumps. Last but not least – check that your name is still clearly on the bottom of your work. Step Five – Bisque Firing When the work is completely dry it can go into the bisque kiln. The bisque kiln is fired to 1000°C. This process burns off the water in the clay as well as some of the chemically bound water. The structure of the clay is not altered that much at this temperature. Inside the bisque kiln, the work is stacked a little, small bowl inside a larger bowl and onto a heavy plate. Smaller items like decorations or drink coasters might get stacked several high. Consideration is paid to the weight of the stack and shape of the work. A bisque kiln can fire about one and a half times the amount of work that the glaze kiln can fire. The firing takes about 10 hours to complete the cycle and about two days to cool down. Once it has been emptied the work is placed in the glaze room ready for you to decorate! Step Six – Glazing Decorating your work with colour can be a lot of fun – and time consuming! There are three main options for surface treatment at this stage: Oxide Washes Underglazes Glazes Washes and underglazes do not “glaze” the work – It will still need a layer of glaze to fully seal the clay (washes don’t need glaze on surfaces not designed for food or liquid as they can gloss up a little on their own). Underglazes are stable colourants that turn out pretty much how they look in the jar. They can be mixed with each other to form other colours and can be used like water colours to paint onto your work. Mostly they should have a clear glaze on top to seal them. Oxides are a different species – the pink oxide (cobalt) wash turns out bright blue for instance. They don’t always need a glaze on top, and some glazes can change the colour of the wash! The glazes need no other “glaze” on top! Be careful of unknown glaze interactions – you can put any combination of glaze in a bowl or on a plate, but only a single glaze on the outside of any vertical surface! Glazes are a chemical reaction under heat. We don’t know the exact chemicals in the Mayco glazes we use. I can guess by the way they interact with each other, however, on the whole, you need to test every idea you have, and not run the test on a vertical surface! Simply put, glaze is a layer of glass like substance that bonds with the clay underneath. Clay is made of silica, alumina and water. Glaze is made of mostly silica. Silica has a melting point of 1700°C and we fire to 1240°C. The silica requires a “flux” to help it melt at the lower temperature. Fluxes can be all sorts of chemicals – a common one is calcium – calcium has a melting point of 2500°C, however, together they both melt at a much lower temperature! Colourants are metal oxides like cobalt (blue), chrome (green through black), copper (green, blue, even red!), manganese (black, purple and pink) iron (red brown), etc. Different chemicals in the glaze can have dramatic effects. for example, barium carbonate (which we don’t use) turns manganese bright pink! Other elements can turn manganese dioxide brown, blue, purple and reddish brown. Manganese dioxide is a flux in and of itself as well. So, glazes that get their black and purple colours, often interact with other glazes and RUN! Our mirror black is a good example – it mixes really well with many glazes because it fluxes them – causes them to melt faster. It will also bring out many beautiful colours in the glazes because it’s black colouring most definitely comes from manganese dioxide! Glaze chemistry is a whole subject on it’s own! We use commercial Mayco glazes on purpose – for their huge range of colour possibilities, stability, cool interactions, artistic freedom with the ability to easily brush the glazes on and ease of use. We currently have almost 50 glazes on hand! A major project is to test the interactions of all glazes with each other. That is 2,500 test tiles!!!! I’m going to make the wall behind the wheels the feature wall of pretty colours! Step Seven – Glaze (Gloss or sometimes called “Glost”) Firing Most of the time this is the final stage of making your creation (but not always!) The glaze kiln goes to 1240°C. This is called cone 6, or midrange. It is the low end of stoneware temperatures. Stoneware clays and glazes are typically fired at cone 8 – 10, that is 1260 – 1290°C. The energy requirement to go from 1240°C to 1280°C is almost a 30% more! Our clay is formulated to vitrify (mature, turn “glass-like”) at 1240°, as are our glazes. A glaze kiln take around 12 hours to reach temperature and two to three days to cool down. Sometimes a third firing process is required – this is for decoration that is added to work after the glaze firing. For example – adding precious metals and lustres. this firing temperature is usually around 600 – 800°C depending upon the techniques being used. There are many students interested in gold and silver trims – we will be doing this third type of firing soon! After firing your work will be in the student finished work shelves. Remember to pay for it before you head out the door! There is a small extra charge for using porcelain clay (it’s more than twice the price of regular clay), and for any third firing process! Once your work has been fired it can not turn back into clay for millennia – so don’t fire it if you don’t like it! Put it in the bucket for recycling. https://firebirdstudios.com.au/the-process-of-making-pottery/This bowl was made by renowned pottery company J & G Meakin of England. The firm was established in the mid-1800's. The bowl is an example of kitchenware used in the 19th century and still in use today.Bowl; white ceramic, round and tapering inwards towards base. Made by J and G Meakin England.On base, 'Ironstone China Reg SOL 391413' with symbolflagstaff hill, flagstaff hill maritime museum and village, warrnambool, maritime museum, maritime village, great ocean road, shipwreck coast, mixing bowl, food preparation, j & g meakin, pottery, stoke-on-trent, kitchen equipment, ceramic -
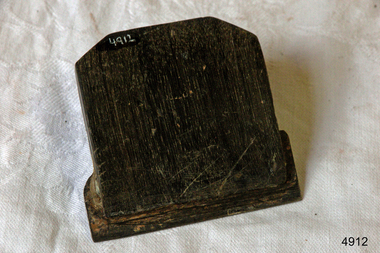
 Flagstaff Hill Maritime Museum and Village
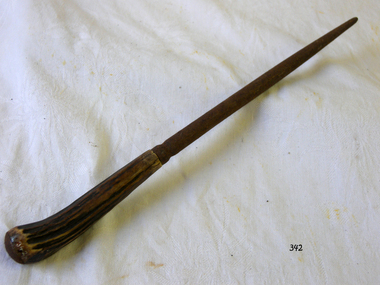
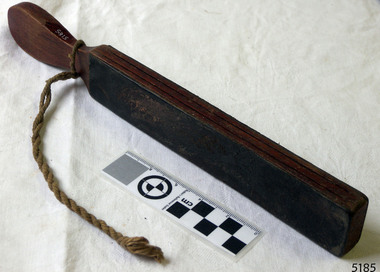
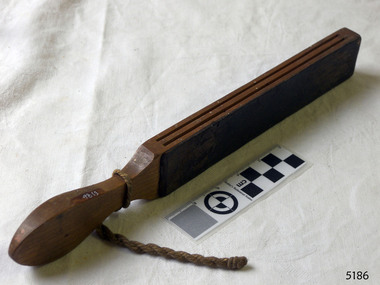
Domestic object - Sharpening Steel
A honing steel, sometimes referred to as a sharpening steel, whet steel, sharpening stick, sharpening rod, butcher's steel, and chef's steel, is a rod of steel, ceramic or diamond-coated steel used to restore keenness to dulled blade edges. They are flat, oval, or round in cross-section and up to 30 centimetres (1 ft) long. The steel and ceramic honing steels may have longitudinal ridges, whereas the diamond-coated steels are smooth but embedded with abrasive diamond particles. Non-abrasive honing rods such as smooth ceramic or ribbed steel are able to remove small amounts of metal via adhesive wear. In normal use, the rod is applied to the blade at a slightly higher angle than that of the bevel, resulting in the formation of a micro-bevel. The term "hone" is associated with light maintenance performed on a blade without the effort and precision normally associated with sharpening, so the name "hone" was borrowed. In the 1980s, ceramic abrasives became increasingly popular and proved an equal, if not superior, method for accomplishing the same daily maintenance tasks; manufacturers replaced steels with ceramic (and later, manufactured diamond abrasive) sharpening "steels" that were actually hones. Use Honing steels are used by lightly placing the near edge of the blade against the base of the steel, then sliding the blade away from yourself along the steel while moving it down – the blade moves diagonally, while the steel remains stationary. This should be done with the blade held at an angle to the steel, usually about 20°, and repeating on the opposite side at the same angle. This is repeated five to ten times per side. Steeling It is often recommended that steeling be performed immediately before or after using a knife and can be done daily. By contrast, knives are generally sharpened much less frequently. A traditional smooth honing steel is of no use if the edge is blunt, because it removes no material; instead it fixes deformations along the edge of a sharp blade, technically known as burnishing. There has long been speculation about the efficacy of steeling (re-aligning the edge) vs honing (removing minor deformation with abrasives); studies tend to favour abrasives for daily maintenance, especially in high-carbide-volume "stainless" steels (such as the popular CPM S30V steel, which tends to "tear out" when steeled rather than re-forming an edge.) Small honing steel for outdoor activities Usage trends Steels have traditionally been used in the West, especially in heavy-use scenarios (e.g. butchering, where the edge deforms due to forceful contact with bone). These scenarios also lead Western trends toward blades tempered to a lower level of hardness (and thus lower brittleness). In East Asia, notably Japan, harder knives are preferred, so there is little need for steeling intra-day, as the edge does not deform as much. Instead, the blade is honed as needed on a waterstone. While tradition has kept the practice of steeling alive in Western kitchens, the majority of honing steels sold are abrasive rather than smooth, and knives are harder and more frequently made of stainless steel, which does not respond to traditional steeling techniques as well as high-carbon/low alloy tool steels.The sharpening steel is essential to maintain the sharpness of carving and other knives.Steel knife sharpener with bone handle. Part of a carving set.None.flagstaff hill, warrnambool, shipwrecked-coast, flagstaff-hill, flagstaff-hill-maritime-museum, maritime-museum, shipwreck-coast, flagstaff-hill-maritime-village, sharpening steel, carving set, kitchen equipment -
 Flagstaff Hill Maritime Museum and Village
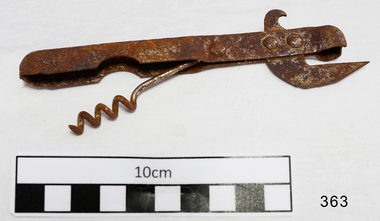
Domestic object - Can Opener, Bottle Opener & Corkscrew
... the blade through the metal along the rim. Because meat... the blade through the metal along the rim. Because meat ...It took 15 years to invent the can. It took 100 more to invent a standard way to open it. In the 19th century, decades after the invention of canning, there were virtually no can openers. Canned food, such as sardines, came with its own "key" to peel back the tin lid. Birth of the can One of the oddest things about the can opener is that the can predates it by almost 150 years. Though common today, cans were once military-grade technology. In 1795, Napoleon, to whom the phrase "an army marches on its stomach" is attributed, offered 12,000 francs to anyone who could find a way to preserve food. Without any knowledge of bacteria or their role in food spoilage, scientists didn't even know where to begin. It took 15 years before a chef named Nicholas Appert claimed the prize after successfully jarring food. Soon after that, his countryman Philippe de Girard came up with a variant on Appert's method—metal tins—and sold the idea to the British. Spoiled food, and the sickness it caused, was a widespread problem. The public would have benefited from canned food, but for decades cans were almost exclusively for the army and the navy. The canning process, with its hours of boiling and steaming, its scrupulous cleanliness, its heated metal, and its need for a great deal of disposable material, made canned food far too expensive for anyone but the military. No can openers were needed or even possible. The metal of early cans was too thick to make openers practical. Soldiers and sailors had plenty of sharp objects on hand and made ample use of them when they wanted to eat. During the 19th century, the process of canning was refined and mechanised, and the metal wall of the average can slimmed down enough that a civilian could get it open—if that civilian had the right tool. No one had that tool yet, so early cans had to open themselves. In other words, they came with built-in openers. The result was a confusing but pleasing free-for-all, in terms of product engineering. Each type of food came with its own kind of can, and each kind of can came with its own kind of opener. Tinned fish and meat were often sold in rectangular cans. These cans were fitted with a "key" that would roll down the top of the can. Coffee, beans, and other types of meat were packaged in cylinders with metal strips that could be peeled back with their own kinds of built-in keys. Cans of milk, which didn't need to be completely opened, came with puncture devices. As tinned food became more common, its containers became more regular. A nice cylindrical can became the norm, and, as these cans filled kitchens, more engineers put their minds to finding a convenient way to open all of them. The first standalone can opener worked on a simple principle: point, stab, and pull. From the mid-19th century to the end of World War I, the typical can opener looked roughly like a wrench, if the lower 'jaw' of the wrench were replaced with a blade. People used the blade to puncture the top of the can near its edge, push the upper jaw against the side of the can, and drag the blade through the metal along the rim. Because meat was the first and most popular canned substance, these can openers were often shaped to look like cows and given the nickname 'bully beef can openers'. The bully beef can opener, popular in the mid-19th century, resulted in many lost fingers. Later, a corkscrew was added that was seated in the handle, and could be pulled out for use. Bully beef can openers were so common, effective, and sturdy that they are still frequently available on collectors' sites. Some are advertised as “still working,” and every last one of them is, without a doubt, soaked in the blood of our ancestors. Dragging a sharp blade along the edge of a can is certain to cause injury sooner or later. So once people got a reliable can shape and a reliable way to get the can open, the search was on for a reliable way to get a can open without the possibility of losing a finger. The answer came in 1925, from the Star Can Opener Company of San Francisco. This is probably the first can opener that resembles the one people have in their kitchens today. Instead of using a blade to pry open a metal can, buyers could clamp the edge of the can between two wheels and twist the handle of one of the wheels to move the blade around the lip. The Star can openers weren't perfect. Compared to the bully beef model, they were flimsy and breakable, but they probably prevented a few injuries. Six short years after the Star model came to market, the first electric can opener was invented. It was patented in 1931 by the Bunker Clancey Company of Kansas City, who had already been sued by the Star Can Opener Company for trying sell a double-wheeled can opener like the Star model (the case was dismissed). The electric can opener must have seemed like the wave of the future and a sure-fire seller, but it proved to be too far ahead of its time. In 1931 not that many households had electricity, and those that did weren't interested in buying can openers. The Bunker Clancey Company was subsequently bought by the Rival Company, which still makes small appliances like can openers today. It took another 25 years for electrically powered can openers to become practical. In the 1950s, Walter Hess Bodle and his daughter, Elizabeth Bodle, developed an electric can opener in the family garage. Walter came up with the opener's blades and motor, and Elizabeth sculpted the outside. Their can opener was a free-standing unit that could sit on the kitchen counter. The Udico brand of the Union Die Casting Company put it on the market in time for Christmas in 1956 and had great success with it. Over the next few years it came out in different styles and colours, and, like the bully beef can opener, has become a collector's item. Also like the bully beef model, Udico can openers often still work. They don't make 'em like they used to. Although there have been some design changes and refinements over the last sixty years, there have yet to be any more leaps forward in can opener technology. If you're resentfully opening a can, you are almost certainly doing it using the Star design, manually forcing the can between two wheels, or the Bodle design, clamping the can into a free-standing electrical opener. Whether or not you enjoy your holiday meals, at least you can be happy that you are not getting poisoned by your own food or cutting open your hand with the blade you use to get at it. That's something, right?The can opener, Bottle opener and the corkscrew are still very important and essential items in most kitchens.Metal can opener, chromed, with bottle opener, and a corkscrew seated in the handle.None.flagstaff hill, warrnambool, shipwrecked-coast, flagstaff-hill, flagstaff-hill-maritime-museum, maritime-museum, shipwreck-coast, flagstaff-hill-maritime-village, canning, can opener, corkscrew, bottle opener, kitchen equipment -
 Blacksmith's Cottage and Forge
Opener, tin
Early domestic utensil.Local.Heavy metal tin opener. Cast iron, hand held, blade attached separately. -
 Federation University Historical Collection
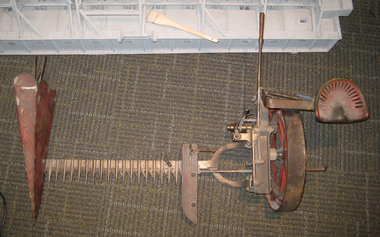
Model, Model of the Munro Reaper, 1887
An example of good invention in an era of innovation in Australian manufacture and production. Levers raise the height of the cutter, disengaging the drive from the blades. The moveable blades under the fixed ‘fingers’. An eccentric rod changes circular motion to linear back and forth of the blades. Such a machine is now known as a mower for cutting grass for hay, and other grasses for storing as sheaves. 'Gift for Museum - The School of Mnes committee has accepted the offer from mr H.B. Munro, of Elsternwick, of a model reaping machine made in 1887 when the Munro machinery business was in operation in Alfredton. The model, which has won gold medals at various exhibitions, is to be placed in thr school museum. (Ballarat Courier 22 April 1932) Metal model with red paint detail in sectionsM263ballarat school of mines, ballarat school of mines museum, munro machinery, model, munro reaper -
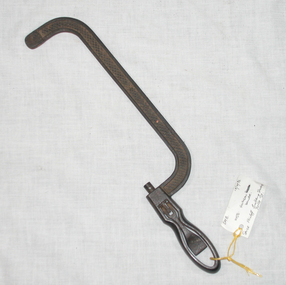
 Federation University Historical Collection
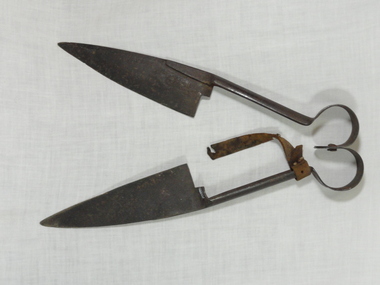
Tool, Handshears
Hand shears needed to be very sharp and often had a leather strap or ‘driver’ which passed over the hand. Others had sheepskin bound around the grip. Blades had to be regularly sharpened on a grinding stone. Most hand shears were made in Sheffield, England, with various models produced offering wide or narrow blades, sharp or rounded points, and various grips and bows. The technique of Australian hand shearing gradually developed from the 1830s using the old English method of cutting the flank with hand shears in a series of circular cuts from the sheep’s neck to the tail. In the early 1930s the Ballarat School of Mines introduced a wide-ranging Wool Classing Course as jobs were in extremely short supply during the Great Depression. Metal handshears used for shearing sheep.ballarat school of mines, shearing, woolclassing, sheep -
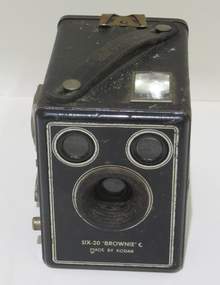 Federation University Historical Collection
Equipment - Camera, Kodak Six-20 'Brownie' C, c1950
This model of camera was made between 1946 and 1957. (http://www.brownie-camera.com/71.shtml)Morocco-grained imitation leather covered metal body with two brilliant finders. Plain matt enamel front; metal wind knob and release button with a single blade shutter. (http://www.brownie-camera.com/71.shtml) This camera took box rollfilm, with 629 film size. The picture size was 2 1/4 X 3 1/4" .(http://www.brownie-camera.com/71.shtml) Instruction books for this model are available at http://www.brownie-camera.com/manuals.shtml camera, photography, brownie, kodak, box brownie, photographic equipment -
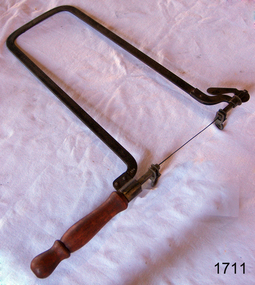
 Federation University Historical Collection
Hacksaw Frame
A hacksaw is a fine-tooth saw with a blade held under tension by a frame. It is used for cutting materials such as metal or plastics. Hand-held hacksaws consist of a metal arch with a handle, usually a pistol grip, and pins for attaching a narrow disposable blade. A screw or other mechanism is used to put the thin blade under tension. The blade can be mounted with the teeth facing toward or away from the handle, resulting in cutting action on either the push or pull stroke. On the push stroke, the arch flexes slightly, decreasing the tension on the blade.Steel frame for blade. adjustment lever in handle.Dimpled feature on curved sectionhacksaw, tool, ballarat school of mines, trade, cutting, metal, plastics -
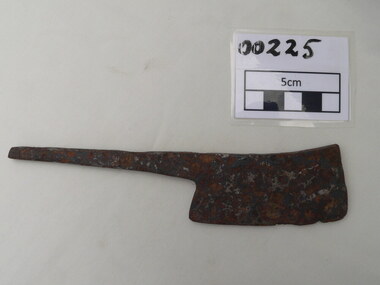 Bright & District Historical Society operating the Bright Museum
Cleaver
Metal cleaver, rusted and missing the handle. Blade has indentations along the cutting edge.cleaver, goldfields, chinese, harrietville, cooking utensils -
 Flagstaff Hill Maritime Museum and Village
Razor Strop
This razor strop is made like a leather strap. ABOUT STROPS Straight razors and cut throat razors were the major tools for shaving before the safety razor was invented in the 1880’s and even today specialty shaving shops still sell the straight razors. Along with the razor, the process of shaving would commonly involve lathering up shaving soap using a shaving brush with boar bristles. Men could own several razors and rotate them through the week and some shops sold the razors in a set, a razor for each day of the week. Straight razors could require stropping more than once during the shaving of a heavy beard, and stropping would also be performed at the end of each shave. Honing would only be performed two or three times a year, preserving the blade’s edge. A lot of skill was needed to hone and strop the blades of these early razors and the methods to do so were a large part of the curriculum in Barber colleges. The razor would be sharpened on a grinding wheel then honed on sharpening stone and finally finished using a strop. Straight edge razors would usually be sold unfinished and that process would be completed by the customer. A razor strop, usually made from leather, thick canvas or light timber, would be used to straighten and polish the straight razor for shaving. Strops could also be used to polish other blades such as knives, small metal tools and chisels. Sometimes an abrasive polishing compound is also used to give a mirror finish. Some strops, such as this one in our Collection, are designed to be used while hanging from a nail or peg, while others are hand held. To use the strop draw the spine of the blade down along the strop with the blade following, without putting any pressure on the blade. At the end of the stroke, rotate the blade over its spine then draw the spine along the strop again so that the edge moves away from the top. The finer grade of leather strap is used to give the final finish. Double Swing Razor Strop. Use for honing razors.flagstaff hill, warrnambool, shipwrecked-coast, flagstaff-hill, flagstaff-hill-maritime-museum, maritime-museum, shipwreck-coast, flagstaff-hill-maritime-village, strop, swing razor strop, barber's equipment, shaving equipment, personal accessory -
 Flagstaff Hill Maritime Museum and Village
Rudder
Rudder wooden with 4 metal reinforcing pieces & long crack through bladeflagstaff hill, warrnambool, shipwrecked-coast, flagstaff-hill, flagstaff-hill-maritime-museum, maritime-museum, shipwreck-coast, flagstaff-hill-maritime-village -
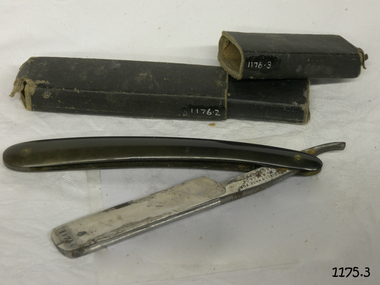 Flagstaff Hill Maritime Museum and Village
Domestic object - Razor
Razor metal with synthetic ornate handle. "Special Hollow Ground" "Specially made for A Harris & Co Melbourne" and "Joseph Allen and Son, Sheffield England" inscribed on razor. In box container. 3 piecesOn blade "Special Hollow Ground" "Non XLL Joseph Allen and Son" "Sheffield England Specially Made for A Harrison and Co Melbourne"flagstaff hill, warrnambool, shipwrecked-coast, flagstaff-hill, flagstaff-hill-maritime-museum, maritime-museum, shipwreck-coast, flagstaff-hill-maritime-village -
 Flagstaff Hill Maritime Museum and Village
Saw
Fret saw with metal frame and turned wooden handle. Hobbies patent blade tension mechanism.flagstaff hill, warrnambool, shipwrecked-coast, flagstaff-hill, flagstaff-hill-maritime-museum, maritime-museum, shipwreck-coast, flagstaff-hill-maritime-village, fret saw, saw -
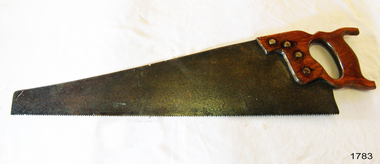 Flagstaff Hill Maritime Museum and Village
Tool - Wood Saw, Mid to late 20th century
A saw is a tool consisting of a tough blade, wire, or chain with a hard-toothed edge. It is used to cut through material, very often wood, though sometimes metal or stone. The cut is made by placing the toothed edge against the material and moving it forcefully forth and less vigorously back or continuously forward. This force may be applied by hand, or powered by steam, water, electricity or other power sources. An abrasive saw has a powered circular blade designed to cut through metal or ceramic. In ancient Egypt, open (unframed) saws made of copper are documented as early as the Early Dynastic Period, circa 3,100–2,686 BC. Many copper saws were found in tombs dating to the 31st century BC. Models of saws have been found in many contexts throughout Egyptian history. As the saw developed, teeth were raked to cut only on the pull stroke and set with the teeth projecting only on one side, rather than in the modern fashion with an alternating set. Saws were also made of bronze and later iron. In the Iron Age, frame saws were developed holding the thin blades in tension. The earliest known sawmill is the Roman Hierapolis sawmill from the third century AD used for cutting stone. The subject item at this time cannot be associated with an historical event, person or place, provenance is unknown, as the maker is unknown but the pattern or design and type of wood used indicate it is a tool of modern manufacture around the mid to late 20th century.Wood hand saw with wooden handle attached to saw by 4 rivets. No blade markings Noneflagstaff hill, warrnambool, flagstaff-hill, flagstaff-hill-maritime-museum, maritime-museum, shipwreck-coast, flagstaff-hill-maritime-village, handsaw, wood saw, carpenders tools, cabinet makers tools, wood cutting -
 Flagstaff Hill Maritime Museum and Village
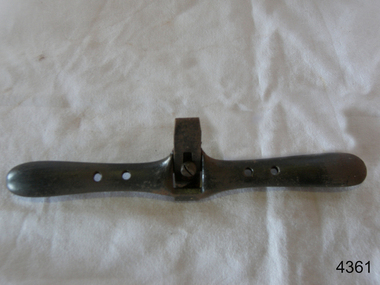
Spokeshave
Metal Spokeshave, Concave. Has two screws holding blade. flagstaff hill, warrnambool, shipwrecked-coast, flagstaff-hill, flagstaff-hill-maritime-museum, maritime-museum, shipwreck-coast, flagstaff-hill-maritime-village, metal spokeshave, spoke shave -
 Flagstaff Hill Maritime Museum and Village
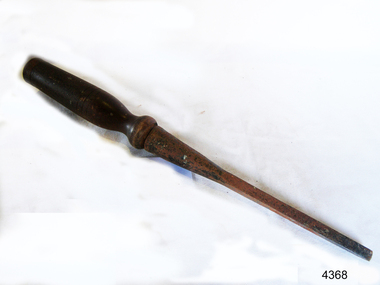
Scraper
Metal scraper with wooden handle, blade is 69mm wide, wooden handle is 60mm wide, overall 68mm longflagstaff hill, warrnambool, shipwrecked-coast, flagstaff-hill, flagstaff-hill-maritime-museum, maritime-museum, shipwreck-coast, flagstaff-hill-maritime-village -
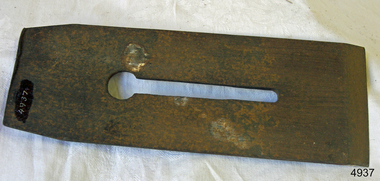 Flagstaff Hill Maritime Museum and Village
Tool - Blade, A Mathieson & Son, late 19th to early 20th century
Blade for a woodworking plane. Maker's name moulded into metal in arch configuration. Made by A Mathieson & Son."ALEXANDER MATHIESON &o SON." flagstaff hill, flagstaff hill maritime museum and village, warrnambool, woodworking tool, plane, blade, hand tool -
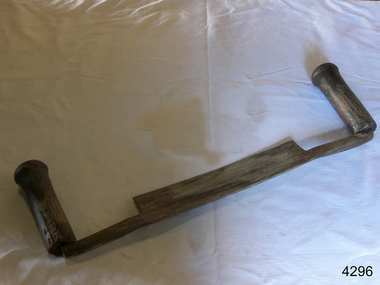 Flagstaff Hill Maritime Museum and Village
Draw knife
Draw knife - metal with 2 wooden handles. Marked Wm Thomson and a 9. Blade 46L Handle 13Lflagstaff hill, warrnambool, shipwrecked-coast, flagstaff-hill, flagstaff-hill-maritime-museum, maritime-museum, shipwreck-coast, flagstaff-hill-maritime-village, draw knife -
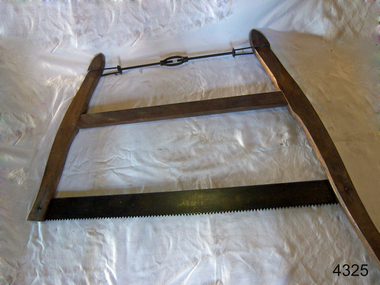 Flagstaff Hill Maritime Museum and Village
Saw
Saw metal large on three sided wooden frame. Blade attached to frame by screws & tensioned by metal turnbuckle. A frame saw.flagstaff hill, warrnambool, shipwrecked-coast, flagstaff-hill, flagstaff-hill-maritime-museum, maritime-museum, shipwreck-coast, flagstaff-hill-maritime-village -
 Flagstaff Hill Maritime Museum and Village
Spokeshave
Spokeshave metal with wooden handles with 2 screw holes small blade. 295mm x 34mmflagstaff hill, warrnambool, shipwrecked-coast, flagstaff-hill, flagstaff-hill-maritime-museum, maritime-museum, shipwreck-coast, flagstaff-hill-maritime-village -
 Flagstaff Hill Maritime Museum and Village
Mortice Chisel
Mortice chisel with wooden handle and metal ferrel attached. Has I Penn stamped on blade 420mm Blade 10mm wide Mortice chiselflagstaff hill, warrnambool, shipwrecked-coast, flagstaff-hill, flagstaff-hill-maritime-museum, maritime-museum, shipwreck-coast, flagstaff-hill-maritime-village, mortice chisel, chisel -
 Flagstaff Hill Maritime Museum and Village
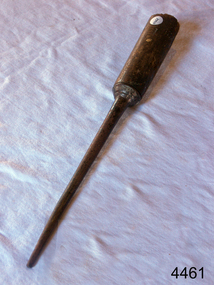
Punch
John Heath tool boxPunch metal with wooden handle. Half handle is missing. Blade is tapered 195mmLflagstaff hill, warrnambool, shipwrecked-coast, flagstaff-hill, flagstaff-hill-maritime-museum, maritime-museum, shipwreck-coast, flagstaff-hill-maritime-village -
 Flagstaff Hill Maritime Museum and Village
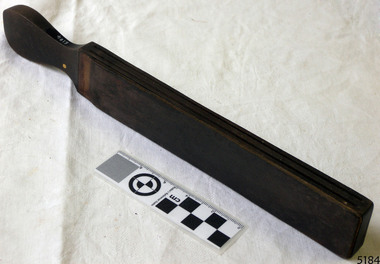
Paddle Strop
This razor strop is called a paddle strop. ABOUT STROPS Straight razors and cut throat razors were the major tools for shaving before the safety razor was invented in the 1880’s and even today specialty shaving shops still sell the straight razors. Along with the razor, the process of shaving would commonly involve lathering up shaving soap using a shaving brush with boar bristles. Men could own several razors and rotate them through the week and some shops sold the razors in a set, a razor for each day of the week. Straight razors could require stropping more than once during the shaving of a heavy beard, and stropping would also be performed at the end of each shave. Honing would only be performed two or three times a year, preserving the blade’s edge. A lot of skill was needed to hone and strop the blades of these early razors and the methods to do so were a large part of the curriculum in Barber colleges. The razor would be sharpened on a grinding wheel then honed on sharpening stone and finally finished using a strop. Straight edge razors would usually be sold unfinished and that process would be completed by the customer. A razor strop, usually made from leather, thick canvas or light timber, would be used to straighten and polish the straight razor for shaving. Strops could also be used to polish other blades such as knives, small metal tools and chisels. Sometimes an abrasive polishing compound is also used to give a mirror finish. Some strops, such as this one in our Collection, are designed to be used while hanging from a nail or peg, while others are hand held. To use the strop draw the spine of the blade down along the strop with the blade following, without putting any pressure on the blade. At the end of the stroke, rotate the blade over its spine then draw the spine along the strop again so that the edge moves away from the top. The finer grade of leather strap is used to give the final finish. Wooden paddle strop, (or raxor strop or cushion strop). Strop has two leather sides, numbered 1 and 2, on a slotted paddle. Marked on handle “Hamon”. Sides are numbered 1 and 2. Has two slits in body of strop. "Hamon" stamped on handle. "Hamon" stamped on handle. flagstaff hill, warrnambool, shipwrecked-coast, flagstaff-hill, flagstaff-hill-maritime-museum, maritime-museum, shipwreck-coast, flagstaff-hill-maritime-village, wooden strop, paddle strop, strop, razor strop, shaving accessory, barber's equipment, personal grooming -
 Flagstaff Hill Maritime Museum and Village
Paddle Strop
This razor strop is called a paddle strop. ABOUT STROPS Straight razors and cut throat razors were the major tools for shaving before the safety razor was invented in the 1880’s and even today specialty shaving shops still sell the straight razors. Along with the razor, the process of shaving would commonly involve lathering up shaving soap using a shaving brush with boar bristles. Men could own several razors and rotate them through the week and some shops sold the razors in a set, a razor for each day of the week. Straight razors could require stropping more than once during the shaving of a heavy beard, and stropping would also be performed at the end of each shave. Honing would only be performed two or three times a year, preserving the blade’s edge. A lot of skill was needed to hone and strop the blades of these early razors and the methods to do so were a large part of the curriculum in Barber colleges. The razor would be sharpened on a grinding wheel then honed on sharpening stone and finally finished using a strop. Straight edge razors would usually be sold unfinished and that process would be completed by the customer. A razor strop, usually made from leather, thick canvas or light timber, would be used to straighten and polish the straight razor for shaving. Strops could also be used to polish other blades such as knives, small metal tools and chisels. Sometimes an abrasive polishing compound is also used to give a mirror finish. Some strops, such as this one in our Collection, are designed to be used while hanging from a nail or peg, while others are hand held. To use the strop draw the spine of the blade down along the strop with the blade following, without putting any pressure on the blade. At the end of the stroke, rotate the blade over its spine then draw the spine along the strop again so that the edge moves away from the top. The finer grade of leather strap is used to give the final finish. Wooden strop, paddle strop design (sometimes called razor strop). Has leather attached to one side. Has two slits in body of strop. flagstaff hill, warrnambool, shipwrecked-coast, flagstaff-hill, flagstaff-hill-maritime-museum, maritime-museum, shipwreck-coast, flagstaff-hill-maritime-village, strop, paddle strop, personal effects, shaving equipment, razor strop, barber's equipment -
 Flagstaff Hill Maritime Museum and Village
Paddle Strop
This razor strop is called a paddle strop. ABOUT STROPS Straight razors and cut throat razors were the major tools for shaving before the safety razor was invented in the 1880’s and even today specialty shaving shops still sell the straight razors. Along with the razor, the process of shaving would commonly involve lathering up shaving soap using a shaving brush with boar bristles. Men could own several razors and rotate them through the week and some shops sold the razors in a set, a razor for each day of the week. Straight razors could require stropping more than once during the shaving of a heavy beard, and stropping would also be performed at the end of each shave. Honing would only be performed two or three times a year, preserving the blade’s edge. A lot of skill was needed to hone and strop the blades of these early razors and the methods to do so were a large part of the curriculum in Barber colleges. The razor would be sharpened on a grinding wheel then honed on sharpening stone and finally finished using a strop. Straight edge razors would usually be sold unfinished and that process would be completed by the customer. A razor strop, usually made from leather, thick canvas or light timber, would be used to straighten and polish the straight razor for shaving. Strops could also be used to polish other blades such as knives, small metal tools and chisels. Sometimes an abrasive polishing compound is also used to give a mirror finish. Some strops, such as this one in our Collection, are designed to be used while hanging from a nail or peg, while others are hand held. To use the strop draw the spine of the blade down along the strop with the blade following, without putting any pressure on the blade. At the end of the stroke, rotate the blade over its spine then draw the spine along the strop again so that the edge moves away from the top. The finer grade of leather strap is used to give the final finish. Wooden strop, paddle strop design (sometimes called razor strop). Has leather attached to one side. Sides are numbered 1 and 2. Has two slits in body of strop. Stamped Hamon Paris France. "Hamon Paris France. "flagstaff hill, warrnambool, shipwrecked-coast, flagstaff-hill, flagstaff-hill-maritime-museum, maritime-museum, shipwreck-coast, flagstaff-hill-maritime-village, paddle strop, strop, shaving equipment, personal effects, barber's equipment, personal grooming accessory -
 Flagstaff Hill Maritime Museum and Village
Pocket Knife
Pocket Knife.- wooden handle with metal ferrules on end. Knife is housed within handle. Blade is broken. Has JE 1874 on blade.flagstaff hill, warrnambool, shipwrecked-coast, flagstaff-hill, flagstaff-hill-maritime-museum, maritime-museum, shipwreck-coast, flagstaff-hill-maritime-village, pocket knife -
 Flagstaff Hill Maritime Museum and Village
Domestic object - Plate
The Process of Making Pottery Decorating, Firing, Glazing, Making, Technical There is a rhythm and flow to clay. It can’t be done all at once! Even the making process! It can take weeks to get everything done, especially if you can only work on your pottery once a week! Even though we have three hour classes, it’s often just not enough time! Here is an overview of some of the processes so you have a bit more grasp on some of the technical stuff! Step One – Design There are SO many ideas out there for making stuff in clay! From delicate porcelain jewellery, through to heavy sculptural work and everything in between. Deciding your direction is sometimes not that easy – when you first start, try everything, you will naturally gravitate to the style that you enjoy! The options and variations are endless and can get a wee bit overwhelming too! Check in with me before you start to ensure your ideas will work, what order you might do things, how you could achieve the look you are seeking and any other technical data required! Step Two – Making Clay is thixotropic. This means that as you work with it, the clay first gets sloppier and wetter, before is begins to dry in the atmosphere. For most things, you simply can’t do all parts of the project at once. An example of work order might look like: Get last weeks work out from the shelves Prepare clay for today’s work – roll your clay, prepare balls for throwing, make the first stage of a pinch pot) Clean up last week’s work and put it on the shelf for bisque firing Check that you have any glazing to do – and do enough of it that you will have time to finish your main project Do the next step of your next project – there might be a further step that can’t be complete immediately, in that case, wrap your work well and put onto the shelves. Letting your work rest for a while can really help keep your work clean and professional looking. Many things require bagging under plastic to keep it ready for work the next week – put your name on the outside of the bag so you can find your work easily. We have stickers and markers. Consider how you want to decorate your work – coloured slip can be applied at a fairly wet stage (remembering that it will make your work even wetter!). Trying to apply slip to dry clay won’t work! If you want to do sgraffito – you will need to keep the work leather hard (a state of dryness where you can still work the clay with a little effort and a little water and care). Step Three – Drying Most of the time your work can go into the rack uncovered to let it dry out for the following week. If you want to continue forming or shaping you will need to double bag your work – put your work on a suitable sized bat and put the bat in a bag so the base of the bag is under the bat, then put another bag over the top of the work and tuck the top of the bag under the bat. If you want to trim (or turn) your thrown work the following week, it should also be double bagged. If your work is large, delicate, or of uneven thicknesses, you should lightly cover your work for drying. When considering the drying process, bare in mind the weather, humidity and wind! The hotter and dryer, the faster things dry and work can dry unevenly in the shelves – this can lead to cracking – another time to lightly cover your work for drying. Step Four – Trimming and Cleaning Up Your work is dry! It is called greenware now and it is at it’s most fragile! Handle everything with two hands. I often refer to soft hands – keep everything gentle and with your fingers spread as much as possible. Try to not pick up things like plates too much, and always with both hands! Before your work can be bisque fired it should be “cleaned up”. You work won’t go into the kiln if it has sharp edges – when glazed, sharp edges turn into razor blades! Use a piece of fly wire to rub the work all over – this will scratch a little so be light handed. Use a knife or metal kidney to scrape any areas that require a bit more dynamic treatment than the fly wire offers! Finally, a very light wipe over with a slightly damp sponge can help soften and soothe all of your edges and dags! Trimming thrown work: If you are planning to trim (or turn) your thrown work (and you should be), make sure you bag it well – your work should be leather hard to almost dry for easiest trimming. Use this step to finish the work completely – use a metal kidney to polish the surface, or a slightly damp sponge to give a freshly thrown look. Wipe the sponge around the rim after trimming, and check the inside of the pot for dags! Trimming slip cast work: Usually I will trim the rims of your work on the wheel the following day to make that stage easier, however you will still need to check your work for lumps and bumps. Last but not least – check that your name is still clearly on the bottom of your work. Step Five – Bisque Firing When the work is completely dry it can go into the bisque kiln. The bisque kiln is fired to 1000°C. This process burns off the water in the clay as well as some of the chemically bound water. The structure of the clay is not altered that much at this temperature. Inside the bisque kiln, the work is stacked a little, small bowl inside a larger bowl and onto a heavy plate. Smaller items like decorations or drink coasters might get stacked several high. Consideration is paid to the weight of the stack and shape of the work. A bisque kiln can fire about one and a half times the amount of work that the glaze kiln can fire. The firing takes about 10 hours to complete the cycle and about two days to cool down. Once it has been emptied the work is placed in the glaze room ready for you to decorate! Step Six – Glazing Decorating your work with colour can be a lot of fun – and time consuming! There are three main options for surface treatment at this stage: Oxide Washes Underglazes Glazes Washes and underglazes do not “glaze” the work – It will still need a layer of glaze to fully seal the clay (washes don’t need glaze on surfaces not designed for food or liquid as they can gloss up a little on their own). Underglazes are stable colourants that turn out pretty much how they look in the jar. They can be mixed with each other to form other colours and can be used like water colours to paint onto your work. Mostly they should have a clear glaze on top to seal them. Oxides are a different species – the pink oxide (cobalt) wash turns out bright blue for instance. They don’t always need a glaze on top, and some glazes can change the colour of the wash! The glazes need no other “glaze” on top! Be careful of unknown glaze interactions – you can put any combination of glaze in a bowl or on a plate, but only a single glaze on the outside of any vertical surface! Glazes are a chemical reaction under heat. We don’t know the exact chemicals in the Mayco glazes we use. I can guess by the way they interact with each other, however, on the whole, you need to test every idea you have, and not run the test on a vertical surface! Simply put, glaze is a layer of glass like substance that bonds with the clay underneath. Clay is made of silica, alumina and water. Glaze is made of mostly silica. Silica has a melting point of 1700°C and we fire to 1240°C. The silica requires a “flux” to help it melt at the lower temperature. Fluxes can be all sorts of chemicals – a common one is calcium – calcium has a melting point of 2500°C, however, together they both melt at a much lower temperature! Colourants are metal oxides like cobalt (blue), chrome (green through black), copper (green, blue, even red!), manganese (black, purple and pink) iron (red brown), etc. Different chemicals in the glaze can have dramatic effects. for example, barium carbonate (which we don’t use) turns manganese bright pink! Other elements can turn manganese dioxide brown, blue, purple and reddish brown. Manganese dioxide is a flux in and of itself as well. So, glazes that get their black and purple colours, often interact with other glazes and RUN! Our mirror black is a good example – it mixes really well with many glazes because it fluxes them – causes them to melt faster. It will also bring out many beautiful colours in the glazes because it’s black colouring most definitely comes from manganese dioxide! Glaze chemistry is a whole subject on it’s own! We use commercial Mayco glazes on purpose – for their huge range of colour possibilities, stability, cool interactions, artistic freedom with the ability to easily brush the glazes on and ease of use. We currently have almost 50 glazes on hand! A major project is to test the interactions of all glazes with each other. That is 2,500 test tiles!!!! I’m going to make the wall behind the wheels the feature wall of pretty colours! Step Seven – Glaze (Gloss or sometimes called “Glost”) Firing Most of the time this is the final stage of making your creation (but not always!) The glaze kiln goes to 1240°C. This is called cone 6, or midrange. It is the low end of stoneware temperatures. Stoneware clays and glazes are typically fired at cone 8 – 10, that is 1260 – 1290°C. The energy requirement to go from 1240°C to 1280°C is almost a 30% more! Our clay is formulated to vitrify (mature, turn “glass-like”) at 1240°, as are our glazes. A glaze kiln take around 12 hours to reach temperature and two to three days to cool down. Sometimes a third firing process is required – this is for decoration that is added to work after the glaze firing. For example – adding precious metals and lustres. this firing temperature is usually around 600 – 800°C depending upon the techniques being used. There are many students interested in gold and silver trims – we will be doing this third type of firing soon! After firing your work will be in the student finished work shelves. Remember to pay for it before you head out the door! There is a small extra charge for using porcelain clay (it’s more than twice the price of regular clay), and for any third firing process! Once your work has been fired it can not turn back into clay for millennia – so don’t fire it if you don’t like it! Put it in the bucket for recycling. https://firebirdstudios.com.au/the-process-of-making-pottery/Ceramics have evolved over thousands of years.White earthenware dinner plate. Crazing evident all over.Backstamped ‘Made in England S LTD’flagstaff hill, warrnambool, shipwrecked-coast, flagstaff-hill, flagstaff-hill-maritime-museum, maritime-museum, shipwreck-coast, flagstaff-hill-maritime-village, ceramics, tableware -
 Flagstaff Hill Maritime Museum and Village
Domestic object - Plate, Johnson Bros
The Process of Making Pottery Decorating, Firing, Glazing, Making, Technical There is a rhythm and flow to clay. It can’t be done all at once! Even the making process! It can take weeks to get everything done, especially if you can only work on your pottery once a week! Even though we have three hour classes, it’s often just not enough time! Here is an overview of some of the processes so you have a bit more grasp on some of the technical stuff! Step One – Design There are SO many ideas out there for making stuff in clay! From delicate porcelain jewellery, through to heavy sculptural work and everything in between. Deciding your direction is sometimes not that easy – when you first start, try everything, you will naturally gravitate to the style that you enjoy! The options and variations are endless and can get a wee bit overwhelming too! Check in with me before you start to ensure your ideas will work, what order you might do things, how you could achieve the look you are seeking and any other technical data required! Step Two – Making Clay is thixotropic. This means that as you work with it, the clay first gets sloppier and wetter, before is begins to dry in the atmosphere. For most things, you simply can’t do all parts of the project at once. An example of work order might look like: Get last weeks work out from the shelves Prepare clay for today’s work – roll your clay, prepare balls for throwing, make the first stage of a pinch pot) Clean up last week’s work and put it on the shelf for bisque firing Check that you have any glazing to do – and do enough of it that you will have time to finish your main project Do the next step of your next project – there might be a further step that can’t be complete immediately, in that case, wrap your work well and put onto the shelves. Letting your work rest for a while can really help keep your work clean and professional looking. Many things require bagging under plastic to keep it ready for work the next week – put your name on the outside of the bag so you can find your work easily. We have stickers and markers. Consider how you want to decorate your work – coloured slip can be applied at a fairly wet stage (remembering that it will make your work even wetter!). Trying to apply slip to dry clay won’t work! If you want to do sgraffito – you will need to keep the work leather hard (a state of dryness where you can still work the clay with a little effort and a little water and care). Step Three – Drying Most of the time your work can go into the rack uncovered to let it dry out for the following week. If you want to continue forming or shaping you will need to double bag your work – put your work on a suitable sized bat and put the bat in a bag so the base of the bag is under the bat, then put another bag over the top of the work and tuck the top of the bag under the bat. If you want to trim (or turn) your thrown work the following week, it should also be double bagged. If your work is large, delicate, or of uneven thicknesses, you should lightly cover your work for drying. When considering the drying process, bare in mind the weather, humidity and wind! The hotter and dryer, the faster things dry and work can dry unevenly in the shelves – this can lead to cracking – another time to lightly cover your work for drying. Step Four – Trimming and Cleaning Up Your work is dry! It is called greenware now and it is at it’s most fragile! Handle everything with two hands. I often refer to soft hands – keep everything gentle and with your fingers spread as much as possible. Try to not pick up things like plates too much, and always with both hands! Before your work can be bisque fired it should be “cleaned up”. You work won’t go into the kiln if it has sharp edges – when glazed, sharp edges turn into razor blades! Use a piece of fly wire to rub the work all over – this will scratch a little so be light handed. Use a knife or metal kidney to scrape any areas that require a bit more dynamic treatment than the fly wire offers! Finally, a very light wipe over with a slightly damp sponge can help soften and soothe all of your edges and dags! Trimming thrown work: If you are planning to trim (or turn) your thrown work (and you should be), make sure you bag it well – your work should be leather hard to almost dry for easiest trimming. Use this step to finish the work completely – use a metal kidney to polish the surface, or a slightly damp sponge to give a freshly thrown look. Wipe the sponge around the rim after trimming, and check the inside of the pot for dags! Trimming slip cast work: Usually I will trim the rims of your work on the wheel the following day to make that stage easier, however you will still need to check your work for lumps and bumps. Last but not least – check that your name is still clearly on the bottom of your work. Step Five – Bisque Firing When the work is completely dry it can go into the bisque kiln. The bisque kiln is fired to 1000°C. This process burns off the water in the clay as well as some of the chemically bound water. The structure of the clay is not altered that much at this temperature. Inside the bisque kiln, the work is stacked a little, small bowl inside a larger bowl and onto a heavy plate. Smaller items like decorations or drink coasters might get stacked several high. Consideration is paid to the weight of the stack and shape of the work. A bisque kiln can fire about one and a half times the amount of work that the glaze kiln can fire. The firing takes about 10 hours to complete the cycle and about two days to cool down. Once it has been emptied the work is placed in the glaze room ready for you to decorate! Step Six – Glazing Decorating your work with colour can be a lot of fun – and time consuming! There are three main options for surface treatment at this stage: Oxide Washes Underglazes Glazes Washes and underglazes do not “glaze” the work – It will still need a layer of glaze to fully seal the clay (washes don’t need glaze on surfaces not designed for food or liquid as they can gloss up a little on their own). Underglazes are stable colourants that turn out pretty much how they look in the jar. They can be mixed with each other to form other colours and can be used like water colours to paint onto your work. Mostly they should have a clear glaze on top to seal them. Oxides are a different species – the pink oxide (cobalt) wash turns out bright blue for instance. They don’t always need a glaze on top, and some glazes can change the colour of the wash! The glazes need no other “glaze” on top! Be careful of unknown glaze interactions – you can put any combination of glaze in a bowl or on a plate, but only a single glaze on the outside of any vertical surface! Glazes are a chemical reaction under heat. We don’t know the exact chemicals in the Mayco glazes we use. I can guess by the way they interact with each other, however, on the whole, you need to test every idea you have, and not run the test on a vertical surface! Simply put, glaze is a layer of glass like substance that bonds with the clay underneath. Clay is made of silica, alumina and water. Glaze is made of mostly silica. Silica has a melting point of 1700°C and we fire to 1240°C. The silica requires a “flux” to help it melt at the lower temperature. Fluxes can be all sorts of chemicals – a common one is calcium – calcium has a melting point of 2500°C, however, together they both melt at a much lower temperature! Colourants are metal oxides like cobalt (blue), chrome (green through black), copper (green, blue, even red!), manganese (black, purple and pink) iron (red brown), etc. Different chemicals in the glaze can have dramatic effects. for example, barium carbonate (which we don’t use) turns manganese bright pink! Other elements can turn manganese dioxide brown, blue, purple and reddish brown. Manganese dioxide is a flux in and of itself as well. So, glazes that get their black and purple colours, often interact with other glazes and RUN! Our mirror black is a good example – it mixes really well with many glazes because it fluxes them – causes them to melt faster. It will also bring out many beautiful colours in the glazes because it’s black colouring most definitely comes from manganese dioxide! Glaze chemistry is a whole subject on it’s own! We use commercial Mayco glazes on purpose – for their huge range of colour possibilities, stability, cool interactions, artistic freedom with the ability to easily brush the glazes on and ease of use. We currently have almost 50 glazes on hand! A major project is to test the interactions of all glazes with each other. That is 2,500 test tiles!!!! I’m going to make the wall behind the wheels the feature wall of pretty colours! Step Seven – Glaze (Gloss or sometimes called “Glost”) Firing Most of the time this is the final stage of making your creation (but not always!) The glaze kiln goes to 1240°C. This is called cone 6, or midrange. It is the low end of stoneware temperatures. Stoneware clays and glazes are typically fired at cone 8 – 10, that is 1260 – 1290°C. The energy requirement to go from 1240°C to 1280°C is almost a 30% more! Our clay is formulated to vitrify (mature, turn “glass-like”) at 1240°, as are our glazes. A glaze kiln take around 12 hours to reach temperature and two to three days to cool down. Sometimes a third firing process is required – this is for decoration that is added to work after the glaze firing. For example – adding precious metals and lustres. this firing temperature is usually around 600 – 800°C depending upon the techniques being used. There are many students interested in gold and silver trims – we will be doing this third type of firing soon! After firing your work will be in the student finished work shelves. Remember to pay for it before you head out the door! There is a small extra charge for using porcelain clay (it’s more than twice the price of regular clay), and for any third firing process! Once your work has been fired it can not turn back into clay for millennia – so don’t fire it if you don’t like it! Put it in the bucket for recycling. https://firebirdstudios.com.au/the-process-of-making-pottery/Ceramics have evolved over thousands of years.A white earthenware side plate with a gadroon edge. Has water marks and chips on front.‘Johnson Bros England Reg No 15587’flagstaff hill, warrnambool, shipwrecked-coast, flagstaff-hill, flagstaff-hill-maritime-museum, maritime-museum, shipwreck-coast, flagstaff-hill-maritime-village, johnson bros, ceramics, tableware