Showing 780 items matching "passenger signs"
-
 Flagstaff Hill Maritime Museum and Village
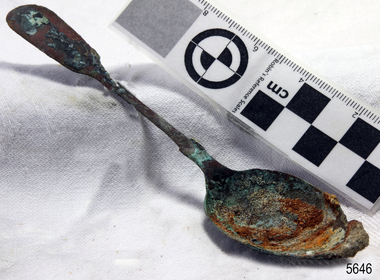
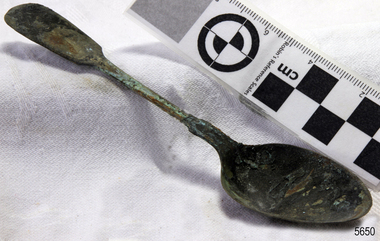
Spoon, circa 1878
This tea spoon is from the wreck of the LOCH ARD, a Loch Line ship of 1,693 tons which sailed from Gravesend, London, on 2 March 1878 with 17 passengers and a crew of 36 under Captain George Gibbs. “The intention was to discharge cargo in Melbourne, before returning to London via the Horn with wool and wheat”. Instead, on 1 June 1878, after 90 days at sea, she struck the sandstone cliffs of Mutton Bird Island on the south west coast of Victoria, and sank with the loss of 52 lives and all her cargo. The manifest of the LOCH ARD listed an array of manufactured goods and bulk metals being exported to the Colony of Victoria, with a declared value of £53,700. (202 bills of lading show an actual invoice value of £68, 456, with insurance underwriting to £30,000 of all cargo). Included in the manifest is the item of “Tin hardware & cutlery £7,530”. This teaspoon is one of 482 similar items of electro-plated cutlery from the LOCH ARD site, comprising spoons and forks of various sizes but all sharing the same general shape or design and metallic composition. 49 of these pieces display a legible makers’ mark — the initials “W” and “P” placed within a raised diamond outline, which is in turn contained within a sunken crown shape — identifying the manufacturer as William Page & Co of Birmingham. An electroplater’s makers’ marks, unlike sterling silver hallmarks, are not consistent identifiers of quality or date and place of manufacture. A similar line of five impressions was usually made to impress the consumer with an implication of industry standards, but what each one actually signified was not regulated and so they varied according to the whim of the individual foundry. In this case, the maker’s marks are often obscured by sedimentary accretion or removed by corrosion after a century of submersion in the ocean. However sufficient detail has survived to indicate that these samples of electro-plated cutlery probably originated from the same consignment in the LOCH ARD’s cargo. The following descriptions of maker’s marks are drawn from 255 tea spoons, 125 dessert spoons, and 99 table forks. These marks are clearly visible in 66 instances, while the same sequence of general outlines, or depression shapes, is discernible in another 166 examples. 1. A recessed Crown containing a raised Diamond outline and the initials “W” and “P” (the recognised trademark of William Page & Co) 2. An impressed Ellipse containing a raised, pivoted, Triangle in its lower part and bearing a Resurrection Cross on its upper section (a possible dissenting church symbol reflecting religious affiliation); OR a rounded Square impression containing a raised, ‘lazy’, letter “B” (possibly mimicking sterling silver hallmark signifying city of manufacture i.e. Birmingham) 3. An impressed rounded Square filled with a raised Maltese Cross (the base metal composite of nickel silver was also known as ‘German silver’ after its Berlin inventors in 1823) 4. A recessed Circle containing a Crab or Scarab Beetle image; OR a recessed Circle containing a rotated ‘fleur de lys’ or ‘fasces’ design 5. A depressed Diamond shape enclosing a large raised letter “R” and a small raised letter “D” (mimicking the U.K. Patent Office stamp which abbreviated the term ‘registered’ to “RD”, but also included date and class of patent) Suggested trade names for William Page & Co’s particular blend of brass plating are ‘roman silver’ or ‘silverite’. This copper alloy polishes to a lustrous gold when new, discolouring to a murky grey with greenish hue when neglected. The LOCH ARD belonged to the famous Loch Line which sailed many ships from England to Australia. Built in Glasgow by Barclay, Curdle and Co. in 1873, the LOCH ARD was a three-masted square rigged iron sailing ship. The ship measured 262ft 7" (79.87m) in length, 38ft (11.58m) in width, 23ft (7m) in depth and had a gross tonnage of 1693 tons. The LOCH ARD's main mast measured a massive 150ft (45.7m) in height. LOCH ARD made three trips to Australia and one trip to Calcutta before its final voyage. LOCH ARD left England on March 2, 1878, under the command of Captain Gibbs, a newly married, 29 year old. She was bound for Melbourne with a crew of 37, plus 17 passengers and a load of cargo. The general cargo reflected the affluence of Melbourne at the time. On board were straw hats, umbrella, perfumes, clay pipes, pianos, clocks, confectionary, linen and candles, as well as a heavier load of railway irons, cement, lead and copper. There were items included that intended for display in the Melbourne International Exhibition in 1880. The voyage to Port Phillip was long but uneventful. At 3am on June 1, 1878, Captain Gibbs was expecting to see land and the passengers were becoming excited as they prepared to view their new homeland in the early morning. But LOCH ARD was running into a fog which greatly reduced visibility. Captain Gibbs was becoming anxious as there was no sign of land or the Cape Otway lighthouse. At 4am the fog lifted. A man aloft announced that he could see breakers. The sheer cliffs of Victoria's west coast came into view, and Captain Gibbs realised that the ship was much closer to them than expected. He ordered as much sail to be set as time would permit and then attempted to steer the vessel out to sea. On coming head on into the wind, the ship lost momentum, the sails fell limp and LOCH ARD's bow swung back. Gibbs then ordered the anchors to be released in an attempt to hold its position. The anchors sank some 50 fathoms - but did not hold. By this time LOCH ARD was among the breakers and the tall cliffs of Mutton Bird Island rose behind the ship. Just half a mile from the coast, the ship's bow was suddenly pulled around by the anchor. The captain tried to tack out to sea, but the ship struck a reef at the base of Mutton Bird Island, near Port Campbell. Waves broke over the ship and the top deck was loosened from the hull. The masts and rigging came crashing down knocking passengers and crew overboard. When a lifeboat was finally launched, it crashed into the side of LOCH ARD and capsized. Tom Pearce, who had launched the boat, managed to cling to its overturned hull and shelter beneath it. He drifted out to sea and then on the flood tide came into what is now known as LOCH ARD Gorge. He swam to shore, bruised and dazed, and found a cave in which to shelter. Some of the crew stayed below deck to shelter from the falling rigging but drowned when the ship slipped off the reef into deeper water. Eva Carmichael had raced onto deck to find out what was happening only to be confronted by towering cliffs looming above the stricken ship. In all the chaos, Captain Gibbs grabbed Eva and said, "If you are saved Eva, let my dear wife know that I died like a sailor". That was the last Eva Carmichael saw of the captain. She was swept off the ship by a huge wave. Eva saw Tom Pearce on a small rocky beach and yelled to attract his attention. He dived in and swam to the exhausted woman and dragged her to shore. He took her to the cave and broke open case of brandy which had washed up on the beach. He opened a bottle to revive the unconscious woman. A few hours later Tom scaled a cliff in search of help. He followed hoof prints and came by chance upon two men from nearby Glenample Station three and a half miles away. In a state of exhaustion, he told the men of the tragedy. Tom returned to the gorge while the two men rode back to the station to get help. By the time they reached LOCH ARD Gorge, it was cold and dark. The two shipwreck survivors were taken to Glenample Station to recover. Eva stayed at the station for six weeks before returning to Ireland, this time by steamship. In Melbourne, Tom Pearce received a hero's welcome. He was presented with the first gold medal of the Royal Humane Society of Victoria and a £1000 cheque from the Victorian Government. Concerts were performed to honour the young man's bravery and to raise money for those who lost family in the LOCH ARD disaster. Of the 54 crew members and passengers on board, only two survived: the apprentice, Tom Pearce and the young woman passenger, Eva Carmichael, who lost all of her family in the tragedy. Ten days after the LOCH ARD tragedy, salvage rights to the wreck were sold at auction for £2,120. Cargo valued at £3,000 was salvaged and placed on the beach, but most washed back into the sea when another storm developed. The wreck of LOCH ARD still lies at the base of Mutton Bird Island. Much of the cargo has now been salvaged and some was washed up into what is now known as LOCH ARD Gorge. Cargo and artefacts have also been illegally salvaged over many years before protective legislation was introduced. One of the most unlikely pieces of cargo to have survived the shipwreck was a Minton porcelain peacock - one of only seven in the world. The peacock was destined for the Melbourne International Exhibition in 1880. It had been well packed, which gave it adequate protection during the violent storm. Today, the Minton peacock can be seen at the Flagstaff Hill Maritime Museum in Warrnambool. From Australia's most dramatic shipwreck it has now become Australia's most valuable shipwreck artefact and is one of very few 'objects' on the Victorian State Heritage Register. The LOCH ARD shipwreck is of State significance – Victorian Heritage Register S 417. Flagstaff Hill’s collection of artefacts from LOCH ARD is significant for being one of the largest collections of artefacts from this shipwreck in Victoria. It is significant for its association with the shipwreck, which is on the Victorian Heritage Register (VHR S417). The collection is significant because of the relationship between the objects, as together they have a high potential to interpret the story of the LOCH ARD. The LOCH ARD collection is archaeologically significant as the remains of a large international passenger and cargo ship. The LOCH ARD collection is historically significant for representing aspects of Victoria’s shipping history and its potential to interpret sub-theme 1.5 of Victoria’s Framework of Historical Themes (living with natural processes). The collection is also historically significant for its association with the LOCH ARD, which was one of the worst and best known shipwrecks in Victoria’s history. Unrestored tea spoon from the wreck of the LOCH ARD. The spoon design has a flattened fiddle-back handle, with a thin stem or shank, flared collar, and elongated bowl. The spoons metallic composition is a thin layer of brass alloy which has partially corroded back to a nickel-silver base metal. Corrosive oxides of orange-red and aqua-marine on predominantly base metal. Only 5% of plate remains. 15% concretion.flagstaff hill, warrnambool, shipwrecked coast, flagstaff hill maritime museum, maritime museum, shipwreck coast, flagstaff hill maritime village, great ocean road, loch line, loch ard, captain gibbs, eva carmichael, tom pearce, glenample station, mutton bird island, loch ard gorge, electroplated cutlery, loch ard shipwreck, nickel silver, william page & co, birmingham, brass plating, makers marks -
 Flagstaff Hill Maritime Museum and Village
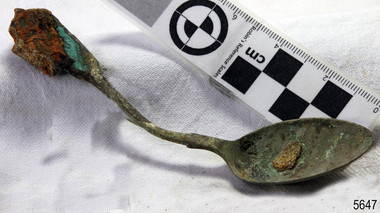
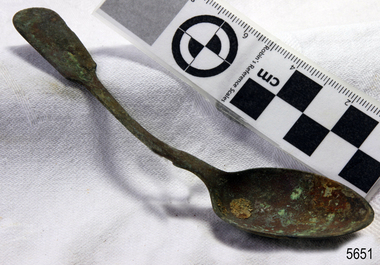
Spoon, circa 1878
This tea spoon is from the wreck of the LOCH ARD, a Loch Line ship of 1,693 tons which sailed from Gravesend, London, on 2 March 1878 with 17 passengers and a crew of 36 under Captain George Gibbs. “The intention was to discharge cargo in Melbourne, before returning to London via the Horn with wool and wheat”. Instead, on 1 June 1878, after 90 days at sea, she struck the sandstone cliffs of Mutton Bird Island on the south west coast of Victoria, and sank with the loss of 52 lives and all her cargo. The manifest of the LOCH ARD listed an array of manufactured goods and bulk metals being exported to the Colony of Victoria, with a declared value of £53,700. (202 bills of lading show an actual invoice value of £68, 456, with insurance underwriting to £30,000 of all cargo). Included in the manifest is the item of “Tin hardware & cutlery £7,530”. This teaspoon is one of 482 similar items of electro-plated cutlery from the LOCH ARD site, comprising spoons and forks of various sizes but all sharing the same general shape or design and metallic composition. 49 of these pieces display a legible makers’ mark — the initials “W” and “P” placed within a raised diamond outline, which is in turn contained within a sunken crown shape — identifying the manufacturer as William Page & Co of Birmingham. An electroplater’s makers’ marks, unlike sterling silver hallmarks, are not consistent identifiers of quality or date and place of manufacture. A similar line of five impressions was usually made to impress the consumer with an implication of industry standards, but what each one actually signified was not regulated and so they varied according to the whim of the individual foundry. In this case, the maker’s marks are often obscured by sedimentary accretion or removed by corrosion after a century of submersion in the ocean. However sufficient detail has survived to indicate that these samples of electro-plated cutlery probably originated from the same consignment in the LOCH ARD’s cargo. The following descriptions of maker’s marks are drawn from 255 tea spoons, 125 dessert spoons, and 99 table forks. These marks are clearly visible in 66 instances, while the same sequence of general outlines, or depression shapes, is discernible in another 166 examples. 1. A recessed Crown containing a raised Diamond outline and the initials “W” and “P” (the recognised trademark of William Page & Co) 2. An impressed Ellipse containing a raised, pivoted, Triangle in its lower part and bearing a Resurrection Cross on its upper section (a possible dissenting church symbol reflecting religious affiliation); OR a rounded Square impression containing a raised, ‘lazy’, letter “B” (possibly mimicking sterling silver hallmark signifying city of manufacture i.e. Birmingham) 3. An impressed rounded Square filled with a raised Maltese Cross (the base metal composite of nickel silver was also known as ‘German silver’ after its Berlin inventors in 1823) 4. A recessed Circle containing a Crab or Scarab Beetle image; OR a recessed Circle containing a rotated ‘fleur de lys’ or ‘fasces’ design 5. A depressed Diamond shape enclosing a large raised letter “R” and a small raised letter “D” (mimicking the U.K. Patent Office stamp which abbreviated the term ‘registered’ to “RD”, but also included date and class of patent) Suggested trade names for William Page & Co’s particular blend of brass plating are ‘roman silver’ or ‘silverite’. This copper alloy polishes to a lustrous gold when new, discolouring to a murky grey with greenish hue when neglected. HISTORY OF THE LOCH ARD The LOCH ARD belonged to the famous Loch Line which sailed many ships from England to Australia. Built in Glasgow by Barclay, Curdle and Co. in 1873, the LOCH ARD was a three-masted square rigged iron sailing ship. The ship measured 262ft 7" (79.87m) in length, 38ft (11.58m) in width, 23ft (7m) in depth and had a gross tonnage of 1693 tons. The LOCH ARD's main mast measured a massive 150ft (45.7m) in height. LOCH ARD made three trips to Australia and one trip to Calcutta before its final voyage. LOCH ARD left England on March 2, 1878, under the command of Captain Gibbs, a newly married, 29 year old. She was bound for Melbourne with a crew of 37, plus 17 passengers and a load of cargo. The general cargo reflected the affluence of Melbourne at the time. On board were straw hats, umbrella, perfumes, clay pipes, pianos, clocks, confectionary, linen and candles, as well as a heavier load of railway irons, cement, lead and copper. There were items included that intended for display in the Melbourne International Exhibition in 1880. The voyage to Port Phillip was long but uneventful. At 3am on June 1, 1878, Captain Gibbs was expecting to see land and the passengers were becoming excited as they prepared to view their new homeland in the early morning. But LOCH ARD was running into a fog which greatly reduced visibility. Captain Gibbs was becoming anxious as there was no sign of land or the Cape Otway lighthouse. At 4am the fog lifted. A man aloft announced that he could see breakers. The sheer cliffs of Victoria's west coast came into view, and Captain Gibbs realised that the ship was much closer to them than expected. He ordered as much sail to be set as time would permit and then attempted to steer the vessel out to sea. On coming head on into the wind, the ship lost momentum, the sails fell limp and LOCH ARD's bow swung back. Gibbs then ordered the anchors to be released in an attempt to hold its position. The anchors sank some 50 fathoms - but did not hold. By this time LOCH ARD was among the breakers and the tall cliffs of Mutton Bird Island rose behind the ship. Just half a mile from the coast, the ship's bow was suddenly pulled around by the anchor. The captain tried to tack out to sea, but the ship struck a reef at the base of Mutton Bird Island, near Port Campbell. Waves broke over the ship and the top deck was loosened from the hull. The masts and rigging came crashing down knocking passengers and crew overboard. When a lifeboat was finally launched, it crashed into the side of LOCH ARD and capsized. Tom Pearce, who had launched the boat, managed to cling to its overturned hull and shelter beneath it. He drifted out to sea and then on the flood tide came into what is now known as LOCH ARD Gorge. He swam to shore, bruised and dazed, and found a cave in which to shelter. Some of the crew stayed below deck to shelter from the falling rigging but drowned when the ship slipped off the reef into deeper water. Eva Carmichael had raced onto deck to find out what was happening only to be confronted by towering cliffs looming above the stricken ship. In all the chaos, Captain Gibbs grabbed Eva and said, "If you are saved Eva, let my dear wife know that I died like a sailor". That was the last Eva Carmichael saw of the captain. She was swept off the ship by a huge wave. Eva saw Tom Pearce on a small rocky beach and yelled to attract his attention. He dived in and swam to the exhausted woman and dragged her to shore. He took her to the cave and broke open case of brandy which had washed up on the beach. He opened a bottle to revive the unconscious woman. A few hours later Tom scaled a cliff in search of help. He followed hoof prints and came by chance upon two men from nearby Glenample Station three and a half miles away. In a state of exhaustion, he told the men of the tragedy. Tom returned to the gorge while the two men rode back to the station to get help. By the time they reached LOCH ARD Gorge, it was cold and dark. The two shipwreck survivors were taken to Glenample Station to recover. Eva stayed at the station for six weeks before returning to Ireland, this time by steamship. In Melbourne, Tom Pearce received a hero's welcome. He was presented with the first gold medal of the Royal Humane Society of Victoria and a £1000 cheque from the Victorian Government. Concerts were performed to honour the young man's bravery and to raise money for those who lost family in the LOCH ARD disaster. Of the 54 crew members and passengers on board, only two survived: the apprentice, Tom Pearce and the young woman passenger, Eva Carmichael, who lost all of her family in the tragedy. Ten days after the LOCH ARD tragedy, salvage rights to the wreck were sold at auction for £2,120. Cargo valued at £3,000 was salvaged and placed on the beach, but most washed back into the sea when another storm developed. The wreck of LOCH ARD still lies at the base of Mutton Bird Island. Much of the cargo has now been salvaged and some was washed up into what is now known as LOCH ARD Gorge. Cargo and artefacts have also been illegally salvaged over many years before protective legislation was introduced. One of the most unlikely pieces of cargo to have survived the shipwreck was a Minton porcelain peacock - one of only seven in the world. The peacock was destined for the Melbourne International Exhibition in 1880. It had been well packed, which gave it adequate protection during the violent storm. Today, the Minton peacock can be seen at the Flagstaff Hill Maritime Museum in Warrnambool. From Australia's most dramatic shipwreck it has now become Australia's most valuable shipwreck artefact and is one of very few 'objects' on the Victorian State Heritage Register. The LOCH ARD shipwreck is of State significance – Victorian Heritage Register S 417. Flagstaff Hill’s collection of artefacts from LOCH ARD is significant for being one of the largest collections of artefacts from this shipwreck in Victoria. It is significant for its association with the shipwreck, which is on the Victorian Heritage Register (VHR S417). The collection is significant because of the relationship between the objects, as together they have a high potential to interpret the story of the LOCH ARD. The LOCH ARD collection is archaeologically significant as the remains of a large international passenger and cargo ship. The LOCH ARD collection is historically significant for representing aspects of Victoria’s shipping history and its potential to interpret sub-theme 1.5 of Victoria’s Framework of Historical Themes (living with natural processes). The collection is also historically significant for its association with the LOCH ARD, which was one of the worst and best known shipwrecks in Victoria’s history. Unrestored tea spoon from the wreck of the LOCH ARD. The spoon design has a flattened fiddle-back handle, with a thin stem or shank, flared collar, and elongated bowl. The spoons metallic composition is a thin layer of brass alloy which has partially corroded back to a nickel-silver base metal. Stem is bent. 70% of dull plate remains. Handle is concreted with sediment. Part of heraldic shield on upper rear of bowl (decorative rats-tail).flagstaff hill, warrnambool, shipwrecked coast, flagstaff hill maritime museum, maritime museum, shipwreck coast, flagstaff hill maritime village, great ocean road, loch line, loch ard, captain gibbs, eva carmichael, tom pearce, glenample station, mutton bird island, loch ard gorge, electroplated cutlery, loch ard shipwreck, nickel silver, william page & co, birmingham, brass plating, makers marks -
 Flagstaff Hill Maritime Museum and Village
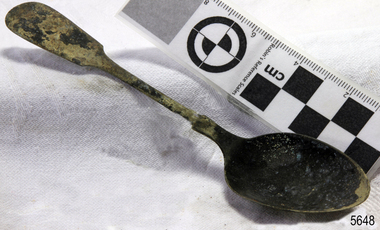
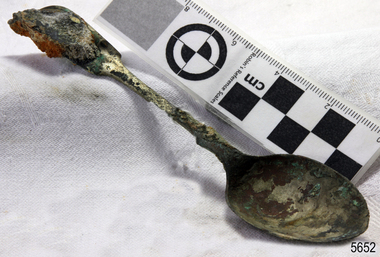
Spoon, circa 1878
This tea spoon is from the wreck of the LOCH ARD, a Loch Line ship of 1,693 tons which sailed from Gravesend, London, on 2 March 1878 with 17 passengers and a crew of 36 under Captain George Gibbs. “The intention was to discharge cargo in Melbourne, before returning to London via the Horn with wool and wheat”. Instead, on 1 June 1878, after 90 days at sea, she struck the sandstone cliffs of Mutton Bird Island on the south west coast of Victoria, and sank with the loss of 52 lives and all her cargo. The manifest of the LOCH ARD listed an array of manufactured goods and bulk metals being exported to the Colony of Victoria, with a declared value of £53,700. (202 bills of lading show an actual invoice value of £68, 456, with insurance underwriting to £30,000 of all cargo). Included in the manifest is the item of “Tin hardware & cutlery £7,530”. This teaspoon is one of 482 similar items of electro-plated cutlery from the LOCH ARD site, comprising spoons and forks of various sizes but all sharing the same general shape or design and metallic composition. 49 of these pieces display a legible makers’ mark — the initials “W” and “P” placed within a raised diamond outline, which is in turn contained within a sunken crown shape — identifying the manufacturer as William Page & Co of Birmingham. An electroplater’s makers’ marks, unlike sterling silver hallmarks, are not consistent identifiers of quality or date and place of manufacture. A similar line of five impressions was usually made to impress the consumer with an implication of industry standards, but what each one actually signified was not regulated and so they varied according to the whim of the individual foundry. In this case, the maker’s marks are often obscured by sedimentary accretion or removed by corrosion after a century of submersion in the ocean. However sufficient detail has survived to indicate that these samples of electro-plated cutlery probably originated from the same consignment in the LOCH ARD’s cargo. The following descriptions of maker’s marks are drawn from 255 tea spoons, 125 dessert spoons, and 99 table forks. These marks are clearly visible in 66 instances, while the same sequence of general outlines, or depression shapes, is discernible in another 166 examples. 1. A recessed Crown containing a raised Diamond outline and the initials “W” and “P” (the recognised trademark of William Page & Co) 2. An impressed Ellipse containing a raised, pivoted, Triangle in its lower part and bearing a Resurrection Cross on its upper section (a possible dissenting church symbol reflecting religious affiliation); OR a rounded Square impression containing a raised, ‘lazy’, letter “B” (possibly mimicking sterling silver hallmark signifying city of manufacture i.e. Birmingham) 3. An impressed rounded Square filled with a raised Maltese Cross (the base metal composite of nickel silver was also known as ‘German silver’ after its Berlin inventors in 1823) 4. A recessed Circle containing a Crab or Scarab Beetle image; OR a recessed Circle containing a rotated ‘fleur de lys’ or ‘fasces’ design 5. A depressed Diamond shape enclosing a large raised letter “R” and a small raised letter “D” (mimicking the U.K. Patent Office stamp which abbreviated the term ‘registered’ to “RD”, but also included date and class of patent) Suggested trade names for William Page & Co’s particular blend of brass plating are ‘roman silver’ or ‘silverite’. This copper alloy polishes to a lustrous gold when new, discolouring to a murky grey with greenish hue when neglected. HISTORY OF THE LOCH ARD The LOCH ARD belonged to the famous Loch Line which sailed many ships from England to Australia. Built in Glasgow by Barclay, Curdle and Co. in 1873, the LOCH ARD was a three-masted square rigged iron sailing ship. The ship measured 262ft 7" (79.87m) in length, 38ft (11.58m) in width, 23ft (7m) in depth and had a gross tonnage of 1693 tons. The LOCH ARD's main mast measured a massive 150ft (45.7m) in height. LOCH ARD made three trips to Australia and one trip to Calcutta before its final voyage. LOCH ARD left England on March 2, 1878, under the command of Captain Gibbs, a newly married, 29 year old. She was bound for Melbourne with a crew of 37, plus 17 passengers and a load of cargo. The general cargo reflected the affluence of Melbourne at the time. On board were straw hats, umbrella, perfumes, clay pipes, pianos, clocks, confectionary, linen and candles, as well as a heavier load of railway irons, cement, lead and copper. There were items included that intended for display in the Melbourne International Exhibition in 1880. The voyage to Port Phillip was long but uneventful. At 3am on June 1, 1878, Captain Gibbs was expecting to see land and the passengers were becoming excited as they prepared to view their new homeland in the early morning. But LOCH ARD was running into a fog which greatly reduced visibility. Captain Gibbs was becoming anxious as there was no sign of land or the Cape Otway lighthouse. At 4am the fog lifted. A man aloft announced that he could see breakers. The sheer cliffs of Victoria's west coast came into view, and Captain Gibbs realised that the ship was much closer to them than expected. He ordered as much sail to be set as time would permit and then attempted to steer the vessel out to sea. On coming head on into the wind, the ship lost momentum, the sails fell limp and LOCH ARD's bow swung back. Gibbs then ordered the anchors to be released in an attempt to hold its position. The anchors sank some 50 fathoms - but did not hold. By this time LOCH ARD was among the breakers and the tall cliffs of Mutton Bird Island rose behind the ship. Just half a mile from the coast, the ship's bow was suddenly pulled around by the anchor. The captain tried to tack out to sea, but the ship struck a reef at the base of Mutton Bird Island, near Port Campbell. Waves broke over the ship and the top deck was loosened from the hull. The masts and rigging came crashing down knocking passengers and crew overboard. When a lifeboat was finally launched, it crashed into the side of LOCH ARD and capsized. Tom Pearce, who had launched the boat, managed to cling to its overturned hull and shelter beneath it. He drifted out to sea and then on the flood tide came into what is now known as LOCH ARD Gorge. He swam to shore, bruised and dazed, and found a cave in which to shelter. Some of the crew stayed below deck to shelter from the falling rigging but drowned when the ship slipped off the reef into deeper water. Eva Carmichael had raced onto deck to find out what was happening only to be confronted by towering cliffs looming above the stricken ship. In all the chaos, Captain Gibbs grabbed Eva and said, "If you are saved Eva, let my dear wife know that I died like a sailor". That was the last Eva Carmichael saw of the captain. She was swept off the ship by a huge wave. Eva saw Tom Pearce on a small rocky beach and yelled to attract his attention. He dived in and swam to the exhausted woman and dragged her to shore. He took her to the cave and broke open case of brandy which had washed up on the beach. He opened a bottle to revive the unconscious woman. A few hours later Tom scaled a cliff in search of help. He followed hoof prints and came by chance upon two men from nearby Glenample Station three and a half miles away. In a state of exhaustion, he told the men of the tragedy. Tom returned to the gorge while the two men rode back to the station to get help. By the time they reached LOCH ARD Gorge, it was cold and dark. The two shipwreck survivors were taken to Glenample Station to recover. Eva stayed at the station for six weeks before returning to Ireland, this time by steamship. In Melbourne, Tom Pearce received a hero's welcome. He was presented with the first gold medal of the Royal Humane Society of Victoria and a £1000 cheque from the Victorian Government. Concerts were performed to honour the young man's bravery and to raise money for those who lost family in the LOCH ARD disaster. Of the 54 crew members and passengers on board, only two survived: the apprentice, Tom Pearce and the young woman passenger, Eva Carmichael, who lost all of her family in the tragedy. Ten days after the LOCH ARD tragedy, salvage rights to the wreck were sold at auction for £2,120. Cargo valued at £3,000 was salvaged and placed on the beach, but most washed back into the sea when another storm developed. The wreck of LOCH ARD still lies at the base of Mutton Bird Island. Much of the cargo has now been salvaged and some was washed up into what is now known as LOCH ARD Gorge. Cargo and artefacts have also been illegally salvaged over many years before protective legislation was introduced. One of the most unlikely pieces of cargo to have survived the shipwreck was a Minton porcelain peacock - one of only seven in the world. The peacock was destined for the Melbourne International Exhibition in 1880. It had been well packed, which gave it adequate protection during the violent storm. Today, the Minton peacock can be seen at the Flagstaff Hill Maritime Museum in Warrnambool. From Australia's most dramatic shipwreck it has now become Australia's most valuable shipwreck artefact and is one of very few 'objects' on the Victorian State Heritage Register. The LOCH ARD shipwreck is of State significance – Victorian Heritage Register S 417. Flagstaff Hill’s collection of artefacts from LOCH ARD is significant for being one of the largest collections of artefacts from this shipwreck in Victoria. It is significant for its association with the shipwreck, which is on the Victorian Heritage Register (VHR S417). The collection is significant because of the relationship between the objects, as together they have a high potential to interpret the story of the LOCH ARD. The LOCH ARD collection is archaeologically significant as the remains of a large international passenger and cargo ship. The LOCH ARD collection is historically significant for representing aspects of Victoria’s shipping history and its potential to interpret sub-theme 1.5 of Victoria’s Framework of Historical Themes (living with natural processes). The collection is also historically significant for its association with the LOCH ARD, which was one of the worst and best known shipwrecks in Victoria’s history. Unrestored tea spoon from the wreck of the LOCH ARD. The spoon design has a flattened fiddle-back handle, with a thin stem or shank, flared collar, and elongated bowl. The spoons metallic composition is a thin layer of brass alloy which has partially corroded back to a nickel-silver base metal. 30% of plate remains. Makers marks are obscured.flagstaff hill, warrnambool, shipwrecked coast, flagstaff hill maritime museum, maritime museum, shipwreck coast, flagstaff hill maritime village, great ocean road, loch line, loch ard, captain gibbs, eva carmichael, tom pearce, glenample station, mutton bird island, loch ard gorge, electroplated cutlery, loch ard shipwreck, nickel silver, william page & co, birmingham, brass plating, makers marks -
 Flagstaff Hill Maritime Museum and Village
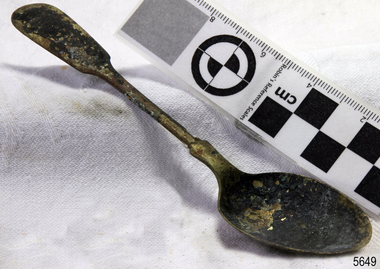
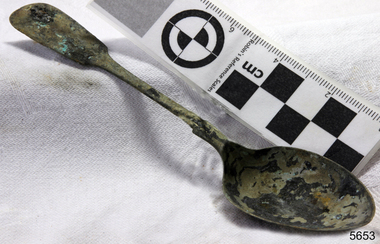
Spoon, circa 1878
This tea spoon is from the wreck of the LOCH ARD, a Loch Line ship of 1,693 tons which sailed from Gravesend, London, on 2 March 1878 with 17 passengers and a crew of 36 under Captain George Gibbs. “The intention was to discharge cargo in Melbourne, before returning to London via the Horn with wool and wheat”. Instead, on 1 June 1878, after 90 days at sea, she struck the sandstone cliffs of Mutton Bird Island on the south west coast of Victoria, and sank with the loss of 52 lives and all her cargo. The manifest of the LOCH ARD listed an array of manufactured goods and bulk metals being exported to the Colony of Victoria, with a declared value of £53,700. (202 bills of lading show an actual invoice value of £68, 456, with insurance underwriting to £30,000 of all cargo). Included in the manifest is the item of “Tin hardware & cutlery £7,530”. This teaspoon is one of 482 similar items of electro-plated cutlery from the LOCH ARD site, comprising spoons and forks of various sizes but all sharing the same general shape or design and metallic composition. 49 of these pieces display a legible makers’ mark — the initials “W” and “P” placed within a raised diamond outline, which is in turn contained within a sunken crown shape — identifying the manufacturer as William Page & Co of Birmingham. An electroplater’s makers’ marks, unlike sterling silver hallmarks, are not consistent identifiers of quality or date and place of manufacture. A similar line of five impressions was usually made to impress the consumer with an implication of industry standards, but what each one actually signified was not regulated and so they varied according to the whim of the individual foundry. In this case, the maker’s marks are often obscured by sedimentary accretion or removed by corrosion after a century of submersion in the ocean. However sufficient detail has survived to indicate that these samples of electro-plated cutlery probably originated from the same consignment in the LOCH ARD’s cargo. The following descriptions of maker’s marks are drawn from 255 tea spoons, 125 dessert spoons, and 99 table forks. These marks are clearly visible in 66 instances, while the same sequence of general outlines, or depression shapes, is discernible in another 166 examples. 1. A recessed Crown containing a raised Diamond outline and the initials “W” and “P” (the recognised trademark of William Page & Co) 2. An impressed Ellipse containing a raised, pivoted, Triangle in its lower part and bearing a Resurrection Cross on its upper section (a possible dissenting church symbol reflecting religious affiliation); OR a rounded Square impression containing a raised, ‘lazy’, letter “B” (possibly mimicking sterling silver hallmark signifying city of manufacture i.e. Birmingham) 3. An impressed rounded Square filled with a raised Maltese Cross (the base metal composite of nickel silver was also known as ‘German silver’ after its Berlin inventors in 1823) 4. A recessed Circle containing a Crab or Scarab Beetle image; OR a recessed Circle containing a rotated ‘fleur de lys’ or ‘fasces’ design 5. A depressed Diamond shape enclosing a large raised letter “R” and a small raised letter “D” (mimicking the U.K. Patent Office stamp which abbreviated the term ‘registered’ to “RD”, but also included date and class of patent) Suggested trade names for William Page & Co’s particular blend of brass plating are ‘roman silver’ or ‘silverite’. This copper alloy polishes to a lustrous gold when new, discolouring to a murky grey with greenish hue when neglected. HISTORY OF THE LOCH ARD The LOCH ARD belonged to the famous Loch Line which sailed many ships from England to Australia. Built in Glasgow by Barclay, Curdle and Co. in 1873, the LOCH ARD was a three-masted square rigged iron sailing ship. The ship measured 262ft 7" (79.87m) in length, 38ft (11.58m) in width, 23ft (7m) in depth and had a gross tonnage of 1693 tons. The LOCH ARD's main mast measured a massive 150ft (45.7m) in height. LOCH ARD made three trips to Australia and one trip to Calcutta before its final voyage. LOCH ARD left England on March 2, 1878, under the command of Captain Gibbs, a newly married, 29 year old. She was bound for Melbourne with a crew of 37, plus 17 passengers and a load of cargo. The general cargo reflected the affluence of Melbourne at the time. On board were straw hats, umbrella, perfumes, clay pipes, pianos, clocks, confectionary, linen and candles, as well as a heavier load of railway irons, cement, lead and copper. There were items included that intended for display in the Melbourne International Exhibition in 1880. The voyage to Port Phillip was long but uneventful. At 3am on June 1, 1878, Captain Gibbs was expecting to see land and the passengers were becoming excited as they prepared to view their new homeland in the early morning. But LOCH ARD was running into a fog which greatly reduced visibility. Captain Gibbs was becoming anxious as there was no sign of land or the Cape Otway lighthouse. At 4am the fog lifted. A man aloft announced that he could see breakers. The sheer cliffs of Victoria's west coast came into view, and Captain Gibbs realised that the ship was much closer to them than expected. He ordered as much sail to be set as time would permit and then attempted to steer the vessel out to sea. On coming head on into the wind, the ship lost momentum, the sails fell limp and LOCH ARD's bow swung back. Gibbs then ordered the anchors to be released in an attempt to hold its position. The anchors sank some 50 fathoms - but did not hold. By this time LOCH ARD was among the breakers and the tall cliffs of Mutton Bird Island rose behind the ship. Just half a mile from the coast, the ship's bow was suddenly pulled around by the anchor. The captain tried to tack out to sea, but the ship struck a reef at the base of Mutton Bird Island, near Port Campbell. Waves broke over the ship and the top deck was loosened from the hull. The masts and rigging came crashing down knocking passengers and crew overboard. When a lifeboat was finally launched, it crashed into the side of LOCH ARD and capsized. Tom Pearce, who had launched the boat, managed to cling to its overturned hull and shelter beneath it. He drifted out to sea and then on the flood tide came into what is now known as LOCH ARD Gorge. He swam to shore, bruised and dazed, and found a cave in which to shelter. Some of the crew stayed below deck to shelter from the falling rigging but drowned when the ship slipped off the reef into deeper water. Eva Carmichael had raced onto deck to find out what was happening only to be confronted by towering cliffs looming above the stricken ship. In all the chaos, Captain Gibbs grabbed Eva and said, "If you are saved Eva, let my dear wife know that I died like a sailor". That was the last Eva Carmichael saw of the captain. She was swept off the ship by a huge wave. Eva saw Tom Pearce on a small rocky beach and yelled to attract his attention. He dived in and swam to the exhausted woman and dragged her to shore. He took her to the cave and broke open case of brandy which had washed up on the beach. He opened a bottle to revive the unconscious woman. A few hours later Tom scaled a cliff in search of help. He followed hoof prints and came by chance upon two men from nearby Glenample Station three and a half miles away. In a state of exhaustion, he told the men of the tragedy. Tom returned to the gorge while the two men rode back to the station to get help. By the time they reached LOCH ARD Gorge, it was cold and dark. The two shipwreck survivors were taken to Glenample Station to recover. Eva stayed at the station for six weeks before returning to Ireland, this time by steamship. In Melbourne, Tom Pearce received a hero's welcome. He was presented with the first gold medal of the Royal Humane Society of Victoria and a £1000 cheque from the Victorian Government. Concerts were performed to honour the young man's bravery and to raise money for those who lost family in the LOCH ARD disaster. Of the 54 crew members and passengers on board, only two survived: the apprentice, Tom Pearce and the young woman passenger, Eva Carmichael, who lost all of her family in the tragedy. Ten days after the LOCH ARD tragedy, salvage rights to the wreck were sold at auction for £2,120. Cargo valued at £3,000 was salvaged and placed on the beach, but most washed back into the sea when another storm developed. The wreck of LOCH ARD still lies at the base of Mutton Bird Island. Much of the cargo has now been salvaged and some was washed up into what is now known as LOCH ARD Gorge. Cargo and artefacts have also been illegally salvaged over many years before protective legislation was introduced. One of the most unlikely pieces of cargo to have survived the shipwreck was a Minton porcelain peacock - one of only seven in the world. The peacock was destined for the Melbourne International Exhibition in 1880. It had been well packed, which gave it adequate protection during the violent storm. Today, the Minton peacock can be seen at the Flagstaff Hill Maritime Museum in Warrnambool. From Australia's most dramatic shipwreck it has now become Australia's most valuable shipwreck artefact and is one of very few 'objects' on the Victorian State Heritage Register. The LOCH ARD shipwreck is of State significance – Victorian Heritage Register S 417. Flagstaff Hill’s collection of artefacts from LOCH ARD is significant for being one of the largest collections of artefacts from this shipwreck in Victoria. It is significant for its association with the shipwreck, which is on the Victorian Heritage Register (VHR S417). The collection is significant because of the relationship between the objects, as together they have a high potential to interpret the story of the LOCH ARD. The LOCH ARD collection is archaeologically significant as the remains of a large international passenger and cargo ship. The LOCH ARD collection is historically significant for representing aspects of Victoria’s shipping history and its potential to interpret sub-theme 1.5 of Victoria’s Framework of Historical Themes (living with natural processes). The collection is also historically significant for its association with the LOCH ARD, which was one of the worst and best known shipwrecks in Victoria’s history. Unrestored tea spoon from the wreck of the LOCH ARD. The spoon design has a flattened fiddle-back handle, with a thin stem or shank, flared collar, and elongated bowl. The spoons metallic composition is a thin layer of brass alloy which has partially corroded back to a nickel-silver base metal. 30% of surface plating remains with some verdigris.flagstaff hill, warrnambool, shipwrecked coast, flagstaff hill maritime museum, maritime museum, shipwreck coast, flagstaff hill maritime village, great ocean road, loch line, loch ard, captain gibbs, eva carmichael, tom pearce, glenample station, mutton bird island, loch ard gorge, electroplated cutlery, loch ard shipwreck, nickel silver, william page & co, birmingham, brass plating, makers marks -
 Flagstaff Hill Maritime Museum and Village
Spoon, circa 1878
This tea spoon is from the wreck of the LOCH ARD, a Loch Line ship of 1,693 tons which sailed from Gravesend, London, on 2 March 1878 with 17 passengers and a crew of 36 under Captain George Gibbs. “The intention was to discharge cargo in Melbourne, before returning to London via the Horn with wool and wheat”. Instead, on 1 June 1878, after 90 days at sea, she struck the sandstone cliffs of Mutton Bird Island on the south west coast of Victoria, and sank with the loss of 52 lives and all her cargo. The manifest of the LOCH ARD listed an array of manufactured goods and bulk metals being exported to the Colony of Victoria, with a declared value of £53,700. (202 bills of lading show an actual invoice value of £68, 456, with insurance underwriting to £30,000 of all cargo). Included in the manifest is the item of “Tin hardware & cutlery £7,530”. This teaspoon is one of 482 similar items of electro-plated cutlery from the LOCH ARD site, comprising spoons and forks of various sizes but all sharing the same general shape or design and metallic composition. 49 of these pieces display a legible makers’ mark — the initials “W” and “P” placed within a raised diamond outline, which is in turn contained within a sunken crown shape — identifying the manufacturer as William Page & Co of Birmingham. An electroplater’s makers’ marks, unlike sterling silver hallmarks, are not consistent identifiers of quality or date and place of manufacture. A similar line of five impressions was usually made to impress the consumer with an implication of industry standards, but what each one actually signified was not regulated and so they varied according to the whim of the individual foundry. In this case, the maker’s marks are often obscured by sedimentary accretion or removed by corrosion after a century of submersion in the ocean. However sufficient detail has survived to indicate that these samples of electro-plated cutlery probably originated from the same consignment in the LOCH ARD’s cargo. The following descriptions of maker’s marks are drawn from 255 tea spoons, 125 dessert spoons, and 99 table forks. These marks are clearly visible in 66 instances, while the same sequence of general outlines, or depression shapes, is discernible in another 166 examples. 1. A recessed Crown containing a raised Diamond outline and the initials “W” and “P” (the recognised trademark of William Page & Co) 2. An impressed Ellipse containing a raised, pivoted, Triangle in its lower part and bearing a Resurrection Cross on its upper section (a possible dissenting church symbol reflecting religious affiliation); OR a rounded Square impression containing a raised, ‘lazy’, letter “B” (possibly mimicking sterling silver hallmark signifying city of manufacture i.e. Birmingham) 3. An impressed rounded Square filled with a raised Maltese Cross (the base metal composite of nickel silver was also known as ‘German silver’ after its Berlin inventors in 1823) 4. A recessed Circle containing a Crab or Scarab Beetle image; OR a recessed Circle containing a rotated ‘fleur de lys’ or ‘fasces’ design 5. A depressed Diamond shape enclosing a large raised letter “R” and a small raised letter “D” (mimicking the U.K. Patent Office stamp which abbreviated the term ‘registered’ to “RD”, but also included date and class of patent) Suggested trade names for William Page & Co’s particular blend of brass plating are ‘roman silver’ or ‘silverite’. This copper alloy polishes to a lustrous gold when new, discolouring to a murky grey with greenish hue when neglected. HISTORY OF THE LOCH ARD The LOCH ARD belonged to the famous Loch Line which sailed many ships from England to Australia. Built in Glasgow by Barclay, Curdle and Co. in 1873, the LOCH ARD was a three-masted square rigged iron sailing ship. The ship measured 262ft 7" (79.87m) in length, 38ft (11.58m) in width, 23ft (7m) in depth and had a gross tonnage of 1693 tons. The LOCH ARD's main mast measured a massive 150ft (45.7m) in height. LOCH ARD made three trips to Australia and one trip to Calcutta before its final voyage. LOCH ARD left England on March 2, 1878, under the command of Captain Gibbs, a newly married, 29 year old. She was bound for Melbourne with a crew of 37, plus 17 passengers and a load of cargo. The general cargo reflected the affluence of Melbourne at the time. On board were straw hats, umbrella, perfumes, clay pipes, pianos, clocks, confectionary, linen and candles, as well as a heavier load of railway irons, cement, lead and copper. There were items included that intended for display in the Melbourne International Exhibition in 1880. The voyage to Port Phillip was long but uneventful. At 3am on June 1, 1878, Captain Gibbs was expecting to see land and the passengers were becoming excited as they prepared to view their new homeland in the early morning. But LOCH ARD was running into a fog which greatly reduced visibility. Captain Gibbs was becoming anxious as there was no sign of land or the Cape Otway lighthouse. At 4am the fog lifted. A man aloft announced that he could see breakers. The sheer cliffs of Victoria's west coast came into view, and Captain Gibbs realised that the ship was much closer to them than expected. He ordered as much sail to be set as time would permit and then attempted to steer the vessel out to sea. On coming head on into the wind, the ship lost momentum, the sails fell limp and LOCH ARD's bow swung back. Gibbs then ordered the anchors to be released in an attempt to hold its position. The anchors sank some 50 fathoms - but did not hold. By this time LOCH ARD was among the breakers and the tall cliffs of Mutton Bird Island rose behind the ship. Just half a mile from the coast, the ship's bow was suddenly pulled around by the anchor. The captain tried to tack out to sea, but the ship struck a reef at the base of Mutton Bird Island, near Port Campbell. Waves broke over the ship and the top deck was loosened from the hull. The masts and rigging came crashing down knocking passengers and crew overboard. When a lifeboat was finally launched, it crashed into the side of LOCH ARD and capsized. Tom Pearce, who had launched the boat, managed to cling to its overturned hull and shelter beneath it. He drifted out to sea and then on the flood tide came into what is now known as LOCH ARD Gorge. He swam to shore, bruised and dazed, and found a cave in which to shelter. Some of the crew stayed below deck to shelter from the falling rigging but drowned when the ship slipped off the reef into deeper water. Eva Carmichael had raced onto deck to find out what was happening only to be confronted by towering cliffs looming above the stricken ship. In all the chaos, Captain Gibbs grabbed Eva and said, "If you are saved Eva, let my dear wife know that I died like a sailor". That was the last Eva Carmichael saw of the captain. She was swept off the ship by a huge wave. Eva saw Tom Pearce on a small rocky beach and yelled to attract his attention. He dived in and swam to the exhausted woman and dragged her to shore. He took her to the cave and broke open case of brandy which had washed up on the beach. He opened a bottle to revive the unconscious woman. A few hours later Tom scaled a cliff in search of help. He followed hoof prints and came by chance upon two men from nearby Glenample Station three and a half miles away. In a state of exhaustion, he told the men of the tragedy. Tom returned to the gorge while the two men rode back to the station to get help. By the time they reached LOCH ARD Gorge, it was cold and dark. The two shipwreck survivors were taken to Glenample Station to recover. Eva stayed at the station for six weeks before returning to Ireland, this time by steamship. In Melbourne, Tom Pearce received a hero's welcome. He was presented with the first gold medal of the Royal Humane Society of Victoria and a £1000 cheque from the Victorian Government. Concerts were performed to honour the young man's bravery and to raise money for those who lost family in the LOCH ARD disaster. Of the 54 crew members and passengers on board, only two survived: the apprentice, Tom Pearce and the young woman passenger, Eva Carmichael, who lost all of her family in the tragedy. Ten days after the LOCH ARD tragedy, salvage rights to the wreck were sold at auction for £2,120. Cargo valued at £3,000 was salvaged and placed on the beach, but most washed back into the sea when another storm developed. The wreck of LOCH ARD still lies at the base of Mutton Bird Island. Much of the cargo has now been salvaged and some was washed up into what is now known as LOCH ARD Gorge. Cargo and artefacts have also been illegally salvaged over many years before protective legislation was introduced. One of the most unlikely pieces of cargo to have survived the shipwreck was a Minton porcelain peacock - one of only seven in the world. The peacock was destined for the Melbourne International Exhibition in 1880. It had been well packed, which gave it adequate protection during the violent storm. Today, the Minton peacock can be seen at the Flagstaff Hill Maritime Museum in Warrnambool. From Australia's most dramatic shipwreck it has now become Australia's most valuable shipwreck artefact and is one of very few 'objects' on the Victorian State Heritage Register. The LOCH ARD shipwreck is of State significance – Victorian Heritage Register S 417. Flagstaff Hill’s collection of artefacts from LOCH ARD is significant for being one of the largest collections of artefacts from this shipwreck in Victoria. It is significant for its association with the shipwreck, which is on the Victorian Heritage Register (VHR S417). The collection is significant because of the relationship between the objects, as together they have a high potential to interpret the story of the LOCH ARD. The LOCH ARD collection is archaeologically significant as the remains of a large international passenger and cargo ship. The LOCH ARD collection is historically significant for representing aspects of Victoria’s shipping history and its potential to interpret sub-theme 1.5 of Victoria’s Framework of Historical Themes (living with natural processes). The collection is also historically significant for its association with the LOCH ARD, which was one of the worst and best known shipwrecks in Victoria’s history. Unrestored tea spoon from the wreck of the LOCH ARD. The spoon design has a flattened fiddle-back handle, with a thin stem or shank, flared collar, and elongated bowl. The spoons metallic composition is a thin layer of brass alloy which has partially corroded back to a nickel-silver base metal. Only 15% of electroplated surface remains. flagstaff hill, warrnambool, shipwrecked coast, flagstaff hill maritime museum, maritime museum, shipwreck coast, flagstaff hill maritime village, great ocean road, loch line, loch ard, captain gibbs, eva carmichael, tom pearce, glenample station, mutton bird island, loch ard gorge, electroplated cutlery, loch ard shipwreck, nickel silver, william page & co, birmingham, brass plating, makers marks -
 Flagstaff Hill Maritime Museum and Village
Spoon, circa 1878
This tea spoon is from the wreck of the LOCH ARD, a Loch Line ship of 1,693 tons which sailed from Gravesend, London, on 2 March 1878 with 17 passengers and a crew of 36 under Captain George Gibbs. “The intention was to discharge cargo in Melbourne, before returning to London via the Horn with wool and wheat”. Instead, on 1 June 1878, after 90 days at sea, she struck the sandstone cliffs of Mutton Bird Island on the south west coast of Victoria, and sank with the loss of 52 lives and all her cargo. The manifest of the LOCH ARD listed an array of manufactured goods and bulk metals being exported to the Colony of Victoria, with a declared value of £53,700. (202 bills of lading show an actual invoice value of £68, 456, with insurance underwriting to £30,000 of all cargo). Included in the manifest is the item of “Tin hardware & cutlery £7,530”. This teaspoon is one of 482 similar items of electro-plated cutlery from the LOCH ARD site, comprising spoons and forks of various sizes but all sharing the same general shape or design and metallic composition. 49 of these pieces display a legible makers’ mark — the initials “W” and “P” placed within a raised diamond outline, which is in turn contained within a sunken crown shape — identifying the manufacturer as William Page & Co of Birmingham. An electroplater’s makers’ marks, unlike sterling silver hallmarks, are not consistent identifiers of quality or date and place of manufacture. A similar line of five impressions was usually made to impress the consumer with an implication of industry standards, but what each one actually signified was not regulated and so they varied according to the whim of the individual foundry. In this case, the maker’s marks are often obscured by sedimentary accretion or removed by corrosion after a century of submersion in the ocean. However sufficient detail has survived to indicate that these samples of electro-plated cutlery probably originated from the same consignment in the LOCH ARD’s cargo. The following descriptions of maker’s marks are drawn from 255 tea spoons, 125 dessert spoons, and 99 table forks. These marks are clearly visible in 66 instances, while the same sequence of general outlines, or depression shapes, is discernible in another 166 examples. 1. A recessed Crown containing a raised Diamond outline and the initials “W” and “P” (the recognised trademark of William Page & Co) 2. An impressed Ellipse containing a raised, pivoted, Triangle in its lower part and bearing a Resurrection Cross on its upper section (a possible dissenting church symbol reflecting religious affiliation); OR a rounded Square impression containing a raised, ‘lazy’, letter “B” (possibly mimicking sterling silver hallmark signifying city of manufacture i.e. Birmingham) 3. An impressed rounded Square filled with a raised Maltese Cross (the base metal composite of nickel silver was also known as ‘German silver’ after its Berlin inventors in 1823) 4. A recessed Circle containing a Crab or Scarab Beetle image; OR a recessed Circle containing a rotated ‘fleur de lys’ or ‘fasces’ design 5. A depressed Diamond shape enclosing a large raised letter “R” and a small raised letter “D” (mimicking the U.K. Patent Office stamp which abbreviated the term ‘registered’ to “RD”, but also included date and class of patent) Suggested trade names for William Page & Co’s particular blend of brass plating are ‘roman silver’ or ‘silverite’. This copper alloy polishes to a lustrous gold when new, discolouring to a murky grey with greenish hue when neglected. HISTORY OF THE LOCH ARD The LOCH ARD belonged to the famous Loch Line which sailed many ships from England to Australia. Built in Glasgow by Barclay, Curdle and Co. in 1873, the LOCH ARD was a three-masted square rigged iron sailing ship. The ship measured 262ft 7" (79.87m) in length, 38ft (11.58m) in width, 23ft (7m) in depth and had a gross tonnage of 1693 tons. The LOCH ARD's main mast measured a massive 150ft (45.7m) in height. LOCH ARD made three trips to Australia and one trip to Calcutta before its final voyage. LOCH ARD left England on March 2, 1878, under the command of Captain Gibbs, a newly married, 29 year old. She was bound for Melbourne with a crew of 37, plus 17 passengers and a load of cargo. The general cargo reflected the affluence of Melbourne at the time. On board were straw hats, umbrella, perfumes, clay pipes, pianos, clocks, confectionary, linen and candles, as well as a heavier load of railway irons, cement, lead and copper. There were items included that intended for display in the Melbourne International Exhibition in 1880. The voyage to Port Phillip was long but uneventful. At 3am on June 1, 1878, Captain Gibbs was expecting to see land and the passengers were becoming excited as they prepared to view their new homeland in the early morning. But LOCH ARD was running into a fog which greatly reduced visibility. Captain Gibbs was becoming anxious as there was no sign of land or the Cape Otway lighthouse. At 4am the fog lifted. A man aloft announced that he could see breakers. The sheer cliffs of Victoria's west coast came into view, and Captain Gibbs realised that the ship was much closer to them than expected. He ordered as much sail to be set as time would permit and then attempted to steer the vessel out to sea. On coming head on into the wind, the ship lost momentum, the sails fell limp and LOCH ARD's bow swung back. Gibbs then ordered the anchors to be released in an attempt to hold its position. The anchors sank some 50 fathoms - but did not hold. By this time LOCH ARD was among the breakers and the tall cliffs of Mutton Bird Island rose behind the ship. Just half a mile from the coast, the ship's bow was suddenly pulled around by the anchor. The captain tried to tack out to sea, but the ship struck a reef at the base of Mutton Bird Island, near Port Campbell. Waves broke over the ship and the top deck was loosened from the hull. The masts and rigging came crashing down knocking passengers and crew overboard. When a lifeboat was finally launched, it crashed into the side of LOCH ARD and capsized. Tom Pearce, who had launched the boat, managed to cling to its overturned hull and shelter beneath it. He drifted out to sea and then on the flood tide came into what is now known as LOCH ARD Gorge. He swam to shore, bruised and dazed, and found a cave in which to shelter. Some of the crew stayed below deck to shelter from the falling rigging but drowned when the ship slipped off the reef into deeper water. Eva Carmichael had raced onto deck to find out what was happening only to be confronted by towering cliffs looming above the stricken ship. In all the chaos, Captain Gibbs grabbed Eva and said, "If you are saved Eva, let my dear wife know that I died like a sailor". That was the last Eva Carmichael saw of the captain. She was swept off the ship by a huge wave. Eva saw Tom Pearce on a small rocky beach and yelled to attract his attention. He dived in and swam to the exhausted woman and dragged her to shore. He took her to the cave and broke open case of brandy which had washed up on the beach. He opened a bottle to revive the unconscious woman. A few hours later Tom scaled a cliff in search of help. He followed hoof prints and came by chance upon two men from nearby Glenample Station three and a half miles away. In a state of exhaustion, he told the men of the tragedy. Tom returned to the gorge while the two men rode back to the station to get help. By the time they reached LOCH ARD Gorge, it was cold and dark. The two shipwreck survivors were taken to Glenample Station to recover. Eva stayed at the station for six weeks before returning to Ireland, this time by steamship. In Melbourne, Tom Pearce received a hero's welcome. He was presented with the first gold medal of the Royal Humane Society of Victoria and a £1000 cheque from the Victorian Government. Concerts were performed to honour the young man's bravery and to raise money for those who lost family in the LOCH ARD disaster. Of the 54 crew members and passengers on board, only two survived: the apprentice, Tom Pearce and the young woman passenger, Eva Carmichael, who lost all of her family in the tragedy. Ten days after the LOCH ARD tragedy, salvage rights to the wreck were sold at auction for £2,120. Cargo valued at £3,000 was salvaged and placed on the beach, but most washed back into the sea when another storm developed. The wreck of LOCH ARD still lies at the base of Mutton Bird Island. Much of the cargo has now been salvaged and some was washed up into what is now known as LOCH ARD Gorge. Cargo and artefacts have also been illegally salvaged over many years before protective legislation was introduced. One of the most unlikely pieces of cargo to have survived the shipwreck was a Minton porcelain peacock - one of only seven in the world. The peacock was destined for the Melbourne International Exhibition in 1880. It had been well packed, which gave it adequate protection during the violent storm. Today, the Minton peacock can be seen at the Flagstaff Hill Maritime Museum in Warrnambool. From Australia's most dramatic shipwreck it has now become Australia's most valuable shipwreck artefact and is one of very few 'objects' on the Victorian State Heritage Register. The LOCH ARD shipwreck is of State significance – Victorian Heritage Register S 417. Flagstaff Hill’s collection of artefacts from LOCH ARD is significant for being one of the largest collections of artefacts from this shipwreck in Victoria. It is significant for its association with the shipwreck, which is on the Victorian Heritage Register (VHR S417). The collection is significant because of the relationship between the objects, as together they have a high potential to interpret the story of the LOCH ARD. The LOCH ARD collection is archaeologically significant as the remains of a large international passenger and cargo ship. The LOCH ARD collection is historically significant for representing aspects of Victoria’s shipping history and its potential to interpret sub-theme 1.5 of Victoria’s Framework of Historical Themes (living with natural processes). The collection is also historically significant for its association with the LOCH ARD, which was one of the worst and best known shipwrecks in Victoria’s history. Unrestored tea spoon from the wreck of the LOCH ARD. The spoon design has a flattened fiddle-back handle, with a thin stem or shank, flared collar, and elongated bowl. The spoons metallic composition is a thin layer of brass alloy which has partially corroded back to a nickel-silver base metal. Stem is bent. Base metal has reddish stain. One of five makers marks is legible: (2) Resurrection Cross. Plain heraldic shield embossed on upper rear of bowl.flagstaff hill, warrnambool, shipwrecked coast, flagstaff hill maritime museum, maritime museum, shipwreck coast, flagstaff hill maritime village, great ocean road, loch line, loch ard, captain gibbs, eva carmichael, tom pearce, glenample station, mutton bird island, loch ard gorge, electroplated cutlery, loch ard shipwreck, nickel silver, william page & co, birmingham, brass plating, makers marks -
 Flagstaff Hill Maritime Museum and Village
Spoon, circa 1878
This tea spoon is from the wreck of the LOCH ARD, a Loch Line ship of 1,693 tons which sailed from Gravesend, London, on 2 March 1878 with 17 passengers and a crew of 36 under Captain George Gibbs. “The intention was to discharge cargo in Melbourne, before returning to London via the Horn with wool and wheat”. Instead, on 1 June 1878, after 90 days at sea, she struck the sandstone cliffs of Mutton Bird Island on the south west coast of Victoria, and sank with the loss of 52 lives and all her cargo. The manifest of the LOCH ARD listed an array of manufactured goods and bulk metals being exported to the Colony of Victoria, with a declared value of £53,700. (202 bills of lading show an actual invoice value of £68, 456, with insurance underwriting to £30,000 of all cargo). Included in the manifest is the item of “Tin hardware & cutlery £7,530”. This teaspoon is one of 482 similar items of electro-plated cutlery from the LOCH ARD site, comprising spoons and forks of various sizes but all sharing the same general shape or design and metallic composition. 49 of these pieces display a legible makers’ mark — the initials “W” and “P” placed within a raised diamond outline, which is in turn contained within a sunken crown shape — identifying the manufacturer as William Page & Co of Birmingham. An electroplater’s makers’ marks, unlike sterling silver hallmarks, are not consistent identifiers of quality or date and place of manufacture. A similar line of five impressions was usually made to impress the consumer with an implication of industry standards, but what each one actually signified was not regulated and so they varied according to the whim of the individual foundry. In this case, the maker’s marks are often obscured by sedimentary accretion or removed by corrosion after a century of submersion in the ocean. However sufficient detail has survived to indicate that these samples of electro-plated cutlery probably originated from the same consignment in the LOCH ARD’s cargo. The following descriptions of maker’s marks are drawn from 255 tea spoons, 125 dessert spoons, and 99 table forks. These marks are clearly visible in 66 instances, while the same sequence of general outlines, or depression shapes, is discernible in another 166 examples. 1. A recessed Crown containing a raised Diamond outline and the initials “W” and “P” (the recognised trademark of William Page & Co) 2. An impressed Ellipse containing a raised, pivoted, Triangle in its lower part and bearing a Resurrection Cross on its upper section (a possible dissenting church symbol reflecting religious affiliation); OR a rounded Square impression containing a raised, ‘lazy’, letter “B” (possibly mimicking sterling silver hallmark signifying city of manufacture i.e. Birmingham) 3. An impressed rounded Square filled with a raised Maltese Cross (the base metal composite of nickel silver was also known as ‘German silver’ after its Berlin inventors in 1823) 4. A recessed Circle containing a Crab or Scarab Beetle image; OR a recessed Circle containing a rotated ‘fleur de lys’ or ‘fasces’ design 5. A depressed Diamond shape enclosing a large raised letter “R” and a small raised letter “D” (mimicking the U.K. Patent Office stamp which abbreviated the term ‘registered’ to “RD”, but also included date and class of patent) Suggested trade names for William Page & Co’s particular blend of brass plating are ‘roman silver’ or ‘silverite’. This copper alloy polishes to a lustrous gold when new, discolouring to a murky grey with greenish hue when neglected. HISTORY OF THE LOCH ARD The LOCH ARD belonged to the famous Loch Line which sailed many ships from England to Australia. Built in Glasgow by Barclay, Curdle and Co. in 1873, the LOCH ARD was a three-masted square rigged iron sailing ship. The ship measured 262ft 7" (79.87m) in length, 38ft (11.58m) in width, 23ft (7m) in depth and had a gross tonnage of 1693 tons. The LOCH ARD's main mast measured a massive 150ft (45.7m) in height. LOCH ARD made three trips to Australia and one trip to Calcutta before its final voyage. LOCH ARD left England on March 2, 1878, under the command of Captain Gibbs, a newly married, 29 year old. She was bound for Melbourne with a crew of 37, plus 17 passengers and a load of cargo. The general cargo reflected the affluence of Melbourne at the time. On board were straw hats, umbrella, perfumes, clay pipes, pianos, clocks, confectionary, linen and candles, as well as a heavier load of railway irons, cement, lead and copper. There were items included that intended for display in the Melbourne International Exhibition in 1880. The voyage to Port Phillip was long but uneventful. At 3am on June 1, 1878, Captain Gibbs was expecting to see land and the passengers were becoming excited as they prepared to view their new homeland in the early morning. But LOCH ARD was running into a fog which greatly reduced visibility. Captain Gibbs was becoming anxious as there was no sign of land or the Cape Otway lighthouse. At 4am the fog lifted. A man aloft announced that he could see breakers. The sheer cliffs of Victoria's west coast came into view, and Captain Gibbs realised that the ship was much closer to them than expected. He ordered as much sail to be set as time would permit and then attempted to steer the vessel out to sea. On coming head on into the wind, the ship lost momentum, the sails fell limp and LOCH ARD's bow swung back. Gibbs then ordered the anchors to be released in an attempt to hold its position. The anchors sank some 50 fathoms - but did not hold. By this time LOCH ARD was among the breakers and the tall cliffs of Mutton Bird Island rose behind the ship. Just half a mile from the coast, the ship's bow was suddenly pulled around by the anchor. The captain tried to tack out to sea, but the ship struck a reef at the base of Mutton Bird Island, near Port Campbell. Waves broke over the ship and the top deck was loosened from the hull. The masts and rigging came crashing down knocking passengers and crew overboard. When a lifeboat was finally launched, it crashed into the side of LOCH ARD and capsized. Tom Pearce, who had launched the boat, managed to cling to its overturned hull and shelter beneath it. He drifted out to sea and then on the flood tide came into what is now known as LOCH ARD Gorge. He swam to shore, bruised and dazed, and found a cave in which to shelter. Some of the crew stayed below deck to shelter from the falling rigging but drowned when the ship slipped off the reef into deeper water. Eva Carmichael had raced onto deck to find out what was happening only to be confronted by towering cliffs looming above the stricken ship. In all the chaos, Captain Gibbs grabbed Eva and said, "If you are saved Eva, let my dear wife know that I died like a sailor". That was the last Eva Carmichael saw of the captain. She was swept off the ship by a huge wave. Eva saw Tom Pearce on a small rocky beach and yelled to attract his attention. He dived in and swam to the exhausted woman and dragged her to shore. He took her to the cave and broke open case of brandy which had washed up on the beach. He opened a bottle to revive the unconscious woman. A few hours later Tom scaled a cliff in search of help. He followed hoof prints and came by chance upon two men from nearby Glenample Station three and a half miles away. In a state of exhaustion, he told the men of the tragedy. Tom returned to the gorge while the two men rode back to the station to get help. By the time they reached LOCH ARD Gorge, it was cold and dark. The two shipwreck survivors were taken to Glenample Station to recover. Eva stayed at the station for six weeks before returning to Ireland, this time by steamship. In Melbourne, Tom Pearce received a hero's welcome. He was presented with the first gold medal of the Royal Humane Society of Victoria and a £1000 cheque from the Victorian Government. Concerts were performed to honour the young man's bravery and to raise money for those who lost family in the LOCH ARD disaster. Of the 54 crew members and passengers on board, only two survived: the apprentice, Tom Pearce and the young woman passenger, Eva Carmichael, who lost all of her family in the tragedy. Ten days after the LOCH ARD tragedy, salvage rights to the wreck were sold at auction for £2,120. Cargo valued at £3,000 was salvaged and placed on the beach, but most washed back into the sea when another storm developed. The wreck of LOCH ARD still lies at the base of Mutton Bird Island. Much of the cargo has now been salvaged and some was washed up into what is now known as LOCH ARD Gorge. Cargo and artefacts have also been illegally salvaged over many years before protective legislation was introduced. One of the most unlikely pieces of cargo to have survived the shipwreck was a Minton porcelain peacock - one of only seven in the world. The peacock was destined for the Melbourne International Exhibition in 1880. It had been well packed, which gave it adequate protection during the violent storm. Today, the Minton peacock can be seen at the Flagstaff Hill Maritime Museum in Warrnambool. From Australia's most dramatic shipwreck it has now become Australia's most valuable shipwreck artefact and is one of very few 'objects' on the Victorian State Heritage Register. The LOCH ARD shipwreck is of State significance – Victorian Heritage Register S 417. Flagstaff Hill’s collection of artefacts from LOCH ARD is significant for being one of the largest collections of artefacts from this shipwreck in Victoria. It is significant for its association with the shipwreck, which is on the Victorian Heritage Register (VHR S417). The collection is significant because of the relationship between the objects, as together they have a high potential to interpret the story of the LOCH ARD. The LOCH ARD collection is archaeologically significant as the remains of a large international passenger and cargo ship. The LOCH ARD collection is historically significant for representing aspects of Victoria’s shipping history and its potential to interpret sub-theme 1.5 of Victoria’s Framework of Historical Themes (living with natural processes). The collection is also historically significant for its association with the LOCH ARD, which was one of the worst and best known shipwrecks in Victoria’s history. Unrestored tea spoon from the wreck of the LOCH ARD. The spoon design has a flattened fiddle-back handle, with a thin stem or shank, flared collar, and elongated bowl. The spoons metallic composition is a thin layer of brass alloy which has partially corroded back to a nickel-silver base metal. Only 10-15% of electroplating remains. Lump of concretion on handle. Part of heraldic shield (blank) visible on upper rear of bowl. Parts of five makers marks visible on back of handle.flagstaff hill, warrnambool, shipwrecked coast, flagstaff hill maritime museum, maritime museum, shipwreck coast, flagstaff hill maritime village, great ocean road, loch line, loch ard, captain gibbs, eva carmichael, tom pearce, glenample station, mutton bird island, loch ard gorge, electroplated cutlery, loch ard shipwreck, nickel silver, william page & co, birmingham, brass plating, makers marks -
 Flagstaff Hill Maritime Museum and Village
Spoon, circa 1878
This tea spoon is from the wreck of the LOCH ARD, a Loch Line ship of 1,693 tons which sailed from Gravesend, London, on 2 March 1878 with 17 passengers and a crew of 36 under Captain George Gibbs. “The intention was to discharge cargo in Melbourne, before returning to London via the Horn with wool and wheat”. Instead, on 1 June 1878, after 90 days at sea, she struck the sandstone cliffs of Mutton Bird Island on the south west coast of Victoria, and sank with the loss of 52 lives and all her cargo. The manifest of the LOCH ARD listed an array of manufactured goods and bulk metals being exported to the Colony of Victoria, with a declared value of £53,700. (202 bills of lading show an actual invoice value of £68, 456, with insurance underwriting to £30,000 of all cargo). Included in the manifest is the item of “Tin hardware & cutlery £7,530”. This teaspoon is one of 482 similar items of electro-plated cutlery from the LOCH ARD site, comprising spoons and forks of various sizes but all sharing the same general shape or design and metallic composition. 49 of these pieces display a legible makers’ mark — the initials “W” and “P” placed within a raised diamond outline, which is in turn contained within a sunken crown shape — identifying the manufacturer as William Page & Co of Birmingham. An electroplater’s makers’ marks, unlike sterling silver hallmarks, are not consistent identifiers of quality or date and place of manufacture. A similar line of five impressions was usually made to impress the consumer with an implication of industry standards, but what each one actually signified was not regulated and so they varied according to the whim of the individual foundry. In this case, the maker’s marks are often obscured by sedimentary accretion or removed by corrosion after a century of submersion in the ocean. However sufficient detail has survived to indicate that these samples of electro-plated cutlery probably originated from the same consignment in the LOCH ARD’s cargo. The following descriptions of maker’s marks are drawn from 255 tea spoons, 125 dessert spoons, and 99 table forks. These marks are clearly visible in 66 instances, while the same sequence of general outlines, or depression shapes, is discernible in another 166 examples. 1. A recessed Crown containing a raised Diamond outline and the initials “W” and “P” (the recognised trademark of William Page & Co) 2. An impressed Ellipse containing a raised, pivoted, Triangle in its lower part and bearing a Resurrection Cross on its upper section (a possible dissenting church symbol reflecting religious affiliation); OR a rounded Square impression containing a raised, ‘lazy’, letter “B” (possibly mimicking sterling silver hallmark signifying city of manufacture i.e. Birmingham) 3. An impressed rounded Square filled with a raised Maltese Cross (the base metal composite of nickel silver was also known as ‘German silver’ after its Berlin inventors in 1823) 4. A recessed Circle containing a Crab or Scarab Beetle image; OR a recessed Circle containing a rotated ‘fleur de lys’ or ‘fasces’ design 5. A depressed Diamond shape enclosing a large raised letter “R” and a small raised letter “D” (mimicking the U.K. Patent Office stamp which abbreviated the term ‘registered’ to “RD”, but also included date and class of patent) Suggested trade names for William Page & Co’s particular blend of brass plating are ‘roman silver’ or ‘silverite’. This copper alloy polishes to a lustrous gold when new, discolouring to a murky grey with greenish hue when neglected. HISTORY OF THE LOCH ARD The LOCH ARD belonged to the famous Loch Line which sailed many ships from England to Australia. Built in Glasgow by Barclay, Curdle and Co. in 1873, the LOCH ARD was a three-masted square rigged iron sailing ship. The ship measured 262ft 7" (79.87m) in length, 38ft (11.58m) in width, 23ft (7m) in depth and had a gross tonnage of 1693 tons. The LOCH ARD's main mast measured a massive 150ft (45.7m) in height. LOCH ARD made three trips to Australia and one trip to Calcutta before its final voyage. LOCH ARD left England on March 2, 1878, under the command of Captain Gibbs, a newly married, 29 year old. She was bound for Melbourne with a crew of 37, plus 17 passengers and a load of cargo. The general cargo reflected the affluence of Melbourne at the time. On board were straw hats, umbrella, perfumes, clay pipes, pianos, clocks, confectionary, linen and candles, as well as a heavier load of railway irons, cement, lead and copper. There were items included that intended for display in the Melbourne International Exhibition in 1880. The voyage to Port Phillip was long but uneventful. At 3am on June 1, 1878, Captain Gibbs was expecting to see land and the passengers were becoming excited as they prepared to view their new homeland in the early morning. But LOCH ARD was running into a fog which greatly reduced visibility. Captain Gibbs was becoming anxious as there was no sign of land or the Cape Otway lighthouse. At 4am the fog lifted. A man aloft announced that he could see breakers. The sheer cliffs of Victoria's west coast came into view, and Captain Gibbs realised that the ship was much closer to them than expected. He ordered as much sail to be set as time would permit and then attempted to steer the vessel out to sea. On coming head on into the wind, the ship lost momentum, the sails fell limp and LOCH ARD's bow swung back. Gibbs then ordered the anchors to be released in an attempt to hold its position. The anchors sank some 50 fathoms - but did not hold. By this time LOCH ARD was among the breakers and the tall cliffs of Mutton Bird Island rose behind the ship. Just half a mile from the coast, the ship's bow was suddenly pulled around by the anchor. The captain tried to tack out to sea, but the ship struck a reef at the base of Mutton Bird Island, near Port Campbell. Waves broke over the ship and the top deck was loosened from the hull. The masts and rigging came crashing down knocking passengers and crew overboard. When a lifeboat was finally launched, it crashed into the side of LOCH ARD and capsized. Tom Pearce, who had launched the boat, managed to cling to its overturned hull and shelter beneath it. He drifted out to sea and then on the flood tide came into what is now known as LOCH ARD Gorge. He swam to shore, bruised and dazed, and found a cave in which to shelter. Some of the crew stayed below deck to shelter from the falling rigging but drowned when the ship slipped off the reef into deeper water. Eva Carmichael had raced onto deck to find out what was happening only to be confronted by towering cliffs looming above the stricken ship. In all the chaos, Captain Gibbs grabbed Eva and said, "If you are saved Eva, let my dear wife know that I died like a sailor". That was the last Eva Carmichael saw of the captain. She was swept off the ship by a huge wave. Eva saw Tom Pearce on a small rocky beach and yelled to attract his attention. He dived in and swam to the exhausted woman and dragged her to shore. He took her to the cave and broke open case of brandy which had washed up on the beach. He opened a bottle to revive the unconscious woman. A few hours later Tom scaled a cliff in search of help. He followed hoof prints and came by chance upon two men from nearby Glenample Station three and a half miles away. In a state of exhaustion, he told the men of the tragedy. Tom returned to the gorge while the two men rode back to the station to get help. By the time they reached LOCH ARD Gorge, it was cold and dark. The two shipwreck survivors were taken to Glenample Station to recover. Eva stayed at the station for six weeks before returning to Ireland, this time by steamship. In Melbourne, Tom Pearce received a hero's welcome. He was presented with the first gold medal of the Royal Humane Society of Victoria and a £1000 cheque from the Victorian Government. Concerts were performed to honour the young man's bravery and to raise money for those who lost family in the LOCH ARD disaster. Of the 54 crew members and passengers on board, only two survived: the apprentice, Tom Pearce and the young woman passenger, Eva Carmichael, who lost all of her family in the tragedy. Ten days after the LOCH ARD tragedy, salvage rights to the wreck were sold at auction for £2,120. Cargo valued at £3,000 was salvaged and placed on the beach, but most washed back into the sea when another storm developed. The wreck of LOCH ARD still lies at the base of Mutton Bird Island. Much of the cargo has now been salvaged and some was washed up into what is now known as LOCH ARD Gorge. Cargo and artefacts have also been illegally salvaged over many years before protective legislation was introduced. One of the most unlikely pieces of cargo to have survived the shipwreck was a Minton porcelain peacock - one of only seven in the world. The peacock was destined for the Melbourne International Exhibition in 1880. It had been well packed, which gave it adequate protection during the violent storm. Today, the Minton peacock can be seen at the Flagstaff Hill Maritime Museum in Warrnambool. From Australia's most dramatic shipwreck it has now become Australia's most valuable shipwreck artefact and is one of very few 'objects' on the Victorian State Heritage Register. The LOCH ARD shipwreck is of State significance – Victorian Heritage Register S 417. Flagstaff Hill’s collection of artefacts from LOCH ARD is significant for being one of the largest collections of artefacts from this shipwreck in Victoria. It is significant for its association with the shipwreck, which is on the Victorian Heritage Register (VHR S417). The collection is significant because of the relationship between the objects, as together they have a high potential to interpret the story of the LOCH ARD. The LOCH ARD collection is archaeologically significant as the remains of a large international passenger and cargo ship. The LOCH ARD collection is historically significant for representing aspects of Victoria’s shipping history and its potential to interpret sub-theme 1.5 of Victoria’s Framework of Historical Themes (living with natural processes). The collection is also historically significant for its association with the LOCH ARD, which was one of the worst and best known shipwrecks in Victoria’s history. Unrestored tea spoon from the wreck of the LOCH ARD. The spoon design has a flattened fiddle-back handle, with a thin stem or shank, flared collar, and elongated bowl. The spoons metallic composition is a thin layer of brass alloy which has partially corroded back to a nickel-silver base metal. Only 10-15% of original electroplating remains. One of five makers marks is legible: (3) Maltese Cross.flagstaff hill, warrnambool, shipwrecked coast, flagstaff hill maritime museum, maritime museum, shipwreck coast, flagstaff hill maritime village, great ocean road, loch line, loch ard, captain gibbs, eva carmichael, tom pearce, glenample station, mutton bird island, loch ard gorge, electroplated cutlery, loch ard shipwreck, nickel silver, william page & co, birmingham, brass plating, makers marks -
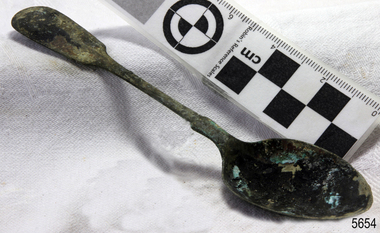 Flagstaff Hill Maritime Museum and Village
Spoon, circa 1878
This tea spoon is from the wreck of the LOCH ARD, a Loch Line ship of 1,693 tons which sailed from Gravesend, London, on 2 March 1878 with 17 passengers and a crew of 36 under Captain George Gibbs. “The intention was to discharge cargo in Melbourne, before returning to London via the Horn with wool and wheat”. Instead, on 1 June 1878, after 90 days at sea, she struck the sandstone cliffs of Mutton Bird Island on the south west coast of Victoria, and sank with the loss of 52 lives and all her cargo. The manifest of the LOCH ARD listed an array of manufactured goods and bulk metals being exported to the Colony of Victoria, with a declared value of £53,700. (202 bills of lading show an actual invoice value of £68, 456, with insurance underwriting to £30,000 of all cargo). Included in the manifest is the item of “Tin hardware & cutlery £7,530”. This teaspoon is one of 482 similar items of electro-plated cutlery from the LOCH ARD site, comprising spoons and forks of various sizes but all sharing the same general shape or design and metallic composition. 49 of these pieces display a legible makers’ mark — the initials “W” and “P” placed within a raised diamond outline, which is in turn contained within a sunken crown shape — identifying the manufacturer as William Page & Co of Birmingham. An electroplater’s makers’ marks, unlike sterling silver hallmarks, are not consistent identifiers of quality or date and place of manufacture. A similar line of five impressions was usually made to impress the consumer with an implication of industry standards, but what each one actually signified was not regulated and so they varied according to the whim of the individual foundry. In this case, the maker’s marks are often obscured by sedimentary accretion or removed by corrosion after a century of submersion in the ocean. However sufficient detail has survived to indicate that these samples of electro-plated cutlery probably originated from the same consignment in the LOCH ARD’s cargo. The following descriptions of maker’s marks are drawn from 255 tea spoons, 125 dessert spoons, and 99 table forks. These marks are clearly visible in 66 instances, while the same sequence of general outlines, or depression shapes, is discernible in another 166 examples. 1. A recessed Crown containing a raised Diamond outline and the initials “W” and “P” (the recognised trademark of William Page & Co) 2. An impressed Ellipse containing a raised, pivoted, Triangle in its lower part and bearing a Resurrection Cross on its upper section (a possible dissenting church symbol reflecting religious affiliation); OR a rounded Square impression containing a raised, ‘lazy’, letter “B” (possibly mimicking sterling silver hallmark signifying city of manufacture i.e. Birmingham) 3. An impressed rounded Square filled with a raised Maltese Cross (the base metal composite of nickel silver was also known as ‘German silver’ after its Berlin inventors in 1823) 4. A recessed Circle containing a Crab or Scarab Beetle image; OR a recessed Circle containing a rotated ‘fleur de lys’ or ‘fasces’ design 5. A depressed Diamond shape enclosing a large raised letter “R” and a small raised letter “D” (mimicking the U.K. Patent Office stamp which abbreviated the term ‘registered’ to “RD”, but also included date and class of patent) Suggested trade names for William Page & Co’s particular blend of brass plating are ‘roman silver’ or ‘silverite’. This copper alloy polishes to a lustrous gold when new, discolouring to a murky grey with greenish hue when neglected. HISTORY OF THE LOCH ARD The LOCH ARD belonged to the famous Loch Line which sailed many ships from England to Australia. Built in Glasgow by Barclay, Curdle and Co. in 1873, the LOCH ARD was a three-masted square rigged iron sailing ship. The ship measured 262ft 7" (79.87m) in length, 38ft (11.58m) in width, 23ft (7m) in depth and had a gross tonnage of 1693 tons. The LOCH ARD's main mast measured a massive 150ft (45.7m) in height. LOCH ARD made three trips to Australia and one trip to Calcutta before its final voyage. LOCH ARD left England on March 2, 1878, under the command of Captain Gibbs, a newly married, 29 year old. She was bound for Melbourne with a crew of 37, plus 17 passengers and a load of cargo. The general cargo reflected the affluence of Melbourne at the time. On board were straw hats, umbrella, perfumes, clay pipes, pianos, clocks, confectionary, linen and candles, as well as a heavier load of railway irons, cement, lead and copper. There were items included that intended for display in the Melbourne International Exhibition in 1880. The voyage to Port Phillip was long but uneventful. At 3am on June 1, 1878, Captain Gibbs was expecting to see land and the passengers were becoming excited as they prepared to view their new homeland in the early morning. But LOCH ARD was running into a fog which greatly reduced visibility. Captain Gibbs was becoming anxious as there was no sign of land or the Cape Otway lighthouse. At 4am the fog lifted. A man aloft announced that he could see breakers. The sheer cliffs of Victoria's west coast came into view, and Captain Gibbs realised that the ship was much closer to them than expected. He ordered as much sail to be set as time would permit and then attempted to steer the vessel out to sea. On coming head on into the wind, the ship lost momentum, the sails fell limp and LOCH ARD's bow swung back. Gibbs then ordered the anchors to be released in an attempt to hold its position. The anchors sank some 50 fathoms - but did not hold. By this time LOCH ARD was among the breakers and the tall cliffs of Mutton Bird Island rose behind the ship. Just half a mile from the coast, the ship's bow was suddenly pulled around by the anchor. The captain tried to tack out to sea, but the ship struck a reef at the base of Mutton Bird Island, near Port Campbell. Waves broke over the ship and the top deck was loosened from the hull. The masts and rigging came crashing down knocking passengers and crew overboard. When a lifeboat was finally launched, it crashed into the side of LOCH ARD and capsized. Tom Pearce, who had launched the boat, managed to cling to its overturned hull and shelter beneath it. He drifted out to sea and then on the flood tide came into what is now known as LOCH ARD Gorge. He swam to shore, bruised and dazed, and found a cave in which to shelter. Some of the crew stayed below deck to shelter from the falling rigging but drowned when the ship slipped off the reef into deeper water. Eva Carmichael had raced onto deck to find out what was happening only to be confronted by towering cliffs looming above the stricken ship. In all the chaos, Captain Gibbs grabbed Eva and said, "If you are saved Eva, let my dear wife know that I died like a sailor". That was the last Eva Carmichael saw of the captain. She was swept off the ship by a huge wave. Eva saw Tom Pearce on a small rocky beach and yelled to attract his attention. He dived in and swam to the exhausted woman and dragged her to shore. He took her to the cave and broke open case of brandy which had washed up on the beach. He opened a bottle to revive the unconscious woman. A few hours later Tom scaled a cliff in search of help. He followed hoof prints and came by chance upon two men from nearby Glenample Station three and a half miles away. In a state of exhaustion, he told the men of the tragedy. Tom returned to the gorge while the two men rode back to the station to get help. By the time they reached LOCH ARD Gorge, it was cold and dark. The two shipwreck survivors were taken to Glenample Station to recover. Eva stayed at the station for six weeks before returning to Ireland, this time by steamship. In Melbourne, Tom Pearce received a hero's welcome. He was presented with the first gold medal of the Royal Humane Society of Victoria and a £1000 cheque from the Victorian Government. Concerts were performed to honour the young man's bravery and to raise money for those who lost family in the LOCH ARD disaster. Of the 54 crew members and passengers on board, only two survived: the apprentice, Tom Pearce and the young woman passenger, Eva Carmichael, who lost all of her family in the tragedy. Ten days after the LOCH ARD tragedy, salvage rights to the wreck were sold at auction for £2,120. Cargo valued at £3,000 was salvaged and placed on the beach, but most washed back into the sea when another storm developed. The wreck of LOCH ARD still lies at the base of Mutton Bird Island. Much of the cargo has now been salvaged and some was washed up into what is now known as LOCH ARD Gorge. Cargo and artefacts have also been illegally salvaged over many years before protective legislation was introduced. One of the most unlikely pieces of cargo to have survived the shipwreck was a Minton porcelain peacock - one of only seven in the world. The peacock was destined for the Melbourne International Exhibition in 1880. It had been well packed, which gave it adequate protection during the violent storm. Today, the Minton peacock can be seen at the Flagstaff Hill Maritime Museum in Warrnambool. From Australia's most dramatic shipwreck it has now become Australia's most valuable shipwreck artefact and is one of very few 'objects' on the Victorian State Heritage Register. The LOCH ARD shipwreck is of State significance – Victorian Heritage Register S 417. Flagstaff Hill’s collection of artefacts from LOCH ARD is significant for being one of the largest collections of artefacts from this shipwreck in Victoria. It is significant for its association with the shipwreck, which is on the Victorian Heritage Register (VHR S417). The collection is significant because of the relationship between the objects, as together they have a high potential to interpret the story of the LOCH ARD. The LOCH ARD collection is archaeologically significant as the remains of a large international passenger and cargo ship. The LOCH ARD collection is historically significant for representing aspects of Victoria’s shipping history and its potential to interpret sub-theme 1.5 of Victoria’s Framework of Historical Themes (living with natural processes). The collection is also historically significant for its association with the LOCH ARD, which was one of the worst and best known shipwrecks in Victoria’s history Unrestored tea spoon from the wreck of the LOCH ARD. The spoon design has a flattened fiddle-back handle, with a thin stem or shank, flared collar, and elongated bowl. The spoons metallic composition is a thin layer of brass alloy which has partially corroded back to a nickel-silver base metal. Only 10-15% of original electroplating remains with some aqua-marine verdigris. Makers marks are obscured.flagstaff hill, warrnambool, shipwrecked coast, flagstaff hill maritime museum, maritime museum, shipwreck coast, flagstaff hill maritime village, great ocean road, loch line, loch ard, captain gibbs, eva carmichael, tom pearce, glenample station, mutton bird island, loch ard gorge, electroplated cutlery, loch ard shipwreck, nickel silver, william page & co, birmingham, brass plating, makers marks, william page & co -
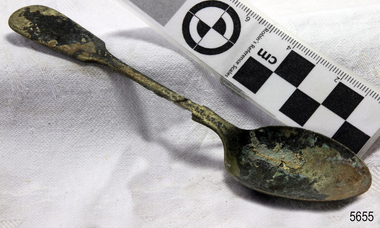 Flagstaff Hill Maritime Museum and Village
Spoon, circa 1878
This tea spoon is from the wreck of the LOCH ARD, a Loch Line ship of 1,693 tons which sailed from Gravesend, London, on 2 March 1878 with 17 passengers and a crew of 36 under Captain George Gibbs. “The intention was to discharge cargo in Melbourne, before returning to London via the Horn with wool and wheat”. Instead, on 1 June 1878, after 90 days at sea, she struck the sandstone cliffs of Mutton Bird Island on the south west coast of Victoria, and sank with the loss of 52 lives and all her cargo. The manifest of the LOCH ARD listed an array of manufactured goods and bulk metals being exported to the Colony of Victoria, with a declared value of £53,700. (202 bills of lading show an actual invoice value of £68, 456, with insurance underwriting to £30,000 of all cargo). Included in the manifest is the item of “Tin hardware & cutlery £7,530”. This teaspoon is one of 482 similar items of electro-plated cutlery from the LOCH ARD site, comprising spoons and forks of various sizes but all sharing the same general shape or design and metallic composition. 49 of these pieces display a legible makers’ mark — the initials “W” and “P” placed within a raised diamond outline, which is in turn contained within a sunken crown shape — identifying the manufacturer as William Page & Co of Birmingham. An electroplater’s makers’ marks, unlike sterling silver hallmarks, are not consistent identifiers of quality or date and place of manufacture. A similar line of five impressions was usually made to impress the consumer with an implication of industry standards, but what each one actually signified was not regulated and so they varied according to the whim of the individual foundry. In this case, the maker’s marks are often obscured by sedimentary accretion or removed by corrosion after a century of submersion in the ocean. However sufficient detail has survived to indicate that these samples of electro-plated cutlery probably originated from the same consignment in the LOCH ARD’s cargo. The following descriptions of maker’s marks are drawn from 255 tea spoons, 125 dessert spoons, and 99 table forks. These marks are clearly visible in 66 instances, while the same sequence of general outlines, or depression shapes, is discernible in another 166 examples. 1. A recessed Crown containing a raised Diamond outline and the initials “W” and “P” (the recognised trademark of William Page & Co) 2. An impressed Ellipse containing a raised, pivoted, Triangle in its lower part and bearing a Resurrection Cross on its upper section (a possible dissenting church symbol reflecting religious affiliation); OR a rounded Square impression containing a raised, ‘lazy’, letter “B” (possibly mimicking sterling silver hallmark signifying city of manufacture i.e. Birmingham) 3. An impressed rounded Square filled with a raised Maltese Cross (the base metal composite of nickel silver was also known as ‘German silver’ after its Berlin inventors in 1823) 4. A recessed Circle containing a Crab or Scarab Beetle image; OR a recessed Circle containing a rotated ‘fleur de lys’ or ‘fasces’ design 5. A depressed Diamond shape enclosing a large raised letter “R” and a small raised letter “D” (mimicking the U.K. Patent Office stamp which abbreviated the term ‘registered’ to “RD”, but also included date and class of patent) Suggested trade names for William Page & Co’s particular blend of brass plating are ‘roman silver’ or ‘silverite’. This copper alloy polishes to a lustrous gold when new, discolouring to a murky grey with greenish hue when neglected. HISTORY OF THE LOCH ARD The LOCH ARD belonged to the famous Loch Line which sailed many ships from England to Australia. Built in Glasgow by Barclay, Curdle and Co. in 1873, the LOCH ARD was a three-masted square rigged iron sailing ship. The ship measured 262ft 7" (79.87m) in length, 38ft (11.58m) in width, 23ft (7m) in depth and had a gross tonnage of 1693 tons. The LOCH ARD's main mast measured a massive 150ft (45.7m) in height. LOCH ARD made three trips to Australia and one trip to Calcutta before its final voyage. LOCH ARD left England on March 2, 1878, under the command of Captain Gibbs, a newly married, 29 year old. She was bound for Melbourne with a crew of 37, plus 17 passengers and a load of cargo. The general cargo reflected the affluence of Melbourne at the time. On board were straw hats, umbrella, perfumes, clay pipes, pianos, clocks, confectionary, linen and candles, as well as a heavier load of railway irons, cement, lead and copper. There were items included that intended for display in the Melbourne International Exhibition in 1880. The voyage to Port Phillip was long but uneventful. At 3am on June 1, 1878, Captain Gibbs was expecting to see land and the passengers were becoming excited as they prepared to view their new homeland in the early morning. But LOCH ARD was running into a fog which greatly reduced visibility. Captain Gibbs was becoming anxious as there was no sign of land or the Cape Otway lighthouse. At 4am the fog lifted. A man aloft announced that he could see breakers. The sheer cliffs of Victoria's west coast came into view, and Captain Gibbs realised that the ship was much closer to them than expected. He ordered as much sail to be set as time would permit and then attempted to steer the vessel out to sea. On coming head on into the wind, the ship lost momentum, the sails fell limp and LOCH ARD's bow swung back. Gibbs then ordered the anchors to be released in an attempt to hold its position. The anchors sank some 50 fathoms - but did not hold. By this time LOCH ARD was among the breakers and the tall cliffs of Mutton Bird Island rose behind the ship. Just half a mile from the coast, the ship's bow was suddenly pulled around by the anchor. The captain tried to tack out to sea, but the ship struck a reef at the base of Mutton Bird Island, near Port Campbell. Waves broke over the ship and the top deck was loosened from the hull. The masts and rigging came crashing down knocking passengers and crew overboard. When a lifeboat was finally launched, it crashed into the side of LOCH ARD and capsized. Tom Pearce, who had launched the boat, managed to cling to its overturned hull and shelter beneath it. He drifted out to sea and then on the flood tide came into what is now known as LOCH ARD Gorge. He swam to shore, bruised and dazed, and found a cave in which to shelter. Some of the crew stayed below deck to shelter from the falling rigging but drowned when the ship slipped off the reef into deeper water. Eva Carmichael had raced onto deck to find out what was happening only to be confronted by towering cliffs looming above the stricken ship. In all the chaos, Captain Gibbs grabbed Eva and said, "If you are saved Eva, let my dear wife know that I died like a sailor". That was the last Eva Carmichael saw of the captain. She was swept off the ship by a huge wave. Eva saw Tom Pearce on a small rocky beach and yelled to attract his attention. He dived in and swam to the exhausted woman and dragged her to shore. He took her to the cave and broke open case of brandy which had washed up on the beach. He opened a bottle to revive the unconscious woman. A few hours later Tom scaled a cliff in search of help. He followed hoof prints and came by chance upon two men from nearby Glenample Station three and a half miles away. In a state of exhaustion, he told the men of the tragedy. Tom returned to the gorge while the two men rode back to the station to get help. By the time they reached LOCH ARD Gorge, it was cold and dark. The two shipwreck survivors were taken to Glenample Station to recover. Eva stayed at the station for six weeks before returning to Ireland, this time by steamship. In Melbourne, Tom Pearce received a hero's welcome. He was presented with the first gold medal of the Royal Humane Society of Victoria and a £1000 cheque from the Victorian Government. Concerts were performed to honour the young man's bravery and to raise money for those who lost family in the LOCH ARD disaster. Of the 54 crew members and passengers on board, only two survived: the apprentice, Tom Pearce and the young woman passenger, Eva Carmichael, who lost all of her family in the tragedy. Ten days after the LOCH ARD tragedy, salvage rights to the wreck were sold at auction for £2,120. Cargo valued at £3,000 was salvaged and placed on the beach, but most washed back into the sea when another storm developed. The wreck of LOCH ARD still lies at the base of Mutton Bird Island. Much of the cargo has now been salvaged and some was washed up into what is now known as LOCH ARD Gorge. Cargo and artefacts have also been illegally salvaged over many years before protective legislation was introduced. One of the most unlikely pieces of cargo to have survived the shipwreck was a Minton porcelain peacock - one of only seven in the world. The peacock was destined for the Melbourne International Exhibition in 1880. It had been well packed, which gave it adequate protection during the violent storm. Today, the Minton peacock can be seen at the Flagstaff Hill Maritime Museum in Warrnambool. From Australia's most dramatic shipwreck it has now become Australia's most valuable shipwreck artefact and is one of very few 'objects' on the Victorian State Heritage Register. The LOCH ARD shipwreck is of State significance – Victorian Heritage Register S 417. Flagstaff Hill’s collection of artefacts from LOCH ARD is significant for being one of the largest collections of artefacts from this shipwreck in Victoria. It is significant for its association with the shipwreck, which is on the Victorian Heritage Register (VHR S417). The collection is significant because of the relationship between the objects, as together they have a high potential to interpret the story of the LOCH ARD. The LOCH ARD collection is archaeologically significant as the remains of a large international passenger and cargo ship. The LOCH ARD collection is historically significant for representing aspects of Victoria’s shipping history and its potential to interpret sub-theme 1.5 of Victoria’s Framework of Historical Themes (living with natural processes). The collection is also historically significant for its association with the LOCH ARD, which was one of the worst and best known shipwrecks in Victoria’s history. Unrestored tea spoon from the wreck of the LOCH ARD. The spoon design has a flattened fiddle-back handle, with a thin stem or shank, flared collar, and elongated bowl. The spoons metallic composition is a thin layer of brass alloy which has partially corroded back to a nickel-silver base metal. Approximately 25% of original electroplating remains in dull unburnished condition. One of five makers marks is legible: (3) Maltese Cross.flagstaff hill, warrnambool, shipwrecked coast, flagstaff hill maritime museum, maritime museum, shipwreck coast, flagstaff hill maritime village, great ocean road, loch line, loch ard, captain gibbs, eva carmichael, tom pearce, glenample station, mutton bird island, loch ard gorge, electroplated cutlery, loch ard shipwreck, nickel silver, william page & co, birmingham, brass plating, makers marks -
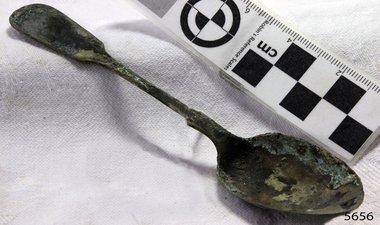 Flagstaff Hill Maritime Museum and Village
Spoon, circa 1878
This tea spoon is from the wreck of the LOCH ARD, a Loch Line ship of 1,693 tons which sailed from Gravesend, London, on 2 March 1878 with 17 passengers and a crew of 36 under Captain George Gibbs. “The intention was to discharge cargo in Melbourne, before returning to London via the Horn with wool and wheat”. Instead, on 1 June 1878, after 90 days at sea, she struck the sandstone cliffs of Mutton Bird Island on the south west coast of Victoria, and sank with the loss of 52 lives and all her cargo. The manifest of the LOCH ARD listed an array of manufactured goods and bulk metals being exported to the Colony of Victoria, with a declared value of £53,700. (202 bills of lading show an actual invoice value of £68, 456, with insurance underwriting to £30,000 of all cargo). Included in the manifest is the item of “Tin hardware & cutlery £7,530”. This teaspoon is one of 482 similar items of electro-plated cutlery from the LOCH ARD site, comprising spoons and forks of various sizes but all sharing the same general shape or design and metallic composition. 49 of these pieces display a legible makers’ mark — the initials “W” and “P” placed within a raised diamond outline, which is in turn contained within a sunken crown shape — identifying the manufacturer as William Page & Co of Birmingham. An electroplater’s makers’ marks, unlike sterling silver hallmarks, are not consistent identifiers of quality or date and place of manufacture. A similar line of five impressions was usually made to impress the consumer with an implication of industry standards, but what each one actually signified was not regulated and so they varied according to the whim of the individual foundry. In this case, the maker’s marks are often obscured by sedimentary accretion or removed by corrosion after a century of submersion in the ocean. However sufficient detail has survived to indicate that these samples of electro-plated cutlery probably originated from the same consignment in the LOCH ARD’s cargo. The following descriptions of maker’s marks are drawn from 255 tea spoons, 125 dessert spoons, and 99 table forks. These marks are clearly visible in 66 instances, while the same sequence of general outlines, or depression shapes, is discernible in another 166 examples. 1. A recessed Crown containing a raised Diamond outline and the initials “W” and “P” (the recognised trademark of William Page & Co) 2. An impressed Ellipse containing a raised, pivoted, Triangle in its lower part and bearing a Resurrection Cross on its upper section (a possible dissenting church symbol reflecting religious affiliation); OR a rounded Square impression containing a raised, ‘lazy’, letter “B” (possibly mimicking sterling silver hallmark signifying city of manufacture i.e. Birmingham) 3. An impressed rounded Square filled with a raised Maltese Cross (the base metal composite of nickel silver was also known as ‘German silver’ after its Berlin inventors in 1823) 4. A recessed Circle containing a Crab or Scarab Beetle image; OR a recessed Circle containing a rotated ‘fleur de lys’ or ‘fasces’ design 5. A depressed Diamond shape enclosing a large raised letter “R” and a small raised letter “D” (mimicking the U.K. Patent Office stamp which abbreviated the term ‘registered’ to “RD”, but also included date and class of patent) Suggested trade names for William Page & Co’s particular blend of brass plating are ‘roman silver’ or ‘silverite’. This copper alloy polishes to a lustrous gold when new, discolouring to a murky grey with greenish hue when neglected. HISTORY OF THE LOCH ARD The LOCH ARD belonged to the famous Loch Line which sailed many ships from England to Australia. Built in Glasgow by Barclay, Curdle and Co. in 1873, the LOCH ARD was a three-masted square rigged iron sailing ship. The ship measured 262ft 7" (79.87m) in length, 38ft (11.58m) in width, 23ft (7m) in depth and had a gross tonnage of 1693 tons. The LOCH ARD's main mast measured a massive 150ft (45.7m) in height. LOCH ARD made three trips to Australia and one trip to Calcutta before its final voyage. LOCH ARD left England on March 2, 1878, under the command of Captain Gibbs, a newly married, 29 year old. She was bound for Melbourne with a crew of 37, plus 17 passengers and a load of cargo. The general cargo reflected the affluence of Melbourne at the time. On board were straw hats, umbrella, perfumes, clay pipes, pianos, clocks, confectionary, linen and candles, as well as a heavier load of railway irons, cement, lead and copper. There were items included that intended for display in the Melbourne International Exhibition in 1880. The voyage to Port Phillip was long but uneventful. At 3am on June 1, 1878, Captain Gibbs was expecting to see land and the passengers were becoming excited as they prepared to view their new homeland in the early morning. But LOCH ARD was running into a fog which greatly reduced visibility. Captain Gibbs was becoming anxious as there was no sign of land or the Cape Otway lighthouse. At 4am the fog lifted. A man aloft announced that he could see breakers. The sheer cliffs of Victoria's west coast came into view, and Captain Gibbs realised that the ship was much closer to them than expected. He ordered as much sail to be set as time would permit and then attempted to steer the vessel out to sea. On coming head on into the wind, the ship lost momentum, the sails fell limp and LOCH ARD's bow swung back. Gibbs then ordered the anchors to be released in an attempt to hold its position. The anchors sank some 50 fathoms - but did not hold. By this time LOCH ARD was among the breakers and the tall cliffs of Mutton Bird Island rose behind the ship. Just half a mile from the coast, the ship's bow was suddenly pulled around by the anchor. The captain tried to tack out to sea, but the ship struck a reef at the base of Mutton Bird Island, near Port Campbell. Waves broke over the ship and the top deck was loosened from the hull. The masts and rigging came crashing down knocking passengers and crew overboard. When a lifeboat was finally launched, it crashed into the side of LOCH ARD and capsized. Tom Pearce, who had launched the boat, managed to cling to its overturned hull and shelter beneath it. He drifted out to sea and then on the flood tide came into what is now known as LOCH ARD Gorge. He swam to shore, bruised and dazed, and found a cave in which to shelter. Some of the crew stayed below deck to shelter from the falling rigging but drowned when the ship slipped off the reef into deeper water. Eva Carmichael had raced onto deck to find out what was happening only to be confronted by towering cliffs looming above the stricken ship. In all the chaos, Captain Gibbs grabbed Eva and said, "If you are saved Eva, let my dear wife know that I died like a sailor". That was the last Eva Carmichael saw of the captain. She was swept off the ship by a huge wave. Eva saw Tom Pearce on a small rocky beach and yelled to attract his attention. He dived in and swam to the exhausted woman and dragged her to shore. He took her to the cave and broke open case of brandy which had washed up on the beach. He opened a bottle to revive the unconscious woman. A few hours later Tom scaled a cliff in search of help. He followed hoof prints and came by chance upon two men from nearby Glenample Station three and a half miles away. In a state of exhaustion, he told the men of the tragedy. Tom returned to the gorge while the two men rode back to the station to get help. By the time they reached LOCH ARD Gorge, it was cold and dark. The two shipwreck survivors were taken to Glenample Station to recover. Eva stayed at the station for six weeks before returning to Ireland, this time by steamship. In Melbourne, Tom Pearce received a hero's welcome. He was presented with the first gold medal of the Royal Humane Society of Victoria and a £1000 cheque from the Victorian Government. Concerts were performed to honour the young man's bravery and to raise money for those who lost family in the LOCH ARD disaster. Of the 54 crew members and passengers on board, only two survived: the apprentice, Tom Pearce and the young woman passenger, Eva Carmichael, who lost all of her family in the tragedy. Ten days after the LOCH ARD tragedy, salvage rights to the wreck were sold at auction for £2,120. Cargo valued at £3,000 was salvaged and placed on the beach, but most washed back into the sea when another storm developed. The wreck of LOCH ARD still lies at the base of Mutton Bird Island. Much of the cargo has now been salvaged and some was washed up into what is now known as LOCH ARD Gorge. Cargo and artefacts have also been illegally salvaged over many years before protective legislation was introduced. One of the most unlikely pieces of cargo to have survived the shipwreck was a Minton porcelain peacock - one of only seven in the world. The peacock was destined for the Melbourne International Exhibition in 1880. It had been well packed, which gave it adequate protection during the violent storm. Today, the Minton peacock can be seen at the Flagstaff Hill Maritime Museum in Warrnambool. From Australia's most dramatic shipwreck it has now become Australia's most valuable shipwreck artefact and is one of very few 'objects' on the Victorian State Heritage Register. The LOCH ARD shipwreck is of State significance – Victorian Heritage Register S 417. Flagstaff Hill’s collection of artefacts from LOCH ARD is significant for being one of the largest collections of artefacts from this shipwreck in Victoria. It is significant for its association with the shipwreck, which is on the Victorian Heritage Register (VHR S417). The collection is significant because of the relationship between the objects, as together they have a high potential to interpret the story of the LOCH ARD. The LOCH ARD collection is archaeologically significant as the remains of a large international passenger and cargo ship. The LOCH ARD collection is historically significant for representing aspects of Victoria’s shipping history and its potential to interpret sub-theme 1.5 of Victoria’s Framework of Historical Themes (living with natural processes). The collection is also historically significant for its association with the LOCH ARD, which was one of the worst and best known shipwrecks in Victoria’s history. Unrestored tea spoon from the wreck of the LOCH ARD. The spoon design has a flattened fiddle-back handle, with a thin stem or shank, flared collar, and elongated bowl. The spoons metallic composition is a thin layer of brass alloy which has partially corroded back to a nickel-silver base metal. Approximately 25% of original electroplating remains with some verdigris. One of five makers marks is legible: (3) Maltese Cross.flagstaff hill, warrnambool, shipwrecked coast, flagstaff hill maritime museum, maritime museum, shipwreck coast, flagstaff hill maritime village, great ocean road, loch line, loch ard, captain gibbs, eva carmichael, tom pearce, glenample station, mutton bird island, loch ard gorge, electroplated cutlery, loch ard shipwreck, nickel silver, william page & co, birmingham, brass plating, makers marks -
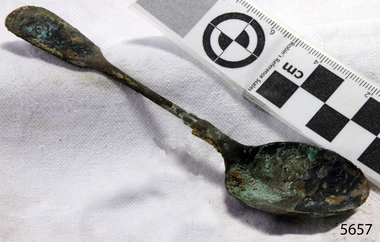 Flagstaff Hill Maritime Museum and Village
Spoon, circa 1878
This tea spoon is from the wreck of the LOCH ARD, a Loch Line ship of 1,693 tons which sailed from Gravesend, London, on 2 March 1878 with 17 passengers and a crew of 36 under Captain George Gibbs. “The intention was to discharge cargo in Melbourne, before returning to London via the Horn with wool and wheat”. Instead, on 1 June 1878, after 90 days at sea, she struck the sandstone cliffs of Mutton Bird Island on the south west coast of Victoria, and sank with the loss of 52 lives and all her cargo. The manifest of the LOCH ARD listed an array of manufactured goods and bulk metals being exported to the Colony of Victoria, with a declared value of £53,700. (202 bills of lading show an actual invoice value of £68, 456, with insurance underwriting to £30,000 of all cargo). Included in the manifest is the item of “Tin hardware & cutlery £7,530”. This teaspoon is one of 482 similar items of electro-plated cutlery from the LOCH ARD site, comprising spoons and forks of various sizes but all sharing the same general shape or design and metallic composition. 49 of these pieces display a legible makers’ mark — the initials “W” and “P” placed within a raised diamond outline, which is in turn contained within a sunken crown shape — identifying the manufacturer as William Page & Co of Birmingham. An electroplater’s makers’ marks, unlike sterling silver hallmarks, are not consistent identifiers of quality or date and place of manufacture. A similar line of five impressions was usually made to impress the consumer with an implication of industry standards, but what each one actually signified was not regulated and so they varied according to the whim of the individual foundry. In this case, the maker’s marks are often obscured by sedimentary accretion or removed by corrosion after a century of submersion in the ocean. However sufficient detail has survived to indicate that these samples of electro-plated cutlery probably originated from the same consignment in the LOCH ARD’s cargo. The following descriptions of maker’s marks are drawn from 255 tea spoons, 125 dessert spoons, and 99 table forks. These marks are clearly visible in 66 instances, while the same sequence of general outlines, or depression shapes, is discernible in another 166 examples. 1. A recessed Crown containing a raised Diamond outline and the initials “W” and “P” (the recognised trademark of William Page & Co) 2. An impressed Ellipse containing a raised, pivoted, Triangle in its lower part and bearing a Resurrection Cross on its upper section (a possible dissenting church symbol reflecting religious affiliation); OR a rounded Square impression containing a raised, ‘lazy’, letter “B” (possibly mimicking sterling silver hallmark signifying city of manufacture i.e. Birmingham) 3. An impressed rounded Square filled with a raised Maltese Cross (the base metal composite of nickel silver was also known as ‘German silver’ after its Berlin inventors in 1823) 4. A recessed Circle containing a Crab or Scarab Beetle image; OR a recessed Circle containing a rotated ‘fleur de lys’ or ‘fasces’ design 5. A depressed Diamond shape enclosing a large raised letter “R” and a small raised letter “D” (mimicking the U.K. Patent Office stamp which abbreviated the term ‘registered’ to “RD”, but also included date and class of patent) Suggested trade names for William Page & Co’s particular blend of brass plating are ‘roman silver’ or ‘silverite’. This copper alloy polishes to a lustrous gold when new, discolouring to a murky grey with greenish hue when neglected. HISTORY OF THE LOCH ARD The LOCH ARD belonged to the famous Loch Line which sailed many ships from England to Australia. Built in Glasgow by Barclay, Curdle and Co. in 1873, the LOCH ARD was a three-masted square rigged iron sailing ship. The ship measured 262ft 7" (79.87m) in length, 38ft (11.58m) in width, 23ft (7m) in depth and had a gross tonnage of 1693 tons. The LOCH ARD's main mast measured a massive 150ft (45.7m) in height. LOCH ARD made three trips to Australia and one trip to Calcutta before its final voyage. LOCH ARD left England on March 2, 1878, under the command of Captain Gibbs, a newly married, 29 year old. She was bound for Melbourne with a crew of 37, plus 17 passengers and a load of cargo. The general cargo reflected the affluence of Melbourne at the time. On board were straw hats, umbrella, perfumes, clay pipes, pianos, clocks, confectionary, linen and candles, as well as a heavier load of railway irons, cement, lead and copper. There were items included that intended for display in the Melbourne International Exhibition in 1880. The voyage to Port Phillip was long but uneventful. At 3am on June 1, 1878, Captain Gibbs was expecting to see land and the passengers were becoming excited as they prepared to view their new homeland in the early morning. But LOCH ARD was running into a fog which greatly reduced visibility. Captain Gibbs was becoming anxious as there was no sign of land or the Cape Otway lighthouse. At 4am the fog lifted. A man aloft announced that he could see breakers. The sheer cliffs of Victoria's west coast came into view, and Captain Gibbs realised that the ship was much closer to them than expected. He ordered as much sail to be set as time would permit and then attempted to steer the vessel out to sea. On coming head on into the wind, the ship lost momentum, the sails fell limp and LOCH ARD's bow swung back. Gibbs then ordered the anchors to be released in an attempt to hold its position. The anchors sank some 50 fathoms - but did not hold. By this time LOCH ARD was among the breakers and the tall cliffs of Mutton Bird Island rose behind the ship. Just half a mile from the coast, the ship's bow was suddenly pulled around by the anchor. The captain tried to tack out to sea, but the ship struck a reef at the base of Mutton Bird Island, near Port Campbell. Waves broke over the ship and the top deck was loosened from the hull. The masts and rigging came crashing down knocking passengers and crew overboard. When a lifeboat was finally launched, it crashed into the side of LOCH ARD and capsized. Tom Pearce, who had launched the boat, managed to cling to its overturned hull and shelter beneath it. He drifted out to sea and then on the flood tide came into what is now known as LOCH ARD Gorge. He swam to shore, bruised and dazed, and found a cave in which to shelter. Some of the crew stayed below deck to shelter from the falling rigging but drowned when the ship slipped off the reef into deeper water. Eva Carmichael had raced onto deck to find out what was happening only to be confronted by towering cliffs looming above the stricken ship. In all the chaos, Captain Gibbs grabbed Eva and said, "If you are saved Eva, let my dear wife know that I died like a sailor". That was the last Eva Carmichael saw of the captain. She was swept off the ship by a huge wave. Eva saw Tom Pearce on a small rocky beach and yelled to attract his attention. He dived in and swam to the exhausted woman and dragged her to shore. He took her to the cave and broke open case of brandy which had washed up on the beach. He opened a bottle to revive the unconscious woman. A few hours later Tom scaled a cliff in search of help. He followed hoof prints and came by chance upon two men from nearby Glenample Station three and a half miles away. In a state of exhaustion, he told the men of the tragedy. Tom returned to the gorge while the two men rode back to the station to get help. By the time they reached LOCH ARD Gorge, it was cold and dark. The two shipwreck survivors were taken to Glenample Station to recover. Eva stayed at the station for six weeks before returning to Ireland, this time by steamship. In Melbourne, Tom Pearce received a hero's welcome. He was presented with the first gold medal of the Royal Humane Society of Victoria and a £1000 cheque from the Victorian Government. Concerts were performed to honour the young man's bravery and to raise money for those who lost family in the LOCH ARD disaster. Of the 54 crew members and passengers on board, only two survived: the apprentice, Tom Pearce and the young woman passenger, Eva Carmichael, who lost all of her family in the tragedy. Ten days after the LOCH ARD tragedy, salvage rights to the wreck were sold at auction for £2,120. Cargo valued at £3,000 was salvaged and placed on the beach, but most washed back into the sea when another storm developed. The wreck of LOCH ARD still lies at the base of Mutton Bird Island. Much of the cargo has now been salvaged and some was washed up into what is now known as LOCH ARD Gorge. Cargo and artefacts have also been illegally salvaged over many years before protective legislation was introduced. One of the most unlikely pieces of cargo to have survived the shipwreck was a Minton porcelain peacock - one of only seven in the world. The peacock was destined for the Melbourne International Exhibition in 1880. It had been well packed, which gave it adequate protection during the violent storm. Today, the Minton peacock can be seen at the Flagstaff Hill Maritime Museum in Warrnambool. From Australia's most dramatic shipwreck it has now become Australia's most valuable shipwreck artefact and is one of very few 'objects' on the Victorian State Heritage Register. The LOCH ARD shipwreck is of State significance – Victorian Heritage Register S 417. Flagstaff Hill’s collection of artefacts from LOCH ARD is significant for being one of the largest collections of artefacts from this shipwreck in Victoria. It is significant for its association with the shipwreck, which is on the Victorian Heritage Register (VHR S417). The collection is significant because of the relationship between the objects, as together they have a high potential to interpret the story of the LOCH ARD. The LOCH ARD collection is archaeologically significant as the remains of a large international passenger and cargo ship. The LOCH ARD collection is historically significant for representing aspects of Victoria’s shipping history and its potential to interpret sub-theme 1.5 of Victoria’s Framework of Historical Themes (living with natural processes). The collection is also historically significant for its association with the LOCH ARD, which was one of the worst and best known shipwrecks in Victoria’s history. Unrestored tea spoon from the wreck of the LOCH ARD. The spoon design has a flattened fiddle-back handle, with a thin stem or shank, flared collar, and elongated bowl. The spoons metallic composition is a thin layer of brass alloy which has partially corroded back to a nickel-silver base metal. Fragile bowl that is thinned, pealing and split. Outline of five makers marks are generally discernible.flagstaff hill, warrnambool, shipwrecked coast, flagstaff hill maritime museum, maritime museum, shipwreck coast, flagstaff hill maritime village, great ocean road, loch line, loch ard, captain gibbs, eva carmichael, tom pearce, glenample station, mutton bird island, loch ard gorge, electroplated cutlery, loch ard shipwreck, nickel silver, william page & co, birmingham, brass plating, makers marks -
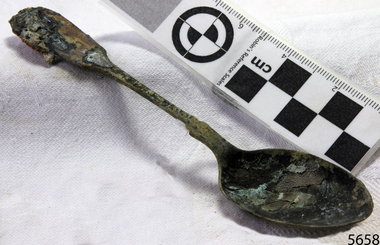 Flagstaff Hill Maritime Museum and Village
Spoon, circa 1878
This tea spoon is from the wreck of the LOCH ARD, a Loch Line ship of 1,693 tons which sailed from Gravesend, London, on 2 March 1878 with 17 passengers and a crew of 36 under Captain George Gibbs. “The intention was to discharge cargo in Melbourne, before returning to London via the Horn with wool and wheat”. Instead, on 1 June 1878, after 90 days at sea, she struck the sandstone cliffs of Mutton Bird Island on the south west coast of Victoria, and sank with the loss of 52 lives and all her cargo. The manifest of the LOCH ARD listed an array of manufactured goods and bulk metals being exported to the Colony of Victoria, with a declared value of £53,700. (202 bills of lading show an actual invoice value of £68, 456, with insurance underwriting to £30,000 of all cargo). Included in the manifest is the item of “Tin hardware & cutlery £7,530”. This teaspoon is one of 482 similar items of electro-plated cutlery from the LOCH ARD site, comprising spoons and forks of various sizes but all sharing the same general shape or design and metallic composition. 49 of these pieces display a legible makers’ mark — the initials “W” and “P” placed within a raised diamond outline, which is in turn contained within a sunken crown shape — identifying the manufacturer as William Page & Co of Birmingham. An electroplater’s makers’ marks, unlike sterling silver hallmarks, are not consistent identifiers of quality or date and place of manufacture. A similar line of five impressions was usually made to impress the consumer with an implication of industry standards, but what each one actually signified was not regulated and so they varied according to the whim of the individual foundry. In this case, the maker’s marks are often obscured by sedimentary accretion or removed by corrosion after a century of submersion in the ocean. However sufficient detail has survived to indicate that these samples of electro-plated cutlery probably originated from the same consignment in the LOCH ARD’s cargo. The following descriptions of maker’s marks are drawn from 255 tea spoons, 125 dessert spoons, and 99 table forks. These marks are clearly visible in 66 instances, while the same sequence of general outlines, or depression shapes, is discernible in another 166 examples. 1. A recessed Crown containing a raised Diamond outline and the initials “W” and “P” (the recognised trademark of William Page & Co) 2. An impressed Ellipse containing a raised, pivoted, Triangle in its lower part and bearing a Resurrection Cross on its upper section (a possible dissenting church symbol reflecting religious affiliation); OR a rounded Square impression containing a raised, ‘lazy’, letter “B” (possibly mimicking sterling silver hallmark signifying city of manufacture i.e. Birmingham) 3. An impressed rounded Square filled with a raised Maltese Cross (the base metal composite of nickel silver was also known as ‘German silver’ after its Berlin inventors in 1823) 4. A recessed Circle containing a Crab or Scarab Beetle image; OR a recessed Circle containing a rotated ‘fleur de lys’ or ‘fasces’ design 5. A depressed Diamond shape enclosing a large raised letter “R” and a small raised letter “D” (mimicking the U.K. Patent Office stamp which abbreviated the term ‘registered’ to “RD”, but also included date and class of patent) Suggested trade names for William Page & Co’s particular blend of brass plating are ‘roman silver’ or ‘silverite’. This copper alloy polishes to a lustrous gold when new, discolouring to a murky grey with greenish hue when neglected. HISTORY OF THE LOCH ARD The LOCH ARD belonged to the famous Loch Line which sailed many ships from England to Australia. Built in Glasgow by Barclay, Curdle and Co. in 1873, the LOCH ARD was a three-masted square rigged iron sailing ship. The ship measured 262ft 7" (79.87m) in length, 38ft (11.58m) in width, 23ft (7m) in depth and had a gross tonnage of 1693 tons. The LOCH ARD's main mast measured a massive 150ft (45.7m) in height. LOCH ARD made three trips to Australia and one trip to Calcutta before its final voyage. LOCH ARD left England on March 2, 1878, under the command of Captain Gibbs, a newly married, 29 year old. She was bound for Melbourne with a crew of 37, plus 17 passengers and a load of cargo. The general cargo reflected the affluence of Melbourne at the time. On board were straw hats, umbrella, perfumes, clay pipes, pianos, clocks, confectionary, linen and candles, as well as a heavier load of railway irons, cement, lead and copper. There were items included that intended for display in the Melbourne International Exhibition in 1880. The voyage to Port Phillip was long but uneventful. At 3am on June 1, 1878, Captain Gibbs was expecting to see land and the passengers were becoming excited as they prepared to view their new homeland in the early morning. But LOCH ARD was running into a fog which greatly reduced visibility. Captain Gibbs was becoming anxious as there was no sign of land or the Cape Otway lighthouse. At 4am the fog lifted. A man aloft announced that he could see breakers. The sheer cliffs of Victoria's west coast came into view, and Captain Gibbs realised that the ship was much closer to them than expected. He ordered as much sail to be set as time would permit and then attempted to steer the vessel out to sea. On coming head on into the wind, the ship lost momentum, the sails fell limp and LOCH ARD's bow swung back. Gibbs then ordered the anchors to be released in an attempt to hold its position. The anchors sank some 50 fathoms - but did not hold. By this time LOCH ARD was among the breakers and the tall cliffs of Mutton Bird Island rose behind the ship. Just half a mile from the coast, the ship's bow was suddenly pulled around by the anchor. The captain tried to tack out to sea, but the ship struck a reef at the base of Mutton Bird Island, near Port Campbell. Waves broke over the ship and the top deck was loosened from the hull. The masts and rigging came crashing down knocking passengers and crew overboard. When a lifeboat was finally launched, it crashed into the side of LOCH ARD and capsized. Tom Pearce, who had launched the boat, managed to cling to its overturned hull and shelter beneath it. He drifted out to sea and then on the flood tide came into what is now known as LOCH ARD Gorge. He swam to shore, bruised and dazed, and found a cave in which to shelter. Some of the crew stayed below deck to shelter from the falling rigging but drowned when the ship slipped off the reef into deeper water. Eva Carmichael had raced onto deck to find out what was happening only to be confronted by towering cliffs looming above the stricken ship. In all the chaos, Captain Gibbs grabbed Eva and said, "If you are saved Eva, let my dear wife know that I died like a sailor". That was the last Eva Carmichael saw of the captain. She was swept off the ship by a huge wave. Eva saw Tom Pearce on a small rocky beach and yelled to attract his attention. He dived in and swam to the exhausted woman and dragged her to shore. He took her to the cave and broke open case of brandy which had washed up on the beach. He opened a bottle to revive the unconscious woman. A few hours later Tom scaled a cliff in search of help. He followed hoof prints and came by chance upon two men from nearby Glenample Station three and a half miles away. In a state of exhaustion, he told the men of the tragedy. Tom returned to the gorge while the two men rode back to the station to get help. By the time they reached LOCH ARD Gorge, it was cold and dark. The two shipwreck survivors were taken to Glenample Station to recover. Eva stayed at the station for six weeks before returning to Ireland, this time by steamship. In Melbourne, Tom Pearce received a hero's welcome. He was presented with the first gold medal of the Royal Humane Society of Victoria and a £1000 cheque from the Victorian Government. Concerts were performed to honour the young man's bravery and to raise money for those who lost family in the LOCH ARD disaster. Of the 54 crew members and passengers on board, only two survived: the apprentice, Tom Pearce and the young woman passenger, Eva Carmichael, who lost all of her family in the tragedy. Ten days after the LOCH ARD tragedy, salvage rights to the wreck were sold at auction for £2,120. Cargo valued at £3,000 was salvaged and placed on the beach, but most washed back into the sea when another storm developed. The wreck of LOCH ARD still lies at the base of Mutton Bird Island. Much of the cargo has now been salvaged and some was washed up into what is now known as LOCH ARD Gorge. Cargo and artefacts have also been illegally salvaged over many years before protective legislation was introduced. One of the most unlikely pieces of cargo to have survived the shipwreck was a Minton porcelain peacock - one of only seven in the world. The peacock was destined for the Melbourne International Exhibition in 1880. It had been well packed, which gave it adequate protection during the violent storm. Today, the Minton peacock can be seen at the Flagstaff Hill Maritime Museum in Warrnambool. From Australia's most dramatic shipwreck it has now become Australia's most valuable shipwreck artefact and is one of very few 'objects' on the Victorian State Heritage Register. The LOCH ARD shipwreck is of State significance – Victorian Heritage Register S 417. Flagstaff Hill’s collection of artefacts from LOCH ARD is significant for being one of the largest collections of artefacts from this shipwreck in Victoria. It is significant for its association with the shipwreck, which is on the Victorian Heritage Register (VHR S417). The collection is significant because of the relationship between the objects, as together they have a high potential to interpret the story of the LOCH ARD. The LOCH ARD collection is archaeologically significant as the remains of a large international passenger and cargo ship. The LOCH ARD collection is historically significant for representing aspects of Victoria’s shipping history and its potential to interpret sub-theme 1.5 of Victoria’s Framework of Historical Themes (living with natural processes). The collection is also historically significant for its association with the LOCH ARD, which was one of the worst and best known shipwrecks in Victoria’s history. Unrestored tea spoon from the wreck of the LOCH ARD. The spoon design has a flattened fiddle-back handle, with a thin stem or shank, flared collar, and elongated bowl. The spoons metallic composition is a thin layer of brass alloy which has partially corroded back to a nickel-silver base metal. Lump of concretion on handle. Only 10-15% of original electroplating survives with some verdigris.flagstaff hill, warrnambool, shipwrecked coast, flagstaff hill maritime museum, maritime museum, shipwreck coast, flagstaff hill maritime village, great ocean road, loch line, loch ard, captain gibbs, eva carmichael, tom pearce, glenample station, mutton bird island, loch ard gorge, electroplated cutlery, loch ard shipwreck, nickel silver, william page & co, birmingham, brass plating, makers marks -
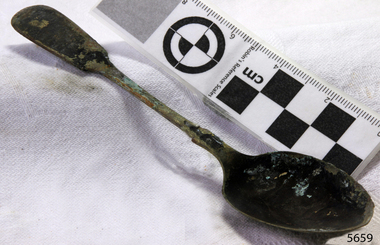 Flagstaff Hill Maritime Museum and Village
Spoon, circa 1878
This tea spoon is from the wreck of the LOCH ARD, a Loch Line ship of 1,693 tons which sailed from Gravesend, London, on 2 March 1878 with 17 passengers and a crew of 36 under Captain George Gibbs. “The intention was to discharge cargo in Melbourne, before returning to London via the Horn with wool and wheat”. Instead, on 1 June 1878, after 90 days at sea, she struck the sandstone cliffs of Mutton Bird Island on the south west coast of Victoria, and sank with the loss of 52 lives and all her cargo. The manifest of the LOCH ARD listed an array of manufactured goods and bulk metals being exported to the Colony of Victoria, with a declared value of £53,700. (202 bills of lading show an actual invoice value of £68, 456, with insurance underwriting to £30,000 of all cargo). Included in the manifest is the item of “Tin hardware & cutlery £7,530”. This teaspoon is one of 482 similar items of electro-plated cutlery from the LOCH ARD site, comprising spoons and forks of various sizes but all sharing the same general shape or design and metallic composition. 49 of these pieces display a legible makers’ mark — the initials “W” and “P” placed within a raised diamond outline, which is in turn contained within a sunken crown shape — identifying the manufacturer as William Page & Co of Birmingham. An electroplater’s makers’ marks, unlike sterling silver hallmarks, are not consistent identifiers of quality or date and place of manufacture. A similar line of five impressions was usually made to impress the consumer with an implication of industry standards, but what each one actually signified was not regulated and so they varied according to the whim of the individual foundry. In this case, the maker’s marks are often obscured by sedimentary accretion or removed by corrosion after a century of submersion in the ocean. However sufficient detail has survived to indicate that these samples of electro-plated cutlery probably originated from the same consignment in the LOCH ARD’s cargo. The following descriptions of maker’s marks are drawn from 255 tea spoons, 125 dessert spoons, and 99 table forks. These marks are clearly visible in 66 instances, while the same sequence of general outlines, or depression shapes, is discernible in another 166 examples. 1. A recessed Crown containing a raised Diamond outline and the initials “W” and “P” (the recognised trademark of William Page & Co) 2. An impressed Ellipse containing a raised, pivoted, Triangle in its lower part and bearing a Resurrection Cross on its upper section (a possible dissenting church symbol reflecting religious affiliation); OR a rounded Square impression containing a raised, ‘lazy’, letter “B” (possibly mimicking sterling silver hallmark signifying city of manufacture i.e. Birmingham) 3. An impressed rounded Square filled with a raised Maltese Cross (the base metal composite of nickel silver was also known as ‘German silver’ after its Berlin inventors in 1823) 4. A recessed Circle containing a Crab or Scarab Beetle image; OR a recessed Circle containing a rotated ‘fleur de lys’ or ‘fasces’ design 5. A depressed Diamond shape enclosing a large raised letter “R” and a small raised letter “D” (mimicking the U.K. Patent Office stamp which abbreviated the term ‘registered’ to “RD”, but also included date and class of patent) Suggested trade names for William Page & Co’s particular blend of brass plating are ‘roman silver’ or ‘silverite’. This copper alloy polishes to a lustrous gold when new, discolouring to a murky grey with greenish hue when neglected. HISTORY OF THE LOCH ARD The LOCH ARD belonged to the famous Loch Line which sailed many ships from England to Australia. Built in Glasgow by Barclay, Curdle and Co. in 1873, the LOCH ARD was a three-masted square rigged iron sailing ship. The ship measured 262ft 7" (79.87m) in length, 38ft (11.58m) in width, 23ft (7m) in depth and had a gross tonnage of 1693 tons. The LOCH ARD's main mast measured a massive 150ft (45.7m) in height. LOCH ARD made three trips to Australia and one trip to Calcutta before its final voyage. LOCH ARD left England on March 2, 1878, under the command of Captain Gibbs, a newly married, 29 year old. She was bound for Melbourne with a crew of 37, plus 17 passengers and a load of cargo. The general cargo reflected the affluence of Melbourne at the time. On board were straw hats, umbrella, perfumes, clay pipes, pianos, clocks, confectionary, linen and candles, as well as a heavier load of railway irons, cement, lead and copper. There were items included that intended for display in the Melbourne International Exhibition in 1880. The voyage to Port Phillip was long but uneventful. At 3am on June 1, 1878, Captain Gibbs was expecting to see land and the passengers were becoming excited as they prepared to view their new homeland in the early morning. But LOCH ARD was running into a fog which greatly reduced visibility. Captain Gibbs was becoming anxious as there was no sign of land or the Cape Otway lighthouse. At 4am the fog lifted. A man aloft announced that he could see breakers. The sheer cliffs of Victoria's west coast came into view, and Captain Gibbs realised that the ship was much closer to them than expected. He ordered as much sail to be set as time would permit and then attempted to steer the vessel out to sea. On coming head on into the wind, the ship lost momentum, the sails fell limp and LOCH ARD's bow swung back. Gibbs then ordered the anchors to be released in an attempt to hold its position. The anchors sank some 50 fathoms - but did not hold. By this time LOCH ARD was among the breakers and the tall cliffs of Mutton Bird Island rose behind the ship. Just half a mile from the coast, the ship's bow was suddenly pulled around by the anchor. The captain tried to tack out to sea, but the ship struck a reef at the base of Mutton Bird Island, near Port Campbell. Waves broke over the ship and the top deck was loosened from the hull. The masts and rigging came crashing down knocking passengers and crew overboard. When a lifeboat was finally launched, it crashed into the side of LOCH ARD and capsized. Tom Pearce, who had launched the boat, managed to cling to its overturned hull and shelter beneath it. He drifted out to sea and then on the flood tide came into what is now known as LOCH ARD Gorge. He swam to shore, bruised and dazed, and found a cave in which to shelter. Some of the crew stayed below deck to shelter from the falling rigging but drowned when the ship slipped off the reef into deeper water. Eva Carmichael had raced onto deck to find out what was happening only to be confronted by towering cliffs looming above the stricken ship. In all the chaos, Captain Gibbs grabbed Eva and said, "If you are saved Eva, let my dear wife know that I died like a sailor". That was the last Eva Carmichael saw of the captain. She was swept off the ship by a huge wave. Eva saw Tom Pearce on a small rocky beach and yelled to attract his attention. He dived in and swam to the exhausted woman and dragged her to shore. He took her to the cave and broke open case of brandy which had washed up on the beach. He opened a bottle to revive the unconscious woman. A few hours later Tom scaled a cliff in search of help. He followed hoof prints and came by chance upon two men from nearby Glenample Station three and a half miles away. In a state of exhaustion, he told the men of the tragedy. Tom returned to the gorge while the two men rode back to the station to get help. By the time they reached LOCH ARD Gorge, it was cold and dark. The two shipwreck survivors were taken to Glenample Station to recover. Eva stayed at the station for six weeks before returning to Ireland, this time by steamship. In Melbourne, Tom Pearce received a hero's welcome. He was presented with the first gold medal of the Royal Humane Society of Victoria and a £1000 cheque from the Victorian Government. Concerts were performed to honour the young man's bravery and to raise money for those who lost family in the LOCH ARD disaster. Of the 54 crew members and passengers on board, only two survived: the apprentice, Tom Pearce and the young woman passenger, Eva Carmichael, who lost all of her family in the tragedy. Ten days after the LOCH ARD tragedy, salvage rights to the wreck were sold at auction for £2,120. Cargo valued at £3,000 was salvaged and placed on the beach, but most washed back into the sea when another storm developed. The wreck of LOCH ARD still lies at the base of Mutton Bird Island. Much of the cargo has now been salvaged and some was washed up into what is now known as LOCH ARD Gorge. Cargo and artefacts have also been illegally salvaged over many years before protective legislation was introduced. One of the most unlikely pieces of cargo to have survived the shipwreck was a Minton porcelain peacock - one of only seven in the world. The peacock was destined for the Melbourne International Exhibition in 1880. It had been well packed, which gave it adequate protection during the violent storm. Today, the Minton peacock can be seen at the Flagstaff Hill Maritime Museum in Warrnambool. From Australia's most dramatic shipwreck it has now become Australia's most valuable shipwreck artefact and is one of very few 'objects' on the Victorian State Heritage Register. The LOCH ARD shipwreck is of State significance – Victorian Heritage Register S 417. Flagstaff Hill’s collection of artefacts from LOCH ARD is significant for being one of the largest collections of artefacts from this shipwreck in Victoria. It is significant for its association with the shipwreck, which is on the Victorian Heritage Register (VHR S417). The collection is significant because of the relationship between the objects, as together they have a high potential to interpret the story of the LOCH ARD. The LOCH ARD collection is archaeologically significant as the remains of a large international passenger and cargo ship. The LOCH ARD collection is historically significant for representing aspects of Victoria’s shipping history and its potential to interpret sub-theme 1.5 of Victoria’s Framework of Historical Themes (living with natural processes). The collection is also historically significant for its association with the LOCH ARD, which was one of the worst and best known shipwrecks in Victoria’s history. Unrestored tea spoon from the wreck of the LOCH ARD. The spoon design has a flattened fiddle-back handle, with a thin stem or shank, flared collar, and elongated bowl. The spoons metallic composition is a thin layer of brass alloy which has partially corroded back to a nickel-silver base metal. Only 10-15% of original electroplating remains.flagstaff hill, warrnambool, shipwrecked coast, flagstaff hill maritime museum, maritime museum, shipwreck coast, flagstaff hill maritime village, great ocean road, loch line, loch ard, captain gibbs, eva carmichael, tom pearce, glenample station, mutton bird island, loch ard gorge, electroplated cutlery, loch ard shipwreck, nickel silver, william page & co, birmingham, brass plating, makers marks -
 Flagstaff Hill Maritime Museum and Village
Spoon, circa 1878
This tea spoon is from the wreck of the LOCH ARD, a Loch Line ship of 1,693 tons which sailed from Gravesend, London, on 2 March 1878 with 17 passengers and a crew of 36 under Captain George Gibbs. “The intention was to discharge cargo in Melbourne, before returning to London via the Horn with wool and wheat”. Instead, on 1 June 1878, after 90 days at sea, she struck the sandstone cliffs of Mutton Bird Island on the south west coast of Victoria, and sank with the loss of 52 lives and all her cargo. The manifest of the LOCH ARD listed an array of manufactured goods and bulk metals being exported to the Colony of Victoria, with a declared value of £53,700. (202 bills of lading show an actual invoice value of £68, 456, with insurance underwriting to £30,000 of all cargo). Included in the manifest is the item of “Tin hardware & cutlery £7,530”. This teaspoon is one of 482 similar items of electro-plated cutlery from the LOCH ARD site, comprising spoons and forks of various sizes but all sharing the same general shape or design and metallic composition. 49 of these pieces display a legible makers’ mark — the initials “W” and “P” placed within a raised diamond outline, which is in turn contained within a sunken crown shape — identifying the manufacturer as William Page & Co of Birmingham. An electroplater’s makers’ marks, unlike sterling silver hallmarks, are not consistent identifiers of quality or date and place of manufacture. A similar line of five impressions was usually made to impress the consumer with an implication of industry standards, but what each one actually signified was not regulated and so they varied according to the whim of the individual foundry. In this case, the maker’s marks are often obscured by sedimentary accretion or removed by corrosion after a century of submersion in the ocean. However sufficient detail has survived to indicate that these samples of electro-plated cutlery probably originated from the same consignment in the LOCH ARD’s cargo. The following descriptions of maker’s marks are drawn from 255 tea spoons, 125 dessert spoons, and 99 table forks. These marks are clearly visible in 66 instances, while the same sequence of general outlines, or depression shapes, is discernible in another 166 examples. 1. A recessed Crown containing a raised Diamond outline and the initials “W” and “P” (the recognised trademark of William Page & Co) 2. An impressed Ellipse containing a raised, pivoted, Triangle in its lower part and bearing a Resurrection Cross on its upper section (a possible dissenting church symbol reflecting religious affiliation); OR a rounded Square impression containing a raised, ‘lazy’, letter “B” (possibly mimicking sterling silver hallmark signifying city of manufacture i.e. Birmingham) 3. An impressed rounded Square filled with a raised Maltese Cross (the base metal composite of nickel silver was also known as ‘German silver’ after its Berlin inventors in 1823) 4. A recessed Circle containing a Crab or Scarab Beetle image; OR a recessed Circle containing a rotated ‘fleur de lys’ or ‘fasces’ design 5. A depressed Diamond shape enclosing a large raised letter “R” and a small raised letter “D” (mimicking the U.K. Patent Office stamp which abbreviated the term ‘registered’ to “RD”, but also included date and class of patent) Suggested trade names for William Page & Co’s particular blend of brass plating are ‘roman silver’ or ‘silverite’. This copper alloy polishes to a lustrous gold when new, discolouring to a murky grey with greenish hue when neglected. HISTORY OF THE LOCH ARD The LOCH ARD belonged to the famous Loch Line which sailed many ships from England to Australia. Built in Glasgow by Barclay, Curdle and Co. in 1873, the LOCH ARD was a three-masted square rigged iron sailing ship. The ship measured 262ft 7" (79.87m) in length, 38ft (11.58m) in width, 23ft (7m) in depth and had a gross tonnage of 1693 tons. The LOCH ARD's main mast measured a massive 150ft (45.7m) in height. LOCH ARD made three trips to Australia and one trip to Calcutta before its final voyage. LOCH ARD left England on March 2, 1878, under the command of Captain Gibbs, a newly married, 29 year old. She was bound for Melbourne with a crew of 37, plus 17 passengers and a load of cargo. The general cargo reflected the affluence of Melbourne at the time. On board were straw hats, umbrella, perfumes, clay pipes, pianos, clocks, confectionary, linen and candles, as well as a heavier load of railway irons, cement, lead and copper. There were items included that intended for display in the Melbourne International Exhibition in 1880. The voyage to Port Phillip was long but uneventful. At 3am on June 1, 1878, Captain Gibbs was expecting to see land and the passengers were becoming excited as they prepared to view their new homeland in the early morning. But LOCH ARD was running into a fog which greatly reduced visibility. Captain Gibbs was becoming anxious as there was no sign of land or the Cape Otway lighthouse. At 4am the fog lifted. A man aloft announced that he could see breakers. The sheer cliffs of Victoria's west coast came into view, and Captain Gibbs realised that the ship was much closer to them than expected. He ordered as much sail to be set as time would permit and then attempted to steer the vessel out to sea. On coming head on into the wind, the ship lost momentum, the sails fell limp and LOCH ARD's bow swung back. Gibbs then ordered the anchors to be released in an attempt to hold its position. The anchors sank some 50 fathoms - but did not hold. By this time LOCH ARD was among the breakers and the tall cliffs of Mutton Bird Island rose behind the ship. Just half a mile from the coast, the ship's bow was suddenly pulled around by the anchor. The captain tried to tack out to sea, but the ship struck a reef at the base of Mutton Bird Island, near Port Campbell. Waves broke over the ship and the top deck was loosened from the hull. The masts and rigging came crashing down knocking passengers and crew overboard. When a lifeboat was finally launched, it crashed into the side of LOCH ARD and capsized. Tom Pearce, who had launched the boat, managed to cling to its overturned hull and shelter beneath it. He drifted out to sea and then on the flood tide came into what is now known as LOCH ARD Gorge. He swam to shore, bruised and dazed, and found a cave in which to shelter. Some of the crew stayed below deck to shelter from the falling rigging but drowned when the ship slipped off the reef into deeper water. Eva Carmichael had raced onto deck to find out what was happening only to be confronted by towering cliffs looming above the stricken ship. In all the chaos, Captain Gibbs grabbed Eva and said, "If you are saved Eva, let my dear wife know that I died like a sailor". That was the last Eva Carmichael saw of the captain. She was swept off the ship by a huge wave. Eva saw Tom Pearce on a small rocky beach and yelled to attract his attention. He dived in and swam to the exhausted woman and dragged her to shore. He took her to the cave and broke open case of brandy which had washed up on the beach. He opened a bottle to revive the unconscious woman. A few hours later Tom scaled a cliff in search of help. He followed hoof prints and came by chance upon two men from nearby Glenample Station three and a half miles away. In a state of exhaustion, he told the men of the tragedy. Tom returned to the gorge while the two men rode back to the station to get help. By the time they reached LOCH ARD Gorge, it was cold and dark. The two shipwreck survivors were taken to Glenample Station to recover. Eva stayed at the station for six weeks before returning to Ireland, this time by steamship. In Melbourne, Tom Pearce received a hero's welcome. He was presented with the first gold medal of the Royal Humane Society of Victoria and a £1000 cheque from the Victorian Government. Concerts were performed to honour the young man's bravery and to raise money for those who lost family in the LOCH ARD disaster. Of the 54 crew members and passengers on board, only two survived: the apprentice, Tom Pearce and the young woman passenger, Eva Carmichael, who lost all of her family in the tragedy. Ten days after the LOCH ARD tragedy, salvage rights to the wreck were sold at auction for £2,120. Cargo valued at £3,000 was salvaged and placed on the beach, but most washed back into the sea when another storm developed. The wreck of LOCH ARD still lies at the base of Mutton Bird Island. Much of the cargo has now been salvaged and some was washed up into what is now known as LOCH ARD Gorge. Cargo and artefacts have also been illegally salvaged over many years before protective legislation was introduced. One of the most unlikely pieces of cargo to have survived the shipwreck was a Minton porcelain peacock - one of only seven in the world. The peacock was destined for the Melbourne International Exhibition in 1880. It had been well packed, which gave it adequate protection during the violent storm. Today, the Minton peacock can be seen at the Flagstaff Hill Maritime Museum in Warrnambool. From Australia's most dramatic shipwreck it has now become Australia's most valuable shipwreck artefact and is one of very few 'objects' on the Victorian State Heritage Register. The LOCH ARD shipwreck is of State significance – Victorian Heritage Register S 417. Flagstaff Hill’s collection of artefacts from LOCH ARD is significant for being one of the largest collections of artefacts from this shipwreck in Victoria. It is significant for its association with the shipwreck, which is on the Victorian Heritage Register (VHR S417). The collection is significant because of the relationship between the objects, as together they have a high potential to interpret the story of the LOCH ARD. The LOCH ARD collection is archaeologically significant as the remains of a large international passenger and cargo ship. The LOCH ARD collection is historically significant for representing aspects of Victoria’s shipping history and its potential to interpret sub-theme 1.5 of Victoria’s Framework of Historical Themes (living with natural processes). The collection is also historically significant for its association with the LOCH ARD, which was one of the worst and best known shipwrecks in Victoria’s history. Unrestored tea spoon from the wreck of the LOCH ARD. The spoon design has a flattened fiddle-back handle, with a thin stem or shank, flared collar, and elongated bowl. The spoons metallic composition is a thin layer of brass alloy which has partially corroded back to a nickel-silver base metal. Minimal electroplating survives. Some accretion and verdigris present.flagstaff hill, warrnambool, shipwrecked coast, flagstaff hill maritime museum, maritime museum, shipwreck coast, flagstaff hill maritime village, great ocean road, loch line, loch ard, captain gibbs, eva carmichael, tom pearce, glenample station, mutton bird island, loch ard gorge, electroplated cutlery, loch ard shipwreck, nickel silver, william page & co, birmingham, brass plating, makers marks -
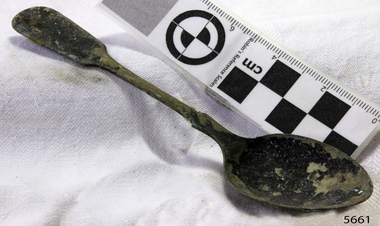 Flagstaff Hill Maritime Museum and Village
Spoon, circa 1878
This tea spoon is from the wreck of the LOCH ARD, a Loch Line ship of 1,693 tons which sailed from Gravesend, London, on 2 March 1878 with 17 passengers and a crew of 36 under Captain George Gibbs. “The intention was to discharge cargo in Melbourne, before returning to London via the Horn with wool and wheat”. Instead, on 1 June 1878, after 90 days at sea, she struck the sandstone cliffs of Mutton Bird Island on the south west coast of Victoria, and sank with the loss of 52 lives and all her cargo. The manifest of the LOCH ARD listed an array of manufactured goods and bulk metals being exported to the Colony of Victoria, with a declared value of £53,700. (202 bills of lading show an actual invoice value of £68, 456, with insurance underwriting to £30,000 of all cargo). Included in the manifest is the item of “Tin hardware & cutlery £7,530”. This teaspoon is one of 482 similar items of electro-plated cutlery from the LOCH ARD site, comprising spoons and forks of various sizes but all sharing the same general shape or design and metallic composition. 49 of these pieces display a legible makers’ mark — the initials “W” and “P” placed within a raised diamond outline, which is in turn contained within a sunken crown shape — identifying the manufacturer as William Page & Co of Birmingham. An electroplater’s makers’ marks, unlike sterling silver hallmarks, are not consistent identifiers of quality or date and place of manufacture. A similar line of five impressions was usually made to impress the consumer with an implication of industry standards, but what each one actually signified was not regulated and so they varied according to the whim of the individual foundry. In this case, the maker’s marks are often obscured by sedimentary accretion or removed by corrosion after a century of submersion in the ocean. However sufficient detail has survived to indicate that these samples of electro-plated cutlery probably originated from the same consignment in the LOCH ARD’s cargo. The following descriptions of maker’s marks are drawn from 255 tea spoons, 125 dessert spoons, and 99 table forks. These marks are clearly visible in 66 instances, while the same sequence of general outlines, or depression shapes, is discernible in another 166 examples. 1. A recessed Crown containing a raised Diamond outline and the initials “W” and “P” (the recognised trademark of William Page & Co) 2. An impressed Ellipse containing a raised, pivoted, Triangle in its lower part and bearing a Resurrection Cross on its upper section (a possible dissenting church symbol reflecting religious affiliation); OR a rounded Square impression containing a raised, ‘lazy’, letter “B” (possibly mimicking sterling silver hallmark signifying city of manufacture i.e. Birmingham) 3. An impressed rounded Square filled with a raised Maltese Cross (the base metal composite of nickel silver was also known as ‘German silver’ after its Berlin inventors in 1823) 4. A recessed Circle containing a Crab or Scarab Beetle image; OR a recessed Circle containing a rotated ‘fleur de lys’ or ‘fasces’ design 5. A depressed Diamond shape enclosing a large raised letter “R” and a small raised letter “D” (mimicking the U.K. Patent Office stamp which abbreviated the term ‘registered’ to “RD”, but also included date and class of patent) Suggested trade names for William Page & Co’s particular blend of brass plating are ‘roman silver’ or ‘silverite’. This copper alloy polishes to a lustrous gold when new, discolouring to a murky grey with greenish hue when neglected. HISTORY OF THE LOCH ARD The LOCH ARD belonged to the famous Loch Line which sailed many ships from England to Australia. Built in Glasgow by Barclay, Curdle and Co. in 1873, the LOCH ARD was a three-masted square rigged iron sailing ship. The ship measured 262ft 7" (79.87m) in length, 38ft (11.58m) in width, 23ft (7m) in depth and had a gross tonnage of 1693 tons. The LOCH ARD's main mast measured a massive 150ft (45.7m) in height. LOCH ARD made three trips to Australia and one trip to Calcutta before its final voyage. LOCH ARD left England on March 2, 1878, under the command of Captain Gibbs, a newly married, 29 year old. She was bound for Melbourne with a crew of 37, plus 17 passengers and a load of cargo. The general cargo reflected the affluence of Melbourne at the time. On board were straw hats, umbrella, perfumes, clay pipes, pianos, clocks, confectionary, linen and candles, as well as a heavier load of railway irons, cement, lead and copper. There were items included that intended for display in the Melbourne International Exhibition in 1880. The voyage to Port Phillip was long but uneventful. At 3am on June 1, 1878, Captain Gibbs was expecting to see land and the passengers were becoming excited as they prepared to view their new homeland in the early morning. But LOCH ARD was running into a fog which greatly reduced visibility. Captain Gibbs was becoming anxious as there was no sign of land or the Cape Otway lighthouse. At 4am the fog lifted. A man aloft announced that he could see breakers. The sheer cliffs of Victoria's west coast came into view, and Captain Gibbs realised that the ship was much closer to them than expected. He ordered as much sail to be set as time would permit and then attempted to steer the vessel out to sea. On coming head on into the wind, the ship lost momentum, the sails fell limp and LOCH ARD's bow swung back. Gibbs then ordered the anchors to be released in an attempt to hold its position. The anchors sank some 50 fathoms - but did not hold. By this time LOCH ARD was among the breakers and the tall cliffs of Mutton Bird Island rose behind the ship. Just half a mile from the coast, the ship's bow was suddenly pulled around by the anchor. The captain tried to tack out to sea, but the ship struck a reef at the base of Mutton Bird Island, near Port Campbell. Waves broke over the ship and the top deck was loosened from the hull. The masts and rigging came crashing down knocking passengers and crew overboard. When a lifeboat was finally launched, it crashed into the side of LOCH ARD and capsized. Tom Pearce, who had launched the boat, managed to cling to its overturned hull and shelter beneath it. He drifted out to sea and then on the flood tide came into what is now known as LOCH ARD Gorge. He swam to shore, bruised and dazed, and found a cave in which to shelter. Some of the crew stayed below deck to shelter from the falling rigging but drowned when the ship slipped off the reef into deeper water. Eva Carmichael had raced onto deck to find out what was happening only to be confronted by towering cliffs looming above the stricken ship. In all the chaos, Captain Gibbs grabbed Eva and said, "If you are saved Eva, let my dear wife know that I died like a sailor". That was the last Eva Carmichael saw of the captain. She was swept off the ship by a huge wave. Eva saw Tom Pearce on a small rocky beach and yelled to attract his attention. He dived in and swam to the exhausted woman and dragged her to shore. He took her to the cave and broke open case of brandy which had washed up on the beach. He opened a bottle to revive the unconscious woman. A few hours later Tom scaled a cliff in search of help. He followed hoof prints and came by chance upon two men from nearby Glenample Station three and a half miles away. In a state of exhaustion, he told the men of the tragedy. Tom returned to the gorge while the two men rode back to the station to get help. By the time they reached LOCH ARD Gorge, it was cold and dark. The two shipwreck survivors were taken to Glenample Station to recover. Eva stayed at the station for six weeks before returning to Ireland, this time by steamship. In Melbourne, Tom Pearce received a hero's welcome. He was presented with the first gold medal of the Royal Humane Society of Victoria and a £1000 cheque from the Victorian Government. Concerts were performed to honour the young man's bravery and to raise money for those who lost family in the LOCH ARD disaster. Of the 54 crew members and passengers on board, only two survived: the apprentice, Tom Pearce and the young woman passenger, Eva Carmichael, who lost all of her family in the tragedy. Ten days after the LOCH ARD tragedy, salvage rights to the wreck were sold at auction for £2,120. Cargo valued at £3,000 was salvaged and placed on the beach, but most washed back into the sea when another storm developed. The wreck of LOCH ARD still lies at the base of Mutton Bird Island. Much of the cargo has now been salvaged and some was washed up into what is now known as LOCH ARD Gorge. Cargo and artefacts have also been illegally salvaged over many years before protective legislation was introduced. One of the most unlikely pieces of cargo to have survived the shipwreck was a Minton porcelain peacock - one of only seven in the world. The peacock was destined for the Melbourne International Exhibition in 1880. It had been well packed, which gave it adequate protection during the violent storm. Today, the Minton peacock can be seen at the Flagstaff Hill Maritime Museum in Warrnambool. From Australia's most dramatic shipwreck it has now become Australia's most valuable shipwreck artefact and is one of very few 'objects' on the Victorian State Heritage Register. The LOCH ARD shipwreck is of State significance – Victorian Heritage Register S 417. Flagstaff Hill’s collection of artefacts from LOCH ARD is significant for being one of the largest collections of artefacts from this shipwreck in Victoria. It is significant for its association with the shipwreck, which is on the Victorian Heritage Register (VHR S417). The collection is significant because of the relationship between the objects, as together they have a high potential to interpret the story of the LOCH ARD. The LOCH ARD collection is archaeologically significant as the remains of a large international passenger and cargo ship. The LOCH ARD collection is historically significant for representing aspects of Victoria’s shipping history and its potential to interpret sub-theme 1.5 of Victoria’s Framework of Historical Themes (living with natural processes). The collection is also historically significant for its association with the LOCH ARD, which was one of the worst and best known shipwrecks in Victoria’s history. Unrestored tea spoon from the wreck of the LOCH ARD. The spoon design has a flattened fiddle-back handle, with a thin stem or shank, flared collar, and elongated bowl. The spoons metallic composition is a thin layer of brass alloy which has partially corroded back to a nickel-silver base metal. Traces of original electroplating remain with spots of verdigris. Pitted and corroded but in fair (stable) condition. Five makers marks are obscured.flagstaff hill, warrnambool, shipwrecked coast, flagstaff hill maritime museum, maritime museum, shipwreck coast, flagstaff hill maritime village, great ocean road, loch line, loch ard, captain gibbs, eva carmichael, tom pearce, glenample station, mutton bird island, loch ard gorge, electroplated cutlery, loch ard shipwreck, nickel silver, william page & co, birmingham, brass plating, makers marks -
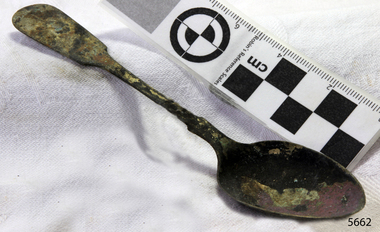 Flagstaff Hill Maritime Museum and Village
Spoon, circa 1878
This tea spoon is from the wreck of the LOCH ARD, a Loch Line ship of 1,693 tons which sailed from Gravesend, London, on 2 March 1878 with 17 passengers and a crew of 36 under Captain George Gibbs. “The intention was to discharge cargo in Melbourne, before returning to London via the Horn with wool and wheat”. Instead, on 1 June 1878, after 90 days at sea, she struck the sandstone cliffs of Mutton Bird Island on the south west coast of Victoria, and sank with the loss of 52 lives and all her cargo. The manifest of the LOCH ARD listed an array of manufactured goods and bulk metals being exported to the Colony of Victoria, with a declared value of £53,700. (202 bills of lading show an actual invoice value of £68, 456, with insurance underwriting to £30,000 of all cargo). Included in the manifest is the item of “Tin hardware & cutlery £7,530”. This teaspoon is one of 482 similar items of electro-plated cutlery from the LOCH ARD site, comprising spoons and forks of various sizes but all sharing the same general shape or design and metallic composition. 49 of these pieces display a legible makers’ mark — the initials “W” and “P” placed within a raised diamond outline, which is in turn contained within a sunken crown shape — identifying the manufacturer as William Page & Co of Birmingham. An electroplater’s makers’ marks, unlike sterling silver hallmarks, are not consistent identifiers of quality or date and place of manufacture. A similar line of five impressions was usually made to impress the consumer with an implication of industry standards, but what each one actually signified was not regulated and so they varied according to the whim of the individual foundry. In this case, the maker’s marks are often obscured by sedimentary accretion or removed by corrosion after a century of submersion in the ocean. However sufficient detail has survived to indicate that these samples of electro-plated cutlery probably originated from the same consignment in the LOCH ARD’s cargo. The following descriptions of maker’s marks are drawn from 255 tea spoons, 125 dessert spoons, and 99 table forks. These marks are clearly visible in 66 instances, while the same sequence of general outlines, or depression shapes, is discernible in another 166 examples. 1. A recessed Crown containing a raised Diamond outline and the initials “W” and “P” (the recognised trademark of William Page & Co) 2. An impressed Ellipse containing a raised, pivoted, Triangle in its lower part and bearing a Resurrection Cross on its upper section (a possible dissenting church symbol reflecting religious affiliation); OR a rounded Square impression containing a raised, ‘lazy’, letter “B” (possibly mimicking sterling silver hallmark signifying city of manufacture i.e. Birmingham) 3. An impressed rounded Square filled with a raised Maltese Cross (the base metal composite of nickel silver was also known as ‘German silver’ after its Berlin inventors in 1823) 4. A recessed Circle containing a Crab or Scarab Beetle image; OR a recessed Circle containing a rotated ‘fleur de lys’ or ‘fasces’ design 5. A depressed Diamond shape enclosing a large raised letter “R” and a small raised letter “D” (mimicking the U.K. Patent Office stamp which abbreviated the term ‘registered’ to “RD”, but also included date and class of patent) Suggested trade names for William Page & Co’s particular blend of brass plating are ‘roman silver’ or ‘silverite’. This copper alloy polishes to a lustrous gold when new, discolouring to a murky grey with greenish hue when neglected. HISTORY OF THE LOCH ARD The LOCH ARD belonged to the famous Loch Line which sailed many ships from England to Australia. Built in Glasgow by Barclay, Curdle and Co. in 1873, the LOCH ARD was a three-masted square rigged iron sailing ship. The ship measured 262ft 7" (79.87m) in length, 38ft (11.58m) in width, 23ft (7m) in depth and had a gross tonnage of 1693 tons. The LOCH ARD's main mast measured a massive 150ft (45.7m) in height. LOCH ARD made three trips to Australia and one trip to Calcutta before its final voyage. LOCH ARD left England on March 2, 1878, under the command of Captain Gibbs, a newly married, 29 year old. She was bound for Melbourne with a crew of 37, plus 17 passengers and a load of cargo. The general cargo reflected the affluence of Melbourne at the time. On board were straw hats, umbrella, perfumes, clay pipes, pianos, clocks, confectionary, linen and candles, as well as a heavier load of railway irons, cement, lead and copper. There were items included that intended for display in the Melbourne International Exhibition in 1880. The voyage to Port Phillip was long but uneventful. At 3am on June 1, 1878, Captain Gibbs was expecting to see land and the passengers were becoming excited as they prepared to view their new homeland in the early morning. But LOCH ARD was running into a fog which greatly reduced visibility. Captain Gibbs was becoming anxious as there was no sign of land or the Cape Otway lighthouse. At 4am the fog lifted. A man aloft announced that he could see breakers. The sheer cliffs of Victoria's west coast came into view, and Captain Gibbs realised that the ship was much closer to them than expected. He ordered as much sail to be set as time would permit and then attempted to steer the vessel out to sea. On coming head on into the wind, the ship lost momentum, the sails fell limp and LOCH ARD's bow swung back. Gibbs then ordered the anchors to be released in an attempt to hold its position. The anchors sank some 50 fathoms - but did not hold. By this time LOCH ARD was among the breakers and the tall cliffs of Mutton Bird Island rose behind the ship. Just half a mile from the coast, the ship's bow was suddenly pulled around by the anchor. The captain tried to tack out to sea, but the ship struck a reef at the base of Mutton Bird Island, near Port Campbell. Waves broke over the ship and the top deck was loosened from the hull. The masts and rigging came crashing down knocking passengers and crew overboard. When a lifeboat was finally launched, it crashed into the side of LOCH ARD and capsized. Tom Pearce, who had launched the boat, managed to cling to its overturned hull and shelter beneath it. He drifted out to sea and then on the flood tide came into what is now known as LOCH ARD Gorge. He swam to shore, bruised and dazed, and found a cave in which to shelter. Some of the crew stayed below deck to shelter from the falling rigging but drowned when the ship slipped off the reef into deeper water. Eva Carmichael had raced onto deck to find out what was happening only to be confronted by towering cliffs looming above the stricken ship. In all the chaos, Captain Gibbs grabbed Eva and said, "If you are saved Eva, let my dear wife know that I died like a sailor". That was the last Eva Carmichael saw of the captain. She was swept off the ship by a huge wave. Eva saw Tom Pearce on a small rocky beach and yelled to attract his attention. He dived in and swam to the exhausted woman and dragged her to shore. He took her to the cave and broke open case of brandy which had washed up on the beach. He opened a bottle to revive the unconscious woman. A few hours later Tom scaled a cliff in search of help. He followed hoof prints and came by chance upon two men from nearby Glenample Station three and a half miles away. In a state of exhaustion, he told the men of the tragedy. Tom returned to the gorge while the two men rode back to the station to get help. By the time they reached LOCH ARD Gorge, it was cold and dark. The two shipwreck survivors were taken to Glenample Station to recover. Eva stayed at the station for six weeks before returning to Ireland, this time by steamship. In Melbourne, Tom Pearce received a hero's welcome. He was presented with the first gold medal of the Royal Humane Society of Victoria and a £1000 cheque from the Victorian Government. Concerts were performed to honour the young man's bravery and to raise money for those who lost family in the LOCH ARD disaster. Of the 54 crew members and passengers on board, only two survived: the apprentice, Tom Pearce and the young woman passenger, Eva Carmichael, who lost all of her family in the tragedy. Ten days after the LOCH ARD tragedy, salvage rights to the wreck were sold at auction for £2,120. Cargo valued at £3,000 was salvaged and placed on the beach, but most washed back into the sea when another storm developed. The wreck of LOCH ARD still lies at the base of Mutton Bird Island. Much of the cargo has now been salvaged and some was washed up into what is now known as LOCH ARD Gorge. Cargo and artefacts have also been illegally salvaged over many years before protective legislation was introduced. One of the most unlikely pieces of cargo to have survived the shipwreck was a Minton porcelain peacock - one of only seven in the world. The peacock was destined for the Melbourne International Exhibition in 1880. It had been well packed, which gave it adequate protection during the violent storm. Today, the Minton peacock can be seen at the Flagstaff Hill Maritime Museum in Warrnambool. From Australia's most dramatic shipwreck it has now become Australia's most valuable shipwreck artefact and is one of very few 'objects' on the Victorian State Heritage Register. The LOCH ARD shipwreck is of State significance – Victorian Heritage Register S 417. Flagstaff Hill’s collection of artefacts from LOCH ARD is significant for being one of the largest collections of artefacts from this shipwreck in Victoria. It is significant for its association with the shipwreck, which is on the Victorian Heritage Register (VHR S417). The collection is significant because of the relationship between the objects, as together they have a high potential to interpret the story of the LOCH ARD. The LOCH ARD collection is archaeologically significant as the remains of a large international passenger and cargo ship. The LOCH ARD collection is historically significant for representing aspects of Victoria’s shipping history and its potential to interpret sub-theme 1.5 of Victoria’s Framework of Historical Themes (living with natural processes). The collection is also historically significant for its association with the LOCH ARD, which was one of the worst and best known shipwrecks in Victoria’s history. Unrestored tea spoon from the wreck of the LOCH ARD. The spoon design has a flattened fiddle-back handle, with a thin stem or shank, flared collar, and elongated bowl. The spoons metallic composition is a thin layer of brass alloy which has partially corroded back to a nickel-silver base metal. Approximately 30% of original electroplating remain with traces of verdigris. Corroded but in fair condition. Five makers marks on lower rear of handle are obscured.flagstaff hill, warrnambool, shipwrecked coast, flagstaff hill maritime museum, maritime museum, shipwreck coast, flagstaff hill maritime village, great ocean road, loch line, loch ard, captain gibbs, eva carmichael, tom pearce, glenample station, mutton bird island, loch ard gorge, electroplated cutlery, loch ard shipwreck, nickel silver, william page & co, birmingham, brass plating, makers marks -
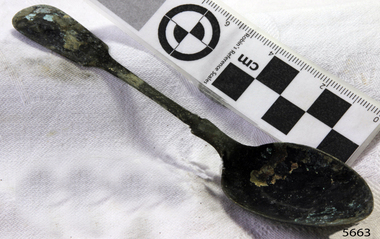 Flagstaff Hill Maritime Museum and Village
Spoon, circa 1878
This tea spoon is from the wreck of the LOCH ARD, a Loch Line ship of 1,693 tons which sailed from Gravesend, London, on 2 March 1878 with 17 passengers and a crew of 36 under Captain George Gibbs. “The intention was to discharge cargo in Melbourne, before returning to London via the Horn with wool and wheat”. Instead, on 1 June 1878, after 90 days at sea, she struck the sandstone cliffs of Mutton Bird Island on the south west coast of Victoria, and sank with the loss of 52 lives and all her cargo. The manifest of the LOCH ARD listed an array of manufactured goods and bulk metals being exported to the Colony of Victoria, with a declared value of £53,700. (202 bills of lading show an actual invoice value of £68, 456, with insurance underwriting to £30,000 of all cargo). Included in the manifest is the item of “Tin hardware & cutlery £7,530”. This teaspoon is one of 482 similar items of electro-plated cutlery from the LOCH ARD site, comprising spoons and forks of various sizes but all sharing the same general shape or design and metallic composition. 49 of these pieces display a legible makers’ mark — the initials “W” and “P” placed within a raised diamond outline, which is in turn contained within a sunken crown shape — identifying the manufacturer as William Page & Co of Birmingham. An electroplater’s makers’ marks, unlike sterling silver hallmarks, are not consistent identifiers of quality or date and place of manufacture. A similar line of five impressions was usually made to impress the consumer with an implication of industry standards, but what each one actually signified was not regulated and so they varied according to the whim of the individual foundry. In this case, the maker’s marks are often obscured by sedimentary accretion or removed by corrosion after a century of submersion in the ocean. However sufficient detail has survived to indicate that these samples of electro-plated cutlery probably originated from the same consignment in the LOCH ARD’s cargo. The following descriptions of maker’s marks are drawn from 255 tea spoons, 125 dessert spoons, and 99 table forks. These marks are clearly visible in 66 instances, while the same sequence of general outlines, or depression shapes, is discernible in another 166 examples. 1. A recessed Crown containing a raised Diamond outline and the initials “W” and “P” (the recognised trademark of William Page & Co) 2. An impressed Ellipse containing a raised, pivoted, Triangle in its lower part and bearing a Resurrection Cross on its upper section (a possible dissenting church symbol reflecting religious affiliation); OR a rounded Square impression containing a raised, ‘lazy’, letter “B” (possibly mimicking sterling silver hallmark signifying city of manufacture i.e. Birmingham) 3. An impressed rounded Square filled with a raised Maltese Cross (the base metal composite of nickel silver was also known as ‘German silver’ after its Berlin inventors in 1823) 4. A recessed Circle containing a Crab or Scarab Beetle image; OR a recessed Circle containing a rotated ‘fleur de lys’ or ‘fasces’ design 5. A depressed Diamond shape enclosing a large raised letter “R” and a small raised letter “D” (mimicking the U.K. Patent Office stamp which abbreviated the term ‘registered’ to “RD”, but also included date and class of patent) Suggested trade names for William Page & Co’s particular blend of brass plating are ‘roman silver’ or ‘silverite’. This copper alloy polishes to a lustrous gold when new, discolouring to a murky grey with greenish hue when neglected. HISTORY OF THE LOCH ARD The LOCH ARD belonged to the famous Loch Line which sailed many ships from England to Australia. Built in Glasgow by Barclay, Curdle and Co. in 1873, the LOCH ARD was a three-masted square rigged iron sailing ship. The ship measured 262ft 7" (79.87m) in length, 38ft (11.58m) in width, 23ft (7m) in depth and had a gross tonnage of 1693 tons. The LOCH ARD's main mast measured a massive 150ft (45.7m) in height. LOCH ARD made three trips to Australia and one trip to Calcutta before its final voyage. LOCH ARD left England on March 2, 1878, under the command of Captain Gibbs, a newly married, 29 year old. She was bound for Melbourne with a crew of 37, plus 17 passengers and a load of cargo. The general cargo reflected the affluence of Melbourne at the time. On board were straw hats, umbrella, perfumes, clay pipes, pianos, clocks, confectionary, linen and candles, as well as a heavier load of railway irons, cement, lead and copper. There were items included that intended for display in the Melbourne International Exhibition in 1880. The voyage to Port Phillip was long but uneventful. At 3am on June 1, 1878, Captain Gibbs was expecting to see land and the passengers were becoming excited as they prepared to view their new homeland in the early morning. But LOCH ARD was running into a fog which greatly reduced visibility. Captain Gibbs was becoming anxious as there was no sign of land or the Cape Otway lighthouse. At 4am the fog lifted. A man aloft announced that he could see breakers. The sheer cliffs of Victoria's west coast came into view, and Captain Gibbs realised that the ship was much closer to them than expected. He ordered as much sail to be set as time would permit and then attempted to steer the vessel out to sea. On coming head on into the wind, the ship lost momentum, the sails fell limp and LOCH ARD's bow swung back. Gibbs then ordered the anchors to be released in an attempt to hold its position. The anchors sank some 50 fathoms - but did not hold. By this time LOCH ARD was among the breakers and the tall cliffs of Mutton Bird Island rose behind the ship. Just half a mile from the coast, the ship's bow was suddenly pulled around by the anchor. The captain tried to tack out to sea, but the ship struck a reef at the base of Mutton Bird Island, near Port Campbell. Waves broke over the ship and the top deck was loosened from the hull. The masts and rigging came crashing down knocking passengers and crew overboard. When a lifeboat was finally launched, it crashed into the side of LOCH ARD and capsized. Tom Pearce, who had launched the boat, managed to cling to its overturned hull and shelter beneath it. He drifted out to sea and then on the flood tide came into what is now known as LOCH ARD Gorge. He swam to shore, bruised and dazed, and found a cave in which to shelter. Some of the crew stayed below deck to shelter from the falling rigging but drowned when the ship slipped off the reef into deeper water. Eva Carmichael had raced onto deck to find out what was happening only to be confronted by towering cliffs looming above the stricken ship. In all the chaos, Captain Gibbs grabbed Eva and said, "If you are saved Eva, let my dear wife know that I died like a sailor". That was the last Eva Carmichael saw of the captain. She was swept off the ship by a huge wave. Eva saw Tom Pearce on a small rocky beach and yelled to attract his attention. He dived in and swam to the exhausted woman and dragged her to shore. He took her to the cave and broke open case of brandy which had washed up on the beach. He opened a bottle to revive the unconscious woman. A few hours later Tom scaled a cliff in search of help. He followed hoof prints and came by chance upon two men from nearby Glenample Station three and a half miles away. In a state of exhaustion, he told the men of the tragedy. Tom returned to the gorge while the two men rode back to the station to get help. By the time they reached LOCH ARD Gorge, it was cold and dark. The two shipwreck survivors were taken to Glenample Station to recover. Eva stayed at the station for six weeks before returning to Ireland, this time by steamship. In Melbourne, Tom Pearce received a hero's welcome. He was presented with the first gold medal of the Royal Humane Society of Victoria and a £1000 cheque from the Victorian Government. Concerts were performed to honour the young man's bravery and to raise money for those who lost family in the LOCH ARD disaster. Of the 54 crew members and passengers on board, only two survived: the apprentice, Tom Pearce and the young woman passenger, Eva Carmichael, who lost all of her family in the tragedy. Ten days after the LOCH ARD tragedy, salvage rights to the wreck were sold at auction for £2,120. Cargo valued at £3,000 was salvaged and placed on the beach, but most washed back into the sea when another storm developed. The wreck of LOCH ARD still lies at the base of Mutton Bird Island. Much of the cargo has now been salvaged and some was washed up into what is now known as LOCH ARD Gorge. Cargo and artefacts have also been illegally salvaged over many years before protective legislation was introduced. One of the most unlikely pieces of cargo to have survived the shipwreck was a Minton porcelain peacock - one of only seven in the world. The peacock was destined for the Melbourne International Exhibition in 1880. It had been well packed, which gave it adequate protection during the violent storm. Today, the Minton peacock can be seen at the Flagstaff Hill Maritime Museum in Warrnambool. From Australia's most dramatic shipwreck it has now become Australia's most valuable shipwreck artefact and is one of very few 'objects' on the Victorian State Heritage Register. The LOCH ARD shipwreck is of State significance – Victorian Heritage Register S 417. Flagstaff Hill’s collection of artefacts from LOCH ARD is significant for being one of the largest collections of artefacts from this shipwreck in Victoria. It is significant for its association with the shipwreck, which is on the Victorian Heritage Register (VHR S417). The collection is significant because of the relationship between the objects, as together they have a high potential to interpret the story of the LOCH ARD. The LOCH ARD collection is archaeologically significant as the remains of a large international passenger and cargo ship. The LOCH ARD collection is historically significant for representing aspects of Victoria’s shipping history and its potential to interpret sub-theme 1.5 of Victoria’s Framework of Historical Themes (living with natural processes). The collection is also historically significant for its association with the LOCH ARD, which was one of the worst and best known shipwrecks in Victoria’s history. Unrestored tea spoon from the wreck of the LOCH ARD. The spoon design has a flattened fiddle-back handle, with a thin stem or shank, flared collar, and elongated bowl. The spoons metallic composition is a thin layer of brass alloy which has partially corroded back to a nickel-silver base metal. Traces of original electroplating remain with some verdigris. Corroded but in fair (stable) condition. Five makers marks on lower rear of handle are partially obscured.flagstaff hill, warrnambool, shipwrecked coast, flagstaff hill maritime museum, maritime museum, shipwreck coast, flagstaff hill maritime village, great ocean road, loch line, loch ard, captain gibbs, eva carmichael, tom pearce, glenample station, mutton bird island, loch ard gorge, electroplated cutlery, loch ard shipwreck, nickel silver, william page & co, birmingham, brass plating, makers marks -
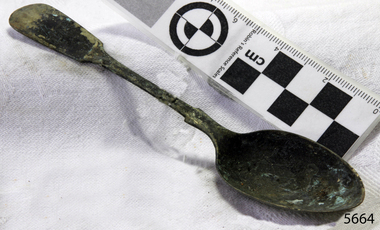 Flagstaff Hill Maritime Museum and Village
Spoon, circa 1878
This tea spoon is from the wreck of the LOCH ARD, a Loch Line ship of 1,693 tons which sailed from Gravesend, London, on 2 March 1878 with 17 passengers and a crew of 36 under Captain George Gibbs. “The intention was to discharge cargo in Melbourne, before returning to London via the Horn with wool and wheat”. Instead, on 1 June 1878, after 90 days at sea, she struck the sandstone cliffs of Mutton Bird Island on the south west coast of Victoria, and sank with the loss of 52 lives and all her cargo. The manifest of the LOCH ARD listed an array of manufactured goods and bulk metals being exported to the Colony of Victoria, with a declared value of £53,700. (202 bills of lading show an actual invoice value of £68, 456, with insurance underwriting to £30,000 of all cargo). Included in the manifest is the item of “Tin hardware & cutlery £7,530”. This teaspoon is one of 482 similar items of electro-plated cutlery from the LOCH ARD site, comprising spoons and forks of various sizes but all sharing the same general shape or design and metallic composition. 49 of these pieces display a legible makers’ mark — the initials “W” and “P” placed within a raised diamond outline, which is in turn contained within a sunken crown shape — identifying the manufacturer as William Page & Co of Birmingham. An electroplater’s makers’ marks, unlike sterling silver hallmarks, are not consistent identifiers of quality or date and place of manufacture. A similar line of five impressions was usually made to impress the consumer with an implication of industry standards, but what each one actually signified was not regulated and so they varied according to the whim of the individual foundry. In this case, the maker’s marks are often obscured by sedimentary accretion or removed by corrosion after a century of submersion in the ocean. However sufficient detail has survived to indicate that these samples of electro-plated cutlery probably originated from the same consignment in the LOCH ARD’s cargo. The following descriptions of maker’s marks are drawn from 255 tea spoons, 125 dessert spoons, and 99 table forks. These marks are clearly visible in 66 instances, while the same sequence of general outlines, or depression shapes, is discernible in another 166 examples. 1. A recessed Crown containing a raised Diamond outline and the initials “W” and “P” (the recognised trademark of William Page & Co) 2. An impressed Ellipse containing a raised, pivoted, Triangle in its lower part and bearing a Resurrection Cross on its upper section (a possible dissenting church symbol reflecting religious affiliation); OR a rounded Square impression containing a raised, ‘lazy’, letter “B” (possibly mimicking sterling silver hallmark signifying city of manufacture i.e. Birmingham) 3. An impressed rounded Square filled with a raised Maltese Cross (the base metal composite of nickel silver was also known as ‘German silver’ after its Berlin inventors in 1823) 4. A recessed Circle containing a Crab or Scarab Beetle image; OR a recessed Circle containing a rotated ‘fleur de lys’ or ‘fasces’ design 5. A depressed Diamond shape enclosing a large raised letter “R” and a small raised letter “D” (mimicking the U.K. Patent Office stamp which abbreviated the term ‘registered’ to “RD”, but also included date and class of patent) Suggested trade names for William Page & Co’s particular blend of brass plating are ‘roman silver’ or ‘silverite’. This copper alloy polishes to a lustrous gold when new, discolouring to a murky grey with greenish hue when neglected. HISTORY OF THE LOCH ARD The LOCH ARD belonged to the famous Loch Line which sailed many ships from England to Australia. Built in Glasgow by Barclay, Curdle and Co. in 1873, the LOCH ARD was a three-masted square rigged iron sailing ship. The ship measured 262ft 7" (79.87m) in length, 38ft (11.58m) in width, 23ft (7m) in depth and had a gross tonnage of 1693 tons. The LOCH ARD's main mast measured a massive 150ft (45.7m) in height. LOCH ARD made three trips to Australia and one trip to Calcutta before its final voyage. LOCH ARD left England on March 2, 1878, under the command of Captain Gibbs, a newly married, 29 year old. She was bound for Melbourne with a crew of 37, plus 17 passengers and a load of cargo. The general cargo reflected the affluence of Melbourne at the time. On board were straw hats, umbrella, perfumes, clay pipes, pianos, clocks, confectionary, linen and candles, as well as a heavier load of railway irons, cement, lead and copper. There were items included that intended for display in the Melbourne International Exhibition in 1880. The voyage to Port Phillip was long but uneventful. At 3am on June 1, 1878, Captain Gibbs was expecting to see land and the passengers were becoming excited as they prepared to view their new homeland in the early morning. But LOCH ARD was running into a fog which greatly reduced visibility. Captain Gibbs was becoming anxious as there was no sign of land or the Cape Otway lighthouse. At 4am the fog lifted. A man aloft announced that he could see breakers. The sheer cliffs of Victoria's west coast came into view, and Captain Gibbs realised that the ship was much closer to them than expected. He ordered as much sail to be set as time would permit and then attempted to steer the vessel out to sea. On coming head on into the wind, the ship lost momentum, the sails fell limp and LOCH ARD's bow swung back. Gibbs then ordered the anchors to be released in an attempt to hold its position. The anchors sank some 50 fathoms - but did not hold. By this time LOCH ARD was among the breakers and the tall cliffs of Mutton Bird Island rose behind the ship. Just half a mile from the coast, the ship's bow was suddenly pulled around by the anchor. The captain tried to tack out to sea, but the ship struck a reef at the base of Mutton Bird Island, near Port Campbell. Waves broke over the ship and the top deck was loosened from the hull. The masts and rigging came crashing down knocking passengers and crew overboard. When a lifeboat was finally launched, it crashed into the side of LOCH ARD and capsized. Tom Pearce, who had launched the boat, managed to cling to its overturned hull and shelter beneath it. He drifted out to sea and then on the flood tide came into what is now known as LOCH ARD Gorge. He swam to shore, bruised and dazed, and found a cave in which to shelter. Some of the crew stayed below deck to shelter from the falling rigging but drowned when the ship slipped off the reef into deeper water. Eva Carmichael had raced onto deck to find out what was happening only to be confronted by towering cliffs looming above the stricken ship. In all the chaos, Captain Gibbs grabbed Eva and said, "If you are saved Eva, let my dear wife know that I died like a sailor". That was the last Eva Carmichael saw of the captain. She was swept off the ship by a huge wave. Eva saw Tom Pearce on a small rocky beach and yelled to attract his attention. He dived in and swam to the exhausted woman and dragged her to shore. He took her to the cave and broke open case of brandy which had washed up on the beach. He opened a bottle to revive the unconscious woman. A few hours later Tom scaled a cliff in search of help. He followed hoof prints and came by chance upon two men from nearby Glenample Station three and a half miles away. In a state of exhaustion, he told the men of the tragedy. Tom returned to the gorge while the two men rode back to the station to get help. By the time they reached LOCH ARD Gorge, it was cold and dark. The two shipwreck survivors were taken to Glenample Station to recover. Eva stayed at the station for six weeks before returning to Ireland, this time by steamship. In Melbourne, Tom Pearce received a hero's welcome. He was presented with the first gold medal of the Royal Humane Society of Victoria and a £1000 cheque from the Victorian Government. Concerts were performed to honour the young man's bravery and to raise money for those who lost family in the LOCH ARD disaster. Of the 54 crew members and passengers on board, only two survived: the apprentice, Tom Pearce and the young woman passenger, Eva Carmichael, who lost all of her family in the tragedy. Ten days after the LOCH ARD tragedy, salvage rights to the wreck were sold at auction for £2,120. Cargo valued at £3,000 was salvaged and placed on the beach, but most washed back into the sea when another storm developed. The wreck of LOCH ARD still lies at the base of Mutton Bird Island. Much of the cargo has now been salvaged and some was washed up into what is now known as LOCH ARD Gorge. Cargo and artefacts have also been illegally salvaged over many years before protective legislation was introduced. One of the most unlikely pieces of cargo to have survived the shipwreck was a Minton porcelain peacock - one of only seven in the world. The peacock was destined for the Melbourne International Exhibition in 1880. It had been well packed, which gave it adequate protection during the violent storm. Today, the Minton peacock can be seen at the Flagstaff Hill Maritime Museum in Warrnambool. From Australia's most dramatic shipwreck it has now become Australia's most valuable shipwreck artefact and is one of very few 'objects' on the Victorian State Heritage Register. The LOCH ARD shipwreck is of State significance – Victorian Heritage Register S 417. Flagstaff Hill’s collection of artefacts from LOCH ARD is significant for being one of the largest collections of artefacts from this shipwreck in Victoria. It is significant for its association with the shipwreck, which is on the Victorian Heritage Register (VHR S417). The collection is significant because of the relationship between the objects, as together they have a high potential to interpret the story of the LOCH ARD. The LOCH ARD collection is archaeologically significant as the remains of a large international passenger and cargo ship. The LOCH ARD collection is historically significant for representing aspects of Victoria’s shipping history and its potential to interpret sub-theme 1.5 of Victoria’s Framework of Historical Themes (living with natural processes). The collection is also historically significant for its association with the LOCH ARD, which was one of the worst and best known shipwrecks in Victoria’s history. Unrestored tea spoon from the wreck of the LOCH ARD. The spoon design has a flattened fiddle-back handle, with a thin stem or shank, flared collar, and elongated bowl. The spoons metallic composition is a thin layer of brass alloy which has partially corroded back to a nickel-silver base metal. Traces of original electroplating remain with patches of verdigris. Five makers marks on lower rear of handle are indistinguishable. Fair condition.flagstaff hill, warrnambool, shipwrecked coast, flagstaff hill maritime museum, maritime museum, shipwreck coast, flagstaff hill maritime village, great ocean road, loch line, loch ard, captain gibbs, eva carmichael, tom pearce, glenample station, mutton bird island, loch ard gorge, electroplated cutlery, loch ard shipwreck, nickel silver, william page & co, birmingham, brass plating, makers marks -
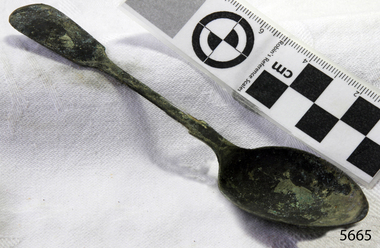 Flagstaff Hill Maritime Museum and Village
Spoon, circa 1878
This tea spoon is from the wreck of the LOCH ARD, a Loch Line ship of 1,693 tons which sailed from Gravesend, London, on 2 March 1878 with 17 passengers and a crew of 36 under Captain George Gibbs. “The intention was to discharge cargo in Melbourne, before returning to London via the Horn with wool and wheat”. Instead, on 1 June 1878, after 90 days at sea, she struck the sandstone cliffs of Mutton Bird Island on the south west coast of Victoria, and sank with the loss of 52 lives and all her cargo. The manifest of the LOCH ARD listed an array of manufactured goods and bulk metals being exported to the Colony of Victoria, with a declared value of £53,700. (202 bills of lading show an actual invoice value of £68, 456, with insurance underwriting to £30,000 of all cargo). Included in the manifest is the item of “Tin hardware & cutlery £7,530”. This teaspoon is one of 482 similar items of electro-plated cutlery from the LOCH ARD site, comprising spoons and forks of various sizes but all sharing the same general shape or design and metallic composition. 49 of these pieces display a legible makers’ mark — the initials “W” and “P” placed within a raised diamond outline, which is in turn contained within a sunken crown shape — identifying the manufacturer as William Page & Co of Birmingham. An electroplater’s makers’ marks, unlike sterling silver hallmarks, are not consistent identifiers of quality or date and place of manufacture. A similar line of five impressions was usually made to impress the consumer with an implication of industry standards, but what each one actually signified was not regulated and so they varied according to the whim of the individual foundry. In this case, the maker’s marks are often obscured by sedimentary accretion or removed by corrosion after a century of submersion in the ocean. However sufficient detail has survived to indicate that these samples of electro-plated cutlery probably originated from the same consignment in the LOCH ARD’s cargo. The following descriptions of maker’s marks are drawn from 255 tea spoons, 125 dessert spoons, and 99 table forks. These marks are clearly visible in 66 instances, while the same sequence of general outlines, or depression shapes, is discernible in another 166 examples. 1. A recessed Crown containing a raised Diamond outline and the initials “W” and “P” (the recognised trademark of William Page & Co) 2. An impressed Ellipse containing a raised, pivoted, Triangle in its lower part and bearing a Resurrection Cross on its upper section (a possible dissenting church symbol reflecting religious affiliation); OR a rounded Square impression containing a raised, ‘lazy’, letter “B” (possibly mimicking sterling silver hallmark signifying city of manufacture i.e. Birmingham) 3. An impressed rounded Square filled with a raised Maltese Cross (the base metal composite of nickel silver was also known as ‘German silver’ after its Berlin inventors in 1823) 4. A recessed Circle containing a Crab or Scarab Beetle image; OR a recessed Circle containing a rotated ‘fleur de lys’ or ‘fasces’ design 5. A depressed Diamond shape enclosing a large raised letter “R” and a small raised letter “D” (mimicking the U.K. Patent Office stamp which abbreviated the term ‘registered’ to “RD”, but also included date and class of patent) Suggested trade names for William Page & Co’s particular blend of brass plating are ‘roman silver’ or ‘silverite’. This copper alloy polishes to a lustrous gold when new, discolouring to a murky grey with greenish hue when neglected. HISTORY OF THE LOCH ARD The LOCH ARD belonged to the famous Loch Line which sailed many ships from England to Australia. Built in Glasgow by Barclay, Curdle and Co. in 1873, the LOCH ARD was a three-masted square rigged iron sailing ship. The ship measured 262ft 7" (79.87m) in length, 38ft (11.58m) in width, 23ft (7m) in depth and had a gross tonnage of 1693 tons. The LOCH ARD's main mast measured a massive 150ft (45.7m) in height. LOCH ARD made three trips to Australia and one trip to Calcutta before its final voyage. LOCH ARD left England on March 2, 1878, under the command of Captain Gibbs, a newly married, 29 year old. She was bound for Melbourne with a crew of 37, plus 17 passengers and a load of cargo. The general cargo reflected the affluence of Melbourne at the time. On board were straw hats, umbrella, perfumes, clay pipes, pianos, clocks, confectionary, linen and candles, as well as a heavier load of railway irons, cement, lead and copper. There were items included that intended for display in the Melbourne International Exhibition in 1880. The voyage to Port Phillip was long but uneventful. At 3am on June 1, 1878, Captain Gibbs was expecting to see land and the passengers were becoming excited as they prepared to view their new homeland in the early morning. But LOCH ARD was running into a fog which greatly reduced visibility. Captain Gibbs was becoming anxious as there was no sign of land or the Cape Otway lighthouse. At 4am the fog lifted. A man aloft announced that he could see breakers. The sheer cliffs of Victoria's west coast came into view, and Captain Gibbs realised that the ship was much closer to them than expected. He ordered as much sail to be set as time would permit and then attempted to steer the vessel out to sea. On coming head on into the wind, the ship lost momentum, the sails fell limp and LOCH ARD's bow swung back. Gibbs then ordered the anchors to be released in an attempt to hold its position. The anchors sank some 50 fathoms - but did not hold. By this time LOCH ARD was among the breakers and the tall cliffs of Mutton Bird Island rose behind the ship. Just half a mile from the coast, the ship's bow was suddenly pulled around by the anchor. The captain tried to tack out to sea, but the ship struck a reef at the base of Mutton Bird Island, near Port Campbell. Waves broke over the ship and the top deck was loosened from the hull. The masts and rigging came crashing down knocking passengers and crew overboard. When a lifeboat was finally launched, it crashed into the side of LOCH ARD and capsized. Tom Pearce, who had launched the boat, managed to cling to its overturned hull and shelter beneath it. He drifted out to sea and then on the flood tide came into what is now known as LOCH ARD Gorge. He swam to shore, bruised and dazed, and found a cave in which to shelter. Some of the crew stayed below deck to shelter from the falling rigging but drowned when the ship slipped off the reef into deeper water. Eva Carmichael had raced onto deck to find out what was happening only to be confronted by towering cliffs looming above the stricken ship. In all the chaos, Captain Gibbs grabbed Eva and said, "If you are saved Eva, let my dear wife know that I died like a sailor". That was the last Eva Carmichael saw of the captain. She was swept off the ship by a huge wave. Eva saw Tom Pearce on a small rocky beach and yelled to attract his attention. He dived in and swam to the exhausted woman and dragged her to shore. He took her to the cave and broke open case of brandy which had washed up on the beach. He opened a bottle to revive the unconscious woman. A few hours later Tom scaled a cliff in search of help. He followed hoof prints and came by chance upon two men from nearby Glenample Station three and a half miles away. In a state of exhaustion, he told the men of the tragedy. Tom returned to the gorge while the two men rode back to the station to get help. By the time they reached LOCH ARD Gorge, it was cold and dark. The two shipwreck survivors were taken to Glenample Station to recover. Eva stayed at the station for six weeks before returning to Ireland, this time by steamship. In Melbourne, Tom Pearce received a hero's welcome. He was presented with the first gold medal of the Royal Humane Society of Victoria and a £1000 cheque from the Victorian Government. Concerts were performed to honour the young man's bravery and to raise money for those who lost family in the LOCH ARD disaster. Of the 54 crew members and passengers on board, only two survived: the apprentice, Tom Pearce and the young woman passenger, Eva Carmichael, who lost all of her family in the tragedy. Ten days after the LOCH ARD tragedy, salvage rights to the wreck were sold at auction for £2,120. Cargo valued at £3,000 was salvaged and placed on the beach, but most washed back into the sea when another storm developed. The wreck of LOCH ARD still lies at the base of Mutton Bird Island. Much of the cargo has now been salvaged and some was washed up into what is now known as LOCH ARD Gorge. Cargo and artefacts have also been illegally salvaged over many years before protective legislation was introduced. One of the most unlikely pieces of cargo to have survived the shipwreck was a Minton porcelain peacock - one of only seven in the world. The peacock was destined for the Melbourne International Exhibition in 1880. It had been well packed, which gave it adequate protection during the violent storm. Today, the Minton peacock can be seen at the Flagstaff Hill Maritime Museum in Warrnambool. From Australia's most dramatic shipwreck it has now become Australia's most valuable shipwreck artefact and is one of very few 'objects' on the Victorian State Heritage Register The LOCH ARD shipwreck is of State significance – Victorian Heritage Register S 417. Flagstaff Hill’s collection of artefacts from LOCH ARD is significant for being one of the largest collections of artefacts from this shipwreck in Victoria. It is significant for its association with the shipwreck, which is on the Victorian Heritage Register (VHR S417). The collection is significant because of the relationship between the objects, as together they have a high potential to interpret the story of the LOCH ARD. The LOCH ARD collection is archaeologically significant as the remains of a large international passenger and cargo ship. The LOCH ARD collection is historically significant for representing aspects of Victoria’s shipping history and its potential to interpret sub-theme 1.5 of Victoria’s Framework of Historical Themes (living with natural processes). The collection is also historically significant for its association with the LOCH ARD, which was one of the worst and best known shipwrecks in Victoria’s history. Unrestored tea spoon from the wreck of the LOCH ARD. The spoon design has a flattened fiddle-back handle, with a thin stem or shank, flared collar, and elongated bowl. The spoons metallic composition is a thin layer of brass alloy which has partially corroded back to a nickel-silver base metal. Traces of original electroplating remain with some verdigris. Corroded but in fair (stable) condition. Makers marks on lower rear of handle are indistinguishable.flagstaff hill, warrnambool, shipwrecked coast, flagstaff hill maritime museum, maritime museum, shipwreck coast, flagstaff hill maritime village, great ocean road, loch line, loch ard, captain gibbs, eva carmichael, tom pearce, glenample station, mutton bird island, loch ard gorge, electroplated cutlery, loch ard shipwreck, nickel silver, william page & co, birmingham, brass plating, makers marks -
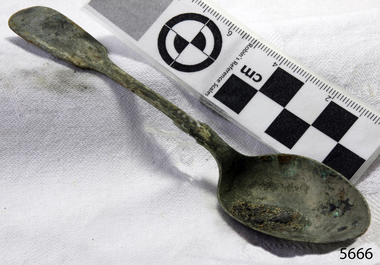 Flagstaff Hill Maritime Museum and Village
Spoon, circa 1878
This tea spoon is from the wreck of the LOCH ARD, a Loch Line ship of 1,693 tons which sailed from Gravesend, London, on 2 March 1878 with 17 passengers and a crew of 36 under Captain George Gibbs. “The intention was to discharge cargo in Melbourne, before returning to London via the Horn with wool and wheat”. Instead, on 1 June 1878, after 90 days at sea, she struck the sandstone cliffs of Mutton Bird Island on the south west coast of Victoria, and sank with the loss of 52 lives and all her cargo. The manifest of the LOCH ARD listed an array of manufactured goods and bulk metals being exported to the Colony of Victoria, with a declared value of £53,700. (202 bills of lading show an actual invoice value of £68, 456, with insurance underwriting to £30,000 of all cargo). Included in the manifest is the item of “Tin hardware & cutlery £7,530”. This teaspoon is one of 482 similar items of electro-plated cutlery from the LOCH ARD site, comprising spoons and forks of various sizes but all sharing the same general shape or design and metallic composition. 49 of these pieces display a legible makers’ mark — the initials “W” and “P” placed within a raised diamond outline, which is in turn contained within a sunken crown shape — identifying the manufacturer as William Page & Co of Birmingham. An electroplater’s makers’ marks, unlike sterling silver hallmarks, are not consistent identifiers of quality or date and place of manufacture. A similar line of five impressions was usually made to impress the consumer with an implication of industry standards, but what each one actually signified was not regulated and so they varied according to the whim of the individual foundry. In this case, the maker’s marks are often obscured by sedimentary accretion or removed by corrosion after a century of submersion in the ocean. However sufficient detail has survived to indicate that these samples of electro-plated cutlery probably originated from the same consignment in the LOCH ARD’s cargo. The following descriptions of maker’s marks are drawn from 255 tea spoons, 125 dessert spoons, and 99 table forks. These marks are clearly visible in 66 instances, while the same sequence of general outlines, or depression shapes, is discernible in another 166 examples. 1. A recessed Crown containing a raised Diamond outline and the initials “W” and “P” (the recognised trademark of William Page & Co) 2. An impressed Ellipse containing a raised, pivoted, Triangle in its lower part and bearing a Resurrection Cross on its upper section (a possible dissenting church symbol reflecting religious affiliation); OR a rounded Square impression containing a raised, ‘lazy’, letter “B” (possibly mimicking sterling silver hallmark signifying city of manufacture i.e. Birmingham) 3. An impressed rounded Square filled with a raised Maltese Cross (the base metal composite of nickel silver was also known as ‘German silver’ after its Berlin inventors in 1823) 4. A recessed Circle containing a Crab or Scarab Beetle image; OR a recessed Circle containing a rotated ‘fleur de lys’ or ‘fasces’ design 5. A depressed Diamond shape enclosing a large raised letter “R” and a small raised letter “D” (mimicking the U.K. Patent Office stamp which abbreviated the term ‘registered’ to “RD”, but also included date and class of patent) Suggested trade names for William Page & Co’s particular blend of brass plating are ‘roman silver’ or ‘silverite’. This copper alloy polishes to a lustrous gold when new, discolouring to a murky grey with greenish hue when neglected. HISTORY OF THE LOCH ARD The LOCH ARD belonged to the famous Loch Line which sailed many ships from England to Australia. Built in Glasgow by Barclay, Curdle and Co. in 1873, the LOCH ARD was a three-masted square rigged iron sailing ship. The ship measured 262ft 7" (79.87m) in length, 38ft (11.58m) in width, 23ft (7m) in depth and had a gross tonnage of 1693 tons. The LOCH ARD's main mast measured a massive 150ft (45.7m) in height. LOCH ARD made three trips to Australia and one trip to Calcutta before its final voyage. LOCH ARD left England on March 2, 1878, under the command of Captain Gibbs, a newly married, 29 year old. She was bound for Melbourne with a crew of 37, plus 17 passengers and a load of cargo. The general cargo reflected the affluence of Melbourne at the time. On board were straw hats, umbrella, perfumes, clay pipes, pianos, clocks, confectionary, linen and candles, as well as a heavier load of railway irons, cement, lead and copper. There were items included that intended for display in the Melbourne International Exhibition in 1880. The voyage to Port Phillip was long but uneventful. At 3am on June 1, 1878, Captain Gibbs was expecting to see land and the passengers were becoming excited as they prepared to view their new homeland in the early morning. But LOCH ARD was running into a fog which greatly reduced visibility. Captain Gibbs was becoming anxious as there was no sign of land or the Cape Otway lighthouse. At 4am the fog lifted. A man aloft announced that he could see breakers. The sheer cliffs of Victoria's west coast came into view, and Captain Gibbs realised that the ship was much closer to them than expected. He ordered as much sail to be set as time would permit and then attempted to steer the vessel out to sea. On coming head on into the wind, the ship lost momentum, the sails fell limp and LOCH ARD's bow swung back. Gibbs then ordered the anchors to be released in an attempt to hold its position. The anchors sank some 50 fathoms - but did not hold. By this time LOCH ARD was among the breakers and the tall cliffs of Mutton Bird Island rose behind the ship. Just half a mile from the coast, the ship's bow was suddenly pulled around by the anchor. The captain tried to tack out to sea, but the ship struck a reef at the base of Mutton Bird Island, near Port Campbell. Waves broke over the ship and the top deck was loosened from the hull. The masts and rigging came crashing down knocking passengers and crew overboard. When a lifeboat was finally launched, it crashed into the side of LOCH ARD and capsized. Tom Pearce, who had launched the boat, managed to cling to its overturned hull and shelter beneath it. He drifted out to sea and then on the flood tide came into what is now known as LOCH ARD Gorge. He swam to shore, bruised and dazed, and found a cave in which to shelter. Some of the crew stayed below deck to shelter from the falling rigging but drowned when the ship slipped off the reef into deeper water. Eva Carmichael had raced onto deck to find out what was happening only to be confronted by towering cliffs looming above the stricken ship. In all the chaos, Captain Gibbs grabbed Eva and said, "If you are saved Eva, let my dear wife know that I died like a sailor". That was the last Eva Carmichael saw of the captain. She was swept off the ship by a huge wave. Eva saw Tom Pearce on a small rocky beach and yelled to attract his attention. He dived in and swam to the exhausted woman and dragged her to shore. He took her to the cave and broke open case of brandy which had washed up on the beach. He opened a bottle to revive the unconscious woman. A few hours later Tom scaled a cliff in search of help. He followed hoof prints and came by chance upon two men from nearby Glenample Station three and a half miles away. In a state of exhaustion, he told the men of the tragedy. Tom returned to the gorge while the two men rode back to the station to get help. By the time they reached LOCH ARD Gorge, it was cold and dark. The two shipwreck survivors were taken to Glenample Station to recover. Eva stayed at the station for six weeks before returning to Ireland, this time by steamship. In Melbourne, Tom Pearce received a hero's welcome. He was presented with the first gold medal of the Royal Humane Society of Victoria and a £1000 cheque from the Victorian Government. Concerts were performed to honour the young man's bravery and to raise money for those who lost family in the LOCH ARD disaster. Of the 54 crew members and passengers on board, only two survived: the apprentice, Tom Pearce and the young woman passenger, Eva Carmichael, who lost all of her family in the tragedy. Ten days after the LOCH ARD tragedy, salvage rights to the wreck were sold at auction for £2,120. Cargo valued at £3,000 was salvaged and placed on the beach, but most washed back into the sea when another storm developed. The wreck of LOCH ARD still lies at the base of Mutton Bird Island. Much of the cargo has now been salvaged and some was washed up into what is now known as LOCH ARD Gorge. Cargo and artefacts have also been illegally salvaged over many years before protective legislation was introduced. One of the most unlikely pieces of cargo to have survived the shipwreck was a Minton porcelain peacock - one of only seven in the world. The peacock was destined for the Melbourne International Exhibition in 1880. It had been well packed, which gave it adequate protection during the violent storm. Today, the Minton peacock can be seen at the Flagstaff Hill Maritime Museum in Warrnambool. From Australia's most dramatic shipwreck it has now become Australia's most valuable shipwreck artefact and is one of very few 'objects' on the Victorian State Heritage Register. The LOCH ARD shipwreck is of State significance – Victorian Heritage Register S 417. Flagstaff Hill’s collection of artefacts from LOCH ARD is significant for being one of the largest collections of artefacts from this shipwreck in Victoria. It is significant for its association with the shipwreck, which is on the Victorian Heritage Register (VHR S417). The collection is significant because of the relationship between the objects, as together they have a high potential to interpret the story of the LOCH ARD. The LOCH ARD collection is archaeologically significant as the remains of a large international passenger and cargo ship. The LOCH ARD collection is historically significant for representing aspects of Victoria’s shipping history and its potential to interpret sub-theme 1.5 of Victoria’s Framework of Historical Themes (living with natural processes). The collection is also historically significant for its association with the LOCH ARD, which was one of the worst and best known shipwrecks in Victoria’s history. Unrestored tea spoon from the wreck of the LOCH ARD. The spoon design has a flattened fiddle-back handle, with a thin stem or shank, flared collar, and elongated bowl. The spoons metallic composition is a thin layer of brass alloy which has partially corroded back to a nickel-silver base metal. Good proportion of original electroplating remains with some verdigris. Five makers marks are partly distinguishable. flagstaff hill, warrnambool, shipwrecked coast, flagstaff hill maritime museum, maritime museum, shipwreck coast, flagstaff hill maritime village, great ocean road, loch line, loch ard, captain gibbs, eva carmichael, tom pearce, glenample station, mutton bird island, loch ard gorge, electroplated cutlery, loch ard shipwreck, nickel silver, william page & co, birmingham, brass plating, makers marks -
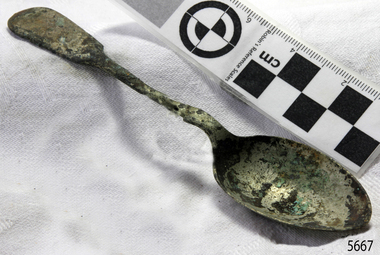 Flagstaff Hill Maritime Museum and Village
Domestic object - Spoon, c.1878
This tea spoon is from the wreck of the LOCH ARD, a Loch Line ship of 1,693 tons which sailed from Gravesend, London, on 2 March 1878 with 17 passengers and a crew of 36 under Captain George Gibbs. “The intention was to discharge cargo in Melbourne, before returning to London via the Horn with wool and wheat”. Instead, on 1 June 1878, after 90 days at sea, she struck the sandstone cliffs of Mutton Bird Island on the south west coast of Victoria, and sank with the loss of 52 lives and all her cargo. The manifest of the LOCH ARD listed an array of manufactured goods and bulk metals being exported to the Colony of Victoria, with a declared value of £53,700. (202 bills of lading show an actual invoice value of £68, 456, with insurance underwriting to £30,000 of all cargo). Included in the manifest is the item of “Tin hardware & cutlery £7,530”. This teaspoon is one of 482 similar items of electro-plated cutlery from the LOCH ARD site, comprising spoons and forks of various sizes but all sharing the same general shape or design and metallic composition. 49 of these pieces display a legible makers’ mark — the initials “W” and “P” placed within a raised diamond outline, which is in turn contained within a sunken crown shape — identifying the manufacturer as William Page & Co of Birmingham. An electroplater’s makers’ marks, unlike sterling silver hallmarks, are not consistent identifiers of quality or date and place of manufacture. A similar line of five impressions was usually made to impress the consumer with an implication of industry standards, but what each one actually signified was not regulated and so they varied according to the whim of the individual foundry. In this case, the maker’s marks are often obscured by sedimentary accretion or removed by corrosion after a century of submersion in the ocean. However sufficient detail has survived to indicate that these samples of electro-plated cutlery probably originated from the same consignment in the LOCH ARD’s cargo. The following descriptions of maker’s marks are drawn from 255 tea spoons, 125 dessert spoons, and 99 table forks. These marks are clearly visible in 66 instances, while the same sequence of general outlines, or depression shapes, is discernible in another 166 examples. 1. A recessed Crown containing a raised Diamond outline and the initials “W” and “P” (the recognised trademark of William Page & Co) 2. An impressed Ellipse containing a raised, pivoted, Triangle in its lower part and bearing a Resurrection Cross on its upper section (a possible dissenting church symbol reflecting religious affiliation); OR a rounded Square impression containing a raised, ‘lazy’, letter “B” (possibly mimicking sterling silver hallmark signifying city of manufacture i.e. Birmingham) 3. An impressed rounded Square filled with a raised Maltese Cross (the base metal composite of nickel silver was also known as ‘German silver’ after its Berlin inventors in 1823) 4. A recessed Circle containing a Crab or Scarab Beetle image; OR a recessed Circle containing a rotated ‘fleur de lys’ or ‘fasces’ design 5. A depressed Diamond shape enclosing a large raised letter “R” and a small raised letter “D” (mimicking the U.K. Patent Office stamp which abbreviated the term ‘registered’ to “RD”, but also included date and class of patent) Suggested trade names for William Page & Co’s particular blend of brass plating are ‘roman silver’ or ‘silverite’. This copper alloy polishes to a lustrous gold when new, discolouring to a murky grey with greenish hue when neglected. HISTORY OF THE LOCH ARD The LOCH ARD belonged to the famous Loch Line which sailed many ships from England to Australia. Built in Glasgow by Barclay, Curdle and Co. in 1873, the LOCH ARD was a three-masted square rigged iron sailing ship. The ship measured 262ft 7" (79.87m) in length, 38ft (11.58m) in width, 23ft (7m) in depth and had a gross tonnage of 1693 tons. The LOCH ARD's main mast measured a massive 150ft (45.7m) in height. LOCH ARD made three trips to Australia and one trip to Calcutta before its final voyage. LOCH ARD left England on March 2, 1878, under the command of Captain Gibbs, a newly married, 29 year old. She was bound for Melbourne with a crew of 37, plus 17 passengers and a load of cargo. The general cargo reflected the affluence of Melbourne at the time. On board were straw hats, umbrella, perfumes, clay pipes, pianos, clocks, confectionary, linen and candles, as well as a heavier load of railway irons, cement, lead and copper. There were items included that intended for display in the Melbourne International Exhibition in 1880. The voyage to Port Phillip was long but uneventful. At 3am on June 1, 1878, Captain Gibbs was expecting to see land and the passengers were becoming excited as they prepared to view their new homeland in the early morning. But LOCH ARD was running into a fog which greatly reduced visibility. Captain Gibbs was becoming anxious as there was no sign of land or the Cape Otway lighthouse. At 4am the fog lifted. A man aloft announced that he could see breakers. The sheer cliffs of Victoria's west coast came into view, and Captain Gibbs realised that the ship was much closer to them than expected. He ordered as much sail to be set as time would permit and then attempted to steer the vessel out to sea. On coming head on into the wind, the ship lost momentum, the sails fell limp and LOCH ARD's bow swung back. Gibbs then ordered the anchors to be released in an attempt to hold its position. The anchors sank some 50 fathoms - but did not hold. By this time LOCH ARD was among the breakers and the tall cliffs of Mutton Bird Island rose behind the ship. Just half a mile from the coast, the ship's bow was suddenly pulled around by the anchor. The captain tried to tack out to sea, but the ship struck a reef at the base of Mutton Bird Island, near Port Campbell. Waves broke over the ship and the top deck was loosened from the hull. The masts and rigging came crashing down knocking passengers and crew overboard. When a lifeboat was finally launched, it crashed into the side of LOCH ARD and capsized. Tom Pearce, who had launched the boat, managed to cling to its overturned hull and shelter beneath it. He drifted out to sea and then on the flood tide came into what is now known as LOCH ARD Gorge. He swam to shore, bruised and dazed, and found a cave in which to shelter. Some of the crew stayed below deck to shelter from the falling rigging but drowned when the ship slipped off the reef into deeper water. Eva Carmichael had raced onto deck to find out what was happening only to be confronted by towering cliffs looming above the stricken ship. In all the chaos, Captain Gibbs grabbed Eva and said, "If you are saved Eva, let my dear wife know that I died like a sailor". That was the last Eva Carmichael saw of the captain. She was swept off the ship by a huge wave. Eva saw Tom Pearce on a small rocky beach and yelled to attract his attention. He dived in and swam to the exhausted woman and dragged her to shore. He took her to the cave and broke open case of brandy which had washed up on the beach. He opened a bottle to revive the unconscious woman. A few hours later Tom scaled a cliff in search of help. He followed hoof prints and came by chance upon two men from nearby Glenample Station three and a half miles away. In a state of exhaustion, he told the men of the tragedy. Tom returned to the gorge while the two men rode back to the station to get help. By the time they reached LOCH ARD Gorge, it was cold and dark. The two shipwreck survivors were taken to Glenample Station to recover. Eva stayed at the station for six weeks before returning to Ireland, this time by steamship. In Melbourne, Tom Pearce received a hero's welcome. He was presented with the first gold medal of the Royal Humane Society of Victoria and a £1000 cheque from the Victorian Government. Concerts were performed to honour the young man's bravery and to raise money for those who lost family in the LOCH ARD disaster. Of the 54 crew members and passengers on board, only two survived: the apprentice, Tom Pearce and the young woman passenger, Eva Carmichael, who lost all of her family in the tragedy. Ten days after the LOCH ARD tragedy, salvage rights to the wreck were sold at auction for £2,120. Cargo valued at £3,000 was salvaged and placed on the beach, but most washed back into the sea when another storm developed. The wreck of LOCH ARD still lies at the base of Mutton Bird Island. Much of the cargo has now been salvaged and some was washed up into what is now known as LOCH ARD Gorge. Cargo and artefacts have also been illegally salvaged over many years before protective legislation was introduced. One of the most unlikely pieces of cargo to have survived the shipwreck was a Minton porcelain peacock - one of only seven in the world. The peacock was destined for the Melbourne International Exhibition in 1880. It had been well packed, which gave it adequate protection during the violent storm. Today, the Minton peacock can be seen at the Flagstaff Hill Maritime Museum in Warrnambool. From Australia's most dramatic shipwreck it has now become Australia's most valuable shipwreck artefact and is one of very few 'objects' on the Victorian State Heritage Register. The LOCH ARD shipwreck is of State significance – Victorian Heritage Register S 417. Flagstaff Hill’s collection of artefacts from LOCH ARD is significant for being one of the largest collections of artefacts from this shipwreck in Victoria. It is significant for its association with the shipwreck, which is on the Victorian Heritage Register (VHR S417). The collection is significant because of the relationship between the objects, as together they have a high potential to interpret the story of the LOCH ARD. The LOCH ARD collection is archaeologically significant as the remains of a large international passenger and cargo ship. The LOCH ARD collection is historically significant for representing aspects of Victoria’s shipping history and its potential to interpret sub-theme 1.5 of Victoria’s Framework of Historical Themes (living with natural processes). The collection is also historically significant for its association with the LOCH ARD, which was one of the worst and best known shipwrecks in Victoria’s history. Unrestored tea spoon from the wreck of the LOCH ARD. The spoon design has a flattened fiddle-back handle, with a thin stem or shank, flared collar, and elongated bowl. The spoons metallic composition is a thin layer of brass alloy which has partially corroded back to a nickel-silver base metal. Good proportion of original electroplating remains with some verdigris. Makers marks are obscured.flagstaff hill, warrnambool, shipwrecked coast, flagstaff hill maritime museum, maritime museum, shipwreck coast, flagstaff hill maritime village, great ocean road, loch line, loch ard, captain gibbs, eva carmichael, tom pearce, glenample station, mutton bird island, loch ard gorge, electroplated cutlery, loch ard shipwreck, nickel silver, william page & co, birmingham, brass plating, makers marks -
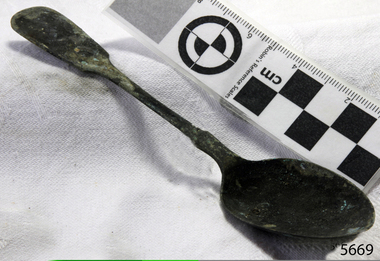 Flagstaff Hill Maritime Museum and Village
Spoon, circa 1878
This tea spoon is from the wreck of the LOCH ARD, a Loch Line ship of 1,693 tons which sailed from Gravesend, London, on 2 March 1878 with 17 passengers and a crew of 36 under Captain George Gibbs. “The intention was to discharge cargo in Melbourne, before returning to London via the Horn with wool and wheat”. Instead, on 1 June 1878, after 90 days at sea, she struck the sandstone cliffs of Mutton Bird Island on the south west coast of Victoria, and sank with the loss of 52 lives and all her cargo. The manifest of the LOCH ARD listed an array of manufactured goods and bulk metals being exported to the Colony of Victoria, with a declared value of £53,700. (202 bills of lading show an actual invoice value of £68, 456, with insurance underwriting to £30,000 of all cargo). Included in the manifest is the item of “Tin hardware & cutlery £7,530”. This teaspoon is one of 482 similar items of electro-plated cutlery from the LOCH ARD site, comprising spoons and forks of various sizes but all sharing the same general shape or design and metallic composition. 49 of these pieces display a legible makers’ mark — the initials “W” and “P” placed within a raised diamond outline, which is in turn contained within a sunken crown shape — identifying the manufacturer as William Page & Co of Birmingham. An electroplater’s makers’ marks, unlike sterling silver hallmarks, are not consistent identifiers of quality or date and place of manufacture. A similar line of five impressions was usually made to impress the consumer with an implication of industry standards, but what each one actually signified was not regulated and so they varied according to the whim of the individual foundry. In this case, the maker’s marks are often obscured by sedimentary accretion or removed by corrosion after a century of submersion in the ocean. However sufficient detail has survived to indicate that these samples of electro-plated cutlery probably originated from the same consignment in the LOCH ARD’s cargo. The following descriptions of maker’s marks are drawn from 255 tea spoons, 125 dessert spoons, and 99 table forks. These marks are clearly visible in 66 instances, while the same sequence of general outlines, or depression shapes, is discernible in another 166 examples. 1. A recessed Crown containing a raised Diamond outline and the initials “W” and “P” (the recognised trademark of William Page & Co) 2. An impressed Ellipse containing a raised, pivoted, Triangle in its lower part and bearing a Resurrection Cross on its upper section (a possible dissenting church symbol reflecting religious affiliation); OR a rounded Square impression containing a raised, ‘lazy’, letter “B” (possibly mimicking sterling silver hallmark signifying city of manufacture i.e. Birmingham) 3. An impressed rounded Square filled with a raised Maltese Cross (the base metal composite of nickel silver was also known as ‘German silver’ after its Berlin inventors in 1823) 4. A recessed Circle containing a Crab or Scarab Beetle image; OR a recessed Circle containing a rotated ‘fleur de lys’ or ‘fasces’ design 5. A depressed Diamond shape enclosing a large raised letter “R” and a small raised letter “D” (mimicking the U.K. Patent Office stamp which abbreviated the term ‘registered’ to “RD”, but also included date and class of patent) Suggested trade names for William Page & Co’s particular blend of brass plating are ‘roman silver’ or ‘silverite’. This copper alloy polishes to a lustrous gold when new, discolouring to a murky grey with greenish hue when neglected. HISTORY OF THE LOCH ARD The LOCH ARD belonged to the famous Loch Line which sailed many ships from England to Australia. Built in Glasgow by Barclay, Curdle and Co. in 1873, the LOCH ARD was a three-masted square rigged iron sailing ship. The ship measured 262ft 7" (79.87m) in length, 38ft (11.58m) in width, 23ft (7m) in depth and had a gross tonnage of 1693 tons. The LOCH ARD's main mast measured a massive 150ft (45.7m) in height. LOCH ARD made three trips to Australia and one trip to Calcutta before its final voyage. LOCH ARD left England on March 2, 1878, under the command of Captain Gibbs, a newly married, 29 year old. She was bound for Melbourne with a crew of 37, plus 17 passengers and a load of cargo. The general cargo reflected the affluence of Melbourne at the time. On board were straw hats, umbrella, perfumes, clay pipes, pianos, clocks, confectionary, linen and candles, as well as a heavier load of railway irons, cement, lead and copper. There were items included that intended for display in the Melbourne International Exhibition in 1880. The voyage to Port Phillip was long but uneventful. At 3am on June 1, 1878, Captain Gibbs was expecting to see land and the passengers were becoming excited as they prepared to view their new homeland in the early morning. But LOCH ARD was running into a fog which greatly reduced visibility. Captain Gibbs was becoming anxious as there was no sign of land or the Cape Otway lighthouse. At 4am the fog lifted. A man aloft announced that he could see breakers. The sheer cliffs of Victoria's west coast came into view, and Captain Gibbs realised that the ship was much closer to them than expected. He ordered as much sail to be set as time would permit and then attempted to steer the vessel out to sea. On coming head on into the wind, the ship lost momentum, the sails fell limp and LOCH ARD's bow swung back. Gibbs then ordered the anchors to be released in an attempt to hold its position. The anchors sank some 50 fathoms - but did not hold. By this time LOCH ARD was among the breakers and the tall cliffs of Mutton Bird Island rose behind the ship. Just half a mile from the coast, the ship's bow was suddenly pulled around by the anchor. The captain tried to tack out to sea, but the ship struck a reef at the base of Mutton Bird Island, near Port Campbell. Waves broke over the ship and the top deck was loosened from the hull. The masts and rigging came crashing down knocking passengers and crew overboard. When a lifeboat was finally launched, it crashed into the side of LOCH ARD and capsized. Tom Pearce, who had launched the boat, managed to cling to its overturned hull and shelter beneath it. He drifted out to sea and then on the flood tide came into what is now known as LOCH ARD Gorge. He swam to shore, bruised and dazed, and found a cave in which to shelter. Some of the crew stayed below deck to shelter from the falling rigging but drowned when the ship slipped off the reef into deeper water. Eva Carmichael had raced onto deck to find out what was happening only to be confronted by towering cliffs looming above the stricken ship. In all the chaos, Captain Gibbs grabbed Eva and said, "If you are saved Eva, let my dear wife know that I died like a sailor". That was the last Eva Carmichael saw of the captain. She was swept off the ship by a huge wave. Eva saw Tom Pearce on a small rocky beach and yelled to attract his attention. He dived in and swam to the exhausted woman and dragged her to shore. He took her to the cave and broke open case of brandy which had washed up on the beach. He opened a bottle to revive the unconscious woman. A few hours later Tom scaled a cliff in search of help. He followed hoof prints and came by chance upon two men from nearby Glenample Station three and a half miles away. In a state of exhaustion, he told the men of the tragedy. Tom returned to the gorge while the two men rode back to the station to get help. By the time they reached LOCH ARD Gorge, it was cold and dark. The two shipwreck survivors were taken to Glenample Station to recover. Eva stayed at the station for six weeks before returning to Ireland, this time by steamship. In Melbourne, Tom Pearce received a hero's welcome. He was presented with the first gold medal of the Royal Humane Society of Victoria and a £1000 cheque from the Victorian Government. Concerts were performed to honour the young man's bravery and to raise money for those who lost family in the LOCH ARD disaster. Of the 54 crew members and passengers on board, only two survived: the apprentice, Tom Pearce and the young woman passenger, Eva Carmichael, who lost all of her family in the tragedy. Ten days after the LOCH ARD tragedy, salvage rights to the wreck were sold at auction for £2,120. Cargo valued at £3,000 was salvaged and placed on the beach, but most washed back into the sea when another storm developed. The wreck of LOCH ARD still lies at the base of Mutton Bird Island. Much of the cargo has now been salvaged and some was washed up into what is now known as LOCH ARD Gorge. Cargo and artefacts have also been illegally salvaged over many years before protective legislation was introduced. One of the most unlikely pieces of cargo to have survived the shipwreck was a Minton porcelain peacock - one of only seven in the world. The peacock was destined for the Melbourne International Exhibition in 1880. It had been well packed, which gave it adequate protection during the violent storm. Today, the Minton peacock can be seen at the Flagstaff Hill Maritime Museum in Warrnambool. From Australia's most dramatic shipwreck it has now become Australia's most valuable shipwreck artefact and is one of very few 'objects' on the Victorian State Heritage Register. The LOCH ARD shipwreck is of State significance – Victorian Heritage Register S 417. Flagstaff Hill’s collection of artefacts from LOCH ARD is significant for being one of the largest collections of artefacts from this shipwreck in Victoria. It is significant for its association with the shipwreck, which is on the Victorian Heritage Register (VHR S417). The collection is significant because of the relationship between the objects, as together they have a high potential to interpret the story of the LOCH ARD. The LOCH ARD collection is archaeologically significant as the remains of a large international passenger and cargo ship. The LOCH ARD collection is historically significant for representing aspects of Victoria’s shipping history and its potential to interpret sub-theme 1.5 of Victoria’s Framework of Historical Themes (living with natural processes). The collection is also historically significant for its association with the LOCH ARD, which was one of the worst and best known shipwrecks in Victoria’s history. Unrestored tea spoon from the wreck of the LOCH ARD. The spoon design has a flattened fiddle-back handle, with a thin stem or shank, flared collar, and elongated bowl. The spoons metallic composition is a thin layer of brass alloy which has partially corroded back to a nickel-silver base metal. Traces of original electroplating remain. Makers marks on rear of handle are obscured.flagstaff hill, warrnambool, shipwrecked coast, flagstaff hill maritime museum, maritime museum, shipwreck coast, flagstaff hill maritime village, great ocean road, loch line, loch ard, captain gibbs, eva carmichael, tom pearce, glenample station, mutton bird island, loch ard gorge, electroplated cutlery, loch ard shipwreck, nickel silver, william page & co, birmingham, brass plating, makers marks -
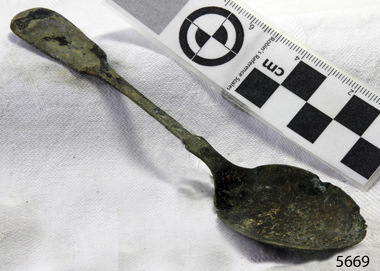 Flagstaff Hill Maritime Museum and Village
Spoon, circa 1878
This tea spoon is from the wreck of the LOCH ARD, a Loch Line ship of 1,693 tons which sailed from Gravesend, London, on 2 March 1878 with 17 passengers and a crew of 36 under Captain George Gibbs. “The intention was to discharge cargo in Melbourne, before returning to London via the Horn with wool and wheat”. Instead, on 1 June 1878, after 90 days at sea, she struck the sandstone cliffs of Mutton Bird Island on the south west coast of Victoria, and sank with the loss of 52 lives and all her cargo. The manifest of the LOCH ARD listed an array of manufactured goods and bulk metals being exported to the Colony of Victoria, with a declared value of £53,700. (202 bills of lading show an actual invoice value of £68, 456, with insurance underwriting to £30,000 of all cargo). Included in the manifest is the item of “Tin hardware & cutlery £7,530”. This teaspoon is one of 482 similar items of electro-plated cutlery from the LOCH ARD site, comprising spoons and forks of various sizes but all sharing the same general shape or design and metallic composition. 49 of these pieces display a legible makers’ mark — the initials “W” and “P” placed within a raised diamond outline, which is in turn contained within a sunken crown shape — identifying the manufacturer as William Page & Co of Birmingham. An electroplater’s makers’ marks, unlike sterling silver hallmarks, are not consistent identifiers of quality or date and place of manufacture. A similar line of five impressions was usually made to impress the consumer with an implication of industry standards, but what each one actually signified was not regulated and so they varied according to the whim of the individual foundry. In this case, the maker’s marks are often obscured by sedimentary accretion or removed by corrosion after a century of submersion in the ocean. However sufficient detail has survived to indicate that these samples of electro-plated cutlery probably originated from the same consignment in the LOCH ARD’s cargo. The following descriptions of maker’s marks are drawn from 255 tea spoons, 125 dessert spoons, and 99 table forks. These marks are clearly visible in 66 instances, while the same sequence of general outlines, or depression shapes, is discernible in another 166 examples. 1. A recessed Crown containing a raised Diamond outline and the initials “W” and “P” (the recognised trademark of William Page & Co) 2. An impressed Ellipse containing a raised, pivoted, Triangle in its lower part and bearing a Resurrection Cross on its upper section (a possible dissenting church symbol reflecting religious affiliation); OR a rounded Square impression containing a raised, ‘lazy’, letter “B” (possibly mimicking sterling silver hallmark signifying city of manufacture i.e. Birmingham) 3. An impressed rounded Square filled with a raised Maltese Cross (the base metal composite of nickel silver was also known as ‘German silver’ after its Berlin inventors in 1823) 4. A recessed Circle containing a Crab or Scarab Beetle image; OR a recessed Circle containing a rotated ‘fleur de lys’ or ‘fasces’ design 5. A depressed Diamond shape enclosing a large raised letter “R” and a small raised letter “D” (mimicking the U.K. Patent Office stamp which abbreviated the term ‘registered’ to “RD”, but also included date and class of patent) Suggested trade names for William Page & Co’s particular blend of brass plating are ‘roman silver’ or ‘silverite’. This copper alloy polishes to a lustrous gold when new, discolouring to a murky grey with greenish hue when neglected. HISTORY OF THE LOCH ARD The LOCH ARD belonged to the famous Loch Line which sailed many ships from England to Australia. Built in Glasgow by Barclay, Curdle and Co. in 1873, the LOCH ARD was a three-masted square rigged iron sailing ship. The ship measured 262ft 7" (79.87m) in length, 38ft (11.58m) in width, 23ft (7m) in depth and had a gross tonnage of 1693 tons. The LOCH ARD's main mast measured a massive 150ft (45.7m) in height. LOCH ARD made three trips to Australia and one trip to Calcutta before its final voyage. LOCH ARD left England on March 2, 1878, under the command of Captain Gibbs, a newly married, 29 year old. She was bound for Melbourne with a crew of 37, plus 17 passengers and a load of cargo. The general cargo reflected the affluence of Melbourne at the time. On board were straw hats, umbrella, perfumes, clay pipes, pianos, clocks, confectionary, linen and candles, as well as a heavier load of railway irons, cement, lead and copper. There were items included that intended for display in the Melbourne International Exhibition in 1880. The voyage to Port Phillip was long but uneventful. At 3am on June 1, 1878, Captain Gibbs was expecting to see land and the passengers were becoming excited as they prepared to view their new homeland in the early morning. But LOCH ARD was running into a fog which greatly reduced visibility. Captain Gibbs was becoming anxious as there was no sign of land or the Cape Otway lighthouse. At 4am the fog lifted. A man aloft announced that he could see breakers. The sheer cliffs of Victoria's west coast came into view, and Captain Gibbs realised that the ship was much closer to them than expected. He ordered as much sail to be set as time would permit and then attempted to steer the vessel out to sea. On coming head on into the wind, the ship lost momentum, the sails fell limp and LOCH ARD's bow swung back. Gibbs then ordered the anchors to be released in an attempt to hold its position. The anchors sank some 50 fathoms - but did not hold. By this time LOCH ARD was among the breakers and the tall cliffs of Mutton Bird Island rose behind the ship. Just half a mile from the coast, the ship's bow was suddenly pulled around by the anchor. The captain tried to tack out to sea, but the ship struck a reef at the base of Mutton Bird Island, near Port Campbell. Waves broke over the ship and the top deck was loosened from the hull. The masts and rigging came crashing down knocking passengers and crew overboard. When a lifeboat was finally launched, it crashed into the side of LOCH ARD and capsized. Tom Pearce, who had launched the boat, managed to cling to its overturned hull and shelter beneath it. He drifted out to sea and then on the flood tide came into what is now known as LOCH ARD Gorge. He swam to shore, bruised and dazed, and found a cave in which to shelter. Some of the crew stayed below deck to shelter from the falling rigging but drowned when the ship slipped off the reef into deeper water. Eva Carmichael had raced onto deck to find out what was happening only to be confronted by towering cliffs looming above the stricken ship. In all the chaos, Captain Gibbs grabbed Eva and said, "If you are saved Eva, let my dear wife know that I died like a sailor". That was the last Eva Carmichael saw of the captain. She was swept off the ship by a huge wave. Eva saw Tom Pearce on a small rocky beach and yelled to attract his attention. He dived in and swam to the exhausted woman and dragged her to shore. He took her to the cave and broke open case of brandy which had washed up on the beach. He opened a bottle to revive the unconscious woman. A few hours later Tom scaled a cliff in search of help. He followed hoof prints and came by chance upon two men from nearby Glenample Station three and a half miles away. In a state of exhaustion, he told the men of the tragedy. Tom returned to the gorge while the two men rode back to the station to get help. By the time they reached LOCH ARD Gorge, it was cold and dark. The two shipwreck survivors were taken to Glenample Station to recover. Eva stayed at the station for six weeks before returning to Ireland, this time by steamship. In Melbourne, Tom Pearce received a hero's welcome. He was presented with the first gold medal of the Royal Humane Society of Victoria and a £1000 cheque from the Victorian Government. Concerts were performed to honour the young man's bravery and to raise money for those who lost family in the LOCH ARD disaster. Of the 54 crew members and passengers on board, only two survived: the apprentice, Tom Pearce and the young woman passenger, Eva Carmichael, who lost all of her family in the tragedy. Ten days after the LOCH ARD tragedy, salvage rights to the wreck were sold at auction for £2,120. Cargo valued at £3,000 was salvaged and placed on the beach, but most washed back into the sea when another storm developed. The wreck of LOCH ARD still lies at the base of Mutton Bird Island. Much of the cargo has now been salvaged and some was washed up into what is now known as LOCH ARD Gorge. Cargo and artefacts have also been illegally salvaged over many years before protective legislation was introduced. One of the most unlikely pieces of cargo to have survived the shipwreck was a Minton porcelain peacock - one of only seven in the world. The peacock was destined for the Melbourne International Exhibition in 1880. It had been well packed, which gave it adequate protection during the violent storm. Today, the Minton peacock can be seen at the Flagstaff Hill Maritime Museum in Warrnambool. From Australia's most dramatic shipwreck it has now become Australia's most valuable shipwreck artefact and is one of very few 'objects' on the Victorian State Heritage Register. The LOCH ARD shipwreck is of State significance – Victorian Heritage Register S 417. Flagstaff Hill’s collection of artefacts from LOCH ARD is significant for being one of the largest collections of artefacts from this shipwreck in Victoria. It is significant for its association with the shipwreck, which is on the Victorian Heritage Register (VHR S417). The collection is significant because of the relationship between the objects, as together they have a high potential to interpret the story of the LOCH ARD. The LOCH ARD collection is archaeologically significant as the remains of a large international passenger and cargo ship. The LOCH ARD collection is historically significant for representing aspects of Victoria’s shipping history and its potential to interpret sub-theme 1.5 of Victoria’s Framework of Historical Themes (living with natural processes). The collection is also historically significant for its association with the LOCH ARD, which was one of the worst and best known shipwrecks in Victoria’s history. Unrestored tea spoon from the wreck of the LOCH ARD. The spoon design has a flattened fiddle-back handle, with a thin stem or shank, flared collar, and elongated bowl. The spoons metallic composition is a thin layer of brass alloy which has partially corroded back to a nickel-silver base metal. The bowl is in fragile condition, torn with frayed edges. Five makers marks on rear of handle are indistinguishable.flagstaff hill, warrnambool, shipwrecked coast, flagstaff hill maritime museum, maritime museum, shipwreck coast, flagstaff hill maritime village, great ocean road, loch line, loch ard, captain gibbs, eva carmichael, tom pearce, glenample station, mutton bird island, loch ard gorge, electroplated cutlery, loch ard shipwreck, nickel silver, william page & co, birmingham, brass plating, makers marks -
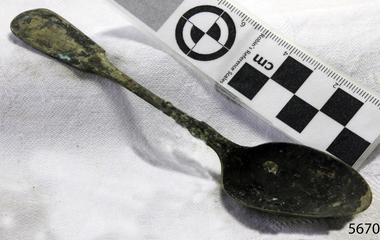 Flagstaff Hill Maritime Museum and Village
Spoon, circa 1878
This tea spoon is from the wreck of the LOCH ARD, a Loch Line ship of 1,693 tons which sailed from Gravesend, London, on 2 March 1878 with 17 passengers and a crew of 36 under Captain George Gibbs. “The intention was to discharge cargo in Melbourne, before returning to London via the Horn with wool and wheat”. Instead, on 1 June 1878, after 90 days at sea, she struck the sandstone cliffs of Mutton Bird Island on the south west coast of Victoria, and sank with the loss of 52 lives and all her cargo. The manifest of the LOCH ARD listed an array of manufactured goods and bulk metals being exported to the Colony of Victoria, with a declared value of £53,700. (202 bills of lading show an actual invoice value of £68, 456, with insurance underwriting to £30,000 of all cargo). Included in the manifest is the item of “Tin hardware & cutlery £7,530”. This teaspoon is one of 482 similar items of electro-plated cutlery from the LOCH ARD site, comprising spoons and forks of various sizes but all sharing the same general shape or design and metallic composition. 49 of these pieces display a legible makers’ mark — the initials “W” and “P” placed within a raised diamond outline, which is in turn contained within a sunken crown shape — identifying the manufacturer as William Page & Co of Birmingham. An electroplater’s makers’ marks, unlike sterling silver hallmarks, are not consistent identifiers of quality or date and place of manufacture. A similar line of five impressions was usually made to impress the consumer with an implication of industry standards, but what each one actually signified was not regulated and so they varied according to the whim of the individual foundry. In this case, the maker’s marks are often obscured by sedimentary accretion or removed by corrosion after a century of submersion in the ocean. However sufficient detail has survived to indicate that these samples of electro-plated cutlery probably originated from the same consignment in the LOCH ARD’s cargo. The following descriptions of maker’s marks are drawn from 255 tea spoons, 125 dessert spoons, and 99 table forks. These marks are clearly visible in 66 instances, while the same sequence of general outlines, or depression shapes, is discernible in another 166 examples. 1. A recessed Crown containing a raised Diamond outline and the initials “W” and “P” (the recognised trademark of William Page & Co) 2. An impressed Ellipse containing a raised, pivoted, Triangle in its lower part and bearing a Resurrection Cross on its upper section (a possible dissenting church symbol reflecting religious affiliation); OR a rounded Square impression containing a raised, ‘lazy’, letter “B” (possibly mimicking sterling silver hallmark signifying city of manufacture i.e. Birmingham) 3. An impressed rounded Square filled with a raised Maltese Cross (the base metal composite of nickel silver was also known as ‘German silver’ after its Berlin inventors in 1823) 4. A recessed Circle containing a Crab or Scarab Beetle image; OR a recessed Circle containing a rotated ‘fleur de lys’ or ‘fasces’ design 5. A depressed Diamond shape enclosing a large raised letter “R” and a small raised letter “D” (mimicking the U.K. Patent Office stamp which abbreviated the term ‘registered’ to “RD”, but also included date and class of patent) Suggested trade names for William Page & Co’s particular blend of brass plating are ‘roman silver’ or ‘silverite’. This copper alloy polishes to a lustrous gold when new, discolouring to a murky grey with greenish hue when neglected. HISTORY OF THE LOCH ARD The LOCH ARD belonged to the famous Loch Line which sailed many ships from England to Australia. Built in Glasgow by Barclay, Curdle and Co. in 1873, the LOCH ARD was a three-masted square rigged iron sailing ship. The ship measured 262ft 7" (79.87m) in length, 38ft (11.58m) in width, 23ft (7m) in depth and had a gross tonnage of 1693 tons. The LOCH ARD's main mast measured a massive 150ft (45.7m) in height. LOCH ARD made three trips to Australia and one trip to Calcutta before its final voyage. LOCH ARD left England on March 2, 1878, under the command of Captain Gibbs, a newly married, 29 year old. She was bound for Melbourne with a crew of 37, plus 17 passengers and a load of cargo. The general cargo reflected the affluence of Melbourne at the time. On board were straw hats, umbrella, perfumes, clay pipes, pianos, clocks, confectionary, linen and candles, as well as a heavier load of railway irons, cement, lead and copper. There were items included that intended for display in the Melbourne International Exhibition in 1880. The voyage to Port Phillip was long but uneventful. At 3am on June 1, 1878, Captain Gibbs was expecting to see land and the passengers were becoming excited as they prepared to view their new homeland in the early morning. But LOCH ARD was running into a fog which greatly reduced visibility. Captain Gibbs was becoming anxious as there was no sign of land or the Cape Otway lighthouse. At 4am the fog lifted. A man aloft announced that he could see breakers. The sheer cliffs of Victoria's west coast came into view, and Captain Gibbs realised that the ship was much closer to them than expected. He ordered as much sail to be set as time would permit and then attempted to steer the vessel out to sea. On coming head on into the wind, the ship lost momentum, the sails fell limp and LOCH ARD's bow swung back. Gibbs then ordered the anchors to be released in an attempt to hold its position. The anchors sank some 50 fathoms - but did not hold. By this time LOCH ARD was among the breakers and the tall cliffs of Mutton Bird Island rose behind the ship. Just half a mile from the coast, the ship's bow was suddenly pulled around by the anchor. The captain tried to tack out to sea, but the ship struck a reef at the base of Mutton Bird Island, near Port Campbell. Waves broke over the ship and the top deck was loosened from the hull. The masts and rigging came crashing down knocking passengers and crew overboard. When a lifeboat was finally launched, it crashed into the side of LOCH ARD and capsized. Tom Pearce, who had launched the boat, managed to cling to its overturned hull and shelter beneath it. He drifted out to sea and then on the flood tide came into what is now known as LOCH ARD Gorge. He swam to shore, bruised and dazed, and found a cave in which to shelter. Some of the crew stayed below deck to shelter from the falling rigging but drowned when the ship slipped off the reef into deeper water. Eva Carmichael had raced onto deck to find out what was happening only to be confronted by towering cliffs looming above the stricken ship. In all the chaos, Captain Gibbs grabbed Eva and said, "If you are saved Eva, let my dear wife know that I died like a sailor". That was the last Eva Carmichael saw of the captain. She was swept off the ship by a huge wave. Eva saw Tom Pearce on a small rocky beach and yelled to attract his attention. He dived in and swam to the exhausted woman and dragged her to shore. He took her to the cave and broke open case of brandy which had washed up on the beach. He opened a bottle to revive the unconscious woman. A few hours later Tom scaled a cliff in search of help. He followed hoof prints and came by chance upon two men from nearby Glenample Station three and a half miles away. In a state of exhaustion, he told the men of the tragedy. Tom returned to the gorge while the two men rode back to the station to get help. By the time they reached LOCH ARD Gorge, it was cold and dark. The two shipwreck survivors were taken to Glenample Station to recover. Eva stayed at the station for six weeks before returning to Ireland, this time by steamship. In Melbourne, Tom Pearce received a hero's welcome. He was presented with the first gold medal of the Royal Humane Society of Victoria and a £1000 cheque from the Victorian Government. Concerts were performed to honour the young man's bravery and to raise money for those who lost family in the LOCH ARD disaster. Of the 54 crew members and passengers on board, only two survived: the apprentice, Tom Pearce and the young woman passenger, Eva Carmichael, who lost all of her family in the tragedy. Ten days after the LOCH ARD tragedy, salvage rights to the wreck were sold at auction for £2,120. Cargo valued at £3,000 was salvaged and placed on the beach, but most washed back into the sea when another storm developed. The wreck of LOCH ARD still lies at the base of Mutton Bird Island. Much of the cargo has now been salvaged and some was washed up into what is now known as LOCH ARD Gorge. Cargo and artefacts have also been illegally salvaged over many years before protective legislation was introduced. One of the most unlikely pieces of cargo to have survived the shipwreck was a Minton porcelain peacock - one of only seven in the world. The peacock was destined for the Melbourne International Exhibition in 1880. It had been well packed, which gave it adequate protection during the violent storm. Today, the Minton peacock can be seen at the Flagstaff Hill Maritime Museum in Warrnambool. From Australia's most dramatic shipwreck it has now become Australia's most valuable shipwreck artefact and is one of very few 'objects' on the Victorian State Heritage Register. The LOCH ARD shipwreck is of State significance – Victorian Heritage Register S 417. Flagstaff Hill’s collection of artefacts from LOCH ARD is significant for being one of the largest collections of artefacts from this shipwreck in Victoria. It is significant for its association with the shipwreck, which is on the Victorian Heritage Register (VHR S417). The collection is significant because of the relationship between the objects, as together they have a high potential to interpret the story of the LOCH ARD. The LOCH ARD collection is archaeologically significant as the remains of a large international passenger and cargo ship. The LOCH ARD collection is historically significant for representing aspects of Victoria’s shipping history and its potential to interpret sub-theme 1.5 of Victoria’s Framework of Historical Themes (living with natural processes). The collection is also historically significant for its association with the LOCH ARD, which was one of the worst and best known shipwrecks in Victoria’s history. Unrestored tea spoon from the wreck of the LOCH ARD. The spoon design has a flattened fiddle-back handle, with a thin stem or shank, flared collar, and elongated bowl. The spoons metallic composition is a thin layer of brass alloy which has partially corroded back to a nickel-silver base metal. Approximately 30% of original electroplating remains with some verdigris. Two of five makers marks on lower rear of handle are distinguishable: (1) Trade Mark (2) Resurrection Cross.flagstaff hill, warrnambool, shipwrecked coast, flagstaff hill maritime museum, maritime museum, shipwreck coast, flagstaff hill maritime village, great ocean road, loch line, loch ard, captain gibbs, eva carmichael, tom pearce, glenample station, mutton bird island, loch ard gorge, electroplated cutlery, loch ard shipwreck, nickel silver, william page & co, birmingham, brass plating, makers marks -
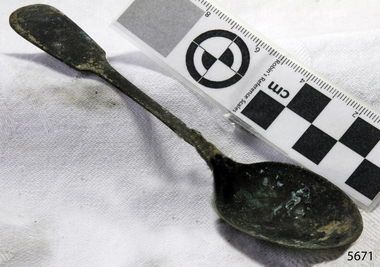 Flagstaff Hill Maritime Museum and Village
Spoon, circa 1878
This tea spoon is from the wreck of the LOCH ARD, a Loch Line ship of 1,693 tons which sailed from Gravesend, London, on 2 March 1878 with 17 passengers and a crew of 36 under Captain George Gibbs. “The intention was to discharge cargo in Melbourne, before returning to London via the Horn with wool and wheat”. Instead, on 1 June 1878, after 90 days at sea, she struck the sandstone cliffs of Mutton Bird Island on the south west coast of Victoria, and sank with the loss of 52 lives and all her cargo. The manifest of the LOCH ARD listed an array of manufactured goods and bulk metals being exported to the Colony of Victoria, with a declared value of £53,700. (202 bills of lading show an actual invoice value of £68, 456, with insurance underwriting to £30,000 of all cargo). Included in the manifest is the item of “Tin hardware & cutlery £7,530”. This teaspoon is one of 482 similar items of electro-plated cutlery from the LOCH ARD site, comprising spoons and forks of various sizes but all sharing the same general shape or design and metallic composition. 49 of these pieces display a legible makers’ mark — the initials “W” and “P” placed within a raised diamond outline, which is in turn contained within a sunken crown shape — identifying the manufacturer as William Page & Co of Birmingham. An electroplater’s makers’ marks, unlike sterling silver hallmarks, are not consistent identifiers of quality or date and place of manufacture. A similar line of five impressions was usually made to impress the consumer with an implication of industry standards, but what each one actually signified was not regulated and so they varied according to the whim of the individual foundry. In this case, the maker’s marks are often obscured by sedimentary accretion or removed by corrosion after a century of submersion in the ocean. However sufficient detail has survived to indicate that these samples of electro-plated cutlery probably originated from the same consignment in the LOCH ARD’s cargo. The following descriptions of maker’s marks are drawn from 255 tea spoons, 125 dessert spoons, and 99 table forks. These marks are clearly visible in 66 instances, while the same sequence of general outlines, or depression shapes, is discernible in another 166 examples. 1. A recessed Crown containing a raised Diamond outline and the initials “W” and “P” (the recognised trademark of William Page & Co) 2. An impressed Ellipse containing a raised, pivoted, Triangle in its lower part and bearing a Resurrection Cross on its upper section (a possible dissenting church symbol reflecting religious affiliation); OR a rounded Square impression containing a raised, ‘lazy’, letter “B” (possibly mimicking sterling silver hallmark signifying city of manufacture i.e. Birmingham) 3. An impressed rounded Square filled with a raised Maltese Cross (the base metal composite of nickel silver was also known as ‘German silver’ after its Berlin inventors in 1823) 4. A recessed Circle containing a Crab or Scarab Beetle image; OR a recessed Circle containing a rotated ‘fleur de lys’ or ‘fasces’ design 5. A depressed Diamond shape enclosing a large raised letter “R” and a small raised letter “D” (mimicking the U.K. Patent Office stamp which abbreviated the term ‘registered’ to “RD”, but also included date and class of patent) Suggested trade names for William Page & Co’s particular blend of brass plating are ‘roman silver’ or ‘silverite’. This copper alloy polishes to a lustrous gold when new, discolouring to a murky grey with greenish hue when neglected. HISTORY OF THE LOCH ARD The LOCH ARD belonged to the famous Loch Line which sailed many ships from England to Australia. Built in Glasgow by Barclay, Curdle and Co. in 1873, the LOCH ARD was a three-masted square rigged iron sailing ship. The ship measured 262ft 7" (79.87m) in length, 38ft (11.58m) in width, 23ft (7m) in depth and had a gross tonnage of 1693 tons. The LOCH ARD's main mast measured a massive 150ft (45.7m) in height. LOCH ARD made three trips to Australia and one trip to Calcutta before its final voyage. LOCH ARD left England on March 2, 1878, under the command of Captain Gibbs, a newly married, 29 year old. She was bound for Melbourne with a crew of 37, plus 17 passengers and a load of cargo. The general cargo reflected the affluence of Melbourne at the time. On board were straw hats, umbrella, perfumes, clay pipes, pianos, clocks, confectionary, linen and candles, as well as a heavier load of railway irons, cement, lead and copper. There were items included that intended for display in the Melbourne International Exhibition in 1880. The voyage to Port Phillip was long but uneventful. At 3am on June 1, 1878, Captain Gibbs was expecting to see land and the passengers were becoming excited as they prepared to view their new homeland in the early morning. But LOCH ARD was running into a fog which greatly reduced visibility. Captain Gibbs was becoming anxious as there was no sign of land or the Cape Otway lighthouse. At 4am the fog lifted. A man aloft announced that he could see breakers. The sheer cliffs of Victoria's west coast came into view, and Captain Gibbs realised that the ship was much closer to them than expected. He ordered as much sail to be set as time would permit and then attempted to steer the vessel out to sea. On coming head on into the wind, the ship lost momentum, the sails fell limp and LOCH ARD's bow swung back. Gibbs then ordered the anchors to be released in an attempt to hold its position. The anchors sank some 50 fathoms - but did not hold. By this time LOCH ARD was among the breakers and the tall cliffs of Mutton Bird Island rose behind the ship. Just half a mile from the coast, the ship's bow was suddenly pulled around by the anchor. The captain tried to tack out to sea, but the ship struck a reef at the base of Mutton Bird Island, near Port Campbell. Waves broke over the ship and the top deck was loosened from the hull. The masts and rigging came crashing down knocking passengers and crew overboard. When a lifeboat was finally launched, it crashed into the side of LOCH ARD and capsized. Tom Pearce, who had launched the boat, managed to cling to its overturned hull and shelter beneath it. He drifted out to sea and then on the flood tide came into what is now known as LOCH ARD Gorge. He swam to shore, bruised and dazed, and found a cave in which to shelter. Some of the crew stayed below deck to shelter from the falling rigging but drowned when the ship slipped off the reef into deeper water. Eva Carmichael had raced onto deck to find out what was happening only to be confronted by towering cliffs looming above the stricken ship. In all the chaos, Captain Gibbs grabbed Eva and said, "If you are saved Eva, let my dear wife know that I died like a sailor". That was the last Eva Carmichael saw of the captain. She was swept off the ship by a huge wave. Eva saw Tom Pearce on a small rocky beach and yelled to attract his attention. He dived in and swam to the exhausted woman and dragged her to shore. He took her to the cave and broke open case of brandy which had washed up on the beach. He opened a bottle to revive the unconscious woman. A few hours later Tom scaled a cliff in search of help. He followed hoof prints and came by chance upon two men from nearby Glenample Station three and a half miles away. In a state of exhaustion, he told the men of the tragedy. Tom returned to the gorge while the two men rode back to the station to get help. By the time they reached LOCH ARD Gorge, it was cold and dark. The two shipwreck survivors were taken to Glenample Station to recover. Eva stayed at the station for six weeks before returning to Ireland, this time by steamship. In Melbourne, Tom Pearce received a hero's welcome. He was presented with the first gold medal of the Royal Humane Society of Victoria and a £1000 cheque from the Victorian Government. Concerts were performed to honour the young man's bravery and to raise money for those who lost family in the LOCH ARD disaster. Of the 54 crew members and passengers on board, only two survived: the apprentice, Tom Pearce and the young woman passenger, Eva Carmichael, who lost all of her family in the tragedy. Ten days after the LOCH ARD tragedy, salvage rights to the wreck were sold at auction for £2,120. Cargo valued at £3,000 was salvaged and placed on the beach, but most washed back into the sea when another storm developed. The wreck of LOCH ARD still lies at the base of Mutton Bird Island. Much of the cargo has now been salvaged and some was washed up into what is now known as LOCH ARD Gorge. Cargo and artefacts have also been illegally salvaged over many years before protective legislation was introduced. One of the most unlikely pieces of cargo to have survived the shipwreck was a Minton porcelain peacock - one of only seven in the world. The peacock was destined for the Melbourne International Exhibition in 1880. It had been well packed, which gave it adequate protection during the violent storm. Today, the Minton peacock can be seen at the Flagstaff Hill Maritime Museum in Warrnambool. From Australia's most dramatic shipwreck it has now become Australia's most valuable shipwreck artefact and is one of very few 'objects' on the Victorian State Heritage Register. The LOCH ARD shipwreck is of State significance – Victorian Heritage Register S 417. Flagstaff Hill’s collection of artefacts from LOCH ARD is significant for being one of the largest collections of artefacts from this shipwreck in Victoria. It is significant for its association with the shipwreck, which is on the Victorian Heritage Register (VHR S417). The collection is significant because of the relationship between the objects, as together they have a high potential to interpret the story of the LOCH ARD. The LOCH ARD collection is archaeologically significant as the remains of a large international passenger and cargo ship. The LOCH ARD collection is historically significant for representing aspects of Victoria’s shipping history and its potential to interpret sub-theme 1.5 of Victoria’s Framework of Historical Themes (living with natural processes). The collection is also historically significant for its association with the LOCH ARD, which was one of the worst and best known shipwrecks in Victoria’s history. Unrestored tea spoon from the wreck of the LOCH ARD. The spoon design has a flattened fiddle-back handle, with a thin stem or shank, flared collar, and elongated bowl. The spoons metallic composition is a thin layer of brass alloy which has partially corroded back to a nickel-silver base metal. Traces of original electroplating with verdigris. Three of five makers marks on lower rear of handle are reasonably distinguishable: (1) Trade Mark (2) Resurrection Cross (3) Maltese Cross.flagstaff hill, warrnambool, shipwrecked coast, flagstaff hill maritime museum, maritime museum, shipwreck coast, flagstaff hill maritime village, great ocean road, loch line, loch ard, captain gibbs, eva carmichael, tom pearce, glenample station, mutton bird island, loch ard gorge, electroplated cutlery, loch ard shipwreck, nickel silver, william page & co, birmingham, brass plating, makers marks -
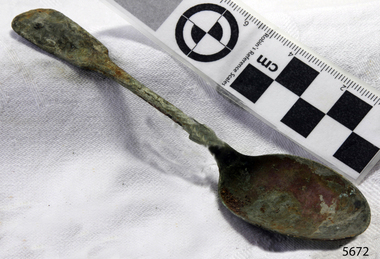 Flagstaff Hill Maritime Museum and Village
Spoon, circa 1878
This tea spoon is from the wreck of the LOCH ARD, a Loch Line ship of 1,693 tons which sailed from Gravesend, London, on 2 March 1878 with 17 passengers and a crew of 36 under Captain George Gibbs. “The intention was to discharge cargo in Melbourne, before returning to London via the Horn with wool and wheat”. Instead, on 1 June 1878, after 90 days at sea, she struck the sandstone cliffs of Mutton Bird Island on the south west coast of Victoria, and sank with the loss of 52 lives and all her cargo. The manifest of the LOCH ARD listed an array of manufactured goods and bulk metals being exported to the Colony of Victoria, with a declared value of £53,700. (202 bills of lading show an actual invoice value of £68, 456, with insurance underwriting to £30,000 of all cargo). Included in the manifest is the item of “Tin hardware & cutlery £7,530”. This teaspoon is one of 482 similar items of electro-plated cutlery from the LOCH ARD site, comprising spoons and forks of various sizes but all sharing the same general shape or design and metallic composition. 49 of these pieces display a legible makers’ mark — the initials “W” and “P” placed within a raised diamond outline, which is in turn contained within a sunken crown shape — identifying the manufacturer as William Page & Co of Birmingham. An electroplater’s makers’ marks, unlike sterling silver hallmarks, are not consistent identifiers of quality or date and place of manufacture. A similar line of five impressions was usually made to impress the consumer with an implication of industry standards, but what each one actually signified was not regulated and so they varied according to the whim of the individual foundry. In this case, the maker’s marks are often obscured by sedimentary accretion or removed by corrosion after a century of submersion in the ocean. However sufficient detail has survived to indicate that these samples of electro-plated cutlery probably originated from the same consignment in the LOCH ARD’s cargo. The following descriptions of maker’s marks are drawn from 255 tea spoons, 125 dessert spoons, and 99 table forks. These marks are clearly visible in 66 instances, while the same sequence of general outlines, or depression shapes, is discernible in another 166 examples. 1. A recessed Crown containing a raised Diamond outline and the initials “W” and “P” (the recognised trademark of William Page & Co) 2. An impressed Ellipse containing a raised, pivoted, Triangle in its lower part and bearing a Resurrection Cross on its upper section (a possible dissenting church symbol reflecting religious affiliation); OR a rounded Square impression containing a raised, ‘lazy’, letter “B” (possibly mimicking sterling silver hallmark signifying city of manufacture i.e. Birmingham) 3. An impressed rounded Square filled with a raised Maltese Cross (the base metal composite of nickel silver was also known as ‘German silver’ after its Berlin inventors in 1823) 4. A recessed Circle containing a Crab or Scarab Beetle image; OR a recessed Circle containing a rotated ‘fleur de lys’ or ‘fasces’ design 5. A depressed Diamond shape enclosing a large raised letter “R” and a small raised letter “D” (mimicking the U.K. Patent Office stamp which abbreviated the term ‘registered’ to “RD”, but also included date and class of patent) Suggested trade names for William Page & Co’s particular blend of brass plating are ‘roman silver’ or ‘silverite’. This copper alloy polishes to a lustrous gold when new, discolouring to a murky grey with greenish hue when neglected. HISTORY OF THE LOCH ARD The LOCH ARD belonged to the famous Loch Line which sailed many ships from England to Australia. Built in Glasgow by Barclay, Curdle and Co. in 1873, the LOCH ARD was a three-masted square rigged iron sailing ship. The ship measured 262ft 7" (79.87m) in length, 38ft (11.58m) in width, 23ft (7m) in depth and had a gross tonnage of 1693 tons. The LOCH ARD's main mast measured a massive 150ft (45.7m) in height. LOCH ARD made three trips to Australia and one trip to Calcutta before its final voyage. LOCH ARD left England on March 2, 1878, under the command of Captain Gibbs, a newly married, 29 year old. She was bound for Melbourne with a crew of 37, plus 17 passengers and a load of cargo. The general cargo reflected the affluence of Melbourne at the time. On board were straw hats, umbrella, perfumes, clay pipes, pianos, clocks, confectionary, linen and candles, as well as a heavier load of railway irons, cement, lead and copper. There were items included that intended for display in the Melbourne International Exhibition in 1880. The voyage to Port Phillip was long but uneventful. At 3am on June 1, 1878, Captain Gibbs was expecting to see land and the passengers were becoming excited as they prepared to view their new homeland in the early morning. But LOCH ARD was running into a fog which greatly reduced visibility. Captain Gibbs was becoming anxious as there was no sign of land or the Cape Otway lighthouse. At 4am the fog lifted. A man aloft announced that he could see breakers. The sheer cliffs of Victoria's west coast came into view, and Captain Gibbs realised that the ship was much closer to them than expected. He ordered as much sail to be set as time would permit and then attempted to steer the vessel out to sea. On coming head on into the wind, the ship lost momentum, the sails fell limp and LOCH ARD's bow swung back. Gibbs then ordered the anchors to be released in an attempt to hold its position. The anchors sank some 50 fathoms - but did not hold. By this time LOCH ARD was among the breakers and the tall cliffs of Mutton Bird Island rose behind the ship. Just half a mile from the coast, the ship's bow was suddenly pulled around by the anchor. The captain tried to tack out to sea, but the ship struck a reef at the base of Mutton Bird Island, near Port Campbell. Waves broke over the ship and the top deck was loosened from the hull. The masts and rigging came crashing down knocking passengers and crew overboard. When a lifeboat was finally launched, it crashed into the side of LOCH ARD and capsized. Tom Pearce, who had launched the boat, managed to cling to its overturned hull and shelter beneath it. He drifted out to sea and then on the flood tide came into what is now known as LOCH ARD Gorge. He swam to shore, bruised and dazed, and found a cave in which to shelter. Some of the crew stayed below deck to shelter from the falling rigging but drowned when the ship slipped off the reef into deeper water. Eva Carmichael had raced onto deck to find out what was happening only to be confronted by towering cliffs looming above the stricken ship. In all the chaos, Captain Gibbs grabbed Eva and said, "If you are saved Eva, let my dear wife know that I died like a sailor". That was the last Eva Carmichael saw of the captain. She was swept off the ship by a huge wave. Eva saw Tom Pearce on a small rocky beach and yelled to attract his attention. He dived in and swam to the exhausted woman and dragged her to shore. He took her to the cave and broke open case of brandy which had washed up on the beach. He opened a bottle to revive the unconscious woman. A few hours later Tom scaled a cliff in search of help. He followed hoof prints and came by chance upon two men from nearby Glenample Station three and a half miles away. In a state of exhaustion, he told the men of the tragedy. Tom returned to the gorge while the two men rode back to the station to get help. By the time they reached LOCH ARD Gorge, it was cold and dark. The two shipwreck survivors were taken to Glenample Station to recover. Eva stayed at the station for six weeks before returning to Ireland, this time by steamship. In Melbourne, Tom Pearce received a hero's welcome. He was presented with the first gold medal of the Royal Humane Society of Victoria and a £1000 cheque from the Victorian Government. Concerts were performed to honour the young man's bravery and to raise money for those who lost family in the LOCH ARD disaster. Of the 54 crew members and passengers on board, only two survived: the apprentice, Tom Pearce and the young woman passenger, Eva Carmichael, who lost all of her family in the tragedy. Ten days after the LOCH ARD tragedy, salvage rights to the wreck were sold at auction for £2,120. Cargo valued at £3,000 was salvaged and placed on the beach, but most washed back into the sea when another storm developed. The wreck of LOCH ARD still lies at the base of Mutton Bird Island. Much of the cargo has now been salvaged and some was washed up into what is now known as LOCH ARD Gorge. Cargo and artefacts have also been illegally salvaged over many years before protective legislation was introduced. One of the most unlikely pieces of cargo to have survived the shipwreck was a Minton porcelain peacock - one of only seven in the world. The peacock was destined for the Melbourne International Exhibition in 1880. It had been well packed, which gave it adequate protection during the violent storm. Today, the Minton peacock can be seen at the Flagstaff Hill Maritime Museum in Warrnambool. From Australia's most dramatic shipwreck it has now become Australia's most valuable shipwreck artefact and is one of very few 'objects' on the Victorian State Heritage Register. The LOCH ARD shipwreck is of State significance – Victorian Heritage Register S 417. Flagstaff Hill’s collection of artefacts from LOCH ARD is significant for being one of the largest collections of artefacts from this shipwreck in Victoria. It is significant for its association with the shipwreck, which is on the Victorian Heritage Register (VHR S417). The collection is significant because of the relationship between the objects, as together they have a high potential to interpret the story of the LOCH ARD. The LOCH ARD collection is archaeologically significant as the remains of a large international passenger and cargo ship. The LOCH ARD collection is historically significant for representing aspects of Victoria’s shipping history and its potential to interpret sub-theme 1.5 of Victoria’s Framework of Historical Themes (living with natural processes). The collection is also historically significant for its association with the LOCH ARD, which was one of the worst and best known shipwrecks in Victoria’s history. Unrestored tea spoon from the wreck of the LOCH ARD. The spoon design has a flattened fiddle-back handle, with a thin stem or shank, flared collar, and elongated bowl. The spoons metallic composition is a thin layer of brass alloy which has partially corroded back to a nickel-silver base metal. Traces of original electroplate remaining with verdigris. Five makers marks obscured. flagstaff hill, warrnambool, shipwrecked coast, flagstaff hill maritime museum, maritime museum, shipwreck coast, flagstaff hill maritime village, great ocean road, loch line, loch ard, captain gibbs, eva carmichael, tom pearce, glenample station, mutton bird island, loch ard gorge, electroplated cutlery, loch ard shipwreck, nickel silver, william page & co, birmingham, brass plating, makers marks -
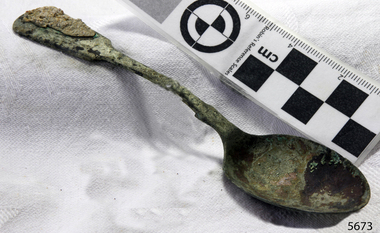 Flagstaff Hill Maritime Museum and Village
Domestic object - Spoon, circa 1878
This tea spoon is from the wreck of the LOCH ARD, a Loch Line ship of 1,693 tons which sailed from Gravesend, London, on 2 March 1878 with 17 passengers and a crew of 36 under Captain George Gibbs. “The intention was to discharge cargo in Melbourne, before returning to London via the Horn with wool and wheat”. Instead, on 1 June 1878, after 90 days at sea, she struck the sandstone cliffs of Mutton Bird Island on the south west coast of Victoria, and sank with the loss of 52 lives and all her cargo. The manifest of the LOCH ARD listed an array of manufactured goods and bulk metals being exported to the Colony of Victoria, with a declared value of £53,700. (202 bills of lading show an actual invoice value of £68, 456, with insurance underwriting to £30,000 of all cargo). Included in the manifest is the item of “Tin hardware & cutlery £7,530”. This teaspoon is one of 482 similar items of electro-plated cutlery from the LOCH ARD site, comprising spoons and forks of various sizes but all sharing the same general shape or design and metallic composition. 49 of these pieces display a legible makers’ mark — the initials “W” and “P” placed within a raised diamond outline, which is in turn contained within a sunken crown shape — identifying the manufacturer as William Page & Co of Birmingham. An electroplater’s makers’ marks, unlike sterling silver hallmarks, are not consistent identifiers of quality or date and place of manufacture. A similar line of five impressions was usually made to impress the consumer with an implication of industry standards, but what each one actually signified was not regulated and so they varied according to the whim of the individual foundry. In this case, the maker’s marks are often obscured by sedimentary accretion or removed by corrosion after a century of submersion in the ocean. However sufficient detail has survived to indicate that these samples of electro-plated cutlery probably originated from the same consignment in the LOCH ARD’s cargo. The following descriptions of maker’s marks are drawn from 255 tea spoons, 125 dessert spoons, and 99 table forks. These marks are clearly visible in 66 instances, while the same sequence of general outlines, or depression shapes, is discernible in another 166 examples. 1. A recessed Crown containing a raised Diamond outline and the initials “W” and “P” (the recognised trademark of William Page & Co) 2. An impressed Ellipse containing a raised, pivoted, Triangle in its lower part and bearing a Resurrection Cross on its upper section (a possible dissenting church symbol reflecting religious affiliation); OR a rounded Square impression containing a raised, ‘lazy’, letter “B” (possibly mimicking sterling silver hallmark signifying city of manufacture i.e. Birmingham) 3. An impressed rounded Square filled with a raised Maltese Cross (the base metal composite of nickel silver was also known as ‘German silver’ after its Berlin inventors in 1823) 4. A recessed Circle containing a Crab or Scarab Beetle image; OR a recessed Circle containing a rotated ‘fleur de lys’ or ‘fasces’ design 5. A depressed Diamond shape enclosing a large raised letter “R” and a small raised letter “D” (mimicking the U.K. Patent Office stamp which abbreviated the term ‘registered’ to “RD”, but also included date and class of patent) Suggested trade names for William Page & Co’s particular blend of brass plating are ‘roman silver’ or ‘silverite’. This copper alloy polishes to a lustrous gold when new, discolouring to a murky grey with greenish hue when neglected. HISTORY OF THE LOCH ARD The LOCH ARD belonged to the famous Loch Line which sailed many ships from England to Australia. Built in Glasgow by Barclay, Curdle and Co. in 1873, the LOCH ARD was a three-masted square rigged iron sailing ship. The ship measured 262ft 7" (79.87m) in length, 38ft (11.58m) in width, 23ft (7m) in depth and had a gross tonnage of 1693 tons. The LOCH ARD's main mast measured a massive 150ft (45.7m) in height. LOCH ARD made three trips to Australia and one trip to Calcutta before its final voyage. LOCH ARD left England on March 2, 1878, under the command of Captain Gibbs, a newly married, 29 year old. She was bound for Melbourne with a crew of 37, plus 17 passengers and a load of cargo. The general cargo reflected the affluence of Melbourne at the time. On board were straw hats, umbrella, perfumes, clay pipes, pianos, clocks, confectionary, linen and candles, as well as a heavier load of railway irons, cement, lead and copper. There were items included that intended for display in the Melbourne International Exhibition in 1880. The voyage to Port Phillip was long but uneventful. At 3am on June 1, 1878, Captain Gibbs was expecting to see land and the passengers were becoming excited as they prepared to view their new homeland in the early morning. But LOCH ARD was running into a fog which greatly reduced visibility. Captain Gibbs was becoming anxious as there was no sign of land or the Cape Otway lighthouse. At 4am the fog lifted. A man aloft announced that he could see breakers. The sheer cliffs of Victoria's west coast came into view, and Captain Gibbs realised that the ship was much closer to them than expected. He ordered as much sail to be set as time would permit and then attempted to steer the vessel out to sea. On coming head on into the wind, the ship lost momentum, the sails fell limp and LOCH ARD's bow swung back. Gibbs then ordered the anchors to be released in an attempt to hold its position. The anchors sank some 50 fathoms - but did not hold. By this time LOCH ARD was among the breakers and the tall cliffs of Mutton Bird Island rose behind the ship. Just half a mile from the coast, the ship's bow was suddenly pulled around by the anchor. The captain tried to tack out to sea, but the ship struck a reef at the base of Mutton Bird Island, near Port Campbell. Waves broke over the ship and the top deck was loosened from the hull. The masts and rigging came crashing down knocking passengers and crew overboard. When a lifeboat was finally launched, it crashed into the side of LOCH ARD and capsized. Tom Pearce, who had launched the boat, managed to cling to its overturned hull and shelter beneath it. He drifted out to sea and then on the flood tide came into what is now known as LOCH ARD Gorge. He swam to shore, bruised and dazed, and found a cave in which to shelter. Some of the crew stayed below deck to shelter from the falling rigging but drowned when the ship slipped off the reef into deeper water. Eva Carmichael had raced onto deck to find out what was happening only to be confronted by towering cliffs looming above the stricken ship. In all the chaos, Captain Gibbs grabbed Eva and said, "If you are saved Eva, let my dear wife know that I died like a sailor". That was the last Eva Carmichael saw of the captain. She was swept off the ship by a huge wave. Eva saw Tom Pearce on a small rocky beach and yelled to attract his attention. He dived in and swam to the exhausted woman and dragged her to shore. He took her to the cave and broke open case of brandy which had washed up on the beach. He opened a bottle to revive the unconscious woman. A few hours later Tom scaled a cliff in search of help. He followed hoof prints and came by chance upon two men from nearby Glenample Station three and a half miles away. In a state of exhaustion, he told the men of the tragedy. Tom returned to the gorge while the two men rode back to the station to get help. By the time they reached LOCH ARD Gorge, it was cold and dark. The two shipwreck survivors were taken to Glenample Station to recover. Eva stayed at the station for six weeks before returning to Ireland, this time by steamship. In Melbourne, Tom Pearce received a hero's welcome. He was presented with the first gold medal of the Royal Humane Society of Victoria and a £1000 cheque from the Victorian Government. Concerts were performed to honour the young man's bravery and to raise money for those who lost family in the LOCH ARD disaster. Of the 54 crew members and passengers on board, only two survived: the apprentice, Tom Pearce and the young woman passenger, Eva Carmichael, who lost all of her family in the tragedy. Ten days after the LOCH ARD tragedy, salvage rights to the wreck were sold at auction for £2,120. Cargo valued at £3,000 was salvaged and placed on the beach, but most washed back into the sea when another storm developed. The wreck of LOCH ARD still lies at the base of Mutton Bird Island. Much of the cargo has now been salvaged and some was washed up into what is now known as LOCH ARD Gorge. Cargo and artefacts have also been illegally salvaged over many years before protective legislation was introduced. One of the most unlikely pieces of cargo to have survived the shipwreck was a Minton porcelain peacock - one of only seven in the world. The peacock was destined for the Melbourne International Exhibition in 1880. It had been well packed, which gave it adequate protection during the violent storm. Today, the Minton peacock can be seen at the Flagstaff Hill Maritime Museum in Warrnambool. From Australia's most dramatic shipwreck it has now become Australia's most valuable shipwreck artefact and is one of very few 'objects' on the Victorian State Heritage Register. The LOCH ARD shipwreck is of State significance – Victorian Heritage Register S 417. Flagstaff Hill’s collection of artefacts from LOCH ARD is significant for being one of the largest collections of artefacts from this shipwreck in Victoria. It is significant for its association with the shipwreck, which is on the Victorian Heritage Register (VHR S417). The collection is significant because of the relationship between the objects, as together they have a high potential to interpret the story of the LOCH ARD. The LOCH ARD collection is archaeologically significant as the remains of a large international passenger and cargo ship. The LOCH ARD collection is historically significant for representing aspects of Victoria’s shipping history and its potential to interpret sub-theme 1.5 of Victoria’s Framework of Historical Themes (living with natural processes). The collection is also historically significant for its association with the LOCH ARD, which was one of the worst and best known shipwrecks in Victoria’s history. Unrestored tea spoon from the wreck of the LOCH ARD. The spoon design has a flattened fiddle-back handle, with a thin stem or shank, flared collar, and elongated bowl. The spoons metallic composition is a thin layer of brass alloy which has partially corroded back to a nickel-silver base metal. Concretion of sediment on handle. Approximately 25% of original electroplating remains. flagstaff hill maritime museum, shipwreck coast, flagstaff hill maritime village, great ocean road, loch line, loch ard, mutton bird island, loch ard gorge, electroplated cutlery, loch ard shipwreck, nickel silver, william page & co, birmingham, brass plating, makers marks -
 Flagstaff Hill Maritime Museum and Village
Spoon, circa 1878
This tea spoon is from the wreck of the LOCH ARD, a Loch Line ship of 1,693 tons which sailed from Gravesend, London, on 2 March 1878 with 17 passengers and a crew of 36 under Captain George Gibbs. “The intention was to discharge cargo in Melbourne, before returning to London via the Horn with wool and wheat”. Instead, on 1 June 1878, after 90 days at sea, she struck the sandstone cliffs of Mutton Bird Island on the south west coast of Victoria, and sank with the loss of 52 lives and all her cargo. The manifest of the LOCH ARD listed an array of manufactured goods and bulk metals being exported to the Colony of Victoria, with a declared value of £53,700. (202 bills of lading show an actual invoice value of £68, 456, with insurance underwriting to £30,000 of all cargo). Included in the manifest is the item of “Tin hardware & cutlery £7,530”. This teaspoon is one of 482 similar items of electro-plated cutlery from the LOCH ARD site, comprising spoons and forks of various sizes but all sharing the same general shape or design and metallic composition. 49 of these pieces display a legible makers’ mark — the initials “W” and “P” placed within a raised diamond outline, which is in turn contained within a sunken crown shape — identifying the manufacturer as William Page & Co of Birmingham. An electroplater’s makers’ marks, unlike sterling silver hallmarks, are not consistent identifiers of quality or date and place of manufacture. A similar line of five impressions was usually made to impress the consumer with an implication of industry standards, but what each one actually signified was not regulated and so they varied according to the whim of the individual foundry. In this case, the maker’s marks are often obscured by sedimentary accretion or removed by corrosion after a century of submersion in the ocean. However sufficient detail has survived to indicate that these samples of electro-plated cutlery probably originated from the same consignment in the LOCH ARD’s cargo. The following descriptions of maker’s marks are drawn from 255 tea spoons, 125 dessert spoons, and 99 table forks. These marks are clearly visible in 66 instances, while the same sequence of general outlines, or depression shapes, is discernible in another 166 examples. 1. A recessed Crown containing a raised Diamond outline and the initials “W” and “P” (the recognised trademark of William Page & Co) 2. An impressed Ellipse containing a raised, pivoted, Triangle in its lower part and bearing a Resurrection Cross on its upper section (a possible dissenting church symbol reflecting religious affiliation); OR a rounded Square impression containing a raised, ‘lazy’, letter “B” (possibly mimicking sterling silver hallmark signifying city of manufacture i.e. Birmingham) 3. An impressed rounded Square filled with a raised Maltese Cross (the base metal composite of nickel silver was also known as ‘German silver’ after its Berlin inventors in 1823) 4. A recessed Circle containing a Crab or Scarab Beetle image; OR a recessed Circle containing a rotated ‘fleur de lys’ or ‘fasces’ design 5. A depressed Diamond shape enclosing a large raised letter “R” and a small raised letter “D” (mimicking the U.K. Patent Office stamp which abbreviated the term ‘registered’ to “RD”, but also included date and class of patent) Suggested trade names for William Page & Co’s particular blend of brass plating are ‘roman silver’ or ‘silverite’. This copper alloy polishes to a lustrous gold when new, discolouring to a murky grey with greenish hue when neglected. HISTORY OF THE LOCH ARD The LOCH ARD belonged to the famous Loch Line which sailed many ships from England to Australia. Built in Glasgow by Barclay, Curdle and Co. in 1873, the LOCH ARD was a three-masted square rigged iron sailing ship. The ship measured 262ft 7" (79.87m) in length, 38ft (11.58m) in width, 23ft (7m) in depth and had a gross tonnage of 1693 tons. The LOCH ARD's main mast measured a massive 150ft (45.7m) in height. LOCH ARD made three trips to Australia and one trip to Calcutta before its final voyage. LOCH ARD left England on March 2, 1878, under the command of Captain Gibbs, a newly married, 29 year old. She was bound for Melbourne with a crew of 37, plus 17 passengers and a load of cargo. The general cargo reflected the affluence of Melbourne at the time. On board were straw hats, umbrella, perfumes, clay pipes, pianos, clocks, confectionary, linen and candles, as well as a heavier load of railway irons, cement, lead and copper. There were items included that intended for display in the Melbourne International Exhibition in 1880. The voyage to Port Phillip was long but uneventful. At 3am on June 1, 1878, Captain Gibbs was expecting to see land and the passengers were becoming excited as they prepared to view their new homeland in the early morning. But LOCH ARD was running into a fog which greatly reduced visibility. Captain Gibbs was becoming anxious as there was no sign of land or the Cape Otway lighthouse. At 4am the fog lifted. A man aloft announced that he could see breakers. The sheer cliffs of Victoria's west coast came into view, and Captain Gibbs realised that the ship was much closer to them than expected. He ordered as much sail to be set as time would permit and then attempted to steer the vessel out to sea. On coming head on into the wind, the ship lost momentum, the sails fell limp and LOCH ARD's bow swung back. Gibbs then ordered the anchors to be released in an attempt to hold its position. The anchors sank some 50 fathoms - but did not hold. By this time LOCH ARD was among the breakers and the tall cliffs of Mutton Bird Island rose behind the ship. Just half a mile from the coast, the ship's bow was suddenly pulled around by the anchor. The captain tried to tack out to sea, but the ship struck a reef at the base of Mutton Bird Island, near Port Campbell. Waves broke over the ship and the top deck was loosened from the hull. The masts and rigging came crashing down knocking passengers and crew overboard. When a lifeboat was finally launched, it crashed into the side of LOCH ARD and capsized. Tom Pearce, who had launched the boat, managed to cling to its overturned hull and shelter beneath it. He drifted out to sea and then on the flood tide came into what is now known as LOCH ARD Gorge. He swam to shore, bruised and dazed, and found a cave in which to shelter. Some of the crew stayed below deck to shelter from the falling rigging but drowned when the ship slipped off the reef into deeper water. Eva Carmichael had raced onto deck to find out what was happening only to be confronted by towering cliffs looming above the stricken ship. In all the chaos, Captain Gibbs grabbed Eva and said, "If you are saved Eva, let my dear wife know that I died like a sailor". That was the last Eva Carmichael saw of the captain. She was swept off the ship by a huge wave. Eva saw Tom Pearce on a small rocky beach and yelled to attract his attention. He dived in and swam to the exhausted woman and dragged her to shore. He took her to the cave and broke open case of brandy which had washed up on the beach. He opened a bottle to revive the unconscious woman. A few hours later Tom scaled a cliff in search of help. He followed hoof prints and came by chance upon two men from nearby Glenample Station three and a half miles away. In a state of exhaustion, he told the men of the tragedy. Tom returned to the gorge while the two men rode back to the station to get help. By the time they reached LOCH ARD Gorge, it was cold and dark. The two shipwreck survivors were taken to Glenample Station to recover. Eva stayed at the station for six weeks before returning to Ireland, this time by steamship. In Melbourne, Tom Pearce received a hero's welcome. He was presented with the first gold medal of the Royal Humane Society of Victoria and a £1000 cheque from the Victorian Government. Concerts were performed to honour the young man's bravery and to raise money for those who lost family in the LOCH ARD disaster. Of the 54 crew members and passengers on board, only two survived: the apprentice, Tom Pearce and the young woman passenger, Eva Carmichael, who lost all of her family in the tragedy. Ten days after the LOCH ARD tragedy, salvage rights to the wreck were sold at auction for £2,120. Cargo valued at £3,000 was salvaged and placed on the beach, but most washed back into the sea when another storm developed. The wreck of LOCH ARD still lies at the base of Mutton Bird Island. Much of the cargo has now been salvaged and some was washed up into what is now known as LOCH ARD Gorge. Cargo and artefacts have also been illegally salvaged over many years before protective legislation was introduced. One of the most unlikely pieces of cargo to have survived the shipwreck was a Minton porcelain peacock - one of only seven in the world. The peacock was destined for the Melbourne International Exhibition in 1880. It had been well packed, which gave it adequate protection during the violent storm. Today, the Minton peacock can be seen at the Flagstaff Hill Maritime Museum in Warrnambool. From Australia's most dramatic shipwreck it has now become Australia's most valuable shipwreck artefact and is one of very few 'objects' on the Victorian State Heritage Register The LOCH ARD shipwreck is of State significance – Victorian Heritage Register S 417. Flagstaff Hill’s collection of artefacts from LOCH ARD is significant for being one of the largest collections of artefacts from this shipwreck in Victoria. It is significant for its association with the shipwreck, which is on the Victorian Heritage Register (VHR S417). The collection is significant because of the relationship between the objects, as together they have a high potential to interpret the story of the LOCH ARD. The LOCH ARD collection is archaeologically significant as the remains of a large international passenger and cargo ship. The LOCH ARD collection is historically significant for representing aspects of Victoria’s shipping history and its potential to interpret sub-theme 1.5 of Victoria’s Framework of Historical Themes (living with natural processes). The collection is also historically significant for its association with the LOCH ARD, which was one of the worst and best known shipwrecks in Victoria’s history. Unrestored tea spoon from the wreck of the LOCH ARD. The spoon design has a flattened fiddle-back handle, with a thin stem or shank, flared collar, and elongated bowl. The spoons metallic composition is a thin layer of brass alloy which has partially corroded back to a nickel-silver base metal. Concretion of sediment on handle. Outlines of three makers marks visible on lower rear of handle. Plain heraldic shield embossed on upper rear of bowl.flagstaff hill, warrnambool, shipwrecked coast, flagstaff hill maritime museum, maritime museum, shipwreck coast, flagstaff hill maritime village, great ocean road, loch line, loch ard, captain gibbs, eva carmichael, tom pearce, glenample station, mutton bird island, loch ard gorge, electroplated cutlery, loch ard shipwreck, nickel silver, william page & co, birmingham, brass plating, makers marks -
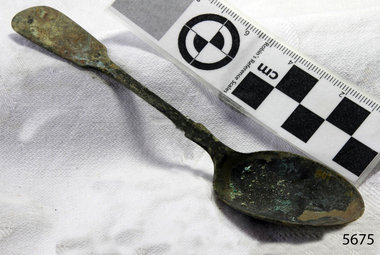 Flagstaff Hill Maritime Museum and Village
Spoon, circa 1878
This tea spoon is from the wreck of the LOCH ARD, a Loch Line ship of 1,693 tons which sailed from Gravesend, London, on 2 March 1878 with 17 passengers and a crew of 36 under Captain George Gibbs. “The intention was to discharge cargo in Melbourne, before returning to London via the Horn with wool and wheat”. Instead, on 1 June 1878, after 90 days at sea, she struck the sandstone cliffs of Mutton Bird Island on the south west coast of Victoria, and sank with the loss of 52 lives and all her cargo. The manifest of the LOCH ARD listed an array of manufactured goods and bulk metals being exported to the Colony of Victoria, with a declared value of £53,700. (202 bills of lading show an actual invoice value of £68, 456, with insurance underwriting to £30,000 of all cargo). Included in the manifest is the item of “Tin hardware & cutlery £7,530”. This teaspoon is one of 482 similar items of electro-plated cutlery from the LOCH ARD site, comprising spoons and forks of various sizes but all sharing the same general shape or design and metallic composition. 49 of these pieces display a legible makers’ mark — the initials “W” and “P” placed within a raised diamond outline, which is in turn contained within a sunken crown shape — identifying the manufacturer as William Page & Co of Birmingham. An electroplater’s makers’ marks, unlike sterling silver hallmarks, are not consistent identifiers of quality or date and place of manufacture. A similar line of five impressions was usually made to impress the consumer with an implication of industry standards, but what each one actually signified was not regulated and so they varied according to the whim of the individual foundry. In this case, the maker’s marks are often obscured by sedimentary accretion or removed by corrosion after a century of submersion in the ocean. However sufficient detail has survived to indicate that these samples of electro-plated cutlery probably originated from the same consignment in the LOCH ARD’s cargo. The following descriptions of maker’s marks are drawn from 255 tea spoons, 125 dessert spoons, and 99 table forks. These marks are clearly visible in 66 instances, while the same sequence of general outlines, or depression shapes, is discernible in another 166 examples. 1. A recessed Crown containing a raised Diamond outline and the initials “W” and “P” (the recognised trademark of William Page & Co) 2. An impressed Ellipse containing a raised, pivoted, Triangle in its lower part and bearing a Resurrection Cross on its upper section (a possible dissenting church symbol reflecting religious affiliation); OR a rounded Square impression containing a raised, ‘lazy’, letter “B” (possibly mimicking sterling silver hallmark signifying city of manufacture i.e. Birmingham) 3. An impressed rounded Square filled with a raised Maltese Cross (the base metal composite of nickel silver was also known as ‘German silver’ after its Berlin inventors in 1823) 4. A recessed Circle containing a Crab or Scarab Beetle image; OR a recessed Circle containing a rotated ‘fleur de lys’ or ‘fasces’ design 5. A depressed Diamond shape enclosing a large raised letter “R” and a small raised letter “D” (mimicking the U.K. Patent Office stamp which abbreviated the term ‘registered’ to “RD”, but also included date and class of patent) Suggested trade names for William Page & Co’s particular blend of brass plating are ‘roman silver’ or ‘silverite’. This copper alloy polishes to a lustrous gold when new, discolouring to a murky grey with greenish hue when neglected. HISTORY OF THE LOCH ARD The LOCH ARD belonged to the famous Loch Line which sailed many ships from England to Australia. Built in Glasgow by Barclay, Curdle and Co. in 1873, the LOCH ARD was a three-masted square rigged iron sailing ship. The ship measured 262ft 7" (79.87m) in length, 38ft (11.58m) in width, 23ft (7m) in depth and had a gross tonnage of 1693 tons. The LOCH ARD's main mast measured a massive 150ft (45.7m) in height. LOCH ARD made three trips to Australia and one trip to Calcutta before its final voyage. LOCH ARD left England on March 2, 1878, under the command of Captain Gibbs, a newly married, 29 year old. She was bound for Melbourne with a crew of 37, plus 17 passengers and a load of cargo. The general cargo reflected the affluence of Melbourne at the time. On board were straw hats, umbrella, perfumes, clay pipes, pianos, clocks, confectionary, linen and candles, as well as a heavier load of railway irons, cement, lead and copper. There were items included that intended for display in the Melbourne International Exhibition in 1880. The voyage to Port Phillip was long but uneventful. At 3am on June 1, 1878, Captain Gibbs was expecting to see land and the passengers were becoming excited as they prepared to view their new homeland in the early morning. But LOCH ARD was running into a fog which greatly reduced visibility. Captain Gibbs was becoming anxious as there was no sign of land or the Cape Otway lighthouse. At 4am the fog lifted. A man aloft announced that he could see breakers. The sheer cliffs of Victoria's west coast came into view, and Captain Gibbs realised that the ship was much closer to them than expected. He ordered as much sail to be set as time would permit and then attempted to steer the vessel out to sea. On coming head on into the wind, the ship lost momentum, the sails fell limp and LOCH ARD's bow swung back. Gibbs then ordered the anchors to be released in an attempt to hold its position. The anchors sank some 50 fathoms - but did not hold. By this time LOCH ARD was among the breakers and the tall cliffs of Mutton Bird Island rose behind the ship. Just half a mile from the coast, the ship's bow was suddenly pulled around by the anchor. The captain tried to tack out to sea, but the ship struck a reef at the base of Mutton Bird Island, near Port Campbell. Waves broke over the ship and the top deck was loosened from the hull. The masts and rigging came crashing down knocking passengers and crew overboard. When a lifeboat was finally launched, it crashed into the side of LOCH ARD and capsized. Tom Pearce, who had launched the boat, managed to cling to its overturned hull and shelter beneath it. He drifted out to sea and then on the flood tide came into what is now known as LOCH ARD Gorge. He swam to shore, bruised and dazed, and found a cave in which to shelter. Some of the crew stayed below deck to shelter from the falling rigging but drowned when the ship slipped off the reef into deeper water. Eva Carmichael had raced onto deck to find out what was happening only to be confronted by towering cliffs looming above the stricken ship. In all the chaos, Captain Gibbs grabbed Eva and said, "If you are saved Eva, let my dear wife know that I died like a sailor". That was the last Eva Carmichael saw of the captain. She was swept off the ship by a huge wave. Eva saw Tom Pearce on a small rocky beach and yelled to attract his attention. He dived in and swam to the exhausted woman and dragged her to shore. He took her to the cave and broke open case of brandy which had washed up on the beach. He opened a bottle to revive the unconscious woman. A few hours later Tom scaled a cliff in search of help. He followed hoof prints and came by chance upon two men from nearby Glenample Station three and a half miles away. In a state of exhaustion, he told the men of the tragedy. Tom returned to the gorge while the two men rode back to the station to get help. By the time they reached LOCH ARD Gorge, it was cold and dark. The two shipwreck survivors were taken to Glenample Station to recover. Eva stayed at the station for six weeks before returning to Ireland, this time by steamship. In Melbourne, Tom Pearce received a hero's welcome. He was presented with the first gold medal of the Royal Humane Society of Victoria and a £1000 cheque from the Victorian Government. Concerts were performed to honour the young man's bravery and to raise money for those who lost family in the LOCH ARD disaster. Of the 54 crew members and passengers on board, only two survived: the apprentice, Tom Pearce and the young woman passenger, Eva Carmichael, who lost all of her family in the tragedy. Ten days after the LOCH ARD tragedy, salvage rights to the wreck were sold at auction for £2,120. Cargo valued at £3,000 was salvaged and placed on the beach, but most washed back into the sea when another storm developed. The wreck of LOCH ARD still lies at the base of Mutton Bird Island. Much of the cargo has now been salvaged and some was washed up into what is now known as LOCH ARD Gorge. Cargo and artefacts have also been illegally salvaged over many years before protective legislation was introduced. One of the most unlikely pieces of cargo to have survived the shipwreck was a Minton porcelain peacock - one of only seven in the world. The peacock was destined for the Melbourne International Exhibition in 1880. It had been well packed, which gave it adequate protection during the violent storm. Today, the Minton peacock can be seen at the Flagstaff Hill Maritime Museum in Warrnambool. From Australia's most dramatic shipwreck it has now become Australia's most valuable shipwreck artefact and is one of very few 'objects' on the Victorian State Heritage Register. The LOCH ARD shipwreck is of State significance – Victorian Heritage Register S 417. Flagstaff Hill’s collection of artefacts from LOCH ARD is significant for being one of the largest collections of artefacts from this shipwreck in Victoria. It is significant for its association with the shipwreck, which is on the Victorian Heritage Register (VHR S417). The collection is significant because of the relationship between the objects, as together they have a high potential to interpret the story of the LOCH ARD. The LOCH ARD collection is archaeologically significant as the remains of a large international passenger and cargo ship. The LOCH ARD collection is historically significant for representing aspects of Victoria’s shipping history and its potential to interpret sub-theme 1.5 of Victoria’s Framework of Historical Themes (living with natural processes). The collection is also historically significant for its association with the LOCH ARD, which was one of the worst and best known shipwrecks in Victoria’s history. Unrestored tea spoon from the wreck of the LOCH ARD. The spoon design has a flattened fiddle-back handle, with a thin stem or shank, flared collar, and elongated bowl. The spoons metallic composition is a thin layer of brass alloy which has partially corroded back to a nickel-silver base metal. Only traces of original electroplate remain. Makers marks obscured.flagstaff hill, warrnambool, shipwrecked coast, flagstaff hill maritime museum, maritime museum, shipwreck coast, flagstaff hill maritime village, great ocean road, loch line, loch ard, captain gibbs, eva carmichael, tom pearce, glenample station, mutton bird island, loch ard gorge, electroplated cutlery, loch ard shipwreck, nickel silver, william page & co, birmingham, brass plating, makers marks