Showing 1696 items
matching uk.
-
 Flagstaff Hill Maritime Museum and Village
Container - Tin, c. 1930-1955s
This metal tin once contained sewing silk thread used in the making of the ship model, Sovereign of the Seas. Natural silk thread has elasticity and can also be teased out for making fine line for rigging on ship models. ”. It is part of a collection of objects used by Jim Williams, maker of fine ship models from about 1930-1955. Most of the components for the models, as well as many of the tools, were handmade by Jim Williams. Ship model of HMS Sovereign of the Seas, scale model of 17th Century English war ship, was handmade and carved from plans, enclosed in airtight glass case. All components of that model, including even the smallest pulleys, were hand crafted using tools designed and made by Jim. Outstanding details include functional rigging and moving cannons. Please see our record 3732 of the mode Sovereign of the Seas for further details of the ship and the maker. This tin of tailor's silk is connected with the hobby and skill of ship model making that has been crafted as a leisure activity for many generations. The hobby is often chosen by serving and retired mariners who appreciate the connection with maritime history. This tailor's silk was used by local Warrnambool man, Jim Williams, who was employed at Cramond and Dickson clothing store, and then at Fletcher Jones menswear for 27 years. It was used in making components for the model of the historic ship, the Sovereign of the Seas. The Sovereign of the Seas was a historic 17th century English war ship with important maritime heritage.Tin, round, with lid. Red label reads “The "A.B.C" Brand Tailors Sewing Silk (Raven) Color Fast. Dyed by a new process. Manufactured from the best raw silks procurable. Warranted. Made in England. Size No. 1/4 LB” .The container has no contents. This tin is part of a collection of tools and accessories once used by Jim Williams, maker of a series of ship models 1930-1955 including “HMS Sovereign of the Seas”. “The "A.B.C" Brand Tailors Sewing Silk (Raven) Color Fast. Dyed by a new process. Manufactured from the best raw silks procurable. Warranted. Made in England. Size No. 1/4 LB”, Logo on lid is the intertwined letters of “A.B.C.” flagstaff hill, warrnambool, shipwrecked coast, flagstaff hill maritime museum, maritime museum, shipwreck coast, flagstaff hill maritime village, great ocean road, ship model sovereign of the seas, jim williams, james bernard williams, ship model tools, ship model making, ship model making accessories, "a.b.c" brand tailors sewing silk, silk sewing thread, textile, tin container for silk thread, ship model, hobby, ship model tool, english war ship -
 Flagstaff Hill Maritime Museum and Village
Container - Tin, 1930-1955's
This metal tin once contained sewing silk thread, and was later used for storing 'B' hinges used in the making of the ship model, Sovereign of the Seas. Natural silk thread used in the model has elasticity and can also be teased out for making fine line for rigging on ship models. This object is one of the tools and accessories used by Jim Williams from about 1930-1955 to hand craft the ship model “HMS Sovereign of the Seas”. It is part of a collection of objects used by Jim Williams, maker of fine ship models from about 1930-1955. Most of the components for the models, as well as many of the tools, were handmade by Jim Williams. Ship model of HMS Sovereign of the Seas, scale model of 17th Century English war ship, was handmade and carved from plans, enclosed in airtight glass case. All components of that model, including even the smallest pulleys, were hand crafted using tools designed and made by Jim. Outstanding details include functional rigging and moving cannons. Please see our record 3732 of the mode Sovereign of the Seas for further details of the ship and the maker. This tailor’s silk container, and its later used as storage for hinges, was used in the hobby and skill of ship model making that has been carried as a leisure activity out for generations. The hobby is often chosen by serving and retired mariners who appreciate the connection with maritime history. This tin was used by local Warrnambool man, Jim Williams, who was employed at Cramond and Dickson clothing store, and then at Fletcher Jones menswear for 27 years. It was used in making components for the model of the historic ship, the Sovereign of the Seas. The Sovereign of the Seas was a historic 17th century English war ship with important maritime heritage. Tin, round, with lid. Red label reads “The "A.B.C" Brand Tailors Sewing Silk (Raven) Color Fast. Dyed by a new process. Manufactured from the best raw silks procurable. Warranted. Made in England. Size No. 1/4 LB” .The container has no contents. This tin is part of a collection of tools and accessories once used by Jim Williams, maker of a series of ship models 1930-1955 including “HMS Sovereign of the Seas”. “The "A.B.C" Brand Tailors Sewing Silk (Raven) Color Fast. Dyed by a new process. Manufactured from the best raw silks procurable. Warranted. Made in England. Size No. 1/4 LB”, Logo on lid is the intertwined letters of “A.B.C.”flagstaff hill, warrnambool, flagstaff hill maritime museum, maritime museum, flagstaff hill maritime village, great ocean road, jim williams, james bernard williams, ship model tools, ship model making, ship model making accessories, "a.b.c" brand tailors sewing silk, b hinges, textile, silk thread, sewing silk, shipwreck coast, ship model, hobby, ship model tool, english war ship -
 Flagstaff Hill Maritime Museum and Village
Instrument - Spirit Level, Barringtons, 1930-1955's
This 10” (ten inch) spirit level was made from boxwood by Barringtons of London. It was used in the making of ship model Sovereign of the Seas. It is part of a collection of objects used by Jim Williams, maker of fine ship models from about 1930-1955. Most of the components for the models, as well as many of the tools, were handmade by Jim Williams. Jim’s family has donated the ship model “Sovereign of the Seas” and many tools, accessories and documents used in the making of this and other ship models have been donated to Flagstaff Hill Maritime Village. Ship model of HMS Sovereign of the Seas, scale model of 17th Century English war ship, was handmade and carved from plans, enclosed in airtight glass case. All components of that model, including even the smallest pulleys, were hand crafted using tools designed and made by Jim. Outstanding details include functional rigging and moving cannons. Please see our record 3732 of the mode Sovereign of the Seas for further details of the ship and the maker. This spirit level is connected with the hobby and skill of ship model making that has been crafted as a leisure activity for many generations. The hobby is often chosen by serving and retired mariners who appreciate the connection with maritime history. This spirit level was used by local Warrnambool man, Jim Williams, who was employed at Cramond and Dickson clothing store, and then at Fletcher Jones menswear for 27 years. It was used in making components for the model of the historic ship, the Sovereign of the Seas. The Sovereign of the Seas was a historic 17th century English war ship with important maritime heritage. Wooden spirit level. Barringtons Spirit level No 650, Warranted boxwood. Made in London. Length 10" (10 inches). Bottom corners are reinforced with metal protection. It has two levels. The vertical level is within a round cut-out in one end. The horizontal level is on the top edge, surrounded by a metal plate with two cut-outs. One side of the spirit level has a ruler marked at 1/16 inch intervals, the other side is marked at 1/8 inch intervals. There is a large circle cut-out in the end that holds the vertical level. Both sides have the manufacturer’s name, the level’s model number and the material it is made of. One side also has the city of manufacture – England. This spirit level is part of a collection of tools and accessories once used by Jim Williams, maker of a series of ship models 1930-1955 including “HMS Sovereign of the Seas”. 2x “WARRANTED BOXWOOD”, 2x “BARRINGTON’S No 650”, “LONDON”flagstaff hill, warrnambool, flagstaff hill maritime museum, shipwreck coast, flagstaff hill maritime village, great ocean road, jim williams, james bernard williams, ship model hobby, ship model tools, ship model making equipment, ship model making accessories, barringtons spirit level, barringtons london, 10” spirit level, sovereign of the sea, ship model, hobby, ship model tool, english war ship, measuring instrument -
 Flagstaff Hill Maritime Museum and Village
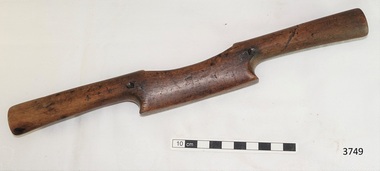
Tool - Hammer, 1930-1955's
This double headed hammer seems to be modified for a particular use, with the addition of a one-pronged claw on one end. It was used in the making of ship model Sovereign of the Seas. It is part of a collection of objects used by Jim Williams, maker of fine ship models from about 1930-1955. Most of the components for the models, as well as many of the tools, were handmade by Jim Williams. Jim’s family has donated the ship model “Sovereign of the Seas” and many tools, accessories and documents used in the making of this and other ship models have been donated to Flagstaff Hill Maritime Village. Ship model of HMS Sovereign of the Seas, scale model of 17th Century English war ship, was handmade and carved from plans, enclosed in airtight glass case. All components of that model, including even the smallest pulleys, were hand crafted using tools designed and made by Jim. Outstanding details include functional rigging and moving cannons. Please see our record 3732 of the mode Sovereign of the Seas for further details of the ship and the maker. This hammer is connected with the hobby and skill of ship model making that has been crafted as a leisure activity for many generations. The hobby is often chosen by serving and retired mariners who appreciate the connection with maritime history. This hammer was modified and was used by local Warrnambool man, Jim Williams, who was employed at Cramond and Dickson clothing store, and then at Fletcher Jones menswear for 27 years. It was used in making components for the model of the historic ship, the Sovereign of the Seas. The Sovereign of the Seas was a historic 17th century English war ship with important maritime heritage. Hammer, small, double ended; metal hammer one end, wooden bulbous handle, metal claw hook at the end. This hook is part of a claw hammer with one prong broken off, perhaps to serve a particular purpose. The claw end has remnants of red paint. This hammer is part of a collection of tools and accessories once used by Jim Williams, maker of a series of ship models 1930-1955 including “HMS Sovereign of the Seas”. flagstaff hill, warrnambool, flagstaff hill maritime museum, shipwreck coast, flagstaff hill maritime village, great ocean road, ship model sovereign of the seas, jim williams, james bernard williams, ship model hobby, ship model tools, ship model making equipment, ship model making accessories, double ended hammer, modified hammer, sovereign of the sea, ship model, hobby, ship model tool, english war ship -
 Flagstaff Hill Maritime Museum and Village
Tool - Spokeshave, 1930-1955's
This wooden spokeshave was used in the making of ship model Sovereign of the Seas. It would have been used to shave and shape wood in a similar way that a plane would be used. Its name comes from its use for shaping curved objects such as wheel spokes, oars, paddles, chair legs and bows. It is part of a collection of objects used by Jim Williams, maker of fine ship models from about 1930-1955. Most of the components for the models, as well as many of the tools, were handmade by Jim Williams. Jim’s family has donated the ship model “Sovereign of the Seas” and many tools, accessories and documents used in the making of this and other ship models have been donated to Flagstaff Hill Maritime Village. Ship model of HMS Sovereign of the Seas, scale model of 17th Century English war ship, was handmade and carved from plans, enclosed in airtight glass case. All components of that model, including even the smallest pulleys, were hand crafted using tools designed and made by Jim. Outstanding details include functional rigging and moving cannons. Please see our record 3732 of the mode Sovereign of the Seas for further details of the ship and the maker.This spokeshave is connected with the hobby and skill of ship model making that has been crafted as a leisure activity for many generations. The hobby is often chosen by serving and retired mariners who appreciate the connection with maritime history. This spokeshave was used by local Warrnambool man, Jim Williams, who was employed at Cramond and Dickson clothing store, and then at Fletcher Jones menswear for 27 years. It was used in making components for the model of the historic ship, the Sovereign of the Seas. The Sovereign of the Seas was a historic 17th century English war ship with important maritime heritage. Spokeshave; two-handled, medium coloured wood tool, slightly curved centre. The front has two blade screws protruding from it, the back has a flat ‘sole’ with removable brass blade attached by screws. This spokeshave is part of a collection of tools and accessories once used by Jim Williams, maker of a series of ship models 1930-1955 including “HMS Sovereign of the Seas”. (Illegible text is pressed into the top side of the spoke shave.)flagstaff hill, warrnambool, flagstaff hill maritime museum, shipwreck coast, flagstaff hill maritime village, great ocean road, jim williams, james bernard williams, ship model hobby, ship model tools, ship model making equipment, ship model making accessories, spokeshave, spoke shave, sovereign of the sea, ship model, hobby, ship model tool, english war ship -
 Flagstaff Hill Maritime Museum and Village
Instrument - Dividers, 1930-1955's
This set of dividers was used for measuring and marking details in the planning making of components for the ship model Sovereign of the Seas. It is part of a collection of objects used by Jim Williams, maker of fine ship models from about 1930-1955. Most of the components for the models, as well as many of the tools, were handmade by Jim Williams. Jim’s family has donated the ship model “Sovereign of the Seas” and many tools, accessories and documents used in the making of this and other ship models have been donated to Flagstaff Hill Maritime Village. Ship model of HMS Sovereign of the Seas, scale model of 17th Century English war ship, was handmade and carved from plans, enclosed in airtight glass case. All components of that model, including even the smallest pulleys, were hand crafted using tools designed and made by Jim. Outstanding details include functional rigging and moving cannons. Please see our record 3732 of the mode Sovereign of the Seas for further details of the ship and the maker.This set of dividers is connected with the hobby and skill of ship model making that has been crafted as a leisure activity for many generations. The hobby is often chosen by serving and retired mariners who appreciate the connection with maritime history. These dividers were used by local Warrnambool man, Jim Williams, who was employed at Cramond and Dickson clothing store, and then at Fletcher Jones menswear for 27 years. It was used in making components for the model of the historic ship, the Sovereign of the Seas. The Sovereign of the Seas was a historic 17th century English war ship with important maritime heritage. Dividers, metal, adjustable with wingnut to hold in place. Used to measure and mark reoccurring distances. This set of dividers is part of a collection of tools and accessories once used by Jim Williams, maker of a series of ship models 1930-1955 including “HMS Sovereign of the Seas”.flagstaff hill, warrnambool, flagstaff hill maritime museum, maritime museum, shipwreck coast, flagstaff hill maritime village, great ocean road, jim williams, james bernard williams, ship model hobby, ship model tools, ship model making equipment, ship model making accessories, technical drawing instrument, dividers for drawing and measuring, set of dividers, sovereign of the sea, ship model, hobby, ship model tool, english war ship, measuring instrument -
 Flagstaff Hill Maritime Museum and Village
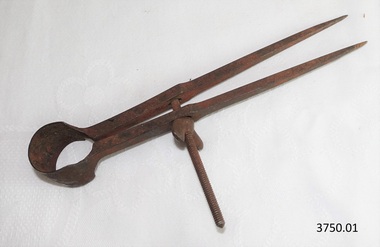
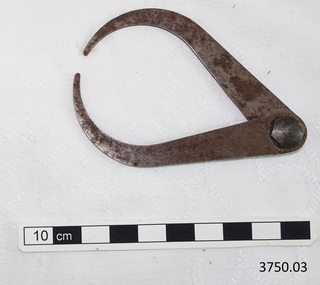
Instrument - Calipers, 1930-1955's
This set of calipers was used for measuring widths or thicknesses in the planning and making of components for the ship model Sovereign of the Seas. It is part of a collection of objects used by Jim Williams, maker of fine ship models from about 1930-1955. Most of the components for the models, as well as many of the tools, were handmade by Jim Williams. Jim’s family has donated the ship model “Sovereign of the Seas” and many tools, accessories and documents used in the making of this and other ship models have been donated to Flagstaff Hill Maritime Village. Ship model of HMS Sovereign of the Seas, scale model of 17th Century English war ship, was handmade and carved from plans, enclosed in airtight glass case. All components of that model, including even the smallest pulleys, were hand crafted using tools designed and made by Jim. Outstanding details include functional rigging and moving cannons. Please see our record 3732 of the mode Sovereign of the Seas for further details of the ship and the maker. This calliper is connected with the hobby and skill of ship model making that has been crafted as a leisure activity for many generations. The hobby is often chosen by serving and retired mariners who appreciate the connection with maritime history. This calliper was used by local Warrnambool man, Jim Williams, who was employed at Cramond and Dickson clothing store, and then at Fletcher Jones menswear for 27 years. It was used in making components for the model of the historic ship, the Sovereign of the Seas. The Sovereign of the Seas was a historic 17th century English war ship with important maritime heritage.Calipers, metal, two curved arms joined at the top to open and close. Spot of orange paint on one arm. Used to measure thickness of materials. This set of calipers is part of a collection of tools and accessories once used by Jim Williams, maker of a series of ship models 1930-1955 including “HMS Sovereign of the Seas”.flagstaff hill, warrnambool, flagstaff hill maritime museum, maritime museum, shipwreck coast, flagstaff hill maritime village, great ocean road, jim williams, james bernard williams, ship model hobby, ship model tools, ship model making equipment, ship model making accessories, technical drawing instrument, calipers for drawing and measuring, measuring instrument, sovereign of the sea, ship model, hobby, ship model tool, english war ship, calliper, callipers -
 Flagstaff Hill Maritime Museum and Village
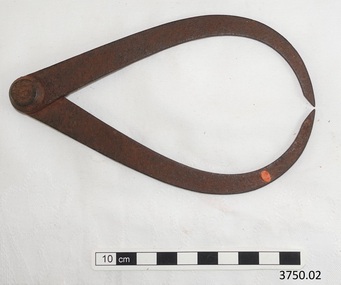
Instrument - Calipers, 1930-1955's
This set of calipers was used for measuring and marking in the planning and making of components for the ship model Sovereign of the Seas. It is part of a collection of objects used by Jim Williams, maker of fine ship models from about 1930-1955. Most of the components for the models, as well as many of the tools, were handmade by Jim Williams. Jim’s family has donated the ship model “Sovereign of the Seas” and many tools, accessories and documents used in the making of this and other ship models have been donated to Flagstaff Hill Maritime Village. Ship model of HMS Sovereign of the Seas, scale model of 17th Century English war ship, was handmade and carved from plans, enclosed in airtight glass case. All components of that model, including even the smallest pulleys, were hand crafted using tools designed and made by Jim. Outstanding details include functional rigging and moving cannons. Please see our record 3732 of the mode Sovereign of the Seas for further details of the ship and the maker. This calliper is connected with the hobby and skill of ship model making that has been crafted as a leisure activity for many generations. The hobby is often chosen by serving and retired mariners who appreciate the connection with maritime history. This calliper was used by local Warrnambool man, Jim Williams, who was employed at Cramond and Dickson clothing store, and then at Fletcher Jones menswear for 27 years. It was used in making components for the model of the historic ship, the Sovereign of the Seas. The Sovereign of the Seas was a historic 17th century English war ship with important maritime heritage. Calipers, metal, two arms joined by hexagonal bolt. Made by Moore & Wright, Sheffield, England. Maker’s name pressed into metal on arm. Use to measure thickness of materials. This set of calipers is part of a collection of tools and accessories once used by Jim Williams, maker of a series of ship models 1930-1955 including “HMS Sovereign of the Seas”. “MOORE & WRIGHT / SHEFFIELD ENGLAND”flagstaff hill, warrnambool, flagstaff hill maritime museum, maritime museum, shipwreck coast, flagstaff hill maritime village, great ocean road, ship model sovereign of the seas, jim williams, james bernard williams, ship model hobby, ship model tools, ship model making equipment, ship model making accessories, technical drawing instrument, calipers for drawing and measuring, moore & wright of sheffield england, sovereign of the sea, ship model, hobby, ship model tool, english war ship, measuring instrument -
 Flagstaff Hill Maritime Museum and Village
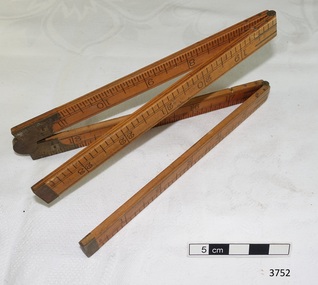
Instrument - Ruler, 1930-1955's
This measuring ruler was used in the planning and making of components for the ship model Sovereign of the Seas. It is part of a collection of objects used by Jim Williams, maker of fine ship models from about 1930-1955. Most of the components for the models, as well as many of the tools, were handmade by Jim Williams. Jim’s family has donated the ship model “Sovereign of the Seas” and many tools, accessories and documents used in the making of this and other ship models have been donated to Flagstaff Hill Maritime Village. Ship model of HMS Sovereign of the Seas, scale model of 17th Century English war ship, was handmade and carved from plans, enclosed in airtight glass case. All components of that model, including even the smallest pulleys, were hand crafted using tools designed and made by Jim. Outstanding details include functional rigging and moving cannons. Please see our record 3732 of the mode Sovereign of the Seas for further details of the ship and the maker. This ruler is connected with the hobby and skill of ship model making that has been crafted as a leisure activity for many generations. The hobby is often chosen by serving and retired mariners who appreciate the connection with maritime history. This ruler was used by local Warrnambool man, Jim Williams, who was employed at Cramond and Dickson clothing store, and then at Fletcher Jones menswear for 27 years. It was used in making components for the model of the historic ship, the Sovereign of the Seas. The Sovereign of the Seas was a historic 17th century English war ship with important maritime heritage. Ruler; folding wooden ruler, 36 inches long. Two small notches match with tiny pins when folded. This ruler is part of a collection of tools and accessories once used by Jim Williams, maker of a series of ship models 1930-1955 including “HMS Sovereign of the Seas”. flagstaff hill, warrnambool, flagstaff hill maritime museum, maritime museum, shipwreck coast, flagstaff hill maritime village, great ocean road, ship model sovereign of the seas, jim williams, james bernard williams, ship model hobby, ship model tools, ship model making equipment, ship model making accessories, measuring instrument, ruler, folding ruler, sovereign of the sea, ship model, hobby, ship model tool, english war ship -
 Flagstaff Hill Maritime Museum and Village
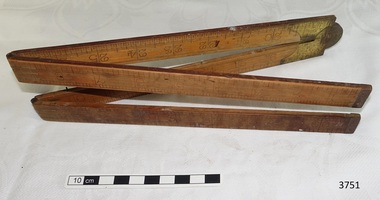
Instrument - Ruler, 1930-1955's
This measuring ruler was used in the planning and making of components for the ship model Sovereign of the Seas. It is part of a collection of objects used by Jim Williams, maker of fine ship models from about 1930-1955. Most of the components for the models, as well as many of the tools, were handmade by Jim Williams. Jim’s family has donated the ship model “Sovereign of the Seas” and many tools, accessories and documents used in the making of this and other ship models have been donated to Flagstaff Hill Maritime Village. Ship model of HMS Sovereign of the Seas, scale model of 17th Century English war ship, was handmade and carved from plans, enclosed in airtight glass case. All components of that model, including even the smallest pulleys, were hand crafted using tools designed and made by Jim. Outstanding details include functional rigging and moving cannons. Please see our record 3732 of the mode Sovereign of the Seas for further details of the ship and the maker. This ruler made by instrument makers J Rabone and Sons of Birmingham, is connected with the hobby and skill of ship model making that has been crafted as a leisure activity for many generations. The hobby is often chosen by serving and retired mariners who appreciate the connection with maritime history. This ruler was used by local Warrnambool man, Jim Williams, who was employed at Cramond and Dickson clothing store, and then at Fletcher Jones menswear for 27 years. It was used in making components for the model of the historic ship, the Sovereign of the Seas. The Sovereign of the Seas was a historic 17th century English war ship with important maritime heritage. Ruler, folding, wooden with brass hinges. Maker J. Rabone & Sons, Birmingham. Model No. 1375. It is warranted to be made of Boxwood. Length is 24 inches, divided into 1/8th inches on one side and 1/16th inches on the other side. This ruler is part of a collection of tools and accessories once used by Jim Williams, maker of a series of ship models 1930-1955 including “HMS Sovereign of the Seas”.“J RABONE & SONS / BIRMINGHAM”, “WARAND BOXWOOD”, “NO 1375”flagstaff hill, warrnambool, flagstaff hill maritime museum, maritime museum, shipwreck coast, flagstaff hill maritime village, great ocean road, ship model sovereign of the seas, jim williams, james bernard williams, ship model hobby, ship model tools, ship model making equipment, ship model making accessories, measuring instrument, ruler, folding ruler, j rabone and sons of birmingham england, ruler model 1375, sovereign of the sea, ship model, hobby, ship model tool, english war ship, j rabone and sons -
 Flagstaff Hill Maritime Museum and Village
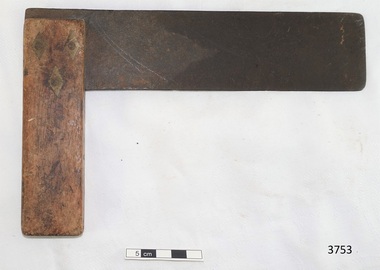
Instrument - Set Square, 1930-1955's
This set square was used in the planning and making of components for the ship model Sovereign of the Seas. It is part of a collection of objects used by Jim Williams, maker of fine ship models from about 1930-1955. Most of the components for the models, as well as many of the tools, were handmade by Jim Williams. Jim’s family has donated the ship model “Sovereign of the Seas” and many tools, accessories and documents used in the making of this and other ship models have been donated to Flagstaff Hill Maritime Village. Ship model of HMS Sovereign of the Seas, scale model of 17th Century English war ship, was handmade and carved from plans, enclosed in airtight glass case. All components of that model, including even the smallest pulleys, were hand crafted using tools designed and made by Jim. Outstanding details include functional rigging and moving cannons. Please see our record 3732 of the mode Sovereign of the Seas for further details of the ship and the maker. James Bernard Williams was known as Jim Williams, born 1888 at The Forth and died 1959 in Warrnambool. He was a passionate ship model builder. Jim left school at the age of 14 years to work at the Don Store in Ulverstone, Tasmania. He played piano at the silent pictures. He enlisted and fought in France along with his two brothers and was wounded there. On return to Tasmania he found it difficult to get employment. He moved to Warrnambool and worked in the menswear department at Cramond & Dickson clothing store, corner of Timor and Liebig streets, until the Depression, when he lost his job. After some time unemployed and working part time until 1932, Jim was employed at Fletcher Jones Menswear in Warrnambool. In 1957 Fletcher Jones invited Jim to write out a list of the most interesting details of the ship model Sovereign of the Seas, with the view of displaying the model and the information for a short time in the factory and then move it to the display window of the Fletcher Jones shop in Warrnambool. Jim worked there for 27 years until just before he died in 1959. His Retirement Speech letter and a Staff Photo from Fletcher Jones are included with the donation. ABOUT JIM’S MODEL MAKING For many years Jim worked on his model ships, including The Endeavour and The Sovereign of the Seas. He had a table set up in a bay window and worked on them on and off using a jeweller's eye glass on the finer pieces. He was a real perfectionist and would re-carve pieces many times until he was happy with the results. This set square is connected with the hobby and skill of ship model making that has been crafted as a leisure activity for many generations. The hobby is often chosen by serving and retired mariners who appreciate the connection with maritime history. This set square was used by local Warrnambool man, Jim Williams, who was employed at Cramond and Dickson clothing store, and then at Fletcher Jones menswear for 27 years. It was used in making components for the model of the historic ship, the Sovereign of the Seas. The Sovereign of the Seas was a historic 17th century English war ship with important maritime heritage. Set square; thin, flat metal blade with rounded corners set at a right-angle into timber stock using three rivets, each with a diamond shaped surround. There is a remnant of red paint on the timber and signs that the set square has been well used. This set square is part of a collection of tools and accessories once used by Jim Williams, maker of a series of ship models 1930-1955 including “HMS Sovereign of the Seas”. flagstaff hill, warrnambool, flagstaff hill maritime museum, maritime museum, shipwreck coast, flagstaff hill maritime village, great ocean road, ship model sovereign of the seas, jim williams, james bernard williams, ship model hobby, ship model tools, ship model making equipment, ship model making accessories, measuring instrument, technical drawing instrument, set square, carpenter’s square, drawing instrument, drawing tool, technical drawing tool, sovereign of the sea, ship model, hobby, ship model tool, english war ship -
 Flagstaff Hill Maritime Museum and Village
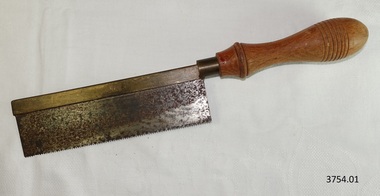
Tool - Saw, 1930-1955's
This tenon saw was used in the making of components for the ship model Sovereign of the Seas. Tenon saws are often used for making dovetail joints. It is part of a collection of objects used by Jim Williams, maker of fine ship models from about 1930-1955. Most of the components for the models, as well as many of the tools, were handmade by Jim Williams. Jim’s family has donated the ship model “Sovereign of the Seas” and many tools, accessories and documents used in the making of this and other ship models have been donated to Flagstaff Hill Maritime Village. Ship model of HMS Sovereign of the Seas, scale model of 17th Century English war ship, was handmade and carved from plans, enclosed in airtight glass case. All components of that model, including even the smallest pulleys, were hand crafted using tools designed and made by Jim. Outstanding details include functional rigging and moving cannons. Please see our record 3732 of the mode Sovereign of the Seas for further details of the ship and the maker. This tenon saw is connected with the hobby and skill of ship model making that has been crafted as a leisure activity for many generations. The hobby is often chosen by serving and retired mariners who appreciate the connection with maritime history. This tenon saw was used by local Warrnambool man, Jim Williams, who was employed at Cramond and Dickson clothing store, and then at Fletcher Jones menswear for 27 years. It was used in making components for the model of the historic ship, the Sovereign of the Seas. The Sovereign of the Seas was a historic 17th century English war ship with important maritime heritage. Tenon Saw. Hand saw with small-toothed metal blade set into a slotted brass back, attached to a round brass fitting in the light coloured, turned wooden handle. Top on handle is marked with seven concentric rings scored into the wood. On top of blade is maker’s name “AVIA” within oval ring. This tenon saw is part of a collection of tools and accessories once used by Jim Williams, maker of a series of ship models 1930-1955 including “HMS Sovereign of the Seas”."Avia" within oval ring.flagstaff hill, warrnambool, flagstaff hill maritime museum, maritime museum, shipwreck coast, flagstaff hill maritime village, great ocean road, jim williams, james bernard williams, ship model hobby, ship model tools, ship model making equipment, ship model making accessories, saw, wood cutting tool, tenon saw, avia steel and tool company limited, carpenter's tool, tool, sovereign of the sea, ship model, hobby, ship model tool -
 Flagstaff Hill Maritime Museum and Village
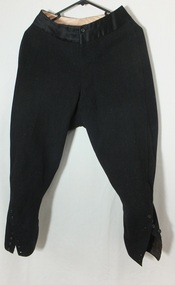
Clothing - Riding Habit, Jodhpurs, 1920s
The Manifolds were a significant pioneering pastoral family in Western Victoria. The donated riding jodhpurs originally belonged to Mrs Edward Manifold, formally Beatrice Mary Synnot Anderson. Beatrice was Edward Manifold’s cousin once removed whom he married in 1900. Edward, the son of John Manifold, was born on 15 November 1868 and educated at Geelong and Melbourne Grammar schools and at Trinity Hall, Cambridge (B.A., 1891). He chose the Danedite portion of land at Purrumbete, and on the death of his bachelor brother Thomas Peter (1863-1895), after a hunting accident, he took over his allocation, Wiridgil. He also owned Boortkoi, near Hexham and on these properties, he ran merino sheep, a Lincoln stud which dated back to 1870, and Shorthorn cattle. 3000 acres were also leased to dairy farmers. Edward was a member of Hampden Shire Council in 1909-31 and three times president at Camperdown. The town was largely bordered by Manifold land and partly dependent upon the local pastoral dynasties, which benefited the local area from the families’ various business interests. Though an offer to build public baths to commemorate the Queen Victoria Jubilee in 1897 was not proceeded with, the town acquired a hospital, a reserve on Mount Leura, a clock tower and a cricket pavilion, as well as notable donations from the Manifolds to St Paul's Church and the grammar school. Edward was a keen polo player and racing man. He was also a successful owner of steeplechasers and a committeeman of the Victoria Racing Club for many years. He was also a member of many Western District racing clubs. On the 16 July 1900, Edward had married his sixteen-year-old cousin Beatrice Mary Synnot Anderson by whom he had three sons Thomas Peter, Andrew and Robert Edward Manifold. Edwards's estate at his death was valued for probate at nearly £500,000. Edward died following an operation on 14 February 1931 at a private hospital in Yarra Vale Melbourne. Beatrice passed away in 1954, aged 79 in Ballarat where she was born in 1874. Contextual historic Family background: The Manifold brothers Thomas (1809-1875), John (1811-1877) and Peter (1817-1885) were the fourth, fifth and sixth sons of William Manifold and Mary, nee Barnes, of Courthouse Farm, Bromborough, Cheshire, England. The family had decided to emigrate to Van Diemen's Land. Thomas was sent ahead, arriving in Hobart Town on 23rd January 1828 with £1500 and a letter of recommendation from the Colonial Office. Thomas acquired 1280 acres on the west bank of the Tamar River. John and Peter, with their parents and three sisters, arrived on 8th July 1831. Land grants by then had finished but William brought ninety acres next to his son Thomas’ land and on the combined properties the family built Kelso House. The Manifolds’ properties were comparatively poor and when news of the Port Phillip District, in Victoria reached Thomas, he lost no time in coming to see for himself in February 1836. He was impressed with what he saw and hurried back to Tasmania to buy lambs and ewes. With one of his brothers, on July 9th he landed his stores at Point Henry and proceeded to occupy both sides of the Moorabool River. Thomas, at the end of the year, returned to Tasmania and left Peter and John to run the new property. Thomas, however, returned to Victoria for several visits and on one of these visits he, along with his brothers, examined the country near Ballarat. In December 1838 they managed to penetrate the Stony Rises, and Peter and John reached Lake Purrumbete and the Mount Leura country. During this time, on 4th July 1838, Thomas married Jane Elizabeth, eldest daughter of Captain Walter Synnot, formerly of Ballinate, County Armagh, Ireland, and then of Van Diemen's Land. Thomas joined his brothers, and they occupied the Purrumbete run in January 1839. On the journey to Purrumbete they could not take their stock and drays through the Stony Rises, so went north of Lake Corangamite, to the neck of land between it and Lake Gnarpurt. By April the move from Moorabool area was complete. As yet they had no hut and were working day and night, but their delight in their new run was unbounded. John wrote to his mother: “We are at last got to the land we wished for it is a beautiful place, and cannot be surpassed by any I have ever seen”. The three brothers occupied Purrumbete together, breeding both sheep and cattle until Thomas went to Grassmere run on the Merri River near Warrnambool in 1844. John and Peter soon gave up breeding sheep but retained the well-known '3M' brand for the cattle. These were Shorthorns, derived from four bulls originally imported by the Boldon brothers and later improved by further importations, and were renowned for size and quality. By the time of the gold rush in 1851, John and Peter were breeding over 1000 head a year, as well as fattening stores. The diggings at this time had disorganised Grassmere by drawing away Thomas's men, and his wife decided to take her two sons and two daughters to Europe for their education. Thomas gave up the property next year, went to England to join his family, and eventually brought the family back to live in Melbourne. At Purrumbete things were different. The brothers, John and Peter, preferred black stockmen to white, so the discovery of gold upset them very little while providing the very market they required. John was on his second visit to England when the rush started, and Peter went in his turn soon after John returned. On 2 September 1856 John married Marion Thomson, at Cormiston, Van Diemen's Land. They had four daughters and five sons, from three of whom, William Thomson, James Chester and Edward, the later generations of the family descend. Through the years the brothers had to contend with the scab, fluke and footrot, depression, rabbits, bush fires and pleuro-pneumonia. In 1861 they appointed as manager Henry Manifold Matson, their nephew, who had already been with them for five years. Thomas died in Melbourne on 7 November 1875, John at Purrumbete on 3 January 1877 and Peter at Purrumbete on 31 July 1885. Devout members of the Church of England, John and Peter, during their lives, gave generously towards building St Paul's Church, Camperdown, and guaranteed part of the vicar's stipend. Peter was a member of the Hampden and Heytesbury Roads Board from 1859 and carried on into the Hampden Shire Council when it was formed in 1864. However, it was not for public works that they were known, but for their personal example. In a new land where speculators and adventurers were all too common, the Manifold brothers were among those who intended it to be their home and their children's home. Industrious, unpretentious and hospitable, they were respected in their community as men of the highest integrity. This riding habit is a characteristic example of the type and style of riding clothes that well-dressed ladies wore in the 1920s. It highlights the changes that were beginning in society for women. Prior to 1918 ladies still had to ride side-saddle with skirts over Jodhpurs. Society of the time regarded women riding astride as unseemly and just not done. This riding habit is particularly significant on a number of levels, it shows the beginnings of change in society's attitudes through women's fashion after the First World War. A change that was to bring a start to a more liberating societal attitude towards women after the successful establishment of the Representation of People Act 1918 that gave women the right to vote. This garments provenance is linked to one of Victoria's important pioneering families the Manifolds, one of the first families that came from Van Diemen's land to settle the Western District of Victoria in 1844. Originally the garment belonged to the wife of the great-grandson of pioneer William Manifold, Edward Manifold who married Beatrice May Synnot Anderson, Edwards Cousin in 1900. The garment was made by the Mayfair tailors J. Busvine & Co. in the early to mid-1920s (estimate) who at the turn of the century were tailors to the Courts of Europe. Their clothing is highly collectible today and examples can be found in a number of significant museum collections around the world, notably the Metropolitan Museum of Art in New York and the FIDM in Los Angeles. Jodhpurs, part of a three-piece, side saddle riding habit tailored for Mrs Edward Manifold, with four buttons to the front material black woolen twill the legs are cuffed below the knee with 8 buttons holes which are reinforced to the inside with fabric. Cream Satin waistband and removable chamois lining to the seat makers label Busvines Co. tailored for Mrs Edward Manifold.Embroidered in blue on a Satin Cream label to Jodhpurs "Busvine Ltd / 4, Brook St, London. W. No." Hand written in black ink script "523/ Mrs Edward Manifold"flagstaff hill, warrnambool, shipwrecked coast, flagstaff hill maritime museum, maritime museum, side saddle riding habit, side saddle riding outfit, breeches, mrs edward manifold, beatrice manifold, shipwreck coast, flagstaff hill maritime village, great ocean road -
 Flagstaff Hill Maritime Museum and Village
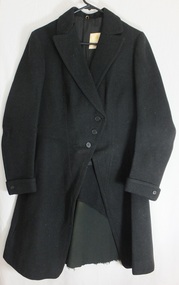
Clothing - Riding Habit, jacket, Early 20th Century
The Manifolds were a significant pioneering pastoral family in Western Victoria. The donated riding jacket originally belonged to Mrs Edward Manifold, formally Beatrice Mary Synnot Anderson. Beatrice was Edward Manifold’s cousin once removed whom he married in 1900. Edward, the son of John Manifold, was born on 15 November 1868 and educated at Geelong and Melbourne Grammar schools and at Trinity Hall, Cambridge (B.A., 1891). He chose the Danedite portion of land at Purrumbete, and on the death of his bachelor brother Thomas Peter (1863-1895), after a hunting accident, he took over his allocation, Wiridgil. He also owned Boortkoi, near Hexham and on these properties, he ran merino sheep, a Lincoln stud which dated back to 1870, and Shorthorn cattle. 3000 acres were also leased to dairy farmers. Edward was a member of Hampden Shire Council in 1909-31 and three times president at Camperdown. The town was largely bordered by Manifold land and partly dependent upon the local pastoral dynasties, which benefited the local area from the families’ various business interests. Though an offer to build public baths to commemorate the Queen Victoria Jubilee in 1897 was not proceeded with, the town acquired a hospital, a reserve on Mount Leura, a clock tower and a cricket pavilion, as well as notable donations from the Manifolds to St Paul's Church and the grammar school. Edward was a keen polo player and racing man. He was also a successful owner of steeplechasers and a committeeman of the Victoria Racing Club for many years. He was also a member of many Western District racing clubs. On the 16 July 1900, Edward had married his sixteen-year-old cousin Beatrice Mary Synnot Anderson by whom he had three sons Thomas Peter, Andrew and Robert Edward Manifold. Edwards's estate at his death was valued for probate at nearly £500,000. Edward died following an operation on 14 February 1931 at a private hospital in Yarra Vale Melbourne. Beatrice passed away in 1954, aged 79 in Ballarat where she was born in 1874. Contextual historic Family background: The Manifold brothers Thomas (1809-1875), John (1811-1877) and Peter (1817-1885) were the fourth, fifth and sixth sons of William Manifold and Mary, nee Barnes, of Courthouse Farm, Bromborough, Cheshire, England. The family had decided to emigrate to Van Diemen's Land. Thomas was sent ahead, arriving in Hobart Town on 23rd January 1828 with £1500 and a letter of recommendation from the Colonial Office. Thomas acquired 1280 acres on the west bank of the Tamar River. John and Peter, with their parents and three sisters, arrived on 8th July 1831. Land grants by then had finished but William brought ninety acres next to his son Thomas’ land and on the combined properties the family built Kelso House. The Manifolds’ properties were comparatively poor and when news of the Port Phillip District, in Victoria reached Thomas, he lost no time in coming to see for himself in February 1836. He was impressed with what he saw and hurried back to Tasmania to buy lambs and ewes. With one of his brothers, on July 9th he landed his stores at Point Henry and proceeded to occupy both sides of the Moorabool River. Thomas, at the end of the year, returned to Tasmania and left Peter and John to run the new property. Thomas, however, returned to Victoria for several visits and on one of these visits he, along with his brothers, examined the country near Ballarat. In December 1838 they managed to penetrate the Stony Rises, and Peter and John reached Lake Purrumbete and the Mount Leura country. During this time, on 4th July 1838, Thomas married Jane Elizabeth, eldest daughter of Captain Walter Synnot, formerly of Ballinate, County Armagh, Ireland, and then of Van Diemen's Land. Thomas joined his brothers, and they occupied the Purrumbete run in January 1839. On the journey to Purrumbete they could not take their stock and drays through the Stony Rises, so went north of Lake Corangamite, to the neck of land between it and Lake Gnarpurt. By April the move from Moorabool area was complete. As yet they had no hut and were working day and night, but their delight in their new run was unbounded. John wrote to his mother: “We are at last got to the land we wished for it is a beautiful place, and cannot be surpassed by any I have ever seen”. The three brothers occupied Purrumbete together, breeding both sheep and cattle until Thomas went to Grassmere run on the Merri River near Warrnambool in 1844. John and Peter soon gave up breeding sheep but retained the well-known '3M' brand for the cattle. These were Shorthorns, derived from four bulls originally imported by the Boldon brothers and later improved by further importations, and were renowned for size and quality. By the time of the gold rush in 1851, John and Peter were breeding over 1000 head a year, as well as fattening stores. The diggings at this time had disorganised Grassmere by drawing away Thomas's men, and his wife decided to take her two sons and two daughters to Europe for their education. Thomas gave up the property next year, went to England to join his family, and eventually brought the family back to live in Melbourne. At Purrumbete things were different. The brothers, John and Peter, preferred black stockmen to white, so the discovery of gold upset them very little while providing the very market they required. John was on his second visit to England when the rush started, and Peter went in his turn soon after John returned. On 2 September 1856 John married Marion Thomson, at Cormiston, Van Diemen's Land. They had four daughters and five sons, from three of whom, William Thomson, James Chester and Edward, the later generations of the family descend. Through the years the brothers had to contend with the scab, fluke and footrot, depression, rabbits, bush fires and pleuro-pneumonia. In 1861 they appointed as manager Henry Manifold Matson, their nephew, who had already been with them for five years. Thomas died in Melbourne on 7 November 1875, John at Purrumbete on 3 January 1877 and Peter at Purrumbete on 31 July 1885. Devout members of the Church of England, John and Peter, during their lives, gave generously towards building St Paul's Church, Camperdown, and guaranteed part of the vicar's stipend. Peter was a member of the Hampden and Heytesbury Roads Board from 1859 and carried on into the Hampden Shire Council when it was formed in 1864. However, it was not for public works that they were known, but for their personal example. In a new land where speculators and adventurers were all too common, the Manifold brothers were among those who intended it to be their home and their children's home. Industrious, unpretentious and hospitable, they were respected in their community as men of the highest integrity. This riding habit is a characteristic example of the type and style of riding clothes that well-dressed ladies wore in the 1920s. It highlights the changes that were beginning in society for women. Prior to 1918 ladies still had to ride side-saddle with skirts over Jodhpurs. Society of the time regarded women riding astride as unseemly and just not done. This riding habit is particularly significant on a number of levels, it shows the beginnings of change in society's attitudes through women's fashion after the First World War. A change that was to bring a start to a more liberating societal attitude towards women after the successful establishment of the Representation of People Act 1918 that gave women the right to vote. This garments provenance is linked to one of Victoria's important pioneering families the Manifolds, one of the first families that came from Van Diemen's land to settle the Western District of Victoria in 1844. Originally the garment belonged to the wife of the great-grandson of pioneer William Manifold, Edward Manifold who married Beatrice May Synnot Anderson, Edwards Cousin in 1900. The garment was made by the Mayfair tailors J. Busvine & Co. in the early to mid-1920s (estimate) who at the turn of the century were tailors to the Courts of Europe. Their clothing is highly collectible today and examples can be found in a number of significant museum collections around the world, notably the Metropolitan Museum of Art in New York and the FIDM in Los Angeles. A riding jacket, part of a three-piece, side saddle riding habit tailored for Mrs Edward Manifold. Knee length English woolen jacket black in colour, seamed and fitted to the female client's figure, fastening from the waist with three bone buttons to rather high lapels. The sleeves are long with closely fitted cuffs and one button and lined with cream satin. The jacket is fitted to the waist and flared to below the hips with a 35 cm vent to the back. Lower back to the jacket is reinforced with removable fabric and the jacket is lined with black twill cotton, there is a cream satin label, with makers' emblem Busvine. Circa 1920s Label to Jacket Embroidered in gold with a Royal logo on a Cream Satin label “By Special /Appointment” “To Her Majesty/The Queen”, “Busvine / Ltd / London 4 Brook St. W. / No” “hand written in purple ink 315 / Mrs Edward Manifold”flagstaff hill, warrnambool, shipwrecked coast, flagstaff hill maritime museum, maritime museum, side saddle riding habit, mrs edward manifold, edward manifold, busvines, shipwreck coast, flagstaff hill maritime village, great ocean road -
 Flagstaff Hill Maritime Museum and Village
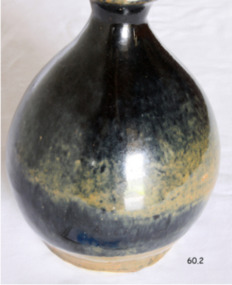
Container - Ceramic Bottle (Chinese Style), Minton Potteries, Late 19th century
The subject item is believed to be a "Chinese style stoneware liquor bottle used to store "Tiger Whiskey" (rice wine). These Chinese liquor bottles are made of glazed pottery known as brown stoneware and have been made throughout the centuries by many makers until well after American Prohibition. Later varieties from the mid 20th century are commonly found in the USA with the raised lettering "Federal Law Forbids Sale Or Re-use of this bottle" a sure sign of post-1934 manufacture. This example is interesting as it has a British Minton mark of two triangles on the base indicating a date of 1879 and was likely exported to Australia by Minton. These ceramic bottles virtually always have irregularities and flaws which indicate a product has been hastily manufactured, in any event, this is a fine example of a relatively common item that may have been copied by Minton and sold as a decorative domestic item for display or mass produced for storing liquor. Giles Family: The pair of ceramic bottles were given to Vera Giles by Jim Thompson and are just many 19th century items of furniture, linen and crockery donated to Flagstaff Hill Maritime Village by, Vera and Aurelin Giles. The items are associated with Warrnambool and the Giles Family history. Items donated by the family have come to be known as the “Giles Collection”. Many items in the Lighthouse Keeper’s Cottage were donated by Vera and Aurelin Giles and mostly came from the home of Vera’s parents-in-law, Henry Giles and his wife Mary Jane (nee Freckleton) who married in 1880 and whose photos are on display in the parlour. Henry was born at Tower Hill in 1858, and was a labourer on the construction of the Warrnambool Breakwater before leaving in 1895 for around seven years to build bridges in NSW. Mary Jane was born in 1860 at Cooramook and she attended Mailor’s Flat State School and where she eventually was to become a student teacher. After which she became a governess at “Injemiara” where her grandfather, Francis Freckleton, had once owned land. Henry and Mary’s family consisted of six, some of the children were born at Mailor’s Flat and later some children at Wangoom. They lived with their parents at Wangoom and Purnim west, and this is where Henry died in 1933 and Mary Jane in 1940. A significant item of lead-glazed ceramic with the possibility it was made by the Minton potteries in England who were renowned for making quality pottery. The item style is in all probability a copy of a Chinese liquor bottle that was in common use throughout the British colonies and America up until the mid 20th Century. The Giles family collection has social significance at a local level, because it illustrates the level of material support the Warrnambool community gave to Flagstaff Hill when the Museum was established.Chinese liquor bottle one of a pair, lead glazed ceramic, dark brown and blue/black. Part of the Giles Collection.Mark of a double triangle, apex touching, on base, (Minton mark for 1879).flagstaff hill, warrnambool, shipwrecked coast, flagstaff hill maritime museum, shipwreck coast, flagstaff hill maritime village, great ocean road, vase, pottery, ceramic ornament, domestic ware, late 19th - early 20th centuy ornament, giles collection, henry giles, tower hill, cooramook, warrnambool breakwater, mailor’s flat, wangoom, 19th century household goods -
 Flagstaff Hill Maritime Museum and Village
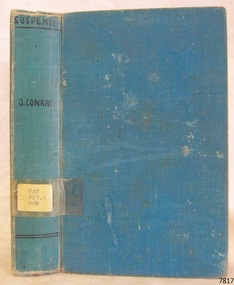
Book - Maritime Novel, Joseph Conway, Suspense, 1925
This book was written by the renowned maritime author Joseph Conrad. Joseph Conrad was Polish-born and became a British subject in 1886. He was a renowned marine fiction writer and also, for a short time, a mariner and Captain. As a boy of 13 years old, Joseph Conrad’s desire was to be a sailor. At 19, he joined the British merchant marine, working in several roles. He eventually qualified as a captain but only served in this role once, from 1888-89, when he commanded the barque Otago sailing from Sydney to Mauritius. In 1889 he also began writing his first novel, Almayer’s Folly. He retired from life as a mariner in 1894, aged 36. Conrad’s visits to Australia from 1878 to 1982, and his affection for Australia, were later commemorated by a plaque in Circular Quay, Sydney. Conrad continued as an author. It is said that many of the characters in his books were inspired by his maritime experiences and the people he had met. By the end of his life, he had completed many stories and essays, and 19 novels, plus one incomplete novel titled ‘Suspense’ that was finished and published posthumously. Shortly before he passed away, in 1924, Conrad was offered a Knighthood by Prime Minister Ramsay MacDonald for his work but declined. An 1882 sailing ship, Georg Stage, was a Danish training ship, in which after a tragic accident 22 boys lost their lives. It was later renamed the Joseph Conrad by Alan Villiers in honour of the author. It continued as a training ship with various organisations until 1947 when it ship was transferred to the Mystic Seaport for use as an exhibit in the maritime museum. About the Pattison Collection: - The Pattison Collection is a group of books and records that was originally owned by the Warrnambool Mechanics’ Institute, (WMI) which was founded in Warrnambool in 1853. In 1935 Ralph Pattison was appointed as City Librarian to establish and organise the Warrnambool Library as it was then called. When the WMI building was pulled down in 1963 a new civic building was erected on the site and the new Warrnambool Library, on behalf of the City Council, took over all the holdings of the WMI. At this time some of the items were separated and identified as the ‘Pattison Collection’, named after Ralph Pattison. Eventually, the components of the WMI were distributed from the Warrnambool Library to various places, including the Art Gallery, Historical Society and Flagstaff Hill. Later some were even distributed to other regional branches of Corangamite Regional Library and passed to and fro. It is difficult now to trace just where all of the items have ended up. The books at Flagstaff Hill Maritime Village generally display stamps and markings from Pattison as well as a variety of other institutions including the Mechanics’ Institute itself.The Pattison Collection, along with other items at Flagstaff Hill Maritime Village, was originally part of the Warrnambool Mechanics' Institute’s collection. The Warrnambool Mechanics’ Institute Collection is primarily significant in its totality, rather than for the individual objects it contains. Its contents are highly representative of the development of Mechanics' Institute libraries across Australia, particularly Victoria. A diversity of publications and themes has been amassed, and these provide clues to our understanding of the nature of and changes in the reading habits of Victorians from the 1850s to the middle of the 20th century. The collection also highlights the Warrnambool community’s commitment to the Mechanics’ Institute, reading, literacy and learning in the regions, and proves that access to knowledge was not impeded by distance. These items help to provide a more complete picture of our community’s ideals and aspirations. The Warrnambool Mechanics Institute book collection has historical and social significance for its strong association with the Mechanics Institute movement and the important role it played in the intellectual, cultural and social development of people throughout the latter part of the nineteenth century and the early twentieth century. The collection of books is a rare example of an early lending library and its significance is enhanced by the survival of an original collection of many volumes. The Warrnambool Mechanics' Institute’s publication collection is of both local and state significance. Suspense Author: Joseph Conrad Publisher: J M Dent & Co Date: 1925 Introduction by Richard Curle Blue hardcover with inscription on sticker on spine and a purple stamp on the fly pageLabel on spine, typed text "PAT 823.9 CON" Pastedown front endpaper has sticker from Warrnambool Public Library covered by a sticker from Corangamite Regional Library Service Front loose endpaper has a stamp from Corangamite Regional Library Serviceflagstaff hill, flagstaff hill maritime museum and village, warrnambool, maritime museum, maritime village, great ocean road, shipwreck coast, joseph conrad, captain joseph conrad, maritime author, marine author, nautical author, sailor, seafarer, georg stage, 1882 ship, danish ship, training ship, boys killed, alan villiers, ship joseph conrad, mystic seaport, museum ship, warrnambool mechanics institute, pattison collection, warrnambool library, ralph eric pattison, corangamite regional library service, suspense, unfinished book -
 Flagstaff Hill Maritime Museum and Village
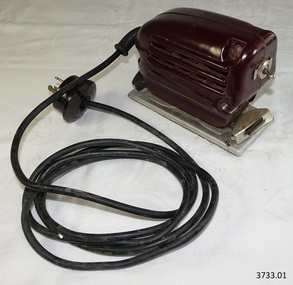
Tool - Sander, c. 1930-1955
This burgundy coloured, portable electric belt sander is stored in its own heavy duty cardboard box. It was made in England and, according to the label on the lid of the box, it is a Portrix Sander-Polisher, all-electric, portable, sands wood metal and polishes. Its uses include decorating, carpentry and polishing. It has a complete with electric unit with flex. The price of 75/- (75 shillings) is printed on the label of the box. The model and the brand of the sander have been removed from the manufacturer’s information embossed on the side of the sander. The sander is part of a collection of objects used by Jim Williams, maker of fine ship models from about 1930-1955. Most of the components for the models, as well as many of the tools, were handmade by Jim Williams. Jim’s family has donated the ship model “Sovereign of the Seas” and many tools, accessories and documents used in the making of this and other ship models have been donated to Flagstaff Hill Maritime Village. Please see our record 3732 of the mode Sovereign of the Seas for further details of the ship and the maker.This vintage Portrix sander-polisher represents tools used for the hobby and skill of ship model making that has been carried as a leisure activity out for generations. Ship model making was also a pastime for sailing crew, who often made a model of the ship in which they were sailing. This sander was used by local Warrnambool man, Jim Williams, who was employed at Cramond and Dickson clothing store, and then at Fletcher Jones menswear for 27 years. It was used in making components for the model of the historic ship, the Sovereign of the Seas. The Sovereign of the Seas was a historic 17th century English war ship with important maritime heritage.Belt sander, electric. Portable power tool, Portrix model Sander–Polisher, burgundy coloured body with swivelling, black electric cable, 250V 1 / 4 amp. For sanding wood and metal, and for polishing. (Stored in original box.) Made in England. Part of a collection of tools and accessories used by Mr. Jim Williams to build ship model of the “Sovereign of the Sea” and other models. c. 1930-1955. Moulded into body “ - - - SANDER –POLISHER / 1 / 4 amp. PRODUCT OF - - - MANUFACTURING CO. LTD. 50 CYCLES / MADE IN ENGLAND PAT. PEND. 200/250 volts A.C.” (the Brand and Manufacturer’s name have been removed)flagstaff hill, warrnambool, shipwrecked coast, flagstaff hill maritime museum, maritime museum, shipwreck coast, flagstaff hill maritime village, great ocean road, portrix sander-polisher, portrix power tool, portrix belt sander, woodworking equipment, ship modelling equipment, jim williams, james bernard williams, ship model, hobby, ship model tool, sovereign of the seas, english war ship -
 Phillip Island and District Historical Society Inc.
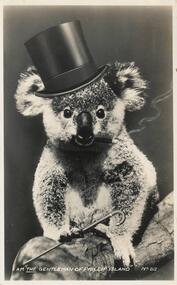
Photograph - Post Card, 1940's
One of a collection of 18 photographs and postcards donated by Jill YeomanBlack & White Postcard of a Koala "wearing a top hat and holding a cane""I am The Gentleman of Phillip Island" No. 83 On the back a letter from Rita to Lily & Miss Harmsworth.koala phillip island, wildlife - koalas, jill yeoman -
 Phillip Island and District Historical Society Inc.
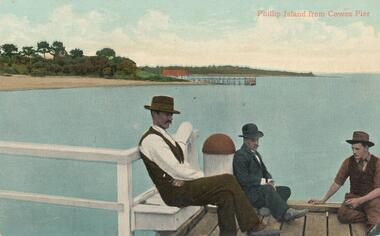
Photograph - Post Card, Early 1900's
One of a group of photographs/postcards from the Bryant West Collection donated by Mary Karney.Coloured postcard of three men sitting on the Cowes Pier with the sea baths in background.Phillip Island from Cowes Pier On Back: New Year's greetings from J. J. Robb sent to Miss M Robb.cowes pier phillip island, cowes jetty phillip island, cowes beach phillip island, bryant west collection, mary karney -
 Phillip Island and District Historical Society Inc.
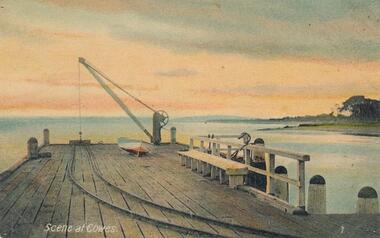
Photograph - Post Card, Unknown
One of a group of photographs from the Bryant West Collection donated by Mary Karney.Coloured postcard of the end of the Cowes Pier looking towards the mainland. Small boat on the pier.Scene at Cowes. Greetings on back to Miss Robb from Bert and Kenneth West.cowes pier phillip island, cowes jetty phillip island, bryant west collection, mary karney -
 Phillip Island and District Historical Society Inc.
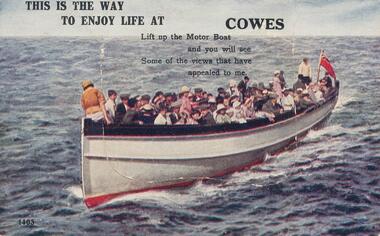
Photograph - Post Card, 1950's
Novelty Postcard with flap opening to two photos. Donated by Rhonda ParisNovelty Coloured postcard of motor boat loaded with passengers. Flap opens up to two Black & White photographs - 1. The Nobbies. 2. Birds on the Island."This is the way to enjoy life at Cowes" "Life up the Motor Boat and you will see some of the views that have appealed to me".the nobbies phillip island, wildlife - birds, nesting birds phillip island, rhonda paris, life boat -
 Seaworks Maritime Museum
Bell, Richard Dunstan Ltd, BP Endeavour 1967, 1962
Brass ship's bell on heavy timber plinth. -
 Mission to Seafarers Victoria
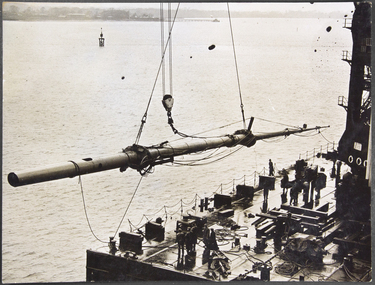
Photograph - Photograph, Black and white, London News Agency Photos Ltd. (LNA), Giant liner's mast replaced, 13 Fevrier 935
The repaired mast of the giant liner Cunard White-Star Liner "MAJESTIC" was installed in the liner at Southampton today. Photo shows the mast being lifted by the giant floating crane into the liner. A comparison of the size of the crane and mast is given by the men is picture.Black and white photograph depicting the mast being lifted onto the liner deck. A few men can be seen on board.On a thin paper glued to the back, typed in black ink: Issued 13-2-35 /Supplied: LNA/GIANT LINER'S MAST REPLACED./The repaired mast of the giant liner Cunard White-Star Liner "MAJESTIC" was installed in the liner at Southampton today. Photo shows the mast being lifted by the giant floating crane into the liner. A comparison of the size of the crane and mast is given by the men is picture. On the left side written in blue pen: Copyright LNA / NB (an arrow directs to stamp). On the right top corner an oval shape stamp in red ink: London News Agency Photos LTD. 46, Fleet Street, London, ECA. In the centre: Photo Supplied/L.N.A/Tel: Central 3751.passenger ship, liner, cunard-white star, rms majestic -
![Photograph - Digital image, Charles Partington [Heywood], 1856_](/media/collectors/4f729f5697f83e03086015b8/items/5441f5592162f10c08213c48/item-media/5441f5822162f10c08214095/item-fit-380x285.jpg) Greensborough Historical Society
Greensborough Historical SocietyPhotograph - Digital image, Charles Partington [Heywood], 1856_
Photograph of Charles Partington probably taken in England before his departure (in 1856) for Melbourne. Charles Partington and family came to Melbourne in the 1857 and moved to Greensborough where they farmed along the Plenty River. Digital copy of black and white studio photograph.charles partington -
 Greensborough Historical Society
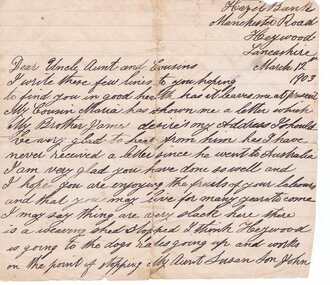
Letter (copy), Copy of letter from John Chadwick, 12/03/1903
Letter to Charles Partington from nephew John Chadwick, son of Hannah (nee Partington) and James Chadwick (married Sept 5 1832)Copy of letter in 2 parts.partington family, john chadwick, charles partington -
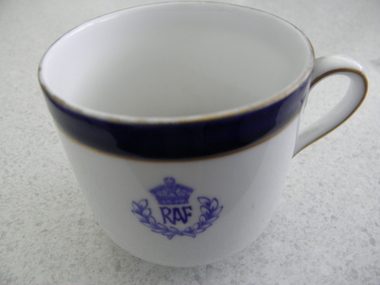 Geelong RSL Sub Branch
Coffee Cup, Early 20th Century
This cup was used in RAF Messes during WW2, This particular cup was brought back to Australia and donated by Mr and Mrs InsleyThie coffee cup is an original made by Royal Doulton and used in an Officersd Mess during WW2A white china coffee cup, blue and gold band around the rimOn the front of the cup a Royal Crown, RAF and a laurel wreath On the bottom of the cup Royal Crown with a lion on top of the crown, Made in England, Royal Doulton Englandww2, coffee cup, raf, england -
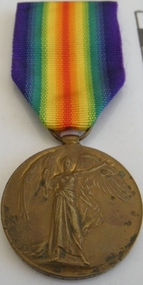 Geelong RSL Sub Branch
Decoration - 3163 W J Smith, ?1919
3163 Pte W J Smith enlisted in to the AIF on 29 September 1915 and embarked from Fremantle on the Argylishire. On arrival Pte Smith was take on strength to Pioneer Training Battalion and was then transferred to 5 Pioneer Battalion. Pt Smith returned to Australia on the Berrima and arrived on 02 January 1919, was discharged on 22 March 1919.This Victory Medal is the original that was issued to 3163 Pte W J Smith.Victory Medal. Round bronze Medal , with ribbon.3163 Pte W J Smith. 5 Pnr Bn. A I F On the reverse of the Medal - The Great War for Civilisaztion 1914-1919.3163 w j smith, 5 pn bn, ww1 -
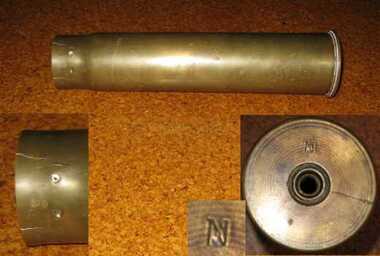 Friends of the Cerberus Inc
6 pounder Shell casing, 1889
Nordenfelt Six pounder quick firing guns were used by land and naval forces to counter torpedo boats.The projectile and its shell casing are of the type and age used by the Victorian Naval Forces but could equally have been used by the land forces.Cylindrical brass tube closed at base and open at other end.victorian naval forces, victorian navy, nordenfelt quich firing gun, ammunition -
 Kiewa Valley Historical Society
Saucer Ceramic, from 1921 to 1961
This item was used by the State Electricity Commission of Victoria in their mess rooms for their workers during the construction of the Kiewa Hydro Electricity Scheme. The imprint of the year "1921" was to identify the year that the SECV was formed and relieved the private VHEC(Victorian Hydro-Electric Company). As the scheme was of such a huge, isolated and time consuming nature the feeding of its workers was quite demanding of cutlery and crockery. The use of sturdy English cups and saucers was essential. The period of construction and the isolation of the Kiewa Valley area placed heavy demand for "solid" crockery that could wear abusive handling. This period in time was one when crockery, whether for domestic or commercial use, was imported from "mother" England. This scenario was more so for governmental bodies such as rail, jails and electricity providers than domestic users. The influx of cheaper Asian crockery had not yet begun.This type of crockery item was used by the thousands of SEC Victorian staff and construction workers involved in the building of the Kiewa Hydro Electricity Scheme, over the extensive period (1938 to 1961). This was a period when Government bodies and other semi- government organisations were still tied to the "establishments" of "mother" England. It was a period in Australia's development when the Asian influence was very weak and the established ties to England and Europe was still very strong. The majority of heavy equipment and machinery was either made in England or Europe. Local/European expertise in dam construction and water management in alpine terrain came from migrants or English and European specialist. The quality of workmanship from big steel manufacturing plants in England and Europe could not be matched from anywhere else in the developed world.This item is a white ceramic saucer (tea /coffee). It is made in England and is of strong and durable ceramic. The bottom cup indent is for either tea or coffee cups of a similar ceramic structure. The 5mm thickness of the ceramic suggests this saucer belongs to a commercial kitchen environment and not domestic. The indent bottom of the saucer is 5mm deep with a side curvature ratio of 2:5. The ceramic is glazed to a commercial standard (worker's mess). See also KVHS 0128 (A,C and D) The seal of the State Electricity Commission Of Victoria is imprinted on the top inside rim within a curved scroll. Snuggled within the borders of the scroll is a banner with the five stars of the southern cross and an arm with a closed fist projecting from the top with five lightning bolts projecting outwards. On the underside "Vitrified sold by Cafe & Hotel Supplies Pty Ltd Dunn Bennett & Co. Ltd. Burslem Made in England"saucer, plate, secv, state electricity commission of victoria, crockery, mt beauty chalet, bogong mess hall -
 Kiewa Valley Historical Society
Saucer Ceramic, from 1921 to 1961
This item was used by the State Electricity Commission of Victoria in their mess rooms for their workers during the construction of the Kiewa Hydro Electricity Scheme. The imprint of the year "1921" was to identify the year that the SECV was formed and relieved the private VHEC (Victorian Hydro-Electric Company). As the scheme was of such a huge, isolated and time consuming nature the feeding of its workers was quite demanding of cutlery and crockery. The use of sturdy English cups and saucers was essential. The period of construction and the isolation of the Kiewa Valley area placed heavy demand for "solid" crockery that could wear abusive handling. This period in time was one when crockery, whether for domestic or commercial use, was imported from "mother" England. This scenario was more so for governmental bodies such as rail, jails and electricity providers than domestic users. The influx of cheaper Asian crockery had not yet begun.This type of crockery item was used by the thousands of SEC Victorian staff and construction workers involved in the building of the Kiewa Hydro Electricity Scheme, over the extensive period (1938 to 1961). This was a period when Government bodies and other semi- government organisations were still tied to the "establishments" of "mother" England. It was a period in Australia's development when the Asian influence was very weak and the established ties to England and Europe was still very strong. The majority of heavy equipment and machinery was either made in England or Europe. Local/European expertise in dam construction and water management in alpine terrain came from migrants and specialist recruited from England and Europe. The quality of workmanship from big steel manufacturing plants in England and Europe could not be matched from anywhere else in the developed world.This item is a white ceramic saucer (tea /coffee). It is made in England and is of strong and durable ceramic. The bottom cup indent is for either tea or coffee cups of a similar ceramic structure. The 5mm thickness of the ceramic suggests this saucer belongs to a commercial kitchen environment and not domestic. The indent bottom of the saucer is 5mm deep with a side curvature ratio of 2:5. The ceramic is glazed to a commercial standard (worker's mess). See also KVHS 0128 ( A,B&D)The seal of the State Electricity Commission Of Victoria is imprinted on the top inside rim within a curved scroll. Snuggled within the borders of the scroll is a banner with the five stars of the southern cross and an arm with a closed fist projecting from the top with five lightning bolts projecting outwards. On the underside "Vitrified sold by Cafe & Hotel Supplies Pty Ltd Dunn Bennett & Co. Ltd. Burslem Made in England"saucer, plate, secv, state electricity commission of victoria, crockery, mt beauty chalet, bogong mess hall