Showing 399 items
matching nth garden
-
 Ballarat Tramway Museum
Photograph - Digital image, Wal Jack, 21/04/1962 12:00:00 AM
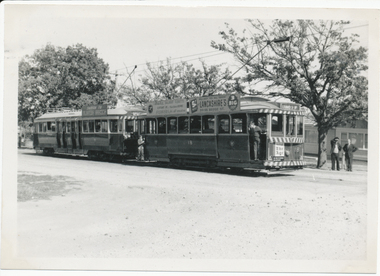
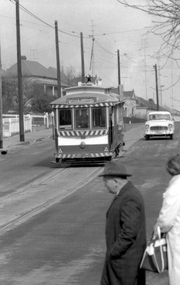
Yields information about the AETA tour in 1962 and the trams used.Digital image from the Wal Jack Ballarat Album of a photograph of two trams at the Lydiard St North terminus during an AETA tour 21-4-1962. 18 and 37 the tour trams. No. 18 has roof Advertisements for White Florists of Sturt St and Lancashire's of Bridge St and a dash panel advert for The Age newspaper. No. 37 has an SEC "Switch to Electric Cooking" roof Advertisements. See image i2 for rear of photograph. See image i3 for hi res scan of print. See image i4 for hi res scan of negativeOn rear of photograph in ink "SEC, Ballarat Nos. 18 and 37 at Lydiard St Nth 21-4-62" and Wal Jack stamp in top right hand corner with number "T1267" written in.trams, tramways, aeta, tours, special trams, lydiard st north, tram 18, tram 37 -
 Ballarat Tramway Museum
Photograph - Digital image, Wal Jack, 25/04/1959 12:00:00 AM
Yields information about the appearance of Lydiard St north and two of the Ballarat trams in 1959 and tram operations during closure of Sturt St.Digital image from the Wal Jack Ballarat Album of No. 40 and 14 in Sturt St, shunting during the Anzac day march. Appears to have a group of trammies on the right side of the photograph alongside a motor vehicle. Photograph 25-4-1959 Wal Jack Photograph. Has the ANZ Bank, National Mutual and Craigs hotel in the photograph along with a number of motor vehicles. See image i2 for rear of photograph. See image i3 for hi res scan of print. See image i4 for hi res scan of negativeOn rear of photograph in ink "SEC Ballarat, No. 14 to Lydiard St Nth on up track, No. 40 ex Mt Pleasant on "down" in Lydiard St Nth, during Anzac Day march in Sturt St. 25-4-59" and Wal Jack stamp in top right hand corner with "T250" written in ink.trams, tramways, lydiard st north, sturt st, tram 14, tram 40 -
 Ballarat Tramway Museum
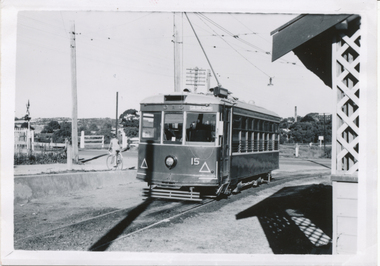
Photograph - Digital image, Wal Jack, 14/12/1945 12:00:00 AM
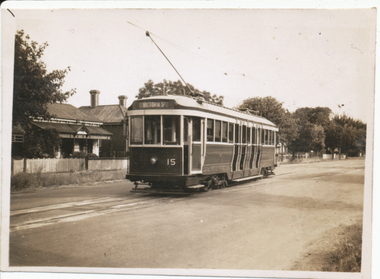
Yields information about the early use of Ballarat's 2nd bogie tram and its first day in service.Digital image from the Wal Jack Ballarat Album of No. 15 running out to Victoria St in Drummond St North at Duncan St. Tram has the destination of Victoria St. Taken by Wal Jack on 14-12-1945. See image i2 for rear of photograph. See image i3 for hi res scan of print. See image i4 for hi res scan of negativeIn ink on rear " SEC Ballarat Tramways bogie. 15 ex M&MTB C132 on first day runs 14-12-45 Gardens - Victoria St run. Photo taken in Drummond St North and showing No. 15 entering loop from Duncan St." with number "T537" within Wal Jack photo stamp.trams, tramways, drummond st nth, bogie trams, tram 15 -
 Ballarat Tramway Museum
Album - Photo Album, c1970
Set of 16 photos of Ballarat tram system taken 1970c on a tour by an unknown Qld based person.Photo album containing 16 colour prints. Photo album has heavy card covers, covered in black textured plastic containing 12 clear plastic photo sleeves held with a white comb binder. Photos of Ballarat prior to closure, c1970. Photographer unknown. Donated by Peter Hyde of Brisbane Tramway Museum to BTM 3/2/2010, from a deceased estate. Photos apparently taken on a tram tour. .1 - No. 42 and a single trucker inbound in Sturt St. .2 - taken from tram ascending Bakery St hill in Victoria St. .3 - End of No. 42, with the destination "Haddon St via Drummond Nth" .4 - No. 11 and 42 in Lydiard St Nth, near the railway station. No. 11 showing special. .5 - photo of three people on the tour. .6 - Trams reversing at the Victoria St terminus .7 - ditto .8 - 11, 42 and 12? in Lydiard St North by railway station. .9 - Three trams at Sebastopol terminus. .10 - View in Albert St Sebastopol looking north along the track on the side of the road. .11 - View of the tram crossing in Albert St. .12 - 27 and 42 crossing Albert St Sebastopol. .13 - View of Albert St from the tram, north of the crossing looking at the reserved track 14. - Lydiard St North looking south .15 - 42 at the railway level crossing. .16 - View south of the railway level crossing, three trams, with passengers alighting.trams, tramways, ballarat, albert st, sebastopol, victoria st, sturt st, lydiard st nth, railway crossing -
 Ballarat Tramway Museum
Photograph - Digital image, Late 1950's
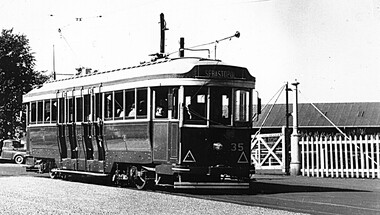
Yields information the appearance and details about SEC Tram No. 35 in the late 1950's and the activities at a terminus.Digital scan from the Ben Parle collection of SEC No. 35 at the Lydiard St Nth terminus, with the crew changing the poles and a lady with a polka dot skirt walking nearby. Photo 1950's or early 1960 prior to introduction of dash canopy lighting. Photo received with the Ben Parle slides 09/2004. trams, tramways, lydiard st nth, tram 35 -
 Ballarat Tramway Museum
Photograph - Digital image, Late 1950's
Yields information the appearance and details about SEC Tram No. 36 in the late 1950's and the railway level crossing at Ballarat station.Digital scan from the Ben Parle collection of SEC No. 36 crossing the level crossing at the Ballarat Railway station with the signalling mast and Reid's Coffee Palace in the background. Photo 1950's or early 1960 prior to introduction of dash canopy lighting. Photo received with the Ben Parle slides 09/2004. trams, tramways, lydiard st nth, railway, level crossings, tram 36 -
 Ballarat Tramway Museum
Photograph - Digital image, Late 1950's
... in bound in Bridge St, with the destination of Gardens via Drummond...Ballarat Tramway Museum South Gardens Reserve Wendouree ...Yields information the appearance and details about Bridge St shopping area late 1950's and the motor cars in the street at the time.Digital scan from the Ben Parle collection of SEC No.41 in bound in Bridge St, with the destination of Gardens via Drummond Nth. Photo 1950's or early 1960 prior to introduction of dash canopy lighting. Photo received with the Ben Parle slides 09/2004. trams, tramways, bridge st, tram 41 -
 Ballarat Tramway Museum
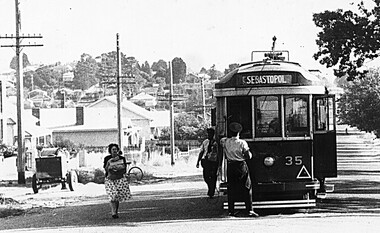
Photograph - Digital image, Late 1950's
Yields information the appearance and details about No. 35 crossing the railway level crossing.Digital scan from the Ben Parle collection of SEC 35 crossing the railway level crossing, south bound with the destination of Sebastopol . Photo 1950's or early 1960 prior to introduction of dash canopy lighting. Photo received with the Ben Parle slides 09/2004. trams, tramways, lydiard st nth, level crossings, tram 35 -
 Ballarat Tramway Museum
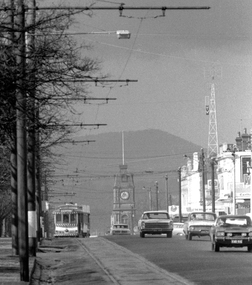
Photograph - Digital image, Peter Bruce, Sturt St into Drummond St North at 1.55pm, 1970s
Yields information about the Sturt St landscape looking east.Digital Image of a tram turning from Sturt St into Drummond St North at 1.55pm - long telephoto lens shot from about Ripon St, looking east. Mt Warrenheip in the far background. Photo taken by Peter Bruce 1970's and 1971 prior to the closure of the Ballarat System. Peter's Title of image: 1.55pmtrams, tramways, ballarat, sturt st, town hall, drummond st nth -
 Ballarat Tramway Museum
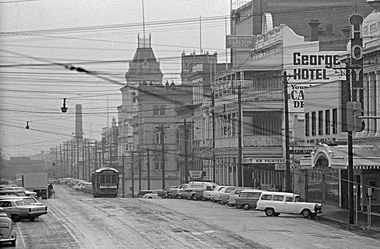
Photograph - Digital image, 1970s
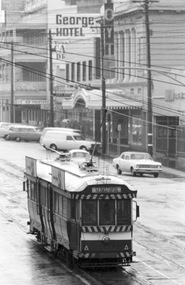
Yields information about the Lydiard St Nth landscape looking south.Digital image of a bogie tram travelling north in Lydiard St North between Sturt and Mair Sts, with many parked cars. Has the George Hotel, the CBC Bank, Hoyts Regent, and other buildings in the view. Photo taken by Peter Bruce 1970's and 1971, prior to the closure of the Ballarat tramway system. Peter's Title of image: "Gloomy Lydiard St"trams, tramways, lydiard st nth -
 Ballarat Tramway Museum
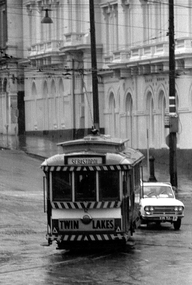
Photograph - Digital image, Peter Bruce, "No. 12 Lydiard St", 1970s
Yields information about the Sturt and Lydiard St intersection.Digital image, black and white, of No. 12 turning from Lydiard St Nth into Sturt St, enroute to Sebastopol, with the Post Office in the background. Tram has a Twin Lakes sign. Photo taken by Peter Bruce 1970's and 1971, prior to the closure of the Ballarat tramway system. Peter's Title of image: "No. 12 Lydiard St"trams, tramways, lydiard st nth, sturt st, post office, tram 12 -
 Ballarat Tramway Museum
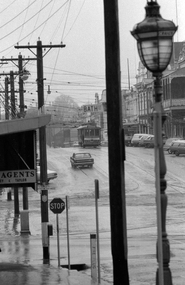
Photograph - Digital image Set of 2, 1970s
Yields information about the Lydiard St and Sturt St intersection and some of the signs that were in place at the time.Digital image, black and white, two photos of No. 12 southbound in Lydiard St North, before turning into Sturt St. Note Craigs Royal Hotel street lamp, the fire alarm box, fire plug post and the warning sign behind the Stop sign Photo taken by Peter Bruce 1970's and 1971, prior to the closure of the Ballarat tramway system. Peter's Title of image: "No. 12 and gas lamp" and "No. 12 Lydiard St Sturt 1"trams, tramways, lydiard st nth, craig s hotel, signs, tram 12 -
 Ballarat Tramway Museum
Photograph - Digital image, 1970s
Yields information about Sturt St, Drummond St Jtn and the conductor changing the points.Digital image, black and white, of the conductor on No. 18 standing along side with a point bar, to change the points before the tram goes out along Drummond St Nth. Photo taken by Peter Bruce 1970's and 1971, prior to the closure of the Ballarat tramway system. Peter's Title of image: "No. 18 and Connie"trams, tramways, hospital corner, conductors, points, sturt st, tram 18 -
 Ballarat Tramway Museum
Photograph - Digital image, 1970s
... has the destination of Gardens via Drummond Nth. Photo... has the destination of Gardens via Drummond Nth. Photo ...Yields information about the Mt Pleasant route.Digital image, black and white, of No. 30 inbound along Barkly St, Mt Pleasant about to stop to pick up passengers. Tram has the destination of Gardens via Drummond Nth. Photo taken by Peter Bruce 1970's and 1971, prior to the closure of the Ballarat tramway system. Peter's Title of image: "No. 30 Mt Pleasant".trams, tramways, barkly st, mt pleasant, tram 30 -
 Ballarat Tramway Museum
Photograph - Digital image, 1970s
... and destination of Gardens via Drummond Nth. Tram picking up passenger... and destination of Gardens via Drummond Nth. Tram picking up passenger ...Yields information about the Mt Pleasant route and Barkly St.Digital image, black and white, of No. 30 in bound along Barkly St, Mt Pleasant. Tram has a Twin Lakes sign and destination of Gardens via Drummond Nth. Tram picking up passenger at rear door, while a Vanguard motor car waits. Photo taken by Peter Bruce 1970's and 1971, prior to the closure of the Ballarat tramway system. Peter's Title of image: "No. 31 and Vanguard"trams, tramways, barkly st, mt pleasant, tram 31 -
 Ballarat Tramway Museum
Photograph - Digital image, Peter Bruce, "No. 39 at Doveton St", 1970s
... of Doveton and Sturt St, with the tram going to Gardens via Drummond...Ballarat Tramway Museum South Gardens Reserve Wendouree ...Yields information about the Sturt St track, near Doveton St.Digital image, black and white, of No. 39 at the corner of Doveton and Sturt St, with the tram going to Gardens via Drummond Nth. A lady is walking behind the tram. Photo taken by Peter Bruce 1970's and 1971, prior to the closure of the Ballarat tramway system. Peter's Title of image: "No. 39 at Doveton St"trams, tramways, doveton st, sturt st, tram 39 -
 Ballarat Tramway Museum
Photograph - Digital image, 1970s
Yields information about the railway level crossing.Digital image, black and white, of No. 41 north bound in Lydiard St North, crossing the railway lines with Victoria House in the background, at the level crossing. A wet day. Photo taken by Peter Bruce 1970's and 1971, prior to the closure of the Ballarat tramway system. Peter's Title of image: "No. 41 at the Railway"trams, tramways, level crossings, railway station, lydiard st nth, tram 41 -
 Ballarat Tramway Museum
Photograph - Digital image, Peter Bruce, "No. 41 Mair St", 1970s
Yields information about Lydiard St between Mair and Sturt St.Digital image, black and white, of No. 41 southbound in Lydiard St after crossing Mair St with the George Hotel and Hoyts theatre in the background. The tram has the destination of Sebastopol. Photo taken by Peter Bruce 1970's and 1971, prior to the closure of the Ballarat tramway system. Peter's Title of image: "No. 41 Mair St"trams, tramways, mair st, lydiard st nth, tram 41 -
 Ballarat Tramway Museum
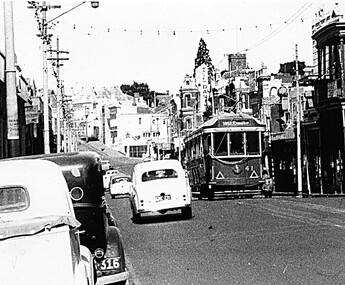
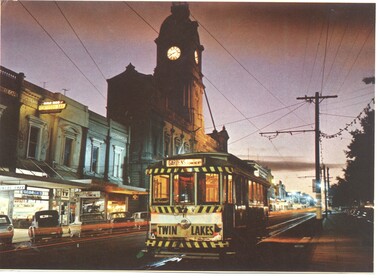
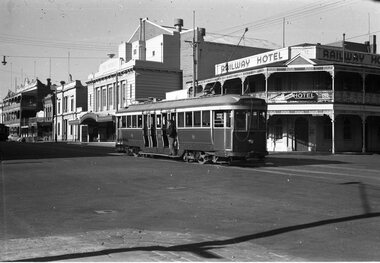
Photograph - Illustration/s, Ballarat 11 with Town Hall
... Hall in background. Tram has destination of "GARDENS via... destination of "GARDENS via Drummond Nth", with a "TWIN LAKES" sign ...Illustration that yields information about a Ballarat tram and streetscape mid 1960's - evening photograph and a Ballarat tourist attraction at the time - the shell house.Illustrator with a printed photograph of Ballarat tram No. 11 at dusk in Sturt St, just west of Lydiard St. with Town Hall in background. Tram has destination of "GARDENS via Drummond Nth", with a "TWIN LAKES" sign on rear driver's apron of tram. On pole in front of tram is tram stop sign and a section sign. Pole painted with tram stop sign as well. On rear , printed in dark green ink is the card details etc. "Ballarat, Victoria, Looking to the City Hall, Sturt Street at sunset." See also Reg Item 669 - Nucolorvue car, BT 65 for the same photographs. On rear is a photo of the crown at the Shell house - see also Reg Item 2143 and 3079 for the same photograph. Possibly cut from a Nu-colour-vue publication.trams, tramways, sturt st, town hall -
 Ballarat Tramway Museum
Photograph - Black & White Photograph/s, Wal Jack, 12/04/1950 12:00:00 AM
Black and White print contained within the Wal Jack Bendigo and Geelong Album, see Reg Item 5003 for more details. Photo of Bendigo Birney No.15 at North Bendigo, Photo Wal Jack, with the destination of Golden Square - 12-4-1959. Has the level crossing and rail line in the background and part of the tram stop shelter. i1 - scan of print in the album i2 - rear of image i3 - scan of negative at 3200dpi added 6/6/2020. On the rear in black ink "SEC Bendigo, No. 15 at Nth Bendigo 12-4-1959. Has the Wal Jack copyright stamp in the top right corner with the number "T219" written in.trams, tramways, bendigo, north bendigo, level crossings, birney, tram 15 -
 Ballarat Tramway Museum
Photograph - Black & White Photograph/s, Leon Marshall Wood, 29/12/1947 12:00:00 AM
Black and White print contained within the Wal Jack Bendigo and Geelong Album, see Reg Item 5003 for more details. Photo of Bendigo Birney No.30 at North Bendigo, Photo Leon Marshall Wood, with the destination of Golden Square - 29-12-1947. Has the level crossing and rail line in the background and part of the tram stop shelter. On the rear in black ink "SEC of Victoria Bendigo, ex Geelong "Birney" car No. 30 Nth Bendigo terminus. In the bottom left hand corner "29.12.1947" The Leon Marshall Wood stamp in green ink and the number "SEC 15" written in.trams, tramways, bendigo, north bendigo, level crossings, birney, tram 30 -
 Ballarat Tramway Museum
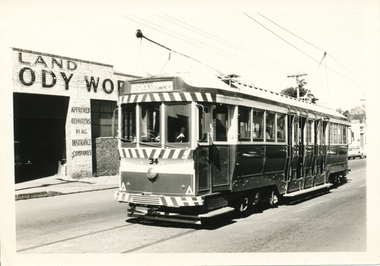
Photograph - Black & White Photograph/s, Ellen Butland, 1971
... Ballarat. Tram has the destination of "Gardens via Drummond Nth... Ballarat. Tram has the destination of "Gardens via Drummond Nth ...Yields information about Ballarat's bogie trams and Main Road Ballaarat.Black and white photograph of No. 34 inbound in Main Rd Ballarat. Tram has the destination of "Gardens via Drummond Nth". Has the Inland Motor Body works buildings in the background (still functioning 2013). Photo by Ellen Butland, 1971.On rear in ink "Ballarat" and "E. G. Butland" stamp.trams, tramways, main road, tram 34 -
 Ballarat Tramway Museum
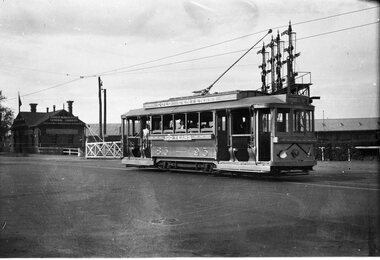
Photograph - Tram 38 decorated for Royal Visit, Ken Magor, 1954
The photo, shows tram 38 decorated for the 1954 Royal Visit, crossing the railway tracks at Ballarat Station in Lydiard St North. The tram has the destination of Sebastopol. In the background is the railway signal gantry, Reids Coffee Palace and the Post Office. Many of the buildings are flying flags.Yields information about the 1954 Royal Tram.Photograph, black and white - plain black with Ken Magor stamp and negative number written on the rear.Ken Magor Negative Number - "3427" tramways, trams, royal visit, decorated trams, tram 38, lydiard st nth, level crossings -
 Ballarat Tramway Museum
Functional object - Conductors Bell, Conductors Bell Tramcar No. 34
The bell from the final tram, Tram No. 34, to run on Lydiard Street North in 1971. Demonstrates a conductors communication or signal bell made for use on tramcars. A reminder of the network of trams that existed in Ballarat. Brass Conductor Communication Bell consisting of cast frame, bell pull part, one nut to secure the bell to the frame and two rivets securing for the bell pull part. Displayed in wooden frame with brass plaque. Stamped at one end with "48" "1". Brass plaque reads "Tram No. 34 Last Tram LYDIARD St. Nth. 19 -9- 71 ALLAN C JEFFREYS (DRIVER)". conductor, bell, trams, tramways, ballarat tramways, btm -
 Ballarat Tramway Museum
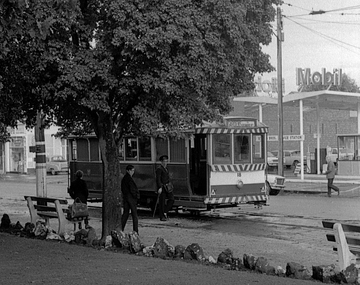
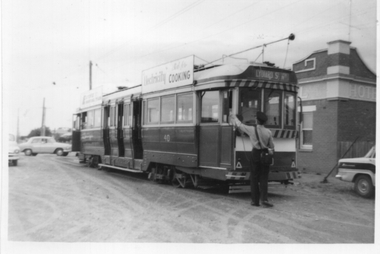
Photograph - Tram 40 at Sebastopol terminus, 1/1966
Photograph - Black and white of Ballarat tram No. 40 parked at the Sebastopol tram terminus. The conductor has lowered the trolley pole and is tying the rope off. The tram has an SEC Electric Cooking roof advertisement and the destination of Lydiard St Nth. In the background is the Royal Mail Hotel. Not known who took the photo during Jan. 1966.Yields information about the appearance of tram No. 40 during Jan 1966 and the Sebastopol terminus.Black and white photograph on Ilford paper.In ink on rear "Gardens 1/66"tramways, wendouree parade, gardens loop, tramcars, tram 40 -
 Ballarat Tramway Museum
Negative, Wal Jack, 1951
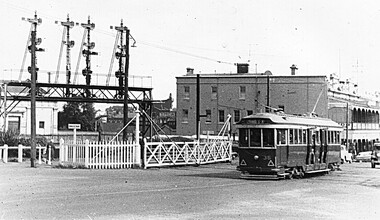
Yields information about the Gold tram of 1951 and of the railway level crossing in Lydiard St North.Negative and Digital image of the Wal Jack Ballarat Negative file of No. 23 as the gold tram crossing the level crossing in Lydiard St North, during 1951 on its way to Lydiard St North. In the background is the signal gantry and the Kennedy Murray Pty Ltd General Carriers. trams, tramways, lydiard st nth, level crossings, ballarat railway station, gold tram, tram 23 -
 Ballarat Tramway Museum
Negative, Wal Jack, late 1940's or early 1950's
Yields information about the intersection of Mair and Lydiard St North.Negative and Digital image of the Wal Jack Ballarat Negative file of No. 35 crossing Mair St in Lydiard St North with a passenger ready to get off - riding on the footboard. In the background is the George Hotel, the Regent Theatre and the Railway Hotel.trams, tramways, mair st, lydiard st nth, tram 35 -
 Ballarat Tramway Museum
Slide - 27 mm sq slide/s, Andrew Howlett, Tram No. 11 northbound in Lydiard St North, with the cutting concrete wall before Gregory St, Feb. 1969
The concrete wall behind the tram was removed following closure of the SEC operated system and reconstruction of the street.Yields information about the Lydiard St line and in particular the concrete cutting wall before Gregory St.Colour slide, Kodak white cardboard mount, developed Feb. 1969 of No. 11 northbound in Lydiard St North, with the cutting concrete wall before Gregory St Tram has the destination of Lydiard St Nth and has a Twin Lake sign.ballarat, tramways, trams, lydiard st north, gregory st, tram 11 -
 Ballarat Tramway Museum
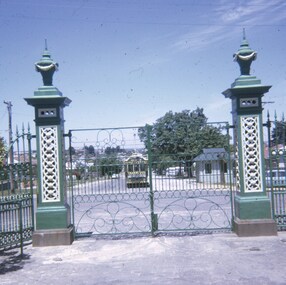
Slide - 27 mm sq slide/s, Andrew Howlett, Tram No. 41 at the Lydiard St North terminus, Dec. 1969
Yields information about the Lydiard St line and the terminus.Colour slide, Kodak white cardboard mount, developed Dec 1969 of No. 41 at the Lydiard St North terminus looking through the Cemetery gates with the passenger shelter on the right hand side.ballarat, tramways, trams, lydiard st nth, cemetery, shelters, tram 41 -
 Ballarat Tramway Museum
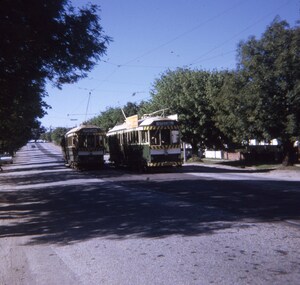
Slide - 27 mm sq slide/s - set of 2, Andrew Howlett, No. 34 and 37 crossing at the Duncan St loop in Drummond St North, Mar. 1969
Yields information about the Drummond St line and the Mills St loop area and a special tram tour using No. 37.Colour slide, Kodak white cardboard mount, developed Mar 1969 of No. 34 and 37 crossing at the Duncan St loop in Drummond St North. No. 34 has destination of Gardens via Drummond North, while No. 37 running a special service. .2 - No. 37 in the loop by itself. See Reg Items 7675, 7678, 7681, 7684, 7686, 7705 and 7713."Duncan St Loop Drummond St" in red ink.ballarat, tramways, trams, drummond st nth, mill st loop, tram 34, tram 37