Showing 856 items matching " railway reserves"
-
 Ballarat Tramway Museum
Photograph - Black & White Photograph/s, CLC, 1950
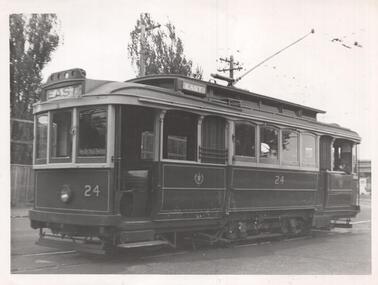
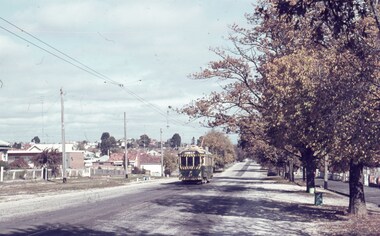
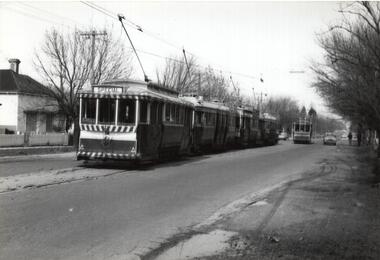
Yields information about Geelong trams in the late 1940's on the Chilwell - East - West lines.Black and White photograph of Geelong No. 24 at the West terminus. Tram has the destination of East. About 1954. Photo by CLC - General Manager of the Wombat Hill Railway,On the rear in pencil "With compliments by General Manager of the Wombat Hill Railway, Printed by the Public Relations Publicity Dept Wombat Hill railway, Geelong No. 24 West terminus about 1950." Has the Keith Kings number "CLC-8" in top right hand corner.trams, tramways, geelong, east, west, tram 24 -
 Ballarat Tramway Museum
Slide - 35mm slide/s, Keith Caldwell, 12/03/1962 12:00:00 AM
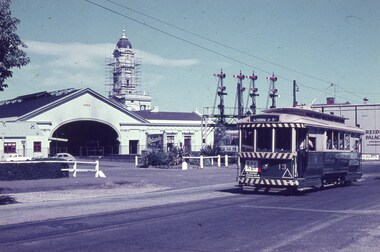
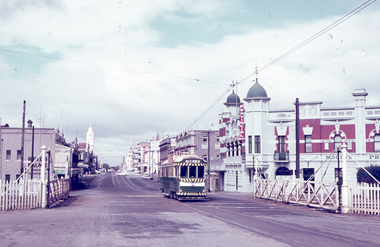
Yields information about the nature of tram services and trams in Lydiard St North and the Railway Station.Agfa colour slide, white cardboard mount, photo by Keith Caldwell on 12/3/1962 of: Tram 13 northbound in Lydiard St North, with the railway station and Reid's Coffee Palace in the background. The station clock tower has scaffolding around it. An Orlando wine advertisement is visible on the platform along with signal gantry. The Tram has an Age advertisement.In ink "Ballarat 12.3.62"tramways, trams, railway station, lydiard st north, tram 13 -
 Ballarat Tramway Museum
Photograph - Black & White Photograph/s, State of Victoria Lands Department, c1940
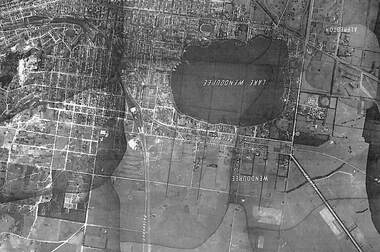
Yields information about the development and Lake Wendouree from an aerial photograph c1940.Black and white photograph of an aerial view of the Lake Wendouree and the northern part of Ballarat c1940. Shows the photograph join lines, has names of suburbs, Railway lines. Purchased from rusty via Ebay 16/5/2019.trams, tramways, lake wendouree, ballarat, aerial views -
 Ballarat Tramway Museum
Photograph - Digital image, Dave Macartney, c1969
Digital Image of MMTB tram W5 836 inbound in Mt Alexander road, just before the crossing of Moonee Ponds Creek. Tram is freshly painted, showing City Route 59. In the background is a Holden car dealer, the railway bridge over Flemington Road. Photo by Dave Macartney 1969?trams, tramways, w5 class, mt alexander road, tram 836 -
 Ballarat Tramway Museum
Slide - 35mm slide/s, Robert Thomson, 27/03/1964 12:00:00 AM
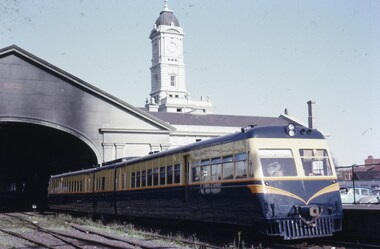
Yields information about the type of rail motor or rail car that served Ballarat's railway stations.Ilford Ilfochrome cardboard mount, colour slide of 280HP Rail motor at the Ballarat Railway Station, taken from the level crossing. Has the clock tower in the background, but no clock."Rail Motor, Ballarat Station - 37- 27/3/1964" in ink.tramways, trams, lydiard st north, railway station, railcar, ballarat station -
 Ballarat Tramway Museum
Slide - 35mm slide/s - set of 3, Robert Thomson, 27/04/1965 12:00:00 AM
Yields information about Ballarat's trams in Lydiard St North during the autumn of 1965.Set of 3 Agfa blue/white mount, colour slides: .1 - tram 37 northbound in Lydiard St North, with autumn leaves on the adjacent trees. .2 - tram 40 ditto. .3 - tram 35, but nearer to the Railway Station."27-4-65" in ink.tramways, trams, lydiard st north, tram 37, tram 40, tram 35 -
 Ballarat Tramway Museum
Slide - 35mm slide/s, Robert Thomson, 5/04/1969 12:00:00 AM
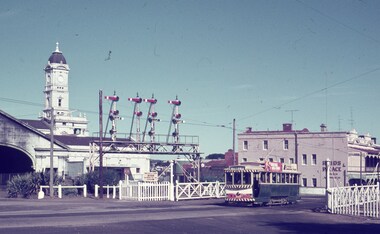
Yields information about Ballarat's trams in Lydiard St North and the railway level crossing.Agfa blue/white mount, colour slide of a bogie tram 36 crossing the Lydiard St North level crossing northbound. Has the railway gates in the view. Moody's Provincial Hotel, Hoyts and Reid's Coffee Palace are in the view. Shows the track arrangement at this location."5-4-69" in ink.tramways, trams, lydiard st north, railway station, level crossings, tram 36 -
 Ballarat Tramway Museum
Slide - 35mm slide/s, Robert Thomson, 11/04/1971 12:00:00 AM
Yields information about Ballarat's trams in Lydiard St North and the railway level crossing.Agfa blue/white mount, colour slide of tram 33 crossing the Lydiard St North level crossing northbound. Has the railway gates and signal gantry in the view. Reid's coffee palace is in the view. Image i2 - cleaned by PCW -"11-4-71" in ink.tramways, trams, lydiard st north, railway station, level crossings, tram 33 -
 Ballarat Tramway Museum
Photograph - Tram tour - TMSV & ARHS, Richard Gilbert, 21/8/1971
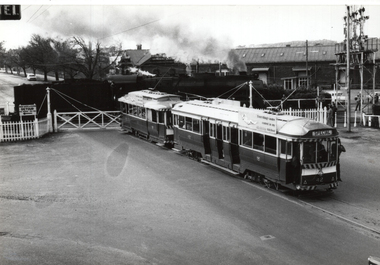
A. Cook Tours database that the tour by the ARHS and TMSV using trams 11, 26, 39 and 42 and was a farewelll tour, with the first of the Ballarat tram lines closing the following day. See also item 9442 for other photographs. .1 - two trams (27 and 42) at the gates with an R class locomotive using the crossing. Both trams have SEC advertising. Tram 42 is running a special tour. .2 - tram 39, running a special tram service, loading passengers at the railway station tram stop. In the background is awning for the Provincial Hotel and SF Motors Mercedes Benz. .3 - tram 27 northbound crossing the level crossing. Yields information about the use of the Lydiard St Nth line prior to closure and the use of the level crossing. Series of 3 Black and white photographs of trams using the Lydiard St North level crossing.trams, tramways, lydiard st north, level crossings, railways, locomotives, ballarat station, special trams, tram 27, tram 42, tram 39 -
 Ballarat Tramway Museum
Photograph - Black & White Photograph/s, Richard Gilbert, c August 1971
Yields information about tram operations in the Drummond St North at the time of the closure of the first of Ballarat's lines in August 1971.Black and white photograph of four trams (last tram No. 14 showing Special) crossing a single tram at the Mill St loop in Drummond St Nth, possibly on the final day of Victoria St operations, the trams running special to meet the ARHS / TMSV train at the railway station. trams, tramways, closure, mill st loop, drummond st nth, tram 14 -
 Ballarat Tramway Museum
Photograph - Digital image, John Ward, 2/01/1972 12:00:00 AM
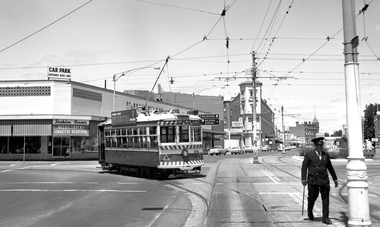
Digital image of the Bendigo tram 29 turning from Pall Mall into Mitchell St with the destination of Railway Station. In the background is the Fountain Plaza, advertising Melba Frocks and Gidgette Boutique, the City Family Hotel, Park Lane chicken shop. In the foreground is the Inspector returning the point bar to its holder on a pole. Photo by John Ward 2-1-1972. Slide title "04771 020172 7210-F SECV Birney tram 29 Pall Mall to Mitchell St at High St & View St Charing Cross Bendigo Vic"trams, tramways, bendigo, pall mall, mitchell st, charing cross, tram 29 -
 Ballarat Tramway Museum
Photograph - Black & White Photograph/s, Andrew Howlett?, early 1960's
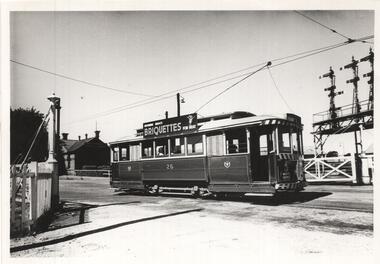
Yields information about the appearance of the Lydiard St North level crossing and tram 26 in the early 1960'sBlack and White photograph print of tram 26 northbound in Lydiard St North, crossing the railway level crossing. Tram has a briquettes roof advert and a White Horse Whiskey front panel advert. Tram has dash canopy lights and the colour scheme of the early 1960's. May not be a Andrew Howlett taken photograph.trams, tramways, lydiard st north, railway, level crossings, tram 26 -
 Ballarat Tramway Museum
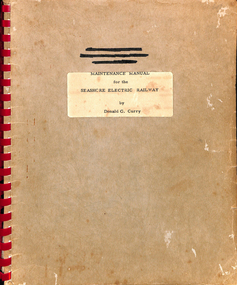
Manual, Seashore Trolley Museum and Kennebunkport USA, "Seashore Museum Maintenance Manual - Electrical", c1970
Manual - 176 quarto pages + light grey covers Electrical" on a cover pages. with a red comb binding. Prepared by Donald G Curry of the Seashore Electric Railway, 17/6/1962. Document has table of contents: Covers Painting, Roof repairs, body repairs, inspections, Lubrication, Traction Motor Maintenance, controllers, hand operated circuit breaks, car resistors, traction braking equipment, trucks and rigging. Has an appendix and index. Document has been scanned. Part 1 - cover to page 17 2 - pages 18 to 40 3 - pages 41 to 66 4 - pages 67 to 100 5 - pages 101 to 132 6 - pages 132 to 159 7 - pages 160 to rear cover trams, tramways, manual, tramcar equipment, maintenance, motors, controllers, tramcars, tram bodies -
 Ballarat Tramway Museum
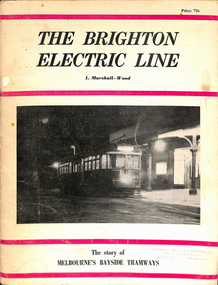
Book, Leon Marshall-Wood, "The Brighton Electric Line", 1966
Book - 40 pages including card covers - the history of the Brighton Electric Line by Leon Marshall-Wood, published 1966, 3rd edition revised and enlarged. Gives a brief history of the electric tramway operated by the Victorian Railways between St. Kilda Station and the Brighton Beach railway station, that commenced operation in 1905. Also a short history of the Sandringham - Black Rock - Beaumaris - Cheltenham tram electric and horse tram lines. Includes maps, rolling stock and ticket notes. Published by Traction Publications. Has details of the AETA on the back cover and listing of some publications. See Reg Item 1146 for 1956 edition.Has the stamp of the "Technical Book and Magazine Co" on front cover.trams, tramways, vr, melbourne, brighton, st kilda, sandringham, black rock, horse trams -
 Ballarat Tramway Museum
Newspaper, The Age, "Where have all the old trams gone?", 30/05/1970 12:00:00 AM
Newspaper clipping from The Age, Saturday Magazine of 30/5/1970 about old tramcars, where they have gone, TMSV, Bylands and Bob Prentice. Has four photographs. Notes that the trams are earmarked for the TMSV's collection, has leased land south of Kilmore and negotiating for a building at Bylands. 1086i1 - ex St. Kilda Railway - Brighton Beach VR 3 at Yarrambat 1086i2 - X1 and X2 at Wantirna 1086i3 - Barry George driver at Glen Huntly showing Peter Stoneham controls of a tram 1086i4 - X1 217 at Malvern Depot Story by Michael Hudson, Pictures Neil Town.In red ink about the X1 X2 photo "30/5/70".trams, tramways, tmsv, tramcar preservation, bylands, mr. r. prentice -
 Ballarat Tramway Museum
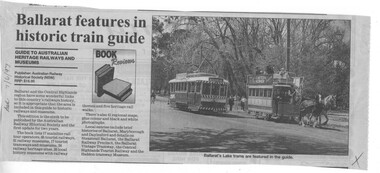
Newspaper, The Courier Ballarat, "Ballarat features in historic train guide", 7/06/1997 12:00:00 AM
Newspaper cutting from The Courier, Ballarat, Saturday 7/6/1997 in the Book Review section of the "Guide to Heritage Railways and Museums" published by the ARHS (NSW), RRP $16.95. Includes a photo of the horse tram and tram No. 14 at the crossing loop, which is featured in the guide. Gives details of the coverage of the district rail based museums, publication details and general details of the book.On left hand edge of the cutting, "Sat. 7/6/1997" in blue ink. Also a blue ink cross in the bottom right hand corner.trams, tramways, btm, horse trams, tour guide, rail museum guide -
 Ballarat Tramway Museum
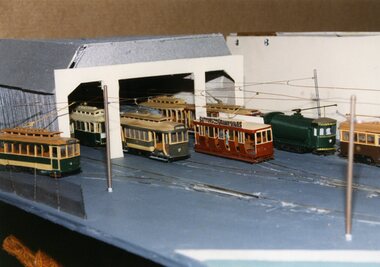
Photograph - Colour Photograph/s set of 2, Darren Hutchesson, 6/06/1998 12:00:00 AM
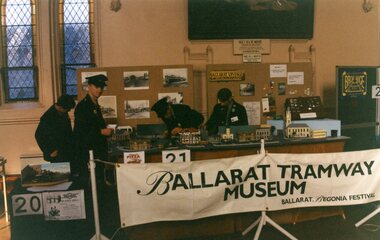
Set of two colour photographs of the 1998 Model Railway Exhibition, BTM stand, June 1998, sent to the Editor of Trolley Wire - used in the August 1998 issue of Trolley Wire. All photos by Darren Hutchesson. All photos on AGFA Prestige paper. 1142.1 - Photo of nine of the model trams in front of the depot - BTM Model Tramway - June 1998 Queens Birthday weekend - used on page 45 of Trolley Wire. 1142.2 - General photo of the model railway and stands. Alastair Reither at the controls! - used on 46 of Trolley Wire magazine. See August 1998 issue of Trolley Wire and July 1998 issue of Fares Please!Both have stickers on the rear with photo number "55 or 56" and "Photo same size" and pencil cropping marks for printing purposes.trolley wire, model tramways, model railways, models -
 Ballarat Tramway Museum
Book, Jack Richardson, "Destination City", 1954
Reproduced from the Australian Tramway Album 2nd Edition, (revised). 2nd Edition, (revised). Two colour cover - green with black. Describes Melbourne's tram car fleet, including Victorian Railways tramcars, cable cars and the Doncaster and Box Hill tramway. Includes brief description of each type, photographs and a summary history. Has many photographs of the various tramcars associated with relevant text. On front cover, has PCC 980 with green banding and price. On back cover is a map of Melbourne tramways drawn in 1948. Book - "Destination City" - paper covers - 20 pages - with sub title "A Pictorial Review of Melbourne's Tramcars", priced at 2/-, published by Traction Publications of Brighton Beach in 1954. Copy 2 - on front cover has number "500/18" crossed out with "501/2" in blue ink underneath. Copy 3 - on inside of front cover, stamped in black ink "R.J.Meyer / 6 Moorefield Rd., / Johnsonville".trams, tramways, melbourne, tramcars, mmtb, vr -
 Ballarat Tramway Museum
Photograph - Colour Photograph/s, Len Millar, 6/06/1998 12:00:00 AM
Colour photograph of the BTM Model tramway exhibition stand at the June 1998 model railway exhibition. Included in the photograph are Alastair Reither, Simon Jenkins, Darren Hutchesson and Paul Mong. Photograph taken by Len Millar. See Reg Item No. 1142 also. On AGFA Prestige photo paper with a Castlemaine printing notation on the rear. See July 1998 Fares Please!btm, model tramways, queens birthday, models -
 Ballarat Tramway Museum
Slide - 35mm slide/s - set of 2, Noel Simons, 23/12/1967 12:00:00 AM
Set of two Kodak Ready-mount with slides made from the Association of Railway Enthusiast Provincial Tramways film strip. Both taken by D. Macartney, 23/12/1967. See Reg Item 2560 for details of the slide strip and reference to the other slides within the strip. 1164.1 - No. 18 north bound in Drummond St. North, at Victoria Ave. - side on photo - slide has a red coloured background. 1164.2 - No. 32 decorated for Myer's Christmas tram at Macarthur St. with destination of "Victoria St." See Reg Item 4184 for a black and white photograph.1164.1 - "No. 18 heads up Drummond St. North, bound for "Gardens"" 1164.2 - "No. 32 with Christmas decoration alongside Lake Wendouree" All have date stamp of "Dec 1967" in blue ink. Writing in blue ink.tramways, trams, myer, christmas trams, drummond st. nth, wendouree parade, tram 18, tram 32 -
 Ballarat Tramway Museum
Slide - 35mm slide/s - set of 2, Noel Simons, Nov. 1970
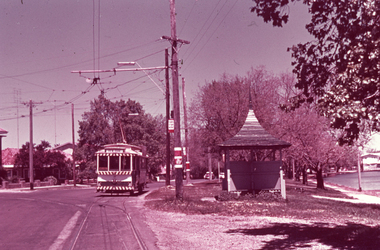
Set of 2 Kodak Ready-mount with slides made from the Association of Railway Enthusiast Provincial Tramways film strip. 1166.1 - No. 31 at the View Point terminus, corner of Wendouree Parade and Macarthur St., shows tram and section arrangements on poles. Also has SEC tramway shelter alongside stop. Tram has destination of "View Point" 1166.2 - No. 38 crossing Albert St. en route to Sebastopol.1166.1 - "No. 21 at View Point terminus. Line of left is that for cars on "Gardens via Drummond St. Nth" route." 1166.2 - "No. 38 crossing Albert St. near Sebastopol terminus" All have date stamp of "Nov. 1970" in blue ink. Writing in blue ink.tramways, trams, view point, wendouree parade, albert st, sebastopol, tram 21, tram 38 -
 Ballarat Tramway Museum
Slide - 35mm slide/s - set of 9, Noel Simons, Sept. 1971
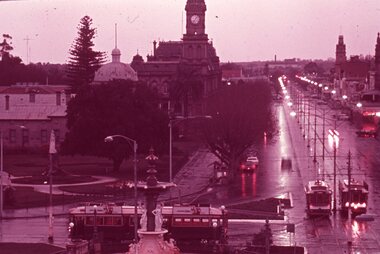
Set of 9 Kodak Ready-mount with slides made from the Association of Railway Enthusiast Provincial Tramways film strip. Reference Item 2560 details the ARE Film Strip, and provide references to other slides. See also Reg. item 1164. 1174.9 on plain white mount. 1174.1 - Tram 40 North bound for Lydiard St. North at the Railway Gates, with the gates closed. Tram carrying a heavy load of passengers. Railway station building and car park in background. Taken from the signal box. 1174.2 - Tram 12 bound for Gardens, photographed across the median strip plantation near Dawson St. Image i2a - adjusted 9/2021 to remove colour cast. 1174.3 - Tram 43 in bound along Wendouree Parade near Barrett Ave, passing a former tram stop and with "Warning Oncoming Trams" sign mounted on an adjacent pole. See also Reg. item 1172.1 for a photo taken in May 1971. This photo taken after the closure of the Victoria St. line, as the tram stop has been painted out. 1174.4 - Looking along the track to Sebastopol terminus on the west side of Albert St. - telephoto shot showing bogie tram in the far distance. Shows the nature of the track, poles, tram stop frequency and in the fare distance the terminus. Also show the trees that used to be along this section of the track. 1174.5 - No. 42 showing "Special" in Macarthur St. approaching Drummond St. north. Photo taken from under the verandah of a shop on the south side of the street that were many years later to become the Tramcar Restaurant. Note metal fence to cemetery. 1174.6 - Nos. 21 (Sebastopol) crossing 14 (Lydiard St. Nth) at the loop between Sayle and Grey St. Photo taken looking south. 1174.7 - No. 12 bound for Mt Pleasant, in Bridge St. about to stop at the junction for the two routes. Telephoto photo looking west along Bridge St. with many cars in the photo. Very few people on the street itself. 1174.8 - No. 30 and 17 at the City Terminus, on the north side of Sturt St. Taken from the Post Office corner with the Town Hall in the background. 1174.9 - No. 39 inbound along Sturt St. West. with many cars on the road. Bus stop on a pole on the other side of the road.1174.1 - "No. 40 on Lydiard St. North service waits at the level crossing at Ballarat Railway Station." 1174.2 - "No. 12 bound for 'Gardens' seen across the centre plantation in Sturt St." 1174.3 - "Barrett Ave." 1174.4 - "The Sebastopol route near the terminus" 1174.6 - "Nos. 21 and 14 crossing at Sayle St. Loop on Sebastopol route" 1174.7 - "No. 12 at Eastern end of Bridge St." 1174.8 - "Nos. 30 and 17 in Sturt St. at Cnr of Lydiard St." 1174.9 - "No. 39 City bound from 'Gardens" in Sturt St. West" All have date stamp of "Sep 1971" in black ink. Writing in blue ink.tramways, trams, lydiard st. nth, railway crossing, sturt st, wendouree parade, sebastopol, macarthur st., bridge st., sturt st. west, tram 12, tram 14, tram 17, tram 21, tram 30, tram 39, tram 40, tram 42, tram 43 -
 Ballarat Tramway Museum
Certificate, Ballarat and District Model Railway Club, Jun. 1998
"Certificate of Appreciation" issued by the Ballarat and District Model Railway Club for the BTM's participation in the Model Railway Spectacular held during the Queens Birthday Weekend June 1998. Printed by laser printer onto an A4 size off white preprinted paper, with the clubs logo. Signed in blue ink by Club President (Ian Mitaxa) and Secretary (Peter Roberts).tramways, trams, model tramways, btm, displays -
 Ballarat Tramway Museum
Slide - 35mm slide/s, Noel Simons, 21/11/1962 12:00:00 AM
Set of 6 transparencies taken on 21/11/1962 on Kodak mounts. 1189.1 - Bendigo No.11 at Quarry Hill terminus. Photo taken looking in along the route. Tram has destination of North Bendigo. 1189.2 - No. 21 in Pall Mall bound for North Bendigo. Tram has roof ads for Mamouney's furniture and SEC. In the background are the National Bank building, Dad and Dave's Cafe and the Beehive Buildings and the London Pharmacy. 1189.3 - No. 2 in Mitchell St, just after crossing over railway bridge. Photo taken after tram has passed photographer. Has what appears to be an SEC road works crew in the background. Has destination of Quarry Hill. 1189.4 - No. 17 climbing Mitchell St. on the start of the single track section, just before crossing the railway bridge. Has destination of Quarry Hill and the large Maples building sign in the background. 1189.5 - as for 1189.4 but after tram has passed photographer. Has an Ilford film roof ad and an SEC roof ad. Railway bridge in the background. 1189.6 - No. 21 at Charing Cross with passengers boarding. Tram has destination of North Bendigo and roof ads for SEC 'Electric Cooking' and Sandhurst Milk. In background are the buildings on the south side of High St. Also has a SEC worker in white overalls sweeping the track.Information written on in black ink and date stamped on purple ink. 1189.1 - "Birney car No. 11 in High St. Bendigo at Golden Square terminus" 1189.2 - "No. 21 in Pall Mall Bendigo near Charing Cross" 1189.3 - "No. 2 in Mitchell St. Bendigo, just after crossing bridge over railway line (Quarry Hill route)" 1189.4 - "No. 17 in Mitchell St. Bendigo, climbing the hill the bridge over the railway line. (Quarry Hill route)" 1189.5 - "No. 17 in Mitchell St., Bendigo approaching bridge over Railway line (Quarry Hill route)" 1189.6 - "No. 21 at Charing Cross, Bendigo"tramways, trams, bendigo, golden square, pall mall, mitchell st., quarry hill, tram 2, tram 11, tram 17, tram 21 -
 Ballarat Tramway Museum
Slide - 35mm slide/s - set of 4, Noel Simons, Apr. 1967
Set of 2 slides made from the Association of Railway Enthusiast Provincial Tramways film strip, possibly during April 1967. 1192.1 and 1192.3 mounted in Kodak Ready Mounts. The others in plain white mounts. Slides dated Dec. 1968. 1192.1 - No. 21 out bound to Golden Square in High St., between Wattle and Vine Streets. Photo taken after tram has passed photographer. Has a sign for "Reid's Furnituorium" in the background. 1192.2 - Bendigo No. 28 dressed up as Myers Christmas tram, passing the Post Office and Courts in Pall Mall. 1192.3 - Bendigo No. 23 at Needle Loop en route to Eaglehawk. Tram has two SEC roof ads, one "Electric Cooking" and the other "Everything fine in my all electric kitchen". 1192.4 - Bendigo scrubber parked at the end of the main depot lead, alongside the depot office buildings.Details in blue ink, date hand stamped in purple ink. 1192.1 - "No. 21 heads along High St for Golden Square between Wattle and Vine Streets." 1192.2 - "Birney No. 28 in Christmas Garb, traverses Pall Mall en route to North Bendigo". 1192.3 - "No. 23 at Needle Loop on its run to Eaglehawk". 1192.4 - "Scrubber car at Bendigo Depot".tramways, trams, north bendigo, bendigo, bridge st loop, depot, tram 21, tram 23, tram 28, tram scrubber -
 Ballarat Tramway Museum
Slide - 35mm slide/s, Noel Simons, Sep. 1971
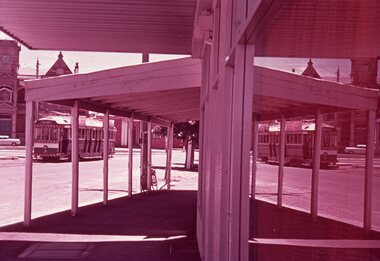
One slide on a Kodak Ready Mount made from the Association of Railway Enthusiast Provincial Tramways film strip, during September 1971 with a group of three trams at Charing Cross at dusk. Taken from an elevated position (the tower in the City Family Hotel) over looking the Alexandra fountain and looking towards the North on a wet evening. Two single truckers (1 possibly No. 6) and one bogie car waiting to proceed."Rainy evening at Charing Cross" in blue ink and "Sept 1971" in purple ink using a hand stamp.tramways, trams, charing cross, bendigo, tram 6 -
 Ballarat Tramway Museum
Slide - 35mm slide/s, Noel Simons, Dec. 1971
One slide on a Kodak Ready Mount made from the Association of Railway Enthusiast Provincial Tramways film strip, during December 1971 of Bendigo No. 3 at Eaglehawk terminus with its reflection in a shop window looking through a multi post verandah. Has the Eaglehawk Town Hall in the background."No. 3 and its reflection at Eaglehawk terminus" and "Dec 1971" in purple ink using a hand stamp.tramways, trams, eaglehawk, bendigo, tram 3 -
 Ballarat Tramway Museum
Slide - 35mm slide/s - set of 20, Noel Simons, 21/05/1971 12:00:00 AM
Set of 20 transparencies taken on 21/5/1971 on Kodak mounts. 1197.1 - Bendigo No. 5 en route to Eaglehawk at Creeth St Long Gully. Tram has a SEC roof ad and Cinzano roof ad. 1197.2 - No 5 approaching Needle Loop between Long Gully and California Gully. On left hand side is the City of Bendigo sign, indicating city boundary. 1197.3 - As for 1197.2 but actually entering loop. Photo taken after tram has passed photographer. 1197.4 - No. 26 bound for Eaglehawk descending the railway bridge near Eaglehawk, at Jobs Gully. 1197.5 - as for 1197.4, but after crossing bridge, now ascending a hill. Photo taken after tram has passed photographer. 1197.6 - No. 26 climbing High St. hill Eaglehawk, nearing end of Double track, bound for Quarry Hill. Shows centre of the road poles. 1197.7 - As for 1197.6, with tram entering single track section. Photo taken after tram has passed photographer. Has a BP service station in the background. 1197.8 - No. 26 (bound for Quarry Hill) crossing No. 17 (Eaglehawk) at Job's Gully Loop. 1197.9 - No. 17 climbing railway bridge at Job's Gully, en route to Eaglehawk. Photo taken after tram has passed photographer. 1197.10 - No.26 bound for Quarry Hill, leaving Long Gully Loop? Has the Creeth St. church in l197.l in the far background. Photo taken after tram has passed photographer. 1197.11 - Tramway Point work at the northern end of Long Gully Loop. 1197.12 - No. 17 en route for Quarry Hill turning into View St. from Bamard St. Tram has SEC roof ads "Everything fine in my all electric Kitchen' and 'Electric Cooking is Matchless'. 1197.13 - as for 1197.12, but tram has turned into View St and about to enter the double line track. Photo taken after tram has passed photographer. 1197.14 - No. 21 enters Nolan St after turning from MacRae St. en route to Bendigo. Note sign on its own post noting tram turns "Beware Tram Turns" and stop sign on adjacent pole "Trams stop on Request". No. 21 has two SEC roof ads. 1197.15 - No. 21 in Nolan St. after turning from Bridge St. (White Hills Road). Note signal light for Bridge St. loop on pole corner of street. Photo taken after tram has passed photographer. 1197.16 - No. 2 bound for Eaglehawk at unknown location. 1197.17 - Tram stop sign on a pole "CARS STOP BY REQUEST" 1197.18 - No. 5 in Carpenter St.? en route to Quarry Hill. 1197.19 - No. 28 has just arrive at Golden Square terminus, passengers are disembarking and the trolley pole is being turned. Golden Square Hotel in the background. 1197.20 - No. 28 at Golden Square terminus. Has a "Nothing beats Briquettes for hear roof ad. Information written on in black ink and date stamped on purple ink. 1197.1 - "No. 5 at Creeth St. Long Gully" 1197.2 - "No. 5 approaching Needle Loop between Long Gully and California Gully" 1197.3 - "No. 5 at Needle Loop between Long Gully and California Gully" 1197.4 - "No. 26 crossing railway bridge at Job's Gully near Eaglehawk" 1197.5 - "No. 26 just after crossing railway bridge at Job's Gully near Eaglehawk/ 1197.6 - "No. 26 in High St. Eaglehawk" 1197.7 - "No. 26 at end of double track in High St. Eaglehawk" 1197.8 - "Nos. 26 and 17 crossing at Job's Gully Loop" 1197.9 - "No. 17 crossing railway bridge at Job's Gully near Eaglehawk". 1197.10 - "No. 26 at Long Gully" 1197.11 - 'Northern end of points at Long Gully Loop". 1197.12 - "No. 17 turning into View St. from Bamard St. Bendigo". 1197.13 -'No. 17 at beginning of double track in View St. after leaving Bamard St. Bendigo. 1197.14 - "No. 21 enters Nolan St. from MacRae St. Bendigo." 1197.15 - "No. 21 in Nolan St. Bendigo just after leaving White Hills Road." 1197.16 - "No. 2" 1197.18 - "No. 5" 1197.19 - "Birney car No. 28 at Golden Square Terminus" 1197.20 "Birney car No. 28 at Golden Square Terminus" tramways, trams, bendigo, long gully, railway bridge, jobs gully, trackwork, nolan st, quarry hill, tram stops, golden square, tram 2, tram 5, tram 17, tram 21, tram 26, tram 28 -
 Ballarat Tramway Museum
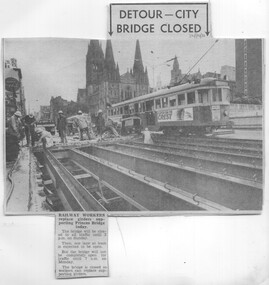
Newspaper, Herald & Weekly Times Ltd, "Detour - City Bridge Closed", 24/10/1970 12:00:00 AM
Newspaper Clipping from The Sun newspaper 24/10/1970 about the replacement of bridge girders in Swanston St. over the Railway lines with W2 381 in the background. Gives details of road closure. Good photo of the type of structure."24/10/70" in blue ink in top left hand corner.trams, tramways, swanston st., mmtb, bridges -
 Ballarat Tramway Museum
Document - Report, Les Stewart, "Proceedings of the joint Conference of the COTMA", 1993
110 page A4 sized bound document - Proceedings of the joint Conference of the Council of Tramway Museums of Australasia and the National Federation of Rail Societies Inc. 1st - 8th June 1990. Has laminated plastic white covers front and back. Front cover has the title details. Edited by Les Stewart of the Wellington Tramway Museum. (10th Conference) Contents: 1. Participants and programme 2. Workshops Development of the Volunteer Worker NZ Railway and Tramway Safety Regime Code of Electrical Practice for COTMA Groups Archives Photography as an aid in the Museum Tram and Railway Carriage roof coverings Handy hints and new ideas for Restoration and Maintenance Trolley Buses Is Your Museum Dying? Brill 21E and other tram truck bogie/requirements Overhead Construction and maintenance MMTB instructions in Overhead Construction Facts and Data on Overhead Trolley Wire Construction Trolley Wire Renewal Wellington Tramway Museum 1990 Projects 3. Field and Social Activities 4. AGM of COTMA 5. AGM of the NZFRS. See item 1255 for a group photo of delegates.trams, tramways, cotma, wellington, proceedings, conferences