Showing 428 items matching " wendouree station"
-
 Ballarat Tramway Museum
Photograph - Digital image, Wal Jack, 14/03/1960 12:00:00 AM
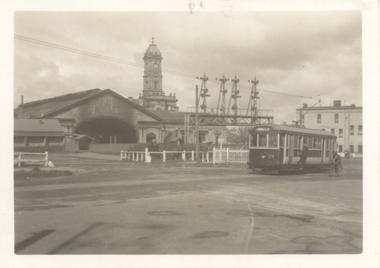
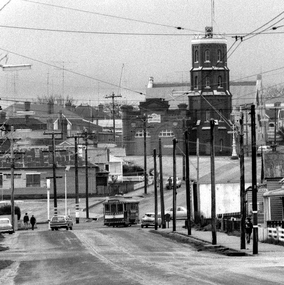
Yields information about the appearance of railway level crossing and Ballarat station in 1960.Digital image from the Wal Jack Ballarat Album of a photograph of No. 21 at the gates at Ballarat Railway station while R734 shunts onto the 1.40pm Horsham Passenger train, 14-3-1960. Photo Wal Jack. See image i2 for rear of photograph.On rear of photograph in ink "VR , SEC, Ballarat No. 21 tram newly painted waiting at rail gates Ballarat Rly Station. R734 4-6-4 backing on 1.40pm Horsham Passenger Train 14-3-60" and in top right hand corner, Wal Jack stamp with "2899" written in.trams, tramways, lydiard st, railway station, level crossings, tram 21 -
 Ballarat Tramway Museum
Photograph - Black & White Photograph/s, E. A. Downs, Sept. 1943
Black and white photograph of Ballarat No. 29 passing over the level crossing at the Ballarat Railway Station, with the station building in the background. The conductor is on the footboards of the tram. Sept. 1943, Photograph E. Downs. Lydiard St North.On rear in ink "Ballarat Railway Station - from Down end Sept. 1943 Photo E. Downs.trams, tramways, ballarat station, railway crossing, lydiard st north, tram 29 -
 Ballarat Tramway Museum
Photograph - Black & White Photograph/s, William G. A. Lewis, 25/11/1939 12:00:00 AM
Black and white photograph of Geelong No. 1 at the Geelong railway station, with the destination of West. Has a bus in the background. Photo William G. A. Lewis, 25 Nov. 1939. Two copies held.On rear in ink and stamped "William G. A. Lewis Photo No. 451 25 Nov 1939 and SEC Car No. 1 Geelong system, Geelong Railway Station". trams, tramways, geelong, railway station, tram 1 -
 Ballarat Tramway Museum
Postcard, Pall Mall Bendigo, early 1900's
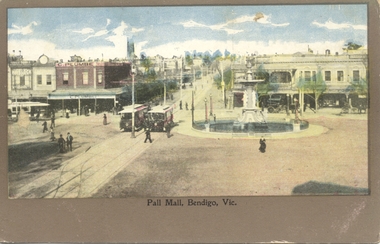
Postcard, coloured, Pall Mall Bendigo, looking east towards the Railway Station. Has three trams in the view, along with the fountain. Has C. Plumbe store on the north east corner of the intersection. Title "Pall Mall, Bendigo Vic." Note the small space for a message under the image. On rear, undivided back, with "Post card", "Address to be written on this side" and position for stamp. In the top left hand corner, has "Ian Barkla's" hand stamp. Ian Barkla stamptrams, tramways, bendigo, pall mall -
 Ballarat Tramway Museum
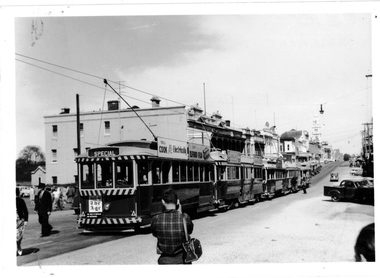
Photograph - Digital image, Wal Jack, 7/04/1962 12:00:00 AM
Yields information about the trams used and how they were arranged at the railway station for a major tour group visit in 1962.Digital image from the Wal Jack Ballarat Album of a photograph of the ten trams to be used for the ARHS visit to Ballarat 7-4-62. Ten trams used as listed in the inscriptions below. No. 20 the lead tram, has an SEC roof Advertisements, Ilford Film and The Age advert on the back dash panel. See image i2 for rear of photograph. See image i3 for hi res scan of print. See image i4 for hi res scan of negativeOn rear of photograph in ink "SEC, Ballarat ARHS Specials to Gardens (10 trams) No. 20, 31, 31, 38 in order, others 14, 28, 33, 35, 36,37 from Railway level crossing Lydiard St Nth 7-4-62" and Wal Jack stamp in top right hand corner with number "T1265" written in.trams, tramways, arhs, tours, lydiard st nth, railway station, tram 20 -
 Ballarat Tramway Museum
Photograph - Digital image, Wal Jack, 29/12/1945 12:00:00 AM
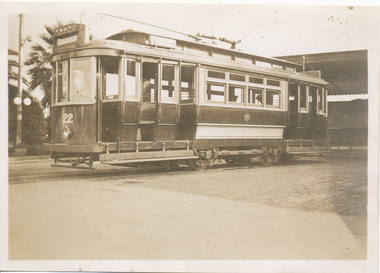
Yields information about the early use of Ballarat's first bogie tram after it had been re-numbered and Stones Corner.Digital image from the Wal Jack Ballarat Album of No. 22 turning from Bridge St into Main St 29-12-1945. Has the Castrol / Caltex service station with clock in the background and Stones Corner building. Tram proceeding to Mt Pleasant. See image i2 for rear of photograph. See image i3 for hi res scan of print. See image i4 for hi res scan of negativeIn ink on rear " SEC Ballarat Tramways bogie. 22, turning out of Bridge St into Main St, Ballarat East Post Office in background in Main St. 29-12-45" with number "T547" within Wal Jack photo stamp.trams, tramways, bridge st, stones corner, main st, bogie trams, tram 22 -
 Ballarat Tramway Museum
Slide - 35mm slide/s - set of 7, Eldon Hogan, Aug. 1964
Set of seven Kodak cardboard mounted slides - featuring photos taken during a visit to Bendigo by Eldon Hogan. Slides have slide number (26 to 32) and date "Aug 64" stamped onto them. Possibly a Xavier College Cadets tour - Eldon was involved with them at the time, given slide No. 27. Scanned on the Canon scanner at the depot 15/12/1971 at the time of the installation of the scanner. .1 - No 11 and a bogie car at the Railway Station .2 - ditto - note uniformed person boarding (Xavier College Cadet?) .3 - No. 11 at Charing Cross, showing "special" .4 - No. 11 bound for Eaglehawk at a Crossing loop .5 - No. 20 in bound for Quarry Hill - at the above crossing loop? .6 - No. 11 crossing the Eaglehawk / Swan Hill railway line at the overbridge. .7 - No. 11, High St Eaglehawk.tramways, trams, bendigo, railway station, eaglehawk, charing cross, birney, tram 11, tram 20 -
 Ballarat Tramway Museum
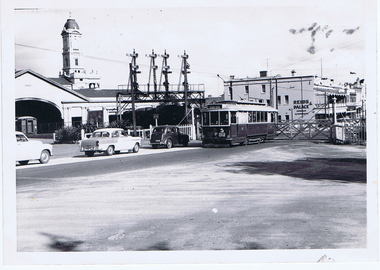
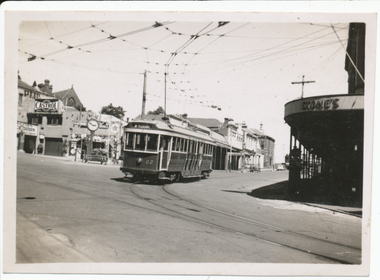
Photograph - Digital image, Late 1950's
Yields information the appearance and details about SEC Tram No. 36 in the late 1950's and the railway level crossing at Ballarat station.Digital scan from the Ben Parle collection of SEC No. 36 crossing the level crossing at the Ballarat Railway station with the signalling mast and Reid's Coffee Palace in the background. Photo 1950's or early 1960 prior to introduction of dash canopy lighting. Photo received with the Ben Parle slides 09/2004. trams, tramways, lydiard st nth, railway, level crossings, tram 36 -
 Ballarat Tramway Museum
Photograph - Digital image, Peter Bruce, "Barkly and Eureka St", 1970s
Yields information about the intersection of Barkly and Eureka St with the Ballarat Fire Station in the background.Digital image of a tram turning at the intersection of Barkly and Eureka St with the Ballarat Fire Station (East) in the background. Has a number of motor cars and pedestrians in the image. Photo taken by Peter Bruce 1970's and 1971, prior to the closure of the Ballarat tramway system. Peter's Title of image: "Barkly and Eureka St"trams, tramways, ballarat, barkly st, fire station, mt pleasant -
 Ballarat Tramway Museum
Photograph - Digital image, Peter Bruce, "Bridge St", 1970s
Yields information about the Bridge St landscape looking east.Digital image of a view looking east along Barkly St from Grenville St showing a tram a the intersection of the Mt Pleasant and Victoria St lines (Stones Corner). Has the shops on both side of the street in view. In the far distance is the Caltex service station. Photo taken by Peter Bruce 1970's and 1971, prior to the closure of the Ballarat tramway system. Peter's Title of image: "Bridge St"trams, tramways, ballarat, bridge st -
 Ballarat Tramway Museum
Photograph - Digital image, 1970s
Yields information about the Bakery Hill Victoria St and the Caltex Service Station.Digital image, black and white, of No. 26 descending Bakery Hill to Stone's Corner, Victoria and Main St with the Caltex service station in the foreground. Has a lady with slacks walking across the road and a boy wheeling a bike down the footpath. Note the Highway direction signs and service station signage. O'Brien Motors and a book and record shop on the north side Bakery Hill Victoria St. shops. See Reg 4603 for the subsequent photo at this location. Photo taken by Peter Bruce 1970's and 1971, prior to the closure of the Ballarat tramway system. Peter's Title of image: "No. 26 Bridge and Vic1"trams, tramways, victoria st, main st, stones corner, bakery hill, tram 26 -
 Ballarat Tramway Museum
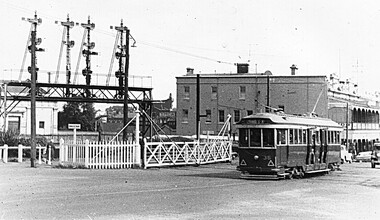
Photograph - Digital image, 1970s
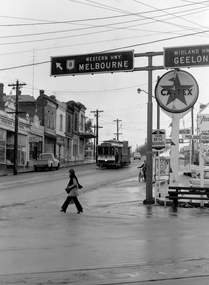
Yields information about the railway level crossing.Digital image, black and white, of No. 41 north bound in Lydiard St North, crossing the railway lines with Victoria House in the background, at the level crossing. A wet day. Photo taken by Peter Bruce 1970's and 1971, prior to the closure of the Ballarat tramway system. Peter's Title of image: "No. 41 at the Railway"trams, tramways, level crossings, railway station, lydiard st nth, tram 41 -
 Ballarat Tramway Museum
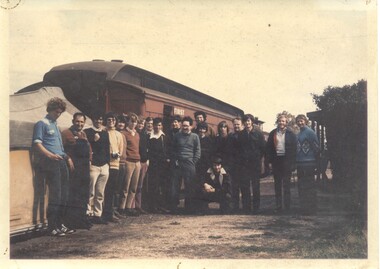
Photograph - Colour Print, Richard Gilbert, 27/09/1973 12:00:00 AM
Has a strong association with those who travelled on the BTPS organised tour to Mirboo North in 1973.Colour Print of the tour group and loco crew on the BTPS arranged special train to Mirboo North on 27/9/1973 at Yinnar station. Printed on Kodak paper. See Reg items 1817, 1819 and 3274 for other related items. Names: Fireman, Driver, Terry Oakley, Geoff Cargeeg, Alan Harnwell, Clyde Croft, Richard Gilbert, Rolf Jinks, ?., Peter Winspur, John Withers, Warren Doubleday, Peter Rees, Graham Jordan, Tom Murray, John Wayman, Rob McUtcheon, Bill Kingsley and Jeff Bounds kneeling down."BTPS Mirboo North Tour / Thurs 27-9-73 at Yinnar" in ink on rear.trams, tramways, btps, tours, special trains, morwell mirboo north -
 Ballarat Tramway Museum
Photograph - Black & White Photograph/s, John Alfred, 1960
Yields information about the appearance of BTM tram No. 661 in 1960, W2 349 and how the Carnegie line section of single track was worked.Black and white photograph of trams W3 661 (Route 4 Carnegie) and X2 675 (Point Ormond), Glenhuntly Road, Elsternwick Station, during the lowering of the railway line, 1960. Photo by John Alfred. Two copies held. See also Reg Item 5163 for an Ian Brady photograph prior to the work commencing.trams, tramways, mmtb, elsternwick, point ormond, w class trams, level crossings, tram 661, tram 675 -
 Ballarat Tramway Museum
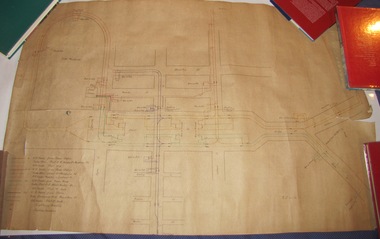
Drawing, Electric Supply Co. of Vic (ESCo), Tramway Power supply arrangements 1914, Jan. 2014
Yields information about the electrical power supply and overhead switching for Ballarat in 1914.Rolled drawing showing Tramway Power supply arrangements 1914, track map, power station, feeder cable, switches, section insulators, box locations, lightning arrestors and feeder cables for the various routes in Ballarat. Dated 2/1/1914, with initials GL. The various cables and trolley wire has been drawing in differing colours.ballarat, power station, overhead, section insulators -
 Ballarat Tramway Museum
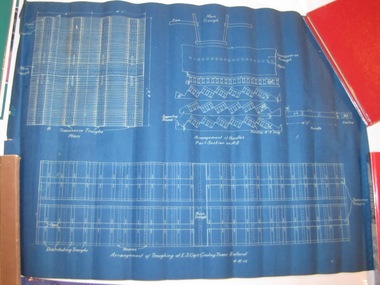
Drawing, Electric Supply Co. of Vic (ESCo), "Arrangements of Troughing at ESCo Cooling Tower Ballarat", 4/12/1914 12:00:00 AM
Yields information about the cooling tower troughing arrangements within the cooling tower itself at the power station.Rolled blue print of the "Arrangements of Troughing at ESCo Cooling Tower Ballarat" showing how the various systems to pipe and pass air through the water falling onto timber hurdles was made. Gives dimensions and details of the timber and arrangements made. Date 4.12.1914.ballarat, power station, ballarat a power station, esco -
 Ballarat Tramway Museum
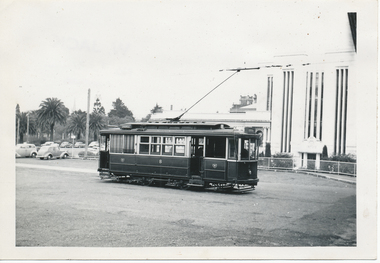
Photograph - Black & White Photograph/s, Wal Jack, 7/03/1954 12:00:00 AM
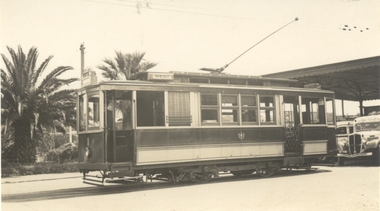
Black and White print contained within the Wal Jack Bendigo and Geelong Album, see Reg Item 5003 for more details. Photo of No. 21 in Mitchell St, near the Railway Station, 7-3-1954. Photo by Wal Jack. Printed on Ilford paper. See image i2 for rear of photograph. See image i3 for hi res scan of negative On the rear in blue ink "SEC Bendigo No 21 in Mitchell St near Rly Stn Sunday morning 7-3-54" with Wal Jack copyright stamp in the top right hand corner and the number "T67PC" written in.trams, tramways, bendigo, mitchell st, tram 21 -
 Ballarat Tramway Museum
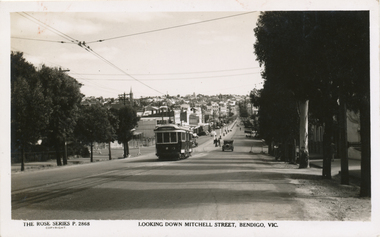
Postcard, Rose Stereograph Co, "Looking down Mitchel St Bendigo Vic"
Postcard contained within the Wal Jack Bendigo and Geelong Album, see Reg Item 5003 for more details. Rose Series Postcard No. 2868, titled "Looking down Mitchel St Bendigo Vic", from the railway overbridge. Has bogie tram No. 23 descending the hill, with the destination of Eaglehawk. Would appear the railway station entrance has been barriered off. Published by the Rose Stereograph Co. Armadale Vic, has the rose logo on the rear and a statement "A real photograph produced in Australia". No space for the stamp or address line. On rear in ink "Bogie 23" and in pencil "WJ"trams, tramways, bendigo, rose postcards, mitchell st, tram 28 -
 Ballarat Tramway Museum
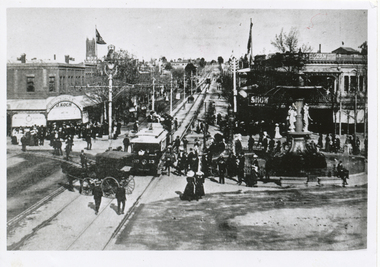
Photograph - Black & White Photograph/s, The Bendigonian, Sep. 2005
Black and White copy print contained within the Wal Jack Bendigo and Geelong Album, see Reg Item 5003 for more details. Photo of looking east along Mitchell St towards the Railway Station with tram No. 13 and a double deck trailer - has the centre poles along Mitchell St. in the photograph. In the background is a J. Koch and the Bendigo Supply Stores. Has fountain in photograph. Copied by Keith Kings from The Bendigonian 19/9/1905. On rear in ink " SA782, Bendigo, No. 13 - 3 window saloon Charing Cross. Note:- Crossover in Mitchell St.". Copied ex "The Bendigonian 19/9/1905."trams, tramways, bendigo, charing cross, horse trams, mitchell st -
 Ballarat Tramway Museum
Photograph - Black & White Photograph/s, Wal Jack, 27/06/1955 12:00:00 AM
Black and White print contained within the Wal Jack Bendigo and Geelong Album, see Reg Item 5003 for more details. Photo of Geelong No. 8 at the Railway Station with the Gordon Institute buildings in the background. The tram has the destination of Chilwell. Photo by Wal Jack 27/6/1955. Printed on Ilford paper. i1 - scan of print in the album i2 - rear of image i3 - scan of negative at 3200dpi added 27/6/2020. On rear in ink "SEC Geelong No. 8 to Chilwell at Geelong Station". Has the Wal Jack copyright stamp in the top right hand corner with the number "T331" written in and the date "27 Jun 1955" stamped with a purple ink hand date stamp.trams, tramways, geelong, railway station, tram 8 -
 Ballarat Tramway Museum
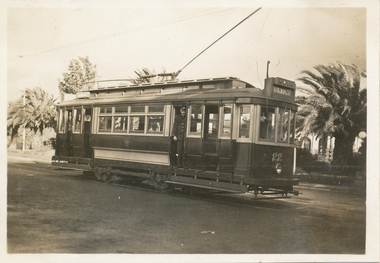
Photograph - Black & White Photograph/s, Wal Jack, Jun. 1939
Black and White print contained within the Wal Jack Bendigo and Geelong Album, see Reg Item 5003 for more details. Photo of No. 22 at the Geelong Railway Station. Photographer unknown - possibly Wal Jack - see date on Reg Item 5861. Wal's album notes dates the photo as June 1939. Printed on Kodak Velox paper. The tram has two trolley poles, the destination of Newtown. A conductor is standing in one of the doorways. i1 - scan of print in the album i2 - rear of image i3 - scan of negative at 3200dpi added 6/6/2020. trams, tramways, geelong, railway station, tram 22 -
 Ballarat Tramway Museum
Photograph - Black & White Photograph/s, Wal Jack, Jun. 1939
Black and White print contained within the Wal Jack Bendigo and Geelong Album, see Reg Item 5003 for more details. Photo of No. 22 at the Geelong Railway Station. Photographer unknown same as 5859 - possibly Wal Jack - see date on Reg Item 5861. Wal's album notes dates the photo as June 1939. Printed on Kodak Velox paper. The tram has two trolley poles. i1 - scan of print in the album i2 - rear of image i3 - scan of negative at 3200dpi added 6/6/2020. trams, tramways, geelong, railway station, tram 22 -
 Ballarat Tramway Museum
Photograph - Black & White Photograph/s - Geelong 23 at Railway Station, Wal Jack, Jun. 1939
Black and white photo from the Wal Jack album (item 5003) of Geelong tram 23 leaving the railway station with Johnstone park in the background. i1 - scan of print in the album i2 - rear of image i3 - scan of negative at 3200dpi - not exactly the same location given the position of the trees behind. i4 - scan of a print from the Ken Magor collection i5 - scan of rear of print with date 21-6-1939 and Ken Magor number 1805. Yields information about Geelong tram 23Photo of No. 23 at the Geelong Railway Station. Has the Wal Jack copyright stamp on the back.trams, tramways, geelong, railway station, tram 23 -
 Ballarat Tramway Museum
Photograph - Black & White Photograph/s, Wal Jack, Jun. 1939
Black and White print contained within the Wal Jack Bendigo and Geelong Album, see Reg Item 5003 for more details. Photo of No. 23 at the Geelong Railway Station with the station buildings in the background. Photographer unknown - handwriting is the same as other photos such as Reg item 5850.. Wal's album notes dates the photo as June 1939. Printed on Kodak Velox paper. The tram has two trolley poles and the destination of Newtown. i1 - scan of print in the album i2 - rear of image i3 - scan of negative at 3200dpi added 6/6/2020. Has the rear in ink "Geelong Tramways, No. 23 "Two man trams", built by A. Pengelley South Australia"trams, tramways, geelong, railway station, tram 23 -
 Ballarat Tramway Museum
Photograph - Black & White Photograph/s, Wal Jack, 3/01/1945 12:00:00 AM
Black and White print contained within the Wal Jack Bendigo and Geelong Album, see Reg Item 5003 for more details. Photo of No. 17 from the Railway Station turning out of Railway Terrace into Mercer St. 3-1-1945. Printed on Ilford Paper. Tram has the destination of West. i1 - scan of print in the album i2 - rear of image i3 - scan of negative at 3200dpi added 30/6/2020.Has the rear in ink "SEC Geelong No. 17 from the Railway Station turning out of Railway Terrace into Mercer St. 3rd January 1945". Has the Wal Jack copyright stamp on the rear with the number T319 written in.trams, tramways, geelong, mercer st, railway station, tram 17 -
 Ballarat Tramway Museum
Photograph - Black & White Photograph/s, 8/01/1956 12:00:00 AM
Black and White print contained within the Wal Jack Bendigo and Geelong Album, see Reg Item 5003 for more details. Photo of Geelong No 31 bound for North Geelong at Railway station junction, Malop and Mercer Streets 8/1/1956. General view of junction in the area with a Olympic tyre / service station No details on photographer. On rear in ink "No.31 bound for North Geelong at Railway Stn Junc Malop and Mercer Streets 8/1/56"trams, tramways, geelong, north, railway station, malop st, mercer st, tram 31 -
 Ballarat Tramway Museum
Photograph - Black & White Photograph/s, 11/07/1950 12:00:00 AM
Black and White print contained within the Wal Jack Bendigo and Geelong Album, see Reg Item 5003 for more details. Photo of an illuminated street sign, lamp, near Geelong Railway Station, at Mercer St corner, 11-7-1950. Photographer not known. Photo is glued into album. Sign has the words "Geelong Electric Tramways / Board tram at Curve" with a hand and finger pointing the direction to walk in.trams, tramways, geelong, signs, railway station -
 Ballarat Tramway Museum
Newspaper, The Courier Ballarat, "A White Elephant?", 23/04/1962 12:00:00 AM
Yields information about the status of the SEC's Ballarat B power station in 1962.An article on page 8 of The Courier Newspaper, 12 pages, for Monday April 23, 1962. Note the year, shown as 1961 on the front page and the editorial on page 3 is incorrect, the correct year is 1962 as shown on the other pages - see Reg Item 5909 for other items within the paper. Page 8 of the newspaper contains a photo and text about the SEC's Ballarat B power station, titled "A White Elephant?" and its usefulness giving other generators being brought on line. The SEC advised that it was still in use.ballarat, sec, power station, ballarat b power station -
 Ballarat Tramway Museum
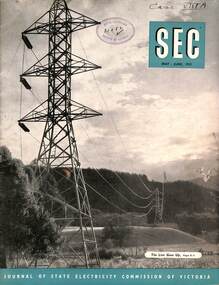
Magazine, State Electricity Commission of Victoria (SECV), SEC News, May June 1953
Published for the staff of the SEC, features the Kiewa Valley transmission line, North East towns and workers, industry, Bendigo Tram's Golden Jubilee, (AETA Visit, Mr George Laurens, Doug Dean, Tom Lynch and Basil Miller), electrical safety, meter reading in the country, sports, electric cooking, and sports section. In the retirements were Mr P Pithie, Senior Traffic Inspector Geelong, Mr V Pipps Depot Foreman Geelong and Mr S Watson, Geelong Senior depot clerk. On the inside cover are photos of the package power stations being installed at Geelong, Ballarat (Ballarat B) and Mildura.Demonstrates a SECV Staff magazine.Magazine, 36 pages, black and white production, centre stapled.Has RHSV stamp on the cover and "Case ViiiA" in inktramways, geelong, secv, retirements, ballarat b power station, power stations, bendigo -
 Ballarat Tramway Museum
Photograph - Tram 28 Ripon & Sturt Sts, 15-2-1967
Black and white photograph of tram 18 in Ripon St after turning from Sturt St on its way to View Point. Has an Ampol Service station sign on the left-hand side. An adjacent pole has a compulsory tram stop marks. Photographer unknown.Yields information about the intersection of Ripon and Sturt Sts.Black and white photograph with photographer's notes on rear.In ink on rear - "Ripon & Sturt Sts 15-2-67 No 28"trams, tramways, tram 18, ripon st, view point, sturt st, ampol