Showing 5919 items
matching railway to melbourne
-
 Flagstaff Hill Maritime Museum and Village
Photograph
HISTORY OF THE LOCH ARD The LOCH ARD belonged to the famous Loch Line which sailed many ships from England to Australia. Built in Glasgow by Barclay, Curdle and Co. in 1873, the LOCH ARD was a three-masted square rigged iron sailing ship. The ship measured 262ft 7" (79.87m) in length, 38ft (11.58m) in width, 23ft (7m) in depth and had a gross tonnage of 1693 tons. The LOCH ARD's main mast measured a massive 150ft (45.7m) in height. LOCH ARD made three trips to Australia and one trip to Calcutta before its final voyage. LOCH ARD left England on March 2, 1878, under the command of Captain Gibbs, a newly married, 29 year old. She was bound for Melbourne with a crew of 37, plus 17 passengers and a load of cargo. The general cargo reflected the affluence of Melbourne at the time. On board were straw hats, umbrella, perfumes, clay pipes, pianos, clocks, confectionary, linen and candles, as well as a heavier load of railway irons, cement, lead and copper. There were items included that intended for display in the Melbourne International Exhibition in 1880. The voyage to Port Phillip was long but uneventful. At 3am on June 1, 1878, Captain Gibbs was expecting to see land and the passengers were becoming excited as they prepared to view their new homeland in the early morning. But LOCH ARD was running into a fog which greatly reduced visibility. Captain Gibbs was becoming anxious as there was no sign of land or the Cape Otway lighthouse. At 4am the fog lifted. A man aloft announced that he could see breakers. The sheer cliffs of Victoria's west coast came into view, and Captain Gibbs realised that the ship was much closer to them than expected. He ordered as much sail to be set as time would permit and then attempted to steer the vessel out to sea. On coming head on into the wind, the ship lost momentum, the sails fell limp and LOCH ARD's bow swung back. Gibbs then ordered the anchors to be released in an attempt to hold its position. The anchors sank some 50 fathoms - but did not hold. By this time LOCH ARD was among the breakers and the tall cliffs of Mutton Bird Island rose behind the ship. Just half a mile from the coast, the ship's bow was suddenly pulled around by the anchor. The captain tried to tack out to sea, but the ship struck a reef at the base of Mutton Bird Island, near Port Campbell. Waves broke over the ship and the top deck was loosened from the hull. The masts and rigging came crashing down knocking passengers and crew overboard. When a lifeboat was finally launched, it crashed into the side of LOCH ARD and capsized. Tom Pearce, who had launched the boat, managed to cling to its overturned hull and shelter beneath it. He drifted out to sea and then on the flood tide came into what is now known as LOCH ARD Gorge. He swam to shore, bruised and dazed, and found a cave in which to shelter. Some of the crew stayed below deck to shelter from the falling rigging but drowned when the ship slipped off the reef into deeper water. Eva Carmichael had raced onto deck to find out what was happening only to be confronted by towering cliffs looming above the stricken ship. In all the chaos, Captain Gibbs grabbed Eva and said, "If you are saved Eva, let my dear wife know that I died like a sailor". That was the last Eva Carmichael saw of the captain. She was swept off the ship by a huge wave. Eva saw Tom Pearce on a small rocky beach and yelled to attract his attention. He dived in and swam to the exhausted woman and dragged her to shore. He took her to the cave and broke open case of brandy which had washed up on the beach. He opened a bottle to revive the unconscious woman. A few hours later Tom scaled a cliff in search of help. He followed hoof prints and came by chance upon two men from nearby Glenample Station three and a half miles away. In a state of exhaustion, he told the men of the tragedy. Tom returned to the gorge while the two men rode back to the station to get help. By the time they reached LOCH ARD Gorge, it was cold and dark. The two shipwreck survivors were taken to Glenample Station to recover. Eva stayed at the station for six weeks before returning to Ireland, this time by steamship. In Melbourne, Tom Pearce received a hero's welcome. He was presented with the first gold medal of the Royal Humane Society of Victoria and a £1000 cheque from the Victorian Government. Concerts were performed to honour the young man's bravery and to raise money for those who lost family in the LOCH ARD disaster. Of the 54 crew members and passengers on board, only two survived: the apprentice, Tom Pearce and the young woman passenger, Eva Carmichael, who lost all of her family in the tragedy. Ten days after the LOCH ARD tragedy, salvage rights to the wreck were sold at auction for £2,120. Cargo valued at £3,000 was salvaged and placed on the beach, but most washed back into the sea when another storm developed. The wreck of LOCH ARD still lies at the base of Mutton Bird Island. Much of the cargo has now been salvaged and some was washed up into what is now known as LOCH ARD Gorge. Cargo and artefacts have also been illegally salvaged over many years before protective legislation was introduced. One of the most unlikely pieces of cargo to have survived the shipwreck was a Minton porcelain peacock - one of only nine in the world. The peacock was destined for the Melbourne International Exhibition in 1880. It had been well packed, which gave it adequate protection during the violent storm. Today, the Minton peacock can be seen at the Flagstaff Hill Maritime Museum in Warrnambool. From Australia's most dramatic shipwreck it has now become Australia's most valuable shipwreck artefact and is one of very few 'objects' on the Victorian State Heritage Register. Flagstaff Hill’s collection of artefacts from LOCH ARD is significant for being one of the largest collections of artefacts from this shipwreck in Victoria. It is significant for its association with the shipwreck, which is on the Victorian Heritage Register (VHR S417). The collection is significant because of the relationship between the objects, as together they have a high potential to interpret the story of the LOCH ARD. The LOCH ARD collection is archaeologically significant as the remains of a large international passenger and cargo ship. The LOCH ARD collection is historically significant for representing aspects of Victoria’s shipping history and its potential to interpret sub-theme 1.5 of Victoria’s Framework of Historical Themes (living with natural processes). The collection is also historically significant for its association with the LOCH ARD, which was one of the worst and best known shipwrecks in Victoria’s history. Photograph of Loch Ard Gorge c1900flagstaff hill, warrnambool, shipwrecked coast, flagstaff hill maritime museum, maritime museum, shipwreck coast, flagstaff hill maritime village, great ocean road, loch line, loch ard, captain gibbs, eva carmichael, tom pearce, glenample station, mutton bird island, loch ard gorge, photograph of loch ard gorge, photograph -
 Flagstaff Hill Maritime Museum and Village
Calendar
HISTORY OF THE LOCH ARD The LOCH ARD belonged to the famous Loch Line which sailed many ships from England to Australia. Built in Glasgow by Barclay, Curdle and Co. in 1873, the LOCH ARD was a three-masted square rigged iron sailing ship. The ship measured 262ft 7" (79.87m) in length, 38ft (11.58m) in width, 23ft (7m) in depth and had a gross tonnage of 1693 tons. The LOCH ARD's main mast measured a massive 150ft (45.7m) in height. LOCH ARD made three trips to Australia and one trip to Calcutta before its final voyage. LOCH ARD left England on March 2, 1878, under the command of Captain Gibbs, a newly married, 29 year old. She was bound for Melbourne with a crew of 37, plus 17 passengers and a load of cargo. The general cargo reflected the affluence of Melbourne at the time. On board were straw hats, umbrella, perfumes, clay pipes, pianos, clocks, confectionary, linen and candles, as well as a heavier load of railway irons, cement, lead and copper. There were items included that intended for display in the Melbourne International Exhibition in 1880. The voyage to Port Phillip was long but uneventful. At 3am on June 1, 1878, Captain Gibbs was expecting to see land and the passengers were becoming excited as they prepared to view their new homeland in the early morning. But LOCH ARD was running into a fog which greatly reduced visibility. Captain Gibbs was becoming anxious as there was no sign of land or the Cape Otway lighthouse. At 4am the fog lifted. A man aloft announced that he could see breakers. The sheer cliffs of Victoria's west coast came into view, and Captain Gibbs realised that the ship was much closer to them than expected. He ordered as much sail to be set as time would permit and then attempted to steer the vessel out to sea. On coming head on into the wind, the ship lost momentum, the sails fell limp and LOCH ARD's bow swung back. Gibbs then ordered the anchors to be released in an attempt to hold its position. The anchors sank some 50 fathoms - but did not hold. By this time LOCH ARD was among the breakers and the tall cliffs of Mutton Bird Island rose behind the ship. Just half a mile from the coast, the ship's bow was suddenly pulled around by the anchor. The captain tried to tack out to sea, but the ship struck a reef at the base of Mutton Bird Island, near Port Campbell. Waves broke over the ship and the top deck was loosened from the hull. The masts and rigging came crashing down knocking passengers and crew overboard. When a lifeboat was finally launched, it crashed into the side of LOCH ARD and capsized. Tom Pearce, who had launched the boat, managed to cling to its overturned hull and shelter beneath it. He drifted out to sea and then on the flood tide came into what is now known as LOCH ARD Gorge. He swam to shore, bruised and dazed, and found a cave in which to shelter. Some of the crew stayed below deck to shelter from the falling rigging but drowned when the ship slipped off the reef into deeper water. Eva Carmichael had raced onto deck to find out what was happening only to be confronted by towering cliffs looming above the stricken ship. In all the chaos, Captain Gibbs grabbed Eva and said, "If you are saved Eva, let my dear wife know that I died like a sailor". That was the last Eva Carmichael saw of the captain. She was swept off the ship by a huge wave. Eva saw Tom Pearce on a small rocky beach and yelled to attract his attention. He dived in and swam to the exhausted woman and dragged her to shore. He took her to the cave and broke open case of brandy which had washed up on the beach. He opened a bottle to revive the unconscious woman. A few hours later Tom scaled a cliff in search of help. He followed hoof prints and came by chance upon two men from nearby Glenample Station three and a half miles away. In a state of exhaustion, he told the men of the tragedy. Tom returned to the gorge while the two men rode back to the station to get help. By the time they reached LOCH ARD Gorge, it was cold and dark. The two shipwreck survivors were taken to Glenample Station to recover. Eva stayed at the station for six weeks before returning to Ireland, this time by steamship. In Melbourne, Tom Pearce received a hero's welcome. He was presented with the first gold medal of the Royal Humane Society of Victoria and a £1000 cheque from the Victorian Government. Concerts were performed to honour the young man's bravery and to raise money for those who lost family in the LOCH ARD disaster. Of the 54 crew members and passengers on board, only two survived: the apprentice, Tom Pearce and the young woman passenger, Eva Carmichael, who lost all of her family in the tragedy. Ten days after the LOCH ARD tragedy, salvage rights to the wreck were sold at auction for £2,120. Cargo valued at £3,000 was salvaged and placed on the beach, but most washed back into the sea when another storm developed. The wreck of LOCH ARD still lies at the base of Mutton Bird Island. Much of the cargo has now been salvaged and some was washed up into what is now known as LOCH ARD Gorge. Cargo and artefacts have also been illegally salvaged over many years before protective legislation was introduced. One of the most unlikely pieces of cargo to have survived the shipwreck was a Minton porcelain peacock - one of only nine in the world. The peacock was destined for the Melbourne International Exhibition in 1880. It had been well packed, which gave it adequate protection during the violent storm. Today, the Minton peacock can be seen at the Flagstaff Hill Maritime Museum in Warrnambool. From Australia's most dramatic shipwreck it has now become Australia's most valuable shipwreck artefact and is one of very few 'objects' on the Victorian State Heritage Register. Flagstaff Hill’s collection of artefacts from LOCH ARD is significant for being one of the largest collections of artefacts from this shipwreck in Victoria. It is significant for its association with the shipwreck, which is on the Victorian Heritage Register (VHR S417). The collection is significant because of the relationship between the objects, as together they have a high potential to interpret the story of the LOCH ARD. The LOCH ARD collection is archaeologically significant as the remains of a large international passenger and cargo ship. The LOCH ARD collection is historically significant for representing aspects of Victoria’s shipping history and its potential to interpret sub-theme 1.5 of Victoria’s Framework of Historical Themes (living with natural processes). The collection is also historically significant for its association with the LOCH ARD, which was one of the worst and best known shipwrecks in Victoria’s history. Calendar printed by Terang Express for December 1923 with picture of Loch Ard Gorge and survivors of wreck and also story of the episode. Has some large tears in it.flagstaff hill, warrnambool, shipwrecked coast, flagstaff hill maritime museum, maritime museum, shipwreck coast, flagstaff hill maritime village, great ocean road, loch line, loch ard, captain gibbs, eva carmichael, tom pearce, glenample station, mutton bird island, loch ard gorge, calendar, terang express -
 Flagstaff Hill Maritime Museum and Village
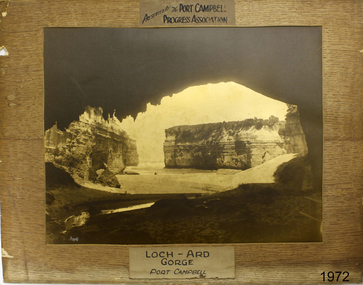
Photograph - Coastal Scene, Foyle Photographic Studio, Loch Ard Gorge Port Campbell, 1889-1919
The photograph shows the popular tourist attraction, Loch Ard Gorge, which is located along the Great Ocean Road in Victoria, near Port Campbell. The gorge is named after the famous sailing ship, the LOCH ARD, that was wrecked there in 1878. Only two of the 54 passengers and crew survived. FOYLE “Foyle” written on the photograph is the name of Foyle’s Photographic studio. At the time of the photograph, the studio was owned by both Charles and Lilian Foyle (sometimes known as Lillian or Lily), either of whom could have taken this photograph. They also worked together at a later date on the photographs, sketches and paintings of the famous and historical Pioneers’ Honour Board, which is currently on view in the Warrnambool Library. Foyles Photography was the studio of James Charles Foyle. He owned “Foyle’s Photo Card Studios” in Liebig St, Warrnambool, which operated between 1889 – 1919. A letter to the editor (by Mr Edward Vidler) in the Melbourne Argus, 3rd August 1907, mentions that in that year Warrnambool would celebrate the 60th anniversary of its proclamation as a town, and that talented local artist Miss Lily Foyle would paint 200 portraits in watercolour of the pioneers who settled in the district prior to 1860. The Pioneer Honour Board can still be seen on display in the Warrnambool Library. In the Warrnambool Standard, Dec. 1917, “Mr Foyle’s studio was awarded the contract to decorate rail cars on newly opened Trans-Continental railway, assisted by his sister, Miss Findlay.” HISTORY OF THE LOCH ARD The LOCH ARD belonged to the famous Loch Line which sailed many ships from England to Australia. Built-in Glasgow by Barclay, Curdle and Co. in 1873, the LOCH ARD was a three-masted square-rigged iron sailing ship. The ship measured 262ft 7" (79.87m) in length, 38ft (11.58m) in width, 23ft (7m) in depth and had a gross tonnage of 1693 tons. The LOCH ARD's main mast measured a massive 150ft (45.7m) in height. LOCH ARD made three trips to Australia and one trip to Calcutta before its final voyage. LOCH ARD left England on March 2, 1878, under the command of Captain Gibbs, a newly married, 29-year-old. She was bound for Melbourne with a crew of 37, plus 17 passengers and a load of cargo. The general cargo reflected the affluence of Melbourne at the time. Onboard were straw hats, umbrella, perfumes, clay pipes, pianos, clocks, confectionary, linen and candles, as well as a heavier load of railway irons, cement, lead and copper. There were items included that intended for display in the Melbourne International Exhibition in 1880. The voyage to Port Phillip was long but uneventful. At 3 am on June 1, 1878, Captain Gibbs was expecting to see land and the passengers were becoming excited as they prepared to view their new homeland in the early morning. But LOCH ARD was running into a fog which greatly reduced visibility. Captain Gibbs was becoming anxious as there was no sign of land or the Cape Otway lighthouse. At 4 am the fog lifted. A man aloft announced that he could see breakers. The sheer cliffs of Victoria's west coast came into view, and Captain Gibbs realised that the ship was much closer to them than expected. He ordered as much sail to be set as time would permit and then attempted to steer the vessel out to sea. On coming head-on into the wind, the ship lost momentum, the sails fell limp and LOCH ARD's bow swung back. Gibbs then ordered the anchors to be released in an attempt to hold its position. The anchors sank some 50 fathoms - but did not hold. By this time LOCH ARD was among the breakers and the tall cliffs of Mutton Bird Island rose behind the ship. Just half a mile from the coast, the ship's bow was suddenly pulled around by the anchor. The captain tried to tack out to sea, but the ship struck a reef at the base of Mutton Bird Island, near Port Campbell. Waves broke over the ship and the top deck was loosened from the hull. The masts and rigging came crashing down knocking passengers and crew overboard. When a lifeboat was finally launched, it crashed into the side of LOCH ARD and capsized. Tom Pearce, who had launched the boat, managed to cling to its overturned hull and shelter beneath it. He drifted out to sea and then on the flood tide came into what is now known as LOCH ARD Gorge. He swam to shore, bruised and dazed, and found a cave in which to shelter. Some of the crew stayed below deck to shelter from the falling rigging but drowned when the ship slipped off the reef into deeper water. Eva Carmichael had raced onto the deck to find out what was happening only to be confronted by towering cliffs looming above the stricken ship. In all the chaos, Captain Gibbs grabbed Eva and said, "If you are saved Eva, let my dear wife know that I died like a sailor". That was the last Eva Carmichael saw of the captain. She was swept off the ship by a huge wave. Eva saw Tom Pearce on a small rocky beach and yelled to attract his attention. He dived in and swam to the exhausted woman and dragged her to shore. He took her to the cave and broke and opened the case of brandy, which had washed up on the beach. He opened a bottle to revive the unconscious woman. A few hours later Tom scaled a cliff in search of help. He followed hoof prints and came by chance upon two men from nearby Glenample Station three and a half miles away. In a state of exhaustion, he told the men of the tragedy. Tom returned to the gorge while the two men rode back to the station to get help. By the time they reached LOCH ARD Gorge, it was cold and dark. The two shipwreck survivors were taken to Glenample Station to recover. Eva stayed at the station for six weeks before returning to Ireland, this time by steamship. In Melbourne, Tom Pearce received a hero's welcome. He was presented with the first gold medal of the Royal Humane Society of Victoria and a £1000 cheque from the Victorian Government. Concerts were performed to honour the young man's bravery and to raise money for those who lost family in the LOCH ARD disaster. Of the 54 crew members and passengers on board, only two survived: the apprentice, Tom Pearce and the young woman passenger, Eva Carmichael, who lost all of her family in the tragedy. Ten days after the LOCH ARD tragedy, salvage rights to the wreck were sold at auction for £2,120. Cargo valued at £3,000 was salvaged and placed on the beach, but most washed back into the sea when another storm developed. The wreck of LOCH ARD still lies at the base of Mutton Bird Island. Much of the cargo has now been salvaged, and some of it was washed up into what is now known as LOCH ARD Gorge. Cargo and artefacts have also been illegally salvaged over many years before protective legislation was introduced. One of the most unlikely pieces of cargo to have survived the shipwreck was a Minton porcelain peacock - one of only nine in the world. The peacock was destined for the Melbourne International Exhibition in 1880. It had been well packed, which gave it adequate protection during the violent storm. Today, the Minton peacock can be seen at the Flagstaff Hill Maritime Museum in Warrnambool. From Australia's most dramatic shipwreck it has now become Australia's most valuable shipwreck artefact and is one of very few 'objects' on the Victorian State Heritage Register.Flagstaff Hill’s collection of artefacts from LOCH ARD is significant for being one of the largest collections of artefacts from this shipwreck in Victoria. It is significant for its association with the shipwreck, which is on the Victorian Heritage Register (VHR S417). The collection is significant because of the relationship between the objects, as together they have a high potential to interpret the story of the LOCH ARD. The LOCH ARD collection is archaeologically significant as the remains of a large international passenger and cargo ship. The LOCH ARD collection is historically significant for representing aspects of Victoria’s shipping history and its potential to interpret sub-theme 1.5 of Victoria’s Framework of Historical Themes (living with natural processes). The collection is also historically significant for its association with the LOCH ARD, which was one of the worst and best-known shipwrecks in Victoria’s history. Foyle's photographs date from the late 19th century to the early 20th century, representing a time of growth in the Warrnambool district and a time when the still relatively new technology of photography was more available to the community.Photograph of Loch Ard Gorge. This sepia coloured rectangular photograph is mounted on a brown cardboard backing that has a wood grain pattern. The photograph has an inscription above it, below it, and in the bottom left corner. It was made for the purpose of a presentation by the Port Campbell Progress Association. Printed above the photograph "PRESENTED BY THE PORT CAMPBELL / PROGRESS ASSOCIATION". Printed below the photograph "LOCH ARD GORGE / PORT CAMPBELL". Hand written on bottom left corner "Foyle". flagstaff hill, warrnambool, shipwrecked coast, flagstaff hill maritime museum, maritime museum, shipwreck coast, flagstaff hill maritime village, great ocean road, loch line, loch ard, captain gibbs, eva carmichael, tom pearce, glenample station, mutton bird island, loch ard gorge, photograph, port campbell, port campbell progress association, foyle photograph, foyle photographic studio warrnambool, warrnambool photo studio -
 Ringwood and District Historical Society
Newspaper, Newspaper Articles Ringwood Borough Council from 1906 to 1929
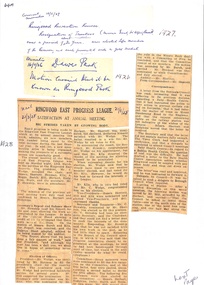
18 pages of newspaper articles featuring council reports on Ringwood and Ringwood East ranging from the years 1906 to 1969. Featuring articles: Ringwood East Progress League, Ringwood East Railway League, Ringwood East Reserve, Ringwood East School Committee and the Ladies Guild. East Ringwood Recreation Ground. -
 Ringwood and District Historical Society
Map, Borough of Ringwood, Victoria - Proposed Subway Road - 1943
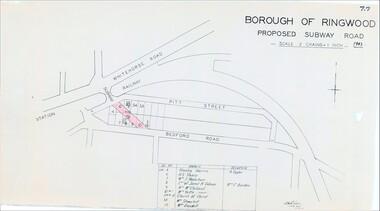
Technical drawing by D.H. Oliver dated 22/9/43 showing residential lots affected by proposed road extending from Warrandyte Road railway underpass into Pitt Street and Bedford Road. Includes list of owners and occupiers of properties - Lot 4 Stanley Harris /R. Taylor, Lot 6 R.S. Sharp, Lot 7 William J. Wakeham, Lot 8 Janet R. Gibson /Mrs C. Burden, Lot 9 Mrs McClelland, Lot 10 part Mrs. Yetts, Lot 11 part 10 Church of Christ, Lot 54 Mrs Shwerkolt, Lot 55 Mrs Goodall.Scale: 2 chains = 1 inch. -
 Ringwood and District Historical Society
Map, Proposed Subdivision - Hilltop Estate, Heathmont, Victoria - circa 1925
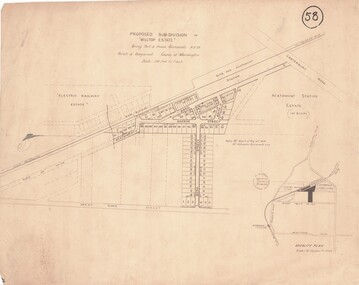
Plan of Part of Crown Allotments 16 & 18, Parish of Ringwood, County of Mornington. Subdivision includes Site for Heathmont Station, Heathmont Road, George Street, Lilian Street, Edith Street, Edna Street, Great Ryrie Street. Inset locality plan also shows nearby Electric Railway Estate and Heathmont Station Estate. L.H. Webber, Licensed Surveyor, 440 Little Collins Street, Melbourne. -
 Ringwood and District Historical Society
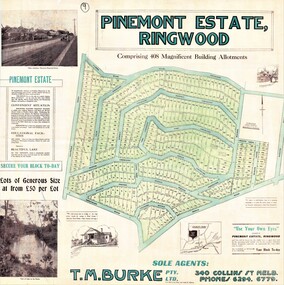
Poster, Land Sale Advertisement - Pinemont Estate, Ringwood, Victoria - circa 1924
Map of residential allotments for sale, with terms of sale, summary of subdivision features and local services and facilities, and photographs of local street scene and lake (Loughnan's Lake - location not marked), Subdivision includes Wonga Road (later Loughnan's Road), Glenvale Road, Kubba Road, Felix Crescent, Summit Crescent, Pine Crescent, Aurum Crescent, Hygeia Parade, Panorama Avenue, Avalon Grove, Montalbo Road, Cielterre Avenue. Sole Agents T.M. Burke Pty Ltd, 340 Collins Street Melbourne Phones 6294, 6779. Map by S. Callanan, Licensed Surveyor, 107 Elizabeth Street Melbourne. Date of poster estimated from railway services information extract " ... 36 fast electric trains to Flinders Street daily ... proposed electrification to Croydon ..." . Timeline for electrification of Lilydale Line record indicates Box Hill to Ringwood January 1923, Ringwood to Croydon November 1924 (Source: History of Croydon - McGivern, Vol.1 p20). -
 Ringwood and District Historical Society
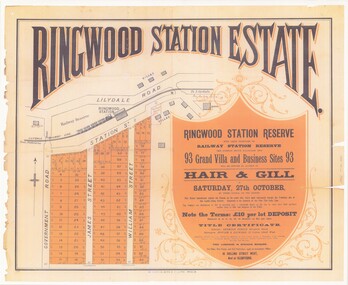
Poster - Auction, Ringwood Station Estate, Ringwood, Victoria - circa 1925
Colour photocopy of poster sub-titled Ringwood Station Reserve & Railway Station Reserve. Auction of 93 sites on Saturday 27th October (no year, likely 1925). Subdivision includes Station Street, Government Road (Wantirna Road), James Street, William Street. Auctioneers - Hair & Gill, 16 Collins Street West and Glenferrie. Solicitor - Seymour Fergie, Elizabeth Street. Surveyors - Fowler & Gatward, 12 Collins Street West. -
 Ringwood and District Historical Society
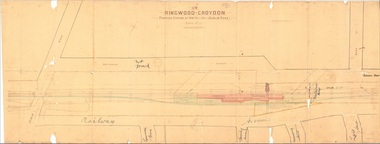
Plan - Proposed Ringwood East Railway Station, VR Ringwood-Croydon (Dublin Road) - 1923
Technical drawing of "Proposed Station At 16Mls 38Chs 89Lks (Dublin Road)" inluding boundary line, red shaded platform with station buildings, and green shaded possible future "up" track. Surrounding streets include Dublin Road, Patterson Street, and subsequent hand-written additions of Railway Avenue, Lawrence Grove, Stanley Avenue, Wenwood Street, and Lois Street. Land title details of Patterson Street properties mainly illegible.Scale: 40'=1". Possible future (platform) extension for 8 car trains (and) extension for 10 car trains. -
 Ringwood and District Historical Society
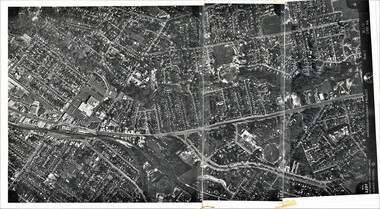
Photograph, Composite Aerial Views of Ringwood, Victoria - 1972
Two composite black & white aerial photographs with north-facing view over Maroondah Highway, including Railway Station precinct, Civic Centre precinct, Eastland, Mount Dandenong Road, Bedford Road, Ringwood Street, Warrandyte Road, Mullum Road, Loughnan's Road.Department of Crown Lands and Survey. Maroondah Highway Project - Run 3 - 20.1.72 - 3,900' ASL. -
 Ringwood and District Historical Society
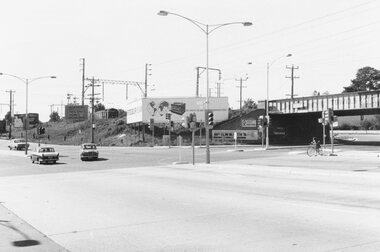
Photograph, Maroondah Highway East, Ringwood- 1969. Looking east from Warrandyte Road railway bridge
Black and white photographWritten on back of photograph: "May 1969, Site of first clock tower." -
 Ringwood and District Historical Society
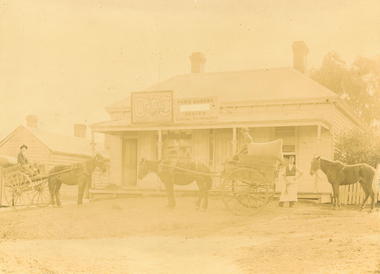
Photograph, Maroondah Highway East, Ringwood c1920. 'Paris Bakery - Baker and General Storekeeper' (Owned by the Herry Family.)
2 photographs (1 black and white, 1 sepia)Image shows building on Maroondah Highway with two horse driven carts at front, and another gentleman holding a horse. Louis Herry had a bakery and general store in Lilydale and opened another in Mount Dandenong Road, opposite the Club Hotel. His wife, Kate, mostly ran the Ringwood store. The store was previously owned by the Blood Bros, after they moved premises closer to the railway station. From the Place of Many Eagles book, "Louis was born in Purdu, France, in 1855, and came to Ringwood from Walhalla in 1887 and erected a weatherboard house and shop opposite the Club Hotel, using a Miner's Right to secure the land. When he arrived, Louis was a married man with three children, Leopold (1882), Marie (1884), John (1886). He had married Kate Handforth at Walhalla in 1879. In later years Elizabeth, Minellia, Louis and Denise were born. Kate's father was known as the midwife of the Gippsiand township because he had once been a fourth year medical student in England, but earnt a living as a goldbuyer in Victoria. Marie Herry would grow up remembering her grandfather calling sometimes at Ringwood; he would bring the children jubilee Mixture to eat and he carried a revolver in his pocket. Often he would play the violin while Marie would stepdance on the kitchen table." Leo served in WWI, whose name appears on the Ringwood Clocktower. -
 Ringwood and District Historical Society
Archive - Parent Record, Railways Archival Collection - Parent Record
Parent Record for Archive collection of photographs and documents relating to Railways in the Ringwood District -
 Ringwood and District Historical Society
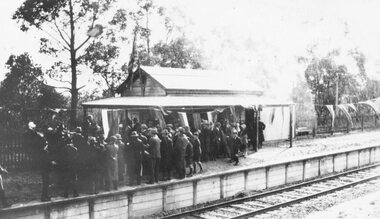
Photograph, Opening Heathmont Railway Station in May 1926, 1926
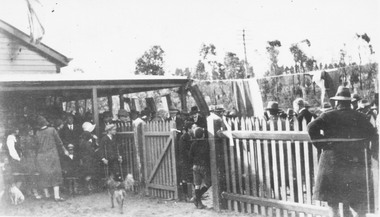
... Road Ringwood North melbourne Opening Heathmont Railway Station ...Opening Heathmont Railway Station in May 1926. The photo shows the audience, including Bill Everard MLA, at the entrance to the railway platform. The Station building was located on the west side of the tracks, near the corner of Heathmont and Canterbury Roads. At the officially opening, the ribbon was cut by Louise Pump, wife of Herman. -
 Ringwood and District Historical Society
Photograph, Opening Heathmont Railway Station in May 1926, 1926
... Road Ringwood North melbourne Opening Heathmont Railway Station ...Opening Heathmont Railway Station in May 1926. The photo shows the audience, including Bill Everard MLA, just behind the gate at the entrance to the railway platform. The Station building was located on the west side of the tracks, near the corner of Heathmont and Canterbury Roads. At the officially opening, the ribbon was cut by Louise Pump, wife of Herman. -
 Ringwood and District Historical Society
Photograph, Ringwood Railway Station's main platform and staff in 1914, 1926
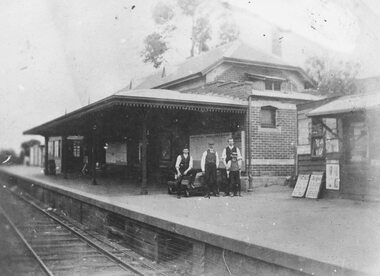
Showing main building at Ringwood Railway Station in 1914, including railway staff and newspaper shop on the platform. -
 Ringwood and District Historical Society
Pamphlet - Land Auction Brochure, Heatherdale Estate, Ringwood, Victoria - 1919
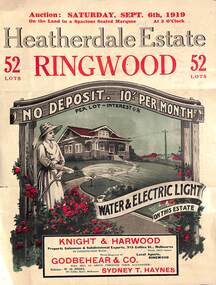
Double sided leaflet advertising subdivision site, layout of streets and allotments, summary of local features and services and terms of sale. Inset photographs of local views and residence of F.W. Purches on the Estate.Auction Saturday September 6th, 1919. 52 Lots. Subdivision includes White Horse Road, Witt Street, Mitcham, Station Street (later Victory Street, Mitcham). (Railway Avenue marked on the map did not eventuate). Agents - Knight & Harwood, 315 Collins Street, Melbourne in conjunction with Godbehear & Co, Phone Ringwood 49, selling through their auctioneer - Sydney T. Haynes. Solicitor W.H. Peers, 395 Collins Street, Melbourne. -
 Ringwood and District Historical Society
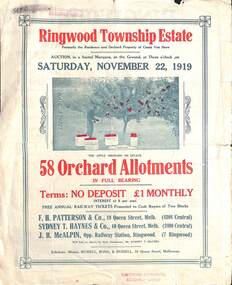
Pamphlet - Land Auction Brochure, Ringwood Township Estate, Ringwood, Victoria - 1919
Double sided bi-fold leaflet advertising subdivision site, layout of streets and allotments, summary of local features and services and terms of sale. Inset photographs of local views.Auction Saturday November 22, 1919. 58 Orchard Allotments. Formerly the residence and orchard property of Count Von Horn. Subdivision includes Wantirna Road, Ellison Street, Haig Street. Free annual railway tickets presented to cash buyers of two blocks. Agents - F.H. Patterson & Co., 19 Queen Street, Melbourne, Tel Central 4308, Sydney T. Haynes & Co., 60 Queen Street, Melbourne, Tel. Central 3400, J.B. McAlpin, Opp Railway Station, Ringwood, Tel. Ringwood 7. Auctioneer - Mr. Sydney T. Haynes. Solicitors - Messrs. Russell, Bona & Russell, 19 Queen Street, Melbourne. -
 Ringwood and District Historical Society
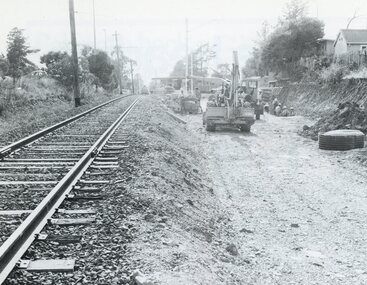
Photograph, Duplication of the five-kilometre section of railway line between Ringwood and Croydon in 1983
Digital scanFrom Vicrail News magazine, April 1983. “Duplication of the five-kilometre section of line between Ringwood and Croydon is on the way. Several major works will be undertaken over the next few months so the two tracks can be brought into service later this year. Intensive work on this section follows completion of duplication works between Ringwood and Bayswater on the Belgrave line last December. The completion of this 5.17 kilometre section between Ringwood and Bayswater means that this Belgrave line is now duplicated as far out as Ferntree Gully. Commuters using the Belgrave line now have an improved service with the intro duction in January of an additional evening peak train to Upper Ferntree Gully, two additional peak hour services in the morning from both Belgrave and Upper Ferntree Gully, and with the additional tracks delays on one line will not affect trains travelling in the opposite direction. Commenting on the completion of this stretch of track the Minister of Transport, Mr. Crabb, said a further improvement had been made with the commissioning of boom barriers at the Bedford Road level crossing in Ringwood. "The installation is part of the State Government's $9.4 million four-year plan to equip 70 dangerous level crossings throughout the State with boom barriers", he said. Works to be carried out on the Ringwood/ Croydon section include laying of new track, station works at Croydon and installation of boom barriers at East Ringwood. Already completed are bridge works to cater for double tracks at both Mt. Dandenong and Eastfield Roads between Croydon and East Ringwood and construction of an island platform at East Ringwood station. At several locations alignment of the existing track will be slightly relocated. The new line is being constructed with concrete sleepers and heavyweight rails. The existing line will also be reconstructed using these heavy 60kg per metre rails. Engineering works to be completed include installation of overhead wiring necessary to supply power to trains, construction of two new station buildings and a new platform at Croydon, provision of boom barriers, and pedestrian boom barriers at Dublin Road level crossing. East Ringwood, and replacement of existing timber overhead wire support structures with steel structures. Other works in this program included installation of boom barriers at Bedford Road, Ringwood and Scoresby Road, Bayswater and provision of a new platform for trains going to Melbourne and Heathmont. A new timetable on the Lilydale and Belgrave lines will commence when the Ringwood—Croydon duplication track work is completed.” -
 Ringwood and District Historical Society
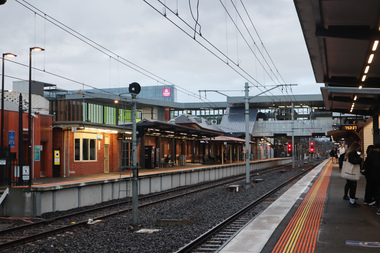
Photograph, East side of Melbourne Street, Ringwood in 2008, opens up to Maroondah Highway with Railway Station over the road
Photographic record by Russ Haines, RDHS, in 2008. -
 Ringwood and District Historical Society
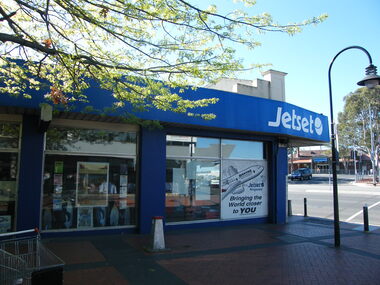
Photograph, Johnny Boys Pizza on Railway Place, near the corner of Maroondah Highway. West end of Railway Place
Photographic record by Russ Haines, RDHS, in October 2008. -
 Ringwood and District Historical Society
Photograph, Johnny Boys Pizza, Fist2face and other shops on Railway Place, near the corner of Maroondah Highway. West end of Railway Place
Photographic record by Russ Haines, RDHS, in October 2008. -
 Ringwood and District Historical Society
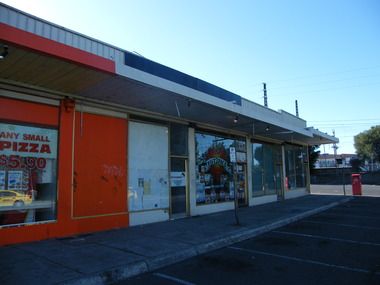
Photograph, Some shops on Railway Place, near the corner of Maroondah Highway. West end of Railway Place
Photographic record by Russ Haines, RDHS, in October 2008. -
 Ringwood and District Historical Society
Photograph, Some shops on Railway Place, near the corner of Maroondah Highway. South-west end of Railway Place
Photographic record by Russ Haines, RDHS, in October 2008. -
 Ringwood and District Historical Society
Photograph, Access lane on Railway Place, near the corner of Maroondah Highway. South-west end of Railway Place
Photographic record by Russ Haines, RDHS, in October 2008. -
 Ringwood and District Historical Society
Photograph, Vacant shop on Railway Place. South side of Railway Place
Photographic record by Russ Haines, RDHS, in October 2008. -
 Ringwood and District Historical Society
Photograph, Computer repairs shop on Railway Place. South side of Railway Place
Photographic record by Russ Haines, RDHS, in October 2008. -
 Ringwood and District Historical Society
Photograph, Computer repairs shop, MixedMartial Arts and Booketab second-hand books on Railway Place. South side of Railway Place
Photographic record by Russ Haines, RDHS, in October 2008. -
 Ringwood and District Historical Society
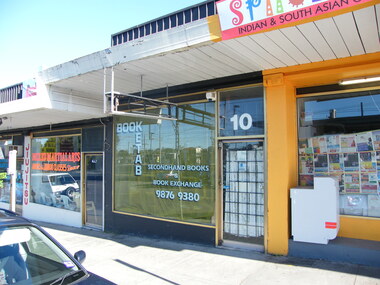
Photograph, Mixed Martial Arts, Secondhand books shop and asian grocery on Railway Place. South side of Railway Place
Photographic record by Russ Haines, RDHS, in October 2008. -
 Ringwood and District Historical Society
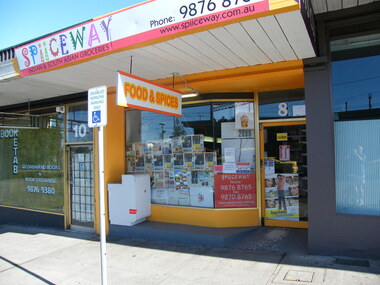
Photograph, Asian grocery on Railway Place. South side of Railway Place
Photographic record by Russ Haines, RDHS, in October 2008.