Showing 533 items matching "stamp album"
-
 Ballarat Tramway Museum
Photograph - Black & White Photograph/s, Wal Jack, 1/01/1956 12:00:00 AM
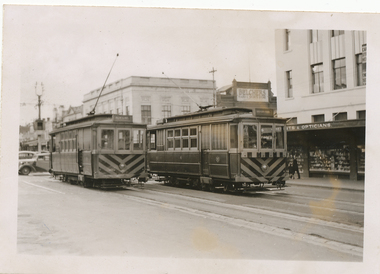
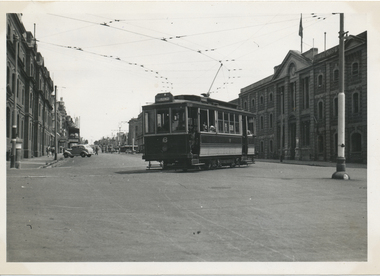
Black and White print contained within the Wal Jack Bendigo and Geelong Album, see Reg Item 5003 for more details. Photo of Geelong No. 5 and No. 4 in Ryrie St near Moorabool St. 1-1-1956, Photo by Wal Jack. In the background is Belchers Radio and Sport Store and a set of bar traffic lights. No. 5 has the destination of Newtown, and No. 4 the destination of Eastern Park. i1 - scan of print in the album i2 - rear of image i3 - scan of negative at 3200dpi added 27/6/2020.On the rear in blue ink "Geelong No. 5 to Newtown, No. 4 to Eastern Park, Ryrie St near Moorabool St, 1-1-56" with Wal Jack copyright stamp in the top right hand corner and the number "T1303" written in.trams, tramways, geelong, ryrie st, tram 5, tram 4 -
 Ballarat Tramway Museum
Photograph - Black & White Photograph/s, Keith Kings, 31/07/1955 12:00:00 AM
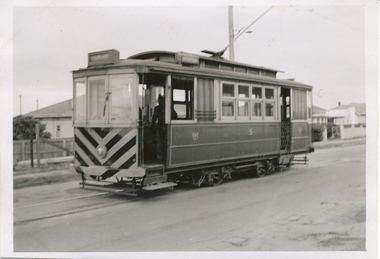
Black and White print contained within the Wal Jack Bendigo and Geelong Album, see Reg Item 5003 for more details. Photo of Geelong No. 5 painted with zebra stripes at Belmont 31/7/1955. Photo by Keith Kings. On rear in ink - in top right hand corner, the Keith Kings copyright stamp with number P(b)(3) written in. "Geelong No. 5 "Zebra" painted ends, but without canopy. On car thus. 31/7/55".trams, tramways, geelong, belmont, tram 5 -
 Ballarat Tramway Museum
Photograph - Black & White Photograph/s, Keith Kings, 31/07/1955 12:00:00 AM
Black and White print contained within the Wal Jack Bendigo and Geelong Album, see Reg Item 5003 for more details. Photo of Geelong No. 4 painted with zebra stripes north bound in Moorabool St. Keith notes it has been fitted with dash canopy lights. 31/7/1955. Photo by Keith Kings. On rear in ink - in top right hand corner, the Keith Kings copyright stamp with number P(b)(2) written in. "Geelong No. 4 "Zebra" painted ends, with canopy. On single truck car thus. 31/7/55".trams, tramways, geelong, moorabool st, tram 4 -
 Ballarat Tramway Museum
Photograph - Black & White Photograph/s, Ken Magor, Geelong 10 at Beach terminus, 26/2/1948
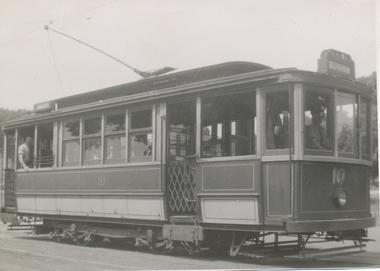
Yields information about Geelong tram No. 10 in 1948.Black and White print contained within the Wal Jack Bendigo and Geelong Album, see Reg Item 5003 for more details. Photo of Geelong No. 10 at the Beach terminus, 1940's. Photos by Ken Magor, Negative No. 3103. Taken on a summers day as the crew are in rolled up shirt sleeves. Two copies held - second is dated 26/2/1948.On rear in ink "SEC Geelong, No. 10 at Beach terminus" Has in bottom right hand corner Ken Magor stamp with negative number "3103" written in. In the bottom left hand corners has details of the photograph itself.trams, tramways, geelong, beach, tram 10 -
 Ballarat Tramway Museum
Photograph - Black & White Photograph/s, Wal Jack, 27/06/1955 12:00:00 AM
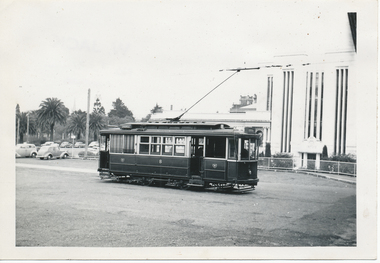
Black and White print contained within the Wal Jack Bendigo and Geelong Album, see Reg Item 5003 for more details. Photo of Geelong No. 8 at the Railway Station with the Gordon Institute buildings in the background. The tram has the destination of Chilwell. Photo by Wal Jack 27/6/1955. Printed on Ilford paper. i1 - scan of print in the album i2 - rear of image i3 - scan of negative at 3200dpi added 27/6/2020. On rear in ink "SEC Geelong No. 8 to Chilwell at Geelong Station". Has the Wal Jack copyright stamp in the top right hand corner with the number "T331" written in and the date "27 Jun 1955" stamped with a purple ink hand date stamp.trams, tramways, geelong, railway station, tram 8 -
 Ballarat Tramway Museum
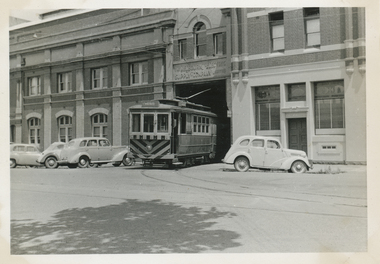
Photograph - Black & White Photograph/s, Wal Jack, 1/01/1956 12:00:00 AM
Black and White print contained within the Wal Jack Bendigo and Geelong Album, see Reg Item 5003 for more details. Photo of Geelong No. 4 standing outside the depot building with a number of cars parked outside. Photo by Wal Jack 1-1-1956. Printed on Ilford paper. i1 - scan of print in the album i2 - rear of image i3 - scan of negative at 3200dpi added 29/6/2020. On rear in ink "SEC Geelong No. 4 coming out of the depot, Corio Terrace Geelong 1-1-56". Has the Wal Jack copyright stamp in the top right hand corner with the number "T333" written in..trams, tramways, geelong, geelong depot, sec depot, corio terrace, mesco, tram 4 -
 Ballarat Tramway Museum
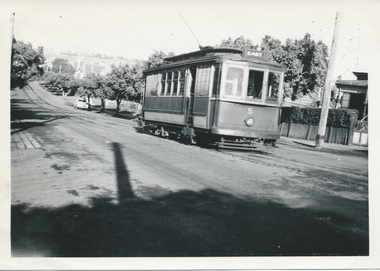
Photograph - Black & White Photograph/s, Wal Jack, 23/06/1949 12:00:00 AM
Black and White print contained within the Wal Jack Bendigo and Geelong Album, see Reg Item 5003 for more details. Photo of Geelong No. 5 from Chilwell climbing up Pakington St Hill, from Mercer St. Chilwell. Has the destination of East. Photo by Wal Jack 23-6-1949. Printed on Ilford paper. See also Reg Item 7824 for another similar photograph. i1 - scan of print in the album i2 - rear of image i3 - scan of negative at 3200dpi added 17/6/2020. On rear in ink "SEC Geelong No."5 from Chilwell climbing up Pakington St Hill, from Mercer St. Chilwell. 23-6-49" Has the Wal Jack copyright stamp in the top right hand corner with the number "T281" written in..trams, tramways, geelong, chilwell, pakington st, tram 5 -
 Ballarat Tramway Museum
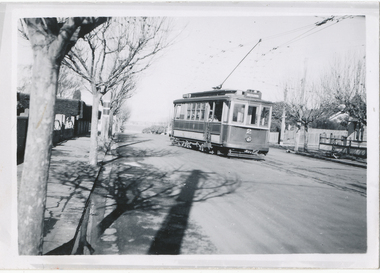
Photograph - Black & White Photograph/s, Wal Jack, 23/06/1949 12:00:00 AM
Black and White print contained within the Wal Jack Bendigo and Geelong Album, see Reg Item 5003 for more details. Photo of Geelong No. 8 to Newtown, in Aphrasia St at Talbot St. Newtown. Photo by Wal Jack 23-6-1949. Tram has the destination of Newtown. Has a church in the background - possibly now part of the Geelong College - (Google Earth) i1 - scan of print in the album i2 - rear of image i3 - scan of negative at 3200dpi added 18/6/2020. On rear in ink "SEC Geelong No. 8 to Newtown in Aphrasia St from Talbot St. 11.31am Newtown 23-6-49" Has the Wal Jack copyright stamp in the top right hand corner with the number "T284" written in.., Negs contained within a shoe box received from Keith Kings.trams, tramways, geelong, newtown, aphrasia st, tram 8 -
 Ballarat Tramway Museum
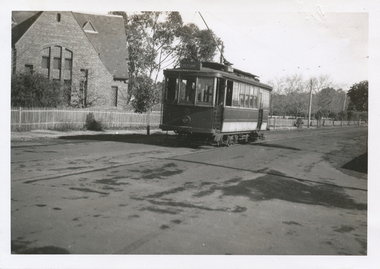
Photograph - Black & White Photograph/s, Wal Jack, 23/06/1949 12:00:00 AM
Black and White print contained within the Wal Jack Bendigo and Geelong Album, see Reg Item 5003 for more details. Photo of Geelong No. 2 at the junction of the Newtown line. Has the destination of Chilwell. Photo by Wal Jack 23-6-1949. i1 - scan of print in the album i2 - rear of image i3 - scan of negative at 3200dpi added 6/6/2020. On rear in ink "SEC Geelong No. 2 leaving Newtown Junc for Chilwell 23-6-49" Has the Wal Jack copyright stamp in the top right hand corner with the number "T282" written in..trams, tramways, geelong, newtown, chilwell, tram 2 -
 Ballarat Tramway Museum
Photograph - Black & White Photograph/s, Wal Jack, 3/01/1945 12:00:00 AM
Black and White print contained within the Wal Jack Bendigo and Geelong Album, see Reg Item 5003 for more details. Photo of Geelong No. 6 turning from Moorabool St in Corio St enroute to Beach. Has many wool store buildings in the background. Printed on Ilford paper. i1 - scan of print in the album i2 - rear of image i3 - scan of negative at 3200dpi added 25/6/2020. On rear in ink "SEC Geelong No. 6 to Beach. Turning out of Moorabool St. into Corio Terrace 1.50pm 3rd January 1945" Has the Wal Jack copyright stamp in the top right hand corner with the number "T323" written in. trams, tramways, geelong, moorabool st, corio st, beach, tram 6 -
 Ballarat Tramway Museum
Photograph - Black & White Photograph/s, Wal Jack, 26/03/1939 12:00:00 AM
Black and White print contained within the Wal Jack Bendigo and Geelong Album, see Reg Item 5003 for more details. Photo of Geelong No. 15 at the Wharf terminus, Moorabool St, 26-3-1939. Photo by Wal Jack. Tram has the destination of Newtown. In the background are the Australian Steamships Pty Ltd Office and Sailor's Rest building. Printed on Ilford paper. i1 - scan of print in the album i2 - rear of image i3 - scan of negative at 3200dpi added 6/6/2020. On rear in ink "SEC Geelong No. 15 Birney at Moorabool St Wharf terminus. 26-3-1939." Has the Wal Jack copyright stamp in the top right hand corner with the number "T264" written in.trams, tramways, geelong, moorabool st, wharf, tram 15 -
 Ballarat Tramway Museum
Photograph - Black & White Photograph/s, Wal Jack, 3/01/1945 12:00:00 AM
Black and White print contained within the Wal Jack Bendigo and Geelong Album, see Reg Item 5003 for more details. Photo of Geelong No. 15 in Ryrie St near Normanby Road stop, car from Eastern Park 3rd January 1945. Photo by Wal Jack. Note tram has the destination of Eastern Park. i1 - scan of print in the album i2 - rear of image i3 - scan of negative at 3200dpi added 27/6/2020. On rear in ink "SEC Geelong No. 15 Birney car in Ryrie St near Normanby Road stop, car from Eastern Park 3rd January 1945" Has the Wal Jack copyright stamp in the top right hand corner with the number "T317" written in.trams, tramways, geelong, ryrie st, eastern park, tram 15 -
 Ballarat Tramway Museum
Photograph - Black & White Photograph/s, Wal Jack, Jul. 1943
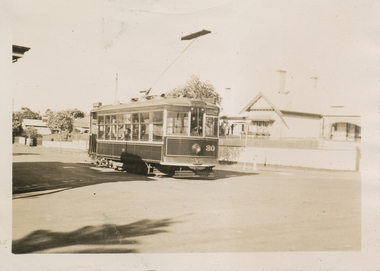
Black and White print contained within the Wal Jack Bendigo and Geelong Album, see Reg Item 5003 for more details. Photo of No. 30 at the Newtown Terminus, July 1943. Photo Wal Jack i1 - scan of print in the album i2 - rear of image i3 - scan of negative at 3200dpi added 18/6/2020. Has the Wal Jack stamp on rear, but no details written in.trams, tramways, geelong, newtown, tram 30 -
 Ballarat Tramway Museum
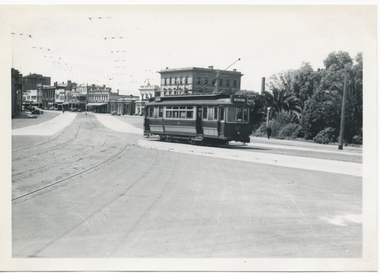
Photograph - Black & White Photograph/s - Geelong 23 at Railway Station, Wal Jack, Jun. 1939
Black and white photo from the Wal Jack album (item 5003) of Geelong tram 23 leaving the railway station with Johnstone park in the background. i1 - scan of print in the album i2 - rear of image i3 - scan of negative at 3200dpi - not exactly the same location given the position of the trees behind. i4 - scan of a print from the Ken Magor collection i5 - scan of rear of print with date 21-6-1939 and Ken Magor number 1805. Yields information about Geelong tram 23Photo of No. 23 at the Geelong Railway Station. Has the Wal Jack copyright stamp on the back.trams, tramways, geelong, railway station, tram 23 -
 Ballarat Tramway Museum
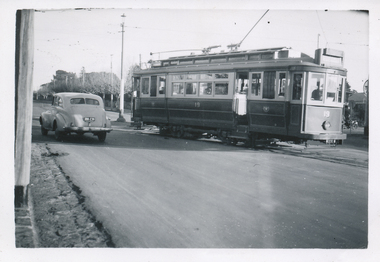
Photograph - Black & White Photograph/s, Wal Jack, 23/06/1949 12:00:00 AM
Black and White print contained within the Wal Jack Bendigo and Geelong Album, see Reg Item 5003 for more details. Photo of No 19, from West, turning out of Pakington St into Aberdeen St. 23-6-1949, photo by Wal Jack. i1 - scan of print in the album i2 - rear of image i3 - scan of negative at 3200dpi added 18/6/2020.Has the rear in ink "SEC Geelong, No. 19 ex West turning out of Pakington St into Aberdeen St, 23 June '49". Has the Wal Jack copyright stamp on the rear with the number T291 written in.trams, tramways, geelong, west, pakington st, tram 19 -
 Ballarat Tramway Museum
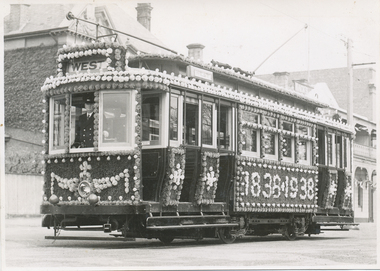
Photograph - Black & White Photograph/s, E. Bonney, Geelong No. 23 decorated for the Centenary, Oct. 1938
Black and White print contained within the Wal Jack Bendigo and Geelong Album, see Reg Item 5003 for more details. Photo of No. Geelong No. 23 was decorated for the Centenary of Geelong in 1938, photographed in Corio Terrace, decorated with festooned lighting and other "baubles" and items. On the sides, the letters "1838.1938". Tram has the destination of West, with a driver in the front cabin. Shows the lighting on the tram in detail and able to see the waxed flowers and other greenery. Photo by E. Bonney of 11 Shannon Ave Newtown Geelong, representing the "Sun News Pictorial" and "Melbourne Herald". Would indicate a "launch" of the tramcar. See also Reg item 5863 for another photograph of the same decorated tramcar.and 8886 for a mounted versioin.Has the rear a stamp advising photo taken by E. Bonney of Geelong.trams, tramways, geelong, depot, decorated trams, tram 23 -
 Ballarat Tramway Museum
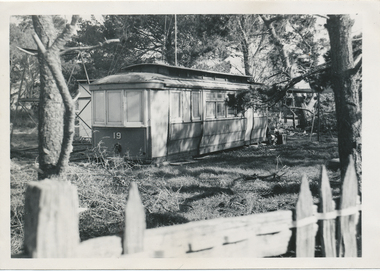
Photograph - Black & White Photograph/s, Wal Jack, 5/07/1962 12:00:00 AM
Black and White print contained within the Wal Jack Bendigo and Geelong Album, see Reg Item 5003 for more details. Photo of No. 19 as a body on a property at Rokewood, photo by Wal Jack, 5-7-1962. Printed on Ilford paper. For a colour slide see Reg Item btm6569i i1 - scan of print in the album i2 - rear of image i3 - scan of negative at 3200dpi added 27/6/2020. Has "Rookwood" marked in white ink on the negative.Has the rear in ink "No. 19 ex Geelong tram body at Rookwood (Vic) 5-7-62 with "Rokewood" in pencil underneath.. Has the Wal Jack copyright stamp on the rear with the number T1305 written in.trams, tramways, geelong, tram bodies, scrapped trams, sale of trams, tram 19 -
 Ballarat Tramway Museum
Photograph - Black & White Photograph/s, Wal Jack, 3/01/1945 12:00:00 AM
Black and White print contained within the Wal Jack Bendigo and Geelong Album, see Reg Item 5003 for more details. Photo of No. 17 from the Railway Station turning out of Railway Terrace into Mercer St. 3-1-1945. Printed on Ilford Paper. Tram has the destination of West. i1 - scan of print in the album i2 - rear of image i3 - scan of negative at 3200dpi added 30/6/2020.Has the rear in ink "SEC Geelong No. 17 from the Railway Station turning out of Railway Terrace into Mercer St. 3rd January 1945". Has the Wal Jack copyright stamp on the rear with the number T319 written in.trams, tramways, geelong, mercer st, railway station, tram 17 -
 Ballarat Tramway Museum
Photograph - Black & White Photograph/s, Wal Jack, 1/01/1956 12:00:00 AM
Black and White print contained within the Wal Jack Bendigo and Geelong Album, see Reg Item 5003 for more details. Photo of No. 5 in Corio Terrace, near the depot. Photo by Wal Jack 1/1/1956. The tram has destination of Chilwell. the Blakiston & Co building in the background. i1 - scan of print in the album i2 - rear of image i3 - scan of negative at 3200dpi added 27/6/2020.Has the rear in ink "SEC Geelong No. 5 Corio Terrace, January 1st 1956". Has the Wal Jack copyright stamp on the rear with the number T129 written in.trams, tramways, geelong, corio terrace, tram 5 -
 Ballarat Tramway Museum
Photograph - Black & White Photograph/s, Leon Marshall Wood, 29/03/1948 12:00:00 AM
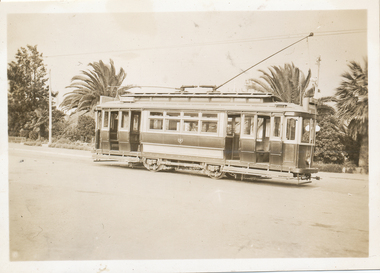
Black and White print contained within the Wal Jack Bendigo and Geelong Album, see Reg Item 5003 for more details. Photo of No. 24 in Aberdeen St, 29-3-1948. Wal's album notes that the tram is in the new colour (all green) scheme. Printed on Velox Paper. Tram has the destination of East. Note the "Pay as you enter" sign. Has on the rear in ink "Aberdeen St, Geelong 29-3-48" and the L. M. Wood copyright stamp.trams, tramways, geelong, aberdeen st, east, tram 24 -
 Ballarat Tramway Museum
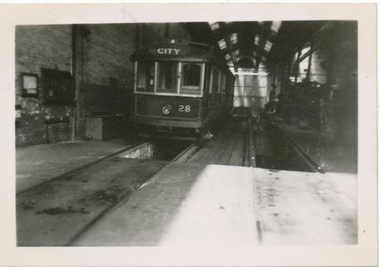
Photograph - Black & White Photograph/s, Keith Kings, 13/11/1951 12:00:00 AM
Black and White print contained within the Wal Jack Bendigo and Geelong Album, see Reg Item 5003 for more details. Photo of Geelong 28 in the depot, 13.11.1951. Photo by Keith Kings. On the rear in ink "Geelong, No. 28 !!! 13.11.51, ex No. 25. Renumbered earlier in 1951" Has the Keith Kings copyright stamp and the number "E(y)(viii)" written in.trams, tramways, geelong, depot, tram 28 -
 Ballarat Tramway Museum
Photograph - Black & White Photograph/s, Wal Jack, 3/01/1945 12:00:00 AM
Black and White print contained within the Wal Jack Bendigo and Geelong Album, see Reg Item 5003 for more details. Photo of No. 25 and 1 at the junction between the Newtown and East lines, in Pakington St. Photo by Wal Jack 3/1/1945. City of Newtown and Chilwell offices on the right hand side. i1 - scan of print in the album i2 - rear of image i3 - scan of negative at 3200dpi added 29/6/2020. Has the rear in ink "SEC Geelong No. 25 from Beach to Newtown, No. 1 from East to Chilwell (straight down hill) Newtown Junc. Pakington St 3-1-45". Has the Wal Jack copyright stamp on the rear with the number T326 written in.trams, tramways, geelong, pakington st, newtown, east, tram 25, tram 1 -
 Ballarat Tramway Museum
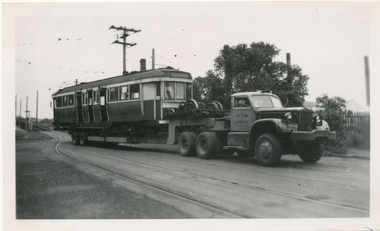
Photograph - Black & White Photograph/s, Keith Kings, 15/05/1991 12:00:00 AM
Black and White print contained within the Wal Jack Bendigo and Geelong Album, see Reg Item 5003 for more details. Photo of MMTB Maximum Traction Car No. 37 loaded onto a Yellow Express truck leaving Preston workshops with the "hump" behind the tram. Tram has the war time stripes, no trolley pole and no destination boxes. One of the bogies is loaded on the goose neck of the truck. Tram became Geelong No. 38. Photo taken 15/5/1951 by Keith Kings. On rear in blue ink "Melbourne M&MTB "C-37 on Yellow Express low-loading semi trailer truck, leaving Preston Workshops for Geelong, after sale to the SEC. Became Geelong No. 38. (15.5.51). In the top left hand corner is the Keith Kings copyright stamp with the number "E(t)(v)" written in.trams, tramways, geelong, preston workshops, maximum traction, bogie trams, corio terrace, tram 37, tram 38 -
 Ballarat Tramway Museum
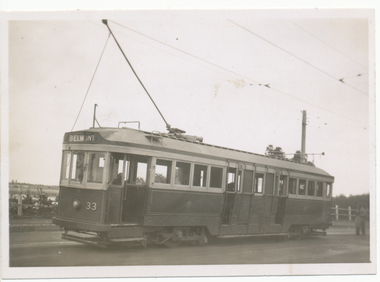
Photograph - Black & White Photograph/s, 29/03/1948 12:00:00 AM
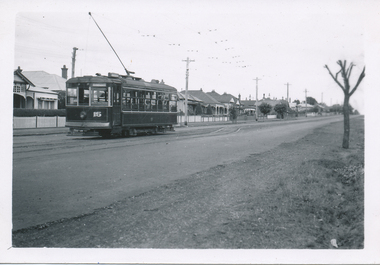
Black and White print contained within the Wal Jack Bendigo and Geelong Album, see Reg Item 5003 for more details. Photo of Geelong No. 33 on the Barwon Bridge, with the destination of Belmont. Photo by Leon Marshall Wood, 29-3-1948. Printed on Kodak Velox paper. On rear in ink "Geelong 29.3.48, Barwon Bridge". Has the L. M Wood copyright stamp on rear.trams, tramways, geelong, belmont, tram 33 -
 Ballarat Tramway Museum
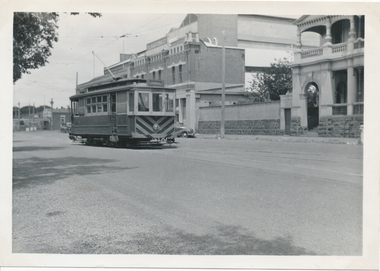
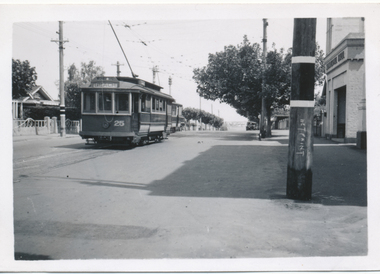
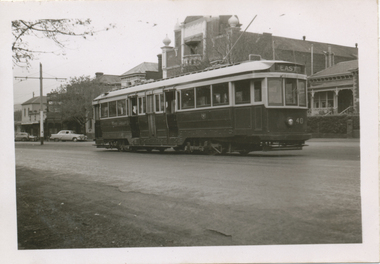
Photograph - Black & White Photograph/s, Wal Jack, 27/06/1955 12:00:00 AM
Black and White print contained within the Wal Jack Bendigo and Geelong Album, see Reg Item 5003 for more details. Photo of Geelong No. 40 in Ryrie St, with the destination of East. Has centre poles in Ryrie St. Photo by Wal Jack 27-6-1955. i1 - scan of print in the album i2 - rear of image i3 - scan of negative at 3200dpi added 27/6/2020. On rear in ink "SEC No. 40 Ryrie St Geelong 27-6-55" Has the Wal Jack copyright stamp but no number written in.trams, tramways, geelong, ryrie st, tram 40 -
 Ballarat Tramway Museum
Photograph - Black & White Photograph/s, Wal Jack, 1/01/1956 12:00:00 AM
Black and White print contained within the Wal Jack Bendigo and Geelong Album, see Reg Item 5003 for more details. Photo of Geelong No 39 in Ryrie St, 1-1-1956. Photo by Wal Jack. Tram has the destination of West. In the background is the T&G building, Belchers Corner store, Miss Vic? Art Florist store. i1 - scan of print in the album i2 - rear of image i3 - scan of negative at 3200dpi added 27/6/2020. On rear in ink SEC Geelong, No. 39 (now Ballarat's 41) from East to West, Ryrie St Geelong 1-1-56". Has the Wal Jack copyright stamp in the top right hand corner with the number T1297 written in.trams, tramways, geelong, ryrie st, tram 39 -
 Ballarat Tramway Museum
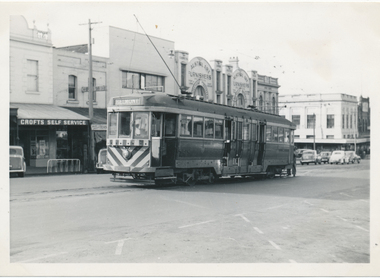
Photograph - Black & White Photograph/s, Wal Jack, 1/01/1956 12:00:00 AM
Black and White print contained within the Wal Jack Bendigo and Geelong Album, see Reg Item 5003 for more details. Photo of Geelong No 32 in Moorabool Street, 1-1-1956. Photo by Wal Jack. Printed on Ilford Paper. Tram has the destination of Belmont. In the background are Crofts Self Service, Austral Art Furnishers. i1 - scan of print in the album i2 - rear of image i3 - scan of negative at 3200dpi added 27/6/2020.On rear in ink "State Electricity Commission of Victoria, Geelong / No. 32 with yellow stripes in Moorabool St. 1-1-56". Has the Wal Jack copyright stamp in the top right hand corner with the number T1302 written in.trams, tramways, geelong, moorabool st, belmont, tram 32 -
 Ballarat Tramway Museum
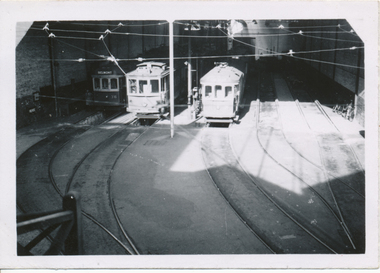
Photograph - Black & White Photograph/s, Wal Jack, 24/06/1949 12:00:00 AM
Black and White print contained within the Wal Jack Bendigo and Geelong Album, see Reg Item 5003 for more details. Photo of Geelong Nos 36, 3 and 31 at the depot building entrance, or inside depot, 24-6-1949. Photo by Wal Jack from the Roster Room landing. Shows the depot track arrangements. See Also Reg item 5891 for a ground level photograph. i1 - scan of print in the album i2 - rear of image i3 - scan of negative at 3200dpi added 18/6/2020. On rear in ink SEC Geelong / Nos. 36, 3, 31 inside depot from Roster Room landing / 24-6-1949". Has the Wal Jack copyright stamp in the top right hand corner with the number T296 written in.trams, tramways, geelong, depot, tram 36, tram 3, tram 31 -
 Ballarat Tramway Museum
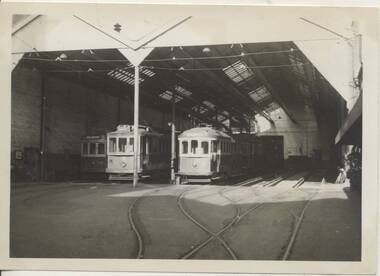
Photograph - Black & White Photograph/s, Wal Jack, 24/06/1949 12:00:00 AM
Black and White print contained within the Wal Jack Bendigo and Geelong Album, see Reg Item 5003 for more details. Photograph of Geelong trams 36, 3 and 31, inside the depot at Geelong 24-6-1949. Shows the Geelong trackwork at the depot and overhead. Photo by Wal Jack. See Also Reg item 5889 for an elevated photograph. i1 - scan of print in the album i2 - rear of image i3 - scan of negative at 3200dpi added 29/6/2020.On rear in ink SEC Geelong / Nos. 36, 3, 31 inside sheds (from ground level), Geelong depot / 24-6-1949". Has the Wal Jack copyright stamp in the top right hand corner with the number T297 written in.trams, tramways, geelong, depot, tram 36, tram 3, tram 31 -
 Ballarat Tramway Museum
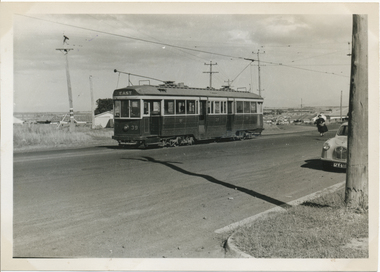
Photograph - Black & White Photograph/s, Wal Jack, 1/01/1956 12:00:00 AM
Black and White print contained within the Wal Jack Bendigo and Geelong Album, see Reg Item 5003 for more details. Photograph of Geelong tram No. 39 at the East Terminus, 1/1/1956. Photo by Wal Jack. Tram has the destination of East, with few houses directly behind the tram. Their is a lady walking towards the tram. i1 - scan of print in the album i2 - rear of image i3 - scan of negative at 3200dpi added 27/6/2020. On rear in ink SEC Geelong / No. 39 (now Ballarat No. 43) at East Geelong / Sunday 1-1-1956". Has the Wal Jack copyright stamp in the top right hand corner with the number T1301 written in.trams, tramways, geelong, east, tram 39