Showing 456 items matching "w. bridges"
-
 Ballarat Tramway Museum
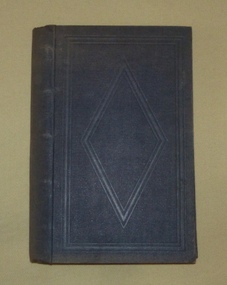
Magazine, Australian Railway and Locomotive Historical Society, "ARLHS Bulletin", 1942
Yields information about the tramways of Ballarat and the North Melbourne tramways and has a strong association with well known tramway enthusiasts of the era., Yields information about the tramways of Ballarat and the North Melbourne tramways and has a strong association with well known tramway enthusiasts of the era.Set of 8 Australian Railway and Locomotive Historical Society Bulletins for the period May 1942 to December 1942. Each page has been stencil duplicated. Index sheets for the journals at the front of the documents. The sheets have been placed in a heavy brown flysheet and then placed in "The Riven" spring back binder. May 1942 - page 57 to 59 - has a article, Horse Trams of Ballarat 1887 to 1913" written by Wal Jack, including a map prepared by C. C. Singleton. June 1942 - page 82 & 83 - has an article "Electric Trams of Ballarat 1905 to 1942" written by Wal Jack. November 1942 - page 65 & 66, has an article "Flemington Bridge Tramways, The North Melbourne Electric Tramway and Lighting Company" written by Peter W Duckett.ballarat, esco, nmetl, melbourne, horse trams, electrification -
 Ballarat Tramway Museum
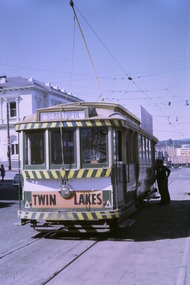
Photograph - Digital image Set of 10, Tony Smith, 5/09/1971 12:00:00 AM
Yields information about Ballarat Tramways and trams prior to the closure of the tramway system.Set of 10 digital images of Ballarat trams prior to closure, scanned from original slides by Tony Smith, 1971 prior to closure of the system. This set of slides, possibly on the last weekend of Mt Pleasant services - closure took place on 5/9/1971. . .1 - 17 at the City terminus, north side. Tram showing the destination of Sebastopol and has a Twin Lakes sign. .2 - 26 at the city terminus, south side with Geommola's Pharmacy and Kodak Film advert and Town Hall in the background. .3 - 43 at the City terminus, north side, with destination of Mt Pleasant. Has a number of men at the tram stop. .4 - 14 leaving Bridge St, crossing Grenville St into Sturt St, with destination of City. Has the Dickins and Woolworths Big W store in the background. .5 - 43 at Mt Pleasant terminus with conductor boarding the tram. Tram has destination of Gardens via Sturt St West. In the background is the corner store with adverts for The Sun, Womens Weekly, Coca Cola and Robur Tea. .6 - 43 and 26 Barkly St, about to arrive at the Grant St loop. Both trams inbound. .7 - 43, 26 and 27 at Grant St loop. .8 - 12 (Lydiard St Nth) and another bogie tram at the city terminus north with the Town Hall in the background. .9 - 39 outbound in Barkly St to Mt Pleasant - note the new bus stop signs on either side of the tram. 10 - 27 (City) and 26 turning from Barkly St into Main St with the Ampol petrol station, a general store advertising Escort cigarettes and The Age in the background . On the right hand side is a fish and chips shop advertising crays and drinks.trams, tramways, sturt st, city, grenville st, bridge st, mt pleasant, barkly st, grant st, main st, closure, tram 17, tram 26, tram 43, tram 14, tram 12, tram 27, tram 39 -
 Ballarat Tramway Museum
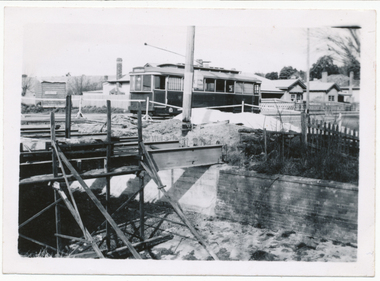
Photograph - Digital image, Wal Jack, 3/07/1955 12:00:00 AM
Yields information the reconstruction of the Canadian Creek Bridge in 1955.Digital image from the Wal Jack Ballarat Album of No. 31 at Canadian Creek bridge in Barkly St, Mt Pleasant during the reconstruction of the bridge. Photo dated 3-7-55 and shows the reconstruction work in progress. Tram was isolated to enable the service in Barkly St during the reconstruction of the Canadian Creek bridge during June-July 1955, see Reg Item 5155 as well and 5301, 5302 and 5305 and 7735. See image i2 for rear of photograph. See image i3 for hi res scan of print. See image i4 for hi res scan of negativeon rear of photo in ink, "SEC Ballarat, No. 31 in Barkly St west of creek during rebuilding of bridge, trams weren't able to cross. Ballarat June 1955" In the top right hand corner is the W. Jack stamp but no negative number. In top left hand corner "3rd July 1955".trams, tramways, mt pleasant, barkly st, canadian creek, bridges, tram 31 -
 Ballarat Tramway Museum
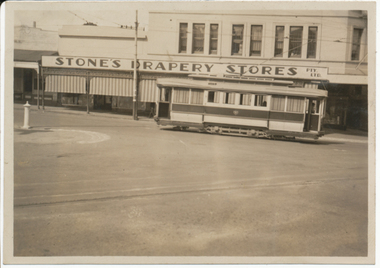
Photograph - Digital image, Wal Jack, 3/01/1944 12:00:00 AM
Yields information about the Stones Corner and Ballarat trams during the mid 1940's.Digital image from the Wal Jack Ballarat Album of Ballarat No. 11 outbound to Mt Pleasant in Main St, at Bridge St with Stones Drapery corner in the background. Photo by Wal Jack 3-1-1944. See image i2 for rear of photograph.In ink on rear "Ballarat Tramway No. 11 in Main St near Bridge St Junction 3-1-1944" and "W. Jack" in bottom right hand corner.trams, tramways, main st, bridge st, stones corner, tram 11 -
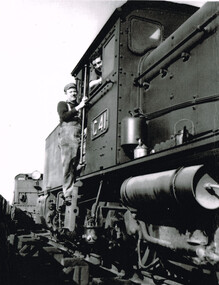 Otway Districts Historical Society
Photograph, Victorian Railways, G41 at Colac, c 1956
Locomotive G41 on a trestle bridge at Colac Station with two enginemen. Another G class locomotive sits in the background. B/W.colac; beech forest; railway; locomotive g41; -
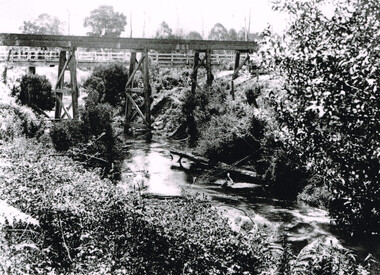 Otway Districts Historical Society
Photograph, Knox Collection, Railway Bridge over Gellibrand River, 1902
... on the roadway bridge in the top left corner. B/W. Railway Bridge over ...Railway bridge over the Gellibrand River, 1902. Note the people on the roadway bridge in the top left corner. B/W.colac; beech forest; gellibrand; railway; -
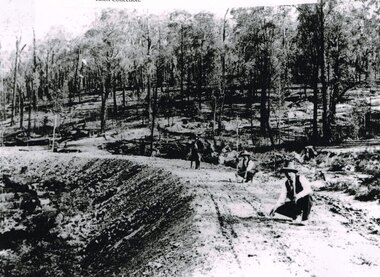 Otway Districts Historical Society
Photograph, Knox Collection, Surveying construction near Barongarook, 1900, 1900
In 1898 a recommendation for a railway of 2 ft 6 in gauge was handed down by the Parliamentary Standing Committee on Railways, to cost $138,000. Construction of the Colac-Beech Forest railway line began in 1900. About 100 men were employed in laying and ballasting the track while others formed the earthworks and the building of culverts and bridges. The earthworks of gravel ballast 150 mm deep were formed by horse and scoop or by shovel. Once the bed had been laid surveyors went along to check the layout, particularly all check rail curves and all 100 metre curves which the surveyors in the picture are doing.B/W. Three men surveying the construction of a curved bed on which track will be laid, near Barongarook, Victoria.colac; beech forest; barongarook; railways; -
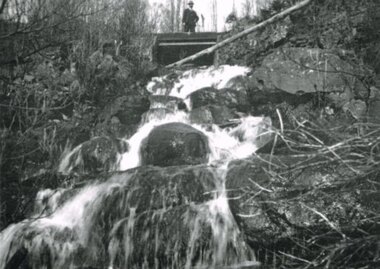 Otway Districts Historical Society
Photograph, Waterfall between Dinmont and Ditchley, 1919, 1919
B/W. Between Dinmont and Ditchley, a man on a railway bridge overlooking a waterfall in 1919. dinmont; ditchley; beech forest; waterfall; railways; -
 Bendigo Historical Society Inc.
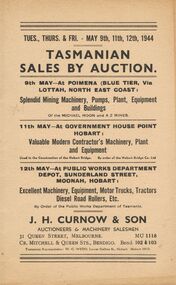
Document - IAN DYETT COLLECTION: AUCTION CATALOGUE - TASMANIAN MINING AND CONTRACTOR'S AUCTION
Beige covered catalogue of Tasmanian Sales by Auction held over three days. On Tuesday 9th May 1944 was an auction of Mining machinery,pumps, plant, equipment and buildings at the Michael Moon Mine, Poimena (Blue Tier) and at the AZ Mine, Poimena (Blue Tier). Thursday 11th May 1944 was the sale of Contractor's Machinery, plant and equipment used in the Construction of the Hobart Bridge by order of the Hobart Bridge Co. Ltd. And Friday 12th May 1944 was the auction of machinery, equipment, motor vehicles etc. at the Public Works Depot at Moonah, Hobart. J. H. Curnow & Son were the Auctioneers. Booklet contains description of some of the machinery, Special Notice regarding travelling and freight, Conditions of Sale and an Auctioneer's Notice mentioning the sale is being conducted by permission of the Director of Machine Tools and Gauges under Regulation 59 of the National Security (General) Regulations. Principals only are allowed to bid and buy unless special permission is granted by DMT & G for some person to act on their behalf, and that person must be an employee of the Firm.business, auctioneers, j h curnow & son pty ltd, ian dyett collection - auction catalogue - tasmanian mining and contractor's auction, michael moon mine, a z mines, hobart bridge co ltd, public works department hobart, j h curnow & son, w c wedd, director of machine tools and gauges, national security (general) regulations, the prahran telegraph printing co, c j curnow, h j lowe, f c dyett, j l jamieson & co -
 Bendigo Historical Society Inc.
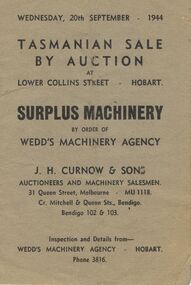
Document - IAN DYETT COLLECTION: AUCTION CATALOGUE - TASMANIAN SURPLUS MACHINERY
Small grey covered auction catalogue for a sale of Surplus Machinery situated at Blue Tier, Lottah and at Derwent Bridge Construction Works by order of Wedd's Machinery Agency. Auctioneers J. H. Curnow & Sons. Machinery offered included mining machinery, electric motors, pumps, tools, spare parts and a tractor. Most of the lots have the sale price written beside them.business, auctioneers, j h curnow & son pty ltd, ian dyett collection - auction catalogue - tasmanian surplus machinery, j h curnow & son, wedd's machinery agnecy hobart, derwent bridge construction works, c j curnow, h j lowe, f c dyett, j l jamieson & co, w g wedd, mercury press -
 Bendigo Historical Society Inc.
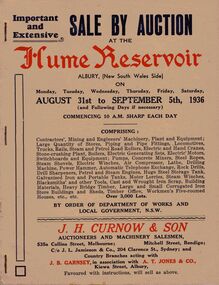
Document - IAN DYETT COLLECTION: AUCTION CATALOGUE - HUME RESERVOIR
Pale beige auction catalogue with red and dark blue printing for a sale held from the 31st August to 5th September 1936 at the Hume Reservoir, Albury, (New South Wales Side) By Order of Department of Works and Local Government, N. S. W. For sale was Contractors', Mining and Engineers' Machinery, Plant and Equipment, Stores, Locomotives, Tools, Petrol and Steam Engines, Tanks, Scrap, Building Materials, Heavy Bridge Timber, Buildings, and Workmen's Five-roomed Houses, etc. J. H. Curnow & Son were the auctioneers. Black and white photos include Lots 2065 and 2622 Kelly & Lewis Engine and Condensing Plant with G.E.C. Dynamo, Generating 300 K.W.; Lot 2018 Locomotive; Lots 2617 and 2618 Steam Road Rollers; Lot 2069 Administrative Offices; and Lot 93 Locomotives (Victorian Side).business, auctioneers, j h curnow & son pty ltd, ian dyett collection - auction catalogue - hume reservoir, department of works and local government nsw, j h curnow & son, j l jamieson & co, j b garnsey, a t jones, bolton bros pty ltd -
 Bendigo Historical Society Inc.
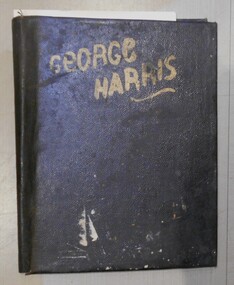
Album - Harris Collection: Art Folio
Black leather covered album containing forty two drawings and paintings belonging to the Harris Family of Axedale. Written on the front cover of the album in gold paint is the name George Harris. The album has been used as a folio to hold the artworks. The artworks vary in size and those with dates range from 1886 - 1942. Nineteen are signed or initialled by George Harris and six by D Harris. One is signed by W W May. The others are unsigned. There is a range of mediums - pencil, water colour, chalk, charcoal, paint. They are mostly country landscapes, many including structures such as fences and bridges, some with farm animals, some with water. The D Harris collection includes a cat and a goblet. Study of a French Fishing Boat. Watercolour by Captain Walter William May. https://www.istockphoto.com/vector/study-of-a-french-fishing-boat-19th-century-gm1143359556-307028737 G Harris and D Harris signatures on some. W W May signature on one.harris family, axedale -
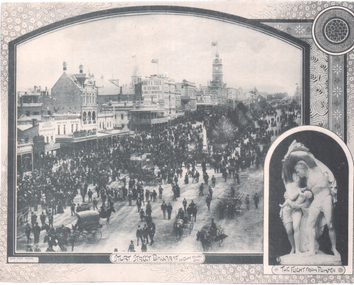 Ballarat Tramway Museum
Photograph - Illustration, F W Niven & Co, "Sturt Street Ballarat on eight hours day", 1890s
The photo shows a large crowd on an 8 hours (Labour Day) gathered in the eastern end or lower end of Sturt St. The 8-hour memorial or monument is in the centre of the photograph. Has one double-deck horse tram in view along with many other horse-drawn vehicles. On the Ballarat Mechanics Institute building is an advert for "Morrey & Tyler, the Cash Drapers" at 11 Bridge St Ballarat. Also in the view are Ribble, Suttons, E Payne, the Ballarat Gas Co. building and a dentist along with other buildings. In the bottom right-hand corner is an insert photo of the statue "The Flight from Pompeii". In the bottom left hand corner is "Crisp Photo Process F W Niven & Co.Yields information about an 8 hour celebration day in the lower end of Sturt St.Illustration cut from a journaltramways, trams, sturt st, horse tram, 8 hour day monument, labour day -
 Bendigo Historical Society Inc.
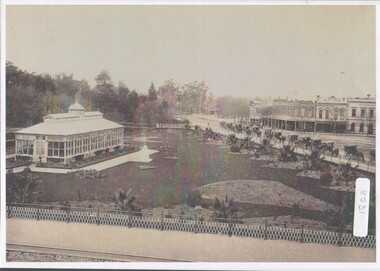
Photograph - Bendigo Conservatory and gardens
Fifty nine acres of land was reserved for a park in1861, and the first gardener began setting out the gardens in 1870. The conservatory was built in 1897 and is the last building of its type in a public park.The conservatory was designed by Mr G. Minto, city surveyor at the time. The building is 72 feet long and 24 feet wide. The walls re twenty two feet high and are topped by a lantern roof, adding a further six feet. It was built at a cost of between 700 and 800 pounds.B&W photograph with view over the Bendigo Conservatory and gardens with a line of twelve horse drawn cabs on Bridge Streetconservatory gardens, bendigo -
 Ballarat Tramway Museum
Postcard - Bridge Sreet Ballarat Vic, VSM Melbourne
Postcard - Bridge Sreet, Ballarat Vic showing tram tracks, a number of horse drawn carts and cabs. On the far right, a tram stop sign can be seen, along with men talking. In the view are shops, businesses or advertisements for: Junction Boot Store, Havelock Tobacco, Halls Corner, A Bregeut Ales & Butter shop, W A Stark Wines and Spirits, Velvet Soap, Thomas Dunstan? Leather Merchant.Yields infomation about the corner of Bridge Street, Main Road and Victoria Streets.Black and white postcard titled Bridge Sreet Ballarat Vic, looking west from the corner of Bridge Street, Main Road and Victoria Streets 1910c. Divided back type, published by VSM Melboune and printed in Prussia.bridge street, ballarat, stones corner, victoria street, main road, tramways, tram track, horse drawn vehicles -
 Ballarat Tramway Museum
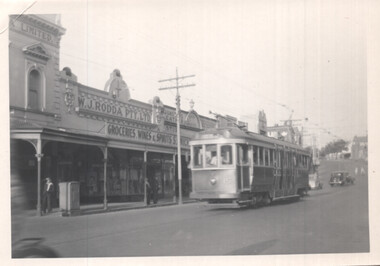
Photograph - Ballarat 15 in Victoria Street, Bob Lilburn, early 1950s
Photo shows Ballarat bogie tram 15 in Bridge Street Ballarat, near Stones Corner. The tram arrived in Ballarat in Oct. 1945 and was renumbered to No. 36 in Sept 1953. Photo early 1950s. In the background is W J Rodda Pty Ltd Grocery, wines and spirits store and Dunstan's leather store. Note the metal box on the footpath - could be an Electric Supply Co. cable power terminal box.Yields information about bogie tram 15, early 1950s.Black and White photograph of Ballarat 15 in Bridge StreetHas in ink on rear " R Lilburn"ballarat, tramways, trams, stones corner, bridge st, tram 15, esco, w j rodda -
 Buninyong & District Historical Society
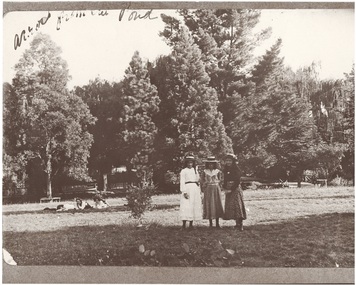
Photograph - Photo of Original Photograph, Buninyong Botanic Gardens with three girls standing centre, 1914, c 1980
Social, eve of WWIB/W photo Buninyong Botanic Gardens with three girls standing centre in calf-length dresses, straw hats 1914. Three more girls lying on grass to left. Tall trees behind, wooden bridge.buninyong, botanic gardens, people, 1914 -
 Buninyong & District Historical Society
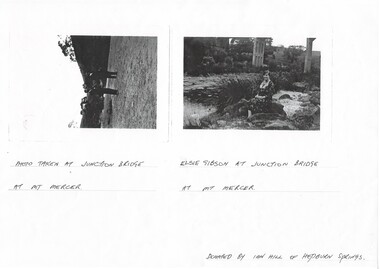
Photograph - Photocopy of two original B/W photographs, Mt Mercer Junction Bridge, photocopy made in 1995
Photos taken of the Junction Bridge at Mt Mercer, documenting the location, date unknown.The photos document the physical status of the location of the Junction Bridge at Mt Mercer at the time of photography, date unknown.Mt Mercer Junction Bridge. Photo 1 shows two men on the river bed probably looking at the bridge. Photo 2 shows Elsie Gibson sitting on the river bank with the bridge in the background.Photo 1. Photo taken at Junction Bridge at Mt Mercer. Photo 2. Elsie Gibson at Junction Bridge at Mt Mercer. Donated by Ian Hill of Hepburn Springsjunction bridge, mt mercer, bridge, elsie gibson, gibson, landscape -
 Buninyong & District Historical Society
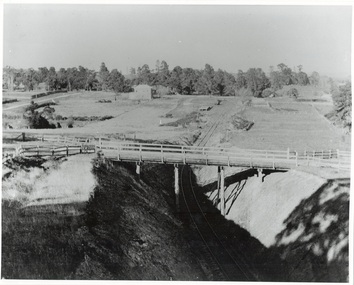
Photograph - Photo of Original Photograph, W. Jack, Buninyong Railway Station precinct in 1940, 9 June 1940
Railway station and surrounds in 1940.B/W photograph f Buninyong Railway station precinct, taken 9 June 1940, showing Barkly St. trestle bridge over railway cutting, Butter Factory on left, station and rail yards on left, township to thye right.buninyong, railway, bunny, butter factory, bridge, cutting, barkly st. -
 Buninyong & District Historical Society
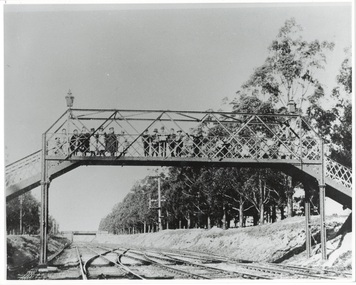
Photograph - Photo of Original Photograph, D. Macartney, B/W photo of footbridge over Buninyong Junction, in 1892 or 1897, 1995
... station and surrounds in 1940. Buninyong Railway Bunny Bridge ...Railway station and surrounds in 1940.Photo B/W of footbridge, lined with children, linking Dyte's Parade and Scott's Parade to Queen St. Ballarat. Bridge in distance shows the junction of the Buninyong Line near Ballarat East, known as Buninyong Junction. Taken 1892 or 1897.buninyong, railway, bunny, bridge, footbridge -
 Buninyong & District Historical Society
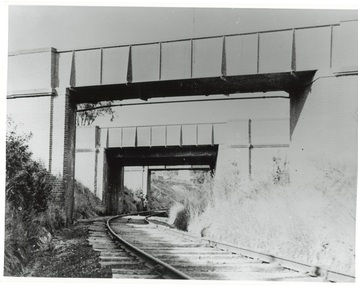
Photograph - Photo of Original Photograph, Wal Larsen, B/W photo of Victoria St Bridge, Ballarat, over Buninyong Railway line, in June 1940, June 1940
... . Bridge B/W photo of Victoria St Bridge, Ballarat, over Buninyong ...Railway and surrounds in 1940.B/W photo of Victoria St Bridge, Ballarat, over Buninyong Railway line, in June 1940buninyong, railway, bunny, cutting, victoria st., bridge -
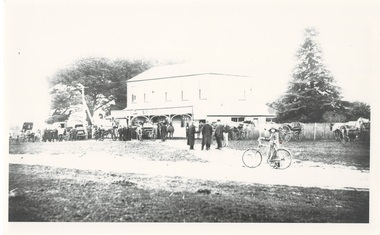 Buninyong & District Historical Society
Photograph - Photograph of Original Photograph, Corduroy Bridge Hotel, 1906, 1988
Building historyB/W photo of original photo of Corduroy Bridge Hotel, High St. Clarendon, circa 1906, at date of auction, showing Midland Highway, people, buggies and carts.Identification on reverse.corduroy bridge hotel, clarendon, high street -
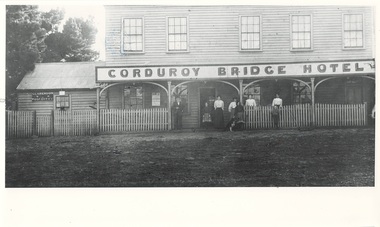 Buninyong & District Historical Society
Photograph - Photograph of Original Photograph, Corduroy Bridge Hotel and Post Office, 1906, 1988
Building historyB/W photo of original photo of Corduroy Bridge Hotel, High St. Clarendon, circa 1906, shows Clarendon Post Office and members of Brown family.corduroy bridge hotel, clarendon, high street, clarendon post office -
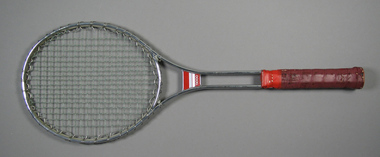
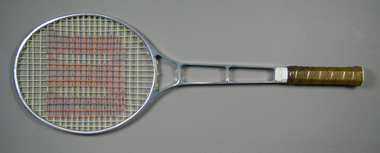 Tennis Australia
Racquet, Circa 1973
A metal 'ProAm' tennis racquet. Has double shaft with two metal bridges. White plastic shaft casing and butt cap. 'W' logo printed onto net in red. Handle wrapped with perforated brown leather grip tape. Materials: Metal, Plastic, Leather, Nylon, Adhesive tape, Painttennis -
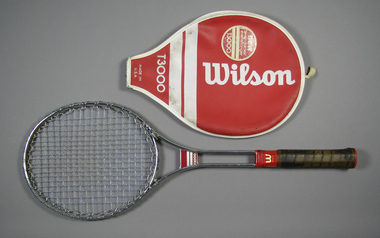 Tennis Australia
Racquet & cover, Circa 1974
Two part object. (1) A Wilson 'T3000' metal tennis racquet, with double shaft; metal shaft bridge;and red plastic shaft casing featuring 'W' logo. Model name printed on metal adhesive labels fitted to shaft bridge. Handle wrapped with brown leather. Net anchored to metal wire wrapped around head frame. Red plastic butt cap with partial white label featuring manufacturer's 'W' logo in red. (2) A white and red vinyl racquet head cover with zipper and printed with manufacturer and model names. Has adhesive sticker on each side. Both state: 'NEW/EVEN QUICKER/EVEN STRONGER/T3000'. Materials: Metal, Plastic, Adhesive tape, Nylon, Adhesive label, Leathertennis -
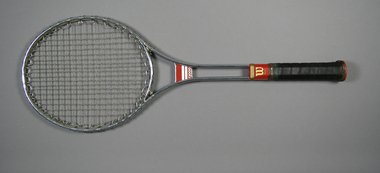 Tennis Australia
Racquet, Circa 1974
A Wilson 'T3000' metal tennis racquet, with double shaft; metal shaft bridge; red plastic shaft casing featuring 'W' logo and gold whipping. Model name printed on metal adhesive labels fitted to shaft bridge. Handle wrapped with brown leather. Net anchored to metal wire wrapped around head frame. Red plastic butt cap with partial white label featuring manufacturer's 'W' logo in red. Materials: Metal, Plastic, Adhesive tape, Nylon, Adhesive label, String, Leathertennis -
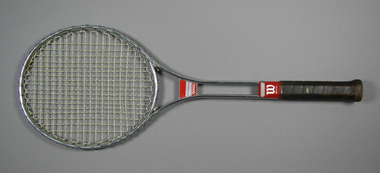 Tennis Australia
Racquet, Circa 1974
A Wilson 'T3000' metal tennis racquet, with double shaft; metal shaft bridge; red plastic shaft casing featuring 'W' logo and silver whipping. Model name printed on metal adhesive labels fitted to shaft bridge. Handle wrapped with brown leather. Net anchored to metal wire wrapped around head frame. Red plastic butt cap with white label featuring manufacturer's 'W' logo in red. Materials: Metal, Plastic, Adhesive tape, Nylon, Adhesive label, Stringtennis -
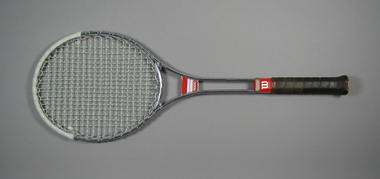 Tennis Australia
Racquet, Circa 1974
A Wilson 'T3000' metal tennis racquet, with double shaft; metal shaft bridge; red plastic shaft casing featuring 'W' logo and silver whipping. Model name printed on metal adhesive label fitted to shaft bridge. Handle wrapped with brown leather. Net anchored to metal wire wrapped around head frame. Red plastic butt cap with white label featuring manufacturer's 'W' logo in red. Plastic reinforcement strip attached to crown. Materials: Metal, Plastic, Adhesive tape, Nylon, Adhesive label, Stringtennis -
 Tennis Australia
Racquet, Circa 1974
A Wilson 'T3000' metal tennis racquet, with double shaft; metal shaft bridge; red plastic shaft casing featuring 'W' logo and silver whipping. Model name printed on metal adhesive label fitted to shaft bridge. Handle wrapped with brown leather. Net anchored to metal wire wrapped around head frame. Red plastic butt cap with white label featuring manufacturer's 'W' logo in red. Materials: Metal, Plastic, Adhesive tape, Nylon, Adhesive label, Stringtennis -
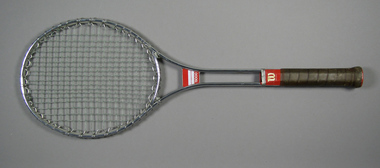
 Tennis Australia
Racquet, Circa 1974
A Wilson 'T3000' metal tennis racquet, with double shaft; metal shaft bridge; red plastic shaft casing featuring 'W' logo and silver whipping. Model name printed on metal adhesive labels fitted to shaft bridge. Handle wrapped with red grip tape. Net anchored to metal wire wrapped around head frame. Red plastic butt cap with white label featuring manufacturer's 'W' logo in red. Materials: Metal, Plastic, Adhesive tape, Nylon, Adhesive label, Stringtennis