Showing 5390 items matching "register"
-
 Flagstaff Hill Maritime Museum and Village
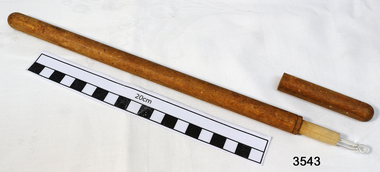
Functional object - Ship's Wheel, 1871 or earlier
The ship building company E. & A. Sewall, from Bath, Maine, USA, built many ships that had wheels with the same decorative, starburst pattern on them as this particular wheel segment, including the Eric the Red. The wheel was manufactured by their local Bath foundry, Geo. Moulton & Co. and sold to the Sewall yard for $100, according to the construction accounts of the vessel. Eric the Red was a wooden, three masted clipper ship. She had 1,580 tons register and was the largest full-rigged ship built at Bath, Maine, USA in 1871. She was built and registered by Arthur Sewall, later to become the partnership E. & A. Sewall, and was the 51st ship built by this company. The annually-published List of Merchant Vessels of the U.S. shows that Bath was still the home port of Eric the Red in 1880. The vessel was named after the Viking discoverer, Eric the Red, who was the first European to reach the shores of North America (in 980AD). The ship Eric the Red at first traded in coal between America and Britain, and later traded in guano nitrates from South America. In 1879 she was re-metalled and was in first class condition. On 10th June 1880 (some records say 12th June) Eric the Red departed New York for Melbourne and then Sydney. She had been commissioned by American trade representatives to carry a special cargo of 500 exhibits (1400 tons) - about a quarter to a third of America’s total exhibits - from America for the U.S.A. pavilion at Melbourne’s first International Exhibition. The exhibits included furniture, ironmongery, wines, chemicals, dental and surgical instruments, paper, cages, bronze lamp trimmings, axles, stamped ware, astronomical and time globes, samples of corn and the choicest of leaf tobacco. Other general cargo included merchandise such as cases of kerosene and turpentine, brooms, Bristol's Sarsaparilla, Wheeler and Wilson sewing machines, Wheeler’s thresher machine, axe handles and tools, cases of silver plate, toys, pianos and organs, carriages and Yankee notions. The Eric the Red left New York under the command of Captain Z. Allen (or some records say Captain Jacques Allen) and 24 other crew including the owner’s son third mate Ned Sewall. There were 2 saloon passengers also. On 4th September 1880 the ship had been sailing for an uneventful 85 days and the voyage was almost at its end. Eric the Red approached Cape Otway in a moderate north-west wind and hazy and overcast atmosphere. Around 1:30am Captain Allen sighted the Cape Otway light and was keeping the ship 5-6 miles offshore to stay clear of the hazardous Otway Reef. However he had badly misjudged his position. The ship hit the Otway Reef about 2 miles out to sea, south west of the Cape Otway light station. Captain Allen ordered the wheel to be put ‘hard up’ thinking that she might float off the reef. A heavy sea knocked the man away from the wheel, broke the wheel ropes and carried away the rudder. The sea swamped the lifeboats, the mizzenmast fell, with all of its rigging, then the mainmast fell and the ship broke in two. Some said that the passenger Vaughan, who was travelling for his health and not very strong, was washed overboard and never seen again. The ship started breaking up. The forward house came adrift with three of the crew on it as well as a longboat, which the men succeeded in launching and keeping afloat by continually bailing with their sea boots. The captain, the third mate (the owner’s son) and others clung to the mizzenmast in the sea. Then the owner’s son was washed away off the mast. Within 10 minutes the rest of the ship was in pieces, completely wrecked, with cargo and wreckage floating in the sea. The captain encouraged the second mate to swim with him to the deckhouse where there were other crew but the second mate wouldn’t go with him. Eventually the Captain made it to the deckhouse and the men pulled him up. At about 4:30am the group of men on the deckhouse saw the lights of a steamer and called for help. At the same time they noticed the second mate and the other man had drifted nearby, still on the spur, and pulled them both onto the wreck. The coastal steamer Dawn was returning to Warrnambool from Melbourne, its sailing time different to its usual schedule. Cries were heard coming from out of the darkness. Captain Jones sent out two life boats, and fired off rockets and blue lights to illuminate the area. They picked up the three survivors who were in the long boat from Eric the Red. Two men were picked up out of the water, one being the owner’s son who was clinging to floating kerosene boxes. At daylight the Dawn then rescued the 18 men from the floating portion of the deckhouse, which had drifted about 4 miles from where they’d struck the reef. Shortly after the rescue the deckhouse drifted onto breakers and was thrown onto rocks at Point Franklin, about 2 miles east of Cape Otway. Captain Jones had signalled to Cape Otway lighthouse the number of the Eric the Red and later signalled that there was a wreck at Otway Reef but there was no response from the lighthouse. The captain and crew of the Dawn spent several more hours searching unsuccessfully for more survivors, even going back as far as Apollo Bay. On board the Dawn the exhausted men received care and attention to their needs and wants, including much needed clothing. Captain Allen was amongst the 23 battered and injured men who were rescued and later taken to Warrnambool for care. Warrnambool’s mayor and town clerk offered them all hospitality, the three badly injured men going to the hospital and others to the Olive Branch Hotel, then on to Melbourne. Captain Allen’s leg injury prevented him from going ashore so he and three other men travelled on the Dawn to Portland. They were met by the mayor who also treated them all with great kindness. Captain Allen took the train back to Melbourne then returned to America. Those saved were Captain Z. Allen (or Jacques Allen), J. Darcy chief mate, James F. Lawrence second mate, Ned Sewall third mate and owner’s son, John French the cook, C. Nelson sail maker, Clarence W. New passenger, and the able seamen Dickenson, J. Black, Denis White, C. Herbert, C. Thompson, A. Brooks, D. Wilson, J. Ellis, Q. Thompson, C. Newman, W. Paul, J. Davis, M. Horenleng, J. Ogduff, T. W. Drew, R. Richardson. Four men had lost their lives; three of them were crew (Gus Dahlgreen ship’s carpenter, H. Ackman steward, who drowned in his cabin, and George Silver seaman) and one a passenger (J. B. Vaughan). The body of one of them had been found washed up at Cape Otway and was later buried in the lighthouse cemetery; another body was seen on an inaccessible ledge. Twelve months later the second mate James F. Lawrence, from Nova Scotia, passed away in the Warrnambool district; an obituary was displayed in the local paper. The captain and crew of the Dawn were recognised by the United States Government in July 1881 for their humane efforts and bravery, being thanked and presented with substantial monetary rewards, medals and gifts. Neither the ship, nor its cargo, was insured. The ship was worth about £15,000 and the cargo was reportedly worth £40,000; only about £2,000 worth had been recovered. Cargo and wreckage washed up at Apollo Bay, Peterborough, Port Campbell, Western Port and according to some reports, even as far away as the beaches of New Zealand. The day after the wreck the government steam ship Pharos was sent from Queenscliff to clear the shipping lanes of debris that could be a danger to ships. The large midship deckhouse of the ship was found floating in a calm sea near Henty Reef. Items such as an American chair, a ladder and a nest of boxes were all on top of the deckhouse. As it was so large and could cause danger to passing ships, Captain Payne had the deckhouse towed towards the shore just beyond Apollo Bay. Between Apollo Bay and Blanket Bay the captain and crew of Pharos collected Wheeler and Wilson sewing machines, nests of boxes, bottles of Bristol’s sarsaparilla, pieces of common American chairs, axe handles, a Wheelers’ Patent thresher and a sailor’s trunk with the words “A. James” on the front. A ship’s flag-board bearing the words “Eric the Red” was found on the deckhouse; finally those on board the Pharos had the name of the wrecked vessel. During this operation Pharos came across the government steamer Victoria and also a steamer S.S. Otway, both of which were picking up flotsam and wreckage. A whole side of the hull and three large pieces of the other side of the hull, with some of the copper sheathing stripped off, had floated on to Point Franklin. Some of the vessels yards and portions of her masts were on shore. The pieces of canvas attached to the yards and masts confirmed that the vessel had been under sail. The beach there was piled with debris several feet high. There were many cases of Diamond Oil kerosene, labelled R. W. Cameron and Company, New York. There were also many large planks of red pine, portions of a small white boat and a large, well-used oar. Other items found ashore included sewing machines (some consigned to ‘Long and Co.”) and notions, axe and scythe handles, hay forks, wooden pegs, rolls of wire (some branded “T.S” and Co, Melbourne”), kegs of nails branded “A.T. and Co.” from the factory of A. Field and Son, Taunton, Massachusetts, croquet balls and mallets, buggy fittings, rat traps, perfumery, cutlery and Douay Bibles, clocks, bicycles, chairs, a fly wheel, a cooking stove, timber, boxes, pianos, organs and a ladder. (Wooden clothes pegs drifted in for many years). There seemed to be no personal luggage or clothing. The Pharos encountered a long line, about one and a half miles, of floating wreckage about 10 miles off land, south east of Cape Otway, and in some places about 40 feet wide. It seemed that more than half of it was from Eric the Red. The ship’s crew rescued 3 cases that were for the Melbourne Exhibition and other items from amongst the debris. There were also chairs, doors, musical instruments, washing boards, nests of trunks and fly catchers floating in the sea. Most of the goods were saturated and smelt of kerosene. A section of the hull lies buried in the sand at Parker River Beach. An anchor with chain is embedded in the rocks east of Point Franklin and a second anchor, thought to be from Eric the Red, is on display at the Cape Otway light station. (There is a photograph of a life belt on the verandah of Rivernook Guest House in Princetown with the words “ERIC THE RED / BOSTON”. This is rather a mystery as the ship was registered in Bath, Maine, USA.) Parts of the ship are on display at Bimbi Park Caravan Park and at Apollo Bay Museum. Flagstaff Hill Maritime Village also has part of the helm (steering wheel), a carved wooden sword (said to be the only remaining portion of the ship’s figurehead; further research is currently being carried out), a door, a metal rod, samples of wood and a medal for bravery. Much of the wreckage was recovered by the local residents before police and other authorities arrived at the scene. Looters went to great effort to salvage goods, being lowered down the high cliff faces to areas with little or no beach to collect items from the wreckage, their mates above watching out for dangerous waves. A Tasmanian newspaper reports on a court case in Stawell, Victoria, noting a man who was caught 2 months later selling tobacco from the wreckage of Eric the Red. Some of the silverware is still treasured by descendants of Mr Mackenzie who was given these items by officials for his help in securing the cargo. The gifts included silver coffee and tea pots, half a dozen silver serviette rings and two sewing machines. The wreck and cargo were sold to a Melbourne man who salvaged a quantity of high quality tobacco and dental and surgical instruments. Timbers from the ship were salvaged and used in the construction of houses and sheds around Apollo Bay, including a guest house, Milford House (since burnt down in bushfires), which had furniture, fittings and timber on the dining room floor from the ship. A 39.7 foot long trading ketch, the Apollo, was also built from its timbers by Mr Burgess in 1883 and subsequently used in Tasmanian waters. It was the first attempt at ship building in Apollo bay. In 1881 a red light was installed about 300 feet above sea level at the base of the Cape Otway lighthouse to warn ships when they were too close to shore; It would not be visible unless a ship came within 3 miles from it. This has proved to be an effective warning. The State Library of Victoria has a lithograph in its collection depicting the steamer Dawn and the shipwrecked men, titled. "Wreck of the ship Eric the Red, Cape Otway: rescue of the crew by the Dawn". “The Eric the Red is historically significant as one of Victoria's major 19th century shipwrecks. (Heritage Victoria Eric the Red; HV ID 239) The wreck led to the provision of an additional warning light placed below the Cape Otway lighthouse to alert mariners to the location of Otway Reef. The site is archaeologically significant for its remains of a large and varied cargo and ship's fittings being scattered over a wide area. The site is recreationally and aesthetically significant as it is one of the few sites along this coast where tourists can visit identifiable remains of a large wooden shipwreck, and for its location set against the background of Cape Otway, Bass Strait, and the Cape Otway lighthouse.“ (Victorian Heritage Database Registration Number S239, Official Number 8745 USA) Segment of a ship's wheel, or helm, from the wreck of the sailing ship Eric the Red. The wheel part is an arc shape from the outer rim of the wheel and is made up of three layers of timber. The centre layer is a dark, dense timber and is wider than the two outer layers, which are less dense and lighter in colour. The wheel segment has a vertically symmetrical, decorative copper plate inlaid on the front. The plate has a starburst pattern; six stars decorate it, each at a point where there is a metal fitting going through the three layers of timber to the rear side of the wheel. On the rear each of the six fittings has an individual copper star around it. The edges of the helm are rounded and bevelled, polished to a shine in a dark stain. Around each of the stars, front and back, the wood is a lighter colour, as though the metal in that area being polished frequently. The length of the segment suggests that it has probably come from a wheel or helm that had ten spokes. (Ref: F.H.M.M. 16th March 1994, 239.6.610.3.7. Artefact Reg No ER/1.)flagstaff hill, warrnambool, shipwrecked-coast, flagstaff-hill, flagstaff-hill-maritime-museum, maritime-museum, shipwreck-coast, flagstaff-hill-maritime-village, ship's-wheel, eric-the-red, helm, shei's wheel, ship's steering wheel -
 Flagstaff Hill Maritime Museum and Village
Functional object - Thermometer, Late 19th - early 20th century
The Thermoscope The thermometer dates back to the early 1600s, with Galileo’s invention of the “thermoscope.” Galileo’s device could determine whether temperature was rising or falling, but was not able to detect the actual scale of the temperature. In 1612, Italian inventor and physician Sanctorius was the first to put a numerical scale on the thermoscope. His product was also designed for taking temperature from a patient’s mouth. However, neither Galileo’s nor Sanctorius’ thermoscopes were very accurate. Standardized Scales In 1709, Daniel Gabriel Fahrenheit invented his first thermometer using alcohol. He later introduced the mercury thermometer in 1714, which was more accurate and predictable. The Fahrenheit temperature scale was standardized in 1724 with a freezing point of 32 degrees and a boiling point of 212 degrees. Fahrenheit’s mercury thermometer is recognized as the first modern thermometer with a standardized scale. The Celsius scale was invented in 1742 by Anders Celsius, with a freezing point of 0 degrees and a boiling point of 100 degrees. This scale was accepted into the international conference on weights and measurements in 1948. The Kelvin Scale, measuring extreme temperatures, was developed by Lord Kelvin in 1848. Registering Thermometers Early versions of the thermometer were not able to hold the temperature after they were moved. You can imagine how this made it hard for doctors to correctly read a patient’s temperature. The first thermometer that could register and hold onto temperature was built by James Six in 1782. Today, it is known as Six’s thermometer. Since then, the mercury thermometer was adapted to read a patients temperature after leaving the body. Registering thermometers are still used today and are reset by shaking down the mercury to the bottom of the tube. The Modern Devices Modern Day Thermometers This brings us to the first practical clinical thermometer, which was invented in 1867 by Sir Thomas Allbutt. The device was portable, about 6 inches long and was capable of recording a patient’s temperature in 5 minutes. Now, there are a few options for clinical and home use. Liquid filled thermometers have been adapted based on the designs of inventors like Fahrenheight and Six are still used today. Digital thermometers, like the Omron Compact Digital Thermometer, are capable of finding a temperature and producing an electronic number within a minute of use. Digital ear thermometers also produce a quick and accurate temperature. Dr. Jacob Fraden invented an infared thermometer called the Thermoscan Human Ear Thermometer in 1984. These thermometers use an infared light to scan the heat radiation in a patient’s ear or forehead. The thermometer, like many medical devices, has made strides in efficiency and accuracy. As medical technology continues to advance, businesses in the medical device industry must be prepared to move with it. This thermometer was donated to Flagstaff Hill Maritime Village by the family of Doctor William Roy Angus, Surgeon and Oculist. It is part of the “W.R. Angus Collection” that includes historical medical equipment, surgical instruments, and material once belonging to Dr. Edward Ryan and Dr. Thomas Francis Ryan, (both of Nhill, Victoria) as well as Dr. Angus’ own belongings. The Collection’s history spans the medical practices of the two Doctors Ryan, from 1885-1926 plus that of Dr. Angus, up until 1969. ABOUT THE “W.R.ANGUS COLLECTION” Doctor William Roy Angus M.B., B.S., Adel., 1923, F.R.C.S. Edin.,1928 (also known as Dr. Roy Angus) was born in Murrumbeena, Victoria in 1901 and lived until 1970. He qualified as a doctor in 1923 at the University of Adelaide, was Resident Medical Officer at the Royal Adelaide Hospital in 1924 and for a period was house surgeon to Sir (then Mr.) Henry Simpson Newland. Dr. Angus was briefly an Assistant to Dr. Riddell of Kapunda, then commenced private practice at Curramulka, Yorke Peninsula, SA, where he was a physician, surgeon, and chemist. In 1926, he was appointed as a new Medical Assistant to Dr. Thomas Francis Ryan (T.F. Ryan, or Tom), in Nhill, Victoria, where his experiences included radiology and pharmacy. In 1927 he was Acting House Surgeon in Dr. Tom Ryan’s absence. Dr. Angus had become engaged to Gladys Forsyth and they decided he would take time to further his studies overseas in the UK in 1927. He studied at London University College Hospital and at Edinburgh Royal Infirmary and in 1928, was awarded FRCS (Fellow from the Royal College of Surgeons), Edinburgh. He worked his passage back to Australia as a Ship’s Surgeon on the Australian Commonwealth Line’s SS Largs Bay. Dr. Angus married Gladys in 1929, in Ballarat. (They went on to have one son (Graham 1932, born in SA) and two daughters (Helen (died 12/07/1996) and Berenice (Berry), both born at Mira, Nhill ) Dr. Angus was a ‘flying doctor’ for the A.I.M. (Australian Inland Ministry) Aerial Medical Service in 1928. The organisation began in South Australia through the Presbyterian Church that year, with its first station being in the remote town of Oodnadatta, where Dr. Angus was stationed. He was locum tenens there on North-South Railway at 21 Mile Camp. He took up this ‘flying doctor’ position in response to a call from Dr. John Flynn; the organisation was later known as the Flying Doctor Service, then the Royal Flying Doctor Service. A lot of his work during this time involved dental surgery also. Between 1928-1932 he was a surgeon at the Curramulka Hospital, Yorke Peninsula, South Australia. In 1933 Dr. Angus returned to Nhill where he’d previously worked as Medical Assistant and purchased a share of the Nelson Street practice and Mira hospital from Dr. Les Middleton one of the Middleton Brothers, the current owners of what was once Dr. Tom Ryan’s practice. Dr. L Middleton was House Surgeon at the Nhill Hospital from 1926-1933 when he resigned. [Dr. Tom Ryan’s practice had originally belonged to his older brother Dr. Edward Ryan, who came to Nhill in 1885. Dr. Edward saw patients in his rooms, firstly in Victoria Street and in 1886 in Nelson Street, until 1901. The Nelson Street practice also had a 2-bed ward, called Mira Private Hospital ). Dr. Edward Ryan was House Surgeon at the Nhill Hospital from 1884-1902. He also had occasions where he successfully performed veterinary surgery for the local farmers too. Dr. Tom Ryan then purchased the practice from his brother in 1901. Both Dr. Edward and Dr. Tom Ryan work as surgeons including in eye surgery. Dr. Tom Ryan performed many of his operations in the Mira private hospital on his premises. He too was House Surgeon at the Nhill Hospital from 1902-1926. Dr. Tom Ryan had one of the only two pieces of radiology equipment in Victoria during his practicing years – The Royal Melbourne Hospital had the other one. Over the years Dr. Tom Ryan gradually set up what was effectively a training school for country general-practitioner-surgeons. Each patient was carefully examined, including using the X-ray machine, and any surgery was discussed and planned with Dr. Ryan’s assistants several days in advance. Dr. Angus gained experience in using the X-ray machine there during his time as assistant to Dr. Ryan. Dr. Tom Ryan moved from Nhill in 1926. He became a Fellow of the Royal Australasian College of Surgeons in 1927, soon after its formation, a rare accolade for a doctor outside any of the major cities. He remained a bachelor and died suddenly on 7th Dec 1955, aged 91, at his home in Ararat. Scholarships and prizes are still awarded to medical students in the honour of Dr. T.F. Ryan and his father, Dr. Michael Ryan, and brother, John Patrick Ryan. ] When Dr. Angus bought into the Nelson Street premises in Nhill he was also appointed as the Nhill Hospital’s Honorary House Surgeon from 1933-1938. His practitioner’s plate from his Nhill surgery states “HOURS Daily, except Tuesdays, Fridays and Saturday afternoons, 9-10 am, 2-4 pm, 7-8 pm. Sundays by appointment”. This plate is now mounted on the doorway to the Port Medical Office at Flagstaff Hill Maritime Village, Warrnambool. Dr. Edward Ryan and Dr. Tom Ryan had an extensive collection of historical medical equipment and materials spanning 1884-1926 and when Dr. Angus took up practice in their old premises he obtained this collection, a large part of which is now on display at the Port Medical Office at Flagstaff Hill Maritime Village in Warrnambool. During his time in Nhill Dr. Angus was involved in the merging of the Mira Hospital and Nhill Public Hospital into one public hospital and the property titles were passed on to Nhill Hospital in 1939. In 1939 Dr Angus and his family moved to Warrnambool where he purchased “Birchwood,” the 1852 home and medical practice of Dr. John Hunter Henderson, at 214 Koroit Street. (This property was sold in1965 to the State Government and is now the site of the Warrnambool Police Station. ). The Angus family was able to afford gardeners, cooks, and maids; their home was a popular place for visiting dignitaries to stay whilst visiting Warrnambool. Dr. Angus had his own silkworm farm at home in a Mulberry tree. His young daughter used his centrifuge for spinning the silk. Dr. Angus was appointed on a part-time basis as Port Medical Officer (Health Officer) in Warrnambool and held this position until the 1940’s when the government no longer required the service of a Port Medical Officer in Warrnambool; he was thus Warrnambool’s last serving Port Medical Officer. (The duties of a Port Medical Officer were outlined by the Colonial Secretary on 21st June 1839 under the terms of the Quarantine Act. Masters of immigrant ships arriving in port reported incidents of diseases, illness, and death and the Port Medical Officer made a decision on whether the ship required Quarantine and for how long, in this way preventing contagious illness from spreading from new immigrants to the residents already in the colony.) Dr. Angus was a member of the Australian Medical Association, for 35 years and a surgeon at the Warrnambool Base Hospital from 1939-1942, He served as a Surgeon Captain during WWII1942-45, in Ballarat, Victoria, and in Bonegilla, N.S.W., completing his service just before the end of the war due to suffering from a heart attack. During his convalescence, he carved an intricate and ‘most artistic’ chess set from the material that dentures were made from. He then studied ophthalmology at the Royal Melbourne Eye and Ear Hospital and created cosmetically superior artificial eyes by pioneering using the intrascleral cartilage. Angus received accolades from the Ophthalmological Society of Australasia for this work. He returned to Warrnambool to commence practice as an ophthalmologist, pioneering artificial eye improvements. He was Honorary Consultant Ophthalmologist at Warrnambool Base Hospital for 31 years. He made monthly visits to Portland as a visiting surgeon, to perform eye surgery. He represented the Victorian South-West subdivision of the Australian Medical Association as its secretary between 1949 and 1956 and as chairman from 1956 to 1958. In 1968 Dr. Angus was elected a member of Spain’s Barraquer Institute of Barcelona after his research work in Intrasclearal cartilage grafting, becoming one of the few Australian ophthalmologists to receive this honour, and in the following year presented his final paper on Living Intrasclearal Cartilage Implants at the Inaugural Meeting of the Australian College of Ophthalmologists in Melbourne In his personal life, Dr. Angus was a Presbyterian and treated Sunday as a Sabbath, a day of rest. He would visit 3 or 4 country patients on a Sunday, taking his children along ‘for the ride’ and to visit with him. Sunday evenings he would play the pianola and sing Scottish songs to his family. One of Dr. Angus’ patients was Margaret MacKenzie, author of a book on local shipwrecks that she’d seen as an eyewitness from the late 1880s in Peterborough, Victoria. In the early 1950’s Dr. Angus, painted a picture of a shipwreck for the cover jacket of Margaret’s book, Shipwrecks, and More Shipwrecks. She was blind in later life and her daughter wrote the actual book for her. Dr. Angus and his wife Gladys were very involved in Warrnambool’s society with a strong interest in civic affairs. Their interests included organisations such as the Red Cross, Rostrum, Warrnambool and District Historical Society (founding members), Wine and Food Society, Steering Committee for Tertiary Education in Warrnambool, Local National Trust, Good Neighbour Council, Housing Commission Advisory Board, United Services Institute, Legion of Ex-Servicemen, Olympic Pool Committee, Food for Britain Organisation, Warrnambool Hospital, Anti-Cancer Council, Boys’ Club, Charitable Council, National Fitness Council, and Air Raid Precautions Group. He was also a member of the Steam Preservation Society and derived much pleasure from a steam traction engine on his farm. He had an interest in people and the community He and his wife Gladys were both involved in the creation of Flagstaff Hill, including the layout of the gardens. After his death (28th March 1970) his family requested his practitioner’s plate, medical instruments, and some personal belongings be displayed in the Port Medical Office surgery at Flagstaff Hill Maritime Village, and be called the “W. R. Angus Collection”. The W.R. Angus Collection is significant for still being located at the site it is connected with, Doctor Angus being the last Port Medical Officer in Warrnambool. The collection of medical instruments and other equipment is culturally significant, being an historical example of medicine from late 19th to mid-20th century. Dr Angus assisted Dr Tom Ryan, a pioneer in the use of X-rays and in ocular surgery. Long cylindrical glass thermometer with mercury bulb, inside a light weight wooden cylinder with top, (W.R. Angus Collection) Temperature scale in fahrenheit. flagstaff hill, warrnambool, shipwrecked-coast, flagstaff-hill, flagstaff-hill-maritime-museum, maritime-museum, shipwreck-coast, flagstaff-hill-maritime-village, thermometer, dr w r angus, medical equipment, surgical instrument, dr ryan, ophthalmology, s.s. largs bay, warrnambool base hospital, nhill base hospital, flying doctor, medical history, medical treatment, mira hospital, medical education -
 Flagstaff Hill Maritime Museum and Village
Furniture - Door, 1871 or earlier
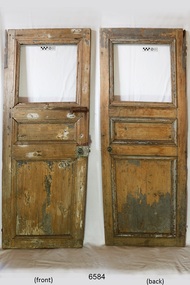
The wooden door was salvaged from the wreck of the sailing ship Eric the Red, which was a wooden, three masted clipper ship. Eric the Red was the largest full-rigged ship built at Bath, Maine, USA in 1871, having had a 1,580 tons register. She was built and registered by Arthur Sewall, later to become the partnership E. & A. Sewall, the 51st ship built by this company. The annually-published List of Merchant Vessels of the U.S. shows Bath was still the home port of Eric the Red in 1880. The vessel was named after the Viking discoverer, Eric the Red, who was the first European to reach the shores of North America (in 980AD). The ship Eric the Red at first traded in coal between America and Britain, and later traded in guano nitrates from South America. In 1879 she was re-metalled and was in first class condition. On 10th June 1880 (some records say 12th June) Eric the Red departed New York for Melbourne and then Sydney. She had been commissioned by American trade representatives to carry a special cargo of 500 exhibits (1400 tons) – about a quarter to a third of America’s total exhibits - from America for the U.S.A. pavilion at Melbourne’s first International Exhibition. The exhibits included furniture, ironmongery, wines, chemicals, dental and surgical instruments, paper, cages, bronze lamp trimmings, axles, stamped ware, astronomical and time globes, samples of corn and the choicest of leaf tobacco. Other general cargo included merchandise such as cases of kerosene and turpentine, brooms, Bristol's Sarsaparilla, Wheeler and Wilson sewing machines, Wheeler’s thresher machine, axe handles and tools, cases of silver plate, toys, pianos and organs, carriages and Yankee notions. The Eric the Red left New York under the command of Captain Z. Allen (or some records say Captain Jacques Allen) and 24 other crew including the owner’s son third mate Ned Sewall. There were 2 saloon passengers also. The ship had been sailing for an uneventful 85 days and the voyage was almost at its end. On 4th September 1880 the Eric the Red approached Cape Otway with a moderate north-west wind and hazy and overcast atmosphere. Around 1:30am Captain Allen sighted the Cape Otway light and was keeping the ship 5-6 miles offshore to stay clear of the hazardous Otway Reef. However he had badly misjudged his position. The ship hit the Otway Reef about 2 miles out to sea, south west of the Cape Otway light station. He ordered the wheel to be put ‘hard up’ thinking that she might float off the reef. A heavy sea knocked the man away from the wheel, broke the wheel ropes and carried away the rudder. The sea swamped the lifeboats. The mizzenmast fell, with all of its rigging, then the mainmast also fell and the ship broke in two. Some said that the passenger Vaughan, who was travelling for his health and not very strong, was washed overboard and never seen again. The ship started breaking up. The forward house came adrift with three of the crew on it as well as a longboat, which the men succeeded in launching and keeping afloat by continually bailing with their sea boots. The captain, the third mate (the owner’s son) and others clung to the mizzenmast in the sea. Then the owner’s son was washed away off the mast. Within 10 minutes the rest of the ship was in pieces, completely wrecked, with cargo and wreckage floating in the sea. The captain encouraged the second mate to swim with him to the deckhouse where there were other crew but the second mate wouldn’t go with him. Eventually the Captain made it to the deckhouse and the men pulled him up. At about 4:30am the group of men on the deckhouse saw the lights of a steamer and called for help. At the same time they noticed the second mate and the other man had drifted nearby, still on the spur, and pulled them both onto the wreck. The coastal steamer Dawn was returning to Warrnambool from Melbourne, its sailing time different to its usual schedule. Captain Jones sent out two life boats, and fired off rockets and blue lights to illuminate the area. They picked up the three survivors who were in the long boat from Eric the Red. Two men were picked up out of the water, one being the owner’s son who was clinging to floating kerosene boxes. At daylight the Dawn then rescued the 18 men from the floating portion of the deckhouse, which had drifted about 4 miles from where they’d struck the reef. Shortly after the rescue the deckhouse drifted onto breakers and was thrown onto rocks at Point Franklin, about 2 miles east of Cape Otway. Captain Jones had signalled to Cape Otway lighthouse the number of the Eric the Red and later signalled that there was a wreck at Otway Reef but there was no response from the lighthouse. The captain and crew of the Dawn spent several more hours searching unsuccessfully for more survivors, even going back as far as Apollo Bay. On board the Dawn the exhausted men received care and attention to their needs and wants, including much needed clothing. Captain Allen was amongst the 23 battered and injured men who were rescued and later taken to Warrnambool for care. Warrnambool’s mayor and town clerk offered them all hospitality, the three badly injured men going to the hospital for care and others to the Olive Branch Hotel, then on to Melbourne. Captain Allen’s leg injury prevented him from going ashore so he and three other men travelled on the Dawn to Portland. They were met by the mayor who also treated them all with great kindness. Captain Allen took the train back to Melbourne then returned to America. Those saved were Captain Z. Allen (or Jacques Allen), J. Darcy chief mate, James F. Lawrence second mate, Ned Sewall third mate and owner’s son, John French the cook, C. Nelson sail maker, Clarence W. New passenger, and the able seamen Dickenson, J. Black, Denis White, C. Herbert, C. Thompson, A. Brooks, D. Wilson, J. Ellis, Q. Thompson, C. Newman, W. Paul, J. Davis, M. Horenleng, J. Ogduff, T. W. Drew, R. Richardson. Four men had lost their lives; three of them were crew (Gus Dahlgreen ship’s carpenter, H. Ackman steward, who drowned in his cabin, and George Silver seaman) and one a passenger (J. B. Vaughan). The body of one of them had been found washed up at Cape Otway and was later buried in the lighthouse cemetery; another body was seen on an inaccessible ledge. Twelve months later the second mate James F. Lawrence, from Nova Scotia, passed away in the Warrnambool district; an obituary was displayed in the local paper. The captain and crew of the Dawn were recognised by the United States Government in July 1881 for their humane efforts, being thanked and presented with substantial monetary rewards, medals and gifts. Neither the ship, nor its cargo, was insured. The ship was worth about £15,000 and the cargo was reportedly worth £40,000; only about £2,000 worth had been recovered. Cargo and wreckage washed up at Apollo Bay, Peterborough, Port Campbell, Western Port and according to some reports, even as far away as the beaches of New Zealand. The day after the wreck the government steam ship Pharos was sent from Queenscliff to clear the shipping lanes of debris that could be a danger to ships. The large midship deckhouse of the ship was found floating in a calm sea near Henty Reef. Items such as an American chair, a ladder and a nest of boxes were all on top of the deckhouse. As it was so large and could cause danger to passing ships, Captain Payne had the deckhouse towed towards the shore just beyond Apollo Bay. Between Apollo Bay and Blanket Bay the captain and crew of Pharos collected Wheeler and Wilson sewing machines, nests of boxes, bottles of Bristol’s sarsaparilla, pieces of common American chairs, axe handles, a Wheelers’ Patent thresher and a sailor’s trunk with the words “A. James” on the front. A ship’s flag-board bearing the words “Eric the Red” was found on the deckhouse; finally those on board the Pharos had the name of the wrecked vessel. During this operation Pharos came across the government steamer Victoria and also a steamer S.S. Otway, both of which were picking up flotsam and wreckage. A whole side of the hull and three large pieces of the other side of the hull, with some of the copper sheathing stripped off, had floated on to Point Franklin. Some of the vessels yards and portions of her masts were on shore. The pieces of canvas attached to the yards and masts confirmed that the vessel had been under sail. The beach there was piled with debris several feet high. There were many cases of Diamond Oil kerosene, labelled R. W. Cameron and Company, New York. There were also many large planks of red pine, portions of a small white boat and a large, well-used oar. Other items found ashore included sewing machines (some consigned to ‘Long and Co.”) and notions, axe and scythe handles, hay forks, wooden pegs, rolls of wire (some branded “T.S” and Co, Melbourne”), kegs of nails branded “A.T. and Co.” from the factory of A. Field and Son, Taunton, Massachusetts, croquet balls and mallets, buggy fittings, rat traps, perfumery, cutlery and Douay Bibles, clocks, bicycles, chairs, a fly wheel, a cooking stove, timber, boxes, pianos, organs and a ladder. (Wooden clothes pegs drifted in for many years). There seemed to be no personal luggage or clothing. The Pharos encountered a long line, about one and a half miles, of floating wreckage about 10 miles off land, south east of Cape Otway, and in some places about 40 feet wide. It seemed that more than half of it was from Eric the Red. The ship’s crew rescued 3 cases that were for the Melbourne Exhibition and other items from amongst the debris. There were also chairs, doors, musical instruments, washing boards, nests of trunks and fly catchers floating in the sea. Most of the goods were saturated and smelt of kerosene. A section of the hull lies buried in the sand at Parker River Beach. An anchor with chain is embedded in the rocks east of Point Franklin and a second anchor, thought to be from Eric the Red, is on display at the Cape Otway light station. (There is a photograph of a life belt on the verandah of Rivernook Guest House in Princetown with the words “ERIC THE RED / BOSTON”. This is rather a mystery as the ship was registered in Bath, Maine, USA.) Parts of the ship are on display at Bimbi Park Caravan Park and at Apollo Bay Museum. Flagstaff Hill Maritime Village also has part of the helm (steering wheel), a carved wooden sword (said to be the only remaining portion of the ship’s figurehead; further research is currently being carried out), a door, a metal rod and samples of wood. Much of the wreckage was recovered by the local residents before police and other authorities arrived at the scene. Looters went to great effort to salvage goods, being lowered down the high cliff faces to areas with little or no beach to collect items from the wreckage, their mates above watching out for dangerous waves. A Tasmanian newspaper reports on a court case in Stawell, Victoria, noting a man who was caught 2 months later selling tobacco from the wreckage of Eric the Red. Some of the silverware is still treasured by descendants of Mr Mackenzie who was given these items by officials for his help in securing the cargo. The gifts included silver coffee and tea pots, half a dozen silver serviette rings and two sewing machines. The wreck and cargo were sold to a Melbourne man who salvaged a quantity of high quality tobacco and dental and surgical instruments. Timbers from the ship were salvaged and used in the construction of houses and sheds around Apollo Bay, including a guest house, Milford House (since burnt down in bushfires), which had furniture, fittings and timber on the dining room floor from the ship. A 39.7 foot long trading ketch, the Apollo, was also built from its timbers by Mr Burgess in 1883 and subsequently used in Tasmanian waters. It was the first attempt at ship building in Apollo bay. In 1881 a red light was installed about 300 feet above sea level at the base of the Cape Otway lighthouse to warn ships when they were too close to shore; It would not be visible unless a ship came within 3 miles from it. This has proved to be an effective warning. The State Library of Victoria has a lithograph in its collection depicting the steamer Dawn and the shipwrecked men, titled. "Wreck of the ship Eric the Red, Cape Otway: rescue of the crew by the Dawn". “The Eric the Red is historically significant as one of Victoria's major 19th century shipwrecks. (Heritage Victoria Eric the Red; HV ID 239) The wreck led to the provision of an additional warning light placed below the Cape Otway lighthouse to alert mariners to the location of Otway Reef. The site is archaeologically significant for its remains of a large and varied cargo and ship's fittings being scattered over a wide area. The site is recreationally and aesthetically significant as it is one of the few sites along this coast where tourists can visit identifiable remains of a large wooden shipwreck, and for its location set against the background of Cape Otway, Bass Strait, and the Cape Otway lighthouse.“ (Victorian Heritage Database Registration Number S239, Official Number 8745 USA) Door from the wreck of the ship Eric the Red. The wooden singular rectangular door includes three insert panel sections. The top section is square shaped and is missing its panel or glass. The centre timber panel is about a third of the height of the top panel and the bottom timber panel is approximately equal in height to the total height of the two upper panels. The door fastenings include both a metal door latch and traditional door bolt. They are both attached to the front right hand side of the door. The bolt is just below the top panel, and the door latch is in approximately the centre of that side. The door latch has a round mark where a handle could have been attached. The wood of the door has scraping marks in a semi-circle around the door latch where the latch has swung around on its one remaining fastening and grazed the surface. There is a metal hinge at the top section of the door on the opposite side to the latch. The painted surface has been scraped back to expose the wood. The door is shorter than the average height of a person. On the reverse of the door there are lines on the panels, just inside their edges, is what appears to be pencil. The door is not aligned straight but is skew to centre.warrnambool, flagstaff hill, flagstaff hill maritime village, maritime museum, shipwreck coast, great ocean road, shipwreck artefact, eric the red, jaques allen, sewall, 1880, melbourne exhibition 1880, cape otway, otway reef, victorian shipwreck, bass strait, eric-the-red, door -
 Flagstaff Hill Maritime Museum and Village
Tool - Hand Adze, A Mathieson and Son, First quarter of the 20th Century
An adze is an ancient and versatile cutting tool similar to an axe but with the cutting edge perpendicular to the handle rather than parallel. Adzes are used for smoothing or carving wood in hand woodworking, and as a hoe for agriculture and horticulture. Two basic forms of an adze are the hand adze (short hoe) a short handled tool swung with one hand and the foot adze (hoe) a long handled tool capable of powerful swings using both hands, the cutting edge usually striking at foot or shin level. Mathieson & Sons Maker: In 1792 John Manners had set up a workshop making woodworking planes at 14 Saracens Lane Glasgow. He also had employed an apprentice Alexander Mathieson (1773-1851). But in the following year at Saracen's Lane, the 1841 census describes Alexander Mathieson as a master plane-maker now at 38 Saracen Lane with his son Thomas Adam working with him as a journeyman plane-maker. Presumably, Alexander must have taken over the premises and business of John Manners. Now that the business had Thomas Adam Mathieson working with his father it gradually grew and became more diversified, and it is recorded at the time by the Post-Office Glasgow Annual Directory that by 1847-1848 Alexander Mathieson was a “plane, brace, bit, auger & edge tool maker” In 1849 the firm of James & William Stewart at 65 Nicolson Street, Edinburgh was taken over and Thomas was put in charge of the business, trading under the name Thomas A. Mathieson & Co. as plane and edge-tool makers. Thomas's company went on to acquire the Edinburgh edge-tool makers “Charles & Hugh McPherson” and took over their premises in Gilmore Street. In the Edinburgh directory of 1856/7, the business is recorded as being Alexander Mathieson & Son, plane and edge-tool makers at 48 Nicolson Street and Paul's Work, Gilmore Street Edinburgh. The 1851 census Alexander is recorded as working as a tool and plane-maker employing eight men. Later that year Alexander died and his son Thomas took over the business. Under the heading of an edge-tool maker in the 1852/3 Post-Office Glasgow Annual Directory the firm is now listed as Alexander Mathieson & Son, with further entries as "turning-lathe and vice manufacturers". By the early 1850s, the business had moved to 24 Saracen Lane. The directory for 1857/8 records that the firm had moved again only a few years later to East Campbell Street, off the Gallowgate area, and that through further diversification was also manufacturing coopers' and tinmen's tools. The ten-yearly censuses report the firm's growth in 1861 stating that Thomas was a tool manufacturer employing 95 men and 30 boys; in 1871 he had 200 men working for him and in 1881 300 men. By 1899 the firm had been incorporated as Alexander Mathieson & Sons Ltd, even though only Alexander's son Thomas appears ever to have joined the firm so the company was still in his fathers' name. In September 1868 Thomas Mathieson put a notice in the newspapers of the Sheffield & Rotherham Independent and the Sheffield Daily Telegraph stating that his firm had used the trade-mark of a crescent and star "for some time" and that "using or imitating the Mark would be proceeded against for infringement". The firm had acquired its interest in the crescent-and-star mark from the heirs of Charles Pickslay, the Sheffield cutler who had registered it with the Cutlers' Company in 1833 and had died in 1852. The year 1868 seems also to be the one in which the name Saracen Tool Works was first adopted; not only does it figure at the foot of the notice in the Sheffield press, it also makes its first appearance in the firm's entry in the Post-Office Glasgow Annual Directory in the 1868/9 edition. As Thomas Mathieson's business grew, so too did his involvement in local public life and philanthropy. One of the representatives of the third ward on the town council of Glasgow, he became a river bailie in 1868, a magistrate in 1870 and a preceptor of Hutcheson's Hospital in 1878. He had a passion for books and was an "ardent Ruskinian". He served on the committee handling the bequest for the setting up of the Mitchell Library in Glasgow. When he died at Coulter Maynes near Biggar in 1899, he left an estate worth £142,764. The firm of Alexander Mathieson & Sons was one of the leading makers of hand tools in Scotland. Its success went hand in hand with the growth of the shipbuilding industries on the Firth of Clyde in the nineteenth century and the emergence of Glasgow as the "second city of the Empire". It also reflected the firm's skill in responding to an unprecedented demand for quality tools by shipyards, cooperages and other industries, both locally and far and wide.Hand Adze or Cooper's adze No 4 A Mathieson & Sons Glasgowflagstaff hill, warrnambool, flagstaff-hill-maritime-museum, maritime-museum, shipwreck-coast, flagstaff-hill-maritime-village, adze mathieson & sons, cooperage tools, woodworking, barrel making, working timber, joiners tools, carpenters tools -
 Flagstaff Hill Maritime Museum and Village
Tool - Coopers Adze, Mathieson and Son, First quarter of the 20th Century
An adze is an ancient and versatile cutting tool similar to an axe but with the cutting edge perpendicular to the handle rather than parallel. Adzes are used for smoothing or carving wood in hand woodworking, and as a hoe for agriculture and horticulture. Two basic forms of an adze are the hand adze (short hoe) a short handled tool swung with one hand and the foot adze (hoe) a long handled tool capable of powerful swings using both hands, the cutting edge usually striking at foot or shin level. Mathieson & Sons Maker: In 1792 John Manners had set up a workshop making woodworking planes at 14 Saracens Lane Glasgow. He also had employed an apprentice Alexander Mathieson (1773-1851). But in the following year at Saracen's Lane, the 1841 census describes Alexander Mathieson as a master plane-maker now at 38 Saracen Lane with his son Thomas Adam working with him as a journeyman plane-maker. Presumably, Alexander must have taken over the premises and business of John Manners. Now that the business had Thomas Adam Mathieson working with his father it gradually grew and became more diversified, and it is recorded at the time by the Post-Office Glasgow Annual Directory that by 1847-1848 Alexander Mathieson was a “plane, brace, bit, auger & edge tool maker” In 1849 the firm of James & William Stewart at 65 Nicholson Street, Edinburgh was taken over and Thomas was put in charge of the business, trading under the name Thomas A. Mathieson & Co. as plane and edge-tool makers. Thomas company went on to acquire the Edinburgh edge-tool makers “Charles & Hugh McPherson” and took over their premises in Gilmore Street. In the Edinburgh directory of 1856/7, the business is recorded as being Alexander Mathieson & Son, plane and edge-tool makers at 48 Nicholson Street and Paul's Work, Gilmore Street Edinburgh. The 1851 census Alexander is recorded as working as a tool and plane-maker employing eight men. Later that year Alexander died and his son Thomas took over the business. Under the heading of an edge-tool maker in the 1852/3 Post-Office Glasgow Annual Directory the firm is now listed as Alexander Mathieson & Son, with further entries as "turning-lathe and vice manufacturers". By the early 1850s, the business had moved to 24 Saracen Lane. The directory for 1857/8 records that the firm had moved again only a few years later to East Campbell Street, off the Gallowgate area, and that through further diversification was also manufacturing coopers' and tin men's tools. The ten-yearly censuses report the firm's growth in 1861 stating that Thomas was a tool manufacturer employing 95 men and 30 boys; in 1871 he had 200 men working for him and in 1881 300 men. By 1899 the firm had been incorporated as Alexander Mathieson & Sons Ltd, even though only Alexander's son Thomas appears ever to have joined the firm so the company was still in his fathers' name. In September 1868 Thomas Mathieson put a notice in the newspapers of the Sheffield & Rotherham Independent and the Sheffield Daily Telegraph stating that his firm had used the trade-mark of a crescent and star "for some time" and that "using or imitating the Mark would be proceeded against for infringement". The firm had acquired its interest in the crescent-and-star mark from the heirs of Charles Pickslay, the Sheffield cutler who had registered it with the Cutlers' Company in 1833 and had died in 1852. The year 1868 seems also to be the one in which the name Saracen Tool Works was first adopted; not only does it figure at the foot of the notice in the Sheffield press, it also makes its first appearance in the firm's entry in the Post-Office Glasgow Annual Directory in the 1868/9 edition. As Thomas Mathieson's business grew, so too did his involvement in local public life and philanthropy. One of the representatives of the third ward on the town council of Glasgow, he became a river Bailie in 1868, a magistrate in 1870 and a preceptor of Hutcheson's Hospital in 1878. He had a passion for books and was an "ardent Ruskinian". He served on the committee handling the bequest for the setting up of the Mitchell Library in Glasgow. When he died at Coulter Maynes near Biggar in 1899, he left an estate worth £142,764. The firm of Alexander Mathieson & Sons was one of the leading makers of hand tools in Scotland. Its success went hand in hand with the growth of the shipbuilding industries on the Firth of Clyde in the nineteenth century and the emergence of Glasgow as the "second city of the Empire". It also reflected the firm's skill in responding to an unprecedented demand for quality tools by shipyards, cooperages and other industries, both locally and far and wide.Coopers Adze steel with wooden handle No 194 A Mathieson & Sons Glasgowflagstaff hill, warrnambool, shipwrecked coast, flagstaff hill maritime museum, maritime museum, shipwreck coast, flagstaff hill maritime village, great ocean road, flagstaff hill, warrnambool, shipwrecked coast, flagstaff hill maritime museum, maritime museum, shipwreck coast, flagstaff hill maritime village, great ocean road -
 Flagstaff Hill Maritime Museum and Village
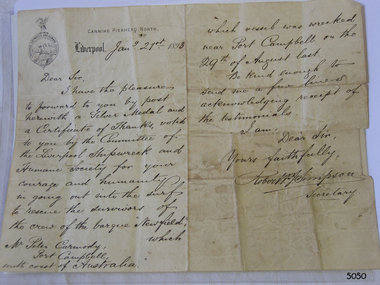
Award - Document, 21/1/1893
The name on the letterhead, “Canning Pierhead North” is the name of the Liverpool Pilot Authority, which was situated in 1883 at Cannon Pier on the River Mersey where ships entered to travel to Liverpool. The logo on the letterhead belongs to the Liverpool Shipwreck and Humane Society. The letter is addressed to “Mr Peter Carmody, Port Campbell, south coast of Australia”, and reads as follows: “January 21st 1893, Dear Sir, I have the pleasure to forward to you by post herewith a Silver Medal and a Certificate of Thanks, voted to you by the Committee of the Liverpool Shipwreck and Humane Society for your courage and humanity in going out into the surf to rescue the survivors of the crew of the barque “Newfield” which vessel was wrecked near Port Campbell on the 29th of August last. Be kind enough to send a few lines acknowledging receipt of the testimonials. I am Dear Sir, Yours Faithfully, Robert P. J. Simpson, Secretary.” The medal accompanying the letter is the Liverpool Shipwreck and Humane Society’s “Bramley-Moore medal for saving life at sea 1872”. The Society was formed in 1839. In 1872 Mr John Bramley-Moore donated £500 on condition that the medal have the specific inscription above on its reverse. The Bramley Morre medal was first awarded in 1874 and records show that since that time only one gold medal has been awarded, twenty-two silver medals and seventeen bronze medals, the last being in 1945. This Bromley-Moore medal was awarded to Peter Carmody for his bravery in saving lives on the Newfield shipwreck. The Newfield was a three-masted iron and steel barque, built in Dundee, Scotland, in 1889 by Alexander Stephen and Sons. It was owned by the Newfield Ship Company in 1890 and later that year It was registered in Liverpool to owners Brownells and Co. The Newfield left Sharpness, Scotland, on 28th May 1892 with a crew of 25 under the command of Captain George Scott and on 1st June left Liverpool. She was bound for Brisbane, Australia, with a cargo of 1850 tons of fine rock salt, the main export product of Sharpness. At about 9pm on 28th August 1892, in heavy weather, Captain Scott sighted, between heavy squalls, the Cape Otway light on the mainland of Victoria but, due to a navigational error (the ship’s chronometers were wrong), he assumed it to be the Cape Wickham light on King Island, some 40 miles south. He altered his course to the north, expecting to enter Bass Strait. The ship was now heading straight for the south west Victorian coast. At about 1:30am the Newfield ran aground on a reef about 100 yards from shore and one mile east of Curdie’s Inlet, Peterborough. The ship struck heavily three times before grounding on an inner shoal with 6 feet of water in the holds. Rough sea made the job of launching lifeboats very difficult. The first two lifeboats launched by the crew were smashed against the side of the ship and some men were crushed or swept away. The third lifeboat brought eight men to shore. It capsized when the crew tried to return it to the ship for further rescue The rescue was a difficult operation. The Port Campbell Rocket Crew arrived and fired four rocket lines, none of which connected with the ship. Peter Carmody, a local man, volunteered to swim about one mile off shore to the ship with a line to guide the fourth and final lifeboat safely to shore. He was assisted by James McKenzie and Gerard Irvine. Seventeen men survived the shipwreck but the captain and eight of his crew perished. The Newfield remained upright on the reef with sails set for a considerable time as the wind slowly ripped the canvas to shreds and the sea battered the hull to pieces. The Marine Board inquiry found the wreck was caused by a "one man style of navigation" and that the Captain had not heeded the advice of his crew. According to Jack Loney ‘… when the drama was over . . the Newfield was deserted except for the Captain’s dog and two pigs.’ Peter Carmody was awarded the Bramley-Moore medal by the Liverpool Shipwreck and Humane Society for Saving Life at Ssea, which he received by mail on January 21st 1893. The medal and letter of congratulations were donated to Flagstaff Hill Maritime Museum by Peter Carmody’s grand-daughter Norma Bracken and her son Stuart Bracken on 25th May 2006. The Medal and Letter of Congratulations join other items in the Newfield collectionlFlagstaff Hill’s collection of artefacts from the Newfield is significant for its association with the shipwreck Newfield, which is listed on the Victorian Heritage Registry. The collection is significant because of the relationship between the objects. The Newfield collection is archaeologically significant as the remains of an international cargo ship. The Newfield collection is historically significant for representing aspects of Victoria’s shipping history and its association with the shipwreck. The Letter accompanying the Medal for Bravery awarded to Peter Carmody is significant because the attempt to save lives is associated with the shipwreck Newfield.A copy of a letter from the Liverpool Shipwreck and Humane Society to Peter Carmody in reference to the bravery of Peter Carmody over the wreck of the "Newfield". The letter is divided into 2 columns and is written in longhand using black ink on both columns. There is a letterhead in the centre of the left hand page and a round logo printed or stamped on the top of left of the left hand page. The centre of the logo shows a design of a man kneeling on a floating part of a wreck. He is rescuing a child from the sea. On the top of the circle of the logo a design shows a long-legged hen cormorant with extended wings holding an olive branch in its beak. There is also the name of a city printed onto the page under the letterhead. The letter has been folded into half along its long side, then in half again along its long side then into thirds. The letter is dated January 21st 1893. “CANNING, PIERHEAD, NORTH” and “LIVERPOOL” are printed on the top left hand page. The logo “LIVERPOOL SHIPWRECK AND HUMANE SOCIETY” is printed or embossed on the paper.28 august 1892, bramley moore, carmody, certificate of thanks, curdie's river, flagstaff hill, flagstaff hill maritime museum, gerard irvine, james mckenzie, liverpool shipwreck and humane society, maritime museum, medal, newfield, nineteenth century, norma bracken, peter carmody, port campbell, rescue, robert simpson,, shipwreck, ship wreck, stuart bracken, victorian shipwrecks -
 Flagstaff Hill Maritime Museum and Village
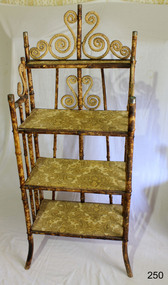
Furniture - Shelves, A. Englander & Searle, Late 19th Century (1898)
This music stand set of shelves is one of many 19th century items of furniture, linen and crockery donated to Flagstaff Hill Maritime Village by, Vera and Aurelin Giles. The items are associated with the Giles Family and are known as the “Giles Collection”. Many of the items of furniture, linen and crockery in the Lighthouse Keeper’s Cottage were donated by Vera and Aurelin Giles and mostly came from the simple home of Vera’s parents-in-law, Henry Giles and his wife Mary Jane (nee Freckleton) whose photos are in the parlour. They married in 1880. Henry, born at Tower Hill in 1858, was a labourer on the construction of the Breakwater before leaving in 1895 to build bridges in N.S.W. for about seven years. Mary Jane was born in 1860 at Cooramook. She attended Mailor’s Flat State School where she was also a student teacher before, as family legend has it, she became a governess at “Injemiara” where her grandfather, Francis Freckleton, once owned land. Henry and Mary’s family of six, some of whom were born at Mailor’s Flat and later children at Wangoom, lived with their parents at Wangoom and Purnim west, where Henry died in 1933 and Mary Jane in 1940. THE SHELVES During the years 1869-1935 there were well over 250 registered bamboo furniture producers in Britain. The earliest recorded firm was Hubert Bill of 14 Little Camden St, London N.W., who claimed to have been established in (1869 the first bamboo furniture maker), while Daniel Jacobs & Sons of Hackney Road, London, were still in business in 1915, after 45 years of production. Design, quality, price and methods of construction were fairly consistent throughout the whole period, but it was the imaginative and often eccentric choice of subject matter that marked the differentiation between the various firms. While most produced standard tables, stands and fire-screens, the more adventurous offered for sale items such as Corner shelve units, charcoal barbecue grills and musical tea tables. Shelves were often covered with embossed leather paper designs, at first imported from Japan and then later produced in England. Some firms incorporated the knobbly roots of the bamboo stems into their designs, generally to form feet. Occasionally handles to drawers and cupboards were made with these roots although they were more commonly carved as imitations. Handles were mostly of cheap metal or brass. The ends of the bamboo canes were capped with stamped metal or turned bone, ivory or wooden discs. Methods of construction fell into three categories. First and most common is that of pegging. Bamboo stems being hollow, thick dowels can easily be glued into the joints. Some firms farmed out this work of `plugging' the ends of the canes to part-time workers at home. The second method, that of pinning, was far less satisfactory as bamboo tends to split lengthwise and therefore the jointed pieces eventually disintegrated. The most efficient method was that patented in 1888 (patent No 2383) by the firm of W. F. Needham in Birmingham. It consisted of metal shoes and covers for all joints which were made by wrapping a metal strip around the stems and soldering the overlapping ends. Some joints were further strengthened by a small pin or screw. Needham was by far the largest and most successful manufacturer and their individual and superior method of construction undoubtedly gained them their reputation. A. Englander & Searle of 34 Gt Eastern St and 31 Mare St, Hackney, London, were a firm particularly concerned with methods of construction. Although they seem to have entered the bamboo furniture market at a comparatively late date, about 1898, they produced inexpensive bamboo, aimed particularly at the export trade. The company stated in their catalogue that bamboo furniture “can be exported in one piece or it can be exported in pieces and put together again. The fixing up is much facilitated by a system of marking and numbering. Further, no glue is required for putting together as the screw system only is applied”. This method of construction best fits the Etagere in the Flagstaff collection and it is believed to have been made by A Englander & Searle, exported in a knock down form to Australia, purchased in kit form from a dealer hear and put together by the owner. The Etagere is a significant item as it highlight furniture fashion of the late Victorian era. This item was highly sort after in its time and although mass produced, not many examples remain, so this example is a valuable addition to the Flagstaff collection. It is believed that the construction method used is by a notable and respected maker of bamboo furniture and that its production was aimed at the export market and probably came to Australia in kit form.Bamboo shelves: decorative free standing Etagere comprising three large shelves and one small shelf. Shelves are made of wood used to store either orange or bacon boxes (as there are no knots in the wood, imported from South America and cheap to recycle). Shelves are covered with embossed leather paper. Frame is made from tortoise shell bamboo (brown lacquer applied to simulate tortoise shell appearance). Ends of bamboo canes are covered with metal shoes and fixed with a pin. Other bamboo joints are fixed with round head steel screws. This item is part of the Giles Collection.Noneflagstaff hill, warrnambool, shipwrecked-coast, flagstaff-hill, flagstaff-hill-maritime-museum, maritime-museum, shipwreck-coast, flagstaff-hill-maritime-village, bamboo shelves, bamboo etagere, victorian furniture, furniture, bamboo furniture, embossed leather paper, simulated bamboo, tortise shell, a englander & searle, giles collection, henry giles, tower hill, cooramook, warrnambool breakwater, mailor’s flat, wangoom, 19th century furniture -
 Puffing Billy Railway
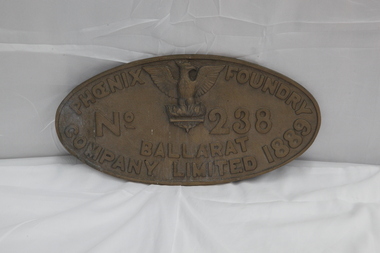
Phoenix Foundry Plate
Phoenix Foundry Plate - replica Made about 2010 cast off original from locomotive Y112 The Phoenix Foundry (1857-1906) fabricated iron and brass products - including engines and pumping gear for the mining industry, locomotives, steam rollers, water pipes, water gauges and diverse small items. Throughout its operation the business was located at premises on Armstrong Street, Ballarat . Background In 1852, at the age of thirty-three and after a year of operating his own engineering business at Williamstown, Lancashire-born blacksmith and engineer George Threlfall (1819-1897) arrived on the Sebastopol gold plain and immediately undertook blacksmith work repairing picks and tools for the miners. Little did he know that this fledgling business would be the genesis of the most iconic business of nineteenth-century Ballarat. At approximately thirty-nine years of age, English mechanical engineer Richard Carter (c1814-1883) came to Australia on board the Arrogant - arriving in Melbourne on 19 April 1853. He soon travelled to the Ballarat goldfields. Born in the year 1830 in Belfast (Ireland), mechanical engineer William Henry Shaw (1830-1896) arrived in Australia in October 1853. He worked briefly with George Threlfall at Sebastopol, then moved to Geelong to manage the small foundry of Frederick Moore. Twenty-four year old English-born iron moulder Robert Holden (c1831-?) left his home in Belfast (Ireland) in late 1854 and travelled from Liverpool to Melbourne on board the James Baines - arriving in February 1855. Afterwards he joined his brother-in-law William Henry Shaw in Ballarat. History Foundation to Incorporation In March 1857 George Threlfall joined in business with Richard Carter, William Henry Shaw and Robert Holden. They relocated Threlfall's successful engineering enterprise from Sebastopol to new premises in Armstrong Street, Ballarat. This business was then known variously as the Phoenix Iron Works Company, Phoenix Foundry or Messrs Carter and Co. By 15 April 1857 they were advertising that they were open for business as engineers, millwrights, boiler makers, smiths, iron founders and brass founders. In January 1858 George Threlfall left the partnership. Incorporation to 1889 1890 to Closing locomotive Y112 Builder: Phoenix Foundry, Ballarat Builder’s Number & Year: 238 of 1889 Designer: Kitson & Co Wheel Arrangement: 0-6-0 No. in class: 31 Entered Service: 24 July 1889 Taken off Register: 11 May 1961 The origins of the Victorian Railways Y-class lay with the decision by Kitson & Co, Leeds to place a 0-6-0 freight locomotive on display at the Centennial International Exhibition, Melbourne in 1888, together with a 2-4-2T suburban passenger locomotive. This marketing initiative proved successful as the Victorian Railways were clearly impressed with these machines, with both purchased after the exhibition and becoming the patterns for new standard locomotive types. Thirty examples of the 0-6-0 heavy freight design were ordered from the Phoenix Foundry, Ballarat, becoming the Y-class for main line heavy freight duties, while the 2-4-2T design became the E-class for Melbourne suburban passenger duties (represented by preserved locomotive E 236). The Y-class prove successful in service and accrued high mileages. They were inevitably superseded by more modern and powerful steam locomotives and a number cascaded into shunting and yard pilot duties, often with the addition of shunters steps along both locomotive and tender. Y 112 was one of the last in service when withdrawn in 1961. Fortunately it was saved for preservation and plinthed in central Ballarat, ostensibly in commemoration of Phoenix Foundry. I understand it is owned by the Sovereign Hill Museums Association. During the 1980’s, Y 112 was leased to Steamrail Victoria and restored to operation at an industrial site in Ballarat. Y 112 features an attractive lined apple green livery and has performed various rail tours around Victoria since restoration. It is normally based at the Steamrail depot in Ballarat East. Y 112 is the only 19th century design in operational condition in Victoria and as such is one of the oldest working steam locomotive in Victoria . Historic - Phoenix Foundry Plate - replica Made about 2010 cast off original from locomotive Y112Phoenix Foundry Plate Oval shaped plate with an image of a phoenix centered at the top with lettering surrounding it.Phoenix Foundry No 238 Ballarat Company Limited 1889.puffing billy, phoenix foundry, ballarat, locomotive y112, phoenix foundry plate - replica -
 Melton City Libraries
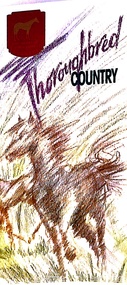
Pamphlet, Thoroughbred Country, c.1985
"Melton has a long and celebrated history of horse breeding and racing. Draught horses were a crucial aspect of life in the early days of European settlement, and were heavily depended upon for both transport and agricultural labour. Peppercorn trees at the corner of Station and Brooklyn roads have been associated with a horse trough installed there to provide a drink to workhorses carting produce to the chaff mills and railway station south of Melton.20 Breeders, trainers and harness drivers in the area later became such an influential force in the equine industry that this came to be a defining aspect of the district’s identity and reputation.Pioneer of the Victorian horse racing industry and early Rockbank squatter William Cross Yuille was one of the earliest importers of stud racehorses in the district in the 1850s. A leading sports editor and writer, Yuille established bloodstock auctioning agency W. C. Yuille & Co. and was involved in the compilation of the first Australian Stud Book, which ensures the integrity of thoroughbred breeding in Australia. According to early Melton chronicler Alexander Cameron, horse races were first organised in the area by Rockbank farmer William Keating. Keating owned racehorses of his own, and many brought horses from Melbourne for the events, which ‘drew large gatherings’.22 Melton Racing Club meetings were held on the Exford Estate with the permission of H. W. Staughton, who built a small wooden grandstand in 1882. Other early races and sports meetings are said to have been held in the vicinity of the current-day Melton golf course.23 An 1884 article reported that Melton’s ‘race programme … equals any put forth by country towns of far greater size’. Ernest Clarke was another important figure in the early horse racing industry in Melton. He established the Melton Stud in 1902, which bred numerous successful racehorses. Perhaps most notably The Welkin, one of the most famous stallions in Australian horse racing in the early twentieth century. The Welkin sired Gloaming, bred by Clarke at the Melton stud in 1915 and one of Australia’s greatest champion racehorses. During a long and prestigious career in both Australia and New Zealand, Gloaming achieved a triumphant 57 wins out of 67 starts and won a record amount of prize money. Ken Cox purchased the Stockwell Stud in Diggers Rest in 1957 and developed it into one of the largest and most renowned thoroughbred breeders in Australia. With its top-class facilities, international design standards and scientific methods, Stockwell became ‘the flagship of the Victorian breeding industry’.26 As well as racing studs, numerous trotting tracks were established on the flat plains around Melton in the 1960s.27 Other studs to play a leading role in the development of Melton as thoroughbred country were Cornwall Park and Merrywood at Toolern Vale, St John’s Lane Stud at Diggers Rest and Birchwood, Teppo Park and Dreelburn in the far north-east of the shire, near Sunbury. By 1985, thoroughbred horse breeding was such big business in Melton that the shire council adopted the slogan ‘The Heart of Thoroughbred Country’, which was used throughout its promotional material.29 But the slogan contained deeper meaning and was not just about Melton’s great equine industry and thoroughbred champions, the council explained: ‘“Thoroughbred Country” should be seen as a new concept of Melton, as a place where people can achieve the “Thoroughbred” ideal, excellence in all aspects of life’. The aim of the council in promoting ‘The Heart of Thoroughbred Country’, was ‘to instil in present and future residents the feeling that this is a place that is better than others. A place to be proud of’. In 1988, Melton’s champion reinsman Gavin Lang won his 176th race of the season, claiming the national harness racing record for the most wins in a single season.The following year, the first Melton Plate was held at Moonee Valley Racecourse, cementing the district’s importance in the harness racing industry. The inaugural winner was Victorys Phil, owned by local Danny Mullan. By the 1990s, Melton had earned the title of the ‘Home of Harness Racing in Victoria’. State-of-the-art, world-class harness racing facility and entertainment complex Tabcorp Park opened in Melton in 2009. In 2011, the Shire of Melton was home to over 140 registered trainers and over 1,200 horses. The municipality’s continuing leadership and influence in the industry today is a testament to the skills, talents and leadership of the local community over its history".Shire of Melton pamphlet of a map and information of the equine industry in Meltoncouncil -
 Flagstaff Hill Maritime Museum and Village
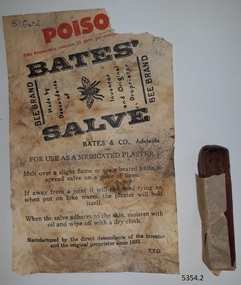
Article - Ointment, Bates & Co. (William Usher), 1851 - mid-1900s
Bates' Salve has been used as a home remedy for the treatment of boils, skin infections, splinters, pimples and insect bites for decades, from the mid-1800s to the mid-1900s. It is a drawing application for bringing out foreign bodies and pusses from a wound. There are still many families who remember using it and others who have been using it and are down to their last ‘inch’. One comment from a reader from Queensland tells how his Dad was a sleeper cutter in the 1950s and on school holidays his brother and he used to help their Dad. When doing this task after a wet season they would be confronted with spear grass about a metre high. Sometimes the spears would enter their skin, and when the spears were wet they would screw like a corkscrew into their flesh. If they left them for too long it was impossible to dig them out with a needle. That's when the Bates Salve was put into action to draw the spearhead out. "It worked wonders. It was a marvellous invention." Many people say that they would love to be able to purchase more of it today and hope that someone will produce a ‘safe’ version of it. There are several versions of a recipe for the salve available online. It appears that the salve is named after Daisy Bates, wife of the Bates’ Salve proprietor, William Usher. William’s son Victor continued making Bates’ Salve well into the mid-1900s, with the business being carried on by Victor’s only son, Alan. There are still descendants in the family home in Norwood, Adelaide. William’s great-grandchild has stated that, despite being subject to the salve during childhood, there have been no noticeable ill effects. A small notice in the Adelaide Advertiser in 1915 made a suggestion “It is said that Bates’ Salve is the popular line with OUR BOYS in Gallipoli. They recently sent to the Adelaide Red Cross for a supply, so it would be a good line to put in soldiers’ Christmas Billies.“ Over 700 ‘Christmas Billies’ were sent from generous Warrnambool citizens to our soldiers in the trenches in Gallipoli. The average cost of filling a billy with gifts was Ten Shillings, calculated at about Fifty-four Dollars in 2021. The contents included Christmas puddings and tobacco. The huge project was coordinated by a local Committee and involved generous businesses and hundreds of kind-hearted community members, with recognition sown by naming many of those involved in an article in the Warrnambool Standard. The project’s idea was initiated by Australia’s Department of Defence and all states were involved in supporting the soldiers in this way. Mr Bates (Theopholis) of Hull, England, was the original owner of the Bates’ Salve recipe. When he died he left his business to William Usher, his son-in-law. William arrived in South Australia in 1851 after he had sold his recipe to an English firm, giving them the rights to make and sell it all over the world, except in Australia. Bates then became the registered proprietor of Bates’ Salve for the Commonwealth and still had a large market for his product. William Usher made the salve at his Norwood home, in a wood-fired copper in the garden within a three-sided enclosure. The ointment was then taken to a room in the house where it was divided, labelled and packaged. It was then sent to Faulding’s Wholesale Chemist for distribution. William and his wife May (or Mary) had three children; Jack, Victor and Ivy. When May died, William married Mary Williams (May’s maid, from Tasmania, twenty years younger than William) and had seven more children. The treatment’s packaging labels it as a POISON. It seems that its active ingredient was lead oxide (22 per cent), which is no longer considered unsafe. A member of the public mentioned that in 2016 they found some Bates’ Salve in an old family medicine chest. Its label stated that the product “contains a minimum of 25.8 per cent of red lead oxide”. That particular sample was made at 470 Wallon Road, West Molesey, Surrey, England. Some people would love to be able to use the product still and even take the risk of poisoning. Instructions for its use are included on the wrapper. Here is a transcription - "Bates' Salve. Bee Brand. POISON. This Preparation contains 22 parts per centum [lead oxide]… Made by Descendants of the Inventor and Original Proprietor. For use as a medicated plaster. Melt over a slight flame or use a heated knife to spread the salve on a piece of linen. If away from a joint it will not need tying as, when put on lukewarm, the plaster will hold itself. When the salve adheres to the skin moisten it with oil and wipe it off with a dry cloth. Manufactured by the direct descendants of the inventor and the original proprietor since 1833."This package of Bates' Salve has been used as a home remedy since the mod-1800s and even up to now in 2019 by those who consider themselves lucky to still have some at home. It was promoted as a 'cure all' treatment and kept handy for use at home and away. It represents our early industry and health management when medical treatment was often difficult to access. The product is the part of many childhood memories of those alive today.Bates’ Salve ointment; oblong stick of firm, brown waxy substance wrapped in waxed paper, with an outer printed wrapper. Text on wrapper warns that it is POISON and includes instructions for use as a medicated plaster, to be heated and spread onto linen then applied to the injury. Made by Bates & Co., Adelaide. The wrapper shows an emblem of a bee. The formula has been used since 1833.Text on wrapper includes "POISO[N]", "BATES' SALVE", "BEE BRAND", "BATES & CO., ADELAIDE". "This Preparation contains 22 parts per centum [lead oxide]" There is an emblem of a bee with wings outstretched.flagstaff hill, warrnambool, shipwrecked-coast, flagstaff-hill, flagstaff-hill-maritime-museum, maritime-museum, shipwreck-coast, flagstaff-hill-maritime-village, bates’ salve, bates’ salve medicated plaster, bates and co adelaide, bee brand, medicated plaster, medical treatment, remedy, drawing treatment for infection, medicine cabinet, home remedy, pharmacy treatment, mid 1800s – mid 1900s remedy, topical application, treatment for boils, bites, splinters and infections, poison, preparation for treatment, ointment -
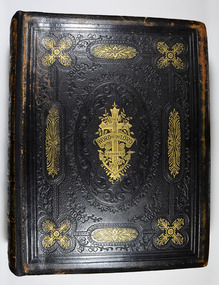 Marysville & District Historical Society
Book, James Semple, The Self-Interpreting Family Bible, 1800's
The Batchelor family Bible. The Batchelor Family were early residents of Taggerty.Leather bound with decorative embossing with some in gold on covers and spine.non-fictionThe Batchelor family Bible. The Batchelor Family were early residents of Taggerty.bible, batchelor family, taggerty -
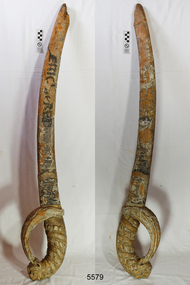 Flagstaff Hill Maritime Museum and Village
Decorative object - Sword, 1871 or earlier
This wooden sword is said to “possibly be the only remaining part of the figurehead from the sailing ship Eric the Red.” It was previously part of the collection of the old Warrnambool Museum and the entry in its inventory says “Wooden sword, portion of the figurehead, held by “Eric the Red” at the bow.” A large part of the ship’s hull was found on the rocks and a figurehead may have been attached or washed up on the shore. The shipping records for E. & A. Sewall, the builders, owners and managers of Eric the Red, are now preserved in the Maine Maritime Museum. There is no photograph on record of Eric the Red but photographs of other ships built around that time by the same company show that these did not have figureheads, and there is no record found of a figurehead for Eric the Red being ordered or paid for. Further research is being carried out. The ship building company E. & A. Sewall, from Bath, Maine, USA, built Eric the Red, a wooden, three masted clipper ship. She had 1,580 tons register and was the largest full-rigged ship built at Bath, Maine, USA in 1871. She was built and registered by Arthur Sewall, later to become the partnership E. & A. Sewall, and was the 51st ship built by this company. The annually-published List of Merchant Vessels of the U.S. shows that Bath was still the home port of Eric the Red in 1880. The vessel was named after the Viking discoverer, Eric the Red, who was the first European to reach the shores of North America (in 980AD). The ship Eric the Red at first traded in coal between America and Britain, and later traded in guano nitrates from South America. In 1879 she was re-metalled and was in first class condition. On 10th June 1880 (some records say 12th June) Eric the Red departed New York for Melbourne and then Sydney. She had been commissioned by American trade representatives to carry a special cargo of 500 exhibits (1400 tons) - about a quarter to a third of America’s total exhibits - from America for the U.S.A. pavilion at Melbourne’s first International Exhibition. The exhibits included furniture, ironmongery, wines, chemicals, dental and surgical instruments, paper, cages, bronze lamp trimmings, axles, stamped ware, astronomical and time globes, samples of corn and the choicest of leaf tobacco. Other general cargo included merchandise such as cases of kerosene and turpentine, brooms, Bristol's Sarsaparilla, Wheeler and Wilson sewing machines, Wheeler’s thresher machine, axe handles and tools, cases of silver plate, toys, pianos and organs, carriages and Yankee notions. The Eric the Red left New York under the command of Captain Z. Allen (or some records say Captain Jacques Allen) and 24 other crew including the owner’s son third mate Ned Sewall. There were 2 saloon passengers also. On 4th September 1880 the ship had been sailing for an uneventful 85 days and the voyage was almost at its end. Eric the Red approached Cape Otway in a moderate north-west wind and hazy and overcast atmosphere. Around 1:30am Captain Allen sighted the Cape Otway light and was keeping the ship 5-6 miles offshore to stay clear of the hazardous Otway Reef. However he had badly misjudged his position. The ship hit the Otway Reef about 2 miles out to sea, south west of the Cape Otway light station. Captain Allen ordered the wheel to be put ‘hard up’ thinking that she might float off the reef. A heavy sea knocked the man away from the wheel, broke the wheel ropes and carried away the rudder. The sea swamped the lifeboats, the mizzenmast fell, with all of its rigging, then the mainmast fell and the ship broke in two. Some said that the passenger Vaughan, who was travelling for his health and not very strong, was washed overboard and never seen again. The ship started breaking up. The forward house came adrift with three of the crew on it as well as a longboat, which the men succeeded in launching and keeping afloat by continually bailing with their sea boots. The captain, the third mate (the owner’s son) and others clung to the mizzenmast in the sea. Then the owner’s son was washed away off the mast. Within 10 minutes the rest of the ship was in pieces, completely wrecked, with cargo and wreckage floating in the sea. The captain encouraged the second mate to swim with him to the deckhouse where there were other crew but the second mate wouldn’t go with him. Eventually the Captain made it to the deckhouse and the men pulled him up. At about 4:30am the group of men on the deckhouse saw the lights of a steamer and called for help. At the same time they noticed the second mate and the other man had drifted nearby, still on the spur, and pulled them both onto the wreck. The coastal steamer Dawn was returning to Warrnambool from Melbourne, its sailing time different to its usual schedule. Cries were heard coming from out of the darkness. Captain Jones sent out two life boats, and fired off rockets and blue lights to illuminate the area. They picked up the three survivors who were in the long boat from Eric the Red. Two men were picked up out of the water, one being the owner’s son who was clinging to floating kerosene boxes. At daylight the Dawn then rescued the 18 men from the floating portion of the deckhouse, which had drifted about 4 miles from where they’d struck the reef. Shortly after the rescue the deckhouse drifted onto breakers and was thrown onto rocks at Point Franklin, about 2 miles east of Cape Otway. Captain Jones had signalled to Cape Otway lighthouse the number of the Eric the Red and later signalled that there was a wreck at Otway Reef but there was no response from the lighthouse. The captain and crew of the Dawn spent several more hours searching unsuccessfully for more survivors, even going back as far as Apollo Bay. On board the Dawn the exhausted men received care and attention to their needs and wants, including much needed clothing. Captain Allen was amongst the 23 battered and injured men who were rescued and later taken to Warrnambool for care. Warrnambool’s mayor and town clerk offered them all hospitality, the three badly injured men going to the hospital and others to the Olive Branch Hotel, then on to Melbourne. Captain Allen’s leg injury prevented him from going ashore so he and three other men travelled on the Dawn to Portland. They were met by the mayor who also treated them all with great kindness. Captain Allen took the train back to Melbourne then returned to America. Those saved were Captain Z. Allen (or Jacques Allen), J. Darcy chief mate, James F. Lawrence second mate, Ned Sewall third mate and owner’s son, John French the cook, C. Nelson sail maker, Clarence W. New passenger, and the able seamen Dickenson, J. Black, Denis White, C. Herbert, C. Thompson, A. Brooks, D. Wilson, J. Ellis, Q. Thompson, C. Newman, W. Paul, J. Davis, M. Horenleng, J. Ogduff, T. W. Drew, R. Richardson. Four men had lost their lives; three of them were crew (Gus Dahlgreen ship’s carpenter, H. Ackman steward, who drowned in his cabin, and George Silver seaman) and one a passenger (J. B. Vaughan). The body of one of them had been found washed up at Cape Otway and was later buried in the lighthouse cemetery; another body was seen on an inaccessible ledge. Twelve months later the second mate James F. Lawrence, from Nova Scotia, passed away in the Warrnambool district; an obituary was displayed in the local paper. The captain and crew of the Dawn were recognised by the United States Government in July 1881 for their humane efforts and bravery, being thanked and presented with substantial monetary rewards, medals and gifts. Neither the ship, nor its cargo, was insured. The ship was worth about £15,000 and the cargo was reportedly worth £40,000; only about £2,000 worth had been recovered. Cargo and wreckage washed up at Apollo Bay, Peterborough, Port Campbell, Western Port and according to some reports, even as far away as the beaches of New Zealand. The day after the wreck the government steam ship Pharos was sent from Queenscliff to clear the shipping lanes of debris that could be a danger to ships. The large midship deckhouse of the ship was found floating in a calm sea near Henty Reef. Items such as an American chair, a ladder and a nest of boxes were all on top of the deckhouse. As it was so large and could cause danger to passing ships, Captain Payne had the deckhouse towed towards the shore just beyond Apollo Bay. Between Apollo Bay and Blanket Bay the captain and crew of Pharos collected Wheeler and Wilson sewing machines, nests of boxes, bottles of Bristol’s sarsaparilla, pieces of common American chairs, axe handles, a Wheelers’ Patent thresher and a sailor’s trunk with the words “A. James” on the front. A ship’s flag-board bearing the words “Eric the Red” was found on the deckhouse; finally those on board the Pharos had the name of the wrecked vessel. During this operation Pharos came across the government steamer Victoria and also a steamer S.S. Otway, both of which were picking up flotsam and wreckage. A whole side of the hull and three large pieces of the other side of the hull, with some of the copper sheathing stripped off, had floated on to Point Franklin. Some of the vessels yards and portions of her masts were on shore. The pieces of canvas attached to the yards and masts confirmed that the vessel had been under sail. The beach there was piled with debris several feet high. There were many cases of Diamond Oil kerosene, labelled R. W. Cameron and Company, New York. There were also many large planks of red pine, portions of a small white boat and a large, well-used oar. Other items found ashore included sewing machines (some consigned to ‘Long and Co.”) and notions, axe and scythe handles, hay forks, wooden pegs, rolls of wire (some branded “T.S” and Co, Melbourne”), kegs of nails branded “A.T. and Co.” from the factory of A. Field and Son, Taunton, Massachusetts, croquet balls and mallets, buggy fittings, rat traps, perfumery, cutlery and Douay Bibles, clocks, bicycles, chairs, a fly wheel, a cooking stove, timber, boxes, pianos, organs and a ladder. (Wooden clothes pegs drifted in for many years). There seemed to be no personal luggage or clothing. The Pharos encountered a long line, about one and a half miles, of floating wreckage about 10 miles off land, south east of Cape Otway, and in some places about 40 feet wide. It seemed that more than half of it was from Eric the Red. The ship’s crew rescued 3 cases that were for the Melbourne Exhibition and other items from amongst the debris. There were also chairs, doors, musical instruments, washing boards, nests of trunks and fly catchers floating in the sea. Most of the goods were saturated and smelt of kerosene. A section of the hull lies buried in the sand at Parker River Beach. An anchor with chain is embedded in the rocks east of Point Franklin and a second anchor, thought to be from Eric the Red, is on display at the Cape Otway light station. (There is a photograph of a life belt on the verandah of Rivernook Guest House in Princetown with the words “ERIC THE RED / BOSTON”. This is rather a mystery as the ship was registered in Bath, Maine, USA.) Parts of the ship are on display at Bimbi Park Caravan Park and at Apollo Bay Museum. Flagstaff Hill Maritime Village also has part of the helm (steering wheel), a carved wooden sword (said to be the only remaining portion of the ship’s figurehead; further research is currently being carried out), a door, a metal rod, samples of wood and a medal for bravery. Much of the wreckage was recovered by the local residents before police and other authorities arrived at the scene. Looters went to great effort to salvage goods, being lowered down the high cliff faces to areas with little or no beach to collect items from the wreckage, their mates above watching out for dangerous waves. A Tasmanian newspaper reports on a court case in Stawell, Victoria, noting a man who was caught 2 months later selling tobacco from the wreckage of Eric the Red. Some of the silverware is still treasured by descendants of Mr Mackenzie who was given these items by officials for his help in securing the cargo. The gifts included silver coffee and tea pots, half a dozen silver serviette rings and two sewing machines. The wreck and cargo were sold to a Melbourne man who salvaged a quantity of high quality tobacco and dental and surgical instruments. Timbers from the ship were salvaged and used in the construction of houses and sheds around Apollo Bay, including a guest house, Milford House (since burnt down in bushfires), which had furniture, fittings and timber on the dining room floor from the ship. A 39.7 foot long trading ketch, the Apollo, was also built from its timbers by Mr Burgess in 1883 and subsequently used in Tasmanian waters. It was the first attempt at ship building in Apollo bay. In 1881 a red light was installed about 300 feet above sea level at the base of the Cape Otway lighthouse to warn ships when they were too close to shore; It would not be visible unless a ship came within 3 miles from it. This has proved to be an effective warning. The State Library of Victoria has a lithograph in its collection depicting the steamer Dawn and the shipwrecked men, titled. "Wreck of the ship Eric the Red, Cape Otway: rescue of the crew by the Dawn".The Eric the Red is historically significant as one of Victoria's major 19th century shipwrecks. (Heritage Victoria Eric the Red; HV ID 239) The wreck led to the provision of an additional warning light placed below the Cape Otway lighthouse to alert mariners to the location of Otway Reef. The site is archaeologically significant for its remains of a large and varied cargo and ship's fittings being scattered over a wide area. The site is recreationally and aesthetically significant as it is one of the few sites along this coast where tourists can visit identifiable remains of a large wooden shipwreck, and for its location set against the background of Cape Otway, Bass Strait, and the Cape Otway lighthouse. (Victorian Heritage Database Registration Number S239, Official Number 8745 USA)This carved wooden sword, recovered from the Eric the Red, is possibly the only portion of the figurehead recovered after the wreck. There are spirals carved from the base of the handle to the top of the sword. The hilt of the sword is a lion’s head holding its tail in its mouth, the tail forming the handle. The blade of the sword has engraved patterns on it. Tiny particles of gold leaf and dark blue paint fragments can be seen between the carving marks. There are remnants of yellowish-orange and crimson paint on the handle. At some time after the sword was salvaged the name of the ship was hand painted on the blade in black paint. The tip of the sword has broken or split and the remaining part is charcoal in appearance. On both the tip and the base of the handle are parts made where the sword could have been joined onto the figurehead There is a white coating over some areas of the sword, similar to white lead putty used in traditional shipbuilding. The words “ERIC the RED” have been hand painted on the blade of the sword in black paint sometime after it was salvaged.flagstaff hill, flagstaff hill maritime museum and village, warrnambool, maritime museum, maritime village, great ocean road, shipwreck coast, sword, wooden sword, eric the red, carved sword, figurehead, snake head on sword -
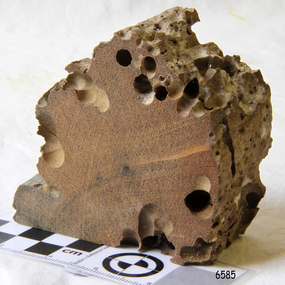 Flagstaff Hill Maritime Museum and Village
Wood Sample, about 1871
This piece of timber from the ship Eric the Red has been eaten through by the marine animals called Teredo Worms, sometimes called sea worms or ‘termites of the sea’. The worms bore holes into wood that is immersed in sea water and bacteria inside the worms digest the wood. Shipbuilders tried to prevent this problem by using coatings of tar, wax, lead or pitch. In the 18th and 19th centuries the outside of their ships were sheathed in copper or a combination of copper and zinc (called Muntz metal) and would be re-metalled periodically to ensure the sheathing would remain effective. In more recent times the ships are protected with a toxic coating. The American ship Eric the Red was a wooden, three masted clipper ship. She had 1,580 tons register and was the largest full-rigged ship built at Bath, Maine, USA in 1871. She was built and registered by Arthur Sewall, later to become the partnership E. & A. Sewall, the 51st ship built by this company. The annually-published List of Merchant Vessels of the U.S. shows Bath was still the home port of Eric the Red in 1880. The vessel was named after the Viking discoverer, Eric ‘the Red-haired’ Thorvaldsson , who was the first European to reach the shores of North America (in 980AD). The ship Eric the Red at first traded in coal between America and Britain, and later traded in guano nitrates from South America. In 1879 she was re-metalled and was in first class condition. On 10th June 1880 (some records say 12th June) Eric the Red departed New York for Melbourne and then Sydney. She had been commissioned by American trade representatives to carry a special cargo of 500 exhibits (1400 tons) – about a quarter to a third of America’s total exhibits - for the U.S.A. pavilion at Melbourne’s first International Exhibition. The exhibits included furniture, ironmongery, wines, chemicals, dental and surgical instruments, paper, cages, bronze lamp trimmings, axles, stamped ware, astronomical and time globes, samples of corn and the choicest of leaf tobacco. Other general cargo included merchandise such as cases of kerosene and turpentine, brooms, Bristol's Sarsaparilla, Wheeler and Wilson sewing machines, Wheeler’s thresher machine, axe handles and tools, cases of silver plate, toys, pianos and organs, carriages and Yankee notions. The Eric the Red left New York under the command of Captain Zaccheus Allen (or some records say Captain Jacques Allen) and 24 other crew including the owner’s son third mate Ned Sewall. There were also 2 saloon passengers on board. The ship had been sailing for an uneventful 85 days and the voyage was almost at its end. As Eric the Red approached Cape Otway there was a moderate north-west wind and hazy and overcast atmosphere. On 4th September 1880 at about 1:30am Captain Allen sighted the Cape Otway light and was keeping the ship 5-6 miles offshore to stay clear of the hazardous Otway Reef. However he had badly misjudged his position. The ship hit the Otway Reef about 2 miles out to sea, south west of the Cape Otway light station. Captain Allen ordered the wheel to be put ‘hard up’ thinking that she might float off the reef. The sea knocked the helmsman away from the wheel, broke the wheel ropes and carried away the rudder. The lifeboats were swamped, the mizzenmast fell, with all of its rigging, then the mainmast also fell and the ship broke in two. Some said that the passenger Vaughan, who was travelling for his health and not very strong, was washed overboard and never seen again. The ship started breaking up. The forward house came adrift with three of the crew on it as well as a longboat, which the men succeeded in launching and keeping afloat by continually bailing with their sea boots. The captain, the third mate (the owner’s son) and others clung to the mizzenmast in the sea. Then the owner’s son was washed away off the mast. Within 10 minutes the rest of the ship was in pieces, completely wrecked, with cargo and wreckage floating in the sea. The captain encouraged the second mate to swim with him to the deckhouse where there were other crew but the second mate wouldn’t go with him. Eventually the Captain made it to the deckhouse and the men pulled him up. At about 4:30am the group of men on the deckhouse saw the lights of a steamer and called for help. At the same time they noticed the second mate and the other man had drifted nearby, still on the spur, and pulled them both onto the wreck. The coastal steamer SS Dawn was returning to Warrnambool from Melbourne, its sailing time different to its usual schedule. She was built in 1876 and bought by the Portland and Belfast Steam Navigation Co. in 1877. At the time of this journey she was commanded by Captain Jones, and was sailing between Melbourne and Portland via Warrnambool. The provedore of the Dawn, Benjamin Lear, heard cries of distress coming through the portholes of the saloon. He gave the alarm and the engines were stopped. Cries could be heard clearly, coming from the land. Captain Jones sent out crew in two boats, and fired off rockets and blue lights to illuminate the area. They picked up the three survivors who were in the long boat from Eric the Red. Two men were picked up out of the water, one being the owner’s son who was clinging to floating kerosene boxes. At daylight the Dawn then rescued the 18 men from the floating portion of the deckhouse, which had drifted about 4 miles from where they’d struck the reef. Shortly after the rescue the deckhouse drifted onto breakers and was thrown onto rocks at Point Franklin, about 2 miles east of Cape Otway. Captain Jones had signalled to Cape Otway lighthouse the number of the Eric the Red and later signalled that there was a wreck at Otway Reef but there was no response from the lighthouse. The captain and crew of the Dawn spent several more hours searching unsuccessfully for more survivors, even going back as far as Apollo Bay. On board the Dawn the exhausted men received care and attention to their needs and wants, including much needed clothing. Captain Allen was amongst the 23 battered and injured men who were rescued and later taken to Warrnambool for care. Warrnambool’s mayor and town clerk offered them all hospitality, the three badly injured men going to the hospital for care and others to the Olive Branch Hotel, then on to Melbourne. Captain Allen’s leg injury prevented him from going ashore so he and three other men travelled on the Dawn to Portland. They were met by the mayor who also treated them all with great kindness. Captain Allen took the train back to Melbourne then returned to America. Those saved were Captain Zaccheus Allen (or Jacques Allen), J. Darcy chief mate, James F. Lawrence second mate, Ned Sewall third mate and owner’s son, John French the cook, C. Nelson sail maker, Clarence W. New passenger, and the able seamen Dickenson, J. Black, Denis White, C. Herbert, C. Thompson, A. Brooks, D. Wilson, J. Ellis, Q. Thompson, C. Newman, W. Paul, J. Davis, M. Horenleng, J. Ogduff, T. W. Drew, R. Richardson. Four men had lost their lives; three of them were crew (Gus Dahlgreen ship’s carpenter, H. Ackman steward, who drowned in his cabin, and George Silver seaman) and one a passenger (J. B. Vaughan). The body of one of them had been found washed up at Cape Otway and was later buried in the lighthouse cemetery; another body was seen on an inaccessible ledge. Twelve months later the second mate James F. Lawrence, from Nova Scotia, passed away in the Warrnambool district; an obituary was displayed in the local paper. Neither the ship, nor its cargo, was insured. The ship was worth about £15,000 and the cargo was reportedly worth £40,000; only about £2,000 worth had been recovered. Cargo and wreckage washed up at Apollo Bay, Peterborough, Port Campbell, Western Port and according to some reports, even as far away as the beaches of New Zealand. The day after the wreck the government steam ship Pharos was sent from Queenscliff to clear the shipping lanes of debris that could be a danger to ships. The large midship deckhouse of the ship was found floating in a calm sea near Henty Reef. Items such as an American chair, a ladder and a nest of boxes were all on top of the deckhouse. As it was so large and could cause danger to passing ships, Captain Payne had the deckhouse towed towards the shore just beyond Apollo Bay. Between Apollo Bay and Blanket Bay the captain and crew of Pharos collected Wheeler and Wilson sewing machines, nests of boxes, bottles of Bristol’s sarsaparilla, pieces of common American chairs, axe handles, a Wheelers’ Patent thresher and a sailor’s trunk with the words “A. James” on the front. A ship’s flag-board bearing the words “Eric the Red” was found on the deckhouse; finally those on board the Pharos had the name of the wrecked vessel. During this operation Pharos came across the government steamer Victoria and also a steamer S.S. Otway, both of which were picking up flotsam and wreckage. A whole side of the hull and three large pieces of the other side of the hull, with some of the copper sheathing stripped off, had floated on to Point Franklin. Some of the vessels yards and portions of her masts were on shore. The pieces of canvas attached to the yards and masts confirmed that the vessel had been under sail. The beach there was piled with debris several feet high. There were many cases of Diamond Oil kerosene, labelled R. W. Cameron and Company, New York. There were also many large planks of red pine, portions of a small white boat and a large, well-used oar. Other items found ashore included sewing machines (some consigned to ‘Long and Co.”) and notions, axe and scythe handles, hay forks, wooden pegs, rolls of wire (some branded “T.S” and Co, Melbourne”), kegs of nails branded “A.T. and Co.” from the factory of A. Field and Son, Taunton, Massachusetts, croquet balls and mallets, buggy fittings, rat traps, perfumery, cutlery and Douay Bibles, clocks, bicycles, chairs, a fly wheel, a cooking stove, timber, boxes, pianos, organs and a ladder. (Wooden clothes pegs drifted in for many years). There seemed to be no personal luggage or clothing. The Pharos encountered a long line, about one and a half miles, of floating wreckage about 10 miles off land, south east of Cape Otway, and in some places about 40 feet wide. It seemed that more than half of it was from Eric the Red. The ship’s crew rescued 3 cases that were for the Melbourne Exhibition and other items from amongst the debris. There were also chairs, doors, musical instruments, washing boards, nests of trunks and fly catchers floating in the sea. Most of the goods were saturated and smelt of kerosene. A section of the hull lies buried in the sand at Parker River Beach. An anchor with chain is embedded in the rocks east of Point Franklin and a second anchor, thought to be from Eric the Red, is on display at the Cape Otway light station. (There is a photograph of a life belt on the verandah of Rivernook Guest House in Princetown with the words “ERIC THE RED / BOSTON”. This is rather a mystery as the ship was registered in Bath, Maine, USA.) Parts of the ship are on display at Bimbi Park Caravan Park and at Apollo Bay Museum. Flagstaff Hill Maritime Village also has part of the helm (steering wheel), a carved wooden sword (said to be the only remaining portion of the ship’s figurehead; further research is currently being carried out), a door, a metal rod, several samples of wood and a medal for bravery, awarded to Nelson Johnson, a crew member of the S.S. Dawn by the U.S. President, for the rescue of the crew. Much of the wreckage was recovered by the local residents before police and other authorities arrived at the scene. Looters went to great effort to salvage goods, being lowered down the high cliff faces to areas with little or no beach to collect items from the wreckage, their mates above watching out for dangerous waves. A Tasmanian newspaper reports on a court case in Stawell, Victoria, noting a man who was caught 2 months later selling tobacco from the wreckage of Eric the Red. Some of the silverware is still treasured by descendants of Mr Mackenzie who was given these items by officials for his help in securing the cargo. The gifts included silver coffee and tea pots, half a dozen silver serviette rings and two sewing machines. A Mr G.W. Black has in his possession a medal and a purse that were awarded to his father, another Dawn crew member who was part of the rescue team. The medal is inscribed and named “To John Black ….” (from “Shipwrecks” by Margaret E. Mackenzie, 3rd edition, published 1964). The wreck and cargo were sold to a Melbourne man who salvaged a quantity of high quality tobacco and dental and surgical instruments. Timbers from the ship were salvaged and used in the construction of houses and sheds around Apollo Bay, including a guest house, Milford House (since burnt down in bushfires), which had furniture, fittings and timber on the dining room floor from the ship. A 39.7 foot long trading ketch, the Apollo, was also built from its timbers by Mr Burgess in 1883 and subsequently used in Tasmanian waters. It was the first attempt at ship building in Apollo bay. In 1881 a red light was installed about 300 feet above sea level at the base of the Cape Otway lighthouse to warn ships when they were too close to shore; It would not be visible unless a ship came within 3 miles from it. This has proved to be an effective warning. Nelson Johnson, recipient of the medal for bravery, married Elizabeth Howard in 1881 and they had 10 children. They lived in South Melbourne, Victoria. Nelson died in 1922 in Fitzroy Victoria, age 66. In 1895 the owners of the S.S. Dawn, the Portland and Belfast Steam Navigation Co., wound up and sold out to the Belfast Company who took over the Dawn for one year before selling her to Howard Smith. She was condemned and sunk in Suva in 1928. The State Library of Victoria has a lithograph in its collection depicting the steamer Dawn and the shipwrecked men, titled. "Wreck of the ship Eric the Red, Cape Otway: rescue of the crew by the Dawn".The wood (timber) sample is listed on the Collections Australia Database, Heritage Victoria, number 239 00010 A “The Eric the Red is historically significant as one of Victoria's major 19th century shipwrecks. (Heritage Victoria Eric the Red; HV ID 239) The wreck led to the provision of an additional warning light placed below the Cape Otway lighthouse to alert mariners to the location of Otway Reef. The site is archaeologically significant for its remains of a large and varied cargo and ship's fittings being scattered over a wide area. The site is recreationally and aesthetically significant as it is one of the few sites along this coast where tourists can visit identifiable remains of a large wooden shipwreck, and for its location set against the background of Cape Otway, Bass Strait, and the Cape Otway lighthouse.“ (Victorian Heritage Database Registration Number S239, Official Number 8745 USA) Wood sample from the wreck of the ship Eric the Red. Triangular shaped, full of sea worm (Teredo worm) holes. The wood is dark in colour and is very light in weight.flagstaff hill, warrnambool, shipwrecked-coast, flagstaff-hill, flagstaff-hill-maritime-museum, maritime-museum, shipwreck-coast, flagstaff-hill-maritime-village, shipwreck-artefact, eric-the-red, zaccheus-allen, sewall, 1880, melbourne-exhibition, cape-otway, otway-reef, wood-sample, s.s.-dawn -
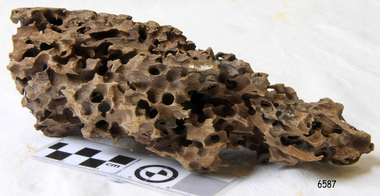 Flagstaff Hill Maritime Museum and Village
Wood Sample, About 1871
This piece of timber from the ship Eric the Red has been eaten through by the marine animals called Teredo Worms, sometimes called sea worms or ‘termites of the sea’. The worms bore holes into wood that is immersed in sea water and bacteria inside the worms digest the wood. Shipbuilders tried to prevent this problem by using coatings of tar, wax, lead or pitch. In the 18th and 19th centuries the outside of their ships were sheathed in copper or a combination of copper and zinc (called Muntz metal) and would be re-metalled periodically to ensure the sheathing would remain effective. In more recent times the ships are protected with a toxic coating. The American ship Eric the Red was a wooden, three masted clipper ship. She had 1,580 tons register and was the largest full-rigged ship built at Bath, Maine, USA in 1871. She was built and registered by Arthur Sewall, later to become the partnership E. & A. Sewall, the 51st ship built by this company. The annually-published List of Merchant Vessels of the U.S. shows Bath was still the home port of Eric the Red in 1880. The vessel was named after the Viking discoverer, Eric ‘the Red-haired’ Thorvaldsson , who was the first European to reach the shores of North America (in 980AD). The ship Eric the Red at first traded in coal between America and Britain, and later traded in guano nitrates from South America. In 1879 she was re-metalled and was in first class condition. On 10th June 1880 (some records say 12th June) Eric the Red departed New York for Melbourne and then Sydney. She had been commissioned by American trade representatives to carry a special cargo of 500 exhibits (1400 tons) – about a quarter to a third of America’s total exhibits - for the U.S.A. pavilion at Melbourne’s first International Exhibition. The exhibits included furniture, ironmongery, wines, chemicals, dental and surgical instruments, paper, cages, bronze lamp trimmings, axles, stamped ware, astronomical and time globes, samples of corn and the choicest of leaf tobacco. Other general cargo included merchandise such as cases of kerosene and turpentine, brooms, Bristol's Sarsaparilla, Wheeler and Wilson sewing machines, Wheeler’s thresher machine, axe handles and tools, cases of silver plate, toys, pianos and organs, carriages and Yankee notions. The Eric the Red left New York under the command of Captain Zaccheus Allen (or some records say Captain Jacques Allen) and 24 other crew including the owner’s son third mate Ned Sewall. There were also 2 saloon passengers on board. The ship had been sailing for an uneventful 85 days and the voyage was almost at its end. As Eric the Red approached Cape Otway there was a moderate north-west wind and hazy and overcast atmosphere. On 4th September 1880 at about 1:30am Captain Allen sighted the Cape Otway light and was keeping the ship 5-6 miles offshore to stay clear of the hazardous Otway Reef. However he had badly misjudged his position. The ship hit the Otway Reef about 2 miles out to sea, south west of the Cape Otway light station. Captain Allen ordered the wheel to be put ‘hard up’ thinking that she might float off the reef. The sea knocked the helmsman away from the wheel, broke the wheel ropes and carried away the rudder. The lifeboats were swamped, the mizzenmast fell, with all of its rigging, then the mainmast also fell and the ship broke in two. Some said that the passenger Vaughan, who was travelling for his health and not very strong, was washed overboard and never seen again. The ship started breaking up. The forward house came adrift with three of the crew on it as well as a longboat, which the men succeeded in launching and keeping afloat by continually bailing with their sea boots. The captain, the third mate (the owner’s son) and others clung to the mizzenmast in the sea. Then the owner’s son was washed away off the mast. Within 10 minutes the rest of the ship was in pieces, completely wrecked, with cargo and wreckage floating in the sea. The captain encouraged the second mate to swim with him to the deckhouse where there were other crew but the second mate wouldn’t go with him. Eventually the Captain made it to the deckhouse and the men pulled him up. At about 4:30am the group of men on the deckhouse saw the lights of a steamer and called for help. At the same time they noticed the second mate and the other man had drifted nearby, still on the spur, and pulled them both onto the wreck. The coastal steamer SS Dawn was returning to Warrnambool from Melbourne, its sailing time different to its usual schedule. She was built in 1876 and bought by the Portland and Belfast Steam Navigation Co. in 1877. At the time of this journey she was commanded by Captain Jones, and was sailing between Melbourne and Portland via Warrnambool. The provedore of the Dawn, Benjamin Lear, heard cries of distress coming through the portholes of the saloon. He gave the alarm and the engines were stopped. Cries could be heard clearly, coming from the land. Captain Jones sent out crew in two boats, and fired off rockets and blue lights to illuminate the area. They picked up the three survivors who were in the long boat from Eric the Red. Two men were picked up out of the water, one being the owner’s son who was clinging to floating kerosene boxes. At daylight the Dawn then rescued the 18 men from the floating portion of the deckhouse, which had drifted about 4 miles from where they’d struck the reef. Shortly after the rescue the deckhouse drifted onto breakers and was thrown onto rocks at Point Franklin, about 2 miles east of Cape Otway. Captain Jones had signalled to Cape Otway lighthouse the number of the Eric the Red and later signalled that there was a wreck at Otway Reef but there was no response from the lighthouse. The captain and crew of the Dawn spent several more hours searching unsuccessfully for more survivors, even going back as far as Apollo Bay. On board the Dawn the exhausted men received care and attention to their needs and wants, including much needed clothing. Captain Allen was amongst the 23 battered and injured men who were rescued and later taken to Warrnambool for care. Warrnambool’s mayor and town clerk offered them all hospitality, the three badly injured men going to the hospital for care and others to the Olive Branch Hotel, then on to Melbourne. Captain Allen’s leg injury prevented him from going ashore so he and three other men travelled on the Dawn to Portland. They were met by the mayor who also treated them all with great kindness. Captain Allen took the train back to Melbourne then returned to America. Those saved were Captain Zaccheus Allen (or Jacques Allen), J. Darcy chief mate, James F. Lawrence second mate, Ned Sewall third mate and owner’s son, John French the cook, C. Nelson sail maker, Clarence W. New passenger, and the able seamen Dickenson, J. Black, Denis White, C. Herbert, C. Thompson, A. Brooks, D. Wilson, J. Ellis, Q. Thompson, C. Newman, W. Paul, J. Davis, M. Horenleng, J. Ogduff, T. W. Drew, R. Richardson. Four men had lost their lives; three of them were crew (Gus Dahlgreen ship’s carpenter, H. Ackman steward, who drowned in his cabin, and George Silver seaman) and one a passenger (J. B. Vaughan). The body of one of them had been found washed up at Cape Otway and was later buried in the lighthouse cemetery; another body was seen on an inaccessible ledge. Twelve months later the second mate James F. Lawrence, from Nova Scotia, passed away in the Warrnambool district; an obituary was displayed in the local paper. Neither the ship, nor its cargo, was insured. The ship was worth about £15,000 and the cargo was reportedly worth £40,000; only about £2,000 worth had been recovered. Cargo and wreckage washed up at Apollo Bay, Peterborough, Port Campbell, Western Port and according to some reports, even as far away as the beaches of New Zealand. The day after the wreck the government steam ship Pharos was sent from Queenscliff to clear the shipping lanes of debris that could be a danger to ships. The large midship deckhouse of the ship was found floating in a calm sea near Henty Reef. Items such as an American chair, a ladder and a nest of boxes were all on top of the deckhouse. As it was so large and could cause danger to passing ships, Captain Payne had the deckhouse towed towards the shore just beyond Apollo Bay. Between Apollo Bay and Blanket Bay the captain and crew of Pharos collected Wheeler and Wilson sewing machines, nests of boxes, bottles of Bristol’s sarsaparilla, pieces of common American chairs, axe handles, a Wheelers’ Patent thresher and a sailor’s trunk with the words “A. James” on the front. A ship’s flag-board bearing the words “Eric the Red” was found on the deckhouse; finally those on board the Pharos had the name of the wrecked vessel. During this operation Pharos came across the government steamer Victoria and also a steamer S.S. Otway, both of which were picking up flotsam and wreckage. A whole side of the hull and three large pieces of the other side of the hull, with some of the copper sheathing stripped off, had floated on to Point Franklin. Some of the vessels yards and portions of her masts were on shore. The pieces of canvas attached to the yards and masts confirmed that the vessel had been under sail. The beach there was piled with debris several feet high. There were many cases of Diamond Oil kerosene, labelled R. W. Cameron and Company, New York. There were also many large planks of red pine, portions of a small white boat and a large, well-used oar. Other items found ashore included sewing machines (some consigned to ‘Long and Co.”) and notions, axe and scythe handles, hay forks, wooden pegs, rolls of wire (some branded “T.S” and Co, Melbourne”), kegs of nails branded “A.T. and Co.” from the factory of A. Field and Son, Taunton, Massachusetts, croquet balls and mallets, buggy fittings, rat traps, perfumery, cutlery and Douay Bibles, clocks, bicycles, chairs, a fly wheel, a cooking stove, timber, boxes, pianos, organs and a ladder. (Wooden clothes pegs drifted in for many years). There seemed to be no personal luggage or clothing. The Pharos encountered a long line, about one and a half miles, of floating wreckage about 10 miles off land, south east of Cape Otway, and in some places about 40 feet wide. It seemed that more than half of it was from Eric the Red. The ship’s crew rescued 3 cases that were for the Melbourne Exhibition and other items from amongst the debris. There were also chairs, doors, musical instruments, washing boards, nests of trunks and fly catchers floating in the sea. Most of the goods were saturated and smelt of kerosene. A section of the hull lies buried in the sand at Parker River Beach. An anchor with chain is embedded in the rocks east of Point Franklin and a second anchor, thought to be from Eric the Red, is on display at the Cape Otway light station. (There is a photograph of a life belt on the verandah of Rivernook Guest House in Princetown with the words “ERIC THE RED / BOSTON”. This is rather a mystery as the ship was registered in Bath, Maine, USA.) Parts of the ship are on display at Bimbi Park Caravan Park and at Apollo Bay Museum. Flagstaff Hill Maritime Village also has part of the helm (steering wheel), a carved wooden sword (said to be the only remaining portion of the ship’s figurehead; further research is currently being carried out), a door, a metal rod, several samples of wood and a medal for bravery, awarded to Nelson Johnson, a crew member of the S.S. Dawn by the U.S. President, for the rescue of the crew. Much of the wreckage was recovered by the local residents before police and other authorities arrived at the scene. Looters went to great effort to salvage goods, being lowered down the high cliff faces to areas with little or no beach to collect items from the wreckage, their mates above watching out for dangerous waves. A Tasmanian newspaper reports on a court case in Stawell, Victoria, noting a man who was caught 2 months later selling tobacco from the wreckage of Eric the Red. Some of the silverware is still treasured by descendants of Mr Mackenzie who was given these items by officials for his help in securing the cargo. The gifts included silver coffee and tea pots, half a dozen silver serviette rings and two sewing machines. A Mr G.W. Black has in his possession a medal and a purse that were awarded to his father, another Dawn crew member who was part of the rescue team. The medal is inscribed and named “To John Black ….” (from “Shipwrecks” by Margaret E. Mackenzie, 3rd edition, published 1964). The wreck and cargo were sold to a Melbourne man who salvaged a quantity of high quality tobacco and dental and surgical instruments. Timbers from the ship were salvaged and used in the construction of houses and sheds around Apollo Bay, including a guest house, Milford House (since burnt down in bushfires), which had furniture, fittings and timber on the dining room floor from the ship. A 39.7 foot long trading ketch, the Apollo, was also built from its timbers by Mr Burgess in 1883 and subsequently used in Tasmanian waters. It was the first attempt at ship building in Apollo bay. In 1881 a red light was installed about 300 feet above sea level at the base of the Cape Otway lighthouse to warn ships when they were too close to shore; It would not be visible unless a ship came within 3 miles from it. This has proved to be an effective warning. Nelson Johnson, recipient of the medal for bravery, married Elizabeth Howard in 1881 and they had 10 children. They lived in South Melbourne, Victoria. Nelson died in 1922 in Fitzroy Victoria, age 66. In 1895 the owners of the S.S. Dawn, the Portland and Belfast Steam Navigation Co., wound up and sold out to the Belfast Company who took over the Dawn for one year before selling her to Howard Smith. She was condemned and sunk in Suva in 1928. The State Library of Victoria has a lithograph in its collection depicting the steamer Dawn and the shipwrecked men, titled. "Wreck of the ship Eric the Red, Cape Otway: rescue of the crew by the Dawn".The wood (timber) sample is listed on the Collections Australia Database, Heritage Victoria, number 239 00010 A “The Eric the Red is historically significant as one of Victoria's major 19th century shipwrecks. (Heritage Victoria Eric the Red; HV ID 239) The wreck led to the provision of an additional warning light placed below the Cape Otway lighthouse to alert mariners to the location of Otway Reef. The site is archaeologically significant for its remains of a large and varied cargo and ship's fittings being scattered over a wide area. The site is recreationally and aesthetically significant as it is one of the few sites along this coast where tourists can visit identifiable remains of a large wooden shipwreck, and for its location set against the background of Cape Otway, Bass Strait, and the Cape Otway lighthouse.“ (Victorian Heritage Database Registration Number S239, Official Number 8745 USA) Wood sample from the wreck of the ship Eric the Red. Oblong shaped, full of sea worm (Teredo worm) holes. The wood is dark in colour and is very light in weight. flagstaff hill, warrnambool, shipwrecked-coast, flagstaff-hill, flagstaff-hill-maritime-museum, maritime-museum, shipwreck-coast, flagstaff-hill-maritime-village, shipwreck-artefact, eric-the-red, zaccheus-allen, sewall, 1880, melbourne-exhibition, cape-otway, otway-reef, wood-sample, s.s.-dawn -
 Flagstaff Hill Maritime Museum and Village
Spoon, circa 1878
This tea spoon is from the wreck of the LOCH ARD, a Loch Line ship of 1,693 tons which sailed from Gravesend, London, on 2 March 1878 with 17 passengers and a crew of 36 under Captain George Gibbs. “The intention was to discharge cargo in Melbourne, before returning to London via the Horn with wool and wheat”. Instead, on 1 June 1878, after 90 days at sea, she struck the sandstone cliffs of Mutton Bird Island on the south west coast of Victoria, and sank with the loss of 52 lives and all her cargo. The manifest of the LOCH ARD listed an array of manufactured goods and bulk metals being exported to the Colony of Victoria, with a declared value of £53,700. (202 bills of lading show an actual invoice value of £68, 456, with insurance underwriting to £30,000 of all cargo). Included in the manifest is the item of “Tin hardware & cutlery £7,530”. This teaspoon is one of 482 similar items of electro-plated cutlery from the LOCH ARD site, comprising spoons and forks of various sizes but all sharing the same general shape or design and metallic composition. 49 of these pieces display a legible makers’ mark — the initials “W” and “P” placed within a raised diamond outline, which is in turn contained within a sunken crown shape — identifying the manufacturer as William Page & Co of Birmingham. An electroplater’s makers’ marks, unlike sterling silver hallmarks, are not consistent identifiers of quality or date and place of manufacture. A similar line of five impressions was usually made to impress the consumer with an implication of industry standards, but what each one actually signified was not regulated and so they varied according to the whim of the individual foundry. In this case, the maker’s marks are often obscured by sedimentary accretion or removed by corrosion after a century of submersion in the ocean. However sufficient detail has survived to indicate that these samples of electro-plated cutlery probably originated from the same consignment in the LOCH ARD’s cargo. The following descriptions of maker’s marks are drawn from 255 tea spoons, 125 dessert spoons, and 99 table forks. These marks are clearly visible in 66 instances, while the same sequence of general outlines, or depression shapes, is discernible in another 166 examples. 1. A recessed Crown containing a raised Diamond outline and the initials “W” and “P” (the recognised trademark of William Page & Co) 2. An impressed Ellipse containing a raised, pivoted, Triangle in its lower part and bearing a Resurrection Cross on its upper section (a possible dissenting church symbol reflecting religious affiliation); OR a rounded Square impression containing a raised, ‘lazy’, letter “B” (possibly mimicking sterling silver hallmark signifying city of manufacture i.e. Birmingham) 3. An impressed rounded Square filled with a raised Maltese Cross (the base metal composite of nickel silver was also known as ‘German silver’ after its Berlin inventors in 1823) 4. A recessed Circle containing a Crab or Scarab Beetle image; OR a recessed Circle containing a rotated ‘fleur de lys’ or ‘fasces’ design 5. A depressed Diamond shape enclosing a large raised letter “R” and a small raised letter “D” (mimicking the U.K. Patent Office stamp which abbreviated the term ‘registered’ to “RD”, but also included date and class of patent) Suggested trade names for William Page & Co’s particular blend of brass plating are ‘roman silver’ or ‘silverite’. This copper alloy polishes to a lustrous gold when new, discolouring to a murky grey with greenish hue when neglected. HISTORY OF THE LOCH ARD The LOCH ARD belonged to the famous Loch Line which sailed many ships from England to Australia. Built in Glasgow by Barclay, Curdle and Co. in 1873, the LOCH ARD was a three-masted square rigged iron sailing ship. The ship measured 262ft 7" (79.87m) in length, 38ft (11.58m) in width, 23ft (7m) in depth and had a gross tonnage of 1693 tons. The LOCH ARD's main mast measured a massive 150ft (45.7m) in height. LOCH ARD made three trips to Australia and one trip to Calcutta before its final voyage. LOCH ARD left England on March 2, 1878, under the command of Captain Gibbs, a newly married, 29 year old. She was bound for Melbourne with a crew of 37, plus 17 passengers and a load of cargo. The general cargo reflected the affluence of Melbourne at the time. On board were straw hats, umbrella, perfumes, clay pipes, pianos, clocks, confectionary, linen and candles, as well as a heavier load of railway irons, cement, lead and copper. There were items included that intended for display in the Melbourne International Exhibition in 1880. The voyage to Port Phillip was long but uneventful. At 3am on June 1, 1878, Captain Gibbs was expecting to see land and the passengers were becoming excited as they prepared to view their new homeland in the early morning. But LOCH ARD was running into a fog which greatly reduced visibility. Captain Gibbs was becoming anxious as there was no sign of land or the Cape Otway lighthouse. At 4am the fog lifted. A man aloft announced that he could see breakers. The sheer cliffs of Victoria's west coast came into view, and Captain Gibbs realised that the ship was much closer to them than expected. He ordered as much sail to be set as time would permit and then attempted to steer the vessel out to sea. On coming head on into the wind, the ship lost momentum, the sails fell limp and LOCH ARD's bow swung back. Gibbs then ordered the anchors to be released in an attempt to hold its position. The anchors sank some 50 fathoms - but did not hold. By this time LOCH ARD was among the breakers and the tall cliffs of Mutton Bird Island rose behind the ship. Just half a mile from the coast, the ship's bow was suddenly pulled around by the anchor. The captain tried to tack out to sea, but the ship struck a reef at the base of Mutton Bird Island, near Port Campbell. Waves broke over the ship and the top deck was loosened from the hull. The masts and rigging came crashing down knocking passengers and crew overboard. When a lifeboat was finally launched, it crashed into the side of LOCH ARD and capsized. Tom Pearce, who had launched the boat, managed to cling to its overturned hull and shelter beneath it. He drifted out to sea and then on the flood tide came into what is now known as LOCH ARD Gorge. He swam to shore, bruised and dazed, and found a cave in which to shelter. Some of the crew stayed below deck to shelter from the falling rigging but drowned when the ship slipped off the reef into deeper water. Eva Carmichael had raced onto deck to find out what was happening only to be confronted by towering cliffs looming above the stricken ship. In all the chaos, Captain Gibbs grabbed Eva and said, "If you are saved Eva, let my dear wife know that I died like a sailor". That was the last Eva Carmichael saw of the captain. She was swept off the ship by a huge wave. Eva saw Tom Pearce on a small rocky beach and yelled to attract his attention. He dived in and swam to the exhausted woman and dragged her to shore. He took her to the cave and broke open case of brandy which had washed up on the beach. He opened a bottle to revive the unconscious woman. A few hours later Tom scaled a cliff in search of help. He followed hoof prints and came by chance upon two men from nearby Glenample Station three and a half miles away. In a state of exhaustion, he told the men of the tragedy. Tom returned to the gorge while the two men rode back to the station to get help. By the time they reached LOCH ARD Gorge, it was cold and dark. The two shipwreck survivors were taken to Glenample Station to recover. Eva stayed at the station for six weeks before returning to Ireland, this time by steamship. In Melbourne, Tom Pearce received a hero's welcome. He was presented with the first gold medal of the Royal Humane Society of Victoria and a £1000 cheque from the Victorian Government. Concerts were performed to honour the young man's bravery and to raise money for those who lost family in the LOCH ARD disaster. Of the 54 crew members and passengers on board, only two survived: the apprentice, Tom Pearce and the young woman passenger, Eva Carmichael, who lost all of her family in the tragedy. Ten days after the LOCH ARD tragedy, salvage rights to the wreck were sold at auction for £2,120. Cargo valued at £3,000 was salvaged and placed on the beach, but most washed back into the sea when another storm developed. The wreck of LOCH ARD still lies at the base of Mutton Bird Island. Much of the cargo has now been salvaged and some was washed up into what is now known as LOCH ARD Gorge. Cargo and artefacts have also been illegally salvaged over many years before protective legislation was introduced. One of the most unlikely pieces of cargo to have survived the shipwreck was a Minton porcelain peacock - one of only seven in the world. The peacock was destined for the Melbourne International Exhibition in 1880. It had been well packed, which gave it adequate protection during the violent storm. Today, the Minton peacock can be seen at the Flagstaff Hill Maritime Museum in Warrnambool. From Australia's most dramatic shipwreck it has now become Australia's most valuable shipwreck artefact and is one of very few 'objects' on the Victorian State Heritage Register. The LOCH ARD shipwreck is of State significance – Victorian Heritage Register S 417. Flagstaff Hill’s collection of artefacts from LOCH ARD is significant for being one of the largest collections of artefacts from this shipwreck in Victoria. It is significant for its association with the shipwreck, which is on the Victorian Heritage Register (VHR S417). The collection is significant because of the relationship between the objects, as together they have a high potential to interpret the story of the LOCH ARD. The LOCH ARD collection is archaeologically significant as the remains of a large international passenger and cargo ship. The LOCH ARD collection is historically significant for representing aspects of Victoria’s shipping history and its potential to interpret sub-theme 1.5 of Victoria’s Framework of Historical Themes (living with natural processes). The collection is also historically significant for its association with the LOCH ARD, which was one of the worst and best known shipwrecks in Victoria’s history. Unrestored tea spoon from the wreck of the LOCH ARD. The spoon design has a flattened fiddle-back handle, with a thin stem or shank, flared collar, and elongated bowl. The spoons metallic composition is a thin layer of brass alloy which has partially corroded back to a nickel-silver base metal. Approximately 30%of original electroplating remains. Small amount of concretion on stem.flagstaff hill, warrnambool, shipwrecked coast, flagstaff hill maritime museum, maritime museum, shipwreck coast, flagstaff hill maritime village, great ocean road, loch line, loch ard, captain gibbs, eva carmichael, tom pearce, glenample station, mutton bird island, loch ard gorge, electroplated cutlery, loch ard shipwreck, nickel silver, william page & co, birmingham, brass plating, makers marks -
 Flagstaff Hill Maritime Museum and Village
Spoon, circa 1878
This tea spoon is from the wreck of the LOCH ARD, a Loch Line ship of 1,693 tons which sailed from Gravesend, London, on 2 March 1878 with 17 passengers and a crew of 36 under Captain George Gibbs. “The intention was to discharge cargo in Melbourne, before returning to London via the Horn with wool and wheat”. Instead, on 1 June 1878, after 90 days at sea, she struck the sandstone cliffs of Mutton Bird Island on the south west coast of Victoria, and sank with the loss of 52 lives and all her cargo. The manifest of the LOCH ARD listed an array of manufactured goods and bulk metals being exported to the Colony of Victoria, with a declared value of £53,700. (202 bills of lading show an actual invoice value of £68, 456, with insurance underwriting to £30,000 of all cargo). Included in the manifest is the item of “Tin hardware & cutlery £7,530”. This teaspoon is one of 482 similar items of electro-plated cutlery from the LOCH ARD site, comprising spoons and forks of various sizes but all sharing the same general shape or design and metallic composition. 49 of these pieces display a legible makers’ mark — the initials “W” and “P” placed within a raised diamond outline, which is in turn contained within a sunken crown shape — identifying the manufacturer as William Page & Co of Birmingham. An electroplater’s makers’ marks, unlike sterling silver hallmarks, are not consistent identifiers of quality or date and place of manufacture. A similar line of five impressions was usually made to impress the consumer with an implication of industry standards, but what each one actually signified was not regulated and so they varied according to the whim of the individual foundry. In this case, the maker’s marks are often obscured by sedimentary accretion or removed by corrosion after a century of submersion in the ocean. However sufficient detail has survived to indicate that these samples of electro-plated cutlery probably originated from the same consignment in the LOCH ARD’s cargo. The following descriptions of maker’s marks are drawn from 255 tea spoons, 125 dessert spoons, and 99 table forks. These marks are clearly visible in 66 instances, while the same sequence of general outlines, or depression shapes, is discernible in another 166 examples. 1. A recessed Crown containing a raised Diamond outline and the initials “W” and “P” (the recognised trademark of William Page & Co) 2. An impressed Ellipse containing a raised, pivoted, Triangle in its lower part and bearing a Resurrection Cross on its upper section (a possible dissenting church symbol reflecting religious affiliation); OR a rounded Square impression containing a raised, ‘lazy’, letter “B” (possibly mimicking sterling silver hallmark signifying city of manufacture i.e. Birmingham) 3. An impressed rounded Square filled with a raised Maltese Cross (the base metal composite of nickel silver was also known as ‘German silver’ after its Berlin inventors in 1823) 4. A recessed Circle containing a Crab or Scarab Beetle image; OR a recessed Circle containing a rotated ‘fleur de lys’ or ‘fasces’ design 5. A depressed Diamond shape enclosing a large raised letter “R” and a small raised letter “D” (mimicking the U.K. Patent Office stamp which abbreviated the term ‘registered’ to “RD”, but also included date and class of patent) Suggested trade names for William Page & Co’s particular blend of brass plating are ‘roman silver’ or ‘silverite’. This copper alloy polishes to a lustrous gold when new, discolouring to a murky grey with greenish hue when neglected. HISTORY OF THE LOCH ARD The LOCH ARD belonged to the famous Loch Line which sailed many ships from England to Australia. Built in Glasgow by Barclay, Curdle and Co. in 1873, the LOCH ARD was a three-masted square rigged iron sailing ship. The ship measured 262ft 7" (79.87m) in length, 38ft (11.58m) in width, 23ft (7m) in depth and had a gross tonnage of 1693 tons. The LOCH ARD's main mast measured a massive 150ft (45.7m) in height. LOCH ARD made three trips to Australia and one trip to Calcutta before its final voyage. LOCH ARD left England on March 2, 1878, under the command of Captain Gibbs, a newly married, 29 year old. She was bound for Melbourne with a crew of 37, plus 17 passengers and a load of cargo. The general cargo reflected the affluence of Melbourne at the time. On board were straw hats, umbrella, perfumes, clay pipes, pianos, clocks, confectionary, linen and candles, as well as a heavier load of railway irons, cement, lead and copper. There were items included that intended for display in the Melbourne International Exhibition in 1880. The voyage to Port Phillip was long but uneventful. At 3am on June 1, 1878, Captain Gibbs was expecting to see land and the passengers were becoming excited as they prepared to view their new homeland in the early morning. But LOCH ARD was running into a fog which greatly reduced visibility. Captain Gibbs was becoming anxious as there was no sign of land or the Cape Otway lighthouse. At 4am the fog lifted. A man aloft announced that he could see breakers. The sheer cliffs of Victoria's west coast came into view, and Captain Gibbs realised that the ship was much closer to them than expected. He ordered as much sail to be set as time would permit and then attempted to steer the vessel out to sea. On coming head on into the wind, the ship lost momentum, the sails fell limp and LOCH ARD's bow swung back. Gibbs then ordered the anchors to be released in an attempt to hold its position. The anchors sank some 50 fathoms - but did not hold. By this time LOCH ARD was among the breakers and the tall cliffs of Mutton Bird Island rose behind the ship. Just half a mile from the coast, the ship's bow was suddenly pulled around by the anchor. The captain tried to tack out to sea, but the ship struck a reef at the base of Mutton Bird Island, near Port Campbell. Waves broke over the ship and the top deck was loosened from the hull. The masts and rigging came crashing down knocking passengers and crew overboard. When a lifeboat was finally launched, it crashed into the side of LOCH ARD and capsized. Tom Pearce, who had launched the boat, managed to cling to its overturned hull and shelter beneath it. He drifted out to sea and then on the flood tide came into what is now known as LOCH ARD Gorge. He swam to shore, bruised and dazed, and found a cave in which to shelter. Some of the crew stayed below deck to shelter from the falling rigging but drowned when the ship slipped off the reef into deeper water. Eva Carmichael had raced onto deck to find out what was happening only to be confronted by towering cliffs looming above the stricken ship. In all the chaos, Captain Gibbs grabbed Eva and said, "If you are saved Eva, let my dear wife know that I died like a sailor". That was the last Eva Carmichael saw of the captain. She was swept off the ship by a huge wave. Eva saw Tom Pearce on a small rocky beach and yelled to attract his attention. He dived in and swam to the exhausted woman and dragged her to shore. He took her to the cave and broke open case of brandy which had washed up on the beach. He opened a bottle to revive the unconscious woman. A few hours later Tom scaled a cliff in search of help. He followed hoof prints and came by chance upon two men from nearby Glenample Station three and a half miles away. In a state of exhaustion, he told the men of the tragedy. Tom returned to the gorge while the two men rode back to the station to get help. By the time they reached LOCH ARD Gorge, it was cold and dark. The two shipwreck survivors were taken to Glenample Station to recover. Eva stayed at the station for six weeks before returning to Ireland, this time by steamship. In Melbourne, Tom Pearce received a hero's welcome. He was presented with the first gold medal of the Royal Humane Society of Victoria and a £1000 cheque from the Victorian Government. Concerts were performed to honour the young man's bravery and to raise money for those who lost family in the LOCH ARD disaster. Of the 54 crew members and passengers on board, only two survived: the apprentice, Tom Pearce and the young woman passenger, Eva Carmichael, who lost all of her family in the tragedy. Ten days after the LOCH ARD tragedy, salvage rights to the wreck were sold at auction for £2,120. Cargo valued at £3,000 was salvaged and placed on the beach, but most washed back into the sea when another storm developed. The wreck of LOCH ARD still lies at the base of Mutton Bird Island. Much of the cargo has now been salvaged and some was washed up into what is now known as LOCH ARD Gorge. Cargo and artefacts have also been illegally salvaged over many years before protective legislation was introduced. One of the most unlikely pieces of cargo to have survived the shipwreck was a Minton porcelain peacock - one of only seven in the world. The peacock was destined for the Melbourne International Exhibition in 1880. It had been well packed, which gave it adequate protection during the violent storm. Today, the Minton peacock can be seen at the Flagstaff Hill Maritime Museum in Warrnambool. From Australia's most dramatic shipwreck it has now become Australia's most valuable shipwreck artefact and is one of very few 'objects' on the Victorian State Heritage Register. The LOCH ARD shipwreck is of State significance – Victorian Heritage Register S 417. Flagstaff Hill’s collection of artefacts from LOCH ARD is significant for being one of the largest collections of artefacts from this shipwreck in Victoria. It is significant for its association with the shipwreck, which is on the Victorian Heritage Register (VHR S417). The collection is significant because of the relationship between the objects, as together they have a high potential to interpret the story of the LOCH ARD. The LOCH ARD collection is archaeologically significant as the remains of a large international passenger and cargo ship. The LOCH ARD collection is historically significant for representing aspects of Victoria’s shipping history and its potential to interpret sub-theme 1.5 of Victoria’s Framework of Historical Themes (living with natural processes). The collection is also historically significant for its association with the LOCH ARD, which was one of the worst and best known shipwrecks in Victoria’s history. Unrestored tea spoon from the wreck of the LOCH ARD. The spoon design has a flattened fiddle-back handle, with a thin stem or shank, flared collar, and elongated bowl. The spoons metallic composition is a thin layer of brass alloy which has partially corroded back to a nickel-silver base metal. Only 10% of original electroplating remains with some verdigris. No marks visible.flagstaff hill, warrnambool, shipwrecked coast, flagstaff hill maritime museum, maritime museum, shipwreck coast, flagstaff hill maritime village, great ocean road, loch line, loch ard, captain gibbs, eva carmichael, tom pearce, glenample station, mutton bird island, loch ard gorge, electroplated cutlery, loch ard shipwreck, nickel silver, william page & co, birmingham, brass plating, makers marks -
 Flagstaff Hill Maritime Museum and Village
Spoon, circa 1878
This tea spoon is from the wreck of the LOCH ARD, a Loch Line ship of 1,693 tons which sailed from Gravesend, London, on 2 March 1878 with 17 passengers and a crew of 36 under Captain George Gibbs. “The intention was to discharge cargo in Melbourne, before returning to London via the Horn with wool and wheat”. Instead, on 1 June 1878, after 90 days at sea, she struck the sandstone cliffs of Mutton Bird Island on the south west coast of Victoria, and sank with the loss of 52 lives and all her cargo. The manifest of the LOCH ARD listed an array of manufactured goods and bulk metals being exported to the Colony of Victoria, with a declared value of £53,700. (202 bills of lading show an actual invoice value of £68, 456, with insurance underwriting to £30,000 of all cargo). Included in the manifest is the item of “Tin hardware & cutlery £7,530”. This teaspoon is one of 482 similar items of electro-plated cutlery from the LOCH ARD site, comprising spoons and forks of various sizes but all sharing the same general shape or design and metallic composition. 49 of these pieces display a legible makers’ mark — the initials “W” and “P” placed within a raised diamond outline, which is in turn contained within a sunken crown shape — identifying the manufacturer as William Page & Co of Birmingham. An electroplater’s makers’ marks, unlike sterling silver hallmarks, are not consistent identifiers of quality or date and place of manufacture. A similar line of five impressions was usually made to impress the consumer with an implication of industry standards, but what each one actually signified was not regulated and so they varied according to the whim of the individual foundry. In this case, the maker’s marks are often obscured by sedimentary accretion or removed by corrosion after a century of submersion in the ocean. However sufficient detail has survived to indicate that these samples of electro-plated cutlery probably originated from the same consignment in the LOCH ARD’s cargo. The following descriptions of maker’s marks are drawn from 255 tea spoons, 125 dessert spoons, and 99 table forks. These marks are clearly visible in 66 instances, while the same sequence of general outlines, or depression shapes, is discernible in another 166 examples. 1. A recessed Crown containing a raised Diamond outline and the initials “W” and “P” (the recognised trademark of William Page & Co) 2. An impressed Ellipse containing a raised, pivoted, Triangle in its lower part and bearing a Resurrection Cross on its upper section (a possible dissenting church symbol reflecting religious affiliation); OR a rounded Square impression containing a raised, ‘lazy’, letter “B” (possibly mimicking sterling silver hallmark signifying city of manufacture i.e. Birmingham) 3. An impressed rounded Square filled with a raised Maltese Cross (the base metal composite of nickel silver was also known as ‘German silver’ after its Berlin inventors in 1823) 4. A recessed Circle containing a Crab or Scarab Beetle image; OR a recessed Circle containing a rotated ‘fleur de lys’ or ‘fasces’ design 5. A depressed Diamond shape enclosing a large raised letter “R” and a small raised letter “D” (mimicking the U.K. Patent Office stamp which abbreviated the term ‘registered’ to “RD”, but also included date and class of patent) Suggested trade names for William Page & Co’s particular blend of brass plating are ‘roman silver’ or ‘silverite’. This copper alloy polishes to a lustrous gold when new, discolouring to a murky grey with greenish hue when neglected. HISTORY OF THE LOCH ARD The LOCH ARD belonged to the famous Loch Line which sailed many ships from England to Australia. Built in Glasgow by Barclay, Curdle and Co. in 1873, the LOCH ARD was a three-masted square rigged iron sailing ship. The ship measured 262ft 7" (79.87m) in length, 38ft (11.58m) in width, 23ft (7m) in depth and had a gross tonnage of 1693 tons. The LOCH ARD's main mast measured a massive 150ft (45.7m) in height. LOCH ARD made three trips to Australia and one trip to Calcutta before its final voyage. LOCH ARD left England on March 2, 1878, under the command of Captain Gibbs, a newly married, 29 year old. She was bound for Melbourne with a crew of 37, plus 17 passengers and a load of cargo. The general cargo reflected the affluence of Melbourne at the time. On board were straw hats, umbrella, perfumes, clay pipes, pianos, clocks, confectionary, linen and candles, as well as a heavier load of railway irons, cement, lead and copper. There were items included that intended for display in the Melbourne International Exhibition in 1880. The voyage to Port Phillip was long but uneventful. At 3am on June 1, 1878, Captain Gibbs was expecting to see land and the passengers were becoming excited as they prepared to view their new homeland in the early morning. But LOCH ARD was running into a fog which greatly reduced visibility. Captain Gibbs was becoming anxious as there was no sign of land or the Cape Otway lighthouse. At 4am the fog lifted. A man aloft announced that he could see breakers. The sheer cliffs of Victoria's west coast came into view, and Captain Gibbs realised that the ship was much closer to them than expected. He ordered as much sail to be set as time would permit and then attempted to steer the vessel out to sea. On coming head on into the wind, the ship lost momentum, the sails fell limp and LOCH ARD's bow swung back. Gibbs then ordered the anchors to be released in an attempt to hold its position. The anchors sank some 50 fathoms - but did not hold. By this time LOCH ARD was among the breakers and the tall cliffs of Mutton Bird Island rose behind the ship. Just half a mile from the coast, the ship's bow was suddenly pulled around by the anchor. The captain tried to tack out to sea, but the ship struck a reef at the base of Mutton Bird Island, near Port Campbell. Waves broke over the ship and the top deck was loosened from the hull. The masts and rigging came crashing down knocking passengers and crew overboard. When a lifeboat was finally launched, it crashed into the side of LOCH ARD and capsized. Tom Pearce, who had launched the boat, managed to cling to its overturned hull and shelter beneath it. He drifted out to sea and then on the flood tide came into what is now known as LOCH ARD Gorge. He swam to shore, bruised and dazed, and found a cave in which to shelter. Some of the crew stayed below deck to shelter from the falling rigging but drowned when the ship slipped off the reef into deeper water. Eva Carmichael had raced onto deck to find out what was happening only to be confronted by towering cliffs looming above the stricken ship. In all the chaos, Captain Gibbs grabbed Eva and said, "If you are saved Eva, let my dear wife know that I died like a sailor". That was the last Eva Carmichael saw of the captain. She was swept off the ship by a huge wave. Eva saw Tom Pearce on a small rocky beach and yelled to attract his attention. He dived in and swam to the exhausted woman and dragged her to shore. He took her to the cave and broke open case of brandy which had washed up on the beach. He opened a bottle to revive the unconscious woman. A few hours later Tom scaled a cliff in search of help. He followed hoof prints and came by chance upon two men from nearby Glenample Station three and a half miles away. In a state of exhaustion, he told the men of the tragedy. Tom returned to the gorge while the two men rode back to the station to get help. By the time they reached LOCH ARD Gorge, it was cold and dark. The two shipwreck survivors were taken to Glenample Station to recover. Eva stayed at the station for six weeks before returning to Ireland, this time by steamship. In Melbourne, Tom Pearce received a hero's welcome. He was presented with the first gold medal of the Royal Humane Society of Victoria and a £1000 cheque from the Victorian Government. Concerts were performed to honour the young man's bravery and to raise money for those who lost family in the LOCH ARD disaster. Of the 54 crew members and passengers on board, only two survived: the apprentice, Tom Pearce and the young woman passenger, Eva Carmichael, who lost all of her family in the tragedy. Ten days after the LOCH ARD tragedy, salvage rights to the wreck were sold at auction for £2,120. Cargo valued at £3,000 was salvaged and placed on the beach, but most washed back into the sea when another storm developed. The wreck of LOCH ARD still lies at the base of Mutton Bird Island. Much of the cargo has now been salvaged and some was washed up into what is now known as LOCH ARD Gorge. Cargo and artefacts have also been illegally salvaged over many years before protective legislation was introduced. One of the most unlikely pieces of cargo to have survived the shipwreck was a Minton porcelain peacock - one of only seven in the world. The peacock was destined for the Melbourne International Exhibition in 1880. It had been well packed, which gave it adequate protection during the violent storm. Today, the Minton peacock can be seen at the Flagstaff Hill Maritime Museum in Warrnambool. From Australia's most dramatic shipwreck it has now become Australia's most valuable shipwreck artefact and is one of very few 'objects' on the Victorian State Heritage Register. The LOCH ARD shipwreck is of State significance – Victorian Heritage Register S 417. Flagstaff Hill’s collection of artefacts from LOCH ARD is significant for being one of the largest collections of artefacts from this shipwreck in Victoria. It is significant for its association with the shipwreck, which is on the Victorian Heritage Register (VHR S417). The collection is significant because of the relationship between the objects, as together they have a high potential to interpret the story of the LOCH ARD. The LOCH ARD collection is archaeologically significant as the remains of a large international passenger and cargo ship. The LOCH ARD collection is historically significant for representing aspects of Victoria’s shipping history and its potential to interpret sub-theme 1.5 of Victoria’s Framework of Historical Themes (living with natural processes). The collection is also historically significant for its association with the LOCH ARD, which was one of the worst and best known shipwrecks in Victoria’s history. Unrestored tea spoon from the wreck of the LOCH ARD. The spoon design has a flattened fiddle-back handle, with a thin stem or shank, flared collar, and elongated bowl. The spoons metallic composition is a thin layer of brass alloy which has partially corroded back to a nickel-silver base metal. Only 10% of original electroplating remains with some verdigris. Makers marks are obscured.flagstaff hill, warrnambool, shipwrecked coast, flagstaff hill maritime museum, maritime museum, shipwreck coast, flagstaff hill maritime village, great ocean road, loch line, loch ard, captain gibbs, eva carmichael, tom pearce, glenample station, mutton bird island, loch ard gorge, electroplated cutlery, loch ard shipwreck, nickel silver, william page & co, birmingham, brass plating, makers marks -
 Flagstaff Hill Maritime Museum and Village
Spoon, circa 1878
This tea spoon is from the wreck of the LOCH ARD, a Loch Line ship of 1,693 tons which sailed from Gravesend, London, on 2 March 1878 with 17 passengers and a crew of 36 under Captain George Gibbs. “The intention was to discharge cargo in Melbourne, before returning to London via the Horn with wool and wheat”. Instead, on 1 June 1878, after 90 days at sea, she struck the sandstone cliffs of Mutton Bird Island on the south west coast of Victoria, and sank with the loss of 52 lives and all her cargo. The manifest of the LOCH ARD listed an array of manufactured goods and bulk metals being exported to the Colony of Victoria, with a declared value of £53,700. (202 bills of lading show an actual invoice value of £68, 456, with insurance underwriting to £30,000 of all cargo). Included in the manifest is the item of “Tin hardware & cutlery £7,530”. This teaspoon is one of 482 similar items of electro-plated cutlery from the LOCH ARD site, comprising spoons and forks of various sizes but all sharing the same general shape or design and metallic composition. 49 of these pieces display a legible makers’ mark — the initials “W” and “P” placed within a raised diamond outline, which is in turn contained within a sunken crown shape — identifying the manufacturer as William Page & Co of Birmingham. An electroplater’s makers’ marks, unlike sterling silver hallmarks, are not consistent identifiers of quality or date and place of manufacture. A similar line of five impressions was usually made to impress the consumer with an implication of industry standards, but what each one actually signified was not regulated and so they varied according to the whim of the individual foundry. In this case, the maker’s marks are often obscured by sedimentary accretion or removed by corrosion after a century of submersion in the ocean. However sufficient detail has survived to indicate that these samples of electro-plated cutlery probably originated from the same consignment in the LOCH ARD’s cargo. The following descriptions of maker’s marks are drawn from 255 tea spoons, 125 dessert spoons, and 99 table forks. These marks are clearly visible in 66 instances, while the same sequence of general outlines, or depression shapes, is discernible in another 166 examples. 1. A recessed Crown containing a raised Diamond outline and the initials “W” and “P” (the recognised trademark of William Page & Co) 2. An impressed Ellipse containing a raised, pivoted, Triangle in its lower part and bearing a Resurrection Cross on its upper section (a possible dissenting church symbol reflecting religious affiliation); OR a rounded Square impression containing a raised, ‘lazy’, letter “B” (possibly mimicking sterling silver hallmark signifying city of manufacture i.e. Birmingham) 3. An impressed rounded Square filled with a raised Maltese Cross (the base metal composite of nickel silver was also known as ‘German silver’ after its Berlin inventors in 1823) 4. A recessed Circle containing a Crab or Scarab Beetle image; OR a recessed Circle containing a rotated ‘fleur de lys’ or ‘fasces’ design 5. A depressed Diamond shape enclosing a large raised letter “R” and a small raised letter “D” (mimicking the U.K. Patent Office stamp which abbreviated the term ‘registered’ to “RD”, but also included date and class of patent) Suggested trade names for William Page & Co’s particular blend of brass plating are ‘roman silver’ or ‘silverite’. This copper alloy polishes to a lustrous gold when new, discolouring to a murky grey with greenish hue when neglected. HISTORY OF THE LOCH ARD The LOCH ARD belonged to the famous Loch Line which sailed many ships from England to Australia. Built in Glasgow by Barclay, Curdle and Co. in 1873, the LOCH ARD was a three-masted square rigged iron sailing ship. The ship measured 262ft 7" (79.87m) in length, 38ft (11.58m) in width, 23ft (7m) in depth and had a gross tonnage of 1693 tons. The LOCH ARD's main mast measured a massive 150ft (45.7m) in height. LOCH ARD made three trips to Australia and one trip to Calcutta before its final voyage. LOCH ARD left England on March 2, 1878, under the command of Captain Gibbs, a newly married, 29 year old. She was bound for Melbourne with a crew of 37, plus 17 passengers and a load of cargo. The general cargo reflected the affluence of Melbourne at the time. On board were straw hats, umbrella, perfumes, clay pipes, pianos, clocks, confectionary, linen and candles, as well as a heavier load of railway irons, cement, lead and copper. There were items included that intended for display in the Melbourne International Exhibition in 1880. The voyage to Port Phillip was long but uneventful. At 3am on June 1, 1878, Captain Gibbs was expecting to see land and the passengers were becoming excited as they prepared to view their new homeland in the early morning. But LOCH ARD was running into a fog which greatly reduced visibility. Captain Gibbs was becoming anxious as there was no sign of land or the Cape Otway lighthouse. At 4am the fog lifted. A man aloft announced that he could see breakers. The sheer cliffs of Victoria's west coast came into view, and Captain Gibbs realised that the ship was much closer to them than expected. He ordered as much sail to be set as time would permit and then attempted to steer the vessel out to sea. On coming head on into the wind, the ship lost momentum, the sails fell limp and LOCH ARD's bow swung back. Gibbs then ordered the anchors to be released in an attempt to hold its position. The anchors sank some 50 fathoms - but did not hold. By this time LOCH ARD was among the breakers and the tall cliffs of Mutton Bird Island rose behind the ship. Just half a mile from the coast, the ship's bow was suddenly pulled around by the anchor. The captain tried to tack out to sea, but the ship struck a reef at the base of Mutton Bird Island, near Port Campbell. Waves broke over the ship and the top deck was loosened from the hull. The masts and rigging came crashing down knocking passengers and crew overboard. When a lifeboat was finally launched, it crashed into the side of LOCH ARD and capsized. Tom Pearce, who had launched the boat, managed to cling to its overturned hull and shelter beneath it. He drifted out to sea and then on the flood tide came into what is now known as LOCH ARD Gorge. He swam to shore, bruised and dazed, and found a cave in which to shelter. Some of the crew stayed below deck to shelter from the falling rigging but drowned when the ship slipped off the reef into deeper water. Eva Carmichael had raced onto deck to find out what was happening only to be confronted by towering cliffs looming above the stricken ship. In all the chaos, Captain Gibbs grabbed Eva and said, "If you are saved Eva, let my dear wife know that I died like a sailor". That was the last Eva Carmichael saw of the captain. She was swept off the ship by a huge wave. Eva saw Tom Pearce on a small rocky beach and yelled to attract his attention. He dived in and swam to the exhausted woman and dragged her to shore. He took her to the cave and broke open case of brandy which had washed up on the beach. He opened a bottle to revive the unconscious woman. A few hours later Tom scaled a cliff in search of help. He followed hoof prints and came by chance upon two men from nearby Glenample Station three and a half miles away. In a state of exhaustion, he told the men of the tragedy. Tom returned to the gorge while the two men rode back to the station to get help. By the time they reached LOCH ARD Gorge, it was cold and dark. The two shipwreck survivors were taken to Glenample Station to recover. Eva stayed at the station for six weeks before returning to Ireland, this time by steamship. In Melbourne, Tom Pearce received a hero's welcome. He was presented with the first gold medal of the Royal Humane Society of Victoria and a £1000 cheque from the Victorian Government. Concerts were performed to honour the young man's bravery and to raise money for those who lost family in the LOCH ARD disaster. Of the 54 crew members and passengers on board, only two survived: the apprentice, Tom Pearce and the young woman passenger, Eva Carmichael, who lost all of her family in the tragedy. Ten days after the LOCH ARD tragedy, salvage rights to the wreck were sold at auction for £2,120. Cargo valued at £3,000 was salvaged and placed on the beach, but most washed back into the sea when another storm developed. The wreck of LOCH ARD still lies at the base of Mutton Bird Island. Much of the cargo has now been salvaged and some was washed up into what is now known as LOCH ARD Gorge. Cargo and artefacts have also been illegally salvaged over many years before protective legislation was introduced. One of the most unlikely pieces of cargo to have survived the shipwreck was a Minton porcelain peacock - one of only seven in the world. The peacock was destined for the Melbourne International Exhibition in 1880. It had been well packed, which gave it adequate protection during the violent storm. Today, the Minton peacock can be seen at the Flagstaff Hill Maritime Museum in Warrnambool. From Australia's most dramatic shipwreck it has now become Australia's most valuable shipwreck artefact and is one of very few 'objects' on the Victorian State Heritage Register. The LOCH ARD shipwreck is of State significance – Victorian Heritage Register S 417. Flagstaff Hill’s collection of artefacts from LOCH ARD is significant for being one of the largest collections of artefacts from this shipwreck in Victoria. It is significant for its association with the shipwreck, which is on the Victorian Heritage Register (VHR S417). The collection is significant because of the relationship between the objects, as together they have a high potential to interpret the story of the LOCH ARD. The LOCH ARD collection is archaeologically significant as the remains of a large international passenger and cargo ship. The LOCH ARD collection is historically significant for representing aspects of Victoria’s shipping history and its potential to interpret sub-theme 1.5 of Victoria’s Framework of Historical Themes (living with natural processes). The collection is also historically significant for its association with the LOCH ARD, which was one of the worst and best known shipwrecks in Victoria’s history Unrestored tea spoon from the wreck of the LOCH ARD. The spoon design has a flattened fiddle-back handle, with a thin stem or shank, flared collar, and elongated bowl. The spoons metallic composition is a thin layer of brass alloy which has partially corroded back to a nickel-silver base metal. 40% of spoon surface is encrusted with red and white sediment and 40% shows verdigris. Makers marks are obscured.flagstaff hill, warrnambool, shipwrecked coast, flagstaff hill maritime museum, maritime museum, shipwreck coast, flagstaff hill maritime village, great ocean road, loch line, loch ard, captain gibbs, eva carmichael, tom pearce, glenample station, mutton bird island, loch ard gorge, electroplated cutlery, loch ard shipwreck, nickel silver, william page & co, birmingham, brass plating, makers marks -
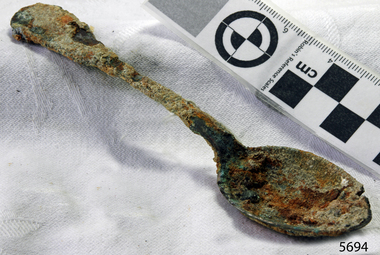 Flagstaff Hill Maritime Museum and Village
Spoon, circa 1878
This tea spoon is from the wreck of the LOCH ARD, a Loch Line ship of 1,693 tons which sailed from Gravesend, London, on 2 March 1878 with 17 passengers and a crew of 36 under Captain George Gibbs. “The intention was to discharge cargo in Melbourne, before returning to London via the Horn with wool and wheat”. Instead, on 1 June 1878, after 90 days at sea, she struck the sandstone cliffs of Mutton Bird Island on the south west coast of Victoria, and sank with the loss of 52 lives and all her cargo. The manifest of the LOCH ARD listed an array of manufactured goods and bulk metals being exported to the Colony of Victoria, with a declared value of £53,700. (202 bills of lading show an actual invoice value of £68, 456, with insurance underwriting to £30,000 of all cargo). Included in the manifest is the item of “Tin hardware & cutlery £7,530”. This teaspoon is one of 482 similar items of electro-plated cutlery from the LOCH ARD site, comprising spoons and forks of various sizes but all sharing the same general shape or design and metallic composition. 49 of these pieces display a legible makers’ mark — the initials “W” and “P” placed within a raised diamond outline, which is in turn contained within a sunken crown shape — identifying the manufacturer as William Page & Co of Birmingham. An electroplater’s makers’ marks, unlike sterling silver hallmarks, are not consistent identifiers of quality or date and place of manufacture. A similar line of five impressions was usually made to impress the consumer with an implication of industry standards, but what each one actually signified was not regulated and so they varied according to the whim of the individual foundry. In this case, the maker’s marks are often obscured by sedimentary accretion or removed by corrosion after a century of submersion in the ocean. However sufficient detail has survived to indicate that these samples of electro-plated cutlery probably originated from the same consignment in the LOCH ARD’s cargo. The following descriptions of maker’s marks are drawn from 255 tea spoons, 125 dessert spoons, and 99 table forks. These marks are clearly visible in 66 instances, while the same sequence of general outlines, or depression shapes, is discernible in another 166 examples. 1. A recessed Crown containing a raised Diamond outline and the initials “W” and “P” (the recognised trademark of William Page & Co) 2. An impressed Ellipse containing a raised, pivoted, Triangle in its lower part and bearing a Resurrection Cross on its upper section (a possible dissenting church symbol reflecting religious affiliation); OR a rounded Square impression containing a raised, ‘lazy’, letter “B” (possibly mimicking sterling silver hallmark signifying city of manufacture i.e. Birmingham) 3. An impressed rounded Square filled with a raised Maltese Cross (the base metal composite of nickel silver was also known as ‘German silver’ after its Berlin inventors in 1823) 4. A recessed Circle containing a Crab or Scarab Beetle image; OR a recessed Circle containing a rotated ‘fleur de lys’ or ‘fasces’ design 5. A depressed Diamond shape enclosing a large raised letter “R” and a small raised letter “D” (mimicking the U.K. Patent Office stamp which abbreviated the term ‘registered’ to “RD”, but also included date and class of patent) Suggested trade names for William Page & Co’s particular blend of brass plating are ‘roman silver’ or ‘silverite’. This copper alloy polishes to a lustrous gold when new, discolouring to a murky grey with greenish hue when neglected. HISTORY OF THE LOCH ARD The LOCH ARD belonged to the famous Loch Line which sailed many ships from England to Australia. Built in Glasgow by Barclay, Curdle and Co. in 1873, the LOCH ARD was a three-masted square rigged iron sailing ship. The ship measured 262ft 7" (79.87m) in length, 38ft (11.58m) in width, 23ft (7m) in depth and had a gross tonnage of 1693 tons. The LOCH ARD's main mast measured a massive 150ft (45.7m) in height. LOCH ARD made three trips to Australia and one trip to Calcutta before its final voyage. LOCH ARD left England on March 2, 1878, under the command of Captain Gibbs, a newly married, 29 year old. She was bound for Melbourne with a crew of 37, plus 17 passengers and a load of cargo. The general cargo reflected the affluence of Melbourne at the time. On board were straw hats, umbrella, perfumes, clay pipes, pianos, clocks, confectionary, linen and candles, as well as a heavier load of railway irons, cement, lead and copper. There were items included that intended for display in the Melbourne International Exhibition in 1880. The voyage to Port Phillip was long but uneventful. At 3am on June 1, 1878, Captain Gibbs was expecting to see land and the passengers were becoming excited as they prepared to view their new homeland in the early morning. But LOCH ARD was running into a fog which greatly reduced visibility. Captain Gibbs was becoming anxious as there was no sign of land or the Cape Otway lighthouse. At 4am the fog lifted. A man aloft announced that he could see breakers. The sheer cliffs of Victoria's west coast came into view, and Captain Gibbs realised that the ship was much closer to them than expected. He ordered as much sail to be set as time would permit and then attempted to steer the vessel out to sea. On coming head on into the wind, the ship lost momentum, the sails fell limp and LOCH ARD's bow swung back. Gibbs then ordered the anchors to be released in an attempt to hold its position. The anchors sank some 50 fathoms - but did not hold. By this time LOCH ARD was among the breakers and the tall cliffs of Mutton Bird Island rose behind the ship. Just half a mile from the coast, the ship's bow was suddenly pulled around by the anchor. The captain tried to tack out to sea, but the ship struck a reef at the base of Mutton Bird Island, near Port Campbell. Waves broke over the ship and the top deck was loosened from the hull. The masts and rigging came crashing down knocking passengers and crew overboard. When a lifeboat was finally launched, it crashed into the side of LOCH ARD and capsized. Tom Pearce, who had launched the boat, managed to cling to its overturned hull and shelter beneath it. He drifted out to sea and then on the flood tide came into what is now known as LOCH ARD Gorge. He swam to shore, bruised and dazed, and found a cave in which to shelter. Some of the crew stayed below deck to shelter from the falling rigging but drowned when the ship slipped off the reef into deeper water. Eva Carmichael had raced onto deck to find out what was happening only to be confronted by towering cliffs looming above the stricken ship. In all the chaos, Captain Gibbs grabbed Eva and said, "If you are saved Eva, let my dear wife know that I died like a sailor". That was the last Eva Carmichael saw of the captain. She was swept off the ship by a huge wave. Eva saw Tom Pearce on a small rocky beach and yelled to attract his attention. He dived in and swam to the exhausted woman and dragged her to shore. He took her to the cave and broke open case of brandy which had washed up on the beach. He opened a bottle to revive the unconscious woman. A few hours later Tom scaled a cliff in search of help. He followed hoof prints and came by chance upon two men from nearby Glenample Station three and a half miles away. In a state of exhaustion, he told the men of the tragedy. Tom returned to the gorge while the two men rode back to the station to get help. By the time they reached LOCH ARD Gorge, it was cold and dark. The two shipwreck survivors were taken to Glenample Station to recover. Eva stayed at the station for six weeks before returning to Ireland, this time by steamship. In Melbourne, Tom Pearce received a hero's welcome. He was presented with the first gold medal of the Royal Humane Society of Victoria and a £1000 cheque from the Victorian Government. Concerts were performed to honour the young man's bravery and to raise money for those who lost family in the LOCH ARD disaster. Of the 54 crew members and passengers on board, only two survived: the apprentice, Tom Pearce and the young woman passenger, Eva Carmichael, who lost all of her family in the tragedy. Ten days after the LOCH ARD tragedy, salvage rights to the wreck were sold at auction for £2,120. Cargo valued at £3,000 was salvaged and placed on the beach, but most washed back into the sea when another storm developed. The wreck of LOCH ARD still lies at the base of Mutton Bird Island. Much of the cargo has now been salvaged and some was washed up into what is now known as LOCH ARD Gorge. Cargo and artefacts have also been illegally salvaged over many years before protective legislation was introduced. One of the most unlikely pieces of cargo to have survived the shipwreck was a Minton porcelain peacock - one of only seven in the world. The peacock was destined for the Melbourne International Exhibition in 1880. It had been well packed, which gave it adequate protection during the violent storm. Today, the Minton peacock can be seen at the Flagstaff Hill Maritime Museum in Warrnambool. From Australia's most dramatic shipwreck it has now become Australia's most valuable shipwreck artefact and is one of very few 'objects' on the Victorian State Heritage Register. The LOCH ARD shipwreck is of State significance – Victorian Heritage Register S 417. Flagstaff Hill’s collection of artefacts from LOCH ARD is significant for being one of the largest collections of artefacts from this shipwreck in Victoria. It is significant for its association with the shipwreck, which is on the Victorian Heritage Register (VHR S417). The collection is significant because of the relationship between the objects, as together they have a high potential to interpret the story of the LOCH ARD. The LOCH ARD collection is archaeologically significant as the remains of a large international passenger and cargo ship. The LOCH ARD collection is historically significant for representing aspects of Victoria’s shipping history and its potential to interpret sub-theme 1.5 of Victoria’s Framework of Historical Themes (living with natural processes). The collection is also historically significant for its association with the LOCH ARD, which was one of the worst and best known shipwrecks in Victoria’s history Unrestored tea spoon from the wreck of the LOCH ARD. The spoon design has a flattened fiddle-back handle, with a thin stem or shank, flared collar, and elongated bowl. The spoons metallic composition is a thin layer of brass alloy which has partially corroded back to a nickel-silver base metal. 80% of the spoon surface is encrusted with red and white sediment. The bowl is corroded and chipped. Makers marks are obscured.flagstaff hill, warrnambool, shipwrecked coast, flagstaff hill maritime museum, maritime museum, shipwreck coast, flagstaff hill maritime village, great ocean road, loch line, loch ard, captain gibbs, eva carmichael, tom pearce, glenample station, mutton bird island, loch ard gorge, electroplated cutlery, loch ard shipwreck, nickel silver, william page & co, birmingham, brass plating, makers marks -
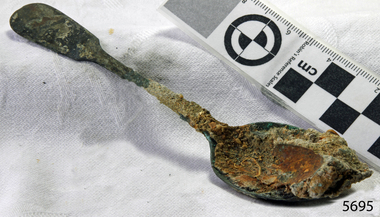 Flagstaff Hill Maritime Museum and Village
Spoon, circa 1878
This tea spoon is from the wreck of the LOCH ARD, a Loch Line ship of 1,693 tons which sailed from Gravesend, London, on 2 March 1878 with 17 passengers and a crew of 36 under Captain George Gibbs. “The intention was to discharge cargo in Melbourne, before returning to London via the Horn with wool and wheat”. Instead, on 1 June 1878, after 90 days at sea, she struck the sandstone cliffs of Mutton Bird Island on the south west coast of Victoria, and sank with the loss of 52 lives and all her cargo. The manifest of the LOCH ARD listed an array of manufactured goods and bulk metals being exported to the Colony of Victoria, with a declared value of £53,700. (202 bills of lading show an actual invoice value of £68, 456, with insurance underwriting to £30,000 of all cargo). Included in the manifest is the item of “Tin hardware & cutlery £7,530”. This teaspoon is one of 482 similar items of electro-plated cutlery from the LOCH ARD site, comprising spoons and forks of various sizes but all sharing the same general shape or design and metallic composition. 49 of these pieces display a legible makers’ mark — the initials “W” and “P” placed within a raised diamond outline, which is in turn contained within a sunken crown shape — identifying the manufacturer as William Page & Co of Birmingham. An electroplater’s makers’ marks, unlike sterling silver hallmarks, are not consistent identifiers of quality or date and place of manufacture. A similar line of five impressions was usually made to impress the consumer with an implication of industry standards, but what each one actually signified was not regulated and so they varied according to the whim of the individual foundry. In this case, the maker’s marks are often obscured by sedimentary accretion or removed by corrosion after a century of submersion in the ocean. However sufficient detail has survived to indicate that these samples of electro-plated cutlery probably originated from the same consignment in the LOCH ARD’s cargo. The following descriptions of maker’s marks are drawn from 255 tea spoons, 125 dessert spoons, and 99 table forks. These marks are clearly visible in 66 instances, while the same sequence of general outlines, or depression shapes, is discernible in another 166 examples. 1. A recessed Crown containing a raised Diamond outline and the initials “W” and “P” (the recognised trademark of William Page & Co) 2. An impressed Ellipse containing a raised, pivoted, Triangle in its lower part and bearing a Resurrection Cross on its upper section (a possible dissenting church symbol reflecting religious affiliation); OR a rounded Square impression containing a raised, ‘lazy’, letter “B” (possibly mimicking sterling silver hallmark signifying city of manufacture i.e. Birmingham) 3. An impressed rounded Square filled with a raised Maltese Cross (the base metal composite of nickel silver was also known as ‘German silver’ after its Berlin inventors in 1823) 4. A recessed Circle containing a Crab or Scarab Beetle image; OR a recessed Circle containing a rotated ‘fleur de lys’ or ‘fasces’ design 5. A depressed Diamond shape enclosing a large raised letter “R” and a small raised letter “D” (mimicking the U.K. Patent Office stamp which abbreviated the term ‘registered’ to “RD”, but also included date and class of patent) Suggested trade names for William Page & Co’s particular blend of brass plating are ‘roman silver’ or ‘silverite’. This copper alloy polishes to a lustrous gold when new, discolouring to a murky grey with greenish hue when neglected. HISTORY OF THE LOCH ARD The LOCH ARD belonged to the famous Loch Line which sailed many ships from England to Australia. Built in Glasgow by Barclay, Curdle and Co. in 1873, the LOCH ARD was a three-masted square rigged iron sailing ship. The ship measured 262ft 7" (79.87m) in length, 38ft (11.58m) in width, 23ft (7m) in depth and had a gross tonnage of 1693 tons. The LOCH ARD's main mast measured a massive 150ft (45.7m) in height. LOCH ARD made three trips to Australia and one trip to Calcutta before its final voyage. LOCH ARD left England on March 2, 1878, under the command of Captain Gibbs, a newly married, 29 year old. She was bound for Melbourne with a crew of 37, plus 17 passengers and a load of cargo. The general cargo reflected the affluence of Melbourne at the time. On board were straw hats, umbrella, perfumes, clay pipes, pianos, clocks, confectionary, linen and candles, as well as a heavier load of railway irons, cement, lead and copper. There were items included that intended for display in the Melbourne International Exhibition in 1880. The voyage to Port Phillip was long but uneventful. At 3am on June 1, 1878, Captain Gibbs was expecting to see land and the passengers were becoming excited as they prepared to view their new homeland in the early morning. But LOCH ARD was running into a fog which greatly reduced visibility. Captain Gibbs was becoming anxious as there was no sign of land or the Cape Otway lighthouse. At 4am the fog lifted. A man aloft announced that he could see breakers. The sheer cliffs of Victoria's west coast came into view, and Captain Gibbs realised that the ship was much closer to them than expected. He ordered as much sail to be set as time would permit and then attempted to steer the vessel out to sea. On coming head on into the wind, the ship lost momentum, the sails fell limp and LOCH ARD's bow swung back. Gibbs then ordered the anchors to be released in an attempt to hold its position. The anchors sank some 50 fathoms - but did not hold. By this time LOCH ARD was among the breakers and the tall cliffs of Mutton Bird Island rose behind the ship. Just half a mile from the coast, the ship's bow was suddenly pulled around by the anchor. The captain tried to tack out to sea, but the ship struck a reef at the base of Mutton Bird Island, near Port Campbell. Waves broke over the ship and the top deck was loosened from the hull. The masts and rigging came crashing down knocking passengers and crew overboard. When a lifeboat was finally launched, it crashed into the side of LOCH ARD and capsized. Tom Pearce, who had launched the boat, managed to cling to its overturned hull and shelter beneath it. He drifted out to sea and then on the flood tide came into what is now known as LOCH ARD Gorge. He swam to shore, bruised and dazed, and found a cave in which to shelter. Some of the crew stayed below deck to shelter from the falling rigging but drowned when the ship slipped off the reef into deeper water. Eva Carmichael had raced onto deck to find out what was happening only to be confronted by towering cliffs looming above the stricken ship. In all the chaos, Captain Gibbs grabbed Eva and said, "If you are saved Eva, let my dear wife know that I died like a sailor". That was the last Eva Carmichael saw of the captain. She was swept off the ship by a huge wave. Eva saw Tom Pearce on a small rocky beach and yelled to attract his attention. He dived in and swam to the exhausted woman and dragged her to shore. He took her to the cave and broke open case of brandy which had washed up on the beach. He opened a bottle to revive the unconscious woman. A few hours later Tom scaled a cliff in search of help. He followed hoof prints and came by chance upon two men from nearby Glenample Station three and a half miles away. In a state of exhaustion, he told the men of the tragedy. Tom returned to the gorge while the two men rode back to the station to get help. By the time they reached LOCH ARD Gorge, it was cold and dark. The two shipwreck survivors were taken to Glenample Station to recover. Eva stayed at the station for six weeks before returning to Ireland, this time by steamship. In Melbourne, Tom Pearce received a hero's welcome. He was presented with the first gold medal of the Royal Humane Society of Victoria and a £1000 cheque from the Victorian Government. Concerts were performed to honour the young man's bravery and to raise money for those who lost family in the LOCH ARD disaster. Of the 54 crew members and passengers on board, only two survived: the apprentice, Tom Pearce and the young woman passenger, Eva Carmichael, who lost all of her family in the tragedy. Ten days after the LOCH ARD tragedy, salvage rights to the wreck were sold at auction for £2,120. Cargo valued at £3,000 was salvaged and placed on the beach, but most washed back into the sea when another storm developed. The wreck of LOCH ARD still lies at the base of Mutton Bird Island. Much of the cargo has now been salvaged and some was washed up into what is now known as LOCH ARD Gorge. Cargo and artefacts have also been illegally salvaged over many years before protective legislation was introduced. One of the most unlikely pieces of cargo to have survived the shipwreck was a Minton porcelain peacock - one of only seven in the world. The peacock was destined for the Melbourne International Exhibition in 1880. It had been well packed, which gave it adequate protection during the violent storm. Today, the Minton peacock can be seen at the Flagstaff Hill Maritime Museum in Warrnambool. From Australia's most dramatic shipwreck it has now become Australia's most valuable shipwreck artefact and is one of very few 'objects' on the Victorian State Heritage Register. The LOCH ARD shipwreck is of State significance – Victorian Heritage Register S 417. Flagstaff Hill’s collection of artefacts from LOCH ARD is significant for being one of the largest collections of artefacts from this shipwreck in Victoria. It is significant for its association with the shipwreck, which is on the Victorian Heritage Register (VHR S417). The collection is significant because of the relationship between the objects, as together they have a high potential to interpret the story of the LOCH ARD. The LOCH ARD collection is archaeologically significant as the remains of a large international passenger and cargo ship. The LOCH ARD collection is historically significant for representing aspects of Victoria’s shipping history and its potential to interpret sub-theme 1.5 of Victoria’s Framework of Historical Themes (living with natural processes). The collection is also historically significant for its association with the LOCH ARD, which was one of the worst and best known shipwrecks in Victoria’s history. Unrestored tea spoon from the wreck of the LOCH ARD. The spoon design has a flattened fiddle-back handle, with a thin stem or shank, flared collar, and elongated bowl. The spoons metallic composition is a thin layer of brass alloy which has partially corroded back to a nickel-silver base metal. Some verdigris and there is heavy encrustation on stem and bowl of spoon (encrustation in bowl bears the imprint of another spoon).flagstaff hill, warrnambool, shipwrecked coast, flagstaff hill maritime museum, maritime museum, shipwreck coast, flagstaff hill maritime village, great ocean road, loch line, loch ard, captain gibbs, eva carmichael, tom pearce, glenample station, mutton bird island, loch ard gorge, electroplated cutlery, loch ard shipwreck, nickel silver, william page & co, birmingham, brass plating, makers marks -
 Flagstaff Hill Maritime Museum and Village
Spoon, circa 1878
This tea spoon is from the wreck of the LOCH ARD, a Loch Line ship of 1,693 tons which sailed from Gravesend, London, on 2 March 1878 with 17 passengers and a crew of 36 under Captain George Gibbs. “The intention was to discharge cargo in Melbourne, before returning to London via the Horn with wool and wheat”. Instead, on 1 June 1878, after 90 days at sea, she struck the sandstone cliffs of Mutton Bird Island on the south west coast of Victoria, and sank with the loss of 52 lives and all her cargo. The manifest of the LOCH ARD listed an array of manufactured goods and bulk metals being exported to the Colony of Victoria, with a declared value of £53,700. (202 bills of lading show an actual invoice value of £68, 456, with insurance underwriting to £30,000 of all cargo). Included in the manifest is the item of “Tin hardware & cutlery £7,530”. This teaspoon is one of 482 similar items of electro-plated cutlery from the LOCH ARD site, comprising spoons and forks of various sizes but all sharing the same general shape or design and metallic composition. 49 of these pieces display a legible makers’ mark — the initials “W” and “P” placed within a raised diamond outline, which is in turn contained within a sunken crown shape — identifying the manufacturer as William Page & Co of Birmingham. An electroplater’s makers’ marks, unlike sterling silver hallmarks, are not consistent identifiers of quality or date and place of manufacture. A similar line of five impressions was usually made to impress the consumer with an implication of industry standards, but what each one actually signified was not regulated and so they varied according to the whim of the individual foundry. In this case, the maker’s marks are often obscured by sedimentary accretion or removed by corrosion after a century of submersion in the ocean. However sufficient detail has survived to indicate that these samples of electro-plated cutlery probably originated from the same consignment in the LOCH ARD’s cargo. The following descriptions of maker’s marks are drawn from 255 tea spoons, 125 dessert spoons, and 99 table forks. These marks are clearly visible in 66 instances, while the same sequence of general outlines, or depression shapes, is discernible in another 166 examples. 1. A recessed Crown containing a raised Diamond outline and the initials “W” and “P” (the recognised trademark of William Page & Co) 2. An impressed Ellipse containing a raised, pivoted, Triangle in its lower part and bearing a Resurrection Cross on its upper section (a possible dissenting church symbol reflecting religious affiliation); OR a rounded Square impression containing a raised, ‘lazy’, letter “B” (possibly mimicking sterling silver hallmark signifying city of manufacture i.e. Birmingham) 3. An impressed rounded Square filled with a raised Maltese Cross (the base metal composite of nickel silver was also known as ‘German silver’ after its Berlin inventors in 1823) 4. A recessed Circle containing a Crab or Scarab Beetle image; OR a recessed Circle containing a rotated ‘fleur de lys’ or ‘fasces’ design 5. A depressed Diamond shape enclosing a large raised letter “R” and a small raised letter “D” (mimicking the U.K. Patent Office stamp which abbreviated the term ‘registered’ to “RD”, but also included date and class of patent) Suggested trade names for William Page & Co’s particular blend of brass plating are ‘roman silver’ or ‘silverite’. This copper alloy polishes to a lustrous gold when new, discolouring to a murky grey with greenish hue when neglected. HISTORY OF THE LOCH ARD The LOCH ARD belonged to the famous Loch Line which sailed many ships from England to Australia. Built in Glasgow by Barclay, Curdle and Co. in 1873, the LOCH ARD was a three-masted square rigged iron sailing ship. The ship measured 262ft 7" (79.87m) in length, 38ft (11.58m) in width, 23ft (7m) in depth and had a gross tonnage of 1693 tons. The LOCH ARD's main mast measured a massive 150ft (45.7m) in height. LOCH ARD made three trips to Australia and one trip to Calcutta before its final voyage. LOCH ARD left England on March 2, 1878, under the command of Captain Gibbs, a newly married, 29 year old. She was bound for Melbourne with a crew of 37, plus 17 passengers and a load of cargo. The general cargo reflected the affluence of Melbourne at the time. On board were straw hats, umbrella, perfumes, clay pipes, pianos, clocks, confectionary, linen and candles, as well as a heavier load of railway irons, cement, lead and copper. There were items included that intended for display in the Melbourne International Exhibition in 1880. The voyage to Port Phillip was long but uneventful. At 3am on June 1, 1878, Captain Gibbs was expecting to see land and the passengers were becoming excited as they prepared to view their new homeland in the early morning. But LOCH ARD was running into a fog which greatly reduced visibility. Captain Gibbs was becoming anxious as there was no sign of land or the Cape Otway lighthouse. At 4am the fog lifted. A man aloft announced that he could see breakers. The sheer cliffs of Victoria's west coast came into view, and Captain Gibbs realised that the ship was much closer to them than expected. He ordered as much sail to be set as time would permit and then attempted to steer the vessel out to sea. On coming head on into the wind, the ship lost momentum, the sails fell limp and LOCH ARD's bow swung back. Gibbs then ordered the anchors to be released in an attempt to hold its position. The anchors sank some 50 fathoms - but did not hold. By this time LOCH ARD was among the breakers and the tall cliffs of Mutton Bird Island rose behind the ship. Just half a mile from the coast, the ship's bow was suddenly pulled around by the anchor. The captain tried to tack out to sea, but the ship struck a reef at the base of Mutton Bird Island, near Port Campbell. Waves broke over the ship and the top deck was loosened from the hull. The masts and rigging came crashing down knocking passengers and crew overboard. When a lifeboat was finally launched, it crashed into the side of LOCH ARD and capsized. Tom Pearce, who had launched the boat, managed to cling to its overturned hull and shelter beneath it. He drifted out to sea and then on the flood tide came into what is now known as LOCH ARD Gorge. He swam to shore, bruised and dazed, and found a cave in which to shelter. Some of the crew stayed below deck to shelter from the falling rigging but drowned when the ship slipped off the reef into deeper water. Eva Carmichael had raced onto deck to find out what was happening only to be confronted by towering cliffs looming above the stricken ship. In all the chaos, Captain Gibbs grabbed Eva and said, "If you are saved Eva, let my dear wife know that I died like a sailor". That was the last Eva Carmichael saw of the captain. She was swept off the ship by a huge wave. Eva saw Tom Pearce on a small rocky beach and yelled to attract his attention. He dived in and swam to the exhausted woman and dragged her to shore. He took her to the cave and broke open case of brandy which had washed up on the beach. He opened a bottle to revive the unconscious woman. A few hours later Tom scaled a cliff in search of help. He followed hoof prints and came by chance upon two men from nearby Glenample Station three and a half miles away. In a state of exhaustion, he told the men of the tragedy. Tom returned to the gorge while the two men rode back to the station to get help. By the time they reached LOCH ARD Gorge, it was cold and dark. The two shipwreck survivors were taken to Glenample Station to recover. Eva stayed at the station for six weeks before returning to Ireland, this time by steamship. In Melbourne, Tom Pearce received a hero's welcome. He was presented with the first gold medal of the Royal Humane Society of Victoria and a £1000 cheque from the Victorian Government. Concerts were performed to honour the young man's bravery and to raise money for those who lost family in the LOCH ARD disaster. Of the 54 crew members and passengers on board, only two survived: the apprentice, Tom Pearce and the young woman passenger, Eva Carmichael, who lost all of her family in the tragedy. Ten days after the LOCH ARD tragedy, salvage rights to the wreck were sold at auction for £2,120. Cargo valued at £3,000 was salvaged and placed on the beach, but most washed back into the sea when another storm developed. The wreck of LOCH ARD still lies at the base of Mutton Bird Island. Much of the cargo has now been salvaged and some was washed up into what is now known as LOCH ARD Gorge. Cargo and artefacts have also been illegally salvaged over many years before protective legislation was introduced. One of the most unlikely pieces of cargo to have survived the shipwreck was a Minton porcelain peacock - one of only seven in the world. The peacock was destined for the Melbourne International Exhibition in 1880. It had been well packed, which gave it adequate protection during the violent storm. Today, the Minton peacock can be seen at the Flagstaff Hill Maritime Museum in Warrnambool. From Australia's most dramatic shipwreck it has now become Australia's most valuable shipwreck artefact and is one of very few 'objects' on the Victorian State Heritage Register. The LOCH ARD shipwreck is of State significance – Victorian Heritage Register S 417. Flagstaff Hill’s collection of artefacts from LOCH ARD is significant for being one of the largest collections of artefacts from this shipwreck in Victoria. It is significant for its association with the shipwreck, which is on the Victorian Heritage Register (VHR S417). The collection is significant because of the relationship between the objects, as together they have a high potential to interpret the story of the LOCH ARD. The LOCH ARD collection is archaeologically significant as the remains of a large international passenger and cargo ship. The LOCH ARD collection is historically significant for representing aspects of Victoria’s shipping history and its potential to interpret sub-theme 1.5 of Victoria’s Framework of Historical Themes (living with natural processes). The collection is also historically significant for its association with the LOCH ARD, which was one of the worst and best known shipwrecks in Victoria’s history. Restored tea spoon from the wreck of the LOCH ARD. The spoon design has a flattened fiddle-back handle, with a thin stem or shank, flared collar, and elongated bowl. The spoons metallic composition is a thin layer of brass alloy which has been electroplated onto a nickel-silver base metal. Spoon has been treated and cleaned to present a shining golden appearance. There is some pitting on the reverse side of the spoon. Four of the five makers marks are clearly visible on the lower rear of the handle: (1) Trade Mark (2) Resurrection Cross (3) Maltese Cross (4) Crab Design.flagstaff hill, warrnambool, shipwrecked coast, flagstaff hill maritime museum, maritime museum, shipwreck coast, flagstaff hill maritime village, great ocean road, loch line, loch ard, captain gibbs, eva carmichael, tom pearce, glenample station, mutton bird island, loch ard gorge, electroplated cutlery, loch ard shipwreck, nickel silver, william page & co, birmingham, brass plating, makers marks -
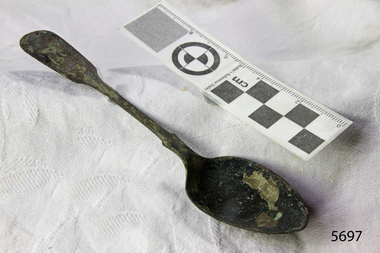 Flagstaff Hill Maritime Museum and Village
Spoon, circa 1878
This tea spoon is from the wreck of the LOCH ARD, a Loch Line ship of 1,693 tons which sailed from Gravesend, London, on 2 March 1878 with 17 passengers and a crew of 36 under Captain George Gibbs. “The intention was to discharge cargo in Melbourne, before returning to London via the Horn with wool and wheat”. Instead, on 1 June 1878, after 90 days at sea, she struck the sandstone cliffs of Mutton Bird Island on the south west coast of Victoria, and sank with the loss of 52 lives and all her cargo. The manifest of the LOCH ARD listed an array of manufactured goods and bulk metals being exported to the Colony of Victoria, with a declared value of £53,700. (202 bills of lading show an actual invoice value of £68, 456, with insurance underwriting to £30,000 of all cargo). Included in the manifest is the item of “Tin hardware & cutlery £7,530”. This teaspoon is one of 482 similar items of electro-plated cutlery from the LOCH ARD site, comprising spoons and forks of various sizes but all sharing the same general shape or design and metallic composition. 49 of these pieces display a legible makers’ mark — the initials “W” and “P” placed within a raised diamond outline, which is in turn contained within a sunken crown shape — identifying the manufacturer as William Page & Co of Birmingham. An electroplater’s makers’ marks, unlike sterling silver hallmarks, are not consistent identifiers of quality or date and place of manufacture. A similar line of five impressions was usually made to impress the consumer with an implication of industry standards, but what each one actually signified was not regulated and so they varied according to the whim of the individual foundry. In this case, the maker’s marks are often obscured by sedimentary accretion or removed by corrosion after a century of submersion in the ocean. However sufficient detail has survived to indicate that these samples of electro-plated cutlery probably originated from the same consignment in the LOCH ARD’s cargo. The following descriptions of maker’s marks are drawn from 255 tea spoons, 125 dessert spoons, and 99 table forks. These marks are clearly visible in 66 instances, while the same sequence of general outlines, or depression shapes, is discernible in another 166 examples. 1. A recessed Crown containing a raised Diamond outline and the initials “W” and “P” (the recognised trademark of William Page & Co) 2. An impressed Ellipse containing a raised, pivoted, Triangle in its lower part and bearing a Resurrection Cross on its upper section (a possible dissenting church symbol reflecting religious affiliation); OR a rounded Square impression containing a raised, ‘lazy’, letter “B” (possibly mimicking sterling silver hallmark signifying city of manufacture i.e. Birmingham) 3. An impressed rounded Square filled with a raised Maltese Cross (the base metal composite of nickel silver was also known as ‘German silver’ after its Berlin inventors in 1823) 4. A recessed Circle containing a Crab or Scarab Beetle image; OR a recessed Circle containing a rotated ‘fleur de lys’ or ‘fasces’ design 5. A depressed Diamond shape enclosing a large raised letter “R” and a small raised letter “D” (mimicking the U.K. Patent Office stamp which abbreviated the term ‘registered’ to “RD”, but also included date and class of patent) Suggested trade names for William Page & Co’s particular blend of brass plating are ‘roman silver’ or ‘silverite’. This copper alloy polishes to a lustrous gold when new, discolouring to a murky grey with greenish hue when neglected. HISTORY OF THE LOCH ARD The LOCH ARD belonged to the famous Loch Line which sailed many ships from England to Australia. Built in Glasgow by Barclay, Curdle and Co. in 1873, the LOCH ARD was a three-masted square rigged iron sailing ship. The ship measured 262ft 7" (79.87m) in length, 38ft (11.58m) in width, 23ft (7m) in depth and had a gross tonnage of 1693 tons. The LOCH ARD's main mast measured a massive 150ft (45.7m) in height. LOCH ARD made three trips to Australia and one trip to Calcutta before its final voyage. LOCH ARD left England on March 2, 1878, under the command of Captain Gibbs, a newly married, 29 year old. She was bound for Melbourne with a crew of 37, plus 17 passengers and a load of cargo. The general cargo reflected the affluence of Melbourne at the time. On board were straw hats, umbrella, perfumes, clay pipes, pianos, clocks, confectionary, linen and candles, as well as a heavier load of railway irons, cement, lead and copper. There were items included that intended for display in the Melbourne International Exhibition in 1880. The voyage to Port Phillip was long but uneventful. At 3am on June 1, 1878, Captain Gibbs was expecting to see land and the passengers were becoming excited as they prepared to view their new homeland in the early morning. But LOCH ARD was running into a fog which greatly reduced visibility. Captain Gibbs was becoming anxious as there was no sign of land or the Cape Otway lighthouse. At 4am the fog lifted. A man aloft announced that he could see breakers. The sheer cliffs of Victoria's west coast came into view, and Captain Gibbs realised that the ship was much closer to them than expected. He ordered as much sail to be set as time would permit and then attempted to steer the vessel out to sea. On coming head on into the wind, the ship lost momentum, the sails fell limp and LOCH ARD's bow swung back. Gibbs then ordered the anchors to be released in an attempt to hold its position. The anchors sank some 50 fathoms - but did not hold. By this time LOCH ARD was among the breakers and the tall cliffs of Mutton Bird Island rose behind the ship. Just half a mile from the coast, the ship's bow was suddenly pulled around by the anchor. The captain tried to tack out to sea, but the ship struck a reef at the base of Mutton Bird Island, near Port Campbell. Waves broke over the ship and the top deck was loosened from the hull. The masts and rigging came crashing down knocking passengers and crew overboard. When a lifeboat was finally launched, it crashed into the side of LOCH ARD and capsized. Tom Pearce, who had launched the boat, managed to cling to its overturned hull and shelter beneath it. He drifted out to sea and then on the flood tide came into what is now known as LOCH ARD Gorge. He swam to shore, bruised and dazed, and found a cave in which to shelter. Some of the crew stayed below deck to shelter from the falling rigging but drowned when the ship slipped off the reef into deeper water. Eva Carmichael had raced onto deck to find out what was happening only to be confronted by towering cliffs looming above the stricken ship. In all the chaos, Captain Gibbs grabbed Eva and said, "If you are saved Eva, let my dear wife know that I died like a sailor". That was the last Eva Carmichael saw of the captain. She was swept off the ship by a huge wave. Eva saw Tom Pearce on a small rocky beach and yelled to attract his attention. He dived in and swam to the exhausted woman and dragged her to shore. He took her to the cave and broke open case of brandy which had washed up on the beach. He opened a bottle to revive the unconscious woman. A few hours later Tom scaled a cliff in search of help. He followed hoof prints and came by chance upon two men from nearby Glenample Station three and a half miles away. In a state of exhaustion, he told the men of the tragedy. Tom returned to the gorge while the two men rode back to the station to get help. By the time they reached LOCH ARD Gorge, it was cold and dark. The two shipwreck survivors were taken to Glenample Station to recover. Eva stayed at the station for six weeks before returning to Ireland, this time by steamship. In Melbourne, Tom Pearce received a hero's welcome. He was presented with the first gold medal of the Royal Humane Society of Victoria and a £1000 cheque from the Victorian Government. Concerts were performed to honour the young man's bravery and to raise money for those who lost family in the LOCH ARD disaster. Of the 54 crew members and passengers on board, only two survived: the apprentice, Tom Pearce and the young woman passenger, Eva Carmichael, who lost all of her family in the tragedy. Ten days after the LOCH ARD tragedy, salvage rights to the wreck were sold at auction for £2,120. Cargo valued at £3,000 was salvaged and placed on the beach, but most washed back into the sea when another storm developed. The wreck of LOCH ARD still lies at the base of Mutton Bird Island. Much of the cargo has now been salvaged and some was washed up into what is now known as LOCH ARD Gorge. Cargo and artefacts have also been illegally salvaged over many years before protective legislation was introduced. One of the most unlikely pieces of cargo to have survived the shipwreck was a Minton porcelain peacock - one of only seven in the world. The peacock was destined for the Melbourne International Exhibition in 1880. It had been well packed, which gave it adequate protection during the violent storm. Today, the Minton peacock can be seen at the Flagstaff Hill Maritime Museum in Warrnambool. From Australia's most dramatic shipwreck it has now become Australia's most valuable shipwreck artefact and is one of very few 'objects' on the Victorian State Heritage Register. The LOCH ARD shipwreck is of State significance – Victorian Heritage Register S 417. Flagstaff Hill’s collection of artefacts from LOCH ARD is significant for being one of the largest collections of artefacts from this shipwreck in Victoria. It is significant for its association with the shipwreck, which is on the Victorian Heritage Register (VHR S417). The collection is significant because of the relationship between the objects, as together they have a high potential to interpret the story of the LOCH ARD. The LOCH ARD collection is archaeologically significant as the remains of a large international passenger and cargo ship. The LOCH ARD collection is historically significant for representing aspects of Victoria’s shipping history and its potential to interpret sub-theme 1.5 of Victoria’s Framework of Historical Themes (living with natural processes). The collection is also historically significant for its association with the LOCH ARD, which was one of the worst and best known shipwrecks in Victoria’s history. Unrestored tea spoon from the wreck of the LOCH ARD. The spoon design has a flattened fiddle-back handle, with a thin stem or shank, flared collar, and elongated bowl. The spoons metallic composition is a thin layer of brass alloy which has partially corroded back to a nickel-silver base metal. Two of five makers marks are discernible on lower rear of handle: (3) Maltese Cross (4) Crab Design.flagstaff hill, warrnambool, shipwrecked coast, flagstaff hill maritime museum, maritime museum, shipwreck coast, flagstaff hill maritime village, great ocean road, loch line, loch ard, captain gibbs, eva carmichael, tom pearce, glenample station, mutton bird island, loch ard gorge, electroplated cutlery, loch ard shipwreck, nickel silver, william page & co, birmingham, brass plating, makers marks -
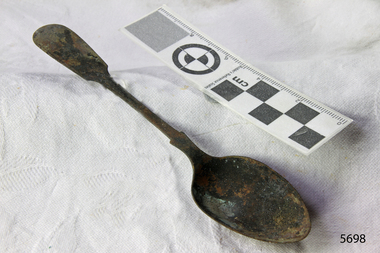 Flagstaff Hill Maritime Museum and Village
Spoon, circa 1878
This tea spoon is from the wreck of the LOCH ARD, a Loch Line ship of 1,693 tons which sailed from Gravesend, London, on 2 March 1878 with 17 passengers and a crew of 36 under Captain George Gibbs. “The intention was to discharge cargo in Melbourne, before returning to London via the Horn with wool and wheat”. Instead, on 1 June 1878, after 90 days at sea, she struck the sandstone cliffs of Mutton Bird Island on the south west coast of Victoria, and sank with the loss of 52 lives and all her cargo. The manifest of the LOCH ARD listed an array of manufactured goods and bulk metals being exported to the Colony of Victoria, with a declared value of £53,700. (202 bills of lading show an actual invoice value of £68, 456, with insurance underwriting to £30,000 of all cargo). Included in the manifest is the item of “Tin hardware & cutlery £7,530”. This teaspoon is one of 482 similar items of electro-plated cutlery from the LOCH ARD site, comprising spoons and forks of various sizes but all sharing the same general shape or design and metallic composition. 49 of these pieces display a legible makers’ mark — the initials “W” and “P” placed within a raised diamond outline, which is in turn contained within a sunken crown shape — identifying the manufacturer as William Page & Co of Birmingham. An electroplater’s makers’ marks, unlike sterling silver hallmarks, are not consistent identifiers of quality or date and place of manufacture. A similar line of five impressions was usually made to impress the consumer with an implication of industry standards, but what each one actually signified was not regulated and so they varied according to the whim of the individual foundry. In this case, the maker’s marks are often obscured by sedimentary accretion or removed by corrosion after a century of submersion in the ocean. However sufficient detail has survived to indicate that these samples of electro-plated cutlery probably originated from the same consignment in the LOCH ARD’s cargo. The following descriptions of maker’s marks are drawn from 255 tea spoons, 125 dessert spoons, and 99 table forks. These marks are clearly visible in 66 instances, while the same sequence of general outlines, or depression shapes, is discernible in another 166 examples. 1. A recessed Crown containing a raised Diamond outline and the initials “W” and “P” (the recognised trademark of William Page & Co) 2. An impressed Ellipse containing a raised, pivoted, Triangle in its lower part and bearing a Resurrection Cross on its upper section (a possible dissenting church symbol reflecting religious affiliation); OR a rounded Square impression containing a raised, ‘lazy’, letter “B” (possibly mimicking sterling silver hallmark signifying city of manufacture i.e. Birmingham) 3. An impressed rounded Square filled with a raised Maltese Cross (the base metal composite of nickel silver was also known as ‘German silver’ after its Berlin inventors in 1823) 4. A recessed Circle containing a Crab or Scarab Beetle image; OR a recessed Circle containing a rotated ‘fleur de lys’ or ‘fasces’ design 5. A depressed Diamond shape enclosing a large raised letter “R” and a small raised letter “D” (mimicking the U.K. Patent Office stamp which abbreviated the term ‘registered’ to “RD”, but also included date and class of patent) Suggested trade names for William Page & Co’s particular blend of brass plating are ‘roman silver’ or ‘silverite’. This copper alloy polishes to a lustrous gold when new, discolouring to a murky grey with greenish hue when neglected. HISTORY OF THE LOCH ARD The LOCH ARD belonged to the famous Loch Line which sailed many ships from England to Australia. Built in Glasgow by Barclay, Curdle and Co. in 1873, the LOCH ARD was a three-masted square rigged iron sailing ship. The ship measured 262ft 7" (79.87m) in length, 38ft (11.58m) in width, 23ft (7m) in depth and had a gross tonnage of 1693 tons. The LOCH ARD's main mast measured a massive 150ft (45.7m) in height. LOCH ARD made three trips to Australia and one trip to Calcutta before its final voyage. LOCH ARD left England on March 2, 1878, under the command of Captain Gibbs, a newly married, 29 year old. She was bound for Melbourne with a crew of 37, plus 17 passengers and a load of cargo. The general cargo reflected the affluence of Melbourne at the time. On board were straw hats, umbrella, perfumes, clay pipes, pianos, clocks, confectionary, linen and candles, as well as a heavier load of railway irons, cement, lead and copper. There were items included that intended for display in the Melbourne International Exhibition in 1880. The voyage to Port Phillip was long but uneventful. At 3am on June 1, 1878, Captain Gibbs was expecting to see land and the passengers were becoming excited as they prepared to view their new homeland in the early morning. But LOCH ARD was running into a fog which greatly reduced visibility. Captain Gibbs was becoming anxious as there was no sign of land or the Cape Otway lighthouse. At 4am the fog lifted. A man aloft announced that he could see breakers. The sheer cliffs of Victoria's west coast came into view, and Captain Gibbs realised that the ship was much closer to them than expected. He ordered as much sail to be set as time would permit and then attempted to steer the vessel out to sea. On coming head on into the wind, the ship lost momentum, the sails fell limp and LOCH ARD's bow swung back. Gibbs then ordered the anchors to be released in an attempt to hold its position. The anchors sank some 50 fathoms - but did not hold. By this time LOCH ARD was among the breakers and the tall cliffs of Mutton Bird Island rose behind the ship. Just half a mile from the coast, the ship's bow was suddenly pulled around by the anchor. The captain tried to tack out to sea, but the ship struck a reef at the base of Mutton Bird Island, near Port Campbell. Waves broke over the ship and the top deck was loosened from the hull. The masts and rigging came crashing down knocking passengers and crew overboard. When a lifeboat was finally launched, it crashed into the side of LOCH ARD and capsized. Tom Pearce, who had launched the boat, managed to cling to its overturned hull and shelter beneath it. He drifted out to sea and then on the flood tide came into what is now known as LOCH ARD Gorge. He swam to shore, bruised and dazed, and found a cave in which to shelter. Some of the crew stayed below deck to shelter from the falling rigging but drowned when the ship slipped off the reef into deeper water. Eva Carmichael had raced onto deck to find out what was happening only to be confronted by towering cliffs looming above the stricken ship. In all the chaos, Captain Gibbs grabbed Eva and said, "If you are saved Eva, let my dear wife know that I died like a sailor". That was the last Eva Carmichael saw of the captain. She was swept off the ship by a huge wave. Eva saw Tom Pearce on a small rocky beach and yelled to attract his attention. He dived in and swam to the exhausted woman and dragged her to shore. He took her to the cave and broke open case of brandy which had washed up on the beach. He opened a bottle to revive the unconscious woman. A few hours later Tom scaled a cliff in search of help. He followed hoof prints and came by chance upon two men from nearby Glenample Station three and a half miles away. In a state of exhaustion, he told the men of the tragedy. Tom returned to the gorge while the two men rode back to the station to get help. By the time they reached LOCH ARD Gorge, it was cold and dark. The two shipwreck survivors were taken to Glenample Station to recover. Eva stayed at the station for six weeks before returning to Ireland, this time by steamship. In Melbourne, Tom Pearce received a hero's welcome. He was presented with the first gold medal of the Royal Humane Society of Victoria and a £1000 cheque from the Victorian Government. Concerts were performed to honour the young man's bravery and to raise money for those who lost family in the LOCH ARD disaster. Of the 54 crew members and passengers on board, only two survived: the apprentice, Tom Pearce and the young woman passenger, Eva Carmichael, who lost all of her family in the tragedy. Ten days after the LOCH ARD tragedy, salvage rights to the wreck were sold at auction for £2,120. Cargo valued at £3,000 was salvaged and placed on the beach, but most washed back into the sea when another storm developed. The wreck of LOCH ARD still lies at the base of Mutton Bird Island. Much of the cargo has now been salvaged and some was washed up into what is now known as LOCH ARD Gorge. Cargo and artefacts have also been illegally salvaged over many years before protective legislation was introduced. One of the most unlikely pieces of cargo to have survived the shipwreck was a Minton porcelain peacock - one of only seven in the world. The peacock was destined for the Melbourne International Exhibition in 1880. It had been well packed, which gave it adequate protection during the violent storm. Today, the Minton peacock can be seen at the Flagstaff Hill Maritime Museum in Warrnambool. From Australia's most dramatic shipwreck it has now become Australia's most valuable shipwreck artefact and is one of very few 'objects' on the Victorian State Heritage Register. The LOCH ARD shipwreck is of State significance – Victorian Heritage Register S 417. Flagstaff Hill’s collection of artefacts from LOCH ARD is significant for being one of the largest collections of artefacts from this shipwreck in Victoria. It is significant for its association with the shipwreck, which is on the Victorian Heritage Register (VHR S417). The collection is significant because of the relationship between the objects, as together they have a high potential to interpret the story of the LOCH ARD. The LOCH ARD collection is archaeologically significant as the remains of a large international passenger and cargo ship. The LOCH ARD collection is historically significant for representing aspects of Victoria’s shipping history and its potential to interpret sub-theme 1.5 of Victoria’s Framework of Historical Themes (living with natural processes). The collection is also historically significant for its association with the LOCH ARD, which was one of the worst and best known shipwrecks in Victoria’s history. Unrestored tea spoon from the wreck of the LOCH ARD. The spoon design has a flattened fiddle-back handle, with a thin stem or shank, flared collar, and elongated bowl. The spoons metallic composition is a thin layer of brass alloy which has partially corroded back to a nickel-silver base metal. One of five makers marks is legible: (3) Maltese Cross.flagstaff hill, warrnambool, shipwrecked coast, flagstaff hill maritime museum, maritime museum, shipwreck coast, flagstaff hill maritime village, great ocean road, loch line, loch ard, captain gibbs, eva carmichael, tom pearce, glenample station, mutton bird island, loch ard gorge, electroplated cutlery, loch ard shipwreck, nickel silver, william page & co, birmingham, brass plating, makers marks -
 Flagstaff Hill Maritime Museum and Village
Spoon, circa 1878
This tea spoon is from the wreck of the LOCH ARD, a Loch Line ship of 1,693 tons which sailed from Gravesend, London, on 2 March 1878 with 17 passengers and a crew of 36 under Captain George Gibbs. “The intention was to discharge cargo in Melbourne, before returning to London via the Horn with wool and wheat”. Instead, on 1 June 1878, after 90 days at sea, she struck the sandstone cliffs of Mutton Bird Island on the south west coast of Victoria, and sank with the loss of 52 lives and all her cargo. The manifest of the LOCH ARD listed an array of manufactured goods and bulk metals being exported to the Colony of Victoria, with a declared value of £53,700. (202 bills of lading show an actual invoice value of £68, 456, with insurance underwriting to £30,000 of all cargo). Included in the manifest is the item of “Tin hardware & cutlery £7,530”. This teaspoon is one of 482 similar items of electro-plated cutlery from the LOCH ARD site, comprising spoons and forks of various sizes but all sharing the same general shape or design and metallic composition. 49 of these pieces display a legible makers’ mark — the initials “W” and “P” placed within a raised diamond outline, which is in turn contained within a sunken crown shape — identifying the manufacturer as William Page & Co of Birmingham. An electroplater’s makers’ marks, unlike sterling silver hallmarks, are not consistent identifiers of quality or date and place of manufacture. A similar line of five impressions was usually made to impress the consumer with an implication of industry standards, but what each one actually signified was not regulated and so they varied according to the whim of the individual foundry. In this case, the maker’s marks are often obscured by sedimentary accretion or removed by corrosion after a century of submersion in the ocean. However sufficient detail has survived to indicate that these samples of electro-plated cutlery probably originated from the same consignment in the LOCH ARD’s cargo. The following descriptions of maker’s marks are drawn from 255 tea spoons, 125 dessert spoons, and 99 table forks. These marks are clearly visible in 66 instances, while the same sequence of general outlines, or depression shapes, is discernible in another 166 examples. 1. A recessed Crown containing a raised Diamond outline and the initials “W” and “P” (the recognised trademark of William Page & Co) 2. An impressed Ellipse containing a raised, pivoted, Triangle in its lower part and bearing a Resurrection Cross on its upper section (a possible dissenting church symbol reflecting religious affiliation); OR a rounded Square impression containing a raised, ‘lazy’, letter “B” (possibly mimicking sterling silver hallmark signifying city of manufacture i.e. Birmingham) 3. An impressed rounded Square filled with a raised Maltese Cross (the base metal composite of nickel silver was also known as ‘German silver’ after its Berlin inventors in 1823) 4. A recessed Circle containing a Crab or Scarab Beetle image; OR a recessed Circle containing a rotated ‘fleur de lys’ or ‘fasces’ design 5. A depressed Diamond shape enclosing a large raised letter “R” and a small raised letter “D” (mimicking the U.K. Patent Office stamp which abbreviated the term ‘registered’ to “RD”, but also included date and class of patent) Suggested trade names for William Page & Co’s particular blend of brass plating are ‘roman silver’ or ‘silverite’. This copper alloy polishes to a lustrous gold when new, discolouring to a murky grey with greenish hue when neglected. HISTORY OF THE LOCH ARD The LOCH ARD belonged to the famous Loch Line which sailed many ships from England to Australia. Built in Glasgow by Barclay, Curdle and Co. in 1873, the LOCH ARD was a three-masted square rigged iron sailing ship. The ship measured 262ft 7" (79.87m) in length, 38ft (11.58m) in width, 23ft (7m) in depth and had a gross tonnage of 1693 tons. The LOCH ARD's main mast measured a massive 150ft (45.7m) in height. LOCH ARD made three trips to Australia and one trip to Calcutta before its final voyage. LOCH ARD left England on March 2, 1878, under the command of Captain Gibbs, a newly married, 29 year old. She was bound for Melbourne with a crew of 37, plus 17 passengers and a load of cargo. The general cargo reflected the affluence of Melbourne at the time. On board were straw hats, umbrella, perfumes, clay pipes, pianos, clocks, confectionary, linen and candles, as well as a heavier load of railway irons, cement, lead and copper. There were items included that intended for display in the Melbourne International Exhibition in 1880. The voyage to Port Phillip was long but uneventful. At 3am on June 1, 1878, Captain Gibbs was expecting to see land and the passengers were becoming excited as they prepared to view their new homeland in the early morning. But LOCH ARD was running into a fog which greatly reduced visibility. Captain Gibbs was becoming anxious as there was no sign of land or the Cape Otway lighthouse. At 4am the fog lifted. A man aloft announced that he could see breakers. The sheer cliffs of Victoria's west coast came into view, and Captain Gibbs realised that the ship was much closer to them than expected. He ordered as much sail to be set as time would permit and then attempted to steer the vessel out to sea. On coming head on into the wind, the ship lost momentum, the sails fell limp and LOCH ARD's bow swung back. Gibbs then ordered the anchors to be released in an attempt to hold its position. The anchors sank some 50 fathoms - but did not hold. By this time LOCH ARD was among the breakers and the tall cliffs of Mutton Bird Island rose behind the ship. Just half a mile from the coast, the ship's bow was suddenly pulled around by the anchor. The captain tried to tack out to sea, but the ship struck a reef at the base of Mutton Bird Island, near Port Campbell. Waves broke over the ship and the top deck was loosened from the hull. The masts and rigging came crashing down knocking passengers and crew overboard. When a lifeboat was finally launched, it crashed into the side of LOCH ARD and capsized. Tom Pearce, who had launched the boat, managed to cling to its overturned hull and shelter beneath it. He drifted out to sea and then on the flood tide came into what is now known as LOCH ARD Gorge. He swam to shore, bruised and dazed, and found a cave in which to shelter. Some of the crew stayed below deck to shelter from the falling rigging but drowned when the ship slipped off the reef into deeper water. Eva Carmichael had raced onto deck to find out what was happening only to be confronted by towering cliffs looming above the stricken ship. In all the chaos, Captain Gibbs grabbed Eva and said, "If you are saved Eva, let my dear wife know that I died like a sailor". That was the last Eva Carmichael saw of the captain. She was swept off the ship by a huge wave. Eva saw Tom Pearce on a small rocky beach and yelled to attract his attention. He dived in and swam to the exhausted woman and dragged her to shore. He took her to the cave and broke open case of brandy which had washed up on the beach. He opened a bottle to revive the unconscious woman. A few hours later Tom scaled a cliff in search of help. He followed hoof prints and came by chance upon two men from nearby Glenample Station three and a half miles away. In a state of exhaustion, he told the men of the tragedy. Tom returned to the gorge while the two men rode back to the station to get help. By the time they reached LOCH ARD Gorge, it was cold and dark. The two shipwreck survivors were taken to Glenample Station to recover. Eva stayed at the station for six weeks before returning to Ireland, this time by steamship. In Melbourne, Tom Pearce received a hero's welcome. He was presented with the first gold medal of the Royal Humane Society of Victoria and a £1000 cheque from the Victorian Government. Concerts were performed to honour the young man's bravery and to raise money for those who lost family in the LOCH ARD disaster. Of the 54 crew members and passengers on board, only two survived: the apprentice, Tom Pearce and the young woman passenger, Eva Carmichael, who lost all of her family in the tragedy. Ten days after the LOCH ARD tragedy, salvage rights to the wreck were sold at auction for £2,120. Cargo valued at £3,000 was salvaged and placed on the beach, but most washed back into the sea when another storm developed. The wreck of LOCH ARD still lies at the base of Mutton Bird Island. Much of the cargo has now been salvaged and some was washed up into what is now known as LOCH ARD Gorge. Cargo and artefacts have also been illegally salvaged over many years before protective legislation was introduced. One of the most unlikely pieces of cargo to have survived the shipwreck was a Minton porcelain peacock - one of only seven in the world. The peacock was destined for the Melbourne International Exhibition in 1880. It had been well packed, which gave it adequate protection during the violent storm. Today, the Minton peacock can be seen at the Flagstaff Hill Maritime Museum in Warrnambool. From Australia's most dramatic shipwreck it has now become Australia's most valuable shipwreck artefact and is one of very few 'objects' on the Victorian State Heritage Register. The LOCH ARD shipwreck is of State significance – Victorian Heritage Register S 417. Flagstaff Hill’s collection of artefacts from LOCH ARD is significant for being one of the largest collections of artefacts from this shipwreck in Victoria. It is significant for its association with the shipwreck, which is on the Victorian Heritage Register (VHR S417). The collection is significant because of the relationship between the objects, as together they have a high potential to interpret the story of the LOCH ARD. The LOCH ARD collection is archaeologically significant as the remains of a large international passenger and cargo ship. The LOCH ARD collection is historically significant for representing aspects of Victoria’s shipping history and its potential to interpret sub-theme 1.5 of Victoria’s Framework of Historical Themes (living with natural processes). The collection is also historically significant for its association with the LOCH ARD, which was one of the worst and best known shipwrecks in Victoria’s history. Unrestored tea spoon from the wreck of the LOCH ARD. The spoon design has a flattened fiddle-back handle, with a thin stem or shank, flared collar, and elongated bowl. The spoons metallic composition is a thin layer of brass alloy which has partially corroded back to a nickel-silver base metal. Minimal original electroplating remains and makers marks are obscured. flagstaff hill, warrnambool, shipwrecked coast, flagstaff hill maritime museum, maritime museum, shipwreck coast, flagstaff hill maritime village, great ocean road, loch line, loch ard, captain gibbs, eva carmichael, tom pearce, glenample station, mutton bird island, loch ard gorge, electroplated cutlery, loch ard shipwreck, nickel silver, william page & co, birmingham, brass plating, makers marks -
 Flagstaff Hill Maritime Museum and Village
Spoon, circa 1878
This tea spoon is from the wreck of the LOCH ARD, a Loch Line ship of 1,693 tons which sailed from Gravesend, London, on 2 March 1878 with 17 passengers and a crew of 36 under Captain George Gibbs. “The intention was to discharge cargo in Melbourne, before returning to London via the Horn with wool and wheat”. Instead, on 1 June 1878, after 90 days at sea, she struck the sandstone cliffs of Mutton Bird Island on the south west coast of Victoria, and sank with the loss of 52 lives and all her cargo. The manifest of the LOCH ARD listed an array of manufactured goods and bulk metals being exported to the Colony of Victoria, with a declared value of £53,700. (202 bills of lading show an actual invoice value of £68, 456, with insurance underwriting to £30,000 of all cargo). Included in the manifest is the item of “Tin hardware & cutlery £7,530”. This teaspoon is one of 482 similar items of electro-plated cutlery from the LOCH ARD site, comprising spoons and forks of various sizes but all sharing the same general shape or design and metallic composition. 49 of these pieces display a legible makers’ mark — the initials “W” and “P” placed within a raised diamond outline, which is in turn contained within a sunken crown shape — identifying the manufacturer as William Page & Co of Birmingham. An electroplater’s makers’ marks, unlike sterling silver hallmarks, are not consistent identifiers of quality or date and place of manufacture. A similar line of five impressions was usually made to impress the consumer with an implication of industry standards, but what each one actually signified was not regulated and so they varied according to the whim of the individual foundry. In this case, the maker’s marks are often obscured by sedimentary accretion or removed by corrosion after a century of submersion in the ocean. However sufficient detail has survived to indicate that these samples of electro-plated cutlery probably originated from the same consignment in the LOCH ARD’s cargo. The following descriptions of maker’s marks are drawn from 255 tea spoons, 125 dessert spoons, and 99 table forks. These marks are clearly visible in 66 instances, while the same sequence of general outlines, or depression shapes, is discernible in another 166 examples. 1. A recessed Crown containing a raised Diamond outline and the initials “W” and “P” (the recognised trademark of William Page & Co) 2. An impressed Ellipse containing a raised, pivoted, Triangle in its lower part and bearing a Resurrection Cross on its upper section (a possible dissenting church symbol reflecting religious affiliation); OR a rounded Square impression containing a raised, ‘lazy’, letter “B” (possibly mimicking sterling silver hallmark signifying city of manufacture i.e. Birmingham) 3. An impressed rounded Square filled with a raised Maltese Cross (the base metal composite of nickel silver was also known as ‘German silver’ after its Berlin inventors in 1823) 4. A recessed Circle containing a Crab or Scarab Beetle image; OR a recessed Circle containing a rotated ‘fleur de lys’ or ‘fasces’ design 5. A depressed Diamond shape enclosing a large raised letter “R” and a small raised letter “D” (mimicking the U.K. Patent Office stamp which abbreviated the term ‘registered’ to “RD”, but also included date and class of patent) Suggested trade names for William Page & Co’s particular blend of brass plating are ‘roman silver’ or ‘silverite’. This copper alloy polishes to a lustrous gold when new, discolouring to a murky grey with greenish hue when neglected. HISTORY OF THE LOCH ARD The LOCH ARD belonged to the famous Loch Line which sailed many ships from England to Australia. Built in Glasgow by Barclay, Curdle and Co. in 1873, the LOCH ARD was a three-masted square rigged iron sailing ship. The ship measured 262ft 7" (79.87m) in length, 38ft (11.58m) in width, 23ft (7m) in depth and had a gross tonnage of 1693 tons. The LOCH ARD's main mast measured a massive 150ft (45.7m) in height. LOCH ARD made three trips to Australia and one trip to Calcutta before its final voyage. LOCH ARD left England on March 2, 1878, under the command of Captain Gibbs, a newly married, 29 year old. She was bound for Melbourne with a crew of 37, plus 17 passengers and a load of cargo. The general cargo reflected the affluence of Melbourne at the time. On board were straw hats, umbrella, perfumes, clay pipes, pianos, clocks, confectionary, linen and candles, as well as a heavier load of railway irons, cement, lead and copper. There were items included that intended for display in the Melbourne International Exhibition in 1880. The voyage to Port Phillip was long but uneventful. At 3am on June 1, 1878, Captain Gibbs was expecting to see land and the passengers were becoming excited as they prepared to view their new homeland in the early morning. But LOCH ARD was running into a fog which greatly reduced visibility. Captain Gibbs was becoming anxious as there was no sign of land or the Cape Otway lighthouse. At 4am the fog lifted. A man aloft announced that he could see breakers. The sheer cliffs of Victoria's west coast came into view, and Captain Gibbs realised that the ship was much closer to them than expected. He ordered as much sail to be set as time would permit and then attempted to steer the vessel out to sea. On coming head on into the wind, the ship lost momentum, the sails fell limp and LOCH ARD's bow swung back. Gibbs then ordered the anchors to be released in an attempt to hold its position. The anchors sank some 50 fathoms - but did not hold. By this time LOCH ARD was among the breakers and the tall cliffs of Mutton Bird Island rose behind the ship. Just half a mile from the coast, the ship's bow was suddenly pulled around by the anchor. The captain tried to tack out to sea, but the ship struck a reef at the base of Mutton Bird Island, near Port Campbell. Waves broke over the ship and the top deck was loosened from the hull. The masts and rigging came crashing down knocking passengers and crew overboard. When a lifeboat was finally launched, it crashed into the side of LOCH ARD and capsized. Tom Pearce, who had launched the boat, managed to cling to its overturned hull and shelter beneath it. He drifted out to sea and then on the flood tide came into what is now known as LOCH ARD Gorge. He swam to shore, bruised and dazed, and found a cave in which to shelter. Some of the crew stayed below deck to shelter from the falling rigging but drowned when the ship slipped off the reef into deeper water. Eva Carmichael had raced onto deck to find out what was happening only to be confronted by towering cliffs looming above the stricken ship. In all the chaos, Captain Gibbs grabbed Eva and said, "If you are saved Eva, let my dear wife know that I died like a sailor". That was the last Eva Carmichael saw of the captain. She was swept off the ship by a huge wave. Eva saw Tom Pearce on a small rocky beach and yelled to attract his attention. He dived in and swam to the exhausted woman and dragged her to shore. He took her to the cave and broke open case of brandy which had washed up on the beach. He opened a bottle to revive the unconscious woman. A few hours later Tom scaled a cliff in search of help. He followed hoof prints and came by chance upon two men from nearby Glenample Station three and a half miles away. In a state of exhaustion, he told the men of the tragedy. Tom returned to the gorge while the two men rode back to the station to get help. By the time they reached LOCH ARD Gorge, it was cold and dark. The two shipwreck survivors were taken to Glenample Station to recover. Eva stayed at the station for six weeks before returning to Ireland, this time by steamship. In Melbourne, Tom Pearce received a hero's welcome. He was presented with the first gold medal of the Royal Humane Society of Victoria and a £1000 cheque from the Victorian Government. Concerts were performed to honour the young man's bravery and to raise money for those who lost family in the LOCH ARD disaster. Of the 54 crew members and passengers on board, only two survived: the apprentice, Tom Pearce and the young woman passenger, Eva Carmichael, who lost all of her family in the tragedy. Ten days after the LOCH ARD tragedy, salvage rights to the wreck were sold at auction for £2,120. Cargo valued at £3,000 was salvaged and placed on the beach, but most washed back into the sea when another storm developed. The wreck of LOCH ARD still lies at the base of Mutton Bird Island. Much of the cargo has now been salvaged and some was washed up into what is now known as LOCH ARD Gorge. Cargo and artefacts have also been illegally salvaged over many years before protective legislation was introduced. One of the most unlikely pieces of cargo to have survived the shipwreck was a Minton porcelain peacock - one of only seven in the world. The peacock was destined for the Melbourne International Exhibition in 1880. It had been well packed, which gave it adequate protection during the violent storm. Today, the Minton peacock can be seen at the Flagstaff Hill Maritime Museum in Warrnambool. From Australia's most dramatic shipwreck it has now become Australia's most valuable shipwreck artefact and is one of very few 'objects' on the Victorian State Heritage Register. The LOCH ARD shipwreck is of State significance – Victorian Heritage Register S 417. Flagstaff Hill’s collection of artefacts from LOCH ARD is significant for being one of the largest collections of artefacts from this shipwreck in Victoria. It is significant for its association with the shipwreck, which is on the Victorian Heritage Register (VHR S417). The collection is significant because of the relationship between the objects, as together they have a high potential to interpret the story of the LOCH ARD. The LOCH ARD collection is archaeologically significant as the remains of a large international passenger and cargo ship. The LOCH ARD collection is historically significant for representing aspects of Victoria’s shipping history and its potential to interpret sub-theme 1.5 of Victoria’s Framework of Historical Themes (living with natural processes). The collection is also historically significant for its association with the LOCH ARD, which was one of the worst and best known shipwrecks in Victoria’s history. Unrestored tea spoon from the wreck of the LOCH ARD. The spoon design has a flattened fiddle-back handle, with a thin stem or shank, flared collar, and elongated bowl. The spoons metallic composition is a thin layer of brass alloy which has partially corroded back to a nickel-silver base metal. No makers marks are visible.flagstaff hill, warrnambool, shipwrecked coast, flagstaff hill maritime museum, maritime museum, shipwreck coast, flagstaff hill maritime village, great ocean road, loch line, loch ard, captain gibbs, eva carmichael, tom pearce, glenample station, mutton bird island, loch ard gorge, electroplated cutlery, loch ard shipwreck, nickel silver, william page & co, birmingham, brass plating, makers marks -
 Flagstaff Hill Maritime Museum and Village
Spoon, circa 1878
This tea spoon is from the wreck of the LOCH ARD, a Loch Line ship of 1,693 tons which sailed from Gravesend, London, on 2 March 1878 with 17 passengers and a crew of 36 under Captain George Gibbs. “The intention was to discharge cargo in Melbourne, before returning to London via the Horn with wool and wheat”. Instead, on 1 June 1878, after 90 days at sea, she struck the sandstone cliffs of Mutton Bird Island on the south west coast of Victoria, and sank with the loss of 52 lives and all her cargo. The manifest of the LOCH ARD listed an array of manufactured goods and bulk metals being exported to the Colony of Victoria, with a declared value of £53,700. (202 bills of lading show an actual invoice value of £68, 456, with insurance underwriting to £30,000 of all cargo). Included in the manifest is the item of “Tin hardware & cutlery £7,530”. This teaspoon is one of 482 similar items of electro-plated cutlery from the LOCH ARD site, comprising spoons and forks of various sizes but all sharing the same general shape or design and metallic composition. 49 of these pieces display a legible makers’ mark — the initials “W” and “P” placed within a raised diamond outline, which is in turn contained within a sunken crown shape — identifying the manufacturer as William Page & Co of Birmingham. An electroplater’s makers’ marks, unlike sterling silver hallmarks, are not consistent identifiers of quality or date and place of manufacture. A similar line of five impressions was usually made to impress the consumer with an implication of industry standards, but what each one actually signified was not regulated and so they varied according to the whim of the individual foundry. In this case, the maker’s marks are often obscured by sedimentary accretion or removed by corrosion after a century of submersion in the ocean. However sufficient detail has survived to indicate that these samples of electro-plated cutlery probably originated from the same consignment in the LOCH ARD’s cargo. The following descriptions of maker’s marks are drawn from 255 tea spoons, 125 dessert spoons, and 99 table forks. These marks are clearly visible in 66 instances, while the same sequence of general outlines, or depression shapes, is discernible in another 166 examples. 1. A recessed Crown containing a raised Diamond outline and the initials “W” and “P” (the recognised trademark of William Page & Co) 2. An impressed Ellipse containing a raised, pivoted, Triangle in its lower part and bearing a Resurrection Cross on its upper section (a possible dissenting church symbol reflecting religious affiliation); OR a rounded Square impression containing a raised, ‘lazy’, letter “B” (possibly mimicking sterling silver hallmark signifying city of manufacture i.e. Birmingham) 3. An impressed rounded Square filled with a raised Maltese Cross (the base metal composite of nickel silver was also known as ‘German silver’ after its Berlin inventors in 1823) 4. A recessed Circle containing a Crab or Scarab Beetle image; OR a recessed Circle containing a rotated ‘fleur de lys’ or ‘fasces’ design 5. A depressed Diamond shape enclosing a large raised letter “R” and a small raised letter “D” (mimicking the U.K. Patent Office stamp which abbreviated the term ‘registered’ to “RD”, but also included date and class of patent) Suggested trade names for William Page & Co’s particular blend of brass plating are ‘roman silver’ or ‘silverite’. This copper alloy polishes to a lustrous gold when new, discolouring to a murky grey with greenish hue when neglected. HISTORY OF THE LOCH ARD The LOCH ARD belonged to the famous Loch Line which sailed many ships from England to Australia. Built in Glasgow by Barclay, Curdle and Co. in 1873, the LOCH ARD was a three-masted square rigged iron sailing ship. The ship measured 262ft 7" (79.87m) in length, 38ft (11.58m) in width, 23ft (7m) in depth and had a gross tonnage of 1693 tons. The LOCH ARD's main mast measured a massive 150ft (45.7m) in height. LOCH ARD made three trips to Australia and one trip to Calcutta before its final voyage. LOCH ARD left England on March 2, 1878, under the command of Captain Gibbs, a newly married, 29 year old. She was bound for Melbourne with a crew of 37, plus 17 passengers and a load of cargo. The general cargo reflected the affluence of Melbourne at the time. On board were straw hats, umbrella, perfumes, clay pipes, pianos, clocks, confectionary, linen and candles, as well as a heavier load of railway irons, cement, lead and copper. There were items included that intended for display in the Melbourne International Exhibition in 1880. The voyage to Port Phillip was long but uneventful. At 3am on June 1, 1878, Captain Gibbs was expecting to see land and the passengers were becoming excited as they prepared to view their new homeland in the early morning. But LOCH ARD was running into a fog which greatly reduced visibility. Captain Gibbs was becoming anxious as there was no sign of land or the Cape Otway lighthouse. At 4am the fog lifted. A man aloft announced that he could see breakers. The sheer cliffs of Victoria's west coast came into view, and Captain Gibbs realised that the ship was much closer to them than expected. He ordered as much sail to be set as time would permit and then attempted to steer the vessel out to sea. On coming head on into the wind, the ship lost momentum, the sails fell limp and LOCH ARD's bow swung back. Gibbs then ordered the anchors to be released in an attempt to hold its position. The anchors sank some 50 fathoms - but did not hold. By this time LOCH ARD was among the breakers and the tall cliffs of Mutton Bird Island rose behind the ship. Just half a mile from the coast, the ship's bow was suddenly pulled around by the anchor. The captain tried to tack out to sea, but the ship struck a reef at the base of Mutton Bird Island, near Port Campbell. Waves broke over the ship and the top deck was loosened from the hull. The masts and rigging came crashing down knocking passengers and crew overboard. When a lifeboat was finally launched, it crashed into the side of LOCH ARD and capsized. Tom Pearce, who had launched the boat, managed to cling to its overturned hull and shelter beneath it. He drifted out to sea and then on the flood tide came into what is now known as LOCH ARD Gorge. He swam to shore, bruised and dazed, and found a cave in which to shelter. Some of the crew stayed below deck to shelter from the falling rigging but drowned when the ship slipped off the reef into deeper water. Eva Carmichael had raced onto deck to find out what was happening only to be confronted by towering cliffs looming above the stricken ship. In all the chaos, Captain Gibbs grabbed Eva and said, "If you are saved Eva, let my dear wife know that I died like a sailor". That was the last Eva Carmichael saw of the captain. She was swept off the ship by a huge wave. Eva saw Tom Pearce on a small rocky beach and yelled to attract his attention. He dived in and swam to the exhausted woman and dragged her to shore. He took her to the cave and broke open case of brandy which had washed up on the beach. He opened a bottle to revive the unconscious woman. A few hours later Tom scaled a cliff in search of help. He followed hoof prints and came by chance upon two men from nearby Glenample Station three and a half miles away. In a state of exhaustion, he told the men of the tragedy. Tom returned to the gorge while the two men rode back to the station to get help. By the time they reached LOCH ARD Gorge, it was cold and dark. The two shipwreck survivors were taken to Glenample Station to recover. Eva stayed at the station for six weeks before returning to Ireland, this time by steamship. In Melbourne, Tom Pearce received a hero's welcome. He was presented with the first gold medal of the Royal Humane Society of Victoria and a £1000 cheque from the Victorian Government. Concerts were performed to honour the young man's bravery and to raise money for those who lost family in the LOCH ARD disaster. Of the 54 crew members and passengers on board, only two survived: the apprentice, Tom Pearce and the young woman passenger, Eva Carmichael, who lost all of her family in the tragedy. Ten days after the LOCH ARD tragedy, salvage rights to the wreck were sold at auction for £2,120. Cargo valued at £3,000 was salvaged and placed on the beach, but most washed back into the sea when another storm developed. The wreck of LOCH ARD still lies at the base of Mutton Bird Island. Much of the cargo has now been salvaged and some was washed up into what is now known as LOCH ARD Gorge. Cargo and artefacts have also been illegally salvaged over many years before protective legislation was introduced. One of the most unlikely pieces of cargo to have survived the shipwreck was a Minton porcelain peacock - one of only seven in the world. The peacock was destined for the Melbourne International Exhibition in 1880. It had been well packed, which gave it adequate protection during the violent storm. Today, the Minton peacock can be seen at the Flagstaff Hill Maritime Museum in Warrnambool. From Australia's most dramatic shipwreck it has now become Australia's most valuable shipwreck artefact and is one of very few 'objects' on the Victorian State Heritage Register. The LOCH ARD shipwreck is of State significance – Victorian Heritage Register S 417. Flagstaff Hill’s collection of artefacts from LOCH ARD is significant for being one of the largest collections of artefacts from this shipwreck in Victoria. It is significant for its association with the shipwreck, which is on the Victorian Heritage Register (VHR S417). The collection is significant because of the relationship between the objects, as together they have a high potential to interpret the story of the LOCH ARD. The LOCH ARD collection is archaeologically significant as the remains of a large international passenger and cargo ship. The LOCH ARD collection is historically significant for representing aspects of Victoria’s shipping history and its potential to interpret sub-theme 1.5 of Victoria’s Framework of Historical Themes (living with natural processes). The collection is also historically significant for its association with the LOCH ARD, which was one of the worst and best known shipwrecks in Victoria’s history. Unrestored tea spoon from the wreck of the LOCH ARD. The spoon design has a flattened fiddle-back handle, with a thin stem or shank, flared collar, and elongated bowl. The spoons metallic composition is a thin layer of brass alloy which has partially corroded back to a nickel-silver base metal. Approximately 15% of original electroplating remains with some verdigris. Outlines of five makers marks are discernible but the details are obscured.flagstaff hill, warrnambool, shipwrecked coast, flagstaff hill maritime museum, maritime museum, shipwreck coast, flagstaff hill maritime village, great ocean road, loch line, loch ard, captain gibbs, eva carmichael, tom pearce, glenample station, mutton bird island, loch ard gorge, electroplated cutlery, loch ard shipwreck, nickel silver, william page & co, birmingham, brass plating, makers marks -
 Flagstaff Hill Maritime Museum and Village
Spoon, circa 1878
This tea spoon is from the wreck of the LOCH ARD, a Loch Line ship of 1,693 tons which sailed from Gravesend, London, on 2 March 1878 with 17 passengers and a crew of 36 under Captain George Gibbs. “The intention was to discharge cargo in Melbourne, before returning to London via the Horn with wool and wheat”. Instead, on 1 June 1878, after 90 days at sea, she struck the sandstone cliffs of Mutton Bird Island on the south west coast of Victoria, and sank with the loss of 52 lives and all her cargo. The manifest of the LOCH ARD listed an array of manufactured goods and bulk metals being exported to the Colony of Victoria, with a declared value of £53,700. (202 bills of lading show an actual invoice value of £68, 456, with insurance underwriting to £30,000 of all cargo). Included in the manifest is the item of “Tin hardware & cutlery £7,530”. This teaspoon is one of 482 similar items of electro-plated cutlery from the LOCH ARD site, comprising spoons and forks of various sizes but all sharing the same general shape or design and metallic composition. 49 of these pieces display a legible makers’ mark — the initials “W” and “P” placed within a raised diamond outline, which is in turn contained within a sunken crown shape — identifying the manufacturer as William Page & Co of Birmingham. An electroplater’s makers’ marks, unlike sterling silver hallmarks, are not consistent identifiers of quality or date and place of manufacture. A similar line of five impressions was usually made to impress the consumer with an implication of industry standards, but what each one actually signified was not regulated and so they varied according to the whim of the individual foundry. In this case, the maker’s marks are often obscured by sedimentary accretion or removed by corrosion after a century of submersion in the ocean. However sufficient detail has survived to indicate that these samples of electro-plated cutlery probably originated from the same consignment in the LOCH ARD’s cargo. The following descriptions of maker’s marks are drawn from 255 tea spoons, 125 dessert spoons, and 99 table forks. These marks are clearly visible in 66 instances, while the same sequence of general outlines, or depression shapes, is discernible in another 166 examples. 1. A recessed Crown containing a raised Diamond outline and the initials “W” and “P” (the recognised trademark of William Page & Co) 2. An impressed Ellipse containing a raised, pivoted, Triangle in its lower part and bearing a Resurrection Cross on its upper section (a possible dissenting church symbol reflecting religious affiliation); OR a rounded Square impression containing a raised, ‘lazy’, letter “B” (possibly mimicking sterling silver hallmark signifying city of manufacture i.e. Birmingham) 3. An impressed rounded Square filled with a raised Maltese Cross (the base metal composite of nickel silver was also known as ‘German silver’ after its Berlin inventors in 1823) 4. A recessed Circle containing a Crab or Scarab Beetle image; OR a recessed Circle containing a rotated ‘fleur de lys’ or ‘fasces’ design 5. A depressed Diamond shape enclosing a large raised letter “R” and a small raised letter “D” (mimicking the U.K. Patent Office stamp which abbreviated the term ‘registered’ to “RD”, but also included date and class of patent) Suggested trade names for William Page & Co’s particular blend of brass plating are ‘roman silver’ or ‘silverite’. This copper alloy polishes to a lustrous gold when new, discolouring to a murky grey with greenish hue when neglected. HISTORY OF THE LOCH ARD The LOCH ARD belonged to the famous Loch Line which sailed many ships from England to Australia. Built in Glasgow by Barclay, Curdle and Co. in 1873, the LOCH ARD was a three-masted square rigged iron sailing ship. The ship measured 262ft 7" (79.87m) in length, 38ft (11.58m) in width, 23ft (7m) in depth and had a gross tonnage of 1693 tons. The LOCH ARD's main mast measured a massive 150ft (45.7m) in height. LOCH ARD made three trips to Australia and one trip to Calcutta before its final voyage. LOCH ARD left England on March 2, 1878, under the command of Captain Gibbs, a newly married, 29 year old. She was bound for Melbourne with a crew of 37, plus 17 passengers and a load of cargo. The general cargo reflected the affluence of Melbourne at the time. On board were straw hats, umbrella, perfumes, clay pipes, pianos, clocks, confectionary, linen and candles, as well as a heavier load of railway irons, cement, lead and copper. There were items included that intended for display in the Melbourne International Exhibition in 1880. The voyage to Port Phillip was long but uneventful. At 3am on June 1, 1878, Captain Gibbs was expecting to see land and the passengers were becoming excited as they prepared to view their new homeland in the early morning. But LOCH ARD was running into a fog which greatly reduced visibility. Captain Gibbs was becoming anxious as there was no sign of land or the Cape Otway lighthouse. At 4am the fog lifted. A man aloft announced that he could see breakers. The sheer cliffs of Victoria's west coast came into view, and Captain Gibbs realised that the ship was much closer to them than expected. He ordered as much sail to be set as time would permit and then attempted to steer the vessel out to sea. On coming head on into the wind, the ship lost momentum, the sails fell limp and LOCH ARD's bow swung back. Gibbs then ordered the anchors to be released in an attempt to hold its position. The anchors sank some 50 fathoms - but did not hold. By this time LOCH ARD was among the breakers and the tall cliffs of Mutton Bird Island rose behind the ship. Just half a mile from the coast, the ship's bow was suddenly pulled around by the anchor. The captain tried to tack out to sea, but the ship struck a reef at the base of Mutton Bird Island, near Port Campbell. Waves broke over the ship and the top deck was loosened from the hull. The masts and rigging came crashing down knocking passengers and crew overboard. When a lifeboat was finally launched, it crashed into the side of LOCH ARD and capsized. Tom Pearce, who had launched the boat, managed to cling to its overturned hull and shelter beneath it. He drifted out to sea and then on the flood tide came into what is now known as LOCH ARD Gorge. He swam to shore, bruised and dazed, and found a cave in which to shelter. Some of the crew stayed below deck to shelter from the falling rigging but drowned when the ship slipped off the reef into deeper water. Eva Carmichael had raced onto deck to find out what was happening only to be confronted by towering cliffs looming above the stricken ship. In all the chaos, Captain Gibbs grabbed Eva and said, "If you are saved Eva, let my dear wife know that I died like a sailor". That was the last Eva Carmichael saw of the captain. She was swept off the ship by a huge wave. Eva saw Tom Pearce on a small rocky beach and yelled to attract his attention. He dived in and swam to the exhausted woman and dragged her to shore. He took her to the cave and broke open case of brandy which had washed up on the beach. He opened a bottle to revive the unconscious woman. A few hours later Tom scaled a cliff in search of help. He followed hoof prints and came by chance upon two men from nearby Glenample Station three and a half miles away. In a state of exhaustion, he told the men of the tragedy. Tom returned to the gorge while the two men rode back to the station to get help. By the time they reached LOCH ARD Gorge, it was cold and dark. The two shipwreck survivors were taken to Glenample Station to recover. Eva stayed at the station for six weeks before returning to Ireland, this time by steamship. In Melbourne, Tom Pearce received a hero's welcome. He was presented with the first gold medal of the Royal Humane Society of Victoria and a £1000 cheque from the Victorian Government. Concerts were performed to honour the young man's bravery and to raise money for those who lost family in the LOCH ARD disaster. Of the 54 crew members and passengers on board, only two survived: the apprentice, Tom Pearce and the young woman passenger, Eva Carmichael, who lost all of her family in the tragedy. Ten days after the LOCH ARD tragedy, salvage rights to the wreck were sold at auction for £2,120. Cargo valued at £3,000 was salvaged and placed on the beach, but most washed back into the sea when another storm developed. The wreck of LOCH ARD still lies at the base of Mutton Bird Island. Much of the cargo has now been salvaged and some was washed up into what is now known as LOCH ARD Gorge. Cargo and artefacts have also been illegally salvaged over many years before protective legislation was introduced. One of the most unlikely pieces of cargo to have survived the shipwreck was a Minton porcelain peacock - one of only seven in the world. The peacock was destined for the Melbourne International Exhibition in 1880. It had been well packed, which gave it adequate protection during the violent storm. Today, the Minton peacock can be seen at the Flagstaff Hill Maritime Museum in Warrnambool. From Australia's most dramatic shipwreck it has now become Australia's most valuable shipwreck artefact and is one of very few 'objects' on the Victorian State Heritage Register. The LOCH ARD shipwreck is of State significance – Victorian Heritage Register S 417. Flagstaff Hill’s collection of artefacts from LOCH ARD is significant for being one of the largest collections of artefacts from this shipwreck in Victoria. It is significant for its association with the shipwreck, which is on the Victorian Heritage Register (VHR S417). The collection is significant because of the relationship between the objects, as together they have a high potential to interpret the story of the LOCH ARD. The LOCH ARD collection is archaeologically significant as the remains of a large international passenger and cargo ship. The LOCH ARD collection is historically significant for representing aspects of Victoria’s shipping history and its potential to interpret sub-theme 1.5 of Victoria’s Framework of Historical Themes (living with natural processes). The collection is also historically significant for its association with the LOCH ARD, which was one of the worst and best known shipwrecks in Victoria’s history. Unrestored tea spoon from the wreck of the LOCH ARD. The spoon design has a flattened fiddle-back handle, with a thin stem or shank, flared collar, and elongated bowl. The spoons metallic composition is a thin layer of brass alloy which has partially corroded back to a nickel-silver base metal. Approximately 15% of original electroplating remains with some verdigris. One of five makers marks is legible: (3) Maltese Crossflagstaff hill, warrnambool, shipwrecked coast, flagstaff hill maritime museum, maritime museum, shipwreck coast, flagstaff hill maritime village, great ocean road, loch line, loch ard, captain gibbs, eva carmichael, tom pearce, glenample station, mutton bird island, loch ard gorge, electroplated cutlery, loch ard shipwreck, nickel silver, william page & co, birmingham, brass plating, makers marks -
 Flagstaff Hill Maritime Museum and Village
Spoon, circa 1878
This tea spoon is from the wreck of the LOCH ARD, a Loch Line ship of 1,693 tons which sailed from Gravesend, London, on 2 March 1878 with 17 passengers and a crew of 36 under Captain George Gibbs. “The intention was to discharge cargo in Melbourne, before returning to London via the Horn with wool and wheat”. Instead, on 1 June 1878, after 90 days at sea, she struck the sandstone cliffs of Mutton Bird Island on the south west coast of Victoria, and sank with the loss of 52 lives and all her cargo. The manifest of the LOCH ARD listed an array of manufactured goods and bulk metals being exported to the Colony of Victoria, with a declared value of £53,700. (202 bills of lading show an actual invoice value of £68, 456, with insurance underwriting to £30,000 of all cargo). Included in the manifest is the item of “Tin hardware & cutlery £7,530”. This teaspoon is one of 482 similar items of electro-plated cutlery from the LOCH ARD site, comprising spoons and forks of various sizes but all sharing the same general shape or design and metallic composition. 49 of these pieces display a legible makers’ mark — the initials “W” and “P” placed within a raised diamond outline, which is in turn contained within a sunken crown shape — identifying the manufacturer as William Page & Co of Birmingham. An electroplater’s makers’ marks, unlike sterling silver hallmarks, are not consistent identifiers of quality or date and place of manufacture. A similar line of five impressions was usually made to impress the consumer with an implication of industry standards, but what each one actually signified was not regulated and so they varied according to the whim of the individual foundry. In this case, the maker’s marks are often obscured by sedimentary accretion or removed by corrosion after a century of submersion in the ocean. However sufficient detail has survived to indicate that these samples of electro-plated cutlery probably originated from the same consignment in the LOCH ARD’s cargo. The following descriptions of maker’s marks are drawn from 255 tea spoons, 125 dessert spoons, and 99 table forks. These marks are clearly visible in 66 instances, while the same sequence of general outlines, or depression shapes, is discernible in another 166 examples. 1. A recessed Crown containing a raised Diamond outline and the initials “W” and “P” (the recognised trademark of William Page & Co) 2. An impressed Ellipse containing a raised, pivoted, Triangle in its lower part and bearing a Resurrection Cross on its upper section (a possible dissenting church symbol reflecting religious affiliation); OR a rounded Square impression containing a raised, ‘lazy’, letter “B” (possibly mimicking sterling silver hallmark signifying city of manufacture i.e. Birmingham) 3. An impressed rounded Square filled with a raised Maltese Cross (the base metal composite of nickel silver was also known as ‘German silver’ after its Berlin inventors in 1823) 4. A recessed Circle containing a Crab or Scarab Beetle image; OR a recessed Circle containing a rotated ‘fleur de lys’ or ‘fasces’ design 5. A depressed Diamond shape enclosing a large raised letter “R” and a small raised letter “D” (mimicking the U.K. Patent Office stamp which abbreviated the term ‘registered’ to “RD”, but also included date and class of patent) Suggested trade names for William Page & Co’s particular blend of brass plating are ‘roman silver’ or ‘silverite’. This copper alloy polishes to a lustrous gold when new, discolouring to a murky grey with greenish hue when neglected. HISTORY OF THE LOCH ARD The LOCH ARD belonged to the famous Loch Line which sailed many ships from England to Australia. Built in Glasgow by Barclay, Curdle and Co. in 1873, the LOCH ARD was a three-masted square rigged iron sailing ship. The ship measured 262ft 7" (79.87m) in length, 38ft (11.58m) in width, 23ft (7m) in depth and had a gross tonnage of 1693 tons. The LOCH ARD's main mast measured a massive 150ft (45.7m) in height. LOCH ARD made three trips to Australia and one trip to Calcutta before its final voyage. LOCH ARD left England on March 2, 1878, under the command of Captain Gibbs, a newly married, 29 year old. She was bound for Melbourne with a crew of 37, plus 17 passengers and a load of cargo. The general cargo reflected the affluence of Melbourne at the time. On board were straw hats, umbrella, perfumes, clay pipes, pianos, clocks, confectionary, linen and candles, as well as a heavier load of railway irons, cement, lead and copper. There were items included that intended for display in the Melbourne International Exhibition in 1880. The voyage to Port Phillip was long but uneventful. At 3am on June 1, 1878, Captain Gibbs was expecting to see land and the passengers were becoming excited as they prepared to view their new homeland in the early morning. But LOCH ARD was running into a fog which greatly reduced visibility. Captain Gibbs was becoming anxious as there was no sign of land or the Cape Otway lighthouse. At 4am the fog lifted. A man aloft announced that he could see breakers. The sheer cliffs of Victoria's west coast came into view, and Captain Gibbs realised that the ship was much closer to them than expected. He ordered as much sail to be set as time would permit and then attempted to steer the vessel out to sea. On coming head on into the wind, the ship lost momentum, the sails fell limp and LOCH ARD's bow swung back. Gibbs then ordered the anchors to be released in an attempt to hold its position. The anchors sank some 50 fathoms - but did not hold. By this time LOCH ARD was among the breakers and the tall cliffs of Mutton Bird Island rose behind the ship. Just half a mile from the coast, the ship's bow was suddenly pulled around by the anchor. The captain tried to tack out to sea, but the ship struck a reef at the base of Mutton Bird Island, near Port Campbell. Waves broke over the ship and the top deck was loosened from the hull. The masts and rigging came crashing down knocking passengers and crew overboard. When a lifeboat was finally launched, it crashed into the side of LOCH ARD and capsized. Tom Pearce, who had launched the boat, managed to cling to its overturned hull and shelter beneath it. He drifted out to sea and then on the flood tide came into what is now known as LOCH ARD Gorge. He swam to shore, bruised and dazed, and found a cave in which to shelter. Some of the crew stayed below deck to shelter from the falling rigging but drowned when the ship slipped off the reef into deeper water. Eva Carmichael had raced onto deck to find out what was happening only to be confronted by towering cliffs looming above the stricken ship. In all the chaos, Captain Gibbs grabbed Eva and said, "If you are saved Eva, let my dear wife know that I died like a sailor". That was the last Eva Carmichael saw of the captain. She was swept off the ship by a huge wave. Eva saw Tom Pearce on a small rocky beach and yelled to attract his attention. He dived in and swam to the exhausted woman and dragged her to shore. He took her to the cave and broke open case of brandy which had washed up on the beach. He opened a bottle to revive the unconscious woman. A few hours later Tom scaled a cliff in search of help. He followed hoof prints and came by chance upon two men from nearby Glenample Station three and a half miles away. In a state of exhaustion, he told the men of the tragedy. Tom returned to the gorge while the two men rode back to the station to get help. By the time they reached LOCH ARD Gorge, it was cold and dark. The two shipwreck survivors were taken to Glenample Station to recover. Eva stayed at the station for six weeks before returning to Ireland, this time by steamship. In Melbourne, Tom Pearce received a hero's welcome. He was presented with the first gold medal of the Royal Humane Society of Victoria and a £1000 cheque from the Victorian Government. Concerts were performed to honour the young man's bravery and to raise money for those who lost family in the LOCH ARD disaster. Of the 54 crew members and passengers on board, only two survived: the apprentice, Tom Pearce and the young woman passenger, Eva Carmichael, who lost all of her family in the tragedy. Ten days after the LOCH ARD tragedy, salvage rights to the wreck were sold at auction for £2,120. Cargo valued at £3,000 was salvaged and placed on the beach, but most washed back into the sea when another storm developed. The wreck of LOCH ARD still lies at the base of Mutton Bird Island. Much of the cargo has now been salvaged and some was washed up into what is now known as LOCH ARD Gorge. Cargo and artefacts have also been illegally salvaged over many years before protective legislation was introduced. One of the most unlikely pieces of cargo to have survived the shipwreck was a Minton porcelain peacock - one of only seven in the world. The peacock was destined for the Melbourne International Exhibition in 1880. It had been well packed, which gave it adequate protection during the violent storm. Today, the Minton peacock can be seen at the Flagstaff Hill Maritime Museum in Warrnambool. From Australia's most dramatic shipwreck it has now become Australia's most valuable shipwreck artefact and is one of very few 'objects' on the Victorian State Heritage Register The LOCH ARD shipwreck is of State significance – Victorian Heritage Register S 417. Flagstaff Hill’s collection of artefacts from LOCH ARD is significant for being one of the largest collections of artefacts from this shipwreck in Victoria. It is significant for its association with the shipwreck, which is on the Victorian Heritage Register (VHR S417). The collection is significant because of the relationship between the objects, as together they have a high potential to interpret the story of the LOCH ARD. The LOCH ARD collection is archaeologically significant as the remains of a large international passenger and cargo ship. The LOCH ARD collection is historically significant for representing aspects of Victoria’s shipping history and its potential to interpret sub-theme 1.5 of Victoria’s Framework of Historical Themes (living with natural processes). The collection is also historically significant for its association with the LOCH ARD, which was one of the worst and best known shipwrecks in Victoria’s history. Unrestored tea spoon from the wreck of the LOCH ARD. The spoon design has a flattened fiddle-back handle, with a thin stem or shank, flared collar, and elongated bowl. The spoons metallic composition is a thin layer of brass alloy which has partially corroded back to a nickel-silver base metal. Approximately 15% of original electroplating remains with some verdigris. Two of five makers marks are visible: (3) Maltese Cross (4) Crab Designflagstaff hill, warrnambool, shipwrecked coast, flagstaff hill maritime museum, maritime museum, shipwreck coast, flagstaff hill maritime village, great ocean road, loch line, loch ard, captain gibbs, eva carmichael, tom pearce, glenample station, mutton bird island, loch ard gorge, electroplated cutlery, loch ard shipwreck, nickel silver, william page & co, birmingham, brass plating, makers marks -
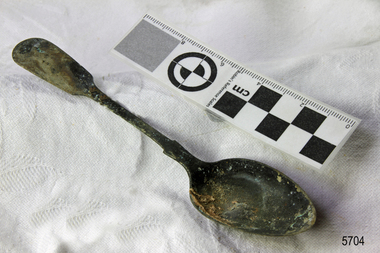 Flagstaff Hill Maritime Museum and Village
Spoon, circa 1878
This tea spoon is from the wreck of the LOCH ARD, a Loch Line ship of 1,693 tons which sailed from Gravesend, London, on 2 March 1878 with 17 passengers and a crew of 36 under Captain George Gibbs. “The intention was to discharge cargo in Melbourne, before returning to London via the Horn with wool and wheat”. Instead, on 1 June 1878, after 90 days at sea, she struck the sandstone cliffs of Mutton Bird Island on the south west coast of Victoria, and sank with the loss of 52 lives and all her cargo. The manifest of the LOCH ARD listed an array of manufactured goods and bulk metals being exported to the Colony of Victoria, with a declared value of £53,700. (202 bills of lading show an actual invoice value of £68, 456, with insurance underwriting to £30,000 of all cargo). Included in the manifest is the item of “Tin hardware & cutlery £7,530”. This teaspoon is one of 482 similar items of electro-plated cutlery from the LOCH ARD site, comprising spoons and forks of various sizes but all sharing the same general shape or design and metallic composition. 49 of these pieces display a legible makers’ mark — the initials “W” and “P” placed within a raised diamond outline, which is in turn contained within a sunken crown shape — identifying the manufacturer as William Page & Co of Birmingham. An electroplater’s makers’ marks, unlike sterling silver hallmarks, are not consistent identifiers of quality or date and place of manufacture. A similar line of five impressions was usually made to impress the consumer with an implication of industry standards, but what each one actually signified was not regulated and so they varied according to the whim of the individual foundry. In this case, the maker’s marks are often obscured by sedimentary accretion or removed by corrosion after a century of submersion in the ocean. However sufficient detail has survived to indicate that these samples of electro-plated cutlery probably originated from the same consignment in the LOCH ARD’s cargo. The following descriptions of maker’s marks are drawn from 255 tea spoons, 125 dessert spoons, and 99 table forks. These marks are clearly visible in 66 instances, while the same sequence of general outlines, or depression shapes, is discernible in another 166 examples. 1. A recessed Crown containing a raised Diamond outline and the initials “W” and “P” (the recognised trademark of William Page & Co) 2. An impressed Ellipse containing a raised, pivoted, Triangle in its lower part and bearing a Resurrection Cross on its upper section (a possible dissenting church symbol reflecting religious affiliation); OR a rounded Square impression containing a raised, ‘lazy’, letter “B” (possibly mimicking sterling silver hallmark signifying city of manufacture i.e. Birmingham) 3. An impressed rounded Square filled with a raised Maltese Cross (the base metal composite of nickel silver was also known as ‘German silver’ after its Berlin inventors in 1823) 4. A recessed Circle containing a Crab or Scarab Beetle image; OR a recessed Circle containing a rotated ‘fleur de lys’ or ‘fasces’ design 5. A depressed Diamond shape enclosing a large raised letter “R” and a small raised letter “D” (mimicking the U.K. Patent Office stamp which abbreviated the term ‘registered’ to “RD”, but also included date and class of patent) Suggested trade names for William Page & Co’s particular blend of brass plating are ‘roman silver’ or ‘silverite’. This copper alloy polishes to a lustrous gold when new, discolouring to a murky grey with greenish hue when neglected. HISTORY OF THE LOCH ARD The LOCH ARD belonged to the famous Loch Line which sailed many ships from England to Australia. Built in Glasgow by Barclay, Curdle and Co. in 1873, the LOCH ARD was a three-masted square rigged iron sailing ship. The ship measured 262ft 7" (79.87m) in length, 38ft (11.58m) in width, 23ft (7m) in depth and had a gross tonnage of 1693 tons. The LOCH ARD's main mast measured a massive 150ft (45.7m) in height. LOCH ARD made three trips to Australia and one trip to Calcutta before its final voyage. LOCH ARD left England on March 2, 1878, under the command of Captain Gibbs, a newly married, 29 year old. She was bound for Melbourne with a crew of 37, plus 17 passengers and a load of cargo. The general cargo reflected the affluence of Melbourne at the time. On board were straw hats, umbrella, perfumes, clay pipes, pianos, clocks, confectionary, linen and candles, as well as a heavier load of railway irons, cement, lead and copper. There were items included that intended for display in the Melbourne International Exhibition in 1880. The voyage to Port Phillip was long but uneventful. At 3am on June 1, 1878, Captain Gibbs was expecting to see land and the passengers were becoming excited as they prepared to view their new homeland in the early morning. But LOCH ARD was running into a fog which greatly reduced visibility. Captain Gibbs was becoming anxious as there was no sign of land or the Cape Otway lighthouse. At 4am the fog lifted. A man aloft announced that he could see breakers. The sheer cliffs of Victoria's west coast came into view, and Captain Gibbs realised that the ship was much closer to them than expected. He ordered as much sail to be set as time would permit and then attempted to steer the vessel out to sea. On coming head on into the wind, the ship lost momentum, the sails fell limp and LOCH ARD's bow swung back. Gibbs then ordered the anchors to be released in an attempt to hold its position. The anchors sank some 50 fathoms - but did not hold. By this time LOCH ARD was among the breakers and the tall cliffs of Mutton Bird Island rose behind the ship. Just half a mile from the coast, the ship's bow was suddenly pulled around by the anchor. The captain tried to tack out to sea, but the ship struck a reef at the base of Mutton Bird Island, near Port Campbell. Waves broke over the ship and the top deck was loosened from the hull. The masts and rigging came crashing down knocking passengers and crew overboard. When a lifeboat was finally launched, it crashed into the side of LOCH ARD and capsized. Tom Pearce, who had launched the boat, managed to cling to its overturned hull and shelter beneath it. He drifted out to sea and then on the flood tide came into what is now known as LOCH ARD Gorge. He swam to shore, bruised and dazed, and found a cave in which to shelter. Some of the crew stayed below deck to shelter from the falling rigging but drowned when the ship slipped off the reef into deeper water. Eva Carmichael had raced onto deck to find out what was happening only to be confronted by towering cliffs looming above the stricken ship. In all the chaos, Captain Gibbs grabbed Eva and said, "If you are saved Eva, let my dear wife know that I died like a sailor". That was the last Eva Carmichael saw of the captain. She was swept off the ship by a huge wave. Eva saw Tom Pearce on a small rocky beach and yelled to attract his attention. He dived in and swam to the exhausted woman and dragged her to shore. He took her to the cave and broke open case of brandy which had washed up on the beach. He opened a bottle to revive the unconscious woman. A few hours later Tom scaled a cliff in search of help. He followed hoof prints and came by chance upon two men from nearby Glenample Station three and a half miles away. In a state of exhaustion, he told the men of the tragedy. Tom returned to the gorge while the two men rode back to the station to get help. By the time they reached LOCH ARD Gorge, it was cold and dark. The two shipwreck survivors were taken to Glenample Station to recover. Eva stayed at the station for six weeks before returning to Ireland, this time by steamship. In Melbourne, Tom Pearce received a hero's welcome. He was presented with the first gold medal of the Royal Humane Society of Victoria and a £1000 cheque from the Victorian Government. Concerts were performed to honour the young man's bravery and to raise money for those who lost family in the LOCH ARD disaster. Of the 54 crew members and passengers on board, only two survived: the apprentice, Tom Pearce and the young woman passenger, Eva Carmichael, who lost all of her family in the tragedy. Ten days after the LOCH ARD tragedy, salvage rights to the wreck were sold at auction for £2,120. Cargo valued at £3,000 was salvaged and placed on the beach, but most washed back into the sea when another storm developed. The wreck of LOCH ARD still lies at the base of Mutton Bird Island. Much of the cargo has now been salvaged and some was washed up into what is now known as LOCH ARD Gorge. Cargo and artefacts have also been illegally salvaged over many years before protective legislation was introduced. One of the most unlikely pieces of cargo to have survived the shipwreck was a Minton porcelain peacock - one of only seven in the world. The peacock was destined for the Melbourne International Exhibition in 1880. It had been well packed, which gave it adequate protection during the violent storm. Today, the Minton peacock can be seen at the Flagstaff Hill Maritime Museum in Warrnambool. From Australia's most dramatic shipwreck it has now become Australia's most valuable shipwreck artefact and is one of very few 'objects' on the Victorian State Heritage Register. The LOCH ARD shipwreck is of State significance – Victorian Heritage Register S 417. Flagstaff Hill’s collection of artefacts from LOCH ARD is significant for being one of the largest collections of artefacts from this shipwreck in Victoria. It is significant for its association with the shipwreck, which is on the Victorian Heritage Register (VHR S417). The collection is significant because of the relationship between the objects, as together they have a high potential to interpret the story of the LOCH ARD. The LOCH ARD collection is archaeologically significant as the remains of a large international passenger and cargo ship. The LOCH ARD collection is historically significant for representing aspects of Victoria’s shipping history and its potential to interpret sub-theme 1.5 of Victoria’s Framework of Historical Themes (living with natural processes). The collection is also historically significant for its association with the LOCH ARD, which was one of the worst and best known shipwrecks in Victoria’s history. Unrestored tea spoon from the wreck of the LOCH ARD. The spoon design has a flattened fiddle-back handle, with a thin stem or shank, flared collar, and elongated bowl. The spoons metallic composition is a thin layer of brass alloy which has partially corroded back to a nickel-silver base metal. Approximately 15% of original electroplating remains. There are traces of verdigris and a little encrustation in the bowl.flagstaff hill, warrnambool, shipwrecked coast, flagstaff hill maritime museum, maritime museum, shipwreck coast, flagstaff hill maritime village, great ocean road, loch line, loch ard, captain gibbs, eva carmichael, tom pearce, glenample station, mutton bird island, loch ard gorge, electroplated cutlery, loch ard shipwreck, nickel silver, william page & co, birmingham, brass plating, makers marks -
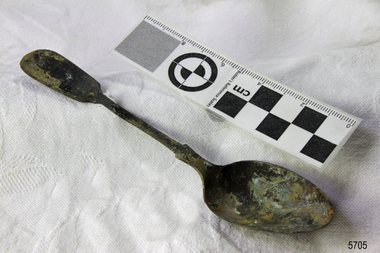 Flagstaff Hill Maritime Museum and Village
Spoon, circa 1878
This tea spoon is from the wreck of the LOCH ARD, a Loch Line ship of 1,693 tons which sailed from Gravesend, London, on 2 March 1878 with 17 passengers and a crew of 36 under Captain George Gibbs. “The intention was to discharge cargo in Melbourne, before returning to London via the Horn with wool and wheat”. Instead, on 1 June 1878, after 90 days at sea, she struck the sandstone cliffs of Mutton Bird Island on the south west coast of Victoria, and sank with the loss of 52 lives and all her cargo. The manifest of the LOCH ARD listed an array of manufactured goods and bulk metals being exported to the Colony of Victoria, with a declared value of £53,700. (202 bills of lading show an actual invoice value of £68, 456, with insurance underwriting to £30,000 of all cargo). Included in the manifest is the item of “Tin hardware & cutlery £7,530”. This teaspoon is one of 482 similar items of electro-plated cutlery from the LOCH ARD site, comprising spoons and forks of various sizes but all sharing the same general shape or design and metallic composition. 49 of these pieces display a legible makers’ mark — the initials “W” and “P” placed within a raised diamond outline, which is in turn contained within a sunken crown shape — identifying the manufacturer as William Page & Co of Birmingham. An electroplater’s makers’ marks, unlike sterling silver hallmarks, are not consistent identifiers of quality or date and place of manufacture. A similar line of five impressions was usually made to impress the consumer with an implication of industry standards, but what each one actually signified was not regulated and so they varied according to the whim of the individual foundry. In this case, the maker’s marks are often obscured by sedimentary accretion or removed by corrosion after a century of submersion in the ocean. However sufficient detail has survived to indicate that these samples of electro-plated cutlery probably originated from the same consignment in the LOCH ARD’s cargo. The following descriptions of maker’s marks are drawn from 255 tea spoons, 125 dessert spoons, and 99 table forks. These marks are clearly visible in 66 instances, while the same sequence of general outlines, or depression shapes, is discernible in another 166 examples. 1. A recessed Crown containing a raised Diamond outline and the initials “W” and “P” (the recognised trademark of William Page & Co) 2. An impressed Ellipse containing a raised, pivoted, Triangle in its lower part and bearing a Resurrection Cross on its upper section (a possible dissenting church symbol reflecting religious affiliation); OR a rounded Square impression containing a raised, ‘lazy’, letter “B” (possibly mimicking sterling silver hallmark signifying city of manufacture i.e. Birmingham) 3. An impressed rounded Square filled with a raised Maltese Cross (the base metal composite of nickel silver was also known as ‘German silver’ after its Berlin inventors in 1823) 4. A recessed Circle containing a Crab or Scarab Beetle image; OR a recessed Circle containing a rotated ‘fleur de lys’ or ‘fasces’ design 5. A depressed Diamond shape enclosing a large raised letter “R” and a small raised letter “D” (mimicking the U.K. Patent Office stamp which abbreviated the term ‘registered’ to “RD”, but also included date and class of patent) Suggested trade names for William Page & Co’s particular blend of brass plating are ‘roman silver’ or ‘silverite’. This copper alloy polishes to a lustrous gold when new, discolouring to a murky grey with greenish hue when neglected. HISTORY OF THE LOCH ARD The LOCH ARD belonged to the famous Loch Line which sailed many ships from England to Australia. Built in Glasgow by Barclay, Curdle and Co. in 1873, the LOCH ARD was a three-masted square rigged iron sailing ship. The ship measured 262ft 7" (79.87m) in length, 38ft (11.58m) in width, 23ft (7m) in depth and had a gross tonnage of 1693 tons. The LOCH ARD's main mast measured a massive 150ft (45.7m) in height. LOCH ARD made three trips to Australia and one trip to Calcutta before its final voyage. LOCH ARD left England on March 2, 1878, under the command of Captain Gibbs, a newly married, 29 year old. She was bound for Melbourne with a crew of 37, plus 17 passengers and a load of cargo. The general cargo reflected the affluence of Melbourne at the time. On board were straw hats, umbrella, perfumes, clay pipes, pianos, clocks, confectionary, linen and candles, as well as a heavier load of railway irons, cement, lead and copper. There were items included that intended for display in the Melbourne International Exhibition in 1880. The voyage to Port Phillip was long but uneventful. At 3am on June 1, 1878, Captain Gibbs was expecting to see land and the passengers were becoming excited as they prepared to view their new homeland in the early morning. But LOCH ARD was running into a fog which greatly reduced visibility. Captain Gibbs was becoming anxious as there was no sign of land or the Cape Otway lighthouse. At 4am the fog lifted. A man aloft announced that he could see breakers. The sheer cliffs of Victoria's west coast came into view, and Captain Gibbs realised that the ship was much closer to them than expected. He ordered as much sail to be set as time would permit and then attempted to steer the vessel out to sea. On coming head on into the wind, the ship lost momentum, the sails fell limp and LOCH ARD's bow swung back. Gibbs then ordered the anchors to be released in an attempt to hold its position. The anchors sank some 50 fathoms - but did not hold. By this time LOCH ARD was among the breakers and the tall cliffs of Mutton Bird Island rose behind the ship. Just half a mile from the coast, the ship's bow was suddenly pulled around by the anchor. The captain tried to tack out to sea, but the ship struck a reef at the base of Mutton Bird Island, near Port Campbell. Waves broke over the ship and the top deck was loosened from the hull. The masts and rigging came crashing down knocking passengers and crew overboard. When a lifeboat was finally launched, it crashed into the side of LOCH ARD and capsized. Tom Pearce, who had launched the boat, managed to cling to its overturned hull and shelter beneath it. He drifted out to sea and then on the flood tide came into what is now known as LOCH ARD Gorge. He swam to shore, bruised and dazed, and found a cave in which to shelter. Some of the crew stayed below deck to shelter from the falling rigging but drowned when the ship slipped off the reef into deeper water. Eva Carmichael had raced onto deck to find out what was happening only to be confronted by towering cliffs looming above the stricken ship. In all the chaos, Captain Gibbs grabbed Eva and said, "If you are saved Eva, let my dear wife know that I died like a sailor". That was the last Eva Carmichael saw of the captain. She was swept off the ship by a huge wave. Eva saw Tom Pearce on a small rocky beach and yelled to attract his attention. He dived in and swam to the exhausted woman and dragged her to shore. He took her to the cave and broke open case of brandy which had washed up on the beach. He opened a bottle to revive the unconscious woman. A few hours later Tom scaled a cliff in search of help. He followed hoof prints and came by chance upon two men from nearby Glenample Station three and a half miles away. In a state of exhaustion, he told the men of the tragedy. Tom returned to the gorge while the two men rode back to the station to get help. By the time they reached LOCH ARD Gorge, it was cold and dark. The two shipwreck survivors were taken to Glenample Station to recover. Eva stayed at the station for six weeks before returning to Ireland, this time by steamship. In Melbourne, Tom Pearce received a hero's welcome. He was presented with the first gold medal of the Royal Humane Society of Victoria and a £1000 cheque from the Victorian Government. Concerts were performed to honour the young man's bravery and to raise money for those who lost family in the LOCH ARD disaster. Of the 54 crew members and passengers on board, only two survived: the apprentice, Tom Pearce and the young woman passenger, Eva Carmichael, who lost all of her family in the tragedy. Ten days after the LOCH ARD tragedy, salvage rights to the wreck were sold at auction for £2,120. Cargo valued at £3,000 was salvaged and placed on the beach, but most washed back into the sea when another storm developed. The wreck of LOCH ARD still lies at the base of Mutton Bird Island. Much of the cargo has now been salvaged and some was washed up into what is now known as LOCH ARD Gorge. Cargo and artefacts have also been illegally salvaged over many years before protective legislation was introduced. One of the most unlikely pieces of cargo to have survived the shipwreck was a Minton porcelain peacock - one of only seven in the world. The peacock was destined for the Melbourne International Exhibition in 1880. It had been well packed, which gave it adequate protection during the violent storm. Today, the Minton peacock can be seen at the Flagstaff Hill Maritime Museum in Warrnambool. From Australia's most dramatic shipwreck it has now become Australia's most valuable shipwreck artefact and is one of very few 'objects' on the Victorian State Heritage Register. The LOCH ARD shipwreck is of State significance – Victorian Heritage Register S 417. Flagstaff Hill’s collection of artefacts from LOCH ARD is significant for being one of the largest collections of artefacts from this shipwreck in Victoria. It is significant for its association with the shipwreck, which is on the Victorian Heritage Register (VHR S417). The collection is significant because of the relationship between the objects, as together they have a high potential to interpret the story of the LOCH ARD. The LOCH ARD collection is archaeologically significant as the remains of a large international passenger and cargo ship. The LOCH ARD collection is historically significant for representing aspects of Victoria’s shipping history and its potential to interpret sub-theme 1.5 of Victoria’s Framework of Historical Themes (living with natural processes). The collection is also historically significant for its association with the LOCH ARD, which was one of the worst and best known shipwrecks in Victoria’s history. Unrestored tea spoon from the wreck of the LOCH ARD. The spoon design has a flattened fiddle-back handle, with a thin stem or shank, flared collar, and elongated bowl. The spoons metallic composition is a thin layer of brass alloy which has partially corroded back to a nickel-silver base metal. Approximately 15% of original electroplating remains with some verdigris. One of five makers marks is discernible: (3) Maltese Crossflagstaff hill, warrnambool, shipwrecked coast, flagstaff hill maritime museum, maritime museum, shipwreck coast, flagstaff hill maritime village, great ocean road, loch line, loch ard, captain gibbs, eva carmichael, tom pearce, glenample station, mutton bird island, loch ard gorge, electroplated cutlery, loch ard shipwreck, nickel silver, william page & co, birmingham, brass plating, makers marks