Showing 692 items
matching tramway crossings
-
 Ballarat Tramway Museum
Photograph - Black & White Photograph/s, Keith Kings, 12/01/1957 12:00:00 AM
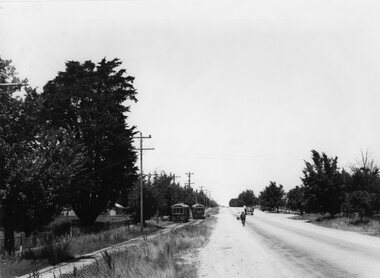
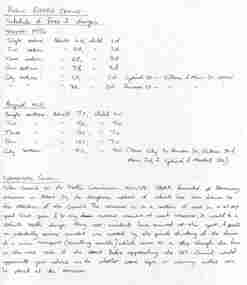
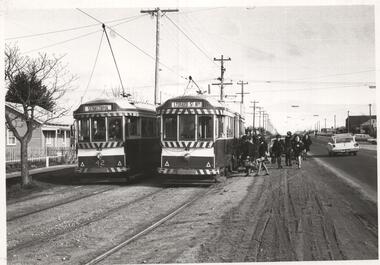
Black and white photograph of bogie trams crossing at Grey St. Loop, Albert St. Sebastopol, - Nos. 40 and 39 on 12/1/1957. Photo by Keith Kings. Colour photocopy, laminated, of this photograph on display 5/2000 at 02-02-06On rear of photo in blue ink. "Ballarat: "K.S. Kings No. u (w)(6) Copyright reserved" and "Albert Street, Sebastopol, is one of the most changed thoroughfares in greater Ballarat since this view was taken on 12/1/1957." Bogie cars nos. 40 and 39 cross on the Grey Street passing loop on the long single track side of the road route."trams, tramways, albert st, grey st., sebastopol, tram 39, tram 40 -
 Kew Historical Society Inc
Photograph - Railway level crossing in Glenferrie Road, Glenferrie, E.J. Dower, 1912
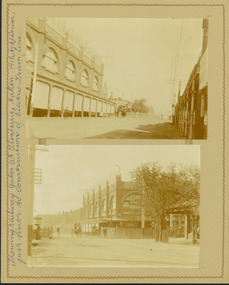
Contextual or historic information One of a series of photographs, taken by Edgar James Dower in the second decade of the twentieth century. Born and raised in Olinda, his family later moved to Surrey Hills. He worked as an adult as a clerk in the city office of the Metropolitan Gas Company, and in his role as a 'collector', he was able to photograph scenes including the construction of tramlines and associated buildings in Kew, Hawthorn, Camberwell and Surrey Hills. Later he established a real estate agency with his brother - the E.J. Dower Real Estate Agency, Dandenong Office.The image is an historically significant record of the development of transport infrastructure which was used to connect Victorians in the first two decades of the twentieth century. This development resulted from increases in population and the consequent extension of Melbourne's suburbs. The photographs, both individually and collectively, richly detail the labour of workers and the tools and machinery used to create and extend Melbourne's tram network in the years preceding and during World War 1.Two faded original horizontal photographs, mounted on vertical card showing the original railway level crossing in Glenferrie Road, Hawthorn, before a railway overpass was constructed and the laying of the electric tramline. The two photos depict northern and southern views of the crossing. Dimensions: Photo 1 106 x 157 mm Photo 2 107 x 147 mm Mount 249 x 197 mmAnnotated recto: "Showing tramway gates at Glenferrie, taken 1912 by E.J. Dower, just prior to construction of electric tramline." Verso: "1912"theme --- travelling by tram, theme -- connecting victorians by transport and communications, trams -- boroondara (vic.), tramways -- hawthorn, trains -- hawthorn (vic.), glenferrie station -
 Melbourne Tram Museum
Document - Instruction, Public Transport Corporation (PTC), "Operational Guide to Tram Stud Markings", Jul. 1990
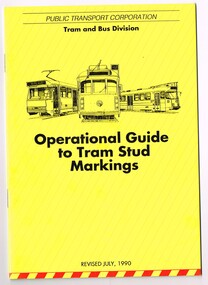
Set of two documents involved with stud markings in the roadways for Melbourne tramway operations. .1 - A5 size centre stapled document, 16 pages on white paper plus colour, printed yellow with sketches of a B, W and Z class trams, titled "Operational Guide to Tram Stud Markings". Published by the PTC July 1990. Gives information to drivers on types of studs at facing points, cross overs, shunts, clearance markings, section insulations, H crossings, T light, depot yards, compulsory stops. Has diagrams, and provides details for various classes of trams. 2nd copy added 6-1-2018. .2 - folded A4 sheet printed on gloss white paper, with the same sketch of trams on the top, titled "Summary of Changes and additions to stud markings", published by the PTC.trams, tramways, ptc, tramways, stud marking, drivers, instructions -
 Ballarat Tramway Museum
Photograph - Black & White Photograph/s - set of 4, 1960s
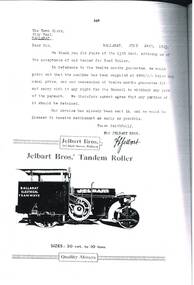
Yields information about the use of the Jelbart road roller by the Ballarat Tramways and the sale of a unit to the City of Ballarat.Set of documents concerning the Ballarat Jelbart Bros road roller that the SEC had purchased. .1 - Photocopy of part copy of a letter between Jelbart Bros and the City of Ballarat, dated 24/7/1923 concerning the purchase of a roller, guarantee and withholding a sum of money. Below the letter is an image of a roller with the name "Ballarat Electrical Tramways" written on it. .2 - Reproduction of a photograph of the roller pre 1936, working on tram track. The roller has the words "Ballarat Electric Tramways" painted on the side of it. Location not known, possibly Victoria St. The building in the background does not exist any more. .3 - Reproduction of a photograph of the roller at Sturt and Lydiard Streets c1969 - see also Reg Item. 3743 .4 - Reproduction a photograph of 8 road/workers (working on a footpath or crossing) holding shovels or picks. Date unknown. .1 - in folded 11, photos in folder 83 Printed on Kodak XtralifeII paper. See the June 2010 issue of Fares Please! for an article written by Colin Holmes on Jelbart and the Ballarat roller.In pencil on rear of each photograph: .2 - "Ballarat Electrical Tramways on LHS of Roller Jelbart, pre 1936. Colin Holmes." .3 - "Ballarat PO Corner Jelbart Roller SEC. Colin Holmes" .4 - "Not to be viewed by younger members. Colin Holmes"trams, tramways, jelbart, secv, sturt st, road works, trackwork -
 Ballarat Tramway Museum
Postcard, Ballarat Tramway Museum (BTM), BTM - Gardens Loop, Feb. 1988
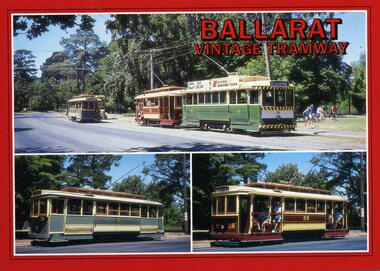
BTM produced postcard featuring three different views of trams in Wendouree Parade taken Dec. 1987. Titled "Ballarat Vintage Tramway" First photograph features BTM trams 27, 26 and 33 at the crossing loop and two close up images of 27 and 26. Card has a wide red border around it. On rear is a place for stamp, address, address for the Ballarat Vintage Tramway and details of the operations of the BTM. Photographs by William F. Scott. Printed by Scancolor Melbourne in Feb. 1988. See also Reg. Item 2007 for another photograph of the same scene. trams, tramways, wendouree parade, postcards, btm, gardens loop, tram 1 -
 Ballarat Tramway Museum
Magazine, Association of Railway Enthusiasts (ARE), "Australian Railway Enthusiast - Vol 29, No. 4, December 1991", Dec. 1991
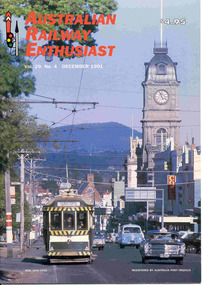
Yields information about the personal views of the Ballarat tramway system and his photographs. Has a strong association with the author of the article.Copy of the Australian Railway Enthusiast - Vol 29, No. 4, December 1991, which has a front cover photograph of No. 40, west bound in Sturt St at intersection with Doveton St. (Photo by Glen Mills), centre page spread "Brisbane Traction Memories" - four photographs by Mick Morahan, a four page article with photographs by Chris Wurr "Ballarat Tramway Tribute "and on the inside rear page, a photograph of Elizabeth St. Hobart and King William St. Adelaide with trams. Ballarat Photographs: Page 14 - No. 31 at Mount Pleasant terminus Page 15 - No. 12 crossing Albert St. Sebastopol (has Skipton St. in the photo caption) Page 16 - No. 40 on the Dawson St. Crossover Page 16 - No. 26 and 27 crossing at the Bell St. Loop Page 17 - No. 17 at Sturt and Lydiard Sts Page 17 - Two trammies having a chat. Map of Ballarat provided by BTPS Ltd on page 15.trams, tramways, ballarat, recollections, lydiard st, sturt st, sebastopol -
 Ballarat Tramway Museum
Photograph - Black & White Photograph/s, Chris Wurr, late 1960's or early 1970's
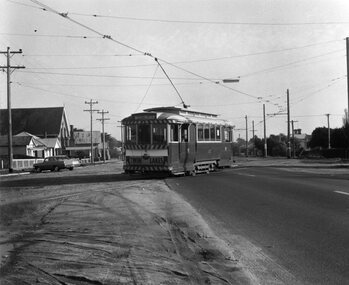
Yields information about the tram crossover point in Albert St Sebastopol during the last few years of the tramways and the condition of the roadway at the time.Black and White photograph of SEC tram No. 12 crossing Albert St. from east to west side at Ophir St. late 1960's or early 1970's. Tram has destination of SEBASTOPOL, and Twin Lakes sign on rear. Photo taken after tram has passed photographer. Photo by Chris Wurr. Photo shows sealed road (to Colac) and tram stop sign on west side of road. Photocopy made 4/1999 for display purposes. Copy 2 added 27/7/2007, ex Alan Bradley photographs.On rear, in black stamp ink "Photo by Chris Wurr / 12 Truscott Street, Ararat 3377 / (053) 523403 Copy 2 - Additional words to above "Donated to BTPS by and"trams, tramways, albert st., sebastopol, tram 12 -
 Ballarat Tramway Museum
Photograph - Black & White Photograph/s - set of 3, William. F. Scott, 1989
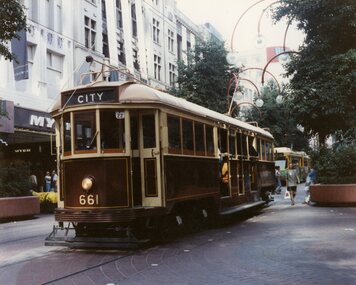
Yields information about the appearance of Geelong's trams and the railway station area and the conversion to a one-man tram.Set of three colour photographs of BTPS owned W3 661 operating in Bourke St Melbourne. Presumed taken at the same time as the front cover of the annual report, 1988-1989 - 29/4/1989. Has Myer building in the background. .2 - ditto - crossing an articulated tram. .3 - westbound in Bourke Street with the Priceline Centrepoint building in the background and Medicare office. Printed on Kodak paper.In pencil on the rear "William F Scott".trams, tramways, btps, bourke st, yapper tours, tram 661 -
 Ballarat Tramway Museum
Negative, Wal Jack, mid 1940's
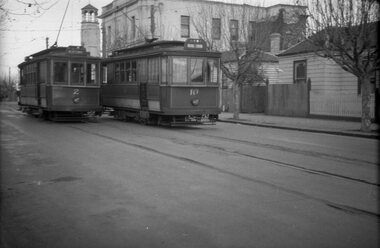
Negative and Digital images of the Wal Jack Geelong Negative file of Geelong trams 2 and 10 crossing at the Retreat Rd loop in Pakington St, just north of Aphasia St. Tram 2 - has destination of Newtown and 10, East. In the background is 271 Pakington St - City of Newtown and Chilwell offices, in 2020, a Residential property. Photo mid 1940's. trams, tramways, geelong, pakington st, aphasia st, tram 2, tram 10 -
 Melbourne Tram Museum
Photograph - Z23 Flinders St - Swanston St, late 1980s
Photo of Z23 (East Burwood, route 75) in Flinders St just before crossing Swanston St. The tram has The Met logos, a Fox FM radio station. In the background is the Port Phillip Arcade buildings. These buildings were demolished for the Metro Rail Project during 2017-2018. Photo taken from Princes Gate Plaza.Yields information about Melbourne trams late 1980s.Colour photograph with paper parts on rear.melbourne, tramways, tramcars, flinders st, z class, tram 23, route 75, trams -
 Melbourne Tram Museum
Photograph - A258 Flinders St - Swanston St, late 1980s
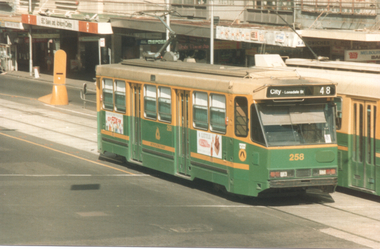
Photo of A class 258 (City Lonsdale St, route 48) in Flinders St just after crossing Swanston St. The tram has The Met logos, a Fox FM radio station. In the background is the Port Phillip Arcade buildings. Photo taken from Princes Gate Plaza.Yields information about Melbourne trams late 1980s.Colour photograph with paper parts on rear.melbourne, tramways, tramcars, flinders st, a class, tram 258, trams, route 48 -
 Melbourne Tram Museum
Photograph - A268 Bourke and Elizabeth Sts, late 1980s
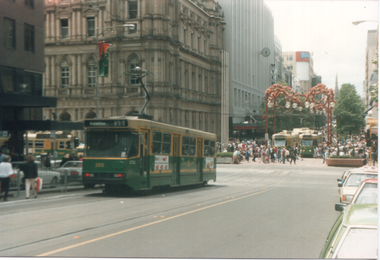
Photo of A 268 (Exhibition, route 111) in Bourke St before crossing Elizabeth St. Has the GPO in the background. Taken at Christmas, has many pedestrians in the view.Yields information about Melbourne trams late 1980s and shows A class trams in service in Bourke St.Colour photograph with paper parts on rear.melbourne, tramways, elizabeth st, bourke st, a class, tram 268, trams -
 Melbourne Tram Museum
Photograph - Z2 115 Bourke and Elizabeth Sts, late 1980s
Photo of Z2 115 (City, route 89) in Bourke St after crossing Elizabeth St. Has the GPO in the background. Taken at Christmas, has many pedestrians in the view.Yields information about Melbourne trams late 1980s.Colour photograph with paper parts on rear.melbourne, tramways, elizabeth st, bourke st, z2 class, tram 115, trams, route 89 -
 Melbourne Tram Museum
Photograph - SW6 881 Swanston and Flinders St, late 1980s
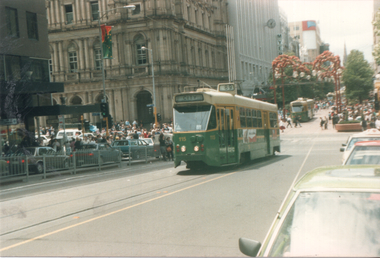
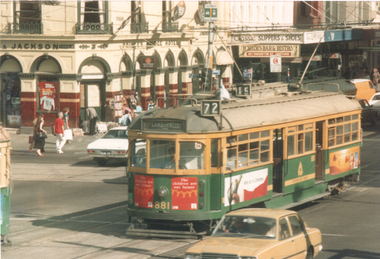
Photo of SW6 881 (Camberwell, Route 72) crossing Flinders St in Swanston St. The tram has The Met logos, and adverts for "The Children are our future" Smith Family? In the background is Young & Jackson Hotel. Swanston St was partly closed to traffic in 1992. Photo taken from Princes Gate Plaza.Yields information about Melbourne trams late 1980s.Colour photograph with paper parts on rear.melbourne, tramways, swanston st, flinders st, tram 881, sw6 class, route 72, trams -
 Melbourne Tram Museum
Photograph - Z28 Flinders St - Swanston St, late 1980s
Photo of Z28 (Spencer St, route 75) in Flinders St after crossing Swanston St. The tram has The Met logos, an advert for Westpac Bank. In the background is part of Young & Jackson Hotel and the Port Phillip Arcade. Photo taken from Princes Gate Plaza.Yields information about Melbourne trams late 1980s.Colour photograph with paper parts on rear.melbourne, tramways, tramcars, flinders st, z class, tram 28, route 75, trams -
 Melbourne Tram Museum
Slide, Keith Caldwell, March 1968?
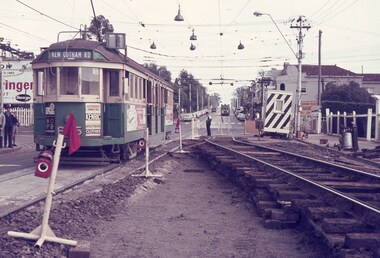
Agfa colour blue white plastic mount slide, photo by Keith Caldwell of W2 605 or 625, southbound in Glenferrie Road, at the Kooyong level crossing. Glenferrie Road is being reconstructed with the north bound track in a temporary location. Tram has advert for Kenric clothes and Exide? batteries. The night watchman is watching the tram. His cabin is behind him.. The tram is showing (incorrectly) Kew Cotham Road destination. This is a Camberwell Depot tram bound for Malvern Town Hall assisting movement of School children in Glenferrie Road in the afternoon. Note the Camberwell Run number in the driver cab window. On the north bound track is possibly a SW6. Slide undated - c1968?trams, tramways, glenferrie rd, kooyong, level crossings, temporary track, w2 class, trackwork, kew- cotham road, tram 605, tram 625 -
 Glen Eira Historical Society
Article - ELSTERNWICK RAILWAY STATION AND LINE
Contains 5 downloaded photographs: 1/Photocopy of postcard of ‘Elsternwick Express Disaster at Richmond Railway Station, 18/07/1910’ with photograph of the train wreck, from the State Library of Victoria (dated 24/05/2012). 2/Photocopy of postcard of ‘Elsternwick Express Disaster, at Richmond Railway Station, 18/07/1910’ (a different photograph from the previous) from State Library of Victoria (dated 24/05/2012). 3/Photocopy of photographic print titled ‘A Revolving Signal, Elsternwick Crossing (Vic)’, from State Library of Victoria (dated 06/03/2012). 4/Photocopy of a gelatin silver photograph of ‘Elsternwick (train) derailment, 21/04/1926’ from State Library of Victoria (dated 24/05/2012). 5/Photocopy of postcard of ‘Elsternwick Railway Station’ (no date given perhaps c.1910), from State Library of Vitoria (dated 24/05/2012).railways, stations, transport, tramways, accidents, elsternwick, richmond, caulfield -
 Ballarat Tramway Museum
Document - Research Notes, Alan Bradley, Fare changes in Ballarat in November 1955 and August 1966, 2003
Yields information about the various fare increases in Ballarat, how they were applied and about the problems of the tram cross over in Albert St Sebastopol.1. Photocopy of handwritten notes prepared by Alan Bradley, c2002/3 on fare changes in Ballarat in November 1955 and August 1966. Gives the fares for the various sections. 1 x A4 sheet. Copy of a note from the Borough of Sebastopol to Traffic Commission 15/10/1958 about the problem of the tramline crossing Albert St, Sebastopol at and angle and the lack of appropriate warning signage. 2. E-mail from Alan Bradley, - 2 x A4 sheets dated 26/4/2003 detailing fares/sections for 11/55, 3/63, 9/66 and 1/69, other changes to fares, eg city sections and pensioners. Sheets stapled in top left hand corner. 3. E-mail from Alan Bradley - 2 x A4 sheets dated 29/5/2003 re ESCo fares, SEC tram fares in 1937, 1938, overlapping sections, 1949 fare increase, and other notes that formed the basis of the fares appendix in the Tramways of the Golden City. Sheets stapled in top left hand corner.trams, tramways, albert st, fares, tickets, sebastopol, sec, esco -
 Ballarat Tramway Museum
Photograph - Black & White Photograph/s - set of 2, Dave Macartney, Apr. 1962
Black and white photograph of Ballarat trams 18 and 37 northbound in Lydiard St. North during the AETA East Convention tour of 1962. No 18 has an ATEA auxiliary board and is showing special. Tram 18 has an AGE newspaper ad on the drivers cab panel. See Reg. Item 674 for further details. Trams are crossing possibly No. 12 or 32 at Gregory St. loop. Number of participants standing under the trees. 3227.1 - additional print ex Alan Bradley 5/2007, made by John Phillips added - 203H x 253W. tramways, trams, ballarat, lydiard st. nth, aeta tour, specials, tram 18, tram 37 -
 Melbourne Tram Museum
Photograph - Set of 8 Black & White Photograph/s, Melbourne & Metropolitan Tramways Board (MMTB), 1966
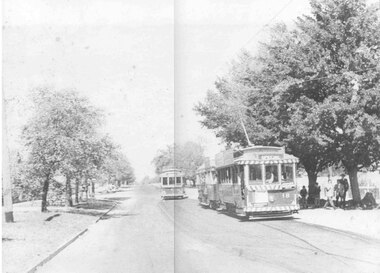
Series of 8 black and white photographs of the trackwork used at H crossings (where two tracks cross another two tracks at right angles.) .1 - H crossing being renewed. .2 - New H crossing laide out in a yard .3 - H crossing being completed at Queensway / Chapel and Dandenong Road, early 1968 with the All Saints church in the background. .4 - being renewed .5 - ditto .6 - ditto with a tram crossing. .7 - as for .4 .8 - showing extensive fish plating on a wooden longitudinal sleepers, plates bolted to the wood or timbers.trams, tramways, trackwork, rails, track materials, track repairs, sleepers, equipment, queensway, chapel st, dandenong road -
 Melbourne Tram Museum
Photograph - Set of 12 Black & White Photograph/s, Melbourne & Metropolitan Tramways Board (MMTB), 1966
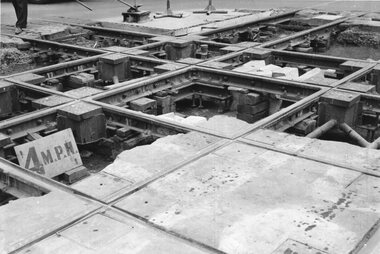
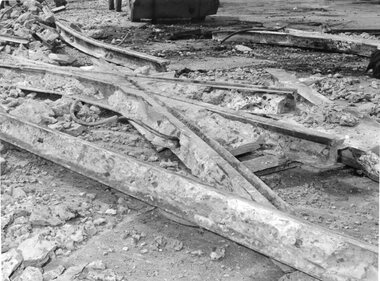
Series of 12 black and white photographs of the trackwork on the MMTB system. .1 - demolished track at a junction .2 - section of rail showing the flangeway missing .3 - junction plates between different weight railway . .4 - wood blocked track showing broken joint and failure .5 - ditto .6 - V crossing ,7 - ditto at a wooden sleepered crossing with puppy dog spikes. .8 - crossing possibly between tram and rail .9 - H crossing rail showing broken joints and wear .10 - ditto .11 - section of rail pumping - waterlogged .12 - damaged joint, pumping, broken joint plate.trams, tramways, trackwork, rails, points, crossover, track materials, track repairs -
 Melbourne Tram Museum
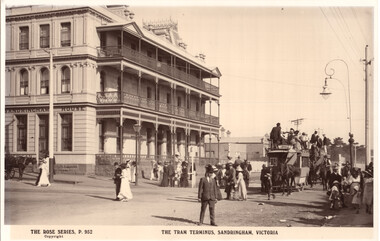
Photograph - Beaumaris Horse Tram Sandringham terminus, Rose Stereograph Co, c1900
Photo of two double deck horse trams, shortly after arriving at the Sandringham - Beaumaris Tramway terminus c1900, including the Sandringham House Private Hotel on the corner on the corner of Beach Road and Melrose Street. Has many well dressed people crossing the roadway.Shows a double deck horse tram on the Sandringham to Beaumaris tramway.Reproduction print of Rose Series postcard P952 on paper.trams, tramways, horse trams, sandringham, hotels, beaumaris -
 Ballarat Tramway Museum
Newspaper, The Courier Ballarat, No headline - but depot Tram Lines ripped up, 13/02/1973 12:00:00 AM
Yields information about the demolition or removal of the track in Wendouree Parade and how it was done.Newspaper clipping from The Courier, 13/2/1973- photo of tram lines being ripped up in Wendouree Parade at what would appear to be the site of Depot Loop, though possibly at the junction for the SEC depot. Has a point casting in the foreground and the church on the corner of Forest St. in the background. Has arm of excavator and a worker crossing the ripped up track as well. On top has a caption small note about the work and reference to Lydiard St. works.date in pencil of "13/2/73" in top right hand corner of cutting.trams, tramways, wendouree parade, track removal, sec depot, depot loop -
 Ballarat Tramway Museum
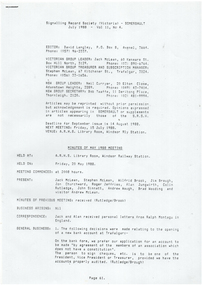
Document - Photocopy, Signalling Record Society of Victoria, "Safeworking on the Ballarat Electric Tramway System", Jul. 1988
... Trams tramways Signals Crossing Loop SECV Operations Copy ...Copy of an article by Peter Barry on the location of loops and operations of the Ballarat Tramway system. From pages 76 to 79 of the July 1988 issue of Somersault. Cover page, page 61 included. Covers running times, loop sections on Sebastopol, Lydiard St and Eastern Routes, Weekdays and Sats. and Suns., View Point, Signalling system, points where trams reversed in the section.trams, tramways, signals, crossing loop, secv, operations -
 Ballarat Tramway Museum
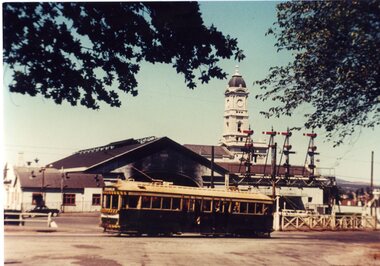
Postcard, Ron Scholten, Bogie car at Railway Level crossing
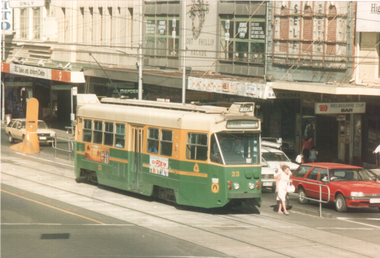
Colour photograph, printed on a postcard back format of SEC Ballarat of No. 34? in bound in Lydiard St North about to cross the railway level crossing, with the Ballarat Railway Station and signals in the background. Note the very dirty end of the station canopy.trams, tramways, lydiard st nth, railway station, railway crossing, tram 33 -
 Ballarat Tramway Museum
Photograph - Black & White Photograph/s, Dave Macartney, 21/04/1962 12:00:00 AM
Black and white photograph for SEC trams 18 and 37 at the Carlton St. Loop, Northbound in Wendouree Parade on 21/4/1962. Tram 18 is showing destination of "Gardens via Sturt St. West". Also has an "The Age" advertisement on drivers panel. Two crew members standing alongside the tram. Can see the Olympic monument in the background.In red ink on rear of photograph in three of the four corners "18 and 37 Carlton St. 21-4-62", "Keystone Ballarat" and "Neg 662-10".trams, tramways, carlton st, wendouree parade, crossing loop, keystone, tram 18, tram 37 -
 Ballarat Tramway Museum
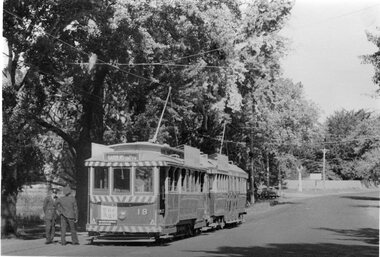
Photograph - Bromide of a b/w photograph, set of 2, Richard Gilbert, c1971
Yields information about the use of the trams on the Sebastopol line and their use by school children.Bromide of a black and white photograph of Ballarat trams 41 and 42 crossing at the Grey St. Loop, Albert St. Sebastopol, c1970. School children are boarding No. 41, which is inbound with the destination of Lydiard St. North. No. 42 is southbound, or outbound with a destination of Sebastopol. Richard Gilbert photo. Bromide made c1994 for possible publication, but not used, though may have been used in another publication. Print of the actual photograph added 27/1/2019 - see image i1. Richards notes that came with the photograph "Near the end of school term, students use the trams for the last few days of the closing school term. When the next terms commenced, the trams had been replaced". See image i2. Photograph has a sticker on the rear with "9" written on it and "Both these cars were transferred to Ballarat in 1956 from Geelong after that system closed. They were originally from Melbourne" and "Richard C Gilbert 1970". trams, tramways, grey st., sebastopol, albert st, crossing loop, schools, tram 41, tram 42 -
 Ballarat Tramway Museum
Photograph - Bromide of a b/w photograph, The Courier Ballarat, 1960
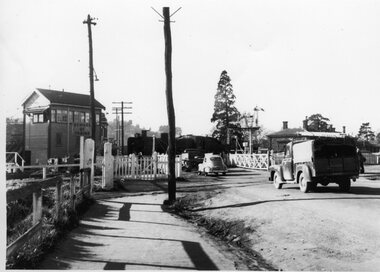
Bromide of a black and white photograph of the Humffray St level crossing in 1960 with a steam locomotive passing through the level crossing, with a set of interlocked gates and a number of motor vehicles waiting. Buildings in view are the Ballarat East signal box and the station building, which was demolished in 1962. Was used in Fares Please! September 1990 issue, in an articles "Beware of Trains" by Alan Bradley. Photo by Ballarat Courier. Bromide made c1994 for possible publication, but not used.trams, tramways, ballarat east, humffray st., level crossings, fares please! -
 Ballarat Tramway Museum
Photograph - Bromide of a b/w photograph, mid 1960's?
Bromide of a black and white photograph of Ballarat No. 40 crossing Sturt St. from Lydiard St. North with Post Office in background. No. 40 does not have any advertising signs. Showing destination of Sebastopol. Possibly photographed mid 1960's. Photographer unknown. Bromide made c1994 for possible publication, but not used.trams, tramways, sebastopol, sturt st., lydiard st north, post office, tram 40 -
 Ballarat Tramway Museum
Newspaper, The Ballarat News, "Ballarat's love of trams lingers", 26/01/2000 12:00:00 AM
Newspaper clipping from the Ballarat News of 26/1/2000 featuring an item on the 25th anniversary celebrations of the BTM, giving a brief history of the Ballarat Tramways and BTM. Features a photo (very old) of tram 27 crossing tram 33 at the loop."Ballarat News 26/1/2000" on rear in top right hand corner in pencil and ink.trams, tramways, btm, 25th anniversary