Showing 4879 items
matching plains-wanderer
-
 Ballarat Tramway Museum
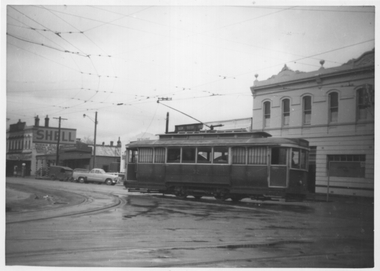
Photograph - Tram 32 - Hospital Corner, mid 1950s
The photograph shows SEC Ballarat tram No. 32 at Hospital Corner, turning from Sturt St into Drummond St Sth. Has the Southern Cross Hotel in the background along with a Shell petrol sign. Note the signal contactor above the trolley pole. Photographer and date unknown - mid-1950s.Yields information about tram 32 and Hospital corner, mid 1950s.Black and White print on plain paper.tramcars, tram 32, hospital corner, sturt st, drummond st sth -
 Ballarat Tramway Museum
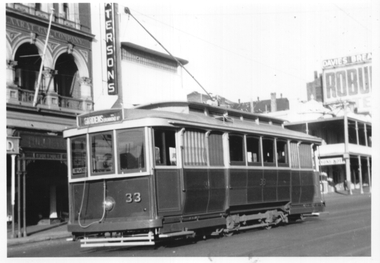
Photograph - Tram 33 lower Sturt St, mid 1950s
The photograph shows SEC Ballarat tram No. 33 (Gardens via Drummond St North) in lower Sturt St mid 1950s with tail lights installed. In the background is the Ballaarat Gas Co. building, Patersons, a hotel and the Ballarat Mechanics Institute Building with signs for Robur Tea and Davies Bread. Photographer unknown.Yields information about tram 33 and lower Sturt St mid 1950s.Black and white print with plain back.tramcars, tram 33, sturt st -
 Ballarat Tramway Museum
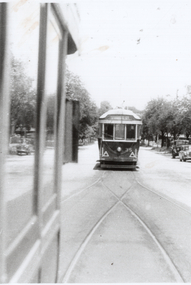
Photograph - Tram 35 Lydiard St Nth crossing, late 1950s
The photograph shows SEC Ballarat tram No. 35 northbound in Lydiard St loop, crossing another bogie tram, probably at the Seymour St Loop. The tram is fitted with tail lights and large reflective triangles, indicating a date between 1956 and 1960. Photographer unknown.Yields information about tram 35 crossing another bogie, probably at the Seymour St loop - late 1950s.Black and white print on plain papertramcars, tram 35, lydiard st nth -
 Ballarat Tramway Museum
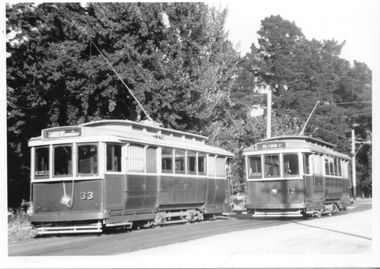
Photograph - Trams 33 and 12 crossing Wendouree Parade, mid 1950s
The photograph shows SEC Ballarat tram No. 33 (Gardens via Drummond St North) and No. 12 (Mt Pleasant) crossing each other in Wendouree Parade, mid 1950s with tail lights installed. Photographer unknown.Yields information about tram 33 tram 12 during the mid 1950s in Wendoure Parade.Black and white print with plain back.tramcars, tram 33, wendouree parade, tram 12 -
 Ballarat Tramway Museum
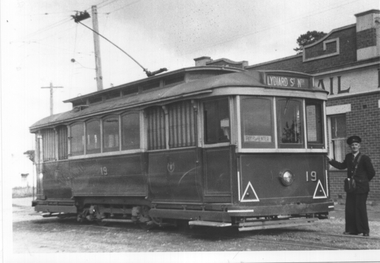
Photograph - Ballarat tram 19 Sebastopol, late 1950s
The photograph shows Ballarat Tram No. 19 at the Sebastopol terminus late 1950s with the driver/conductor standing by the front door before returning to Lydiard St North. On the opposite side of the tram is the "Pay as You Enter" sign. The Royal Mail Hotel is in the background. Photographer unknown. Yields information about tram 19 at the Sebastopol terminus, late 1950s.Black and white prints - plain back. tramcars, tramways, one man trams, sebastopol, royal mail hotel, crews, tram 19 -
 Ballarat Tramway Museum
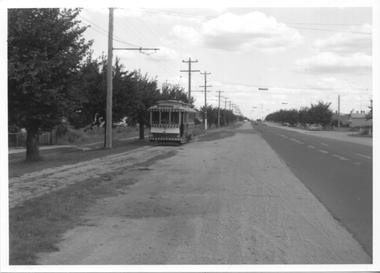
Photograph - Ballarat tram 18 Grey St Loop, early 1970s
Photograph of Ballarat No. 18 inbound from Sebastopol to Lydiard St North, leaving the Grey St loop in Albert St late 1960s or early 1970s. Photographer unknown. Yields information about tram 18 and the Grey St loop areaBlack and white print - plain back. tramcars, tramways, albert st, grey st loop, tram 18 -
 Ballarat Tramway Museum
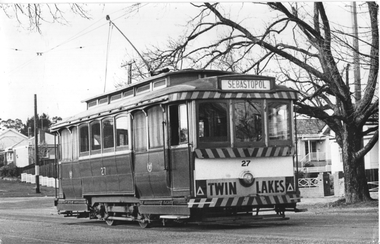
Photograph - Tram 27 - Lydiard St Nth, Keith Kings, c1970
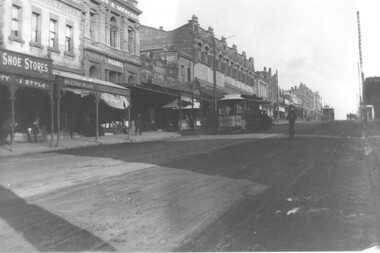
Photograph shows SEC Ballarat tram No. 27 (Sebastopol) in bound in Lydiard St North at Landsborough St. Tram has a Twin Lakes sign. Photograph used in the book "Ballarat Tramways" written by Keith Kings in 1971 on page 27. See note for some background. Yields information about tram 27 running a Lydiard St Nth to Sebastopol service.Black and white photograph on plain papertramcars, tram 27, lydiard st nth, twin lakes -
 Melbourne Tram Museum
Photograph - Cable tram 389 Bourke St, late 1930s
Photo of a cable tram set, trailer 389 at the Bourke St terminus shortly after its arrival. Passengers are waiting in the Safety Zone, for the shunting to be completed before returning to Nicholson St. in the background are the Bourke St West Police station, Hudson's Stores, the MTO Co. Head office building and Carlyons Hotel. Under the awning of the MTOC Head office building is Buchanan;s Cafe. Photo late 1930sYields information about the Bourke St cable tram terminus, late 1930sBlack and white print with a plain backtrams, tramways, tram 306, cable trams, bourke st -
 Melbourne Tram Museum
Photograph - Cable Grip - Abbotsford St, mid 1930s
Photo of a cable grip or dummy at the Abbotsford St terminus, North Melbourne. This line closed during July 1935 and was converted to electric trams. Photographer and date unknown, mid 1930s?Yields information about the Abbotsford St terminus, early 1930s.Black and white print with a plain backtrams, tramways, cable trams, abbotsford st, north melbourne -
 Melbourne Tram Museum
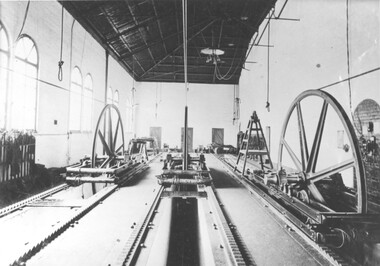
Photograph - Cable Engine house interior - Gertrude St
Photo of the interior of an engine house showing the tension wheels for three different cables. See page 76 of Mind The Curve by Keating, showing the cable tensioning arrangements. Based on a review of the window arrangements, it is believed to be the Nicholson St and Gertrude St winding house. See attached email.Yields information about the interior of a engine house powering three separate cables.Black and white print with a plain backtrams, tramways, cable trams, engine houses, power house, winding house, gertrude st -
 Melbourne Tram Museum
Photograph, Cable Tram Royal Parade Parkville - Walker St, 1930s
Photograph shows an inbound cable tram - bogie trailer in Royal Parade Parkville at Walker St. The building behind the tram remains in 2024. Photo copied from another photograph.Yields information about Royal Parade in the 1920sPhotograph, black and white, plain back.trams, tramways, cable tram, royal parade, parkville -
 Melbourne Tram Museum
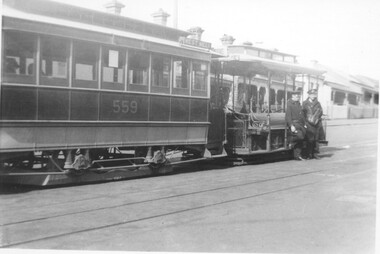
Photograph, Cable Tram 559 West Melbourne, 1930s
Photograph shows a cable tram set, trailer No. 559 at the West Melbourne terminus in Abbotsford St at Queensberry St, opposite the engine house. The trailer has the destination of "West Melb". The crew are standing by the grip in MMTB Uniforms. The line closed in July 1935 (see item 1784).Yields information about the West Melbourne cable terminus and tram 559.Photograph, black and white, plain back.Has "10" in pencil on rear.trams, tramways, cable tram, west melbourne, tram 559, abbotsford st, uniforms, crews -
 Melbourne Tram Museum
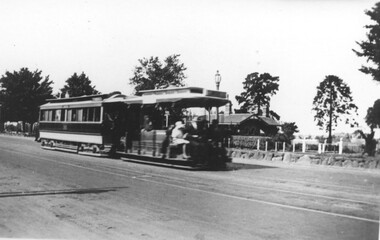
Photograph, Cable tram 41 Bridge Road Richmond, c1900
The photograph shows cable, trailer 41 climbing the Bridge Road hill just west of Waltham Steet bound for the city. A second cable set can be seen in the distance, bound for Hawthorn Bridge. Nearly all of the buildings on this south side of Bridge Road remain today including the former Forbes and Sons building. Photo possibly dated c1900.Yields information about cable trams in Bridge Road Richmond and associated buildings.Photograph, black and white, plain papertrams, tramways, cable tram, bridge road, tram 41, richmond -
 Melbourne Tram Museum
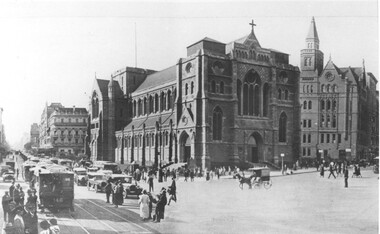
Photograph, Swanston St and St Pauls Cathedral and tram 146, early 1920s
The photograph shows St Paul's Cathedral on the corner of Flinders and Swanston St Melbourne, before the construction of the spires during the 1930s. Several cable trams, including cable car 146 can be seen in Swanston St, along with many motor cars, buses and pedestrians. The photo is early 1920s. The cable line was converted to electric trams during 1925/1926.Yields information about St Paul's Cathedral and Swanston St cable trams.Photograph, black and white, plain papertrams, tramways, cable tram, swanston st, flinders st, tram 146, st paul's cathedral, buses -
 Melbourne Tram Museum
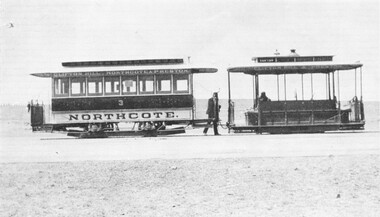
Photograph, Northcote cable tram 3
The photograph shows a Northcote cable tram set - grip car and trailer No. 3. The trailer is lettered - Clifton Hill - Northcote & Preston. The background has been whited out though possibly a conductor and the gripman can be seen. For the story of the Northcote line, see the Museum's article - Northcote: the on again, off again cable tramway in the references.Yields information about the Northcote cable trams before they were merged with the MMTB.Photograph, black and white, plain papertrams, tramways, cable tram, northcote, clifton hill, tram 3 -
 Melbourne Tram Museum
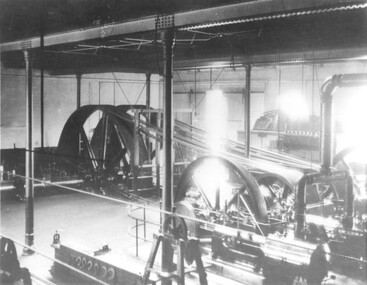
Photograph, Interior of a Melbourne cable tram Engine House
The photograph shows the interior of a Melbourne cable tram engine house, or powerhouse, with the steam cylinders and flywheels in the view. Location and date unknown.Yields information about the interior of an cable tram engine house.Photograph, black and white, plain papertrams, tramways, cable tram, engine house, power house -
 Melbourne Tram Museum
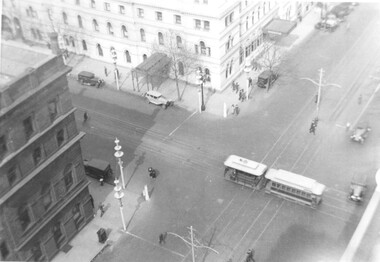
Photograph, Menzies Hotel and the Goldsborough & Mort Woolstore with a cable tram crossing William Street in Bourke Street, c1937
The photograph shows a cable tram in Bourke St, crossing over the electric tram track in William Street. The Menzies Hotel 1867 (see reference) is in the background, along with the Goldborough Mort Woolstore building 1862 on the opposite corner. Also in the photo are the Melbourne Centenary "Lollypop" street decorations of 1934. The photo appears to be taken from the roof of the Shell Building in William Street. Yields information about the Menzies Hotel and the intersection of Bourke and William St. Photograph, black and white, plain papertrams, tramways, cable tram, bourke st, william st, menzies hotel, goldsborough mort, melbourne centenary -
 Melbourne Tram Museum
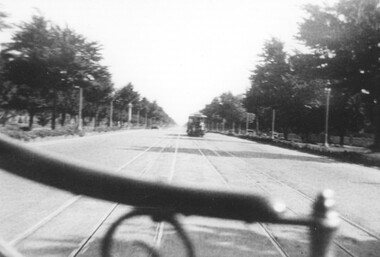
Photograph, St Kilda Road from a cable tram, c1910
The photograph shows the view from the front seat of a cable tram travelling along St Kilda Road with another cable tram on the other track. The photo shows, though out of focus, the median strip trees, street lights and the rock kerb markers known as "dragon teeth". The line was converted to electric traction in 1925/26. See also item 5894 for another image.Yields information about St Kilda Road, possibly in the 1910s.Photograph, black and white, plain papertrams, tramways, cable tram, st kilda road, grip car -
 Melbourne Tram Museum
Photograph, Gripman's view forward
The photograph shows the view of a gripman looking forward with his levers, the longitudinal seats and the head light. Also shown is the seat in the opposite corner of the grip car or dummy.Yields information about cable trams in the 1920s and 1930s.Photograph, black and white, plain backtrams, tramways, cable tram, gripmen, grip tram, dummy -
 Melbourne Tram Museum
Photograph, Forward view from a cable tram trailer
The photograph shows the view of a passenger or conductor from the rear door of a cable tram trailer looking forward. The gripman in MMTB uniform is standing by his levers. Shows the longitudinal seats.Yields information about cable trams in the 1920s and 1930s.Photograph, black and white, plain backtrams, tramways, cable tram, gripmen, uniforms -
 Melbourne Tram Museum
Photograph, Bogie Cable tram - Elizabeth and Victoria Sts, 1920s
The photograph shows a cable tram (Brunswick) with a bogie trailer, north bound in Elizabeth St having just crossed over Victoria St. The tram is flying two red ensigns. In the background is a horse drawn gig, and the Independent Order of Oddfellows (IOOF) building.Yields information about the intersection of Victoria and Elizabeth Sts and the Brunswick cable tram services, 1920s.Photograph, black and white, plain backtrams, tramways, cable tram, elizabeth st, victoria st, bogie cable trailers -
 Melbourne Tram Museum
Photograph, Cable tram 534 in Bourke Street outside the St. James Building, 1924
The photograph shows a cable tram set with trailer No. 534 east bound in Bourke St on its way to Nicholson St passing the St. James Building at William Street. The conductor standing at the back of the grip car is in MMTB uniform with his ticket wallet in his left hand and bag visible. The grip man appears to be ringing his bell. There is a side advertisement for the "All Australian Exhibition". A reference to the exhibition is in The Argus of 3/11/1924 - see reference.Yields information cable trams in Bourke St and their crews.Photograph, black and white, plain backtrams, tramways, cable tram, bourke st, conductors, tram crews, william st, tram 534 -
 Melbourne Tram Museum
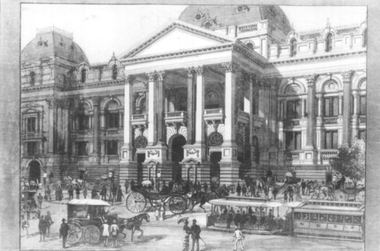
Photograph, Illustration Melbourne Town Hall, c1890
The photograph is of an illustration of the Melbourne Town Hall, Swanston St of a busy scene with a large horse drawn Landau open carriage arriving at the Town Hall. There is one north bound cable tram in the view along with a horse drawn cab and many pedestrians. Possibly taken from a magazine showing a state occasion. Possibly c1890.Yields information about the Melbourne Town Hall and possibly a state event.Black and white photograph with a plain back.melbourne town hall, swanston st, cable tram, horse drawn vehicles -
 Melbourne Tram Museum
Photograph - Overhead Track lighting Nicholson St Coburg, Melbourne & Metropolitan Tramways Board (MMTB), 1960
Photo shows extensive track lights on the left side of the single-track Nicholson St East Coburg tram line with W2 class tram 473? inbound on route 1 just to the north of Grant St. This section of track was considered dangerous and to alleviate the problem of inbound or southbound tramcars not being visible well in advance to northbound motorists, the MMTB installed the track lights. The Chief Engineer at the 24/3/1960 meeting of the Board advised of the scheme that the track lights would be progressively switched on in advance of a southbound tram. The line was eventually duplicated in Dec. 1966.Yields information about a track lighting system to improve safety on a single line of tramway in East Coburg.Black and white photo, plain backnicholson st, single line, track lights, east coburg -
 Melbourne Tram Museum
Photograph - Caulfield Races traffic, Dave Macartney, c1970
Photograph shows many W2 class trams, led by W2 220 for the Caulfield Race day traffic in Railway Ave. Photo taken from the Railway embankment. In the view are Downard's Furniture storage in the former Crystal Palace cinema (see reference), along with adverts for Stegbar, Alsatian, and Weber Real Estate. A policeman is on point duty. In the far background is the Caulfield Railway station. Photo c1970.Yields information about Caulfield Race day traffic c1970Black and white photograph, plain back.caulfield, trams, caulfield races, railway ave, railways, w2 class, tram 220 -
 Melbourne Tram Museum
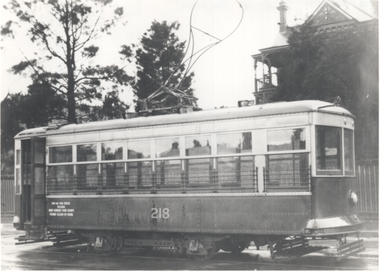
Photograph - Birney 218 Power St. Hawthorn, 1924
Photo shows X class Birney No. 218 in Power Street soon after delivery. It is fitted with a bow pantograph.Yields information about X class tram No. 218Black and White photograph on plain paper.In ink on rear "Birney 218, Power St Hawthorn" Has TMSV Sales stamp on rear.tramways, tram 218, power st, x class, birney, new trams -
 Melbourne Tram Museum
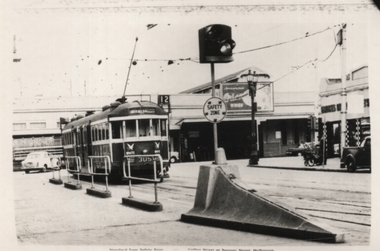
Photograph - Safety Zone prow & W2 305, Melbourne & Metropolitan Tramways Board (MMTB), 1961
Photo, an Official MMTB photograph, shows a safety zone concrete prow with a set of flashing lights at the intersection of Collins and Spencer Sts. In the view is W2 305 (Route 12, South Melbourne Beach). The tram has large experimental roof ventilators and two White Wings Tomato sauce adverts on the end panels. In the background are the Victorian Railways Spencer St buildings. Photo used in the 1961 MMTB Annual Report.Yields information about Safety zones and W2 305.Black and White photograph on plain paper.In ink on rear "Collins & Spencer"tramways, collins st., spencer st, safety zone, w2 class, tram 305 -
 Ballarat Tramway Museum
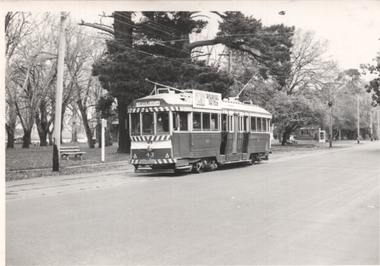
Photograph - Tram 43 Gardens Loop, Maureen van Rooy, Winter 1971
Photograph shows Ballarat No. 43 at Gardens Loop, Wendouree Parade winter 1971. Tram has the destination of Gardens via Sturt St West. Yields infomation about tram 43 and Gardens Loop.Black and white photograph with plain back.tramcars, tramways, tram 43, wendouree parade, gardens loop -
 Melbourne Tram Museum
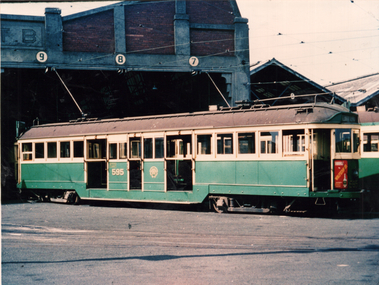
Photograph - W2 595 Essendon Depot, 1960s
Photograph of W2 class 595 Essendon Depot on No. 9 road. Photo from the Bob Lilburn collection.Yields information about W2 class tram 595.Colour print of a photograph with a plain back.trams, tramways, mmtb, w2 class, essendon depot, tram 595 -
 Melbourne Tram Museum
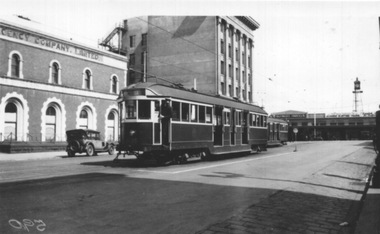
Photograph - Tram 636 Collins St at Spencer St, early 1930s
Black and white photograph showing W2 class No. 636 at the Collins St terminus at the corner with Spencer St. The tram has the destination of Victoria St and is not fitted with a route number box with the driver in the cabin door. The tram entered service in Aug. 1930 and was fitted with a route number box in Feb. 1934. There is another W2 class tram behind. In the background is the State Savings Bank building, now the Batman Hill Hotel and the VR Outward Parcels office.Yields information about tram 636 at the Collins St terminus, early 1930s.Black and White photograph with a plain back.trams, tramways, w2 class, collins st, spencer st, tram 636