Showing 22103 items matching " work "
-
 Flagstaff Hill Maritime Museum and Village
Domestic object - Plate, Johnson Bros
The Process of Making Pottery Decorating, Firing, Glazing, Making, Technical There is a rhythm and flow to clay. It can’t be done all at once! Even the making process! It can take weeks to get everything done, especially if you can only work on your pottery once a week! Even though we have three hour classes, it’s often just not enough time! Here is an overview of some of the processes so you have a bit more grasp on some of the technical stuff! Step One – Design There are SO many ideas out there for making stuff in clay! From delicate porcelain jewellery, through to heavy sculptural work and everything in between. Deciding your direction is sometimes not that easy – when you first start, try everything, you will naturally gravitate to the style that you enjoy! The options and variations are endless and can get a wee bit overwhelming too! Check in with me before you start to ensure your ideas will work, what order you might do things, how you could achieve the look you are seeking and any other technical data required! Step Two – Making Clay is thixotropic. This means that as you work with it, the clay first gets sloppier and wetter, before is begins to dry in the atmosphere. For most things, you simply can’t do all parts of the project at once. An example of work order might look like: Get last weeks work out from the shelves Prepare clay for today’s work – roll your clay, prepare balls for throwing, make the first stage of a pinch pot) Clean up last week’s work and put it on the shelf for bisque firing Check that you have any glazing to do – and do enough of it that you will have time to finish your main project Do the next step of your next project – there might be a further step that can’t be complete immediately, in that case, wrap your work well and put onto the shelves. Letting your work rest for a while can really help keep your work clean and professional looking. Many things require bagging under plastic to keep it ready for work the next week – put your name on the outside of the bag so you can find your work easily. We have stickers and markers. Consider how you want to decorate your work – coloured slip can be applied at a fairly wet stage (remembering that it will make your work even wetter!). Trying to apply slip to dry clay won’t work! If you want to do sgraffito – you will need to keep the work leather hard (a state of dryness where you can still work the clay with a little effort and a little water and care). Step Three – Drying Most of the time your work can go into the rack uncovered to let it dry out for the following week. If you want to continue forming or shaping you will need to double bag your work – put your work on a suitable sized bat and put the bat in a bag so the base of the bag is under the bat, then put another bag over the top of the work and tuck the top of the bag under the bat. If you want to trim (or turn) your thrown work the following week, it should also be double bagged. If your work is large, delicate, or of uneven thicknesses, you should lightly cover your work for drying. When considering the drying process, bare in mind the weather, humidity and wind! The hotter and dryer, the faster things dry and work can dry unevenly in the shelves – this can lead to cracking – another time to lightly cover your work for drying. Step Four – Trimming and Cleaning Up Your work is dry! It is called greenware now and it is at it’s most fragile! Handle everything with two hands. I often refer to soft hands – keep everything gentle and with your fingers spread as much as possible. Try to not pick up things like plates too much, and always with both hands! Before your work can be bisque fired it should be “cleaned up”. You work won’t go into the kiln if it has sharp edges – when glazed, sharp edges turn into razor blades! Use a piece of fly wire to rub the work all over – this will scratch a little so be light handed. Use a knife or metal kidney to scrape any areas that require a bit more dynamic treatment than the fly wire offers! Finally, a very light wipe over with a slightly damp sponge can help soften and soothe all of your edges and dags! Trimming thrown work: If you are planning to trim (or turn) your thrown work (and you should be), make sure you bag it well – your work should be leather hard to almost dry for easiest trimming. Use this step to finish the work completely – use a metal kidney to polish the surface, or a slightly damp sponge to give a freshly thrown look. Wipe the sponge around the rim after trimming, and check the inside of the pot for dags! Trimming slip cast work: Usually I will trim the rims of your work on the wheel the following day to make that stage easier, however you will still need to check your work for lumps and bumps. Last but not least – check that your name is still clearly on the bottom of your work. Step Five – Bisque Firing When the work is completely dry it can go into the bisque kiln. The bisque kiln is fired to 1000°C. This process burns off the water in the clay as well as some of the chemically bound water. The structure of the clay is not altered that much at this temperature. Inside the bisque kiln, the work is stacked a little, small bowl inside a larger bowl and onto a heavy plate. Smaller items like decorations or drink coasters might get stacked several high. Consideration is paid to the weight of the stack and shape of the work. A bisque kiln can fire about one and a half times the amount of work that the glaze kiln can fire. The firing takes about 10 hours to complete the cycle and about two days to cool down. Once it has been emptied the work is placed in the glaze room ready for you to decorate! Step Six – Glazing Decorating your work with colour can be a lot of fun – and time consuming! There are three main options for surface treatment at this stage: Oxide Washes Underglazes Glazes Washes and underglazes do not “glaze” the work – It will still need a layer of glaze to fully seal the clay (washes don’t need glaze on surfaces not designed for food or liquid as they can gloss up a little on their own). Underglazes are stable colourants that turn out pretty much how they look in the jar. They can be mixed with each other to form other colours and can be used like water colours to paint onto your work. Mostly they should have a clear glaze on top to seal them. Oxides are a different species – the pink oxide (cobalt) wash turns out bright blue for instance. They don’t always need a glaze on top, and some glazes can change the colour of the wash! The glazes need no other “glaze” on top! Be careful of unknown glaze interactions – you can put any combination of glaze in a bowl or on a plate, but only a single glaze on the outside of any vertical surface! Glazes are a chemical reaction under heat. We don’t know the exact chemicals in the Mayco glazes we use. I can guess by the way they interact with each other, however, on the whole, you need to test every idea you have, and not run the test on a vertical surface! Simply put, glaze is a layer of glass like substance that bonds with the clay underneath. Clay is made of silica, alumina and water. Glaze is made of mostly silica. Silica has a melting point of 1700°C and we fire to 1240°C. The silica requires a “flux” to help it melt at the lower temperature. Fluxes can be all sorts of chemicals – a common one is calcium – calcium has a melting point of 2500°C, however, together they both melt at a much lower temperature! Colourants are metal oxides like cobalt (blue), chrome (green through black), copper (green, blue, even red!), manganese (black, purple and pink) iron (red brown), etc. Different chemicals in the glaze can have dramatic effects. for example, barium carbonate (which we don’t use) turns manganese bright pink! Other elements can turn manganese dioxide brown, blue, purple and reddish brown. Manganese dioxide is a flux in and of itself as well. So, glazes that get their black and purple colours, often interact with other glazes and RUN! Our mirror black is a good example – it mixes really well with many glazes because it fluxes them – causes them to melt faster. It will also bring out many beautiful colours in the glazes because it’s black colouring most definitely comes from manganese dioxide! Glaze chemistry is a whole subject on it’s own! We use commercial Mayco glazes on purpose – for their huge range of colour possibilities, stability, cool interactions, artistic freedom with the ability to easily brush the glazes on and ease of use. We currently have almost 50 glazes on hand! A major project is to test the interactions of all glazes with each other. That is 2,500 test tiles!!!! I’m going to make the wall behind the wheels the feature wall of pretty colours! Step Seven – Glaze (Gloss or sometimes called “Glost”) Firing Most of the time this is the final stage of making your creation (but not always!) The glaze kiln goes to 1240°C. This is called cone 6, or midrange. It is the low end of stoneware temperatures. Stoneware clays and glazes are typically fired at cone 8 – 10, that is 1260 – 1290°C. The energy requirement to go from 1240°C to 1280°C is almost a 30% more! Our clay is formulated to vitrify (mature, turn “glass-like”) at 1240°, as are our glazes. A glaze kiln take around 12 hours to reach temperature and two to three days to cool down. Sometimes a third firing process is required – this is for decoration that is added to work after the glaze firing. For example – adding precious metals and lustres. this firing temperature is usually around 600 – 800°C depending upon the techniques being used. There are many students interested in gold and silver trims – we will be doing this third type of firing soon! After firing your work will be in the student finished work shelves. Remember to pay for it before you head out the door! There is a small extra charge for using porcelain clay (it’s more than twice the price of regular clay), and for any third firing process! Once your work has been fired it can not turn back into clay for millennia – so don’t fire it if you don’t like it! Put it in the bucket for recycling. https://firebirdstudios.com.au/the-process-of-making-pottery/Ceramics have evolved over thousands of years.A white earthenware side plate with a gadroon edge. Has water marks and chips on front.‘Johnson Bros England Reg No 15587’flagstaff hill, warrnambool, shipwrecked-coast, flagstaff-hill, flagstaff-hill-maritime-museum, maritime-museum, shipwreck-coast, flagstaff-hill-maritime-village, johnson bros, ceramics, tableware -
 Flagstaff Hill Maritime Museum and Village
Domestic object - Plate, Alfred Meakin
The Process of Making Pottery Decorating, Firing, Glazing, Making, Technical There is a rhythm and flow to clay. It can’t be done all at once! Even the making process! It can take weeks to get everything done, especially if you can only work on your pottery once a week! Even though we have three hour classes, it’s often just not enough time! Here is an overview of some of the processes so you have a bit more grasp on some of the technical stuff! Step One – Design There are SO many ideas out there for making stuff in clay! From delicate porcelain jewellery, through to heavy sculptural work and everything in between. Deciding your direction is sometimes not that easy – when you first start, try everything, you will naturally gravitate to the style that you enjoy! The options and variations are endless and can get a wee bit overwhelming too! Check in with me before you start to ensure your ideas will work, what order you might do things, how you could achieve the look you are seeking and any other technical data required! Step Two – Making Clay is thixotropic. This means that as you work with it, the clay first gets sloppier and wetter, before is begins to dry in the atmosphere. For most things, you simply can’t do all parts of the project at once. An example of work order might look like: Get last weeks work out from the shelves Prepare clay for today’s work – roll your clay, prepare balls for throwing, make the first stage of a pinch pot) Clean up last week’s work and put it on the shelf for bisque firing Check that you have any glazing to do – and do enough of it that you will have time to finish your main project Do the next step of your next project – there might be a further step that can’t be complete immediately, in that case, wrap your work well and put onto the shelves. Letting your work rest for a while can really help keep your work clean and professional looking. Many things require bagging under plastic to keep it ready for work the next week – put your name on the outside of the bag so you can find your work easily. We have stickers and markers. Consider how you want to decorate your work – coloured slip can be applied at a fairly wet stage (remembering that it will make your work even wetter!). Trying to apply slip to dry clay won’t work! If you want to do sgraffito – you will need to keep the work leather hard (a state of dryness where you can still work the clay with a little effort and a little water and care). Step Three – Drying Most of the time your work can go into the rack uncovered to let it dry out for the following week. If you want to continue forming or shaping you will need to double bag your work – put your work on a suitable sized bat and put the bat in a bag so the base of the bag is under the bat, then put another bag over the top of the work and tuck the top of the bag under the bat. If you want to trim (or turn) your thrown work the following week, it should also be double bagged. If your work is large, delicate, or of uneven thicknesses, you should lightly cover your work for drying. When considering the drying process, bare in mind the weather, humidity and wind! The hotter and dryer, the faster things dry and work can dry unevenly in the shelves – this can lead to cracking – another time to lightly cover your work for drying. Step Four – Trimming and Cleaning Up Your work is dry! It is called greenware now and it is at it’s most fragile! Handle everything with two hands. I often refer to soft hands – keep everything gentle and with your fingers spread as much as possible. Try to not pick up things like plates too much, and always with both hands! Before your work can be bisque fired it should be “cleaned up”. You work won’t go into the kiln if it has sharp edges – when glazed, sharp edges turn into razor blades! Use a piece of fly wire to rub the work all over – this will scratch a little so be light handed. Use a knife or metal kidney to scrape any areas that require a bit more dynamic treatment than the fly wire offers! Finally, a very light wipe over with a slightly damp sponge can help soften and soothe all of your edges and dags! Trimming thrown work: If you are planning to trim (or turn) your thrown work (and you should be), make sure you bag it well – your work should be leather hard to almost dry for easiest trimming. Use this step to finish the work completely – use a metal kidney to polish the surface, or a slightly damp sponge to give a freshly thrown look. Wipe the sponge around the rim after trimming, and check the inside of the pot for dags! Trimming slip cast work: Usually I will trim the rims of your work on the wheel the following day to make that stage easier, however you will still need to check your work for lumps and bumps. Last but not least – check that your name is still clearly on the bottom of your work. Step Five – Bisque Firing When the work is completely dry it can go into the bisque kiln. The bisque kiln is fired to 1000°C. This process burns off the water in the clay as well as some of the chemically bound water. The structure of the clay is not altered that much at this temperature. Inside the bisque kiln, the work is stacked a little, small bowl inside a larger bowl and onto a heavy plate. Smaller items like decorations or drink coasters might get stacked several high. Consideration is paid to the weight of the stack and shape of the work. A bisque kiln can fire about one and a half times the amount of work that the glaze kiln can fire. The firing takes about 10 hours to complete the cycle and about two days to cool down. Once it has been emptied the work is placed in the glaze room ready for you to decorate! Step Six – Glazing Decorating your work with colour can be a lot of fun – and time consuming! There are three main options for surface treatment at this stage: Oxide Washes Underglazes Glazes Washes and underglazes do not “glaze” the work – It will still need a layer of glaze to fully seal the clay (washes don’t need glaze on surfaces not designed for food or liquid as they can gloss up a little on their own). Underglazes are stable colourants that turn out pretty much how they look in the jar. They can be mixed with each other to form other colours and can be used like water colours to paint onto your work. Mostly they should have a clear glaze on top to seal them. Oxides are a different species – the pink oxide (cobalt) wash turns out bright blue for instance. They don’t always need a glaze on top, and some glazes can change the colour of the wash! The glazes need no other “glaze” on top! Be careful of unknown glaze interactions – you can put any combination of glaze in a bowl or on a plate, but only a single glaze on the outside of any vertical surface! Glazes are a chemical reaction under heat. We don’t know the exact chemicals in the Mayco glazes we use. I can guess by the way they interact with each other, however, on the whole, you need to test every idea you have, and not run the test on a vertical surface! Simply put, glaze is a layer of glass like substance that bonds with the clay underneath. Clay is made of silica, alumina and water. Glaze is made of mostly silica. Silica has a melting point of 1700°C and we fire to 1240°C. The silica requires a “flux” to help it melt at the lower temperature. Fluxes can be all sorts of chemicals – a common one is calcium – calcium has a melting point of 2500°C, however, together they both melt at a much lower temperature! Colourants are metal oxides like cobalt (blue), chrome (green through black), copper (green, blue, even red!), manganese (black, purple and pink) iron (red brown), etc. Different chemicals in the glaze can have dramatic effects. for example, barium carbonate (which we don’t use) turns manganese bright pink! Other elements can turn manganese dioxide brown, blue, purple and reddish brown. Manganese dioxide is a flux in and of itself as well. So, glazes that get their black and purple colours, often interact with other glazes and RUN! Our mirror black is a good example – it mixes really well with many glazes because it fluxes them – causes them to melt faster. It will also bring out many beautiful colours in the glazes because it’s black colouring most definitely comes from manganese dioxide! Glaze chemistry is a whole subject on it’s own! We use commercial Mayco glazes on purpose – for their huge range of colour possibilities, stability, cool interactions, artistic freedom with the ability to easily brush the glazes on and ease of use. We currently have almost 50 glazes on hand! A major project is to test the interactions of all glazes with each other. That is 2,500 test tiles!!!! I’m going to make the wall behind the wheels the feature wall of pretty colours! Step Seven – Glaze (Gloss or sometimes called “Glost”) Firing Most of the time this is the final stage of making your creation (but not always!) The glaze kiln goes to 1240°C. This is called cone 6, or midrange. It is the low end of stoneware temperatures. Stoneware clays and glazes are typically fired at cone 8 – 10, that is 1260 – 1290°C. The energy requirement to go from 1240°C to 1280°C is almost a 30% more! Our clay is formulated to vitrify (mature, turn “glass-like”) at 1240°, as are our glazes. A glaze kiln take around 12 hours to reach temperature and two to three days to cool down. Sometimes a third firing process is required – this is for decoration that is added to work after the glaze firing. For example – adding precious metals and lustres. this firing temperature is usually around 600 – 800°C depending upon the techniques being used. There are many students interested in gold and silver trims – we will be doing this third type of firing soon! After firing your work will be in the student finished work shelves. Remember to pay for it before you head out the door! There is a small extra charge for using porcelain clay (it’s more than twice the price of regular clay), and for any third firing process! Once your work has been fired it can not turn back into clay for millennia – so don’t fire it if you don’t like it! Put it in the bucket for recycling. https://firebirdstudios.com.au/the-process-of-making-pottery/Ceramics have evolved over thousands of years.Earthenware dessert plate, cream colour. Made by Alfred Meakin, England. Backstamped ‘Alfred Meakin England’. flagstaff hill, warrnambool, shipwrecked-coast, flagstaff-hill, flagstaff-hill-maritime-museum, maritime-museum, shipwreck-coast, flagstaff-hill-maritime-village, alfred meakin, ceramics, earthenware, kitchenware -
 Flagstaff Hill Maritime Museum and Village
Domestic object - Jug
The Process of Making Pottery Decorating, Firing, Glazing, Making, Technical There is a rhythm and flow to clay. It can’t be done all at once! Even the making process! It can take weeks to get everything done, especially if you can only work on your pottery once a week! Even though we have three hour classes, it’s often just not enough time! Here is an overview of some of the processes so you have a bit more grasp on some of the technical stuff! Step One – Design There are SO many ideas out there for making stuff in clay! From delicate porcelain jewellery, through to heavy sculptural work and everything in between. Deciding your direction is sometimes not that easy – when you first start, try everything, you will naturally gravitate to the style that you enjoy! The options and variations are endless and can get a wee bit overwhelming too! Check in with me before you start to ensure your ideas will work, what order you might do things, how you could achieve the look you are seeking and any other technical data required! Step Two – Making Clay is thixotropic. This means that as you work with it, the clay first gets sloppier and wetter, before is begins to dry in the atmosphere. For most things, you simply can’t do all parts of the project at once. An example of work order might look like: Get last weeks work out from the shelves Prepare clay for today’s work – roll your clay, prepare balls for throwing, make the first stage of a pinch pot) Clean up last week’s work and put it on the shelf for bisque firing Check that you have any glazing to do – and do enough of it that you will have time to finish your main project Do the next step of your next project – there might be a further step that can’t be complete immediately, in that case, wrap your work well and put onto the shelves. Letting your work rest for a while can really help keep your work clean and professional looking. Many things require bagging under plastic to keep it ready for work the next week – put your name on the outside of the bag so you can find your work easily. We have stickers and markers. Consider how you want to decorate your work – coloured slip can be applied at a fairly wet stage (remembering that it will make your work even wetter!). Trying to apply slip to dry clay won’t work! If you want to do sgraffito – you will need to keep the work leather hard (a state of dryness where you can still work the clay with a little effort and a little water and care). Step Three – Drying Most of the time your work can go into the rack uncovered to let it dry out for the following week. If you want to continue forming or shaping you will need to double bag your work – put your work on a suitable sized bat and put the bat in a bag so the base of the bag is under the bat, then put another bag over the top of the work and tuck the top of the bag under the bat. If you want to trim (or turn) your thrown work the following week, it should also be double bagged. If your work is large, delicate, or of uneven thicknesses, you should lightly cover your work for drying. When considering the drying process, bare in mind the weather, humidity and wind! The hotter and dryer, the faster things dry and work can dry unevenly in the shelves – this can lead to cracking – another time to lightly cover your work for drying. Step Four – Trimming and Cleaning Up Your work is dry! It is called greenware now and it is at it’s most fragile! Handle everything with two hands. I often refer to soft hands – keep everything gentle and with your fingers spread as much as possible. Try to not pick up things like plates too much, and always with both hands! Before your work can be bisque fired it should be “cleaned up”. You work won’t go into the kiln if it has sharp edges – when glazed, sharp edges turn into razor blades! Use a piece of fly wire to rub the work all over – this will scratch a little so be light handed. Use a knife or metal kidney to scrape any areas that require a bit more dynamic treatment than the fly wire offers! Finally, a very light wipe over with a slightly damp sponge can help soften and soothe all of your edges and dags! Trimming thrown work: If you are planning to trim (or turn) your thrown work (and you should be), make sure you bag it well – your work should be leather hard to almost dry for easiest trimming. Use this step to finish the work completely – use a metal kidney to polish the surface, or a slightly damp sponge to give a freshly thrown look. Wipe the sponge around the rim after trimming, and check the inside of the pot for dags! Trimming slip cast work: Usually I will trim the rims of your work on the wheel the following day to make that stage easier, however you will still need to check your work for lumps and bumps. Last but not least – check that your name is still clearly on the bottom of your work. Step Five – Bisque Firing When the work is completely dry it can go into the bisque kiln. The bisque kiln is fired to 1000°C. This process burns off the water in the clay as well as some of the chemically bound water. The structure of the clay is not altered that much at this temperature. Inside the bisque kiln, the work is stacked a little, small bowl inside a larger bowl and onto a heavy plate. Smaller items like decorations or drink coasters might get stacked several high. Consideration is paid to the weight of the stack and shape of the work. A bisque kiln can fire about one and a half times the amount of work that the glaze kiln can fire. The firing takes about 10 hours to complete the cycle and about two days to cool down. Once it has been emptied the work is placed in the glaze room ready for you to decorate! Step Six – Glazing Decorating your work with colour can be a lot of fun – and time consuming! There are three main options for surface treatment at this stage: Oxide Washes Underglazes Glazes Washes and underglazes do not “glaze” the work – It will still need a layer of glaze to fully seal the clay (washes don’t need glaze on surfaces not designed for food or liquid as they can gloss up a little on their own). Underglazes are stable colourants that turn out pretty much how they look in the jar. They can be mixed with each other to form other colours and can be used like water colours to paint onto your work. Mostly they should have a clear glaze on top to seal them. Oxides are a different species – the pink oxide (cobalt) wash turns out bright blue for instance. They don’t always need a glaze on top, and some glazes can change the colour of the wash! The glazes need no other “glaze” on top! Be careful of unknown glaze interactions – you can put any combination of glaze in a bowl or on a plate, but only a single glaze on the outside of any vertical surface! Glazes are a chemical reaction under heat. We don’t know the exact chemicals in the Mayco glazes we use. I can guess by the way they interact with each other, however, on the whole, you need to test every idea you have, and not run the test on a vertical surface! Simply put, glaze is a layer of glass like substance that bonds with the clay underneath. Clay is made of silica, alumina and water. Glaze is made of mostly silica. Silica has a melting point of 1700°C and we fire to 1240°C. The silica requires a “flux” to help it melt at the lower temperature. Fluxes can be all sorts of chemicals – a common one is calcium – calcium has a melting point of 2500°C, however, together they both melt at a much lower temperature! Colourants are metal oxides like cobalt (blue), chrome (green through black), copper (green, blue, even red!), manganese (black, purple and pink) iron (red brown), etc. Different chemicals in the glaze can have dramatic effects. for example, barium carbonate (which we don’t use) turns manganese bright pink! Other elements can turn manganese dioxide brown, blue, purple and reddish brown. Manganese dioxide is a flux in and of itself as well. So, glazes that get their black and purple colours, often interact with other glazes and RUN! Our mirror black is a good example – it mixes really well with many glazes because it fluxes them – causes them to melt faster. It will also bring out many beautiful colours in the glazes because it’s black colouring most definitely comes from manganese dioxide! Glaze chemistry is a whole subject on it’s own! We use commercial Mayco glazes on purpose – for their huge range of colour possibilities, stability, cool interactions, artistic freedom with the ability to easily brush the glazes on and ease of use. We currently have almost 50 glazes on hand! A major project is to test the interactions of all glazes with each other. That is 2,500 test tiles!!!! I’m going to make the wall behind the wheels the feature wall of pretty colours! Step Seven – Glaze (Gloss or sometimes called “Glost”) Firing Most of the time this is the final stage of making your creation (but not always!) The glaze kiln goes to 1240°C. This is called cone 6, or midrange. It is the low end of stoneware temperatures. Stoneware clays and glazes are typically fired at cone 8 – 10, that is 1260 – 1290°C. The energy requirement to go from 1240°C to 1280°C is almost a 30% more! Our clay is formulated to vitrify (mature, turn “glass-like”) at 1240°, as are our glazes. A glaze kiln take around 12 hours to reach temperature and two to three days to cool down. Sometimes a third firing process is required – this is for decoration that is added to work after the glaze firing. For example – adding precious metals and lustres. this firing temperature is usually around 600 – 800°C depending upon the techniques being used. There are many students interested in gold and silver trims – we will be doing this third type of firing soon! After firing your work will be in the student finished work shelves. Remember to pay for it before you head out the door! There is a small extra charge for using porcelain clay (it’s more than twice the price of regular clay), and for any third firing process! Once your work has been fired it can not turn back into clay for millennia – so don’t fire it if you don’t like it! Put it in the bucket for recycling. https://firebirdstudios.com.au/the-process-of-making-pottery/The form of the jug has been in use for many centuries.Stoneware jug. Two tone brown glaze with pierced lip behind spout. Spout chipped.None.flagstaff hill, warrnambool, shipwrecked-coast, flagstaff-hill, flagstaff-hill-maritime-museum, maritime-museum, shipwreck-coast, flagstaff-hill-maritime-village, jug, ceramic jug -
 Eltham District Historical Society Inc
Document - Folder, Patching, Ian
Ian Patching lived in Wattle Glen. He worked in youth services, later Youth Services Co-ordinator and he worked at Edendale Community Farm in a community development role, As a contractor he worked at Montmorency Secondary College, Whittlesea Secondary College and Diamond Valley College (the later also with Peter Sartori aka Ticarno Sartori), He volunteered with Hurstbridge Youth Activity Centre with Jack Lawson and Martin Drews. Contents Email exchange 2014: Enquiry and research.Newspaper clippings, A4 photocopies, etcian patching, youth services in eltham, edendale community farm, hurstbridge youth activity centre', wattle glen, jack lawson, martin drews, montmorency secondary college, whittlesea secondary college, diamond valley college, peter sartori, ticarno sartori -
Ringwood and District Historical Society
Box, Morny, Small box containing home made beading, buckle and hair clip. Belonged to Maggs Family, Ringwood. C1950, c. 1950
Used in the Maggs Family to store handmade bead work for brooches and edgingCream box with brown printing and motif. Contains 18 pieces of home made beading plus a buckle and a hair clip. Savon de toilette a la rose - Morny -
 Federation University Historical Collection
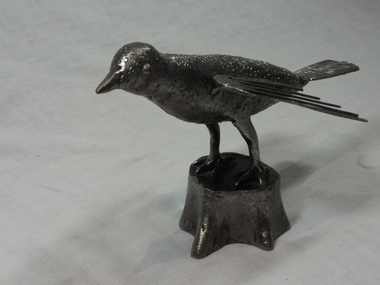
Sculpture - Metalwork, Bird
This work was possibly made in the trade school under the direction of Ken Skull, Metal sculpture of a bird, with wings splayed and standing on a branchsculpture, bird -
Federation University Historical Collection
Flyer - Catalogue, "Mirage", part of Graduate Publication 2013 Bachelor of Visual Arts Graphic Design & Multimedia, 2013
This 4pp A5 extension lists student names and comments regarding their work.Mirage is a 4-page A5 brochure, orange and black cover.university of ballarat, federation university, graphic design, multimedia, bachelor, degree, camp street campus, arts academy -
 Greensborough Historical Society
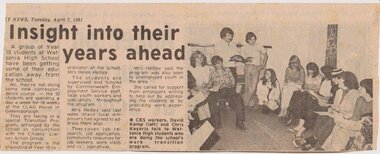
Newspaper Clipping - Digital Image, Insight into their years ahead: Watsonia High School WaHIGH, 07/04/1981
A newspaper clipping about the Watsonia High School transition to work program. Digital copy of newspaper clipping, black and white text and image.watsonia high school -
 Greensborough Historical Society
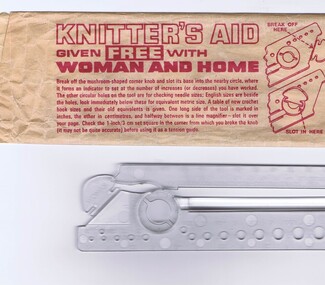
Knitting accessory, Knitter's aid; given free with Woman and Home, 1950s
Gauge for checking needle and crochet hook sizes and checking amount of work.Clear plastic gauge and indicator for knittersknitting -
 Kiewa Valley Historical Society
Papers - Newspaper Obituary Harry Vyner and Family History Chart
The obituary is of Harry Vyner, who came to work for the SECV on the KHES in 1938This is an example of one man's life and how he came to live in the Kiewa Valley and his contribution to the development of Mount Beauty as a thriving community.A4 Sheet with family tree details of Harry Vyner / McKendrick families Newspaper cutting re Obituary of Harry Vyner dated December 1979harry vyner, country roads board, high plains road -
Port Melbourne Historical & Preservation Society
Headwear - Straw hat, Myer, 1950 - 1959
Belonged to donor's father who worked at J Kitchen & Sons and the wharvesWhite straw hat black 3 tier band. Top of hat around crown is perforated. Inside has brown leather band with small bow at back. Soft pad on inside of crownOn inner band " made expressley for the Myer Store for Men, Melbourne"costume, gardner -
 Port Melbourne Historical & Preservation Society
Photograph - Former Port Melbourne library, Liardet Street, Sue Munday, 1988
Photo taken by Sue MUNDAY, who worked at Port Melbourne library.B&W photo of former Port Melbourne library in Liardet street, with sub-station on the right. Library in existence 1938 to 1988.local government - city of port melbourne, port melbourne library, built environment - civic, sue munday, liardet street -
Port Melbourne Historical & Preservation Society
Photograph - Senior Citizens Centre, Port Melbourne, Sue Munday, 1988
Photo taken by Sue MUNDAY, who worked at Port Melbourne library.B&W photo of Senior Citizens Centre, formerly the Temperance Hall. Taken from Bay Street showing Liardet St. & Farrell St.local government - city of port melbourne, built environment - civic, senior citizens centre, sue munday, liardet street, farrell street, port melbourne temperance hall -
Tatura Irrigation & Wartime Camps Museum
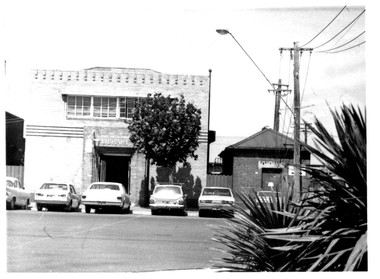
Photograph - original, Kodak, Tatura Museum, 1988
Photograph of Museum after restoration. Painted and iron work painted and replaced.Colour photograph of Tatura Museum after restoration. Exterior. 1988on back: Tatura Museum tatura museum -
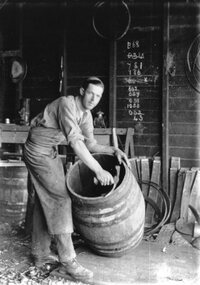 Stawell Historical Society Inc
Photograph, Stawell Brewery in Stawell West showing Cooper Barrel Making c1900
Stawell Brewery Stawell West a Cooper Barrel Making at Work. C1900.stawell -
Rutherglen Historical Society
Horse collar
Thought to be for light horse harness work. 1- Thought to be one of a pair.Leather horse collar, possibly for pony or cob, 2 buckled, one strap missing. Straw packing. -
Rutherglen Historical Society
Horse collar
Thought to be for light horse harness work. 1- Thought to be one of a pair.Leather horse collar, possibly for pony or cob, 2 buckled, one strap missing. Protective flap under buckle. -
 Robin Boyd Foundation
Newspaper - Clipping, The Australian Weekend, Boyd presents three-act show, 13-Dec-69
A report and critique of three simultaneous shows in London of Arthur Boyd's work.AW and date handwrittenarthur boyd, walsh st library -
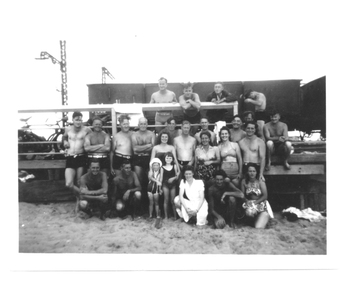 Port Melbourne Historical & Preservation Society
Photograph - Group at beach and Princes Pier, Port Melbourne, 1946
This group used to meet after school or work for a swim at Princes PierB&W photo of men, women and two little girls, most in swimming costumes, on the beach and Princes Pier in the 1940s. Margaret Smith is the taller of the two little girls centre front.piers and wharves - princes pier, sport, swimming, margaret smith -
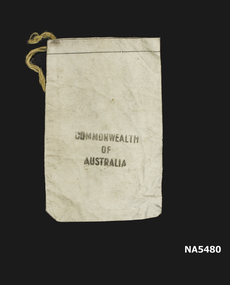 Whitehorse Historical Society Inc.
Functional object - Bank bag, C 1960s'
Collected by person who worked in banking. Example of method of handling coinage.Calico bank coin bag with frayed string drawstring. 'Commonwealth of Australia' printed in black on one side.Commonwealth of Australiabanking -
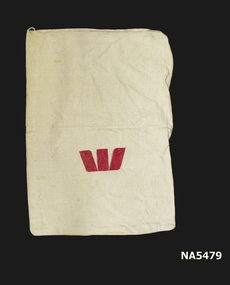 Whitehorse Historical Society Inc.
Functional object - Bank Bag, C 1960's
Collected by persons who worked in banking. Example of method of handling coins.Calico bank bag with Westpac symbol (stylized W) in red on both sides. Bag used for handling coins.W -
Federation University Historical Collection
Drawing - Portrait, Jersey Cow, c1990s
Christine Rushworth was a TAFE Visual Arts Student when this work was undertaken. pastel drawing of a jersey Cowcow, jersey cow, christine rushworth, alumni, requires framing -
St Vincent's Hospital Melbourne Archives
Photograph - Page of photographs of nurses at Mount St Evin's Melbourne
Anecdotal photographs of nurses in uniform during the time of their work at Mount St.Evin's.Photograph 1: Ann Riley. Photograph 2: Gert O'Toole. Photograph 3: Agnes McLean. Photograph 4: Ciss Farrell, Agnes McLean. Photograph 5: Mary Rawson, Sr Cammilus, Ciss Farrell. Photograph 6: Mary Devine, Agnes McLean, Fr Rafferty, Mons Nolan. "After Congress 1934" Photograph 7: J. Farrell, Rita Denton. Photograph 8: Unnamed nuns in black habits. Second page: Photograph 1: Agnes McLean, Ann Riley. Photograph 2: Agnes McLean. Photograph 3: Night Staff. Photograph 4: L Rohan Photograph 5: "Just off duty on the roof". Photograph 6: Eileen Payne, Ann Riley. Photograph 7: Agnes McLean, Ann Caine, Moira Bannon, GP Theatre Photograph 8: OPD Theatre Staff, Mr Derry, M McCabe, Agnes Mclean. Photograph 9: Sr M Stelarian. agnes mclean, nursing colleagues, mount st evin's private hospital melbourne -
 The Beechworth Burke Museum
Ceremonial object - Ushabti of Taweret-Khaiti, Circa 1292 BC
Ushabti are tiny anthropoid (human-shaped) figures placed in the tombs of wealthy Egyptians. They were intended to do the work of the deceased in the afterlife. This purpose is implied through their name, which may have derived from the Egyptian word “to answer”. The Burke Museum in Beechworth is home to a particular ancient Egyptian Ushabti figure. This artefact was donated to the Museum in 1875. No details about how it left Egypt, arrived in Australia, and where it was located before this donation are known. The Nineteenth Century, when this artefact was donated, was a period when many museums acquired items of ancient Egyptian heritage. Many of these items were procured in less than desirable circumstances, having often been looted from ancient tombs and sold to tourists without documentation as to their original location and/or accompanying grave goods. These artefacts were also divested through partage (the trading of artefacts for funds); however, the latter is unlikely to have been the case for this artefact. Since the Ushabti was donated by an unknown donor, it is likely to have been in a private collection rather than an institution. Ushabti can be dated using iconographic analysis which is non-invasive and provides a comprehensive study of the artefact. The later period of the 18th Dynasty marked the beginning of an increase in both the inclusion of Ushabti as essential funerary items and the creation of Ushabti with tools. From this period, they are no longer depicted without tools. Depictions of tools including gardening hoes are frequently depicted grasped in the Ushabti’s hands whilst items like the seed-bag are depicted hanging on the back rather than in an alternative position. This Ushabti figure grasps a gardening hoe and a mattock and a small seed bag surrounded by a yoke bearing water jars are depicted on the upper back of the Ushabti. These features are essential in helping narrow this dating to the late 18th and before the early 20th Dynasty. The position of this seed bag also provides dating information. In the early 18th Dynasty this bag was consistently drawn on the front of the figurine; however, by the reign of Seti I, this feature moved to the back. Thus, since the seed bag is located on the back of this Ushabti, it cannot date to the early 18th Dynasty. By the 19th Dynasty, Ushabti’s were increasingly made from either faience or terracotta. The availability of these materials in Egypt resulted in the increase of Ushabti production with tombs containing many more figurines than previously seen. The Ushabti held by the Burke collections is made from terracotta. Terracotta was rarely used for Ushabti before and during the early 18th Dynasty with only the odd appearance until the late 18th Dynasty and becoming common through that period until the late Third Intermediate Period. Whilst the face has been damaged, there is no evidence for the Ushabti having been provided with an Osirian false beard. This omission rules out a dating of later than the 25th Dynasty when beards became prominent. The inscriptions also date the Ushabti to the New Kingdom. This is because of the use of sḥḏ (“to illuminate”) with Wsjr (“Osiris”) which only occurs in these periods. Therefore, considering all these elements, the Ushabti can be confidently be dated to between the late 18th to early 19th dynasty.Artefacts like this Ushabti are no longer exclusively representative of their origins in burial assemblages and significance in the mythology of the Egyptian afterlife but are also significant for the accumulated histories they have gained through travel. The movement of this artefact from Egypt to Australia allows insight into the collecting habits of the 19th century, and in particular, the reception of ancient Egyptian artefacts in small rural museums. The procurement of Egyptian artefacts was a social trend around the late 1800s to early 1900s. Egyptian artefacts were considered curiosities and recognised for their ability to attract public attention to museums. They were also utilised in Australian museums, like the Burke Museum, to connect the collection to one of the oldest civilisations known to man and since Australia was considered a “young” country by European settlers, this was vital and derived from an interest in Darwin’s “Origin of the Species” 1859. Furthermore, there was a culture of collecting in the 1800s amongst the affluent in English society which led to the appearance of many Egyptian artefacts in private collections. The acquisition of this Ushabti figure is not certain, but it was likely donated from a private collection rather than an institution. This particular artefact is significant as an example of a high-quality Ushabti representative of those produced during the late 18th or early 19th century. It provides insight into the individualism of an Ushabti and the mythology of ancient Egypt. It also provides an example of the types of items required in the tomb assemblages of this period and reinforces the importance of ensuring the successful afterlife of the deceased through art. This Ushabti belonged to a woman named Taweret-Khaiti, Chantress of Amun, in the late 18th Dynasty or early 19th Dynasty (c.1292 BC) of the Egyptian New Kingdom. It likely comes from an undetermined tomb in the locality of Thebes. This figure is made from Nile silt clay (a polyester terracotta; clay sourced from the banks of the Nile River) which was a popular material for Ushabti construction in the early 19th Dynasty. It is in a fair state of preservation (with the exception of a break through the centre) and originally made to a high quality. The face has been damaged but the eyes and eyebrows are clearly marked with black ink and the sclera painted white. The Ushabti is painted a light brown/yellow colour and features a vertical line of inscription down the lower front. The Ushabti wears a large wig and and a schematic collar. The arms are painted light brown and depicted crossed with bracelets around the wrists. It grasps a hoe and mattock. A yellow seed-basket is depicted on the Ushabti’s back. These features represent the likelihood that this particular Ushabti was intended to complete farm work for the deceased in the next life. There would have been additional Ushabti of similar design within the tomb who worked under the supervision of a foreman Ushabti. The foreman Ushabti would be depicted dressed in the clothing of the living. The inscriptions are painted freehand in black ink and written in a vertical column from the base of the collar to the foot pedestal on the front of the Ushabti. The owner of the Ushabti could elect to have the figures inscribed with their name, the Ushabti spell and any other details they deemed necessary. In the case of this example, the Ushabti is inscribed with the owner’s details and is an abbreviated version of the standard Ushabti formula. This formula ensured that the Ushabti would complete the desired task in the afterlife when called upon by the deceased. Ushabti which were not inscribed would represent their intended purpose through design; however, this Ushabti, like most made in the late 18th Dynasty, conveys its purpose both through both design and inscription. The inscription is as follows: sHD wsir nbt pr Smayt imn tA-wr(t)-xai(ti) mAa xrw which translates to: "The illuminated one, the Osiris (the deceased), the mistress of the household, Chantress of Amun, Taweret-Khaiti, true of voice (justified)"ancient egypt -
 Orbost & District Historical Society
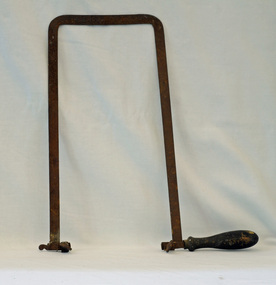
fret saw frame, early 20th century
This fretsaw frame , with a blade, would have been used for intricate cutting work having tight curves. a fretsaw is capable of much tighter radii and more delicate work. than other saws because it has much shallower blades, which are usually extra-fine,This is an example of a woodworking tool used in the first half of the 20th century.A fret saw with very high frame. It has a plain, simple wooden handle.woodwork saw-fret -
 Robin Boyd Foundation
Document - Manuscript, Robin Boyd, Directions & Dilemma, c. 1960s
An opinion article on the direction of modern architecture (c.1960s?), identifying two previous 'phases' described as Functionalist and Fun. Boyd goes on to identify a third phase, typified by the work of Kahn, Tange, and Rudolph, which synthesises the rationality of early modernism with the monumentalism of later modernist work.Typewritten (c copy), foolscap, 4 pagesbauhaus, ciam, kenzo tange, louis kahn, paul rudolph, robin boyd, manuscript -
 Ballarat Tramway Museum
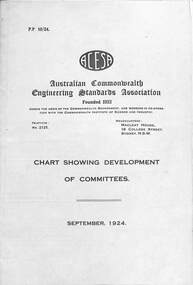
Pamphlet, ACESA - Chart of Committees and Bulletin No. 1, 1924
Provides information on the work of the Australian Commonwealth Engineering Standards Association that was founded in 1922 and later became the Standards Australia who celebrated 100 years in Oct. 2022. Work at the time was on railway, tramway, electrical and other items such as cement. Note the entry for Trolley Wheel Grooves.Demonstrates the work of the Australian standards body in the formation of tramway and electrical standards.Set of two pamhlets or documents published by the Australian Commonwealth Engineering Standards Association 1 - fold out sheet - 6 sections, titled ACESA - Chart showing development committees - Sept. 1924 2 - four page - ACESA - Bulletin No. 1 31-10-1924acesa, standards, tramways, electrical engineering, rails, power engineering, tramway rails -
 Port Melbourne Historical & Preservation Society
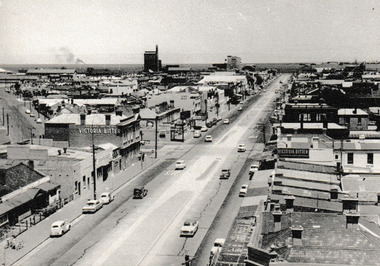
Photograph - Bay Street looking to the Bay 1963, c.1963
In 1963 work was being undertaken to create the central Plantation Strip that divides Bay Street. The layout of the strip can be seen although actual work has not begun. The photo possibly taken from Port Melbourne Town Hall tower. Note absence of traffic lights.Photograph looking toward the Bay before the installation of the central Plantation strip. On reverse 'Bay Street before plantation strip was started 1963'built environment - commercial, bay street, port melbourne town hall -
 Federation University Art Collection
Work on paper - Artwork, Bruno Leti, 'These Trees' by Bruno Leti, 2015
Bruno LETI (1941- ) Born Rome, Italy Arrived Australia 1950 Bruno Leti was nine years old when he came from post World War Two Italy. Known as a painter, printmaker, photographer and publisher of artists’ books, he studied at RMIT, studying Printnaking under Tate Adams, and Melbourne Teachers' College. He has taught art in Italy, Canada, USA, and Melbourne, Australia. Bruno Leti lives and works in Melbourne. This item is part of the Federation University Art Collection. The Art Collection features over 2000 works and was listed as a 'Ballarat Treasure' in 2007.This etching by Bruno Leti was exhibited as part of "Parallel Prints", a limited edition print project which presents the same exhibition simultaneously in New Zealand, at Art at Wharepuke and at a gallery in another part of the world. Eleven Australian artists were invited to join New Zealand-based printmaker Mark Graver to contribute to a portfolio that will be shown simultaneously at Art at Wharepuke, New Zealand and the Art Gallery of Ballarat, Victoria. Using the uniqueness of the reproducible print allows for the same works to be viewed at the same time on opposite sides of the world. This highlights the democratic nature of printmaking and questions the aura of the unique. Which venue is showing the 'real' work? Which the reproduction? The Australian artists showing alongside Mark Graver are James Pasakos, Bruno Leti, Martin King, David Frazer, John Neeson, Antonietta Covino-Beehre, Deborah Klein, Deborah Williams, Melissa Smith, Jodi Heffernan and Susanna Castleden. The original concept, Parallel Prints NZ-UK in 2013, included invited artists from the UK and New Zealand. It featured the work of twelve diverse artists presented in a portfolio set. Each artist contributed one work on 300 x 300 mm paper in an edition of thirty-six. Part of the concept behind the project was to donate twelve of the portfolio sets to international collections. Institutions that have accepted a portfolio include the Victoria & Albert Museum and The Ashmolean Museum in the UK, the Jinling Museum of Art in Nanjing, China, and the Whangarei Art Museum, in New Zealand. In 2015 a portfolio set was donated to the Federation University Art Collection.trees, printmaking, etching, bruno leti, artist, artwork, parallel prints, landscape -
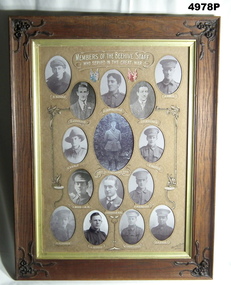 Bendigo Military Museum
Honour Board - BEEHIVE STORE HONOUR BOARD WW1, Bee Hive Staff, Photographic Honour Roll Members of the Beehive Emporium Staff who served in the Great War WW1, c1918-1925
This honour roll was found in poor condition in a district antique shop. It was fully restored by an enthusiastic local lady, It was presented to the Soldiers Memorial Military Museum on 20 April 2022. The Museum is now known as the Bendigo Military Museum. The Beehive was a major store in Pall Mall Bendigo, the Main Street through the centre of the City. Names on the roll. Top row, E. Buddle, Edgar Peter No 4450 14th reinforcements 6th BN. R Jenkins, Reginald Claude No 4526 14th reinforcements 6th BN. H Crowalladar. Spelt wrong, actually Thomas Henry Cadwallader No 4160 13th Reinforcements 7th BN KIA 18.8.1916. J. A. Williams, John Arnold No 9797 16th reinforcements 2nd Fld Amb. J. Holl, James Thomas No 2432 5th reinforcements 60th BN. 2nd row, N. Veale, (Veal) Norman Joseph No 2070 5th reinforcements 14th BN Major Robert Oswald Henderson D.S.O, 38th BN HQ, KIA 29.9.1918. Rank at death Lt Colonel. P, Buddle, Thomas Percy No 3359 9th Reinforcements 58th BN KIA 27.4.1918. 3rd row. C. Wood MM, Charles No 2453 5th Reinforcements 24th BN, MM 20.9.1917, Bar to MM 14.6.1918. T. Henderson MM, Thomas Richard, 15th Reinforcements 5th BN (2nd Lt). Awarded MM after joining the Canadian Army. F. Marriot, Frederick No 1897 13th Reinforcements 4th LH Regt, MM 2.11.1917 4th row. N Meagher, Norman Bernard No 43 38th BN HQ. G.Speedy, George Thomas No 21718 General reinforcements Army medical Corp 1917. W. Trebilcock, William Edward No 55239 5th General Reinforcements (Vic) 1918. C. P. Fisk, Charles Reginald No 55371 6th General Reinforcements (Vic) 1918. "MM" Military Medal "DSO" Distinguished Service Order The frame is a flat faced hardwood timber, varnished. Each corner has a decorative scroll work of leaves and flowers. They are dark brown colour. There is a gold rim around the inside of the picture frame. Inside are 15 oval openings, in which are black and white portraits of WW1 soldiers. The writing and captions are in white paint. Each name has a decorative loop around it. There are two sets of National flags painted near the top. Red and blue tints.ww1, honour roll, beehive