Showing 633 items
matching destination city
-
 Ballarat Tramway Museum
Slide - 35mm slide/s, Peter Moses, Dec. 1963
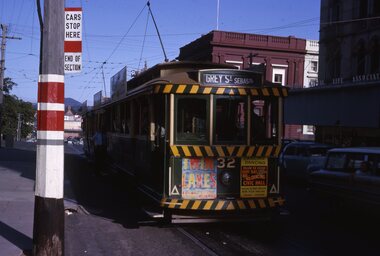
... Photo of Ballarat tram 32 at Lydiard and Sturt St. City... Parade Ballarat Ballarat goldfields Tramways trams Grey St City ...Photo of Ballarat tram 32 at Lydiard and Sturt St. City terminus, showing destination "Grey St. Sebastl" Commonwealth Bank building in background. Tram stop alongside front of tram, has been recently painted. Also fitted with an enamel sign and "End of Section" sign. Advertisements for "Twin Lakes" and 50/50 dancing at the Civic Hall are on the front panel of the tram. Tram has tiger stripes but not the white dash under the lights. Behind No. 32 is a bogie tram. Kodak cardboard mount slide, taken by Peter Moses December 1963.On back of slide in blue ink "1963 Dec. Ballarat tram, Main St." and bottom right hand corner "P. Moses"tramways, trams, grey st, city, tram stops, sturt st., tram 32 -
 Ballarat Tramway Museum
Slide - 35mm slide/s - set of 2, Peter Moses, Jan. 1966
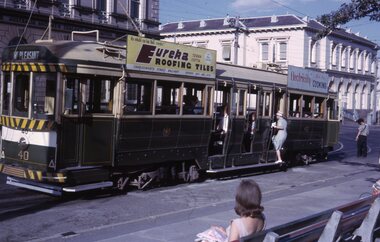
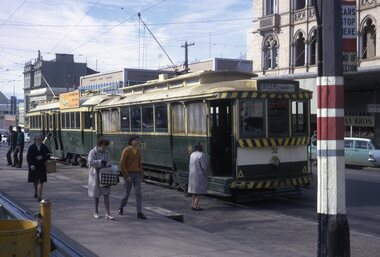
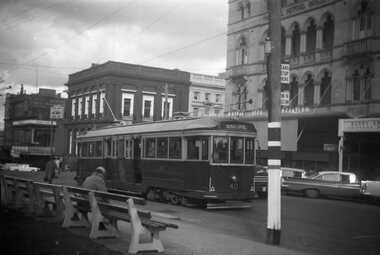
Photo of SEC Ballarat Tram No. 40 at the City terminus in Sturt St. at Lydiard St. Tram has destination of "Mt Pleasant" and roof advertisements for Eureka roofing tiles and SEC "Electricity Best for Cooking". In the background are the Post Office and the ANZ bank buildings. The driver and conductor appear to be looking at the points. 2041.1 - with lady boarding the tram 2041.2 - with conductor returning to the tram. All of the tram in the photo. Note lady on the seat. Kodak cardboard mount slide, taken by Peter Moses January 1966.On back of both slides in blue ink "Jan. 1966 “Main St.” Ballarat No. 40 / 125 f11" and in bottom right hand corner "P. Moses".tramways, trams, city terminus, sturt st, tram 40 -
 Ballarat Tramway Museum
Slide - 35mm slide/s, Peter Moses, Jan. 1966
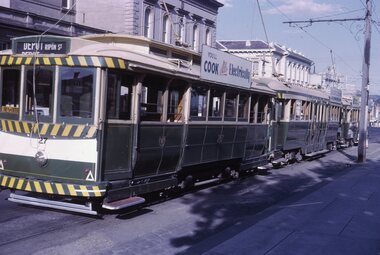
Photo of SEC Ballarat Tram No. 40, 35 and 27 at the City terminus in Sturt St. at Lydiard St. Tram 27 has destination of "Depot via Ripon St." and roof advertisements SEC "You'll cook better electrically". In the background are the Post Office and the ANZ bank buildings. Kodak cardboard mount slide, taken by Peter Moses January 1966.On back of both slides in blue ink "Jan. 1966, Sturt St. No. 35, 27" and in bottom right hand corner "P. Moses".tramways, trams, city terminus, sturt st, tram 40, tram 35, tram 27 -
 Ballarat Tramway Museum
Slide - 35mm slide/s, Peter Moses, Jan. 1966
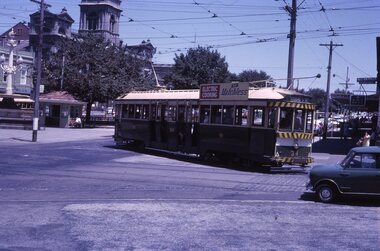
Photo of SEC Ballarat Tram No. 34 turning from Sturt St into Lydiard St. North. Tram has destination of "Lydiard St. North, SEC roof advertisement "Electric Cooking is Matchless" and small painted number above the headlight and large number under the headlight. In the background is the Town Hall, waiting shelter at the terminus and ANZ bank sign. Photo also shows track arrangements at intersection. Kodak cardboard mount slide, taken by Peter Moses January 1966.On back of both slides in blue ink "Jan. 1966, Lydiard St. Tram / 125 f11." and in bottom right hand corner "P. Moses".tramways, trams, city terminus, sturt st, lydiard st, tram 34 -
 Ballarat Tramway Museum
Slide - 35mm slide/s, Peter Moses, Aug. 1971
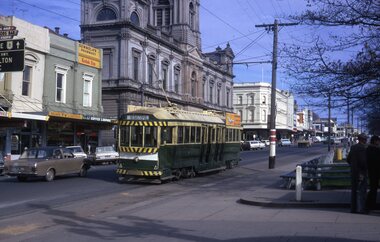
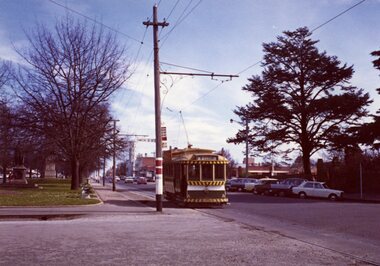
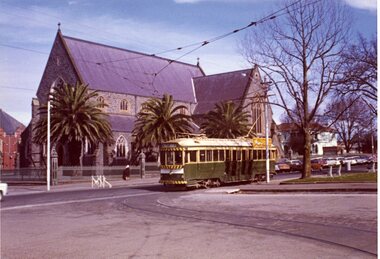
Photo of SEC Ballarat Tram No. 27 west bound at Lyons St. with the city in the background, including the Golden City Hotel and St. Patricks cathedral. Tram has "Twin Lakes" advertisement on front panel and destination of "Gardens via Sturt St. W". Kodak cardboard mount slide, taken by Peter Moses August 1971.On back of both slides in blue ink "Jan. 1966, Lydiard St. Tram / 125 f11." and in bottom left hand corner "P. Moses".tramways, trams, lyons st, sturt st, st patricks, tram 27 -
 Ballarat Tramway Museum
Slide - 35mm slide/s, Peter Moses, Aug. 1971
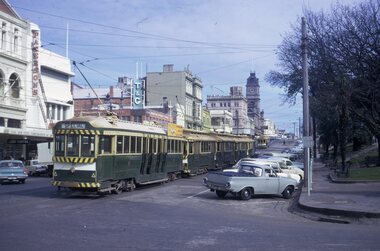
Colour slide - Photo of SEC Ballarat Trams No. 32 and 35 at the Sturt St. south side "City" terminus. No. 32 has destination of "Gardens via Drummond Nth" and No. 35 has "Everything's under control in my all electric kitchen" SEC roof advertisement panel. Photo shows passengers boarding tram and stop signage arrangements. Has buildings on the south side of Sturt and Lydiard in the background. Kodak cardboard mount slide, taken by Peter Moses August 1971. Image btm2047ia - cleaned up by Peter Waugh 9/2021.On back of slide in blue ink "N32 Ballarat Sturt St. terminus." and in bottom left hand corner in black ink "P. Moses".tramways, trams, sturt st, lydiard st north, tram stops, tram 35, tram 32 -
 Ballarat Tramway Museum
Slide - 35mm slide/s, Peter Moses, Aug. 1971
Photo of SEC Ballarat Tram No. 35 leaving the Sturt St. south side "City" terminus. No. 35 has "Everything's under control in my all electric kitchen" SEC roof advertisement panel. Tram has destination of "Sebastopol". Photo has building on the south side of Sturt St., including the Town Hall in the background. Kodak sign on the shop next door to the Town Hall. Kodak cardboard mount slide, taken by Peter Moses August 1971.On back of slide in blue ink "N35 / Ballarat / Sturt St. terminus" and in bottom right hand corner in black ink "P. Moses".tramways, trams, sturt st, town hall, tram 35 -
 Ballarat Tramway Museum
Slide - 35mm slide/s, Peter Moses, Aug. 1971
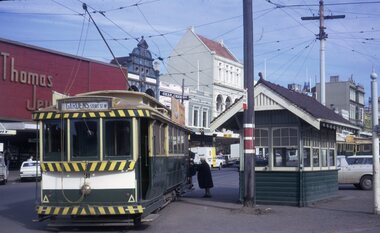
Photo of SEC Ballarat Tram No. 31 at Grenville St. and Sturt St stop. Tram has destination of "Gardens via Sturt St. W". Photo shows the MMTB style shelter at this stop, with Thomas Jewellers shop in the background and other buildings along the south side of Sturt St. Note the two trams in the City Loop. Kodak cardboard mount slide, taken by Peter Moses August 1971.On back of slide in blue ink "N31 Ballarat / Lower Sturt St. " and in bottom left hand corner in black ink "P. Moses".tramways, trams, sturt st, grenville st, shelters, tram stops, tram 31 -
 Ballarat Tramway Museum
Slide - 35mm slide/s, Peter Moses, Aug. 1971
Photo of SEC Ballarat Trams No. 37 and four others (4 single truckers) in City Loop at the east end of Sturt St. Ballarat. and Sturt St stop. Tram 37 has destination of "Special". In the photograph are the buildings on the south side of Sturt St., including Patersons, the Town Hall, T&G building. Kodak cardboard mount slide, taken by Peter Moses August 1971.On back of slide in blue ink "Ballarat, Siding Sturt St. " and in top left hand corner in black ink "P. Moses". On other side of the slide is the word "Siding" in blue ink.tramways, trams, sturt st, city loop, tram 37 -
 Ballarat Tramway Museum
Slide - 35mm slide/s, Peter Moses, 21/08/1971 12:00:00 AM
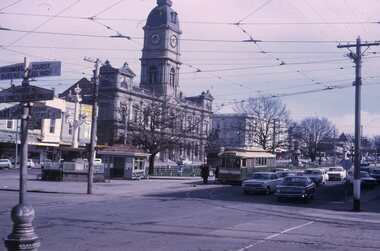
Photo of SEC Ballarat No. 13 at the City terminus, east bound in Sturt St. Tram has destination of Mt Pleasant. Town Hall in background. Note sign in left corner of photograph, giving directions to the Art Gallery and the Tourist Bureau and "Danger Cross Streets and Right Angles". Kodak cardboard mount slide, taken by Peter Moses 21 August 1971.On the rear of the slide in black ink "Ballarat / Sturt St. terminus" and "P. Moses" in the bottom right hand corner.tramways, trams, sturt st, lydiard st, signs, tram 13 -
 Ballarat Tramway Museum
Slide - 35mm slide/s - set of 4, Peter Moses, 21/08/1971 12:00:00 AM
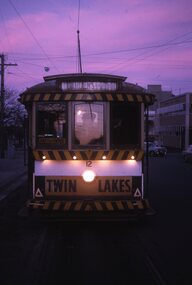
Set of four evening or night photographs of Ballarat trams taken, probably on 21/8/1971. .1 - No. 12 at City terminus, west bound in Sturt St., with Twin Lakes sign and destination of "Gardens via Sturt St. W". .2 - Two single truckers, ?? and 33 at City terminus, east bound in Sturt St. Tram 33 has destination of "Lydiard St. N". .3 - No. 11 at City terminus, west bound in Sturt St, with Twin Lakes sign and destination of "Sebastopol". Has Town Hall in the background. .4 - No. 33 at City terminus, east bound in Sturt St, with SEC offices in background. Destination of "Lydiard St. N" Kodak cardboard mount slide, taken by Peter Moses 21 August 1971 - assumed to be the date.On the rear of the slides in red ink unless noted otherwise. .1 - "N12 Ballarat / Night Sturt St." .2 - "Ballarat / Night Sturt St." .3 - "Ballarat / Night Sturt St." and "P. Moses" in the top right hand corner in black ink. .4 - "Ballarat / Night Sturt St." in black ink.tramways, trams, night photo, city terminus, sturt st, tram 33, tram 11, tram 12 -
 Ballarat Tramway Museum
Photograph - Black & White Photograph/s, Geoff Grant, 25/06/1955 12:00:00 AM
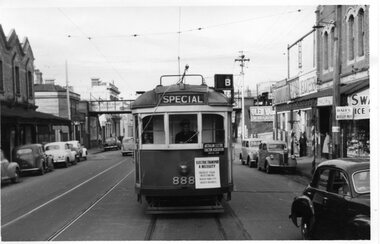
Black & white photo of M&MTB tram No. 888 from rear cab of 877 while on AETA tour of 25/6/1955 in Victoria Street, North Richmond, just to the west of the North Richmond Station, Victoria Street railway bridge. Numerous parked cars of the era in the street, and shops on both sides of street. Tram 888 has destination of "SPECIAL", carrying AETA auxiliary board and a board on front dash of tram that says "ELECTRIC TRANSPORT A NECESSITY , PROTECTS YOUR INVESTMEST, BUILDS YOUR CITY, CREATES BUSINESS"On typed paper on rear, "Shot out of the Rear cabin of 877 showing 888 tailing us on AETA Bourke St. tour. June 25 1955" and "Geoff Grant" stamp in btm rh cnr.trams, tramways, victoria st, bourke st, aeta, north richmond , tram 888 -
 Ballarat Tramway Museum
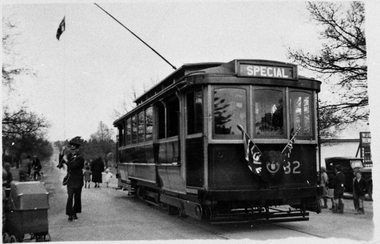
Photograph - Black & White Photograph/s, George Netherway, 30/08/1937 12:00:00 AM
Copy photograph of a small photograph contained within item Reg. No. 587. Photo is the trolley pole being turned by conductor/motorman of the first tram to Lydiard St. Nth 30-8-1937. Both step boards of tram are up showing doors closed. Trolley pole rope has a flag on it. Caption on 587 is "First Tram at Terminus, Driver swinging pole to return to city" Person turning pole has a cash bag over shoulder. Destination on tram is "SPECIAL". Hi res scan of negative used 7-5-2020.trams, tramways, ballarat, lydiard st. nth extension, new track, tramways , tram 32 -
 Ballarat Tramway Museum
Slide - 35mm slide/s, late 1960's
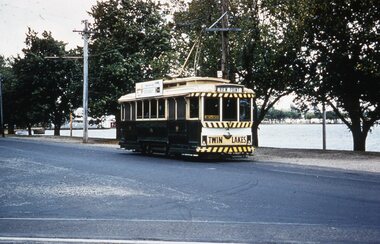
Agfa plastic mount (blue base, white cover) of a photograph of No. 14, at View Point terminus in Wendouree Parade. Has the Macarthur St. track in the foreground. Photo take late 1960's. Has a roof advertisement on the tram that has not been identified. Tram has destination of View Point and has a Twin Lakes sign on the rear end. Trolley pole has been turned to go back into the city. Has the lake in the background. The slide appears to be a copy slide, given the nature of the colour and the additional number WP423. Photographer could be Bill Pearce (WP). Slide rescanned at 3200 dpi 25-10-2020, jpg replaced, tiff file retained. This file was scanned in 2003 and may show colour changes."BAS 58 in penciltramways, trams, view point, wendouree parade, macarthur st., tram 14 -
 Ballarat Tramway Museum
Negative - Black and white print from negative, Travis Jeffrey, 6/09/1960 12:00:00 AM
Negative No. N377 and black and white print made by a laser printer (stored in folder) of Ballarat No. 17 at the City Terminus, Sturt St. Tram has destination of "Victoria St." and a White Horse whiskey dash panel advertisement. Has the short tram stop/section pole adjacent to the tram. In the background has the SEC offices, "The Baby Shop", also Crockers and Tunbridge's stores. Note a Conductor can be seen walking across from the SEC offices to the tram. Date of photo on folder - 11/6/1960. Note: Reg Item 858 of Ron Fluck of 31/12/58 shows tram number to the side of the headlight while Wal Jack (Reg. Item 396) of 23/1/61 shows tram fitted with dash canopy lights. Original negative rescanned 24/5/2020 and image file updated.Paper folder that contained the negative had "NR39A" in red ink, "BA4" in pencil, date stamp of "5 Sep 1960" on front, and on rear date stamps "26 Sep 1962" and "6 Oct 1962".trams, tramways, city terminus, sturt st, tram 17 -
 Ballarat Tramway Museum
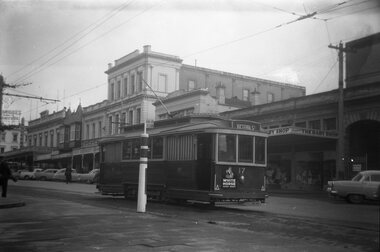
Negative - Black and white print from negative, Travis Jeffrey, 6/09/1959 12:00:00 AM
Negative No. N380 and black and white print made by a laser printer (stored in folder) of Ballarat No. 25 at the City Terminus, Sturt St, south side. Tram has destination of "Sebastopol" with a Bourne? Liquid Plastic (varnish) ad on the front panel of the tram. Has the Commonwealth bank in the background. Adjacent to a pole is a ESCo / SEC electrical connection / switch box on the left hand side of the tram, which is part of the power supply or distribution system. Date of photo on folder - 5/9/1959. Original negative rescanned 24/5/2020 and image file updated. Paper folder that contained the negative had "NR7A" in red ink, "BA7" in pencil, date stamp of "5 Sep 1959" on front, and on rear date stamps "26 Sep 1962" and "26 Sep 1962".trams, tramways, city terminus, sturt st, commonwealth bank, power supply, tram 25 -
 Ballarat Tramway Museum
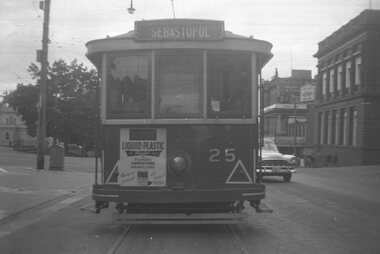
Negative - Black and white print from negative, Travis Jeffrey, 30/09/1961 12:00:00 AM
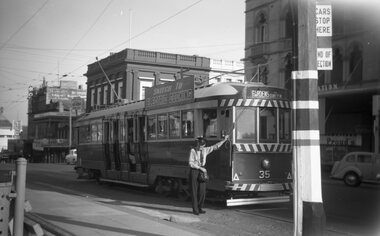
Negative No. N383 and black and white print made by a laser printer (stored in folder) of Ballarat No. 35 at the City Terminus in Sturt St, south side with the conductor (appears to be No. 17) standing by the front of the tram. Part of tram obscured by pole with SEC painted tram stop sign, enamel stop sign and end of section sign. Tram has an SEC roof advertisement, "Switch to Electric Cooking" and destination of Gardens via Sturt St. West. In the background is the Commonwealth Bank building, Prouds jewellers and the Odeon Theatre. Date of photo on folder - 30/9/1961. Original negative rescanned 24/5/2020 and image file updated. Paper folder that contained the negative had "NR57A" in red ink, "BA11" in pencil, date stamp of "20 Sep 1961" on front, and on rear date stamps "26 Sep 1962" and "6 Oct 1962".trams, tramways, sturt st, city terminus, odeon theatre, tram 35 -
 Ballarat Tramway Museum
Negative - Black and white print from negative, Travis Jeffrey, 11/06/1960 12:00:00 AM
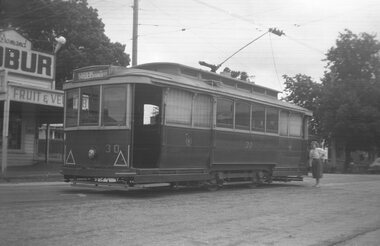
... terminus ready to return to the City with the Destination Gardens... at the Mt Pleasant terminus ready to return to the City ...Negative No. N384 and black and white print made by a laser printer (stored in folder) of Ballarat No. 30 at the Mt Pleasant terminus ready to return to the City with the Destination Gardens via Drummond St. North. Has a lady standing at the back of the tram. On the left hand side of the photograph is the Milk Bar/General Store with part of the Robur Tea sign visible, Peters Ice Cream "ice cream cone" on the roof of the building. Date of photo on folder - 11/6/1960. Original negative rescanned 24/5/2020 and image file updated. Paper folder that contained the negative had "NR35A" in red ink, "BA12" in pencil, date stamp of "11 June 1960" on front, and on rear date stamps "26 Sep 1962" and "6 Oct 1962".trams, tramways, mt pleasant, peters ice cream, robur tea, tram 30 -
 Ballarat Tramway Museum
Negative - Black and white print from negative, Travis Jeffrey, 23/02/1962 12:00:00 AM
Negative No. N389 and black and white print made by a laser printer (stored in folder) of Ballarat tram No. 39 at the City terminus, north side of Sturt St. Has tram No. 32 behind approaching the rear of No. 39. Driver or motorman standing by the front of the tram, with a passenger standing alongside the tram. No. 39 has destination of Victoria St and has a SEC Electric Cooking roof advertisement. Tram alongside the short pole tram stop. In the background is the Baby shop, the SEC offices and Tunbridge's buildings. Date of photo on folder - 23/2/1962. Original negative rescanned 24/5/2020 and image file updated. Paper folder that contained the negative had "NR61A" in red ink, "BA17" in pencil, date stamp of "23 Feb 1962" on front, and on rear date stamps "26 Sep 1962" and "6 Oct 1962".trams, tramways, sturt st, city terminus, tram 39 -
 Ballarat Tramway Museum
Negative - Black and white print from negative, Travis Jeffrey, 5/09/1959 12:00:00 AM
Negative No. N392 and black and white print made by a laser printer (stored in folder) of Ballarat tram No. 40 at the City terminus in Sturt St. on the south side. Tram has the destination of Sebastopol. Has the National Mutual Life Association building in the background, the Commonwealth Bank building and Prouds Jewellers. Date of photo on folder - 5/9/1959. Original negative rescanned 24/5/2020 and image file updated.Paper folder that contained the negative had "NR6A" in red ink, "BA20" in pencil, date stamp of "5/9/1959" on front, and on rear date stamps "26 Sep 1962" and "26 Sep 1962".trams, tramways, sturt st, grenville st, signals, safeworking, tram 40 -
 Ballarat Tramway Museum
Photograph - Colour Photograph/s, Travis Jeffrey, 21/08/1971 12:00:00 AM
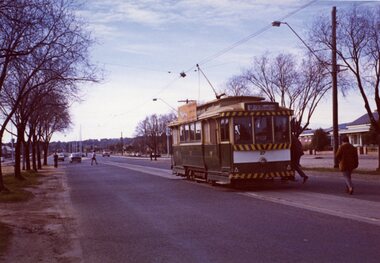
Colour photograph of Ballarat No. 27 at the Victoria St. terminus, prior to returning to the City with passengers boarding the tram. Shows end of double lane highway from Melbourne. Tram has destination Gardens via Drummond Nth and SEC roof advertisement "Everything's under control in my all electric kitchen". Photo on Agfa Paper and taken on Friday 21 August 1971.Stamps with faded green ink: "Photo by Chris Jeffrey / Number" with number "104PC/18" in blue ink and date stamp "Friday 21 August 1971" also in faded green ink.victoria st, tram 27 -
 Ballarat Tramway Museum
Photograph - Colour Photograph/s, Travis Jeffrey, 21/08/1971 12:00:00 AM
Colour photograph of Ballarat No. 17 at the intersection of Dawson St and Sturt St. inbound to the City terminus. Pole adjacent to the tram has a compulsory stop sign and a "End of Section Tram". Tram has destination Mt Pleasant and SEC roof advertisement "Everything's under control in my all electric kitchen". Photo on Agfa Paper and taken on Friday 21 August 1971.Stamps with faded green ink: "Photo by Chris Jeffrey / Number" with number "104PC/19" in blue ink and date stamp "Friday 21 August 1971" also in faded green ink.sturt st, dawson st, tram stops, end of section sign, tram 17 -
 Ballarat Tramway Museum
Photograph - Colour Photograph/s, Travis Jeffrey, 21/08/1971 12:00:00 AM
Colour photograph of Ballarat No. 39 westbound in Sturt St. at Dawson St. with the Golden City Hotel in the background. Tram has destination Sebastopol and SEC roof advertisement "Everything's under control in my all electric kitchen". Note red post box on corner and tram stop signage. Photo on Agfa Paper and taken on Friday 21 August 1971.Stamps with faded green ink: "Photo by Chris Jeffrey / Number" with number "104PC/20" in blue ink and date stamp "Friday 21 August 1971" also in faded green ink.sturt st, dawson st, tram stops, golden city hotel, post box, tram 39 -
 Ballarat Tramway Museum
Photograph - Colour Photograph/s - set of 3, Travis Jeffrey, 21/08/1971 12:00:00 AM
Series of three Colour photograph of Ballarat No. 37 using the Dawson St. crossover in Sturt St. Photos on Agfa Paper and taken on Friday 21 August 1971. Tram has the destination of Lydiard St. North and two roof advertisements for the SEC "Everything's under control in my all electric kitchen" on either side of the tram. 2427.1 - Photo of tram about to use the crossover with St. Patricks Cathedral in the background. 2427.2 - as above, but with tram on crossover. Bottom right hand corner appears to have a sleeve from someone else in the photograph. 2427.3 - after tram has completed the use of the crossover and continuing along Sturt St. to the City terminus. Photo has end of film marks on the right hand edge. Note H.P. Stevens Furriers shop on left.Stamps with faded green ink: "Photo by Chris Jeffrey / Number" with number "104PC/21" ("22" an "23") in blue ink and date stamp "Friday 21 August 1971" also in faded green ink.sturt st, dawson st, st patricks, tram 37 -
 Ballarat Tramway Museum
Photograph - Black & White Photograph/s, John Alfred, Easter 1958?
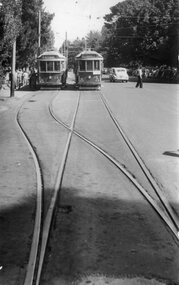
Black and white photograph of Ballarat No. 34 and 38 at Gardens Loop in Wendouree Parade, with many people getting on or off from No. 34. Note 34 has destination of Mt. Pleasant and No. 38, City. Note the auxiliary board on No. 38. Taken from the rear of a tram leaving the loop - possibly the AETA Easter 1958 tour - see Reg. Item No. 122 for a set of tour notes. Taken by John Alfred. On rear written in green ink "Ballarat Gardens / 34, 38"and stamp "Photo by John Alfred / No." in purple ink.tramways, trams, gardens loop, wendouree parade, tram 34, tram 38 -
 Ballarat Tramway Museum
Photograph - Black & White Photograph/s, late 1920's
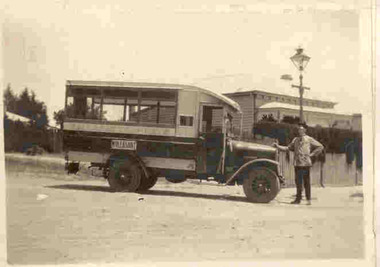
Yields information about a vehicle the Electric Supply Co of Victoria used to provide additional services in Ballarat in the face of bus competition. See page 59 of Golden City and its Tramways for further information.Black and white photograph contained within Reg. Item 2488, page 55, of ESCo or Ballarat Tramways motor bus, with the destination of Mt. Pleasant on the side. Driver W. Irwin? Handwritten caption by H.P. James. Note Item Not formally Numbered. Image btm2507i2 shows position on page relative to items 2507 to 2512. For a copy photograph of this image, see Reg Item 3813. High Res Images added 15/3/2011. Digital scan of a negative in the Wal Jack Collection added 21/4/2019 as image btm2510i4Handwritten in Pencil under the photograph is "Here is an interesting picture. Note the driver he is W. Irwin who gave me these pictures for which I am very grateful. The bus petrol engine International type was formerly in the possession of, one, Cruickshanks, an independent driver with a permit from the council to run between The Point of Pictures?, Ness St, Mt Pleasant via Bond St, Peel St. to City but the Electric Supply Coy purchased the vehicle and ran it from 1927 to 1929 (unpayable). The most use it was put to was on Mt Pleasant, but it ran also to High School as replacement for trams on Sebas if an electric tram was derailed. Perhaps the most unique trips it ever made was between Forest St. Wendouree to the Aerodrome, 1929, on the occasions of any ?? flight. Again Mr Irwin was the driver (& made two trips)"tramways, trams, esco, motor buses, mt pleasant, cruickshanks -
 Ballarat Tramway Museum
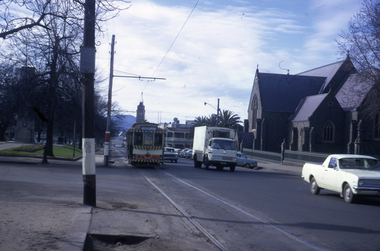
Photograph - Black & White Photograph/s, The Courier Ballarat, 30/09/1969 12:00:00 AM
Yields information about Ballarat's tramway system at the point where it crossed Albert St on the Sebastopol route.Black and White copy photograph of a newspaper photograph taken by The Courier, photo published 30/9/1969 of No. 42, Albert St (Sebastopol) crossover, looking south, after City Council asked Government to close Ballarat system. Tram has the destination of Lydiard St Nth, a Briquettes roof advertisement with the Anglican Trinity church in the background. Collected by Alan Bradley from the Ballarat Courier early 1980's. See Excel file "Record of Ballarat Courier Photos SEC era" (Archive Documents) for source of details.On rear stamped "Copyright, The Ballarat Courier Proprietary Limited."tramways, trams, albert st, sebastopol, tram 42 -
 Ballarat Tramway Museum
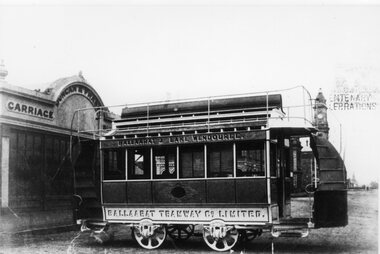
Photograph - Black & White Photograph/s, 1887
Yields information about the pattern tramcar, built by Duncan & Fraser in Adelaide with a view of the factory and the location behind. Shows the tramcar prior to the fitting of modesty panels.Black and White copy photograph of a State Library of South Australia SLSA B37169, of the Ballaarat Tramway Co horse tram pattern tramcar outside the factory or carriage works of Duncan and Fraser Adelaide. Has the Adelaide Town Hall in the background. Tram has the destination board (under the upper deck) "Ballaarat & Lake Wendouree". Modesty boards not fitted. Photo taken on building date - 1887. Collected by Alan Bradley from the State Library of South Australia early 1980's. Used in The Golden City and its Tramways - page 15.tramways, trams, horse tram, duncan fraser, adelaide -
 Ballarat Tramway Museum
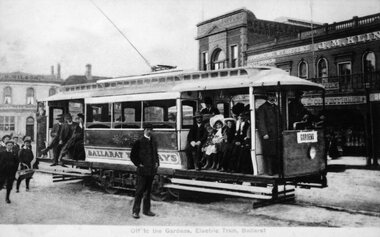
Photograph - Black & White Photograph/s, 1905
Yields information about the opening configuration and early passengers of the tramways in Ballarat, with the Sturt and St Grenville St buildings behind. Shows uniforms and clothing styles.Black and White copy photograph of a Ballarat Municipal library (No. 911) postcard at the time of the opening of the Electric tramway in Ballarat. Tram has destination of Gardens, with four crew/inspector in uniforms, a number of well dressed passengers including ladies and children and some boys at the rear. Shows arrangements of steps lining etc. In the background is the Bucks Head Hotel, a Confectioner (J.M. Kiln?) and other buildings. Photo taken in 1905. Collected by Alan Bradley from the Ballarat Municipal library early 1980's. Used in The Golden City and its Tramways - front covertramways, trams, sturt st, electrification, grenville st, opening -
 Ballarat Tramway Museum
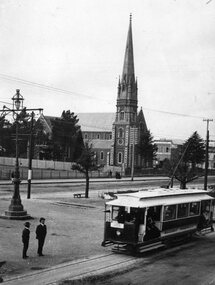
Photograph - Black & White Photograph/s, 1905
Yields information about the opening configuration of the trams and the street scene at the corner of Sturt and Lyons Streets. Also shows two well dressed men standing alongside the tram.Black and White copy photograph of a Public Records Office, Ballarat Office photograph at the time of the opening of the tramway. Photo taken in 1905 at the corner of Lyons and Sturt St with St Andrews Kirk church in the background. Shows the lighting at the intersection, passengers on the ESCo tram and two well dressed men alongside the tram track. Tram has the destination of Gardens. Collected by Alan Bradley from the Public Records Office Ballarat early 1980's. Used in The Golden City and its Tramways - page 54tramways, trams, sturt st, electrification, lyons st, st andrews kirk, opening, esco