Showing 692 items
matching tramway crossings
-
 Ballarat Tramway Museum
Document - Photocopy, Signalling Record Society of Victoria, "Safeworking Operations of the Ballarat Electric Tramway System", May. 1988
... Trams tramways Signals Crossing Loop ESCo Tramway Staffs p1 ...Copy of an article by Neville Gower, published in "Somersault", the magazine of the Signalling Record Society of Victoria, May 1988. Describes location of loops in horse drawn era compared to those of the ESCo area 1905 to 1934, with reference to changes made to ESCo Loops by SECV upon rehabilitation of the system, based upon changes on BTM's collection of staffs. Published in p54, 55, 56 and 60 of Somersault, May 1988. Copy supplied by Graeme Reynolds, printed with a dot matrix printer. Page 56 and cover page supplied by Warren Doubleday (2/1999). Was a follow up article or item by Peter Barry in the July 1988 issue and an article on Bendigo during 1989. (Information provided by David Langley editor at the time - 1/1999). See also item 988.p1 - 54 has been enhanced in black ink.trams, tramways, signals, crossing loop, esco, tramway staffs -
 Ballarat Tramway Museum
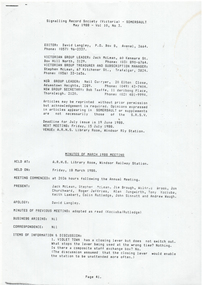
Newspaper, The Courier Ballarat, "Lydiard St. rail crossing repaired", 25/10/1971 12:00:00 AM
... Trams tramways Railway Crossing Tram Track Lydiard St ...Newspaper clipping from The Courier, 25/10/1971 of a photo and caption of railway workers replacing the level crossing track at the Lydiard St. North rail crossing, in order to remove the tramway track. Has a photo showing workmen in the rain, a Gradall excavator and buildings in Lydiard St. in the background, including Reid's Palace.On top edge in blue ink "Taking up the tram lines" and on bottom "25/10/71".trams, tramways, railway crossing, tram track, lydiard st. north -
 Ballarat Tramway Museum
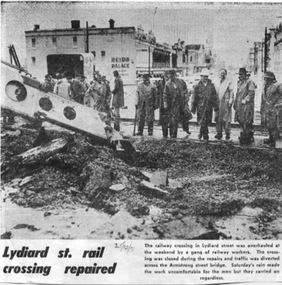
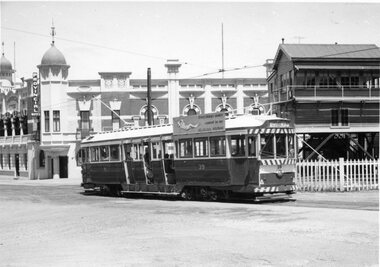
Postcard, Ron Scholten, SEC Ballarat No. 21 and 11?
Colour photograph, printed on a postcard back format of SEC Ballarat No. 21 and 11? crossing at the Urquhart St loop, Drummond St South. No. 21, has destination of Bell St and No. 11?, destination of Lydiard St North and has a Twin Lakes sign on the front dash panel.trams, tramways, drummond st sth, urquhart st, tram 40 -
 Ballarat Tramway Museum
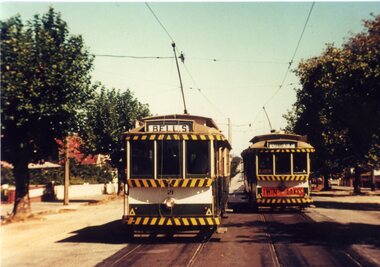
Postcard, Ron Scholten, SEC Ballarat No. 40, Victoria St
Colour photograph, printed on a postcard back format of SEC Ballarat No. 40 crossing No. 21 at the King St. loop. No. 40 outward bound, with destination of Victoria St, and No. 21, showing Special - tram tour. No. 21 has a yellow background Twin Lakes sign on front dash panel.trams, tramways, king st, victoria st, tram 41, tram 42 -
 Ballarat Tramway Museum
Photograph - Miscellaneous Images, Set of 15 (Only three photos in archive, .5, .6 and .7. Location of remaining 12 photos under investigation), 1960s
Set of 15 items personally collected or given to Les Denmead by visiting Tramway enthusiasts or other interested people to Ballarat. Retained as a sample of images or other mementoes given by people though not directly of Ballarat. The following items are a summary only: 1901.1 - Postcard from South Pacific Electric Railway of L/P class tram No. 154 on SPER track , SPER-1 - Nucolorvue. 1901.2 - Photograph of Brisbane FM 440? and drop centre behind - CBD area Brisbane. Has 'Brisbane' written on back. 1901.3 - Photograph of Brisbane FM 473, showing Grange, as for 1901.2. 1901.4 - Photograph of Brisbane FM 422, showing Chermside, Brisbane CBD area, has "Brisbane May 1955' written on front of photo. 1901.5 - Illustration of Christchurch Horse Tram, Tramway Historical Society / Shell Oil company produced card, full details on rear. 1901.6 - Illustration of Wellington 'Fiducia' tram No. 238, operating on Wellington Tramway Museum track. Produced by Museum, with full details on rear. 1901.7 - Colour illustration of Wellington tram No. 257, central or downtown Wellington, outside the Parliament grounds. Full details on rear of card - produced by Shell Oil Company? 1901.8 - Photo of four H class trams at Victoria Sq. Adelaide, 25/3/1967. Taken by Douglas A. Colquhoun. On left hand side is a single car 378 and on the other track a three car set 366, 367 and 368. 1901.9 - Photo of Adelaide E1 111, crossing the Holland St. Bridge, 24.10.1953. Photo by Douglas A. Colquhoun. 1901.10 - Photo of Adelaide A 82, Wayville Junction, Feb. 1952. Photo by Douglas A. Colquhoun. 1901.11 - Photo of Adelaide A 10, later SEC Ballarat 21, in Adelaide CBD, with Ferors Gresham Hotel alongside. Has written note on background re tram. 1901.12 - Two prints of the front vestibule of a Toronto PCC tram, with operator (driver) seated. 1901.13 - Two prints of Toronto PCC 4400 and 4404, coupled together, 9/8/1949 with a depot? or carbarn building in the background. Has caption on the base of the photograph - copy photograph. 1901.14 - Two prints of a close up photograph of the coupling between the two cars in 1901.13. 1901.15 - Photograph of a Fare Box on a Toronto Streetcar. (1901.13 to .14) have "Canada" written on the back. 1trams, tramways, sydney, brisbane, adelaide, wellington, christchurch, toronto, pcc, victoria sq., tram 21 -
 Ballarat Tramway Museum
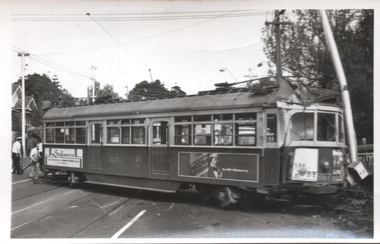
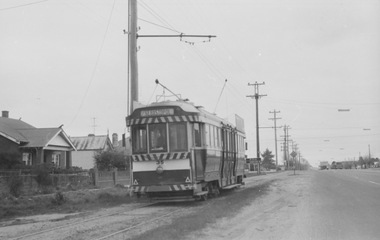
Photograph - Black & White Photograph/s, George Bishop, 1969
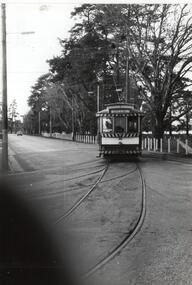
Black and white photograph of Ballarat No. 39 Lydiard St Nth Level crossing, heading north. Tram has destination of Lydiard St Nth, and a "Everything is under control in my all electric kitchen" roof advertisement. In the back is the Moody's Provincial Hotel, and the railway signal box. Photo by George Bishop 1969. Five copies of the photograph held.In ink or pencil "No. 39 / Ballarat tram operated by SEC 1969 / Photo G. Bishop"tramways, trams, lydiard st nth, level crossings, provincial hotel, railway crossing, tram 39 -
 Ballarat Tramway Museum
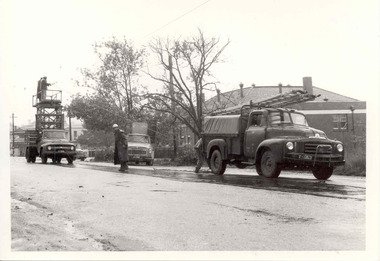
Photograph - Black & White Photograph/s, The Courier Ballarat, 23/04/1965 12:00:00 AM
Yields information about the way the SEC repair overhead failures on the Ballarat Tramway system - shows the trucks and the crews involved.Black and White copy photograph of a newspaper photograph taken by The Courier of repairs to damaged overhead wire, Lydiard St North, just to the north of the Railway level crossing. Tram services were disrupted as a result. Photo taken 23/4/1965, published 24/4/1965. Shows three SEC vehicles in use, including the tower truck. By the front of the truck, the overhead wire and a set of ears can be seen. The Victorian Railways Institute building is in the background. In the far background is the North Star hotel. The types of truck, from the left hand side are Ford (Tower Truck), International and a Bedford. Collected by Alan Bradley from the Ballarat Courier early 1980's. See Excel file "Record of Ballarat Courier Photos SEC era" (Archive Documents) for source of details.On rear stamped "Copyright, The Ballarat Courier Proprietary Limited." and "85%" in ink in the top left hand corner.tramways, trams, lydiard st nth, overhead, secv, repairs -
 Ballarat Tramway Museum
Photograph - Black & White Photograph/s, The Courier Ballarat, 30/09/1969 12:00:00 AM
Yields information about Ballarat's tramway system at the point where the tram services to and from Sebastopol often crossed each other and the nature of Albert St itself at the time.Black and White copy photograph taken by The Courier, photo not published of No. 42 and 41 crossing at the Grey St Loop, in Albert St (Sebastopol) crossover, looking south. No. 41 has the destination of Lydiard St Nth, while No. 41 is proceeding to Lydiard St Nth . Presumably photographed 30/9/1969, at the same time as Reg. Item 3753. Shows the Albert St road looking south with a milk bar on the opposite side of the road, two children adjacent to the tram and the nature of the road surface. Collected by Alan Bradley from the Ballarat Courier early 1980's. See Excel file "Record of Ballarat Courier Photos SEC era" (Archive Documents) for source of details.On rear stamped "Copyright, The Ballarat Courier Proprietary Limited."tramways, trams, albert st, sebastopol, grey st loop, tram 42, tram 41 -
 Melbourne Tram Museum
Photograph - Black & White, tram 867 derailed - Riversdale Road, 22/10/1976
The photographs show SW6 tram 867 derailed at the Riversdale Road level crossing on 22/10/1976. The tram ran out of control in Riversdale Road due to the compressor not being turned on before running out to take up a Wattle Park run. This event resulted in trams being rewired so that power to the controller could not be obtained unless the compressor had been turned on. An extract from Electric Traction magazine, Nov. 1976 has been imaged. Tram 331 would have been used in rerailing. See item 7368 for The Herald report of the date.Yields information about the 1967 derailment of tram 867,Set of four Black and White photographs - printed on plain paper and digital copy of a news item.tramways, trams, mmtb, tram 867, rivesdale road, level crossings, derailments, accidents, compressors, tram 331 -
 Ballarat Tramway Museum
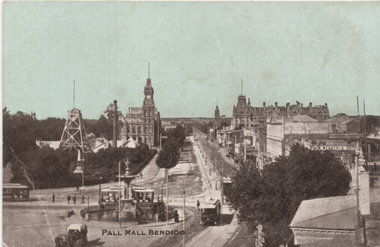
Postcard, E W Cole Book Arcade, "Pall Mall Bendigo", c1905
Printed postcard with a coloured image looking from the City Family Hotel over Charring Crossing and looking along Pall Mall. There are four tramcars in the view. Given the tram track colour, the photo was taken possibly soon after the opening the electric tramways in Bendigo in 1903. In the view is a gold mine poppet head, the Town Hall and the various buildings along Pall Mall. Published by E W Cole Book Arcade, part of their 48 views Cole's Sunny Australia Series.Demonstrates a Bendigo postcard featuring Charing Cross and Pall Mall.Postcard colour - divided back - unusedtramways, trams, bendigo, alexandra fountain, charing cross, esco, pall mall -
 Melbourne Tram Museum
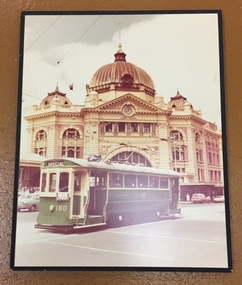
Photograph - Block Mounted Photograph, 1980?
Colour photograph, block mounted onto a piece of wood chipboard with black edging of T Class No. 180 crossing Swanston St in Flinders St with Flinders St station in the background. Tram has the destination of "Special", but carrying an "East Melbourne" Auxiliary board. Photographed during the 1980? Australia Day Transport Cavalcade event. The board has a hanging device which looks like it came from a beer can.On rear in pencil "Driver Ins J. Dowell / Conductor Birney Edison" tramways, australia day, tram 180, t class, trams -
 Ballarat Tramway Museum
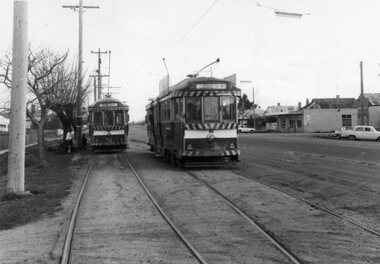
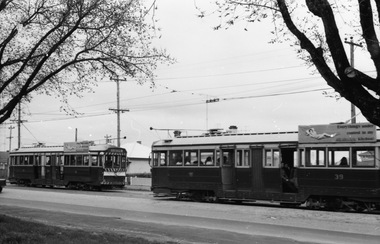
Photograph - B&W print of donated negative - set of 2, Graham Parry, 1971
Set of two black and white prints and associated negatives of trams in Ballarat during 1971 prior to closure of the system by Graham Parry. All images from the scanned negative. All taken at the Grey St crossing loop. .1 - Nos 39 and 34 crossing. .2 - ditto. No. 39 to Lydiard St North, No. 34 to Sebastopol. Both have SEC Roof adverts.tramways, trams, sebastopol, grey st, albert st tram 39 -
 Ballarat Tramway Museum
Photograph - B&W print of donated negative, Graham Parry, 1971
Yields information about the Sebastopol tram line and operations in 1971Black and white prints and associated negatives of tram 39 south bound in Albert St Sebastopol to Sebastopol, soon after crossing Albert St.tramways, trams, sebastopol, albert st, tram 35 -
 Ballarat Tramway Museum
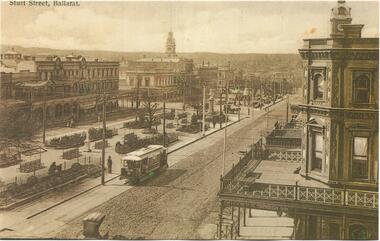
Postcard - copy, "Sturt St, Ballarat", c2000
Yields information about the appearance of Sturt St following the introduction of electric trams in 1905 and has a strong association with the work of Sovereign Hill and Rose Stereograph Co.Postcard reproduction - sepia coloured - of an ESCo tram near the intersection of Doveton St. and Sturt St. travelling west along the south side of Sturt Street. Photo appears to be taken soon after opening of the electric trams, as the tramway is well paved compared to the rest of the street which shows vehicle tracks etc. Small horse drawn vehicle crossing in front of the photograph. Shows buildings along the north side of Sturt St. and the building at the SE corner of Doveton St. ESCo tram has destination board on the front dash of the tram. See Reg Item 834 for a black and white view. Card reproduced for Sovereign Hill Gold Mining Township by Rose Stereograph Co. of Glen Waverley c2000. Divided back type with caption, production and the Rose Co. symbol on the rear.trams, tramways, sturt st, ballarat, esco, rose postcards -
 Ballarat Tramway Museum
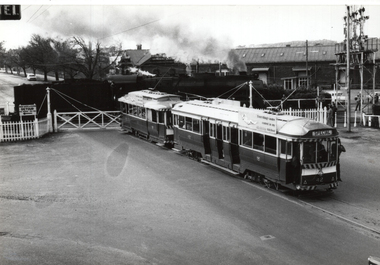
Photograph - Black & White Photograph/s - set of 3, Richard Gilbert, c August 1971
... tramways Lydiard St North Level Crossings Railways Locomotives ...Yields information about the use of the Lydiard St Nth line prior to closure and the use of the level crossing. Series of 3 Black and white photographs of trams using the Lydiard St North level crossing. .1 - two trams (27 and 42) at the gates with an R class locomotive using the crossing. Both trams have SEC advertising. Tram 42 is running a special tour. .2 - tram 39, running a special tram service, loading passengers at the railway station tram stop. In the background is awning for the Provincial Hotel and SF Motors Mercedes Benz. .3 - tram 27 northbound crossing the level crossing. trams, tramways, lydiard st north, level crossings, railways, locomotives, ballarat station, special trams, tram 27, tram 42, tram 39 -
 Ballarat Tramway Museum
Photograph - Black & White Photograph/s - set of 2, Richard Gilbert, c August 1971
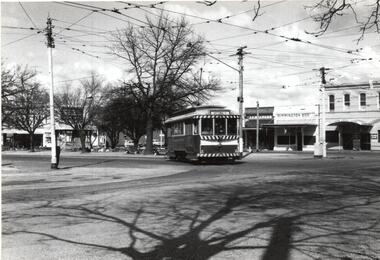
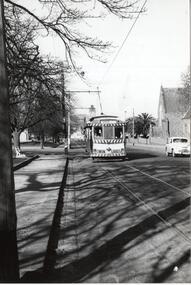
Yields information about the use of the Carlton St crossing loop prior to the closure of the tramway. Series of 2 Black and white photographs of trams using the Carlton St, Wendouree Parade crossing loop. .1 - tram 11 (with a Twin Lakes sign, Mt Pleasant) crossing tram 21 (Gardens via Sturt St West) and another single trucker. Has the signal and the Olympics Monument in the background. .2 - tram 27 and a bogie tram crossing. Tram 27 has the destination of Victoria St and a Twin Lakes sign. trams, tramways, carlton st, wendouree parade, tram 27, tram 11, tram 21 -
 Ballarat Tramway Museum
Photograph - Black & White Photograph/s - set of 4, Richard Gilbert, c August 1971
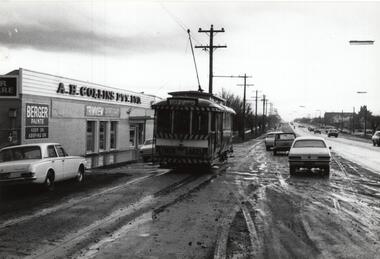
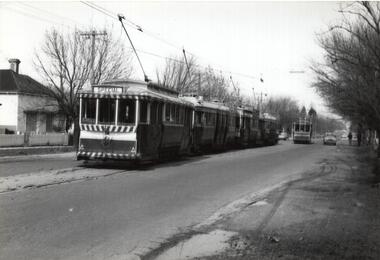
Yields information about the appearance of the Sebastopol line shortly before the closure of the first of the Ballarat tram lines. Series of 4 Black and white photographs of tram operations on the Sebastopol line, during August 1971. .1 - Tram 12, with the destination of Grey St and a twin lakes sign, pass the A H Collins hardware store, with adverts for Berger Paints and Trimview windows. shows the nature of Albert St after rain. .2 - Trams 27 (Sebastopol with a Twin Lakes sign) crossing 32 at the Grey St loop. .3 - Tram 12, showing Depot via Drummond North southbound in Albert St Sebastopol. .4 - Tram 26 at the Sebastopol terminus showing City Oval as its next destination. This may not be correct.trams, tramways, sebastopol, albert st, grey st, tram 12, tram 27, tram 26, tram 32 -
 Ballarat Tramway Museum
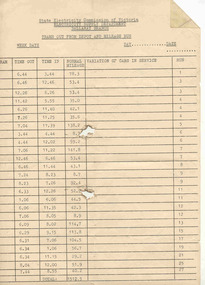
Document - Form, State Electricity Commission of Victoria (SECV), "Trams out from Depot and Mileage Run", c1966
Yields information about the process for recording tramcar mileage against a run number and the use paperwork put to - waste paper?Gestetner reproduced 'State Electricity Commission of Victoria / Electricity Supply Department/Ballarat Branch/ Trams out from Depot and Mileage Run' consisting of a single sheet with details of "Time Out, Time In, Normal Mileage, Variations of cars in Service and Run Number" with a space for the actual tram used to be entered against the respective run". For weekdays only. On rear has pencil sketch of a crossing and the possibly the over gauge recordings on a curve or the offsets for setting out a curve. This could mean that is was used a piece of scrap paper - the form having being superseded at the time. Was located with item 3700 - 1966 Trackwork diary.trams, tramways, sec, trackwork, timetables, forms, tramcars -
 Ballarat Tramway Museum
Photograph - Black & White Photograph/s - set of 2, Richard Gilbert, c August 1971
Yields information about tramway operations at Hospital corner. Series of 2 Black and white photographs of trams using the Hospital corner curves. .1 - tram 13 inbound to Victoria St, with the J A Malpass, Rimmington Bros and the Southern Cross Hotel in background. .2 - tram 14 showing Depot via Drummond North crossing the trackwork at Hospital corner.. trams, tramways, hospital corner, sturt st, drummond st nth, victoria st, tram 13, tram 14 -
 Ballarat Tramway Museum
Photograph - Black & White Photograph/s, Richard Gilbert, Aug. 1971
Yields information about Sturt St near Lyons St. Black and white photograph of No 31 in Sturt St, after crossing Lyons St with St Patricks and the Town Hall in the background. Has Edments Hartley, Gear Chemist, Thomas Jewellery, Union Hotel and Dickins Food store in the background. trams, tramways, sturt st, lyons st, tram 31 -
 Ballarat Tramway Museum
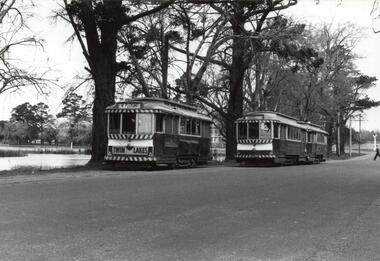
Photograph - Black & White Photograph/s - set of 4, Richard Gilbert, c August 1971
Yields information about tram operations in the vicinity of the SEC depot prior to closure. Series of 4 Black and white photographs of tram operations in Wendouree Parade near the depot prior to its closure in August 1971. .1 - Tram No. 30, running into the depot from Wendouree Parade. .2 - Tram 21 approaching the depot junction. .3 - Trams 13 and 21 crossing at the depot loop. .4 - trams 32 and 39 ditto. 32 has an ANA health fund roof advert.trams, tramways, wendouree parade, depot, depot loop, tram 30, tram 21, tram 13, tram 32, tram 39 -
 Ballarat Tramway Museum
Photograph - Black & White Photograph/s, Richard Gilbert, c August 1971
Yields information about tram operations in the Drummond St North at the time of the closure of the first of Ballarat's lines in August 1971.Black and white photograph of four trams (last tram No. 14 showing Special) crossing a single tram at the Mill St loop in Drummond St Nth, possibly on the final day of Victoria St operations, the trams running special to meet the ARHS / TMSV train at the railway station. trams, tramways, closure, mill st loop, drummond st nth, tram 14 -
 Ballarat Tramway Museum
Photograph - Tram 13 - Gardens, 11/1/1954
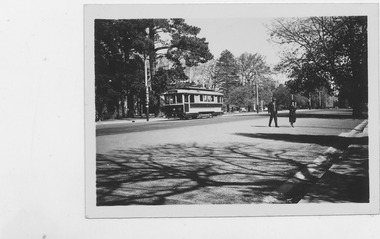
Photograph of Ballarat Tramcar 13 at Gardens. Two people are seen in the foreground, crossing the road.Yields information about SEC tramway operations.Black and white photograph on plain paper"5/7. 41." "Wendouree Parade, Lake Wendouree & gardens, Ballarat." "Car 13 at Gardens terminus".ballarat, gardens, tram 13 -
 Melbourne Tram Museum
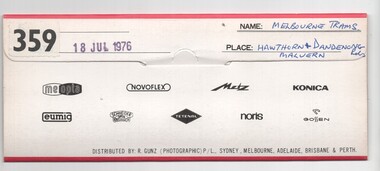
Negative, Bruce Herbert, "Melbourne Trams - Hawthorn and Dandenong Road", 18/07/1976 12:00:00 AM
Negative folder - made by SAGA Japan, containing 11 no. 120 film negatives 60mm x 60mm of Melbourne Trams at the intersection of Hawthorn and Dandenong Road 18 Jul 1976, stamped "359". .1 - Harris train at Malvern station area. .2 - Neerim Road Caulfield level crossing .3 - Caulfield - Glenhuntly sidings .4 - 899, route 69, Kew Cotham Road, with an Army advert. .5 - ditto, out of focused. .6 - 905 route 64 .7 - 1021 - route 64 - has a Kodak advert. .8 - 805, Dandenong Road, route 64 .9 - 904 route 64 .10 - W2 331? running a special Three megs not scanned.trams, tramways, sw6 class, dandenong rd, hawthorn rd, route 64, route 69, w2 class, railways, tram 899, tram 905, tram 1021, tram 904, w7 class, w5 class, mmtb -
 Melbourne Tram Museum
Photograph - Set of 5 Black & White - First AETA tour, 15-2-1947
Set of five photographs of the first Australian Electric Traction Association (AETA) tram tour of Melbourne on 15/2/1947. See page 8 of the March 1947 issue of "Tram Tracks" for details of the tour and the MMTB Crew. 1 - SW6 881 about to leave Glen Huntly Depot 2 - Crossing Balaclava Junction 3 - Crossing the Kooyong railway level crossing in Glenferrie Road - has the railway signal box and gates in view. 4 - Turning into Riversdale Road from Glenferrie Road with the Stotts Business College building in the background. 5 - Just to the east of Yarra River Bridge in Swan Street with the Burnley Gardens on the right.Yields information about the first AETA tram tour in 1947Set of 5 Black and white photograph on paper. Two copies of each held.Each one of the set has a photographers file stamp on the rear, but no details filled in.trams, tramways, aeta, tram tours, tram 881, sw6 class, glen huntly, kooyong level crossing, glenferrie road, riversdale road, burnley, hawthorn, balaclava junction, glen huntly depot, hawthorn road, swan st -
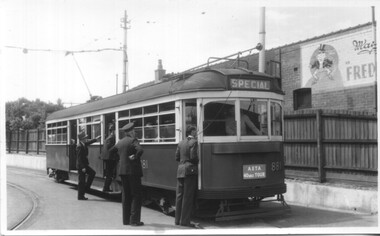
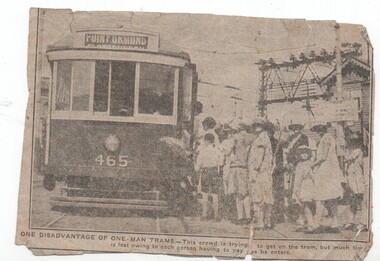 Melbourne Tram Museum
Newspaper, One man trams - their disadvantage when crowded, c1920's
Newspaper cutting from an unknown Melbourne newspaper with a photo of X1 465 loading passengers at Glenhuntly Road Elsternwick, with the signal box and railway overhead in the background. Notes the disadvantage of one many trams, with a large crowd having to pay separately as they enter. Has on the rear a piece of The Age with the date Wednesday 26 October to mend the cutting which has been torn. Dress of the ladies is 1920's with large hats. Tram has the destination of Point Ormond.trams, tramways, point ormond, one man trams, glenhuntly rd, elsternwick, level crossings, tram 465, x1 class, mmtb -
 Melbourne Tram Museum
Document - Report, Melbourne & Metropolitan Tramways Board (MMTB), "Melbourne and Metropolitan Tramways Board General Scheme", c1923
Personal Papers titled "Melbourne and Metropolitan Tramways Board General Scheme": File comprises of: 1. Typed document noting the MMTB Minute of the Board meetings of 30/11/1922, 24/5/1923 and 26/7/1923 approving the General Scheme be forwarded to the Minister and the Parliamentary Standing Committee and changes to resolve crossing the Railway at Brighton Station. 2 - Printed document - 1923 - Report - 8 pages - The Parliamentary Standing Committee on Railways - General Scheme for Tramways for Metropolis - printed 24/7/1923. Has stapled to the document a pink cover sheet. Gives details of the committee, the committee report, comments on the Board's financial position, the debate between tramways or railways, recommendations and views of the Railways Commissioners. Attached to the report is the MMTB 30 page duplicated document giving the Board's proposals. See Reg Item 2089 for actual drawings referred to. See Reg Item 2098 and 3374 for another copy of this document and the map.Both documents have been stamped "Perway File"trams, tramways, mmtb, general scheme, tramways, development, parliament, brighton, railways, finances -
 Melbourne Tram Museum
Photograph - Black & White Photograph/s, Melbourne & Metropolitan Tramways Board (MMTB), Jan. 1926
Black and white photograph of the conversion of the intersection of Domain Road, St Kilda Road, Domain Junction from cable tram to electric tram. Shows the Toorak Road Tram remaining trackwork, the temporary track for the electric trams with 276 inbound with the destination of North Coburg and another W class tram outbound to St Kilda Beach. Note the temporary platform and the temporary board crossing. Has "The Foundation Company Engineers and Contractors" sign in the view and the petrol? powered roller. Photo from the Collection of the Department of Infrastructure now with the Public Records Office - image number H101. Note: this photo is now out of copyright and was not an original VR photograph, but one copied from another source and collected as their Heritage series.Has Department of Infrastructure copy right stamp on rear and number "H513" in ink on rear and "2-5".trams, tramways, swanston st, cable trams, trackwork, new tramway, flinders st, conversion -
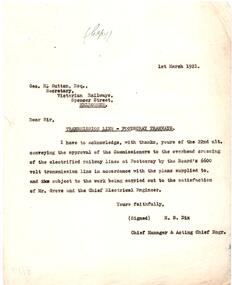 Melbourne Tram Museum
Letter, Melbourne & Metropolitan Tramways Board (MMTB), "Transmission Line - Footscray Tramways", 1/03/1921 12:00:00 AM
Letter, carbon copy, quarto sheet - to the Secretary of the Victorian Railways titled "Transmission Line - Footscray Tramways" dated 1/3/1921, regarding the crossing of the electrified railway at Footscray by the Boards 6000V transmission line to approved plans. Signed by H. S. Dix Chief Manager and Acting Chief Engineer.trams, tramways, mmtb, vr, footscray, new tramway, power supply, electrical engineering -
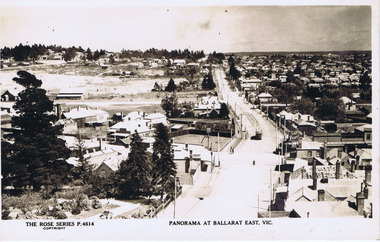 Ballarat Tramway Museum
Photograph - Digital image, Rose Stereograph Co, "Panorama at Ballarat East Vic", c1914
Photo looks west from the Ballarat Fire Station (East) tower, and has a good view looking along Barkly St. Shows the crossing loop between Eastwood and Main St with one tram in the view. Wal has dated the photo as 1914 in his album notes. See item 8243 for an actual postcard. Yields information the buildings, buildings and scene looking west from the Fire Station tower along Barkly St. East BallaratDigital image of a postcard from an album compiled by Wal Jack, loaned to the Museum. The Rose Series Postcard No. P 4614. For rear of postcard - see second image.trams, tramways, esco, ballarat east, barkly st