Showing 1174 items
matching bendigo railway
-
 Bendigo Historical Society Inc.
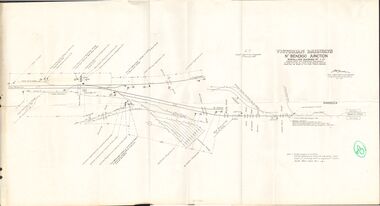
Document - BADHAM COLLECTION: VICTORIAN RAILWAYS MAP - NTH BENDIGO JUNCTION SIGNALLING DIAGRAM NO 4'80
... Victorian railways map: Nth Bendigo junction signalling... DOCUMENT Memo railway nth Bendigo junction signalling diagram ...Victorian railways map: Nth Bendigo junction signalling diagram no 480 showing signal and interlocking arrangements. Large paper map, A F chief electrical engineer 9.1.1980. Black ink diagram and writing.document, memo, railway, nth bendigo junction signalling diagram no 4'80 -
 Bendigo Historical Society Inc.
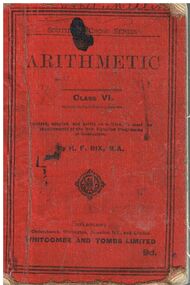
Book - BADHAM COLLECTION: SOUTHERN CROSS SERIES ARITHMETIC BOOK
... Bendigo Historical Society Inc. Bendigo Historical Society ...Southern Cross Series Arithmetic book Class VI by HF Rix, BA Whitcombe and Tombs Ltd, small red covered book.document, memo, railway, southern cross series arithmetic book class vi by hf rix, ba whitcombe and tombs ltd -
 Bendigo Historical Society Inc.
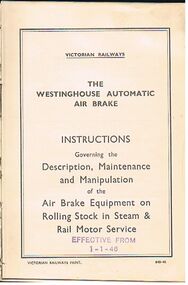
Book - BADHAM COLLECTION: WESTINGHOUSE AUTOMATIC AIR BRAKE INSTRUCTION BOOK
... Bendigo Historical Society Inc. Bendigo Historical Society ...Victorian railways small note book, 'Westinghouse Automatic Air Brake Instruction Book'. Hard bound green covered small book. Victorian Railways governing the description, maintenance and manipulation of the air brake equipment on rolling stock in steam and rail motor service. Effective from 1-1-46.document, memo, railway, westinghouse automatic air brake instruction book -
 Bendigo Historical Society Inc.
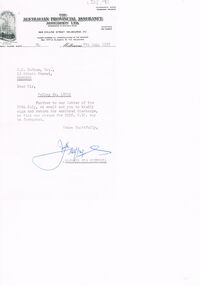
Document - BADHAM COLLECTION: AUSTRALIAN PROVINCIAL ASSURANCE ASSOCIATION LTD BONUS NOTICE
... Bendigo Historical Society Inc. Bendigo Historical Society ...Australia Provincial Assurance Association LTD head office APA building, 383 Collins St Melbourne. Discharge letter 8.8.1957 for J Badham, 16 Abbott St Bendigo. Small fine paper memo.document, memo, railway, australian provincial assurance association ltd -
 Bendigo Historical Society Inc.
Document - BADHAM COLLECTION: AUSTRALIAN PROVINCIAL ASSURANCE ASSOCIATION LTD BONUS NOTICE
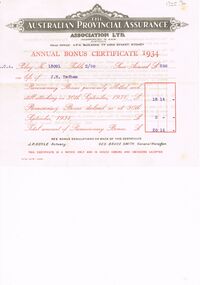
... Bendigo Historical Society Inc. Bendigo Historical Society ...Australia Provincial Assurance Association LTD head office APA building, 77 king St Sydney. 'BONUS NOTICE 30.9.1934 for J Badham'. Small fine paper memo in orange type.document, memo, railway, australian provincial assurance association ltd head office apa building , 53 martin place sydney -
 Bendigo Historical Society Inc.
Document - BADHAM COLLECTION: AUSTRALIAN PROVINCIAL ASSURANCE ASSOCIATION LTD BONUS NOTICE
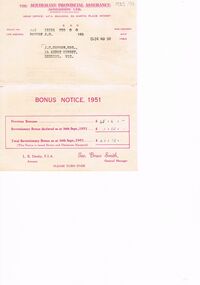
... Bendigo Historical Society Inc. Bendigo Historical Society ...Australia Provincial Assurance Association LTD head office APA building, 53 Martin Place Sydney. 'BONUS NOTICE 30.9.1951 for J Badham', 16 Abbott St Bendigo. Small fine paper memo in purple type.document, memo, railway, australian provincial assurance association ltd head office apa building , 53 martin place sydney -
 Bendigo Historical Society Inc.
Document - BADHAM COLLECTION: AUSTRALIAN PROVINCIAL ASSURANCE ASSOCIATION LTD BONUS NOTICE
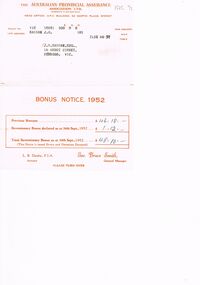
... Bendigo Historical Society Inc. Bendigo Historical Society ...Australia Provincial Assurance Association LTD head office APA building, 53 Martin Place Sydney. 'BONUS NOTICE 30.9.1952 for J Badham', 16 Abbott St Bendigo. Small fine paper memo in orange type.document, memo, railway, australian provincial assurance association ltd head office apa building , 53 martin place sydney -
 Bendigo Historical Society Inc.
Document - BADHAM COLLECTION: AUSTRALIAN PROVINCIAL ASSURANCE ASSOCIATION LTD BONUS NOTICE
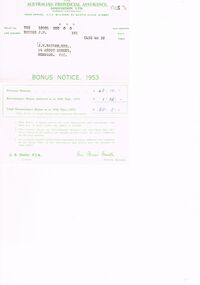
... Bendigo Historical Society Inc. Bendigo Historical Society ...Australia Provincial Assurance Association LTD head office APA building, 53 Martin Place Sydney. 'BONUS NOTICE 30.9.1953 for J Badham', 16 Abbott St Bendigo. Small fine paper memo in green type.document, memo, railway, australian provincial assurance association ltd head office apa building , 53 martin place sydney -
 Bendigo Historical Society Inc.
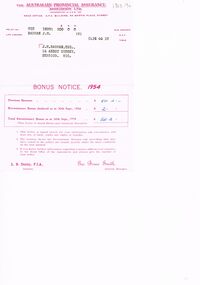
Document - BADHAM COLLECTION: AUSTRALIAN PROVINCIAL ASSURANCE ASSOCIATION LTD BONUS NOTICE
... Bendigo Historical Society Inc. Bendigo Historical Society ...Australia Provincial Assurance Association LTD head office APA building, 53 Martin Place Sydney. 'BONUS NOTICE 30.9.1954 for J Badham', 16 Abbott St Bendigo. Small fine paper memo in purple type.document, memo, railway, australian provincial assurance association ltd head office apa building , 53 martin place sydney -
 Bendigo Historical Society Inc.
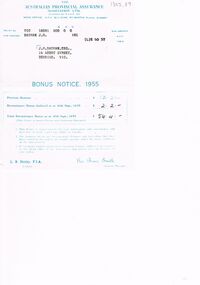
Document - BADHAM COLLECTION: AUSTRALIAN PROVINCIAL ASSURANCE ASSOCIATION LTD BONUS NOTICE
... Bendigo Historical Society Inc. Bendigo Historical Society ...Australia Provincial Assurance Association LTD head office APA building, 53 Martin Place Sydney. 'BONUS NOTICE 30.9.,1955 for J Badham, 16 Abbott St Bendigo. Small fine paper memo in blue type.document, memo, railway, australian provincial assurance association ltd head office apa building , 53 martin place sydney -
 Bendigo Historical Society Inc.
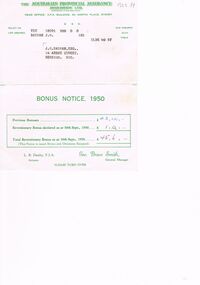
Document - BADHAM COLLECTION: AUSTRALIAN PROVINCIAL ASSURANCE ASSOCIATION LTD BONUS NOTICE
... Bendigo Historical Society Inc. Bendigo Historical Society ...Australia Provincial Assurance Association LTD head office APA building, 53 Martin Place Sydney. 'BONUS NOTICE 30.9.1950 for J Badham', 16 Abbott st Bendigo / small fine paper memo in green type.document, memo, railway, australian provincial assurance association ltd head office apa building , 53 martin place sydney -
 Bendigo Historical Society Inc.
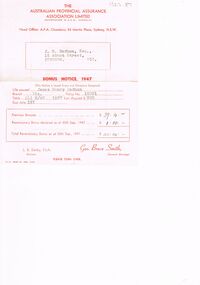
Document - BADHAM COLLECTION: AUSTRALIAN PROVINCIAL ASSURANCE ASSOCIATION LTD BONUS NOTICE
... Bendigo Historical Society Inc. Bendigo Historical Society ...Australian Provincial Assurance Association Ltd. Head office APA building , 53 Martin Place Sydney BONUS NOTICE 30.9.,1947 for J Badham , 16 Abbott St Bendigo / small fine paper memo in red type.document, memo, railway, australian provincial assurance association ltd head office apa building , 53 martin place sydney -
 Bendigo Historical Society Inc.
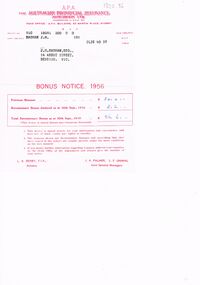
Document - BADHAM COLLECTION: AUSTRALIAN PROVINCIAL ASSURANCE ASSOCIATION LTD BONUS NOTICE
... Bendigo Historical Society Inc. Bendigo Historical Society ...Australian Provincial Assurance Association Ltd. Head office APA building , 53 Martin Place Sydney bonus notice 30.9.1956 for J Badham, 16 Abbott St Bendigo. Printed on small fine paper memo in red type.document, memo, railway, australian provincial assurance association ltd head office apa building , 53 martin place sydney -
 Bendigo Historical Society Inc.
Document - BADHAM COLLECTION: ADVERTISEMENT FOR RAWLEIGH'S FLY KILLER
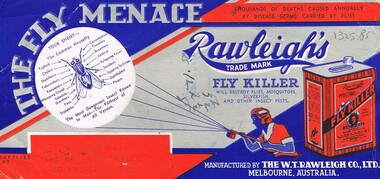
... Bendigo Historical Society Inc. Bendigo Historical Society ...Small blue paper advertisement for rawleigh's fly killer showing 'supplied by C .Fitzgerald , The Rawleigh Dealer , 150 Lyttleton Tce Bendigo'.document, memo, railway, rawleigh's fly killer / c .fitzgerald , the rawleigh dealer , 150 lyttleton tce bendigo' / -
 Bendigo Historical Society Inc.
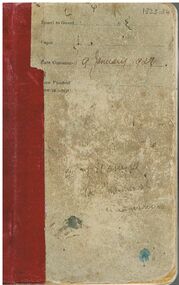
Book - BADHAM COLLECTION: VICTORIAN RAILWAYS NOTE BOOK DATED 9.1.1928
... Bendigo Historical Society Inc. Bendigo Historical Society ...VICTORIAN RAILWAYS small note book, hard cover with purple binding dated 9.1.1928. Each page details the Name of the Driver, Fireman, Van man and State of weather. Number and Class of Vehicles, Tonnage Contents, Total Description of Loading from Station to Station, Time of arrival and departure, Loco shunting, Van goods, Blocked by signals, other causes. Inside cover steam train instructions from T.B Molomby, General Supt, of Transportation. Reference is David Badham.document, memo, railway, victorian railways small note book, hard cover, t.b molomby, general supt, of transportation -
 Bendigo Historical Society Inc.
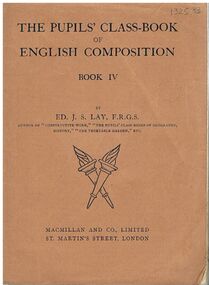
Book - BADHAM COLLECTION: THE PUPILS' CLASS - BOOK OF ENGLISH COMPOSITION BOOK IV
The pupils' class book of english composition - book IV by ED. J.S. Lay F.R.G.S. Macmillan and Co. Ltd. St. Martins Street London. 1924 small book - stapled, Hills Busy Book Bazaar Pall Mall Bendigo is embossed on page1. For young pupils 12-13 age group.book, magazine, victorian railways, the pupils' class book of english composition - book iv by ed. j.s. lay f.r.g.s. macmillan and co. ltd, st. martins street london 1924. hills busy book bazaar pall mall bendigo -
 Bendigo Historical Society Inc.
Document - BADHAM COLLECTION: VICTORIAN RAILWAYS TOUR OF INSPECTION REPORT 1959
... Bendigo Historical Society Inc. Bendigo Historical Society ...Victorian Railways tour of inspection report 1959, dated 15.5.1959 Marong. Foolscap paper.document, memo, railway -
 Bendigo Historical Society Inc.
Document - BADHAM COLLECTION: VICTORIAN RAILWAYS INFORMATION FOLDER
... Bendigo Historical Society Inc. Bendigo Historical Society ...Victorian Railways information folder. Large cash book size paper.document, memo, railway -
 Bendigo Historical Society Inc.
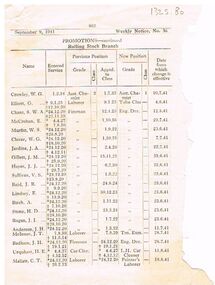
Document - BADHAM COLLECTION: VICTORIAN RAILWAYS WEEKLY NOTICE
... Bendigo Historical Society Inc. Bendigo Historical Society ...Weekly notice dated 9.9.1941. List of promotions showing J Badham from Fireman to Engine driver effective 28.7.1941. Printed on fine paper.document, memo, railway, victorian railways promotions -
 Bendigo Historical Society Inc.
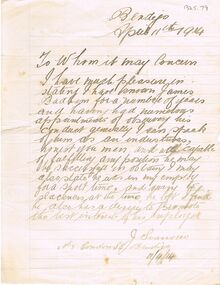
Document - BADHAM COLLECTION: LETTER OF RECOMMENDATION
... Bendigo Historical Society Inc. Bendigo Historical Society ...Letter of recommendation for J Badham from JJ Svanosio, dated 11.4.1914, fine note paper.document, memo, railway -
 Bendigo Historical Society Inc.
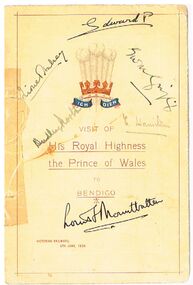
Document - AUTOGRAPHED PAGE - VISIT OF HRH THE PRINCE OF WALES TO BENDIGO 1920, 04/06/1920
... of Wales to Bendigo Victorian Railways Lor? Mountbatten Edward P C ...Copy of a page for the Visit of His Royal Highness the Prince of Wales to Bendigo, 4th June, 1920. Page is pale yellow with a red border 0.6 cm from the edge. Near the top is a crown with three feathery plumes behind it and 'Ich Dien' below. Page is autographed by Louis Mountbatten, C Hamilton, Edward V . Victorian Railways printed on the page.event, official, royal visit, document, visit of hrh the prince of wales to bendigo, victorian railways, lor? mountbatten, edward p, c hamilton -
 Bendigo Historical Society Inc.
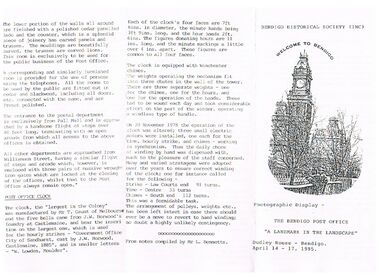
Document - THE BENDIGO POST OFFICE, 14/04/1995
Photographic display - The Bendigo Post Office 'A Landmark in the Landscape’ Dudley House - Bendigo. April 14 - 17, 1995. Also includes a Brief History of the Bendigo Post Office, Building Notes, Description, and the Post Office Clock has a small picture of the Post Office Clock on the front. From notes compiled by Mr. L. Bennetts. Bendigo Historical Society (Inc.) at the top of the front page.bendigo, institutions, bendigo post office, document, the bendigo post office, bendigo historical society (inc), dudley house bendigo, cenotaph, alexandra fountain, survey office, sandhurst trustees, post office savings bank, cohn family, temperance hall, telegraph office, railway station, 1882 directory, sub-treasury, sandhurst public offices, state government department offices, postal department, sir henry brougham lock, mr j nimmo, bendigo advertiser 25.9.1971, keen's cement, mr t gaunt melbourne, j w horwood's foundry castlemaine, w lowden, mr l bennetts -
 Bendigo Historical Society Inc.
Document - BADHAM COLLECTION: CARBON COPY BOOK OF EXAMINATIONS
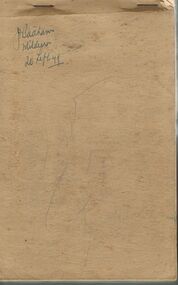
Light brown cover carbon copy book, stapled at top. Contains entries detailing examinations undertaken by J. Badham of Victorian Railways employees. Dated from 20.9.49 through to 21.10.49'.J. Badhamcottage, miners, badham, victorian railways, employees -
 Bendigo Historical Society Inc.
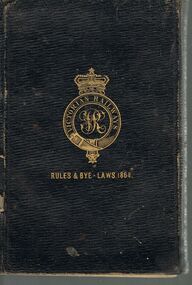
Document - BADHAM COLLECTION: VICTORIAN RAILWAYS RULES AND BYE-LAWS 1864
Black cover book, rules and regulations. Victorian Railways. Written in pencil inside front two pages, ' Jean Bright' in childlike hand. Victorian Railways, rules, regulations and byelaws of the Board of Land and Works for the guidance of officers and servants and the conduct of traffic on the Victorian Railways, in accordance with the provisions of the Railways Act, 1863'.Fergusson & Moore, Printers, Flinders Lane East, 1864cottage, miners, victorian railways, rules, bye-laws -
 Bendigo Historical Society Inc.
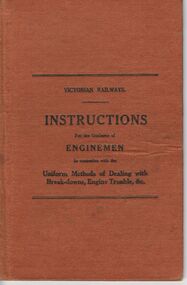
Document - BADHAM COLLECTION: VICTORIAN RAILWAYS INSTRUCTIONS FOR THE GUIDANCE OF ENGINEMEN
Brown hard cover book. On front cover ' Victorian Railways, instructions for the guidance of enginemen in connexion with the uniform methods of dealing with breakdown, engine trouble & c. In front cover written in blue ink ' J. Badham, Castlemaine, 13/11/35, Picnic Day'.H.J,. Green, Govt. Printercottage, miners, badham, victorian railways -
 Bendigo Historical Society Inc.
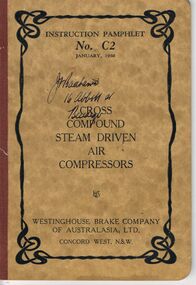
Document - BADHAM COLLECTION: WESTINGHOUSE BRAKE COMPANY INSTRUCTION PAMPHLET NO. C2
Buff cover, maroon spine booklet. On front cover: Instruction Pamphlet No. C 2, January 1930, Cross compound steam driver air compressors, Westinghouse Brake Company of Australasia, Ltd., Concord West, N.S.W.Westinghouse Brake companycottage, miners, badham, victorian railways, westinghouse -
 Bendigo Historical Society Inc.
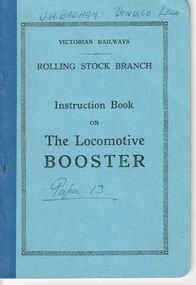
Document - BADHAM COLLECTION: VICTORIAN RAILWAYS, ROLLING STOCK BRANCH, INSTRUCTION BOOK ON THE LOCOMOTIVE
Blue covered booklet, dark blue spine. On front cover: Victorian Railways rolling stock branch, instruction book on the locomotive booster. Written in blue ink on cover, 'J.H. Badham, Bendigo Loco. Paper 13' Paper 13.Victorian Railwayscottage, miners, badham, victorian railways -
 Bendigo Historical Society Inc.
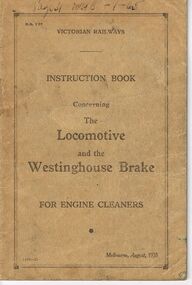
Document - BADHAM COLLECTION: VICTORIAN RAILWAYS INSTRUCTION BOOK LOCOMOTIVE AND THE WESTINGHOUSE BRAKE
Buff coloured booklet. Front cover ' Victorian Railways Instruction Book, concerning the Locomotive and the Westinghouse Brake for engine cleaners, Melbourne, August 1935' Inside front cover in blue ink ' J. Badham, Maryborough 27/10/48. Seymour 11/10/48'.Victorian Railwayscottage, miners, badham, victorian railways, locomotive -
 Bendigo Historical Society Inc.
Document - MINING IN BENDIGO COLLECTION: THE BENDIGO GOLDFIELD
Handwritten notes on the Deborah Mine, the North Deborah, The Central Deborah, the New Chum Railway, Eueka Extended and the South Belle Vue. Mentioned in the noes are: Depth of shaft, Formed, Closed, Best Gold, production and plant.document, gold, mining in bendigo, mining in bendigo, the bendigo goldfield, deborah mine, north deborah, central deborah, new chum railway, eureka extended, south belle vue, shenandoah, shamrock, rourke and henderson's claim -
Bendigo Historical Society Inc.
Document - MINING IN BENDIGO COLLECTION: NOTES ON MINING IN BENDIGO
Handwritten notes on mining in Bendigo. Notes mention the size of the Bendigo Goldfield, the number of lines of reef and a brief history of goldmining in Bendigo.document, gold, mining in bendigo, mining in bendigo, notes on mining in bendigo, ravenswood sheep run, survey regiment, california hill state school, lansell's 222, mr lansell, camp hill school, high school, park mine (royal hustler's reserve no 1), memorial hall, city mine ( royal hustlers reserve no 2), mining stock exchange, beehive buildings, allan's walk, buckell & jeffrey, fortuna hustlers, great extended huatlers, garden gully united, mining exchange, garden gully united, wattle gully mine, ironbark mine, manchester arms hotel, extended hustlers mine, south belle vue, new chum railway, eureka extended, shenandoah, victoria quartz, the big 180, old chum, gt extended hustlers