Showing 2440 items
matching mounted print
-
 Kew Historical Society Inc
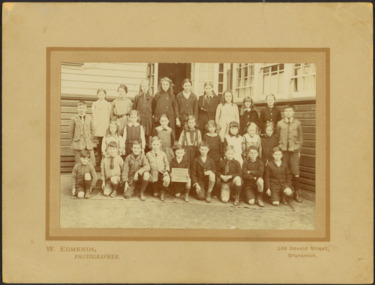
Photograph - Kew East Country School, 1919
... Original print positive, mounted on board of a co..., 2nd row, left - end of row" Original print positive, mounted ...State School No. 3161 was originally situated between High Street (then Bulleen Road) and Kilby Road adjacent to Burke Road and was officially opened on 25th April 1892 with Mr Roland Gray as its Headmaster. With more people moving into the district, the School was moved in 1905 to Strathalbyn Street. (This site was to became the Kew East Bowling Club, and is now a Kindergarten.) 1929 saw the erection of the brick Infant School adjacent to the main building. In subsequent years many other buildings were added, including a weatherboard ‘Rural’ school, a brick library, an administration block, several portables, and a Community Music Centre and shelter sheds, culminating in the opening in March 2011 of the Commonwealth funded new Music/Sports Complex. At one time it was called Kew East Central School and included years 7 & 8. When Kew High School started, the high school students were accommodated there whilst their buildings were being completed.Original print positive, mounted on board of a co-educational class of students at Kew East 'Country School'. Howard Nickell is identified in an inscription on the reverse of the mount. The Age newspaper on 6 March 1906 included in News of the Day that: "At a meeting of the Executive Council yesterday it was decided to proclaim the following State schools as training schools under the provisions of the Teachers' Act: Brunswick 1213; Queensberry-street, Carlton 2365; Kew East 3161; and Queensberry-street, North Melbourne 307. These schools have been specially selected and staffed in order that teachers in training and junior teachers may study the methods of the best teachers in special kinds of work. The infant class is the special feature at Brunswick, while Kew East will be a model of the methods of a country school. The schools at Queensberry-street, North Carlton and North Melbourne, are to be more especially connected with the training college."Obverse: Written on held chalk board: "Kew East 3161 / Country School / 1919". Reverse: "Howard Nickell, 2nd row, left - end of row"kew east primary school, margery canham, margery nickell, elizabeth angel, kew east state school, kew east country school -
 Kew Historical Society Inc
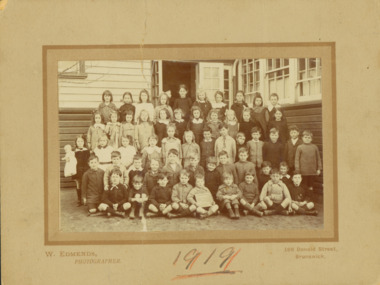
Photograph - Kew East State School, 1919
... Original print positive, mounted on board of a co... row, back right" Original print positive, mounted on board ...State School No. 3161 was originally situated between High Street (then Bulleen Road) and Kilby Road adjacent to Burke Road and was officially opened on 25th April 1892 with Mr Roland Gray as its Headmaster. With more people moving into the district, the School was moved in 1905 to Strathalbyn Street. (This site was to became the Kew East Bowling Club, and is now a Kindergarten.) 1929 saw the erection of the brick Infant School adjacent to the main building. In subsequent years many other buildings were added, including a weatherboard ‘Rural’ school, a brick library, an administration block, several portables, and a Community Music Centre and shelter sheds, culminating in the opening in March 2011 of the Commonwealth funded new Music/Sports Complex. At one time it was called Kew East Central School and included years 7 & 8. When Kew High School started, the high school students were accommodated there whilst their buildings were being completed.Original print positive, mounted on board of a co-educational class of students at Kew East 'Country School'. Margery Canham (nee Nickell) is identified in an inscription on the reverse of the mount. The Age newspaper on 6 March 1906 included in News of the Day that: "At a meeting of the Executive Council yesterday it was decided to proclaim the following State schools as training schools under the provisions of the Teachers' Act: Brunswick 1213; Queensberry-street, Carlton 2365; Kew East 3161; and Queensberry-street, North Melbourne 307. These schools have been specially selected and staffed in order that teachers in training and junior teachers may study the methods of the best teachers in special kinds of work. The infant class is the special feature at Brunswick, while Kew East will be a model of the methods of a country school. The schools at Queensberry-street, North Carlton and North Melbourne, are to be more especially connected with the training college."Obverse: Written on held chalk board: "Kew East 3161 / ? Grades / 1919". Reverse: "Margery Nickell, 4th row, back right"kew east primary school, margery canham, margery nickell, elizabeth angel, kew east state school, kew east country school -
 Kew Historical Society Inc
Photograph - Kew East State School
... Original print positive, mounted on board of a co.... Back row 6th left" Original print positive, mounted on board ...State School No. 3161 was originally situated between High Street (then Bulleen Road) and Kilby Road adjacent to Burke Road and was officially opened on 25th April 1892 with Mr Roland Gray as its Headmaster. With more people moving into the district, the School was moved in 1905 to Strathalbyn Street. (This site was to became the Kew East Bowling Club, and is now a Kindergarten.) 1929 saw the erection of the brick Infant School adjacent to the main building. In subsequent years many other buildings were added, including a weatherboard ‘Rural’ school, a brick library, an administration block, several portables, and a Community Music Centre and shelter sheds, culminating in the opening in March 2011 of the Commonwealth funded new Music/Sports Complex. At one time it was called Kew East Central School and included years 7 & 8. When Kew High School started, the high school students were accommodated there whilst their buildings were being completed.Original print positive, mounted on board of a co-educational class of students at Kew East State School. Jean Nickell is identified in an inscription on the reverse of the mount. The Age newspaper on 6 March 1906 included in News of the Day that: "At a meeting of the Executive Council yesterday it was decided to proclaim the following State schools as training schools under the provisions of the Teachers' Act: Brunswick 1213; Queensberry-street, Carlton 2365; Kew East 3161; and Queensberry-street, North Melbourne 307. These schools have been specially selected and staffed in order that teachers in training and junior teachers may study the methods of the best teachers in special kinds of work. The infant class is the special feature at Brunswick, while Kew East will be a model of the methods of a country school. The schools at Queensberry-street, North Carlton and North Melbourne, are to be more especially connected with the training college."Obverse on chalkboard: "Kew East / 3161 / 1 & 2 Grades" / Reverse: "Jean Nickell. Back row 6th left"kew east primary school, elizabeth angel, kew east state school, jean nickell, w edmends -
 Kew Historical Society Inc
Photograph - Royal Hotel, Sunbury, C.H.R. Christianson, 1890s
... Silver albumen print, mounted on board, of the original... photographer Silver albumen print, mounted on board, of the original ...This item is part of a larger collection donated to the Kew Historical Society by Anna French. The collection includes personal items from the donor's family, as well as items given to the donor and her mother by a family friend, Lucy Merritt (Jean) Hornby. The item is from that part of the collection inherited or assembled by Jean Hornby. The collection is significant given Jean Hornby's mother's descent from Robert Hornby (1854-1935) and Eva Merritt (1865-1959); her mother the chid of a family who settled in Kew in the 1850s, this providing a chain of provenance for items dating to the mid-nineteenth century, when her maternal forebears arrived in Melbourne. Other items represent Jean Hornby's contribution to her local and wider community.This 19th century photograph includes significant architectural details of an important hotel in Sunbury, Victoria. Additionally, it was taken by a local photographer - CHR Christianson - who operated the Sunbury [photographic] Studio. Silver albumen print, mounted on board, of the original Royal Hotel on the corner of Brook and Evans Streets, Sunbury, Victoria.The single-storey, rendered brick building with a corrugated galvanised iron roof includes a number of pieces of information that may assist in dating the photograph. The licensee's name above the door appears to be M.A. Williams. To the left of the door on the external wall is a painted sign: 'BILLIARDS". Another painted sign on the front of the building reads "ROYAL HOTEL [illegible] BILLIARDS." An attached building at right may be the residence of the licensee. Specific architectural features of the building include a corner doorway with a lamp above, three sash windows and a larger square lead-light window to the right of the doorway. The latter identifies the space behind as the "BAR". On the footpath in front of this building is a grill set into the footpath to enable deliveries to a cellar. At least four figures can be identified in the photograph: a woman in the doorway, a man to her right, leaning against the wall, and two other men at the right hand side of the building. Beyond the boundary of the building is a sloping footpath to a bluestone edged gutter. An elm [sic] within a protective, picketed surround is in front of the building. C.H.R. Christianson is identified on the reverse as the photographer. Reverse in pencil: Royal Hotel Billards Sunbury / CHR Christianson photographerroyal hotel -- sunbury (vic.), chr christianson -- photographer, hotels -- sunbury (vic.), recreation -- billiards -
 Bacchus Marsh & District Historical Society
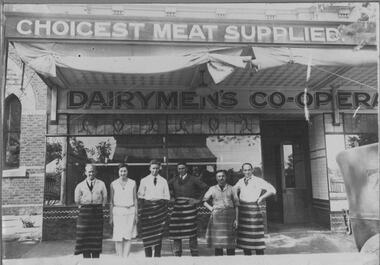
Photograph, Dairymen's Co-operative Butchers Shop. Main Street Bacchus Marsh. 1923
... Black and white photographic print mounted on grey..., (Manager). Black and white photographic print mounted on grey ...Bacchus Marsh Dairymen's Co-operative Association factory began in 1910. The Co-op, as it was known locally, also had a store in Main Street. This butcher's shop was opened in 1923 and was located at 160 Main Street. The Co-op purchased milk from local farmers and trucked the milk direct to a factory in Melbourne. Due to financial difficulties, the Co-op ceased trading in the early 1980s. Records show that this site was in continuous use as a butcher's and allied industries from 1856 to 2011. The original building underwent several changes and additions until it was sold in 1922 to the Dairymen's Co-operative, who erected a new brick building in 1923. This building housed the Hospital Opportunity Shop from 2011 until 2016 when it was taken over by Natural Health and is still in use by this business.Black and white photographic print mounted on grey cardboard with decorative borders. Photo shows staff standing in front of the shop with two store signs. Along the top the verandah a sign reads: CHOICEST MEAT SUPPLIED. The lower sign along the top of the shop frontage reads: DAIRYMEN'S CO-OPERA. This sign is incomplete, indicating that the butcher's shop was part of the Dairymen's Co-operative Association store. At the front of the store six members of the staff stand in a line. There are five men, all wearing the traditional blue and white striped butcher's apron and one woman who is probably the cashier. At the top of the cantilever verandah, two rolls of canvas awning are tied up, ready to be let down on a hot day. On the left of the photo a portion of the brick Baptist Church can be seen. The store frontage continues to the right. The reflection of the store on the opposite side of the street can be seen in the window. The store frontage is finished with tiles along the bottom of the display window and an inset of leaded glass along the top of the window. On the footpath there is a scattering of sawdust, once used traditionally in butcher shops to soak up blood from the meat. The end of a 1920's vehicle has been captured as it passes in front of the store. On the back: On a printed label: OPENING OF BACCHUS MARSH DAIRYMAN'S CO-OPERATIVE BUTCHERS SHOP. 1923 L. to R. Norm Farrow, Sheila Muir, Bill Bence, Norm Mathews, Jim Cash and Ern Coe, (Manager). shops bacchus marsh vic., bacchus marsh dairymen's co-operative association, butcher's shops, main street bacchus marsh vic. -
 Ballarat Tramway Museum
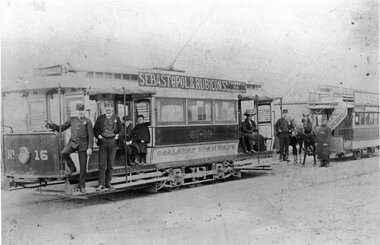
Photograph - Black & White Photograph/s, c1907
... on the photograph itself. .3 - print mounted onto heavy brown cardboard... on the photograph itself. .3 - print mounted onto heavy brown cardboard ...Yields information about the change over from horse to electric trams and a comparison between the two types of trams, uniforms and clothing of passengers and the way destinations were shown.Black and White photograph, assumed a copy photograph of ESCo 16 and a horse tram - at Rubicon St where Sebastopol passengers transferred between horse and electric transport. No. 16 has two uniformed men at the front and a conductor on the rear stop, two children on the front seat and a lady on the rear. A uniformed horse tram driver is standing by the front of the horse. No. 16 has the destination of Grenville St, and a large sign "Sebastopol & Rubicon St Tramways via Drummond St". The destination is on the roof of the tram, possibly indicating early 1907 - 08. Used in The Golden City and its Tramways - page 42. Text notes the photograph was donated by a Mrs. I Butler. Three additional copies of the same photograph and a handwritten note from the donation of Karelyn Satter added 2-3-2016. .2 - handwritten note from the rear of photograph .3 (can be seen from the tape marks - was loose when received), giving the name of the man on the back step of the electric car - Frank Greenfield (Junior) and notes on the photograph itself. .3 - print mounted onto heavy brown cardboard with a scorch mark in the top left hand corner. .4 - print .5 - copy print on a small sheet - darker image. items .2, .3 and .4 to rear of box 77On rear of .3 has in ink "Mr. B. Smith 10 Walker St" and in pencil "B. Smith"tramways, trams, rubicon st, electrification, horse trams, sebastopol, esco, tram 16 -
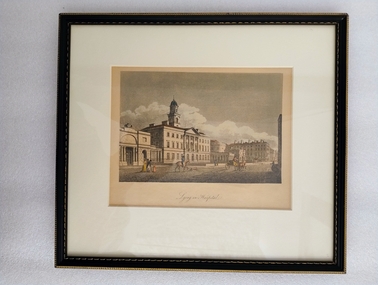 Royal Australian and New Zealand College of Obstetricians & Gynaecologists (RANZCOG)
Print - hand coloured aquatint engraving, James Malton (1761 -1803), Lying in Hospital, 1791
... in Hospital'. The print is mounted and framed in a black wooden frame... in Hospital'. The print is mounted and framed in a black wooden frame ...This is an image of the Rotunda Hospital in Dublin. Established as the Dublin Lying-In Hospital in 1745, it moved to its current location in 1757 and remains there to this day. This image was first published in Malton's 'A Picturesque and Descriptive view of the City of Dublin' in 1791.A colour engraving of a white building with a red roof. A tower, topped by a dome, rises above the middle of the building. There are four decorative columns on the front of the building, and the entrance to the building is surrounded by a metal fence. There are various figures in the foreground of the image. On the left, there is a well dressed family group consisting of three adults and a child. At left of centre, a figure is riding a horse, which is being preceded by a dog. At centre, in the middle background, one tall and one short figure stand next to the metal fence surrounding the building and are peering inside. At right of centre, a figure is driving a two horse buggy. On the far right, the shadowed figure of a beggar is holding out their cap. There is a smaller building to the left hand side of the featured building, and additional buildings are visible in the right side background. Clouds are visible behind the buildings. Text below image reads 'Lying in Hospital'. The print is mounted and framed in a black wooden frame with gold trim. A display label for this print is attached to the back of the frame. Handwritten inscriptions on the back of the frame of the artwork read 'Rotunda Lying in Hospital/Dublin // 19th British Congress RCOG 1971' and 'Original engraving/James Malton. London,/December 1795.' There is a sticker attached to the bottom right of the back of the frame featuring a printed image of a stork in read and the text 'FRIENDS OF THE ROTUNDA HOSPITAL'. There are two hooks and a wire attached to the back of the frame for hanging. -
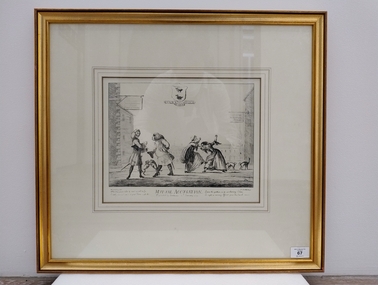 Royal Australian and New Zealand College of Obstetricians & Gynaecologists (RANZCOG)
Print, James Bretherton (British, active 1755–1799), Mutual Accusation
... of image reads 'Js Bretherton f.'. Print is mounted on card... of image reads 'Js Bretherton f.'. Print is mounted on card ...This is a copy of a print originally published in 1774 by James Bretherton (British, active 1755–1799), after Henry William Bunbury (British, 1750–1811). Antiscorbutic pills were intended to prevent, or cure, scurvy. Black and white print, framed. Scene depicts two male 'quack' doctors (at image left) arguing over the relative merits of their antiscorbutic pills. The two men appear to have set up business directly opposite each other in the street, as a sign on the upper left of the image reads 'Dr WALKER'S/VERITABLE/ANTISCORBUTIC/PILLS/Beware of Impostors.' whilst a sign on the upper right of the image, directly opposite, reads 'TRUE/ANTISCORBUTIC/PILLS.' Directly behind the two men arguing, two dogs can be seen fighting each other. To the right of the men, the two wives of the doctors are also having a violent altercation, and to their right, two cats have their backs arched and are hissing at each other. There is a shield emblem resembling a coat of arms 'hanging' from the top centre of the image. The shield features images of two ducks, above the phrase 'QUACK QUACK QUACK'. Title for image is printed at bottom centre of image and reads 'MUTUAL ACCUSATION./Publish'd by Bretherton Ed. January 1774'. Text printed below image to the left of the title reads 'When once you've told and can't recall a Lye/Boldly, percist in't or your Fame will die.' (sic) Text printed below image to the right of the title reads 'Learn this ye Wives, with unrelenting Claws/Or right or wrong, Afsert your husbands cause.' (sic). Small text printed below bottom left corner of image reads 'Mr Bunbury del.' Small text printed below bottom right corner of image reads 'Js Bretherton f.'. Print is mounted on card and housed in a gold coloured wooden frame. A sticker for Gibson's Auctioneers is attached to the bottom right of the front of the frame, printed with the number '67'. There are two small auction house stickers stuck to the back of the frame of the work, as well as a sticker for the framer of the piece, Artist Framing Services. Two sets of D-rings and two wires have been attached to the back of the frame for hanging. -
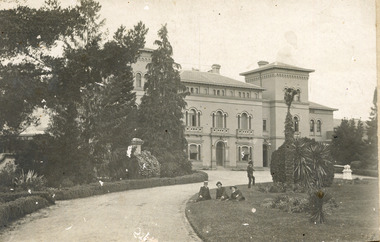 The Beechworth Burke Museum
Photograph, W. D. Gibbon, 1905
Taken 1905 by photograph W.D Gibbons the photograph depicts a pathway leading to the administration building of the Beechworth Mental Asylum. There are three well-dressed young men lounging on the grass as another is jumping behind them. This is significant as it demonstrates that the asylum was not a prison and that the mentally ill patients were allowed their freedom. The Beechworth 'Lunatic' Asylum was constructed between 1864 and 1867 to the designs by the Public Works Department (PWD) and was later renamed the Mayday Hills Mental Asylum. The decommissioned asylum was one of the largest psychiatric hospitals in Victoria and consisted of sixty-seven buildings, one thousand two hundred patients and five hundred staff members. At the asylum, active work was considered imperative and workshops were located near the male accommodations and laundries and drying yards near the female accommodation. The administration building itself highlights the architectural and aesthetic significance of the asylum to the State of Victoria. This photograph is historically significant as it demonstrates the architectural and aesthetic significance of the asylum but also the changing approaches to treating mental health. Black and white rectangular photograph printed on matte photographic paper mounted on grey cork Obverse: W.D Gibbon/ Beechworth Reverse: 79.1701beechworth, beechworth lunatic asylum, beechworth mental hospital, mayday hills, mayday hills mental hospital, asylum, administration building, wd gibbon, photograph -
 The Beechworth Burke Museum
Photograph, Farrell & Martin Landscape Photographers, c1900
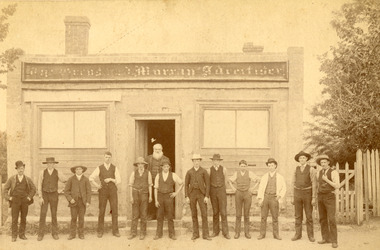
... Faded sepia rectangular photograph printed on photographic... rectangular photograph printed on photographic material, mounted ...This photograph shows a group of workmen standing outside the Ford Street office of the Ovens and Murray Advertiser in Beechworth. The Advertiser was a local paper, first printed as a weekly in 1855, and then as a daily in 1857. It continues to be printed today, albeit in a different form. The Advertiser was launched by architect Francis Hodgson Nixon with assistance from businessman John Henry Gray, and newspaperman Richard Warren. Warren was sole owner from 1860 until his death in 1906, and it responsible for much of the paper’s success. Its goals included coverage of local events, as well as of global news, and the promotion of economic liberty, arts, and sciences. Beyond these initial goals, the Advertiser was instrumental in local politics, particularly Beechworth’s association with conservatism and constitutionalism in the 1860s and 1870s. Numerous other papers sprung up to contest the Advertiser’s hold during the latter half of the nineteenth-century, but none were able to completely oust it from its post. As well as representing a key chapter in Beechworth’s history, the Advertiser can be used as a key source for the stories and figures of historic Beechworth. This photograph has historic significance for its relationship to the history of the Ovens and Murray Advertiser, which is a key example of of successful nineteenth-century business in Beechworth.Faded sepia rectangular photograph printed on photographic material, mounted on board. Obverse: The Owens and Murray Advertiser Reverse: Parkinson (crossed out) BMM 7725 15/ Failey/ [logo Farrell and Martin Landscape Photographers]ovens and murray advertiser, the ovens and murray advertiser, newspaper, printing, ford street, richard warren, journalism, advertising, 1800s, 1800s beechworth, #beechworth, local business, advertiser, workmen, hats, printers, journalists -
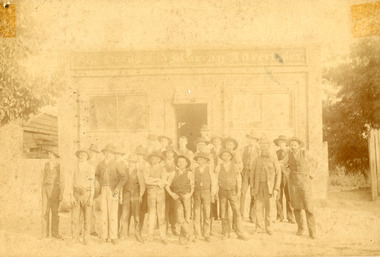
 The Beechworth Burke Museum
Photograph, R & M Harvey
This photograph shows a group of men standing outside the Ford Street office of the Ovens and Murray Advertiser in Beechworth. This group includes the Advertiser''s manager, Richard Warren, who is bearded man standing in the doorway and who's name is written on the reverse of the photograph. The Advertiser was a local paper, first printed as a weekly in 1855, and then as a daily in 1857. It continues to be printed today, albeit in a different form. The Advertiser was launched by architect Francis Hodgson Nixon with assistance from businessman John Henry Gray, and newspaperman Richard Warren. Warren was sole owner from 1860 until his death in 1906, and it responsible for much of the paper’s success. Its goals included coverage of local events, as well as of global news, and the promotion of economic liberty, arts, and sciences. Beyond these initial goals, the Advertiser was instrumental in local politics, particularly Beechworth’s association with conservatism and constitutionalism in the 1860s and 1870s. Numerous other papers sprung up to contest the Advertiser’s hold during the latter half of the nineteenth-century, but none were able to completely oust it from its post. As well as representing a key chapter in Beechworth’s history, the Advertiser can be used as a key source for the stories and figures of historic Beechworth. As well as managing the Advertiser, Richard Warren's owned or managed multiple businesses in Beechworth, founded the Ovens hospital and Benevolent asylum, invested in local companies, and participated in a range of religious brotherhoods and societies. He married Mary Ann Mitchell when he was twenty-six, and, while the couple were unable to have children, they adopted one son, who began managing the Advertiser in the late-nineteenth century. This photograph has historic significance afor its relationship to the history of the Ovens and Murray Advertiser, which is a key example of of successful nineteenth-century business in Beechworth, and for including an image of Richard Warren, a key figure in the period. Sepia rectangular photograph, faded, printed on photographic material and mounted on board. Obverse: The Ovens and Murray Advertiser Reverse: Or M A/ Printing Office/ Ford Street About 1860/ Beechworth/ R Warren [logo: R & M Harvey/Authorised Newsagents/ and Gift Shop/ Beechworth Phone 114]ovens and murray advertiser, the ovens and murray advertiser, newspaper, printing, ford street, richard warren, journalism, advertising, 1800s, 1800s beechworth, #beechworth, local business, advertiser, workmen, hats, printers, journalists, warren, mary ann mitchell, mary ann warren, 1860s, 1860s beechworth, r warren, r & m harvey -
 The Beechworth Burke Museum
Photograph, 1910
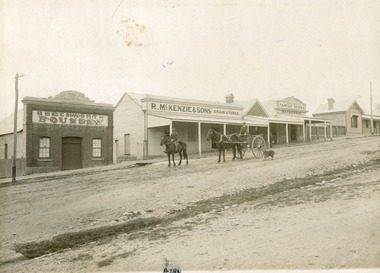
Taken in 1910, this photograph depicts a scene of Bridge road in Newtown, Beechworth. Walking on the road are two men on horseback, one of which is pulling a carriage with a small dog standing beside it. Behind them are a line of small buildings and shops. Small industries began to expand dramatically in Beechworth, particularly during the 1860s, leading to a strengthening of the towns economy. As early as 1853, areas surrounding the waterway known as Spring Creek were surveyed with the intent of mapping out plans for new roads and building allotments. Land was sold and new buildings were erected, creating an expansion of the Beechworth township and retail services. One building shown in this photograph is Straughair and Duncan's Beechworth Foundry. This business was established in 1858 through the partnership of Mark Straughair and John Duncan. It dealt mostly in the manufacturing of castings and mining machinery, receiving orders from all over the Ovens district. The Business eventually collapsed after the deaths of Straughair in 1882 and Duncan in 1896 but was reopened by W.H. Phillips in 1905. The two other buildings are both associated with the name McKenzie. Evidence suggests that the McKenzie family has a long association with the town of Beechworth. This photograph is historically significant as it provides insight into the nineteenth and twentieth century industrial expansions that happened in the area of Newtown, leading to the urbanisation of Beechworth. Black and white rectangular photograph printed on matte photographic paper mounted on card.Reverse: Newton / 1997.2648 / 33 Newton Beechworth / 84-219-1 / McKenzies / BMM3055 / newtown beechworth, bridge road, 1910, j. duncan, r. mckenzie, m. straughair, industrial growth, ford street, beechworth foundry, straughair and duncan, mckenzie and sons grainstore, mckenzie family store -
 The Beechworth Burke Museum
Photograph, c1900
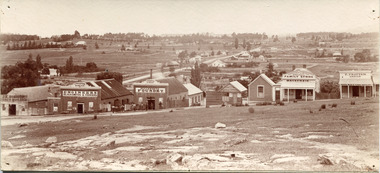
... Sepia rectangular photograph printed on photographic paper.../ 1997.2650/ 21/ BMM3056/ Sepia rectangular photograph printed ...Taken around 1858, depicting a row of five business buildings on a rocky, sloping hillside at New Town, with a view across to residences and open land. Businesses included, Joseph E. Bishop, Coach Builders; Straughair Duncan, Engineers, Blacksmiths & Farriers; Straughair Duncan, Beechworth Foundry; Wholesale & Retail Est. 1855, Mackenzie Family Store ; and T. Pratten, Grocer. The Mental Hospital can be seen in the background. Mark Straughair and John Duncan, established the Beechworth Foundry, Newtown in 1858 and went on to build an important industry, employing around sixteen men, after acquiring Alexander Roger's New Ford Street Foundry in the late 1860s. Making and repairing mostly mining and agricultural machinery for the Ovens District and a Beechworth brewery, the business continued to function after Straughair's death in 1882, up until the death of Duncan in 1896, when the business folded. This photograph is historically significant because it shows the development of the businesses in Beechworth from the early establishment of the town.Sepia rectangular photograph printed on photographic paper mounted on boardObverse: [Pin holes from circular tacks in all four corners] Reverse: 84.216-1/ Newtown/ 1997.2650/ 21/ BMM3056/new town, newtown, newtown beechworth, local business, 1858, 1850s beechworth, joseph e. bishop, coach builder, coach, mark straughair, m. straughair, straughair and duncan, john duncan, j. duncan, beechworth foundry, mackenzie family store, t. pratten, grocer, beechworth grocers, beechworth mental asylum, beechworth mental hospital, mayday hills mental asylum, mental hospital, alexander rogers, new ford street foundry, 1860s beechworth, 1860s, mining machinery, agricultural machinery, manufacturing, bridge road -
 The Beechworth Burke Museum
Photograph, 1859
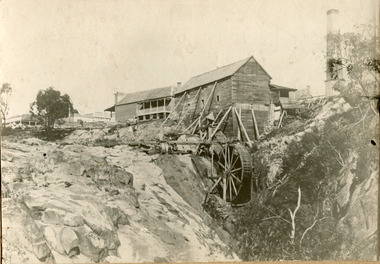
Louis Chevalier, brother of popular artist Nicholas Chevalier, opened a sawmill in Beechworth near Spring Creek in Newtown in 1853. This facilitated a boom in building in the town, as materials were much more available than they had been previously. A second sawmill was opened in the town in 1856. Louis Chevalier served on the Beechworth Council as a representative of Newtown between 1858 and 1860. As this photograph is taken in 1859, the mill would have been operating as a sawmill at the time this photograph was taken. Louis Chevalier’s mill stopped sawing wood and began milling flour at some point between 1860 and 1862. At this time, the Oven’s district was almost self-sufficient, producing considerable quantities of grain, dairy, fodder and meat. Unfortunately, the region experienced poor agricultural yields in the 1880s and 1890s, which lead to the closure of the Beechworth Flour Mills in the 1880s. This photograph depicts the first sawmill in Beechworth, which was responsible for making the materials available for other early buildings in the town. The mill race and wheel are also clearly depicted, which may shed light onto how mill wheels of this era and place were constructedBlack and white rectangular photograph printed on matte photographic paper mounted on boardReverse: 3146 / 1997.2654 / Louis Chevalier's Flour Mill on / the Newtown Falls before the / Bridge / Est 1853 / this photo 1859 / 84-229-1 / Burke Museum Beechworth / Page 41 / 81 % / (Illegible) / (Illegible) 14 / chevalier, louis chevalier, newtown, mill, grain mill, sawmill, flour mill, 1850s beechworth, beechworth council, farming and agriculture, victorian agricultural history, spring creek, buildings, industry, forestry, wood, timber -
 The Beechworth Burke Museum
Photograph, c. 1870
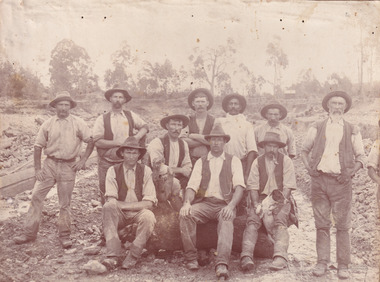
This photograph was captured at an undisclosed location and at an unidentified time but likely dates to approximately 1870. The photographer's details are not recorded and the identities of the men in the image are also not known. This image depicts a group of 10 men in typical miners fashion. Four of them are sat on a large log with one holding a small dog. Six miners stand behind those sitting. All these men are wearing a white button-up shirt and tan coloured work trousers. They wear heavy boots and seven have included a dark vest over their shirt. The man holding the dog has a pipe in his mouth. Two of these men are clean shaven with the remainder sporting a moustache and two with a beard. The ages of these men vary from late 20s to middle age. This group of men are located in a mining location with what appears to be an open cut mine in the background of the image. The ground is muddy and has elements which can help identify it as a mining location based on the condition of the landscape. The bottom of the men's trousers are muddy which provides the assurance that these men were working in this location when their photograph was captured. In the background there is one structure, possibly a dwelling, and bush which identifies the location as Australia. Open cut sluicing is a method used to extract gold and other precious metals from beneath the surface of the earth. This technique involved the use of high-powered hoses which broke down the soil enabling miners to come along and search this soil for gold. After the gold rush of the early 1850s, diggers had to enlist the assistance of heavy machinery and techniques like hydraulic sluicing in order to reach gold because the surface alluvial gold had already been discovered and removed. This heavy machinery was not used until after 1853. The search for gold is ingrained into the history of Victoria and therefore, images like this one which portray an open cut sluicing site can reveal important information for society and technology for the date when the photograph was taken. This image is of important historical significance for its ability to convey information about sluicing and the methods used to find gold in the late 1800s and early 1900s. It also shows a location where sluicing was undertook which provides insight into the impact of sluicing on the environment at a time when it was done. Images, like this one, of Australian gold rush history can reveal important information about the social and environmental impact of this period. This image depicts diggers standing in a mining location and therefore, this image has the capacity to reveal or support significant information for researchers studying the fashion and social status of diggers in Australia in approximately 1870. It can also provide information on the landscape of Australia in this period and the impact of mining for gold on both society and the Australian landscape. The Burke Museum is home to a substantial collection of Australian mining photographs which can be used to gain a deeper understanding into life on the gold fields, technology used in mining, the miners themselves and the impact of the gold digging on the environment.Sepia toned rectangular photograph printed on matte photographic paper mounted on board.Reverse: 1997.2518mining, goldfields, beechworth, 1870, australia, australian goldfields, diggers, victoria, sluicing, gold mining, miners, diggers victoria -
 The Beechworth Burke Museum
Photograph, c.1870
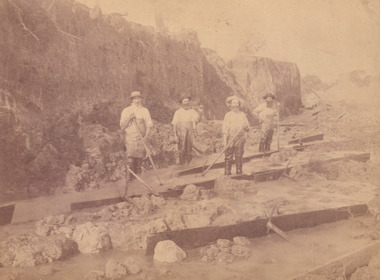
This photograph was taken in approximately 1870 and depicts four male miners standing in mining sluice at the Three Mile Goldfields. These men are wearing typical attire for 1870s gold miners. They wear white shirts, tan coloured pants with water proof shoes and most of the men are wearing an apron to prevent their clothing from becoming too dirty from the mud. Each man is wearing a wide brim hat and hold large wooden tools used for sorting through the sluice. Three of the four men have full beards. The photograph was donated to the Burke Museum by R. Ziegenbein before 2001 but the photographer and the individuals captured in the photo are unknown. The image depicts the landscape of the Three Mile Goldfields during a period when open cut sluicing was undertaken to reach gold. Open cut sluicing is a method used to extract gold and other precious metals from beneath the surface of the earth. This technique involved the use of high-powered hoses which broke down the soil enabling miners to come along and search this soil for gold. After the gold rush of the early 1850s, diggers had to enlist the assistance of heavy machinery and techniques like hydraulic sluicing in order to reach gold because the surface alluvial gold had already been discovered and removed. This heavy machinery was not used until after 1853. The Three Mile Goldfields was a site of rich alluvial gold deposits located about 5 km south of Beechworth in Victoria. Today, the location of this gold deposit is called Baarmutha. It was a popular area for gold mining in the 1850s but became largely abandoned by the following decade. In 1865, a man named John Pund recognized that the area could be potentially rich if a better water supply could be obtained. He secured a 15 year license with three other miners. Within the next five years, these men had constructed 19 km of water race going from Upper Nine Mile Creek to Three Mile Creek. By 1881, these four men had delivered 950,000 gallons to the Three Mile Sluicing area which is depicted in this photograph. Pund was later go into partnership with John Alston Wallace who would become owner of the Star Hotel in Beechworth. The Three Mile sluicing location continued to be operational until 1950. Sluice box workers were a vital part of gold mining regardless of how inefficient they were in the recovery of gold. After using hydraulic sluicing to cut away the earth, miners would use the big wooden boxes depicted in the image to catch the earth which would then be sifted for gold. However, accidents would occur often which would result in the gold washing away and unable to be recovered. It was not a very efficient system because the gold, which was alluvial and thus very fine, would often pass through the sluice box undetected.The search for gold is ingrained into the history of Victoria and therefore, images like this one which portray an open cut sluicing site can reveal important information for society and technology for the date when the photograph was taken. This image is of important historical significance for its ability to convey information about sluicing and the methods used to find gold in the late 1800s and early 1900s. It also shows a location where sluicing was undertook which provides insight into the impact of sluicing on the environment at a time when it was done. Images, like this one, of Australian gold rush history can reveal important information about the social and environmental impact of this period. This image depicts diggers standing in a mining location and therefore, this image has the capacity to reveal or support significant information for researchers studying the fashion and social status of diggers in Australia in approximately 1870. It can also provide information on the landscape of Australia in this period and the impact of mining for gold on both society and the Australian landscape. The Burke Museum is home to a substantial collection of Australian mining photographs which can be used to gain a deeper understanding into life on the gold fields, technology used in mining, the miners themselves and the impact of the gold digging on the environment.Sepia toned rectangular photograph printed on matte photographic paper and mounted on board.[illegible] about 1870 / 97 2514.1 / 2594 30three mile goldfields, goldfields, 1870, 1870 gold, australia, australian landscape, miners, gold miners, diggers, gold diggers, beechworth, victoria, sluice box workers, sluicing, sluice, mining -
 The Beechworth Burke Museum
Photograph - Photograph - Reproduction, W. D. Gibbon, Early 1900s
This photograph was taken in 1911 at Three Mile Creek, about five kilometers south of Beechworth town. Significant digging took place at this location from late 1855, which led to a flood of workers and stores to follow, though daily earnings were slim compared to the nearby Woolshed site. This remained the case even after workers at Three Mile Creek attempted to protest around Beechworth during an election in November 1855. Three Mile Creek was one of seven significant divisions of the Beechworth Mining District formalised by the Governor-in-Council in 1858, though by the time this photograph was taken, the boundaries of the original seven districts had shifted to create seventeen divisions. The Three Mile Goldfields was a site of rich alluvial gold deposits located about 5km south of Beechworth in Victoria. Today, the location of this gold deposit is called Baarmutha. It was a popular area for gold mining in the 1850s but became largely abandoned by the following decade. In 1865, a man named John Pund (a man second from the left in the back row of this photograph shares this surname) recognized that the area could be potentially rich if a better water supply could be obtained. He secured a 15 year license with three other miners. Within the next five years, these men had constructed 19 km of water race going from Upper Nine Mile Creek to Three Mile Creek. By 1881, these four men had delivered 950,000 gallons to the Three Mile Sluicing area which is depicted in this photograph. Pund would later go into partnership with John Alston Wallace who would become owner of the Star Hotel in Beechworth. The Three Mile sluicing location continued to be operational until 1950. The eleven miners in this photograph are: Back row: Led Guthrie, P. Pund, F. Beel, [Unknown] Miller Front row: Paddy McNamara, J. King, W. Beel, [Unknown] Garland, J. Clarke, J. Ryan, H. Bartsh In the background of the photograph is a huge dirt wall that appears to suffer damage caused by hydraulic sluicing. Hydraulic sluicing is a specialised mining technique that involves directing high pressure water flows at dirt to uncover gold. The technique played a significant role in shaping Beechworth's landscape during the gold rush to create the topography seen today.The search for gold is ingrained into the history of Victoria and therefore, images like this one which portray an open cut sluicing site can reveal important information for society and technology for the date when the photograph was taken. This image is of important historical significance for its ability to convey information about sluicing and the methods used to find gold in the late 1800s and early 1900s. It also shows a location where sluicing was undertook which provides insight into the impact of sluicing on the environment at a time when it was done. Images, like this one, of Australian gold rush history can reveal important information about the social and environmental impact of this period. This image depicts diggers standing in a mining location and therefore, this image has the capacity to reveal or support significant information for researchers studying the fashion and social status of diggers in Australia in approximately 1911. It can also provide information on the landscape of Australia in this period and the impact of mining for gold on both society and the Australian landscape. The Burke Museum is home to a substantial collection of Australian mining photographs which can be used to gain a deeper understanding into life on the gold fields, technology used in mining, the miners themselves and the impact of the gold digging on the environment.Black and white / sepia rectangular reproduced photograph printed on glossy photographic paper mounted on board.beechworth, beechworth museum, mining, mining team, three mile creek, sluicing, hydraulic sluicing, photography, gold sluicing, gold mining, pund mining -
 The Beechworth Burke Museum
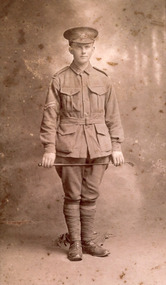
Photograph, 1916-17
Portrait of William Edward Peach in First World War military uniform, holding a crop in front of his thighs with military kit on the ground behind him. A Beechworth postal employee who enlisted in 1915, this photograph is probably taken in 1917, as he is a corporal in the photo and was promoted to this rank in May 1917. This photograph is of historic significance as it depicts William Edward Peach, a Beechworth postal assistant who enlisted in the Australian Imperial Force (AIF) on his nineteenth birthday, 5 August 1915, which required his parents' permission. He was decorated with the military medal for his courage in battle 4/5 October 1917 at the Battle of Broodseinde Ridge near Ypres, the most successful allied attack of the Third Battle of Ypres (31 July to 10 November 1917), also known as the Battle of Paschendale, which saw the greatest loss of human life during World War One, with almost half a million lives were lost on all sides. According to the recommendation for his military medal, Peach 'displayed conspicuous courage and initiative', taking charge after his platoon commander became a casualty, handling the men 'under heavy fire with great skill'. He also assisted the Company Commander in reorganising their military objectives. The photograph is of social as well as historic significance for the Beechworth community, because it provides a direct link between local, national and international histories in relation to Australia' s participation in one of WWI's best-known battles. The record has strong research potential given the ongoing public and scholarly interest in war, history, and especially the ANZAC legend, which is commemorated annually on 25 April, known as ANZAC Day. Peach is also one of the diarists of WWI, including of this significant period of Australian military history, from 1916 to 18, which can be accessed via the Australian War Memorial. Sepia rectangular photograph printed on gloss Kodak photographic paper mounted on board. Reverse: BMM 8779 item catalogue number pencilled in right-hand bottom corner.military medal, defending australia and victoria, military service, hmat a64 demosthenes, wipers, anzac, burke museum, beechworth, ypres, australian military services, beechworth post office, first world war, wartime, our boys, belgium, flanders fields, ww1, british war medal, victory medal, broodseinde, third battle of ypres -
 The Beechworth Burke Museum
Photograph - Stereoscopic Photograph, Unknown c1875
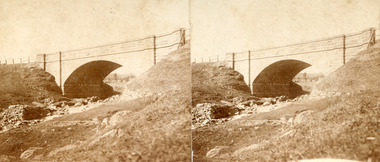
Depicted in the photograph is Newtown Bridge or the Newtown Falls Bridge, in Beechworth, Victoria. Noted for its location, detailed craftsmanship and stonemasonry by Scottish stonemasons the Newtown Bridge was built in the 19th century provincial town of Beechworth (completed in 1875). The bridge was built over Spring Creek, spanning 6.3 meters wide and 24.8 meters tall. Beechworth held a distinct role in the administrative and commercial management of Victoria's north-eastern goldfields, with many objects and structures still well preserved from the towns establishment. The bridge indicates the growth of the town, replacing a previous timber structure as well as its association to the mining activity in the area and the rapid increase in Australia's economy that led to investment and development of roads and railways. The local granite used in the construction of the single arch Newtown Bridge makes the bridge and other buildings made with the granite unique to the area, the honey-toned material distinct to Beechworth. This photograph is historically significant as it provides insight into the industrial development of Beechworth and the surrounding area, contributed to by the goldfields. The photograph further captures the representation of vernacular engineering traditions and Scottish stonemasonry.Two sepia-toned rectangular photographs featuring a bridge in the background printed on matte photographic paper mounted on card.Reverse: 97.2324/ Newtown Bridge/ Beechworthbridge, newtown beechworth, newtown bridge, newtown, beechworth, beechworth falls bridge, beechworth mining district, spring creek, -
 The Beechworth Burke Museum
Photograph
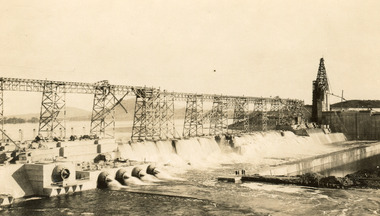
Taken on 25 October 1930, various houses with the Hume Dam under construction are depicted in the background. The construction of the Hume Dam took place from 1919 to 1936. At the time of construction, it was the second largest dam in the world. It was also one of the earliest civil projects developed after the Federation. Some of the Dam workers consisted of World War I veterans. Dam workers often settled their families in Mitta Junction Village and Wodonga. Archaeological surveys were completed by Austral Archaeology, which was done when the Department of Land & Water Conservation was doing work to improve Hume Dam. The archaeological report that came out of the survey recommended three sites of interest where archaeological excavation should be done: Camp Ganger’s Quarters, Stableman’s Quarters, and the Industrial Dump. The excavation uncovered artefacts. Mitta Mitta: Mitta Mitta is situated between Mount Welcome and Mount Misery. It is named after the river that explorers Hume and Hovell discovered in 1824. The town would eventually become a huge gold mining town. Mitta Mitta is called Midamodunga by the local Indigenous peoples Wodonga: Wodonga is situated on the Murray River and is part of North East Victoria. Hume and Hovell: Hamilton Hume (1979-1873) and William Hilton Hovell (1786-1875). W. H. Hovell was born in Norfolk England and Hume was born in Parramatta, New South Wales Hovell and Hume undertook an exploration journey in 1824 and thought they discovered a river, which turned out to be the Murray River. They returned home in 1825, but returned to the area in 1826 and discovered coal in the area. This photo is historically significant as it shows the Hume Dam under construction in 1930. The Dam was named after Hamilton Hume, who is an important historical figure for this area as he helped discover the area where resources were found.Sepia rectangular photograph printed unmountedReverse: 84-19-5 / 1997.3185/ Values & spillway. / When completed the wall / will be as high as the / scaffolding. [featuring trademark: kodak print]construction, houses, veterans, mitta junction village, hume dam, world war i, federation, wodonga, archaeological survey, excavation, austral archaeology, department of land & water conservation, camp ganger's quarter's, stableman's quarters, industrial dump, artefacts, mitta mitta, mount welcome, mount misery, murray river, hamilton hume, william hilton hovell, hume and hovell expedition -
 The Beechworth Burke Museum
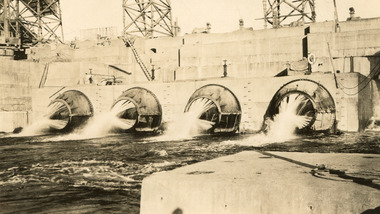
Photograph, c1930
Taken on 25 October 1930, various houses with the Hume Dam under construction are depicted in the background. The construction of the Hume Dam took place from 1919 to 1936. At the time of construction, it was the second largest dam in the world. It was also one of the earliest civil projects developed after the Federation. Some of the Dam workers consisted of World War I veterans. Dam workers often settled their families in Mitta Junction Village and Wodonga. Archaeological surveys were completed by Austral Archaeology, which was done when the Department of Land & Water Conservation was doing work to improve Hume Dam. The archaeological report that came out of the survey recommended three sites of interest where archaeological excavation should be done: Camp Ganger’s Quarters, Stableman’s Quarters, and the Industrial Dump. The excavation uncovered artefacts. Mitta Mitta: Mitta Mitta is situated between Mount Welcome and Mount Misery. It is named after the river that explorers Hume and Hovell discovered in 1824. The town would eventually become a huge gold mining town. Mitta Mitta is called Midamodunga by the local Indigenous peoples Wodonga: Wodonga is situated on the Murray River and is part of North East Victoria. Hume and Hovell: Hamilton Hume (1979-1873) and William Hilton Hovell (1786-1875). W. H. Hovell was born in Norfolk England and Hume was born in Parramatta, New South Wales Hovell and Hume undertook an exploration journey in 1824 and thought they discovered a river, which turned out to be the Murray River. They returned home in 1825, but returned to the area in 1826 and discovered coal in the area.This photo is historically significant as it shows the Hume Dam under construction in 1930. The Dam was named after Hamilton Hume, who is an important historical figure for this area as he helped discover the area where resources were found.Sepia rectangular photograph printed unmountedReverse: 84-19-2/ 1997.3188/ These are the four / release valves they are / not always open (illegible) this / when closed the water flows / over the spillway. [featuring trademark: kodak print] photograph number: 354construction, houses, veterans, mitta junction village, hume dam, world war i, federation, wodonga, archaeological survey, excavation, austral archaeology, department of land & water conservation, camp ganger's quarter's, stableman's quarters, industrial dump, artefacts, mitta mitta, mount welcome, mount misery, murray river, hamilton hume, william hilton hovell, hume and hovell expedition -
 The Beechworth Burke Museum
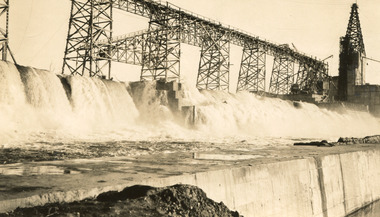
Photograph, 25 October 1930
Taken on 25 October 1930, various houses with the Hume Dam under construction are depicted in the background. The construction of the Hume Dam took place from 1919 to 1936. At the time of construction, it was the second largest dam in the world. It was also one of the earliest civil projects developed after the Federation. Some of the Dam workers consisted of World War I veterans. Dam workers often settled their families in Mitta Junction Village and Wodonga. Archaeological surveys were completed by Austral Archaeology, which was done when the Department of Land & Water Conservation was doing work to improve Hume Dam. The archaeological report that came out of the survey recommended three sites of interest where archaeological excavation should be done: Camp Ganger’s Quarters, Stableman’s Quarters, and the Industrial Dump. The excavation uncovered artefacts. Mitta Mitta: Mitta Mitta is situated between Mount Welcome and Mount Misery. It is named after the river that explorers Hume and Hovell discovered in 1824. The town would eventually become a huge gold mining town. Mitta Mitta is called Midamodunga by the local Indigenous peoples Wodonga: Wodonga is situated on the Murray River and is part of North East Victoria. Hume and Hovell: Hamilton Hume (1979-1873) and William Hilton Hovell (1786-1875). W. H. Hovell was born in Norfolk England and Hume was born in Parramatta, New South Wales Hovell and Hume undertook an exploration journey in 1824 and thought they discovered a river, which turned out to be the Murray River. They returned home in 1825, but returned to the area in 1826 and discovered coal in the area.This photo is historically significant as it shows the Hume Dam under construction in 1930. The Dam was named after Hamilton Hume, who is an important historical figure for this area as he helped discover the area where resources were found.Sepia rectangular photograph printed unmountedReverse: 84-19-6/ 1997.3187/ The spillway [featuring trademark: kodak print] construction, houses, veterans, mitta junction village, hume dam, world war i, federation, wodonga, archaeological survey, excavation, austral archaeology, department of land & water conservation, camp ganger's quarter's, stableman's quarters, industrial dump, artefacts, mitta mitta, mount welcome, mount misery, murray river, hamilton hume, william hilton hovell, hume and hovell expedition -
 The Beechworth Burke Museum
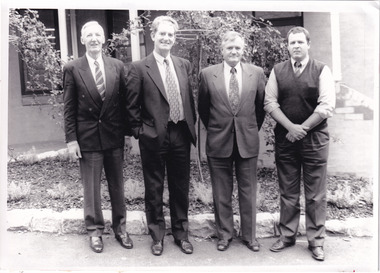
Photograph - Photograph - Reproduction, c1994
... Black and white rectangular photograph printed... March, 1997. / Black and white rectangular photograph printed ...This photograph was taken in 1994 and depicts four Commissioners of the newly formed Shire of Indigo. The Commissioners were appointed on 18 November 1994 and served until the the election of Indigo Shire Councillor's on 15 March, 1997. The United Shire of Beechworth was established in 1871 following the merger of two entities: the Borough of Beechworth, established in 1856, and the Shire of Beechworth, which was created as the union of the Stanley and Wooragee Road Districts in 1865. This photograph is historically significant for its depiction of newly elected Indigo Shire Commissioners, who replaced the former United of Beechworth Shire Council. The only local government entity remaining in Victoria styled as a 'United Shire' at its dissolution in November 1994, the amalgamation of the United Shire of Beechworth, along with parts of the Shires of Chiltern, Rutherglen and Yackandandah into the Shire of Indigo, was part of an extensive restructuring of Victoria's Local Government Areas in the 1990s. The Victorian Governments restructuring of LGA's in the 1990s constituted a major transition in Victoria's systems of local governance. The reforms dissolved over two hundred councils and sacked sixteen hundred elected councillors. The Shire of Indigo was one of seventy-eight new councils that were subsequently created through amalgamations.Black and white rectangular photograph printed on photographic paper mounted on board.Reverse (original): Transcribed to DB / From left to right: Commissioner Kevin Gleeson ~ / Chairman of Commissioners, Mr Frank Burfitt ~ / Chief Executive Officer, Commissioner Kevin Crow, ~ / Commissioner Henry Brewer. / Commissioners were appointed to the Indigo Shire / on 18th November, 1994 and served until the / election of councillors on 15th March, 1997. / indigo shire council, shire councillors, indigo shire commissioners, governance, local government, beechworth, local representatives 1994-1997, lga restructuring, indigo shire amalgamation, victorian government, regional and rural governance, beechworth shire, yackandandah shire, chiltern shire, rutherglen shire -
 Orbost & District Historical Society
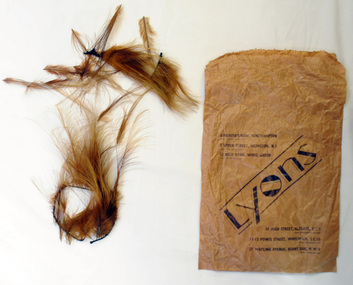
paper bag of feathers, C. 1940's
The bag is probably not connected to the contents. The feathers would have been used by Marjorie Burton to decorate or trim hats. Marjorie Burton ( nee Whiteman), born 12 June, in Birmingham, England came to Orbost in 1995. In England she did office work – typing, shorthand and secretarial work - in accountants’ offices and also trained as a comptometrist with Burroughs in London. She came from middle-class working church-going family. Her mother was a milliner who made many of Marjorie’s clothes, hats and outfits. Marjorie married in 1938 to a salesman who later became a mechanic in the R.A.F. during WW11. This item is an example of the materials used in handcrafting women's hats and reflects the skills of women women necessary during WW11 when clothing became scarce. Clothes rationing began on June 1, 1941, two years after food rationing started. Clothes rationing ended on 15 March 1949.A brown paper bag containing feathers for hat trimming. Some are loose and others are attached to covered wire mounts. the feathers are dark brown.LYONS - diagonally across paper bag in black print. There are addresses of U.K.shops on either side .feathers millinery accessories burton-marjorie -
 Orbost & District Historical Society
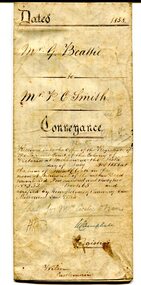
certificate, July 3, 1858
This is a certificate of indenture, a legal agreement, between George Beattie of Forest Creek, near Castlemaine in the colony of Victoria, and Peter Christian Smith of the same place. Both were miners. Beattie was the vendor and Smith paid twenty-five pounds for a land parcel. The contract was witnessed by John Hedderwick, a law clerk in Castlemaine. There is a record in the Mount Alexander Mail, dated Wed. 22 April 1857, of George Beattie purchasing land for three pounds, sixteen and sixpence in Castlemaine and that it was withdrawn. Records also show that a Peter and Thomas Smith farmed in Sandon near Castlemaine.This item is a useful research tool as it a hand-written record of part of the history of the gold fields region of Victoria.A white paper certificate of conveyance with black print and hand-written details from George Beattie to Peter Smith. There is a wax seal on the second page.beattie-george smith-peter-christian castlemaine-certificate-conveyance -
 The Beechworth Burke Museum
Photograph
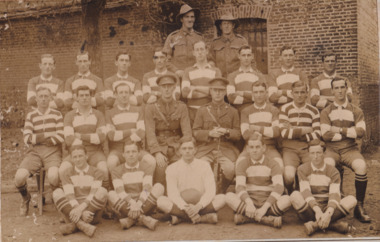
Taken some time between 1914-18, depicted is a large group of unidentified males. Four of them are dressed in Australian military uniforms. The remaining 19 men are dressed in striped uniforms. The male in the centre of the front row is cradling a football, suggesting that the group was part of a football or rugby league team. It is believed that the soldiers in this photograph were part of the Australian Imperial Force. This can be inferred by the chevron rank insignia visible on their uniforms. The placement of this insignia on the sleeve of the right arm suggests that this soldier was either a Warrant Officer or a Non-Commissioned Officer (NCO). Additionally, they are also wearing 'Rising Sun' collar badges on their coats. Australia, unlike most other Commonwealth countries, did not adopt metal regimental badges during the First World War. All units were issued with the Australian Army General Service Badge, better known as the 'Rising Sun’ badge. This insignia is almost always identified with the Australian Imperial Force. Sport has always been entwined with war. Both sport and war demand peak physical fitness, camaraderie, strategy, and allegiance to a team collaboratively working towards a common goal: to win. The connection between sport and war is especially strong in Australia since these two concepts form the basis of our national identity. The Australian War Memorial has a number of World War I recruitment posters linking war and sport in its collection. One of the posters produced in 1915 by the State Parliamentary Recruiting Committee in Victoria attempted to shame young men into enlisting by juxtaposing the image of an Australian soldier standing guard over his deceased mate with a photograph of a Victorian Football League match. Another poster, produced in 1917, features vignettes of different sports including cricket, bowling, boxing, kayaking and golf. Its slogan reads, "Join Together - Train Together - Embark Together - Fight Together: Enlist in the Sportman's 1000".The record is historically significant due to its connection to World War I. This conflict is integral to Australian culture as it was the single greatest loss of life and the greatest repatriation of casualties in the country's history. Australia’s involvement in the First World War began when the Australian government established the Australian Imperial Force (AIF) in August 1914. Immediately, men were recruited to serve the British Empire in the Middle East and on the Western Front. The record has strong research potential. This is due to the ongoing public and scholarly interest in war, history, and especially the ANZAC legend, which is commemorated annually on 25 April, known as ANZAC Day. Additionally, the record presents a unique opportunity to further explore the relationship between the arts, sport and war. This statement of significance has already established that war is integral to Australia's national identity - and sport is of equal importance. Specifically, the record begs to question how the peak physical fitness and camaraderie valued in team sports were creatively translated into military recruitment campaigns during World War I. Evidently, this record and its historic context demonstrates that there is potential here, and if further research is completed on this topic, it may provide insight into Australian military recruitment tactics used in the past and present, and into the future.Sepia rectangular photograph printed on matte photographic paper mounted on card.Reverse: 6529 / hyossest (?) / (?)1/11/1 /military album, army, military, war, wwi, world war i, sport, football, rugby, aif, australian imperial force -
 The Beechworth Burke Museum
Photograph, c. 1917
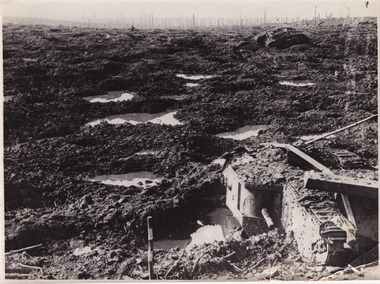
This photograph depicts the third battle of Ypres (Battle of Passchendaele). Depicted is a trench battlefield that has been turned to mud. Two army tank vehicles have been buried in the mud of the trenches. A single soldier stands in the background surveying the battlefield.After mid-1917, and following mutinies in the over-strained French Army, the British Forces had to assume an even greater role in the war on the Western Front. For Field Marshal Sir Douglas Haig, the British commander-in-chief, this provided an opportunity to launch an offensive that he had long wanted. Attacking from Ypres in Belgium, he planned to drive the Germans from the surrounding dominant ridges and even hoped to reach the Belgian coast. Following on the success at Messines in June, he unleashed his great attack on 31 July 1917. Fighting went on, often in appalling weather and despite crippling losses, until November. Finally, with the army stuck in muddy fields churned up by the artillery fire, the bloody offensive came to an untidy close. Many would afterwards call this offensive, actually a series of battles, after the name of the village that had become the last objective – 'Passchendaele'. In the Battle off Passchendaele, the 1st, 2nd and 3rd Australian Divisions captured Broodseinde Ridge on 4 October 1917. It was a vital victory. But, then it began to rain. Five days later the 2nd Australian Division suffered heavily in a further attack in the mud. Finally, on 12 October, another attack, involving the 3rd Division assisted by the 4th, was made against the village of Passchendaele atop the main ridge. In the face of heavy fire, the men fought in the mire while struggling to keep up with their artillery barrages. Ground was taken but it could not be held. In wretched conditions, with casualties mounting at an appalling rate, the Australians had to fall back. The troops were finally exhausted and could do no more; by 15 November they handed over to the Canadians.Black and white rectangular reproduced photograph printed on mate photographic paperReverse: 6523/ (A copyright and reproduction notice from the Australian War Museum, printed upside-down in blue ink)/military album, burke museum, beechworth, military vehicle, trenches, trench warfare, wwi, world war one, world war 1, ypres, belgium -
 The Beechworth Burke Museum
Photograph
The photograph, captured around 1900, depicts a large group of minors located in Beechworth. Importantly, this photograph can provide information into the clothing and fashion of minors during this period of history. These men wear loose fitting shirts which are mostly a pale white colour, several wear vests and/or jackets and loose fitting trousers with boots. The majority of men wear wide brimmed hats to protect their skin and eyes from the sunlight. One man has a wooden pipe in his mouth and a few have ties/neckerchief's tied around their necks. The outfits of these miners has the potential to provide insight into their social status, these men are all dressed equally which provides the notion that they are of equal societal standing. The outfits of these miners dating to the 1900s is not dissimilar to photographs of those captured in the 1880s. The location of this photograph is not easy to interpret, but the photograph is recorded to have been taken in the Beechworth region. Displayed in this image is some wild shrubbery and grass where the men are standing/sitting and behind the group is a tin wall or even tin building. At the end of 1899, companies were continuing to search for gold in Beechworth and the surrounds but these attempts were not overly successful. In the early 1900's Quartz mining was occurring but this was done by individuals or smaller parties. It is unclear if these men are mining for gold or for quartz.The search for gold is ingrained into the history of Victoria and therefore, the study of images like this one which portrays some of the miners who worked behind-the-scenes for these discoveries has the potential to reveal important information regarding society, fashion etc. The date when the photograph was taken is vague but it allows us to form a timeline of mining activities in the North East. This image is of important historical significance for its ability to convey information about society at the time, regarding fashion (which can potentially reveal social status) and mining in Beechworth in 1900. Black and white rectangular photograph printed on matte photographic paper mounted on board.Reverse: BMM 8032/ Group(?) Beechworth Mines about 1900/ 80quartz, north east gold, sluicing, gold sluicing, hydraulic sluicing, mining, gold mining, north-east victoria, beechworth, burke museum, 1900, group, miners, hats, vests, ties, wild shrubs, tin, quartz mining -
 The Beechworth Burke Museum
Photograph
The date this photograph was taken is unknown. Estimated date 1960-70s. The gentleman in the photograph and location the photograph was taken are also unknown. Perhaps in the Beechworth or Stanley area. The photo is associated to another record, 6856 as it has the same elderly gentlemen in the image. He is able to be identified through wearing the same clothes and distinctive hat in both photographs. The photograph is associated to mining as the gentleman is standing next to a small mine site where perhaps a windless or whip was mounted over the entrance of the shaft. The windless was a structure mounted over the shaft, fitted with a hand-cranked winch, which was usually constructed from wood that would have been found in the surrounding area. Colour rectangular photograph printed on glossy photographic paper.Obverse: Reverse: 6856/ mining, windlass, whip, empty record -
 The Beechworth Burke Museum
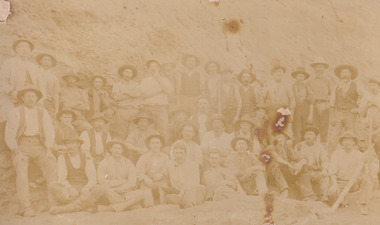
Photograph, Walter William McLean Thwaites, c.1870
This photograph depicts a large group of men in their work clothing situated in front of a large bank of earth. They are identified as miners working in an unidentified location in Australia. This photograph was taken by photographer Walter Thwaites sometime during the period of 1865-1908, likely c.1870. It is unsure where this image was taken since Thwaites travelled a lot over his photography career and the photograph is not annotated with this information. In addition, the identities of the men in the photograph are also unknown. These men are photographed in front of a large bank of earth where they had presumably been mining for gold or other precious metals. The men, with the exception of four, are wearing wide brimmed hats to protect their faces from the sun. They are also wearing loose fitting white shirts which are often worn beneath a darker coloured vest. They wear pale coloured work pants and boots. The men are mostly clean shaven with the exception of the moustache and a couple of beards. Two of the men have pipes in their mouth. Their clothing is basic and much less dramatic than the outfits worn by the gold diggers of the 1852 gold rush. These men, by wearing similar outfits, are expressing a sense of comradery or equality between them. It is likely that they are from the same, or similar, social status. They have an air of independence and share social equality in their stance and clothing. Walter William McLean Thwaites (1840-1908) was a professional photographer born in Sydney, Australia. He learnt the craft in his father's Hobart studio, but later embarked on his own solo career and toured every existing Australian colony between 1860 to 1888. The Thwaites family were a long line of photographers and artists with Thwaites' father Walter WIlliam Thwaites Sr working as an artist and photographer in Australia after moving from England in 1834. Walter Thwaites Sr's father, also named Walter Thwaites, was a British miniature portrait artist.Images, like this one, of Australian gold rush history can reveal important information about the social and environmental impact of this period. This image depicts over 30 diggers standing in front of a bank of earth and therefore, this image has the capacity to reveal or support significant information for researchers studying the fashion and social status of diggers in Australia in approximately 1870. It can also provide information on the landscape of Australia in this period and the impact of mining for gold on both society and the Australian landscape. The Burke Museum is home to a substantial collection of Australian mining photographs which can be used to gain a deeper understanding into life on the gold fields, technology used in mining, the miners themselves and the impact of the gold digging on the environment.Sepia toned rectangular photograph printed on matte photographic paper and mounted on board.Reverse: 1997.208 / MINERS. / W. Thwaites / Photography /australia, australian photography, photography, miners, gold rush, australian landscape, diggers, walter thwaites, thwaites photography, w. thwaites photography, social history