Showing 4280 items matching " prior"
-
 8th/13th Victorian Mounted Rifles Regimental Collection
Photograph - 20 LH soldiers
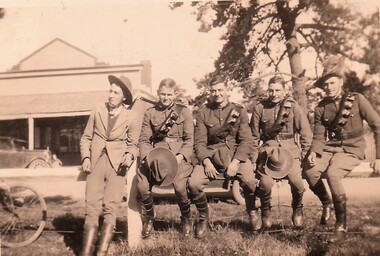
The 20th Light Horse (Victorian Mounted Rifles) was raised in 1920 as part of the 3rd Cavalry Brigade, 2nd Cavalry Division, Citizen Military Forces, with Headquarters at Seymour and depots along the Goulburn Valley from Mansfield to Tocumwal in southern NSW. In December 1941, 20th Light Horse (Victorian Mounted Rifles) converted from horse to mechanised, initially as 20th Motor Regiment. In 1943 the Regiment was deployed to Merauke, Dutch New Guinea. Upon its return in April 1945, the Regiment was redesignated 20th Pioneer Battalion. It was disbanded following the end of the war. 20th Light Horse was the only light horse regiment to serve overseas in WWII.This is one of a collection of photographs featuring a Light Horse regiment drawn from rural and regional Victoria in the period immediately prior to mobilisation for World War 2 (1939-1945).Black and white photograph of 4 soldiers in Light Horse uniform and one other in civilian coat ( probably a recruit )sitting on a fence with shop and tree in background. Part of 20th Light Horse collection.Across bottom of photo " L to R Tapeworm Buckland, L. Willaton, Doug Larkin, Foxy Adams, Colin Bullock, Mansfield Troop."light horse, mansfield, military, uniform -
 8th/13th Victorian Mounted Rifles Regimental Collection
Photograph - 20th farriers
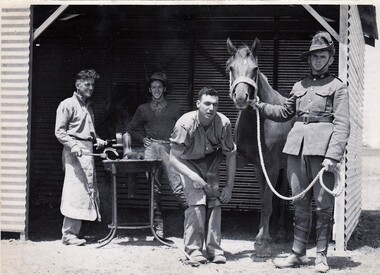
Farriers were an important element in maintaining the regiment's horses. The 20th Light Horse (Victorian Mounted Rifles) was raised in 1920 as part of the 3rd Cavalry Brigade, 2nd Cavalry Division, Citizen Military Forces, with Headquarters at Seymour and depots along the Goulburn Valley from Mansfield to Tocumwal in southern NSW. In December 1941, 20th Light Horse (Victorian Mounted Rifles) converted from horse to mechanised, initially as 20th Motor Regiment. In 1943 the Regiment was deployed to Merauke, Dutch New Guinea. Upon its return in April 1945, the Regiment was redesignated 20th Pioneer Battalion. It was disbanded following the end of the war. 20th Light Horse was the only light horse regiment to serve overseas in WWII. This is one of a collection of photographs featuring a Light Horse regiment drawn from rural and regional Victoria in the period immediately prior to mobilisation for World War 2 (1939-1945).Black and white photograph of farriers at work in Blacksmith Shop. Part of 20th Light Horse collection.Across bottom of photo " Blacksmith Shop Vetinary ( sic ) Lines Torquay Camp ( L ) Gil Anderson 3rd left Jack Catlin."military, farrier, horse shoe, 20th, light horse, torquay -
 8th/13th Victorian Mounted Rifles Regimental Collection
Photograph - Horse and foal
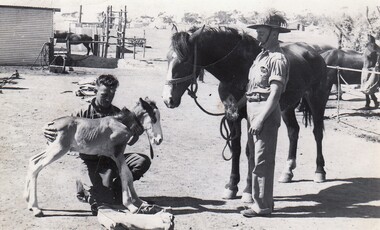
The 20th Light Horse (Victorian Mounted Rifles) was raised in 1920 as part of the 3rd Cavalry Brigade, 2nd Cavalry Division, Citizen Military Forces, with Headquarters at Seymour and depots along the Goulburn Valley from Mansfield to Tocumwal in southern NSW. In December 1941, 20th Light Horse (Victorian Mounted Rifles) converted from horse to mechanised, initially as 20th Motor Regiment. In 1943 the Regiment was deployed to Merauke, Dutch New Guinea. Upon its return in April 1945, the Regiment was redesignated 20th Pioneer Battalion. It was disbanded following the end of the war. 20th Light Horse was the only light horse regiment to serve overseas in WWII.This is one of a collection of photographs featuring a Light Horse regiment drawn from rural and regional Victoria in the period immediately prior to mobilisation for World War 2 (1939-1945).Black and white photograph of one soldier lifting a new born foal while another holds the mare.. Part of 20th Light Horse collection.Across bottom of photo: " Gil Anderson with foal, WO Jack Trebble with proud mother, Torquay Lines."military, horse, foal, light horse, camp, world war two -
 8th/13th Victorian Mounted Rifles Regimental Collection
Photograph
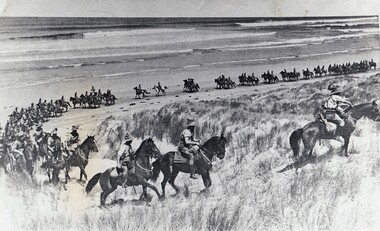
The 20th Light Horse (Victorian Mounted Rifles) was raised in 1920 as part of the 3rd Cavalry Brigade, 2nd Cavalry Division, Citizen Military Forces, with Headquarters at Seymour and depots along the Goulburn Valley from Mansfield to Tocumwal in southern NSW. In December 1941, 20th Light Horse (Victorian Mounted Rifles) converted from horse to mechanised, initially as 20th Motor Regiment. In 1943 the Regiment was deployed to Merauke, Dutch New Guinea. Upon its return in April 1945, the Regiment was redesignated 20th Pioneer Battalion. It was disbanded following the end of the war. 20th Light Horse was the only light horse regiment to serve overseas in WWII.This is one of a collection of photographs featuring a Light Horse regiment drawn from rural and regional Victoria in the period immediately prior to mobilisation for World War 2 (1939-1945).Black and white photograph of large group of horsemen on beach and crossing dunes at Torquay, Victoria 1940." The mobilized 20th Light Horse Regiment CMF on Torquay Beach, Victoria in 1940 shortly before its mechanisation and conversion to an Armoured unit. Sun photograph.military, light horse, world war two, torquay, camp -
 Melbourne Legacy
Document, Girls Legacy Classes, 1976
A recollection of information about Girls Legacy Club and its primary instructor Miss Enez Domec Carre. It was written by C.E. Chancellor in June 1976. "Draft only. Girls Legacy Classes When I was attached to Girls' Classes after being transferred from Mildura Club to Melbourne, I found that the difference between the administration of the Girls' and the Boys' Classes was that the Girls' Classes were centralised in one building in Market Street, whilst the Boys' Classes were held in Melbourne and in various suburbs. The building in Market Street was leased from the Melbourne City Council, it was old, had narrow stairways, small rooms and was dusty and noisy so that is can be appreciated that the classes were held under great difficulties and inconvenience. Classes were held on both Friday and Tuesday nights of each week and the girls were trained in physical culture, ballet and dancing, and most of them also attended a speech training class. The girls were divided into Junior, Intermediate and Senior girls, and the hourly classes commenced at 5 p.m. It will be appreciated that after WW2 the numbers of girls attending increased considerably (actual numbers may be on old files) and it was necessary for the overall organisation to be efficient for this work to be efficiently carried out. In retrospect I do not think that too great a tribute can be paid to Miss Enez Domec Carre, F.P.C.V., not only for her great ability in teaching the physical culture and dancing classes, but also because she became the confidant of the mothers and the girls for their particular problems, and was able to transmit these to the Class Legatees, and she also assisted in helping to solve them - and be sure there were many of them with so many girls and families involved. Miss Carre was also responsible for the many magnificent presentations of the various items learnt by the Classes during each year and of the merging of individual classes held at various times and days to enable them to be so successfully shown at the each annual Legacy Parade. Miss Carre also organised the Mothers, Legatees' wives and friends into sewing groups to provide the thousands of costumes required for the items presented, and naturally she had to design these costumes - all of this work was carried out, as previously mentioned, under the extreme difficulties they were working under in the Market Street building. The purchase of Legacy House and the transfer of classes to this building was of immense help and importance in the carrying on of these classes which have proved so valuable to Legacy work. Many of the girls - now Mothers and Grandmothers still help in Legacy work and still appreciate the value of the Girls' Classes were to them. C.E. Chancellor cc. to Legatees A.R. Beattie / Larkin / Gibsey"A nice summary of the work done by Miss Enez Domec Carre for Legacy and the conditions the classes were held in prior to moving to Legacy House.White foolscap paper with black type x 2 pages recollecting the contribution Miss Enez Domec Carre to the Girls Physical Culture Classes as well as details of location of classes.girls' classes, girls' club, junior legatee -
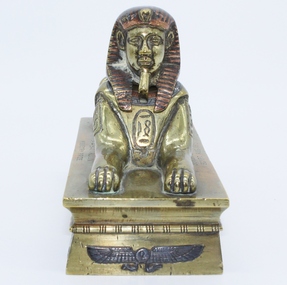 Melbourne Legacy
Souvenir - Trophy, 24th Battalion Musketry Prize, c. 1915
This ornamental Sphinx is a memento of the founder of Melbourne Legacy, Lieutenant General Sir Stanley Savige, K.B.E, C.B., D.S.O., M.C., E.D.O The Sphinx was presented to the then Sergeant Stanley Savige as the 24th Battalion Musketry Prize, whilst he was serving in that unit in Egypt, during the First World War.Sir Stanley Savige founded Melbourne Legacy in 1923. This item is significant as it was awarded to him during his war service, prior to the foundation of Legacy. Brass sphinx trophy. The Sphinx is mounted on a plinth, which is decorated in hieroglyphics made of copper and lead. Sphinx's head opens to reveal an ash tray and a decorative necklace.24th BATTALION MUSKETRY PRIZE SERGT. S.G. SAVIGE EGYPT. Aug. 1915stan savige, trophy, 24th battalion -
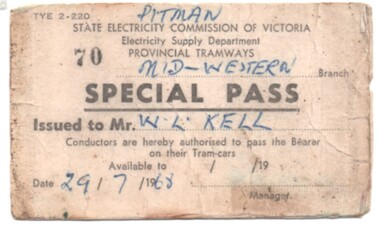 Ballarat Tramway Museum
Ephemera - Ticket, State Electricity Commission of Victoria (SECV), "Special Pass", 1950's
Has a strong association with Wayne Kell the SEC Pitman prior to the closure of the SEC Ballarat system.Ticket - from white card (200 gsm) ticket with, printed in black ink - titled "Special Pass". Has number "70" stamped on. Form number "TYE 2-220" in top left hand corner. Has space for the name of the Bearer (issued to Mr. ...), Branch to be written, space for manager to sign with date .../.../19.... and expiry date of pass." Conditions of use printed on rear. Has been made out to W L Kell, Pitman, dated 29/7/68 of the Mid Western Branch. See Reg Item 69 for an unused sample. trams, tramways, secv, special pass, ballarat, provincial tramways -
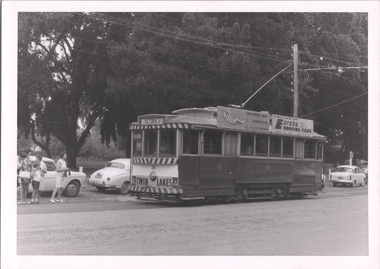 Ballarat Tramway Museum
Photograph - Tram 33 Wendouree Parade Gardens, Vance Findlay, 15/3/1970
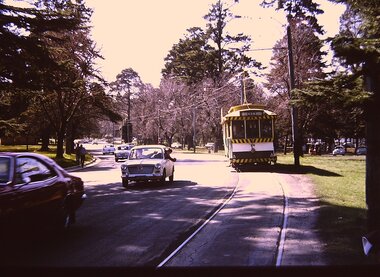
Photograph show SEC Ballarat 33 in Wendouree Parade in the Gardens area, with the destination of Victoria St. Has Eureka Roof tiles and SEC Electric Cooking roof Advertisements along with a Twin Lakes dash canopy panel.Yields information about Wendouree Parade prior to the closure of the SECV operated tramways.Black and White photograph with details on rear.Date and photographer's notes.trams, tramways, wendouree parade, tram 33, sec -
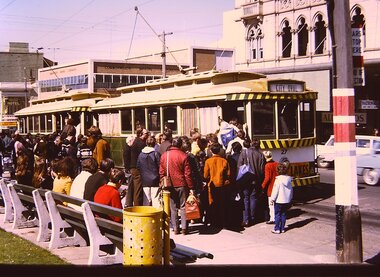 Ballarat Tramway Museum
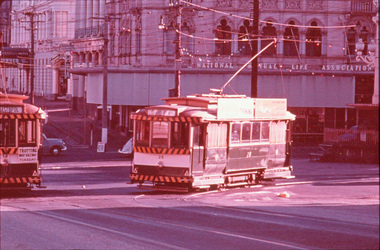
Photograph - Digital image Set of 2, Chris Phillips, c1970
Yields information about the City terminus on the south side of Sturt St and the passenger traffic prior to closure of the system. Shows many people boarding the tram.Set of two digital images of trams at the City terminus on the south side of Sturt St, c1970. and corner with Lydiard St. .1 - No. 27 and another single trucker loading large crowds of passengers at the tram stop. No. 27 has the destination of City Oval. In the background is the Commonwealth Bank building. The tram has a Twin Lakes sign. .2 - Four trams at the same stop, from rear - 12, 43, 26 and ?. No. 12 has the destination of Sebastopol and has a Twin Lakes sign. Has the Town Hall in the background and the ESCo pillar cabinet on the corner.trams, tramways, sturt st, city oval, city, lydiard st, electrical switching, electrical equipment, esco, tram 27, tram 12, tram 43, tram 26 -
 Ballarat Tramway Museum
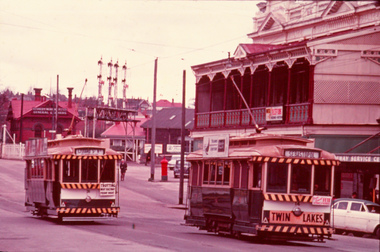
Photograph - Digital image Set of 4, Chris Phillips, c1971
Yields information about the use of trams in the Gardens area prior to closure.Set of four digital images of trams in the Gardens area by Chris Phillips c1971. Possibly on the day of the "Save the Trams" meeting. .1 - No. 26 descending the hill from Carlton St. Has the destination of City. .2 - Nos. 39 and 26 at Gardens Loop with a group of photographers on the right hand side. .3 - No. 27 with destination of City, just after leaving the Carlton St stop. .4 - No. 43 at Gardens Loop.trams, tramways, wendouree parade, gardens, carlton st, gardens loop, tram 39, tram 27, tram 26, tram 43 -
 Ballarat Tramway Museum
Photograph - Digital image Set of 3, Chris Phillips, 30/05/1971 12:00:00 AM
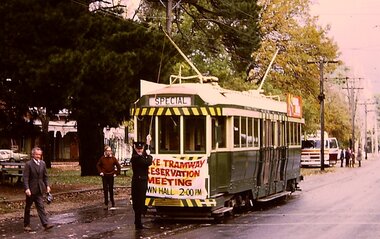
Yields information about the special tram and the people involved at the time of the formation of the BTPS prior to closure of the SEC operated system.Set of three digital images of tram 36 advertising the Lake Tramway Preservation Meeting at the Town Hall 31/5/1971 by Chris Phillips. .1 - tram at Gardens loop with the motorman L Bird pulling the pole down - similar photo to that of The Age Newspaper, see Reg Item 2487. .2 - tram turning from Sturt St into Lydiard St North with the Post Office and the Mining Exchange buildings in the background. .3 - tram at the City stop, south side of Sturt St with the Town Hall and Myers in the background. Also has the tram stop signs in the photograph. See also Reg Item 1064 for the newspaper clipping, 2487 for a print of The Age photograph. See 7033i4 for notes on the tram and who made the banner - thought to be Tom Clark. Imagebtm7033i2bw - black and white version of the slide use in the Long Gallery imagebtm7033i2co - colour hi res scan.trams, tramways, lake wendouree, charters, museum establishment, btps, sturt st, gardens, lydiard st north -
 Ballarat Tramway Museum
Photograph - Digital image, Chris Phillips, c1970
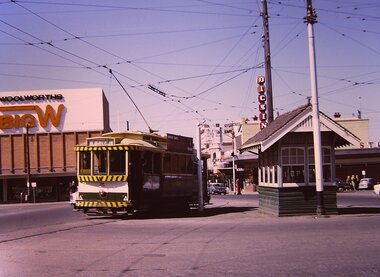
Yields information about the intersection of Sturt and Grenville St prior to closure of the SEC operated system.Digital image of No. 26 at the corner of Sturt and Grenville St. Tram about to cross Grenville St into Bridge St, has destination of Mt. Pleasant. In the background is the Woolworths Big W store and the Dickins Supermarket. Also in the view is a letter box and the tramway shelter. Photo c1970.trams, tramways, grenville st, sturt st, shelters, bridge st, tram 26 -
 Ballarat Tramway Museum
Photograph - Digital image, Chris Phillips, c1970
Yields information about the tram operations in Victoria St Ballarat, prior to the demolition of the tram at this location just prior to closure of the tramway system.Digital image, black and white, of No. 20, at Victoria St. Has a Police station in the background. Tram has the destination of Gardens and a Twin Lake dash canopy advert and a SEC Roof advert.trams, tramways, victoria st, tram 20, police station -
 Ballarat Tramway Museum
Ephemera - Ticket/s, State Electricity Commission of Victoria (SECV), Set of 9 pre-decimal or imperial currency, 1959 to 1965
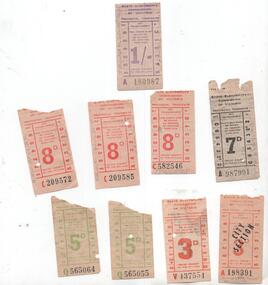
Has a strong association with the Ballarat and Bendigo tramway system as being identified as being used on the system and for which trip on a specific date and demonstrates the ticket style prior to the time of decimal conversion in Australia.Set of 9 pre-decimal or imperial currency tickets used on the Ballarat or the Bendigo tramway system with three of them noted as to their use on the rear. 1 - 3d - orange ticket, over printed "City Section" - A 198391 - used "Charing Cross to Station - tram 23 - Sat 22 May 1965" 2 - 3d - orange - V437554 - on rear "Tram 34 Going to Mt Pleasant Easter Tuesday 31 March 1959". 3 - 5d - green - Q565064 - on rear in pencil "Quarry Hill to Charing Cross (No. 3) 4 - 5d - green - Q565055 - ditto, with addition of "2nd tram" 5 - 7d - black A987991 - on side in pencil' "Eaglehawk to Q Hill No. 3" 6 - 8d - red C209572 - "18 Drummond from L St N Sun 8 Nov. 1964" 7 - 8d- red - C209585 - "ditto" 8 - 8d - red - C582546 - "Q Hill to station tram 23, Sat 22 May 1965" 9 - 1/- purple - A 180987 - "18 decorated for Sebastopol Gold Cent. Sun 8 Nov. 1964 to Sebastopol" trams, tramways, tickets, secv, ballarat, bendigo, gold, sebastopol, quarry hill, mt pleasant, lydiard st north -
 Ballarat Tramway Museum
Newspaper, The Courier Ballarat, "The end for tram 31", 3/09/1971 12:00:00 AM
Yields information about the accident between a tram and truck, just prior to the closure of the SEC Operated Ballarat Tram system.Newspaper Clipping or cutting titled "The end for tram 31", from The Courier, 3/9/1971, containing a report on the collision of tram 31 with a fruit truck in Sturt St near Lydiard St. Gives time as 445, truck driver Nicholas Marios, tram driver D. Powell. Included in the item is a photo of the tram and the two vehicle drivers involved. Tram has a Twin Lakes sign. See Reg Item 547 for a print of the photograph.accidents, twin lakes, collision, sturt st -
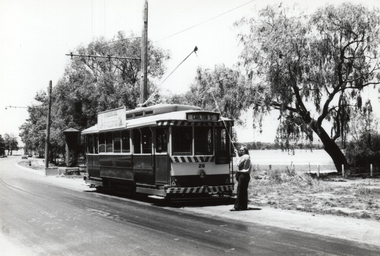
 Ballarat Tramway Museum
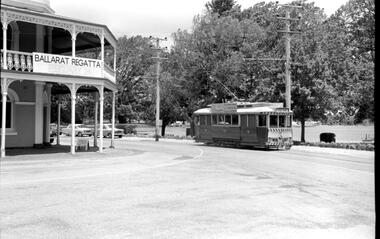
Photograph - Digital image, Mal Rowe, 21/12/1967 12:00:00 AM
Yields information about trams running to View Point outside the View point hotel and a tram that was destroyed in an accident just prior to the closure of the SEC tram system in 1971.Digital image of Ballarat No. 20 passing the View Point Hotel, Wendouree Parade, 21/12/1967 image by Mal Rowe. Tram has a Twin Lakes sign, destination of View Point. Hotel advertising the Ballarat Lake Wendouree Regatta to be held on 24/2/1968. Tram has a SEC Roof Advertisement. There are a number of Holden motor cars in the view.trams, tramways, view point, twin lakes, wendouree parade, tram 20 -
 Ballarat Tramway Museum
Photograph - Black & White Photograph/s, Ray Jackson, c1971
Yields information about depot trackwork from Wendouree Parade prior to its closure in 1971.Black and white photograph of the SEC depot entry trackwork from Wendouree Parade looking towards the depot. Photo c1971. trams, tramways, depot, secv, wendouree parade, trackwork -
 Ballarat Tramway Museum
Slide - 35mm slide/s, Dave Macartney, No. 28 turning from Sturt St into Lydiard St North, Sep. 1971
Yields information about the intersection of Sturt and Lydiard St and the operation of trams prior to the closure of the SEC system. Has a strong association with the work of the Association of Railway Enthusiasts.AGFA blue and white plastic mount, 35mm slide, from the Association of Railway Enthusiast's film strip titled "Provincial Tramway Film Strip" of h, while No 13, turns into Sturt St from Lydiard St Photo taken Sept. 1971. Tram 13 has a "Trotting Bray Raceway Tuesday" sign on the rear of the tram. The National Mutual Life Association building in the background. The film strip notes (Reg. Item 2560), provided the following caption details: "The late afternoon sun catches No. 28, outbound to Lydiard St Nth, passing No. 13 inbound at the Sturt St junction - Dec. '67" Photo by Dave Macartney. "Slide No. 6" Various notations by John as to the slide number and the trams in pencil and ink.tramways, trams, are, film strip, sturt st, lydiard st north, bray raceway, tram 28, tram 13 -
 Ballarat Tramway Museum
Slide - 35mm slide/s, Max Michell, No. 14 southbound in Lydiard St North, Sep. 1971
Yields information the operation of trams prior to the closure of the SEC system near the Railway Station. Has a strong association with the work of the Association of Railway Enthusiasts.AGFA blue and white plastic mount, 35mm slide, from the Association of Railway Enthusiast's film strip titled "Provincial Tramway Film Strip" of No. 14 southbound in Lydiard St North with a Twin Lakes and an auxiliary board advertising a Fete. No. 31 is northbound to Lydiard St North with an auxiliary board "Trotting Bray Raceway Friday Night". Photo taken Sept. 1971. In the background is the railway level crossing signal gantry and Reid's Coffee Palace. Note the letter box at the railway station yard. The film strip notes (Reg. Item 2560), provided the following caption details: "No. 31 and 14 cross at the end of the double track outside the Ballarat Coffee Palance - Oct. '68" Photo Max Michell Slide No. 7 Various notations by John as to the slide number and the trams in pencil and ink.tramways, trams, are, film strip, level crossings, lydiard st north, bray raceway, tram 31, tram 14 -
 Ballarat Tramway Museum
Newspaper, Herald Sun, A place in the sun, 28/05/1971 12:00:00 AM
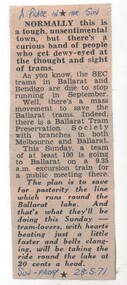
Yields information about the formation of the BTPS and a public meeting prior to the closure of the SEC operated system.Newspaper cutting - from "A Place in the Sun", Friday 28-5-1971, about the closure of the Ballarat tramway system, the formation of the BTPS and a trip this Sunday by train for a public meeting in Ballarat. Written by Keith Dunstan?ballarat, closure, preservation, btps, meeting -
 Ballarat Tramway Museum
Negative - Set of 2, Campbell Duncan, 28/12/1970 12:00:00 AM
Yields information trams at the depot prior to running out of the depot.Set of 2 photographs taken on 28/12/1970 of trams 38 and 40 on the depot fan, pending running out.trams, tramways, depot, tram 38 tram 40 -
 Ballarat Tramway Museum
Negative - Set of 8, Campbell Duncan, 28/12/1970 12:00:00 AM
Yields information trams at the depot prior to running out of the depot and running out on a Sunday morning.Set of 8 photographs taken on 28/12/1970 of trams running out of the depot. .1 - 27 in Wendouree Parade .2 - 12 crossing Wendouree Parade - has a CinZano Vermouth Advert on side. .3 - 12 reversing at Depot Junction - has a Twin Lakes Advert and destination of Victoria St. .4 - 13 running out - has a Twin Lakes Advert and destination of Mt. Pleasant. .5 - ditto with pole being reversed by driver. .6 - 13 at depot junction .7 - 17 running out - has a Twin Lakes Advert and destination of Lydiard St North .8 - 26 in Wendouree Parade.trams, tramways, depot, drivers, wendouree parade, tram 27 tram 12 tram 13 tram 17 tram 26 -
 Ballarat Tramway Museum
Photograph - Black & White Photograph/s - set of 6, Charles Craig, 1950s
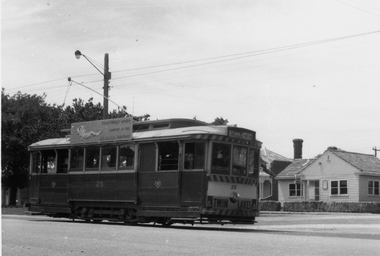
Yields information about the appearance and use of the Ballarat Railway Station level crossing by trams prior to closure.Set of six black and white photographs of trams at the railway level crossing, Ballarat, Lydiard St North featuring the railway station, gates and signals, Reeds Coffee Palace and the Provincial Hotel. .1 - 28 heading south, with an R class and a K class locomotive in the view. .2 - 11, heading north - taken during the 1950's. .3 - 17 parked right up to the gates while K184 shunts at the station. .4 - single trucker (number obscured) - most likely 17 giving the passengers in the previous photo. .5 - Photo with two single truckers in the view and the gates being closed after the tram has passed. .6 - 11, at the gates with a bogie tram behind. No. 11 has a Briquettes roof advert and a Twin Lakes sign. Photo by Charles Craig - during 1971, except for .2, taken during the 1950's. trams, tramways, lydiard st north, railway station, signals, level crossings, tram 28, tram 11, tram 17 -
 Ballarat Tramway Museum
Photograph - Black & White Photograph/s set of 2, Charles Craig, 21/08/1971 12:00:00 AM
Yields information about tram operations in Wendouree Parade prior to closure following a big rain storm.Set of two black and white photographs of trams in Wendouree Parade after the big rain / hail storm on Friday 21/8/1971 .1 - No. 41 at the intersection with St Aidans Drive and Wendouree Parade, Tram has two Johnnie Walker roof advertisements .2 - No. 12 in Wendouree Parade, near Haddon St with destination of Gardens via Drummond North with a tram stop shelter in the background. Tram has a Twin Lakes sign. Photo by Charles Craig, at the time of the first closure of the Ballarat system, 23/8/1971 when the Victoria St line closed.trams, tramways, wendouree parade, haddon st, shelters, st aidans drive, closure, tram 41, tram 12 -
 Ballarat Tramway Museum
Photograph - Digital image, W. J. Llewelyn, c1971
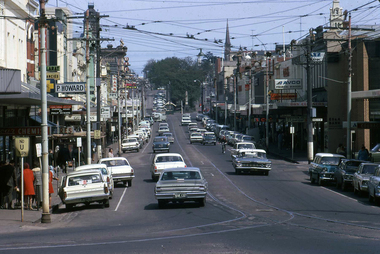
Yields information about the Royal Visit to Ballarat and the appearance of Bridge St during 1956 and just prior to the closure of the tramway.Set of three colour digital images taken of the Bridge St Ballarat by W. J. Llewelyn. .1 - Looking west along Bridge St from the Service Station, shows the various buildings, tram track, tram shelter and overhead. Appears to be c1971. .2 - Look east from Grenville St, 1954 with the Royal Visit decorations in the placed. Has the Dickins Self Service Grocery shop, Bucks Head Hotel and a sign for Morsheads store. Tram tracks and overhead apparent along with two trams in the far distance. .3 - Looking west along Sturt St from Bridge and Grenville St - shows the buildings in the background, tramway overhead, general congestion, letter box, tram stop shelter. A tram is parked in the loop. Has a Davies Bread advert on the Mechanics Institute building, also Thomas Jewellers, T& G and the Odeon Theatre sign.trams, tramways, bridge st, victoria st, stones corner, royal visit, grenville st, shelters, sturt st -
 Ballarat Tramway Museum
Photograph - Digital image, W. J. Llewelyn, c1980
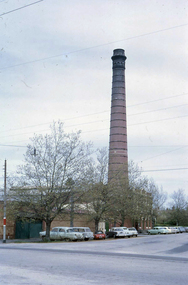
Yields information about the Ballarat Power Station A prior to the demolition of the chimney.Colour digital images taken by W. J. Llewelyn of Ballarat A Power Station, Wendouree Parade and Ripon Street with the chimney standing late 1950's or early 1960's. Note the tram stop pole in the left hand side.trams, tramways, ballarat a power station, wendouree parade, ripon st, sec -
 Ballarat Tramway Museum
Slide - 35mm slide/s, Robert Thomson, c1960
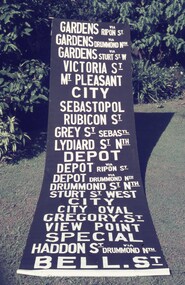
Yields information about Ballarat's tram destination rolls about 1960 prior to their replacement with a different style of lettering.Agfa blue/white mount, colour slide of tram of a Ballarat destination roll display in a yard, possibly post 1960 as the slide is not dated. The destinations are white on black. They were replaced by white on black rolls. The roll appears to be in good condition and little used.tramways, trams, destination roll -
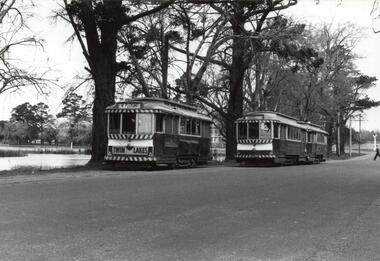
 Ballarat Tramway Museum
Photograph - Tram tour - TMSV & ARHS, Richard Gilbert, 21/8/1971
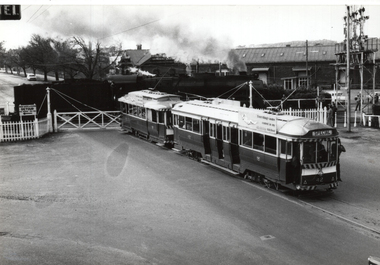
A. Cook Tours database that the tour by the ARHS and TMSV using trams 11, 26, 39 and 42 and was a farewelll tour, with the first of the Ballarat tram lines closing the following day. See also item 9442 for other photographs. .1 - two trams (27 and 42) at the gates with an R class locomotive using the crossing. Both trams have SEC advertising. Tram 42 is running a special tour. .2 - tram 39, running a special tram service, loading passengers at the railway station tram stop. In the background is awning for the Provincial Hotel and SF Motors Mercedes Benz. .3 - tram 27 northbound crossing the level crossing. Yields information about the use of the Lydiard St Nth line prior to closure and the use of the level crossing. Series of 3 Black and white photographs of trams using the Lydiard St North level crossing.trams, tramways, lydiard st north, level crossings, railways, locomotives, ballarat station, special trams, tram 27, tram 42, tram 39 -
 Ballarat Tramway Museum
Photograph - Black & White Photograph/s - set of 2, Richard Gilbert, c August 1971
Yields information about the use of the Carlton St crossing loop prior to the closure of the tramway. Series of 2 Black and white photographs of trams using the Carlton St, Wendouree Parade crossing loop. .1 - tram 11 (with a Twin Lakes sign, Mt Pleasant) crossing tram 21 (Gardens via Sturt St West) and another single trucker. Has the signal and the Olympics Monument in the background. .2 - tram 27 and a bogie tram crossing. Tram 27 has the destination of Victoria St and a Twin Lakes sign. trams, tramways, carlton st, wendouree parade, tram 27, tram 11, tram 21 -
 Ballarat Tramway Museum
Photograph - Black & White Photograph/s, Richard Gilbert, c1976
Has a strong association with Richard Gilbert and yields information about the St Aidans Drive terminus prior to closure. Black and white photograph of Richard Gilbert reversing the trolley pole on No. 26 at the St Aidans drive terminus c1976. The tram has been fitted with a blind extension showing Carlton St. trams, tramways, btps, st aidans drive, tram 26