Showing 2474 items matching " view st."
-
 Ballarat Tramway Museum
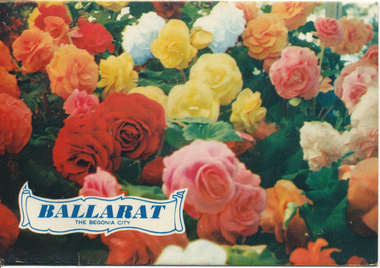
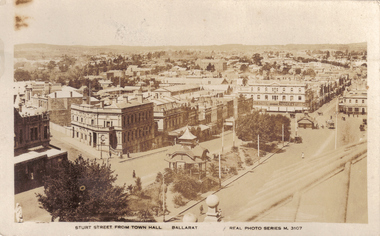
Postcard - Folder set, Nu-color-vue or Nucolorvue Productions, "Ballarat The Begonia City"
... in Sturt St, a view from the Town Hall with a tram parked..., Eureka stockade, floral clock in Sturt St, a view from the Town ...Published by Nucolorvue Productions, Mentone, Victoria. Inside the folder is a printed note on Ballarat, with a note that it was just embarking on its second century, and has a population of 40,000 people. Printed c1955. Inside the folder was a two sided strip of 12 photos, that was glued to the folder. Features photos of the Botanic Gardens, Eureka stockade, floral clock in Sturt St, a view from the Town Hall with a tram parked in the City Loop, Civic Hall, the crown at Shell House, Sturt St at Lydiard St with a tram parked at the City centre and the Arch of Victory. See item 9120 for another similar production.Demonstrates a postcard folder produced by Nucolorvue.Printed colour postcard folder titled "Ballarat The Begonia City", featuring a photo of begonias on the cover and an address box on the rear of the folder. trams, tramways, sturt st, postcards, gardens, lake wendouree, begonia -
 Melbourne Legacy
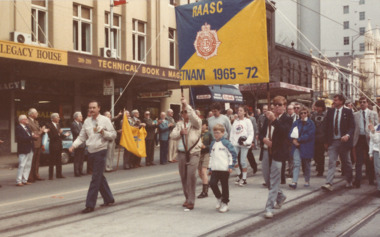
Photograph, Vietnam Veterans March in 1988, 1988
... to the Shrine of Remembrance.' Views of Swanston St streetscape... to the Shrine of Remembrance.' Views of Swanston St streetscape ...It was at the first international reunion of Vietnam Veterans held in Melbourne, in October 1988. It included a march down Swanston St to the Shrine. There are photos of Legatees outside Legacy House watching the veterans march past at 01578. The other photos include a meal provided at Legacy House after the parade at 01580. The 1988 parade of Vietnam Veterans in Melbourne was a significant event and Legacy provided rosemary sprigs for the event, a meal afterwards and Legatees attended. Other photos had a label which said 'The first international reunion of Vietnam Veterans was held in Melbourne in October 1988. Many of Melbourne Legacy's 'Legatees' stood to salute the marchers as they made their way to the Shrine of Remembrance.' Views of Swanston St streetscape in the background, including the old CUB brewery building at the top of Swanston St. Street banners said 'Remember' on a green and red background.The 1988 parade of Vietnam Veterans in Melbourne was a significant event and Legacy provided rosemary sprigs for the event, a meal afterwards and Legatees attended.Colour photo x 10 of a Vietnam Veterans march past Legacy House and a white paper label.White paper label handwritten in black 'Vietnam Veterans International Reunion. Melbourne Legatees salute Vietnam Vets.' Photos were taken by Susie Howard the publicity officer, and the date was 15.10.88.vietnam veterans, march, legatee event, streetscape -
 Melbourne Legacy
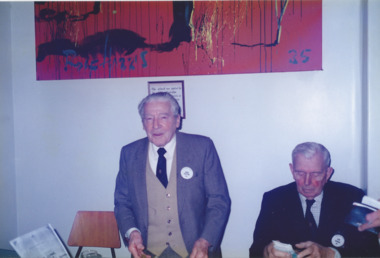
Photograph, 1989-1990
... in uniform. He could be receiving a cheque from the man. A view... in uniform. He could be receiving a cheque from the man. A view ...A mix of photos from a folio of photos labelled between 1988 and 1990 (see items 01042 to 01049). One photo of Legatee Ron Austin, a World War 1 veteran, at Legacy house. One photo of George Woodward at a table counting money from an event. One photo of Legatee John Sullivan shaking hands with a man in uniform. He could be receiving a cheque from the man. A view of Swanston St with Legacy flags flying on the poles. A photo of a school ceremony at the Shrine, unsure of they year - probably 1989. Definitely not 1988 or 1990. A photo of a badge seller in a Hawthorn jumper in the Bourke St Mall. In the President's Highlights report of 1989, the caption mentions that Hawthorn footballer Peter Curran helped with the badge selling. A photo of a luncheon function at Legacy house with the speaker addressing a lady. Perhaps thanking her for her service.The folio was a record of a summary of the year being on display for the Legatees to look through.Colour photo x 7 of events in 1989-90 including Ron Austin at Legacy House.legacy promotion, fundraising, ron austin -
 Eltham District Historical Society Inc
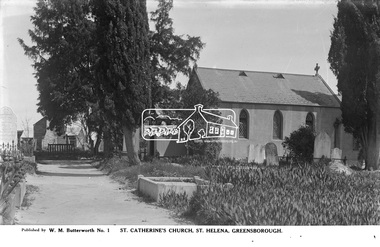
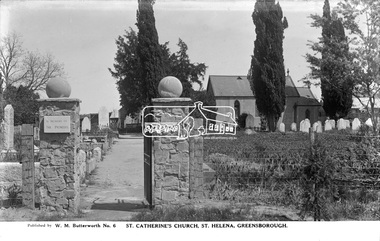
Photograph, The Rose Stereograph Company, St. Katherine's Church, St Helena. Greensborough, c.1936
... View of St Katherine's Church from the path inside...View of St Katherine's Church from the path inside ...View of St Katherine's Church from the path inside the Memorial Gate. Also visible several Mediterranean Cypress trees. A prominent gravestone for the Mapleton and Ellis families visible to the far left of the path. St Katherine’s Anglican Church was built in 1858, by Anthony Beale as a memorial to his late wife Katherine. The cemetery is a rare example in Victoria of a traditional English parish church with its private graveyard and is of State Significance. Rose Chapel with its stained-glass windows of local historical significance, commemorates casualties of the Beale family in World War One. This glass plate negative was used to manufacture postcards (1:1 printing) for commercial sale by the Rose Sterograph Company and its subsidiaries. George Rose founded the Rose Stereograph Company in 1880 and was joined by Herbert (Bert) Cutts in the early 20th Century. The pair formed a lifetime working partnership and strong personal friendship. Assisted by George’s two sons, Herbert George and Walter, and later by Neil Cutts, the Rose Stereograph Company continued its operations for more than 140 years. The company was initially built on stereographs, but as cinema took over and stereographs fell out of fashion, the Rose Stereograph Company developed Australia’s first commercially viable photographic postcard business. Specialising in postcards of iconic historical moments and significant landmarks, The Rose Stereograph Company became a staple of the Australian travel industry.This remarkable collection of glass plate negatives, transparencies, and postcards – arguably Australia’s most significant photography collection outside of public hands – has been passed down through the generations, surviving war, relocation, and the harsh Victorian climate. The historic Rose Stereograph collection is the culmination of George Rose’s dream of capturing and preserving precious moments in time and remains the legacy of the Rose and Cutts families. It is with great sadness that the Cutts family says goodbye to a collection that spans five generations and 140 years. The Cutts family understands that for these historically important pieces to rest with one family is to deny others the pleasure of their custodianship.Glass Plate Negative Size: 9.2 x 14 cmSt. Catherine's Church, St Helena, Greensborough, Published by W. M. Butterworth No. 1postcard, travel, rose stereograph company, glass plate negative, greensborough, st helena, w. m. butterworth, st katherine's church, memorial gate, mapleton, ellis, mediterranean cypress, peter and elizabeth pidgeon collection -
 Eltham District Historical Society Inc
Photograph, The Rose Stereograph Company, St. Katherine's Church, St Helena. Greensborough, c.1936
... View of St Katherine's Church from the Memorial Gate which...View of St Katherine's Church from the Memorial Gate which ...View of St Katherine's Church from the Memorial Gate which were dedicated Saturday, September 12, 1936 "In Memory of The Pioneers". A prominent gravestone for the Mapleton and Ellis families visible to the far left of the path. St Katherine’s Anglican Church was built in 1858, by Anthony Beale as a memorial to his late wife Katherine. The cemetery is a rare example in Victoria of a traditional English parish church with its private graveyard and is of State Significance. Rose Chapel with its stained-glass windows of local historical significance, commemorates casualties of the Beale family in World War One. This glass plate negative was used to manufacture postcards (1:1 printing) for commercial sale by the Rose Sterograph Company and its subsidiaries. George Rose founded the Rose Stereograph Company in 1880 and was joined by Herbert (Bert) Cutts in the early 20th Century. The pair formed a lifetime working partnership and strong personal friendship. Assisted by George’s two sons, Herbert George and Walter, and later by Neil Cutts, the Rose Stereograph Company continued its operations for more than 140 years. The company was initially built on stereographs, but as cinema took over and stereographs fell out of fashion, the Rose Stereograph Company developed Australia’s first commercially viable photographic postcard business. Specialising in postcards of iconic historical moments and significant landmarks, The Rose Stereograph Company became a staple of the Australian travel industry.This remarkable collection of glass plate negatives, transparencies, and postcards – arguably Australia’s most significant photography collection outside of public hands – has been passed down through the generations, surviving war, relocation, and the harsh Victorian climate. The historic Rose Stereograph collection is the culmination of George Rose’s dream of capturing and preserving precious moments in time and remains the legacy of the Rose and Cutts families. It is with great sadness that the Cutts family says goodbye to a collection that spans five generations and 140 years. The Cutts family understands that for these historically important pieces to rest with one family is to deny others the pleasure of their custodianship.Glass Plate Negative Size: 9 x 14 cmSt. Catherine's Church, St Helena, Greensborough, Published by W. M. Butterworth No. 6postcard, travel, rose stereograph company, glass plate negative, greensborough, st helena, w. m. butterworth, st katherine's church, memorial gate, mapleton, ellis, mediterranean cypress, peter and elizabeth pidgeon collection -
 Ballarat Tramway Museum
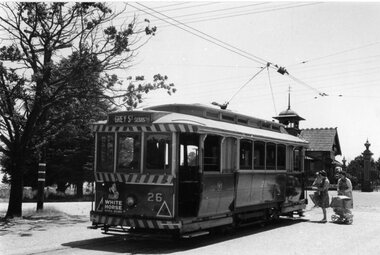
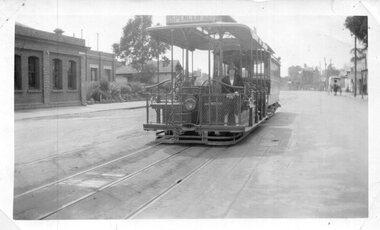
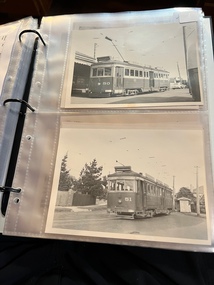
Photograph - Black & White Photograph/s, Ron Hann, Jan. 1963
... of a view at the Lydiard St Nth terminus of No. 26 with the cemetery... of a view at the Lydiard St Nth terminus of No. 26 with the cemetery ...Yields information about the Lydiard St North terminus, tramcars at the time and a family boarding the tram.Black and white print on heavy matt photographic paper of a view at the Lydiard St Nth terminus of No. 26 with the cemetery buildings in the background and a family (two ladies and pram) boarding the tramcar. The tram has the destination of Grey St Sebastopol, and a Whitehorse Whiskey advertisements on the front dash panel. 2nd copy - laser print - with date etc on rear - added 22/2/2010, copy from Ron Hann. Printed on Fujifilm, Fujicolour Crystal Archive for Frontier"On rear in pencil "26 Lydiard St Nth 1963" 2nd copy has label "Reference 6/113/7 Photo by Ron Hann" and another label "Ballarat 01.63"tramways, trams, lydiard st nth, cemetery, tram 26 -
 Melbourne Tram Museum
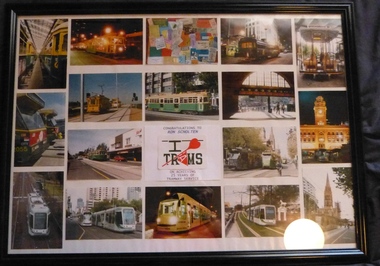
Photograph - Framed Photographs, Kosnar's Picture Framing, c2000
... , View from Flinders St with a city circle car, Y611, 58... W on an extension, 862 in the city, View from Flinders St ...Framed photograph of a series of 17 photographs assembled by Ray Marsh to record Malvern Driver Ron Scholten's 25 years of service. Photographs include: , Malvern Tram Depot, 896 on a Special, 937 as the Restaurant Tram 02, Cable car set possibly Bylands, 2055 and 2017, 11 W on an extension, 862 in the city, View from Flinders St with a city circle car, Y611, 58 and other Z's in Swanston St, Siemens test tram at Flinders St station, C on Port Melbourne, Siemens Test Tram and 3010, Siemens Test tram, 3019 at Box Hill, MTram 3504 in Swanston St with St Patricks behind.On top left of rear "Designed by Ray Marsh" in pencil.trams, tramways, drivers, siemens, testing, flinders st, tram 896, tram 937, tram 2055, tram 2017, tram 11w, tram 862, tram y611, tram 58, tram siemens test tram, tram 3010, tram 3019, tram 3504 -
 Bendigo Historical Society Inc.
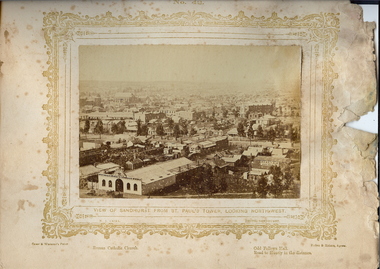
Photograph - VIEWS OF BENDIGO: VIEW FROM ST.PAUL'S CHURCH TOWER LOOKING NW, 1875 Copy ,1970
... of Bendigo|No.42.', Below, 'View of Sandhurst from St. Paul's Tower... PLACE Bendigo nw from st. paul's church See: 'Views of Bendigo ...Sepia photo on a cream board. Shows Bendigo NW from St.Pauls church in 1875. Inscription: Above Image, 'Views of Bendigo|No.42.', Below, 'View of Sandhurst from St. Paul's Tower, looking North West', 'N.J.Caire Photo, Sandhurst'. Bottom, 'Casey & Wenborn's Print Forbes & Holmes, Agents',' Roman Catholic Church Odd Fellows Hall. Road to Huntly in the distance.'. On Back, RHSV stamp, Bendigo Branch '1959|185'. (Two copies) Nicholas CaireN.J.Caireplace, bendigo, nw from st. paul's church, see: 'views of bendigo' by n.j.caire, 'mp160' -
 Melbourne Tram Museum
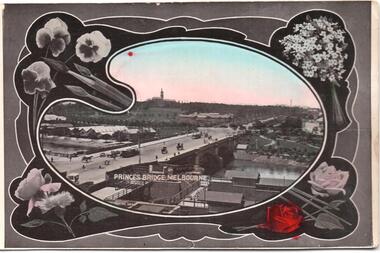
Postcard, SEMCO, "Princes Bridge Melbourne", mid 1900's?
... and white photograph of a view looking from Flinders St towards... black and white photograph of a view looking from Flinders St ...Divided back postcard featuring a hand coloured black and white photograph of a view looking from Flinders St towards Government House, c1900, or from the roof of the Flinders St Station which could be under construction. Embossed Photograph enclosed within an artists palette, surrounded by roses. Note the buildings between the bridge and Government house - a former asylum? Card from the SEMCO Series Box 545 GPO Melbourne. Addressed to Miss V Hall of Blackwood.trams, tramways, princes bridge, cable trams, flinders st, flinders st station -
 Ballarat Tramway Museum
Album - Photo Album, c1970
... - View in Albert St Sebastopol looking north along the track... terminus. .10 - View in Albert St Sebastopol looking north along ...Set of 16 photos of Ballarat tram system taken 1970c on a tour by an unknown Qld based person.Photo album containing 16 colour prints. Photo album has heavy card covers, covered in black textured plastic containing 12 clear plastic photo sleeves held with a white comb binder. Photos of Ballarat prior to closure, c1970. Photographer unknown. Donated by Peter Hyde of Brisbane Tramway Museum to BTM 3/2/2010, from a deceased estate. Photos apparently taken on a tram tour. .1 - No. 42 and a single trucker inbound in Sturt St. .2 - taken from tram ascending Bakery St hill in Victoria St. .3 - End of No. 42, with the destination "Haddon St via Drummond Nth" .4 - No. 11 and 42 in Lydiard St Nth, near the railway station. No. 11 showing special. .5 - photo of three people on the tour. .6 - Trams reversing at the Victoria St terminus .7 - ditto .8 - 11, 42 and 12? in Lydiard St North by railway station. .9 - Three trams at Sebastopol terminus. .10 - View in Albert St Sebastopol looking north along the track on the side of the road. .11 - View of the tram crossing in Albert St. .12 - 27 and 42 crossing Albert St Sebastopol. .13 - View of Albert St from the tram, north of the crossing looking at the reserved track 14. - Lydiard St North looking south .15 - 42 at the railway level crossing. .16 - View south of the railway level crossing, three trams, with passengers alighting.trams, tramways, ballarat, albert st, sebastopol, victoria st, sturt st, lydiard st nth, railway crossing -
 Ballarat Tramway Museum
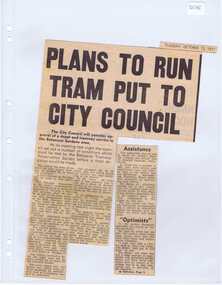
Newspaper, The Courier Ballarat, "Plan to run tram put to City Council", 12/10/1971 12:00:00 AM
... View Point to Carlton St. Sir Arthur Nicholson said "super... View Point to Carlton St. Sir Arthur Nicholson said "super ...Newspaper clipping from The Courier, 12/10/1971, titled "Plan to run tram put to City Council" about the City of Ballaarat considering plans from the BTPS for the construction of a depot in the South Gardens Reserve, consideration of a grant of $750 for the sheltering of tram No. 14. Quotes President Hal Cain about the proposals of the Society, and elements of the submission to council requesting assistance to run the track from View Point to Carlton St. Sir Arthur Nicholson said "super optimists", refers to the editorial.. Cutting in two parts.btps, depot, city of ballarat, preservation -
 Ballarat Tramway Museum
Slide - 35mm slide/s, Ben Parle, 8/04/1958 12:00:00 AM
... St. at Ripon St. Note View Point track and overhead behind... of Ballarat 38, inbound in Sturt St. at Ripon St. Note View Point ...Kodachrome Transparency - 35mm slide - cardboard mount, with one side with red border and words "Kodachrome Transparency / Processed by Kodak" top and bottom. Photo taken by Ben Parle 8/4/1958, date stamped onto slide. Has slide No. "12" stamped in red in top corner. Photo of Ballarat 38, inbound in Sturt St. at Ripon St. Note View Point track and overhead behind tram. Tram has the destination of Mt Pleasant. Photo taken after tram has passed the photographer. "Sturt St" / "8-4-58"tramways, trams, sturt st, ripon st, tram 38 -
 Ballarat Tramway Museum
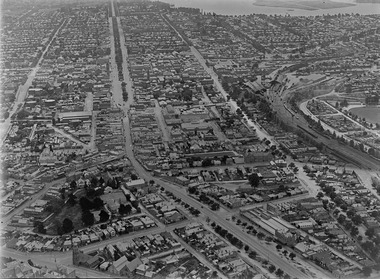
Photograph - Digital image, c1925
... view, looking along Sturt St and Bridge St, taken from about... looking West c1925, aerial view, looking along Sturt St and Bridge ...Yields information about Ballarat c1925 from an aerial photograph looking west.Digital photograph of Ballarat looking West c1925, aerial view, looking along Sturt St and Bridge St, taken from about Eureka and Kings St. Shows both the Alfred Hall, the Railway Station, Sunshine Biscuits and the Coliseum. Shows two single truckers at the east end of Sturt St and two at the west end of Bridge St or Grenville St. See email from Alan Bradley dated 28/7/2012 re date. See also Reg Item 5453 for another similar photograph.trams, tramways, ballarat, aerial views -
 Bendigo Historical Society Inc.
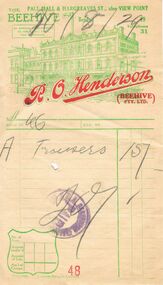
Document - R.O. HENDERSON INVOICE, 20/08/1929
... . Printed on the invoice . * The Pall Mall & Hargreaves St., also... on the invoice . * The Pall Mall & Hargreaves St., also View Point ...BHS CollectionR. O. Henderson Invoice; Cream paper with green print. Printed on the invoice . * The Pall Mall & Hargreaves St., also View Point Beehive. By Special Appointment To his Excellency The Governor. Bendigo .....19. Telephone 31. Underneath is a drawing of the R. O. Henderson building, with R.O.Henderson (Beehive) Pty Ltd printed in red across the building. The invoice was for a pair of Trousers at 15/-, has a Paid stand in blue and signed. Docket no. 48. A hole in the paper where it has been spiked. Box 625Copyright Lamson Paragon Limited.business, retail, general, r.o. henderson. beehive. hargreaves street -
 Melbourne Tram Museum
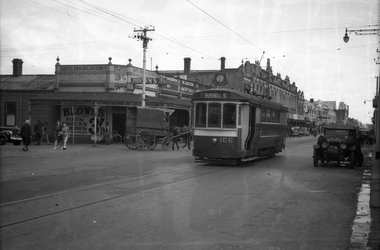
Negative, Wal Jack, c1943-44
... (showing Russell St), in Barkly St Footscray. Based... Trams tramways Barkly St Footscray Russell St S Class tram 166 ...Black and white negative, by Wal Jack, of S class 166 (showing Russell St), in Barkly St Footscray. Based on the photograph, the tram is inbound to Footscray Station, as the buildings match the current (12/2020) Google Earth view at 185 Barkly St and Albert St. In the background is - Brown's Dry cleaner, a Millinery shop at 185, W. Adler Tailor, J. Paarons PA (Radio) on the clockface and H E M Burrow? store sign. A horse drawn van is alongside the tram. Photo undated, c1943-44trams, tramways, barkly st, footscray, russell st, s class, tram 166, mmtb -
 Ballarat Tramway Museum
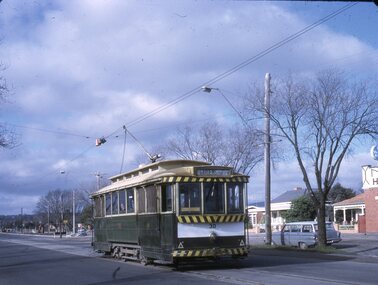
Slide - 27 mm sq slide/s set of 6, Lilian Butler, Tram No. 38 at the Victoria St terminus, Aug. 1971
... of Wendouree Parade and MacArthur St, View Point. .6 - view... Tramways trams Victoria St Crews Gardens Loop View Point Hospital ...Yields information about the streetscapes of Ballarat on the Gardens to Victoria St route and in particular buildings and people that crewed the trams.Set of six Colour 27 x 27 mm slide in a Kodachrome cardboard mount. .1 - Tram No. 38 at the Victoria St terminus, with the destination of Gardens via Sturt St West. Note the red traffic cone in the overhead by the trolley wheel positioning location device. .2 - crew of No. 30 by the tram - R. Knight (57) and Conductor W. Nancarrow (8) .3 - No. 30 at Gardens Loop .4 - as for .2 - see Also Reg item 6455. .5 - view from tram at intersection of Wendouree Parade and MacArthur St, View Point. .6 - view of trackwork at intersection of Drummond and Sturt Streets with the Southern Cross Hotel in the background. Slide mount date August 1971. Photo from the collection of Lilian Butler.ballarat, tramways, trams, victoria st, crews, gardens loop, view point, hospital corner, tram 30 -
 Ballarat Tramway Museum
Photograph - Digital image, c1916
... Critchley, of Ballarat, Sturt St c1916. This 'birds eye' view.... This 'birds eye' view of Sturt St reveals on of the early fleet ...Shows the details of buildings in the east end of Sturt St, c1916.Digital image from a postcard from the collection of David Critchley, of Ballarat, Sturt St c1916. This 'birds eye' view of Sturt St reveals on of the early fleet standing at the city terminus probably during the Great War. Note the absence of motor cars and women's skirts are somewhat shorter - an economy concession with the shortage of cloth during the war years. A Valentines photo postcard. David scanned this pic at a higher resolution than normal, so you should be able to zoom in on the tram, which has been fitted with windshields and looks typically well used and unloved as did most of the original Ballarat fleet in their latter years. Image supplied by email 30/8/2011 - not to be published without David's authority.trams, tramways, sturt st, bridge st, esco -
 Ballarat Tramway Museum
Photograph - Black & White Photograph/s, Ron Hann, Jan. 1963
... of a view looking from Lydiard St, down Sturt St towards Grenville... of a view looking from Lydiard St, down Sturt St towards Grenville ...Yields information about the City Loop and Sturt St buildings terminus, passengers and the tram liveries in 1963.Black and white print on heavy matt photographic paper of a view looking from Lydiard St, down Sturt St towards Grenville St with many motor cars in the street and trams parked in City Loop, c1963. Has cars parked on the median strip and given the number, a working day. At least four trams in the loop. In the background is the Neptune sign and the Dickins Food store. 2nd copy - laser print - with date etc on rear - added 22/2/2010, copy from Ron Hann. Printed on Fujifilm, Fujicolour Crystal Archive for Frontier"On rear in pencil "Sturt St 1963", 2nd copy has label "Reference 6/113/11 Photo by Ron Hann" and another label "Ballarat 01.63"tramways, trams, sturt st, city loop, grenville st -
 Royal District Nursing Service (now known as Bolton Clarke)
Photograph - Photograph, black and white, c.1953
... building and several cars and gives a unique view of St Kilda Road... building and several cars and gives a unique view of St Kilda Road ...Melbourne District Nursing Society (MDNS) moved into 452 St. Kilda Road, in 1953. Seven Ford Prefect cars were purchased by the Society in the early 1950s which became the beginning of a full MDNS, later called Royal District Nursing Service, fleet of cars which would be used by their District nurses to visit patients in the community over the next years.In 1875 J.B.Scott purchased Crown Land on the corner of St Kilda Road and Arthur Street. During the 1890’s an “unpretentious grey building” was built on the site. Known as ‘Airlie’, major additions were carried out during the 1920s and 30s to this historic mansion. From its founding in 1885 until 1891 the Trained nurse (Nurses) of the Melbourne District Nursing Society (MDNS) worked from their own homes which were located in the vicinity of their areas (districts). In November 1891 MDNS was able to rent a two story terraced house at 66 Cardigan Street, Carlton, at £65 a year, which contained accommodation for three Trained nurses (Nurses) and one pupil nurse as well as being used as their Headquarters. The Nurses left from there each morning and returned at the end of their shift to write up their book work before retiring for the day. Three years later they moved into a larger terraced house at 49 Drummond Street Carlton which was rented at ‘a very moderate rental’. There was a Board room, apartments for the Nurses and pupil nurses, a large dispensary which patients could attend each evening to have prescriptions signed and bottles refilled with ‘homely remedies’ and elixirs, which were administered for e.g. Consumptive cases. Doctor’s prescriptions were filled at the Pharmacy. Cupboards containing donated blankets and bedclothes for needy patients were kept in this room, and it was here where the Nurses kept their nursing bags which were refilled at the end of each shift ready for any emergency and for the next day. A list of Doctors the Nurses could call was kept by the telephone. The home also had a kitchen where nourishing soup was made and distributed twice a week to the needy. Milk was also distributed when needed. In 1902 they moved into rented premises at 188 Leicester Street, Carlton and two years later, in 1904, to premises at 5 Royal Terrace, Nicholson Street, Fitzroy. They remained there for ten years. In June 1914 at last the Society had sufficient funding to purchase their own terraced premises, ‘Floraston’ 39 Victoria Parade, Collingwood which was their Headquarters and Nurses Home. In 1926 the After-Care Home for recovering patients, (later called After-Care Hospital) was built by the Society next door to No. 39, running from 41-47 Victoria Parade (became No. 45); the District Trained nurses (Sisters) continued to live at No. 39. In 1953 ‘Airlie’ at 452 St Kilda Road was offered by the Government as part of an agreement to split the management of the Society and the After Care Hospital. On 26th November 1953 the MDNS moved its Headquarters to 452 St Kilda Road. Renovations and alterations were however restricted by limited funds so it was not until 1/12/1954 that the Hon. W. P. Barry, Minister of Health, officially opened the building. MDNS was given Royal patronage in 1966 and became Royal District Nursing Service (RDNS). In January 1983, Headquarters of the Royal District Nursing Service at 452 St Kilda Road was classified by the National Trust. The citation in support of the classification said “The house is of historical interest as the boyhood home of Stanley Melbourne Bruce, later Lord Bruce, Prime Minister of Australia from 1923-1929.” Black and white photograph of Melbourne District Nursing Society Headquarters, 452 St Kilda Road, Melbourne. The photo, taken on the corner of Arthur street, is of a two storey building and several cars and gives a unique view of St Kilda Road in the 1950s (pre high rise buildings) This large grey two storey Italian style building, has four roman column, arched Arcadia to the right of a polygon shaped bay window on the ground floor; an arched Arcade on the second floor, and three long windows above the bay window on Arthur Street. Turning the corner onto St. Kilda Road is a three arched Arcadia running towards the one window seen on the polygon shaped bay window. Arcadia is repeated on the upper storey. A balustrade is in front of the Arcadia on the upper storey and again around the flat roof. Two chimneys can be seen. A spiked metal fence runs in front of the building. To the left of this building are two white double storey buildings and some medium sized trees. On Arthur Street, two Ford Prefect cars, one with the passenger side door partly open, a Vanguard car and another make of car can be seen.royal district nursing service, headquarters, 452 st kilda road melbourne, melbourne district nursing society, mdns, mdns transport, rdns -
 Ballarat Tramway Museum
Film - Movie Film & Box, 1971
... . Pleasant, Lydiard St Nth, view of Sturt St, north side, with motor... St Nth, view of Sturt St, north side, with motor vehicles ...Yields information in movie film format of Ballarat trams and news stories in the period 1965 to 1971 - BTV6 16mm film format., Yields information in movie film format of Ballarat trams and news stories in the period 1965 to 1971 - BTV6 16mm film format.Movie film - 16mm, approx. 5:29 mins, with grey leader strip on a blue plastic Tuscan Reel, with sound track, leader and timer count down strip; c1965 to 1971. Has been transferred to DVD - see Reg item 4100 as Segment No. 7. Compiled from BTV6 film by Paul McDonald c1990. Synopsis: based on time - Black and white film. Title "Ballarat trams" 0:00 Bogie tram arriving behind another bogie tram at the City Centre, Sturt St nth side, passengers boarding tram, view of destination, Mt. Pleasant, Lydiard St Nth, view of Sturt St, north side, with motor vehicles and building in street, and No. 41 turning from Sturt St into Lydiard St. 0:42 Short sequence of a bogie tram in Sturt St, view from window and a driver working the controller. 0:58 Interview on tram with two ladies about the tram service and the staff. (Sound) 1:36 Sequence varying scenes about the 60th anniversary of trams in Ballarat, including on tram, people, No. 18 leaving the depot with the 60th anniversary dash front panel for the event. 2:16 Courier poster “SEC Says: Trams should be scrapped” 2:23 Lydiard St Nth terminus, ladies waiting at terminus shelter, and No. 43 arriving at terminus 2:36 Front of bus with bus destination roll being scrolled, Creswick, Wendouree, Mt Pleasant, view of a Davis Bus outside the Town Hall, view of people (guests) chatting on the bus, all looking very happy, and view of bus travelling along. 3:15 No. 33 and bus, showing special alongside at Victoria St terminus and back to bus interior shot. 3:25 No. 12 loaded on a truck and leaving from insider the depot and out in Wendouree Parade with jacks on rear of truck. 3:59 No. 33 loaded for Hamilton leaving Ballarat (note without the truck attached), and being backed into position for offloading. 4:42 No. 41 loaded on a truck, being backed into an position to be offloaded 4.54 No. 36 with Tourism Week Sign being prepared and lifted at the depot. 5:29 End. Placed in a blue cardboard box specially made for the item 30/08/2010.trams, tramways, ballarat, city centre, lydiard st nth, buses, davis bus lines, tram disposal, tram 33, tram 41, tram 36, tram 18 -
 Melbourne Tram Museum
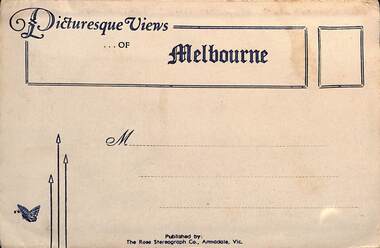
Postcard - Folder, Rose Stereograph Co, "Picturesque Views of Melbourne", mid 1930s
... in the view 4 - St Kilda Road Melbourne - Looking south with the Queen... in the view 4 - St Kilda Road Melbourne - Looking south with the Queen ...Comprises 12 photos of Melbourne, mid to late 1930s. Produced by Rose Stereograph of Armadale. 1 - Botanical Gardens and Government House Melbourne. - 2 - The MacRobertson Fountain Melbourne - Both the Fountain and the Shrine of Remembrance were completed in 1934. Government House tower features in the background. Also note the absence of any mature trees. See reference - completed 1934. 3 - Flinders Street Railway Station with a "W" class tram in Flinders Street and "Y" class tram in Swanston Street in the view 4 - St Kilda Road Melbourne - Looking south with the Queen Victoria Gardens in the left of the photo. 5 - Collins Street Melbourne - Showing the Regent Theatre, Manchester Unity Building and the Town Hall. 6 - Princes Bridge and city Skyline Melbourne - Shows; Princes Bridge, Yarra River, Excursion Ferry, Princes Walk, Flinders Street Railway Station, the Nicholas and Manchester Unity Buildings in Swanston Street and the Sargood Gardner building in Flinders Street. 7 - The Conservatory, Fitzroy Gardens Melbourne - 8 - The Cathedral Corner Melbourne - shows; Young & Jacksons Hotel, St Paul's Cathedral, The Gas & Fuel building, Ball & Walsh Department store and The State Theatre plus several "w" class trams in Swanston Street. 9 - St Kilda Road Melbourne - Looking south from Nolan Street. Note trees still present at the entrance area to the Shrine of Remembrance. 10 - Looking across Princes Bridge to St Kilda Road Melbourne - Looking south from the roof of the Nicolas Building showing; Princes Bridge, St. Kilda Road, The Shrine of Remembrance and the Victoria Barracks in the distance. 11 - Parliament House Melbourne - in Spring Street 12 - Captain Cook's Cottage, Fitzroy Gardens Melbourne - Erected in the gardens in 1934. Yields information about Melbourne city views and new attractions mid 1930s. Paper envelope folder with 6 photos on each side of a foldout section titled "Picturesque Views of Melbourne" melbourne, photo folders, postcards -
 Ballarat Tramway Museum
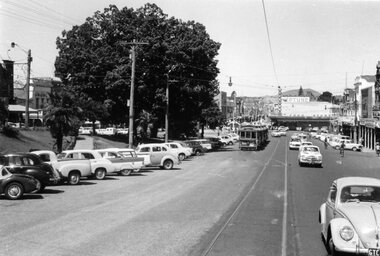
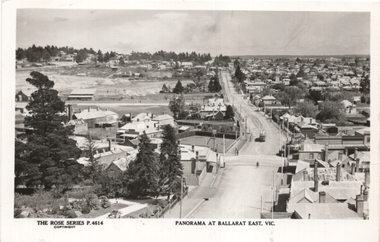
Postcard, Rose Stereograph Co, "Panorama at Ballarat East Vic", c1916
... ) tower, and has a good view looking along Barkly St. Shows... and Main St with one tram in the view. Wal has dated the photo ...Photo looks west from the Ballarat Fire Station (East) tower, and has a good view looking along Barkly St. Shows the crossing loop between Eastwood and Main St with one tram in the view. Wal has dated the photo as 1914 in his album notes. On rear Wal Jack has written "Looking up Barkly St towards Mt Pleasant. Photo taken from Ballarat Fire Station about 1914-1916 period. Old type tram from Mt Pleasant about to turn into Main St. Note old passing loop behind tram. Loop removed to top of rise in centre background. Old Ballarat East Gardens on left and council yards, showing big tin shed in centre of picture. Locality much altered today." See item 5127 for a digital image.Yields information about the buildings and scene looking west from the Fire Station tower along Barkly St. East BallaratPostcard Black and white - Rose Series No P4614, Divided back. No publishers details on rear.See image 2 for Wal Jack's notes.tramways, trams, esco, ballarat east, barkly st -
 Melbourne Tram Museum
Photograph - Set of 4 Black & White Photograph/s, Don Schulz, mid 1920's
... trailer 368 in the view - Elizabeth St, near Flinders St? See... with cable trailer 368 in the view - Elizabeth St, near Flinders St ...Series of four Black and White Photographs cable trams in Melbourne at the Bridge Road terminus or city during the mid 1920's/ .1 - Bridge road terminus with the car house or depot on the left hand side with the destination of Spencer St. .2 - Gripman possibly checking his watch with a depot worker? stepping off the tram. .3 - family stepping off the tram with cable trailer 368 in the view - Elizabeth St, near Flinders St? See Brian Weedon's notes re the photo and the trailer. .4 - As for .1 - with an X marked above the lady and a very large motor car passing. Printed on Kodak Paper. Adam Chandler advised by email 5/8/2020: " note there's a destination box fitted to the grip - from memory, these started to be used from the mid-1920s with the dummy and trailer repaints into the brown colour? That also looks to be either a 1925 or 26 Buick - the "moustache" shape at the top of the front radiator grille and the distinctly angled lower sash of the windscreen are further hints. Given the Richmond line closed in 1927 for conversion I'd say some time between 1924 and 29 June 1927." Also see image i5.pdf for further notes regarding the photographs and the Bridge Road tram depot building - use the original pdf file to read. Image i6, has had the "X" removed - done by Darren Hutchesson.On rear in ink in each print, "Cable car Melbourne" and "286 Anzac Hy/Marion Rd Adelaide SA, collection of late Don Schultz"trams, tramways, cable trams, bridge road, flinders st, richmond depot, hawthorn bridge, tram 368 -
 Bendigo Historical Society Inc.
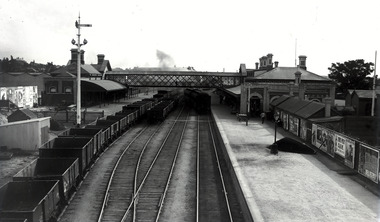
Negative - Photos of Bendigo - Glass Plate Negatives, Early 1900s
... in View St. ... in View St. Negative Photos of Bendigo - Glass Plate Negatives ...Three Boxes of Glass Plate Negatives and six black and white photos. 1. Box 1 Eight whole plate negatives of Pall Mall, Bendigo. Copies from original photos, or negatives made by the Army Survey Regiment stationed at Fortuna Villa. The original photos were taken by Alan Fox in 1857 and are in the State library of Victoria - currently being scanned. 2. Box 2 Fourteen half plate glass negatives collected from Bartlett's (Vincent Kelly) studio, Pall Mall, Bendigo by donor. Many other negatives went to the State Library of Victoria - currently being scanned. 11072.1j In front of the Health Inspector's Office Maybe at the Bendigo Town Hall 11072.1k Group of men and Children, and dog at a cricket match at the side of a sports pavilion. 11072.1l Group of men, maybe a team of runners. 11072.1m Unknown Woman 11072.1n Child in clothing with Kentish Flour sew-ons and hat with wheat on the top. 11072.1o Miss Cohn, 6/7/1911 11072.1p Mr A Robinson, 31/3/1904 11072.1q Mr Ah Hoy, 19/4/1903 11072.1r Mr Ah Gay, 19/11/1903 11072.1s Mr Ah Gay and one other, 19/1/1903 11072.1t Mr Ah Hoy, 22/12/1902 11072.1u Mr Ah Hoy, 22/12/1902 11072.1v Mr Kim Ah Hoy, 22/12/1902 11072.1w Mr Kim Ah Hoy, 22/12/1904 11072.1x Mr Deravin, 5/6/1902 3. Box 3 Bendigo Railway Station and Encroachments - Nine Quarter glass lead Plates in a box labelled "Kahland Collection. Content railway station, locomotives and signal box, Bendigo Railway Station. 11072.1a Bendigo Railway Station from the Mitchell Street Bridge 11072.1b Bendigo Railway Yards 11072.1c Steam Engine A545 11072.1d Train coming into Bendigo - Thistle St mines on the left, Golden Square on the right 11072.1e Bendigo Station from the Myrtle St Bridge 11072.1f Bendigo Railway Yards 11072.1g Engine House Bendigo Station 11072.1h Bendigo Railway Yards 11072.1i Signal Box Bendigo Railway Station 4. Six black and white photos printed taken by Allan Doney - currently being scanned. 11072.1af Bendigo Arcade Pall Mall next to Myers. 11072.1ag Easter 1955 Junior Fire Brigade pulling fire cart with portrait of Queen Elizabeth 2 on the corner of Park Road and Bridge Street. 11072.1ah School of Mines Float Easter procession 1954. 11072.1ai Hustlers Terrace Bendigo 11072.1aj Limerick Castle Hotel Williamson St Bendigo 11072.1ak Christian Science Society 15 MacKenzie St., Bendigo, on the left at 11 MacKenzie St., formerly "Legacy House", now the Bendigo Historical Society. On the extreme left is the rear of the Princess theatre in View St. photos, bendigo, bendigo railway yards, mike butcher collection -
 Ballarat Tramway Museum
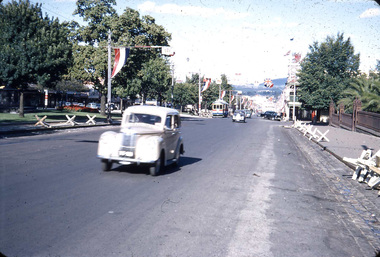
Photograph - Digital image, W. J. Llewelyn, 6/03/1954 12:00:00 AM
... view of Sturt St looking East at St Patrick's church... view of Sturt St looking East at St Patrick's church ...Yields information about the Royal Visit to Ballarat and the tram decorated for its visit along with other arrangements.Set of three eight digital images taken of Queen Elizabeth II to Ballarat 6/3/1954 by W. J. Llewelyn. .1 - Street view of Sturt St looking East at St Patrick's church, with No. 38 in the background and the wooden crowd control barriers stacked by the footpath. .2 - Crowd waiting at the intersection of Sturt and Lydiard St. .3 - Crowd waiting in Sturt St, with soldier's, outside Myers Store .4 - Crowd and guard of honour waiting at the station. .5 - The Queen and Duke in the official car in Sturt St. .6 - ditto with Myer Store in the background. .7 - Scottish unit marching at the intersection of Bridge St and Grenville St with he Bucks Head Hotel in the background. Note the sign on the hotel pointing to the Floral Carpet at the Alfred Hall. .8 - Band at the City Oval. Date obtained from http://wiki.prov.vic.gov.au/index.php/Royal_Visit_1954,_Locations_for_Visiting_Municipalities,_Ballarat (accessed 11-6-2017)trams, tramways, civic functions, royal visit, railway station, lydiard st, sturt st, city oval, myers, tram 38 -
 Bendigo Historical Society Inc.
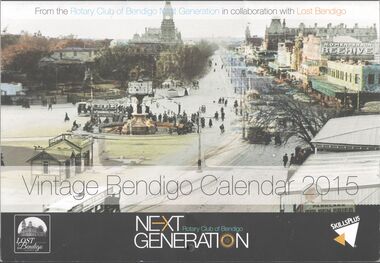
Ephemera - Vintage Bendigo calendar, 2015
... up View Street from St. Paul's Church. This calendar...; December, looking up View Street from St. Paul's Church ...Vintage Bendigo Calendar, 2015. 12-month calendar. Each month features a historic photo of Bendigo. January, BP Five Lions Service Station, 1960's; February, Phone boxes, 1980; March, Electric trams, circa 1910; April, Terminus Hotel, 1966; May, Plaza Theatre, pre 1975; June, Hargreaves Street, circa 1900's; July, Gillies Pie Corner, 1980; August, Favaloro's Cafe, 1960's; September, Dodges and Chevrolets in front of the Lawcourts, circa 1945-54; October, Easter Procession in Pall Mall, circa 1900; November, Sandhurst Town, 1980's; December, looking up View Street from St. Paul's Church. This calendar is not used - no free-hand notations on any dates/months. On the last pages are public holidays for each of the states/territories; and advertisements for three sponsors - Skills Plus, Next Generation and Lost Bendigo.bendigo, business, parade, calendar -
 Melbourne Tram Museum
Album - Geoff Grant Photos, Geoff Grant, mid 1950s
... Bourke St GAG39 View down Bourke St from 988 GAG40 988 Nicholson... Bourke St GAG39 View down Bourke St from 988 GAG40 988 Nicholson ...Photo - see pdf file for further information. Number Brief Description GAG1 51 Sandringham GAG2 50 Sandringham GAG3 50 side Sandringham GAG4 Depot Sandringham_ GAG5 426 Camberwell Depot GAG6 822 St Kilda Rd GAG7 496 St Kilda Rd GAG8 347 Caulfield GAG9 440 Princes Bridge GAG10 190 Camberwell GAG11 190 Camberwell GAG12 Ys Camberwell GAG13 Interior Camberwell Depot GAG14 921 Camberwell GAG15 613 Camberwell Depot GAG16 613 front Camberwell Depot GAG17 887 Bourke St opening_ GAG18 888 Victoria St North Richmond GAG19 888 Victoria Pde GAG20 888 887 Malvern Depot GAG21 888 887 Malvern Depot GAG22 888 Victoria Pde GAG23 1033 North Fitzroy Depot GAG24 957 1033 Bourke St GAG25 1033 Nicholson St East Brunswick GAG26 1001 East Preston Depot GAG27 980 East Preston Depot GAG28 980 Dandenong Rd GAG29 Tower wagons Bourke St at Swanston St GAG30 Tower wagons Nicholson St GAG31 988 tower wagons Nicholson St GAG32 988 tower wagons Bourke St at Russell St GAG33 Albion Tower wagon Clifton Hill GAG34 988 tower wagon Bourke St at Russell St GAG35 988 East Preston Depot GAG36 Cleaner 7 Bourke St GAG37 988 turning from Nicholson St into Victoria Pde GAG38 991 Bourke St GAG39 View down Bourke St from 988 GAG40 988 Nicholson St GAG41 988 Smith St GAG42 988 High St GAG43 988 testing overhead Bourke St GAG44 1003 Nicholson St into Gertrude St GAG45 988 Clifton Hill GAG46 988 Nicholson St GAG47 988 1003 Nicholson St GAG48 988 Bourke St looking west from Elizabeth St GAG49 988 Bourke St looking east from Swanston St GAG50 988 1003 and tower wagons Nicholson St GAG51 988 Clifton Hill GAG52 988 East Preston Depot GAG53 190 Etched saloon door window Yields infomation about VR Tramways, Bourke Street trams and AETA tours. Geoff Grant was a Herald Sun photographer.Assembled album in a black presentation folder of 53 photographs from the Geoff Grant Collection - 27 sleeves All photographs have been scanned and placed on the Museum's G drive. A list of all photographs with details where possible has been compiled. tramways, trams, sandingham, camberwell depot, bourke st, new tramways, tower wagons, tours, victoria parade, east preston, aeta tours -
 Melbourne Tram Museum
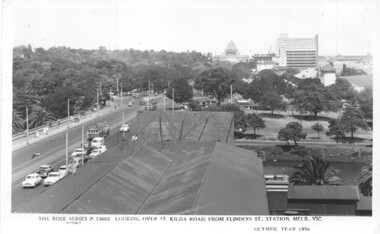
Postcard, Rose Stereograph Co, Flinders St station clock tower looking south towards the Shrine, 1956
... Postcard - Rose Series black and white of the view from... - Rose Series black and white of the view from the Flinders St ...Postcard - Rose Series black and white of the view from the Flinders St station clock tower looking south towards the Shrine. Shows St Kilda Road, Prince Henry's Hospital, the Yarra River and the gardens on the south side of the river. Has two trams in the view. On the lower edge of the card "The Rose Series P13602 Looking over St Kilda Road from Flinders St Station Melb. Vic" and "Olympic Year 1956". On the rear is a note written to Keith from Ken of Barkly St Mornington on 14/1/58 mainly about a Pat Lyton? now a tram conductor at Hanna St and a meeting with Brian. Has some personal notes about Pat.trams, tramways, flinders st, postcards, st kilda road -
 Bendigo Historical Society Inc.
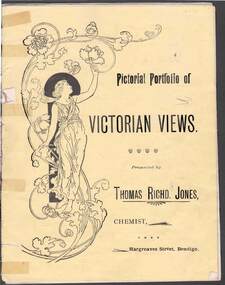
Document - PICTORIAL PORTFOLIO OF VICTORIAN VIEWS
... . View No 4. View from St Paul's Bendigo. View No 5. Unveiling.... A Giant Palm Bendigo. View No 4. View from St Paul's Bendigo. View ...Yellow covered nine page booklet containing 19th Century views of Bendigo and Ballarat presented by Thomas Richard Jones, Chemist of Hargreaves Street Bendigo. Art Noveau figure of woman on front cover. Inside cover features T R Jones Dispensing Chemist and Druggist printed beside man holding a horse. List of Veterinary products supplied by Jones. Farmer's requisites included Strychnine, Toxa, Phosphorus, Poisoined wheat, Bi-sulphide of Carbon. Egg preserving fluid and milk preserving powder Rennet and butter colouring along with Drenches and Cattle medicenes supplied. View No1. Moorabel Falls Ballarat. View No 2. Statues of Leda and Spring Ballarat. View No 3. A Giant Palm Bendigo. View No 4. View from St Paul's Bendigo. View No 5. Unveiling 'The first Public Statue' Bendigo P/Office in background. View No 6. Statue Presented to the City of Bendigo by Cr Harkness. [Reclining greek beside dog fighting lion] View No 7. 'On the Campaspe, near Bendigo. View No 8 The Pine Avenue, Rosalind Park. View No 9. Scenes on Lake Wendouree, Ballarat. View No 10. Statuary in The Botanical Gardens Ballarat. View No 11. Statues of Burns & Moore Ballarat. View No 12. Botanical Gardens, Ballarat. Inside back cover features list of T R Jones products. Outside back cover features advertisement for T R Jones Universal Corn Cure, and Jone's Compound Pectoral Balm.Printed by Periodicacls Publishing Co, 21 Elizabeth Street Melbourne.bendigo, parks and gardens, bendigo chemist and local views. -
 Melbourne Legacy
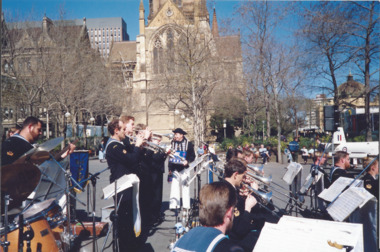
Photograph, Legacy Appeal 1990, 1990
... Square and a view along Swantson st with Legacy flags on the flag... Square and a view along Swantson st with Legacy flags on the flag ...Photos of Badge Day in Melbourne's City Square (corner of Swanston and Collins Streets) where the Victoria Naval Band is playing on 7 September 1990. There are statues promoting a sporting event in the background (Commonwealth games perhaps). A man in an old Naval uniform is watching and is later on a boat in the Yarra River with President Tony Norris. Part of a Legacy Appeal Week promotion in 1990. Also photos showing a tank in the City Square and a view along Swantson st with Legacy flags on the flag poles. Can see how much the City Square and Swanston St has changed since 1990. Similar to 00491 but there are slight variations so different years. Two of these photos were featured in the 1990 President's Report that was published with the Annual Report, it identifies the man in old Naval costume as Commander Mike Lehan. The article also says: 'On Badge Day, the public of Melbourne responded magnificently to Legacy's call for financial assistance. Our Annual Badge Appeal raised $470,000. given the depressed economy and hard times within the community, Legacy was humbled by the generosity of the community and donations from Bequests totalled $193,966 and a further $111,000 was received from Philanthropic Trusts and Foundations. This year were were overwhelmed by the support of serving members of the Army, Navy and Air Force who assisted Legacy as never before for which we are most grateful.'A record of Legacy being promoted for Legacy Week and being helped by the Armed Services in their fundraising .Colour photo x 16 of Badge Day in the city square with a Navy band.Hand-written on paper label in blue pen 'Badge Appeal - City Activities. 1990 7 Sept. S. Howard'legacy appeal, fundraising, legacy week