Showing 585 items matching "heat"
-
 The Beechworth Burke Museum
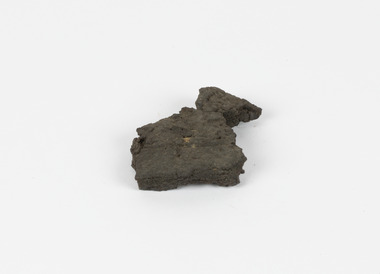
Geological specimen - Brown Coal
... During formation the Brown Coal starts as peats, which is an acidic brown deposit resembling soil, and over time when subjected to pressure and heat these peats form the Coal. Brown Coal is the lowest rank of coal as it has a low carbon (energy) content, and a high moisture content. ...During formation the Brown Coal starts as peats, which is an acidic brown deposit resembling soil, and over time when subjected to pressure and heat these peats form the Coal. Brown Coal is the lowest rank of coal as it has a low carbon (energy) content, and a high moisture content. ...Brown Coal is typically found as rocks. During formation the Brown Coal starts as peats, which is an acidic brown deposit resembling soil, and over time when subjected to pressure and heat these peats form the Coal. Brown Coal is the lowest rank of coal as it has a low carbon (energy) content, and a high moisture content. This high moisture content makes Brown Coal unsuitable for overseas exports. This particular specimen was recovered from the Yallourn Mine in Latrobe Valley, Victoria as part of the geological survey of Victoria being carried out by Alfred Selwyn. Otherwise known as the 'Yallourn Power Station', the Yallourn Mine is Australia's second largest mine. Yallourn Mine was first built in 1920, and since then it has been providing over 1 billion tonnes of Brown Coal to Australia every year. The Yallourn Mine is responsible for 22% of Victoria's electricity and 8% of Australia's electricity. As of 2021 the mine employs around 500 people. Due to ongoing maintenance issues and Australia's move to cleaner energy, the Yallourn Mine intends to shut down permanently as of 2028. Soon after gold was discovered in 1851, Victoria’s Governor La Trobe wrote to the Colonial Office in London, urging ‘the propriety of selecting and appointing as Mineral Surveyor for this Colony a gentleman possessed of the requisite qualifications and acquaintance with geological science and phenomena’. Alfred Selwyn was appointed geological surveyor in Australia in 1852 which began the Geological Survey of Victoria. In 1853-69 the Geological Survey issued under Selwyn's direction sixty-one geological maps and numerous reports; they were of such high standard that a writer in the Quarterly Journal of the Geological Society of London bracketed the survey with that of the United States of America as the best in the world. During his years spent in Australia, Selwyn collected numerous significant geological specimens, examples of which are held in collections such as the Burke Museum.Brown coal is considered to be an essential rock to Australia's energy consumption. Although plentiful in sources, Brown Coal is not able to be exported overseas due to its high moisture content. As Australia moves towards cleaner energy, Brown Coal is going become less used. This specimen is part of a larger collection of geological and mineral specimens collected from around Australia (and some parts of the world) and donated to the Burke Museum between 1868-1880. A large percentage of these specimens were collected in Victoria as part of the Geological Survey of Victoria that begun in 1852 (in response to the Gold Rush) to study and map the geology of Victoria. Collecting geological specimens was an important part of mapping and understanding the scientific makeup of the earth. Many of these specimens were sent to research and collecting organisations across Australia, including the Burke Museum, to educate and encourage further study.A solid hand-sized sedimentary rock that is a dark shade of brown.13 / BROWN COAL / Showing Woody structure / Locality: Yallourn, Vic. | Label probably / correct but / can't find reference / no. 13 to match in / registers. / C Willman / 15/4/21burke museum, beechworth, indigo shire, beechworth museum, geological, geological specimen, mineralogy, yallourn, yallourn mine, victoria, coal, brown coal, brown coal specimen, alfred selwyn, geological survey of victoria, geological survey, yallourn power station -
 Flagstaff Hill Maritime Museum and Village
Functional object - Safe, W. Marr, Circa 1855
... This was achieved by including tubes of a substance between the inner and outer walls of the safe that would react to the heat and the contents would put the fire out. ...This was achieved by including tubes of a substance between the inner and outer walls of the safe that would react to the heat and the contents would put the fire out. ...This strong, heavy bank safe was made by W. Marr in London. It was formerly owned by the ANZ Bank in Portland, Victoria. Portland’s ANZ Bank was originally a branch of the Bank of Australasia, which first came to Australia in 1835, opening in Sydney. Portland’s Bank of Australasia began in a bluestone building built on the north corner of Julia and Bentinck Streets by stonemason William Robb in 1855, around the time of Australia’s Gold Rush. Eventually, in 1951, the Bank of Australasia merged with the Union Bank to become the Australia & New Zealand Bank, known as the ANZ. Portland’s branch of the Bank of Australasia then moved into the old Union Bank building at 44 Percy Streets; both bank buildings were built around the same. The maker of this safe, W. (William) Marr, obtained a patent in 1834 for what is believed to be the first fire-retarding patent, building this into the lining of strong boxes. Others made further design improvements such as hardening the metal plates used to make the boxes. In about 1840 Thomas Milner, a Sheffield tinsmith, made the earliest safes that could safely protect their contents from a surrounding fire. This was achieved by including tubes of a substance between the inner and outer walls of the safe that would react to the heat and the contents would put the fire out. In 1851 an Exhibition at London’s Crystal Palace included fire-proof safes from different vendors. William Marr was listed under Fireproof Box Makers in the 1842 London Trades Directory, at 33 Broad Street, and 52 Cheapside. William Marr & Son were appointed to supply Her Majesty’s National Debt Office and other departments in 1860, with the address 9 Walbrook, Vulcan Safe Works, Skin Yard, Bankside, Southwark, London. 1n 1870 the address for William Marr listed under Safe Makers and Agents in the London Trades Directory was 67 Cannon Street. The manufacturer, W Marr, is significant as an inventor of a way to make a strong box fireproof, then patented his secure safe. This invention indicates that security of money was of great importance in the mid-1800s as it continues to be today. The secure safe would have given much comfort to those with investments and savings, as well as to the bank itself, the custodian of other people's money. This safe was made in London and exported to colonial Australia, giving significance to the safe as an item that was high in the list of the needs of the early Australians and their businesses. The safe has local historical significance as it was used by the original Bank of Australasia in Portland, which was built in 1855 and went on to become the ANZ Bank, still in operation today. The bank was an integral part of the establishment and growth of commerce in Colonial Victoria.Safe; heavy metal bank safe, painted green. Double doors each have top and bottom external hinges, and two front panels; the top panels are arched. The thick doors have five sliding locks. Inside is a fixed metal compartment with a locked sliding metal drawer, and several fitted shelves plus some temporary removable shelving. Both doors have a decorative brass knob near the centre opening. Left door has an oval artificial keyhole and a space where another fitting has been attached. The right door has a second brass knob and an oval keyhole. The top panels of the left door has an oval plaque with an inscription; the right door has evidence that there was an oval attachment. Made by W. Marr, London.Text embossed on plaque: "W. MARR / PATENTEE & MANUFACTURER / 52 / /CHEAPSIDE / LONDON" flagstaff hill, warrnambool, shipwreck coast, flagstaff hill maritime museum, flagstaff hill maritime village, maritime museum, great ocean road, shipwreck artefact, safe, bank safe, vault, security, finances, anz bank, portland bank, w marr, william w marr, financial institution, savings, gold exchange, loans, investments, safety, safe maker, lock maker, iron box, strong-room -
 National Wool Museum
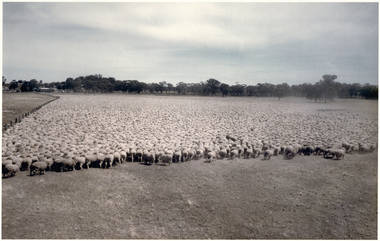
Photograph, Puckapunyal - 75,172 Sheep for Shearing, 1988
... Contractor for the shearing, Jim Walker, Avenel, Victoria, former Australian shearing team captain in 1974-75 and 1978-79, recalls there were up to 21 shearers in his team waiting for the red eyes to arrive despite the mid-summer heat of up to 38°C and the blinding dust on windy days. ...Contractor for the shearing, Jim Walker, Avenel, Victoria, former Australian shearing team captain in 1974-75 and 1978-79, recalls there were up to 21 shearers in his team waiting for the red eyes to arrive despite the mid-summer heat of up to 38°C and the blinding dust on windy days. ...Banjo Paterson once wrote, ‘The musterers are fetching them a hundred thousand strong’. Well, not quite 100,000 strong, but there are 75,172 mixed age Riverina-bred merino wethers in this mob mustered for shearing on January 22, 1988. The sheep were owned by the Mountjoy family from Geelong Victoria and were running on Puckapunyal Army Base near Seymour in Central Victoria on which the family held the grazing lease. Contractor for the shearing, Jim Walker, Avenel, Victoria, former Australian shearing team captain in 1974-75 and 1978-79, recalls there were up to 21 shearers in his team waiting for the red eyes to arrive despite the mid-summer heat of up to 38°C and the blinding dust on windy days. Jim Walker thinks there may also have been some sheep in the mob from Portland Downs and Isis Downs near Isisford in Central Queensland. The biggest shearing he did at ‘Pucka’ was 87,087 shorn in 1988. The ‘Pucka’ base was established during WW1. During the Second World War the Second Australian Imperial Force trained there as well as the US Army 41st Infantry Division. It was also home to the 1st Armoured Regiment from 1949 until 1995. During the 1950s up to 4000 national servicemen at any given time were training there. In the 1980s the Army undertook a major 60,000-acre land rehabilitation programme as decades of heavy use had led to serious degradation. By 1988 when the photo was taken, further land acquisition had increased the area to just under 100,000 acres, 43,000 of which is still bush country. There are no sheep there now, and the old shed was bulldozed and burnt. There are thousands of kangaroos which of course don’t need to be shorn and would be hard to muster and hold for a similar photo. Colour photograph, 75,172 merino wethers, mustered for shearing at Puckapunyal in 1988.shearing merino sheep, mountjoy, mr dale - worungalla pastoral co., shearing, merino sheep -
 Victorian Harness Racing Heritage Collection at Lord's Raceway Bendigo
Clothing - Race Colours, Charlie Robertson
... In Tasmania in 1935, New Derby won the Hobart and Launceston Cups and in WA in 1936 won two heats of the inaugural Inter Dominion. Among New Derby’s wins were the 1932 and 1933 Ascot £500. ...In Tasmania in 1935, New Derby won the Hobart and Launceston Cups and in WA in 1936 won two heats of the inaugural Inter Dominion. Among New Derby’s wins were the 1932 and 1933 Ascot £500. ...Charlie Robertson Jnr. Charlie Robertson, a Boort district farmer and trainer-driver, won his first race driving a horse called Black Spot in 1912 when he was 16. He drove many winners in the 1920s and 1930s, some of them trained by his father Charles Snr who had raced horses from the 1890s. He had a top trotter in Fair Admiral, who won the 1929 Victoria Trotters Derby among other races. As his career flourished, Charlie Jnr won with such horses as Lee Voyage, Royal Bronte, Johnnie Bronte, Betty Direct, Bonnie Heather and Leading Style. He was given the Globe Derby stallion New Derby to train by owner Jack King of Quambatook. He travelled to Tasmania and Western Australia with New Derby. In Tasmania in 1935, New Derby won the Hobart and Launceston Cups and in WA in 1936 won two heats of the inaugural Inter Dominion. Among New Derby’s wins were the 1932 and 1933 Ascot £500. He left 147 winners when standing at stud at Quambatook. During World War II one of the few venues for harness racing was Wayville in Adelaide. During this period Charlie made many trips across the border to race. On the commencement of night trotting, Robertson won many at the Royal Melbourne Showgrounds with Something New, Village Derby and Midnight News, New Gold, Canargo and Tennessee Derby. A bad race smash on Tennessee Derby nearly ended Charlie’s life, but he recovered. In the 1960s Charlie stood the stallion Convivial, who provided him with many winners. He retired from race driving aged 68 and died aged 87 after more than 60 years in trotting.Yellow with cream starscharlie robertson, c robertson, charlie robertson jnr, c robertson jnr -
 Coal Creek Community Park & Museum
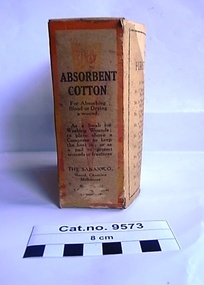
Box of Cottonwool, mid 20th century
... As a Swab for Washing Wounds; to place above a Compress to keep the heat in; or as a pad to protect wounds or fractures. ...As a Swab for Washing Wounds; to place above a Compress to keep the heat in; or as a pad to protect wounds or fractures. ...TROVE : Advocate (Melbourne, Vic. : 1868 - 1954), Saturday 29 March 1919, page 6. For Perfuming the Living or Sick Rooms, for Special Services, High, Mass, Requiem Service, and Benediction. "SANAX" Fragrant Pastille; ignite easily and burn steadily, emitting delightful fumes of fragrant incense. Every home should have them. All Chemists, or BURROWS PHARMACY, 5 Brunswick St., FITZROY. TROVE : Age (Melbourne, Vic. : 1854 - 1954), Saturday 16 August 1941, page 4 SITUATIONS VACANT. ADVERTISERS …………Girl Packer, about 18 yrs. The Sanax Co., 5 Brunswick-street, Fitzroy. City…….. Manila coloured cardboard box printed in dark brown and orange containing a wad of cotton wool wrapped in blue paper.Box. Side 1. 'SANAX (logo) ABSORBANT COTTON. For Absorbing Blood or Drying a wound. As a Swab for Washing Wounds; to place above a Compress to keep the heat in; or as a pad to protect wounds or fractures. THE SANAX CO. Manuf. Chemists Melbourne Reg'd Office : 5 Brunswick Street, Fitzroy, N.6.' Side 2. 'THERE'S A "SANAX" FIRST AID CASE for every purpose 27 Distinct Patterns to choose from. No. 1 "Sanax" First Aid For Factories, Home etc. No. 1a "Sanax" First Aid For the Home, Farm, School No. 2 "Sanax" First Aid For Factories, Mines, Quarries No. 4 "Sanax" First Aid (Portable) For Sports Clubs, Scouts, Guides No. 5 "Sanax" First Aid For Mines, Racing & Football Clubs No. 7 "Sanax" First Aid (Portable) For the Farm, Home or Sports Field No. 9 "Sanax" First Aid (Portable) For the Motor Car No. 11 "Sanax" First Aid (Pocket Size) For Boy Scouts, Girl Guides No. 20 & 25 "Sanax" First Aid (Portable) For the Motorist. Side 3. USE "SANAX" ACHE TABLETS for ALL PAINS ACHES and FEVERS - SAFE and EFFECTIVE. Side 4 Keep "Sanax" First Aid Dressing handy , for small wounds, cuts, cracked hands, and abrasions. It forms an antiseptic healing skin over the damaged part. Sole Makers The SANAX Co. Melbourne. Side 5. TRADE "SANAX" MARK cotton wool, wound dressing -
 Federation University Historical Collection
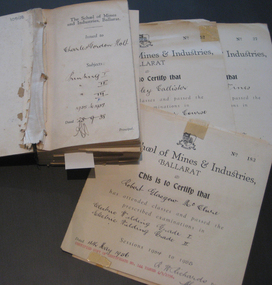
Book - Certificate stub book, School of Mines Ballarat, Ballarat School of Mines Certificate Stubb Book, 1938-1964
... The subjects covered include: Printing, mining, geology, metallurgy, mining geology, mine surveying, mechanics applied to mining, electric welding, machine shop practice, algebra, trigonometry, mechanics and heat, applied mechanics, heat treatment, graphics, oxywelding, engineering drawing, blacksmithing, shorthand theory advanced, shorthand speed, commercial English, intermediate English, plain dressmaking, dressmaking advanced, electric wiring, physics, electric technology, carpentry, machine shop, plumbing, trade science, carpentry and joinery, building construction, heat treatment, wiring, oxyacetylene welding, foremanship, turning and fitting, electric wiring, arithmetic, social studies, commercial correspondence, office routine, bookkeeping, typewriting, shorthand, electric refrigerator servicing, refrigeration, radio mechanics, trade maths, sheetmetal, wool sorting, motor mechanics, human relations in management and industrial supervision. ...The subjects covered include: Printing, mining, geology, metallurgy, mining geology, mine surveying, mechanics applied to mining, electric welding, machine shop practice, algebra, trigonometry, mechanics and heat, applied mechanics, heat treatment, graphics, oxywelding, engineering drawing, blacksmithing, shorthand theory advanced, shorthand speed, commercial English, intermediate English, plain dressmaking, dressmaking advanced, electric wiring, physics, electric technology, carpentry, machine shop, plumbing, trade science, carpentry and joinery, building construction, heat treatment, wiring, oxyacetylene welding, foremanship, turning and fitting, electric wiring, arithmetic, social studies, commercial correspondence, office routine, bookkeeping, typewriting, shorthand, electric refrigerator servicing, refrigeration, radio mechanics, trade maths, sheetmetal, wool sorting, motor mechanics, human relations in management and industrial supervision. ...This certificate stub book contains the subject certificates of the graduates of the School of Mines and Indutsries, Ballarat, a predecessor of Federation University Australia.This item highlights the subjects studied and graduates of the School of Mines between 1938 to 1964. It also records the change of cursive over that time.This book includes stubs of subject certificates from the School of Mines and Industries, Ballarat. This also contains a number of uncollected certificates. It is a brown hardback book with black binding. Its contents covers certificates between 1938 to 1964. Names of recipients include: Charles Holt, Henry Elford, Irvin Singleton, J. H. Hughes, John Morcom, Alfred Amor, John Wastell, John Rudwick, Jared Hines, Harry Allan, L. F. J. Hillman, Arthur Davies, Letitia Stanley, Victor Wright,Raymond Ball, Mary O'Callaghan, Ethna Burke, Alec Foyster, James Duggan, Leonard Auchettl, Reeves Collins, James Patterson, Stanley Douglas Webb, Oswald Lyle, Marvis Orr, Eric Roberts, Jack Clennell, A. R. Millar, Heith Smyth, Walter Hines, Harold Leslie, Joseph Fisher, Geoffry Burns, Alick Dait, George Hill, Raymond Wines, Robert Manson, Albert O'Neill, Thomas Green, William Stargatt, William Harrison, Reginald Allen, Albert Wilson, Allan Curtis, Arthur Donald, John Wynn, Sydney Robinson, John Blackic, Percy Elsdon, Hubert Jenkins, Kingsley Callister, Douglas Hall, Norman Lawson, Winfield Tonkin, Artuhur Williams, Allan Curtis, Ernest, Billinge, John Daelon, Harold Bunting, Stanley Wilton, Robert Sugden, Heith Foster, Winsome Stevens, Herbert Stanbridge, Robert Pittard, Henry Brew, Ernest Berriman, Carlyle West-Onley, William Blackic, Lorna Dunstan, Cedric Pike, Stanley Jephson, Hugh Hendrick, Joseph Fisher, Ernest Grove, Ronald Fisher, Heith Halsall, Henry Harris, Maxwell Silvey, Stanley Trengove, Donald Trescowthick, Harold Tolliday, Russell Lucas, John Boyd, John Keys, Stanley Betteridge, Ernest Betteridge, Michael Ross, Robert Stewart, Joseph Beasley, William Beasley, Ray Deveson, George Hennessy, Charles Matthews, Maxwell Silvey, Ian Creek, Geoffrey Moorhouse, Hector Tonks, John Donald, Hugh Hendrick, Stanley Jephson, Ian McIntosh, Robert Nice, Ralph Scott, Walter Martin, Grant Coutts, Lindsay Hannah, John Tainsh, Hubert Robinson, John Donald, George Beaton, Heather Harris, Brian McCarthy, Samuel Perry, Valentine Pascoe, Philip McLean, Geoffrey Hewish, Hubert Robinson, John Borch, Frederick Gale, Ian Grundell, Albert Perry, Frank Hutchinson, Horace Shuttleworth, Kenneth Mason, David Hatt, Malcom Foster, George Jones, Graham McKinnon, Ronald Newton, John Betts, Leonard Wade, Robert McClure, David Beaumont, Leslie Powell, Samuel Perry, Donald Treweek, Edgar McArthur, Russell Fraser, Edgar McArthur Bartrop, Clive Carmichael, Leslie Fuhrmeister, Lindsay Coon, Zigurds Plavina, Victor Gingell, Rupert McKenna, Graham McKinnon, David Fairley, Johannes Meennen, Ronald Murphy, Johannes Naus, John McConville, Graham Melonie, William Cutter, Thomas Chalkley, Kenneth Morton, Stanley Shears, Robert Auld, Donald Campbell, John Cofield, Brian Whykes, William Milford, Noel Richards, Stewart Jacobs, James Robertson, Clement Rose, Eric Brown, Allan Raworth, Ernest Salter, Neville Cartledge, Peter Stacey, Robert McClure, Antonius Goossens, Rodney Cartledge, Rodney Hayes, Bevan Grigsby, James Robertson, Neil Stephens, John Riddle, Andreas Aaus, Bruce Fletcher, Keith Pedler, Allen Flavell, Robert Cartledge, Ronald Shaw, Kenneth Hibberd, William Lockland, Percival Bilney and Petrus Damen. Uncollected certificates for James Patterson, Robert Sugden, Ernest Berriman, Stanley Jephson, Henry Harris, Maxwell Silvey, Joseph Beasley, Charles Matthews, Maxwell Silvey, Ian Creek, Geoffrey Hewish, Robert McClure, Kingsley Callister, Winfield Tonkin, Raymond Wines, Oswald Wilde and Kenneth Mason are included within. The subjects covered include: Printing, mining, geology, metallurgy, mining geology, mine surveying, mechanics applied to mining, electric welding, machine shop practice, algebra, trigonometry, mechanics and heat, applied mechanics, heat treatment, graphics, oxywelding, engineering drawing, blacksmithing, shorthand theory advanced, shorthand speed, commercial English, intermediate English, plain dressmaking, dressmaking advanced, electric wiring, physics, electric technology, carpentry, machine shop, plumbing, trade science, carpentry and joinery, building construction, heat treatment, wiring, oxyacetylene welding, foremanship, turning and fitting, electric wiring, arithmetic, social studies, commercial correspondence, office routine, bookkeeping, typewriting, shorthand, electric refrigerator servicing, refrigeration, radio mechanics, trade maths, sheetmetal, wool sorting, motor mechanics, human relations in management and industrial supervision. Many of the stubbs are signed by principal Dick Richards. Each certificate is signed by the current principal of the School of Mines and Industries, Ballarat, and a number have also been signed by the students.school of mines, school of mines andindustries, certificate, richard w. richards, horace william shuttleworth, dick richards, charles holt, henry elford, irvin singleton, j. h. hughes, john morcom, alfred amor, john wastell, john rudwick, jared hines, harry allan, l. f. j. hillman, arthur davies, letitia stanley, victor wright, raymond ball, mary o'callaghan, ethna burke, alec foyster, james duggan, leonard auchettl, reeves collins, james patterson, stanley douglas webb, oswald lyle, marvis orr, eric roberts, jack clennell, a. r. millar, heith smyth, walter hines, harold leslie, joseph fisher, geoffry burns, alick dait, george hill, raymond wines, robert manson, albert o'neill, thomas green, william stargatt, william harrison, reginald allen, albert wilson, allan curtis, arthur donald, john wynn, sydney robinson, john blackic, percy elsdon, hubert jenkins, kingsley callister, douglas hall, norman lawson, winfield tonkin, artuhur williams, allan curtis, ernest billinge, john daelon, harold bunting, stanley wilton, robert sugden, winsome stevens, herbert stanbridge, robert pittard, henry bre, ernest berriman, carlyle west-onley, william blackic, lorna dunstan, cedric pike, stanley jephson, hugh hendrick, joseph fisher, ernest grove, ronald fisher, heith halsall, henry harris, maxwell silvey, stanley trengove, donald trescowthick, harold tolliday, russell lucas, john boyd, john keys, stanley betteridge, ernest betteridge, michael ross, robert stewart, joseph beasley, william beasley, ray deveson, george hennessy, charles matthews, maxwell silvey, ian creek, geoffrey moorhouse, hector tonks, john donald, hugh hendrick, stanley jephson, ian mcintosh, robert nice, ralph scott, walter martin, grant coutts, lindsay hannah, john tainsh, hubert robinson, john donald, george beaton, heather harris, brian mccarthy, samuel perry, valentine pascoe, philip mclean, geoffrey hewish, hubert robinson, john borch, frederick gale, ian grundell, albert perry, frank hutchinson, horace shuttleworth, kenneth mason, david hatt, malcom foster, george jones, graham mckinnon, ronald newton, john betts, leonard wade, robert mcclure, david beaumont, leslie powell, samuel perry, donald treweek, edgar mcarthur, russell fraser, edgar mcarthur bartrop, clive carmichael, leslie fuhrmeister, lindsay coon, zigurds plavina, zig plavina, victor gingell, rupert mckenna, graham mckinnon, david fairley, johannes meennen, ronald murphy, johannes naus, john mcconville, graham melonie, william cutter, thomas chalkley, kenneth morton, stanley shears, robert auld, donald campbell, john cofield, brian whykes, william milford, noel richards, stewart jacobs, james robertson, clement rose, eric brown, allan raworth, ernest salter, neville cartledge, peter stacey, robert mcclure, antonius goossens, rodney cartledge, rodney hayes, bevan grigsby, james robertson, neil stephens, john riddle, andreas aaus, bruce fletcher, keith pedler, allen flavell, robert cartledge, ronald shaw, kenneth hibberd, william lockland, percival bilney, petrus damen, james patterson, robert sugden, ernest berriman, stanley jephson, henry harris, maxwell silvey, joseph beasley, charles matthews, maxwell silvey, ian creek, geoffrey hewish, robert mcclure, kingsley callister, winfield tonkin, raymond wines, oswald wilde, kenneth mason, trades -
 Parks Victoria - Point Hicks Lightstation
Stand, pump & tank
... An intact assemblage is displayed in the AMSA offices, Canberra with a text that explains ‘This type of installation was once common and relied on the lightkeeper having to pressurise the cylinders manually at regular intervals throughout the hours of darkness’.The system involved vaporising kerosene under pressure and mixing it with air and then burning the vapour to heat an incandescent mantle. The use of kerosene as a fuel to light the lantern became the most common system of illumination from the 1860s after the oil industry in the United States began to develop. ...An intact assemblage is displayed in the AMSA offices, Canberra with a text that explains ‘This type of installation was once common and relied on the lightkeeper having to pressurise the cylinders manually at regular intervals throughout the hours of darkness’.The system involved vaporising kerosene under pressure and mixing it with air and then burning the vapour to heat an incandescent mantle. The use of kerosene as a fuel to light the lantern became the most common system of illumination from the 1860s after the oil industry in the United States began to develop. ...Was the stand for a Chance Brothers air & oil containers fitted with pump handle & pressure gauges.This type of installation was once common and relied on the lightkeeper having to pressurise the cylinders manually at regular intervals throughout the hours of darkness. The oil was fed under pressure to the burner mantle. It is all that remains of an air and kerosene oil tank installation, with each rounded side formerly supporting a heavy iron tank. The containers would have been fitted with a pump handle and pressure gauges. An intact assemblage is displayed in the AMSA offices, Canberra with a text that explains ‘This type of installation was once common and relied on the lightkeeper having to pressurise the cylinders manually at regular intervals throughout the hours of darkness’.The system involved vaporising kerosene under pressure and mixing it with air and then burning the vapour to heat an incandescent mantle. The use of kerosene as a fuel to light the lantern became the most common system of illumination from the 1860s after the oil industry in the United States began to develop. The kerosene vapour burner was created in 1901 by British inventor Arthur Kitson (1859-1937) and perfected by Chance Bros for burning a more intense light in their renowned lenses. The lamp had to be watched throughout the night in case a mantle broke, and the tanks needed to be maintained by hand-pumping each hour or so. The Point Hicks lantern was initially lit by a six-wick Trinity house kerosene burner. This was replaced by the more efficient and brighter 55mm vaporised kerosene mantle burner in 1905, and the tank stand is probably original to this apparatus. Electricity eventually replaced kerosene at Point Hicks in 1964 making the tank installation obsolete, and the last kerosene system in an Australian lighthouse was replaced in 1985. Gabo Island Lightstation has a pair of tanks that are not attached to the optical system and are no longer in the lighthouse. They are also missing the pressure gauges that were formerly attached to the top of each cylinder. An intact tank assemblage is displayed at the Cape Schanck Lighthouse Museum it is detached and not original to the lighthouse. Although corroded, the remnant Point Hicks tank stand has first level contributory importance to the lightstation. It is significant for its provenance and historical value as part of the Chance Bros vaporised kerosene burner introduced in 1905 to intensify the light and improve the efficiency of the system. The rusted iron stand rests on four short legs and is shaped like a pair of spectacles. -
 Warrnambool and District Historical Society Inc.
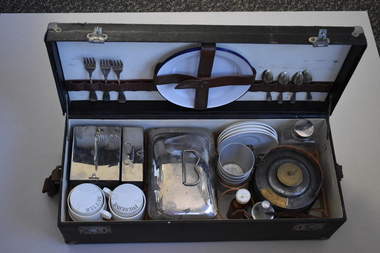
Artefact, G.W.Scott & Sons, Picnic Case, 1930s
... The kettle is sitting in a metal tray which has a lighting mechanism to heat the water The picnic set has some rusted metal catches on the exterior of the box and the leather is very stained and torn in places. ...The kettle is sitting in a metal tray which has a lighting mechanism to heat the water The picnic set has some rusted metal catches on the exterior of the box and the leather is very stained and torn in places. ...This is a car picnic set made by the English firm of G. W. Scott and Sons who were producers of wickerwork crafts, basketry and luxury leather goods. The business was founded in 1661 and ceased operations in 1967. The picnic set belonged to Dr Horace Iles Holmes (1877-1959) who was born and educated in Tasmania and completed a medical degree at Melbourne University. He commenced a practice in Warrnambool in 1906 and was the Honorary Medical Officer at the Warrnambool Hospital and Warrnambool’s Health Officer. His practice was at ‘Ierne’ at the corner of Spence and Kepler Streets. He was an early member of the Royal Australian College of Surgeons and was prominent in Warrnambool community affairs (Foundation President of Warrnmbool Rotary Club, a member of the local Masonic Lodge for over 50 years, Warrnambool Hospital Committee member, long-term Trustee of the Warrnambool Methodist Church and President of the Lyndoch Hostel for the Aged Committee). Dr Holmes also had agricultural interests and enjoyed fishing, golf and bowls. He also had a motor car and this picnic set would have been used for family picnics. This picnic set is of considerable significance because: 1. It is a good example of the luxury picnic sets owned by more affluent people in the 1930s and 40s. 2. It has important local provenance as it belonged to Horace Holmes, a doctor associated with the professional and community life of Warrnambool for over 50 years. This is a rectangular wooden box with a leather covering. It has metal hinges on the corners of the box and two two metal catches on the side with a leather belt and metal buckle on one of these catches with one leather belt missing on the other side. These leather straps were to attach the picnic box to the running board of the car. There are also two metal catches or locks on the front of the box. Inside the box there is a white lining with a plaited wickerwork insert containing spaces for the following: 1. large china container with a silver top 2. smaller metal container with a silver lid 3. small rectangular metal tin with a silver lid. This container still has some loose tea leaves inside 4. four china cups 5. two circular china dishes for jam and butter 6. four china saucers 7. one glass bottle with a silver top 8. one metal phial, silver-coloured 9. one amber-coloured glass bottle (probably not an original) 10. four nickel silver spoons 11. three metal forks 12. three white enamel plates, blue edged Numbers 10,11 and 12 are held in place by leather straps on the inside of the lid of the box 13. two loose metal straps 14. one metal kettle with a handle with cane strapping, a brass lid, a brass spout with an end chain and a metal inscription 15. The kettle is sitting in a metal tray which has a lighting mechanism to heat the water The picnic set has some rusted metal catches on the exterior of the box and the leather is very stained and torn in places. ‘Remove screw before lighting G.W.S. & S ‘ ‘Coracle brand’ antique luxury picnic set, dr horace holmes, history of warrnambool -
 The Ed Muirhead Physics Museum
Coolidge X-ray Tube
... In thermionic emission, electrons are emitted from a metal surface directly by the application of an electric current to heat a wire filament. The electrons accelerate to the anode and produce X-rays. ...In thermionic emission, electrons are emitted from a metal surface directly by the application of an electric current to heat a wire filament. The electrons accelerate to the anode and produce X-rays. ...The investigation of the x-ray appears early on to have been a priority research topic at the University of Melbourne’s School of Physics. This interest was sparked by the appointment in 1889 of Professor T.R. Lyle. Lyle, who was head of the school until 1915, is thought to have been the first person in Australia to have taken an x-ray photograph. A copy of this photograph can be found in the School of Physics Archive. For this particular experiment Lyle actually made his own x-ray tube. His successor, Professor Laby, continued to work with x-rays. During the 1920s Laby worked on the x-ray spectra of atoms and in 1930 he co-published with Dr. C.E. Eddy, Quantitative Analysis by X-Ray Spectroscopy. Also with Eddy, Laby produced the landmark paper Sensitivity of Atomic Analysis by X-rays. Laby went on to have an x-ray spectrograph of his own design manufactured by Adam Hilger Ltd. (see cat. No. 38). School of Physics, the University of Melbourne Cat. No. 22. Jacqueline Eager Student Projects Placement, Cultural Collections 2005 In 1913 Coolidge overcame the limitation of the narrow operating range of the gas X-ray tubes with the invention of the vacuum X-ray tube. A filament heated by an electric current directly releases electrons by thermionic emission. In thermionic emission, electrons are emitted from a metal surface directly by the application of an electric current to heat a wire filament. The electrons accelerate to the anode and produce X-rays. The anode has associated cooling fins due to the high temperatures attained by the release of kinetic energy by the electrons on colliding with the anode. Internal Glass sleeve: “A941/L2593/2821” -
 Ballarat Tramway Museum
Newsletter, Ballarat Tramway Preservation Society (BTPS), "Information for Members and Interested Parties" - 10/71 to 5/73, 1971 to 1973
... Oct. 1971 -pp2 - plus appeal for financial assistance Dec. 1971 - pp2 Jan. 1971 - p2 Feb. 1972 - pp2 - plus list of "Tramcar allocations in Melbourne 1/1/1972" - pp2 ( 2 copies) (with heat sensitive paper copy of this list, stapled in top left hand corner - pp2) Mar. 1972 - pp2 - plus list of disposal of SECV Ballarat tramcars - pp2 April May 1972 - orange paper, plus supplementary foolscap sheet on green paper, for "Bring back 39 to Ballarat", "Sales Department list" and "Driving Training" expression of interest. (2 copies) June-July 1972 - pp2 (2 copies)(copy imaged) September 1972 - pp2 - plus appeal for BTPS funds, p1 on yellow quarto paper. ...Oct. 1971 -pp2 - plus appeal for financial assistance Dec. 1971 - pp2 Jan. 1971 - p2 Feb. 1972 - pp2 - plus list of "Tramcar allocations in Melbourne 1/1/1972" - pp2 ( 2 copies) (with heat sensitive paper copy of this list, stapled in top left hand corner - pp2) Mar. 1972 - pp2 - plus list of disposal of SECV Ballarat tramcars - pp2 April May 1972 - orange paper, plus supplementary foolscap sheet on green paper, for "Bring back 39 to Ballarat", "Sales Department list" and "Driving Training" expression of interest. (2 copies) June-July 1972 - pp2 (2 copies)(copy imaged) September 1972 - pp2 - plus appeal for BTPS funds, p1 on yellow quarto paper. ...12 issues of BTPS Newsletter, titled "Information for Members and Interested Parties" from Oct. 1971 to May 1973, with sales sheets and other sheets. All printed, unless noted otherwise, on stencil duplicator using white duplicator paper, foolscap sized sheets. Listed by Neville Gower 10/98 on cover sheet. Some signed by Paul Nicholson Publicity Officer, some noted as edited by N.Gower. Oct. 1971 -pp2 - plus appeal for financial assistance Dec. 1971 - pp2 Jan. 1971 - p2 Feb. 1972 - pp2 - plus list of "Tramcar allocations in Melbourne 1/1/1972" - pp2 ( 2 copies) (with heat sensitive paper copy of this list, stapled in top left hand corner - pp2) Mar. 1972 - pp2 - plus list of disposal of SECV Ballarat tramcars - pp2 April May 1972 - orange paper, plus supplementary foolscap sheet on green paper, for "Bring back 39 to Ballarat", "Sales Department list" and "Driving Training" expression of interest. (2 copies) June-July 1972 - pp2 (2 copies)(copy imaged) September 1972 - pp2 - plus appeal for BTPS funds, p1 on yellow quarto paper. November 1972 - pp2 - plus sales items, 2 sheets, one on blue quarto paper December 1972 - pp2 - plus sale items, pp2 February 1973 - pp2 plus sales items pp2 on light blue paper May 1973 - pp2 plus sales items pp2 on light green paper, with advertisement of Jack Chadwick, Manager of B.V. Menswear Store of 251 Chapel St. Prahran. various notes, dates received, "Noelene's copy" and other notes on some issues in pencil and ink.museums btps, btps newsletters, publicity, sales items -
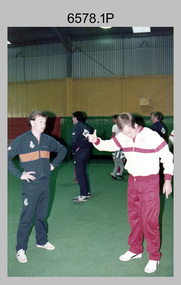
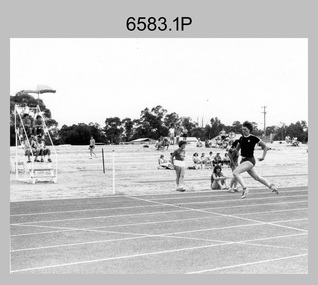 Bendigo Military Museum
Photograph - Army Survey Regiment Inter-Squadron Athletics Competition, Bendigo, 1982
... Pictured I the final heat of the competition, in which Carto Sqn were the eventual winners, 2 tugs to 1.’ ...Pictured I the final heat of the competition, in which Carto Sqn were the eventual winners, 2 tugs to 1.’ ...This is a set of six photographs of an Army Survey Regiment inter-squadron athletics competition held at Epsom, Bendigo in 1982. Personnel from Headquarters, Air Survey, Cartographic and Lithographic Squadrons took part in traditional athletics events, wheelbarrow race, sack race, fireman’s carry and tug-of-war novelty events. Photo .1P caption: FORTUNA RECORDS TUMBLE. ‘Super Sapper Annette Wilson of Air Survey Squadron broke a total of 4 records at the Army Svy Regt annual athletics carnival. She bettered the shot put by an amazing 5.10 metres, while also creating new records for the long jump, discus and javelin. The above photograph shows her winning the Womens 100 metre event.’ Photo .2P caption: ‘SPR Barry Miller of Headquarters/Operations Squadron leads CPL Keith Quinton of Lithographic Squadron out of the turn in the 200 metre mens open. SPR Barry Miller ran on strongly to win the vent.’ Photo .3P caption: ‘CPL Laurie Justin of Lithographic Squadron surges on to the straight to win the 800 metres mens open event.’ Photo .4P caption: ‘CPL Mick Hogan shows how to gain more distance in the air – as he wins the Triple Jump competition for Air Survey Squadron.’ Photo .5P caption: GET WITH THE STRENGTH – GO CARTO ‘Cartographic Squadron won the Tug-of-War competition after a desperate struggle provided by Headquarters/Operations Squadron. Pictured I the final heat of the competition, in which Carto Sqn were the eventual winners, 2 tugs to 1.’ Photo .6P caption: PROTEST UPHELD. ‘As a result of a protest in the running of the wheelbarrow race, a re-run was called for, much to the disappointment of the original winners. MAJ Stan Vote and WO1 Ken Slater of Lithographic Squadron. After wheel chocks had been removed from the wheelbarrow of the protesters, the race was re-run and first place went to MAJ Graham Baker and LT Chris Mazur of Air Survey Squadron.’This is a set of six photographs of an Army Survey Regiment inter-squadron athletics competition held at Bendigo in 1982. The photographs were printed on photographic paper and mounted on A4 paper, with typed captions underneath. The black and white photographs were scanned at 300 dpi. They are part of the Army Survey Regiment’s Collection. .1) - Photo, black & white, 1982, 100m sprint race. Foreground: SPR Annette (Wilson) Godden. Background L to R: SPR Chris Gordon, SPR Sherri (Dally) Burke, SPR Kristin (Isaac) Skidmore – obscured. .2) - Photo, black & white, 1982, 200m sprint race. L to R: CPL Keith Quinton, SPR Barry Miller. .3) - Photo, black & white, 1982, 800m distance. Foreground: CPL Laurie Justin. Background: CPL Graham Johnston. .4) - Photo, black & white, 1982, Triple jump. Foreground: CPL Mick Hogan. Background L to R: SPR Dave Lawler, SPR Barry Hogan, SPR Steve Coulson, WO1 Andy Wilson, SPR Robin Marshall – obscured. .5) - Photo, black & white, 1982, Tug-of-War. Coaches L to R: SPR Barry Hogan, SPR Steve Winner. Cartographic Squadron L to R: CPL Ian McKenzie, SGT Dennis Learmonth, CPL Dan Cirsky, SGT Dave Critchlow – UK Exchange, SPR Peter McCurdy, SPR Robin Marshall, SPR Geunther Ebenwaldner. Spectators L to R: WO1 John Bennett, SPR Steve Burke. .6) - Photo, black & white, 1982, Wheelbarrow race. L to R: 1st wheelbarrow – unidentified. 2nd wheelbarrow – MAJ Graham Baker, LT Chris Mazur. 3rd wheelbarrow - MAJ Stan Vote, WO1 Ken ‘Sluggo’ Slater. 4th wheelbarrow in foreground – CAPT Roger Rix, LT Terry Lord..1P to .6P – Featured personnel are identified on captions below each photograph. ‘Unit Athletics 1980-81??’ annotated on cover sleeve. *Note the 1982 date is more likely, due to the dates of enlistments of junior personnel appearing in the photos.royal australian survey corps, rasvy, army survey regiment, army svy regt, fortuna -
 Flagstaff Hill Maritime Museum and Village
Container - Ink Bottle, from mid-19th century to 1902
... It was crudely made; maybe it was rejected as a practice bottle or perhaps heat or pressure has distorted it. The bottle was recovered from the wreck of the Inverlochy and is part of the John Chance collection. ...It was crudely made; maybe it was rejected as a practice bottle or perhaps heat or pressure has distorted it. The bottle was recovered from the wreck of the Inverlochy and is part of the John Chance collection. ...This ink bottle is ‘boat’ shaped, which was a common design from the mid-1840s. It was crudely made; maybe it was rejected as a practice bottle or perhaps heat or pressure has distorted it. The bottle was recovered from the wreck of the Inverlochy and is part of the John Chance collection. Ink in the 1700s ink could be purchased in powdered or block form from apothecary shops, to be mixed with water as needed. Then in the mid-1800s chemists began selling ink in liquid form, in small, inexpensive and often attractive bottles. The small glass ink bottles were handmade, blown into a cup shaped mould, and sharply broken off from the blow-pipe at the neck, referred to as the English-made ‘burst-off’ finish. The neck was then filed, filled with liquid ink and sealed with a cork or wax. It was a quick, affordable container and made pen and ink writing available to the public. The name ‘penny ink’ bottles was a common title due to their low cost. INVERLOCHY 1895-1902 - The Inverlochy was a steel sailing barque built in Scotland in 1895 for international trade. In 1902 the Inverlochy left Liverpool under the command of Captain E.R. Kendrick. There were 21 officers and crew and the captain’s wife Mrs Kendrick, on board, bound for Australia with cargo that included tools, chemicals, liquor (beer, whisky, stout, rum, and brandy), steel, iron, wire netting, hoop iron, tinplate and pig iron), and steel wire for the Melbourne Tramway Company, tiles, soap, soft goods and earthenware. On December 18 almost at their destination, the Inverlochy ran aground on Ingoldsby Reef at Point Addis, near Anglesea. The crew and passengers left the ship via lifeboat and landed at Thompson’s Creek, then walked about 20 kilometres to Barwon Heads. Salvagers were interested in the 10 miles of cable in the hold. Mrs Kendrick’s ‘high grade’ bicycle was amongst the items salvaged but she lost her jewellery and two pianos. By February 1903 the ship had broken up and objects such as bottles and casks of liquor were washed ashore. Bad weather shook the wreck in June 1903, causing the ship’s spars and figurehead to be washed ashore. This boat shaped handmade ink bottle is historically significant for its association with communications and record keeping in the mid-to-late 19th century. The bottle is socially significant as an example of making a useful product affordable to every day people. This handmade glass ink bottle is significant for its connection with the John Chance Collection, which is historically significant as an example of artefacts from wrecks that had been lost in the coastal waters of Victoria from thirty to over one hundred years before John Chance and others discovered them. These artefacts are a sample of goods carried as cargo or personal possessions, and of ship hardware of that era. The ink bottle is significant through its connection with the barque, Inverlochy, The Inverlochy is significant for its cargo, which is a snapshot of the array of goods imported into Australia at the turn of the 19th century, including cable for the Melbourne Tramway Company. The Inverlochy is historically significant and is registered on the Victorian Heritage Database, VHR S338. The wreck of the Inverlochy is important as an accessible dive site that shows the remains of a large international trading vessel and its contents. It is valuable for an insight into Victorian era of shipping and maritime history.Ink bottle, thick clear glass, rectangular base with small round mouth, long sides have have a U shaped groove along the shoulders (used for resting pen handles). The outside surface has a white clay-type reside over it. Bottle is very bent and distorted. flagstaff hill, warrnambool, flagstaff hill maritime museum, maritime museum, shipwreck coast, flagstaff hill maritime village, great ocean road, john chance, inverlochy, scotland, captain e.r. kendrick, melbourne tramway company, tramway cable, ingoldsby reef, point addis, anglesea, thompson’s creek, barwon heads, boat ink bottle, cottage ink, penny ink, glass ink bottle, pen rest, writing accessory, victorian, antique, ink well, sheer lip, distorted body, handmade, mould blown, statoionery -
 Flagstaff Hill Maritime Museum and Village
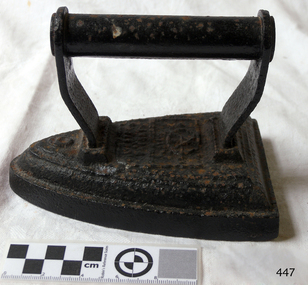
Domestic object - Iron
... It weighed almost 15 pounds (6.8 kg) and took a long time to heat. The UK Electricity Association is reported to have said that an electric iron with a carbon arc appeared in France in 1880, but this is considered doubtful. ...It weighed almost 15 pounds (6.8 kg) and took a long time to heat. The UK Electricity Association is reported to have said that an electric iron with a carbon arc appeared in France in 1880, but this is considered doubtful. ...Before the introduction of electricity, irons were heated by combustion, either in a fire or with some internal arrangement. An "electric flatiron" was invented by American Henry Seely White and patented on June 6, 1882. It weighed almost 15 pounds (6.8 kg) and took a long time to heat. The UK Electricity Association is reported to have said that an electric iron with a carbon arc appeared in France in 1880, but this is considered doubtful. Two of the oldest sorts of iron were either containers filled with a burning substance, or solid lumps of metal which could be heated directly. Metal pans filled with hot coals were used for smoothing fabrics in China in the 1st century BC. A later design consisted of an iron box which could be filled with hot coals, which had to be periodically aerated by attaching a bellows. In the late nineteenth and early twentieth centuries, there were many irons in use that were heated by fuels such as kerosene, ethanol, whale oil, natural gas, carbide gas (acetylene, as with carbide lamps), or even gasoline. Some houses were equipped with a system of pipes for distributing natural gas or carbide gas to different rooms in order to operate appliances such as irons, in addition to lights. Despite the risk of fire, liquid-fuel irons were sold in U.S. rural areas up through World War II. In Kerala in India, burning coconut shells were used instead of charcoal, as they have a similar heating capacity. This method is still in use as a backup device, since power outages are frequent. Other box irons had heated metal inserts instead of hot coals. From the 17th century, sadirons or sad irons (from Middle English "sad", meaning "solid", used in English through the 1800s[4]) began to be used. They were thick slabs of cast iron, triangular and with a handle, heated in a fire or on a stove. These were also called flat irons. A laundry worker would employ a cluster of solid irons that were heated from a single source: As the iron currently in use cooled down, it could be quickly replaced by a hot one. https://en.wikipedia.org/wiki/Clothes_ironThis iron is typical of the clothes iron used before electric irons superseded it.Salter iron no. 6, painted black but with rust showing through. Salter iron no. 6.flagstaff hill, warrnambool, shipwrecked-coast, flagstaff-hill, flagstaff-hill-maritime-museum, maritime-museum, shipwreck-coast, flagstaff-hill-maritime-village, iron, clothes, laundry -
 Department of Energy, Environment and Climate Action
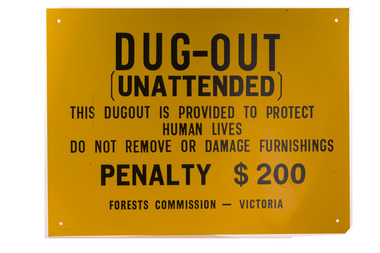
Dugout sign, Post 1966
... A hessian bag often hung at the entrance to keep the heat and smoke out. But they were dark and damp with snakes and other creepy crawlies often lurking inside. ...A hessian bag often hung at the entrance to keep the heat and smoke out. But they were dark and damp with snakes and other creepy crawlies often lurking inside. ...Considered in terms of both loss of property and loss of life, the Black Friday bushfires on 13 January 1939 were one of the worst disasters to have occurred in Australia and certainly the worst bushfire up to that time. The fires burnt 2 million hectares, 69 sawmills were destroyed, 71 people died, and several towns and sawmills were entirely obliterated. Among those killed were four men from the Commission The subsequent Royal Commission conducted by Judge Leonard Stretton has been described as one of the most significant inquiries in the history of Victorian public administration. Its recommendations led to sweeping changes. In addition to building dams and water points, the Stretton Royal Commission recommended expanding and controlling the use of bushfire dugouts at forest sawmills. Well-constructed dugouts had saved the lives of many sawmill workers and their families during the 1939 bushfires. But in some locations, they had proved fatal. Dugouts became mandatory for those few sawmills that remained in the forest after the 1939 fires. Many remote logging coupes and FCV roading camps also had dugouts. The local District Forester was required to make annual pre-season inspections of all dugouts on State forests and those within the Fire Protected Area (FPA). Some were built privately on private land. Most were primitive construction with a log or corrugated iron roof covered with earth. A hessian bag often hung at the entrance to keep the heat and smoke out. But they were dark and damp with snakes and other creepy crawlies often lurking inside. By 1940-41 there were 19 new dugouts constructed by the Commission and a further 128 by forest licensees. Ten years later there were 8 new Commission dugouts and 21 new ones built by other interests. By 1960-61 the rate of new builds was declining but the Commission still managed 103 dugouts while 127 were looked after by others. However, as the forest road network improved and gave all-weather access to modern two-wheel-drive vehicles the reliance on dugouts receded.Large metal sign that was positioned near forest dugoutsbushfire, forest signs, forests commission victoria (fcv) -
 Department of Energy, Environment and Climate Action
Rakehoe, McLeod Tool (American)
... Digging or raking a “mineral earth” trail down to bare dirt proved most effective in forest fuels which, unlike grass, tend to retain heat and smoulder. Early tools were whatever happened to be close at hand. ...Digging or raking a “mineral earth” trail down to bare dirt proved most effective in forest fuels which, unlike grass, tend to retain heat and smoulder. Early tools were whatever happened to be close at hand. ...Bushfire perimeter rather than bushfire area is the main control problem for firefighters on the ground. A conundrum rapidly compounded by spot fires. A small 5 ha fire can be nearly 1 km around the perimeter. That's a long way to build a control line by hand in rough bush. Dry firefighting techniques by hand were mostly confined to “knocking down” or “beating out” the flames, as well as "digging out". Digging or raking a “mineral earth” trail down to bare dirt proved most effective in forest fuels which, unlike grass, tend to retain heat and smoulder. Early tools were whatever happened to be close at hand. They were simple and primitive and included shovels, slashers, axes, hoes, beaters and rakes. A cut branch to beat the flames was often the only thing available. Farming and logging tools, developed over centuries of manual labour, and readily available at local hardware stores came into use, but little thought was given to size, weight, and balance. For years foresters experimented with combination tools. In about 1952 fire beaters and other implements were being replaced with Rakuts. However, its believed the now common Rakehoe is an Australian variation of the American McLeod Tool which was developed in 1905 by forest ranger Malcolm McLeod of the Sierra National Forest. The late Athol Hodgson advised that predecessors, Reg Torbet who had been the Chief Fire Officer for the Forests Commission from 1948-1956, along with his QLD counterpart Clive Price, went in late 1951 as Australian delegates on a 10 week fire study tour of Nth America organised by the United Nations. They came back with a couple of McLeod tools from Canada. Cam MacLeod (different spelling) had been the Head of Fire Research for the Canadian Forest Service at the time and had supplied them. The tools were ideal for deciduous forests in the eastern provinces and Clive arranged to have them manufactured in QLD. The Rakho, as it was then spelled, was first issued to FCV crews 65 years ago in 1955-56. The American Pulaski had been trialled, but never found favour with Australian firefighters.First used in 1955Rakehoe Combination of a heavy-duty six-toothed (each 9cm long) rake with a large, sturdy (25cm) hoe.bushfire, forests commission victoria (fcv) -
 Department of Energy, Environment and Climate Action
Rakehoe (McLeod Tool)
... Digging or raking a “mineral earth” trail down to bare dirt proved most effective in forest fuels which, unlike grass, tend to retain heat and smoulder. Early tools were whatever happened to be close at hand. ...Digging or raking a “mineral earth” trail down to bare dirt proved most effective in forest fuels which, unlike grass, tend to retain heat and smoulder. Early tools were whatever happened to be close at hand. ...Bushfire perimeter rather than bushfire area is the main control problem for firefighters on the ground. A conundrum rapidly compounded by spot fires. A small 5 ha fire can be nearly 1 km around the perimeter. That's a long way to build a control line by hand in rough bush. Dry firefighting techniques by hand were mostly confined to “knocking down” or “beating out” the flames, as well as "digging out". Digging or raking a “mineral earth” trail down to bare dirt proved most effective in forest fuels which, unlike grass, tend to retain heat and smoulder. Early tools were whatever happened to be close at hand. They were simple and primitive and included shovels, slashers, axes, hoes, beaters and rakes. A cut branch to beat the flames was often the only thing available. Farming and logging tools, developed over centuries of manual labour, and readily available at local hardware stores came into use, but little thought was given to size, weight, and balance. For years foresters experimented with combination tools. In about 1952 fire beaters and other implements were being replaced with Rakuts. However, its believed the now common Rakehoe is an Australian variation of the American McLeod Tool which was developed in 1905 by forest ranger Malcolm McLeod of the Sierra National Forest. The late Athol Hodgson advised that predecessors, Reg Torbet who had been the Chief Fire Officer for the Forests Commission from 1948-1956, along with his QLD counterpart Clive Price, went in late 1951 as Australian delegates on a 10 week fire study tour of Nth America organised by the United Nations. They came back with a couple of McLeod tools from Canada. Cam MacLeod (different spelling) had been the Head of Fire Research for the Canadian Forest Service at the time and had supplied them. The tools were ideal for deciduous forests in the eastern provinces and Clive arranged to have them manufactured in QLD. The Rakho, as it was then spelled, was first issued to FCV crews 65 years ago in 1955-56. The American Pulaski had been trialled, but never found favour with Australian firefighters.Rakhoeforests commission victoria (fcv), hand tools, forest harvesting, bushfire -
 Department of Energy, Environment and Climate Action
Pulaski
... Digging or raking a “mineral earth” trail down to bare dirt proved most effective in forest fuels which, unlike grass, tend to retain heat and smoulder. Early tools were whatever happened to be close at hand. ...Digging or raking a “mineral earth” trail down to bare dirt proved most effective in forest fuels which, unlike grass, tend to retain heat and smoulder. Early tools were whatever happened to be close at hand. ...Bushfire perimeter rather than bushfire area is the main control problem for firefighters on the ground. A conundrum rapidly compounded by spot fires. A small 5 ha fire can be nearly 1 km around the perimeter. That's a long way to build a control line by hand in rough bush. Dry firefighting techniques by hand were mostly confined to “knocking down” or “beating out” the flames, as well as "digging out". Digging or raking a “mineral earth” trail down to bare dirt proved most effective in forest fuels which, unlike grass, tend to retain heat and smoulder. Early tools were whatever happened to be close at hand. They were simple and primitive and included shovels, slashers, axes, hoes, beaters and rakes. A cut branch to beat the flames was often the only thing available. Farming and logging tools, developed over centuries of manual labour, and readily available at local hardware stores came into use, but little thought was given to size, weight, and balance. For years foresters experimented with combination tools. In about 1952 fire beaters and other implements were being replaced with Rakuts. However, its believed the now common Rakehoe is an Australian variation of the American McLeod Tool which was developed in 1905 by forest ranger Malcolm McLeod of the Sierra National Forest. The late Athol Hodgson advised that predecessors, Reg Torbet who had been the Chief Fire Officer for the Forests Commission from 1948-1956, along with his QLD counterpart Clive Price, went in late 1951 as Australian delegates on a 10 week fire study tour of Nth America organised by the United Nations. They came back with a couple of McLeod tools from Canada. Cam MacLeod (different spelling) had been the Head of Fire Research for the Canadian Forest Service at the time and had supplied them. The tools were ideal for deciduous forests in the eastern provinces and Clive arranged to have them manufactured in QLD. The Rakho, as it was then spelled, was first issued to FCV crews 65 years ago in 1955-56. The American Pulaski had been trialled, but never found favour with Australian firefighters.Pulaski Fire Tool Combines an axe and a grubbing hoe. Digging end and cutting end with short wooden handleforests commission victoria (fcv), hand tools, forest harvesting, bushfire -
 Department of Energy, Environment and Climate Action
Fire beater (canvas)
... Digging or raking a “mineral earth” trail down to bare dirt proved most effective in forest fuels which, unlike grass, tend to retain heat and smoulder. Early tools were whatever happened to be close at hand. ...Digging or raking a “mineral earth” trail down to bare dirt proved most effective in forest fuels which, unlike grass, tend to retain heat and smoulder. Early tools were whatever happened to be close at hand. ...Bushfire perimeter rather than bushfire area is the main control problem for firefighters on the ground. A conundrum rapidly compounded by spot fires. A small 5 ha fire can be nearly 1 km around the perimeter. That's a long way to build a control line by hand in rough bush. Dry firefighting techniques by hand were mostly confined to “knocking down” or “beating out” the flames, as well as "digging out". Digging or raking a “mineral earth” trail down to bare dirt proved most effective in forest fuels which, unlike grass, tend to retain heat and smoulder. Early tools were whatever happened to be close at hand. They were simple and primitive and included shovels, slashers, axes, hoes, beaters and rakes. A cut branch to beat the flames was often the only thing available. Farming and logging tools, developed over centuries of manual labour, and readily available at local hardware stores came into use, but little thought was given to size, weight, and balance. For years foresters experimented with combination tools. In about 1952 fire beaters and other implements were being replaced with Rakuts. However, its believed the now common Rakehoe is an Australian variation of the American McLeod Tool which was developed in 1905 by forest ranger Malcolm McLeod of the Sierra National Forest. The late Athol Hodgson advised that predecessors, Reg Torbet who had been the Chief Fire Officer for the Forests Commission from 1948-1956, along with his QLD counterpart Clive Price, went in late 1951 as Australian delegates on a 10 week fire study tour of Nth America organised by the United Nations. They came back with a couple of McLeod tools from Canada. Cam MacLeod (different spelling) had been the Head of Fire Research for the Canadian Forest Service at the time and had supplied them. The tools were ideal for deciduous forests in the eastern provinces and Clive arranged to have them manufactured in QLD. The Rakho, as it was then spelled, was first issued to FCV crews 65 years ago in 1955-56. The American Pulaski had been trialled, but never found favour with Australian firefighters.Fire Beater (canvas) 1930s designforests commission victoria (fcv), hand tools, forest harvesting, bushfire -
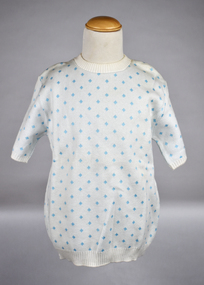 National Wool Museum
Textile - Children's Jumper, Kathryn Knitwear, c.1964-1970
... When dry, place brown paper or pressing cloth over garment and press with iron at correct heat. ORLON Wash as wool Lay flat to dry but DO NOT IRON. ...When dry, place brown paper or pressing cloth over garment and press with iron at correct heat. ORLON Wash as wool Lay flat to dry but DO NOT IRON. ...Kathryn Knitwear, founded by Robert Blake, manufactured high quality children’s knitwear in Melbourne from the 1940s – 1980s. Robert Blake began manufacturing children’s knitwear in his bedroom in Strathmore using a hand powered machine in the late 1940s. The operation moved to Ascot Vale and Essendon, before eventually establishing a factory in Moonee Ponds in the early 1950s. The business continued to expand, necessitating a move to a new factory in Broadmeadows. By 1962, the Broadmeadows factory was producing an average of 20,000 garments per month, which increased to 24,000 by 1964. Robert Blake’s Son, Brendan recalls that “The Kathryn brand was famous around Australia, anywhere children needed to keep warm and dress smartly. It also won a number of wool fashion awards”, including the 1969 Wool Awards, which was held by the Australian Wool Bureau and published in Women’s Weekly. The Kathryn range was designed for durability, comfort and care, without sacrificing style. They used patterning techniques that increase stretchiness, comfort and fit, as well as integrating decorative elements into the fabric to prevent them from being bulky, uncomfortable or tight. Making longevity of style a priority, Brendan Blake remembers that “there was one particular garment that was in the range for at least thirty years”. He also recalls “In the past, when women have found out that I was associated with Kathryn Knitwear, they would often relate to me the story of a garment they had purchased or received as a gift and, when their child had grown out of it, they would hand it on to another child. Several ladies have told me of purchasing garments for their daughters’ glory box, or saving a particular garment after their daughter had grown out of it. Brendan Blake: “At the peak of their operation they employed approximately two hundred people, mainly women and girls. A family would often seek to send their daughter to work in this company because they knew they would be looked after and safe. One lady wrote to me telling me that working at the Moonee Ponds Factory prior to getting married was the happiest time of her life.” In 1963, workers at the Kathryn factory earned £13 per week, which was 8 shillings and 8 pence higher than the minimum weekly wage for female workers in the textile manufacturing industry (£12 11s 4d). By 1970, the Kathryn Knitwear brand expanded from children’s knitwear into womenswear under the brand name ‘Lady Kathryn’, and for boys and men under ‘Robert Blake’. Continuing to diversify their distribution, they also began exporting ‘Kathryn’ garments to New Zealand, the Pacific Islands, and Japan. ‘Kathryn Knitwear’ was well-known for their early adoption of modern materials and techniques that had broad appeal to their customer base. This is shown in their early use of the acrylic fibre ‘Orlon’ in the 50s and 60s and ‘Superwash’ wool in the 1970s. Many of Kathryn Knitwear’s styles, particularly those that were long running staples of the brand, were available in both wool and Orlon to suit the consumer’s preference. Far from the humble origins of one man in his bedroom with a hand-cranked machine; at its closure in 1980, the Broadmeadows factory of ‘Kathryn’ housed more than 100 machines, including 53 sewing machines and 45 knitting machines. Robert Blake was “a passionate advocate for wool and Australian Made” throughout his whole life. A strong thread that ties through the lifespan of Robert Blake and Kathryn Knitwear is a balance between adopting new innovations without sacrificing the core values of durability, comfort, care and style that had made the brand so well known. Their legacy forms an integral part of both Australian social and manufacturing history.White short-sleeved jumper with all-over pattern of aqua blue diamonds. Blue floated threads slightly show through white on main body, leading to an overall pale blue effect on body, with white collar and cuffs. Closes with three pearlescent plastic buttons at back neck. .2 is a retail tag marked with the style code, and includes generic information on care for garments of different material composition..1) [label stitched into back neck of garment] KATHRYN REGD CREATED BY ROBERT BLAKE .2) [retail tag, intended to be folded in three, printed on both sides] [OBVERSE] KATHRYN Children’s Knitwear STYLE: [blue pen] S/35B SIZE: PRICE: / KATHRYN Garments are… • PRE-SHRUNK • STANDARD MEASUREMENTS • FIT EXACTLY • LAUNDER PERFECTLY / NOW .. KATHRYN GOES TO . . SCHOOL Ask your retailer for SCHOOL PULLOVERS by KATHRYN [REVERSE] WASHING INSTRUCTIONS WOOL Wash frequently to AVOID HEAVY SOILING Wash garment BY HAND, in lukewarm Velvet Soap suds. ON NO ACCOUNT RUB SOAP ON GARMENT. Squeeze suds gently through garment but DO NOT RUB. Rubbing will cause garment to thicken. RINSE AT LEAST TWICE IN CLEAN WATER TO REMOVE ALL SOAP. TO dry, roll garment in a towel to remove excess moisture, turn garment inside out and pull it lengthwise, DRY IN SHADE… AVOID SUNLIGHT. When dry, place brown paper or pressing cloth over garment and press with iron at correct heat. ORLON Wash as wool Lay flat to dry but DO NOT IRON. To keep brushed suits like new, brush frequently with nylon brush supplied. COTTON Wash by hand for preference in Velvet Soap suds. Rinse thoroughly in cold water and remove all excess water before drying on line. Please do not use any harsh detergent or bleach. Designed and manufactured by ROBERT BLAKE Pty. Ltd., MELB. (handwritten in pencil) S35 (untintelligible)/5 / NOW KATHRYN GOES TO SCHOOL Ask your retailer for SCHOOL PULLOVERS by KATHRYNknitwear, children's knitwear, clothing, children's clothing, jumper, manufacturing, fashion textile production, machine knitting, colourwork -
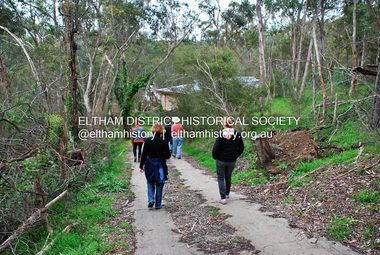 Eltham District Historical Society Inc
Photograph - Digital Photograph, Jim Connor, River Bend House, 130 Laughing Waters Road, Eltham, 7 September 2013
... Nillumbik Shire Council upgraded the property in 2012 with solar panels, a heat pump for hot water and double glazing to improve the comfort of the artists in residence and make the house more energy efficient. ...Nillumbik Shire Council upgraded the property in 2012 with solar panels, a heat pump for hot water and double glazing to improve the comfort of the artists in residence and make the house more energy efficient. ...Laughing Waters Walk, 7 Sep 2013 This Society excursion was a follow up to the Laughing Waters Story told to us by Jane Woollard at our Annual General Meeting in March 2013. It involved a walk commencing from the corner of Laughing Waters and Overbank Roads along Laughing Waters Road to its eastern end and returning partly over the same route - a total distance of about 2.5km. On the way we visited the two artist in residence properties, River Bend and Birrarung, to view the houses on them that are associated with Alistair Knox, Gordon Ford and others in the local mud brick and artistic community. We also able to walk around the derelict ruin which was once home to Gordon and Sue Ford, Boomerang House. An unexpected afternoon tea was offered to us by the artists in residence at Birrarung House and we had a brief opportunity to view inside the house. River Bend was designed and built by Alistair Knox for Rosemary and Bill Cuming in 1968. It sits in a deep cutting on a steep slope above the Yarra River and features floor to ceiling windows and glass doors set into mission brown timber frames and walls of reclaimed bricks in pinkish hue. Rosemary laid the brick paving around the house, a copy of the shell paving found in the ancient French town of Colmar, where the family had lived for a period. The kitchen was equipped with a 1960s stove as well as a cast iron wood stove reclaimed from Rosemary's sister's home in Armadale. Max and Tini Huygens, migrants from Holland, purchased the property in 1975 and named it Tilwinda from an Aboriginal word meaning 'hole in a rock'. In late 1981 Tini died after a short illness, but Max continued to live at Tilwinda until he moved to a retirement village in 2000 and the property was sold to Parks Victoria. Renamed River Bend, the property became part of the Laughing Waters Artist in Residency Program in 2008. Nillumbik Shire Council upgraded the property in 2012 with solar panels, a heat pump for hot water and double glazing to improve the comfort of the artists in residence and make the house more energy efficient. For a more in-depth description of the property and biographies of the various artists in residence commencing from 2008 to 2015, see Jane Woollard's book, "Laughing Waters Road; Art, Landscape & Memory in Eltham" published 2016.2013-09-07, activities, artists in residence, eltham district historical society, heritage excursion, jim connor collection, laughing waters road, river bend house -
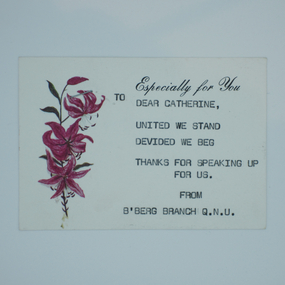 Australian Nursing & Midwifery Federation
Card from Queensland Nurses Union (Bundaberg Branch) to Catherine Hutchings, visiting Victorian nurses union staff member, 1993
... In February, Catherine went to the NT to talk to nurses in Darwin, Alice Springs and Katherine and despite some minor hiccoughs (the Health Department banned all the meetings so alternative venues had to be found) the turnout was gratifying - you have to be dedicated to attend a meeting held in a carpark in 32 C heat! Catherine says that the reception she received in both QLD and the NT was superb. ...In February, Catherine went to the NT to talk to nurses in Darwin, Alice Springs and Katherine and despite some minor hiccoughs (the Health Department banned all the meetings so alternative venues had to be found) the turnout was gratifying - you have to be dedicated to attend a meeting held in a carpark in 32 C heat! Catherine says that the reception she received in both QLD and the NT was superb. ...Thank-you card given to Australian Nursing Federation (Victorian Branch) staff member Catherine Hutchings by staff at the Bundaberg Branch of the Queensland Nurses Union. In 1993, Victorian Branch staff travelled throughout Queensland, Western Australia and the Northern Territory for a series of meetings on recent events impacting nurses' conditions in Victoria. The meetings were strategically held ahead of the 1993 Federal election to discourage the election of a Coalition government. The election of the Coalition government in Victoria in 1992 had seen the introduction of the Employee Relations Act, which saw the end of the state award system in Victoria. This gave employers greater powers to establish wages and conditions and less power to the Industrial Relations Commission, foreshadowing what would later occur at a Federal level. An article in the Victorian Branch newsletter 'On the Record' from April 1993 describes the 'tour'. Entitled 'Vic. Nurses Spreading the Word in Queensland, Western Australia and the Northern Territory', it explains: "Catherine Huntchin[g]s and Elizabeth Hulme recently spent a week in Queensland informing nurses about the effect of a Liberal Government on nurses. As well, Tracy Austin visited WA to talk to nurses there about life under Kenneyt [sic]. Catherine and Liz held a total of 23 meetings from Cairns to Brisbane, as well as giving media interviews. It was well worth the effort and certainly there was much support given to nurses in Victoria. Perhaps the most interesting issue was that many nurses did not realise that they may find themselves in the same situation if we have a change in Federal Government. In February, Catherine went to the NT to talk to nurses in Darwin, Alice Springs and Katherine and despite some minor hiccoughs (the Health Department banned all the meetings so alternative venues had to be found) the turnout was gratifying - you have to be dedicated to attend a meeting held in a carpark in 32 C heat! Catherine says that the reception she received in both QLD and the NT was superb. "Everyone went out of their way to make us feel very welcome, and to shower us with sympathy over the situation. More important, is the fact that the information was distributed so no matter how the votes go on March 13 [1993, federal election] - they will be informed votes." she said. Catherine, Liz and Tracy extend sincere thanks to all interstate nurses who made their visits a success."Typed card given with flower bouquet. Printed on one side with personalised, typed message 'DEAR CATHERINE, UNITED WE STAND DEVIDED [sic] WE BEG THANKS FOR SPEAKING UP FOR US. FROM B'BERG [Bundaberg] BRANCH Q.N.U. [Queensland Nurses Union]'.nursing, nurses, unionism, solidarity, victoria, queensland, bundaberg, campaigning, 1993 federal election, 1992 victorian election, australian nursing federation, trade unions, politics, queensland nurses union, qnu, anf -
 Bendigo Military Museum
Photograph - Continuous Indoor Cricket World Record Attempt, Seymour, Victoria, 1986
... The event was held at the Seymour Indoor Cricket Centre, an iron-roofed building with no air-conditioning, and all players had to battle the effect of the stifling heat in addition to fatigue. One player dropped out through exhaustion, but this did not prejudice the record attempt as the rules permitted each team to lose a player who cannot return to the game nor be replaced. ...The event was held at the Seymour Indoor Cricket Centre, an iron-roofed building with no air-conditioning, and all players had to battle the effect of the stifling heat in addition to fatigue. One player dropped out through exhaustion, but this did not prejudice the record attempt as the rules permitted each team to lose a player who cannot return to the game nor be replaced. ...This is a set of 12 photographs of Army teams from the Army Survey Regiment, Bendigo and the Army School of Transport, Puckapunyal attempting a world record playing indoor cricket, at Seymour Victoria from the 31st of January to the 5th of February 1986. The following article appeared on the back page of the ARMY Newspaper on Thursday 6th of March 1986. 'INDOOR CRICKET RECORD SMASHED. ARMY TEAMS from Puckapunyal and Bendigo recently played indoor cricket for 124 hours to set a new world record. The two eight-man teams, from Army School of Transport and Army Survey Regiment, broke the 120 hour record set by Corrimal High School, NSW earlier this year. Organiser of the event, Capt Marty Alsford of AST told ARMY the teams had played 107 games, scoring 15,000 runs in their chase for the record. "The rules allowed a five-minute rest break every hour which could be accrued, so we played for 64 hours straight then had a five hour sleep. "When everybody got up and went straight back into the game with no grumbling, I knew we had the record," Capt Alsford said. The event was held at the Seymour Indoor Cricket Centre, an iron-roofed building with no air-conditioning, and all players had to battle the effect of the stifling heat in addition to fatigue. One player dropped out through exhaustion, but this did not prejudice the record attempt as the rules permitted each team to lose a player who cannot return to the game nor be replaced. The Army teams' effort are now awaiting recognition by the Guinness Book of Records. During the marathon event, the soldiers raised money for Legacy, through sponsorships and a raffle. At the time ARMY went to press, the final figure was not available.’ Army Survey Regiment Routine Orders Part 1 Issue No 16/86 Notices on Page 7 stated: ‘World Record Indoor Cricket. 1. Congratulations to the following members for their successful attempt on the Guinness Book of Records, Record for continuous playing of indoor cricket: John Whaling, Peter Ball, Brenton McDonald, Per Andersen, John Anderson, Brian Fauth, Brett McAllister and Daryl South. 2. Our team, playing a team from Army School of Transport at Seymour played continuous Indoor Cricket for 124 hours, beating the existing record by 4 hours. During that time the two teams amassed a total in excess of 16,000 runs. 3. Congratulations also to Peter Ball for picking up the Trophy for the most outstanding player during the record attempt.’This is a set of 12 photographs of Army teams from Bendigo and Puckapunyal attempting a world record playing indoor cricket, at Seymour Victoria in February 1986. The photographs were printed on photographic paper and are part of the Army Survey Regiment’s Collection. The colour photographs were scanned at 300 dpi. .1) - Photo, colour, 1986, L to R: John ‘Junior’ Whaling, Marty Alsford. Background L to R: Peter Ball, unidentified, John ‘Flash’ Anderson. .2) - Photo, colour, 1986, L to R: John ‘Junior’ Whaling, unidentified, Peter Ball. .3) to .7) - Photo, colour, 1986, unidentified participants. .8) - Photo, colour, 1986, L to R: unidentified, Peter Ball, Brett McAllister, John ‘Junior’ Whaling. .9) - Photo, colour, 1986, L to R: unidentified, John ‘Flash’ Anderson, Brian Fauth, unidentified, Peter Ball, unidentified (x2). .10) - Photo, colour, 1986, Army School of Transport (red & white uniform) - back row L to R: unidentified (x4), front row L to R: unidentified (x3), Marty Alsford. Army Survey Regiment (dark green uniform) - back row L to R: Brett McAllister, John ‘Flash’ Anderson, Brian Fauth, Per Andersen, front row L to R: John ‘Junior’ Whaling, Daryl South, Brenton McDonald, Peter Ball. .11) & .12) - Photo, colour, 1986, Army Survey Regiment (dark green uniform) - back row L to R: Peter Ball, Per Andersen, Brett McAllister, Brian Fauth, front row L to R: Brenton McDonald, John ‘Flash’ Anderson, Daryl South, John ‘Junior’ Whaling..1P to .12P –No personnel are identified. ‘Attempt at World Record for Indoor Cricket 31 Jan - 5 Feb 1986’ annotated on cover sleeve.royal australian survey corps, rasvy, army survey regiment, army svy regt, fortuna -
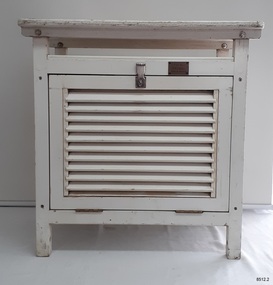 Flagstaff Hill Maritime Museum and Village
Equipment - Stevenson Screen, Thomas Stevenson, ca. 1910
... The screens have been used to shelter and protect thermometers and other meteorological instruments from rain and direct heat while the holes and double-louvre walls allowed air to flow around them. ...The screens have been used to shelter and protect thermometers and other meteorological instruments from rain and direct heat while the holes and double-louvre walls allowed air to flow around them. ...Stevenson screens were first introduced in Australia in the 1880s and were widely installed by 1910. The screens have been used to shelter and protect thermometers and other meteorological instruments from rain and direct heat while the holes and double-louvre walls allowed air to flow around them. Sometimes other meteorological instruments were included in the weather stations, so there were different Stevenson Screen sizes. This authentic, original Stevenson screen was previously owned by the Australian Bureau of Meteorology and was used for many years for weather readings at the Cape Otway Light Station in southwest Victoria. The Lighthouse Keepers recorded the readings for minimum and maximum temperatures at 9 a.m. every day from January 1865 until April 1994. The equipment was sheltered in a Stevenson Screen from 1902 until April 15 1994, when the mercury thermometer was replaced by a platinum resistance probe within an Automatic Weather Station (AWS). This Stevenson screen is one of the two screens that then became redundant. The other Stevenson screen was kept to display to visitors. Lightkeepers were no longer required at the Cape Otway Light station either, due to the automated system. The meteorological instruments donated with the screen were used for measuring temperature and humidity. They are mounted on a metal bracket that fits across the screw holes on the screen’s internal frame. The glass-covered Relative Humidity (RH) sensor was made by the renowned precision instrument maker, Rotronic AG of Switzerland, which was founded in 1965. The firm made its first electronic temperature and humidity instrument in 1967. Meteorological records have been collected in Australia from the 1800s. The records were collated, published and used as a basis for weather forecasts. Many sectors, such as maritime and agriculture industries, have relied on these figures for making important decisions. The quality and placement of the meteorological instruments used to measure temperature and humidity are of utmost importance for accuracy. In early colonial times, there were no national standards for meteorological instruments that would allow for accurate figures and comparisons. Once the Bureau of Meteorology was established (around 1908 to 1910) the department installed Stevenson screens throughout Australia, many at lighthouses and light stations, and the measuring instruments were standardised. The Stevenson Screen was named after its inventor, Scottish Civil Engineer Thomas Stevenson (1818-1887) who was also the father of Robert Louis Stevenson, author. Stevenson developed the small thermometer screen around 1867. It had double-louvred walls around the sides and a top of two asbestos sheets with an air space between them and was thickly painted with a white coating that reflected the sun’s rays. This design was modified in 1884 by Edward Mawley of the Royal Meteorological Society. Standards were set for the locations of the screens and instruments, including their distance above ground level and the direction the door faced.Stevenson screens played a significant part in providing a standardised shelter for all meteorological instruments used by the Australian Bureau of Meteorology from about 1910 until 1994. The readings from the instruments gave the meteorological statistics on which weather forecasts throughout Australia were based. This Stevenson screen was used locally at Cape Otway, along the Great Ocean Road in southwest Victoria, so contributed towards our local forecasts and weather warnings.Stevenson screen, original, from the Australian Bureau of Meteorology’s weather station at the Cape Otway Lighthouse. The screen is a white wooden cupboard with a slanted cover raised above the top. The top has ten drilled ventilation holes, and the sides and door are made of downward-slanting double louvres. Two brass hinges join the door to the lower edge of the screen and a metal fitting at the top edge allows for a padlock closure. The screen is supported on four short legs, each with a hole drilled from side to side for fitting to a frame. Inside the screen are two wooden frames fitted with hooks and screws. The floor has three boards; one across the back and one across the front at the same level, and a board wider than the space between these boards is fitted higher, overlapping them slightly. Inside the screen, a pair of electronic instruments with short electric cables is mounted on a metal bracket with drilled holes in it. One of the instruments is a Relative Humidity (RH) probe. It is 26 cm long and is a glass tube with a filter on one end and an electrical connection on the other. It has inscriptions on its label, showing that was made by Rotronic AG, Switzerland. The other instrument is a Resistance Temperature Device (RTD) thermometer. It is 22.5 cm long and has a narrow metal probe joined to a hexagonal metal fitting. A brass plate on the front of the screen has impressed inscriptions. The screen is Serial Number 01/C0032, Catalogue Number 235862.Stamped into brass plate "CAT. NO. / 253862 / SERIAL NO. 01/C0032" On instrument’s electrical fitting; “CD2” [within oval ‘+’ above S] “Serie693 op65 / 220/380V~16A” On instrument’s glass; “rotronic ag” “SWISS MADE” “CE / CH-8303 / Bassersdorf” Symbol for [BARCODE] “ART NO MP 101A_T4-W4W” “POWER 4.8.30VDC“ “OP. RANGE: 0-100%RH/-40+60° C” “OUT H 0-100% 0-1V” “OUT T -40+60°C -0.4..+0.6V” “SERIE NO 19522 009”flagstaff hill maritime museum and village, warrnambool, maritime museum, maritime village, great ocean road, shipwreck coast, cotton region shelter, instrument shelter, thermometer shelter, thermoscreen, thermometer screen, measuring instruments, meteorological instrument, weather recording, weather station, lighthouse equipment, light station equipment, stevenson screen, marine instruments, mercury thermometer, platinum resistance probe, aws, automatic weather station, rotronic ag, swiss made, meteorological device, weather forecast, weather prediction, weather records, meteorological forecast, meteorological record, australian bureau of meteorology, bureau of meteorology, bureau, bom, relative humidity, rh, relative humidity probe, resistance temperature device, rtd, thermometer, temperature, humidity, cape otway, cape otway lighthouse, cape otway light station, rotronic, switzerland, swiss instrument, thomas stevenson, double-louvered walls, edward mawley, royal meteorological society, 01/c0032, serial number, cat. no. 235862, serial no. 01/c00323 -
 Federation University Historical Collection
Letter - Correspondence, Letter on Bendigo United Pyrites Company Letterhead, 1898, 1898
... Care is taken at the furnace to regulate the heat, otherwise the pyrites might slag instead of roasting evenly right through. ...Care is taken at the furnace to regulate the heat, otherwise the pyrites might slag instead of roasting evenly right through. ..."The United Pyrites Company's Works are situated about three quarters of a mile from Spargo Brothers, and are on the northern side of the Marong road, in Pinch-gut Gully. Two processes are followed at these works, viz., the amalgamating process and the treatment by means of chlorine gas. The latter is called the Newbery-Vautin system, and the mode pursued is that laid down by Mr. Cosmo Newbery and Mr Vautin, whose names have been given to the process. Mr. Edwards manages these works. Three reverbatory furnaces are used to roast the pyrites, which is weighed in the truck before being put into the furnaces. At this weighbridge a sample of each lot is kept, and if the yield is not equal to expectation, the works are carefully gone over to see where the fault occurs. Care is taken at the furnace to regulate the heat, otherwise the pyrites might slag instead of roasting evenly right through. An immense revolving furnace (made of boiler iron) was used at these works. It was found to be suitable for treating blanket sand, but was not a success for roasting coarse pyrites. The process of amalgamating by means of Chilian mills is the same in these works as at the Western Works, but the United Works are on a larger scale, and eleven mills are utilised. It is the chlorine gas process which is most interesting here. The gas is made from sulphuric acid, black oxide of manganese, and common salt, and the gas is introduced into huge vats, where it works its way through a filter of pieces of quartz and then through the bed of roasted pyrites lying above. The action of the gas transforms the gold into chloride of gold. This is easily dissolved in water, and in that form is drawn off into huge delf jars, where the use of sulphate of iron precipitates the gold to the bottom. A small battery—eight head of stamps in two boxes—is in use here to crush small consignments of stone sent for trial. Test crushings come from all the Australasian colonies, and even from India. The jars used are manufactured at Epsom, and some of the salt used is also of home manufacture, from the Salt Lakes on the Northern plains. Mr. Edwards took us over a new building in course of erection, and in which the chlorine gas is to be generated in the midst of the pyrites— a still further advancement in the new process. There is some very good machinery in this new building, and the tailings from the ordinary pyrites works will also be treated by this chlorine gas system, which has been found to work well at Mount Morgan, in Queensland. The purest of gold is obtained by this process, the gold passing in solution into a charcoal filter, from which it emerges in the shape of metallic gold. We saw some nice cakes of retorted gold at the works. One of 26oz. was from some New Zealand pyrites (2½ tons), and assayed over 23 carats. There were also cakes of Avoca gold, of silver, and of the tremulous amalgam." (The Argus, 4 February 1887)Two handwritten letters to the Ballarat School of Mines on Bendigo United Pyrites Company Letterhead.bendigo united pyrites company, pyrites, ballarat school of mines, j.j. deeble, joel deeble, joel james deeble, a.m. dean, fred j. martell, martell, s.h. cowan, letterhead -
 Surrey Hills Historical Society Collection
Photograph, Mr Lance Young
... By 1930 Young's range had expanded and the product range included items like distilled water, gasket cement, vulcanising heat patches, rust prevention and many more diverse products. ...By 1930 Young's range had expanded and the product range included items like distilled water, gasket cement, vulcanising heat patches, rust prevention and many more diverse products. ...Ernest Lance Young was born 24 March 1915 in Surrey Hills, the son of Ernest Augustus Young and Ruby Nichell Whitty. He married Beryl Mair in 1939 and died on 5 October 1999 at Mont Albert. Electoral rolls list him as a manufacturer. His address after marriage was 11 York Street, Mont Albert. He is buried in Box Hill Cemetery (M-*-0867) along with his father. He served in WW2 (Service Number - VX104733 enlisting at St Kilda) and after returning took over his father's business. Young's Motor Products have manufactured products for the automotive and other related industries, including chemical trades, since 1920. Business history: Young's commenced trading in 1917 when Mr Ernest Augustus Young started selling paint brushes. At this time the company was known as E.A.Young & Co. with business premises in Queen Street Melbourne. Ernest soon expanded into paints and other products for the rapidly growing automotive trade and by 1920 was well recognised as a leading supplier. At this time canvas hoods were the norm and Ernest produced a "Canvas Hood Dressing" which gained acceptance as 'the one to buy'. This product was exported throughout the world. By 1930 Young's range had expanded and the product range included items like distilled water, gasket cement, vulcanising heat patches, rust prevention and many more diverse products. Young's name then, was so well known in Australia and the world, that a letter could be addressed just "Young's Melbourne" and it would reach the company. Young's survived the great depression, but in 1939 the Australian government commandeered the factory with all plant and equipment, thus closing Young's for the duration of the WW2. Ernest continued to make products at home for the war effort. When his son, Lance, returned home from overseas war service in Singapore, the Young's factory was re-established at 405 Canterbury Road, Canterbury near Chatham Station and worked to regain markets lost in the 1940s. By 1980 Lance Young wished to retire, his immediate family didn't want to continue the business and Lance believed Australia would lose a great asset if he just closed the company. He sought to find someone within the motor trade who would uphold the Young's principles of product and service and in 1981 Allan Kennedy & Sons bought the business.Lance Young was retained as an active consultant until his death in October 1999, aged 84. Products: Superseal for radiators, tyre dressing (tyre black), car shampoo, hood dressing, leather and vinyl cleaner. The factory was later elased to B&D Rollerdoors. REF: Personal communication (Laurie Newton, nee Young) and http://youngsmp.com.au/comprof.htm Part of a large collection of material related to the Young, Mair and Deakin families.A sepia studio photo of a young man in a suit and tie.On rear: "Lance Young"; photographer's stamp: "THE GLEN STUDIO / 133 GLENFERRIE RD / GLENFERRIE VIC"ernest lance young, lance young, ernest augustus young, young's motor products, 405 canterbury road, ww2 -
 Flagstaff Hill Maritime Museum and Village
Ceramic - Stoneware Bottle, Henry Kennedy Pottery, Late 1800s to early 1900s
... Pottery production reaches a high scale which presented a high risk of fire and Barrowfield was no exception. In April 1884 heat from a kiln set fire to the roof resulting in significant structural damage, the loss of unfinished wares alone amounting to £10,000 a very substantial sum in 1884. ...Pottery production reaches a high scale which presented a high risk of fire and Barrowfield was no exception. In April 1884 heat from a kiln set fire to the roof resulting in significant structural damage, the loss of unfinished wares alone amounting to £10,000 a very substantial sum in 1884. ...This bottle was made in Scotland and recovered decades later from a shipwreck along the coast of Victoria. It may have been amongst the ship's cargo, its provisions or amongst a passenger's personal luggage. It is now part of the John Chance collection. Stoneware bottles similar to this one were in common use during the mid-to-late 19th century. They were used to store and transport. The bottles were handmade using either a potter's wheel or in moulds such as a plaster mould, which gave the bottles uniformity in size and shape. The bottle would then be fired and glazed in a hot kiln. Makers often identified their bottles with the impression of a small symbol or adding a colour to the mouth. The manufacturer usually stamped their bottles with their name and logo, and sometimes a message that the bottle remained their property and should be returned to them. The bottles could then be cleaned and refilled. The Barrowfield pottery was founded in 1866 by Henry Kennedy, an Irish native, in the Camlachie district east of Glasgow, close to the Campbellfield and Mount Blue potteries. It is believed that Kennedy started with just one kiln but by 1871 was employing forty men and six boys and such was the success of the enterprise that by 1880, no less than eight kilns were in operation and a year later one hundred and the pottery was employing eighteen people. Stoneware bottle production was a mainstay of the pottery and over “1500 dozen” were being turned out daily along with other wares, including 30-gallon ironstone containers. With so many kilns in operation, six hundred saggars were required every week but, unlike some potteries, these were made on the premises from Garnkirk and Glenboig fire clays. Pottery production reaches a high scale which presented a high risk of fire and Barrowfield was no exception. In April 1884 heat from a kiln set fire to the roof resulting in significant structural damage, the loss of unfinished wares alone amounting to £10,000 a very substantial sum in 1884. The pottery recovered from this reverse but then Henry Kennedy died in July 1890. The terms of his will indicated that he and his sons John and Joseph were partners and this was reflected in a change of title in the 1891-92 Post Office Directory to Henry Kennedy & Sons. Despite the growth of the business there was still space enough, however, to allow china, earthenware and glass retailers Daniel and John McDougall to commence production of their Nautilus wares there in 1894, the success of which allowed them to soon move to permanent quarters at the empty Saracen Pottery, Possil. In around 1900 John Kennedy left to resurrect the liquidated Cleland Pottery and although Barrowfield remained listed as Henry Kennedy & Sons, brother Joseph was in control. In 1911 Henry Kennedy & Sons Ltd was formed, with two of the four directors being the Kennedy brothers. The pottery’s growth to this point was reflected in the eighteen kilns the largest pottery kilns then recorded in Scotland. However, the disruption of the First World War and the combined effects of subsequent economic depression, US prohibition, hygiene regulations and competition from alternative materials posed severe challenges for stoneware potteries in the post-war years as they competed with each other for diminishing markets. Competitors such as Eagle and Caledonian Potteries fell by the wayside and finally, Barrowfield closed in 1929. This stoneware bottle is historically significant for its manufacture and use in the late 19th to the early 20th century. The bottle is also significant as it was recovered by John Chance, a diver, from a wreck on the coast of Victoria in the 1960s-70s. Items that come from several wrecks along Victoria's coast have since been donated to the Flagstaff Hill Maritime Village’s museum collection by his family, illustrating this item’s level of historical value. Stoneware was produced at Barrowfield pottery for the domestic and export markets, with South America being a large market. Barrowfield stoneware can be found throughout the world. Its longevity and abundant production makes the subject item a significant addition to the Flagstaff Hill Maritime Museum collection.Bottle, salt glazed stoneware, beige, some discolouration above base. Chip on base and on neck. Inscriptions stamped near base.Makers lozenge stamped, H Kennedy Barrowfield Pottery GLASGOW at base.flagstaff hill, warrnambool, flagstaff hill maritime museum, maritime museum, shipwreck coast, flagstaff hill maritime village, great ocean road, john chance, h kennedy pottery, stoneware, ironstone, pottery, barrowfield glasgow -
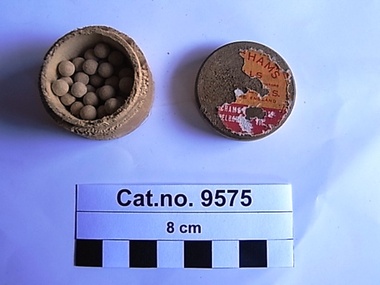 Coal Creek Community Park & Museum
Box, pill, 1930-1940 ref: Museum of Applied Arts and Sciences
... . : 1848 - 1957), Friday 19 December 1884, page 7 'A WONDERFUL MEDICINE BEECHAMS PILLS Are admitted by thousands to be worth above a guinea a box for bilious and nervous disorders such as wind and pain in tho stomach, sick headache, giddiness, fulness and swelling after meals dizziness and drowsiness, cold chills, flushings of heat, loss of appetite, shortness of breath costiveness, scurvy, blotches on the skin, disturbed sleep, frightful dreams, and all nervous and trembling sensations, &c The first dose will give relief in 20 minutes This is no fiction, for they have done it in thousands of cases. .... : 1848 - 1957), Friday 19 December 1884, page 7 'A WONDERFUL MEDICINE BEECHAMS PILLS Are admitted by thousands to be worth above a guinea a box for bilious and nervous disorders such as wind and pain in tho stomach, sick headache, giddiness, fulness and swelling after meals dizziness and drowsiness, cold chills, flushings of heat, loss of appetite, shortness of breath costiveness, scurvy, blotches on the skin, disturbed sleep, frightful dreams, and all nervous and trembling sensations, &c The first dose will give relief in 20 minutes This is no fiction, for they have done it in thousands of cases. ...As per another example in better condition displayed on shelf above Drawers 1+2 in Chemist ' Beechams Pills as sold by the proprietors St.Helens, Lancashire England. Beechams Pills Ltd. Melbourne VIC'. Earliest mention in Victorian Newspapers TROVE : Argus (Melbourne, Vic. : 1848 - 1957), Friday 19 December 1884, page 7 'A WONDERFUL MEDICINE BEECHAMS PILLS Are admitted by thousands to be worth above a guinea a box for bilious and nervous disorders such as wind and pain in tho stomach, sick headache, giddiness, fulness and swelling after meals dizziness and drowsiness, cold chills, flushings of heat, loss of appetite, shortness of breath costiveness, scurvy, blotches on the skin, disturbed sleep, frightful dreams, and all nervous and trembling sensations, &c The first dose will give relief in 20 minutes This is no fiction, for they have done it in thousands of cases. Every sufferer Is earnestly invited to try one box of these pills, and they will be acknowledged to be WORTH A GUINEA A BOX. For females of all ages these pills are invaluable as a few doses of them carry off all humours and bring about all that is required No female should be with-out them There is no medicine to be found to equal Beecham's Pills for removing any obstruction or Irregularity of the system. If taken according to the directions given with each box they will soon restore females of all ages to sound and robust health For a weak stomach, impaired digestion, and all disorders of the liver they act like "Magic, and a few doses will be found to work wonders upon the most important organs of the human machine They strengthen tho whole muscular system, restore the long lost complexion bring back the keen edge of appetite, and arouse into action with the rosebud of health, the whole physical energy of the human frame These are ' facts ' admitted by thousands embracing all classes of society, and one of the best guarantees to the nervous and debilitated Is Beechams Pills have the largest sale of any patent medicine in the world Full directions are given with each box Sold by all druggists and patent medicine dealers throughout the colonies'. Most recent article in Victorian newspapers : TROVE : Wodonga and Towong Sentinel (Vic. : 1885 - 1954), Friday 24 December 1954, page 1. 'MUM KNOWS BEST SHE KEEPS THE FAMILY FIT WITH BEECHAM'S PILLS SAFE because Beecham's Pills contain no harmful habit-forming drugs-they are a purely vegetable laxative. Pills balanced formula gives natural laxative action without harsh purgative effects banishes constipation. MOTHERS know how to keep growing children in their teens fit and happy-with Beecham' s Pill, the family laxative. TAKE Beecham's Pills WORTH A GUINEA A BOX'. Relevant local newspaper article reference : TROVE : Gippsland Times (Vic. : 1861 - 1954), Thursday 29 October 1942, page 1 'ln times like these old friends are best You will not have to go far before finding a friend who can tell you by personal experience how gentle and reliable Beecham's Pills are--and how effectively they banish head aches. digestive upsets and liverish ness. Purely vegetable....1/-....2/...per box Worth a guinea a box' Cylindrical wooden box with the remains of an orange, red and white printed label on top, containing small orb shaped pills.Label on lid : Beecham's pills...............Beecham's Pills Ltd., Melbourne, Vic.laxitive, pills -
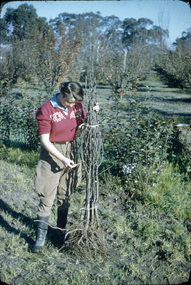 University of Melbourne, Burnley Campus Archives
Photograph - Colour slides, Thomas H. Kneen, Burnley Views, 1956-1969
... Orchard blossom. (14) View of Administration Building at sunset Aug 1964. (15) Rose 'Heat Wave.' May 1965. (16) Kneen child sitting under a tree May 1966. (17) 'Department of Agriculture Burnley Gardens' sign May 1966. (18) Administration Building May 1966. (19) Plant Science Block May 1966. ((20) Wintersweet August 1966....Orchard blossom. (14) View of Administration Building at sunset Aug 1964. (15) Rose 'Heat Wave.' May 1965. (16) Kneen child sitting under a tree May 1966. (17) 'Department of Agriculture Burnley Gardens' sign May 1966. (18) Administration Building May 1966. (19) Plant Science Block May 1966. ((20) Wintersweet August 1966. ...Contributor: T.H. KneenBox of 47 slides, some labelled. (1) "Marjorie Hall 1st Year Student June '56 No. 1872." Working with fruit tree stock. (2) "Orchard June 1956 No. 1710." 2 men and a tractor.(3) "Camp 1957." Wilson's Promontory. (4) View of Drive No. 1677." C. 1958 (5) "GenView No. 1771." (6) "Burnley Gardens Entrance 4.4.58 N0. 1672." (7) "Wilson's Promontory Lilly Pilly Gully Nov 1960." (8) Dec '62." (9) "Dec '62." Kneen child. (10) Luffmann Ponds "Aut. 1962." (11) Grevillea Sep 1963. (12) Sep 1963.Reflection of Crack Willow in Luffmann Ponds. (13) Sep 1963. Orchard blossom. (14) View of Administration Building at sunset Aug 1964. (15) Rose 'Heat Wave.' May 1965. (16) Kneen child sitting under a tree May 1966. (17) 'Department of Agriculture Burnley Gardens' sign May 1966. (18) Administration Building May 1966. (19) Plant Science Block May 1966. ((20) Wintersweet August 1966.(Actually appears to be Witch Hazel Hamamelis mollis.) (21) Student on tractor in the Orchard October 1966. (22) Garden view, view of Principal's Residence through blossom trees October 1966. (23) Students walking through the Gardens October 1966. (24) "Leaf Cuttings Rex begonia 2 October 1966. (25) Emily Gibson beds October 1966. (26) Principal's Residence in a garden view October 1966. (27) Garden view looking towards the Principal's Residence and the Shady Garden October 1966. (28) Drive looking towards the Administration Building from the Plant Research Institute. (29) Kneen child (not Burnley?) (30) Unveiling of Burnley Horticultural College plaque commemorating 75 years, 1891-1966 - Eric Littlejohn, ?, T.H. Kneen. Includes key to Pavilion 1969. (31) "Rose Pruning Demo - Canteen." July 1969. (32, 33) "Rose Pruning Demo 1969." July 1969. (34) "Plant Science Block & College." July 1969. (35) Plant Science Block 6/69." July 1969. (36) "Burnley Gardens 6/69." looking towards Dairy and Yarra Boulevard (37) "Pond No. 1717." (38) "Pond 1748." Kneen children playing by the Luffmann Ponds, Oak tree behind.. (39) Ginkgo leaves June 1967. (42) ? (43) Erithyna caffra in flower (removed 2016) December 1966. ((44) Administration Building and Nursery from PRI." (45) Pelargoniums. (46) Azalea mollis (47) Pelargonium foreground, geranium background.marjorie hall, students, fruit trees, orchard, tractor, wilson's promontory, burnley gardens, entrance, drive, garden view, luffmann ponds, grevillea, rose, kneen family, sign, wintersweet, plant science block, administration building, students working outside, principals residence, plaque, rose pruning demonstrations, ginkgo, pelargoniums, erythryna -
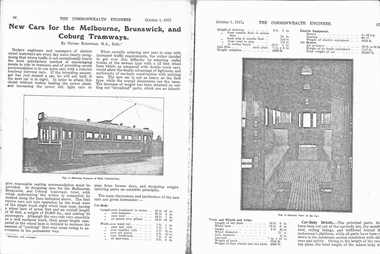 Melbourne Tram Museum
Document - Report, The Commonwealth Engineer, Electrical Engineer, The Electrical Engineer and Merchandiser, Noiseless Tramcar - first Australian Vehicles - Bogies fitted have special noise reducing features, 1917 - 1951
... Set of 12 reports, photocopied onto heat sensitive paper from various magazines. ...Melbourne Tram Museum 8 Wallen Road Hawthorn melbourne Trams tramways MMTB MBCTT New Tramcars VR Bogie Trams Birney X Class W2 class Y Class Y1 Class W3 class One Man Trams W4 class W5 class SW5 class PCC Class Tramcar Design Electrical Engineering Set of 12 reports, photocopied onto heat sensitive paper from various magazines. ...Set of 12 reports, photocopied onto heat sensitive paper from various magazines. Documents match the image numbers. .1 - 2 pages, from The Commonwealth Engineer, 1/10/1917 - "New Cars for the Melbourne Brunswick and Coburg Tramways", written by Straun Robertson. .2 - 2 pages, from The Commonwealth Engineer, 1/3/1919 - "Double Bogie Combination Tram Car - St Kilda Brighton Electric Line". .3 - 2 pages - Electrical Engineer - 15/6/1924 - "One Man cars for Melbourne and Geelong Vic. The Brill Birney Safety Car" .4 - 1 page - Electrical Engineer - 15/11/1925 - "Standard Car for Melbourne Tramways" - has sketch of W2 369. .5 - 2 pages - Electrical Engineer - 15/8/1927 - "New Bogie car for Melbourne Tramways" Y class. .6 - 2 pages - Electrical Engineer -15/3/1936 - "Tramcar of New type for Melbourne - Large car for Two-man or One-man operation" - Y1 class .7 - 3 pages, The Electrical Engineer and Merchandiser - 15/3/1932 - "Modern Tramcars for Melbourne - Design for reduction of noise and construction with electrical Welding" W3 class. .8 - 2 pages, The Electrical Engineer and Merchandiser - 15/11/1933 - "New Tramcars for Melbourne" - has sketch of the W4 class tram. .9 - 3 pages, The Electrical Engineer and Merchandiser - 16/12/1935 - "Melbourne's Lates Tramcars, comfortable Accommodation and modern traction equipment" - W5 class .10 - 3 pages - The Electrical Engineer and Merchandiser - 15/3/1939 - "Improved Type Tramcar - advanced truck design, pneumatically operated doors, special lighting, acceleration 3pmh per sec." SW5 class. .11 - 3 pages - The Electrical Engineer and Merchandiser - 15/9/1950 - "Noiseless Tramcar - first Australian Vehicles - Bogies fitted have special noise reducing features - motor drive through bevel gears, dynamic braking" - PCC 980 (See also Reg Item 5601 for a similar report) .12 - 1 page - handwritten on the rear of a copy of item 11 - Editorial from the Oct. 1951 issue of same magazine looking at the rate of acceleration. Reprint of .7 added 30/7/2019, from papers ex Robert Green - in poor condition, has been folded, both left and right hand edges in multiple tears. The photos are good. Measures 282H x 220W.trams, tramways, mmtb, mbctt, new tramcars, vr, bogie trams, birney, x class, w2 class, y class, y1 class, w3 class, one man trams, w4 class, w5 class, sw5 class, pcc class, tramcar design, electrical engineering -
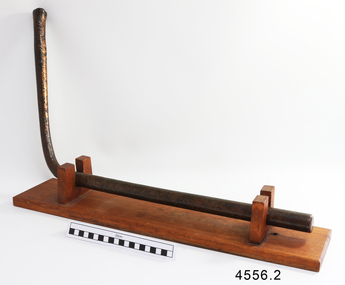 Flagstaff Hill Maritime Museum and Village
Nail, circa 1810
... Two convicts braved the heat and smoke, entered the store and seized the gun powder drums, suffering burns for their efforts but saving a probable disaster. ...Two convicts braved the heat and smoke, entered the store and seized the gun powder drums, suffering burns for their efforts but saving a probable disaster. ...This copper nail, sometimes known as a ‘Dumpy Bolt’ or spike, was salvaged from the hull of the wreck of the “George III”. It dates back to at least 1810. It was found by an abalone diver on the south east coast of Tasmania. The nail would have been used to hold the layers of the ship’s keel frame and the planking together. The nail has been passed from the abalone diver to an interested business man on a trip to the south of Hobart, on again to the business man’s close friend who then donated it to Flagstaff Hill Maritime Village. The metal of nails such as this one, after being in the sea for a long time, become affected by the natural reaction of the sea water, causing it to degenerate and thin, and the stress from the force of the sea over the years alters its shape. Iron nails had been used on ships previously, but they quickly corroded in the salt; ships needed regular, costly and time-consuming maintenance to replace the iron nails. Towards the end of the 18th century the British Navy trialled the use of copper nails, finding them to be very successful. Merchant ships began to adopt this process in the early 19th century, although it made ship building very expensive and was more often used for ships such as the “George III” that sailed on long voyages. The three masted sailing ship “George III” was a convict transport ship built in Deptford, England, in 1810. On 14th December 1834 she left Woolwich, England, bound for Hobart Town, Van Diemen’s Land (Tasmania), under Captain William Hall Moxey. She was carrying 220 male convicts plus crew, guards and their families, totalling 294 persons (another 2 were during the voyage). Amongst the cargo were military stores including several copper drums of gun powder. On 27th January 1835 the “George III” was near the Equator, about half way into her journey. A fire broke out and the gun powder was in danger of explosion, threatening the whole ship. Two convicts braved the heat and smoke, entered the store and seized the gun powder drums, suffering burns for their efforts but saving a probable disaster. The fire destroyed some of the provisions and food was scarce. Many became ill with scurvy and some died during the journey. Nearing the end of their journey on 10th April 1835 the “George III” was headed through the D'Entrecasteaux Channel, south east Tasmania, between the mainland and Bruny Island. She was sailing in the moonlit night to hasten her arrival in port due to the great number of sick on board. She struck uncharted rocks, known only to the local whalers, between Actaeon Reef and Southport Lagoon and within hours began to break up. The ship’s boats were used to first rescue the women and children. Firearms were used to help quell the panic of the convicts below decks and some were killed by the shots. Many convicts, including the sick, were drowned. In all, 133 lives were lost including 5 of the crew, guards and their families. It was the third worst shipping disaster in Tasmanian waters. A monument in honour of the prisoners who perished in the “George III” has been erected, noting the date of the wreck as “Friday 10th April 1835.” (NOTE: there are a few differences between sources regarding dates of the shipwreck, some saying March and others April 1835. There are also differences in the figures of those on board and the number of lives lost.) The copper nail is significant as an example of sailing ship construction; fasteners used in the early 19th century on ships carrying convicts to Australia. The nail is also significant for its association with the ship “George III”. The “George III” is registered on the Australian National Shipwreck Database, ID 7195 as an Historic Shipwreck. She is the third worst shipwreck in Tasmanian waters. She is also associated with Early Australian History and the transportation of convicts to Australia. The incident of the fire on board and the bravery of the convicts in making the gun powder safe is an example of the social character of the people in early Tasmanian colonisation. Copper nail (also called a Dumpy bolt or spike) from the convict ship George III, wrecked in 1835. Nail is long, bent in an ‘L’ shape about 3/5ths along, tapering from both ends to the bend. Both ends are flat and do not taper to a point, nor have a thread. The shorter end has been polished, showing bright copper. There is pitting along the nail and virdigris is evident on the longer, unpolished end. The nail is displayed with the longer section resting on a wooden board between two ‘U’ shaped uprights, the shorter section upright. flagstaff hill, warrnambool, shipwrecked coast, flagstaff hill maritime museum, maritime museum, shipwreck coast, flagstaff hill maritime village, great ocean road, george iii, ship construction, ship nail, 1835 shipwreck, 19th century shipwreck, william moxey, d'entrecasteaux channel, convict transportation, copper nail, dumpy bolt, spike, keel nail