Showing 640 items
matching tram 25
-
 Ballarat Tramway Museum
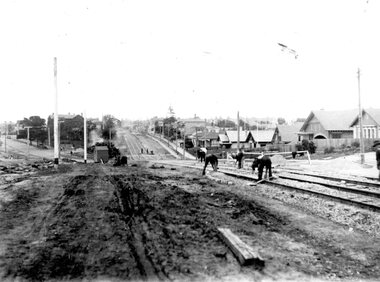
Photograph - Geelong Tramway North line
Men laying sleeper tram tracks for the North tram route along The Esplanade. In the midddle distance, the double track towards the city is in Mercer St. (now The Esplanade South). The street off to the left is Victoria Tce., (now Western Beach Road). 1928Black and white print on paper.GRS710/25/1/10 and 25-10, written on the reverse in paper. The No., 2 inside a circle, written on the reverse in ink.geelong tramway, geelong tramway laying sleeper tracks -
 Ballarat Tramway Museum
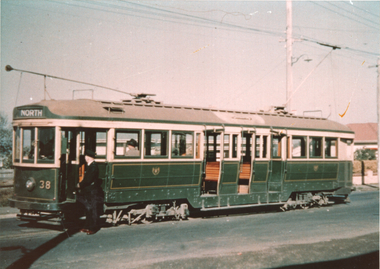
Photograph - Geelong 38 at Belmont, Hugh Ballment, 25-5-1954
The photograph shows SEC Geelong 38 at the Belmont terminus with the conductor talking to the driver. Received in an envelope dated 25-5-1954. Based on a note on item 9580 of the same date, photo by Hugh Ballment. See item 2681 for a colour slide of this photograph.Yields information about Geelong No. 38 in 1954.Colour print with plain back on Agfa paper. Two copies held.tramcars, trams, geelong, belmon -
 Ballarat Tramway Museum
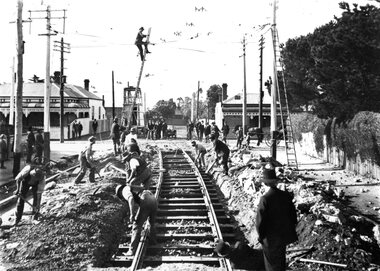
Photograph - Geelong Tramway relaying tracks
Relaying tram tracks at the eastern end of Aphrasia St., Newtown, looking east. The location is immediately west of the Pleasant St. intersection, soon after Aphrasia St. was extended from Pleasant St. to Pakington St. so that the three sharp curves for trams into Retreat Road, Pleasant St. and then Aphrasia St. were reduced to one, from Pakington into Aphrasia St. May 1914. Note that sleepers are being used 8in the construction. All the original tracks were laid as a "stringer" construction, as seen in items 9271 and 9214, with tie bars and continuous concrete about 50cm wide under each rail. The overhead is being worked on in two ways; safely with the horse drawn tower wagon, or less so by ladder.Black and white print on paper.GSR710/25/1/8 and 25-8, written on the reverse in pencil. The No. 1 in a circle written on reverse in ink.geelong tramway, relaying stringer tram tracks in geelong, stringer tram tracks, aphrasia st. -
 Ballarat Tramway Museum
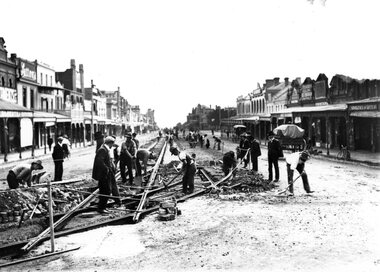
Photograph - Geelong Tramways new tracks on South line
Tram tracks being laid for the South line up the Moorabool St., hill across the intersection of Ryrie St. Photo looks to the SE, curves in the foreground are the completed tracks into Ryrie St., heading towards the West and Newtown termini. The large building at left is the Geelong Theatre.Black and white print on paper.The no., 1 inside a circle written in ink on the reverse. GRS710/25/1/3 and 25-3, written in pencil on the reverse.geelong tramway- new tracks, geelong theatre -
 Ballarat Tramway Museum
Photograph - Geelong Tramway new tracks
Tram tracks being laid in Moorabool St, looking north. Curved track heads into Ryrie St, 1911. See also Item 9214.Black and white print on paper.GRS710/25/1/4 and 24-4 written on the reverse in pencil. No. 1 in a circle, 25-4 and an ink 5 overwriting the pencil 4 in 24, written on the reverse in ink.geelong tramways new tracks -
 Ballarat Tramway Museum
Photograph - Geelong Tramway laying of Malop St. tracks
Tram tracks being laid in Malkoip Street, looking SW, 1911. Several of the buildings in the distance still stand.Black and white print on paper.GSR710/25/1/1 and 25-1 written in pencil on the reverse. The No. 1 in a circle is written in pen on the reverse.geelong tramways new tracks, geelong streetscape c. 1911 -
 Melbourne Tram Museum
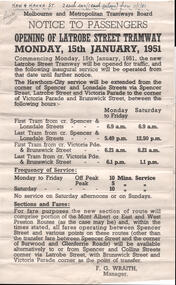
Document, Melbourne & Metropolitan Tramways Board (MMTB), "Opening of LaTrobe Street Tramway", Jan 1951
Notices to Passengers about the LaTrobe St tram line opening in Jan. 1951 and the withdrawal of Saturday services in 1955. The first details the services, times and fares and is signed by the F G Wraith Manager and the second is signed by C E Hall as Acting Traffic Manager. The last Saturday was 25/6/1955.Yields information about the LaTrobe services during the 1950sNotice - printed on foolscap paper with a handwritten note on the top edge and one small sheet."Haw & Hanna St - 2 each car (1 each saloon) from 11/1/51" in ink and "Book". Small sheet has the name of Mr "Rigaldi" in pencil on the top edge.latrobe st, new tramways, timetables, fares, saturday services, notices -
 Ballarat Tramway Museum
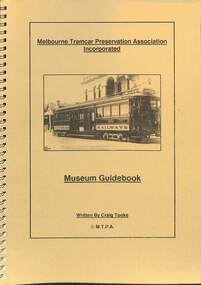
Book, Craig Tooke, "MTPA - Museum Guidebook", 1985
... book VR trams haddon Book - 25 A4 pages + covers wire bound ...Book compiled by Criag Tooke for the Melbourne Tramcar Preservation Association c1985. Details the history of the organisation, its tramcar collection at the time and its works. Has on the front cover VR tram No. 30. At the time of cataloguing, the MTPA had on loan to the BTM, two trams, VR 41, L 103 and W2 407.Yields information about work of the MTPA.Book - 25 A4 pages + covers wire bound.mtpa, museums, guide book, vr trams, haddon -
 Ballarat Tramway Museum
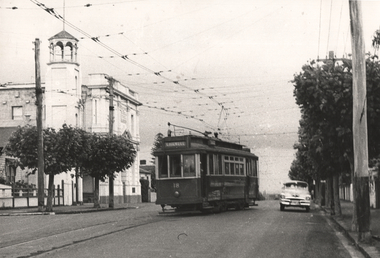
Photograph - Geelong tram 18 - Pakington and Aphrasia Streets, A G Culpeffer Cooke, 1955
... of 1924-25. The sister tram of the one illustrated here has been... of 1924-25. The sister tram of the one illustrated here has been ...Photograph shows Pengelly built tram No. 18 at the intersection of Pakington and Aphrasia Streets Geelong. The tram has the destination of Chilwell. On the left is the Chilwell Newtown fire station and the Municipal Hall. Photo taken in 1955.Yields information about Geelong tram 18 and the intersection of Pakington and Aphrasia St.Black and White photograph with details on rearTyped lable on rear "One of the Pengelley built cars of 1924-25. The sister tram of the one illustrated here has been preserved by the Tramway Museum Society of Victoria." and a stamp in the bottom left hand corner "WELT Collection, A G Culpeffer Cooke Victoria Australia, Ref 8B, Date 1955"trams, tramways, geelong, tram 18, chillwell, pakington st, aphrasia st -
 Melbourne Tram Museum
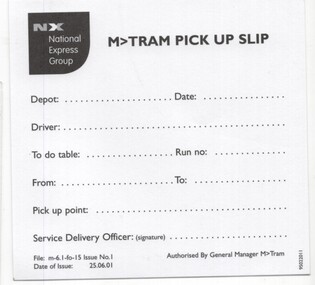
Document - Instruction, M>Tram, "M>Tram Pick up slip", Jun. 2001
Instruction - titled "M>Tram Pick up slip", taken from a pad of sheets, advising drivers which table / Run no to operate on a date and from which point. dated 25/6/2001. 3 copies held.trams, tramways, m>tram, national express, drivers, table cards, operations -
 Melbourne Tram Museum
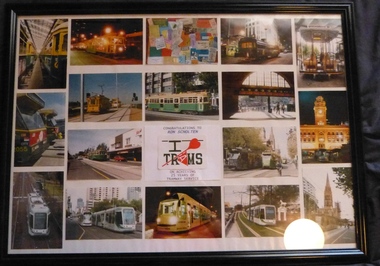
Photograph - Framed Photographs, Kosnar's Picture Framing, c2000
Framed photograph of a series of 17 photographs assembled by Ray Marsh to record Malvern Driver Ron Scholten's 25 years of service. Photographs include: , Malvern Tram Depot, 896 on a Special, 937 as the Restaurant Tram 02, Cable car set possibly Bylands, 2055 and 2017, 11 W on an extension, 862 in the city, View from Flinders St with a city circle car, Y611, 58 and other Z's in Swanston St, Siemens test tram at Flinders St station, C on Port Melbourne, Siemens Test Tram and 3010, Siemens Test tram, 3019 at Box Hill, MTram 3504 in Swanston St with St Patricks behind.On top left of rear "Designed by Ray Marsh" in pencil.trams, tramways, drivers, siemens, testing, flinders st, tram 896, tram 937, tram 2055, tram 2017, tram 11w, tram 862, tram y611, tram 58, tram siemens test tram, tram 3010, tram 3019, tram 3504 -
 Ballarat Tramway Museum
Album - Postcards & Photographs - Vic Solomons and others - Australian Tramways, Vic Solomons, 2023
Contains 184 images of postcards and photographs collected primarily by Vic Solomons of Sydney, with others from the collection of Wal Jack and Warren Doubleday. Covers almost all of Australia's tramway systems. 1 Post Card Hay St Perth Looking East No 3 Unknown Perth 2 Post Card Cars 30 & 90 both on Route 19 pass in Barrack St looking South Perth WA 1935.02.18 Perth 3 Post Card Hay St Looking East Perth WA Unknown Perth 4 Post Card William St Perth WA Unknown Perth 5 Post Card Perth from Shaftsbury Hotel Unknown Perth 6 Post Card Hay St Perth WA Looking East Unknown Perth 7 Post Card Barrack St Perth Unknown Perth 8 Post Card Murray Views No 3 High St Showing Town Hall Fremantle WA Unknown Fremantle 9 Post Card High St Fremantle WA Unknown Fremantle 10 Post Card View of Bolder City Golden Mile in the Background (Section No 1) 1908.08.20 Kalgoolie 11 Post Card Hannan St Kalgoolie 1900.08.19 Kalgoolie 12 Post Card Hannan St Kalgoolie WA (No 2) Unknown Kalgoolie 13 Post Card Intersection Hannan & Maritana Sts Kalgoolie WA Unknown Kalgoolie 14 Post Card Hannan St Kalgoolie Unknown Kalgoolie 15 Post Card Lane Street Bolder City Unknown Kalgoolie 16 Post Card Hobart Double Deck Tram Unknown Hobart 17 Post Card Macquarie St Hobart Unknown Hobart 18 Photo Liverpool Street Hobart Unknown Hobart 19 Photo Hobart 21 Unknown Hobart 20 Photo Hobart 14 in Elizabeth St Hobart Unknown Hobart 21 Post Card Macquarie St Hobart Unknown Hobart 22 Post Card Macquarie St Hobart Tas Unknown Hobart 23 Photo Double Decker Tram 3 at G.P.O. Hobart Tas No 31 Unknown Hobart 24 Post Card Double Decker Tram 19 Hobart Tas A B Series No 24 Unknown Hobart 25 Photo Hobart Municipal Tramways Tas No 95 Unknown Hobart 26 Post Card Elizabeth St Hobart Unknown Hobart 27 Post Card Elizabeth St Hobart Unknown Hobart 28 Post Card Elizabeth St Hobart Unknown Hobart 29 Post Card Elizabeth St Hobart Tas Unknown Hobart 30 Post Card HMT 21 with crew at Beach Road Terminus Unknown Hobart 31 Post Card HMT 9 & another with crew at Beach Road Terminus. Front cover photo of Destination GPO 1921.01.00 Hobart 32 Post Card Cascade Road and Mount Wellington Hobart Unknown Hobart 33 Post Card Elizabeth St Hobart Unknown Hobart 34 Post Card Elizabeth St Hobart Unknown Hobart 35 Post Card Elizabeth St Hobart 1915.04.07 Hobart 36 Post Card Macquarie St Hobart Tas Unknown Hobart 37 Post Card Macquarie St showing Post Office Hobart 1908.03.12 Hobart 38 Post Card Hobart Municipal Tramways 21 Unknown Hobart 39 Post Card Elizabeth St Hobart Tas Unknown Hobart 40 Post Card Liverpool Street Hobart Unknown Hobart 41 Post Card Electric Tram Launceston Tas 446 W J Little Photo 1919.02.08 Launbceston 42 Post Card Launceston Tram no 3 1911.08.30 Launbceston 43 Post Card Launceston Tram no 3 passes tram No 1 Unknown Launbceston 44 Post Card Tram 6 at Trevallyn a popular suburb Launceston Tasmania Unknown Launbceston 45 Post Card Tram 7 at Trevallyn Road Terminus Launceston Tasmania Unknown Launbceston 46 Post Card Tram 4 in Brisbane St Launceston Unknown Launbceston 47 Post Card Tram 9 in Brisbane St Launceston Tasmania Unknown Launbceston 48 Post Card Camerom Street Launceston Tasmania Unknown Launbceston 49 Post Card Murray Views No 15 Jetty Road Glenelg Terminus 1962-02-08 Adelaide 50 Post Card Bay Tram at Jetty Road Terminus Glenelg SA Unknown Adelaide 51 Post Card Tram 3 in King William Street Adelaide S Aust Unknown Adelaide 52 Post Card Valentine Series No 3065 The Old Horse Tram Victor Harbour Unknown Victor Harbour 53 Post Card Bourke Street Melbourne with Cable Car Looking East 1904.04.25 Melbourne 54 Post Card Opening of New Electric Tramway Elsternwick 1913-11-13 Melbourne 55 Post Card Cable trams in Clarendon St Sth Melb Unknown Melbourne 56 Post Card Pall Mall from Charing Cross Bendigo Unknown Bendigo 57 Post Card Tram 4 & 7 pass at The Fountain and Mitchell Street Bendigo Vic Rose Series P 3198 Unknown Bendigo 58 Post Card M&MTB 133 at Charing Cross bound for Eaglehawk Bendigo Vic Murray Views No 45 Unknown Bendigo 59 Post Card Pall Mall Bendigo Vic Unknown Bendigo 60 Post Card Charing Cross & Mitchell St Bendigo Trams passing 1919.00.00 Bendigo 61 Post Card Pall Mall Looking East Unknown Bendigo 62 Post Card Electric Trams and City Hotel Bendigo Vic Unknown Bendigo 63 Post Card Moorabool Street Geelong V 23 Unknown Geelong 64 Post Card Murray Views No 3 Moorabool Street Geelong Vic Unknown Geelong 65 Post Card The Rose Series P 2487 Ryrie Street Geelong Vic Unknown Geelong 66 Post Card Southern Cross Series 2696 Ryrie Stret Geelong Vic Unknown Geelong 67 Post Card The Rose Series P 1490 Ryrie Street Geelong Vic 1920-03-04 Geelong 68 Post Card Valentine Series No 1568 Lower Sturt Street Ballarat Unknown Ballarat 69 Post Card Rose Series P 1710 Sturt Street Ballarat Victoria Unknown Ballarat 70 Post Card Sturt Street Ballarat Victoria Unknown Ballarat 71 Post Card Horse Tram In Sturt Street Ballarat 1905.11.10 Ballarat 72 Post Card Sturt Street Ballarat Looking North-West Unknown Ballarat 73 Post Card Shoppes Square Sturt Street Ballarat Looking North Unknown Ballarat 74 Post Card Junction Sturt and Lydiard Streets Ballarat 1909-09-01 Ballarat 75 Post Card The Electric Supply Co Souvenir Tram Ticket No 3085of the opening of Electric System August 18 1905 1905.08.18 Ballarat 76 Post Card Sturt Street Ballarat Victoria 1907.11.25 Ballarat 77 Post Card Off to the Gardens Electric Tram Ballarat Unknown Ballarat 78 Post Card Sturt Street Ballarat 1907.04.16 Ballarat 79 Post Card Sturt Street Ballarat Looking East Electric tram with Double Deck Trailer 1911.04.17 Ballarat 80 Post Card Sturt Street Ballarat Looking East Unknown Ballarat 81 Post Card Sturt Street Ballarat Looking West 1911.03.01 Ballarat 82 Post Card Town Hall and Sturt Street Ballarat Unknown Ballarat 83 Post Card Lydiard Street Ballarat 1906.11.23 Ballarat 84 Post Card Looking North along Adelaide Street from George Street Brisbane Sidues Series No 764 Unknown Brisbane 85 Post Card Looking South along Queen Street from the Creek Street Intersection Brisbane Qld Sirues Series No 1379 Unknown Brisbane 86 Post Card George Street from near Supreme Court Brisbane Unknown Brisbane 87 Post Card Queen and Eagle Streets Brisbane 1907.07.04 Brisbane 88 Post Card Queen Street showing His Majesty’s Theatre Brisbane Unknown Brisbane 89 Post Card Queen Street Treasury Building 1908.01.20 Brisbane 90 Post Card G P O and Queen Street Brisbane Unknown Brisbane 91 Post Card Queen Street Brisbane Looking from Wharf Street Unknown Brisbane 92 Post Card Customs House Brisbane 1905.02.16 Brisbane 93 Post Card Queen St Brisbane 1905.09.16 Brisbane 94 Post Card Queen St Brisbane 1907.11.19 Brisbane 95 Post Card Treasury Buildings Brisbane Unknown Brisbane 96 Post Card Queen and Eagle Streets Brisbane Unknown Brisbane 97 Post Card The Valley Corner Brisbane Unknown Brisbane 98 Post Card Brisbane Queen Street opposite General Post Office Unknown Brisbane 99 Post Card North Quay and Milton Beach Brisbane Q Unknown Brisbane 100 Post Card Victoria Bridge Brisbane South Side 1907.08.14 Brisbane 101 Post Card Victoria Bridge Brisbane Unknown Brisbane 102 Post Card Breakfast Creek Bridge Brisbane Q Unknown Brisbane 103 Post Card Melbourne Street Station South Brisbane Queensland Unknown Brisbane 104 Post Card General Post Office Queen Street Brisbane 1955.09.23 Brisbane 105 Post Card Customs House Brisbane 1904.11.04 Brisbane 106 Post Card Queen St Brisbane 1919.11.00 Brisbane 107 Post Card Queen St Brisbane Sidues Series No 627 Unknown Brisbane 108 Post Card Creek Street Brisbane Queensland Unknown Brisbane 109 Post Card Customs House and Garden Reach Brisbane Queensland 1910.00.08 Brisbane 110 Post Card Queen and Creek Streets Brisbane 1909.06.07 Brisbane 111 Post Card Queensland National Bank andd Queen Street Brisbane Queensland Unknown Brisbane 112 Post Card Queen Street and Treasury Buildings Brisbane 0000.09.07 Brisbane 113 Post Card Queen Street showing “Courier” Buildings Brisbane Unknown Brisbane 114 Post Card Intersection George & Roma Streets Brisbane Q 1916.05.11 Brisbane 115 Post Card Adelaide Street Brisbane Q Unknown Brisbane 116 Post Card G P O Queen Street Brisbane Q Unknown Brisbane 117 Post Card Treasury Building Brisbane 1906.03-20 Brisbane 118 Post Card Queen and Eagle Streets Brisbane 1907.02.01 Brisbane 119 Post Card Queen St Brisbane Unknown Brisbane 120 Post Card Queen St Brisbane Q Unknown Brisbane 121 Post Card Victoria Bridge Brisbane 1906.07.30 Brisbane 122 Post Card An Unusual View showing Head of Queen Street Victoria Bridge & South SideSuburbs Brisbane Q Unknown Brisbane 123 Post Card Petries Bight Brisbane Q Unknown Brisbane 124 Post Card South End Victoria Bridge Brisbane Q Unknown Brisbane 125 Post Card Customs House Brisbane Unknown Brisbane 126 Post Card Photo of toastrack car circa 1910 Unknown Brisbane 127 Post Card Treasury Buildings Brisbane Unknown Brisbane 128 Post Card East Street Rockhampton with Steam Tram & trailer Unknown Rockhampton 129 Post Card Post Office Rockhampton with steam tram Unknown Rockhampton 130 Post Card East Street Rockhampton with Steam Trams Rose Series P 7154 Unknown Rockhampton 131 Post Card William Street Rockhampton Rose Series P 7156 Unknown Rockhampton 132 Post Card Central East Street Rockhampton Q with Steam Trams Unknown Rockhampton 133 Photo Sturt St Ballarat Unknown Ballarat 134 Photo Bridge Street Ballarat Unknown Ballarat 135 Post Card George St Sydney Unknown Sydney 136 Post Card Elizabeth St Sydney Unknown Sydney 137 Post Card Railway Square Unknown Sydney 138 Post Card Sydney Harbor Bridge - pending receipt 139 Post Card Kings Cross - Mowbray Series with description on rear from C Roy G Field Unknown Sydney 140 Post Card Kings Cross - Mowbray Series with description on rear from C Roy G Field Unknown Sydney 141 Post Card Central Railway Station Sydney - Rose Series P6033 1954-01-26 Sydney 142 Post card William Street Darlinghurst looking towards City - Rose Series P6602 unknown Sydney 143 Post Card Circular Quay Sydney - Rose Series P6680 Unknown Sydney 144 Post Card View at Manly NSW - Rose Series B1003 Unknown Sydney 145 Post Card Hunter St Newcastle NSW - Rose Series P7843 Unknown Newcastle 146 Post Card Bank Corner Newcastle NSW - Mowbray Series No. 155 Unknown Newcastle 147 Post Card Hunter St Newcastle NSW Unknown Newcastle 148 Post Card Criterion Hotel Hunter St Newcastle NSW Unknown Newcastle 149 Photo Horse tram at Newtown Station 1894 to 1898 - PTC photo c1894 Newtown 150 Photo Steam tram motor No 3 at Railway Square 1879 1879 Sydney 151 Photo Railway steam tram c1900 with a horse drawn double deck bus c1900 Sydney 152 Photo Steam motor 5A and doubled deck bus Unknown Sydney 153 Photo Steam motor 53A with detail notes on rear 1922 Sydney 154 Photo Cable tram set at Milsons Point ferry terminal c1900 Sydney 155 Photo Early Sydney electric car - Ocean St - Rose Bay Unknown Sydney 156 Photo George St looking souoth c1905 c1905 Sydney 157 Photo Tram 165 at Circular Quay Unknown Sydney 158 Photo Tramcar ferry or transporter at The Spit Unknown Sydney 159 Photo tram 882 George St at Marti Place, 1937 1937 Sydney 160 Photo Tram 826 Railway Sq area Unknown Sydney 161 Photo Railway Sq in background, Broadway with double decker bus and toastrack car late 1930s Sydney 162 Photo Coupled St Pitt St? - photo Ben Parle Feb. 1950 Sydney 163 Photo Electric tram No. 2 - North Sydney with side trolley pole running Unknown Sydney 164 Photo George St - Horden's Corner Unknown Sydney 165 Photo George St at Martin Place c1920 Sydney 166 Photo Castlereagh St Sydney c1928 c1928 Sydney 167 Photo Railway Sqare c1920 c1920 Sydney 168 Photo Darling St Countereweight Unknown Sydney 169 Photo Trolley bus depot Unknown Sydney 170 Photo Trolley bus No. 14 Unknown Sydney 171 Photo Newcastle Railway Station with steam tram - Wharf Road?? Unknown Newcastle 172 Photo High St West Maitland - steam tram Unknown Maitland 173 Photo High St West Maitland - steam tram Unknown Maitland 174 Post Card Argent St near tram terminal Broken Hill NSW c1900 Broken Hill 175 postcard Argent St looking south Broken Hill - with Ken Magor's notes on rear Unknown Broken Hill 176 Photo Toronto - steam tram 61A Unknown Toronto 177 Photo 124A trial run 1911? Sutherland - Cronulla line 1911 Sutherland 178 Photo 103A at a tram stop Unknown Sydney 179 Photo Cable tram set at Crows Nest terminus grip car 12, trailer 22 Unknown Sydney 180 Photo Cable tram Queens Square Sydney 1903 Sydney 181 Photo cars 2078 and 2077 Chatswood late 1950s Sydney 182 Photo car 1877 Balmain area late 1950s Sydney 183 Photo Trolley bus - Rockdale destination Late 1950s Sydney 184 Photo Broken Hill steam tram - motor 18A North Tram Unknown Broken Hill 185 Photo Millars Point Sydney NSW - ferry/tram interchange, unknown Sydney All items imaged including the rear or back where there was writing of information. All files stored on the Museum's Photo Collections directory. Demonstrates through the medium of many images, Australian tramway systems and Ballarat's place in them.Album - heavy card covers, plastic lined with postcard or 6x4 photo sleeves.australia, tramways, postcards, photographs, steam trams, horse trams, cable trams, trolley buses -
 Ballarat Tramway Museum
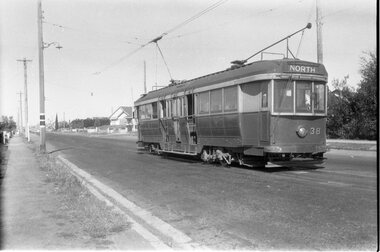
Negative - Geelong Belmont terminus tram 38, Laurie Gallop, early 1956
Photo shows Geelong No. 38 at the Belmont terminus, High Street with the return destination of North. Note the compulsory tram stop on the left-hand pole. One of a set of photos was taken between 15/2/1956 and 3/3/1956 when services operated only between Belmont and North before the final closure of the Belmont route on 25/31956 and that bogie tram 31 is not shown on the board, having gone to Ballarat on 15/2/1956 - see item 5554. See item 8213 for an article on the Geelong system by Keith Kings. Yields information about the Belmont tram terminus prior to closure.Black and white Negative - 120 sizetram stops, tramways, high st, geelong, tram 38, belmont -
 Ballarat Tramway Museum
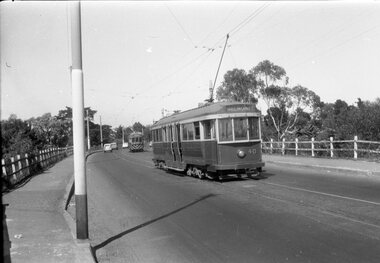
Negative - Geelong trams 33 & 40 Barwon Bridge, Laurie Gallop, early 1956
Photo shows Geelong trams 33 & 40 in Moorabool St just south of the Barwon Bridge on the long crossing loop. Based on the running board at item 8267, most likely tram No. 33. One of a set of photos was taken between 15/2/1956 and 3/3/1956 when services operated only between Belmont and North before the final closure of the Belmont route on 25/31956 and that bogie tram 31 is not shown on the board, having gone to Ballarat on 15/2/1956 - see item 5554. See item 8213 for an article on the Geelong system by Keith Kings. Yields information about the Geelong operations toward the closure of the tram system.Black and white Negative - 120 sizetramways, geelong, moorabool st, tram 33, tram 40, barwon river -
 Ballarat Tramway Museum
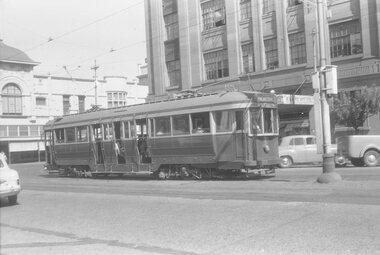
Negative - Tram 40 - Moorabool & Malop Streets, Laurie Gallop, early 1956
Photo shows Geelong 40 on its way to North Geelong, turning from Moorabool St into Malop St. In the background are now the National Mutual and Market Square buildings. One of a set of photos was taken between 15/2/1956 and 3/3/1956 when services operated only between Belmont and North before the final closure of the Belmont route on 25/31956 and that bogie tram 31 is not shown on the board, having gone to Ballarat on 15/2/1956 - see item 5554. See item 8213 for an article on the Geelong system by Keith Kings. Yields information about the Geelong operations toward the closure of the tram system.Black and white Negative - 120 sizetramways, geelong, moorabool st, malop st, tram 40 -
 Ballarat Tramway Museum
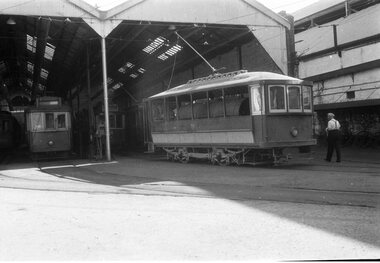
Negative - Geelong scrubber at depot, Laurie Gallop, early 1956
The photo shows the Geelong scrubber on the front of No. 2 road with No. 16 behind and No. 19 alongside. One of a set of photos was taken between 15/2/1956 and 3/3/1956 when services operated only between Belmont and North before the final closure of the Belmont route on 25/31956 and that bogie tram 31 is not shown on the board, having gone to Ballarat on 15/2/1956 - see item 5554. See item 8213 for an article on the Geelong system by Keith Kings. Yields information about the Geelong operations toward the closure of the tram system and in particular the Geelong scrubber or track cleaning tram.Black and white Negative - 120 sizetramways, geelong, geelong depot, scrubber, geelong 16, geelong 19 -
 Ballarat Tramway Museum
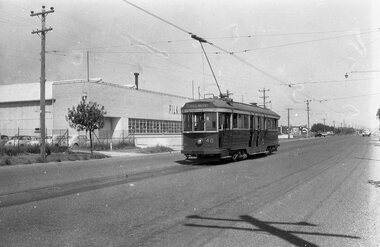
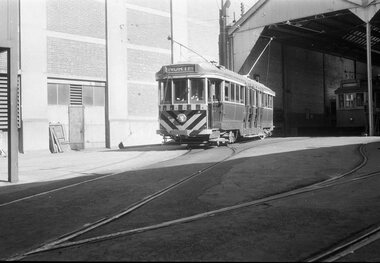
Negative - Tram 40 at the North terminus, Laurie Gallop, early 1956
Photo shows Geelong tram 40 at the North Terminus, with the Pilkington glass factory behind. The tram has the destination of Belmont. One of a set of photos was taken between 15/2/1956 and 3/3/1956 when services operated only between Belmont and North before the final closure of the Belmont route on 25/31956 and that bogie tram 31 is not shown on the board, having gone to Ballarat on 15/2/1956 - see item 5554. See item 8213 for an article on the Geelong system by Keith Kings. Yields information about the Geelong operations toward the closure of the tram system and the North terminus.Black and white Negative - 120 sizetramways, geelong, geelong depot, tram 40, north -
 Ballarat Tramway Museum
Negative - Tram 33 Geelong depot, Laurie Gallop, early 1956
Photo shows Geelong 33 on No. 5 road at Geelong depot being driven out with the destination set to North. One of a set of photos was taken between 15/2/1956 and 3/3/1956 when services operated only between Belmont and North before the final closure of the Belmont route on 25/31956 and that bogie tram 31 is not shown on the board, having gone to Ballarat on 15/2/1956 - see item 5554. See item 8213 for an article on the Geelong system by Keith Kings. Yields information about the Geelong operations toward the closure of the tram system.Black and white Negative - 120 sizetramways, geelong, geelong depot, tram 33 -
 Ballarat Tramway Museum
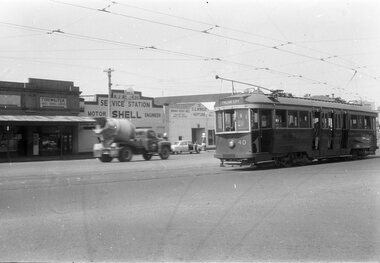
Negative - Tram 40 - Mercer St, city end, early 1956
Photo shows Geelong tram 40 Mercer St, city end. The tram has the destination of North. In the background is a typewriter shop, R J Reynolds? Shell service station and S G Winkler Service station with a Neptune sign. The driver has his hand on the air brake and the controller with the front driver's window open. One of a set of photos was taken between 15/2/1956 and 3/3/1956 when services operated only between Belmont and North before the final closure of the Belmont route on 25/31956 and that bogie tram 31 is not shown on the board, having gone to Ballarat on 15/2/1956 - see item 5554. See item 8213 for an article on the Geelong system by Keith Kings. Yields information about the Geelong operations toward the closure of the tram system.Black and white Negative - 120 sizetramways, geelong, tram 40, north, mercer st -
 Ballarat Tramway Museum
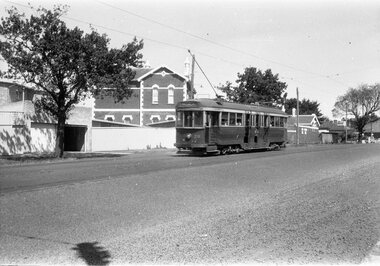
Negative - Tram 38 Mercer Street, Laurie Gallop, early 1956
Photo shows Tram 38 Mercer Street, near The Esplanade with the destination of Belmont. One of a set of photos was taken between 15/2/1956 and 3/3/1956 when services operated only between Belmont and North before the final closure of the Belmont route on 25/31956 and that bogie tram 31 is not shown on the board, having gone to Ballarat on 15/2/1956 - see item 5554. See item 8213 for an article on the Geelong system by Keith Kings. Yields information about the Geelong operations toward the closure of the tram system.Black and white Negative - 120 sizetramways, geelong, tram 38, mercer st -
 Ballarat Tramway Museum
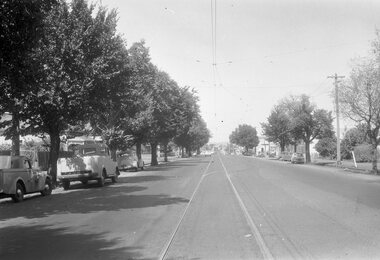
Negative - Moorabool St, looking south at the Kardinia Park loop, Laurie Gallop, early 1956
Photo shows Moorabool St, looking south at the Kardinia Park loop. One of a set of photos was taken between 15/2/1956 and 3/3/1956 when services operated only between Belmont and North before the final closure of the Belmont route on 25/31956 and that bogie tram 31 is not shown on the board, having gone to Ballarat on 15/2/1956 - see item 5554. See item 8213 for an article on the Geelong system by Keith Kings. Yields information about the Geelong tram system.Black and white Negative - 120 sizetramways, geelong, moorabool st, kardinia park loop -
 Ballarat Tramway Museum
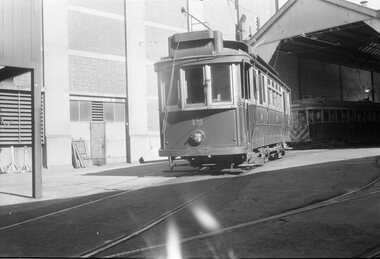
Negative - Tram 19 at Geelong Depot, Laurie Gallop, early 1956
Photo shows Tram 19 at Geelong Depot One of a set of photos was taken between 15/2/1956 and 3/3/1956 when services operated only between Belmont and North before the final closure of the Belmont route on 25/31956 and that bogie tram 31 is not shown on the board, having gone to Ballarat on 15/2/1956 - see item 5554. See item 8213 for an article on the Geelong system by Keith Kings. Yields information about the Geelong operations toward the closure of the tram system.Black and white Negative - 120 sizetramways, geelong, geelong depot, tram 19 -
 Melbourne Tram Museum
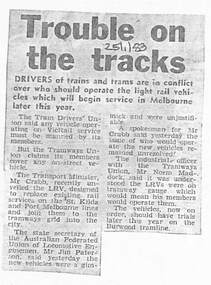
Newspaper - Photocopy, Trouble on the tracks, 25-1-1983
Newspaper clipping from an unknown Melbourne newspaper, dated 25-1-1983 about which union should operate the new Light Rail Vehicles that were on order. AFULE representative said they were a gimmick, Tramways Union spokesman said they operated on the road and that they were standard gauge. The Minister's spokesman noted it was unresolved.Yields information about a possible Union dispute or "turf war"Photocopy of a newspaper from a Melbourne newspaper 25-1-1983 about who should operate the new Light Rail Vehicles. trams, tramways, unions, light rail vehicles, lrv, disputes -
 Melbourne Tram Museum
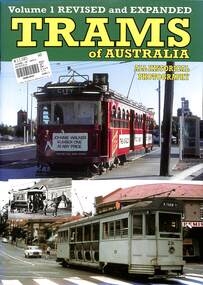
Book, Topmill Pty Ltd, Trams of Australia Vol 1 revised - Topmill
Book published by Topmill, featuring images and background information on tram types including horse, cable, steam and electric trams. Has photos of Sydney, Brisbane, Melbourne, Adelaide, Hobart, Ballarat, Bendigo, Geelong, Rockhampton and Kalgoorlie. Many in colour. Includes photographs of tram museums. Includes Melbourne trams 670, 611, 613, 106, 469, 25, 389, 214, 1008, 234, 975, 814, 279, 2112, 812, 442, 917, 2027. Melbourne photographs by Ray Marsh and Ken Smith.Book - 40 full colour A4 pages + card cover, centre stapled, titled "Trams of Australia Vol. 1" revised and expanded.trams, tramcars, melbourne, sydney, brisbane, adelaide, tram museums, ballarat, bendigo -
 Melbourne Tram Museum
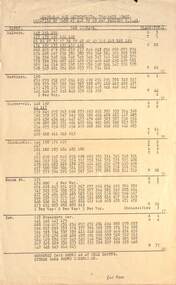
Document - Report, Melbourne & Metropolitan Tramways Board (MMTB), "Allocation of cars"
Set of 7 reports providing information about the depot allocation of each tramcar at the time. Includes information on cars at Preston Workshops, including new cars being built at the time. Gives total numbers for each class of car.Yields information about the allocation of tramcar by depot during the 1940s and 1951.Set of seven reports printed on foolscap sheets, duplicated - providing a detail list of tramcar allocations as at: 1 - 8-3-1941 - single sheet, 2nd sheet missing, 2 - 10-11-1945 - with numerous pencil notes 3 - 2-2-1946 4 - 25-5-1947 5 - 27-3-1948 6 - 21-5-1949 - with numerous pencil notes 7 - 27-1-1951 - has a note re additional cars to be built.On base of 1in ink "Rest Missing"tramways, trams, reports, mmtb, lists, depots, depot allocation -
 Ballarat Tramway Museum
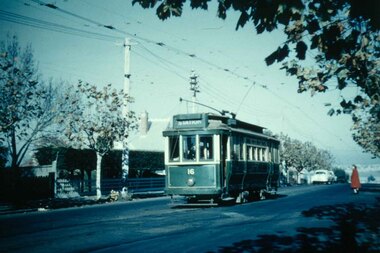
Slide - Geelong 16 Pakington St, Hugh Ballment, 25-5-1954
Photo of Geelong Pengelley No. 16 in Pakington St. Geelong at the junction with the Newtown line. Tram is coming from Chilwell and has the destination of Station. Tracks from Newtown at bottom of photograph. Photo by Hugh Ballment, 25-5-1954. See item 9583 for a print of this image.Yields information about Geelong No. 3 in 1954.Agfachrome Professional plastic mount (blue base, white cover) reproduction slide of a colour slide."G 13" and "1 -13" in pencil.tramways, trams, geelong, pakington st, chilwell, tram 16 -
 Ballarat Tramway Museum
Negative - Geelong 38 and welding truck - Moorabool St, Laurie Gallop, early 1956
Photo shows Geelong 38 south bound to Belmont and welding truck - Moorabool St between Myers and McKillop Streets. The welding with the power supply from the overhead would most likely be repairing a broken joint. One of a set of photos was taken between 15/2/1956 and 3/3/1956 when services operated only between Belmont and North before the final closure of the Belmont route on 25/31956 and that bogie tram 31 is not shown on the board, having gone to Ballarat on 15/2/1956 - see item 5554. See item 8213 for an article on the Geelong system by Keith Kings. Yields information about the Geelong operations toward the closure of the tram system.Black and white Negative - 120 sizetramways, geelong, tram 38, moorabool st, welding truck, track repairs -
 Ballarat Tramway Museum
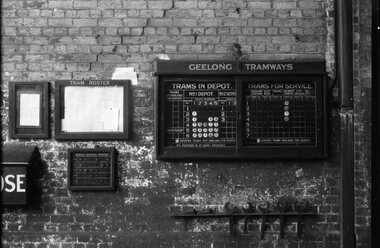
Negative - Tramcar allocation board - Geelong, Laurie Gallop, early 1956
Photo shows the Tramcar allocation board - in the Geelong depot. Shows the four bogie cars in operation or available on the day the photograph was taken. Shows that some of the Meadowbank-built trams and bogie trams had already left the depot. One of a set of photos was taken between 15/2/1956 and 3/3/1956 when services operated only between Belmont and North before the final closure of the Belmont route on 25/31956 and that bogie tram 31 is not shown on the board, having gone to Ballarat on 15/2/1956 - see item 5554. See item 8213 for an article on the Geelong system by Keith Kings. Yields information about the Geelong depot allocation board that showed the location and use of the tramcars on the day.Black and white Negative - 120 sizetramways, geelong, depot, depot allocation, tramcar allocation -
 Ballarat Tramway Museum
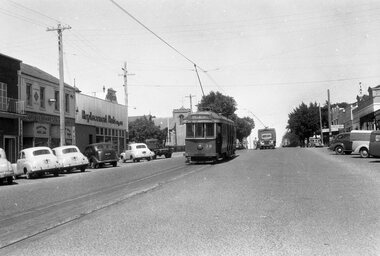
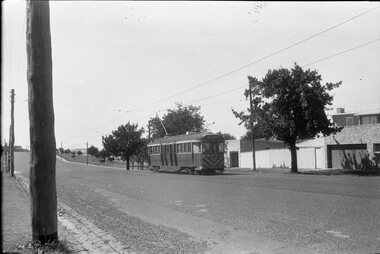
Negative - Geelong tram inbound Mercer Street, Laurie Gallop, early 1956
Photo shows a Geelong tram inbound in Mercer Street, near The Esplanade. Tram has the destination of Belmont. Based on the running board at item 8267, most likely No. 33. One of a set of photos was taken between 15/2/1956 and 3/3/1956 when services operated only between Belmont and North before the final closure of the Belmont route on 25/31956 and that bogie tram 31 is not shown on the board, having gone to Ballarat on 15/2/1956 - see item 5554. See item 8213 for an article on the Geelong system by Keith Kings. Yields information about tramway operations prior to closure of the Geelong system.Black and white Negative - 120 sizetram stops, tramways, geelong, mercer st, tram 33 -
 Ballarat Tramway Museum
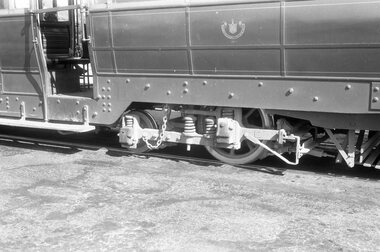
Negative - Brill 22E bogie or truck - Geelong tramcar, Laurie Gallop, early 1956
Photo shows Brill 22E Maximum Traction bogie or truck - Geelong tramcar, has the SEC logo on the side of the tramcar in the view. One of a set of photos was taken between 15/2/1956 and 3/3/1956 when services operated only between Belmont and North before the final closure of the Belmont route on 25/31956 and that bogie tram 31 is not shown on the board, having gone to Ballarat on 15/2/1956 - see item 5554. See item 8213 for an article on the Geelong system by Keith Kings. Yields information about the Geelong bogie trams.Black and white Negative - 120 sizetramways, geelong, brill 22e, maximum traction, bogie trams