Showing 5974 items
matching campbell-jones
-
 Flagstaff Hill Maritime Museum and Village
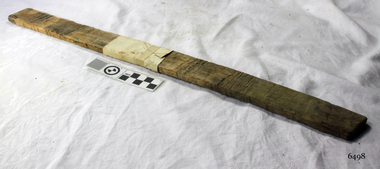
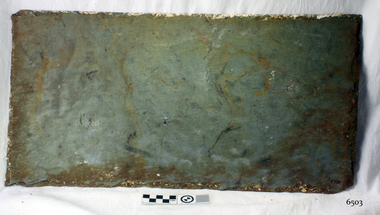
Packing Strip
The iron-hulled, four-masted barque, the Falls of Halladale, was a bulk carrier of general cargo. She left New York in August 1908 on her way to Melbourne and Sydney. In her hold, along with 56,763 tiles of unusual beautiful green American slates (roofing tiles), 5,673 coils of barbed wire, 600 stoves, 500 sewing machines, 6500 gallons of oil, 14400 gallons of benzene, and many other manufactured items, were 117 cases of crockery and glassware. Three months later and close to her destination, a navigational error caused the Falls of Halladale to be wrecked on a reef off the Peterborough headland at 3 am on the morning of the 15th of November, 1908. The captain and 29 crew members all survived, but her valuable cargo was largely lost, despite two salvage attempts in 1908-09 and 1910. ABOUT THE ‘FALLS OF HALLADALE’ (1886 - 1908) Built: in1886 by Russell & Co., Greenock shipyards, River Clyde, Scotland, UK. The company was founded in 1870 (or 1873) as a partnership between Joseph Russell (1834-1917), Anderson Rodger and William Todd Lithgow. During the period 1882-92 Russell & Co., standardised designs, which sped up their building process so much that they were able to build 271 ships over that time. In 1886 they introduced a 3000 ton class of sailing vessel with auxiliary engines and brace halyard winches. In 1890 they broke the world output record. Owner: Falls Line, Wright, Breakenridge & Co, 111 Union Street, Glasgow, Scotland. Configuration: Four masted sailing ship; iron-hulled barque; iron masts, wire rigging, fore & aft lifting bridges. Size: Length 83.87m x Breadth 12.6m x Depth 7.23m, Gross tonnage 2085 ton Wrecked: the night of 14th November 1908, Curdies Inlet, Peterborough south west Victoria Crew: 29 The Falls of Halladale was a four-masted sailing ship built-in 1886 in Glasgow, Scotland, for the long-distance cargo trade and was mostly used for Pacific grain trade. She was owned by Wright, Breakenridge & Co of Glasgow and was one of several Falls Line ships, all of which were named after waterfalls in Scotland. The lines flag was of red, blue and white vertical stripes. The Falls of Halladale had a sturdy construction built to carry maximum cargo and able to maintain full sail in heavy gales, one of the last of the ‘windjammers’ that sailed the Trade Route. She and her sister ship, the Falls of Garry, were the first ships in the world to include fore and aft lifting bridges. Previous to this, heavily loaded vessels could have heavy seas break along the full length of the deck, causing serious injury or even death to those on deck. The new, raised catwalk-type decking allowed the crew to move above the deck stormy conditions. This idea is still used today on the most modern tankers and cargo vessels and has proved to be an important step forward in the safety of men at sea. On 4th August 1908, with new sails, 29 crew, and 2800 tons of cargo, the Falls of Halladale left New York, bound for Melbourne and Sydney via the Cape of Good Hope. The cargo on board was valued at £35,000 and included 56,763 tiles of American slate roofing tiles (roof slates), 5,673 coils of barbed wire, 600 stoves, 500 sewing machines, 6,500 gallons of oil, 14,400 gallons of benzene, plumbing iron, 117 cases of crockery and glassware and many other manufactured items. The Falls of Halladale had been at sail for 102 days when, at 3 am on the night of 14th November 1908, under full sail in calm seas with a six knots breeze behind and misleading fog along the coast, the great vessel rose upon an ocean swell and settled on top of a submerged reef near Peterborough on the south-west Victoria’s coast. The ship was jammed on the rocks and began filling with water. The crew launched the two lifeboats and all 29 crew landed safely on the beach over 4 miles away at the Bay of Islands. The postmistress at Peterborough, who kept a watch for vessels in distress, saw the stranding and sent out an alert to the local people. A rescue party went to the aid of the sailors and the Port Campbell rocket crew was dispatched, but the crew had all managed to reach shore safely by the time help arrived. The ship stayed in full sail on the rocky shelf for nearly two months, attracting hundreds of sightseers who watched her slowly disintegrate until the pounding seas and dynamiting by salvagers finally broke her back, and her remains disappeared back into deeper water. The valuable cargo was largely lost, despite two salvage attempts in 1908-09 and 1910. Further salvage operations were made from 1974-1986, during which time 22,000 slate tiles were recovered with the help of 14 oil drums to float them, plus personal artefacts, ship fittings, reams of paper and other items. The Court of Marine Inquiry in Melbourne ruled that the foundering of the ship was entirely due to Captain David Wood Thomson’s navigational error, not too technical failure of the Clyde-built ship. The shipwreck is a popular site for divers, about 300m offshore and in 3 – 15m of water. Some of the original cargo can be seen at the site, including pieces of roof slate and coils of barbed wire. The Falls of Halladale shipwreck is listed on the Victorian Heritage Register (No. S255). She was one of the last ships to sail the Trade Routes. She is one of the first vessels to have fore and aft lifting bridges. She is an example of the remains of an International Cargo Ship and also represents aspects of Victoria’s shipping industry. The wreck is protected as a Historic Shipwreck under the Commonwealth Historic Shipwrecks Act (1976).Wooden Packing Strip from the slate stacks, Artefact Reg No FoH/16, recovered from the wreck of the Falls of Halladale.flagstaff hill, warrnambool, shipwrecked coast, flagstaff hill maritime museum, maritime museum, shipwreck coast, flagstaff hill maritime village, great ocean road, falls of halladale, shipwreck peterborough, 1908 shipwreck, great clipper ships, russell & co., packing strip -
 Flagstaff Hill Maritime Museum and Village
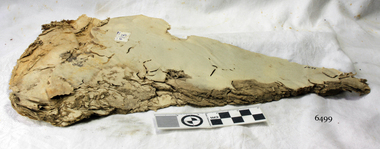
Functional object - Paper, circa 1908
This wad of paper is a section from a bale of paper that was recovered from the Falls of Halladale. The iron-hulled, four-masted barque, the Falls of Halladale, was a bulk carrier of general cargo. She left New York in August 1908 on her way to Melbourne and Sydney. In her hold, along with 56,763 tiles of unusual beautiful green American slates (roofing tiles), 5,673 coils of barbed wire, 600 stoves, 500 sewing machines, 6500 gallons of oil, 14400 gallons of benzene, and many other manufactured items, were 117 cases of crockery and glassware. Three months later and close to her destination, a navigational error caused the Falls of Halladale to be wrecked on a reef off the Peterborough headland at 3 am on the morning of the 15th of November, 1908. The captain and 29 crew members all survived, but her valuable cargo was largely lost, despite two salvage attempts in 1908-09 and 1910. ABOUT THE ‘FALLS OF HALLADALE’ (1886 - 1908) Built: in1886 by Russell & Co., Greenock shipyards, River Clyde, Scotland, UK. The company was founded in 1870 (or 1873) as a partnership between Joseph Russell (1834-1917), Anderson Rodger and William Todd Lithgow. During the period 1882-92 Russell & Co., standardised designs, which sped up their building process so much that they were able to build 271 ships over that time. In 1886 they introduced a 3000 ton class of sailing vessel with auxiliary engines and brace halyard winches. In 1890 they broke the world output record. Owner: Falls Line, Wright, Breakenridge & Co, 111 Union Street, Glasgow, Scotland. Configuration: Four masted sailing ship; iron-hulled barque; iron masts, wire rigging, fore & aft lifting bridges. Size: Length 83.87m x Breadth 12.6m x Depth 7.23m, Gross tonnage 2085 ton Wrecked: the night of 14th November 1908, Curdies Inlet, Peterborough south west Victoria Crew: 29 The Falls of Halladale was a four-masted sailing ship built-in 1886 in Glasgow, Scotland, for the long-distance cargo trade and was mostly used for Pacific grain trade. She was owned by Wright, Breakenridge & Co of Glasgow and was one of several Falls Line ships, all of which were named after waterfalls in Scotland. The lines flag was of red, blue and white vertical stripes. The Falls of Halladale had a sturdy construction built to carry maximum cargo and able to maintain full sail in heavy gales, one of the last of the ‘windjammers’ that sailed the Trade Route. She and her sister ship, the Falls of Garry, were the first ships in the world to include fore and aft lifting bridges. Previous to this, heavily loaded vessels could have heavy seas break along the full length of the deck, causing serious injury or even death to those on deck. The new, raised catwalk-type decking allowed the crew to move above the deck stormy conditions. This idea is still used today on the most modern tankers and cargo vessels and has proved to be an important step forward in the safety of men at sea. On 4th August 1908, with new sails, 29 crew, and 2800 tons of cargo, the Falls of Halladale left New York, bound for Melbourne and Sydney via the Cape of Good Hope. The cargo on board was valued at £35,000 and included 56,763 tiles of American slate roofing tiles (roof slates), 5,673 coils of barbed wire, 600 stoves, 500 sewing machines, 6,500 gallons of oil, 14,400 gallons of benzene, plumbing iron, 117 cases of crockery and glassware and many other manufactured items. The Falls of Halladale had been at sail for 102 days when, at 3 am on the night of 14th November 1908, under full sail in calm seas with a six knots breeze behind and misleading fog along the coast, the great vessel rose upon an ocean swell and settled on top of a submerged reef near Peterborough on the south-west Victoria’s coast. The ship was jammed on the rocks and began filling with water. The crew launched the two lifeboats and all 29 crew landed safely on the beach over 4 miles away at the Bay of Islands. The postmistress at Peterborough, who kept a watch for vessels in distress, saw the stranding and sent out an alert to the local people. A rescue party went to the aid of the sailors and the Port Campbell rocket crew was dispatched, but the crew had all managed to reach shore safely by the time help arrived. The ship stayed in full sail on the rocky shelf for nearly two months, attracting hundreds of sightseers who watched her slowly disintegrate until the pounding seas and dynamiting by salvagers finally broke her back, and her remains disappeared back into deeper water. The valuable cargo was largely lost, despite two salvage attempts in 1908-09 and 1910. Further salvage operations were made from 1974-1986, during which time 22,000 slate tiles were recovered with the help of 14 oil drums to float them, plus personal artefacts, ship fittings, reams of paper and other items. The Court of Marine Inquiry in Melbourne ruled that the foundering of the ship was entirely due to Captain David Wood Thomson’s navigational error, not too technical failure of the Clyde-built ship. The shipwreck is a popular site for divers, about 300m offshore and in 3 – 15m of water. Some of the original cargo can be seen at the site, including pieces of roof slate and coils of barbed wire. The section of paper has significance through its association with the Falls of Halladale. The shipwreck is listed on the Victorian Heritage Register (No. S255). She was one of the last ships to sail the Trade Routes. She is one of the first vessels to have fore and aft lifting bridges. She is an example of the remains of an International Cargo Ship and also represents aspects of Victoria’s shipping industry. The wreck is protected as a Historic Shipwreck under the Commonwealth Historic Shipwrecks Act (1976).Paper wad; a section of a bale of many sheets. The paper has several layers and shows the effects of being in the sea for many years. It was recovered from the wreck of the Falls of Halladale.flagstaff hill, warrnambool, shipwrecked coast, flagstaff hill maritime museum, maritime museum, shipwreck coast, flagstaff hill maritime village, great ocean road, falls of halladale, shipwreck peterborough, 1908 shipwreck, great clipper ships, russell & co., paper, bale of paper, ream of paper, wad of paper -
 Flagstaff Hill Maritime Museum and Village
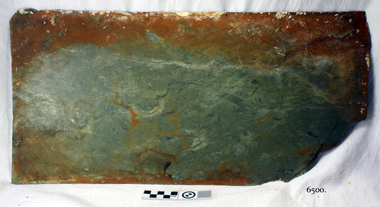
Geological specimen - Slate, c. 1908
The iron-hulled, four-masted barque, the Falls of Halladale, was a bulk carrier of general cargo. She left New York in August 1908 on her way to Melbourne and Sydney. In her hold, along with 56,763 tiles of unusual beautiful green American slates (roof tiles), 5,673 coils of barbed wire, 600 stoves, 500 sewing machines, 6500 gallons of oil, 14400 gallons of benzene, and many other manufactured items, were 117 cases of crockery and glassware. Three months later and close to her destination, a navigational error caused the Falls of Halladale to be wrecked on a reef off the Peterborough headland at 3 am on the morning of the 15th of November, 1908. The captain and 29 crew members all survived, but her valuable cargo was largely lost, despite two salvage attempts in 1908-09 and 1910. ABOUT THE ‘FALLS OF HALLADALE’ (1886 - 1908) Built: in1886 by Russell & Co., Greenock shipyards, River Clyde, Scotland, UK. The company was founded in 1870 (or 1873) as a partnership between Joseph Russell (1834-1917), Anderson Rodger and William Todd Lithgow. During the period 1882-92 Russell & Co., standardised designs, which sped up their building process so much that they were able to build 271 ships over that time. In 1886 they introduced a 3000 ton class of sailing vessel with auxiliary engines and brace halyard winches. In 1890 they broke the world output record. Owner: Falls Line, Wright, Breakenridge & Co, 111 Union Street, Glasgow, Scotland. Configuration: Four masted sailing ship; iron-hulled barque; iron masts, wire rigging, fore & aft lifting bridges. Size: Length 83.87m x Breadth 12.6m x Depth 7.23m, Gross tonnage 2085 ton Wrecked: the night of 14th November 1908, Curdies Inlet, Peterborough south west Victoria Crew: 29 The Falls of Halladale was a four-masted sailing ship built-in 1886 in Glasgow, Scotland, for the long-distance cargo trade and was mostly used for Pacific grain trade. She was owned by Wright, Breakenridge & Co of Glasgow and was one of several Falls Line ships, all of which were named after waterfalls in Scotland. The lines flag was of red, blue and white vertical stripes. The Falls of Halladale had a sturdy construction built to carry maximum cargo and able to maintain full sail in heavy gales, one of the last of the ‘windjammers’ that sailed the Trade Route. She and her sister ship, the Falls of Garry, were the first ships in the world to include fore and aft lifting bridges. Previous to this, heavily loaded vessels could have heavy seas break along the full length of the deck, causing serious injury or even death to those on deck. The new, raised catwalk-type decking allowed the crew to move above the deck stormy conditions. This idea is still used today on the most modern tankers and cargo vessels and has proved to be an important step forward in the safety of men at sea. On 4th August 1908, with new sails, 29 crew, and 2800 tons of cargo, the Falls of Halladale left New York, bound for Melbourne and Sydney via the Cape of Good Hope. The cargo on board was valued at £35,000 and included 56,763 tiles of American slate roof tiles (roof slates), 5,673 coils of barbed wire, 600 stoves, 500 sewing machines, 6,500 gallons of oil, 14,400 gallons of benzene, plumbing iron, 117 cases of crockery and glassware and many other manufactured items. The Falls of Halladale had been at sail for 102 days when, at 3 am on the night of 14th November 1908, under full sail in calm seas with a six knots breeze behind and misleading fog along the coast, the great vessel rose upon an ocean swell and settled on top of a submerged reef near Peterborough on the south-west Victoria’s coast. The ship was jammed on the rocks and began filling with water. The crew launched the two lifeboats and all 29 crew landed safely on the beach over 4 miles away at the Bay of Islands. The postmistress at Peterborough, who kept a watch for vessels in distress, saw the stranding and sent out an alert to the local people. A rescue party went to the aid of the sailors and the Port Campbell rocket crew was dispatched, but the crew had all managed to reach shore safely by the time help arrived. The ship stayed in full sail on the rocky shelf for nearly two months, attracting hundreds of sightseers who watched her slowly disintegrate until the pounding seas and dynamiting by salvagers finally broke her back, and her remains disappeared back into deeper water. The valuable cargo was largely lost, despite two salvage attempts in 1908-09 and 1910. Further salvage operations were made from 1974-1986, during which time 22,000 slate tiles were recovered with the help of 14 oil drums to float them, plus personal artefacts, ship fittings, reams of paper and other items. The Court of Marine Inquiry in Melbourne ruled that the foundering of the ship was entirely due to Captain David Wood Thomson’s navigational error, not too technical failure of the Clyde-built ship. The shipwreck is a popular site for divers, about 300m offshore and in 3 – 15m of water. Some of the original cargo can be seen at the site, including pieces of roof slate and coils of barbed wire The Falls of Halladale shipwreck is listed on the Victorian Heritage Register (No. S255). She was one of the last ships to sail the Trade Routes. She is one of the first vessels to have fore and aft lifting bridges. She is an example of the remains of an International Cargo Ship and also represents aspects of Victoria’s shipping industry. The wreck is protected as a Historic Shipwreck under the Commonwealth Historic Shipwrecks Act (1976).Californian, American, rectangular blue roof slate tile, recovered from the wreck of the Falls of Halladale. flagstaff hill, warrnambool, shipwrecked-coast, flagstaff-hill, flagstaff-hill-maritime-museum, maritime-museum, shipwreck-coast, flagstaff-hill-maritime-village, falls of halladale., slate, roof slate, russell & co. -
 Flagstaff Hill Maritime Museum and Village
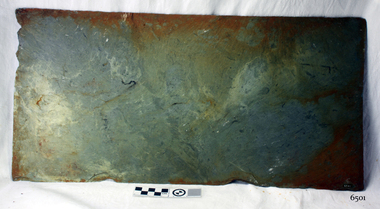
Geological specimen - Slate
The iron-hulled, four-masted barque, the Falls of Halladale, was a bulk carrier of general cargo. She left New York in August 1908 on her way to Melbourne and Sydney. In her hold, along with 56,763 tiles of unusual beautiful green American slates (roof tiles), 5,673 coils of barbed wire, 600 stoves, 500 sewing machines, 6500 gallons of oil, 14400 gallons of benzene, and many other manufactured items, were 117 cases of crockery and glassware. Three months later and close to her destination, a navigational error caused the Falls of Halladale to be wrecked on a reef off the Peterborough headland at 3 am on the morning of the 15th of November, 1908. The captain and 29 crew members all survived, but her valuable cargo was largely lost, despite two salvage attempts in 1908-09 and 1910. ABOUT THE ‘FALLS OF HALLADALE’ (1886 - 1908) Built: in1886 by Russell & Co., Greenock shipyards, River Clyde, Scotland, UK. The company was founded in 1870 (or 1873) as a partnership between Joseph Russell (1834-1917), Anderson Rodger and William Todd Lithgow. During the period 1882-92 Russell & Co., standardised designs, which sped up their building process so much that they were able to build 271 ships over that time. In 1886 they introduced a 3000 ton class of sailing vessel with auxiliary engines and brace halyard winches. In 1890 they broke the world output record. Owner: Falls Line, Wright, Breakenridge & Co, 111 Union Street, Glasgow, Scotland. Configuration: Four masted sailing ship; iron-hulled barque; iron masts, wire rigging, fore & aft lifting bridges. Size: Length 83.87m x Breadth 12.6m x Depth 7.23m, Gross tonnage 2085 ton Wrecked: the night of 14th November 1908, Curdies Inlet, Peterborough south west Victoria Crew: 29 The Falls of Halladale was a four-masted sailing ship built-in 1886 in Glasgow, Scotland, for the long-distance cargo trade and was mostly used for Pacific grain trade. She was owned by Wright, Breakenridge & Co of Glasgow and was one of several Falls Line ships, all of which were named after waterfalls in Scotland. The lines flag was of red, blue and white vertical stripes. The Falls of Halladale had a sturdy construction built to carry maximum cargo and able to maintain full sail in heavy gales, one of the last of the ‘windjammers’ that sailed the Trade Route. She and her sister ship, the Falls of Garry, were the first ships in the world to include fore and aft lifting bridges. Previous to this, heavily loaded vessels could have heavy seas break along the full length of the deck, causing serious injury or even death to those on deck. The new, raised catwalk-type decking allowed the crew to move above the deck stormy conditions. This idea is still used today on the most modern tankers and cargo vessels and has proved to be an important step forward in the safety of men at sea. On 4th August 1908, with new sails, 29 crew, and 2800 tons of cargo, the Falls of Halladale left New York, bound for Melbourne and Sydney via the Cape of Good Hope. The cargo on board was valued at £35,000 and included 56,763 tiles of American slate roof tiles (roof slates), 5,673 coils of barbed wire, 600 stoves, 500 sewing machines, 6,500 gallons of oil, 14,400 gallons of benzene, plumbing iron, 117 cases of crockery and glassware and many other manufactured items. The Falls of Halladale had been at sail for 102 days when, at 3 am on the night of 14th November 1908, under full sail in calm seas with a six knots breeze behind and misleading fog along the coast, the great vessel rose upon an ocean swell and settled on top of a submerged reef near Peterborough on the south-west Victoria’s coast. The ship was jammed on the rocks and began filling with water. The crew launched the two lifeboats and all 29 crew landed safely on the beach over 4 miles away at the Bay of Islands. The postmistress at Peterborough, who kept a watch for vessels in distress, saw the stranding and sent out an alert to the local people. A rescue party went to the aid of the sailors and the Port Campbell rocket crew was dispatched, but the crew had all managed to reach shore safely by the time help arrived. The ship stayed in full sail on the rocky shelf for nearly two months, attracting hundreds of sightseers who watched her slowly disintegrate until the pounding seas and dynamiting by salvagers finally broke her back, and her remains disappeared back into deeper water. The valuable cargo was largely lost, despite two salvage attempts in 1908-09 and 1910. Further salvage operations were made from 1974-1986, during which time 22,000 slate tiles were recovered with the help of 14 oil drums to float them, plus personal artefacts, ship fittings, reams of paper and other items. The Court of Marine Inquiry in Melbourne ruled that the foundering of the ship was entirely due to Captain David Wood Thomson’s navigational error, not too technical failure of the Clyde-built ship. The shipwreck is a popular site for divers, about 300m offshore and in 3 – 15m of water. Some of the original cargo can be seen at the site, including pieces of roof slate and coils of barbed wire. SIGNIFICANCE The Falls of Halladale shipwreck is listed on the Victorian Heritage Register (No. S255). She was one of the last ships to sail the Trade Routes. She is one of the first vessels to have fore and aft lifting bridges. She is an example of the remains of an International Cargo Ship and also represents aspects of Victoria’s shipping industry. The wreck is protected as a Historic Shipwreck under the Commonwealth Historic Shipwrecks Act (1976). Californian, American, blue roof slate tile, rectangular shape, recovered from the wreck of the Falls of Halladale.flagstaff hill, warrnambool, shipwrecked-coast, flagstaff-hill, flagstaff-hill-maritime-museum, maritime-museum, shipwreck-coast, flagstaff-hill-maritime-village, falls of halladale, slate, roof slate, russell & co. -
 Flagstaff Hill Maritime Museum and Village
Geological specimen - Slate, c. 1908
The iron-hulled, four-masted barque, the Falls of Halladale, was a bulk carrier of general cargo. She left New York in August 1908 on her way to Melbourne and Sydney. In her hold, along with 56,763 tiles of unusual beautiful green American slates (roof tiles), 5,673 coils of barbed wire, 600 stoves, 500 sewing machines, 6500 gallons of oil, 14400 gallons of benzene, and many other manufactured items, were 117 cases of crockery and glassware. Three months later and close to her destination, a navigational error caused the Falls of Halladale to be wrecked on a reef off the Peterborough headland at 3 am on the morning of the 15th of November, 1908. The captain and 29 crew members all survived, but her valuable cargo was largely lost, despite two salvage attempts in 1908-09 and 1910. ABOUT THE ‘FALLS OF HALLADALE’ (1886 - 1908) Built: in1886 by Russell & Co., Greenock shipyards, River Clyde, Scotland, UK. The company was founded in 1870 (or 1873) as a partnership between Joseph Russell (1834-1917), Anderson Rodger and William Todd Lithgow. During the period 1882-92 Russell & Co., standardised designs, which sped up their building process so much that they were able to build 271 ships over that time. In 1886 they introduced a 3000 ton class of sailing vessel with auxiliary engines and brace halyard winches. In 1890 they broke the world output record. Owner: Falls Line, Wright, Breakenridge & Co, 111 Union Street, Glasgow, Scotland. Configuration: Four masted sailing ship; iron-hulled barque; iron masts, wire rigging, fore & aft lifting bridges. Size: Length 83.87m x Breadth 12.6m x Depth 7.23m, Gross tonnage 2085 ton Wrecked: the night of 14th November 1908, Curdies Inlet, Peterborough south west Victoria Crew: 29 The Falls of Halladale was a four-masted sailing ship built-in 1886 in Glasgow, Scotland, for the long-distance cargo trade and was mostly used for Pacific grain trade. She was owned by Wright, Breakenridge & Co of Glasgow and was one of several Falls Line ships, all of which were named after waterfalls in Scotland. The lines flag was of red, blue and white vertical stripes. The Falls of Halladale had a sturdy construction built to carry maximum cargo and able to maintain full sail in heavy gales, one of the last of the ‘windjammers’ that sailed the Trade Route. She and her sister ship, the Falls of Garry, were the first ships in the world to include fore and aft lifting bridges. Previous to this, heavily loaded vessels could have heavy seas break along the full length of the deck, causing serious injury or even death to those on deck. The new, raised catwalk-type decking allowed the crew to move above the deck stormy conditions. This idea is still used today on the most modern tankers and cargo vessels and has proved to be an important step forward in the safety of men at sea. On 4th August 1908, with new sails, 29 crew, and 2800 tons of cargo, the Falls of Halladale left New York, bound for Melbourne and Sydney via the Cape of Good Hope. The cargo on board was valued at £35,000 and included 56,763 tiles of American slate roof tiles (roof slates), 5,673 coils of barbed wire, 600 stoves, 500 sewing machines, 6,500 gallons of oil, 14,400 gallons of benzene, plumbing iron, 117 cases of crockery and glassware and many other manufactured items. The Falls of Halladale had been at sail for 102 days when, at 3 am on the night of 14th November 1908, under full sail in calm seas with a six knots breeze behind and misleading fog along the coast, the great vessel rose upon an ocean swell and settled on top of a submerged reef near Peterborough on the south-west Victoria’s coast. The ship was jammed on the rocks and began filling with water. The crew launched the two lifeboats and all 29 crew landed safely on the beach over 4 miles away at the Bay of Islands. The postmistress at Peterborough, who kept a watch for vessels in distress, saw the stranding and sent out an alert to the local people. A rescue party went to the aid of the sailors and the Port Campbell rocket crew was dispatched, but the crew had all managed to reach shore safely by the time help arrived. The ship stayed in full sail on the rocky shelf for nearly two months, attracting hundreds of sightseers who watched her slowly disintegrate until the pounding seas and dynamiting by salvagers finally broke her back, and her remains disappeared back into deeper water. The valuable cargo was largely lost, despite two salvage attempts in 1908-09 and 1910. Further salvage operations were made from 1974-1986, during which time 22,000 slate tiles were recovered with the help of 14 oil drums to float them, plus personal artefacts, ship fittings, reams of paper and other items. The Court of Marine Inquiry in Melbourne ruled that the foundering of the ship was entirely due to Captain David Wood Thomson’s navigational error, not too technical failure of the Clyde-built ship. The shipwreck is a popular site for divers, about 300m offshore and in 3 – 15m of water. Some of the original cargo can be seen at the site, including pieces of roof slate and coils of barbed wire. The Falls of Halladale shipwreck is listed on the Victorian Heritage Register (No. S255). She was one of the last ships to sail the Trade Routes. She is one of the first vessels to have fore and aft lifting bridges. She is an example of the remains of an International Cargo Ship and also represents aspects of Victoria’s shipping industry. The wreck is protected as a Historic Shipwreck under the Commonwealth Historic Shipwrecks Act (1976).Californian, American, rectangular blue roof slate, recovered from the wreck of the Falls of Halladale. flagstaff hill, warrnambool, shipwrecked-coast, flagstaff-hill, flagstaff-hill-maritime-museum, maritime-museum, shipwreck-coast, flagstaff-hill-maritime-village, falls of halladale, slate, roof slate, russell & co. -
 Flagstaff Hill Maritime Museum and Village
Geological specimen - Slate, c. 1908
The iron-hulled, four-masted barque, the Falls of Halladale, was a bulk carrier of general cargo. She left New York in August 1908 on her way to Melbourne and Sydney. In her hold, along with 56,763 tiles of unusual beautiful green American slates (roof tiles), 5,673 coils of barbed wire, 600 stoves, 500 sewing machines, 6500 gallons of oil, 14400 gallons of benzene, and many other manufactured items, were 117 cases of crockery and glassware. Three months later and close to her destination, a navigational error caused the Falls of Halladale to be wrecked on a reef off the Peterborough headland at 3 am on the morning of the 15th of November, 1908. The captain and 29 crew members all survived, but her valuable cargo was largely lost, despite two salvage attempts in 1908-09 and 1910. ABOUT THE ‘FALLS OF HALLADALE’ (1886 - 1908) Built: in1886 by Russell & Co., Greenock shipyards, River Clyde, Scotland, UK. The company was founded in 1870 (or 1873) as a partnership between Joseph Russell (1834-1917), Anderson Rodger and William Todd Lithgow. During the period 1882-92 Russell & Co., standardised designs, which sped up their building process so much that they were able to build 271 ships over that time. In 1886 they introduced a 3000 ton class of sailing vessel with auxiliary engines and brace halyard winches. In 1890 they broke the world output record. Owner: Falls Line, Wright, Breakenridge & Co, 111 Union Street, Glasgow, Scotland. Configuration: Four masted sailing ship; iron-hulled barque; iron masts, wire rigging, fore & aft lifting bridges. Size: Length 83.87m x Breadth 12.6m x Depth 7.23m, Gross tonnage 2085 ton Wrecked: the night of 14th November 1908, Curdies Inlet, Peterborough south west Victoria Crew: 29 The Falls of Halladale was a four-masted sailing ship built-in 1886 in Glasgow, Scotland, for the long-distance cargo trade and was mostly used for Pacific grain trade. She was owned by Wright, Breakenridge & Co of Glasgow and was one of several Falls Line ships, all of which were named after waterfalls in Scotland. The lines flag was of red, blue and white vertical stripes. The Falls of Halladale had a sturdy construction built to carry maximum cargo and able to maintain full sail in heavy gales, one of the last of the ‘windjammers’ that sailed the Trade Route. She and her sister ship, the Falls of Garry, were the first ships in the world to include fore and aft lifting bridges. Previous to this, heavily loaded vessels could have heavy seas break along the full length of the deck, causing serious injury or even death to those on deck. The new, raised catwalk-type decking allowed the crew to move above the deck stormy conditions. This idea is still used today on the most modern tankers and cargo vessels and has proved to be an important step forward in the safety of men at sea. On 4th August 1908, with new sails, 29 crew, and 2800 tons of cargo, the Falls of Halladale left New York, bound for Melbourne and Sydney via the Cape of Good Hope. The cargo on board was valued at £35,000 and included 56,763 tiles of American slate roof tiles (roof slates), 5,673 coils of barbed wire, 600 stoves, 500 sewing machines, 6,500 gallons of oil, 14,400 gallons of benzene, plumbing iron, 117 cases of crockery and glassware and many other manufactured items. The Falls of Halladale had been at sail for 102 days when, at 3 am on the night of 14th November 1908, under full sail in calm seas with a six knots breeze behind and misleading fog along the coast, the great vessel rose upon an ocean swell and settled on top of a submerged reef near Peterborough on the south-west Victoria’s coast. The ship was jammed on the rocks and began filling with water. The crew launched the two lifeboats and all 29 crew landed safely on the beach over 4 miles away at the Bay of Islands. The postmistress at Peterborough, who kept a watch for vessels in distress, saw the stranding and sent out an alert to the local people. A rescue party went to the aid of the sailors and the Port Campbell rocket crew was dispatched, but the crew had all managed to reach shore safely by the time help arrived. The ship stayed in full sail on the rocky shelf for nearly two months, attracting hundreds of sightseers who watched her slowly disintegrate until the pounding seas and dynamiting by salvagers finally broke her back, and her remains disappeared back into deeper water. The valuable cargo was largely lost, despite two salvage attempts in 1908-09 and 1910. Further salvage operations were made from 1974-1986, during which time 22,000 slate tiles were recovered with the help of 14 oil drums to float them, plus personal artefacts, ship fittings, reams of paper and other items. The Court of Marine Inquiry in Melbourne ruled that the foundering of the ship was entirely due to Captain David Wood Thomson’s navigational error, not too technical failure of the Clyde-built ship. The shipwreck is a popular site for divers, about 300m offshore and in 3 – 15m of water. Some of the original cargo can be seen at the site, including pieces of roof slate and coils of barbed wire. The Falls of Halladale shipwreck is listed on the Victorian Heritage Register (No. S255). She was one of the last ships to sail the Trade Routes. She is one of the first vessels to have fore and aft lifting bridges. She is an example of the remains of an International Cargo Ship and also represents aspects of Victoria’s shipping industry. The wreck is protected as a Historic Shipwreck under the Commonwealth Historic Shipwrecks Act (1976).Californian American rectangular blue roof slate, recovered from the wreck of the Falls of Halladale. flagstaff hill, warrnambool, shipwrecked-coast, flagstaff-hill, flagstaff-hill-maritime-museum, maritime-museum, shipwreck-coast, flagstaff-hill-maritime-village, californian blue roof slate, falls of halladale., californian blue roof slate, green american slate, slate, russell & co. -
 Flagstaff Hill Maritime Museum and Village
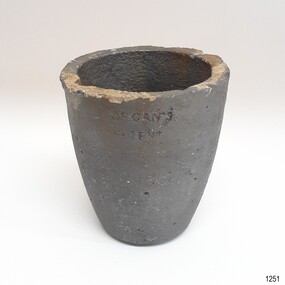
Functional object - Crucible, The Patent Plumbago Crucible Company, circa 1873
Crucibles are used for heating and pouring molten metal. The set of six crucibles was raised from the wreck of the Loch Ard and includes a range of sizes, now in the Flagstaff Hill collection. All were manufactured by the Morgan brothers who founded the Patent Plumbago Crucible Company in 1856, making crucibles in a small factory in Battersea London. A crucible is a container used for purifying and melting metals so that they can be cast in a mould to a predetermined shape and use. They must withstand extremely high temperatures, and abrupt cooling, and shed their contents with minimal adherence. The addition of graphite to the traditional firing clays greatly enhanced the durability of industrial crucibles this technique was pioneered by the Morgan Bros thereby making a significant technological advance in foundry technology and metallurgy. The Morgans first noticed the advantages of graphite crucibles at the Great Exhibition held in London in 1851. Initially, they contracted to be sole selling agents for the American-made products of Joseph Dixon and Co. from New Jersey, but in 1856 they obtained that firm's manufacturing rights and began producing their graphite crucibles from the South London site. The Morgans imported crystalline graphite in 4-5 cwt casks from the British colony of Ceylon (now Sri Lanka) and mixed it with conventional English (Stourbridge) clays to be fired in kilns. Their products were purchased by the Royal Mints in London and India and exported to official mints in France and Germany. They were successful exhibitors of their crucibles and furnaces at the London Exhibition held in 1861 (Class 1, Mining, quarrying, metallurgy and mineral products, Exhibit 265, Patent Plumbago Crucible Co). The range of sizes represented by the six crucibles retrieved from the Loch Ard suggests they may have been part of a sample shipment intended for similar promotion in the Australian colonies or at Melbourne's International Exhibition to be held in 1880. A newspaper account of an 1864 tour of the Morgan brothers' 'Black Potteries' at Battersea indicates: "All the pots were numbered according to their contents, each number standing for one kilogram or a little over two pounds; a No. 2 crucible contains two kilograms; a No. 3, three kilograms, and so on." These numbers are obscured by marine sediment on three of the crucibles in the Flagstaff Hill collection, but those legible on the remaining three are 5, 6, and 8. None of the six is of the same size. A brief history of the Loch Ard (1873-1878): - The sailing ship Loch Ard was one of the famous Loch Line of ships that sailed the long voyage from England to Australia. Barclay, Curdle and Co. built the three-masted iron vessel in Glasgow in 1873. It had sailed three trips to Australia and one trip to Calcutta before its fateful voyage. Loch Ard left England on March 2, 1878, under the command of recently married, 29-year-old Captain Gibbs. It was bound for Melbourne with a crew of 37, plus 17 passengers. The general cargo reflected the affluence of Melbourne at the time. Onboard were straw hats, umbrellas, perfumes, clay pipes, pianos, clocks, confectionery, linen and candles, and a heavier load of railway irons, cement, lead and copper. Other cargo included items intended for display in the Melbourne International Exhibition of 1880. The Loch Ard had been sailing for three months and was close to its destination on June 1, 1878. Captain Gibbs had expected to see land at about 3 am but the Loch Ard ran into a fog that greatly reduced visibility and there was no sign of land or the Cape Otway lighthouse. The fog lifted at 4 am and the sheer cliffs of Victoria's west coast were much closer to them than Captain Gibbs expected. He tried to manage the vessel but failed and the ship struck a reef at the base of Mutton Bird Island, near Port Campbell. The top deck loosened from the hull, and the masts and rigging crashed down, knocking passengers and crew overboard. The lifeboat was launched by Tom Pearce but crashed into the side of Loch Ard and capsized. He clung onto its overturned hull and sheltered under it. He drifted out to sea and the tide brought him back to what is now called Loch Ard Gorge. He swam to shore and found a cave for shelter. A passenger, Eva Carmichael, had raced onto the deck to find out what was happening and was confronted by towering cliffs above the ship. She was soon swept off the ship by a huge wave. Eva saw Tom Pearce on a small rocky beach and yelled to attract his attention. He swam out and dragged her to the shelter of the cave. He revived her with a bottle of brandy from a case that had washed up on the beach. Tom scaled a cliff in search of help and followed some horse hoof prints. He came from two men from Glenample Station, three and a half miles away. He told the men of the tragedy and then returned to the gorge while the two men rode back to the station to get help. They reached Loch Ard Gorge and took the two shipwreck survivors to Glenample Station to recover. Eva stayed at the station for six weeks before returning to Ireland by steamship. In Melbourne, Tom Pearce received a hero's welcome and was presented with a medal and some money. Of the 54 crew members and passengers on board, only two survived: the apprentice, Tom Pearce and the young woman passenger, Eva Carmichael, who lost her family in the tragedy. The shipwreck of the Loch Ard is of significance for Victoria and is registered on the Victorian Heritage Register ( S 417). Flagstaff Hill has a varied collection of artefacts from Loch Ard and its collection is significant for being one of the largest accumulation of artefacts from this notable Victorian shipwreck of which the subject items are a small part. The collection's objects give us a snapshot of how we can interpret the story of this tragic event. The collection is also archaeologically significant as it represents aspects of Victoria's shipping history that allows us to interpret Victoria's social and historical themes of the time. Through is associated with the worst and best-known shipwreck in Victoria's history.This crucible is the smallest of three nested crucibles, or fluxing pots, numbered according to their size. These containers rise slightly from a smaller flat base to a wider open top with a lip for pouring. They were recovered from the wreck of the Loch Ard. The crucibles have a coating of sediment that obscures some of their numerical specifications of size and capacity. Made by the Patent Plumbago Crucible Company at the Battersea Works in London. The number on this crucible is obscured by the sticker.Stamped into side "MORGAN'S PATENT" Stemped into base "MORGAN'S PATENT" "THE PATENT PLUMBAGO CRUCIBLE COMPANY" Sticker "L 96"flagstaff hill, warrnambool, graphite crucible, plumbago crucible, morgan's crucible company, loch ard, morgan potteries, crucible, fluxing pot, nested crucibles, heat proof container, metal worker, maritime museum, shipwreck coast, flagstaff hill maritime village, great ocean road, loch line, morgans crucible company, flagstaff hill maritime museum and village, fluxing pots, morgan’s patent, morgan brothers, patent plumbago crucible co, battersea works, london, loch ard gorge, port campbell -
 Ballarat Tramway Museum
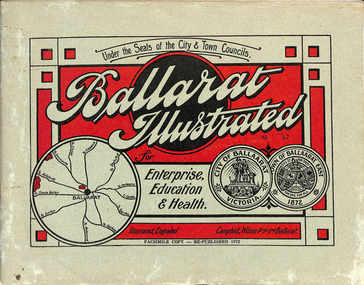
Book, "Ballarat Illustrated", 1972
Original c 1914 (see below), facsimile copy - re-published 1972. Original features photos of Ballarat City and Town, its buildings, parks and the various industries and organisations that were in Ballarat at the time of publication, including ESCo. Many photos features ESCo trams. Photos sepia toned. Has some red colour block printing on the front cover and rear, for Star Oil Engines. On inside back cover is a map with the places of interest and tram route map, marked in red. Pages are un-numbered. Original published by Ballarat East Town Council and Ballaarat City Council. On cover has number stamped in black in, "No. 87" (assume facsimile copy No.). Photos with publication show tram No. 21, built 1913 and ESCo photo page shows Mr. Pringle as Manager. Mr Pringle became manager in January 1911, As there is no photos of the "Avenue of Honour", or other mention of the first world war, assume original published about 1913 or 1914. Original shows Engravings and printing by "Campbell Wilson Prop Ltd, Ballarat". See Other Information as well for more listing details. High Resolution image added 31/8/2012 of i2 of ESCo page and i3 for Ballarat identies and sheet i4 extracted for Mr Pringle. PDF scan of full document added 21/5/2019 - see images btm633-1i.pdf and btm633-2i.pdf Notes on "Ballarat Illustrated" Reg. Item No. 733 From notes made by Neville Gower 12/1/1997 Cover: Inside front cover: Last paragraph, "Facilities for Travelling" - Electric trams serve all parts of Ballarat. Page 3: Street Scene, Municipal Town Hall, showing tram wiring Page 7: Street Scene, Lydiard St. North, intersection and tramway centre, with ESCo tram No. 21 in the bottom photo. Other photos features trams as well in Sturt St and Lydiard St. North. Page 9: Street Scene, Top photo of Sturt St. from Lydiard St. looking east, shows piles on right-hand side of road. Car parked by Post Office has a car registration number "9007". Bottom photo, an tram climbing hill, shows double trolley in the street, with early English type of pull offs. Page 13: Street Scenes and Historic Buildings: One of five photos, shows Victoria St. looking East, with tram track prominent in photo and how stone work was set up about the rails and overhead poles. Page 23: Street scene, Gardens North Entrance gates, shows details of gates near St. Aidans Drive. Note double trolley wire on poles, and style of insulators. No trams in photo, three ladies walking down the track. Page 37: Street Scene; Lydiard St views, top left hand photo, shows Railway station and railway gates with signal gantry and horse drawn vehicles. Tram tracks apparent. Bottom left hand photo shows Lydiard St. North, near Post Office, double track with centre poles - Single wire per track. Top right hand photo, showing Cemetery gates in background. Bottom right hand photo - from north end of Lydiard St. South, looking north, with an ESCo tram in background. Also has a parked car on left hand side. Page 45: Street Scenes - Bridge St; top photo at west end of Bridge St. with ESCo No. 11 with possibly double trolley wire in photo. Bottom photo at east end of Bridge St. with tram in background, shows junction. Double trolley heading out to Mt. Pleasant, single trolley for Victoria St. Page 45: Street Scenes - Bridge St; top photo at west end of Bridge St. with ESCo No. 11 with possibly double trolley wire in photo. Bottom photo at east end of Bridge St. with tram in background, shows junction. Double trolley heading out to Mt. Pleasant, single trolley for Victoria St. Page 61: Street Scenes and Historic Buildings - Public Institutions Ballarat - top left hand photo of the Hospital shows some tram track in foreground, with double trolley wire. Top right photo is of the Orphanage, the name of the tram terminus for many years. Page 68: Electric Supply Co. of Victoria's pages - top photo showing powerhouse in background, across the lake, can hardly see anything for the trees, except for the chimney. Bottom photos of the steam Turbo Generators and the switchboard. Gives Mr. P.J. Pringle as Chief Engineer and General Manager. He took over in Jan. 1911. Page 69: Ballarat East Views - features photo of Black Hill open cut, Ballarat East Railway Station, Ballarat Fire Station and "Victoria St. looking East", repeat of photo printed on page 12, but slightly darker. Image on system includes fire station and railway station, - Ballarat East. Page 78: Series of photos of various Ballarat VIP's of the era, fourth one in on top line features "P.J.Pringle, Electric Supply Co." Inside Back cover - map of Ballarat including tram lines and places of interest marked in red. Gives a detailed photographic presentation of Ballarat in 1914.80 page book with, in addition, light green card covers, titled "Ballarat Illustrated". Loose copy of page 9 and 10 held.trams, tramways, ballarat, local history, heritage buildings, esco -
 Flagstaff Hill Maritime Museum and Village
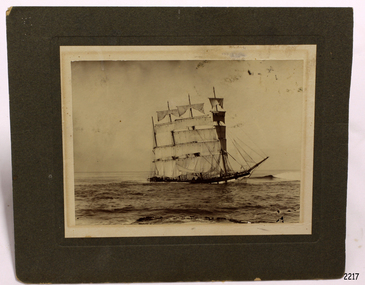
Photograph - Vessel, Sailing Ship, Foyle Photographic Studio, 1908
The photograph is of the sailing ship Falls of Halladale. The ship is in shallow water at Peterborough where it sank on November 14th 1908. The inscription on the photograph reads "Nov 4th 1908". The iron-hulled, four-masted barque, the Falls of Halladale, was a bulk carrier of general cargo. She left New York in August 1908 on her way to Melbourne and Sydney. In her hold, along with 56,763 tiles of unusual beautiful green American slates (roofing tiles), 5,673 coils of barbed wire, 600 stoves, 500 sewing machines, 6500 gallons of oil, 14400 gallons of benzene, and many other manufactured items, were 117 cases of crockery and glassware. Three months later and close to her destination, a navigational error caused the Falls of Halladale to be wrecked on a reef off the Peterborough headland at 3 am on the morning of the 15th of November, 1908. The captain and 29 crew members all survived, but her valuable cargo was largely lost, despite two salvage attempts in 1908-09 and 1910. ABOUT THE ‘FALLS OF HALLADALE’ (1886 - 1908) Built: in1886 by Russell & Co., Greenock shipyards, River Clyde, Scotland, UK. The company was founded in 1870 (or 1873) as a partnership between Joseph Russell (1834-1917), Anderson Rodger and William Todd Lithgow. During the period 1882-92 Russell & Co., standardised designs, which sped up their building process so much that they were able to build 271 ships over that time. In 1886 they introduced a 3000 ton class of sailing vessel with auxiliary engines and brace halyard winches. In 1890 they broke the world output record. Owner: Falls Line, Wright, Breakenridge & Co, 111 Union Street, Glasgow, Scotland. Configuration: Four masted sailing ship; iron-hulled barque; iron masts, wire rigging, fore & aft lifting bridges. Size: Length 83.87m x Breadth 12.6m x Depth 7.23m, Gross tonnage 2085 ton Wrecked: the night of 14th November 1908, Curdies Inlet, Peterborough south west Victoria Crew: 29 The Falls of Halladale was a four-masted sailing ship built-in 1886 in Glasgow, Scotland, for the long-distance cargo trade and was mostly used for Pacific grain trade. She was owned by Wright, Breakenridge & Co of Glasgow and was one of several Falls Line ships, all of which were named after waterfalls in Scotland. The lines flag was of red, blue and white vertical stripes. The Falls of Halladale had a sturdy construction built to carry maximum cargo and able to maintain full sail in heavy gales, one of the last of the ‘windjammers’ that sailed the Trade Route. She and her sister ship, the Falls of Garry, were the first ships in the world to include fore and aft lifting bridges. Previous to this, heavily loaded vessels could have heavy seas break along the full length of the deck, causing serious injury or even death to those on deck. The new, raised catwalk-type decking allowed the crew to move above the deck stormy conditions. This idea is still used today on the most modern tankers and cargo vessels and has proved to be an important step forward in the safety of men at sea. On 4th August 1908, with new sails, 29 crew, and 2800 tons of cargo, the Falls of Halladale left New York, bound for Melbourne and Sydney via the Cape of Good Hope. The cargo on board was valued at £35,000 and included 56,763 tiles of American slate roofing tiles (roof slates), 5,673 coils of barbed wire, 600 stoves, 500 sewing machines, 6,500 gallons of oil, 14,400 gallons of benzene, plumbing iron, 117 cases of crockery and glassware and many other manufactured items. The Falls of Halladale had been at sail for 102 days when, at 3 am on the night of 14th November 1908, under full sail in calm seas with a six knots breeze behind and misleading fog along the coast, the great vessel rose upon an ocean swell and settled on top of a submerged reef near Peterborough on the south-west Victoria’s coast. The ship was jammed on the rocks and began filling with water. The crew launched the two lifeboats and all 29 crew landed safely on the beach over 4 miles away at the Bay of Islands. The postmistress at Peterborough, who kept a watch for vessels in distress, saw the stranding and sent out an alert to the local people. A rescue party went to the aid of the sailors and the Port Campbell rocket crew was dispatched, but the crew had all managed to reach shore safely by the time help arrived. The ship stayed in full sail on the rocky shelf for nearly two months, attracting hundreds of sightseers who watched her slowly disintegrate until the pounding seas and dynamiting by salvagers finally broke her back, and her remains disappeared back into deeper water. The valuable cargo was largely lost, despite two salvage attempts in 1908-09 and 1910. Further salvage operations were made from 1974-1986, during which time 22,000 slate tiles were recovered with the help of 14 oil drums to float them, plus personal artefacts, ship fittings, reams of paper and other items. The Court of Marine Inquiry in Melbourne ruled that the foundering of the ship was entirely due to Captain David Wood Thomson’s navigational error, not too technical failure of the Clyde-built ship. The shipwreck is a popular site for divers, about 300m offshore and in 3 – 15m of water. Some of the original cargo can be seen at the site, including pieces of roof slate and coils of barbed wire. The photograph shows the ship Falls of Halladale in full sail, demonstrating the sails used for power at sea.A sepia landscape photograph; image of a sailing ship in shallow water in full sail. The vessel is the"Falls of Halladale" aground off Peterborough 1908. A figure is in the foreground. Photographed in 1908 by Foyle of Warrnambool. A pencil inscription on the back is underlined. A white sticker is attached.In pencil on reverse "The Falls of Halladale / Wrecked at Peterborough / Nov 4th 1908" [Note: the ship was wrecked on Nov 14th 1908] On white sticker "131"flagstaff hill, flagstaff hill maritime museum and village, warrnambool, maritime museum, maritime village, great ocean road, shipwreck coast, photograph, falls of halladale, sailing ship, vessel, shipwreck, foyle -
 Bendigo Historical Society Inc.
Document - BENDIGO ART GALLERY, BENDIGO ART SOCIETY, 10 October, 1926
Bendigo Art Gallery, Bendigo Art Society. President: Hon. R H S Abbot, M.L.C., F.R.S.A. Eleventh Exhibition, in the Bendigo Art Gallery, View Street. October 10th to 31st, 1926. Hon. Treas.: C E Bulley. Catalogue Price 6d. The President, Officers, and Committee of the Bendigo Art Society express their pleasure in presenting the representative collection embodied in this Exhibition. Mr John Shirlow, the noted etcher has been good enough to get together a fine showing of works from eminent artists, who have kindly exhibited with a disire to help the Society and to encourage the local artists. The patronage and help of our citizens is earnestly solicited. Fee, for exhibiting or ordinary membership, only 5/- per annum. Should you care to join, the executive officers will only be too pleased to give any information and to receive subscriptions. Joint Hon. Secs.: J Hudspeth, V E Greenhalgh. Fine Art Section. Arists names: Elma Roach, Ida F Knox, H J Honeybone, Edith H Moore, M A Hope, Lady Barrett, G E Parker, D Hinchcliffe, Aileen R Dent, J Hudspeth, J Florence MacGregor, Madge Freeman, C E Bulley, Merle Bulley, Ethel f Crook, L M Sheridan, C G Dunlop, Ena Smith, William H oliver, E Phillips Fox, Ethel Carrick, H Septimus Power, David Davies, Norman Davies, Norman W Penrose, Margaret McCloud, Josephine Van Damme, M E Coverdale, Marion Jones,R W Bugg, L Rowe, Lucy C Newell, Claire Colgan, Charles G Stewart, Alice Newell, V E Greenhalgh, Violet Hambly. Display of Hand-Painted China: H W Tilley, M Jacobs, W McKie, A E Collier, Hilda Veale, Elma Curnow, Jean Cahill, Frank Vaughan. Collection of Australian Art: W D Knox, Esther Paterson, Dora L Wilson, A M E Bale, E F Hooton, John Rowell, Horah Gurdon, Louis McCubbin. Section A (Outdoor Study, any subject, any medium.) Members only: C G Duinlop, J Florence MacGregor, Merle Bulley, William H Oliver, Norman W Penrose. Section B Student's Section. Drawing or Design. Pupils of Schools: Stanley R Millott, Joyce Ranson, Ronald William Forbes, Dorothy Clemens, Lilian J White, Ruby A I Welch, Nancy R Hudspeth, J Honey Church, J G Graham, Ivo Steel. Section C Student's Section. Applied Art. Pupols of Art Schools: Florrie Spencer, Joyce Ranson, Ronald W Forbes, Dorothy Clemens, Lilian J White, Ruby A I Welch, Nancy R Hudspeth, Jean Honeychurch, Annie I Paterson, Isabel Blake, Beatrice Lee, Garnet Capper, Gwen Osborne, Dorothy Olds, Marjorie Crossman, Doris Shaw, Phyllis Paul, Amy Bolton. Section D Plant Form From Nature (Pulils of Schools in Bedigo Inspectorate), North Bendigo: Alan Styles, Ronald Wright, Agnes R Styles, Jean Woodman. Creek View S.S. Beryl Butcher, Grace Gerguson, Ruth Cheatley, Elmore S.S.: George Read, Hazel Farnsworth, Lorna Washington, Keith Gow, Jean Oliver, Robbie Dick. Wanalta S.S. Mary Brown, Dorothy Nelson, Isobel Roberts, Kenneth McKenzie, Frank Brown. Barnedown S.S.: Elsie Read, George Cahill, Maud Nicholas, Leonard Robbins, Benjamin Robbins. Gravel Hill S.S.: Gladys Bamford, Jean Wright, Jean Hosking, Nancy Honeychurch, Norman McLean, Norman Guy, Agnes Stilwell. Violet St S.S.: Alma Worth, G McConville, Harry Elliot. Various Schools: Wm. Hyslop, Ruby Robertson, Hilda Parkinson, Maud O'Connor, Archie L Walker, Hedley Leggo, Jan O Hoy, Edith Cheatley, John Tatchell, Jean Barell, Keith Ashcroft, John Mueller, J Howe, Eric Cohen, Alice Glover, Ivy Morphett, Allen V Horne, Yin On, R W Moon. 2 Copies of catalogue. Black print, 12 pages made up of 3 sheets of paper with 2 staples in centre.Boltons Print, Bendigoevent, exhibition, bendigo art society, bendigo art gallery, bendigo art society. president: hon. r h s abbot, m.l.c., f.r.s.a. eleventh exhibition, in the bendigo art gallery, view street. october 10th to 31st, 1926. hon. treas.: c e bulley. catalogue price 6d. the president, officers, and committee of the bendigo art society express their pleasure in presenting the representative collection embodied in this exhibition. mr john shirlow, the noted etcher has been good enough to ger together a fine showing of works from eminent artists, who have kindly exhibited with a disire to help the society and to encourage the local artists. the patronage and help of our citizens is earnestly solicited. fee, for exhibiting or ordinary membership, only 5/- per annum. should you care to join, the executive officers will only be too pleased to give any information and to receive subscriptions. joint hon. secs.: j hudspeth, v e greenhalgh. fine art section. arists names: elma roach, ida f knox, h j honeybone, edith h moore, m a hope, lady barrett, g e parker, d hinchcliffe, aileen r dent, j hudspeth, j florence macgregor, madge freeman, c e bulley, merle bulley, ethel f crook, l m sheridan, c g dunlop, ena smith, william h oliver, e phillips fox, ethel carrick, h septimus power, david davies, norman davies, norman w penrose, margaret mccloud, josephine van damme, m e coverdale, marion jones, r w bugg, l rowe, lucy c newell, claire colgan, charles g stewart, alice newell, v e greenhalgh, violet hambly. display of hand-painted china: h w tilley, m jacobs, w mckie, a e collier, hilda veale, elma curnow, jean cahill, frank vaughan. collection of australian art: w d knox, esther paterson, dora l wilson, a m e bale, e f hooton, john rowell, horah gurdon, louis mccubbin. section a (outdoor study, any subject, any medium.) members only: c g duinlop, j florence macgregor, merle bulley, william h oliver, norman w penrose. section b student's section. drawing or design. pupils of schools: stanley r millott, joyce ranson, ronald william forbes, dorothy clemens, lilian j white, ruby a i welch, nancy r hudspeth, j honey church, j g graham, ivo steel. section c student's section. applied art. pupols of art schools: florrie spencer, joyce ranson, ronald w forbes, dorothy clemens, lilian j white, ruby a i welch, nancy r hudspeth, jean honeychurch, annie i paterson, isabel blake, beatrice lee, garnet capper, gwen osborne, dorothy olds, marjorie crossman, doris shaw, phyllis paul, amy bolton. section d plant form from nature (pulils of schools in bedigo inspectorate), north bendigo: alan styles, ronald wright, agnes r styles, jean woodman. creek view s.s. beryl butcher, grace gerguson, ruth cheatley, elmore s.s.: george read, hazel farnsworth, lorna washington, keith gow, jean oliver, robbie dick. wanalta s.s. mary brown, dorothy nelson, isobel roberts, kenneth mckenzie, frank brown. barnedown s.s.: elsie read, george cahill, maud nicholas, leonard robbins, benjamin robbins. gravel hill s.s.: gladys bamford, jean wright, jean hosking, nancy honeychurch, norman mclean, norman guy, agnes stilwell. violet st s.s.: alma worth, g mcconville, harry elliot. various schools: wm. hyslop, ruby robertson, hilda parkinson, maud o'connor, archie l walker, hedley leggo, jan o hoy, edith cheatley, john tatchell, jean barell, keith ashcroft, john mueller, j howe, eric cohen, alice glover, ivy morphett, allen v horne, yin on, r w moon. 2 copies of catalogue. black print, 12 pages made up of 3 sheets of paper with 2 staples in centre. -
 Bendigo Historical Society Inc.
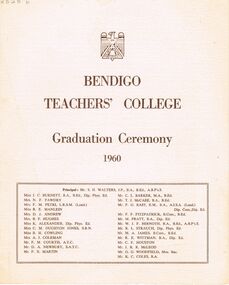
Document - LA TROBE UNIVERSITY BENDIGO COLLECTION: BENDIGO TEACHERS' COLLEGE GRADUATION CEREMONY 1960
A cream document titled "Bendigo Teachers' College Graduation Ceremony 1960". The front page also contains a list of the staff working at the college. They are Mr. S. H. Walters (Principal), Miss J. C. Burnett, Mrs. N. F. Fawdry, Mrs. F. M. Petri, Miss R. E. Manlein, Mrs. D. J. Andrew, Mrs. B. F. Hughes, Miss K. Alexander, Miss C. M. Oughton Jones, Miss B. H. Cowling, Mrs. A. J. Coleman, Mr. F. M. Courtis, Mr. D. A. Newbury, Mr. F. X. Martin, Mr. C. L. Barker, Mr. T. J. McCabe, Mr. F. G. East, Mr. P. F. Fitzpatrick, Mr. M. Pratt, Mr. W. J. F. Bernoth, Mr. R. L. Strauch, Mr. M. A. James, Mr. R. E. Wittman, Mr. C. F. Houston, Mr. J. R. R. McLeod, Mr. G. G. Woodfield and Mr. K. C. Coles. The inside cover contains the "Significance of the Ceremony" and "Order of the Ceremony". Mr. F. M. Courtis welcomed the visitors whilst the Principal read the College Charge. The 'Graduation Book' was presented to Mr. A. L. Harris Inspector of Schools by Miss J. C. Burnett.The final roll call for 1960 was read by Mr. C. L. Barker. Congratulations were offered by The Mayor of Bendigo Cr. R. H. Wilson,J. P., Cr. T. A. Drechsler President of Strathfieldsaye Shire and Mr. G. Salathiel, Head Teacher of Gravel Hill State School. Finally the Occasional Address was presented by Mr. F. H. Brooks Assistant Director of Education. The following page contains a list of "Students of 1958-1960 Trained Infant Teacher's Certificate" - Marjorie May Allen, Janice Helen Ashman, Grada Ali Bos, Joan Margaret Busfield, Barbara Joan Cameron, Shirley Margaret Cribbes, Marcia Ann Davison, Margaret Mary Frances Dick, Lorraine Jean MacIntosh Goddard, Beverley Lorraine Goudie, Jennifer Joy Hamilton, Maureen Margaret Hunt, Shirley Joyce Innocent, Monica McKenna, Eileen Bernadette Mulvahil, Nola Ellen Parker, Jeanette Mary Pearson, Maureen Anne Pentland, Elaine Denise Pochon, Marian Judith Rechter, Marilyn Joy Rose, Catherine Shiels, Margaret Evelyn Stevenson, Rosemary Sutherland, Patricia Helen Tassicker, Eileen Monica Tuohey, Robin Elizabeth Walters, Patricia Ann Wenn and Ethel Dawn Whitelock. The back page contains a list of "Students of 1959-1960 Trained Primary Teacher's Certificate". - Kathleen Anne Algie, Ian Armstrong, Lorna Constance Barbour, Ronald Lindsay Bell, Michael Laurence Brown, Ross Ernest Brown, Graeme Lambden Budd, Duncan Leslie Thomas Cameron, Peter Morgan Clutterbuck, Joan Christine Connor, Allen William Cornelius, Glenys Elaine Cussins, Jean Elizabeth Davis, Denis William DeCann, Robert Alain Denham, Janet Carmel Doyle, Patricia May Edwards, Walter Kenneth Espagne, Fay Iris Evans, Brenda Gertrude Farrell, Malcolm George Ferguson, Elizabeth Joyce Fitzgerald, Kevin Joseph Foley, Barbara Violet Forrester, Lawrence Joseph Ginnivan, Peter Murray Graham, Thelma Elaine Grist, Dorothy Robyn Haines, William Jon Hall, Patricia Jeanette Hancock, Robert John Harris, William Ian Hart, Lorraine Moira Holmes, Lynette Ann Ireland, Morris Raymond Jackman, Christine Jackson, Margaret Nancy Jackson, Nanette Elizabeth Johnson, Trevor John Kellam, Robert Bruce Kemp, Ross Eliot Koochew, Henry Francis Lean, Janet Bobbie Leabeter, Rosemary Elizabeth Lowe, Graeme Stanley Lucas, Joy Patricia Maxwell, Terence Michael Mulvihill, George Alan Murdoch, Kevin Michael Murphy, Ann-Marie McCallum, Helen June Nixon, Kerry Joy O'Brien, William John O'Connell, Christine Lynette Olsen, William Stanley Page, Janice Anne Preston, John Stuart Reed, William Francis Reeves, Gary Desmond Robbins, Peter John Schlitz, Donald John McIntosh Shadforth, Gavin James Smith, John Archibald Spark, Illar Streimann, Janice Margaret Taylor, Ian Leonard Thornton, Rosemary Fay Wait, Russell Gilbert Walker, James John Wallis, Clare Mary Ward, David Ross Wiedermann, and Stephen Wilkinson.bendigo, education, bendigo teachers' college graduatio, la trobe university bendigo collection, collection, bendigo teachers' college, bendigo, education, teaching, teachers, students, graduation, tertiary education, graduation ceremony, history, book, bendigo teachers' college staff, graduands, graduates, bendigo teachers' college students, teacher training -
 Bendigo Military Museum
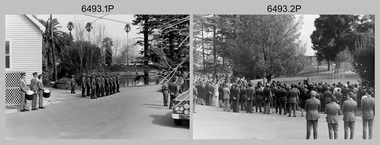
Photograph - Military Funeral for SSGT Peter Dew, Army Survey Regiment, Fortuna, Bendigo, 1977
This is a set of 29 black & white photographs of troops from the Army Headquarters Survey Regiment undertaking ceremonial drill at the military funeral for SSGT Peter Dew on the 28th of September 1977. The location of the funeral service was at Fortuna, Bendigo. He was buried at Bendigo Cemetery in Quarry Hill. Peter Dew died in a tragic accident at home. He was fondly remembered as one of Lithographic Squadron’s colourful personalities. See item 6243.7P for photos of Peter Dew at work in Lithographic Squadron. The "Super Animal of the Year" Peter Dew Memorial Award was an award presented to a member of the squadron for a crude act. To view a photo of this award, refer to item 6230 of the Victorian Collections. Some photos in this set were also printed on photo paper and catalogued under item 6335.5P.This is a set of 29 black & white photographs of troops from the Army Headquarters Survey Regiment undertaking ceremonial drill at the military funeral for SSGT Peter held in 1977. The photographs are on 35mm negative film and scanned at 96 dpi. They are part of the Army Survey Regiment’s Collection. .1) - Photo, black & white, 1977. Rifle party commander: CPL Greg Kidman. Right file right marker: SPR Russ Mollenhauer, unidentified soldiers and civilians. .2) - Photo, black & white, 1977. Unidentified soldiers and civilians. .3) - Photo, black & white, 1977. R to L: SSGT Alan Adsett, WO2 John McCulloch, SGT Graeme Jeffers in foreground holding hats. Remainder unidentified. .4) to .6) - Photo, black & white, 1977. Unidentified soldiers and civilians. R to L: SSGT Alan Adsett, WO2 John McCulloch, unidentified soldiers and civilians. .7) - Photo, black & white, 1977. Pall bearers position the coffin onto the gun carriage. Rifle party commander: CPL Greg Kidman. Right file right marker: SPR Russ Mollenhauer. Seen in background to the right of pall bearers: L to R: CPL Ian Belmont, unidentified, facing away- PTE Le-anne (Smallshaw) Shirley, CPL Di Chalmers, unidentified soldiers and civilians. .8) - Photo, black & white, 1977. Rifle party rear rank right marker: Russ Mollenhauer. Front rank rifle party commander next to right marker: Greg Kidman. Pall bearers in front of vehicle L to R: Dave Miles, Dick Barwald. Remainder unidentified. .9) - Photo, black & white, 1977. In position at beginning of funeral procession, unidentified soldiers and civilians. .10) & .11) - Photo, black & white, 1977. Rifle party commander: CPL Greg Kidman and the rifle party slow march past the front of Fortuna Villa. .12) - Photo, black & white, 1977. The rifle party slow march past the front of Fortuna Villa. Rifle party commander: Greg Kidman. Right file front to back: SPR Russ Mollenhauer, SPR Peter Breukel, SPR Bill Jones, SPR John Anderson. Remainder unidentified. Left file front to back: SPR Jeff Willey, unidentified, SPR Rhys De Laine, SPR Frank Lenane, SPR Josh Degroot, SPR Gary Drummond. .13) - Photo, black & white, 1977. The rifle party slow march past the front of Fortuna Villa. Rifle party commander: Greg Kidman. Right file: SPR Russ Mollenhauer, Left file: SPR Jeff Willey, remainder unidentified. .14) - Photo, black & white, 1977. The rifle party march at quick time towards the entry gate. .15) - Photo, black & white, 1977. The rifle party march at quick time past the front of Fortuna Villa. Rifle party commander: Greg Kidman. Right file: SPR Russ Mollenhauer, Left file: SPR Jeff Willey, remainder unidentified. .16) - Photo, black & white, 1977. The procession marches at quick time towards the entry gate. .17) - Photo, black & white, 1977. The procession departs the entry gate. .18) to .21)- Photo, black & white, 1977. The procession passes through the cemetery. .22) - Photo, black & white, 1977. The procession passes through the cemetery. RSM Wo1 Aub Harvey at far left. Remainder unidentified. .23) - Photo, black & white, 1977. Pallbearers carry Peter Dew’s coffin to the grave site. .24) - Photo, black & white, 1977. The rifle party in position at ‘rest on arms reverse’. .25) - Photo, black & white, 1977. Service at grave site. Left of minister: SGT Alan Toogood. On right of tree L to R: WO2 Max Neil, WO2 Bob Hayden, WO1 Dave Malligan, PTE Le-Anne (Smallshaw) Shirley, CAPT Stan Vote. Remainder unidentified. .26) - Photo, black & white, 1977. The rifle party fire volleys. .27) - Photo, black & white, 1977. The rifle party presents arms. .28) - Photo, black & white, 1977. Service at grave site. SGT Greg Francis-Wright 4th from right. .29) - Photo, black & white, 1977. Outside Litho’s proofing hut at Fortuna. WO1 Darby Munro stands in contemplation next to the collection of flowers.There are no personnel identified. royal australian survey corps, rasvy, army survey regiment, army svy regt, fortuna, asr, litho sqn -
 Bendigo Military Museum
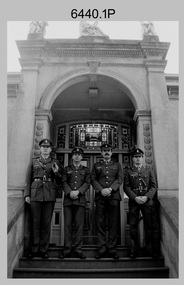
Photograph - Army Survey Regiment Group Photos, Fortuna Villa, Bendigo, 1990
This is a set of 11 photographs of personnel posted to the Army Survey Regiment in 1990. These formal group photos of three of the four Squadrons, Officers, and Warrant Officers/Sergeants were probably taken after CO’s Parades. Although photo .11P is part of this set of negatives, it was taken on another occasion as the SGTs Mess personnel were in summer uniforms. Photos of Lithographic Squadron from this set of negatives are catalogued in item 6441.15P. LTCOL John Winzar was the CO of the Army Survey Regiment from 1987 to 1989 and WO1 Neville Stone was the RSM from 1988 to 1990.This is a set of 11 photographs of personnel posted to the Army Survey Regiment, Fortuna Villa, Bendigo Victoria on the 1st of October 1990. The photographs are on 35mm negative film and were scanned at 96 dpi. They are part of the Army Survey Regiment’s Collection. .1) to .2) - Photo, black & white, 1990. Senior appointments: L to R: RSM WO1 Neville Stone, CO LTCOL Rene van den Tol, 2IC MAJ Duncan Burns, ADJT CAPT Peter Parkes. .3) - Photo, black & white, 1990. Officers Mess: Back row L to R: back row L to R: LT Craig Hersant, LT Greg Tolcher, LT Martin Lyons, LT Steve Hledik, LT Derek Bell, LT Simon Buckpitt. Centre row L to R: CAPT Roger Greenwell, CAPT Dave McLachlan, ADJT CAPT Peter Parkes, unidentified UK exchange officer, CAPT Noel ‘Nesty’ Coulthard. Front row L to R: CAPT John South, MAJ Bob Coote, MAJ Neil Taylor, CO LTCOL Rene van den Tol, 2IC MAJ Duncan Burns, MAJ Peter Clark, MAJ Ray Redman. .4) - Photo, black & white, 1990. SGTs Mess: Back row L to R: SGT Max Watson, unidentified, SGT Martin Evans, SSGT Graham Johnston, SGT Brian Fauth, SGT Ian Fitzgerald, unidentified, SGT Mick Minchin, SGT Kim Reynolds, SGT Peter Imeson, SGT Brian Paul, SSGT John Phillips, SGT Keith Quinton, unidentified (x2), SSGT Noel McNamara, SGT Paul Hopes, SGT Brendan McKinless. 3rd row L to R: SSGT Di Chalmers, SGT Bob Bright, SGT Doug Carswell, WO2 Steve Egan, unidentified, SSGT Garry Drummond, SGT Steve Burke, SSGT Russ Mollenhauer, SGT Paul Cheater, SGT Sandy Craig, SSGT Peter Mustart, SGT Roger Rees, SGT Paul Leskovec CSM, unidentified, SGT John Shephard, SGT Frank Downie, SSGT Bruce Hammond, unidentified. 2nd row L to R: WO2 Jeff Willey, WO2 Barry Lutwyche OAM, WO2 Rob Bogumil, WO2 Rhys De Laine, WO2 Ted Burgess, WO2 Wayne Rothwell, WO2 Steve Hansen, WO2 Keith Fenton RE UK Exchange, SGT Chris Edwards, SGT Russ Mollenhauer, unidentified, SGT Greg Else, unidentified, SSGT Bob Garritty, SSGT Greg Byers, WO2 Pat Lumsden, WO2 George Graham, WO2 Mick Hogan, SGT Sherri (Dally) Burke. Front row L to R: WO1 Trevor Osborne, WO1 Colin Cuskelly, WO1 Bob Rogister, WO1 Allan Hancox, WO1 Bill Jones, 2IC MAJ Duncan Burns, RSM WO1 Neville Stone, WO2 Neil ‘Ned’ Kelly, WO1 Ken Slater, WO1 Rowan Gillies, WO1 Graham Ragless, WO1 Gary Warnest, WO2 Adrian ‘Charlie’ Creedy. .5) - Photo, black & white, 1990. Air Survey Squadron: Back row L to R: SPR Mark Linwood, SPR Trevor Roddam, CPL Noel Brinsmead, CPL Mark Lander, SGT Frank Downie, CPL Sandy Craig. 3rd row L to R: SPR Steve Rundle, SPR Cameron Gee OAM, CPL Darren Wilkinson, CPL Dave Longbottom, CPL Max Watson, SPR Shane Torrens, SGT Paul Hopes, SPR Chris Woodman. 2nd row L to R: SGT John Shephard, SPR Paul Boulton, SPR Stuart Bowd, SPR Paula (Golding) Brinsmead, SPR Joanne Otto, CPL Steve Coulson, SPR Steve Linane, CPL Chris ‘Charlie’ Brown. Front row L to R: SSGT Bruce Hammond, WO2 Barry Lutwyche OAM, LT Craig Hersant, WO1 Allan Hancox, MAJ Peter Clark, LT Simon Buckpitt, WO2 Neil ‘Ned’ Kelly, SSGT SSGT Noel McNamara. .6) - Photo, black & white, 1990. Headquarters Squadron: Back row L to R: unidentified (x2), SPR Wolfgang Hofbauer, SGT Chris Edwards, CPL Pat Drury, SSGT John Phillips, unidentified, CPL Graeme Priestley, unidentified (x2), SGT Paul Leskovec CSM, LCPL Richard Arman. 4th row L to R: unidentified, SGT Ian Fitzgerald, unidentified (x2), LCPL Bob Sheppard, unidentified (x2), CPL John ‘Flash’ Anderson, SPR Todd Reynolds, SGT Keith Quinton, CPL Roger Pearson, unidentified, WO1 Bob Rogister. 3rd row L to R: WO2 Wayne Rothwell, SSGT Peter Mustart, SPR Eric Nicholson, unidentified, SGT Paul Cheater, unidentified, SGT Wolfgang Thun, unidentified (x2), CPL Paul Richards, SGT Mick Minchin, unidentified. 2nd row L to R: unidentified, SPR Kasey Northausen, unidentified, CPL Michelle Griffith, unidentified (x3), SPR Tracy Tillman, unidentified (x4), WO2 Steve Hansen. Front row L to R: WO1 Rowan Gillies, WO1 Colin Cuskelly, CAPT Noel ‘Nesty’ Coulthard, CAPT Roger Hancock, WO1 Ken Slater, MAJ Ray Redman, MAJ John South, unidentified UK exchange officer, WO2 Ted Burgess, WO2 George Graham, unidentified civilian. .7) & .8) - Photo, black & white, 1990. Cartographic Squadron: Back row L to R: Back row L to R: SGT Greg Else, CPL Perry Burt, SSGT Graham Johnston, CPL Mick McConnell, 3rd row L to R: SGT Bob Bright, SGT Doug Carswell, SPR Marcus Seecamp, CPL John Gilbert. 2nd row L to R: SGT Martin Evans, SPR Sandy Winn, SPR Jeanette Drury-Lane, SPR Simone Rodgers, Front row L to R: SPR Guenther Ebenwaldner, WO2 Pat Lumsden, LT Steve Hledik. .9) - Photo, black & white, 1990. Cartographic Squadron: Back row L to R: SGT Greg Else, CPL Perry Burt, SSGT Graham Johnston, CPL Mick McConnell, unidentified, SPR Mark Linwood, SPR Lee Palfrey, SPR John ‘Doc’ Commons, SPR Chris Wynn, SPR Mick Duggan, CPL Peter Johnson, SPR Allan Blake, CPL Damian Killeen, SPR Grant Davis, SPR Simon Reynolds, SPR Peter Smyth. 3rd row L to R: SPR Guenther Ebenwaldner, SGT Bob Bright, SGT Doug Carswell, SPR Marcus Seecamp, CPL John Gilbert, SPR Gordon Santo, SPR Frank Savy, SPR Chris Woodman, SSGT Greg Byers, SPR David Lankshear, SSGT Bob Garritty, CPL Craig Kellet, CPL Darren Maher, CPL Barry Hogan, CPL Dan Cirsky, SPR Bob Bousfield. 2nd row L to R: SGT Martin Evans, CPL John Reid, SPR Sandy Winn, SPR Jeanette Drury-Lane, SPR Simone Rodgers, SPR Cam Bramich, SPR Ailsa (Sorby) Miller, SPR Nadine (Paul) Read, SPR Jodi Seath, SGT Sherri (Dally) Burke, SPR Di (Thomas) Soutar, SPR Dawn Hoadley, CPL Raelene (Munting) Brodie, SPR Jo (Innes) Thun? SPR Damian Nolan. Front row L to R: WO2 Pat Lumsden, LT Steve Hledik, LT Derek Bell, CAPT Dave McLachlan, MAJ Neil Taylor, WO1 Graham Raglass, WO1 Gary Warnest, WO2 Mick Hogan, WO2 Adrian ‘Charlie’ Creedy. .10) - Photo, black & white, 1990. Cartographic Squadron leadership: Back row L to R: CAPT Dave McLachlan, LT Derek Bell, LT Steve Hledik, WO2 Pat Lumsden, WO2 Mick Hogan, WO2 Adrian ‘Charlie’ Creedy. WO1 Gary Warnest. Front row L to R: MAJ Neil Taylor, WO1 Graham Raglass. .11) - Photo, black & white, 1990. SGTs Mess: Back row L to R: WO2 Jeff Willey, unidentified, SGT Brian Fauth, unidentified, SGT Sandy Craig, unidentified, SGT Paul Leskovec CSM, SSGT John Phillips, unidentified, SGT Martin Evans, SGT Steve Burke, SGT Brendan McKinless, SGT Chris Edwards. 3rd row L to R: SGT Brian Paul, unidentified, SSGT Bob Garritty, SSGT Greg Byers, SGT Kim Reynolds, SGT John Reid, unidentified, SSGT Rick van der Bom, SGT Dale Hudson, unidentified, SGT John ‘Stormy’ Tempest, SGT Keith Quinton, SGT Greg Else. 2nd row L to R: WO2 Rob Bogumil, unidentified, WO2 Adrian ‘Charlie’ Creedy, WO2 George Graham, WO2 Wayne Rothwell, WO2 Pat Lumsden, WO2 Mick Flynn, WO2 Ted Burgess, unidentified, SSGT Dennis Learmonth, SGT Bob Bright, WO2 Steve Hansen, WO2 Rhys De Laine. Front row L to R: unidentified, WO1 Trevor Osborne, WO1 Bill Jones, WO1 Colin Cuskelly, MAJ Ray Redman, RSM WO1 Neville Stone, WO1 Stu Thaxter, WO2 Mick Hogan, WO1 Bob Rogister, WO1 Ken Slater, WO1 Gary Warnest..1P to .11P – no annotationsroyal australian survey corps, rasvy, army survey regiment, army svy regt, fortuna, asr -
 Flagstaff Hill Maritime Museum and Village
Photograph
HISTORY OF THE LOCH ARD The LOCH ARD belonged to the famous Loch Line which sailed many ships from England to Australia. Built in Glasgow by Barclay, Curdle and Co. in 1873, the LOCH ARD was a three-masted square rigged iron sailing ship. The ship measured 262ft 7" (79.87m) in length, 38ft (11.58m) in width, 23ft (7m) in depth and had a gross tonnage of 1693 tons. The LOCH ARD's main mast measured a massive 150ft (45.7m) in height. LOCH ARD made three trips to Australia and one trip to Calcutta before its final voyage. LOCH ARD left England on March 2, 1878, under the command of Captain Gibbs, a newly married, 29 year old. She was bound for Melbourne with a crew of 37, plus 17 passengers and a load of cargo. The general cargo reflected the affluence of Melbourne at the time. On board were straw hats, umbrella, perfumes, clay pipes, pianos, clocks, confectionary, linen and candles, as well as a heavier load of railway irons, cement, lead and copper. There were items included that intended for display in the Melbourne International Exhibition in 1880. The voyage to Port Phillip was long but uneventful. At 3am on June 1, 1878, Captain Gibbs was expecting to see land and the passengers were becoming excited as they prepared to view their new homeland in the early morning. But LOCH ARD was running into a fog which greatly reduced visibility. Captain Gibbs was becoming anxious as there was no sign of land or the Cape Otway lighthouse. At 4am the fog lifted. A man aloft announced that he could see breakers. The sheer cliffs of Victoria's west coast came into view, and Captain Gibbs realised that the ship was much closer to them than expected. He ordered as much sail to be set as time would permit and then attempted to steer the vessel out to sea. On coming head on into the wind, the ship lost momentum, the sails fell limp and LOCH ARD's bow swung back. Gibbs then ordered the anchors to be released in an attempt to hold its position. The anchors sank some 50 fathoms - but did not hold. By this time LOCH ARD was among the breakers and the tall cliffs of Mutton Bird Island rose behind the ship. Just half a mile from the coast, the ship's bow was suddenly pulled around by the anchor. The captain tried to tack out to sea, but the ship struck a reef at the base of Mutton Bird Island, near Port Campbell. Waves broke over the ship and the top deck was loosened from the hull. The masts and rigging came crashing down knocking passengers and crew overboard. When a lifeboat was finally launched, it crashed into the side of LOCH ARD and capsized. Tom Pearce, who had launched the boat, managed to cling to its overturned hull and shelter beneath it. He drifted out to sea and then on the flood tide came into what is now known as LOCH ARD Gorge. He swam to shore, bruised and dazed, and found a cave in which to shelter. Some of the crew stayed below deck to shelter from the falling rigging but drowned when the ship slipped off the reef into deeper water. Eva Carmichael had raced onto deck to find out what was happening only to be confronted by towering cliffs looming above the stricken ship. In all the chaos, Captain Gibbs grabbed Eva and said, "If you are saved Eva, let my dear wife know that I died like a sailor". That was the last Eva Carmichael saw of the captain. She was swept off the ship by a huge wave. Eva saw Tom Pearce on a small rocky beach and yelled to attract his attention. He dived in and swam to the exhausted woman and dragged her to shore. He took her to the cave and broke open case of brandy which had washed up on the beach. He opened a bottle to revive the unconscious woman. A few hours later Tom scaled a cliff in search of help. He followed hoof prints and came by chance upon two men from nearby Glenample Station three and a half miles away. In a state of exhaustion, he told the men of the tragedy. Tom returned to the gorge while the two men rode back to the station to get help. By the time they reached LOCH ARD Gorge, it was cold and dark. The two shipwreck survivors were taken to Glenample Station to recover. Eva stayed at the station for six weeks before returning to Ireland, this time by steamship. In Melbourne, Tom Pearce received a hero's welcome. He was presented with the first gold medal of the Royal Humane Society of Victoria and a £1000 cheque from the Victorian Government. Concerts were performed to honour the young man's bravery and to raise money for those who lost family in the LOCH ARD disaster. Of the 54 crew members and passengers on board, only two survived: the apprentice, Tom Pearce and the young woman passenger, Eva Carmichael, who lost all of her family in the tragedy. Ten days after the LOCH ARD tragedy, salvage rights to the wreck were sold at auction for £2,120. Cargo valued at £3,000 was salvaged and placed on the beach, but most washed back into the sea when another storm developed. The wreck of LOCH ARD still lies at the base of Mutton Bird Island. Much of the cargo has now been salvaged and some was washed up into what is now known as LOCH ARD Gorge. Cargo and artefacts have also been illegally salvaged over many years before protective legislation was introduced. One of the most unlikely pieces of cargo to have survived the shipwreck was a Minton porcelain peacock - one of only nine in the world. The peacock was destined for the Melbourne International Exhibition in 1880. It had been well packed, which gave it adequate protection during the violent storm. Today, the Minton peacock can be seen at the Flagstaff Hill Maritime Museum in Warrnambool. From Australia's most dramatic shipwreck it has now become Australia's most valuable shipwreck artefact and is one of very few 'objects' on the Victorian State Heritage Register. Flagstaff Hill’s collection of artefacts from LOCH ARD is significant for being one of the largest collections of artefacts from this shipwreck in Victoria. It is significant for its association with the shipwreck, which is on the Victorian Heritage Register (VHR S417). The collection is significant because of the relationship between the objects, as together they have a high potential to interpret the story of the LOCH ARD. The LOCH ARD collection is archaeologically significant as the remains of a large international passenger and cargo ship. The LOCH ARD collection is historically significant for representing aspects of Victoria’s shipping history and its potential to interpret sub-theme 1.5 of Victoria’s Framework of Historical Themes (living with natural processes). The collection is also historically significant for its association with the LOCH ARD, which was one of the worst and best known shipwrecks in Victoria’s history. Photograph of Loch Ard Gorge. Photograph taken some distance from the Gorge. Three men in the Gorge and outlines of steps can be seen. Right hand side of the photograph is written "Loch Ard Gorge"flagstaff hill, warrnambool, shipwrecked coast, flagstaff hill maritime museum, maritime museum, shipwreck coast, flagstaff hill maritime village, great ocean road, loch line, loch ard, captain gibbs, eva carmichael, tom pearce, glenample station, mutton bird island, loch ard gorge, photograph of loch ard gorge, photograph -
 Flagstaff Hill Maritime Museum and Village
Painting
HISTORY OF THE LOCH ARD The LOCH ARD belonged to the famous Loch Line which sailed many ships from England to Australia. Built in Glasgow by Barclay, Curdle and Co. in 1873, the LOCH ARD was a three-masted square rigged iron sailing ship. The ship measured 262ft 7" (79.87m) in length, 38ft (11.58m) in width, 23ft (7m) in depth and had a gross tonnage of 1693 tons. The LOCH ARD's main mast measured a massive 150ft (45.7m) in height. LOCH ARD made three trips to Australia and one trip to Calcutta before its final voyage. LOCH ARD left England on March 2, 1878, under the command of Captain Gibbs, a newly married, 29 year old. She was bound for Melbourne with a crew of 37, plus 17 passengers and a load of cargo. The general cargo reflected the affluence of Melbourne at the time. On board were straw hats, umbrella, perfumes, clay pipes, pianos, clocks, confectionary, linen and candles, as well as a heavier load of railway irons, cement, lead and copper. There were items included that intended for display in the Melbourne International Exhibition in 1880. The voyage to Port Phillip was long but uneventful. At 3am on June 1, 1878, Captain Gibbs was expecting to see land and the passengers were becoming excited as they prepared to view their new homeland in the early morning. But LOCH ARD was running into a fog which greatly reduced visibility. Captain Gibbs was becoming anxious as there was no sign of land or the Cape Otway lighthouse. At 4am the fog lifted. A man aloft announced that he could see breakers. The sheer cliffs of Victoria's west coast came into view, and Captain Gibbs realised that the ship was much closer to them than expected. He ordered as much sail to be set as time would permit and then attempted to steer the vessel out to sea. On coming head on into the wind, the ship lost momentum, the sails fell limp and LOCH ARD's bow swung back. Gibbs then ordered the anchors to be released in an attempt to hold its position. The anchors sank some 50 fathoms - but did not hold. By this time LOCH ARD was among the breakers and the tall cliffs of Mutton Bird Island rose behind the ship. Just half a mile from the coast, the ship's bow was suddenly pulled around by the anchor. The captain tried to tack out to sea, but the ship struck a reef at the base of Mutton Bird Island, near Port Campbell. Waves broke over the ship and the top deck was loosened from the hull. The masts and rigging came crashing down knocking passengers and crew overboard. When a lifeboat was finally launched, it crashed into the side of LOCH ARD and capsized. Tom Pearce, who had launched the boat, managed to cling to its overturned hull and shelter beneath it. He drifted out to sea and then on the flood tide came into what is now known as LOCH ARD Gorge. He swam to shore, bruised and dazed, and found a cave in which to shelter. Some of the crew stayed below deck to shelter from the falling rigging but drowned when the ship slipped off the reef into deeper water. Eva Carmichael had raced onto deck to find out what was happening only to be confronted by towering cliffs looming above the stricken ship. In all the chaos, Captain Gibbs grabbed Eva and said, "If you are saved Eva, let my dear wife know that I died like a sailor". That was the last Eva Carmichael saw of the captain. She was swept off the ship by a huge wave. Eva saw Tom Pearce on a small rocky beach and yelled to attract his attention. He dived in and swam to the exhausted woman and dragged her to shore. He took her to the cave and broke open case of brandy which had washed up on the beach. He opened a bottle to revive the unconscious woman. A few hours later Tom scaled a cliff in search of help. He followed hoof prints and came by chance upon two men from nearby Glenample Station three and a half miles away. In a state of exhaustion, he told the men of the tragedy. Tom returned to the gorge while the two men rode back to the station to get help. By the time they reached LOCH ARD Gorge, it was cold and dark. The two shipwreck survivors were taken to Glenample Station to recover. Eva stayed at the station for six weeks before returning to Ireland, this time by steamship. In Melbourne, Tom Pearce received a hero's welcome. He was presented with the first gold medal of the Royal Humane Society of Victoria and a £1000 cheque from the Victorian Government. Concerts were performed to honour the young man's bravery and to raise money for those who lost family in the LOCH ARD disaster. Of the 54 crew members and passengers on board, only two survived: the apprentice, Tom Pearce and the young woman passenger, Eva Carmichael, who lost all of her family in the tragedy. Ten days after the LOCH ARD tragedy, salvage rights to the wreck were sold at auction for £2,120. Cargo valued at £3,000 was salvaged and placed on the beach, but most washed back into the sea when another storm developed. The wreck of LOCH ARD still lies at the base of Mutton Bird Island. Much of the cargo has now been salvaged and some was washed up into what is now known as LOCH ARD Gorge. Cargo and artefacts have also been illegally salvaged over many years before protective legislation was introduced. One of the most unlikely pieces of cargo to have survived the shipwreck was a Minton porcelain peacock - one of only nine in the world. The peacock was destined for the Melbourne International Exhibition in 1880. It had been well packed, which gave it adequate protection during the violent storm. Today, the Minton peacock can be seen at the Flagstaff Hill Maritime Museum in Warrnambool. From Australia's most dramatic shipwreck it has now become Australia's most valuable shipwreck artefact and is one of very few 'objects' on the Victorian State Heritage Register. Flagstaff Hill’s collection of artefacts from LOCH ARD is significant for being one of the largest collections of artefacts from this shipwreck in Victoria. It is significant for its association with the shipwreck, which is on the Victorian Heritage Register (VHR S417). The collection is significant because of the relationship between the objects, as together they have a high potential to interpret the story of the LOCH ARD. The LOCH ARD collection is archaeologically significant as the remains of a large international passenger and cargo ship. The LOCH ARD collection is historically significant for representing aspects of Victoria’s shipping history and its potential to interpret sub-theme 1.5 of Victoria’s Framework of Historical Themes (living with natural processes). The collection is also historically significant for its association with the LOCH ARD, which was one of the worst and best known shipwrecks in Victoria’s history. Painting of The Loch Ard oil on board depicting wreck. It shows stormy sea and coastline in background. Ship appears to be capsized.flagstaff hill, warrnambool, shipwrecked coast, flagstaff hill maritime museum, maritime museum, shipwreck coast, flagstaff hill maritime village, great ocean road, loch line, loch ard, captain gibbs, eva carmichael, tom pearce, glenample station, mutton bird island, loch ard gorge, painting -
 Flagstaff Hill Maritime Museum and Village
Photograph
HISTORY OF THE LOCH ARD The LOCH ARD belonged to the famous Loch Line which sailed many ships from England to Australia. Built in Glasgow by Barclay, Curdle and Co. in 1873, the LOCH ARD was a three-masted square rigged iron sailing ship. The ship measured 262ft 7" (79.87m) in length, 38ft (11.58m) in width, 23ft (7m) in depth and had a gross tonnage of 1693 tons. The LOCH ARD's main mast measured a massive 150ft (45.7m) in height. LOCH ARD made three trips to Australia and one trip to Calcutta before its final voyage. LOCH ARD left England on March 2, 1878, under the command of Captain Gibbs, a newly married, 29 year old. She was bound for Melbourne with a crew of 37, plus 17 passengers and a load of cargo. The general cargo reflected the affluence of Melbourne at the time. On board were straw hats, umbrella, perfumes, clay pipes, pianos, clocks, confectionary, linen and candles, as well as a heavier load of railway irons, cement, lead and copper. There were items included that intended for display in the Melbourne International Exhibition in 1880. The voyage to Port Phillip was long but uneventful. At 3am on June 1, 1878, Captain Gibbs was expecting to see land and the passengers were becoming excited as they prepared to view their new homeland in the early morning. But LOCH ARD was running into a fog which greatly reduced visibility. Captain Gibbs was becoming anxious as there was no sign of land or the Cape Otway lighthouse. At 4am the fog lifted. A man aloft announced that he could see breakers. The sheer cliffs of Victoria's west coast came into view, and Captain Gibbs realised that the ship was much closer to them than expected. He ordered as much sail to be set as time would permit and then attempted to steer the vessel out to sea. On coming head on into the wind, the ship lost momentum, the sails fell limp and LOCH ARD's bow swung back. Gibbs then ordered the anchors to be released in an attempt to hold its position. The anchors sank some 50 fathoms - but did not hold. By this time LOCH ARD was among the breakers and the tall cliffs of Mutton Bird Island rose behind the ship. Just half a mile from the coast, the ship's bow was suddenly pulled around by the anchor. The captain tried to tack out to sea, but the ship struck a reef at the base of Mutton Bird Island, near Port Campbell. Waves broke over the ship and the top deck was loosened from the hull. The masts and rigging came crashing down knocking passengers and crew overboard. When a lifeboat was finally launched, it crashed into the side of LOCH ARD and capsized. Tom Pearce, who had launched the boat, managed to cling to its overturned hull and shelter beneath it. He drifted out to sea and then on the flood tide came into what is now known as LOCH ARD Gorge. He swam to shore, bruised and dazed, and found a cave in which to shelter. Some of the crew stayed below deck to shelter from the falling rigging but drowned when the ship slipped off the reef into deeper water. Eva Carmichael had raced onto deck to find out what was happening only to be confronted by towering cliffs looming above the stricken ship. In all the chaos, Captain Gibbs grabbed Eva and said, "If you are saved Eva, let my dear wife know that I died like a sailor". That was the last Eva Carmichael saw of the captain. She was swept off the ship by a huge wave. Eva saw Tom Pearce on a small rocky beach and yelled to attract his attention. He dived in and swam to the exhausted woman and dragged her to shore. He took her to the cave and broke open case of brandy which had washed up on the beach. He opened a bottle to revive the unconscious woman. A few hours later Tom scaled a cliff in search of help. He followed hoof prints and came by chance upon two men from nearby Glenample Station three and a half miles away. In a state of exhaustion, he told the men of the tragedy. Tom returned to the gorge while the two men rode back to the station to get help. By the time they reached LOCH ARD Gorge, it was cold and dark. The two shipwreck survivors were taken to Glenample Station to recover. Eva stayed at the station for six weeks before returning to Ireland, this time by steamship. In Melbourne, Tom Pearce received a hero's welcome. He was presented with the first gold medal of the Royal Humane Society of Victoria and a £1000 cheque from the Victorian Government. Concerts were performed to honour the young man's bravery and to raise money for those who lost family in the LOCH ARD disaster. Of the 54 crew members and passengers on board, only two survived: the apprentice, Tom Pearce and the young woman passenger, Eva Carmichael, who lost all of her family in the tragedy. Ten days after the LOCH ARD tragedy, salvage rights to the wreck were sold at auction for £2,120. Cargo valued at £3,000 was salvaged and placed on the beach, but most washed back into the sea when another storm developed. The wreck of LOCH ARD still lies at the base of Mutton Bird Island. Much of the cargo has now been salvaged and some was washed up into what is now known as LOCH ARD Gorge. Cargo and artefacts have also been illegally salvaged over many years before protective legislation was introduced. One of the most unlikely pieces of cargo to have survived the shipwreck was a Minton porcelain peacock - one of only nine in the world. The peacock was destined for the Melbourne International Exhibition in 1880. It had been well packed, which gave it adequate protection during the violent storm. Today, the Minton peacock can be seen at the Flagstaff Hill Maritime Museum in Warrnambool. From Australia's most dramatic shipwreck it has now become Australia's most valuable shipwreck artefact and is one of very few 'objects' on the Victorian State Heritage Register. Flagstaff Hill’s collection of artefacts from LOCH ARD is significant for being one of the largest collections of artefacts from this shipwreck in Victoria. It is significant for its association with the shipwreck, which is on the Victorian Heritage Register (VHR S417). The collection is significant because of the relationship between the objects, as together they have a high potential to interpret the story of the LOCH ARD. The LOCH ARD collection is archaeologically significant as the remains of a large international passenger and cargo ship. The LOCH ARD collection is historically significant for representing aspects of Victoria’s shipping history and its potential to interpret sub-theme 1.5 of Victoria’s Framework of Historical Themes (living with natural processes). The collection is also historically significant for its association with the LOCH ARD, which was one of the worst and best known shipwrecks in Victoria’s history. Photograph of Loch Ard Gorge c1900flagstaff hill, warrnambool, shipwrecked coast, flagstaff hill maritime museum, maritime museum, shipwreck coast, flagstaff hill maritime village, great ocean road, loch line, loch ard, captain gibbs, eva carmichael, tom pearce, glenample station, mutton bird island, loch ard gorge, photograph of loch ard gorge, photograph -
 Flagstaff Hill Maritime Museum and Village
Calendar
HISTORY OF THE LOCH ARD The LOCH ARD belonged to the famous Loch Line which sailed many ships from England to Australia. Built in Glasgow by Barclay, Curdle and Co. in 1873, the LOCH ARD was a three-masted square rigged iron sailing ship. The ship measured 262ft 7" (79.87m) in length, 38ft (11.58m) in width, 23ft (7m) in depth and had a gross tonnage of 1693 tons. The LOCH ARD's main mast measured a massive 150ft (45.7m) in height. LOCH ARD made three trips to Australia and one trip to Calcutta before its final voyage. LOCH ARD left England on March 2, 1878, under the command of Captain Gibbs, a newly married, 29 year old. She was bound for Melbourne with a crew of 37, plus 17 passengers and a load of cargo. The general cargo reflected the affluence of Melbourne at the time. On board were straw hats, umbrella, perfumes, clay pipes, pianos, clocks, confectionary, linen and candles, as well as a heavier load of railway irons, cement, lead and copper. There were items included that intended for display in the Melbourne International Exhibition in 1880. The voyage to Port Phillip was long but uneventful. At 3am on June 1, 1878, Captain Gibbs was expecting to see land and the passengers were becoming excited as they prepared to view their new homeland in the early morning. But LOCH ARD was running into a fog which greatly reduced visibility. Captain Gibbs was becoming anxious as there was no sign of land or the Cape Otway lighthouse. At 4am the fog lifted. A man aloft announced that he could see breakers. The sheer cliffs of Victoria's west coast came into view, and Captain Gibbs realised that the ship was much closer to them than expected. He ordered as much sail to be set as time would permit and then attempted to steer the vessel out to sea. On coming head on into the wind, the ship lost momentum, the sails fell limp and LOCH ARD's bow swung back. Gibbs then ordered the anchors to be released in an attempt to hold its position. The anchors sank some 50 fathoms - but did not hold. By this time LOCH ARD was among the breakers and the tall cliffs of Mutton Bird Island rose behind the ship. Just half a mile from the coast, the ship's bow was suddenly pulled around by the anchor. The captain tried to tack out to sea, but the ship struck a reef at the base of Mutton Bird Island, near Port Campbell. Waves broke over the ship and the top deck was loosened from the hull. The masts and rigging came crashing down knocking passengers and crew overboard. When a lifeboat was finally launched, it crashed into the side of LOCH ARD and capsized. Tom Pearce, who had launched the boat, managed to cling to its overturned hull and shelter beneath it. He drifted out to sea and then on the flood tide came into what is now known as LOCH ARD Gorge. He swam to shore, bruised and dazed, and found a cave in which to shelter. Some of the crew stayed below deck to shelter from the falling rigging but drowned when the ship slipped off the reef into deeper water. Eva Carmichael had raced onto deck to find out what was happening only to be confronted by towering cliffs looming above the stricken ship. In all the chaos, Captain Gibbs grabbed Eva and said, "If you are saved Eva, let my dear wife know that I died like a sailor". That was the last Eva Carmichael saw of the captain. She was swept off the ship by a huge wave. Eva saw Tom Pearce on a small rocky beach and yelled to attract his attention. He dived in and swam to the exhausted woman and dragged her to shore. He took her to the cave and broke open case of brandy which had washed up on the beach. He opened a bottle to revive the unconscious woman. A few hours later Tom scaled a cliff in search of help. He followed hoof prints and came by chance upon two men from nearby Glenample Station three and a half miles away. In a state of exhaustion, he told the men of the tragedy. Tom returned to the gorge while the two men rode back to the station to get help. By the time they reached LOCH ARD Gorge, it was cold and dark. The two shipwreck survivors were taken to Glenample Station to recover. Eva stayed at the station for six weeks before returning to Ireland, this time by steamship. In Melbourne, Tom Pearce received a hero's welcome. He was presented with the first gold medal of the Royal Humane Society of Victoria and a £1000 cheque from the Victorian Government. Concerts were performed to honour the young man's bravery and to raise money for those who lost family in the LOCH ARD disaster. Of the 54 crew members and passengers on board, only two survived: the apprentice, Tom Pearce and the young woman passenger, Eva Carmichael, who lost all of her family in the tragedy. Ten days after the LOCH ARD tragedy, salvage rights to the wreck were sold at auction for £2,120. Cargo valued at £3,000 was salvaged and placed on the beach, but most washed back into the sea when another storm developed. The wreck of LOCH ARD still lies at the base of Mutton Bird Island. Much of the cargo has now been salvaged and some was washed up into what is now known as LOCH ARD Gorge. Cargo and artefacts have also been illegally salvaged over many years before protective legislation was introduced. One of the most unlikely pieces of cargo to have survived the shipwreck was a Minton porcelain peacock - one of only nine in the world. The peacock was destined for the Melbourne International Exhibition in 1880. It had been well packed, which gave it adequate protection during the violent storm. Today, the Minton peacock can be seen at the Flagstaff Hill Maritime Museum in Warrnambool. From Australia's most dramatic shipwreck it has now become Australia's most valuable shipwreck artefact and is one of very few 'objects' on the Victorian State Heritage Register. Flagstaff Hill’s collection of artefacts from LOCH ARD is significant for being one of the largest collections of artefacts from this shipwreck in Victoria. It is significant for its association with the shipwreck, which is on the Victorian Heritage Register (VHR S417). The collection is significant because of the relationship between the objects, as together they have a high potential to interpret the story of the LOCH ARD. The LOCH ARD collection is archaeologically significant as the remains of a large international passenger and cargo ship. The LOCH ARD collection is historically significant for representing aspects of Victoria’s shipping history and its potential to interpret sub-theme 1.5 of Victoria’s Framework of Historical Themes (living with natural processes). The collection is also historically significant for its association with the LOCH ARD, which was one of the worst and best known shipwrecks in Victoria’s history. Calendar printed by Terang Express for December 1923 with picture of Loch Ard Gorge and survivors of wreck and also story of the episode. Has some large tears in it.flagstaff hill, warrnambool, shipwrecked coast, flagstaff hill maritime museum, maritime museum, shipwreck coast, flagstaff hill maritime village, great ocean road, loch line, loch ard, captain gibbs, eva carmichael, tom pearce, glenample station, mutton bird island, loch ard gorge, calendar, terang express -
 Flagstaff Hill Maritime Museum and Village
Tool - Wood Working Plane, Mathieson and Son, 1880-1900
A Mathieson & Son History: In 1792 John Manners had set up a workshop making woodworking planes at 14 Saracens Lane Glasgow. He also had employed an apprentice Alexander Mathieson (1773-1851). But in the following year at Saracen's Lane, the 1841 census describes Alexander Mathieson as a master plane-maker now at 38 Saracen Lane with his son Thomas Adam working with him as a journeyman plane-maker. Presumably, Alexander must have taken over the premises and business of John Manners. Now that the business had Thomas Adam Mathieson working with his father it gradually grew and became more diversified, and it is recorded at the time by the Post-Office Glasgow Annual Directory that by 1847-1848 Alexander Mathieson was a “plane, brace, bit, auger & edge tool maker.” In 1849 the firm of James & William Stewart at 65 Nicolson Street, Edinburgh was taken over and Thomas was put in charge of the business, trading under the name Thomas A. Mathieson & Co. as plane and edge-tool makers. Thomas's company went on to acquire the Edinburgh edge-tool makers “Charles & Hugh McPherson” and took over their premises in Gilmore Street. In the Edinburgh directory of 1856/7, the business is recorded as being Alexander Mathieson & Son, plane and edge-tool makers at 48 Nicolson Street and Paul's Work, Gilmore Street Edinburgh. The 1851 census Alexander is recorded as working as a tool and plane-maker employing eight men. Later that year Alexander died and his son Thomas took over the business. Under the heading of an edge-tool maker in the 1852/3 Post-Office Glasgow Annual Directory the firm is now listed as Alexander Mathieson & Son, with further entries as "turning-lathe and vice manufacturers". By the early 1850s, the business had moved to 24 Saracen Lane. The directory for 1857/8 records that the firm had moved again only a few years later to East Campbell Street, off the Gallowgate area, and that through further diversification was also manufacturing coopers' and tinmen's tools. The ten-yearly censuses report the firm's growth in 1861 stating that Thomas was a tool manufacturer employing 95 men and 30 boys; in 1871 he had 200 men working for him and in 1881 300 men. By 1899 the firm had been incorporated as Alexander Mathieson & Sons Ltd, even though only Alexander's son Thomas appears ever to have joined the firm so the company was still in his fathers' name. In September 1868 Thomas Mathieson put a notice in the newspapers of the Sheffield & Rotherham Independent and the Sheffield Daily Telegraph stating that his firm had used the trade-mark of a crescent and star "for some time" and that "using or imitating the Mark would be proceeded against for infringement". The firm had acquired its interest in the crescent-and-star mark from the heirs of Charles Pickslay, the Sheffield cutler who had registered it with the Cutlers' Company in 1833 and had died in 1852. The year 1868 seems also to be the one in which the name Saracen Tool Works was first adopted; not only does it figure at the foot of the notice in the Sheffield press, it also makes its first appearance in the firm's entry in the Post-Office Glasgow Annual Directory in the 1868/9 edition. As Thomas Mathieson's business grew, so too did his involvement in local public life and philanthropy. One of the representatives of the third ward on the town council of Glasgow, he became a river bailie in 1868, a magistrate in 1870 and a preceptor of Hutcheson's Hospital in 1878. He had a passion for books and was an "ardent Ruskinian". He served on the committee handling the bequest for the setting up of the Mitchell Library in Glasgow. When he died at Coulter Maynes near Biggar in 1899, he left an estate worth £142,764. Company's later years: Both Thomas's sons, James Harper and Thomas Ogilvie were involved in the continuing life of the firm. James followed in his father's footsteps in becoming a local public figure. He was appointed Deputy Lieutenant of the County of the City of Glasgow and was made a deacon of the Incorporation of the Hammermen of Glasgow in 1919. His brother Thomas Ogilvie was recorded as tool manufacturer and employer in the 1911 census. Thomas Ogilvie's son Thomas Alastair Sutherland Ogilvie Mathieson was born in 1908 took a rather different approach to engineering, however, by becoming a racing driver. In 1947 he wed the French film actress Mila Parély. The firm had won many awards at world fairs for their goods. At the Great Exhibition, London, 1851. Prize medal for joiners' tools in the class of Cutlery & Edge Tools, Great London Exposition, 1862. Prize medal honoris causa. International Exhibition, Melbourne, 1880. Gold medal International Exhibition of Industry, Science and Art, Edinburgh, 1886. Prize medal James Howarth & Sons History: James Howarth and Sons, of Broomspring Works, Bath-street Sheffield were among leading manufacturers of edge tools and joiners tools. The business was commenced in 1835, by James Howarth who was joined by his sons in 1863. Howarth manufacture light and heavy edge tools of all kinds, including a variety of joiners’ tools, hammers, skates, augers. The firm soon was extended and began exporting their products to the USA, Canada, Australia, China, and many other overseas destinations as well as to the home market. They were exhibitors at the London Exhibitions of 1851 and 1862, and Paris in 1855, receiving awards. Howarth was primarily operating from Sheffield. J Howarth & Sons produce goods of a very high class and were also engaged in the manufacture of steel, file, saw, and similar trades. Upon the death of James Howarth, the firm was managed by his four sons James, Samuel, Edwin, and John Howarth. The firm was discontinued in 1913, and its trademark was acquired by Robert Sorby and Sons in 1922.A significant tool made in the late 19th century by a known makers and sought after by collectors of vintage wood working tools.Smoothing Plane Coffin type. 2" stamped on one end and Tertius Keen & Co (plane maker.) Blade has James Howarth Warranted Cast Steel Sheffield (maker of blade only.)flagstaff hill, warrnambool, shipwrecked-coast, flagstaff-hill, flagstaff-hill-maritime-museum, maritime-museum, shipwreck-coast, flagstaff-hill-maritime-village -
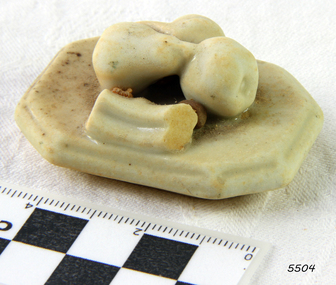 Flagstaff Hill Maritime Museum and Village
Lid
Ref: LA 2 29 274 HISTORY OF THE LOCH ARD The LOCH ARD belonged to the famous Loch Line which sailed many ships from England to Australia. Built in Glasgow by Barclay, Curdle and Co. in 1873, the LOCH ARD was a three-masted square rigged iron sailing ship. The ship measured 262ft 7" (79.87m) in length, 38ft (11.58m) in width, 23ft (7m) in depth and had a gross tonnage of 1693 tons. The LOCH ARD's main mast measured a massive 150ft (45.7m) in height. LOCH ARD made three trips to Australia and one trip to Calcutta before its final voyage. LOCH ARD left England on March 2, 1878, under the command of Captain Gibbs, a newly married, 29 year old. She was bound for Melbourne with a crew of 37, plus 17 passengers and a load of cargo. The general cargo reflected the affluence of Melbourne at the time. On board were straw hats, umbrella, perfumes, clay pipes, pianos, clocks, confectionary, linen and candles, as well as a heavier load of railway irons, cement, lead and copper. There were items included that intended for display in the Melbourne International Exhibition in 1880. The voyage to Port Phillip was long but uneventful. At 3am on June 1, 1878, Captain Gibbs was expecting to see land and the passengers were becoming excited as they prepared to view their new homeland in the early morning. But LOCH ARD was running into a fog which greatly reduced visibility. Captain Gibbs was becoming anxious as there was no sign of land or the Cape Otway lighthouse. At 4am the fog lifted. A man aloft announced that he could see breakers. The sheer cliffs of Victoria's west coast came into view, and Captain Gibbs realised that the ship was much closer to them than expected. He ordered as much sail to be set as time would permit and then attempted to steer the vessel out to sea. On coming head on into the wind, the ship lost momentum, the sails fell limp and LOCH ARD's bow swung back. Gibbs then ordered the anchors to be released in an attempt to hold its position. The anchors sank some 50 fathoms - but did not hold. By this time LOCH ARD was among the breakers and the tall cliffs of Mutton Bird Island rose behind the ship. Just half a mile from the coast, the ship's bow was suddenly pulled around by the anchor. The captain tried to tack out to sea, but the ship struck a reef at the base of Mutton Bird Island, near Port Campbell. Waves broke over the ship and the top deck was loosened from the hull. The masts and rigging came crashing down knocking passengers and crew overboard. When a lifeboat was finally launched, it crashed into the side of LOCH ARD and capsized. Tom Pearce, who had launched the boat, managed to cling to its overturned hull and shelter beneath it. He drifted out to sea and then on the flood tide came into what is now known as LOCH ARD Gorge. He swam to shore, bruised and dazed, and found a cave in which to shelter. Some of the crew stayed below deck to shelter from the falling rigging but drowned when the ship slipped off the reef into deeper water. Eva Carmichael had raced onto deck to find out what was happening only to be confronted by towering cliffs looming above the stricken ship. In all the chaos, Captain Gibbs grabbed Eva and said, "If you are saved Eva, let my dear wife know that I died like a sailor". That was the last Eva Carmichael saw of the captain. She was swept off the ship by a huge wave. Eva saw Tom Pearce on a small rocky beach and yelled to attract his attention. He dived in and swam to the exhausted woman and dragged her to shore. He took her to the cave and broke open case of brandy which had washed up on the beach. He opened a bottle to revive the unconscious woman. A few hours later Tom scaled a cliff in search of help. He followed hoof prints and came by chance upon two men from nearby Glenample Station three and a half miles away. In a state of exhaustion, he told the men of the tragedy. Tom returned to the gorge while the two men rode back to the station to get help. By the time they reached LOCH ARD Gorge, it was cold and dark. The two shipwreck survivors were taken to Glenample Station to recover. Eva stayed at the station for six weeks before returning to Ireland, this time by steamship. In Melbourne, Tom Pearce received a hero's welcome. He was presented with the first gold medal of the Royal Humane Society of Victoria and a £1000 cheque from the Victorian Government. Concerts were performed to honour the young man's bravery and to raise money for those who lost family in the LOCH ARD disaster. Of the 54 crew members and passengers on board, only two survived: the apprentice, Tom Pearce and the young woman passenger, Eva Carmichael, who lost all of her family in the tragedy. Ten days after the LOCH ARD tragedy, salvage rights to the wreck were sold at auction for £2,120. Cargo valued at £3,000 was salvaged and placed on the beach, but most washed back into the sea when another storm developed. The wreck of LOCH ARD still lies at the base of Mutton Bird Island. Much of the cargo has now been salvaged and some was washed up into what is now known as LOCH ARD Gorge. Cargo and artefacts have also been illegally salvaged over many years before protective legislation was introduced. One of the most unlikely pieces of cargo to have survived the shipwreck was a Minton porcelain peacock - one of only nine in the world. The peacock was destined for the Melbourne International Exhibition in 1880. It had been well packed, which gave it adequate protection during the violent storm. Today, the Minton peacock can be seen at the Flagstaff Hill Maritime Museum in Warrnambool. From Australia's most dramatic shipwreck it has now become Australia's most valuable shipwreck artefact and is one of very few 'objects' on the Victorian State Heritage Register. Flagstaff Hill’s collection of artefacts from LOCH ARD is significant for being one of the largest collections of artefacts from this shipwreck in Victoria. It is significant for its association with the shipwreck, which is on the Victorian Heritage Register (VHR S417). The collection is significant because of the relationship between the objects, as together they have a high potential to interpret the story of the LOCH ARD. The LOCH ARD collection is archaeologically significant as the remains of a large international passenger and cargo ship. The LOCH ARD collection is historically significant for representing aspects of Victoria’s shipping history and its potential to interpret sub-theme 1.5 of Victoria’s Framework of Historical Themes (living with natural processes). The collection is also historically significant for its association with the LOCH ARD, which was one of the worst and best known shipwrecks in Victoria’s history. Lid from child's tea set. Porcelain. Lid has small chip and some slight iron stains. Recovered from the wreck of the Loch Ard. Artefact reg No LA/16.flagstaff hill, warrnambool, shipwrecked-coast, flagstaff-hill, flagstaff-hill-maritime-museum, maritime-museum, shipwreck-coast, flagstaff-hill-maritime-village -
 Flagstaff Hill Maritime Museum and Village
Deflector
HISTORY OF THE LOCH ARD The LOCH ARD belonged to the famous Loch Line which sailed many ships from England to Australia. Built in Glasgow by Barclay, Curdle and Co. in 1873, the LOCH ARD was a three-masted square rigged iron sailing ship. The ship measured 262ft 7" (79.87m) in length, 38ft (11.58m) in width, 23ft (7m) in depth and had a gross tonnage of 1693 tons. The LOCH ARD's main mast measured a massive 150ft (45.7m) in height. LOCH ARD made three trips to Australia and one trip to Calcutta before its final voyage. LOCH ARD left England on March 2, 1878, under the command of Captain Gibbs, a newly married, 29 year old. She was bound for Melbourne with a crew of 37, plus 17 passengers and a load of cargo. The general cargo reflected the affluence of Melbourne at the time. On board were straw hats, umbrella, perfumes, clay pipes, pianos, clocks, confectionary, linen and candles, as well as a heavier load of railway irons, cement, lead and copper. There were items included that intended for display in the Melbourne International Exhibition in 1880. The voyage to Port Phillip was long but uneventful. At 3am on June 1, 1878, Captain Gibbs was expecting to see land and the passengers were becoming excited as they prepared to view their new homeland in the early morning. But LOCH ARD was running into a fog which greatly reduced visibility. Captain Gibbs was becoming anxious as there was no sign of land or the Cape Otway lighthouse. At 4am the fog lifted. A man aloft announced that he could see breakers. The sheer cliffs of Victoria's west coast came into view, and Captain Gibbs realised that the ship was much closer to them than expected. He ordered as much sail to be set as time would permit and then attempted to steer the vessel out to sea. On coming head on into the wind, the ship lost momentum, the sails fell limp and LOCH ARD's bow swung back. Gibbs then ordered the anchors to be released in an attempt to hold its position. The anchors sank some 50 fathoms - but did not hold. By this time LOCH ARD was among the breakers and the tall cliffs of Mutton Bird Island rose behind the ship. Just half a mile from the coast, the ship's bow was suddenly pulled around by the anchor. The captain tried to tack out to sea, but the ship struck a reef at the base of Mutton Bird Island, near Port Campbell. Waves broke over the ship and the top deck was loosened from the hull. The masts and rigging came crashing down knocking passengers and crew overboard. When a lifeboat was finally launched, it crashed into the side of LOCH ARD and capsized. Tom Pearce, who had launched the boat, managed to cling to its overturned hull and shelter beneath it. He drifted out to sea and then on the flood tide came into what is now known as LOCH ARD Gorge. He swam to shore, bruised and dazed, and found a cave in which to shelter. Some of the crew stayed below deck to shelter from the falling rigging but drowned when the ship slipped off the reef into deeper water. Eva Carmichael had raced onto deck to find out what was happening only to be confronted by towering cliffs looming above the stricken ship. In all the chaos, Captain Gibbs grabbed Eva and said, "If you are saved Eva, let my dear wife know that I died like a sailor". That was the last Eva Carmichael saw of the captain. She was swept off the ship by a huge wave. Eva saw Tom Pearce on a small rocky beach and yelled to attract his attention. He dived in and swam to the exhausted woman and dragged her to shore. He took her to the cave and broke open case of brandy which had washed up on the beach. He opened a bottle to revive the unconscious woman. A few hours later Tom scaled a cliff in search of help. He followed hoof prints and came by chance upon two men from nearby Glenample Station three and a half miles away. In a state of exhaustion, he told the men of the tragedy. Tom returned to the gorge while the two men rode back to the station to get help. By the time they reached LOCH ARD Gorge, it was cold and dark. The two shipwreck survivors were taken to Glenample Station to recover. Eva stayed at the station for six weeks before returning to Ireland, this time by steamship. In Melbourne, Tom Pearce received a hero's welcome. He was presented with the first gold medal of the Royal Humane Society of Victoria and a £1000 cheque from the Victorian Government. Concerts were performed to honour the young man's bravery and to raise money for those who lost family in the LOCH ARD disaster. Of the 54 crew members and passengers on board, only two survived: the apprentice, Tom Pearce and the young woman passenger, Eva Carmichael, who lost all of her family in the tragedy. Ten days after the LOCH ARD tragedy, salvage rights to the wreck were sold at auction for £2,120. Cargo valued at £3,000 was salvaged and placed on the beach, but most washed back into the sea when another storm developed. The wreck of LOCH ARD still lies at the base of Mutton Bird Island. Much of the cargo has now been salvaged and some was washed up into what is now known as LOCH ARD Gorge. Cargo and artefacts have also been illegally salvaged over many years before protective legislation was introduced. One of the most unlikely pieces of cargo to have survived the shipwreck was a Minton porcelain peacock - one of only nine in the world. The peacock was destined for the Melbourne International Exhibition in 1880. It had been well packed, which gave it adequate protection during the violent storm. Today, the Minton peacock can be seen at the Flagstaff Hill Maritime Museum in Warrnambool. From Australia's most dramatic shipwreck it has now become Australia's most valuable shipwreck artefact and is one of very few 'objects' on the Victorian State Heritage Register. Flagstaff Hill’s collection of artefacts from LOCH ARD is significant for being one of the largest collections of artefacts from this shipwreck in Victoria. It is significant for its association with the shipwreck, which is on the Victorian Heritage Register (VHR S417). The collection is significant because of the relationship between the objects, as together they have a high potential to interpret the story of the LOCH ARD. The LOCH ARD collection is archaeologically significant as the remains of a large international passenger and cargo ship. The LOCH ARD collection is historically significant for representing aspects of Victoria’s shipping history and its potential to interpret sub-theme 1.5 of Victoria’s Framework of Historical Themes (living with natural processes). The collection is also historically significant for its association with the LOCH ARD, which was one of the worst and best known shipwrecks in Victoria’s history. Small Porcelain Heat Deflector from a kero lamp,deflector is blue inside. Outside has some encrustation. Artefact reg no LA/15. Recovered from the wreck of the Loch Ard.flagstaff hill, warrnambool, shipwrecked coast, flagstaff hill maritime museum, maritime museum, shipwreck coast, flagstaff hill maritime village, great ocean road, loch line, loch ard, captain gibbs, eva carmichael, tom pearce, glenample station, mutton bird island, loch ard gorge, porcelain heat deflector, heat deflector -
 Flagstaff Hill Maritime Museum and Village
Pump
HISTORY OF THE LOCH ARD The LOCH ARD belonged to the famous Loch Line which sailed many ships from England to Australia. Built in Glasgow by Barclay, Curdle and Co. in 1873, the LOCH ARD was a three-masted square rigged iron sailing ship. The ship measured 262ft 7" (79.87m) in length, 38ft (11.58m) in width, 23ft (7m) in depth and had a gross tonnage of 1693 tons. The LOCH ARD's main mast measured a massive 150ft (45.7m) in height. LOCH ARD made three trips to Australia and one trip to Calcutta before its final voyage. LOCH ARD left England on March 2, 1878, under the command of Captain Gibbs, a newly married, 29 year old. She was bound for Melbourne with a crew of 37, plus 17 passengers and a load of cargo. The general cargo reflected the affluence of Melbourne at the time. On board were straw hats, umbrella, perfumes, clay pipes, pianos, clocks, confectionary, linen and candles, as well as a heavier load of railway irons, cement, lead and copper. There were items included that intended for display in the Melbourne International Exhibition in 1880. The voyage to Port Phillip was long but uneventful. At 3am on June 1, 1878, Captain Gibbs was expecting to see land and the passengers were becoming excited as they prepared to view their new homeland in the early morning. But LOCH ARD was running into a fog which greatly reduced visibility. Captain Gibbs was becoming anxious as there was no sign of land or the Cape Otway lighthouse. At 4am the fog lifted. A man aloft announced that he could see breakers. The sheer cliffs of Victoria's west coast came into view, and Captain Gibbs realised that the ship was much closer to them than expected. He ordered as much sail to be set as time would permit and then attempted to steer the vessel out to sea. On coming head on into the wind, the ship lost momentum, the sails fell limp and LOCH ARD's bow swung back. Gibbs then ordered the anchors to be released in an attempt to hold its position. The anchors sank some 50 fathoms - but did not hold. By this time LOCH ARD was among the breakers and the tall cliffs of Mutton Bird Island rose behind the ship. Just half a mile from the coast, the ship's bow was suddenly pulled around by the anchor. The captain tried to tack out to sea, but the ship struck a reef at the base of Mutton Bird Island, near Port Campbell. Waves broke over the ship and the top deck was loosened from the hull. The masts and rigging came crashing down knocking passengers and crew overboard. When a lifeboat was finally launched, it crashed into the side of LOCH ARD and capsized. Tom Pearce, who had launched the boat, managed to cling to its overturned hull and shelter beneath it. He drifted out to sea and then on the flood tide came into what is now known as LOCH ARD Gorge. He swam to shore, bruised and dazed, and found a cave in which to shelter. Some of the crew stayed below deck to shelter from the falling rigging but drowned when the ship slipped off the reef into deeper water. Eva Carmichael had raced onto deck to find out what was happening only to be confronted by towering cliffs looming above the stricken ship. In all the chaos, Captain Gibbs grabbed Eva and said, "If you are saved Eva, let my dear wife know that I died like a sailor". That was the last Eva Carmichael saw of the captain. She was swept off the ship by a huge wave. Eva saw Tom Pearce on a small rocky beach and yelled to attract his attention. He dived in and swam to the exhausted woman and dragged her to shore. He took her to the cave and broke open case of brandy which had washed up on the beach. He opened a bottle to revive the unconscious woman. A few hours later Tom scaled a cliff in search of help. He followed hoof prints and came by chance upon two men from nearby Glenample Station three and a half miles away. In a state of exhaustion, he told the men of the tragedy. Tom returned to the gorge while the two men rode back to the station to get help. By the time they reached LOCH ARD Gorge, it was cold and dark. The two shipwreck survivors were taken to Glenample Station to recover. Eva stayed at the station for six weeks before returning to Ireland, this time by steamship. In Melbourne, Tom Pearce received a hero's welcome. He was presented with the first gold medal of the Royal Humane Society of Victoria and a £1000 cheque from the Victorian Government. Concerts were performed to honour the young man's bravery and to raise money for those who lost family in the LOCH ARD disaster. Of the 54 crew members and passengers on board, only two survived: the apprentice, Tom Pearce and the young woman passenger, Eva Carmichael, who lost all of her family in the tragedy. Ten days after the LOCH ARD tragedy, salvage rights to the wreck were sold at auction for £2,120. Cargo valued at £3,000 was salvaged and placed on the beach, but most washed back into the sea when another storm developed. The wreck of LOCH ARD still lies at the base of Mutton Bird Island. Much of the cargo has now been salvaged and some was washed up into what is now known as LOCH ARD Gorge. Cargo and artefacts have also been illegally salvaged over many years before protective legislation was introduced. One of the most unlikely pieces of cargo to have survived the shipwreck was a Minton porcelain peacock - one of only nine in the world. The peacock was destined for the Melbourne International Exhibition in 1880. It had been well packed, which gave it adequate protection during the violent storm. Today, the Minton peacock can be seen at the Flagstaff Hill Maritime Museum in Warrnambool. From Australia's most dramatic shipwreck it has now become Australia's most valuable shipwreck artefact and is one of very few 'objects' on the Victorian State Heritage Register. Flagstaff Hill’s collection of artefacts from LOCH ARD is significant for being one of the largest collections of artefacts from this shipwreck in Victoria. It is significant for its association with the shipwreck, which is on the Victorian Heritage Register (VHR S417). The collection is significant because of the relationship between the objects, as together they have a high potential to interpret the story of the LOCH ARD. The LOCH ARD collection is archaeologically significant as the remains of a large international passenger and cargo ship. The LOCH ARD collection is historically significant for representing aspects of Victoria’s shipping history and its potential to interpret sub-theme 1.5 of Victoria’s Framework of Historical Themes (living with natural processes). The collection is also historically significant for its association with the LOCH ARD, which was one of the worst and best known shipwrecks in Victoria’s history. Part of a pump system. Has been attached to a piece of wood. Possibly a cistern plunger. From the Loch Ard.flagstaff hill, warrnambool, shipwrecked coast, flagstaff hill maritime museum, maritime museum, shipwreck coast, flagstaff hill maritime village, great ocean road, loch line, loch ard, captain gibbs, eva carmichael, tom pearce, glenample station, mutton bird island, loch ard gorge, pump system, pump -
 Flagstaff Hill Maritime Museum and Village
Functional object - Gas Fitting
This gas fitting was recovered from the wreck of the Loch Ard circa 1970, at the time of the discovery of the wreck. HISTORY OF THE LOCH ARD: - The LOCH ARD belonged to the famous Loch Line which sailed many ships from England to Australia. Built in Glasgow by Barclay, Curdle and Co. in 1873, the LOCH ARD was a three-masted square rigged iron sailing ship. The ship measured 262ft 7" (79.87m) in length, 38ft (11.58m) in width, 23ft (7m) in depth and had a gross tonnage of 1693 tons. The LOCH ARD's main mast measured a massive 150ft (45.7m) in height. LOCH ARD made three trips to Australia and one trip to Calcutta before its final voyage. LOCH ARD left England on March 2, 1878, under the command of Captain Gibbs, a newly married, 29 year old. She was bound for Melbourne with a crew of 37, plus 17 passengers and a load of cargo. The general cargo reflected the affluence of Melbourne at the time. On board were straw hats, umbrella, perfumes, clay pipes, pianos, clocks, confectionary, linen and candles, as well as a heavier load of railway irons, cement, lead and copper. There were items included that intended for display in the Melbourne International Exhibition in 1880. The voyage to Port Phillip was long but uneventful. At 3am on June 1, 1878, Captain Gibbs was expecting to see land and the passengers were becoming excited as they prepared to view their new homeland in the early morning. But LOCH ARD was running into a fog which greatly reduced visibility. Captain Gibbs was becoming anxious as there was no sign of land or the Cape Otway lighthouse. At 4am the fog lifted. A man aloft announced that he could see breakers. The sheer cliffs of Victoria's west coast came into view, and Captain Gibbs realised that the ship was much closer to them than expected. He ordered as much sail to be set as time would permit and then attempted to steer the vessel out to sea. On coming head on into the wind, the ship lost momentum, the sails fell limp and LOCH ARD's bow swung back. Gibbs then ordered the anchors to be released in an attempt to hold its position. The anchors sank some 50 fathoms - but did not hold. By this time LOCH ARD was among the breakers and the tall cliffs of Mutton Bird Island rose behind the ship. Just half a mile from the coast, the ship's bow was suddenly pulled around by the anchor. The captain tried to tack out to sea, but the ship struck a reef at the base of Mutton Bird Island, near Port Campbell. Waves broke over the ship and the top deck was loosened from the hull. The masts and rigging came crashing down knocking passengers and crew overboard. When a lifeboat was finally launched, it crashed into the side of LOCH ARD and capsized. Tom Pearce, who had launched the boat, managed to cling to its overturned hull and shelter beneath it. He drifted out to sea and then on the flood tide came into what is now known as LOCH ARD Gorge. He swam to shore, bruised and dazed, and found a cave in which to shelter. Some of the crew stayed below deck to shelter from the falling rigging but drowned when the ship slipped off the reef into deeper water. Eva Carmichael had raced onto deck to find out what was happening only to be confronted by towering cliffs looming above the stricken ship. In all the chaos, Captain Gibbs grabbed Eva and said, "If you are saved Eva, let my dear wife know that I died like a sailor". That was the last Eva Carmichael saw of the captain. She was swept off the ship by a huge wave. Eva saw Tom Pearce on a small rocky beach and yelled to attract his attention. He dived in and swam to the exhausted woman and dragged her to shore. He took her to the cave and broke open case of brandy which had washed up on the beach. He opened a bottle to revive the unconscious woman. A few hours later Tom scaled a cliff in search of help. He followed hoof prints and came by chance upon two men from nearby Glenample Station three and a half miles away. In a state of exhaustion, he told the men of the tragedy. Tom returned to the gorge while the two men rode back to the station to get help. By the time they reached LOCH ARD Gorge, it was cold and dark. The two shipwreck survivors were taken to Glenample Station to recover. Eva stayed at the station for six weeks before returning to Ireland, this time by steamship. In Melbourne, Tom Pearce received a hero's welcome. He was presented with the first gold medal of the Royal Humane Society of Victoria and a £1000 cheque from the Victorian Government. Concerts were performed to honour the young man's bravery and to raise money for those who lost family in the LOCH ARD disaster. Of the 54 crew members and passengers on board, only two survived: the apprentice, Tom Pearce and the young woman passenger, Eva Carmichael, who lost all of her family in the tragedy. Ten days after the LOCH ARD tragedy, salvage rights to the wreck were sold at auction for £2,120. Cargo valued at £3,000 was salvaged and placed on the beach, but most washed back into the sea when another storm developed. The wreck of LOCH ARD still lies at the base of Mutton Bird Island. Much of the cargo has now been salvaged and some was washed up into what is now known as LOCH ARD Gorge. Cargo and artefacts have also been illegally salvaged over many years before protective legislation was introduced. One of the most unlikely pieces of cargo to have survived the shipwreck was a Minton porcelain peacock - one of only nine in the world. The peacock was destined for the Melbourne International Exhibition in 1880. It had been well packed, which gave it adequate protection during the violent storm. Today, the Minton peacock can be seen at the Flagstaff Hill Maritime Museum in Warrnambool. From Australia's most dramatic shipwreck it has now become Australia's most valuable shipwreck artefact and is one of very few 'objects' on the Victorian State Heritage Register. Flagstaff Hill’s collection of artefacts from LOCH ARD is significant for being one of the largest collections of artefacts from this shipwreck in Victoria. It is significant for its association with the shipwreck, which is on the Victorian Heritage Register (VHR S417). The collection is significant because of the relationship between the objects, as together they have a high potential to interpret the story of the LOCH ARD. The LOCH ARD collection is archaeologically significant as the remains of a large international passenger and cargo ship. The LOCH ARD collection is historically significant for representing aspects of Victoria’s shipping history and its potential to interpret sub-theme 1.5 of Victoria’s Framework of Historical Themes (living with natural processes). The collection is also historically significant for its association with the LOCH ARD, which was one of the worst and best known shipwrecks in Victoria’s history. Copper gas pipe and fitting. Tow C-shaped pipes with fittings at each end. One end of each pipe is joined to the other pipe, making a U-shape. It was recovered from the 1878 wreck of the ship Loch Ard in the 1970s. flagstaff hill, warrnambool, shipwrecked coast, flagstaff hill maritime museum, maritime museum, shipwreck coast, flagstaff hill maritime village, great ocean road, loch line, loch ard, captain gibbs, eva carmichael, tom pearce, glenample station, mutton bird island, loch ard gorge, copper gas pipe and fitting, copper gas pipe -
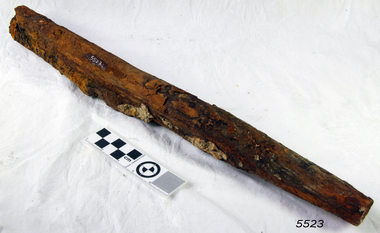 Flagstaff Hill Maritime Museum and Village
Handle
Ref: LA 6 67 311 HISTORY OF THE LOCH ARD The LOCH ARD belonged to the famous Loch Line which sailed many ships from England to Australia. Built in Glasgow by Barclay, Curdle and Co. in 1873, the LOCH ARD was a three-masted square rigged iron sailing ship. The ship measured 262ft 7" (79.87m) in length, 38ft (11.58m) in width, 23ft (7m) in depth and had a gross tonnage of 1693 tons. The LOCH ARD's main mast measured a massive 150ft (45.7m) in height. LOCH ARD made three trips to Australia and one trip to Calcutta before its final voyage. LOCH ARD left England on March 2, 1878, under the command of Captain Gibbs, a newly married, 29 year old. She was bound for Melbourne with a crew of 37, plus 17 passengers and a load of cargo. The general cargo reflected the affluence of Melbourne at the time. On board were straw hats, umbrella, perfumes, clay pipes, pianos, clocks, confectionary, linen and candles, as well as a heavier load of railway irons, cement, lead and copper. There were items included that intended for display in the Melbourne International Exhibition in 1880. The voyage to Port Phillip was long but uneventful. At 3am on June 1, 1878, Captain Gibbs was expecting to see land and the passengers were becoming excited as they prepared to view their new homeland in the early morning. But LOCH ARD was running into a fog which greatly reduced visibility. Captain Gibbs was becoming anxious as there was no sign of land or the Cape Otway lighthouse. At 4am the fog lifted. A man aloft announced that he could see breakers. The sheer cliffs of Victoria's west coast came into view, and Captain Gibbs realised that the ship was much closer to them than expected. He ordered as much sail to be set as time would permit and then attempted to steer the vessel out to sea. On coming head on into the wind, the ship lost momentum, the sails fell limp and LOCH ARD's bow swung back. Gibbs then ordered the anchors to be released in an attempt to hold its position. The anchors sank some 50 fathoms - but did not hold. By this time LOCH ARD was among the breakers and the tall cliffs of Mutton Bird Island rose behind the ship. Just half a mile from the coast, the ship's bow was suddenly pulled around by the anchor. The captain tried to tack out to sea, but the ship struck a reef at the base of Mutton Bird Island, near Port Campbell. Waves broke over the ship and the top deck was loosened from the hull. The masts and rigging came crashing down knocking passengers and crew overboard. When a lifeboat was finally launched, it crashed into the side of LOCH ARD and capsized. Tom Pearce, who had launched the boat, managed to cling to its overturned hull and shelter beneath it. He drifted out to sea and then on the flood tide came into what is now known as LOCH ARD Gorge. He swam to shore, bruised and dazed, and found a cave in which to shelter. Some of the crew stayed below deck to shelter from the falling rigging but drowned when the ship slipped off the reef into deeper water. Eva Carmichael had raced onto deck to find out what was happening only to be confronted by towering cliffs looming above the stricken ship. In all the chaos, Captain Gibbs grabbed Eva and said, "If you are saved Eva, let my dear wife know that I died like a sailor". That was the last Eva Carmichael saw of the captain. She was swept off the ship by a huge wave. Eva saw Tom Pearce on a small rocky beach and yelled to attract his attention. He dived in and swam to the exhausted woman and dragged her to shore. He took her to the cave and broke open case of brandy which had washed up on the beach. He opened a bottle to revive the unconscious woman. A few hours later Tom scaled a cliff in search of help. He followed hoof prints and came by chance upon two men from nearby Glenample Station three and a half miles away. In a state of exhaustion, he told the men of the tragedy. Tom returned to the gorge while the two men rode back to the station to get help. By the time they reached LOCH ARD Gorge, it was cold and dark. The two shipwreck survivors were taken to Glenample Station to recover. Eva stayed at the station for six weeks before returning to Ireland, this time by steamship. In Melbourne, Tom Pearce received a hero's welcome. He was presented with the first gold medal of the Royal Humane Society of Victoria and a £1000 cheque from the Victorian Government. Concerts were performed to honour the young man's bravery and to raise money for those who lost family in the LOCH ARD disaster. Of the 54 crew members and passengers on board, only two survived: the apprentice, Tom Pearce and the young woman passenger, Eva Carmichael, who lost all of her family in the tragedy. Ten days after the LOCH ARD tragedy, salvage rights to the wreck were sold at auction for £2,120. Cargo valued at £3,000 was salvaged and placed on the beach, but most washed back into the sea when another storm developed. The wreck of LOCH ARD still lies at the base of Mutton Bird Island. Much of the cargo has now been salvaged and some was washed up into what is now known as LOCH ARD Gorge. Cargo and artefacts have also been illegally salvaged over many years before protective legislation was introduced. One of the most unlikely pieces of cargo to have survived the shipwreck was a Minton porcelain peacock - one of only nine in the world. The peacock was destined for the Melbourne International Exhibition in 1880. It had been well packed, which gave it adequate protection during the violent storm. Today, the Minton peacock can be seen at the Flagstaff Hill Maritime Museum in Warrnambool. From Australia's most dramatic shipwreck it has now become Australia's most valuable shipwreck artefact and is one of very few 'objects' on the Victorian State Heritage Register. Flagstaff Hill’s collection of artefacts from LOCH ARD is significant for being one of the largest collections of artefacts from this shipwreck in Victoria. It is significant for its association with the shipwreck, which is on the Victorian Heritage Register (VHR S417). The collection is significant because of the relationship between the objects, as together they have a high potential to interpret the story of the LOCH ARD. The LOCH ARD collection is archaeologically significant as the remains of a large international passenger and cargo ship. The LOCH ARD collection is historically significant for representing aspects of Victoria’s shipping history and its potential to interpret sub-theme 1.5 of Victoria’s Framework of Historical Themes (living with natural processes). The collection is also historically significant for its association with Shovel handle. Has pieces of iron and concretion visible. Artefact Reg No LA/42. Recovered from the wreck of the Loch Ard.flagstaff hill, warrnambool, shipwrecked coast, flagstaff hill maritime museum, maritime museum, shipwreck coast, flagstaff hill maritime village, great ocean road, loch line, loch ard, captain gibbs, eva carmichael, tom pearce, glenample station, mutton bird island, loch ard gorge, shovel handle -
 Flagstaff Hill Maritime Museum and Village
Flange
Ref LA 3 32 256 HISTORY OF THE LOCH ARD The LOCH ARD belonged to the famous Loch Line which sailed many ships from England to Australia. Built in Glasgow by Barclay, Curdle and Co. in 1873, the LOCH ARD was a three-masted square rigged iron sailing ship. The ship measured 262ft 7" (79.87m) in length, 38ft (11.58m) in width, 23ft (7m) in depth and had a gross tonnage of 1693 tons. The LOCH ARD's main mast measured a massive 150ft (45.7m) in height. LOCH ARD made three trips to Australia and one trip to Calcutta before its final voyage. LOCH ARD left England on March 2, 1878, under the command of Captain Gibbs, a newly married, 29 year old. She was bound for Melbourne with a crew of 37, plus 17 passengers and a load of cargo. The general cargo reflected the affluence of Melbourne at the time. On board were straw hats, umbrella, perfumes, clay pipes, pianos, clocks, confectionary, linen and candles, as well as a heavier load of railway irons, cement, lead and copper. There were items included that intended for display in the Melbourne International Exhibition in 1880. The voyage to Port Phillip was long but uneventful. At 3am on June 1, 1878, Captain Gibbs was expecting to see land and the passengers were becoming excited as they prepared to view their new homeland in the early morning. But LOCH ARD was running into a fog which greatly reduced visibility. Captain Gibbs was becoming anxious as there was no sign of land or the Cape Otway lighthouse. At 4am the fog lifted. A man aloft announced that he could see breakers. The sheer cliffs of Victoria's west coast came into view, and Captain Gibbs realised that the ship was much closer to them than expected. He ordered as much sail to be set as time would permit and then attempted to steer the vessel out to sea. On coming head on into the wind, the ship lost momentum, the sails fell limp and LOCH ARD's bow swung back. Gibbs then ordered the anchors to be released in an attempt to hold its position. The anchors sank some 50 fathoms - but did not hold. By this time LOCH ARD was among the breakers and the tall cliffs of Mutton Bird Island rose behind the ship. Just half a mile from the coast, the ship's bow was suddenly pulled around by the anchor. The captain tried to tack out to sea, but the ship struck a reef at the base of Mutton Bird Island, near Port Campbell. Waves broke over the ship and the top deck was loosened from the hull. The masts and rigging came crashing down knocking passengers and crew overboard. When a lifeboat was finally launched, it crashed into the side of LOCH ARD and capsized. Tom Pearce, who had launched the boat, managed to cling to its overturned hull and shelter beneath it. He drifted out to sea and then on the flood tide came into what is now known as LOCH ARD Gorge. He swam to shore, bruised and dazed, and found a cave in which to shelter. Some of the crew stayed below deck to shelter from the falling rigging but drowned when the ship slipped off the reef into deeper water. Eva Carmichael had raced onto deck to find out what was happening only to be confronted by towering cliffs looming above the stricken ship. In all the chaos, Captain Gibbs grabbed Eva and said, "If you are saved Eva, let my dear wife know that I died like a sailor". That was the last Eva Carmichael saw of the captain. She was swept off the ship by a huge wave. Eva saw Tom Pearce on a small rocky beach and yelled to attract his attention. He dived in and swam to the exhausted woman and dragged her to shore. He took her to the cave and broke open case of brandy which had washed up on the beach. He opened a bottle to revive the unconscious woman. A few hours later Tom scaled a cliff in search of help. He followed hoof prints and came by chance upon two men from nearby Glenample Station three and a half miles away. In a state of exhaustion, he told the men of the tragedy. Tom returned to the gorge while the two men rode back to the station to get help. By the time they reached LOCH ARD Gorge, it was cold and dark. The two shipwreck survivors were taken to Glenample Station to recover. Eva stayed at the station for six weeks before returning to Ireland, this time by steamship. In Melbourne, Tom Pearce received a hero's welcome. He was presented with the first gold medal of the Royal Humane Society of Victoria and a £1000 cheque from the Victorian Government. Concerts were performed to honour the young man's bravery and to raise money for those who lost family in the LOCH ARD disaster. Of the 54 crew members and passengers on board, only two survived: the apprentice, Tom Pearce and the young woman passenger, Eva Carmichael, who lost all of her family in the tragedy. Ten days after the LOCH ARD tragedy, salvage rights to the wreck were sold at auction for £2,120. Cargo valued at £3,000 was salvaged and placed on the beach, but most washed back into the sea when another storm developed. The wreck of LOCH ARD still lies at the base of Mutton Bird Island. Much of the cargo has now been salvaged and some was washed up into what is now known as LOCH ARD Gorge. Cargo and artefacts have also been illegally salvaged over many years before protective legislation was introduced. One of the most unlikely pieces of cargo to have survived the shipwreck was a Minton porcelain peacock - one of only nine in the world. The peacock was destined for the Melbourne International Exhibition in 1880. It had been well packed, which gave it adequate protection during the violent storm. Today, the Minton peacock can be seen at the Flagstaff Hill Maritime Museum in Warrnambool. From Australia's most dramatic shipwreck it has now become Australia's most valuable shipwreck artefact and is one of very few 'objects' on the Victorian State Heritage Register. Flagstaff Hill’s collection of artefacts from LOCH ARD is significant for being one of the largest collections of artefacts from this shipwreck in Victoria. It is significant for its association with the shipwreck, which is on the Victorian Heritage Register (VHR S417). The collection is significant because of the relationship between the objects, as together they have a high potential to interpret the story of the LOCH ARD. The LOCH ARD collection is archaeologically significant as the remains of a large international passenger and cargo ship. The LOCH ARD collection is historically significant for representing aspects of Victoria’s shipping history and its potential to interpret sub-theme 1.5 of Victoria’s Framework of Historical Themes (living with natural processes). The collection is also historically significant for its association with the LOCH ARD, which was one of the worst and best known shipwrecks in Victoria’s history. Small square brass Flange with four corner holes and one larger centre hole. Artefact Reg No LA/25. Recovered from the wreck of the Loch Ard.flagstaff hill, warrnambool, shipwrecked coast, flagstaff hill maritime museum, maritime museum, shipwreck coast, flagstaff hill maritime village, great ocean road, loch line, loch ard, captain gibbs, eva carmichael, tom pearce, glenample station, mutton bird island, loch ard gorge, flange -
 Flagstaff Hill Maritime Museum and Village
Flange
Ref LA 3 32 257 HISTORY OF THE LOCH ARD The LOCH ARD belonged to the famous Loch Line which sailed many ships from England to Australia. Built in Glasgow by Barclay, Curdle and Co. in 1873, the LOCH ARD was a three-masted square rigged iron sailing ship. The ship measured 262ft 7" (79.87m) in length, 38ft (11.58m) in width, 23ft (7m) in depth and had a gross tonnage of 1693 tons. The LOCH ARD's main mast measured a massive 150ft (45.7m) in height. LOCH ARD made three trips to Australia and one trip to Calcutta before its final voyage. LOCH ARD left England on March 2, 1878, under the command of Captain Gibbs, a newly married, 29 year old. She was bound for Melbourne with a crew of 37, plus 17 passengers and a load of cargo. The general cargo reflected the affluence of Melbourne at the time. On board were straw hats, umbrella, perfumes, clay pipes, pianos, clocks, confectionary, linen and candles, as well as a heavier load of railway irons, cement, lead and copper. There were items included that intended for display in the Melbourne International Exhibition in 1880. The voyage to Port Phillip was long but uneventful. At 3am on June 1, 1878, Captain Gibbs was expecting to see land and the passengers were becoming excited as they prepared to view their new homeland in the early morning. But LOCH ARD was running into a fog which greatly reduced visibility. Captain Gibbs was becoming anxious as there was no sign of land or the Cape Otway lighthouse. At 4am the fog lifted. A man aloft announced that he could see breakers. The sheer cliffs of Victoria's west coast came into view, and Captain Gibbs realised that the ship was much closer to them than expected. He ordered as much sail to be set as time would permit and then attempted to steer the vessel out to sea. On coming head on into the wind, the ship lost momentum, the sails fell limp and LOCH ARD's bow swung back. Gibbs then ordered the anchors to be released in an attempt to hold its position. The anchors sank some 50 fathoms - but did not hold. By this time LOCH ARD was among the breakers and the tall cliffs of Mutton Bird Island rose behind the ship. Just half a mile from the coast, the ship's bow was suddenly pulled around by the anchor. The captain tried to tack out to sea, but the ship struck a reef at the base of Mutton Bird Island, near Port Campbell. Waves broke over the ship and the top deck was loosened from the hull. The masts and rigging came crashing down knocking passengers and crew overboard. When a lifeboat was finally launched, it crashed into the side of LOCH ARD and capsized. Tom Pearce, who had launched the boat, managed to cling to its overturned hull and shelter beneath it. He drifted out to sea and then on the flood tide came into what is now known as LOCH ARD Gorge. He swam to shore, bruised and dazed, and found a cave in which to shelter. Some of the crew stayed below deck to shelter from the falling rigging but drowned when the ship slipped off the reef into deeper water. Eva Carmichael had raced onto deck to find out what was happening only to be confronted by towering cliffs looming above the stricken ship. In all the chaos, Captain Gibbs grabbed Eva and said, "If you are saved Eva, let my dear wife know that I died like a sailor". That was the last Eva Carmichael saw of the captain. She was swept off the ship by a huge wave. Eva saw Tom Pearce on a small rocky beach and yelled to attract his attention. He dived in and swam to the exhausted woman and dragged her to shore. He took her to the cave and broke open case of brandy which had washed up on the beach. He opened a bottle to revive the unconscious woman. A few hours later Tom scaled a cliff in search of help. He followed hoof prints and came by chance upon two men from nearby Glenample Station three and a half miles away. In a state of exhaustion, he told the men of the tragedy. Tom returned to the gorge while the two men rode back to the station to get help. By the time they reached LOCH ARD Gorge, it was cold and dark. The two shipwreck survivors were taken to Glenample Station to recover. Eva stayed at the station for six weeks before returning to Ireland, this time by steamship. In Melbourne, Tom Pearce received a hero's welcome. He was presented with the first gold medal of the Royal Humane Society of Victoria and a £1000 cheque from the Victorian Government. Concerts were performed to honour the young man's bravery and to raise money for those who lost family in the LOCH ARD disaster. Of the 54 crew members and passengers on board, only two survived: the apprentice, Tom Pearce and the young woman passenger, Eva Carmichael, who lost all of her family in the tragedy. Ten days after the LOCH ARD tragedy, salvage rights to the wreck were sold at auction for £2,120. Cargo valued at £3,000 was salvaged and placed on the beach, but most washed back into the sea when another storm developed. The wreck of LOCH ARD still lies at the base of Mutton Bird Island. Much of the cargo has now been salvaged and some was washed up into what is now known as LOCH ARD Gorge. Cargo and artefacts have also been illegally salvaged over many years before protective legislation was introduced. One of the most unlikely pieces of cargo to have survived the shipwreck was a Minton porcelain peacock - one of only nine in the world. The peacock was destined for the Melbourne International Exhibition in 1880. It had been well packed, which gave it adequate protection during the violent storm. Today, the Minton peacock can be seen at the Flagstaff Hill Maritime Museum in Warrnambool. From Australia's most dramatic shipwreck it has now become Australia's most valuable shipwreck artefact and is one of very few 'objects' on the Victorian State Heritage Register. Flagstaff Hill’s collection of artefacts from LOCH ARD is significant for being one of the largest collections of artefacts from this shipwreck in Victoria. It is significant for its association with the shipwreck, which is on the Victorian Heritage Register (VHR S417). The collection is significant because of the relationship between the objects, as together they have a high potential to interpret the story of the LOCH ARD. The LOCH ARD collection is archaeologically significant as the remains of a large international passenger and cargo ship. The LOCH ARD collection is historically significant for representing aspects of Victoria’s shipping history and its potential to interpret sub-theme 1.5 of Victoria’s Framework of Historical Themes (living with natural processes). The collection is also historically significant for its association with the LOCH ARD, which was one of the worst and best known shipwrecks in Victoria’s history. Small square brass Flange with four corner holes and one larger centre hole. Artefact Reg No LA/26. Recovered from the wreck of the Loch Ard.flagstaff hill, warrnambool, shipwrecked coast, flagstaff hill maritime museum, maritime museum, shipwreck coast, flagstaff hill maritime village, great ocean road, loch line, loch ard, captain gibbs, eva carmichael, tom pearce, glenample station, mutton bird island, loch ard gorge, flange -
 Flagstaff Hill Maritime Museum and Village
Flange
Ref LA 3 32 258 HISTORY OF THE LOCH ARD The LOCH ARD belonged to the famous Loch Line which sailed many ships from England to Australia. Built in Glasgow by Barclay, Curdle and Co. in 1873, the LOCH ARD was a three-masted square rigged iron sailing ship. The ship measured 262ft 7" (79.87m) in length, 38ft (11.58m) in width, 23ft (7m) in depth and had a gross tonnage of 1693 tons. The LOCH ARD's main mast measured a massive 150ft (45.7m) in height. LOCH ARD made three trips to Australia and one trip to Calcutta before its final voyage. LOCH ARD left England on March 2, 1878, under the command of Captain Gibbs, a newly married, 29 year old. She was bound for Melbourne with a crew of 37, plus 17 passengers and a load of cargo. The general cargo reflected the affluence of Melbourne at the time. On board were straw hats, umbrella, perfumes, clay pipes, pianos, clocks, confectionary, linen and candles, as well as a heavier load of railway irons, cement, lead and copper. There were items included that intended for display in the Melbourne International Exhibition in 1880. The voyage to Port Phillip was long but uneventful. At 3am on June 1, 1878, Captain Gibbs was expecting to see land and the passengers were becoming excited as they prepared to view their new homeland in the early morning. But LOCH ARD was running into a fog which greatly reduced visibility. Captain Gibbs was becoming anxious as there was no sign of land or the Cape Otway lighthouse. At 4am the fog lifted. A man aloft announced that he could see breakers. The sheer cliffs of Victoria's west coast came into view, and Captain Gibbs realised that the ship was much closer to them than expected. He ordered as much sail to be set as time would permit and then attempted to steer the vessel out to sea. On coming head on into the wind, the ship lost momentum, the sails fell limp and LOCH ARD's bow swung back. Gibbs then ordered the anchors to be released in an attempt to hold its position. The anchors sank some 50 fathoms - but did not hold. By this time LOCH ARD was among the breakers and the tall cliffs of Mutton Bird Island rose behind the ship. Just half a mile from the coast, the ship's bow was suddenly pulled around by the anchor. The captain tried to tack out to sea, but the ship struck a reef at the base of Mutton Bird Island, near Port Campbell. Waves broke over the ship and the top deck was loosened from the hull. The masts and rigging came crashing down knocking passengers and crew overboard. When a lifeboat was finally launched, it crashed into the side of LOCH ARD and capsized. Tom Pearce, who had launched the boat, managed to cling to its overturned hull and shelter beneath it. He drifted out to sea and then on the flood tide came into what is now known as LOCH ARD Gorge. He swam to shore, bruised and dazed, and found a cave in which to shelter. Some of the crew stayed below deck to shelter from the falling rigging but drowned when the ship slipped off the reef into deeper water. Eva Carmichael had raced onto deck to find out what was happening only to be confronted by towering cliffs looming above the stricken ship. In all the chaos, Captain Gibbs grabbed Eva and said, "If you are saved Eva, let my dear wife know that I died like a sailor". That was the last Eva Carmichael saw of the captain. She was swept off the ship by a huge wave. Eva saw Tom Pearce on a small rocky beach and yelled to attract his attention. He dived in and swam to the exhausted woman and dragged her to shore. He took her to the cave and broke open case of brandy which had washed up on the beach. He opened a bottle to revive the unconscious woman. A few hours later Tom scaled a cliff in search of help. He followed hoof prints and came by chance upon two men from nearby Glenample Station three and a half miles away. In a state of exhaustion, he told the men of the tragedy. Tom returned to the gorge while the two men rode back to the station to get help. By the time they reached LOCH ARD Gorge, it was cold and dark. The two shipwreck survivors were taken to Glenample Station to recover. Eva stayed at the station for six weeks before returning to Ireland, this time by steamship. In Melbourne, Tom Pearce received a hero's welcome. He was presented with the first gold medal of the Royal Humane Society of Victoria and a £1000 cheque from the Victorian Government. Concerts were performed to honour the young man's bravery and to raise money for those who lost family in the LOCH ARD disaster. Of the 54 crew members and passengers on board, only two survived: the apprentice, Tom Pearce and the young woman passenger, Eva Carmichael, who lost all of her family in the tragedy. Ten days after the LOCH ARD tragedy, salvage rights to the wreck were sold at auction for £2,120. Cargo valued at £3,000 was salvaged and placed on the beach, but most washed back into the sea when another storm developed. The wreck of LOCH ARD still lies at the base of Mutton Bird Island. Much of the cargo has now been salvaged and some was washed up into what is now known as LOCH ARD Gorge. Cargo and artefacts have also been illegally salvaged over many years before protective legislation was introduced. One of the most unlikely pieces of cargo to have survived the shipwreck was a Minton porcelain peacock - one of only nine in the world. The peacock was destined for the Melbourne International Exhibition in 1880. It had been well packed, which gave it adequate protection during the violent storm. Today, the Minton peacock can be seen at the Flagstaff Hill Maritime Museum in Warrnambool. From Australia's most dramatic shipwreck it has now become Australia's most valuable shipwreck artefact and is one of very few 'objects' on the Victorian State Heritage Register. Flagstaff Hill’s collection of artefacts from LOCH ARD is significant for being one of the largest collections of artefacts from this shipwreck in Victoria. It is significant for its association with the shipwreck, which is on the Victorian Heritage Register (VHR S417). The collection is significant because of the relationship between the objects, as together they have a high potential to interpret the story of the LOCH ARD. The LOCH ARD collection is archaeologically significant as the remains of a large international passenger and cargo ship. The LOCH ARD collection is historically significant for representing aspects of Victoria’s shipping history and its potential to interpret sub-theme 1.5 of Victoria’s Framework of Historical Themes (living with natural processes). The collection is also historically significant for its association with the LOCH ARD, which was one of the worst and best known shipwrecks in Victoria’s history. Small square brass Flange with four corner holes and one larger centre hole. Has slight bend one side. Artefact Reg No LA/27. Recovered from the wreck of the Loch Ard.flagstaff hill, warrnambool, shipwrecked coast, flagstaff hill maritime museum, maritime museum, shipwreck coast, flagstaff hill maritime village, great ocean road, loch line, loch ard, captain gibbs, eva carmichael, tom pearce, glenample station, mutton bird island, loch ard gorge, flange, brass flange -
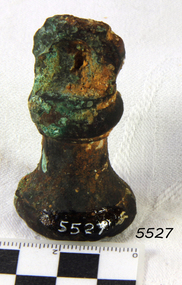 Flagstaff Hill Maritime Museum and Village
Functional object - Weight, 1878
History of the Loch Ard: The Loch Ard got its name from ”Loch Ard” a loch which lies to the west of Aberfoyle, and the east of Loch Lomond. It means "high lake" in Scottish Gaelic. The vessel belonged to the famous Loch Line which sailed many vessels from England to Australia. The Loch Ard was built in Glasgow by Barclay, Curdle and Co. in 1873, the vessel was a three-masted square-rigged iron sailing ship that measured 79.87 meters in length, 11.58 m in width, and 7 m in depth with a gross tonnage of 1693 tons with a mainmast that measured a massive 45.7 m in height. Loch Ard made three trips to Australia and one trip to Calcutta before its fateful voyage. Loch Ard left England on March 2, 1878, under the command of 29-year-old Captain Gibbs, who was newly married. The ship was bound for Melbourne with a crew of 37, plus 17 passengers. The general cargo reflected the affluence of Melbourne at the time. Onboard were straw hats, umbrella, perfumes, clay pipes, pianos, clocks, confectionery, linen and candles, as well as a heavier load of railway irons, cement, lead and copper. There were other items included that were intended for display in the Melbourne International Exhibition of 1880. The voyage to Port Phillip was long but uneventful. Then at 3 am on June 1, 1878, Captain Gibbs was expecting to see land. But the Loch Ard was running into a fog which greatly reduced visibility. Captain Gibbs was becoming anxious as there was no sign of land or the Cape Otway lighthouse. At 4 am the fog lifted and a lookout aloft announced that he could see breakers. The sheer cliffs of Victoria's west coast came into view, and Captain Gibbs realised that the ship was much closer to them than expected. He ordered as much sail to be set as time would permit and then attempted to steer the vessel out to sea. On coming head-on into the wind, the ship lost momentum, the sails fell limp and Loch Ard's bow swung back towards land. Gibbs then ordered the anchors to be released in an attempt to hold its position. The anchors sank some 50 fathoms - but did not hold. By this time the ship was among the breakers and the tall cliffs of Mutton Bird Island rose behind. Just half a mile from the coast, the ship's bow was suddenly pulled around by the anchor. The captain tried to tack out to sea, but the ship struck a reef at the base of Mutton Bird Island, near Port Campbell. Waves subsequently broke over the ship and the top deck became loosened from the hull. The masts and rigging came crashing down knocking passengers and crew overboard. When a lifeboat was finally launched, it crashed into the side of Loch Ard and capsized. Tom Pearce, who had launched the boat, managed to cling to its overturned hull and shelter beneath it. He drifted out to sea and then on the flood tide came into what is now known as Loch Ard Gorge. He swam to shore, bruised and dazed, and found a cave in which to shelter. Some of the crew stayed below deck to shelter from the falling rigging but drowned when the ship slipped off the reef into deeper water. Eva Carmichael a passenger had raced onto the deck to find out what was happening only to be confronted by towering cliffs looming above the stricken ship. In all the chaos, Captain Gibbs grabbed Eva and said, "If you are saved Eva, let my dear wife know that I died like a sailor". That was the last Eva Carmichael saw of the captain. She was swept off the ship by a huge wave. Eva saw Tom Pearce on a small rocky beach and yelled to attract his attention. He dived in and swam to the exhausted woman and dragged her to shore. He took her to the cave and broke the open case of brandy which had washed up on the beach. He opened a bottle to revive the unconscious woman. A few hours later Tom scaled a cliff in search of help. He followed hoof prints and came by chance upon two men from nearby Glenample Station three and a half miles away. In a complete state of exhaustion, he told the men of the tragedy. Tom then returned to the gorge while the two men rode back to the station to get help. By the time they reached Loch Ard Gorge, it was cold and dark. The two shipwreck survivors were taken to Glenample Station to recover. Eva stayed at the station for six weeks before returning to Ireland by steamship. In Melbourne, Tom Pearce received a hero's welcome. He was presented with the first gold medal of the Royal Humane Society of Victoria and a £1000 cheque from the Victorian Government. Concerts were performed to honour the young man's bravery and to raise money for those who lost family in the disaster. Of the 54 crew members and passengers on board, only two survived: the apprentice, Tom Pearce and the young woman passenger, Eva Carmichael, who lost her family in the tragedy. Ten days after the Loch Ard tragedy, salvage rights to the wreck were sold at auction for £2,120. Cargo valued at £3,000 was salvaged and placed on the beach, but most washed back into the sea when another storm developed. The wreck of Loch Ard still lies at the base of Mutton Bird Island. Much of the cargo has now been salvaged and some items were washed up into Loch Ard Gorge. Cargo and artefacts have also been illegally salvaged over many years before protective legislation was introduced in March 1982. One of the most unlikely pieces of cargo to have survived the shipwreck was a Minton majolica peacock- one of only nine in the world. The peacock was destined for the Melbourne 1880 International Exhibition in. It had been well packed, which gave it adequate protection during the violent storm. Today the Minton peacock can be seen at the Flagstaff Hill Maritime Museum in Warrnambool. From Australia's most dramatic shipwreck it has now become Australia's most valuable shipwreck artifact and is one of very few 'objects' on the Victorian State Heritage Register.The shipwreck of the Loch Ard is of significance for Victoria and is registered on the Victorian Heritage Register ( S 417). Flagstaff Hill has a varied collection of artefacts from Loch Ard and its collection is significant for being one of the largest accumulation of artefacts from this notable Victorian shipwreck. The collections object is to also give us a snapshot into history so we can interpret the story of this tragic event. The collection is also archaeologically significant as it represents aspects of Victoria's shipping history that allows us to interpret Victoria's social and historical themes of the time. The collections historically significance is that it is associated unfortunately with the worst and best-known shipwreck in Victoria's history. Small copper alloy weight shaped like a domed bell. Recovered from the wreck of the Loch Ardflagstaff hill, warrnambool, shipwrecked coast, flagstaff hill maritime museum, maritime museum, shipwreck coast, flagstaff hill maritime village, great ocean road, loch line, loch ard, captain gibbs, eva carmichael, tom pearce, glenample station, mutton bird island, loch ard gorge, copper alloy weight, weight, weights and measures, scale weight -
 Flagstaff Hill Maritime Museum and Village
Rubber Ball
Ref: LA (417) 4 49 276 HISTORY OF THE LOCH ARD The LOCH ARD belonged to the famous Loch Line which sailed many ships from England to Australia. Built in Glasgow by Barclay, Curdle and Co. in 1873, the LOCH ARD was a three-masted square rigged iron sailing ship. The ship measured 262ft 7" (79.87m) in length, 38ft (11.58m) in width, 23ft (7m) in depth and had a gross tonnage of 1693 tons. The LOCH ARD's main mast measured a massive 150ft (45.7m) in height. LOCH ARD made three trips to Australia and one trip to Calcutta before its final voyage. LOCH ARD left England on March 2, 1878, under the command of Captain Gibbs, a newly married, 29 year old. She was bound for Melbourne with a crew of 37, plus 17 passengers and a load of cargo. The general cargo reflected the affluence of Melbourne at the time. On board were straw hats, umbrella, perfumes, clay pipes, pianos, clocks, confectionary, linen and candles, as well as a heavier load of railway irons, cement, lead and copper. There were items included that intended for display in the Melbourne International Exhibition in 1880. The voyage to Port Phillip was long but uneventful. At 3am on June 1, 1878, Captain Gibbs was expecting to see land and the passengers were becoming excited as they prepared to view their new homeland in the early morning. But LOCH ARD was running into a fog which greatly reduced visibility. Captain Gibbs was becoming anxious as there was no sign of land or the Cape Otway lighthouse. At 4am the fog lifted. A man aloft announced that he could see breakers. The sheer cliffs of Victoria's west coast came into view, and Captain Gibbs realised that the ship was much closer to them than expected. He ordered as much sail to be set as time would permit and then attempted to steer the vessel out to sea. On coming head on into the wind, the ship lost momentum, the sails fell limp and LOCH ARD's bow swung back. Gibbs then ordered the anchors to be released in an attempt to hold its position. The anchors sank some 50 fathoms - but did not hold. By this time LOCH ARD was among the breakers and the tall cliffs of Mutton Bird Island rose behind the ship. Just half a mile from the coast, the ship's bow was suddenly pulled around by the anchor. The captain tried to tack out to sea, but the ship struck a reef at the base of Mutton Bird Island, near Port Campbell. Waves broke over the ship and the top deck was loosened from the hull. The masts and rigging came crashing down knocking passengers and crew overboard. When a lifeboat was finally launched, it crashed into the side of LOCH ARD and capsized. Tom Pearce, who had launched the boat, managed to cling to its overturned hull and shelter beneath it. He drifted out to sea and then on the flood tide came into what is now known as LOCH ARD Gorge. He swam to shore, bruised and dazed, and found a cave in which to shelter. Some of the crew stayed below deck to shelter from the falling rigging but drowned when the ship slipped off the reef into deeper water. Eva Carmichael had raced onto deck to find out what was happening only to be confronted by towering cliffs looming above the stricken ship. In all the chaos, Captain Gibbs grabbed Eva and said, "If you are saved Eva, let my dear wife know that I died like a sailor". That was the last Eva Carmichael saw of the captain. She was swept off the ship by a huge wave. Eva saw Tom Pearce on a small rocky beach and yelled to attract his attention. He dived in and swam to the exhausted woman and dragged her to shore. He took her to the cave and broke open case of brandy which had washed up on the beach. He opened a bottle to revive the unconscious woman. A few hours later Tom scaled a cliff in search of help. He followed hoof prints and came by chance upon two men from nearby Glenample Station three and a half miles away. In a state of exhaustion, he told the men of the tragedy. Tom returned to the gorge while the two men rode back to the station to get help. By the time they reached LOCH ARD Gorge, it was cold and dark. The two shipwreck survivors were taken to Glenample Station to recover. Eva stayed at the station for six weeks before returning to Ireland, this time by steamship. In Melbourne, Tom Pearce received a hero's welcome. He was presented with the first gold medal of the Royal Humane Society of Victoria and a £1000 cheque from the Victorian Government. Concerts were performed to honour the young man's bravery and to raise money for those who lost family in the LOCH ARD disaster. Of the 54 crew members and passengers on board, only two survived: the apprentice, Tom Pearce and the young woman passenger, Eva Carmichael, who lost all of her family in the tragedy. Ten days after the LOCH ARD tragedy, salvage rights to the wreck were sold at auction for £2,120. Cargo valued at £3,000 was salvaged and placed on the beach, but most washed back into the sea when another storm developed. The wreck of LOCH ARD still lies at the base of Mutton Bird Island. Much of the cargo has now been salvaged and some was washed up into what is now known as LOCH ARD Gorge. Cargo and artefacts have also been illegally salvaged over many years before protective legislation was introduced. One of the most unlikely pieces of cargo to have survived the shipwreck was a Minton porcelain peacock - one of only nine in the world. The peacock was destined for the Melbourne International Exhibition in 1880. It had been well packed, which gave it adequate protection during the violent storm. Today, the Minton peacock can be seen at the Flagstaff Hill Maritime Museum in Warrnambool. From Australia's most dramatic shipwreck it has now become Australia's most valuable shipwreck artefact and is one of very few 'objects' on the Victorian State Heritage Register. Flagstaff Hill’s collection of artefacts from LOCH ARD is significant for being one of the largest collections of artefacts from this shipwreck in Victoria. It is significant for its association with the shipwreck, which is on the Victorian Heritage Register (VHR S417). The collection is significant because of the relationship between the objects, as together they have a high potential to interpret the story of the LOCH ARD. The LOCH ARD collection is archaeologically significant as the remains of a large international passenger and cargo ship. The LOCH ARD collection is historically significant for representing aspects of Victoria’s shipping history and its potential to interpret sub-theme 1.5 of Victoria’s Framework of Historical Themes (living with natural processes). The collection is also historically significant for its association with the LOCH ARD, which was one of the worst and best known shipwrecks in Victoria’s history. Small hard, perished rubber ball with a seam visible. Recovered from the wreck of the Loch Ard. Artefact reg No LA/31.flagstaff hill, warrnambool, shipwrecked coast, flagstaff hill maritime museum, maritime museum, shipwreck coast, flagstaff hill maritime village, great ocean road, loch line, loch ard, captain gibbs, eva carmichael, tom pearce, glenample station, mutton bird island, loch ard gorge, rubber ball, ball -
 Flagstaff Hill Maritime Museum and Village
Bottle
Ref: LA 4 44 283 HISTORY OF THE LOCH ARD The LOCH ARD belonged to the famous Loch Line which sailed many ships from England to Australia. Built in Glasgow by Barclay, Curdle and Co. in 1873, the LOCH ARD was a three-masted square rigged iron sailing ship. The ship measured 262ft 7" (79.87m) in length, 38ft (11.58m) in width, 23ft (7m) in depth and had a gross tonnage of 1693 tons. The LOCH ARD's main mast measured a massive 150ft (45.7m) in height. LOCH ARD made three trips to Australia and one trip to Calcutta before its final voyage. LOCH ARD left England on March 2, 1878, under the command of Captain Gibbs, a newly married, 29 year old. She was bound for Melbourne with a crew of 37, plus 17 passengers and a load of cargo. The general cargo reflected the affluence of Melbourne at the time. On board were straw hats, umbrella, perfumes, clay pipes, pianos, clocks, confectionary, linen and candles, as well as a heavier load of railway irons, cement, lead and copper. There were items included that intended for display in the Melbourne International Exhibition in 1880. The voyage to Port Phillip was long but uneventful. At 3am on June 1, 1878, Captain Gibbs was expecting to see land and the passengers were becoming excited as they prepared to view their new homeland in the early morning. But LOCH ARD was running into a fog which greatly reduced visibility. Captain Gibbs was becoming anxious as there was no sign of land or the Cape Otway lighthouse. At 4am the fog lifted. A man aloft announced that he could see breakers. The sheer cliffs of Victoria's west coast came into view, and Captain Gibbs realised that the ship was much closer to them than expected. He ordered as much sail to be set as time would permit and then attempted to steer the vessel out to sea. On coming head on into the wind, the ship lost momentum, the sails fell limp and LOCH ARD's bow swung back. Gibbs then ordered the anchors to be released in an attempt to hold its position. The anchors sank some 50 fathoms - but did not hold. By this time LOCH ARD was among the breakers and the tall cliffs of Mutton Bird Island rose behind the ship. Just half a mile from the coast, the ship's bow was suddenly pulled around by the anchor. The captain tried to tack out to sea, but the ship struck a reef at the base of Mutton Bird Island, near Port Campbell. Waves broke over the ship and the top deck was loosened from the hull. The masts and rigging came crashing down knocking passengers and crew overboard. When a lifeboat was finally launched, it crashed into the side of LOCH ARD and capsized. Tom Pearce, who had launched the boat, managed to cling to its overturned hull and shelter beneath it. He drifted out to sea and then on the flood tide came into what is now known as LOCH ARD Gorge. He swam to shore, bruised and dazed, and found a cave in which to shelter. Some of the crew stayed below deck to shelter from the falling rigging but drowned when the ship slipped off the reef into deeper water. Eva Carmichael had raced onto deck to find out what was happening only to be confronted by towering cliffs looming above the stricken ship. In all the chaos, Captain Gibbs grabbed Eva and said, "If you are saved Eva, let my dear wife know that I died like a sailor". That was the last Eva Carmichael saw of the captain. She was swept off the ship by a huge wave. Eva saw Tom Pearce on a small rocky beach and yelled to attract his attention. He dived in and swam to the exhausted woman and dragged her to shore. He took her to the cave and broke open case of brandy which had washed up on the beach. He opened a bottle to revive the unconscious woman. A few hours later Tom scaled a cliff in search of help. He followed hoof prints and came by chance upon two men from nearby Glenample Station three and a half miles away. In a state of exhaustion, he told the men of the tragedy. Tom returned to the gorge while the two men rode back to the station to get help. By the time they reached LOCH ARD Gorge, it was cold and dark. The two shipwreck survivors were taken to Glenample Station to recover. Eva stayed at the station for six weeks before returning to Ireland, this time by steamship. In Melbourne, Tom Pearce received a hero's welcome. He was presented with the first gold medal of the Royal Humane Society of Victoria and a £1000 cheque from the Victorian Government. Concerts were performed to honour the young man's bravery and to raise money for those who lost family in the LOCH ARD disaster. Of the 54 crew members and passengers on board, only two survived: the apprentice, Tom Pearce and the young woman passenger, Eva Carmichael, who lost all of her family in the tragedy. Ten days after the LOCH ARD tragedy, salvage rights to the wreck were sold at auction for £2,120. Cargo valued at £3,000 was salvaged and placed on the beach, but most washed back into the sea when another storm developed. The wreck of LOCH ARD still lies at the base of Mutton Bird Island. Much of the cargo has now been salvaged and some was washed up into what is now known as LOCH ARD Gorge. Cargo and artefacts have also been illegally salvaged over many years before protective legislation was introduced. One of the most unlikely pieces of cargo to have survived the shipwreck was a Minton porcelain peacock - one of only nine in the world. The peacock was destined for the Melbourne International Exhibition in 1880. It had been well packed, which gave it adequate protection during the violent storm. Today, the Minton peacock can be seen at the Flagstaff Hill Maritime Museum in Warrnambool. From Australia's most dramatic shipwreck it has now become Australia's most valuable shipwreck artefact and is one of very few 'objects' on the Victorian State Heritage Register. Flagstaff Hill’s collection of artefacts from LOCH ARD is significant for being one of the largest collections of artefacts from this shipwreck in Victoria. It is significant for its association with the shipwreck, which is on the Victorian Heritage Register (VHR S417). The collection is significant because of the relationship between the objects, as together they have a high potential to interpret the story of the LOCH ARD. The LOCH ARD collection is archaeologically significant as the remains of a large international passenger and cargo ship. The LOCH ARD collection is historically significant for representing aspects of Victoria’s shipping history and its potential to interpret sub-theme 1.5 of Victoria’s Framework of Historical Themes (living with natural processes). The collection is also historically significant for its association with the LOCH ARD, which was one of the worst and best known shipwrecks in Victoria’s history. Glass bottle, light green, bottle is intact with slight chip on lip. Bottle has cork and some sand inside. Recovered from the wreck of the Loch Ard. Artefact Reg No LA/43.flagstaff hill, warrnambool, shipwrecked coast, flagstaff hill maritime museum, maritime museum, shipwreck coast, flagstaff hill maritime village, great ocean road, loch line, loch ard, captain gibbs, eva carmichael, tom pearce, glenample station, mutton bird island, loch ard gorge, bottle -
 Flagstaff Hill Maritime Museum and Village
Tap
Ref: LA 3 32 273 HISTORY OF THE LOCH ARD The LOCH ARD belonged to the famous Loch Line which sailed many ships from England to Australia. Built in Glasgow by Barclay, Curdle and Co. in 1873, the LOCH ARD was a three-masted square rigged iron sailing ship. The ship measured 262ft 7" (79.87m) in length, 38ft (11.58m) in width, 23ft (7m) in depth and had a gross tonnage of 1693 tons. The LOCH ARD's main mast measured a massive 150ft (45.7m) in height. LOCH ARD made three trips to Australia and one trip to Calcutta before its final voyage. LOCH ARD left England on March 2, 1878, under the command of Captain Gibbs, a newly married, 29 year old. She was bound for Melbourne with a crew of 37, plus 17 passengers and a load of cargo. The general cargo reflected the affluence of Melbourne at the time. On board were straw hats, umbrella, perfumes, clay pipes, pianos, clocks, confectionary, linen and candles, as well as a heavier load of railway irons, cement, lead and copper. There were items included that intended for display in the Melbourne International Exhibition in 1880. The voyage to Port Phillip was long but uneventful. At 3am on June 1, 1878, Captain Gibbs was expecting to see land and the passengers were becoming excited as they prepared to view their new homeland in the early morning. But LOCH ARD was running into a fog which greatly reduced visibility. Captain Gibbs was becoming anxious as there was no sign of land or the Cape Otway lighthouse. At 4am the fog lifted. A man aloft announced that he could see breakers. The sheer cliffs of Victoria's west coast came into view, and Captain Gibbs realised that the ship was much closer to them than expected. He ordered as much sail to be set as time would permit and then attempted to steer the vessel out to sea. On coming head on into the wind, the ship lost momentum, the sails fell limp and LOCH ARD's bow swung back. Gibbs then ordered the anchors to be released in an attempt to hold its position. The anchors sank some 50 fathoms - but did not hold. By this time LOCH ARD was among the breakers and the tall cliffs of Mutton Bird Island rose behind the ship. Just half a mile from the coast, the ship's bow was suddenly pulled around by the anchor. The captain tried to tack out to sea, but the ship struck a reef at the base of Mutton Bird Island, near Port Campbell. Waves broke over the ship and the top deck was loosened from the hull. The masts and rigging came crashing down knocking passengers and crew overboard. When a lifeboat was finally launched, it crashed into the side of LOCH ARD and capsized. Tom Pearce, who had launched the boat, managed to cling to its overturned hull and shelter beneath it. He drifted out to sea and then on the flood tide came into what is now known as LOCH ARD Gorge. He swam to shore, bruised and dazed, and found a cave in which to shelter. Some of the crew stayed below deck to shelter from the falling rigging but drowned when the ship slipped off the reef into deeper water. Eva Carmichael had raced onto deck to find out what was happening only to be confronted by towering cliffs looming above the stricken ship. In all the chaos, Captain Gibbs grabbed Eva and said, "If you are saved Eva, let my dear wife know that I died like a sailor". That was the last Eva Carmichael saw of the captain. She was swept off the ship by a huge wave. Eva saw Tom Pearce on a small rocky beach and yelled to attract his attention. He dived in and swam to the exhausted woman and dragged her to shore. He took her to the cave and broke open case of brandy which had washed up on the beach. He opened a bottle to revive the unconscious woman. A few hours later Tom scaled a cliff in search of help. He followed hoof prints and came by chance upon two men from nearby Glenample Station three and a half miles away. In a state of exhaustion, he told the men of the tragedy. Tom returned to the gorge while the two men rode back to the station to get help. By the time they reached LOCH ARD Gorge, it was cold and dark. The two shipwreck survivors were taken to Glenample Station to recover. Eva stayed at the station for six weeks before returning to Ireland, this time by steamship. In Melbourne, Tom Pearce received a hero's welcome. He was presented with the first gold medal of the Royal Humane Society of Victoria and a £1000 cheque from the Victorian Government. Concerts were performed to honour the young man's bravery and to raise money for those who lost family in the LOCH ARD disaster. Of the 54 crew members and passengers on board, only two survived: the apprentice, Tom Pearce and the young woman passenger, Eva Carmichael, who lost all of her family in the tragedy. Ten days after the LOCH ARD tragedy, salvage rights to the wreck were sold at auction for £2,120. Cargo valued at £3,000 was salvaged and placed on the beach, but most washed back into the sea when another storm developed. The wreck of LOCH ARD still lies at the base of Mutton Bird Island. Much of the cargo has now been salvaged and some was washed up into what is now known as LOCH ARD Gorge. Cargo and artefacts have also been illegally salvaged over many years before protective legislation was introduced. One of the most unlikely pieces of cargo to have survived the shipwreck was a Minton porcelain peacock - one of only nine in the world. The peacock was destined for the Melbourne International Exhibition in 1880. It had been well packed, which gave it adequate protection during the violent storm. Today, the Minton peacock can be seen at the Flagstaff Hill Maritime Museum in Warrnambool. From Australia's most dramatic shipwreck it has now become Australia's most valuable shipwreck artefact and is one of very few 'objects' on the Victorian State Heritage Register. Flagstaff Hill’s collection of artefacts from LOCH ARD is significant for being one of the largest collections of artefacts from this shipwreck in Victoria. It is significant for its association with the shipwreck, which is on the Victorian Heritage Register (VHR S417). The collection is significant because of the relationship between the objects, as together they have a high potential to interpret the story of the LOCH ARD. The LOCH ARD collection is archaeologically significant as the remains of a large international passenger and cargo ship. The LOCH ARD collection is historically significant for representing aspects of Victoria’s shipping history and its potential to interpret sub-theme 1.5 of Victoria’s Framework of Historical Themes (living with natural processes). The collection is also historically significant for its association with the LOCH ARD, which was one of the worst and best known shipwrecks in Victoria’s history. Brass tap. Bronze disease active and heavily concreted. Recovered from the wreck of the Loch Ard. Artefact Reg No LA/12. flagstaff hill, warrnambool, shipwrecked coast, flagstaff hill maritime museum, maritime museum, shipwreck coast, flagstaff hill maritime village, great ocean road, loch line, loch ard, captain gibbs, eva carmichael, tom pearce, glenample station, mutton bird island, loch ard gorge, tap