Showing 9451 items
matching 4th/19th
-
 Flagstaff Hill Maritime Museum and Village
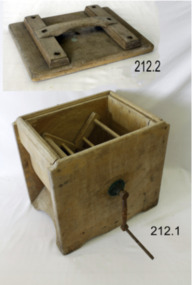
Domestic object - Butter Churn, Late 19th to early 20th century
A butter churn is a device used to convert cream into butter. This is done through a mechanical process, frequently via a pole inserted through the lid of the churn, or via a crank used to turn a rotating device inside the churn. The use of butter is mentioned in biblical works and the earliest butter churn vessels belonging to Beersheba culture in Israel were found in Bir Abu Matar going back to Chalcolithic period between 6500–5500 BC. The butter churn in Europe may have existed as early as the 6th century AD, In the European tradition, the butter churn was primarily a device used by women, and the churning of butter was an essential responsibility along with other household chores. In earlier traditions of butter making, nomadic cultures placed milk in skin bags and produced butter either by shaking the bag manually, or possibly by attaching the bag to a pack animal, and producing butter simply through the movement of the animal. An item used to make butter in a domestic situation by turning a handle until the cream inside has turned to butter.Butter churn, wooden, lid pieces screwed or nailed together. Brass bearing on side with iron turning handle.Handle marked 28204 no other marks to indicate manufacturer or date of productionflagstaff hill, warrnambool, shipwrecked coast, flagstaff hill maritime museum, flagstaff hill maritime village, great ocean road, churn, butter churn, wooden churn, butter making, food, dairy, kitchen utensil -
 Flagstaff Hill Maritime Museum and Village
Functional object - Weight, Jabez & John Whitehouse Phoenix Foundry, Mid 19th to early 20th century
This cast iron weight was made in England by Jabez and John Whitehouse ironfounders of Tipton and who founded the company in 1848. J. Whitehouse owned and operated the Phoenix Foundry, in Castle Street, Tipton, Staffordshire, England. The Whitehouse family at the Phoenix Foundry produced cast-iron goods including this weight from the mid 1800s until the early 1900s. John Whitehouse died in 1893.An item made by one of the many ironfounders that operated foundries in the West Midlands of England giving a snapshot into the history of making cast iron objects at a time before plastics and other modern materials when most utilitarian items were made of cast iron by ironfounders.Weight, metal, 14 pound or 1 stone weight with a lifting handle. Three round indentations underneath."Whitehouse" inscribed at one end, "14" at the other flagstaff hill, warrnambool, shipwrecked coast, flagstaff hill maritime museum, maritime museum, flagstaff hill maritime village, great ocean road, weight, stone weight, weights and measures, j & j whitehouse, phoenix foundry, tipton uk, cast iron weight -
 Flagstaff Hill Maritime Museum and Village
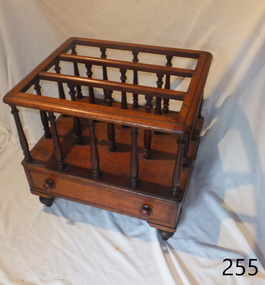
Functional object - Music stand, Early 19th Century before 1860
Thomas Sheraton (1751-1806) appears to have been the first to record the written term “Canterbury” music or magazine stand. In his Cabinet Dictionary of 1803 he refers to “a small music stand” with divisions for holding loose sheet or bound volumes of music. The music stand designed to hold sheet music came into fashion in the late 18th Century in England and was often crafted from mahogany, rosewood or walnut. They were seen as status symbols since music was practiced exclusively by the upper classes of society. In a period when printed music was more widely available and disseminated due to more affordable printing techniques, modern sheet music was very popular and therefore storage for such favoured tunes became a luxury and an opportunity for innovative design by cabinet makers. The Classical period of music, from about 1750 to 1820 and the Romantic Period from around 1815-1910 was the golden age of classical music. And it was at this time that The Canterbury often accompanied the piano in the parlour with styles ranging from Georgian simplicity to Victorian exuberance. Social activities of colonial Victoria would have included evening gatherings of family and friends around the piano to enjoy performances or sing along together with from old and up-to-date music sheets. The Canterbury would also be an elegant and practical place to also store newspapers, magazines, posters and drawings from overseas. The news from ‘home’ would be enjoyed by all. THE INSCRIPTION “Jack Morse” Morse. In 2010 Mr Jack Morse was recognised as one of the “people who have contributed to the long term development of Flagstaff Hill Maritime Village”. He was a member of the Flagstaff hill Planning board and a Current Life Member and had been awarded a Certificate of Service and the provision of an Annual Family Membership for life by Flagstaff Hill. The Morse’s family business, Morse’s Engineering, closed in 2010. It was considered “One of Warrnambool’s longest operating businesses with roots dating to 1883 with the design and manufacture of coaches and buggies, progressing to automotive repairs and later specialising in under-vehicle work” The Canterbury appears to have been handmade prior to 1860 as the dovetails are handmade and there are no saw marks on the drawer sides or back as well the sides. Also the back has small nicks indicating a hand plane or drawer knife was used rather than a saw blade to size the material. Additional indications are that the spindles are slightly different in size meaning they were handmade individually not mass produced. From these indicators the writer believes that the item was made before 1860 as machinery was only used after this date to produce furniture. As yet no individual maker can be attributed to this item, however it is a significant piece historically and is quite valuable if a known maker can be associated with the Canterbury. The item highlights a time in our social history when music played an everyday part in people’s lives as the only entertainment families could enjoy together in their own homes. A Canterbury music stand, having three compartments consisting of twenty turned spindles supporting the slat dividers. A drawer, with two turned wooden handles, is fitted below. The music stand has turnip style turned feet. The drawer front and carcass of the stand are veneered rosewood over a mahogany carcass. The underlined words "Jack Morse" are handwritten underneath the drawer bottom.Hand written inscription on underneath the drawer bottom "Jack Morse".flagstaff hill, warrnambool, shipwrecked-coast, flagstaff-hill, flagstaff-hill-maritime-museum, maritime-museum, shipwreck-coast, flagstaff-hill-maritime-village, canterbury, music rack, magazine rack, music stand, magazine stand, 19th century furniture, occasional furniture, frederick cornwallis, jack morse, morse’s undercar, music, thomas sheraton, regency furniture, music canterbury -
 Flagstaff Hill Maritime Museum and Village
Domestic object - Bowl, Late 19th or early 20th Century
The Process of Making Pottery Decorating, Firing, Glazing, Making, Technical There is a rhythm and flow to clay. It can’t be done all at once! Even the making process! It can take weeks to get everything done, especially if you can only work on your pottery once a week! Even though we have three hour classes, it’s often just not enough time! Here is an overview of some of the processes so you have a bit more grasp on some of the technical stuff! Step One – Design There are SO many ideas out there for making stuff in clay! From delicate porcelain jewellery, through to heavy sculptural work and everything in between. Deciding your direction is sometimes not that easy – when you first start, try everything, you will naturally gravitate to the style that you enjoy! The options and variations are endless and can get a wee bit overwhelming too! Check in with me before you start to ensure your ideas will work, what order you might do things, how you could achieve the look you are seeking and any other technical data required! Step Two – Making Clay is thixotropic. This means that as you work with it, the clay first gets sloppier and wetter, before is begins to dry in the atmosphere. For most things, you simply can’t do all parts of the project at once. An example of work order might look like: Get last weeks work out from the shelves Prepare clay for today’s work – roll your clay, prepare balls for throwing, make the first stage of a pinch pot) Clean up last week’s work and put it on the shelf for bisque firing Check that you have any glazing to do – and do enough of it that you will have time to finish your main project Do the next step of your next project – there might be a further step that can’t be complete immediately, in that case, wrap your work well and put onto the shelves. Letting your work rest for a while can really help keep your work clean and professional looking. Many things require bagging under plastic to keep it ready for work the next week – put your name on the outside of the bag so you can find your work easily. We have stickers and markers. Consider how you want to decorate your work – coloured slip can be applied at a fairly wet stage (remembering that it will make your work even wetter!). Trying to apply slip to dry clay won’t work! If you want to do sgraffito – you will need to keep the work leather hard (a state of dryness where you can still work the clay with a little effort and a little water and care). Step Three – Drying Most of the time your work can go into the rack uncovered to let it dry out for the following week. If you want to continue forming or shaping you will need to double bag your work – put your work on a suitable sized bat and put the bat in a bag so the base of the bag is under the bat, then put another bag over the top of the work and tuck the top of the bag under the bat. If you want to trim (or turn) your thrown work the following week, it should also be double bagged. If your work is large, delicate, or of uneven thicknesses, you should lightly cover your work for drying. When considering the drying process, bare in mind the weather, humidity and wind! The hotter and dryer, the faster things dry and work can dry unevenly in the shelves – this can lead to cracking – another time to lightly cover your work for drying. Step Four – Trimming and Cleaning Up Your work is dry! It is called greenware now and it is at it’s most fragile! Handle everything with two hands. I often refer to soft hands – keep everything gentle and with your fingers spread as much as possible. Try to not pick up things like plates too much, and always with both hands! Before your work can be bisque fired it should be “cleaned up”. You work won’t go into the kiln if it has sharp edges – when glazed, sharp edges turn into razor blades! Use a piece of fly wire to rub the work all over – this will scratch a little so be light handed. Use a knife or metal kidney to scrape any areas that require a bit more dynamic treatment than the fly wire offers! Finally, a very light wipe over with a slightly damp sponge can help soften and soothe all of your edges and dags! Trimming thrown work: If you are planning to trim (or turn) your thrown work (and you should be), make sure you bag it well – your work should be leather hard to almost dry for easiest trimming. Use this step to finish the work completely – use a metal kidney to polish the surface, or a slightly damp sponge to give a freshly thrown look. Wipe the sponge around the rim after trimming, and check the inside of the pot for dags! Trimming slip cast work: Usually I will trim the rims of your work on the wheel the following day to make that stage easier, however you will still need to check your work for lumps and bumps. Last but not least – check that your name is still clearly on the bottom of your work. Step Five – Bisque Firing When the work is completely dry it can go into the bisque kiln. The bisque kiln is fired to 1000°C. This process burns off the water in the clay as well as some of the chemically bound water. The structure of the clay is not altered that much at this temperature. Inside the bisque kiln, the work is stacked a little, small bowl inside a larger bowl and onto a heavy plate. Smaller items like decorations or drink coasters might get stacked several high. Consideration is paid to the weight of the stack and shape of the work. A bisque kiln can fire about one and a half times the amount of work that the glaze kiln can fire. The firing takes about 10 hours to complete the cycle and about two days to cool down. Once it has been emptied the work is placed in the glaze room ready for you to decorate! Step Six – Glazing Decorating your work with colour can be a lot of fun – and time consuming! There are three main options for surface treatment at this stage: Oxide Washes Underglazes Glazes Washes and underglazes do not “glaze” the work – It will still need a layer of glaze to fully seal the clay (washes don’t need glaze on surfaces not designed for food or liquid as they can gloss up a little on their own). Underglazes are stable colourants that turn out pretty much how they look in the jar. They can be mixed with each other to form other colours and can be used like water colours to paint onto your work. Mostly they should have a clear glaze on top to seal them. Oxides are a different species – the pink oxide (cobalt) wash turns out bright blue for instance. They don’t always need a glaze on top, and some glazes can change the colour of the wash! The glazes need no other “glaze” on top! Be careful of unknown glaze interactions – you can put any combination of glaze in a bowl or on a plate, but only a single glaze on the outside of any vertical surface! Glazes are a chemical reaction under heat. We don’t know the exact chemicals in the Mayco glazes we use. I can guess by the way they interact with each other, however, on the whole, you need to test every idea you have, and not run the test on a vertical surface! Simply put, glaze is a layer of glass like substance that bonds with the clay underneath. Clay is made of silica, alumina and water. Glaze is made of mostly silica. Silica has a melting point of 1700°C and we fire to 1240°C. The silica requires a “flux” to help it melt at the lower temperature. Fluxes can be all sorts of chemicals – a common one is calcium – calcium has a melting point of 2500°C, however, together they both melt at a much lower temperature! Colourants are metal oxides like cobalt (blue), chrome (green through black), copper (green, blue, even red!), manganese (black, purple and pink) iron (red brown), etc. Different chemicals in the glaze can have dramatic effects. for example, barium carbonate (which we don’t use) turns manganese bright pink! Other elements can turn manganese dioxide brown, blue, purple and reddish brown. Manganese dioxide is a flux in and of itself as well. So, glazes that get their black and purple colours, often interact with other glazes and RUN! Our mirror black is a good example – it mixes really well with many glazes because it fluxes them – causes them to melt faster. It will also bring out many beautiful colours in the glazes because it’s black colouring most definitely comes from manganese dioxide! Glaze chemistry is a whole subject on it’s own! We use commercial Mayco glazes on purpose – for their huge range of colour possibilities, stability, cool interactions, artistic freedom with the ability to easily brush the glazes on and ease of use. We currently have almost 50 glazes on hand! A major project is to test the interactions of all glazes with each other. That is 2,500 test tiles!!!! I’m going to make the wall behind the wheels the feature wall of pretty colours! Step Seven – Glaze (Gloss or sometimes called “Glost”) Firing Most of the time this is the final stage of making your creation (but not always!) The glaze kiln goes to 1240°C. This is called cone 6, or midrange. It is the low end of stoneware temperatures. Stoneware clays and glazes are typically fired at cone 8 – 10, that is 1260 – 1290°C. The energy requirement to go from 1240°C to 1280°C is almost a 30% more! Our clay is formulated to vitrify (mature, turn “glass-like”) at 1240°, as are our glazes. A glaze kiln take around 12 hours to reach temperature and two to three days to cool down. Sometimes a third firing process is required – this is for decoration that is added to work after the glaze firing. For example – adding precious metals and lustres. this firing temperature is usually around 600 – 800°C depending upon the techniques being used. There are many students interested in gold and silver trims – we will be doing this third type of firing soon! After firing your work will be in the student finished work shelves. Remember to pay for it before you head out the door! There is a small extra charge for using porcelain clay (it’s more than twice the price of regular clay), and for any third firing process! Once your work has been fired it can not turn back into clay for millennia – so don’t fire it if you don’t like it! Put it in the bucket for recycling. https://firebirdstudios.com.au/the-process-of-making-pottery/ The bowl is an example of kitchenware used in the 19th century and still in use today.Bowl white ceramic. Crack on side. Badly stained.Backstamp very faint and unable to be read.flagstaff hill, warrnambool, shipwrecked-coast, flagstaff-hill, flagstaff-hill-maritime-museum, maritime-museum, shipwreck-coast, flagstaff-hill-maritime-village, mixing bowl, food preparation, kitchen equipment, ceramic -
 Flagstaff Hill Maritime Museum and Village
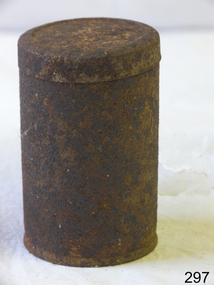
Container - Storage Tin, Late 19th or early 20th Century
The history of metal packaging began in Bohemia in the 1200s. Metal has been produced for a very long time. But the first metal used for packaging was tin. In particular, it was the process of tin plating that was invented in Bohemia. Before this no other metal was economically able to be used for packaging. Later, in 1667 Andrew Yarranton, and English engineer, and Ambrose Crowley brought the method to England. Here it was improved by ironmasters including Philip Foley. Then by 1697, John Hanbury had a rolling mill at Pontypool in South Wales. The method they developed involved rolling iron plates using cylinders. This process enabled more uniform blank plates to be produced than was possible by just hammering the tin.The use of tin to protect and store food and other items, revolutionised the world.Container metal cylindrical plain tin with separate lid. Join line on side of cylinder. Very rusty.None.flagstaff hill, warrnambool, shipwrecked-coast, flagstaff-hill, flagstaff-hill-maritime-museum, maritime-museum, shipwreck-coast, flagstaff-hill-maritime-village, tin plating, food containers -
 Flagstaff Hill Maritime Museum and Village
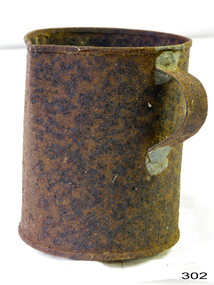
Container - Jug, Late 19th or early 20th Century
The history of metal packaging began in Bohemia in the 1200s. Metal has been produced for a very long time. But the first metal used for packaging was tin. In particular, it was the process of tin plating that was invented in Bohemia. Before this no other metal was economically able to be used for packaging. Later, in 1667 Andrew Yarranton, and English engineer, and Ambrose Crowley brought the method to England. Here it was improved by ironmasters including Philip Foley. Then by 1697, John Hanbury had a rolling mill at Pontypool in South Wales. The method they developed involved rolling iron plates using cylinders. This process enabled more uniform blank plates to be produced than was possible by just hammering the tin.The use of tin to protect and store food and other items, revolutionised the world.Rusty tin jug with small pouring lip and handle. Very plain and possibly made from a jam tin and handle soldered on side.None.flagstaff hill, warrnambool, shipwrecked-coast, flagstaff-hill, flagstaff-hill-maritime-museum, maritime-museum, shipwreck-coast, flagstaff-hill-maritime-village, tin plating, food containers -
 Flagstaff Hill Maritime Museum and Village
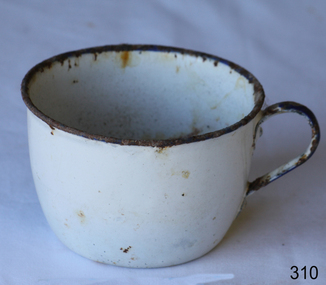
Domestic object - Cup/Mug, Late 19th or early 20th Century
Enamelware dates back to 1760 in Germany.People wanted a way of coating iron to stop metallic tastes or rust getting into food: something acid-resistant and easy to clean without laborious scouring, something more durable than the tin linings used inside copper. http://www.oldandinteresting.com/enamelware-history.aspxWhite enamel cup with dark blue ring around lip and handle. Slightly rusted. Rounded shape unlike a mug.None.flagstaff hill, warrnambool, shipwrecked-coast, flagstaff-hill, flagstaff-hill-maritime-museum, maritime-museum, shipwreck-coast, flagstaff-hill-maritime-village, tableware, enamel, cup, mug -
 Flagstaff Hill Maritime Museum and Village
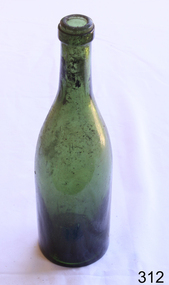
Container - Bottle, Late 19th century or early 20th century
Glass manufacturing has evolved over thousands of years. Glass making has been traced back to 3500 BC in Mesopotamia. The earliest known glass objects were beads, perhaps made by accident while working with metal. In the late Bronze Age, several civilizations discovered how to make vessels and glass bottles by wrapping threads of melted glass around cores of sand or clay. Later, moulds were used to form dishes and table wares. Around the 1st century BC, glassblowing was discovered. This made glass containers less expensive than pottery. Mould-blown glass, the process of blowing a piece of molten glass into a wooden or metal mould, was invented during the 1st century AD. This technique was faster with more consistent results. It paved the way for mass production. It wasn’t until the late 1800s that the production process to become more efficient. In 1887, a company in England created a semi-automatic process that could produce up to 200 bottles an hour. This process has been refined to the point where modern machines can yield more than 600 containers per minute. Blown vs. Manufactured Glass Bottles Nowadays, glass bottles, jars, and cups are usually manufactured on a bigger scale than is found in individual glassblowing studios. If we still depended on hand-blown glass for all of our glass containers, we would see some major differences in the process of creating bottles and jars. First, there's the time. Hand blowing glass takes a significant amount of time, even for one simple container. In contrast, hundreds of jars per minute can be made using modern technology. This leads to the second advantage: price. Because of the automated and streamlined process, the price for manufactured containers is much lower than that of hand-blown glass. Third, manufactured bottles will be much more consistently uniform than bottles blown by hand. Automated glass manufacturing produces nearly identical batches of jars. Glass blowing is awesome for unique, beautiful pieces of art. But for lots of lower priced and uniformly shaped containers, automatic manufacturing is the preferred method to create glass bottles and jars. https://www.containerandpackaging.com/resources/glass-bottles-brief-history The invention and development of glass for domestic items including bottles, has been nothing short of revolutionary. The use of glass bottles, that could be easily washed, led to improved hygiene, and mass manufacturing of drinks of all types, including milk, cordial and alcoholic beverages.Green Glass Bottle Possibly a ginger beer bottle.Concave indentation at the base. Also on base are two raised lumps. flagstaff hill, warrnambool, shipwrecked-coast, flagstaff-hill, flagstaff-hill-maritime-museum, maritime-museum, shipwreck-coast, flagstaff-hill-maritime-village, glass -
 Flagstaff Hill Maritime Museum and Village
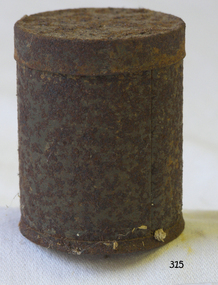
Container - Storage Tin, Late 19th or early 20th Century
The history of metal packaging began in Bohemia in the 1200s. Metal has been produced for a very long time. But the first metal used for packaging was tin. In particular, it was the process of tin plating that was invented in Bohemia. Before this no other metal was economically able to be used for packaging. Later, in 1667 Andrew Yarranton, and English engineer, and Ambrose Crowley brought the method to England. Here it was improved by ironmasters including Philip Foley. Then by 1697, John Hanbury had a rolling mill at Pontypool in South Wales. The method they developed involved rolling iron plates using cylinders. This process enabled more uniform blank plates to be produced than was possible by just hammering the tin.The use of tin to protect and store food and other items, revolutionised the world.Container metal cylindrical plain tin with separate lid. Join line on side of cylinder. Very rusty.None.flagstaff hill, warrnambool, shipwrecked-coast, flagstaff-hill, flagstaff-hill-maritime-museum, maritime-museum, shipwreck-coast, flagstaff-hill-maritime-village, tin plating, food containers -
 Flagstaff Hill Maritime Museum and Village
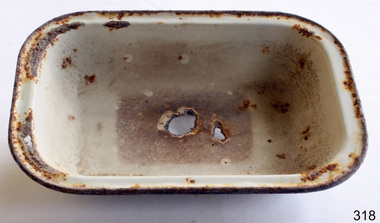
Domestic object - Dish, Late 19th or early 20th Century
Enamel cookware became very popular because people wanted a way of coating iron to stop metallic tastes or rust getting into food: something acid-resistant and easy to clean without laborious scouring, something more durable than the tin linings used inside copper. Enamelware dates back to 1760 in Germany.This object is significant as an example of an item in common use in the 19th and early 20th centuries.Oblong shaped enamel dish. The white enamel has been discoloured on the inside and much rust has occurred. The remains of a blue enamel line around rim.Two large rust holes in base, and a small rust hole near rim. None.flagstaff hill, warrnambool, shipwrecked-coast, flagstaff-hill, flagstaff-hill-maritime-museum, maritime-museum, shipwreck-coast, flagstaff-hill-maritime-village, enamel, kitchenware, baking -
 Flagstaff Hill Maritime Museum and Village
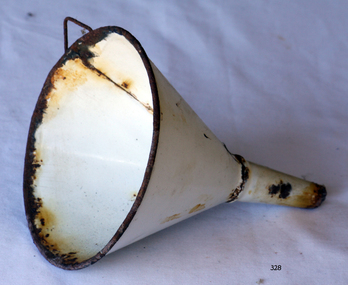
Domestic object - Funnel, Late 19th or early 20th Century
A funnel such as this is used to assist in pouring liquids into a narrow container such as a bottle or jar. An item like this could be commonly used in households for food preparation, cooking and soap making. It could also be used for pouring fuel, and medicinal purposes. Enamelware dates back to 1760 in Germany.This object is significant as an example of a type of item in common use in the 19th Century and that is still in use today.Funnel, white enamel with dark rusty metal rim. It has a triangular shaped hook on the top lip for hanging. The metal has been joined down one side.None.flagstaff hill, flagstaff hill maritime museum and village, warrnambool, maritime museum, maritime village, great ocean road, shipwreck coast, funnel, food preparation, beverage, laundry, fuel, food preservation, medicinal preparation, decanting, pouring -
 Flagstaff Hill Maritime Museum and Village
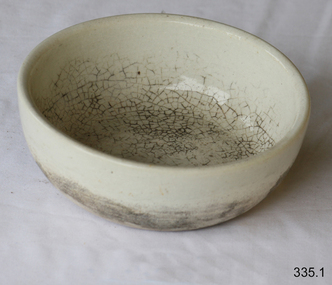
Container - Bowl, Late 19th or early 20th Century
Human beings appear to have been making their own ceramics for at least 26,000 years, subjecting clay and silica to intense heat to fuse and form ceramic materials. The earliest found so far were in southern central Europe and were sculpted figures, not dishes. The earliest known pottery was made by mixing animal products with clay and baked in kilns at up to 800°C. While actual pottery fragments have been found up to 19,000 years old, it was not until about ten thousand years later that regular pottery became common. An early people that spread across much of Europe is named after its use of pottery, the Corded Ware culture. These early Indo-European peoples decorated their pottery by wrapping it with rope, while still wet. When the ceramics were fired, the rope burned off but left a decorative pattern of complex grooves on the surface. The invention of the wheel eventually led to the production of smoother, more even pottery using the wheel-forming technique, like the pottery wheel. Early ceramics were porous, absorbing water easily. It became useful for more items with the discovery of glazing techniques, coating pottery with silicon, bone ash, or other materials that could melt and reform into a glassy surface, making a vessel less pervious to water. https://en.wikipedia.org/wiki/CeramicThe discovery and development of ceramics in numerous shapes, form and materials, revolutionised the world.Plain cream ceramic bowl with flat bottom inside. Shiny glaze fades to flat texture towards base. Possibly hand thrown pottery. No backstamp. Bad crazing and staining.None.flagstaff hill, warrnambool, shipwrecked-coast, flagstaff-hill, flagstaff-hill-maritime-museum, maritime-museum, shipwreck-coast, flagstaff-hill-maritime-village, ceramics -
 Flagstaff Hill Maritime Museum and Village
Domestic object - Bowl, J & G Meakin, Late 19th or early 20th Century
The Process of Making Pottery Decorating, Firing, Glazing, Making, Technical There is a rhythm and flow to clay. It can’t be done all at once! Even the making process! It can take weeks to get everything done, especially if you can only work on your pottery once a week! Even though we have three hour classes, it’s often just not enough time! Here is an overview of some of the processes so you have a bit more grasp on some of the technical stuff! Step One – Design There are SO many ideas out there for making stuff in clay! From delicate porcelain jewellery, through to heavy sculptural work and everything in between. Deciding your direction is sometimes not that easy – when you first start, try everything, you will naturally gravitate to the style that you enjoy! The options and variations are endless and can get a wee bit overwhelming too! Check in with me before you start to ensure your ideas will work, what order you might do things, how you could achieve the look you are seeking and any other technical data required! Step Two – Making Clay is thixotropic. This means that as you work with it, the clay first gets sloppier and wetter, before is begins to dry in the atmosphere. For most things, you simply can’t do all parts of the project at once. An example of work order might look like: Get last weeks work out from the shelves Prepare clay for today’s work – roll your clay, prepare balls for throwing, make the first stage of a pinch pot) Clean up last week’s work and put it on the shelf for bisque firing Check that you have any glazing to do – and do enough of it that you will have time to finish your main project Do the next step of your next project – there might be a further step that can’t be complete immediately, in that case, wrap your work well and put onto the shelves. Letting your work rest for a while can really help keep your work clean and professional looking. Many things require bagging under plastic to keep it ready for work the next week – put your name on the outside of the bag so you can find your work easily. We have stickers and markers. Consider how you want to decorate your work – coloured slip can be applied at a fairly wet stage (remembering that it will make your work even wetter!). Trying to apply slip to dry clay won’t work! If you want to do sgraffito – you will need to keep the work leather hard (a state of dryness where you can still work the clay with a little effort and a little water and care). Step Three – Drying Most of the time your work can go into the rack uncovered to let it dry out for the following week. If you want to continue forming or shaping you will need to double bag your work – put your work on a suitable sized bat and put the bat in a bag so the base of the bag is under the bat, then put another bag over the top of the work and tuck the top of the bag under the bat. If you want to trim (or turn) your thrown work the following week, it should also be double bagged. If your work is large, delicate, or of uneven thicknesses, you should lightly cover your work for drying. When considering the drying process, bare in mind the weather, humidity and wind! The hotter and dryer, the faster things dry and work can dry unevenly in the shelves – this can lead to cracking – another time to lightly cover your work for drying. Step Four – Trimming and Cleaning Up Your work is dry! It is called greenware now and it is at it’s most fragile! Handle everything with two hands. I often refer to soft hands – keep everything gentle and with your fingers spread as much as possible. Try to not pick up things like plates too much, and always with both hands! Before your work can be bisque fired it should be “cleaned up”. You work won’t go into the kiln if it has sharp edges – when glazed, sharp edges turn into razor blades! Use a piece of fly wire to rub the work all over – this will scratch a little so be light handed. Use a knife or metal kidney to scrape any areas that require a bit more dynamic treatment than the fly wire offers! Finally, a very light wipe over with a slightly damp sponge can help soften and soothe all of your edges and dags! Trimming thrown work: If you are planning to trim (or turn) your thrown work (and you should be), make sure you bag it well – your work should be leather hard to almost dry for easiest trimming. Use this step to finish the work completely – use a metal kidney to polish the surface, or a slightly damp sponge to give a freshly thrown look. Wipe the sponge around the rim after trimming, and check the inside of the pot for dags! Trimming slip cast work: Usually I will trim the rims of your work on the wheel the following day to make that stage easier, however you will still need to check your work for lumps and bumps. Last but not least – check that your name is still clearly on the bottom of your work. Step Five – Bisque Firing When the work is completely dry it can go into the bisque kiln. The bisque kiln is fired to 1000°C. This process burns off the water in the clay as well as some of the chemically bound water. The structure of the clay is not altered that much at this temperature. Inside the bisque kiln, the work is stacked a little, small bowl inside a larger bowl and onto a heavy plate. Smaller items like decorations or drink coasters might get stacked several high. Consideration is paid to the weight of the stack and shape of the work. A bisque kiln can fire about one and a half times the amount of work that the glaze kiln can fire. The firing takes about 10 hours to complete the cycle and about two days to cool down. Once it has been emptied the work is placed in the glaze room ready for you to decorate! Step Six – Glazing Decorating your work with colour can be a lot of fun – and time consuming! There are three main options for surface treatment at this stage: Oxide Washes Underglazes Glazes Washes and underglazes do not “glaze” the work – It will still need a layer of glaze to fully seal the clay (washes don’t need glaze on surfaces not designed for food or liquid as they can gloss up a little on their own). Underglazes are stable colourants that turn out pretty much how they look in the jar. They can be mixed with each other to form other colours and can be used like water colours to paint onto your work. Mostly they should have a clear glaze on top to seal them. Oxides are a different species – the pink oxide (cobalt) wash turns out bright blue for instance. They don’t always need a glaze on top, and some glazes can change the colour of the wash! The glazes need no other “glaze” on top! Be careful of unknown glaze interactions – you can put any combination of glaze in a bowl or on a plate, but only a single glaze on the outside of any vertical surface! Glazes are a chemical reaction under heat. We don’t know the exact chemicals in the Mayco glazes we use. I can guess by the way they interact with each other, however, on the whole, you need to test every idea you have, and not run the test on a vertical surface! Simply put, glaze is a layer of glass like substance that bonds with the clay underneath. Clay is made of silica, alumina and water. Glaze is made of mostly silica. Silica has a melting point of 1700°C and we fire to 1240°C. The silica requires a “flux” to help it melt at the lower temperature. Fluxes can be all sorts of chemicals – a common one is calcium – calcium has a melting point of 2500°C, however, together they both melt at a much lower temperature! Colourants are metal oxides like cobalt (blue), chrome (green through black), copper (green, blue, even red!), manganese (black, purple and pink) iron (red brown), etc. Different chemicals in the glaze can have dramatic effects. for example, barium carbonate (which we don’t use) turns manganese bright pink! Other elements can turn manganese dioxide brown, blue, purple and reddish brown. Manganese dioxide is a flux in and of itself as well. So, glazes that get their black and purple colours, often interact with other glazes and RUN! Our mirror black is a good example – it mixes really well with many glazes because it fluxes them – causes them to melt faster. It will also bring out many beautiful colours in the glazes because it’s black colouring most definitely comes from manganese dioxide! Glaze chemistry is a whole subject on it’s own! We use commercial Mayco glazes on purpose – for their huge range of colour possibilities, stability, cool interactions, artistic freedom with the ability to easily brush the glazes on and ease of use. We currently have almost 50 glazes on hand! A major project is to test the interactions of all glazes with each other. That is 2,500 test tiles!!!! I’m going to make the wall behind the wheels the feature wall of pretty colours! Step Seven – Glaze (Gloss or sometimes called “Glost”) Firing Most of the time this is the final stage of making your creation (but not always!) The glaze kiln goes to 1240°C. This is called cone 6, or midrange. It is the low end of stoneware temperatures. Stoneware clays and glazes are typically fired at cone 8 – 10, that is 1260 – 1290°C. The energy requirement to go from 1240°C to 1280°C is almost a 30% more! Our clay is formulated to vitrify (mature, turn “glass-like”) at 1240°, as are our glazes. A glaze kiln take around 12 hours to reach temperature and two to three days to cool down. Sometimes a third firing process is required – this is for decoration that is added to work after the glaze firing. For example – adding precious metals and lustres. this firing temperature is usually around 600 – 800°C depending upon the techniques being used. There are many students interested in gold and silver trims – we will be doing this third type of firing soon! After firing your work will be in the student finished work shelves. Remember to pay for it before you head out the door! There is a small extra charge for using porcelain clay (it’s more than twice the price of regular clay), and for any third firing process! Once your work has been fired it can not turn back into clay for millennia – so don’t fire it if you don’t like it! Put it in the bucket for recycling. https://firebirdstudios.com.au/the-process-of-making-pottery/This bowl was made by renowned pottery company J & G Meakin of England. The firm was established in the mid-1800's. The bowl is an example of kitchenware used in the 19th century and still in use today.Bowl; white ceramic, round and tapering inwards towards base. Made by J and G Meakin England.On base, 'Ironstone China Reg SOL 391413' with symbolflagstaff hill, flagstaff hill maritime museum and village, warrnambool, maritime museum, maritime village, great ocean road, shipwreck coast, mixing bowl, food preparation, j & g meakin, pottery, stoke-on-trent, kitchen equipment, ceramic -
 Flagstaff Hill Maritime Museum and Village
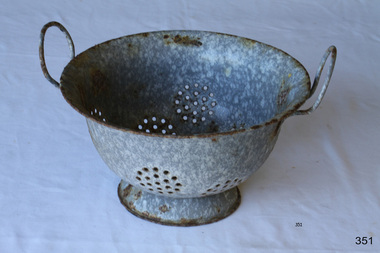
Domestic object - Colander, Late 19th or early 20th Century
The colander is an extremely useful tool in the kitchen, as it allows food to be fully drained of liquids such as water or oil. Enamelware dates back to 1760 in Germany.This object is significant as an example of a type of item in common use in the 19th Century and that is still in use today.Mottled blue enamel colander with draining holes in the base and sides. Two thin handles on lip of bowl.None.flagstaff hill, warrnambool, shipwrecked-coast, flagstaff-hill, flagstaff-hill-maritime-museum, maritime-museum, shipwreck-coast, flagstaff-hill-maritime-village, enamel, colander, food preparation -
 Flagstaff Hill Maritime Museum and Village
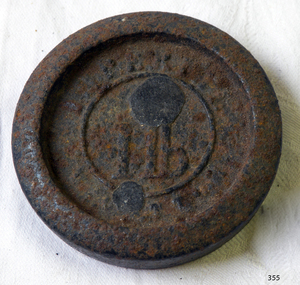
Decorative object - Weight, 19th to mid-20th centuries
W3ights such as this one were used to measure goods sold or purchased. They were used in Australia in homes and stores, and government organisations, until the mid 1960s when the Nation converted to metric measures. Weight; one pound imperial measure with inscription around perimete."1 lb" (Other marks are Indecipherable)flagstaff hill, warrnambool, shipwrecked-coast, flagstaff-hill, flagstaff-hill-maritime-museum, maritime-museum, shipwreck-coast, flagstaff-hill-maritime-village, weight, pound, pound weight, weights and measures, measurement, scale, imperial measure -
 Flagstaff Hill Maritime Museum and Village
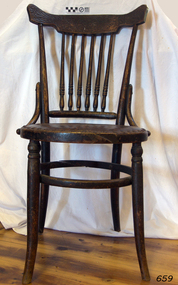
Chair, late 19th - early 20th C
Chair, bentwood, wooden, dark stain, curved backrest with carved leaf pattern, 6 turned spindles. Fabric padded seat attached with studs, upholstery webbing is visible underneath. Bentwood legs have bracing ring, front legs have truned rings on top. Mark; pressed into wood under seat.Mark pressed into wood "15"flagstaff hill, warrnambool, shipwrecked-coast, flagstaff-hill, flagstaff-hill-maritime-museum, maritime-museum, shipwreck-coast, flagstaff-hill-maritime-village, bentwood chair, dining chair, cafe or bistro chair -
 Flagstaff Hill Maritime Museum and Village
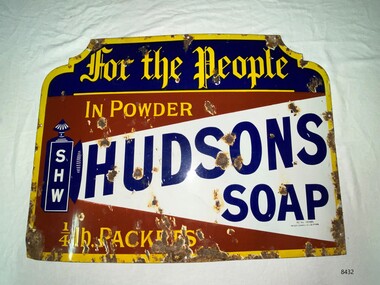
Sign - Hudson's Soap Enamel Advertising Sign, Patent Enamel Co Ltd, c. late 19th century- early 20th century
Hudson's Soap Powder, was the first satisfactory and commercially successful soap powder and was made in Liverpool by Robert Spear Hudson. He was also an innovator in using advertising, commissioning striking images from professional artists and paid for publicity , something which few other businesses did, and as such Hudson's soap became a household name. Horse, steam and electric tramcars, print periodicals and chemist shops carried his advertisements. This sign was manufactured by Patent Enamel Co Ltd was a company built in 1889 at Selly Oak, Borough of Birmingham, West Midlands, England, United Kingdom. The business was the first factory specifically devoted to enameled iron sign making. It had twelve furnaces for fusing the enamel, two scaling furnaces, and a large printing room, plus a huge area for steampipe drying. The company also smelted its own enamels and colour oxides. It is believed that the factory was decommissioned and demolished in the 1960's.the first factory specifically devoted to enameled iron sign making. It had twelve furnaces for fusing the enamel, two scaling furnaces, and a large printing room, plus a huge area for steampipe drying. The company also smelted its own enamels and colour oxides.The factory was decommissioned and demolished in the 1960s.The signage demonstrates the increasing demand for domestic soap products and new forms of advertising. The soap business was apart of the flourishing export trade between Australia and Britain during the height of the British Empire.Enamel advertising sign for Hudson's soapflagstaff hill, warrnambool, maritime museum, hudson's soap, advertising signage, patent enamel co ltd, selly oak, borough of birmingham, robert spear hudson -
 Flagstaff Hill Maritime Museum and Village
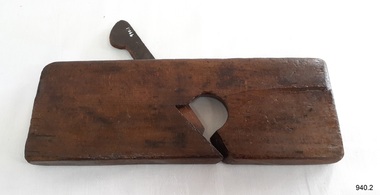
Tool - Rabbet Plane, Mathieson and Son, Late 19th to early 20th Century
In 1792 John Manners had set up a workshop making woodworking planes at 14 Saracens Lane Glasgow. He also had employed an apprentice Alexander Mathieson (1773-1851). But in the following year at Saracen's Lane, the 1841 census describes Alexander Mathieson as a master plane-maker now at 38 Saracen Lane with his son Thomas Adam working with him as a journeyman plane-maker. Presumably, Alexander must have taken over the premises and business of John Manners. Now that the business had Thomas Adam Mathieson working with his father it gradually grew and became more diversified, and it is recorded at the time by the Post-Office Glasgow Annual Directory that by 1847-1848 Alexander Mathieson was a “plane, brace, bit, auger & edge tool maker” In 1849 the firm of James & William Stewart at 65 Nicolson Street, Edinburgh was taken over and Thomas was put in charge of the business, trading under the name Thomas A. Mathieson & Co. as plane and edge-tool makers. Thomas's company went on to acquire the Edinburgh edge-tool makers “Charles & Hugh McPherson” and took over their premises in Gilmore Street. In the Edinburgh directory of 1856/7, the business is recorded as being Alexander Mathieson & Son, plane and edge-tool makers at 48 Nicolson Street and Paul's Work, Gilmore Street Edinburgh. The 1851 census Alexander is recorded as working as a tool and plane-maker employing eight men. Later that year Alexander died and his son Thomas took over the business. Under the heading of an edge-tool maker in the 1852/3 Post-Office Glasgow Annual Directory the firm is now listed as Alexander Mathieson & Son, with further entries as "turning-lathe and vice manufacturers". By the early 1850s, the business had moved to 24 Saracen Lane. The directory for 1857/8 records that the firm had moved again only a few years later to East Campbell Street, off the Gallowgate area, and that through further diversification was also manufacturing coopers' and tinmen's tools. The ten-yearly censuses report the firm's growth in 1861 stating that Thomas was a tool manufacturer employing 95 men and 30 boys; in 1871 he had 200 men working for him and in 1881 300 men. By 1899 the firm had been incorporated as Alexander Mathieson & Sons Ltd, even though only Alexander's son Thomas appears ever to have joined the firm so the company was still in his fathers' name. In September 1868 Thomas Mathieson put a notice in the newspapers of the Sheffield & Rotherham Independent and the Sheffield Daily Telegraph stating that his firm had used the trade-mark of a crescent and star "for some time" and that "using or imitating the Mark would be proceeded against for infringement". The firm had acquired its interest in the crescent-and-star mark from the heirs of Charles Pickslay, the Sheffield cutler who had registered it with the Cutlers' Company in 1833 and had died in 1852. The year 1868 seems also to be the one in which the name Saracen Tool Works was first adopted; not only does it figure at the foot of the notice in the Sheffield press, it also makes its first appearance in the firm's entry in the Post-Office Glasgow Annual Directory in the 1868/9 edition. As Thomas Mathieson's business grew, so too did his involvement in local public life and philanthropy. One of the representatives of the third ward on the town council of Glasgow, he became a river bailie in 1868, a magistrate in 1870 and a preceptor of Hutcheson's Hospital in 1878. He had a passion for books and was an "ardent Ruskinian". He served on the committee handling the bequest for the setting up of the Mitchell Library in Glasgow. When he died at Coulter Maynes near Biggar in 1899, he left an estate worth £142,764. Company's later years: Both Thomas's sons, James Harper and Thomas Ogilvie were involved in the continuing life of the firm. James followed in his father's footsteps in becoming a local public figure. He was appointed Deputy Lieutenant of the County of the City of Glasgow and was made a deacon of the Incorporation of the Hammermen of Glasgow in 1919. His brother Thomas Ogilvie was recorded as tool manufacturer and employer in the 1911 census. Thomas Ogilvie's son Thomas Alastair Sutherland Ogilvie Mathieson was born in 1908 took a rather different approach to engineering, however, by becoming a racing driver. In 1947 he wed the French film actress Mila Parély. The firm had won many awards at world fairs for their goods. At the Great Exhibition, London, 1851. Prize medal for joiners' tools in the class of Cutlery & Edge Tools, Great London Exposition, 1862. Prize medal honoris causa. International Exhibition, Melbourne, 1880. Gold medal International Exhibition of Industry, Science and Art, Edinburgh, 1886. Prize medalThe firm of Alexander Mathieson & Son was one of the leading makers of hand tools in Scotland. Its success went hand in hand with the growth of the shipbuilding industries on the Firth of Clyde in the nineteenth century and the emergence of Glasgow as the "second city of the Empire". It also reflected the firm's skill in responding to an unprecedented demand for quality tools by shipyards, cooperages and other industries, both locally and far and wide.Rabbet plane with a flat base. The blade wedge is inserted but without a blade. Made by A Mathieson and Son.Inscription "Alex Mathieson and Son" no longer visibleflagstaff hill, warrnambool, flagstaff-hill, flagstaff-hill-maritime-museum, maritime-museum, shipwreck-coast, flagstaff-hill-maritime-village, cabinet makers tools, carpenders tools, wood planes, rabbeting plane, window making, tools, wood working, hand tool -
 Flagstaff Hill Maritime Museum and Village
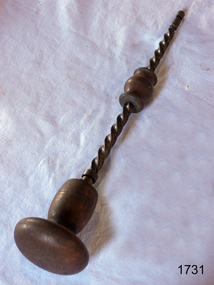
Tool - Archimedean drill, Late 19th Century
The Archimedes drill, also known as a fretwork drill, is an old type of drill which works on the Archimedian principle; the drill rotates quickly as the barrel on the stem is worked up and down. This tool provides a quick and easy way to bore holes through ordinary fret wood and other substances, smaller versions are used in jewellery making where precision drilling is required. There were numerous different sized Archimedes drills made from various materials, usually a combination of wood and steel, some being all steel and some including brass parts. The fancier versions of these drills included parts made from Rosewood, Ebony, Ivory and decorative brass parts. Some of the later Archimedes drills had technological improvements such as a ratchet device and the inclusion of fly-weights. The ratchet device allows the drill to revolve continuously in the cutting direction. The fly-weights give momentum to maintain the speed of the drill during the upward stroke of the hand. Most old examples such as the subject item have no makers names.A vintage drilling tool that gives a snapshot into how holes were drilled by hand into small or delicate objects during the Victorian era. Tools from this time are today regarded as collectable items eagerly sought by collectors of antique tools. Archimedean drill with Rosewood hand, brass bearings, steel twist and wooden grip. Noneflagstaff hill, warrnambool, flagstaff-hill, flagstaff-hill-maritime-museum, maritime-museum, shipwreck-coast, flagstaff-hill-maritime-village, archimedean drill, archimedean drill with wooden hand, drilling tool -
 Flagstaff Hill Maritime Museum and Village
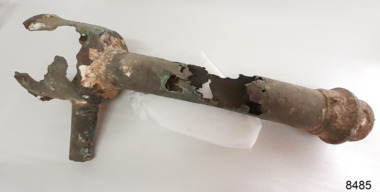
Functional object - Plumbing Fitting, Late 19th to early 20th century
The plumbing fitting has been recovered from the sea, as shown by the encrustations on its surface. The source of the fitting is unknown but i is likely to have been part of the fittings of a shipwreck, probably a urinal.The plumbing fitting is an example of a fitting from a ship, late 19th to early 20th century.Plumbing fitting, metal, from an unknown shipwreck. Top of fitting is bowl-shaped with a narrow inlet pipe. Wide pipe attaches to the centre of the bowl and to a threaded fitting at its base. There is a bar across the inside of the threaded fitting and a bolt joined to the bar's centre.flagstaff hill maritime museum and village, shipwreck artefact, great ocean road, flagstaff maritime museum, plumbing, ship's plumbing, urinal -
 Flagstaff Hill Maritime Museum and Village
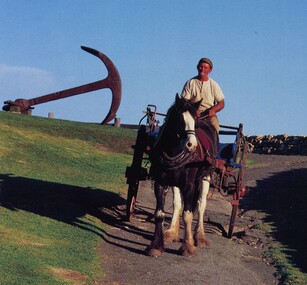
Vehicle - Spring Cart, Late 19th to early 20th centuries
A spring cart is a two-wheeled, one-horse cart, often with the driver standing up to drive it, and otherwise seated on a simple seat. Carts like this one had springs to make the ride smoother. It is a lighter version of a farm dray and is sometimes called a spring dray. Spring carts were often used on farms for carrying loads. In the towns, some businesses used a spring cart for deliveries of bread, milk and other goods. The carts would be used for travel and for families going on outings and picnics. Visitors to Flagstaff Hill Maritime Village from 1986 to 1992 would enjoy watching a Clydesdale horse named Duke as he worked around the village with his driver Pat McGowan. He would be hitched to a wagon or to this lightweight spring cart or sometimes he would pull the wagon with the cart attached as a trailer. The cart was used for maintenance, carting loads of timber or stone around the site or from town to Flagstaff Hill. Sometimes Duke and the cart would take visitors for cart rides around the Village. Pat McGowan was known for his restoration of horse-drawn vehicles including this spring cart. He already had 40 years of horse handling experience when he began looking after Duke, feeding and harnessing him and driving the horse and cart around the Village. Pat’s dog ‘Yabbie’ would often join them. In August 1992 Duke had to be put down. Warrnambool Veterinary Clinic and other fund-raisers began well-supported appeals and the beloved horse was replaced by a Clydesdale also named Duke (the second), who began work in late October 1992. He, like his predecessor, had a quiet temperament and was comfortable in the traffic. The spring card is an example of vehicles used on farms, for business delivery and for domestic transport in the late-19th and early-20th century. This cart is of note for being associated with the Clydesdale horse Duke which pulled the cart around Flagstaff Hills in the 1980s and 1990s, representing transport of that period.Spring cart; two-wheeled cart with shallow box tray and plank seat bolted across the front. Wheels have metal rims and fourteen (14) wooden spokes. A plank is bolted from side to side. A decorative metal step is on the cart's left and has acorn cut-out shapes in the plate. Both wheels have a brake block that is operated by a lever on the cart's right. The cart has eight-leaf suspension from front to back. The box tray is painted blue and has decorative pale yellow detail. Each shaft pole has has a handle fitting on it. (Horse equipment with the cart is a leather covered, straw filled collar.) flagstaff hill, flagstaff hill maritime museum and village, warrnambool, maritime museum, maritime village, great ocean road, shipwreck coast, springcart, spring cart, jingle, horse-drawn cart, one horse cart, two-wheeled cart, dray, spring dray, wagon, transportation, travel, cart, duke, clydesdale, pat mcgowan, delivery cart, yabbie, cartwright, horse-drawn vehicle, transport, horse cart -
 Flagstaff Hill Maritime Museum and Village
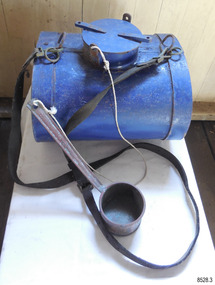
Equipment - Water Canteen and Ladle, mid-to-late 19th century
The horizontal water canteen has been carefully designed to fit snugly on the hip when worn with the straps diagonally across the body. The ladle allows quick and easy scooping of the contents to refresh the lifeboat and rocket launching crew, and the survivors of the disaster Saving lives in Warrnambool – The coastline of South West Victoria is the site of over 600 shipwrecks and many lost lives; even in Warrnambool’s Lady Bay there were around 16 known shipwrecks between 1850 and 1905, with eight lives lost. Victoria’s Government responded to the need for lifesaving equipment and, in 1858, the provision of rocket and mortar apparatus was approved for the lifeboat stations. In 1859 the first Government-built lifeboat arrived at Warrnambool Harbour and a shed was soon built for it on the Tramway Jetty, followed by a rocket house in 1864 to safely store the rocket rescue equipment. In 1878 the buildings were moved to the Breakwater (constructed from 1874-1890), and in 1910 the new Lifeboat Warrnambool arrived with its ‘self-righting’ design. For almost a hundred years the lifesaving and rescue crews, mostly local volunteers, trained regularly to rehearse and maintain their rescue skills. They were summoned when needed by alarms, gunshots, ringing bells and foghorns. In July 1873 a brass bell was erected at Flagstaff Hill specifically to call the rescue crew upon news of a shipwreck. Some crew members became local heroes but all served an important role. Rocket apparatus was used as recently as the 1950s. Rocket Rescue Method - The Government of Victoria adopted lifesaving methods based on Her Majesty’s Coast Guard in Great Britain. It authorised the first line-throwing rescue system in 1858. Captain Manby’s mortar powered a projectile connected to a rope, invented in 1808. The equipment was updated to John Dennett’s 8-foot shaft and rocket method that had a longer range of about 250 yards. From the 1860s the breeches buoy apparatus was in use. The apparatus was suspended on a hawser line and manually pulled to and from the distressed vessel carrying passengers and items. In the early 1870s Colonel Boxer’s rocket carried the light line, which was faked, or coiled, in a particular way between pegs in a faking box to prevent twists and tangles when fired. The angle of firing the rocket to the vessel in distress was measured by a quadrant-type instrument on the side of the rocket machine. Decades later, in about 1920, Schermuly invented the line-throwing pistol that used a small cartridge to fire the rocket. The British Board of Trade published instructions for both the beach rescue crew and ship’s crew. It involved setting up the rocket launcher on shore at a particular angle measured by the quadrant, inserting a rocket that had a lightweight line threaded through its shaft, and then firing it across the stranded vessel, the line issuing freely from the faking board. A tally board was then sent out to the ship with instructions in four languages. The ship’s crew would haul on the line to bring out the heavier, continuous whip line, then secure the attached whip block to the mast or other sturdy part of the ship. The rescue crew on shore then hauled out a stronger hawser line, which the ship’s crew fixed above the whip block. The hawser was then tightened using the block on the shore end of the whip. The breeches buoy and endless whip are then attached to the traveller block on the hawser, allowing the shore crew to haul the breeches buoy to and from the vessel, rescuing the stranded crew one at a time. Beach apparatus equipment - In the mid-1800s the equipment could include a line throwing set, coiled line in wooden carrying case, rockets, cartridges, breeches buoy, hawser and traveller block, line-throwing pistol, beach cart, hand barrow, sand anchor, crotch pole, and tools such as spade, pick, mallet and hawser cutter. Around the 1860s Warrnambool had a Rocket House installed beside the Harbour. This water canteen is significant for its connection with local history, maritime history and marine technology. Lifesaving has been an important part of the services performed from Warrnambool's very early days, supported by State and Local Government, and based on the methods and experience of Great Britain. Hundreds of shipwrecks along the coast are evidence of the rough weather and rugged coastline. Ordinary citizens, the Harbour employees, and the volunteer boat and rescue crew, saved lives in adverse circumstances. Some were recognised as heroes, others went unrecognised. In Lady Bay, Warrnambool, there were around 16 known shipwrecks between 1850 and 1905. Many lives were saved but tragically, eight lives were lost.Water canteen and ladle; blue painted oval metal cylinder with a removable round threaded lid. Two adjustable leather shoulder straps are attached to the canteen through metal rings on the sides of the lid. A blue-painted copper ladle with a fixed, 45-degree angled handle is attached to the canteen with a length of string. The water canteen is designed to be carried horizontally.flagstaff hill maritime museum and village, flagstaff hill, maritime museum, maritime village, warrnambool, great ocean road, lady bay, shipwreck, life-saving, lifesaving, rescue crew, rescue, rocket rescue, rocket crew, lifeboat men, beach rescue, line rescue, rescue equipment, volunteer lifesavers, volunteer crew, life saving rescue crew, lifesaving rescue crew, rocket apparatus, survival canteen, rescue canteen, dipper, cup, canteen and dipper, canteen and ladle, water canteen -
 Flagstaff Hill Maritime Museum and Village
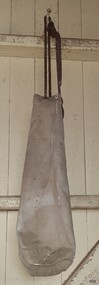
Equipment - Canvas Bag, mid-to-late 19th century
This drawstring canvas bag is amongst the Rocket Rescue equipment. It could have been used to carry equipment, clothing or provisions between the crew on the shore and the victims of a shipwreck or other rescue need. It could be worn on the shoulder or as a backpack or winched out to a vessel on the block and pulley system. The strong canvas could be weatherproof and waterproof to a large extent, provided the drawstring was pulled tight. Saving lives in Warrnambool – The coastline of South West Victoria is the site of over 600 shipwrecks and many lost lives; even in Warrnambool’s Lady Bay, there were around 16 known shipwrecks between 1850 and 1905, with eight lives lost. Victoria’s Government responded to the need for lifesaving equipment and, in 1858, the provision of rocket and mortar apparatus was approved for the lifeboat stations. In 1859 the first Government-built lifeboat arrived at Warrnambool Harbour and a shed was soon built for it on the Tramway Jetty, followed by a rocket house in 1864 to safely store the rocket rescue equipment. In 1878 the buildings were moved to the Breakwater (constructed from 1874-1890), and in 1910 the new Lifeboat Warrnambool arrived with its ‘self-righting’ design. For almost a hundred years the lifesaving and rescue crews, mostly local volunteers, trained regularly to rehearse and maintain their rescue skills. They were summoned when needed by alarms, gunshots, ringing bells and foghorns. In July 1873 a brass bell was erected at Flagstaff Hill specifically to call the rescue crew upon news of a shipwreck. Some crew members became local heroes but all served an important role. Rocket apparatus was used as recently as the 1950s. Rocket Rescue Method - The Government of Victoria adopted lifesaving methods based on Her Majesty’s Coast Guard in Great Britain. It authorised the first line-throwing rescue system in 1858. Captain Manby’s mortar powered a projectile connected to a rope, invented in 1808. The equipment was updated to John Dennett’s 8-foot shaft and rocket method that had a longer range of about 250 yards. From the 1860s the breeches buoy apparatus was in use. The apparatus was suspended on a hawser line and manually pulled to and from the distressed vessel carrying passengers and items. In the early 1870s Colonel Boxer’s rocket carried the light line, which was faked, or coiled, in a particular way between pegs in a faking box to prevent twists and tangles when fired. The angle of firing the rocket to the vessel in distress was measured by a quadrant-type instrument on the side of the rocket machine. Decades later, in about 1920, Schermuly invented the line-throwing pistol that used a small cartridge to fire the rocket. The British Board of Trade published instructions for both the beach rescue crew and ship’s crew. It involved setting up the rocket launcher on shore at a particular angle measured by the quadrant, inserting a rocket that had a lightweight line threaded through its shaft, and then firing it across the stranded vessel, the line issuing freely from the faking board. A tally board was then sent out to the ship with instructions in four languages. The ship’s crew would haul on the line to bring out the heavier, continuous whip line, then secure the attached whip block to the mast or other sturdy part of the ship. The rescue crew on shore then hauled out a stronger hawser line, which the ship’s crew fixed above the whip block. The hawser was then tightened using the block on the shore end of the whip. The breeches buoy and endless whip are then attached to the traveller block on the hawser, allowing the shore crew to haul the breeches buoy to and from the vessel, rescuing the stranded crew one at a time. Beach apparatus equipment - In the mid-1800s the equipment could include a line throwing set, coiled line in a wooden carrying case, rockets, cartridges, breeches buoy, hawser and traveller block, line-throwing pistol, beach cart, hand barrow, sand anchor, crotch pole, and tools such as spade, pick, mallet and hawser cutter. Around the 1860s Warrnambool had a Rocket House installed beside the Harbour. This canvas bag is significant for its connection with local history, maritime history and marine technology. Lifesaving has been an important part of the services performed from Warrnambool's very early days, supported by State and Local Government, and based on the methods and experience of Great Britain. Hundreds of shipwrecks along the coast are evidence of the rough weather and rugged coastline. Ordinary citizens, the Harbour employees, and the volunteer boat and rescue crew saved lives in adverse circumstances. Some were recognised as heroes, others went unrecognised. In Lady Bay, Warrnambool, there were around 16 known shipwrecks between 1850 and 1905. Many lives were saved but tragically, eight lives were lost.Canvas bag; thick beige canvas bag, cylindrical with a round base. The top has a thin rope in a drawstring closure. flagstaff hill maritime museum and village, flagstaff hill, maritime museum, maritime village, warrnambool, great ocean road, lady bay, shipwreck, life-saving, lifesaving, rescue crew, rescue, rocket rescue, rocket crew, lifeboat men, beach rescue, line rescue, rescue equipment, volunteer lifesavers, volunteer crew, life saving rescue crew, lifesaving rescue crew, rocket apparatus, survival kit, rescue kit, canvas bag, storage bag, carry bag, equipment bag, drawerstring bag -
 Blacksmith's Cottage and Forge
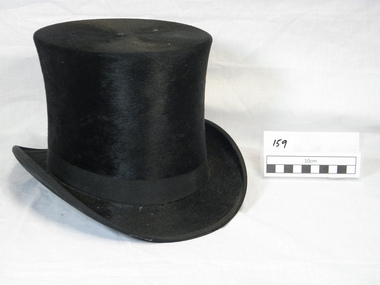
Top Hat, late 19th century
This hat belonged to Mr William Grant, Shire President of Bacchus Marsh. Mr Grant and his wife were invited to the opening of the first Federal Parliament held in the Royal Exhibition Building, Carlton, on the 9th May 1901. The opening was attended by the Duke and Duchess of Cornwall and York (later George V and Queen Mary) and 12,000 guests. Mr Grant's family were early settlers in Bacchus Marsh, and both he and his father were influential people in the town. They owned the property "Millbank". When William Grant died in 1924, his obituary in the 'Express' listed 17 public positions he held, including severaal terms as Shire President.This item has historical significance at a local, state and national level. It is representative of formal gentlemen's dress in the latter part of the 19th century/early 20th century.Gentleman's black shiny velour top hat with silk ribbon band, bound inside with leather sweat band, adjustable with silk ties. Inscription inside hat. Purple lining with gold embossing. Light canvas coated inside. Protective silver paper sweat band under leather sweat band.Inscription in gold inside hat reads "GREASE PROOF / Prize Medal" / Royal Insignia with motto "Honi soit qui mal y pense" / "VENTILATED / AND / FELT BANDED".1910, top hat, gentlemen s fashion, mr grant, velour, ninteenth century attire, skilled hatter, upper class attire, formal wear, monopoly token, president bacchus marsh shire, federation celebrations 1910, federation, owner millbank, mad hatter, opening parliament 1910, royal exhibition building, original box, greaseproof prize medal royal isignia, the sea breeze, no 5044, size 6, 7 8 -
 Blacksmith's Cottage and Forge
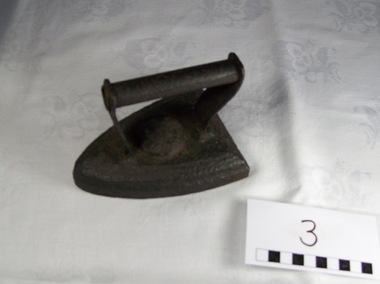
Iron, Flat, 1800 (estimated); 19th. century
From the 17th century, sadirons or sad irons (from an old word meaning solid) began to be used. They were thick slabs of cast iron, delta - shaped and with a handle, heated in a fire. These were also called flat irons. Another solution was to employ a cluster of solid irons that were heated from the single source: as the iron currently in use cools down, it could be quickly replaced by another one that is hot. Source: www.wikipedia.orgLocal social history, domestic itemBlack cast iron with handleon top plate but not decipherabledomestic, iron, work, womens, laundry -
 Blacksmith's Cottage and Forge
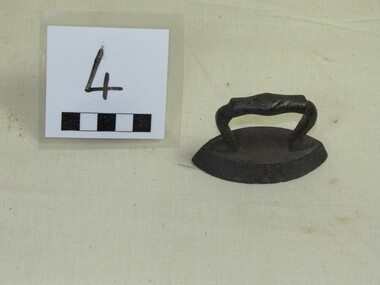
Iron-flat, Iron, 19th. century
Domestic item, well used. Heated on the stove top and used to iron clothes.Interesting domestic item that shows how ironing was done prior to electricity.Black, heavy, triangular shaped with handle attached. Handle rounded smoothed metal.domestic, iron, cast iron, iron flat -
 Blacksmith's Cottage and Forge
Iron-flat-mini, Early 19th. century
This is an iron that would have been used for the very specific purpose of ironing very fine tucking.Purpose specific flat iron.Small double ended domestic iron with handle.domestic, cast iron, laundry, double, ended flat iron, heavy -
 Blacksmith's Cottage and Forge
Bottle, Early 19th Century
Small greenish glass bottle. Heavy base with unusual pattern. There are bubbles in the glass. Lip on neck.glass, glass technology, patterned base -
Blacksmith's Cottage and Forge
Pin cushion, 19th Century
Handmade domestic item used when sewing.Rund red velevet, handmade, possibly filled with sawdust, used to hold pins. -
 Flagstaff Hill Maritime Museum and Village
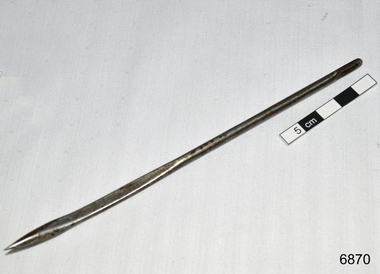
Needle, 19th and 20th century
This was donated to Flagstaff Hill Maritime Village by the family of Doctor William Roy Angus, Surgeon and Oculist. It is part of the “W.R. Angus Collection” includes historical medical equipment, surgical instruments and material once belonging to Dr Edward Ryan and Dr Thomas Francis Ryan, (both of Nhill, Victoria) as well as Dr Angus’ own belongings. The Collection’s history spans the medical practices of the two Doctors Ryan, from 1885-1926 plus that of Dr Angus, up until 1969. ABOUT THE “W.R.ANGUS COLLECTION” Doctor William Roy Angus M.B., B.S., Adel., 1923, F.R.C.S. Edin.,1928 (also known as Dr Roy Angus) was born in Murrumbeena, Victoria in 1901 and lived until 1970. He qualified as a doctor in 1923 at University of Adelaide, was Resident Medical Officer at the Royal Adelaide Hospital in 1924 and for a period was house surgeon to Sir (then Mr.) Henry Simpson Newland. Dr Angus was briefly an Assistant to Dr Riddell of Kapunda, then commenced private practice at Curramulka, Yorke Peninsula, SA, where he was physician, surgeon and chemist. In 1926, he was appointed as new Medical Assistant to Dr Thomas Francis Ryan (T.F. Ryan, or Tom), in Nhill, Victoria, where his experiences included radiology and pharmacy. In 1927 he was Acting House Surgeon in Dr Tom Ryan’s absence. Dr Angus had become engaged to Gladys Forsyth and they decided he further his studies overseas in the UK in 1927. He studied at London University College Hospital and at Edinburgh Royal Infirmary and in 1928, was awarded FRCS (Fellow from the Royal College of Surgeons), Edinburgh. He worked his passage back to Australia as a Ship’s Surgeon on the on the Australian Commonwealth Line’s T.S.S. Largs Bay. Dr Angus married Gladys in 1929, in Ballarat. (They went on to have one son (Graham 1932, born in SA) and two daughters (Helen (died 12/07/1996) and Berenice (Berry), both born at Mira, Nhill ) According to Berry, her mother Gladys made a lot of their clothes. She was very talented and did some lovely embroidery including lingerie for her trousseau and beautifully handmade baby clothes. Dr Angus was a ‘flying doctor’ for the A.I.M. (Australian Inland Ministry) Aerial Medical Service in 1928 . Its first station was in the remote town of Oodnadatta, where Dr Angus was stationed. He was locum tenens there on North-South Railway at 21 Mile Camp. He took up this ‘flying doctor’ position in response to a call from Dr John Flynn; the organisation was later known as the Flying Doctor Service, then the Royal Flying Doctor Service. A lot of his work during this time involved dental surgery also. Between 1928-1932 he was surgeon at the Curramulka Hospital, Yorke Peninsula, South Australia. In 1933 Dr Angus returned to Nhill and purchased a share of the Nelson Street practice and Mira hospital (a 2 bed ward at the Nelson Street Practice) from Dr Les Middleton one of the Middleton Brothers, the current owners of what previously once Dr Tom Ryan’s practice. Dr Tom and his brother had worked as surgeons included eye surgery. Dr Tom Ryan performed many of his operations in the Mira private hospital on his premises. He had been House Surgeon at the Nhill Hospital 1902-1926. Dr Tom Ryan had one of the only two pieces of radiology equipment in Victoria during his practicing years – The Royal Melbourne Hospital had the other one. Over the years Dr Tom Ryan had gradually set up what was effectively a training school for country general-practitioner-surgeons. Each patient was carefully examined, including using the X-ray machine, and any surgery was discussed and planned with Dr Ryan’s assistants several days in advance. Dr Angus gained experience in using the X-ray machine there during his time as assistant to Dr Ryan. When Dr Angus bought into the Nelson Street premises in Nhill he was also appointed as the Nhill Hospital’s Honorary House Surgeon 1933-1938. His practitioner’s plate from his Nhill surgery is now mounted on the doorway to the Port Medical Office at Flagstaff Hill Maritime Village, Warrnambool. When Dr Angus took up practice in the Dr Edward and Dr Tom Ryan’s old premises he obtained their extensive collection of historical medical equipment and materials spanning 1884-1926. A large part of this collection is now on display at the Port Medical Office at Flagstaff Hill Maritime Village in Warrnambool. In 1939 Dr Angus and his family moved to Warrnambool where he purchased “Birchwood,” the 1852 home and medical practice of Dr John Hunter Henderson, at 214 Koroit Street. (This property was sold in1965 to the State Government and is now the site of the Warrnambool Police Station. and an ALDI sore is on the land that was once their tennis court). The Angus family was able to afford gardeners, cooks and maids; their home was a popular place for visiting dignitaries to stay whilst visiting Warrnambool. Dr Angus had his own silk worm farm at home in a Mulberry tree. His young daughter used his centrifuge for spinning the silk. Dr Angus was appointed on a part-time basis as Port Medical Officer (Health Officer) in Warrnambool and held this position until the 1940’s when the government no longer required the service of a Port Medical Officer in Warrnambool; he was thus Warrnambool’s last serving Port Medical Officer. (Masters of immigrant ships arriving in port reported incidents of diseases, illness and death and the Port Medical Officer made a decision on whether the ship required Quarantine and for how long, in this way preventing contagious illness from spreading from new immigrants to the residents already in the colony.) Dr Angus was a member of the Australian Medical Association, for 35 years and surgeon at the Warrnambool Base Hospital 1939-1942, He served as a Surgeon Captain during WWII1942-45, in Ballarat, Victoria, and in Bonegilla, N.S.W., completing his service just before the end of the war due to suffering from a heart attack. During his convalescence he carved an intricate and ‘most artistic’ chess set from the material that dentures were made from. He then studied ophthalmology at the Royal Melbourne Eye and Ear Hospital and created cosmetically superior artificial eyes by pioneering using the intrascleral cartilage. Angus received accolades from the Ophthalmological Society of Australasia for this work. He returned to Warrnambool to commence practice as an ophthalmologist, pioneering in artificial eye improvements. He was Honorary Consultant Ophthalmologist to Warrnambool Base Hospital for 31 years. He made monthly visits to Portland as a visiting surgeon, to perform eye surgery. He represented the Victorian South-West subdivision of the Australian Medical Association as its secretary between 1949 and 1956 and as chairman from 1956 to 1958. In 1968 Dr Angus was elected member of Spain’s Barraquer Institute of Barcelona after his research work in Intrasclearal cartilage grafting, becoming one of the few Australian ophthalmologists to receive this honour, and in the following year presented his final paper on Living Intrasclearal Cartilage Implants at the Inaugural Meeting of the Australian College of Ophthalmologists in Melbourne In his personal life Dr Angus was a Presbyterian and treated Sunday as a Sabbath, a day of rest. He would visit 3 or 4 country patients on a Sunday, taking his children along ‘for the ride’ and to visit with him. Sunday evenings he would play the pianola and sing Scottish songs to his family. One of Dr Angus’ patients was Margaret MacKenzie, author of a book on local shipwrecks that she’d seen as an eye witness from the late 1880’s in Peterborough, Victoria. In the early 1950’s Dr Angus, painted a picture of a shipwreck for the cover jacket of Margaret’s book, Shipwrecks and More Shipwrecks. She was blind in later life and her daughter wrote the actual book for her. Dr Angus and his wife Gladys were very involved in Warrnambool’s society with a strong interest in civic affairs. He had an interest in people and the community They were both involved in the creation of Flagstaff Hill, including the layout of the gardens. After his death (28th March 1970) his family requested his practitioner’s plate, medical instruments and some personal belongings be displayed in the Port Medical Office surgery at Flagstaff Hill Maritime Village, and be called the “W. R. Angus Collection”. W.R. Angus Collection is significant for still being located at the site it is connected with, Doctor Angus being the last Port Medical Officer in Warrnambool. The collection of medical instruments and other equipment is culturally significant, being an historical example of medicine from late 19th to mid-20th century. Dr Angus assisted Dr Tom Ryan, a pioneer in the use of X-rays and in ocular surgery. Bag needle, from W.R. Angus Collection. Steel needle with slightly bent end, used for sewing the tops of wheat bags and other similar bags to close them.flagstaff hill, warrnambool, shipwrecked coast, flagstaff hill maritime museum, maritime museum, shipwreck coast, flagstaff hill maritime village, great ocean road, dr w r angus, dr ryan, surgical instrument, t.s.s. largs bay, warrnambool base hospital, nhill base hospital, mira hospital, flying doctor, bag needle, wheat bag needle