Showing 5811 items
matching s. white
-
 Ballarat Tramway Museum
Drawing - Illustration/s, Gordon Thurling, B&W drawing of tram 39 and Ballarat Town Hall, 1971
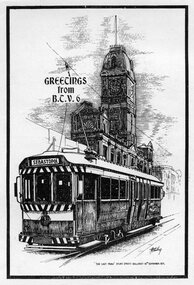
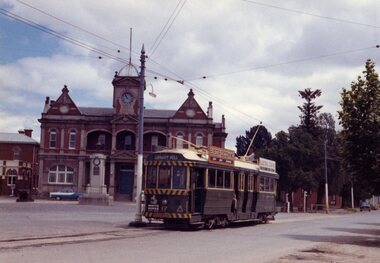
890.1 - black and white drawing of tram 39, with destination "Sebastopol" with Ballarat Town Hall in background. Has words "Greetings from BTV 6" by the top of the trolley pole and "The last tram Sturt St. Ballarat - 19th September 1971" with a thick black border. Printed onto white paper with a slight gloss. Understood to be a copy of the drawing used on Ballarat TV channel 6's Christmas card for 1971. 890.2 - same drawing printed on one half of dark orange heavy paper, but without the words "from BTV6". Understood to be used as a Christmas card by the City of Ballarat for 1971. See btm6422 for a coloured large version. Original drawing by Gordon Thurling, BTV6 graphic artist at the time.trams, tramways, 39, city of ballarat, btv 6, town hall -
 Ballarat Tramway Museum
Photograph - Illustration/s, Ballarat 37
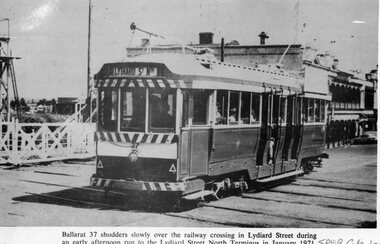
Black and white illustration from the South Pacific Electric Railway Co-op (Sydney Tramway Museum) - Feb. 1974 calendar of Ballarat tram No. 37 crossing the railway crossing in Lydiard St. North, January 1971. Photo by D.Cooke. Tram showing destination of "Lydiard St. Nth." Has buildings on the east side of Lydiard St. in background and railway gates.On bottom right hand corner "SPER Calendar February 1974"trams, tramways, ballarat, lydiard st. nth, railway crossing -
 Ballarat Tramway Museum
Photograph - Illustration/s, Bendigo Charing Cross
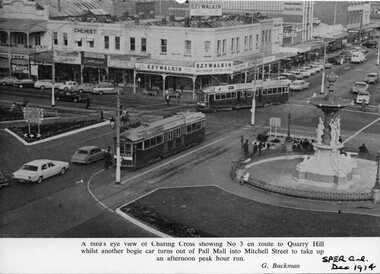
Black and white illustration from the South Pacific Electric Railway Co-op (Sydney Tramway Museum) - Dec.. 1974 calendar of Charing Cross Bendigo from an elevated viewpoint. Overlooks intersection has tram 3 waiting to proceed to Quarry Hill while another bogie tram turns from Pall Mall into Mitchell St. Photo undated, but most likely during the early 1970's. Photo by G. Buckman Has the EZYWALKIN store and other stores in the background.On bottom right hand corner "SPER Calendar Dec. 1974"trams, tramways, bendigo, charing cross, pall mall, mitchell st. -
 Ballarat Tramway Museum
Photograph - Illustration/s, Grenville St. and Sturt St. Ballarat
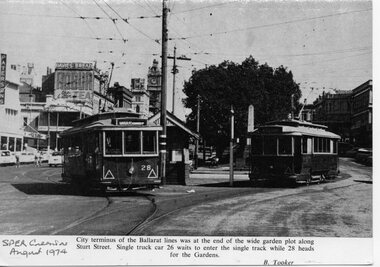
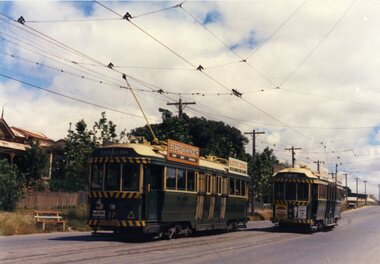
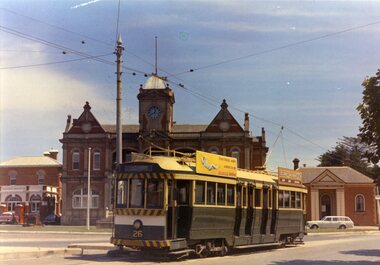
Black and white illustration from the South Pacific Electric Railway Co-op (Sydney Tramway Museum) - Aug. 1974 calendar of Ballarat trams 26 and 28 at the intersection of Grenville St. and Sturt St. Tram 28 proceeding to the Gardens via Drummond St., while 26 waits for 28 to clear and proceed to what appears on the destination to be Mt. Pleasant. Photo undated, but prior to the fitting of marker lights on the drivers canopy window sills - during the 1950's. Photo caption mentions that this was the City terminus of the system - incorrect during the SEC operational days. Photo by B. Tooker. Has buildings on either side of Sturt St. in background.On bottom right hand corner "SPER Calendar Aug. 1974"trams, tramways, ballarat, sturt st., grenville st. -
 Ballarat Tramway Museum
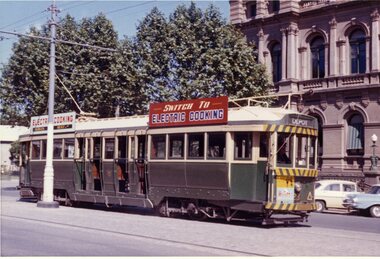
Photograph - Colour Photograph/s, 23/11/1962 12:00:00 AM
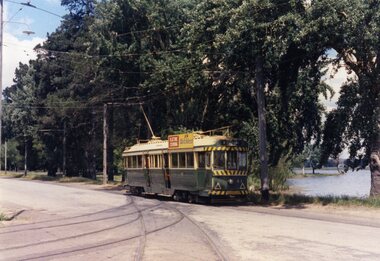
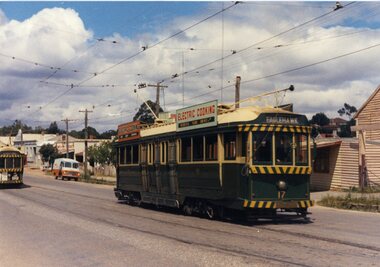
Colour postcard size print of SEC Ballarat tram 41, passing depot junction with Lake Wendouree in background. Tram has been fitted with dash canopy lighting and tiger stripes, but prior to large white painted panel under driver's windows. Still has large triangles on front panel. On roof is advertising sign 'Electric Cooking is Matchless" Has destination of "Mt Pleasant". Photo shows track work into depot. Photo dated 23.11.1962. Printed on AGFA paper.On rear top left hand corner "23.11.62" in very wavy handwriting typical of an aged person.depot trackwork, lake wendouree, ballarat, tram 41 -
 Ballarat Tramway Museum
Photograph - Colour Photograph/s, 23/11/1962 12:00:00 AM
Colour postcard size print of SEC Ballarat trams 13, 26 and bogie car in the City Loop. Photo dated 23.11.1962. Printed on AGFA paper. In background is Morseheads building and another single trucker heading onto Bridge St. Tram 13 has "Twin Lakes" sign in multiple colours on front panel, 26 has briquette ad and the bogie car has an SEC Ad as well. Bogie car has front or east trolley pole up, as if to run back to Bridge St. All trams fitted with dash canopy lighting, but not the large white strip on the front panel. Tram 13 has the destination of "CITY"On rear top left hand corner "23.11.62" in very wavy handwriting typical of an aged person.city loop, sturt st., ballarat, tram 13, tram 26 -
 Ballarat Tramway Museum
Photograph - Colour Photograph/s, 23/11/1962 12:00:00 AM
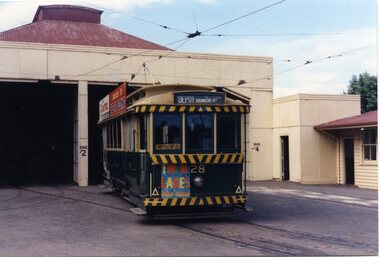
Colour postcard size print of SEC Ballarat tram 28 on No. 3 road at SEC Wendouree Parade depot. Photo dated 23.11.1962. Printed on AGFA paper. Tram 28 has "Twin Lakes" sign in multiple colours on front panel, and what appears to be a CASTROL and an SEC ad.. Trams fitted with dash canopy lighting, but not the large white strip on the front panel and has small triangles on the front panel Tram 13 has the destination of "DEPOT via Drummond St."On rear top left hand corner "23.11.62" in very wavy handwriting typical of an aged person.depot, ballarat, tram 28 -
 Ballarat Tramway Museum
Photograph - Colour Photograph/s, 23/11/1962 12:00:00 AM
967.1 - Colour postcard size print of SEC Bendigo trams 4 and 17 at a crossing Loop on the Eaglehawk line. Photo dated 21.11.1962. Printed on AGFA paper. Both trams fitted with dash canopy lighting, but no large white strip under the driver's windows. 17 showing destination of "Eaglehawk", has two SEC ads on the side re Electric Cook and a White Horse whiskey ad on front panel. Tram 4 showing destination of "Quarry Hill", has two ad panels on roof and two ads on front panel including one Cohn's' Drinks. 967.2 - Colour postcard size print of SEC Bendigo tram 26 in Mitchell St. crossing Hargreaves St. heading for Charing Cross. Photo dated 21.11.1962. Printed on AGFA paper. Trams fitted with dash canopy lighting, but no large white strip under the driver's windows. Has two roof ads and one ad on rear drivers panel. In background of photo are the buildings along Mitchell St. looking down along Mitchell St and into View St. Has Plaza theatre sign in photo above tram. On right hand side, is a van marked "Carrier M. Slattery". Tram has destination of "Quarry Hill" in rear box. 967.3 - Colour postcard size print of SEC Bendigo tram 19 on the North Bendigo line. Photo dated 21.11.1962. Printed on AGFA paper. Trams fitted with dash canopy lighting, but no large white strip under the driver's windows. Has destination "Nth Bendigo" and SEC roof ads and drivers panel ad for Briquettes.On rear top left hand corner "21.11.62" in very wavy handwriting typical of an aged person.bendigo, eaglehawk, mitchell st., north bendigo, tram 4, tram 17, tram 26, tram 19 -
 Ballarat Tramway Museum
Photograph - Colour Photograph/s, 23/11/1962 12:00:00 AM
Colour postcard size print of SEC Bendigo trams 2 and 17 at the California or Thorne St. Loop on the Eaglehawk line. Photo dated 21.11.1962. Printed on AGFA paper. Both trams fitted with dash canopy lighting, but no large white strip under the driver's windows. 17 showing destination of "Eaglehawk", has two SEC ads on the side re Electric Cooking . Tram 2 showing destination of "Quarry Hill", has various ads. On rear top left hand corner "21.11.62" in very wavy handwriting typical of an aged person.bendigo, eaglehawk, tram 2, tram 17 -
 Ballarat Tramway Museum
Photograph - Colour Photograph/s, 23/11/1962 12:00:00 AM
Colour postcard size print of SEC Bendigo trams 26 and a single trucker at Charing Cross with Mitchell St. in the background. Photo dated 21.11.1962. Printed on AGFA paper. Both trams fitted with dash canopy lighting, but no large white strip under the driver's windows. 26 showing destination of "Eaglehawk" with two SEC ads and another ad on the front dash panel. Single trucker has a Castrol ad on the roof. In the background are various buildings along the east side of Pall Mall and along Mitchell St. Pole by the front of 26 has directional signs "Melbourne" and "Heathcote / Echuca". On rear top left hand corner "21.11.62" in very wavy handwriting typical of an aged person.bendigo, pall mall, charing cross, tram 26 -
 Ballarat Tramway Museum
Photograph - Colour Photograph/s, 1962?
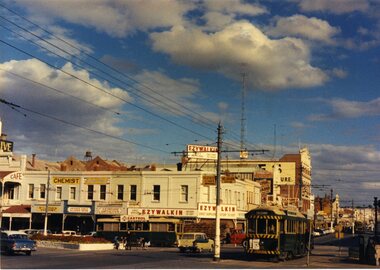
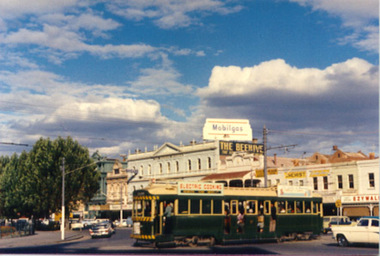
Colour postcard size print of an SEC Bendigo Bogie tram at Charing Cross. Photo undated, but could be 21.11.1962. Printed on AGFA paper. Tram fitted with dash canopy lighting, but no large white strip under the driver's windows. Photo out of focus. Has a SEC roof ad and another ad on the roof, non SEC. In background are the various buildings along Pall Mall. Tram well loaded with passengers. Can see the Ezywalkin, The Beehive and large a Mobilgas sign. Two copies held.bendigo, pall mall, charing cross -
 Ballarat Tramway Museum
Photograph - Colour Photograph/s, 1960's
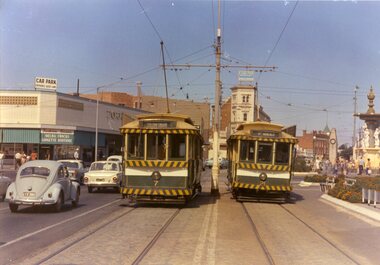
Colour postcard size print of an SEC Bendigo trams 7 and 21 at Charing Cross. Printed on AGFA paper. Photo taken during last years of Bendigo. Trams have dash canopy lighting and large white strip under the driver's windows. Tram 21 showing "North Bendigo" and 7 showing "Golden Square" destinations. Photo has Cenotaph, fountain and buildings on the south east corner of Mitchell St and Pall Mall in background.bendigo, pall mall, charing cross, tram 7, tram 21 -
 Ballarat Tramway Museum
Photograph - Colour Photograph/s, 1960's
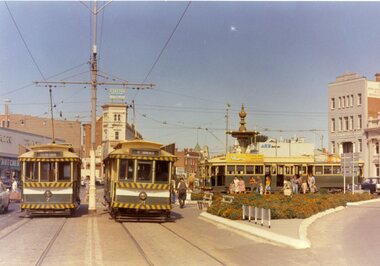
Colour postcard size print of an SEC Bendigo trams 7 and 21 at Charing Cross with two bogie trams by fountain. Printed on AGFA paper. Photo taken during last years of Bendigo. Trams have dash canopy lighting and large white strip under the driver's windows. Tram 21 showing "North Bendigo" and 7 showing "Golden Square" destinations. Taken at same time as 971. Photo has Cenotaph, fountain and buildings on the south side Charing Cross in the background, including ANZ bank and RACV office.bendigo, pall mall, charing cross, tram 7, tram 21 -
 Ballarat Tramway Museum
Photograph - Colour Photograph/s, 1960's
Colour postcard size print of an SEC Bendigo trams 24 and 20 parked on the Bendigo depot access track. Tram 24 on bridge showing destination "SPECIAL" with 20 in background. Tram 24 has two roof ads, do not appear to be SEC ads. Depot buildings in background. Both trams fitted with dash canopy lighting and large white strip under cabin. Printed on AGFA paper.bendigo, depot, tram 24, tram 20 -
 Ballarat Tramway Museum
Photograph - Colour Photograph/s, 1960's
Colour postcard size print of an SEC Bendigo tram 26 at the Eaglehawk terminus. Printed on AGFA paper. Tram has SEC roof ads, both re Electric cooking. Has Eaglehawk Post Office, Town Hall and Mechanics Institute in the background. Tram fitted with dash canopy lighting and large white strip under driver's windows. Photo undated, taken late 1960's or early 1970's. Tram has destination of "Eaglehawk".eaglehawk, bendigo, post office, town hall, tram 26 -
 Ballarat Tramway Museum
Photograph - Colour Photograph/s, 21/11/1962 12:00:00 AM
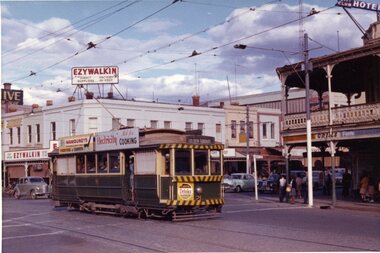
Colour print of Bendigo SECV Bendigo tram 21, leaving Charing Cross for Golden Square. On Kodacolor paper with a Kodak red ink stamp on rear. Tram has dash canopy lights, but no large white strip under the drivers windows. Tram has a good load of passengers on it, with all blinds drawn, showing destination "Golden Square". Fitted with roof ads "Electricity best for Cooking" and an ad Mamouneys - Furniture and Carpets. A Cohn's drinks ad is on the front dash panel. Photo has the Ezywalkin store in background and the City Club Hotel in the right hand side of the photo. Photo dated 21.11.1962.On rear top left hand corner "21 / 21.11.62" in very wavy handwriting, typical of an aged person.charing cross, bendigo, golden square, tram 21 -
 Ballarat Tramway Museum
Photograph - Colour Photograph/s, 21/11/1962 12:00:00 AM
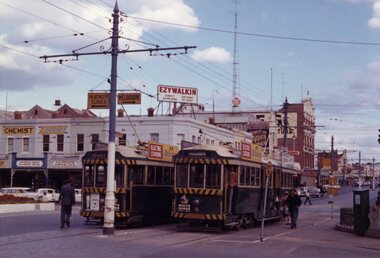
Colour print of Bendigo SECV Bendigo trams 2 and 4 at Charing Cross. On Kodacolor paper with a Kodak red ink stamp on rear. Trams have dash canopy lights, but no large white strip under the drivers windows. Photo dated 21.11.1962. Buildings on corner of Pall Mall and Mitchell St in background. Both trams fitted with roof ads and dash canopy ads - White Horse Whiskey. Shows "safety zone" arrangements. No. 2 has destination of "Quarry Hill" while 4 has destination of "Eaglehawk". Has a number of passengers boarding trams. Note "PYE" name on radio tower mast.On rear top left hand corner "2 and 4 / 21.11.62" in very wavy handwriting, typical of an aged person.charing cross, bendigo, mitchell st., safety zone, tram 2, tram 4 -
 Ballarat Tramway Museum
Photograph - Colour Photograph/s, 21/11/1962 12:00:00 AM
Colour print of Bendigo SECV Bendigo tram 17 at Eaglehawk Terminus. On Kodacolor paper with a Kodak red ink stamp on rear. Tram has dash canopy lights, but no large white strip under the drivers windows. Photo not dated but appears to be at about the same time as 977, 21.11.1962. Has Eaglehawk Town Hall and Post office in background and war memorial. Tram showing destination of "Quarry Hill". Photo shows how tram line extended past the town hall with the white posts visible. Tram has White Horse Whiskey ad on front dash panel and two SEC "Electric Cooking" ads.On rear top left hand corner "17".eaglehawk, bendigo, town hall, post office, tram 17 -
 Ballarat Tramway Museum
Photograph - Colour Photograph/s, 23/11/1962 12:00:00 AM
Colour print of Bendigo SECV Bendigo tram 23 outside the Bendigo Post Office in Pall Mall. On Kodacolor paper with a Kodak red ink stamp on rear. Tram has dash canopy lights, but no large white strip under the drivers windows. Photo dated 23.11.62. Tram showing destination of "Depot". Tram has "Hutton's" ham or bacon ad on front dash panel, with to SEC roof ads "Electric Cooking" and "Switch to Electric Cooking".On rear top left hand corner "17 / 22.11.62" in very wavy handwriting, typical of an aged person.bendigo post office, bendigo, pall mall., tram 26 -
 Ballarat Tramway Museum
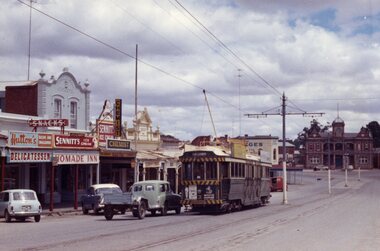
Photograph - Colour Photograph/s, 21/11/1962 12:00:00 AM
Colour print of Bendigo SECV Bendigo tram 3 travelling High St Eaglehawk towards the Eaglehawk Terminus. Photo taken after the tram has passed the photographer. On Kodacolor paper with a Kodak red ink stamp on rear. Tram has dash canopy lights, but no large white strip under the drivers windows. Photo not dated but appears to be at about the same time as 977, 21.11.1962. Has Eaglehawk Town Hall and Post office in background and shops along the south side of High St. Tram showing destination of "Eaglehawk". Tram has White Horse Whiskey ad and another on front dash panel and two roof ads. In photo are advertisements for "Hutton's Bacon" and "Sennett's Ice Cream" on shop roof advertisements.On rear top left hand corner "3"eaglehawk, bendigo, town hall., high st, tram 3 -
 Ballarat Tramway Museum
Newspaper, Bendigo Advertiser, "Buses will replace Trams in Bendigo", 19/07/1968 12:00:00 AM
Newspaper cutting, July 19, 1968 from Bendigo Advertiser about the State Government decision the previous day to replace the tram services in Bendigo and Ballarat. Government accepted the Transport Regulation Board report. Notes the SEC, the Minister of Transport - Mr. Wilcox and that services were expected to close down by the New Year. Also has item on "Comments on the Tram Decision" by the Mayor, Trades Hall Council President Mr. S. Anderson and Manger of the SEC Northern Branch, Mr. A.C. Sandow. Item has been glued onto a sheet of foolscap paper - white.trams, tramways, bendigo, closure, transport regulation board, mr. v. wilcox -
 Ballarat Tramway Museum
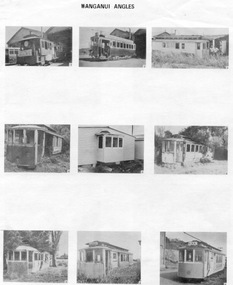
Photograph - Illustration/s, Wanganui NZ and Australian trams, late 1960's
Single printed page with nine photos of Wanganui New Zealand trams, most of tram bodies after completion of service and on the other side, six photos of transport in Australia - 1 Sydney bus and last piece of tram track, four of Brisbane and one of Melbourne - W2 385 and another W2 tramcar. on white paper. Australian photos by Alan Smith. Possible source of sheet is NZ Tramway topics.trams, tramways, wanganui, brisbane, melbourne, sydney -
 Ballarat Tramway Museum
Slide - 35mm slide/s, 26/03/1970 12:00:00 AM
Colour slide - white cardboard mount, ferraniacolor, of two W2's crossing the intersection of Collins and Swanston Street Melbourne, with the Manchester Unity Building in the background. W2 553 showing route 64, southbound and W2 311 northbound, along with a number of motor vehicles and pedestrians. Date shown on slide 26-3-1970.In pencil on slide "TRAMS / Swanston St. Melb. / 26-3-70."tramways, trams, swanston st, melbourne, collins st., tram 553, tram 311 -
 Ballarat Tramway Museum
Slide - 35mm slide/s, Aug. 1984
Colour slide - white / yellow cardboard mount, Kodacolor (Kodachrome) slide, of Z3's 208 (Route 95, showing Exhibition) and 225 showing (Route 96, East Brunswick), at the Bourke St. terminus with the Spencer St. Railway station building in the background and the Greyhound building on the right side. 225 has been painted green, while 208 is in the original orange colour scheme. Date on cardboard mount by Kodak is August 1984. Has an Australia Post van by the side of 225.tramways, trams, bourke st, melbourne, spencer st., tram 225, tram 208 -
 Ballarat Tramway Museum
Photograph - Leaf from a photo album, 1920s
Leaf from a photo album containing 4 black and white photographs pasted onto sheet of brown/grey cardboard with two punch holes at one end. Photos taken early 1920's or just after construction of the Memorial Arch. Photo 1 - "Ballarat" handwritten in pencil at top - Town Hall from the North West taken from a building near Doveton St. Has a Sebastopol tram west bound in Sturt St. passing Town Hall. Photo 2 - "Sturt Street Ballarat" handwritten in pencil at base - Sturt St. Ballarat looking east from most likely the Ballarat City fire station lookout tower. Has a Sebastopol tram travelling eastbound in the photograph. Town Hall in background. No motor vehicles in photograph. Photo 3 - "Memorial Arch, Ballarat" handwritten in pencil at top - photo of the new Memorial Arch at the start of the Avenue of Honour. Photo 4 - "Eureka Stockade, Ballarat" - photo of the Eureka Stockade monument the park.trams, tramways, ballarat, sturt st, memorial arch - avenue of honour, eureka -
 Ballarat Tramway Museum
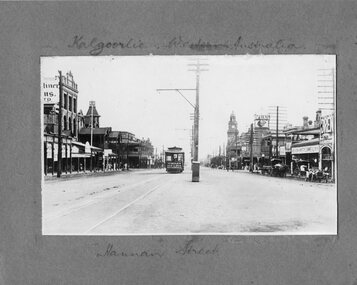
Photograph - Leaf from a photo album, 1920s
Leaf from a photo album containing 2 black and white photographs pasted onto sheet of brown/grey cardboard with two punch holes at one end. Photos taken early 1920's? Photo 1 - "Kalgoorlie Western Australia" in pencil on top of photo, and "Hannan Street" on bottom. Photo shows a tram traveling along Hannan Street with buildings on either side of photograph. Has poles down the centre of the street to support the bracket arms for the tramway and other power lines. Tram has "Nestles Milk" advertisement on dash panel. Photo 2 - "Breakneck Gorge Hepburn" in pencil at base of photograph.trams, tramways, hepburn springs, kalgoorlie, hannan st -
 Ballarat Tramway Museum
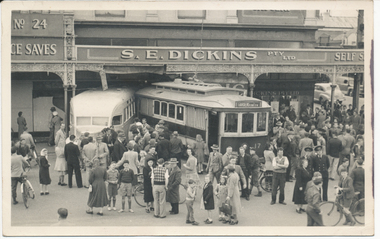
Photograph - Black & White, The Courier Ballarat, Tram 17 and S E Dickins, 1/10/1949 12:00:00 AM
SEC Tram 17 and a former bus used as a food vendor stand, that has finished up in the front of S.E. Dickins Pty Ltd. (Grocers) store 1/10/1949. The tram derailed at the intersection of Sturt and Grenville St. collided with the bus and pushed it into the front of the store. Many people standing around the incident, including two trammies in front of the tram. Thought to be a Ballarat Courier Photograph. Wal Jack's caption advises the Bedford van was a doughnut kitchen. 1020.1 - added 3/06/2006 - small newspaper cutting with the same photo and a caption "While the driver was picking up lunch at Ashkar's pie shop, his tram ploughed into Dickin's grocery, on the present site of Norwich Plaza". Probably from The Courier, and date unknown. 1020.3 - as for 1020, from the Jack Richardson Collection with Wal Jack comments on rear. Comments on rear - see btm1020i4. Photo caption advised 1/10/1949. On Kodak Velox paper. See Reg Item 5587 for newspaper reports and 6858 for other photographs. See image i7 for high res scan of album photograph. See image i8 for high res scan of negative - on a large format size neg - most likely purchased from The Courier. Scanned at 3200dpi. Yields information about Ballarat 17 in an accident with a bus used a doughnut kitchen and S.E. Dickins Store, Bridge St Ballarat.Set of images and a copy negative of a Black and white photograph of an accident.See image trams, tramways, grenville st., accidents, s.e. dickins, tram 17 -
 Ballarat Tramway Museum
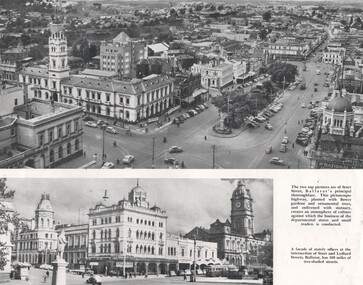
Photograph - Illustration/s, Ballarat Views, 1950's mid
Single sheet of printed paper, collected from a magazine (p59/60) with two black and white photos of Ballarat and one colour of Bendigo. Photo 1 - 260mm long x 122mm high, photo of north east Ballarat from Town Hall, looking out to Black Hill. Photo similar to Reg. No. 102, but buildings on corner of Grenville and Bridge St has a Plume sign instead of a Mobilgas Ad. This indicates early to mid 1950's. One tram in loop in one in Bridge St. Also has a "Neptune" sign in photograph. Photo 2 - 195mm long x 75mm high - from north east corner of Sturt and Lydiard Sts looking towards Town Hall and Craig's Hotel. Photo includes SEC bogie at tram stop and the front end of bus travelling east in Sturt St. Photo 3 - 230mm long x 156mm high - colour printed photo of Pall Mall, Bendigo from west side (by Post Office), looking towards the Shamrock Hotel. Photo includes signs for "COR Motor Spirit", "Tanox Paint" and the rear of a Bendigo to Huntly bus. See item Reg. No. 102trams, tramways, ballarat, bendigo, pall mall, oil companies -
Ballarat Tramway Museum
Poster, Hocking ?, MTA 1985 Centenary, 1985
A group of four posters published for the centenary of Melbourne trams in 1985 by the Metropolitan Transit Authority 701.1 - Poster on creamy paper, title "The Centennial Celebration of the Melbourne Tram 1885 - 1985", features cable tram dummy, bogie cable trailer, horse tram, A, F, J, S, W2, U, SW2, Z3, and A class of 1984 on poster with three tickets illustrated as well. (two copies of this poster added June 2000 - from the ARHS Vic. Div., June 2000 These are black and white versions of the poster, on white paper, different in size - 640H x 445W) 701.2 - as for 701.1m but on glossy paper, titled "Tramways 1885 - 1985". 701.3 - Poster on glossy paper, featuring Melbourne Buses, titled "Buses 1925 - 1985", features 11 different bus types. 701.4 - Poster on glossy paper, featuring Melbourne suburban trains, titled "Railways 1854 - 1985", features 11 different railway trains, or pictures. Made by Hocking? -on bottom of each poster is a signature, appearing to be the name Hocking.trams, tramways, melbourne, centenaries, posters, public transport -
 Ballarat Tramway Museum
Functional Object - Bankcard plates and envelope, Milldean Press, 1970's mid
831.1 - Aluminium plate cut and stamped with the letters and words "467026 1 / BALLARAT TRAMWAY SO / BALLARAT VIC". Used by the BTPS/BTM in the ANZ Bankcard machine as the ID plate from the late 1970's to July 1998, when replaced by the Commonwealth Bank Machine. Plate salvaged for archive storage. Has two holes and cut outs for location onto machine. 831.2 - Plastic card -with words " ANZ BANK / MERCHANT SUMMARY CARD / CREDIT CARDS" and embossed onto cards is "561057 3011 467026 1 / BALLARAT TRAMWAY SOC / BALLARAT VIC". Words ANZ in the ANZ blue style of the time, rest black printing on white card. 831.3 - Envelope that contained item 831.2 - white envelope used by the BTPS at the time, mid 1970's with handwriting in black ink "Society Bank Card / For Claiming on / To be kept in safe at all times" Envelope has the words in green ink "BALLARAT TRAMWAY PREERVATION SOCIETY LIMITED / BOX 632, P.O., BALLARAT, VICTORIA, 3350 / A voluntary organisation operating the / BALLARAT TOURIST TRAWAY / Botanic Gardens, Ballarat". Envelope printed by Milldean Press.See 831.3tramways, trams, bankcard, btps, stationery, sales