Showing 633 items
matching destination city
-
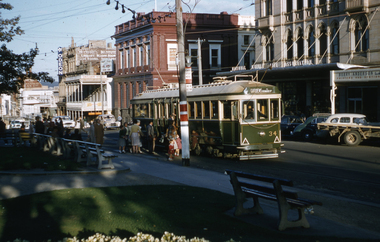
 Ballarat Tramway Museum
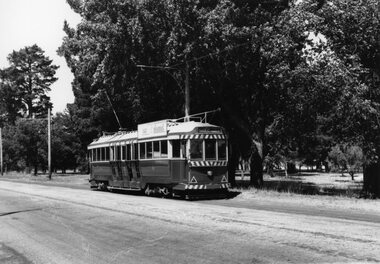
Slide - 35mm slide/s, Ben Parle, Jan. 1954
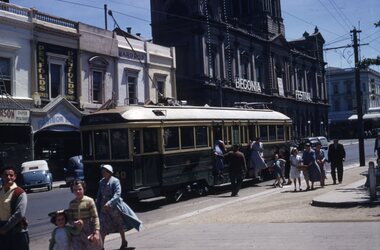
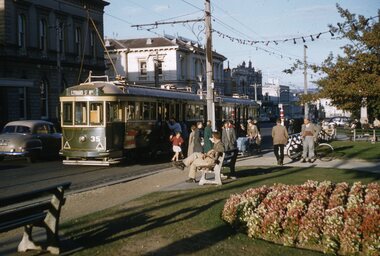
Kodachrome Transparency - 35mm slide - cardboard mount, with one side with red border and words "Kodachrome Transparency" top and bottom. On the other side is "Made in England" and "View from this side". Photo taken by Ben Parle 1/1954. Photo of Ballarat No. 40 at the City Terminus, south side of Sturt St at Lydiard St. Shows a number of passengers disembarking the tram. Tram has the destination of Gardens. The Town Hall has been decorated for the forthcoming Begonia Festival - note the sign and the lights. In the background are advertisements for Penfolds wine, Wardrops building, For high resolution scan see btm2812h.tif "Sturt St Ballarat" "1/54"tramways, trams, city terminus, lydiard st north, town hall, sturt st, passengers, tram 40 -
 Ballarat Tramway Museum
Slide - 35mm slide/s, Ben Parle, Jan. 1954
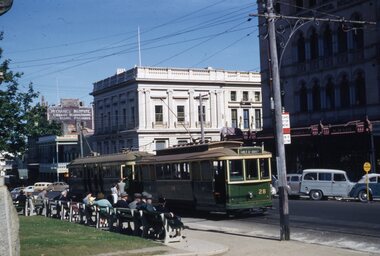
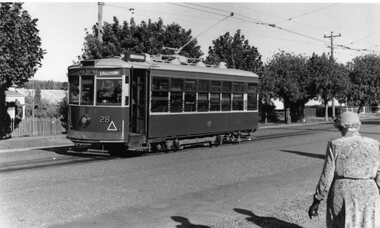
Kodachrome Transparency - 35mm slide - cardboard mount, with one side with red border and words "Kodachrome Transparency" top and bottom. On the other side is "Made in England" and "View from this side". Photo taken by Ben Parle 1/1954. Photo of Ballarat No. 28 and 35? at the City terminus, south side of Sturt St. at Lydiard St. with the Commonwealth Bank, Unicorn Hotel and the Ballarat Mechanics Institute buildings in the background. Number of potential passengers waiting at the stop. Note the tram stop signs. No. 28 has the destination of Gray St. Sebastopol. Note the verandah on the National Mutual Life building and the portable "No Parking" sign on the right hand side of the photograph. For high resolution scan see btm2813h.tif "Sturt St Ballarat" "1/54"tramways, trams, city terminus, lydiard st north, sturt st, tram 28, tram 35 -
 Ballarat Tramway Museum
Slide - 35mm slide/s, Ben Parle, Jan. 1954
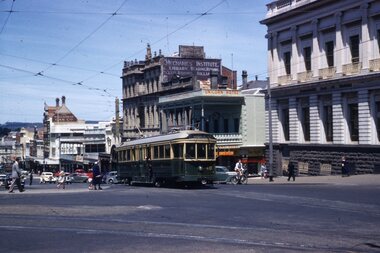
Kodachrome Transparency - 35mm slide - cardboard mount, with one side with red border and words "Kodachrome Transparency" top and bottom. On the other side is "Made in England" and "View from this side". Photo taken by Ben Parle 1/1954. Photo of Ballarat No. 40 at the intersection of Sturt St. at Lydiard St. with the Commonwealth Bank, Unicorn Hotel and the Ballarat Mechanics Institute, Ballarat Gas Company buildings in the background. Tram has the destination of Gardens via?. For high resolution scan see btm2814h.tif "Sturt St Ballarat" "1/54"tramways, trams, city terminus, lydiard st north, sturt st, tram 40 -
 Ballarat Tramway Museum
Slide - 35mm slide/s, Ben Parle, 5/04/1958 12:00:00 AM
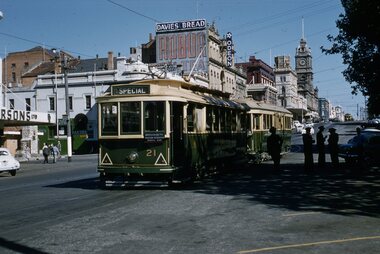
Kodachrome Transparency - 35mm slide - cardboard mount, with one side with red border and words "Kodachrome Transparency / Processed by Kodak" top and bottom. Photo taken by Ben Parle 5/4/1958. Has slide No. "13" stamped in red in top corner. Photo of the No. 21 and 41in the Sturt St. City Loop, with a number of SEC crewmen standing in the shadows, while on the AETA tour. No. 21 has destination of Special. Both trams are carrying the AETA special car auxiliary signs. Trams have been reversed in the loop, and possibly to run "bang road" to Bridge St. Has the Odeon theatre in the background, advertisements for Robur Tea, Davies Bread. Note the Pie / Pasties sign on the building behind 21. For high resolution scan see btm2847h.tif"City Loop" "-5-4-58"tramways, trams, sturt st, city loop, tram 21, tram 41 -
 Ballarat Tramway Museum
Slide - 35mm slide/s, Ben Parle, 5/04/1958 12:00:00 AM
... , Victoria St., inbound to the City. Tram has the destination...., inbound to the City. Tram has the destination of Gardens via Sturt ...Kodachrome Transparency - 35mm slide - cardboard mount, with one side with red border and words "Kodachrome Transparency / Processed by Kodak" top and bottom. Photo taken by Ben Parle 5/4/1958. Has slide No. "17" stamped in red in top corner. Photo of Ballarat No. 14, passing through the King St. Loop, Victoria St., inbound to the City. Tram has the destination of Gardens via Sturt St. West. "Victoria St line" "5-4-58"tramways, trams, victoria st, king st, tram 14 -
 Ballarat Tramway Museum
Slide - 35mm slide/s, Ben Parle, 5/04/1958 12:00:00 AM
... , Victoria St., inbound to the City. Tram has the destination...., inbound to the City. Tram has the destination of Special and has ...Kodachrome Transparency - 35mm slide - cardboard mount, with one side with red border and words "Kodachrome Transparency / Processed by Kodak" top and bottom. Photo taken by Ben Parle 5/4/1958. Has slide No. "18" stamped in red in top corner. Photo of Ballarat No. 41, pass through the King St. Loop, Victoria St., inbound to the City. Tram has the destination of Special and has the AETA special tram sign. Note the garden beds. For high resolution scan see btm2851h.tif"Victoria St line" "5-4-58"tramways, trams, victoria st, king st, aeta, tram 41 -
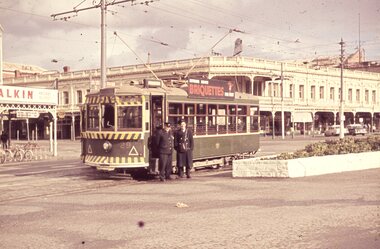
 Ballarat Tramway Museum
Slide - 35mm slide/s, Ben Parle, 5/04/1958 12:00:00 AM
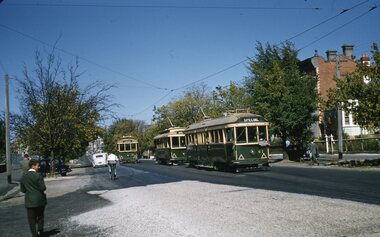
Kodachrome Transparency - 35mm slide - cardboard mount, with one side with red border and words "Kodachrome Transparency / Processed by Kodak" top and bottom. Photo taken by Ben Parle 5/4/1958. Has slide No. "20" stamped in red in top corner. Photo of Ballarat No. 41, 21 in the Seymour St loop, Lydiard St North, with No. 31 leaving the loop, inbound to the City. No. 41 and 21 have the destination of Special and has the AETA special tram sign. For high resolution scan see btm2853h.tif"Lydiard St Nth line" "5-4-58"tramways, trams, lydiard st, seymour st loop, aeta, tram 41, tram 21, tram 31 -
 Ballarat Tramway Museum
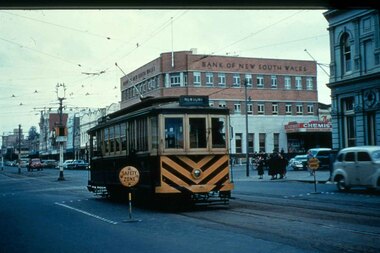
Slide - 35mm slide/s, Ben Parle, 8/04/1958 12:00:00 AM
Kodachrome Transparency - 35mm slide - cardboard mount, with one side with red border and words "Kodachrome Transparency / Processed by Kodak" top and bottom. Photo taken by Ben Parle 8/4/1958, date stamped onto slide. Has slide No. "1" stamped in red in top corner. Photo of Ballarat 35 and another bogie tram at the City terminus, north side of Sturt St, taken from the median strip. Has the ANZ Bank and the Ballarat Post Office in the background. No.35 has the destination of Lydiard St. loop. "Sturt St / Lydiard St" / "8-4-58"tramways, trams, sturt st, city terminus, lydiard st, tram 35 -
 Ballarat Tramway Museum
Slide - 35mm slide/s, Ben Parle, 8/04/1958 12:00:00 AM
Kodachrome Transparency - 35mm slide - cardboard mount, with one side with red border and words "Kodachrome Transparency / Processed by Kodak" top and bottom. Photo taken by Ben Parle 8/4/1958, date stamped onto slide. Has slide No. "2" stamped in red in top corner. Photo of Ballarat 34 at the City Terminus, south side. Tram has the destination of Gardens via Drummond North. A number of passengers boarding the tram. Has the Commonwealth bank, National Mutual Life Association building, Berry Anderson and Odeon Theatre in the background. For high resolution scan see btm2875.tif"Sturt St / Lydiard St" / "8-4-58"tramways, trams, sturt st, city terminus, lydiard st, tram 34 -
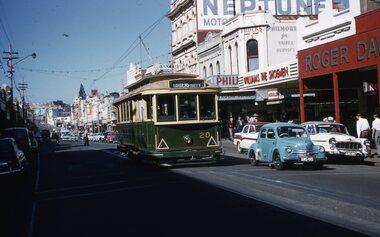 Ballarat Tramway Museum
Slide - 35mm slide/s, Ben Parle, 8/04/1958 12:00:00 AM
Kodachrome Transparency - 35mm slide - cardboard mount, with one side with red border and words "Kodachrome Transparency / Processed by Kodak" top and bottom. Photo taken by Ben Parle 8/4/1958, date stamped onto slide. Has slide No. "4" stamped in red in top corner. Photo of Ballarat 20, city bound, Bridge St. Tram has the destination of Gardens via Sturt St. West. Buildings in the background are Roger David, Williams the Schoeman, Philmore Frocks and an advertisement for Neptune petrol For high resolution scan see btm2876.tif"Sturt St Ballarat" / "8-4-58"tramways, trams, bridge st, roger david, neptune, tram 20 -
 Ballarat Tramway Museum
Slide - 35mm slide/s - set of 2, Travis Jeffrey, 12/1994 or 1/1995
Two Plastic mount (black base, white cover) slides, of No. 671 on No. 4 road of the BTM Depot, being repainted, taken by Travis Jeffrey either Dec. 1994 or Jan. 1995. Painting of the tram in Melbourne MMTB green had commenced, note colour of the destination box. The decision was made soon after to paint the tram in the City of Ballarat Colour.tramways, trams, btm depot, depot, city of ballarat, tram 671 -
 Ballarat Tramway Museum
Slide - 35mm slide/s, Travis Jeffrey, c1962
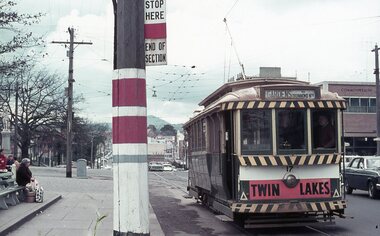
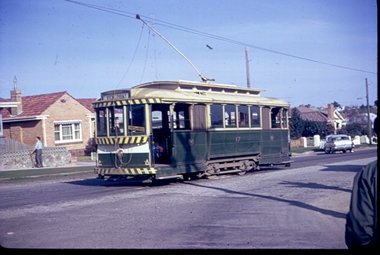
Agfa plastic mount (blue base, white cover) with a photo of Bendigo 29 at Charing Cross, with another single truck car behind it (possibly No. 7). Has two SEC crewman (Driver and Conductor) standing at the front of the tram. In the background is the Ezywalkin Shoe Store and the City Club Hotel in the background. Tram has the destination of North Bendigo and has a SEC Briquettes roof advertisement."BES 12" in penciltramways, trams, bendigo, north bendigo, charing cross, city club hotel, tram 29 -
 Ballarat Tramway Museum
Slide - 35mm slide/s, c1955
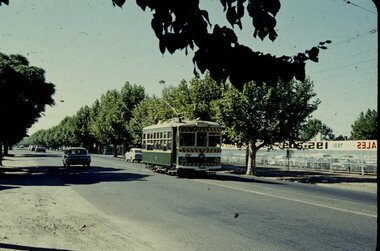
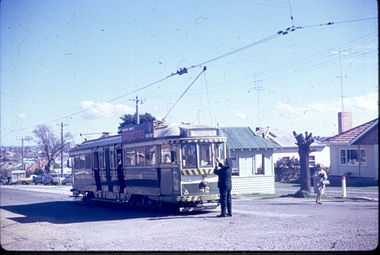
Agfachrome Professional plastic mount (blue base, white cover) reproduction slide of a colour slide of Geelong No. 5, at the corner of Moorabool and Ryrie St. Geelong. Has the Bank of New South Wales building in the background. Also a set of "Bar traffic lights" and signs indicating the safety zone at the tram stops on either side of the road are shown in the photo. The signs could be taken away from the stops when necessary. The tram has the destination of Newtown Photo taken after 1953. Dave O'Neil's notes that the tram has terminated in the city instead of through routing to Eastern Park and was about to reverse to run to Newtown - an unusual working. "G 8" and "1 -8" in pencil.tramways, trams, geelong, moorabool st, ryrie st, traffic lights, safety zones, tram 5 -
 Ballarat Tramway Museum
Photograph - Colour Print/s, Ron Scholten, early 1960's
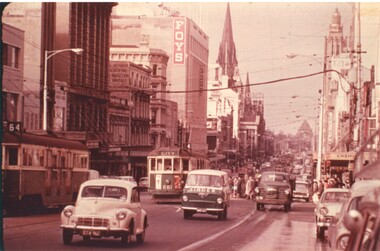
... 661 northbound, route 4, showing "City" as a destination... south with W3 661 northbound, route 4, showing "City ...Colour print of Swanston St Melbourne looking south with W3 661 northbound, route 4, showing "City" as a destination at the intersection of Lonsdale St Another W3 is southbound. Has many vehicles in the street, including a Morris Minor and a van with word "Singer" across the front. In the photo is the Foys building, and a sign for the "Victorian Society for Protection of Animals". Photographer - possibly Ron Scholten. Printed on Kodak paper - from a slide.trams, tramways, mmtb, swanston st, tram 661 -
 Ballarat Tramway Museum
Film - Movie Film & Box, Kodak, 1960 to 1971
Yields information in movie film format of Ballarat trams in 1960 through to 1971, how the system operated and was used by people, including special trams., Yields information in movie film format of Ballarat trams in 1960 through to 1971, how the system operated and was used by people, including special trams.Movie film - 8mm, approx. 15 mins, without leader strip on a plastic reel, within a clear plastic case - Standard 8, titled "Ballarat Trams". See Reg Item 4957 for DVD and Mini DVD. Has been transferred to DVD - see Reg item 4957 Made by Arthur Hill. Also transferred to DVD by Rod Cook Oct. 2015, via Roger Greenwood for use in his DVD, "The City of Ballarat Trams, Gardens & Gold" of 2016. See Reg Item 6883. In Arthur's letter - on file - Made between 1960 and August 1971. Synopsis: based on time. Between 1960 and 1968 0:00 Trams Ahead sign before the Victoria St terminus with 20 at terminus 0.14 - No. 20 leaving Victoria St terminus and being followed along Victoria St by car and then passengers jointing the tram at a tram stop. 00.40 - No. 12 (c1960) in bound along Lydiard St North and arriving in the Gregory St loop. 00.56 - No. 12 and 14 crossing at Gregory St. 01.20 - No. 33 and a bogie car crossing at depot loop. 01.31 - No. 18 travelling along Wendouree Parade with the Lake in the background. 01.42 - No 41 at depot junction and running into the depot No. 2 road with a short sequence of a tramway signal. 02.17 - SEC Sign at the depot gate, shot of 41 in No. 2 road, with the lights other way around, Caution beware of trams sign and a red signal. 02.31- Timetable sign at Gardens Loop 02.36 - No. 30 arriving at Loop and view of a signal with no lights showing. 02.48 - Destination roll being changed through a number of destinations. 03.26 - No. 20 arriving at Carlton St loop with the Olympic monument in the background and the red signal light going out. 03.31 - a lady standing at the front of No. 20, with an ice cream in hand, and No. 17 arriving at the Carlton St loop with a short sped up sequence and No. 20 departing from the loop, followed by No. 17 leaving the loop, heading into the city. 03.41 - No. 13 inbound from Sebastopol crossing Albert St and heading into the city. 04.12 - view of signal and contactor, the light going green and the tram passing underneath. 04.24 - No. 12 at the Sebastopol terminus and departing. 04.51 - No. 12 crossing Albert St Sebastopol. 05.16 - Following No. 12 along Albert St, with Borough Offices in background initially. 05.28 - No. 12 arriving at the Grey St loop with No. 14 arriving at the loop from the city and both trams departing. March 1971 05.58 - No. 30 being followed along Barkly St, Mt Pleasant and the pole being turned at the terminus 06.32 - No. 30 picking up a lady passenger. 06.38 - view from the front of a tram, with the drivers hand and a cigarette, view from the back of the tram, along the Mt Pleasant route and running through the loop and then turning into Main St - has the Ballarat (East) fire station in one sequence, and finally running along Main St. 07.35 - view from tram, with car turning into Bridge St. and then running into Sturt St passed the Parking Loop, and along Sturt St. 08.32 - Points at Drummond St North being changed, doors changed over and the tram running along Drummond St. North, through the Mill St loop and into Macarthur St and in Wendouree Parade, with the Lake Wendouree in view and crossing No. 12 at the Depot Loop, with crews chatting, past the depot, a lady passenger getting off the tram near Forest St., and arriving at Gardens Loop with the same lady passenger who got on in Barkly St, getting off the tram. 11.09 - view of No. 30 at Gardens Loop, departing the loop. August 1971 11.30 - R761 crossing Melton (Exford Wier) on the special train to Ballarat and then the bridge between Ballan and Gordon Stations. 12.16 - View from the front of a tram, following No. 26 along Lydiard St North, crossing at Gregory St and returning to the City. 12.39 - No. 14 and one other tram running along Albert St to Sebastopol, crossing No. 21 at Grey St and then to Sebastopol terminus, crossing Albert St and return and running along Albert St. 13.36 - No. 26, 39 crossing 13 at Gardens Loop. 14.00 - view looking across Lake Wendouree. 14.07 - 26 arriving at Victoria St, running part of Destination roll, passengers getting off with hotel in the background, trolley pole being turned and then with 39 following tram along Victoria St, crossing at the King St Loop. 15.07 - view of a trolley pole tracking through the overhead at curve 15.10 - end. Written labels giving title information on reel.trams, tramways, ballarat, sebastopol, lydiard st north, victoria st, mt pleasant, lake wendouree, depot, tram 12, tram 13, tram 14, tram 17, tram 18, tram 21, tram 26, tram 33, tram 39, tram 41 -
 Ballarat Tramway Museum
Photograph - Digital image Set of 10, 1971
Yields information about Ballarat Tramways and trams prior to the closure of the tramway system.Set of 10 digital images of Ballarat trams prior to closure, scanned from original slides by Stuart Lodington, 1971 prior to closure of the system. .1 - No. 17 at the City Centre, Sturt St, south side, with Gardens via Sturt St on destination roll. Can see the ESCo switch box in the back and the stop and section sign on the adjacent pole. .2 - No. 26 at Sebastopol terminus alongside the Royal Mail Hotel. The tram has yet to turn the pole or the destination roll. Note the Bus Stop sign on the pole, just prior to closure. .3 - ditto .4 - No. 27 and 30 crossing in Skipton St at the Bell St loop (see also btm4975i3) .5 - No. 32, Gardens, about to enter the Carlton St loop, with Lake Wendouree in background, Wendouree Parade. .6 - No. 32 at Depot junction, good photo of depot trackwork entry area. .7 - No. 21, Wendouree Parade, Gardens area, north bound, showing Gardens via Sturt. .8 - No. 12, inbound on Sturt St west at a tram stop. Has destination of Mt. Pleasant. .9 - No. 27 at Lydiard St north terminus with the shelter in the background. .10 - No. 21 at Gardens Loop, tram has destination of Mt. Pleasant. Crews sitting in the saloon.trams, tramways, ballarat, sturt st, sebastopol, drummond st sth, wendouree parade, carlton st, depot, depot junction, trackwork, gardens, sturt st west, crews, tram 17, tram 26, tram 27, tram 32, tram 21, tram 12 -
 Ballarat Tramway Museum
Photograph - Digital image Set of 7, 1971
Yields information about Ballarat Tramways and trams prior to the closure of the tramway system.Set of 7 digital images of Ballarat trams prior to closure, scanned from original slides by Stuart Lodington, 1971 prior to closure of the system. .1 - No. 26 and 27 inbound Sturt St West at Parker St loop, both trams showing CITY. .2 - No. 43 and 14 crossing at Parker St Loop. .3 - No. 39 turning in bound from Hamilton Ave into Sturt St West. Tram showing destination of Mt Pleasant. .4 - No. 39 inbound in Hamilton Ave. .5 - No. 14 (Gardens via Sturt St W), and No. 13 (Special) at Gardens Loop .6 - No. 26, crossing Albert St Sebastopol, northbound, going to Lydiard St North .7 - Crew of No. 43 standing in front of the tram at Gardens Looptrams, tramways, sturt st west, parker st loop, hamilton ave, albert st, crews -
 Ballarat Tramway Museum
Photograph - Black & White Photograph/s, 1905
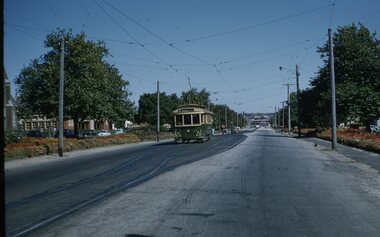
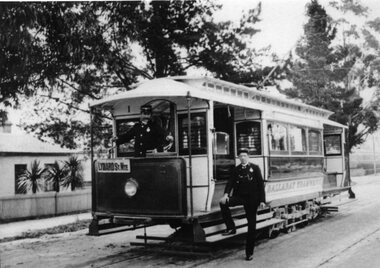
Yields information about Blackpool electric tramways in the 1880's, a system that was offered to the City of Ballarat by tender.Black and White photograph of ESCo Ballarat No. 1 in Ballarat, soon after opening in 1905, destination sign placed over front dash canopy. Has the driver (Rupert Bowd) at the controls. Has the destination of "Lydiard St Nth". (Rupert should be Robert - see page 138 of Alan Bradley's book, The Golden City and its Tramways) - at the Gregory St terminus. Two copies See Reg Item 6974 for another copy and details of the driver/motorman.Copy 1 - in ink "220) and Ballarat Tramways (Company) along the top edge and a "William F Scott" address label and "WFS Collection" in the bottom right hand corner. Copy 2 - in ink "220) and Ballarat Tramways (Company) along the top edge and "Driver Rupert Bowd B1872, Skipton St. Ballarat".trams, tramways, esco, opening, gregory st, tram 1 -
 Ballarat Tramway Museum
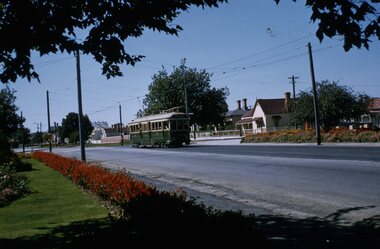
Photograph - Black & White Photograph/s, Wal Jack, 28/02/1962 12:00:00 AM
Yields information about Ballarat Trams and streetscapes and the city terminal area, late 1950's.Black and white print of Ballarat of No. 36 in Wendouree Parade, northern side of the lake. Tram has the destination of Gardens Via Drummond St, a roof advertisement for "Edmonds" Two copies. Photographed by Wal Jack 28/2/1962. Photo print courtesy of Port Dock Railway Museum, now the National Railway Museum. See worksheet 4311 for letter and details of prints sent to Bill Scott, 19/10/2001. Any photo credit to mention NRM Collection.On rear of copy 1"SEC Ballarat / 35 / Wendouree Parade / 28/2/62 2116 / " Copy 2 "Ballarat car 35" in ink, bottom right hand corner.trams, tramways, wendouree parade, tram 35 -
 Ballarat Tramway Museum
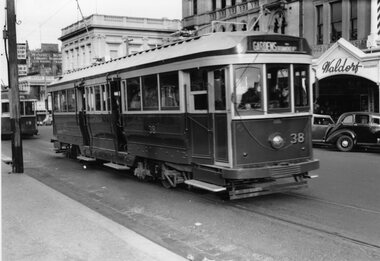
Photograph - Black & White Photograph/s, Doug Colquhoun, 27/04/1954 12:00:00 AM
Yields information about Ballarat Trams and streetscapes, the scrubber tram and the Bell Street loop, early 1960's.Black and white print of Ballarat of No. 38 in Sturt St, just to the west of Lydiard St with No. 19 in the background. Tram has the destination of Gardens via Drummond North, No. 19, Sebastopol. IN the background is the Waldorf shop premises, tram stop signs. Photo by Doug Colquhoun 27/4/1954. Two copies. Photo print courtesy of Port Dock Railway Museum, now the National Railway Museum. See worksheet 4311 for letter and details of prints sent to Bill Scott, 19/10/2001. Any photo credit to mention NRM Collection.On rear of copy 1"SEC Ballarat / 38 / Sturt St / 27/4/54 2118 / D A Colquhoun " Copy 2 "DAC" in ink, bottom right hand corner.trams, tramways, sturt st, city, tram 38, tram 19 -
 Ballarat Tramway Museum
Photograph - Black & White Photograph/s, Wal Jack, 12/04/1959 12:00:00 AM
Yields information about Ballarat's trams, and the City centre area and motor vehicles late 1950's.Black and white print of Bendigo 28 at the Quarry Hill terminus, 12/4/1959, photo by Wal Jack. Has a lady walking across to the tram - dressed in gloves and hat. Tram has the destination of Eaglehawk. Photo print courtesy of Port Dock Railway Museum, now the National Railway Museum. See worksheet 4311 for letter and details of prints sent to Bill Scott, 19/10/2001. Any photo credit to mention NRM Collection.On rear of copy "SEC Bendigo #28 / Quarry Hill terminus / 12/4/59 / Wal Jack photo / National Railway Museum.trams, tramways, bendigo, quarry hill, tram 28 -
 Ballarat Tramway Museum
Ephemera, Wal Jack, Wal Jack notebook, 1940's
Demonstrates Wal Jack's records, hand written in a recycled notebook. Note - several sheets have been cut from the book - appear to be done before use by Wal. The crossed out sheets have not been imaged - these have been transferred by Wal to Reg Item 5507 and re-ordered. Image 30 shows a sample of a crossed out page. See related documents for a pdf file of the contents. Scan No. BTM5623iX Page No. Title or Subject Notes 1 Front 2 Inside Cover Addresses for Jack McLean, John Buckland Trooper Larsen Inside front cover. 3 1 Note re NSWT steam tram motor, MMTB PCC import issues, Peter Duckett seeking info and Photo of Julien’s battery tram on test in Melbourne 4 2 MMTB No. 8, 4, photos, Tyrell’s of Sydney photos, Perth 63 dimensions and MMTB plans for Domain Road & St Kilda Rd Jtn. 5 3 Notes re NSWGR P32, VR locos at Wodonga 13/10/1941, SAR V Class V143, SAR locos – W and Wx 6 4 NSW Private locos, Woy Woy quarry and AGL at Mortlake 5 Blank 6 Blank 7 7 First cable trams – links to photos T154, 29, 154 (Adelaide) 8 8 T156, Powelltown, Ray Pearson Negs 9 9 QR B18 ¼ locos, Ray Pearson’s scrap book, PMTT Zeppelin style trams, MMTB T class locations and 178/179 rebuilding. 10 10 Hawthorn horse tramway, VR Black Rock terminus sketch 11 11 NSW Tramways, Ryde, MMTB L class, Geelong tramway notes 12 12 Locomotive “Ballarat” in WA, Brisbane and various contacts. 13 13 Notes re VR News – 1943, H class, derailments, max speeds, Koondrook tramway and Geelong level crossing. Individual typed sheets pasted onto page – loose within book. 14 to 17 14/17 List of MMTB trams to 877 and work trams Some errors noted. 18 18 Newspaper cutting – Tram Record Day revenue (Brisbane 10/1943), Steam Trams at Journey’s end – Sydney – 6/1943 list of equipment being sold by Sydney Ferries, at Parramatta, 6/1943. MMTB Tram crossings in Melbourne, list of Sydney photos sent to Wal. Cuttings and Individual typed sheets pasted onto page. 19 19 Midland locos WA, VR open wagon stencils and a siding at Mt. Evelyn. Individual typed sheets pasted onto page. 20 20 Note re Sydney four wheel tourist trams and Hawthorn Max. Traction cars locations c1945. 21 to 23 21/23 Notes on Geelong Bogie trams and carrying flags for declaration of Newtown and Chilwell as a city – 1/10/1949 (See also Reg Item 5641) 24 to 26 24/26 Notes on Wellington Corporation Tramcars 37 27 Kelburn – Karoi cable line Wellington 28 to 29 28/29 Auckland Tramway Board tramcars notes 30/31 Blank 30 32/33 Notes on Ballarat tramcars – ESCo Crossed out 34/37 Ditto – SEC Crossed out 38 Music for the people notes Crossed out 39 Notes on Ballarat trams with tail lights Crossed out 40/43 Notes on Ballarat bogie trams Crossed out 44/45 Notes on SEC tram controllers, dead man and truck lengths. Crossed out 31 45 List of Ballarat Destination roll – Dec 1949 32, 33 46/47 Notes on Bendigo Bogie Trams – 1940’s 34 48 Bendigo Destination roll on a Birney tram Easter 1950, notes on tram tail lights and fares on the Bendigo system. 49 Blank – though headed “Bendigo Birney Trams” 50 Notes trams used on special days in Ballarat Crossed out 51 Ditto and No. 24 and 23 Crossed out 52 Ditto, 15, 11, 23 and Gold tram Crossed out 53 Notes on 34 caused delays, 5/1950, and use of 23 as gold tram Crossed out 54 Notes on repair to track at Sturt and Drummond 6/1951 Crossed out - see Reg Item 7720. 55 Notes on track work in Ballarat early 1950’s Crossed out 56/57 Notes on 33, 37, pay as you enter signs and 1953 special workings Crossed out 58/60 Notes trams used on special days in Ballarat Crossed out 61/64 Blank 35 65 “Salute to the Cable Tram” – transcription of text from Truck and Bus Transportation (July 1948) 36, 37 66/67 Continued from above and list cable tram routes, opening, closing, length and route colours. 38 68 List of photos in Truck and Bus Transportation, Anniversary Issue July 1948 of cable trams. 69 Blank 39 70 Notes on Brunswick TT, Fitzroy TT colours, Adelaide Service trams and MMTB route lengths. 40 71 Notes on HTT colours, tramcars, PMTT trams and colours and NMETL colours, trams and route destination signs 41 72 Notes on MMTB routes, cable and other Melbourne tram disposals, and sale of cable trams and storage at Brunswick. 42 73 Blank - page was headed Lugarno, Switzerland and Italian border 42 Handwritten sheet – photos to get – R. Field and Peter Duckett. 43, 44 74/75 Listing of trains on all lines leaving Ballarat and days run. 45 77 Listing of negatives sent to K. Rogers in 1944 and list of MMTB Max. Traction bogie trams 117 to 138 and disposal 46 77 Listing of MMTB trams, - appears to be something to do with photos or negs held. 47 78 Listing of Ray’s (Pearson) negs /photos of Brisbane trams and other railway photos. 79 Blank 48 80 Prices of pine timber in 4/1942, list of photos “I want”, notes re VR Train length, Ironbark Gully bridge, 3817 in Harden smash 7/1948 and 1948 Ballarat destination roll. Partly crossed out. Rear Cover. Has a strong association with Wal Jack, his work to collect and record both railway and tramway information. Yields information about tramways in Ballarat, Bendigo, Geelong and other cities tramways and railways.Grey covered book with black binding containing 40 lined sheets (80 pages) with handwritten notes with the front cover partly cut out and the words "Jewellery & Engraving" book written in. Contains some newspaper clippings and pasted typed notes as listed below. The image number of each sheet is given. See individual pdf files. trams, tramways, mmtb, ballarat, bendigo, sydney, brisbane, railways, geelong, new zealand, victorian railways, sec, esco -
 Ballarat Tramway Museum
Photograph - Black & White Photograph/s, Wal Jack, Easter 1941, Saturday
Black and White print contained within the Wal Jack Bendigo and Geelong Album, see Reg Item 5003 for more details. Photo of No. 18 at Charing Cross, Easter 1941. Tram has the destination of Eaglehawk and is carrying a white disk. Has the City Club Hotel in the background, with a Peters Ice Cream sign on it. i1 - scan of print in the album i2 - rear of image i3 - scan of negative at 3200dpi added 6/6/2020. On rear in ink "T187, Bendigo Tramways, No. 18 Summer Car at Charing Cross, Easter Saturday" and in bottom right hand corner "Photo by W. Jack"trams, tramways, bendigo, easter fair, charing cross, tram 18 -
 Ballarat Tramway Museum
Slide - 35mm slide/s - set of 10, Campbell Duncan, Jan. 1971
Set of 10 Ferraniacolor slides - cardboard mounts taken on either 10/1/71 or 16/1/71. .1 - Birney No. 30, Golden Square line, inbound near Cathedral with car yard in background. .2 - ditto, with Cathedral gardens in background. .3 - single trucker, with two SEC roof adverts, entering Nolan St enroute to North Bendigo. Shows the driver sitting in a side on shot. A 4 square store in the background, with a fading advert for "Peeled Tomatoes". .4 - No. 6 turning from Nolan St into McCrae St with 4 square store in background. .5 - No. 26 at Quarry Hill with cemetery in background. .6 - No. 6 at the North Bendigo Terminus .7 - No. 26 outbound to Eaglehawk on the Railway Overbridge, Mt Korong Road. .8 - No. 17 (inbound to City and Quarry Hill) and another bogie crossing at a loop on the Eaglehawk line. Both trams have SEC roof adverts. The driver of the outbound car is boarding the tram. Based on .9, it is No. 3 at Long Gully. .9 - No. 3 waiting at Long Gully Loop . .10 - No. 26 at Quarry Hill terminus, with destination of Eaglehawk.In ink on slide: .1 - "1/2 mile out on Golden Square line - 10/1/71 (Sun)." .2 - "1/2 mile out on Golden Square line - 10/1/71" .3 - "Has just rounded curve near lake Weeroona on North Bendigo line - 10/1/71 (Sun)." .4 - "16/1/71" .5 - " 10/1/71 (Sun)." .6 - "North Bendigo terminus, 16/1/71 (Sat)" .7 - "10/1/71 (Sun) c 3pm" .8 - "Cross Eaglehawk line - 10/1/71 (Sun)." .9 - "Jackson St Loop on E'Hk line awaiting up - 10/1/71 " .10 - "Quarry Hill terminus Bendigo - - 10/1/71"tramways, trams, bendigo, golden square, high st, nolan st, north bendigo, quarry hill, long gully, railway bridge, tram 30, tram 6, tram 26, tram 17, tram 3 -
 Ballarat Tramway Museum
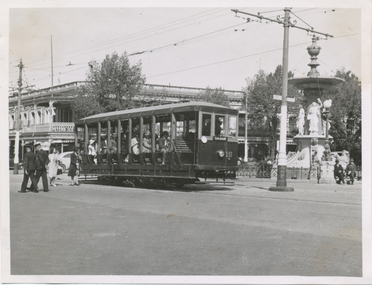
Photograph - Digital image, 1938
Yields information about the appearance and the use of ESCo tram 24 and other single truckers late 1930's and the appearance of the north side of Sturt St near Lydiard St north.Digital Copy of a photograph sourced by Roger Greenwood as part of his work on the production of a Video Tape on Ballarat's trams. Photographer and source details not provided by Roger. See btm6302doc.pdf Image of No. 24 and two other single truckers at the City terminus, 1938. Tram has the destination of Lydiard St North. Shows the appearance of the trams at the time. Has a number of passengers on board. In the background is the ANZ building, Post Office and Whitesides Tailors and Mercers.trams, tramways, sturt st, lydiard st nth, city, tram 24 -
 Ballarat Tramway Museum
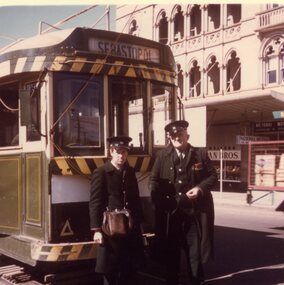
Photograph - Colour Print, Lilian Butler, Aug. 1971
Possibly has a strong association with SEC Ballarat tram crews.Colour print of driver or motorman - R.Segrave (34) and Conductor A Morris? (cap badge 58) standing in front of a tram with the destination of Sebastopol at corner of Sturt and Lydiard Streets. Photo printed on Kodak Paper. See btm6576i1.jpg for a colour slide of this photo. Two copies held. Names based on list given in Reg Item 3425in ink on rear "With my compliments Lilian Butler".trams, tramways, crews, motormen, conductors, city -
 Ballarat Tramway Museum
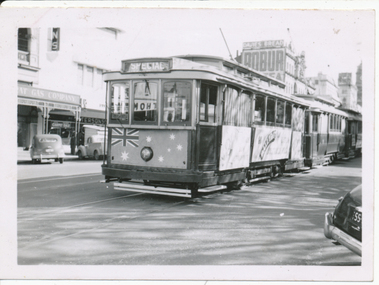
Photograph - Digital image, Wal Jack, 15/05/1956 12:00:00 AM
Yields information about the appearance of No. 25 promoting Made in Australia week during 1956.Digital image from the Wal Jack Ballarat Album of a photograph of No. 25 at the City loop, carrying banners for Made in Australia Week. Tram has a sheet with an Australian flag painted onto it, with holes made for the lights on the front of the tram, and three panels that have been fixed to the side of the tram. Tram has the destination of Special. The Town Hall is in the background. Photo by Wal Jack 15-5-1956. See image i2 for rear of photograph. See image i3 for hi res scan of print. See image i4 for hi res scan of negativeOn rear of photograph in ink "SEC, Ballarat No.25 with Made in Australia posters on sides, Sturt St Loop, Ballarat 15-5-56" and in top right hand corner, Wal Jack stamp with "T236" written in.trams, tramways, sturt st, city loop, advertisements, made in australia week, tram 25 -
 Ballarat Tramway Museum
Photograph - Black and White photograph/s - mounted, John Phillips, c1971
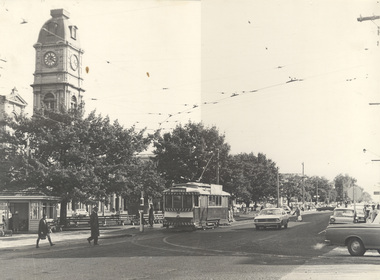
Yields information about the city tram terminus, Sturt and Lydiard c1971 and the motor vehicles in use.Black and White photograph mounted on heavy cardboard backing. Photo of Ballarat No. 26 with the destination of Victoria St at the city tram terminus in Sturt St. Has many motor vehicles in the photograph along with some pedestrians. Town Hall in the background. Has parts of old support tape on rear. Note image scanned in two runs through a scanner, resulting in the shading in the image file.trams, tramways, sturt st, town hall, city, tram 26 -
 Ballarat Tramway Museum
Photograph - Digital image, Joy Waller, 19/09/1971 12:00:00 AM
... it is preparing to head back into the city, however the destination board... of the trolley pole it is preparing to head back into the city, however ...Copy of a colour slide showing Tram 17 in Lydiard Street North, at the terminus. This photo is taken from further north than 6013. From the direction of the trolley pole it is preparing to head back into the city, however the destination board is reading View Point.. One of the crew can be seen standing near a fence in the background, with a point bar in his hand. Several homes and motor cars can be seen. The photographer says this was taken on the last day of trams in Lydiard Street in 1971. There are shadows of other photographers at the location.trams, tramways, ballarat trams, crews, houses, last day, lydiard st nth, secv tramways, street scene, terminus, tramway closure, tram 17 -
 Ballarat Tramway Museum
Photograph - Digital image, Joy Waller, 19/09/1971 12:00:00 AM
... the trolley pole it is preparing to head back into the city... into the city, and the destination board is reading Sebastopol ...Copy of a colour slide showing Tram 42 in Lydiard Street North, at the terminus. This photo is taken from the north east looking down Lydiard Street. The conductor is adjusting the trolley pole it is preparing to head back into the city, and the destination board is reading Sebastopol. The shelter at the terminus can be seen, and there is a female passenger in hat and coat walking away from the tram. The photographer says this was taken on the last of the last tram to run in Lydiard Street in 1971. There is another photographer further down the street.trams, tramways, ballarat trams, crews, houses, last day, lydiard st nth, secv tramways, street scene, terminus, tramway closure, maximum traction, tram 42