Showing 743 items
matching gardens loop
-
 Ballarat Tramway Museum
Slide - 35mm slide/s, Travis Jeffrey, late 1960's
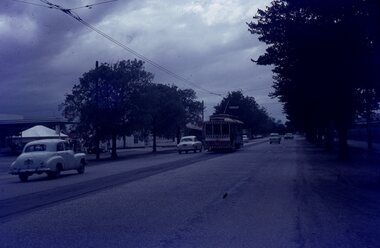
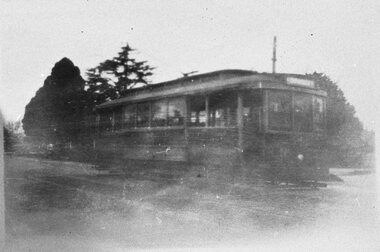
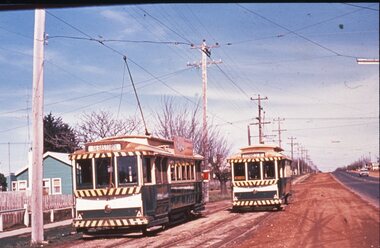
Agfa plastic mount (blue base, white cover) of a photograph of No. 12?, Macarthur St, just past the High St. or Macarthur St. Loop. Has a Service Station in the background. Tram has Twin Lakes sign on the front on the front of the tram. Photo taken late 1960s'. Slide rescanned at 3200 dpi 25-10-2020, jpg replaced, tiff file retained. This file was scanned in 2003 and may show colour changes."BAS 44" in penciltramways, trams, macarthur st, high st, tram 12 -
 Ballarat Tramway Museum
Slide - 35mm slide/s, Travis Jeffrey, late 1960's
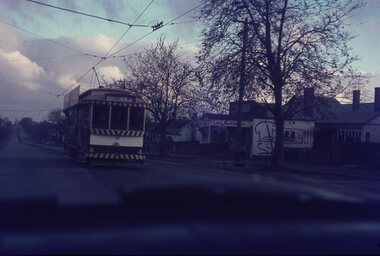
Agfa plastic mount (blue base, white cover) of a photograph of No. 28 Lydiard St North entering Gregory St loop. Photographed from a car. Destination has not been changed from Lydiard St. Nth. Photo taken late 1960's. "Local Maid Bakery" on the right hand side of the photograph. Slide rescanned at 3200 dpi 25-10-2020, jpg replaced, tiff file retained. This file was scanned in 2003 and may show colour changes."BAS 46" in penciltramways, trams, gregory st, lydiard st nth, tram 28 -
 Ballarat Tramway Museum
Functional Object - Cap Badge, Stokes & Sons Melbourne, "ESC of V Ltd", 1905?
Cap or lapel Badge for the Electric Supply Co. of Victoria (ESCo) staff. Has abbreviation of "ESC of V Ltd". Made from a cast brass item, nickel plated to indicate the position held by the wearer as part of their uniform. Cast in the form of the handwritten or script word/s and underlined. On the rear, silver soldered on are two brass loops at either of the badge to enable badge to be sewn or fitted with clips onto the cap or the uniform. Exact use of the badge not known at the time of cataloguing. On the back of the back of the badge in letters is the name of the manufacturer - "Stokes & Sons". Assumed collected by Les Denmead from materials left over from the ESCo era in the SEC offices. tramways, trams, cap badge, hat badge, uniforms, esco -
 Ballarat Tramway Museum
Photograph - Colour Photograph/s, 26/07/1972 12:00:00 AM
Colour print made from slide (Reg. Item 1205.7) of Bendigo No. 7 leaving Myrtle St. loop with the mine poppet head in the background. Photo taken after tram has passed photographer. Print made for use in the 'Gold Gold Gold ' Exhibition 10/2001. On Kodak paper. Copy made Oct. 2001 for the "gold, Gold GOLD" temporary exhibition - colour laser print onto card, with Velcro dots on rear. Stored in box D1 (Display Box) 02/2003.bendigo, myrtle st., golden square, tram 7 -
 Ballarat Tramway Museum
Photograph - Black and White photograph/s - mounted, John Phillips, late 1960's or early 1970's
Yields information about the vicinity of the Sturt St city loop and the buildings on the south side of Sturt St.Black and White photograph mounted on heavy cardboard backing. Photo of Ballarat No. 14 and possibly No. 12 in the City Loop, Sturt St., near Grenville St. Ballarat. no. 14 showing "CITY". On left is Gas and Fuel Corporation of Victoria building, Patersons, T&G Life Assurance and other buildings on the south side of Sturt St. Taken by John Phillips late 1960's or early 1970's. Has 4 Velcro black squares on rear and marks where mounting devices have been removed on the rear. Note image scanned in two runs through a scanner, resulting in the shading in the image file. Second copy added - 8/11/2005 to box 01-01-70.trams, tramways, city loop, sturt st., tram 14 -
 Ballarat Tramway Museum
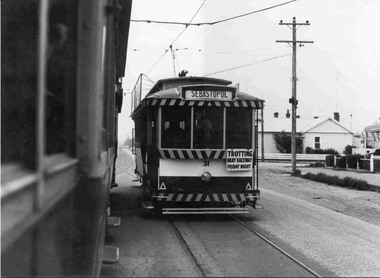
Photograph - Black and White photograph/s - mounted, John Phillips, late 1960's or early 1970's
Yields information about the vicinity of the Drummond St south and the Urquhart St Loop.Black and White photograph mounted on heavy cardboard backing. Photo of Ballarat No. 31 crossing two single truckers in Drummond St. South, at Urquhart St. Loop. (Bell St?)) Tram 31 has destination of Sebastopol and has a "Trotting Bray Raceway Friday Night" auxiliary board on the front of the tram. Taken by John Phillips late 1960's or early 1970's. Note image scanned in two runs through a scanner, resulting in the shading in the image file.trams, tramways, sebastopol, drummond st. sth, urquhart st., tram 31 -
 Ballarat Tramway Museum
Photograph - Black and White photograph/s - mounted, John Phillips, late 1960's or early 1970's
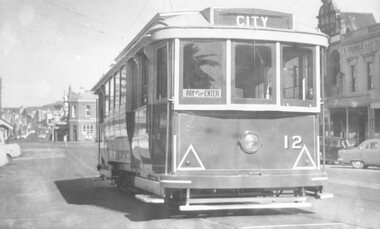
Yields information about the vicinity of the Sturt St city loop and the buildings on the south side of Sturt St.Black and White photograph mounted on heavy cardboard backing. Photo of Ballarat No. 12 with destination of Victoria St., westbound in Sturt St, passing the City Loop. No. 12 has a "Twin Lakes" sign on the back of the tram. In the background is the T&G Assurance Society building, the Vegas cinema and other buildings on the south side of St. St. Has many Velcro dots on rear and left overs of mounting devices have been removed on the rear. Note image scanned in two runs through a scanner, resulting in the shading in the image file.trams, tramways, sturt st, city loop, town hall, tram 12 -
 Ballarat Tramway Museum
Slide - 35mm slide/s, Peter Moses, Dec. 1963
Photo of Ballarat tram 27, southbound at Grey St. loop waiting to cross a City bound tram car. Has one male passenger waiting to board the inbound tram and a conductor (in SEC hat) waiting to board the tram and act as the conductor back into the City. Trams between Bell St. and Sebastopol during the day, were driver only. Conductors changed trams at Bell St. or wherever they crossed one another on the single track. Tram has destination of "Sebastopol", and advertisements for "Twin Lakes" and Whitehorse whiskey. Note long grass on the left hand side of the photo. Tram has tiger stripes but not the white dash under the lights. Kodak cardboard mount slide, taken by Peter Moses December 1963.On back of slide in blue ink "1963 Dec. Tram Ballarat" and bottom right hand corner "P. Moses"tramways, trams, grey st, sebastopol, conductors, tram 27 -
 Ballarat Tramway Museum
Slide - 35mm slide/s, Peter Moses, Dec. 1963
Photo of Ballarat trams 11 and 18 crossing at Carlton St. Loop. Tram 18 showing destination of Victoria St. and Tram 11, southbound in Wendouree Parade, showing Lydiard St North on rear of tram. Both trams have advertisements for 50/50 dancing at the Civic Hall are on the front panel of the tram and No. 11 a roof advertisement for SEC Briquettes. Both trams have tiger stripes but not the white dash under the lights. Kodak cardboard mount slide, taken by Peter Moses December 1963.On back of slide in blue ink "1963 Dec. Trams Lake Wendouree, Ballarat Vic." and bottom right hand corner "P. Moses"tramways, trams, wendouree parade, carlton st, tram 11, tram 18 -
 Ballarat Tramway Museum
Slide - 35mm slide/s, Peter Moses, Dec. 1963
Photo of Ballarat trams 11 at Carlton St. Loop apparently taken from another tramcar (See Reg. No. 2028). Tram 11, southbound in Wendouree Parade, showing Lydiard St North. No. 11 has a roof advertisement for SEC Briquettes, Twin Lakes advertisement on the front drivers panel and has tiger stripes but not the white dash under the lights. The driver is leaning out of the front side window of the tram. Kodak cardboard mount slide, taken by Peter Moses December 1963.On back of slide in blue ink "1963 Dec. Trams Lake Wendouree, Ballarat Vic." and bottom right hand corner "P. Moses".tramways, trams, wendouree parade, carlton st, tram 11 -
 Ballarat Tramway Museum
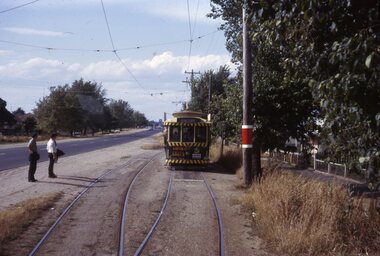
Slide - 35mm slide/s, Peter Moses, Aug. 1971
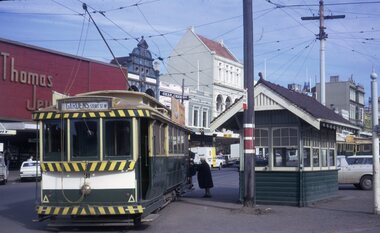
Photo of SEC Ballarat Tram No. 31 at Grenville St. and Sturt St stop. Tram has destination of "Gardens via Sturt St. W". Photo shows the MMTB style shelter at this stop, with Thomas Jewellers shop in the background and other buildings along the south side of Sturt St. Note the two trams in the City Loop. Kodak cardboard mount slide, taken by Peter Moses August 1971.On back of slide in blue ink "N31 Ballarat / Lower Sturt St. " and in bottom left hand corner in black ink "P. Moses".tramways, trams, sturt st, grenville st, shelters, tram stops, tram 31 -
 Ballarat Tramway Museum
Slide - 35mm slide/s, Peter Moses, Aug. 1971
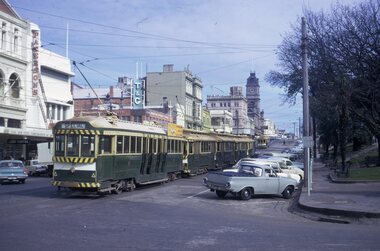
Photo of SEC Ballarat Trams No. 37 and four others (4 single truckers) in City Loop at the east end of Sturt St. Ballarat. and Sturt St stop. Tram 37 has destination of "Special". In the photograph are the buildings on the south side of Sturt St., including Patersons, the Town Hall, T&G building. Kodak cardboard mount slide, taken by Peter Moses August 1971.On back of slide in blue ink "Ballarat, Siding Sturt St. " and in top left hand corner in black ink "P. Moses". On other side of the slide is the word "Siding" in blue ink.tramways, trams, sturt st, city loop, tram 37 -
 Ballarat Tramway Museum
Slide - 35mm slide/s, Peter Moses, Aug. 1971
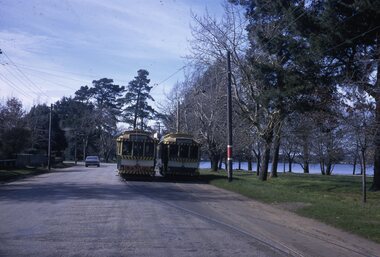
Photo of SEC Ballarat Tram No. 27 and 32 crossing at Depot Loop (Barrett Ave) in Wendouree Parade, east bound, near the Junction for the SEC Depot. Tram 27 has the destination of "Victoria St.". Has Lake Wendouree in the background. Shows the arrangement of the loop within Wendouree Parade Kodak cardboard mount slide, taken by Peter Moses August 1971.On back of slide in red ink "Ballarat / Passing Loop Wendouree Pde" and in bottom right hand corner in black ink "P. Moses" on the other side of the slide.tramways, trams, wendouree parade, depot, crossing loop, barrett ave, depot loop, tram 27, tram 32 -
 Ballarat Tramway Museum
Slide - 35mm slide/s, Peter Moses, 21/08/1971 12:00:00 AM
Photo of SEC Ballarat No. 31 west bound in Victoria St. Ballarat, just past King St. North, entering the King St. loop. Tram fitted with a Twin Lakes sign, two Johnnie Walker whiskey roof advertisements and has destination of "Gardens via Sturt St. W". Note the new bus stop sign in position. This photo was taken on the 2nd last day of operation. Has St. Alipius church in the background. Kodak cardboard mount slide, taken by Peter Moses 21 August 1971.On the rear of the slides in blue ink "Ballarat / Victoria St." and "P. Moses" in the bottom left hand corner in black ink.tramways, trams, victoria st, king st, bus stops, tram stops, tram 21 -
 Ballarat Tramway Museum
Slide - 35mm slide/s, Peter Moses, Jan. 1969
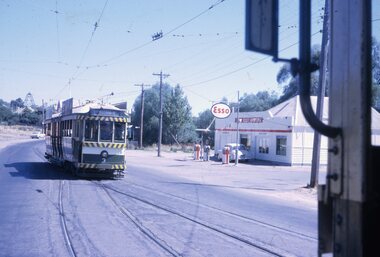
Photo of the SEC Bendigo No. 3 entering Long Gully Loop, bound for Eaglehawk, while another bogie tram waits in the loop. In the background is an Esso service station, known as Long Gully Motors, and a poppet head on a hillside in the background. Kodak cardboard mount slide, taken by Peter Moses, Jan. 1969.On the rear of the slide "P. Moses" in black ink and other side of the slide in red ink “4”.tramways, trams, bendigo, eaglehawk, long gully, esso, tram 3 -
 Ballarat Tramway Museum
Slide - 35mm slide/s, Peter Moses, Jan. 1969
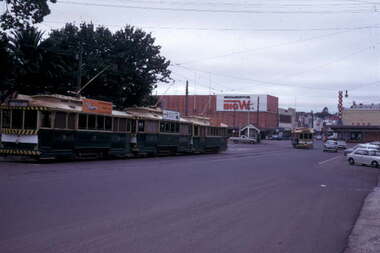
Photo of three single truckers, 31, 32, 21 parked in City Loop, with another single trucker, 26 or 28 entering Sturt St. 31 and 21 have SEC "Everything's under control in my all-electric kitchen", 32 - Wilkinson Sword?. In the background are Woolworths Big W store and Dickins supermarket. Kodak cardboard mount slide, taken by Peter Moses assumed Jan. 1969, dated only "Jan", but date lines up with Bendigo slides and type of numbering. Could be 1970.On the rear of the slide in black ink "P. Moses" along bottom right hand corner in black ink.tramways, trams, city loop, sturt st, grenville st, tram 31, tram 32, tram 21 -
 Ballarat Tramway Museum
Functional Object - Trolley Wire Sample
Piece of worn trolley wire (copper, probably cadmium copper) taken from north bound trolley wire between poles 9 and 17 (Loop and St. Aidans Drive) on 4/3/1997 during replacement operations. Is badly worn on one side. OK on the other side - slightly curve with worn side on the outside of the curve. Green (Oxidized) and sides, dark brown on top. Has been cut at either end. Images added 3-12-2016 See p14 of Section 65 of ICS Manual Tramway systems etc. London c1921.ballarat, overhead, fittings, trolley wire -
 Ballarat Tramway Museum
Functional Object - Trolley Wire Sample
Piece of partly worn trolley wire taken from North bound wire between poles 9 and 17 (Loop & St Aidans Drive) on 4/3/97, during replacement operations. Is slightly curved, and only partly worn, both grooves are still good. Has been cut from other wire. See sketch on original worksheet for colours of wire. Images added 3-12-2016ballarat, overhead, fittings, trolley wire -
 Ballarat Tramway Museum
Photograph - Black & White Photograph/s, Dave Macartney, 23/12/1967 12:00:00 AM
Black and white photograph of SEC No. 37 running "SPECIAL" into the City from the depot,. Photo taken just after leaving Haddon St. loop, loop in background. Tram is blurred due to slow shutter speed, rest of photograph is in focus. Tram has SEC ad on one side. Taken 23/12/1967.trams, tramways, secv, ballarat, wendouree parade, haddon st. , tram 37 -
 Ballarat Tramway Museum
Photograph - Black & White Photograph/s, George Netherway, May. 1930
Copy photograph of a small photograph contained within item Reg. No. 587. Poor quality photo of No. 25 at Orphanage. Caption on 587 is "No. 25 at Orphanage May 1930". Appears to have destination sign, Orphanage, also has track along side tram, indicating photo possibly taken at the King St. Looptrams, tramways, ballarat, new trams, m class, orphanage, victoria st , tram 25 -
 Ballarat Tramway Museum
Photograph - Black & White Photograph/s, George Netherway, May 1937?
Copy photograph of a small photograph contained within item Reg. No. 587. Photo of the construction of the Lydiard St. North extension in 1937, looking north of Gregory St. shows new loop in background, and way of protecting roadworks. Has houses on both sides. Caption on 587 is "North from Gregory St. showing end of original line". Also "Note compressor working off already strung active overhead". Hi res scan of negative used 7-5-2020.trams, tramways, ballarat, lydiard st. nth extension, new track, tramways -
 Ballarat Tramway Museum
Slide - 35mm slide/s, Travis Jeffrey, late 1960's
Agfa plastic mount (blue base, white cover) of a photograph of No. 28, Depot Loop, Tramsheds Loop, Wendouree Parade, with destination of Gardens via Drummond St. Nth. Photo taken late 1960's. Probably taken from a tramcar in the opposite direction. Slide rescanned at 3200 dpi 25-10-2020, jpg replaced, tiff file retained. This file was scanned in 2003 and may show colour changes."BAS 51" in penciltramways, trams, wendouree parade, depot loop, tramsheds loop, tram 28 -
 Ballarat Tramway Museum
Slide - 35mm slide/s, 1960
Agfa plastic mount (blue base, white cover) of a photograph of No. 27 and 30 at Grey St. Loop, possibly on a Sunday as a conductor is changing trams. Note the milk cart to the right of the tram. Photo taken early 1960, as both trams are in the process of being fitted with dash canopy lighting. Both trams have White Horse Whiskey advertisements on the dash panels and No. 27, an Age newspaper advertisement as well. No. 27 has destination of Sebastopol and No. 30 - Lydiard St. Nth. The slide appears to be a copy slide, given the nature of the colour and the additional number WP419. Photographer could be Bill Pearce (WP). Slide rescanned at 3200 dpi 25-10-2020, jpg replaced, tiff file retained. This file was scanned in 2003 and may show colour changes."BAS 57 in penciltramways, trams, albert st, sebastopol, grey st. loop, tram 27, tram 30 -
 Ballarat Tramway Museum
Slide - 35mm slide/s, Glen Mills, Nov. 1970
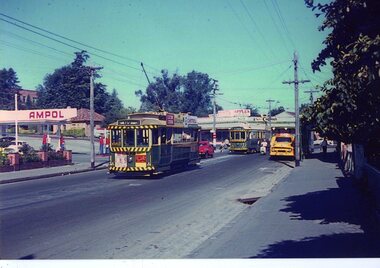
Agfa plastic mount (blue base, white cover) of a photograph of No. 36 and four single truckers at City or Grenville St Loop, with the buildings at the south east end of Sturt St. in the background is Dickins Food Store. A number of the trams have SEC roof advertisements and one unidentified one. Tram 36 has the "Trotting Bray Raceway Friday Night" auxiliary boards and is showing the destination of "CITY". Photo taken Nov 1970. One of a set of 20 slides made by the Association of Railway Enthusiast Provincial Tramways film strip. Reference Item 2560 details the ARE Film Strip and provide references to other slides. Slide rescanned at 3200 dpi 25-10-2020, jpg replaced, tiff file retained. This file was scanned in 2003 and may show colour changes."BAS 62" in pencil.tramways, trams, sturt st, city loop, grenville st., tram 36 -
 Ballarat Tramway Museum
Slide - 35mm slide/s, Stephen Holmes, Sep. 1971
Agfa plastic mount (blue base, white cover) of a photograph of No. 21 and 14 at Grey St loop. No. 21 has destination of Sebastopol and a SEC "Everything's is under control in my all electric kitchen" roof advertisement. No. 14 has destination of Lydiard St. North. Photo taken 9/1971. One of a set of 20 slides made by the Association of Railway Enthusiast Provincial Tramways film strip. Reference Item 2560 details the ARE Film Strip and provide references to other slides. Slide rescanned at 3200 dpi 25-10-2020, jpg replaced, tiff file retained. This file was scanned in 2003 and may show colour changes."BAS 65" in pencil.tramways, trams, grey st loop, albert st, sebastopol, tram 21, tram 14 -
 Ballarat Tramway Museum
Negative - Black and white print from negative, Travis Jeffrey, 12/12/1958?
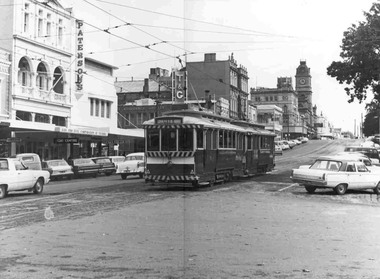
Negative No. N375 and black and white print made by a laser printer (stored in folder) of Ballarat No. 12 in City or Grenville St Loop with Grenville St and Bridge St. in the background. Date thought to be 12/12/1958. Tram has destination of City. Can see the Bucks Head Hotel in the background and the full length of Bridge St., with Victoria St. hill as well. W. Gribble & Co. building on the right hand side of the photograph. Although folder dated 23/2/62, the photo is taken before 12/1960, as tram has not been fitted with dash canopy lights, so date taken as for photograph BA1, Reg. No. 2381 - note angle of shadow. hi res scan made and image updated 23/5/2020. Paper folder that contained the negative had "NR64A" in red ink, "BA2" in pencil, date stamp of "23 Sep 62" on front, and on rear date stamps "26 Sep 1962" and "6 Oct 1962".trams, tramways, city loop, grenville st, bridge st, sturt st, tram 12 -
 Ballarat Tramway Museum
Negative - Black and white print from negative, Travis Jeffrey, 23/02/1962 12:00:00 AM
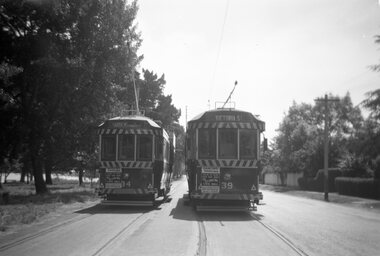
Negative No. N388 and black and white print made by a laser printer (stored in folder) of Ballarat trams Numbers 34 and 39 crossing at the loop near the depot in Wendouree Parade, Depot Loop or Tramsheds loop. Both trams have advertisements on the dash panels advising the 60/40 dancing at Civic Hall on Saturday nights. Tram 34 has destination of Gardens via Drummond St Nth, while 39 has destination of Victoria St. Date of photo on folder - 23/2/1962. Original negative rescanned 24/5/2020 and image file updated. Paper folder that contained the negative had "NR60A" in red ink, "BA16" in pencil, date stamp of "23 Feb 1962" on front, and on rear date stamps "26 Sep 1962" and "6 Oct 1962".trams, tramways, wendouree parade, depot loop, tramsheds loop, tram 34 tram 39 -
 Ballarat Tramway Museum
Photograph - Colour Photograph/s, Travis Jeffrey, 6/11/1962 12:00:00 AM
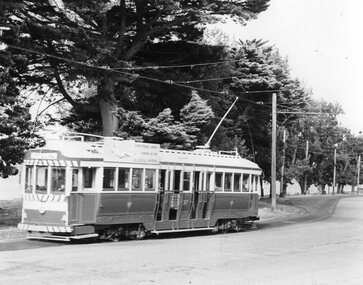
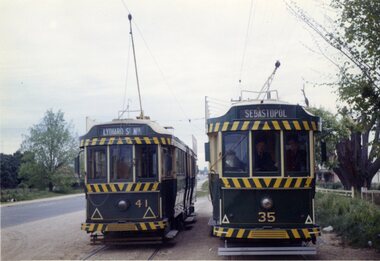
Colour photograph of Ballarat No. 41 crossing No. 35 at the Grey St. loop, Albert St. Sebastopol. No. 41 in bound with destination of Lydiard St. Nth and 35 with destination of Sebastopol. Photo dated 6/11/1962. On Kodacolour paper."54Ed" in blue ink, date stamp 6 Nov 1962" in red ink.albert st., sebastopol, grey st. loop, tram 34, tram 41 -
 Ballarat Tramway Museum
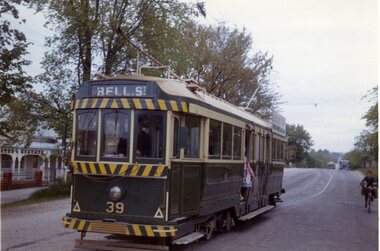
Photograph - Colour Photograph/s, Travis Jeffrey, 6/11/1962 12:00:00 AM
Colour photograph of Ballarat No. 39 leaving Gregory St. loop in Lydiard St. Nth. (House to the left of the photo is No. 803). Tram has the destination of Bell St and a SEC Electric Cooking roof advertisement. Photo dated 6/11/1962. Note outbound tram in distance, and paper or delivery boy on bike on right hand side of the photograph. On Kodacolor paper."76Ed" in blue ink, date stamp 6 Nov 1962" in red ink.gregory st., lydiard st., tram 39 -
 Ballarat Tramway Museum
Photograph - Colour Photograph/s, Travis Jeffrey, 6/11/1962 12:00:00 AM
Colour photograph of Ballarat No. 39 crossing No. 35 at Bell St. loop, Skipton St. The house to the right of the 39 is No. 710 Skipton St. Tram 35 has the destination of Sebastopol and No. 39, Gregory St. Photo dated 6/11/1962. On Kodacolor paper."79Ed" in blue ink, date stamp 6 Nov 1962" in red ink.bell st, skipton st., tram 39, tram 35