Showing 1108 items
matching pipes
-
 Flagstaff Hill Maritime Museum and Village
Domestic object - Bottle, Singer Sewing Machine Company, ca 1878
This Singer Sewing Machine oil bottle was made by hand, with the glass blown into a mould. Isaac M. Singer established his sewing machine company, I.M. Singer & Co. in America in 1851. A brief history of the Loch Ard (1873-1878): - The sailing ship Loch Ard was one of the famous Loch Line ships that sailed from England to Australia. Barclay, Curdle and Co. built the three-masted iron vessel in Glasgow in 1873. It had sailed three trips to Australia and one trip to Calcutta before its fateful voyage. Loch Ard left England on March 2, 1878, under the command of recently married, 29-year-old Captain Gibbs. It was bound for Melbourne with a crew of 37, plus 17 passengers. The general cargo reflected the affluence of Melbourne at the time. Onboard were straw hats, umbrellas, perfumes, clay pipes, pianos, clocks, confectionery, linen and candles, and a heavier load of railway irons, cement, lead and copper. Other cargo included items intended for display in the Melbourne International Exhibition of 1880. The Loch Ard had been sailing for three months and was close to its destination on June 1, 1878. Captain Gibbs had expected to see land at about 3 am but the Loch Ard ran into a fog that greatly reduced visibility and there was no sign of land or the Cape Otway lighthouse. The fog lifted at 4 am and the sheer cliffs of Victoria's west coast were much closer to them than Captain Gibbs expected. He tried to manage the vessel but failed and the ship struck a reef at the base of Mutton Bird Island, near Port Campbell. The top deck loosened from the hull, and the masts and rigging crashed down, knocking passengers and crew overboard. The lifeboat was launched by Tom Pearce but crashed into the side of Loch Ard and capsized. He clung onto its overturned hull and sheltered under it. He drifted out to sea and the tide brought him back to what is now called Loch Ard Gorge. He swam to shore and found a cave for shelter. A passenger, Eva Carmichael, had raced onto the deck to find out what was happening and was confronted by towering cliffs above the ship. She was soon swept off the ship by a huge wave. Eva saw Tom Pearce on a small rocky beach and yelled to attract his attention. He swam out and dragged her to the shelter of the cave. He revived her with a bottle of brandy from a case that had washed up on the beach. Tom scaled a cliff in search of help and followed some horse hoof prints. He came from two men from Glenample Station, three and a half miles away. He told the men of the tragedy and then returned to the gorge while the two men rode back to the station to get help. They reached Loch Ard Gorge and took the two shipwreck survivors to Glenample Station to recover. Eva stayed at the station for six weeks before returning to Ireland by steamship. In Melbourne, Tom Pearce received a hero's welcome and was presented with a medal and some money. Of the 54 crew members and passengers on board, only two survived: the apprentice, Tom Pearce and the young woman passenger, Eva Carmichael, who lost her family in the tragedy.The bottle is significant for representing an early innovation in domestic sewing, the treadle sewing machine. It is also significant for its connection with the Loch Ard shipwreck. The shipwreck of the Loch Ard is of significance for Victoria and is registered on the Victorian Heritage Register ( S 417). Flagstaff Hill has a varied collection of artefacts from Loch Ard and its collection is significant for being one of the largest accumulation of artefacts from this notable Victorian shipwreck. The collections object is to also give us a snapshot into history so we are able to interpret the story of this tragic event. The collection is also archaeologically significant as it represents aspects of Victoria's shipping history that allows us to interpret Victoria's social and historical themes of the time. The collection's historical significance is that it is associated unfortunately with the worst and best-known shipwreck in Victoria's history. Clear glass bottle, straight neck, broad shoulders tapering to slightly narrower indented base. Bottle once contained Singer Sewing Machine oil. Inscription embossed in the glass. Bottle was recovered from the wreck of the Loch Ard.Embossed in the glass "The Singer Manufacturing Company" on one side on the reverse "Extra Quality Machine Oil." flagstaff hill, flagstaff hill maritime museum and village, warrnambool, maritime museum, maritime village, great ocean road, shipwreck coast, singer sewing machine, sewing machine oil, singer sewing machine oil, oil bottle, isaac m. singer, loch ard artifacts, loch ard -
 Bendigo Military Museum
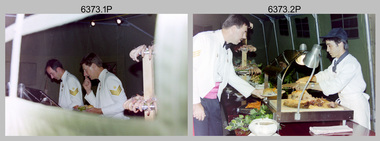
Photograph - Army Survey Regiment Summer Ball - Dinner, Staff and Entertainment, 1995
This is a set of 36 photographs taken at the combined Officer, Warrant Officer and Sergeant’s Mess Summer Ball held at the Army Survey Regiment (ASR), Fortuna Villa on the 25th of February 1995. The Summer Ball was one of the last large scale formal functions held at Fortuna Villa before ASR’s closure the following year. Photos of personnel and their guests was taken on their arrival near the Pompeii Fountain in the gardens at the front of the main building. The Ball and Dinner was held at the rear of Fortuna Villa in temporary 20’ x 30’ Army tents set up on the roadway in front of the transport compound. SERCO contract staff provided the catering and the ASR’s Other Ranks performed stewarding and kitchen hand duties. Refer to item 6347 for information on the administrative file held in the collection and items 6370.23P, 6371.33P and 6372.25P for additional photographs taken at the Summer Ball.This is a set of 36 photographs taken at the Officer, Warrant Officer and Sergeant’s Summer Ball held at the Army Survey Regiment, Fortuna Villa on the 25th of February 1995. The colour photographs are on 35mm negative film and are part of the Army Survey Regiment’s Collection. The photographs were scanned at 96 dpi. .1) - Photo, colour, 1995. L to R: Rod Skidmore, Bob Thrower. .2) - Photo, colour, 1995. L to R: Jim Ash, unidentified SERCO-GM staff. .3) - Photo, colour, 1995. L to R: Helen Drummond, Stan Vote, Steve Drummond. .4) - Photo, colour, 1995. L to R: Helen Drummond, Steve Drummond, unidentified, Stan Vote, .5) - Photo, colour, 1995. Sherri and Steve Burke .6) - Photo, colour, 1995. L to R: Dale Hudson and partner. .7) - Photo, colour, 1995. L to R: Alan Dudley, Glenda Stear, Doug Carswell, unidentified, Chris Carswell, John Stear, Angela Dudley, Tony Harder (background). .8) - Photo, colour, 1995. L to R: John Phillips, Maria Harder. .9) - Photo, colour, 1995. L to R: Tracey Phillips, Peter Peterson. .10) - Photo, colour, 1995. L to R: John South, Tracey Phillips, Peter Peterson, John Bath (background), Miss Delfine. .11) - Photo, colour, 1995. Jo and Peter Peterson. .12) - Photo, colour, 1995. Colin Davidson, Jason Selman, Martin Evans (background). .13) - Photo, colour, 1995. L to R: Bill Griggs (background), Colin Cuskelly. .14) - Photo, colour, 1995. Marzipan sculpture of Australia’s Coat of Arms animals surround RA Svy Corps badge. ‘53’ denoted the number of years of RA Svy occupancy since 1942. .15) - Photo, colour, 1995. L to R: unidentified (x3), Sandra Burns, Brianna Burgin (steward in background). .16) - Photo, colour, 1995. L to R: Mrs Willis, Dave and Sue Stephenson, Corey Hill (steward in background), unidentified, Ros and Wolfgang Effenberg, Doug Willis, unidentified, Simon Lemon (background). .17) - Photo, colour, 1995. unidentified SERCO-GM staff. .18) - Photo, colour, 1995. L to R: Hayden Beer, Duncan Burns (background), Simon Lemon, unidentified SERCO staff (x2). .19) & .20) - Photo, colour, 1995. L to R: Duncan Burns, unidentified SERCO-GM staff. .21) - Photo, colour, 1995. L to R: Mrs Willis, Greg Byers. .22) - Photo, colour, 1995. L to R: Brian Sloan, unidentified. .23) - Photo, colour, 1995. Justine (Sachs) Rainey - steward. .24) - Photo, colour, 1995. Marty Stradbrook- steward. .25) - Photo, colour, 1995. Unidentified guests, Corey Hill - steward. .26) - Photo, colour, 1995. L to R: Troy Larkins, Ken Labouchardiere, Marty Stradbrook, Lance Hillier, unidentified. .27) - Photo, colour, 1995. L to R: Glen Norrell, Trevor King, Troy Larkins. .28) to .31) - Photo, colour. 1995. Unidentified string quartet musicians. .32) to .36P) - Photo, colour. 1995, Fortuna Pipes and Drums musicians..1P to .36P There are no personnel or civilians identified.royal australian survey corps, rasvy, army survey regiment, army svy regt, fortuna, asr -
 Flagstaff Hill Maritime Museum and Village
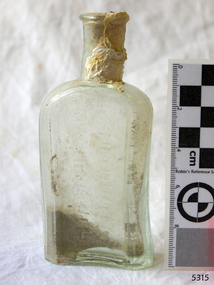
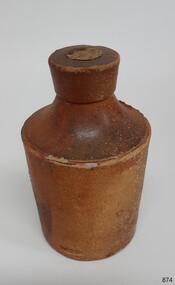
Container - Ink Bottle, Royal Doulton, 1853-1878
The ink bottle was made by the Royal Doulton company which began as a partnership between John Doulton, Martha Jones, and John Wattis an English ceramic and home accessories manufacturer founded in 1815. Operating initially in Vauxhall, London, it later moved to Lambeth, In1882 it opened a factory in Burslem, Stoke on Trent, in the centre of English pottery. The business specialised in making salt-glazed stoneware articles, including utilitarian or decorative bottles, jugs and jars, much of it intended for inns and pubs. The backbone of the business was a wide range of utilitarian wares, mostly stoneware's, including storage jars, tankards and the like, and later extending to pipes for drains, lavatories and other bathroom ceramics. From 1853 to 1902 its wares were marked Doulton & Co., then from 1902, when a royal warrant was given, wares were marked Royal Doulton. The company always made some more decorative items, initially still mostly stoneware, and from the 1860s the firm made considerable efforts to get a reputation for design, in which it was largely successful, as one of the first British makers of art pottery. Initially, this was done through artistic stoneware made in Lambeth, but in 1882 the firm bought a Burslem factory, which was mainly intended for making bone china table wares and decorative items. History of the Loch Ard: The Loch Ard got its name from ”Loch Ard” a loch that lies to the west of Aberfoyle, and the east of Loch Lomond. It means "high lake" in Scottish Gaelic. The vessel belonged to the famous Loch Line which sailed many vessels from England to Australia. The Loch Ard was built in Glasgow by Barclay, Curdle and Co. in 1873, the vessel was a three-masted square-rigged iron sailing ship that measured 79.87 meters in length, 11.58 m in width, and 7 m in depth with a gross tonnage of 1693 tons with a mainmast that measured a massive 45.7 m in height. Loch Ard made three trips to Australia and one trip to Calcutta before its fateful voyage. Loch Ard left England on March 2, 1878, under the command of 29-year-old Captain Gibbs, who was newly married. The ship was bound for Melbourne with a crew of 37, plus 17 passengers. The general cargo reflected the affluence of Melbourne at the time. Onboard were straw hats, umbrellas, perfumes, clay pipes, pianos, clocks, confectionery, linen and candles, as well as a heavier load of railway irons, cement, lead and copper. There were other items included that were intended for display in the Melbourne International Exhibition of 1880. The voyage to Port Phillip was long but uneventful. Then at 3 am on June 1, 1878, Captain Gibbs was expecting to see land. But the Loch Ard was running into a fog which greatly reduced visibility. Captain Gibbs was becoming anxious as there was no sign of land or the Cape Otway lighthouse. At 4 am the fog lifted and a lookout aloft announced that he could see breakers. The sheer cliffs of Victoria's west coast came into view, and Captain Gibbs realised that the ship was much closer to them than expected. He ordered as much sail to be set as time would permit and then attempted to steer the vessel out to sea. On coming head-on into the wind, the ship lost momentum, the sails fell limp and Loch Ard's bow swung back towards land. Gibbs then ordered the anchors to be released in an attempt to hold their position. The anchors sank some 50 fathoms - but did not hold. By this time the ship was among the breakers and the tall cliffs of Mutton Bird Island rose behind. Just half a mile from the coast, the ship's bow was suddenly pulled around by the anchor. The captain tried to tack out to sea, but the ship struck a reef at the base of Mutton Bird Island, near Port Campbell. Waves subsequently broke over the ship and the top deck became loosened from the hull. The masts and rigging came crashing down knocking passengers and crew overboard. When a lifeboat was finally launched, it crashed into the side of Loch Ard and capsized. Tom Pearce, who had launched the boat, managed to cling to its overturned hull and shelter beneath it. He drifted out to sea and then on the flood tide came into what is now known as Lochard Gorge. He swam to shore, bruised and dazed, and found a cave in which to shelter. Some of the crew stayed below deck to shelter from the falling rigging but drowned when the ship slipped off the reef into deeper water. Eva Carmichael a passenger had raced onto the deck to find out what was happening only to be confronted by towering cliffs looming above the stricken ship. In all the chaos, Captain Gibbs grabbed Eva and said, "If you are saved Eva, let my dear wife know that I died like a sailor". That was the last Eva Carmichael saw of the captain. She was swept off the ship by a huge wave. Eva saw Tom Pearce on a small rocky beach and yelled to attract his attention. He dived in and swam to the exhausted woman and dragged her to shore. He took her to the cave and broke the open case of brandy which had washed up on the beach. He opened a bottle to revive the unconscious woman. A few hours later Tom scaled a cliff in search of help. He followed hoof prints and came by chance upon two men from nearby Glenample Station three and a half miles away. In a complete state of exhaustion, he told the men of the tragedy. Tom then returned to the gorge while the two men rode back to the station to get help. By the time they reached Loch Ard Gorge, it was cold and dark. The two shipwreck survivors were taken to Glenample Station to recover. Eva stayed at the station for six weeks before returning to Ireland by steamship. In Melbourne, Tom Pearce received a hero's welcome. He was presented with the first gold medal of the Royal Humane Society of Victoria and a £1000 cheque from the Victorian Government. Concerts were performed to honour the young man's bravery and to raise money for those who lost family in the disaster. Of the 54 crew members and passengers on board, only two survived: the apprentice, Tom Pearce and the young woman passenger, Eva Carmichael, who lost her family in the tragedy. Ten days after the Lochard tragedy, salvage rights to the wreck were sold at auction for £2,120. Cargo valued at £3,000 was salvaged and placed on the beach, but most washed back into the sea when another storm developed. The wreck of Lochard still lies at the base of Mutton Bird Island. Much of the cargo has now been salvaged and some items were washed up into Lochard Gorge. Cargo and artefacts have also been illegally salvaged over many years before protective legislation was introduced in March 1982. One of the most unlikely pieces of cargo to have survived the shipwreck was a Minton majolica peacock- one of only nine in the world. The peacock was destined for the Melbourne 1880 International Exhibition. It had been well packed, which gave it adequate protection during the violent storm. Today the Minton peacock can be seen at the Flagstaff Hill Maritime Museum in Warrnambool. From Australia's most dramatic shipwreck, it has now become Australia's most valuable shipwreck artifact and is one of very few 'objects' on the Victorian State Heritage Register.An early utilitarian stoneware item made by a well-known company that specialised in making salt-glazed items that later earned a reputation for making stoneware art objects. Of additional significance is that it was recovered from the wreck of the Loch Ard. A shipwreck that is of additional significance as it is registered on the Victorian Heritage Register ( S 417). Flagstaff Hill has a varied collection of artefacts from Loch Ard and its collection is significant for being one of the largest accumulations of artefacts from this notable Victorian shipwreck of which the subject items are a small part. The collections objects give us a snapshot of how we can interpret the story of this tragic event. The collection is also archaeologically significant as it represents aspects of Victoria's shipping history that allows us to interpret Victoria's social and historical themes of the time. Through is associated with the worst and best-known shipwreck in Victoria's history. Salt glazed stoneware ink bottle, large capacity, tapered lip and body, two-tone brown with some encrustation on surface, still sealed with cork. Inscription in clay. Recovered from the wreck of the LOCH ARD.Stamped into clay "DOULTON LAMBETH"flagstaff hill, warrnambool, flagstaff hill maritime museum, shipwreck coast, flagstaff hill maritime village, great ocean road, loch line, loch ard, captain gibbs, eva carmichael, tom pearce, glenample station, mutton bird island, loch ard gorge, ink bottle, bulk ink bottle, writing accessory, stationery, stoneware, doulton lambeth, royal doulton, writing equipment -
 Flagstaff Hill Maritime Museum and Village
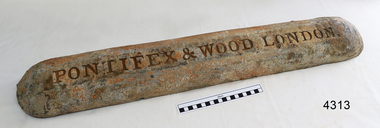
Functional object - Lead Ingot, circa 1878
This lead ingot was donated to Flagstaff Hill Maritime Village in January 2015 by local residents who discovered the ingot in their garden after they purchased the property about 12 months ago The LOCH ARD cargo manifest lists “Pig lead 50 tons” comprising “944 pig and 37 rolls”. Subsequent classification has rendered this section of cargo as “Lead Ballast”. This could be true. The international price per ton of lead ore plunged from a high point of £17 in 1853 to a low of £8 in 1882. The cheaper price of lead at the time of the vessel’s loading in early 1878 may have meant it was considered as an alternative to other ballast material (traditionally stone) for the journey to Melbourne. Loch Line ships generally returned to Britain laden with Australian wool. Even though wool bales were “screwed in” to the hold to less than half their “pressed weight”, they still made an awkwardly light cargo for the passage around the Horn. The concentrated weight of lead pigs along the keel line would help steady and centre the ship, and perhaps the artefacts in this case were to be retained for this purpose, rather than being sold on to the ready colonial market. However this is conjecture. Demand for building materials in the gold and wool rich Colony of Victoria was high in the 1870s, and much of the LOCH ARD cargo was intended for the Melbourne International Exhibition in 1880, which was another example of buoyant economic conditions. In the nineteenth century lead was valued for its density (high ratio of weight to volume), flexibility (relative softness for working into shape), and durability (corrosion resistant and waterproofing properties). It was used for pipes and water tanks, roof flashing and guttering, window sealing and internal plumbing. Many large private residences and new public buildings were at planning or construction stage in the colony during this period. The LOCH ARD lead ingots could equally have been destined for this ready market. HISTORY OF THE LOCH ARD The LOCH ARD belonged to the famous Loch Line which sailed many ships from England to Australia. Built in Glasgow by Barclay, Curdle and Co. in 1873, the LOCH ARD was a three-masted square rigged iron sailing ship. The ship measured 262ft 7" (79.87m) in length, 38ft (11.58m) in width, 23ft (7m) in depth and had a gross tonnage of 1693 tons. The LOCH ARD's main mast measured a massive 150ft (45.7m) in height. LOCH ARD made three trips to Australia and one trip to Calcutta before its final voyage. LOCH ARD left England on March 2, 1878, under the command of Captain Gibbs, a newly married, 29 year old. She was bound for Melbourne with a crew of 37, plus 17 passengers and a load of cargo. The general cargo reflected the affluence of Melbourne at the time. On board were straw hats, umbrella, perfumes, clay pipes, pianos, clocks, confectionary, linen and candles, as well as a heavier load of railway irons, cement, lead and copper. There were items included that intended for display in the Melbourne International Exhibition in 1880. The voyage to Port Phillip was long but uneventful. At 3am on June 1, 1878, Captain Gibbs was expecting to see land and the passengers were becoming excited as they prepared to view their new homeland in the early morning. But LOCH ARD was running into a fog which greatly reduced visibility. Captain Gibbs was becoming anxious as there was no sign of land or the Cape Otway lighthouse. At 4am the fog lifted. A man aloft announced that he could see breakers. The sheer cliffs of Victoria's west coast came into view, and Captain Gibbs realised that the ship was much closer to them than expected. He ordered as much sail to be set as time would permit and then attempted to steer the vessel out to sea. On coming head on into the wind, the ship lost momentum, the sails fell limp and LOCH ARD's bow swung back. Gibbs then ordered the anchors to be released in an attempt to hold its position. The anchors sank some 50 fathoms - but did not hold. By this time LOCH ARD was among the breakers and the tall cliffs of Mutton Bird Island rose behind the ship. Just half a mile from the coast, the ship's bow was suddenly pulled around by the anchor. The captain tried to tack out to sea, but the ship struck a reef at the base of Mutton Bird Island, near Port Campbell. Waves broke over the ship and the top deck was loosened from the hull. The masts and rigging came crashing down knocking passengers and crew overboard. When a lifeboat was finally launched, it crashed into the side of LOCH ARD and capsized. Tom Pearce, who had launched the boat, managed to cling to its overturned hull and shelter beneath it. He drifted out to sea and then on the flood tide came into what is now known as LOCH ARD Gorge. He swam to shore, bruised and dazed, and found a cave in which to shelter. Some of the crew stayed below deck to shelter from the falling rigging but drowned when the ship slipped off the reef into deeper water. Eva Carmichael had raced onto deck to find out what was happening only to be confronted by towering cliffs looming above the stricken ship. In all the chaos, Captain Gibbs grabbed Eva and said, "If you are saved Eva, let my dear wife know that I died like a sailor". That was the last Eva Carmichael saw of the captain. She was swept off the ship by a huge wave. Eva saw Tom Pearce on a small rocky beach and yelled to attract his attention. He dived in and swam to the exhausted woman and dragged her to shore. He took her to the cave and broke open case of brandy which had washed up on the beach. He opened a bottle to revive the unconscious woman. A few hours later Tom scaled a cliff in search of help. He followed hoof prints and came by chance upon two men from nearby Glenample Station three and a half miles away. In a state of exhaustion, he told the men of the tragedy. Tom returned to the gorge while the two men rode back to the station to get help. By the time they reached LOCH ARD Gorge, it was cold and dark. The two shipwreck survivors were taken to Glenample Station to recover. Eva stayed at the station for six weeks before returning to Ireland, this time by steamship. In Melbourne, Tom Pearce received a hero's welcome. He was presented with the first gold medal of the Royal Humane Society of Victoria and a £1000 cheque from the Victorian Government. Concerts were performed to honour the young man's bravery and to raise money for those who lost family in the LOCH ARD disaster. Of the 54 crew members and passengers on board, only two survived: the apprentice, Tom Pearce and the young woman passenger, Eva Carmichael, who lost all of her family in the tragedy. Ten days after the LOCH ARD tragedy, salvage rights to the wreck were sold at auction for £2,120. Cargo valued at £3,000 was salvaged and placed on the beach, but most washed back into the sea when another storm developed. The wreck of LOCH ARD still lies at the base of Mutton Bird Island. Much of the cargo has now been salvaged and some was washed up into what is now known as LOCH ARD Gorge. Cargo and artefacts have also been illegally salvaged over many years before protective legislation was introduced. One of the most unlikely pieces of cargo to have survived the shipwreck was a Minton porcelain peacock - one of only nine in the world. The peacock was destined for the Melbourne International Exhibition in 1880. It had been well packed, which gave it adequate protection during the violent storm. Today, the Minton peacock can be seen at the Flagstaff Hill Maritime Museum in Warrnambool. From Australia's most dramatic shipwreck it has now become Australia's most valuable shipwreck artefact and is one of very few 'objects' on the Victorian State Heritage Register. The shipwreck of the LOCH ARD is of State significance ― Victorian Heritage Register S417 Flagstaff Hill’s collection of artefacts from LOCH ARD is significant for being one of the largest collections of artefacts from this shipwreck in Victoria. It is significant for its association with the shipwreck, which is on the Victorian Heritage Register (VHR S417). The collection is significant because of the relationship between the objects, as together they have a high potential to interpret the story of the LOCH ARD. The LOCH ARD collection is archaeologically significant as the remains of a large international passenger and cargo ship. The LOCH ARD collection is historically significant for representing aspects of Victoria’s shipping history and its potential to interpret sub-theme 1.5 of Victoria’s Framework of Historical Themes (living with natural processes). The collection is also historically significant for its association with the LOCH ARD, which was one of the worst and best known shipwrecks in Victoria’s history. Lead ingots (sometimes referred to as ‘lead ballast’ or ‘lead pigs), salvaged from the wreck of the LOCH ARD. Grey metal bars with flat base, rising in a curved moulded shape to form a smooth rounded upper face. The imprint of the maker runs along the upper surface in clearly legible capital lettering (height 3cm). Durable and heavy, with some marine staining, but in good condition. Stamped along curved surface, within oval border, "PONTIFEX & WOOD LONDON."flagstaff hill, warrnambool, shipwrecked coast, flagstaff hill maritime museum, maritime museum, shipwreck coast, flagstaff hill maritime village, great ocean road, loch line, loch ard, captain gibbs, eva carmichael, tom pearce, glenample station, mutton bird island, loch ard gorge, lead pigs, lead ingots, lead ballast, pontifex and wood, london, lead smelters -
 Flagstaff Hill Maritime Museum and Village
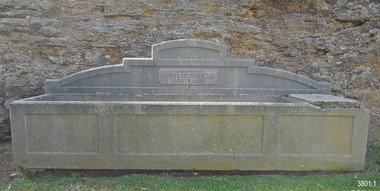
Container - Horse trough, Annis & George Bills, circa Dec. 1932
This horse trough is the only survivor of the two troughs originally installed in Raglan Parade, Warrnambool, in 1932. It was later moved to the Pony Club at Albert Part, near the north corner of Coulstock and Craig Streets. Over the time there its purpose was changed from a horse watering trough to a colourful garden bed of agapanthus plants. By February 2013 the horse trough had been transferred to Flagstaff Hill for display in the Maritime Village’s grounds. This trough is one of hundreds provided by the Annis and George Bills Estate Trust since 1927 for the welfare of working horses and dogs. The original concrete cap over the small compartment is still retained. There are also markings on the right side of the trough where it probably had a birdbath, tap or a dish for the horseman’s dog, similar to other troughs donated elsewhere by the Trust. Less than half of the troughs produced for the Annis and George Bills Trust still survive. In 2017 Felicity Watson, National Trust Victoria’s advocacy manager, said that the troughs were treasures and becoming rare, with more than a dozen across Victoria now being heritage protected. ABOUT ANNIS AND GEORGE BILLS The 1927 Will of George Bills included setting up the Annis and George Bills Estate Trust, which provided for hundreds of horse troughs to be supplied and installed throughout Australia, Britain, USA and other parts of the world for the welfare of horses. Town and city councils could apply to the Trustees for a horse trough for their communities. George “Joe” Bills was born in Brighton, England, in 1859. The family migrated first to New Zealand then to Australia in 1873, settling in the Echuca-Moama district. George moved to Brisbane in 1882 where he met Annis Swann, formerly from Sheffield. Both were animal lovers. George and Annis married 1885 and moved to Sydney to join George’s brother Henry in his mattress wire weaving business, later known as the Bills Brothers. They patented their own machine in 1893 and the business became very profitable. George was able to donate to charities that supported his passion to improve animal welfare. He and Annis joined the Victorian Society for the Protection of Animals and in 1924 George received a Life Membership with the RSPCA. George retired in 1908. The couple moved to Hawthorn, Victoria, in 1910, where they donated troughs for the work horses of Melbourne. During a visit to England Annis passed away. In 1927 George moved from Hawthorn to Camberwell, where he passed away at the end of that year. George had requested in his Will that a trust fund be set up from his estate "…construct and erect and pay for horse troughs wherever they may be of the opinion that such horse troughs are desirable for the relief of horses and other dumb animals either in Australasia, in the British Islands or in any other part of the world subject to the consent of the proper authorities being obtained." The troughs were to bear a plaque inscribed “Donated by Annis and George Bills, Australia”. In 1927 the cost to make a trough was about £13 (which converts to about $1079 in 2020 ), plus transport and installation costs. Most of the troughs were installed between 1930 and 1939 in Victoria and New South Wales. It is estimated that over that time around 500-700 Bills Horse Troughs were installed in Australia and another 50 overseas. Most of the troughs made in Victoria had three moulded front panels like this trough, and no panels moulded on the rear, whereas troughs made in NSW had four panels on the front and five on the back. Victorian troughs were made by a Bills’ relative, J H Phillips. Later, other manufactures for the Trust’s troughs included Rocla Concrete Pipes Ltd, in Auburn Road, Hawthorn, Victoria, who produced to the same original design. No further troughs produced after the end of World War II. A memorial to Annis and George Bills was first erected in Hawthorn in 1929. It included a drinking fountain and a dog dish. Its current location is unknown. In 1964 the George Bills RSPCA Resource Centre opened in Burwood East. This Bills horse trough is nationally significant as one of the surviving examples of the standard Bills memorial horse troughs that still has its compartment cap and evidence of it once having had attached fittings, possibly for a birdbath or dog dish. This trough has State historical significance for being produced in the early 1930s by a business in Hawthorn, Victoria. This example of a Bills horse trough is significant for being in comparatively good condition. The trough is locally significant for being the sole survivor of the two Bills horse troughs installed in the City of Warrnambool in 1932, originally installed on Raglan Parade and continued to be used in the community at the Pony Club, then finally transferred to its current location at Flagstaff Hill by early 2013. It is culturally significant as it represents the community’s dependence on horses for travel and transportation previous to motorised vehicles. It is morally significant as a generous gift from a couple concerned with the welfare of animals.Horse trough; a long narrow rectangular container used for storing water. Trough is made from pre-cast concrete with one large open compartment and a small covered compartment. The base of the small compartment is raised slightly above the base of the trough and is covered by a removable concrete cap. The design of the front of the trough includes three panels moulded into it that align with the shape of the back pediment (panel). The pediment is shaped with side arcs that step up to a wide centre arc. A rectangular concrete plaque is cast into the centre of the pediment and is engraved with the names of the original donors, Annis and George Bills. The trough was made in Hawthorn, Victoria, by J H Phillips circa 1932. “DONATED BY / ANNIS & GEORGE BILLS / AUSTRALIA”flagstaff hill, warrnambool, shipwrecked coast, flagstaff hill maritime museum, maritime museum, shipwreck coast, flagstaff hill maritime village, great ocean road, annis and george bills, bills trust, j h phillips, rocla concrete pipes ltd, hawthorn, water trough, watering trough, horse trough, animal welfare, bills horse trough -
 Flagstaff Hill Maritime Museum and Village
Oar, early 20th century
This oar is from the Lifeboat Warrnambool, which is on sit at Flagstaff Hill Maritime Village. The construction of the lifeboat ‘Warrnambool’ began 15th September 1909 and was completed almost 12 months later, 1st September 1910. It was built at the Government Dockyard in Williamstown, Victoria, along the lines designed by the Great Britain’s Royal Lifeboat Institution, and included whaleback decks fore and aft, mast and centreboard, and rudder and tiller hung from the sternpost. It could be propelled by both sail and oar. At that time Captain Ferguson was Chief Harbour Master and Mr Beagley was foreman boat builder. Mr Beagley built the lifeboat with his fellow workmen. The boat was described as “… a fine piece of workmanship and does credit to her builders and designers…” It had all the latest improvements in shape, disposition of weight and watertight compartments, and it had space for a large number of people in addition to the crew. It appears that 'H Meiers' whose signature was on the plaque that was found concealed in the hull, was involved with the building of the lifeboat. His signature and the dates of the start and finish of the boat’s construction are pencilled on the raw timber 'plaque' found in the hull in the early 1990’s when the lifeboat was being restored. It is interesting that the ‘Melbourne Directory’ of 1911, published by Sands and MacDougal, lists McAuley and Meiers, boat builders, Nelson Place foreshore, between Pasco and Parker Streets, Williamstown, (Victorian Heritage Database, ‘Contextual History, Maritime Facilities’), It is quite possibly the business of the person whose name is inscribed on the lifeboat plaque. Flagstaff Hill’s documentation also mentions that the keel was laid at ‘Harry Myers, boat builders, Williamstown, Melbourne’ – the name ‘Myers’ can also be spelled ‘Meiers’, which could be the same person as the Meiers in “McAuley and Meiers” (as mentioned in genealogy lines of Myers). The new lifeboat, to be named ‘Warrnambool’ was brought to town by train and launched at the breakwater on 1st March 1911 using the Titan crane (the old lifeboat built in 1858, was then returned to Melbourne in 1911). This new lifeboat was stationed at Warrnambool in a shed located at the base of the Breakwater, adjacent to the slipway. A winch was used to bring it in and out of the water. The lifeboat ‘Warrnambool’ was similar in size to the old lifeboat but far superior in design, build and sea-going qualities such as greater manoeuvrability. The ‘self-righting, self-draining’ design was “practically non-capsizeable” and even if the boat overturned it would right itself to an even keel and the water would drain away. The hull was built of New Zealand Kauri, using double diagonal planking, laid in two layers at right angles, with a layer of canvas and red lead paint between the timbers to help seal the planking. It has “… plenty of freeboard, high watertight spaces between the deck and bottom… through which pipes lead…” The backbone timbers were made of Jarrah. The lifeboat Warrnambool was one of several rescue boats used at Port Fairy and Warrnambool in early 1900's. In late 1914 the Warrnambool lifeboat and crew were used to help find what was left of the tragic wreckage of the Antares, and were able to discover the body of one of the crewmen, which they brought back to Warrnambool. Between 1951 and 1954 the lifeboat was manned under the guidance of Captain Carrington. He held lifeboat practice each month on a Sunday morning, to comply with the Ports and Harbour’s request that lifeboats be manned by a strong and competent crew, ready for action in case of emergency. In the early 1960’s it ended its service as a lifeboat and was used in Port Fairy as a barge to help dredge the Moyne River, bolted to the Port Fairy lifeboat. Flagstaff Hill obtained the Warrnambool in 1975. In 1984 it was on display at Flagstaff Hill Maritime Village, Warrnambool. On 23rd May 1990 she was lifted from the water and placed in a cradle for restoration. The name ‘WARRNAMBOOL could be seen faintly on the lifeboat before it was restored. It was during the restoration that Flagstaff Hill's boat builder discovered the 'plaque' inside the hull. A copy of the blueprint plans has the name “V.E.E. Gotch” printed on it. His advertisement in Footscray’s ‘Independent’ newspaper of Saturday 11th May 1901 states he is “Principal and Skilled member (Naval Architect) to the Court of Marine Inquiry of Victoria and holds classes for naval architectural drawing and arithmetic.” The oar is significant for its association with the lifeboat WARRNAMBOOL, which is significant for its half century service to the local community as a lifesaving vessel. She was also used to help retrieve the body of a shipwrecked crew member of the ANTARES. Large wooden oar, shaped two handgrip with tapering shaft to large flattened blade, (2) copper reinforcing strips on blade. Sweep oar is from the Lifeboat Warrnambool. flagstaff hill, warrnambool, shipwrecked-coast, flagstaff-hill, flagstaff-hill-maritime-museum, maritime-museum, shipwreck-coast, flagstaff-hill-maritime-village, oar, lifeboat warrnambool, sweep oar -
 Flagstaff Hill Maritime Museum and Village
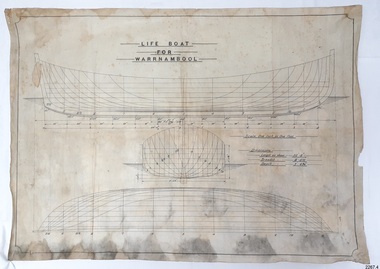
Plan - Vessel Line Drawing, Life Boat for Warrnambool, ca. 1900-1909
The plans were used for the construction of the lifeboat ‘Warrnambool’, which began 15th September 1909 and was completed almost 12 months later 1st September 1910. It was built at the Government Dockyard in Williamstown, Victoria, along the lines designed by Great Britain’s Royal Lifeboat Institution, and included whaleback decks fore and aft, mast and centreboard, and rudder and tiller hung from the sternpost. It could be propelled by both sail and oar. At that time Captain Ferguson was Chief Harbour Master and Mr Beagley was the foreman boat builder. Mr Beagley built the lifeboat with his fellow workmen. The boat was described as “… a fine piece of workmanship and does credit to her builders and designers…” It had all the latest improvements in shape, disposition of weight and watertight compartments, and it had space for a large number of people in addition to the crew. It appears that 'H Meiers' whose signature was on the plaque that was found concealed in the hull, was involved with the building of the lifeboat. His signature and the dates of the start and finish of the boat’s construction are pencilled on the raw timber 'plaque' found in the hull in the early 1990s when the lifeboat was being restored. It is interesting that the ‘Melbourne Directory’ of 1911, published by Sands and MacDougal, lists McAuley and Meiers, boat builders, Nelson Place foreshore, between Pasco and Parker Streets, Williamstown, (Victorian Heritage Database, ‘Contextual History, Maritime Facilities’), It is quite possibly the business of the person whose name is inscribed on the lifeboat plaque. Flagstaff Hill’s documentation also mentions that the keel was laid at ‘Harry Myers, boat builders, Williamstown, Melbourne’ – the name ‘Myers’ can also be spelled ‘Meiers’, which could be the same person as the Meiers in “McAuley and Meiers” (as mentioned in genealogy lines of Myers). The new lifeboat, to be named ‘Warrnambool’ was brought to town by train and launched at the breakwater on 1st March 1911 using the Titan crane (the old lifeboat built in 1858, was then returned to Melbourne in 1911). This new lifeboat was stationed at Warrnambool in a shed located at the base of the Breakwater, adjacent to the slipway. A winch was used to bring it in and out of the water. The lifeboat ‘Warrnambool’ was similar in size to the old lifeboat but far superior in design, build and sea-going qualities such as greater manoeuvrability. The ‘self-righting, self-draining design was “practically non-capsizeable” and even if the boat overturned it would right itself to an even keel and the water would drain away. The hull was built of New Zealand Kauri, using double diagonal planking, laid in two layers at right angles, with a layer of canvas and red lead paint between the timbers to help seal the planking. It has “… plenty of freeboard area, high watertight spaces between the deck and bottom… through which pipes lead…” The backbone timbers were made of Jarrah. The lifeboat Warrnambool was one of several rescue boats used at Port Fairy and Warrnambool in the early 1900s. In late 1914 the Warrnambool lifeboat and crew were used to help find what was left of the tragic wreckage of the Antares and were able to discover the body of one of the crewmen, which they brought back to Warrnambool. Between 1951 and 1954 the lifeboat was manned under the guidance of Captain Carrington. He held lifeboat practice each month on a Sunday morning, to comply with the Ports and Harbour’s request that lifeboats be manned by a strong and competent crew, ready for action in case of emergency. In the early 1960’s it ended its service as a lifeboat and was used in Port Fairy as a barge to help dredge the Moyne River, bolted to the Port Fairy lifeboat. Flagstaff Hill obtained the Warrnambool in 1975. In 1984 it was on display at Flagstaff Hill Maritime Village, Warrnambool. On 23rd May 1990, she was lifted from the water and placed in a cradle for restoration. The name ‘WARRNAMBOOL could be seen faintly on the lifeboat before it was restored. It was during the restoration that Flagstaff Hill's boat builder discovered the 'plaque' inside the hull. A copy of the blueprint plans has the name “V.E.E. Gotch” printed on it. His advertisement in Footscray’s ‘Independent’ newspaper of Saturday 11th May 1901 states he is “Principal and Skilled member (Naval Architect) to the Court of Marine Inquiry of Victoria and holds classes for naval architectural drawing and arithmetic.” The line drawing is significant for its connection with the lifeboat WARRNAMBOOL. The lifeboat is very significant to local and state history for its use in the lifesaving rescues of seafarers, particularly in Lady Bay. It was part of the local rescue equipment. It gave a half-century of service to the local community as a lifesaving vessel, including its involvement in retrieving the body of a shipwrecked crew member of the ANTARES. Line drawing in black ink and pencil on rectangular parchment or waxed linen. Drawing has diagrams of three profiles of a vessel, with measurements and connecting pencil lines on the left quarter. The plan is for the lifeboat named “Warrnambool”, which was built in Melbourne and completed in 1910. Old blue copies of the Lifeboat plan are archived also.“LIFE BOAT / FOR / WARRNAMBOOL” “Scale, One Inch to One Foot” “ “Length as shown 30’ – 8” “ “Breadth “ “ 8’ – 6 ½ “ “ “Depth “ “ 3’ – 4 ¾” “flagstaff hill, warrnambool, shipwrecked-coast, flagstaff-hill, flagstaff-hill-maritime-museum, maritime-museum, shipwreck-coast, flagstaff-hill-maritime-village, lifeboat, warrnambool lifeboat, boat plans, lifeboat plans, boat construction, boat building, line drawing, plan for lifeboat, life boat, life boat 'warrnambool', clinker design, 1910 lifeboat, life saving equipment, shipbuilding -
 Flagstaff Hill Maritime Museum and Village
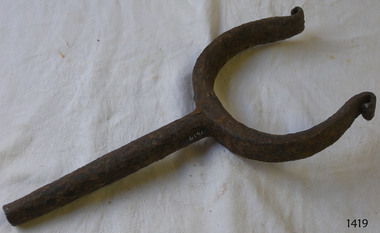
Rowlock, early 20th century
Rowlock from the Lifeboat Warrnambool, which is on site at Flagstaff Hill Maritime Village. The construction of the lifeboat ‘Warrnambool’ began 15th September 1909 and was completed almost 12 months later, 1st September 1910. It was built at the Government Dockyard in Williamstown, Victoria, along the lines designed by the Great Britain’s Royal Lifeboat Institution, and included whaleback decks fore and aft, mast and centreboard, and rudder and tiller hung from the sternpost. It could be propelled by both sail and oar. At that time Captain Ferguson was Chief Harbour Master and Mr Beagley was foreman boat builder. Mr Beagley built the lifeboat with his fellow workmen. The boat was described as “… a fine piece of workmanship and does credit to her builders and designers…” It had all the latest improvements in shape, disposition of weight and watertight compartments, and it had space for a large number of people in addition to the crew. It appears that 'H Meiers' whose signature was on the plaque that was found concealed in the hull, was involved with the building of the lifeboat. His signature and the dates of the start and finish of the boat’s construction are pencilled on the raw timber 'plaque' found in the hull in the early 1990’s when the lifeboat was being restored. It is interesting that the ‘Melbourne Directory’ of 1911, published by Sands and MacDougal, lists McAuley and Meiers, boat builders, Nelson Place foreshore, between Pasco and Parker Streets, Williamstown, (Victorian Heritage Database, ‘Contextual History, Maritime Facilities’), It is quite possibly the business of the person whose name is inscribed on the lifeboat plaque. Flagstaff Hill’s documentation also mentions that the keel was laid at ‘Harry Myers, boat builders, Williamstown, Melbourne’ – the name ‘Myers’ can also be spelled ‘Meiers’, which could be the same person as the Meiers in “McAuley and Meiers” (as mentioned in genealogy lines of Myers). The new lifeboat, to be named ‘Warrnambool’ was brought to town by train and launched at the breakwater on 1st March 1911 using the Titan crane (the old lifeboat built in 1858, was then returned to Melbourne in 1911). This new lifeboat was stationed at Warrnambool in a shed located at the base of the Breakwater, adjacent to the slipway. A winch was used to bring it in and out of the water. The lifeboat ‘Warrnambool’ was similar in size to the old lifeboat but far superior in design, build and sea-going qualities such as greater manoeuvrability. The ‘self-righting, self-draining’ design was “practically non-capsizeable” and even if the boat overturned it would right itself to an even keel and the water would drain away. The hull was built of New Zealand Kauri, using double diagonal planking, laid in two layers at right angles, with a layer of canvas and red lead paint between the timbers to help seal the planking. It has “… plenty of freeboard, high watertight spaces between the deck and bottom… through which pipes lead…” The backbone timbers were made of Jarrah. The lifeboat Warrnambool was one of several rescue boats used at Port Fairy and Warrnambool in early 1900's. In late 1914 the Warrnambool lifeboat and crew were used to help find what was left of the tragic wreckage of the Antares, and were able to discover the body of one of the crewmen, which they brought back to Warrnambool. Between 1951 and 1954 the lifeboat was manned under the guidance of Captain Carrington. He held lifeboat practice each month on a Sunday morning, to comply with the Ports and Harbour’s request that lifeboats be manned by a strong and competent crew, ready for action in case of emergency. In the early 1960’s it ended its service as a lifeboat and was used in Port Fairy as a barge to help dredge the Moyne River, bolted to the Port Fairy lifeboat. Flagstaff Hill obtained the Warrnambool in 1975. In 1984 it was on display at Flagstaff Hill Maritime Village, Warrnambool. On 23rd May 1990 she was lifted from the water and placed in a cradle for restoration. The name ‘WARRNAMBOOL could be seen faintly on the lifeboat before it was restored. It was during the restoration that Flagstaff Hill's boat builder discovered the 'plaque' inside the hull. A copy of the blueprint plans has the name “V.E.E. Gotch” printed on it. His advertisement in Footscray’s ‘Independent’ newspaper of Saturday 11th May 1901 states he is “Principal and Skilled member (Naval Architect) to the Court of Marine Inquiry of Victoria and holds classes for naval architectural drawing and arithmetic.” The rowlock is significant for its association with the lifeboat WARRNAMBOOL, which is significant for its half century service to the local community as a lifesaving vessel. She was also used to help retrieve the body of a shipwrecked crew member of the ANTARES. Rowlock, iron, upper ends scroll over, from the Lifeboat Warrnambool.flagstaff hill, warrnambool, shipwrecked-coast, flagstaff-hill, flagstaff-hill-maritime-museum, maritime-museum, shipwreck-coast, flagstaff-hill-maritime-village, life boat, life saving vessel, 1910 vessel, port fairy, boat builder plaque, rescue boat, beagley, government dockyard, williamstown, v.e.e. gotch, royal lifeboat institution, captain ferguson, non-capsizeable lifeboat, self-righting lifeboat, antares shipwreck, double diagonal planking, captain carrington, rowlock, lifeboat rowlock, lifeboat warrnambool -
 Flagstaff Hill Maritime Museum and Village
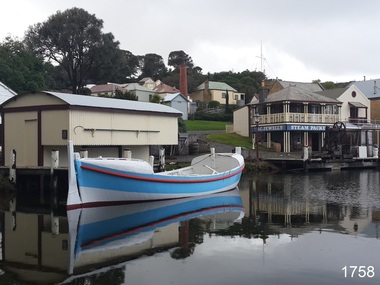
Vehicle - Vessel, Lifeboat Warrnambool, 01/09/1910
The construction of the lifeboat ‘Warrnambool’ began 15th September 1909 and was completed almost 12 months later, 1st September 1910. It was built at the Government Dockyard in Williamstown, Victoria, along the lines designed by the Great Britain’s Royal Lifeboat Institution, and included whaleback decks fore and aft, mast and centreboard, and rudder and tiller hung from the sternpost. It could be propelled by both sail and oar. At that time Captain Ferguson was Chief Harbour Master and Mr Beagley was foreman boat builder when he and his fellow workmen built the boat. The boat was described as “… a fine piece of workmanship and does credit to her builders and designers…” It had all the latest improvements in shape, disposition of weight and watertight compartments, and it had space for a large number of people in addition to the crew. It appears that 'H Meiers' whose signature, along with building dates, is pencilled on a concealed timber 'plaque' in the hull, was involved with the building of the lifeboat. It is interesting that the ‘Melbourne Directory’ of 1911, published by Sands and MacDougal, lists McAuley and Meiers, boat builders, Nelson Place foreshore, between Pasco and Parker Streets, Williamstown, (Victorian Heritage Database, ‘Contextual History, Maritime Facilities’), It is probably the company of the person whose name is inscribed on the lifeboat plaque. Flagstaff Hill’s documentation also mentions that the keel was laid at ‘Harry Myers, boat builders, Williamstown, Melbourne’ – the name ‘Myers’ can also be spelled ‘Meiers’, which could be the same person as the Meiers in “McAuley and Meiers” (as mentioned in genealogy lines of Myers). The new lifeboat, to be named ‘Warrnambool’ was brought to town by train and launched at the breakwater on 1st March 1911 using the Titan crane (the old lifeboat built in 1858, was then returned to Melbourne in 1911). This new lifeboat was stationed at Warrnambool in a shed located at the base of the Breakwater, adjacent to the slipway. A winch was used to bring it in and out of the water. The lifeboat ‘Warrnambool’ was similar in size to the old lifeboat but far superior in design, build and sea-going qualities such as greater manoeuvrability. The ‘self-righting, self-draining’ design was “practically non-capsizeable” and even if the boat overturned it would right itself to an even keel and the water would drain away. The hull was built of New Zealand Kauri, using double diagonal planking, laid in two layers at right angles, with a layer of canvas and red lead paint between the timbers to help seal the planking. It has “… plenty of freeboard, high watertight spaces between the deck and bottom… through which pipes lead…” The backbone timbers were made of Jarrah. The lifeboat Warrnambool was one of several rescue boats used at Port Fairy and Warrnambool in early 1900's. In late 1914 the Warrnambool lifeboat and crew were used to help find what was left of the tragic wreckage of the Antares, and were able to discover the body of one of the crewmen, which they brought back to Warrnambool. Between 1951 and 1954 the lifeboat was manned under the guidance of Captain Carrington. He held lifeboat practice each month on a Sunday morning, to comply with the Ports and Harbour’s request that lifeboats be manned by a strong and competent crew, ready for action in case of emergency. In the early 1960’s it ended its service as a lifeboat and was used in Port Fairy as a barge to help dredge the Moyne River, bolted to the Port Fairy lifeboat. Flagstaff Hill obtained the Warrnambool in 1975. In 1984 it was on display at Flagstaff Hill Maritime Village, Warrnambool. On 23rd May 1990 she was lifted from the water and placed in a cradle for restoration. The name ‘WARRNAMBOOL could be seen faintly on the lifeboat before it was restored. It was during the restoration that Flagstaff Hill's boat builder discovered the 'plaque' inside the hull. A copy of the blueprint plans has the name “V.E.E. Gotch” printed on it. His advertisement in Footscray’s ‘Independent’ newspaper of Saturday 11th May 1901 states he is “Principal and Skilled member (Naval Architect) to the Court of Marine Inquiry of Victoria and holds classes for naval architectural drawing and arithmetic.”The lifeboat WARRNAMBOOL is significant for its half century service to the local community as a lifesaving vessel. She was also used to help retrieve the body of a shipwrecked crew member of the ANTARES. Lifeboat "Warrnambool", a wooden, clinker hull, 'self-righting, self-draining design, single mast, pivoting centreboard. Complete with sail and yardarm. A 'plaque' was found inside the hull of the lifeboat, made of untreated wood, disc-shaped with one straight edge (Diam 15.5cm), inscribed by one of the boat builders in pencil script "Life Boat Start building / 15/9/09 - complete 1/9/10 / (signature looks like H Meiers) / Boat Builder)."'Plaque' inside body of boat is inscribed in pencil, script writing "Life Boat Start building / 15/9/09 - complete 1/9/10 / (signature looks like H Meiels) / Boat Builder)." flagstaff hill, warrnambool, shipwrecked-coast, flagstaff-hill, flagstaff-hill-maritime-museum, maritime-museum, shipwreck-coast, flagstaff-hill-maritime-village, lifeboat, life boat, vessel, life saving, 1910 vessel, port fairy, boat builder plaque, rescue boat, beagley, williamstown, government dockyard, v.e.e. gotch, royal lifeboat institution, captain ferguson, meiers, nelson place, non-capsizeable, self-righting, titan crane, double diagonal planking, captain carrington, barge, antares, self righting, crew of twelve, capacity of 30 survivors -
 Puffing Billy Railway
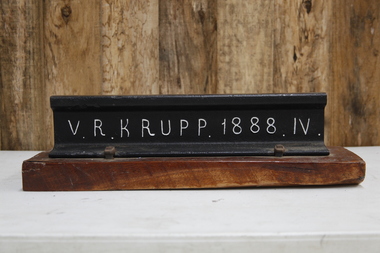
V. R. Krupp 1888. IV. Rail, 1888
60lbs rail that was used throughout the Victorian rail network. In 1887 Gibbs, Bright and Co. had a contract with Victorian Railways for railway and canal construction and supply of Krupp Rails. Gibbs, Bright and Co were merchant bankers and shipping agents and merchants who where also Directors of the GWR ( Great Western Railway ) and the Ship The "Great Britain" in England Gibbs, Bright and Company had principally been involved in shipping and trading, mainly in the West Indies, but following the discovery of gold in Victoria they established an office in Melbourne and soon became one of the leading shipping agents and merchants in the Colony. They expanded into passenger shipping and soon established offices in Brisbane, Sydney, Newcastle, Adelaide and Perth as well as launching passenger services between England, Mauritius and New Zealand. Gibbs, Bright also held a number of financial agencies from British mortgage, finance and investment companies as well as representing several British insurance companies in Australia. In addition they conducted a growing import business as well as an export business that included livestock, dairy produce, wool and flour. Also the company played a substantial part in the development of Australia's mineral resources, starting with lead in 1895, and later venturing into tin, gold, copper, cement and super phosphates. In Australia, after WWI, many of the larger companies were managing their own import and export so Gibbs, Bright and Company tended to focus its Agency business on smaller companies while expanding their interest into other markets such as timber, wire netting, zinc, stevedoring, road transport, marine salvage, gold mining as well as mechanical, structural, electrical and marine engineering. The Company's shipping interests continued to grow as well and still formed a major part of its business. In 1948 the parent company in England took the major step from tradition when they changed the business from a partnership into a private limited company. The name was the same, Antony Gibbs and Sons Limited, and in practice the effect of the change was very little. Some of the firm's branches and departments had already become limited companies and the formation of a parent company simplified the structure. The Australian operation was in time changed to Gibbs Bright & Co Pty Ltd in 1963. In 1848 Alfred Krupp becomes the sole proprietor of the company which from 1850 experiences its first major growth surge. In 1849 his equally talented brother Hermann (1814 - 1879) takes over the hardware factory Metallwarenfabrik in Berndorf near Vienna, which Krupp had established together with Alexander Schöller six years earlier. The factory manufactures cutlery in a rolling process developed by the brothers. Krupp's main products are machinery and machine components made of high-quality cast steel, especially equipment for the railroads, most notably the seamless wheel tire, and from 1859 to an increased extent artillery. To secure raw materials and feedstock for his production, Krupp acquires ore deposits, coal mines and iron works. On Alfred Krupp's death in 1887 the company employs 20,200 people. His great business success is based on the quality of the products, systematic measures to secure sales, the use of new cost-effective steel-making techniques, good organization within the company, and the cultivation of a loyal and highly qualified workforce among other things through an extensive company welfare system. From 1878 August Thyssen starts to get involved in processing the products manufactured by Thyssen & Co., including the fabrication of pipes for gas lines. In 1882 he starts rolling sheet at Styrum, for which two years later he sets up a galvanizing shop. The foundation stone for Maschinenfabrik Thyssen & Co. is laid in 1883 with the purchase of a neighboring mechanical engineering company. In 1891 August Thyssen takes the first step toward creating a vertical company at the Gewerkschaft Deutscher Kaiser coal mine in [Duisburg-]Hamborn, which he expands to an integrated iron and steelmaking plant on the River Rhine. Just before the First World War he starts to expand his group internationally (Netherlands, UK, France, Russia, Mediterranean region, Argentina). info from The company thyssenkrupp - History https://www.thyssenkrupp.com/en/company/history/the-founding-families/alfred-krupp.htmlHistoric - Victorian Railways - Track Rail - made by Krupp in 1888Section of VR Krupp 1888 Rail mounted on a piece of varnished wood. Rail made of ironpuffing billy, krupp, rail, victorian railways -
 Puffing Billy Railway
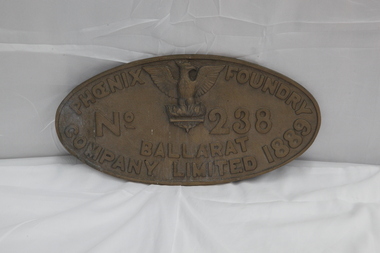
Phoenix Foundry Plate
Phoenix Foundry Plate - replica Made about 2010 cast off original from locomotive Y112 The Phoenix Foundry (1857-1906) fabricated iron and brass products - including engines and pumping gear for the mining industry, locomotives, steam rollers, water pipes, water gauges and diverse small items. Throughout its operation the business was located at premises on Armstrong Street, Ballarat . Background In 1852, at the age of thirty-three and after a year of operating his own engineering business at Williamstown, Lancashire-born blacksmith and engineer George Threlfall (1819-1897) arrived on the Sebastopol gold plain and immediately undertook blacksmith work repairing picks and tools for the miners. Little did he know that this fledgling business would be the genesis of the most iconic business of nineteenth-century Ballarat. At approximately thirty-nine years of age, English mechanical engineer Richard Carter (c1814-1883) came to Australia on board the Arrogant - arriving in Melbourne on 19 April 1853. He soon travelled to the Ballarat goldfields. Born in the year 1830 in Belfast (Ireland), mechanical engineer William Henry Shaw (1830-1896) arrived in Australia in October 1853. He worked briefly with George Threlfall at Sebastopol, then moved to Geelong to manage the small foundry of Frederick Moore. Twenty-four year old English-born iron moulder Robert Holden (c1831-?) left his home in Belfast (Ireland) in late 1854 and travelled from Liverpool to Melbourne on board the James Baines - arriving in February 1855. Afterwards he joined his brother-in-law William Henry Shaw in Ballarat. History Foundation to Incorporation In March 1857 George Threlfall joined in business with Richard Carter, William Henry Shaw and Robert Holden. They relocated Threlfall's successful engineering enterprise from Sebastopol to new premises in Armstrong Street, Ballarat. This business was then known variously as the Phoenix Iron Works Company, Phoenix Foundry or Messrs Carter and Co. By 15 April 1857 they were advertising that they were open for business as engineers, millwrights, boiler makers, smiths, iron founders and brass founders. In January 1858 George Threlfall left the partnership. Incorporation to 1889 1890 to Closing locomotive Y112 Builder: Phoenix Foundry, Ballarat Builder’s Number & Year: 238 of 1889 Designer: Kitson & Co Wheel Arrangement: 0-6-0 No. in class: 31 Entered Service: 24 July 1889 Taken off Register: 11 May 1961 The origins of the Victorian Railways Y-class lay with the decision by Kitson & Co, Leeds to place a 0-6-0 freight locomotive on display at the Centennial International Exhibition, Melbourne in 1888, together with a 2-4-2T suburban passenger locomotive. This marketing initiative proved successful as the Victorian Railways were clearly impressed with these machines, with both purchased after the exhibition and becoming the patterns for new standard locomotive types. Thirty examples of the 0-6-0 heavy freight design were ordered from the Phoenix Foundry, Ballarat, becoming the Y-class for main line heavy freight duties, while the 2-4-2T design became the E-class for Melbourne suburban passenger duties (represented by preserved locomotive E 236). The Y-class prove successful in service and accrued high mileages. They were inevitably superseded by more modern and powerful steam locomotives and a number cascaded into shunting and yard pilot duties, often with the addition of shunters steps along both locomotive and tender. Y 112 was one of the last in service when withdrawn in 1961. Fortunately it was saved for preservation and plinthed in central Ballarat, ostensibly in commemoration of Phoenix Foundry. I understand it is owned by the Sovereign Hill Museums Association. During the 1980’s, Y 112 was leased to Steamrail Victoria and restored to operation at an industrial site in Ballarat. Y 112 features an attractive lined apple green livery and has performed various rail tours around Victoria since restoration. It is normally based at the Steamrail depot in Ballarat East. Y 112 is the only 19th century design in operational condition in Victoria and as such is one of the oldest working steam locomotive in Victoria . Historic - Phoenix Foundry Plate - replica Made about 2010 cast off original from locomotive Y112Phoenix Foundry Plate Oval shaped plate with an image of a phoenix centered at the top with lettering surrounding it.Phoenix Foundry No 238 Ballarat Company Limited 1889.puffing billy, phoenix foundry, ballarat, locomotive y112, phoenix foundry plate - replica -
 Flagstaff Hill Maritime Museum and Village
Ceramic - Teacup, 1920s
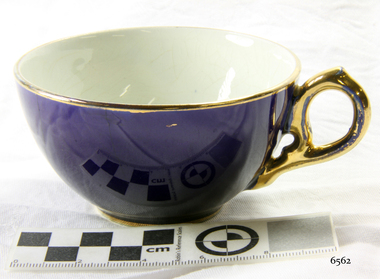
This teacup is part of a four-piece place setting, comprising a teacup, saucer and plates, from a tea set. The tea set was given by Eva Carmichael, a survivor of the ship Loch Ard which was wrecked near Port Campbell in 1878, to Jane Shields, the young woman who supported Eva during her recovery from the ordeal. Ms Shields was Eva’s close companion while she was convalescing at Glenample Homestead. The friendship between the two women continued after Eva Carmichael returned to her home in Britain, became Mrs Townsend, and had three sons. Jane Shields also married, becoming Mrs John Osborne and bearing four daughters and two sons. In 1926-27, almost forty-eight years after the shipwreck, one of Jane’s daughters (Ella Marie Schulby nee Osborne) visited Eva in England. Eva gave her the tea set to take back home to her mother. Jane died in 1932 and her tea set was inherited by her daughters, who divided it between themselves, a four-piece place setting for each of them. A brief history of the Loch Ard: - The Loch Ard was named after a Scottish lake. It was one of the famous Loch Line of ships that sailed the long voyage from England to Australia. Barclay, Curdle and Co. built the three-masted iron ship in Glasgow in 1873. It had sailed three trips to Australia and one trip to Calcutta before its fateful voyage. Loch Ard left England on March 2, 1878, under the command of recently married, 29-year-old Captain Gibbs, bound for Melbourne with a crew of 37, plus 17 passengers. The general cargo reflected the affluence of Melbourne at the time. Onboard were straw hats, umbrellas, perfumes, clay pipes, pianos, clocks, confectionery, linen and candles, and a heavier load of railway irons, cement, lead and copper. Other cargo included items intended for display in the Melbourne International Exhibition of 1880. The Loch Ard had been sailing for three months and was close to its destination. At 3 am on June 1, 1878, Captain Gibbs expected to see land, but the Loch Ard ran into a fog that greatly reduced visibility. Captain Gibbs became anxious as there was no sign of land or the Cape Otway lighthouse. The fog lifted at 4 am. A lookout announced that he could see breakers. The sheer cliffs of Victoria's west coast came into view; the ship was much closer to them than Captain Gibbs expected. It was not long before the Loch Ard's bow swung towards land. Although the Captain tried to manage the vessel, his attempts didn’t work and the ship struck a reef at the base of Mutton Bird Island, near Port Campbell. The top deck became loosened from the hull, and the masts and rigging crashed down, knocking passengers and crew overboard. The lifeboat was launched by Tom Pearce but crashed into the side of Loch Ard and capsized. Tom Pearce managed to cling to the lifeboat’s overturned hull and shelter beneath it. He drifted out to sea and the tide brought him back to what is now called Loch Ard Gorge. He swam to shore and found a cave for shelter. A passenger, Eva Carmichael, had raced onto the deck to find out what was happening and was confronted by towering cliffs above the ship. She was soon swept off the ship by a huge wave. Eva saw Tom Pearce on a small rocky beach and yelled to attract his attention. He swam to the exhausted woman and dragged her to shore and to the shelter of the cave. He revived Eva with a bottle of brandy from a case that had washed up on the beach. Tom scaled a cliff in search of help and followed some horse hoof prints. He came from two men from Glenample Station, three and a half miles away. He told the men of the tragedy and then returned to the gorge while the two men rode back to the station to get help. They reached Loch Ard Gorge and took the two shipwreck survivors to Glenample Station to recover. Eva stayed at the station for six weeks before returning to Ireland by steamship. In Melbourne, Tom Pearce received a hero's welcome and was presented with a medal and some money. Of the 54 crew members and passengers on board, only two survived: the apprentice, Tom Pearce and the young woman passenger, Eva Carmichael, who lost her family in the tragedy.This blue china tea set, comprising a teacup, saucer and two plates, is of high significance as it is closely connected to the wreck of the Loch Ard, and to one of only two survivors, Eva Carmichael. Memorabilia connected to Eva Carmichael are precious and rare. The Loch Ard shipwreck is significant for Victoria and is registered on the Victorian Heritage Register (S 417). Flagstaff Hill has a varied collection of artefacts from Loch Ard and its collection is significant for being one of the largest accumulations of artefacts from this notable Victorian shipwreck. The group gives a snapshot of history, enabling us to interpret the story of this tragic event and the lives of the people involved. The collection is also archaeologically significant as it represents aspects of Victoria's shipping history that allow us to interpret Victoria's social and historical themes of the time. The collection's historical significance is that it is associated unfortunately with the worst and best-known shipwreck in Victoria's history.The teacup is part of a china tea set place setting, which comprises the teacup, a saucer and two plates of slightly different sizes. The cup is a royal blue outer, white inside with gold lip, a gold ring around the base and a gold handle. flagstaff hill, warrnambool, flagstaff hill maritime museum and village, shipwreck coast, great ocean road, china tea set, tea set, royal blue china, tom pearce, eva carmichael, jane shields, glenample, loch ard, place setting, teacup -
 Bendigo Military Museum
Photograph - Army Survey Regiment – Corps Day Parade, Fortuna Villa, Bendigo, 1995
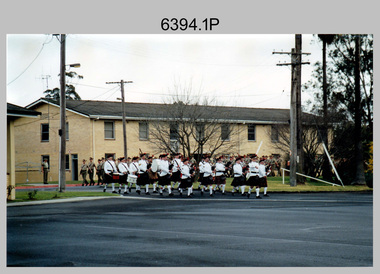
This set of 23 photographs were taken at the Corps Day Parade held at the Army Survey Regiment, Bendigo on the 1st of July 1995. This occasion was to commemorate the 80th anniversary of the formation of the Royal Australian Survey Corps. The Parade Commander was CO LTCOL Duncan Burns, and the Reviewing Officer was the Deputy Chief of the Defence Force MAJGEN G.D. Carter AM. Also in attendance was his MA MAJ M.D. Bornholt AM and the COL COMDT of the Royal Australian Survey Corps COL Don Swiney MBE. On this occasion the Reviewing Officer presented the Defence Force Service Medal to SGT Graham Hales and SPR Ken Labouchardiere for 15 years of efficient remunerated service in the Australian Army. SSGT Russ Mollenhauer received the Defence Force Service Medal clasp in recognition of 20 years of service. SGT Stuart Symonds received his second Defence Force Service Medal clasp in recognition of 25 years of service.This is a set of 23 photographs of the Corps Day Parade held at the Army Survey Regiment, Fortuna, Bendigo on the 1st July 1995. The colour photographs were printed on photographic paper and are part of the Army Survey Regiment’s Collection. The photographs were scanned at 300 dpi. .1) - Photo, colour, 1995. Fortuna Pipes and Drums lead the Army Survey Regiment onto the parade ground. .2) to .3) - Photo, colour, 1995. Fortuna Pipes and Drums in position on the parade ground. .4) - Photo, colour, 1995. Data Acquisition Squadron marches onto the parade ground, led by L to R: WO2 Peter Imeson, WO2 Bruce Hammond. .5) - Photo, colour, 1995. Data Acquisition Squadron front rank L to R: WO2 Peter Imeson, SPR Stuart Catharall, CPL Damien Killeen, CPL Trevor King, SPR Glen Norrell, SPR Kim Baker, SPR Craig Smith, LCPL Mark Fedden, SGT Graham Hales, SPR Josh Andrews, unidentified (x2), WO2 Bruce Hammond. .6) - Photo, colour, 1995. Army Survey Regiment in position on the parade ground. On left - Product Construction Squadron rear rank L to R: CPL Dave Scott, SPR Shane Campbell, CPL Guenther Ebenwaldner, remainder unidentified. Centre rank L to R: CPL Ian Bowes, remainder unidentified. RSM WO1 Ken Johnston OAM MM. Front rank L to R: WO2 Alan Virtue, SSGT Bob Thrower, CPL Paul Einam, SGT Peter Tuddenham, SPR Dik Brierley, SGT Stuart Ridge, SPR Mick Muzeen, SPR Marty Stradbrook, unidentified, SGT Steve Nokes, SPR James Commons, SPR Lance Hillier. WO2 Gill Park. In centre - Administration Support Squadron. On right - Data Acquisition Squadron. 7.) - Photo, colour, 1995. Officers ready to take posts. L to R: LT Dave Sapparth, CAPT Colin Davidson, CAPT Tony Harder – UK Exchange Officer, LT Jason Selman, CAPT Doug Arman, QM CAPT Bill Griggs, LT Roger Grose, CAPT Bin Fashar Sutimin – Indonesian Exchange Officer in white uniform, MAJ Ross Jenkins, CAPT Gary Warnest. 8.) - Photo, colour, 1995. CO LTCOL Duncan Burns salutes the Reviewing Officer MAJGEN G.D. Carter AM. .9) & .10) - Photo, colour, 1995. Data Acquisition Squadron presents arms. Officers’ rank L to R: CAPT Tony Harder – UK Exchange Officer, CAPT Colin Davidson, LT Dave Sapparth. ADJT CAPT Brenton McDonald at far right. Front rank L to R: WO2 Peter Imeson, SPR Stuart Catharall, CPL Damien Killeen, CPL Trevor King, SPR Glen Norrell, SPR Kim Baker, SPR Craig Smith, LCPL Mark Fedden, SGT Graham Hales, SPR Josh Andrews, unidentified (x2), WO2 Bruce Hammond. 11) - Photo, colour, 1995. Army Survey Regiment presenting arms. L to R: Product Construction Squadron, Administration Support Squadron, Data Acquisition Squadron. .12) - Photo, colour, 1995. Product Construction Squadron presents arms. Officers’ Rank: 2IC MAJ Mick Banham, L to R: CAPT Gary Warnest, OC MAJ Ross Jenkins CAPT Bin Fashar Sutimin – Indonesian Exchange Officer, LT Roger Grose. L to R: RSM WO1 Ken Johnston OAM MM. Front rank L to R: SSGT Bob Thrower, CPL Paul Einam, SGT Peter Tuddenham, SPR Dik Brierley, SGT Stuart Ridge, SPR Mick Muzeen, SPR Marty Stradbrook, unidentified, SGT Steve Nokes, SPR James Commons, SPR Lance Hillier, WO2 Gill Park. Other identifiable personnel in rear ranks L to R: SGT Peter Tuddenham, SPR Ben Lucas, SPR Dik Brierley, SGT Dale Hudson, SPR Annette (Odgers) Wynn, CPL Roger Pearson, SPR Corey Hill, SSGT Russ Mollenhauer. 13) - Photo, colour, 1995. Army Survey Regiment Advances in Review Order. L to R: Product Construction Squadron, Administration Support Squadron, Data Acquisition Squadron. 14) - Photo, colour, 1995. Army Survey Regiment in rank formation slow marches around parade ground L to R: Product Construction Squadron, Administration Support Squadron, Data Acquisition Squadron. .15) & .16) - Photo, colour, 1995. Data Acquisition Squadron slow marches, using ‘Forms’ to turn right in rank formation. Officers’ rank L to R: CAPT Tony Harder – UK Exchange Officer, CAPT Colin Davidson, LT Dave Sapparth. ADJT CAPT Brenton McDonald at far right.front rank L to R: WO2 Peter Imeson, SPR Stuart Catharall CPL Damien Killeen, CPL Trevor King, SPR Glen Norrell, SPR Kim Baker, SPR Craig Smith, LCPL Mark Fedden, SGT Graham Hales, SPR Josh Andrews, unidentified (x2), WO2 Bruce Hammond. Centre Right Marker SPR Cameron Gee is behind SPR Stuart Catharall. .17) - Photo, colour, 1995. Data Acquisition Squadron proceeds past Reviewing Officer on ‘Eyes Right’ command. Officers’ rank L to R: CAPT Tony Harder – UK Exchange Officer, LT Dave Sapparth. CAPT Colin Davidson. Centre Right Marker SPR Cameron Gee. Right rear supernumerary SSGT Rod Skidmore, ADJT CAPT Brenton McDonald to his left. Front rank L to R: WO2 Peter Imeson, SPR Stuart Catharall CPL Damien Killeen, CPL Trevor King, SPR Glen Norrell, SPR Kim Baker, SPR Craig Smith, LCPL Mark Fedden, SGT Graham Hales, SPR Josh Andrews, unidentified (x2), WO2 Bruce Hammond. CO LTCOL Duncan Burns in foreground. 18) - Photo, colour, 1995. Data Acquisition Squadron proceeds past Reviewing Officer on ‘Eyes Right’ command. Rear rank L to R: unidentified, CPL John ‘Doc’ Commons, CPL Tony Jackson, SPR Helen Scorgie. Centre rank L to R: SPR Cameron Gee, SPR Derek Percival, SPR Grant Lloyd. Front rank L to R: WO2 Peter Imeson, SPR Stuart Catharall CPL Damien Killeen, CPL Trevor King, SPR Glen Norrell, SPR Kim Baker, SPR Craig Smith, LCPL Mark Fedden, SGT Graham Hales, SPR Josh Andrews, unidentified (x2), WO2 Bruce Hammond. .19) - Photo, colour, 1995. L to R: MAJGEN G.D. Carter AM returning salute, MA MAJ M.D. Bornholt AM, COL COMDT, COL Don Swiney MBE, in background CPL Warren ‘Waldo’ Shirley, WO2 Pat Lumsden. 20.) - Photo, colour, 1995. Product Construction Squadron L to R: SSGT Paul ‘Hutch’ Hunter, WO2 Jeff Willey, rear rank L to R: CPL Dave Scott, SPR Shane Campbell, CPL Guenther Ebenwaldner, remainder unidentified. Centre rank L to R: CPL Ian Bowes, SPR Ben Lucas, remainder unidentified. MAJGEN G.D. Carter AM, CO LTCOL Duncan Burns, Front rank L to R: WO2 Alan Virtue, remainder unidentified, RSM WO1 Ken Johnston OAM MM, Officers’ Rank: LT Jason Selman, CAPT Bin Fashar Sutimin – Indonesian Exchange Officer, CAPT Gary Warnest, MAJ Ross Jenkins, 2IC MAJ Mick Banham. .21) - Photo, colour, 1995. L to R: Centre marker CPL Ian Bowes, SPR Ben Lucas, remainder unidentified, MAJGEN G.D. Carter AM, COL COMDT, COL Don Swiney MBE, CO LTCOL Duncan Burns, WO2 Allan Virtue. .22) & .23) - Photo, colour, 1995. L to R: WO2 Pat Lumsden, MAJGEN G.D. Carter AM, SGT Graham Hales, SPR Ken Labouchardiere, SSGT Russ Mollenhauer, SGT Stuart Symonds..1P to.23P – The occasion and date are annotated on the plastic sleeve.royal australian survey corps, rasvy, army survey regiment, army svy regt, fortuna, asr -
 Tarnagulla History Archive
Photograph - Photograph: Company's Dam and Flour Mill, Tarnagulla, c. 1880 - 1920
Williams Family Collection. On the 20th December 1873 it was reported in the Tarnagulla Courier that arrangements were being made for the erection of a steam flour mill at Tarnagulla. Mr Bristol had purchased the necessary plant which would be erected with as little delay as possible. The site chosen was the premises occupied previously by Mr John Pierce, grocer and wine and spirit merchant, at the corner of King and Commercial Road. These premises were incorporated in the mill building. Suitable buildings for receiving and storing grain and flour had been erected already. On 10th January, 1874 an advertisement in the Courier called for tenders from masons, bricklayers and carpenters for the erection of a flour mill at Tarnagulla for H. C. Bristol, Esq. with all enquiries to be made from G. Minto, Engineer. In December 1881 the proprietors made a request to the Tarnagulla Borough Council for permission to lay pipes to the Municipal Dam, which was generally known as the Company's Dam, and to obtain water from the dam for milling purposes. This was granted. Steam was got up for the first time on 30th of March, 1882. A large quantity of wheat was stored ready for milling. Just prior to 29th of April 1882 the boiler at the mill burst, as the result of which two men, J. H. Smith and W. Hargreaves died and H. Joyce Bousfield, senior and junior, were seriously injured. The mill commenced operations on 13th June, 1882 with Mr W Fitzgerald as manager. The price offered for wheat was thirty-seven pence per bushell. It operated with grinding stones until considerable renovations were done in the early part of 1899 when new rollers and more up to date equipment installed. The mill was then known as the Tarnagulla Flour Mill Co., with Thos. Comrie as proprietor, Mr Fitzgerald was still manager, and Mr T. Leonard was the traveller. Much new equipment was put in and each of the three floors had different processes. The rollers were on the ground floor, the purifiers and elevators reel were on the second floor, plus the clean wheat bin directly over the Ganz rollers. On the top floor was the chop reel, bran reel, inter-elevator reels, brush machine cyclone sack hoist, dirty wheat shaker, clean wheat bin, dust rooms and also double damping rooms. A plant was also erected for the making of an improved quality of wheaten meal, for which purpose special machinery was procured and a pair of stones was left for grinding the meal. A complete plant for the crushing of oats etc was also erected. The driving power of the mill was supplied by a new engine complete with 16 inch cylinder, manufactured and erected by Bousfield & Co. of Eaglehawk. It was fitted with Pickering governors, connected with the cylinder was a super heater. The boiler was tested and all connections etc. overhauled, with much of it being completely renewed. There was a complete network of belts, spouts, elevators etc. all over the building, all conveniently placed. The plans etc for the new plant were drawn up by Mr J. Kilborn, manager of the firm of Bodington & Co., engineers and millwrights of Carlton, which supplied the whole of the machinery, excepting the engine. The work of erection was carried out by Mr Kilborn and his assistants to the entire satisfaction of Mr Comrie, who had gone to considerable expense to bring the mill to a completely up-todate machine, fitted with all of the most modern appliances available. An advertisement on May 6th, 1899 read: "Tarnagulla Flour Mill Co., Patent Roller Flour. Also their Digestive Wheaten Meal specially prepared for Porridge or Bread." In January 1901, 6000 bags of wheat were received weekly at the mill and it was a common sight to see the streets lined with wagons. In May 1902 the mill was lighted by gas and in July 1906 an application was made to the Tarnagulla Borough Council for permission to lay a tram track from the mill to the Railways Station. Council was agreeable to this provided suitable plans were submitted. In 1913, 15,000 bags of wheat were bought at three shillings and four pence per bushell. In January 1914 the mill was renovated. At this time 1500 bags of wheat were coming in daily, with 20,000 bags in storage. On 15th December, 1917 the mill was advertised for sale, to be sold on Friday, 21st December,.1917, on behalf of the Estate of the Late Thomas Comrie, who had died on 4th August, 1910. The Courier at that time recorded him as being responsible for the building of the mill and with being the sole proprietor. The mill was closed, apparently, for a short period. The Courier reported on 13th of September, 1918 that the mill had been sold to Mr O. Albert of Talbot and that it would re-open. An advertisement read: ALBERT. O. & SON, MILLERS. During 1920 the mill was closed and pulled down. It was later re-erected at Mildura where it operated for many years. (by Donald Clark)Monochrome photograph depicting view of Company's Dam and the flour mill in Tarnagulla. Handwritten on reverse: 'J. Caldwell and photographer's stamp 'C. Bock Photo Tarnagulla'.tarnagulla -
Tarnagulla History Archive
Postcard - Photographic postcard: Company's Dam and Flour Mill, Tarnagulla, c. 1880 - 1920
Williams Family Collection. On the 20th December 1873 it was reported in the Tarnagulla Courier that arrangements were being made for the erection of a steam flour mill at Tarnagulla. Mr Bristol had purchased the necessary plant which would be erected with as little delay as possible. The site chosen was the premises occupied previously by Mr John Pierce, grocer and wine and spirit merchant, at the corner of King and Commercial Road. These premises were incorporated in the mill building. Suitable buildings for receiving and storing grain and flour had been erected already. On 10th January, 1874 an advertisement in the Courier called for tenders from masons, bricklayers and carpenters for the erection of a flour mill at Tarnagulla for H. C. Bristol, Esq. with all enquiries to be made from G. Minto, Engineer. In December 1881 the proprietors made a request to the Tarnagulla Borough Council for permission to lay pipes to the Municipal Dam, which was generally known as the Company's Dam, and to obtain water from the dam for milling purposes. This was granted. Steam was got up for the first time on 30th of March, 1882. A large quantity of wheat was stored ready for milling. Just prior to 29th of April 1882 the boiler at the mill burst, as the result of which two men, J. H. Smith and W. Hargreaves died and H. Joyce Bousfield, senior and junior, were seriously injured. The mill commenced operations on 13th June, 1882 with Mr W Fitzgerald as manager. The price offered for wheat was thirty-seven pence per bushell. It operated with grinding stones until considerable renovations were done in the early part of 1899 when new rollers and more up to date equipment installed. The mill was then known as the Tarnagulla Flour Mill Co., with Thos. Comrie as proprietor, Mr Fitzgerald was still manager, and Mr T. Leonard was the traveller. Much new equipment was put in and each of the three floors had different processes. The rollers were on the ground floor, the purifiers and elevators reel were on the second floor, plus the clean wheat bin directly over the Ganz rollers. On the top floor was the chop reel, bran reel, inter-elevator reels, brush machine cyclone sack hoist, dirty wheat shaker, clean wheat bin, dust rooms and also double damping rooms. A plant was also erected for the making of an improved quality of wheaten meal, for which purpose special machinery was procured and a pair of stones was left for grinding the meal. A complete plant for the crushing of oats etc was also erected. The driving power of the mill was supplied by a new engine complete with 16 inch cylinder, manufactured and erected by Bousfield & Co. of Eaglehawk. It was fitted with Pickering governors, connected with the cylinder was a super heater. The boiler was tested and all connections etc. overhauled, with much of it being completely renewed. There was a complete network of belts, spouts, elevators etc. all over the building, all conveniently placed. The plans etc for the new plant were drawn up by Mr J. Kilborn, manager of the firm of Bodington & Co., engineers and millwrights of Carlton, which supplied the whole of the machinery, excepting the engine. The work of erection was carried out by Mr Kilborn and his assistants to the entire satisfaction of Mr Comrie, who had gone to considerable expense to bring the mill to a completely up-todate machine, fitted with all of the most modern appliances available. An advertisement on May 6th, 1899 read: "Tarnagulla Flour Mill Co., Patent Roller Flour. Also their Digestive Wheaten Meal specially prepared for Porridge or Bread." In January 1901, 6000 bags of wheat were received weekly at the mill and it was a common sight to see the streets lined with wagons. In May 1902 the mill was lighted by gas and in July 1906 an application was made to the Tarnagulla Borough Council for permission to lay a tram track from the mill to the Railways Station. Council was agreeable to this provided suitable plans were submitted. In 1913, 15,000 bags of wheat were bought at three shillings and four pence per bushell. In January 1914 the mill was renovated. At this time 1500 bags of wheat were coming in daily, with 20,000 bags in storage. On 15th December, 1917 the mill was advertised for sale, to be sold on Friday, 21st December,.1917, on behalf of the Estate of the Late Thomas Comrie, who had died on 4th August, 1910. The Courier at that time recorded him as being responsible for the building of the mill and with being the sole proprietor. The mill was closed, apparently, for a short period. The Courier reported on 13th of September, 1918 that the mill had been sold to Mr O. Albert of Talbot and that it would re-open. An advertisement read: ALBERT. O. & SON, MILLERS. During 1920 the mill was closed and pulled down. It was later re-erected at Mildura where it operated for many years. (by Donald Clark)Photographic postcard, front image depicting view of Company's Dam and the flour mill in Tarnagulla. Handwritten on reverse: 'A Merry Christmas and a Happy New Year, E. Bool' and photographer's stamp 'C. Bock Photo Tarnagulla'.tarnagulla -
 Eltham District Historical Society Inc
Photograph - Digital Photograph, Alan King, Pigeon Bank, Kangaroo Ground-Warrandyte Road, Kangaroo Ground, 6 February 2008
In 1848, Francis Rogerson form Dumfriesshire, Scotland purchased 80 acres of land at Kangaroo Ground on which he built a two-roomed bark hut. He named the property afterr the many Bronzewings and Wonga Pigeons in the area. Ewen Hugh Cameron moved to Pigeon Bank the same year he was elected to Parliament as the Member for Evelyn. At the time he moved in, Pigeon Bank had six rooms and the present water well. He made further extensive additions and lived there until his death in 1915. Covered under Heritage Overlay, Nillumbik Planning Scheme. Published: Nillumbik Now and Then / Marguerite Marshall 2008; photographs Alan King with Marguerite Marshall.; p27 Pigeon Bank, on the Kangaroo Ground – Warrandyte Road, Kangaroo Ground, is one of the Shire’s oldest farm dwellings, and has been home to some of the district’s earliest and most distinguished families. Although close to the road, the white weatherboard Victorian farmhouse is ensured privacy by the trees and hedges around it. On 4.8 hectares of farmland, Pigeon Bank is surrounded by rolling hills, farmland and bush, the peace of which is punctuated by an occasional birdcall. Pigeon Bank’s first owner was Francis Rogerson, from Dumfriesshire, Scotland, who bought 80 acres (32.4ha) of land in 1848 on which he built a two-roomed bark hut. Today this is the centre piece of the 14-room home.1 Rogerson lined the rooms with tongue-and-groove boards and roofed them with wooden shingles and sapling frames, which remain under the present green corrugated iron roof. He named Pigeon Bank after the many forest bronzewing and Wonga Pigeons in the area at the time, and the name Bank was commonly used in Scotland. Rogerson was united with one of the oldest families in the area when his sister Janet married John Bell, son of William, the original Bell settler. When Ewen Cameron moved to Pigeon Bank in 1874 it had six rooms and the present water well. He made extensive additions to the house and farm buildings and lived at Pigeon Bank until his death in 1915. Cameron, who had arrived in Melbourne from Scotland in 1853, contributed an enormous amount to the community. He worked as a builder, as a miner at Andersons Creek, a storekeeper at Queenstown2 and as the first postmaster at Warrandyte. In 1867 he married Agnes Bell, daughter of local farmer, John Bell. Cameron was a member of the Eltham Road Board (which preceded the Shire Council) and for more than 50 years, from 1863, he was an Eltham Shire Councillor, being President three times. Cameron was the Member for Evelyn for 40 years from 1874. In the 1880s he became the Government Whip, in 1902 the Minister for Mines and Water Supply, and in 1904, the Minister for Health, Cameron was also an outstanding farmer, whose farm won the Agricultural Department prize for the finest in the district, three consecutive times. Not surprisingly Pigeon Bank became the centre of district life. Every New Year’s Eve, Cameron hired a highland piper, who marched from the Kangaroo Ground school house to Pigeon Bank playing his pipes.3 Distinguished visitors included opera singer, Dame Nellie Melba, Victorian Premier, Thomas Bent, Governor, Lord Hopetoun and artist, Longstaff. Following Cameron’s death, the property changed hands several times, then returned to the family in 1919 when bought by Gordon Cameron. As the car took over from the horse, Pigeon Bank entered difficult times because the farm had produced chaff and oats and bred Clydesdales and harness ponies. In 1926 Mr Matthews bought the property and made many alterations including pulling down the kitchen, which had been separate from the main house. The property again changed hands several times. One owner was Senator James F Guthrie, who added a sunroom. In 1968 the house again returned to the Cameron family, when Vera Jackson, a grand-daughter of Ewen Cameron, and her husband, bought the property. The Bishop family, who were sixth and seventh generation Bells and also descended from the Camerons, restored the house in the 1980s. Today tongue-and-groove boards still line part of the hall (which retains two fine arches), the breakfast room, and Ewen Cameron’s former room. Five original fireplaces in the bed and living rooms are still in working order. The wide veranda with a curved iron roof and ornate iron lace work bounds three sides of the house, and nearby a windmill stands beside the water well. Sue and Ron James, who bought the property in 2001, made extensive improvements to the homestead and meticulously restored the grounds to their original state.This collection of almost 130 photos about places and people within the Shire of Nillumbik, an urban and rural municipality in Melbourne's north, contributes to an understanding of the history of the Shire. Published in 2008 immediately prior to the Black Saturday bushfires of February 7, 2009, it documents sites that were impacted, and in some cases destroyed by the fires. It includes photographs taken especially for the publication, creating a unique time capsule representing the Shire in the early 21st century. It remains the most recent comprehenesive publication devoted to the Shire's history connecting local residents to the past. nillumbik now and then (marshall-king) collection, ewen hugh cameron, francis rogerson, kangaroo ground, kangaroo ground-warrandyte road, pigeon bank -
 Eltham District Historical Society Inc
Photograph - Digital Photograph, Alan King, Kangaroo Ground General Store, Eltham-Yarra Glen Road, 28 December 2007
The present store was built circa 1900 to replace another which had been destroyed by fire in 1898, which had replaced a predecessor on the opposite side of the road in 1865. The store was also used as a post office until early 2000s. The general store is historically significant because it has a long association with Kangaroo Ground and has been an important centre of community life for more than 120 years - Council meetings used to be conducted in the front room of the store at a time when Kangaroo Ground rivalled Eltham as the major centre of the Shire. The general store is historically and aesthetically significant as one of a group of three well preserved public buildings in the Kangaroo Ground hamlet and as a major heritage component of Kangaroo Ground which was one of the earliest settled areas of the Shire and which has the character of an English village rather than an Australian settlement. Covered under Heritage Overlay, Nillumbik Planning Scheme. Published: Nillumbik Now and Then / Marguerite Marshall 2008; photographs Alan King with Marguerite Marshall.; p77 Today the general store is an uncommon form of trade but the one at Kangaroo Ground continues a long tradition of friendliness and service. For more than 100 years it has been a centre of community life. In the settlement’s early days a previous general store, on the same site, was the meeting place for the Eltham District Road Board, precursor to the Eltham Shire Council. For years Kangaroo Ground rivalled Eltham as the shire’s major centre. It developed very differently from the rest of the shire as its rich soil attracted prosperous Presbyterian Scots who had large agricultural properties.1 The present store was built to replace another one, which had burnt down in 1898, after replacing a predecessor on the other side of the road in 1865. The store retains its outward character and its cellar, although inside it has changed considerably. It now includes a café and offers local produce, milk bar products, grocery items, gas and other fuel. Until early this century the store was also used as a post office. Kangaroo Ground’s first postmaster was Andrew Ross, who first operated from the school opposite, then from his hotel next to the present tennis court site. The first postmaster at this store was Edward Weller, followed in 1868 by James Anderson. At that time a mail coach ran three times a week between Eltham and Woods Point through Kangaroo Ground, Yarra Flats, Healesville, Fernshaw, Marysville and Matlock. Some early postmasters were Rodger, McLaughlin, Greenway and Burns.2 Burns was the only postmaster operating from the store. The others operated from Andrew Ross’s hotel. The mail service improved in 1892 when coaches ran from Melbourne to Queenstown (now known as St Andrews) and changed horses at Kangaroo Ground twice daily. The only telegraph office in the district at that time was at the Kangaroo Ground Post Office. Telegrams to outlying areas such as Queenstown and Kinglake had to be sent by hand. A local resident in the early 1900s often rode his pony to deliver telegrams and was paid one shilling a mile porterage. The store has also contributed to the lighter side of Kangaroo Ground life. During the years that Con Wraight owned the store, between 1906 and 1946, a new piano was needed for the Kangaroo Ground Hall, so monthly dances were held to raise money. When the piano was bought, a grand ball was held in the Kangaroo Ground Hall to celebrate the occasion and supper followed at Mr Wraight’s barn, cleaned especially for the occasion. Every New Year’s Eve, a Scottish piper would set off from between the store and the schoolhouse, playing his pipes, and march to Cameron’s Pigeon Bank homestead on the Kangaroo Ground-Warrandyte Road. Between 1914 and 1922, the store was a station for the Kangaroo Ground Bush Fire Brigade’s tanker. It consisted of a wooden barrel on a cart, fitted with a hand-pump, and stood on the side of the road outside the store. Joy Ness, who belonged to an early Kangaroo Ground family, moved here in 1940 and recalled her impressions of the store at that time: ‘It was a very dark shop stained in a dark colour and on the walls just below the ceiling hung hurricane lamps, ropes, kitchen utensils and other goods for sale. ‘Goods were weighed on a brass scale with weights, on which mothers also weighed their babies, because the nearest Infant Welfare Centre was at Greensborough. The bacon was cut with a hand slicer and later a pot-bellied stove warmed the store. Farmers and other locals used to gossip around it as they collected their daily mail. In those days the butter and cheese were kept in the cellar as no ice was delivered for cooling.’This collection of almost 130 photos about places and people within the Shire of Nillumbik, an urban and rural municipality in Melbourne's north, contributes to an understanding of the history of the Shire. Published in 2008 immediately prior to the Black Saturday bushfires of February 7, 2009, it documents sites that were impacted, and in some cases destroyed by the fires. It includes photographs taken especially for the publication, creating a unique time capsule representing the Shire in the early 21st century. It remains the most recent comprehenesive publication devoted to the Shire's history connecting local residents to the past. nillumbik now and then (marshall-king) collection, eltham-yarra glen road, kangaroo ground general store -
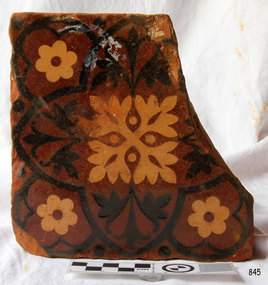 Flagstaff Hill Maritime Museum and Village
Ceramic - Tile, circa 1878
This Minton floor tile is from the wreck of the LOCH ARD along with other examples of this manufacture recovered from the wreck site and form part of the collection at Flagstaff Hill. The iron-hulled clipper ship from the Loch Line was heading for Port Phillip from London when it ran into the cliffs of Mutton Bird Island near Port Campbell and was wrecked on June 1st, 1878. The LOCH ARD was laden with high-value cargo including luxury goods intended for display at the Melbourne International Exhibition in 1880. One notable survivor from the ship’s freight manifest was the well-packed Minton porcelain peacock, a two-metre-high ceramic masterpiece of vivid glazed colours. The almost total loss of life and property from the LOCH ARD registered as a shocking tragedy for the Colony of Victoria, at a time when social confidence and economic optimism were otherwise high. The wealth generated from Gold and Wool was increasingly being spent on grandiose private residences and imposing public buildings. The demand for quality furnishings and fittings was therefore strong. Among the products consigned to burgeoning colonial markets by the Milton Pottery at Stoke upon Trent, were their new range of colourfully patterned but very durable floor tiles – ideal for the high-traffic spaces in the large civic buildings then being constructed in Australia and America. These new floor tiles were “encaustic”, meaning that their designs and colours were encased “within” the depth of the tile. Rather than their decorative patterns being glazed onto the surface of the tile, their inlaid designs were created during the manufacturing process, as “coloured slips” (or liquid clay) were poured into a deep pre-moulded casting. When fired, the resulting tile was colour-fast and design-fast. A brief history of the Loch Ard (1873-1878): - The sailing ship Loch Ard was one of the famous Loch Line ships that sailed from England to Australia. Barclay, Curdle and Co. built the three-masted iron vessel in Glasgow in 1873. It had sailed three trips to Australia and one trip to Calcutta before its fateful voyage. Loch Ard left England on March 2, 1878, under the command of recently married, 29-year-old Captain Gibbs. It was bound for Melbourne with a crew of 37, plus 17 passengers. The general cargo reflected the affluence of Melbourne at the time. Onboard were straw hats, umbrellas, perfumes, clay pipes, pianos, clocks, confectionery, linen and candles, and a heavier load of railway irons, cement, lead and copper. Other cargo included items intended for display in the Melbourne International Exhibition of 1880. The Loch Ard had been sailing for three months and was close to its destination on June 1, 1878. Captain Gibbs had expected to see land at about 3 am but the Loch Ard ran into a fog that greatly reduced visibility and there was no sign of land or the Cape Otway lighthouse. The fog lifted at 4 am and the sheer cliffs of Victoria's west coast were much closer to them than Captain Gibbs expected. He tried to manage the vessel but failed and the ship struck a reef at the base of Mutton Bird Island, near Port Campbell. The top deck loosened from the hull, and the masts and rigging crashed down, knocking passengers and crew overboard. The lifeboat was launched by Tom Pearce but crashed into the side of Loch Ard and capsized. He clung onto its overturned hull and sheltered under it. He drifted out to sea and the tide brought him back to what is now called Loch Ard Gorge. He swam to shore and found a cave for shelter. A passenger, Eva Carmichael, had raced onto the deck to find out what was happening and was confronted by towering cliffs above the ship. She was soon swept off the ship by a huge wave. Eva saw Tom Pearce on a small rocky beach and yelled to attract his attention. He swam out and dragged her to the shelter of the cave. He revived her with a bottle of brandy from a case that had washed up on the beach. Tom scaled a cliff in search of help and followed some horse hoof prints. He came from two men from Glenample Station, three and a half miles away. He told the men of the tragedy and then returned to the gorge while the two men rode back to the station to get help. They reached Loch Ard Gorge and took the two shipwreck survivors to Glenample Station to recover. Eva stayed at the station for six weeks before returning to Ireland by steamship. In Melbourne, Tom Pearce received a hero's welcome and was presented with a medal and some money. Of the 54 crew members and passengers on board, only two survived: the apprentice, Tom Pearce and the young woman passenger, Eva Carmichael, who lost her family in the tragedy. One of the most unlikely pieces of cargo to have survived the shipwreck was a Minton porcelain peacock - one of only nine in the world. The peacock was destined for the Melbourne International Exhibition in 1880. It had been well packed, which gave it adequate protection during the violent storm. Today, the Minton peacock can be seen at the Flagstaff Hill Maritime Museum in Warrnambool. From Australia's most dramatic shipwreck, it has now become Australia's most valuable shipwreck artefact and is one of very few 'objects' on the Victorian State Heritage Register. The Minton floor tile is significant for its hard-wearing yet attractive design. The shipwreck of the LOCH ARD is of State significance. Victorian Heritage Register S417. Flagstaff Hill’s collection of artefacts from LOCH ARD is significant for being one of the largest collections of artefacts from this shipwreck in Victoria. It is significant for its association with the shipwreck, which is on the Victorian Heritage Register (VHR S417). The collection is significant because of the relationship between the objects, as together they have a high potential to interpret the story of the LOCH ARD. The LOCH ARD collection is archaeologically significant as the remains of a large international passenger and cargo ship. The LOCH ARD collection is historically significant for representing aspects of Victoria’s shipping history and its potential to interpret sub-theme 1.5 of Victoria’s Framework of Historical Themes (living with natural processes). The collection is also historically significant for its association with the LOCH ARD, which was one of the worst and best-known shipwrecks in Victoria’s history. A square Minton floor tile with a black and apricot pattern against a chocolate brown background. There is a large chip missing. This decorative floor tile was recovered from the shipwreck of the LOCH ARD. On the back, or base, of the tile is inscribed the number “46” and the letters “Minton & Co Patent Stoke upon Trent”.flagstaff hill, warrnambool, shipwrecked coast, flagstaff hill maritime museum, maritime museum, shipwreck coast, flagstaff hill maritime village, great ocean road, loch line, loch ard, captain gibbs, eva carmichael, tom pearce, glenample station, mutton bird island, loch ard gorge, encaustic tile, melbourne international exhibition, floor tile, minton floor tile -
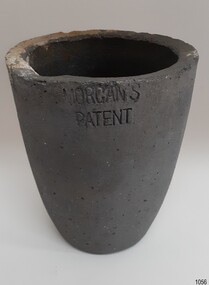 Flagstaff Hill Maritime Museum and Village
Functional object - Crucible, The Patent Plumbago Crucible Company, circa 1878
This crucible was raised from the wreck of the LOCH ARD. It is one of six similar relics, in a range of sizes, now in the Flagstaff Hill collection. All bear markings to indicate their manufacture by the Morgan brothers of Battersea, trading as the Patent Plumbago Crucible Co. A crucible is a container used for purifying and melting metals so that they can be cast in a mould to a predetermined shape and use. They must withstand extremely high temperatures, and abrupt cooling, and shed their contents with minimal adherence. The addition of graphite to the traditional firing clays greatly enhanced the durability of industrial crucibles in mid-Victorian Britain, a significant technological advance at a time of great activity in foundries and expansion of demand for refined metals. The Morgans first noticed the advantages of graphite crucibles at the Great Exhibition held in London in 1851. Initially, they contracted to be sole selling agents for the American-made products of Joseph Dixon and Co. from New Jersey, but in 1856 they obtained that firm’s manufacturing rights and began producing their own graphite crucibles from the South London site. The Morgans imported crystalline graphite in 4-5 cwt casks from the British colony of Ceylon (now Sri Lanka) and mixed it with conventional English (Stourbridge) clays to be fired in kilns. Their products were purchased by the Royal Mints in London and India, and exported to official mints in France and Germany. They were successful exhibitors of their crucibles and furnaces at the London Exhibition held in 1861 (Class 1, Mining, quarrying, metallurgy and mineral products, Exhibit 265, Patent Plumbago Crucible Co). The range of sizes represented by the six crucibles retrieved from the LOCH ARD, suggests they may have been part of a sample shipment intended for similar promotion in the Australian colonies ― at Melbourne’s International Exhibition to be held in 1880. The summary of the LOCH ARD cargo manifest, by Don Charlwood in ‘Wrecks and Reputations’, does not mention any crucibles, implying that they were not a large consignment of uniform items. A newspaper account of an 1864 tour of the Morgan brothers’ ‘Black Potteries’ at Battersea indicates: “All the pots were numbered according to their contents, each number standing for one kilogram, or a little over two pounds; a No. 2 crucible contains two kilogrammes; a No. 3, three kilogrammes, and so on.” These numbers are obscured by marine sediment on three of the crucibles in the Flagstaff Hill collection, but those legible on the remaining three are 5, 6, and 8. None of the six is of the same size from a visual appraisal. A brief history of the Loch Ard (1873-1878): - The sailing ship Loch Ard was one of the famous Loch Line of ships that sailed the long voyage from England to Australia. Barclay, Curdle and Co. built the three-masted iron vessel in Glasgow in 1873. It had sailed three trips to Australia and one trip to Calcutta before its fateful voyage. Loch Ard left England on March 2, 1878, under the command of recently married, 29-year-old Captain Gibbs. It was bound for Melbourne with a crew of 37, plus 17 passengers. The general cargo reflected the affluence of Melbourne at the time. Onboard were straw hats, umbrellas, perfumes, clay pipes, pianos, clocks, confectionery, linen and candles, and a heavier load of railway irons, cement, lead and copper. Other cargo included items intended for display in the Melbourne International Exhibition of 1880. The Loch Ard had been sailing for three months and was close to its destination on June 1, 1878. Captain Gibbs had expected to see land at about 3 am but the Loch Ard ran into a fog that greatly reduced visibility and there was no sign of land or the Cape Otway lighthouse. The fog lifted at 4 am and the sheer cliffs of Victoria's west coast were much closer to them than Captain Gibbs expected. He tried to manage the vessel but failed and the ship struck a reef at the base of Mutton Bird Island, near Port Campbell. The top deck loosened from the hull, and the masts and rigging crashed down, knocking passengers and crew overboard. The lifeboat was launched by Tom Pearce but crashed into the side of Loch Ard and capsized. He clung onto its overturned hull and sheltered under it. He drifted out to sea and the tide brought him back to what is now called Loch Ard Gorge. He swam to shore and found a cave for shelter. A passenger, Eva Carmichael, had raced onto the deck to find out what was happening and was confronted by towering cliffs above the ship. She was soon swept off the ship by a huge wave. Eva saw Tom Pearce on a small rocky beach and yelled to attract his attention. He swam out and dragged her to the shelter of the cave. He revived her with a bottle of brandy from a case that had washed up on the beach. Tom scaled a cliff in search of help and followed some horse hoof prints. He came from two men from Glenample Station, three and a half miles away. He told the men of the tragedy and then returned to the gorge while the two men rode back to the station to get help. They reached Loch Ard Gorge and took the two shipwreck survivors to Glenample Station to recover. Eva stayed at the station for six weeks before returning to Ireland by steamship. In Melbourne, Tom Pearce received a hero's welcome and was presented with a medal and some money. Of the 54 crew members and passengers on board, only two survived: the apprentice, Tom Pearce and the young woman passenger, Eva Carmichael, who lost her family in the tragedy. The shipwreck of the LOCH ARD is of State significance ― Victorian Heritage Register S417. Flagstaff Hill’s collection of artefacts from LOCH ARD is significant for being one of the largest collections of artefacts from this shipwreck in Victoria. It is significant for its association with the shipwreck, which is on the Victorian Heritage Register (VHR S417). The collection is significant because of the relationship between the objects, as together they have a high potential to interpret the story of the LOCH ARD. The LOCH ARD collection is archaeologically significant as the remains of a large international passenger and cargo ship. The LOCH ARD collection is historically significant for representing aspects of Victoria’s shipping history and its potential to interpret sub-theme 1.5 of Victoria’s Framework of Historical Themes (living with natural processes). The collection is also historically significant for its association with the LOCH ARD, which was one of the worst and best-known shipwrecks in Victoria’s history.A Morgan’s Patent graphite crucible No.8 (i.e. 8kgs capacity), one of a set. It was recovered from the wreck of the LOCH ARD. It is in its original grey colouring with minimal sediment accretion on the top rim. It rises in a slight curve from a flat circular base to a wider rim with a pouring lip. Maker’s marks on the side of the container clearly identify the manufacturer. The maker's details are stamped into the base around and within a circle. A white sticker is attached. Made by the Patent Plumbago Crucible Company at the Battersea Works in London. Number “8”. Letters “MORGAN’S PATENT”. Details on the base "MORGAN'S PATENT" "THE PATENT PLUMBAGO CRUCIBLE COMPANY" Symbol [8] above "BATTERSEA WORKS LONDON" Handwritten on a white sticker in black pen "LA/89"flagstaff hill, warrnambool, maritime museum, shipwreck coast, great ocean road, loch line, loch ard, captain gibbs, eva carmichael, tom pearce, glenample station, mutton bird island, loch ard gorge, graphite crucible, plumbago crucible, morgans crucible company, flagstaff hill maritime museum and village, fluxing pots, crucible, morgan’s patent, morgan brothers, patent plumbago crucible co, battersea works, london, port campbell -
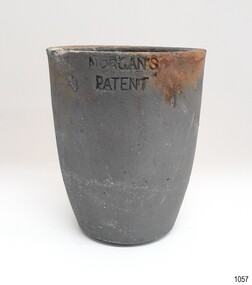 Flagstaff Hill Maritime Museum and Village
Functional object - Crucible, The Patent Plumbago Crucible Company, circa 1878
This crucible was raised from the wreck of the LOCH ARD. It is one of six similar relics, in a range of sizes, now in the Flagstaff Hill collection. All bear markings to indicate their manufacture by the Morgan brothers of Battersea, trading as the Patent Plumbago Crucible Co. A crucible is a container used for purifying and melting metals so that they can be cast in a mould to a predetermined shape and use. They must withstand extremely high temperatures, and abrupt cooling, and shed their contents with minimal adherence. The addition of graphite to the traditional firing clays greatly enhanced the durability of industrial crucibles in mid-Victorian Britain, a significant technological advance at a time of great activity in foundries and expansion of demand for refined metals. The Morgans first noticed the advantages of graphite crucibles at the Great Exhibition held in London in 1851. Initially, they contracted to be sole selling agents for the American-made products of Joseph Dixon and Co. from New Jersey, but in 1856 they obtained that firm’s manufacturing rights and began producing their own graphite crucibles from the South London site. The Morgans imported crystalline graphite in 4-5 cwt casks from the British colony of Ceylon (now Sri Lanka) and mixed it with conventional English (Stourbridge) clays to be fired in kilns. Their products were purchased by the Royal Mints in London and India, and exported to official mints in France and Germany. They were successful exhibitors of their crucibles and furnaces at the London Exhibition held in 1861 (Class 1, Mining, quarrying, metallurgy and mineral products, Exhibit 265, Patent Plumbago Crucible Co). The range of sizes represented by the six crucibles retrieved from the LOCH ARD, suggests they may have been part of a sample shipment intended for similar promotion in the Australian colonies ― at Melbourne’s International Exhibition to be held in 1880. The summary of the LOCH ARD cargo manifest, by Don Charlwood in ‘Wrecks and Reputations’, does not mention any crucibles, implying that they were not a large consignment of uniform items. A newspaper account of an 1864 tour of the Morgan brothers’ ‘Black Potteries’ at Battersea indicates: “All the pots were numbered according to their contents, each number standing for one kilogram, or a little over two pounds; a No. 2 crucible contains two kilogrammes; a No. 3, three kilogrammes, and so on.” These numbers are obscured by marine sediment on three of the crucibles in the Flagstaff Hill collection, but those legible on the remaining three are 5, 6, and 8. None of the six is of the same size from a visual appraisal. A brief history of the Loch Ard (1873-1878): - The sailing ship Loch Ard was one of the famous Loch Line of ships that sailed the long voyage from England to Australia. Barclay, Curdle and Co. built the three-masted iron vessel in Glasgow in 1873. It had sailed three trips to Australia and one trip to Calcutta before its fateful voyage. Loch Ard left England on March 2, 1878, under the command of recently married, 29-year-old Captain Gibbs. It was bound for Melbourne with a crew of 37, plus 17 passengers. The general cargo reflected the affluence of Melbourne at the time. Onboard were straw hats, umbrellas, perfumes, clay pipes, pianos, clocks, confectionery, linen and candles, and a heavier load of railway irons, cement, lead and copper. Other cargo included items intended for display in the Melbourne International Exhibition of 1880. The Loch Ard had been sailing for three months and was close to its destination on June 1, 1878. Captain Gibbs had expected to see land at about 3 am but the Loch Ard ran into a fog that greatly reduced visibility and there was no sign of land or the Cape Otway lighthouse. The fog lifted at 4 am and the sheer cliffs of Victoria's west coast were much closer to them than Captain Gibbs expected. He tried to manage the vessel but failed and the ship struck a reef at the base of Mutton Bird Island, near Port Campbell. The top deck loosened from the hull, and the masts and rigging crashed down, knocking passengers and crew overboard. The lifeboat was launched by Tom Pearce but crashed into the side of Loch Ard and capsized. He clung onto its overturned hull and sheltered under it. He drifted out to sea and the tide brought him back to what is now called Loch Ard Gorge. He swam to shore and found a cave for shelter. A passenger, Eva Carmichael, had raced onto the deck to find out what was happening and was confronted by towering cliffs above the ship. She was soon swept off the ship by a huge wave. Eva saw Tom Pearce on a small rocky beach and yelled to attract his attention. He swam out and dragged her to the shelter of the cave. He revived her with a bottle of brandy from a case that had washed up on the beach. Tom scaled a cliff in search of help and followed some horse hoof prints. He came from two men from Glenample Station, three and a half miles away. He told the men of the tragedy and then returned to the gorge while the two men rode back to the station to get help. They reached Loch Ard Gorge and took the two shipwreck survivors to Glenample Station to recover. Eva stayed at the station for six weeks before returning to Ireland by steamship. In Melbourne, Tom Pearce received a hero's welcome and was presented with a medal and some money. Of the 54 crew members and passengers on board, only two survived: the apprentice, Tom Pearce and the young woman passenger, Eva Carmichael, who lost her family in the tragedy. The shipwreck of the LOCH ARD is of State significance ― Victorian Heritage Register S417 Flagstaff Hill’s collection of artefacts from LOCH ARD is significant for being one of the largest collections of artefacts from this shipwreck in Victoria. It is significant for its association with the shipwreck, which is on the Victorian Heritage Register (VHR S417). The collection is significant because of the relationship between the objects, as together they have a high potential to interpret the story of the LOCH ARD. The LOCH ARD collection is archaeologically significant as the remains of a large international passenger and cargo ship. The LOCH ARD collection is historically significant for representing aspects of Victoria’s shipping history and its potential to interpret sub-theme 1.5 of Victoria’s Framework of Historical Themes (living with natural processes). The collection is also historically significant for its association with the LOCH ARD, which was one of the worst and best-known ahipwrecks in Victoria’s history.A Morgan’s Patent graphite crucible No.4 (i.e. 4kgs capacity), one of a set of three. It was recovered from the wreck of the LOCH ARD. It is in its original grey colouring with minimal sediment accretion on the top rim. It rises in a slight curve from a flat circular base to a wider rim with a pouring lip. Maker’s marks on the side of the container clearly identify the manufacturer. The maker's details are stamped into the base around and within a circle. A white sticker is attached. Made by the Patent Plumbago Crucible Company at the Battersea Works in London.Number or. Letters “MORGAN’S PATENT”. Details on the base "MORGAN'S PATENT" "THE PATENT PLUMBAGO CRUCIBLE COMPANY" Symbol [4] above "BATTERSEA WORKS LONDON" Handwritten on a white sticker in black pen "L89"flagstaff hill, warrnambool, flagstaff hill maritime museum, maritime museum, shipwreck coast, flagstaff hill maritime village, great ocean road, loch line, loch ard, captain gibbs, eva carmichael, tom pearce, glenample station, mutton bird island, loch ard gorge, graphite crucible, plumbago crucible, morgan's crucible company, flagstaff hill maritime museum and village, fluxing pots, crucible, morgan’s patent, morgan brothers, patent plumbago crucible co, battersea works, london, port campbell -
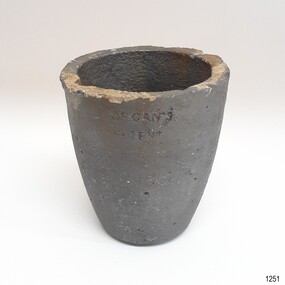 Flagstaff Hill Maritime Museum and Village
Functional object - Crucible, The Patent Plumbago Crucible Company, circa 1873
Crucibles are used for heating and pouring molten metal. The set of six crucibles was raised from the wreck of the Loch Ard and includes a range of sizes, now in the Flagstaff Hill collection. All were manufactured by the Morgan brothers who founded the Patent Plumbago Crucible Company in 1856, making crucibles in a small factory in Battersea London. A crucible is a container used for purifying and melting metals so that they can be cast in a mould to a predetermined shape and use. They must withstand extremely high temperatures, and abrupt cooling, and shed their contents with minimal adherence. The addition of graphite to the traditional firing clays greatly enhanced the durability of industrial crucibles this technique was pioneered by the Morgan Bros thereby making a significant technological advance in foundry technology and metallurgy. The Morgans first noticed the advantages of graphite crucibles at the Great Exhibition held in London in 1851. Initially, they contracted to be sole selling agents for the American-made products of Joseph Dixon and Co. from New Jersey, but in 1856 they obtained that firm's manufacturing rights and began producing their graphite crucibles from the South London site. The Morgans imported crystalline graphite in 4-5 cwt casks from the British colony of Ceylon (now Sri Lanka) and mixed it with conventional English (Stourbridge) clays to be fired in kilns. Their products were purchased by the Royal Mints in London and India and exported to official mints in France and Germany. They were successful exhibitors of their crucibles and furnaces at the London Exhibition held in 1861 (Class 1, Mining, quarrying, metallurgy and mineral products, Exhibit 265, Patent Plumbago Crucible Co). The range of sizes represented by the six crucibles retrieved from the Loch Ard suggests they may have been part of a sample shipment intended for similar promotion in the Australian colonies or at Melbourne's International Exhibition to be held in 1880. A newspaper account of an 1864 tour of the Morgan brothers' 'Black Potteries' at Battersea indicates: "All the pots were numbered according to their contents, each number standing for one kilogram or a little over two pounds; a No. 2 crucible contains two kilograms; a No. 3, three kilograms, and so on." These numbers are obscured by marine sediment on three of the crucibles in the Flagstaff Hill collection, but those legible on the remaining three are 5, 6, and 8. None of the six is of the same size. A brief history of the Loch Ard (1873-1878): - The sailing ship Loch Ard was one of the famous Loch Line of ships that sailed the long voyage from England to Australia. Barclay, Curdle and Co. built the three-masted iron vessel in Glasgow in 1873. It had sailed three trips to Australia and one trip to Calcutta before its fateful voyage. Loch Ard left England on March 2, 1878, under the command of recently married, 29-year-old Captain Gibbs. It was bound for Melbourne with a crew of 37, plus 17 passengers. The general cargo reflected the affluence of Melbourne at the time. Onboard were straw hats, umbrellas, perfumes, clay pipes, pianos, clocks, confectionery, linen and candles, and a heavier load of railway irons, cement, lead and copper. Other cargo included items intended for display in the Melbourne International Exhibition of 1880. The Loch Ard had been sailing for three months and was close to its destination on June 1, 1878. Captain Gibbs had expected to see land at about 3 am but the Loch Ard ran into a fog that greatly reduced visibility and there was no sign of land or the Cape Otway lighthouse. The fog lifted at 4 am and the sheer cliffs of Victoria's west coast were much closer to them than Captain Gibbs expected. He tried to manage the vessel but failed and the ship struck a reef at the base of Mutton Bird Island, near Port Campbell. The top deck loosened from the hull, and the masts and rigging crashed down, knocking passengers and crew overboard. The lifeboat was launched by Tom Pearce but crashed into the side of Loch Ard and capsized. He clung onto its overturned hull and sheltered under it. He drifted out to sea and the tide brought him back to what is now called Loch Ard Gorge. He swam to shore and found a cave for shelter. A passenger, Eva Carmichael, had raced onto the deck to find out what was happening and was confronted by towering cliffs above the ship. She was soon swept off the ship by a huge wave. Eva saw Tom Pearce on a small rocky beach and yelled to attract his attention. He swam out and dragged her to the shelter of the cave. He revived her with a bottle of brandy from a case that had washed up on the beach. Tom scaled a cliff in search of help and followed some horse hoof prints. He came from two men from Glenample Station, three and a half miles away. He told the men of the tragedy and then returned to the gorge while the two men rode back to the station to get help. They reached Loch Ard Gorge and took the two shipwreck survivors to Glenample Station to recover. Eva stayed at the station for six weeks before returning to Ireland by steamship. In Melbourne, Tom Pearce received a hero's welcome and was presented with a medal and some money. Of the 54 crew members and passengers on board, only two survived: the apprentice, Tom Pearce and the young woman passenger, Eva Carmichael, who lost her family in the tragedy. The shipwreck of the Loch Ard is of significance for Victoria and is registered on the Victorian Heritage Register ( S 417). Flagstaff Hill has a varied collection of artefacts from Loch Ard and its collection is significant for being one of the largest accumulation of artefacts from this notable Victorian shipwreck of which the subject items are a small part. The collection's objects give us a snapshot of how we can interpret the story of this tragic event. The collection is also archaeologically significant as it represents aspects of Victoria's shipping history that allows us to interpret Victoria's social and historical themes of the time. Through is associated with the worst and best-known shipwreck in Victoria's history.This crucible is the smallest of three nested crucibles, or fluxing pots, numbered according to their size. These containers rise slightly from a smaller flat base to a wider open top with a lip for pouring. They were recovered from the wreck of the Loch Ard. The crucibles have a coating of sediment that obscures some of their numerical specifications of size and capacity. Made by the Patent Plumbago Crucible Company at the Battersea Works in London. The number on this crucible is obscured by the sticker.Stamped into side "MORGAN'S PATENT" Stemped into base "MORGAN'S PATENT" "THE PATENT PLUMBAGO CRUCIBLE COMPANY" Sticker "L 96"flagstaff hill, warrnambool, graphite crucible, plumbago crucible, morgan's crucible company, loch ard, morgan potteries, crucible, fluxing pot, nested crucibles, heat proof container, metal worker, maritime museum, shipwreck coast, flagstaff hill maritime village, great ocean road, loch line, morgans crucible company, flagstaff hill maritime museum and village, fluxing pots, morgan’s patent, morgan brothers, patent plumbago crucible co, battersea works, london, loch ard gorge, port campbell -
 Flagstaff Hill Maritime Museum and Village
Photograph
HISTORY OF THE LOCH ARD The LOCH ARD belonged to the famous Loch Line which sailed many ships from England to Australia. Built in Glasgow by Barclay, Curdle and Co. in 1873, the LOCH ARD was a three-masted square rigged iron sailing ship. The ship measured 262ft 7" (79.87m) in length, 38ft (11.58m) in width, 23ft (7m) in depth and had a gross tonnage of 1693 tons. The LOCH ARD's main mast measured a massive 150ft (45.7m) in height. LOCH ARD made three trips to Australia and one trip to Calcutta before its final voyage. LOCH ARD left England on March 2, 1878, under the command of Captain Gibbs, a newly married, 29 year old. She was bound for Melbourne with a crew of 37, plus 17 passengers and a load of cargo. The general cargo reflected the affluence of Melbourne at the time. On board were straw hats, umbrella, perfumes, clay pipes, pianos, clocks, confectionary, linen and candles, as well as a heavier load of railway irons, cement, lead and copper. There were items included that intended for display in the Melbourne International Exhibition in 1880. The voyage to Port Phillip was long but uneventful. At 3am on June 1, 1878, Captain Gibbs was expecting to see land and the passengers were becoming excited as they prepared to view their new homeland in the early morning. But LOCH ARD was running into a fog which greatly reduced visibility. Captain Gibbs was becoming anxious as there was no sign of land or the Cape Otway lighthouse. At 4am the fog lifted. A man aloft announced that he could see breakers. The sheer cliffs of Victoria's west coast came into view, and Captain Gibbs realised that the ship was much closer to them than expected. He ordered as much sail to be set as time would permit and then attempted to steer the vessel out to sea. On coming head on into the wind, the ship lost momentum, the sails fell limp and LOCH ARD's bow swung back. Gibbs then ordered the anchors to be released in an attempt to hold its position. The anchors sank some 50 fathoms - but did not hold. By this time LOCH ARD was among the breakers and the tall cliffs of Mutton Bird Island rose behind the ship. Just half a mile from the coast, the ship's bow was suddenly pulled around by the anchor. The captain tried to tack out to sea, but the ship struck a reef at the base of Mutton Bird Island, near Port Campbell. Waves broke over the ship and the top deck was loosened from the hull. The masts and rigging came crashing down knocking passengers and crew overboard. When a lifeboat was finally launched, it crashed into the side of LOCH ARD and capsized. Tom Pearce, who had launched the boat, managed to cling to its overturned hull and shelter beneath it. He drifted out to sea and then on the flood tide came into what is now known as LOCH ARD Gorge. He swam to shore, bruised and dazed, and found a cave in which to shelter. Some of the crew stayed below deck to shelter from the falling rigging but drowned when the ship slipped off the reef into deeper water. Eva Carmichael had raced onto deck to find out what was happening only to be confronted by towering cliffs looming above the stricken ship. In all the chaos, Captain Gibbs grabbed Eva and said, "If you are saved Eva, let my dear wife know that I died like a sailor". That was the last Eva Carmichael saw of the captain. She was swept off the ship by a huge wave. Eva saw Tom Pearce on a small rocky beach and yelled to attract his attention. He dived in and swam to the exhausted woman and dragged her to shore. He took her to the cave and broke open case of brandy which had washed up on the beach. He opened a bottle to revive the unconscious woman. A few hours later Tom scaled a cliff in search of help. He followed hoof prints and came by chance upon two men from nearby Glenample Station three and a half miles away. In a state of exhaustion, he told the men of the tragedy. Tom returned to the gorge while the two men rode back to the station to get help. By the time they reached LOCH ARD Gorge, it was cold and dark. The two shipwreck survivors were taken to Glenample Station to recover. Eva stayed at the station for six weeks before returning to Ireland, this time by steamship. In Melbourne, Tom Pearce received a hero's welcome. He was presented with the first gold medal of the Royal Humane Society of Victoria and a £1000 cheque from the Victorian Government. Concerts were performed to honour the young man's bravery and to raise money for those who lost family in the LOCH ARD disaster. Of the 54 crew members and passengers on board, only two survived: the apprentice, Tom Pearce and the young woman passenger, Eva Carmichael, who lost all of her family in the tragedy. Ten days after the LOCH ARD tragedy, salvage rights to the wreck were sold at auction for £2,120. Cargo valued at £3,000 was salvaged and placed on the beach, but most washed back into the sea when another storm developed. The wreck of LOCH ARD still lies at the base of Mutton Bird Island. Much of the cargo has now been salvaged and some was washed up into what is now known as LOCH ARD Gorge. Cargo and artefacts have also been illegally salvaged over many years before protective legislation was introduced. One of the most unlikely pieces of cargo to have survived the shipwreck was a Minton porcelain peacock - one of only nine in the world. The peacock was destined for the Melbourne International Exhibition in 1880. It had been well packed, which gave it adequate protection during the violent storm. Today, the Minton peacock can be seen at the Flagstaff Hill Maritime Museum in Warrnambool. From Australia's most dramatic shipwreck it has now become Australia's most valuable shipwreck artefact and is one of very few 'objects' on the Victorian State Heritage Register. Flagstaff Hill’s collection of artefacts from LOCH ARD is significant for being one of the largest collections of artefacts from this shipwreck in Victoria. It is significant for its association with the shipwreck, which is on the Victorian Heritage Register (VHR S417). The collection is significant because of the relationship between the objects, as together they have a high potential to interpret the story of the LOCH ARD. The LOCH ARD collection is archaeologically significant as the remains of a large international passenger and cargo ship. The LOCH ARD collection is historically significant for representing aspects of Victoria’s shipping history and its potential to interpret sub-theme 1.5 of Victoria’s Framework of Historical Themes (living with natural processes). The collection is also historically significant for its association with the LOCH ARD, which was one of the worst and best known shipwrecks in Victoria’s history. Photograph of Loch Ard Gorge. Photograph taken some distance from the Gorge. Three men in the Gorge and outlines of steps can be seen. Right hand side of the photograph is written "Loch Ard Gorge"flagstaff hill, warrnambool, shipwrecked coast, flagstaff hill maritime museum, maritime museum, shipwreck coast, flagstaff hill maritime village, great ocean road, loch line, loch ard, captain gibbs, eva carmichael, tom pearce, glenample station, mutton bird island, loch ard gorge, photograph of loch ard gorge, photograph -
 Flagstaff Hill Maritime Museum and Village
Painting
HISTORY OF THE LOCH ARD The LOCH ARD belonged to the famous Loch Line which sailed many ships from England to Australia. Built in Glasgow by Barclay, Curdle and Co. in 1873, the LOCH ARD was a three-masted square rigged iron sailing ship. The ship measured 262ft 7" (79.87m) in length, 38ft (11.58m) in width, 23ft (7m) in depth and had a gross tonnage of 1693 tons. The LOCH ARD's main mast measured a massive 150ft (45.7m) in height. LOCH ARD made three trips to Australia and one trip to Calcutta before its final voyage. LOCH ARD left England on March 2, 1878, under the command of Captain Gibbs, a newly married, 29 year old. She was bound for Melbourne with a crew of 37, plus 17 passengers and a load of cargo. The general cargo reflected the affluence of Melbourne at the time. On board were straw hats, umbrella, perfumes, clay pipes, pianos, clocks, confectionary, linen and candles, as well as a heavier load of railway irons, cement, lead and copper. There were items included that intended for display in the Melbourne International Exhibition in 1880. The voyage to Port Phillip was long but uneventful. At 3am on June 1, 1878, Captain Gibbs was expecting to see land and the passengers were becoming excited as they prepared to view their new homeland in the early morning. But LOCH ARD was running into a fog which greatly reduced visibility. Captain Gibbs was becoming anxious as there was no sign of land or the Cape Otway lighthouse. At 4am the fog lifted. A man aloft announced that he could see breakers. The sheer cliffs of Victoria's west coast came into view, and Captain Gibbs realised that the ship was much closer to them than expected. He ordered as much sail to be set as time would permit and then attempted to steer the vessel out to sea. On coming head on into the wind, the ship lost momentum, the sails fell limp and LOCH ARD's bow swung back. Gibbs then ordered the anchors to be released in an attempt to hold its position. The anchors sank some 50 fathoms - but did not hold. By this time LOCH ARD was among the breakers and the tall cliffs of Mutton Bird Island rose behind the ship. Just half a mile from the coast, the ship's bow was suddenly pulled around by the anchor. The captain tried to tack out to sea, but the ship struck a reef at the base of Mutton Bird Island, near Port Campbell. Waves broke over the ship and the top deck was loosened from the hull. The masts and rigging came crashing down knocking passengers and crew overboard. When a lifeboat was finally launched, it crashed into the side of LOCH ARD and capsized. Tom Pearce, who had launched the boat, managed to cling to its overturned hull and shelter beneath it. He drifted out to sea and then on the flood tide came into what is now known as LOCH ARD Gorge. He swam to shore, bruised and dazed, and found a cave in which to shelter. Some of the crew stayed below deck to shelter from the falling rigging but drowned when the ship slipped off the reef into deeper water. Eva Carmichael had raced onto deck to find out what was happening only to be confronted by towering cliffs looming above the stricken ship. In all the chaos, Captain Gibbs grabbed Eva and said, "If you are saved Eva, let my dear wife know that I died like a sailor". That was the last Eva Carmichael saw of the captain. She was swept off the ship by a huge wave. Eva saw Tom Pearce on a small rocky beach and yelled to attract his attention. He dived in and swam to the exhausted woman and dragged her to shore. He took her to the cave and broke open case of brandy which had washed up on the beach. He opened a bottle to revive the unconscious woman. A few hours later Tom scaled a cliff in search of help. He followed hoof prints and came by chance upon two men from nearby Glenample Station three and a half miles away. In a state of exhaustion, he told the men of the tragedy. Tom returned to the gorge while the two men rode back to the station to get help. By the time they reached LOCH ARD Gorge, it was cold and dark. The two shipwreck survivors were taken to Glenample Station to recover. Eva stayed at the station for six weeks before returning to Ireland, this time by steamship. In Melbourne, Tom Pearce received a hero's welcome. He was presented with the first gold medal of the Royal Humane Society of Victoria and a £1000 cheque from the Victorian Government. Concerts were performed to honour the young man's bravery and to raise money for those who lost family in the LOCH ARD disaster. Of the 54 crew members and passengers on board, only two survived: the apprentice, Tom Pearce and the young woman passenger, Eva Carmichael, who lost all of her family in the tragedy. Ten days after the LOCH ARD tragedy, salvage rights to the wreck were sold at auction for £2,120. Cargo valued at £3,000 was salvaged and placed on the beach, but most washed back into the sea when another storm developed. The wreck of LOCH ARD still lies at the base of Mutton Bird Island. Much of the cargo has now been salvaged and some was washed up into what is now known as LOCH ARD Gorge. Cargo and artefacts have also been illegally salvaged over many years before protective legislation was introduced. One of the most unlikely pieces of cargo to have survived the shipwreck was a Minton porcelain peacock - one of only nine in the world. The peacock was destined for the Melbourne International Exhibition in 1880. It had been well packed, which gave it adequate protection during the violent storm. Today, the Minton peacock can be seen at the Flagstaff Hill Maritime Museum in Warrnambool. From Australia's most dramatic shipwreck it has now become Australia's most valuable shipwreck artefact and is one of very few 'objects' on the Victorian State Heritage Register. Flagstaff Hill’s collection of artefacts from LOCH ARD is significant for being one of the largest collections of artefacts from this shipwreck in Victoria. It is significant for its association with the shipwreck, which is on the Victorian Heritage Register (VHR S417). The collection is significant because of the relationship between the objects, as together they have a high potential to interpret the story of the LOCH ARD. The LOCH ARD collection is archaeologically significant as the remains of a large international passenger and cargo ship. The LOCH ARD collection is historically significant for representing aspects of Victoria’s shipping history and its potential to interpret sub-theme 1.5 of Victoria’s Framework of Historical Themes (living with natural processes). The collection is also historically significant for its association with the LOCH ARD, which was one of the worst and best known shipwrecks in Victoria’s history. Painting of The Loch Ard oil on board depicting wreck. It shows stormy sea and coastline in background. Ship appears to be capsized.flagstaff hill, warrnambool, shipwrecked coast, flagstaff hill maritime museum, maritime museum, shipwreck coast, flagstaff hill maritime village, great ocean road, loch line, loch ard, captain gibbs, eva carmichael, tom pearce, glenample station, mutton bird island, loch ard gorge, painting -
 Flagstaff Hill Maritime Museum and Village
Photograph
HISTORY OF THE LOCH ARD The LOCH ARD belonged to the famous Loch Line which sailed many ships from England to Australia. Built in Glasgow by Barclay, Curdle and Co. in 1873, the LOCH ARD was a three-masted square rigged iron sailing ship. The ship measured 262ft 7" (79.87m) in length, 38ft (11.58m) in width, 23ft (7m) in depth and had a gross tonnage of 1693 tons. The LOCH ARD's main mast measured a massive 150ft (45.7m) in height. LOCH ARD made three trips to Australia and one trip to Calcutta before its final voyage. LOCH ARD left England on March 2, 1878, under the command of Captain Gibbs, a newly married, 29 year old. She was bound for Melbourne with a crew of 37, plus 17 passengers and a load of cargo. The general cargo reflected the affluence of Melbourne at the time. On board were straw hats, umbrella, perfumes, clay pipes, pianos, clocks, confectionary, linen and candles, as well as a heavier load of railway irons, cement, lead and copper. There were items included that intended for display in the Melbourne International Exhibition in 1880. The voyage to Port Phillip was long but uneventful. At 3am on June 1, 1878, Captain Gibbs was expecting to see land and the passengers were becoming excited as they prepared to view their new homeland in the early morning. But LOCH ARD was running into a fog which greatly reduced visibility. Captain Gibbs was becoming anxious as there was no sign of land or the Cape Otway lighthouse. At 4am the fog lifted. A man aloft announced that he could see breakers. The sheer cliffs of Victoria's west coast came into view, and Captain Gibbs realised that the ship was much closer to them than expected. He ordered as much sail to be set as time would permit and then attempted to steer the vessel out to sea. On coming head on into the wind, the ship lost momentum, the sails fell limp and LOCH ARD's bow swung back. Gibbs then ordered the anchors to be released in an attempt to hold its position. The anchors sank some 50 fathoms - but did not hold. By this time LOCH ARD was among the breakers and the tall cliffs of Mutton Bird Island rose behind the ship. Just half a mile from the coast, the ship's bow was suddenly pulled around by the anchor. The captain tried to tack out to sea, but the ship struck a reef at the base of Mutton Bird Island, near Port Campbell. Waves broke over the ship and the top deck was loosened from the hull. The masts and rigging came crashing down knocking passengers and crew overboard. When a lifeboat was finally launched, it crashed into the side of LOCH ARD and capsized. Tom Pearce, who had launched the boat, managed to cling to its overturned hull and shelter beneath it. He drifted out to sea and then on the flood tide came into what is now known as LOCH ARD Gorge. He swam to shore, bruised and dazed, and found a cave in which to shelter. Some of the crew stayed below deck to shelter from the falling rigging but drowned when the ship slipped off the reef into deeper water. Eva Carmichael had raced onto deck to find out what was happening only to be confronted by towering cliffs looming above the stricken ship. In all the chaos, Captain Gibbs grabbed Eva and said, "If you are saved Eva, let my dear wife know that I died like a sailor". That was the last Eva Carmichael saw of the captain. She was swept off the ship by a huge wave. Eva saw Tom Pearce on a small rocky beach and yelled to attract his attention. He dived in and swam to the exhausted woman and dragged her to shore. He took her to the cave and broke open case of brandy which had washed up on the beach. He opened a bottle to revive the unconscious woman. A few hours later Tom scaled a cliff in search of help. He followed hoof prints and came by chance upon two men from nearby Glenample Station three and a half miles away. In a state of exhaustion, he told the men of the tragedy. Tom returned to the gorge while the two men rode back to the station to get help. By the time they reached LOCH ARD Gorge, it was cold and dark. The two shipwreck survivors were taken to Glenample Station to recover. Eva stayed at the station for six weeks before returning to Ireland, this time by steamship. In Melbourne, Tom Pearce received a hero's welcome. He was presented with the first gold medal of the Royal Humane Society of Victoria and a £1000 cheque from the Victorian Government. Concerts were performed to honour the young man's bravery and to raise money for those who lost family in the LOCH ARD disaster. Of the 54 crew members and passengers on board, only two survived: the apprentice, Tom Pearce and the young woman passenger, Eva Carmichael, who lost all of her family in the tragedy. Ten days after the LOCH ARD tragedy, salvage rights to the wreck were sold at auction for £2,120. Cargo valued at £3,000 was salvaged and placed on the beach, but most washed back into the sea when another storm developed. The wreck of LOCH ARD still lies at the base of Mutton Bird Island. Much of the cargo has now been salvaged and some was washed up into what is now known as LOCH ARD Gorge. Cargo and artefacts have also been illegally salvaged over many years before protective legislation was introduced. One of the most unlikely pieces of cargo to have survived the shipwreck was a Minton porcelain peacock - one of only nine in the world. The peacock was destined for the Melbourne International Exhibition in 1880. It had been well packed, which gave it adequate protection during the violent storm. Today, the Minton peacock can be seen at the Flagstaff Hill Maritime Museum in Warrnambool. From Australia's most dramatic shipwreck it has now become Australia's most valuable shipwreck artefact and is one of very few 'objects' on the Victorian State Heritage Register. Flagstaff Hill’s collection of artefacts from LOCH ARD is significant for being one of the largest collections of artefacts from this shipwreck in Victoria. It is significant for its association with the shipwreck, which is on the Victorian Heritage Register (VHR S417). The collection is significant because of the relationship between the objects, as together they have a high potential to interpret the story of the LOCH ARD. The LOCH ARD collection is archaeologically significant as the remains of a large international passenger and cargo ship. The LOCH ARD collection is historically significant for representing aspects of Victoria’s shipping history and its potential to interpret sub-theme 1.5 of Victoria’s Framework of Historical Themes (living with natural processes). The collection is also historically significant for its association with the LOCH ARD, which was one of the worst and best known shipwrecks in Victoria’s history. Photograph of Loch Ard Gorge c1900flagstaff hill, warrnambool, shipwrecked coast, flagstaff hill maritime museum, maritime museum, shipwreck coast, flagstaff hill maritime village, great ocean road, loch line, loch ard, captain gibbs, eva carmichael, tom pearce, glenample station, mutton bird island, loch ard gorge, photograph of loch ard gorge, photograph -
 Flagstaff Hill Maritime Museum and Village
Calendar
HISTORY OF THE LOCH ARD The LOCH ARD belonged to the famous Loch Line which sailed many ships from England to Australia. Built in Glasgow by Barclay, Curdle and Co. in 1873, the LOCH ARD was a three-masted square rigged iron sailing ship. The ship measured 262ft 7" (79.87m) in length, 38ft (11.58m) in width, 23ft (7m) in depth and had a gross tonnage of 1693 tons. The LOCH ARD's main mast measured a massive 150ft (45.7m) in height. LOCH ARD made three trips to Australia and one trip to Calcutta before its final voyage. LOCH ARD left England on March 2, 1878, under the command of Captain Gibbs, a newly married, 29 year old. She was bound for Melbourne with a crew of 37, plus 17 passengers and a load of cargo. The general cargo reflected the affluence of Melbourne at the time. On board were straw hats, umbrella, perfumes, clay pipes, pianos, clocks, confectionary, linen and candles, as well as a heavier load of railway irons, cement, lead and copper. There were items included that intended for display in the Melbourne International Exhibition in 1880. The voyage to Port Phillip was long but uneventful. At 3am on June 1, 1878, Captain Gibbs was expecting to see land and the passengers were becoming excited as they prepared to view their new homeland in the early morning. But LOCH ARD was running into a fog which greatly reduced visibility. Captain Gibbs was becoming anxious as there was no sign of land or the Cape Otway lighthouse. At 4am the fog lifted. A man aloft announced that he could see breakers. The sheer cliffs of Victoria's west coast came into view, and Captain Gibbs realised that the ship was much closer to them than expected. He ordered as much sail to be set as time would permit and then attempted to steer the vessel out to sea. On coming head on into the wind, the ship lost momentum, the sails fell limp and LOCH ARD's bow swung back. Gibbs then ordered the anchors to be released in an attempt to hold its position. The anchors sank some 50 fathoms - but did not hold. By this time LOCH ARD was among the breakers and the tall cliffs of Mutton Bird Island rose behind the ship. Just half a mile from the coast, the ship's bow was suddenly pulled around by the anchor. The captain tried to tack out to sea, but the ship struck a reef at the base of Mutton Bird Island, near Port Campbell. Waves broke over the ship and the top deck was loosened from the hull. The masts and rigging came crashing down knocking passengers and crew overboard. When a lifeboat was finally launched, it crashed into the side of LOCH ARD and capsized. Tom Pearce, who had launched the boat, managed to cling to its overturned hull and shelter beneath it. He drifted out to sea and then on the flood tide came into what is now known as LOCH ARD Gorge. He swam to shore, bruised and dazed, and found a cave in which to shelter. Some of the crew stayed below deck to shelter from the falling rigging but drowned when the ship slipped off the reef into deeper water. Eva Carmichael had raced onto deck to find out what was happening only to be confronted by towering cliffs looming above the stricken ship. In all the chaos, Captain Gibbs grabbed Eva and said, "If you are saved Eva, let my dear wife know that I died like a sailor". That was the last Eva Carmichael saw of the captain. She was swept off the ship by a huge wave. Eva saw Tom Pearce on a small rocky beach and yelled to attract his attention. He dived in and swam to the exhausted woman and dragged her to shore. He took her to the cave and broke open case of brandy which had washed up on the beach. He opened a bottle to revive the unconscious woman. A few hours later Tom scaled a cliff in search of help. He followed hoof prints and came by chance upon two men from nearby Glenample Station three and a half miles away. In a state of exhaustion, he told the men of the tragedy. Tom returned to the gorge while the two men rode back to the station to get help. By the time they reached LOCH ARD Gorge, it was cold and dark. The two shipwreck survivors were taken to Glenample Station to recover. Eva stayed at the station for six weeks before returning to Ireland, this time by steamship. In Melbourne, Tom Pearce received a hero's welcome. He was presented with the first gold medal of the Royal Humane Society of Victoria and a £1000 cheque from the Victorian Government. Concerts were performed to honour the young man's bravery and to raise money for those who lost family in the LOCH ARD disaster. Of the 54 crew members and passengers on board, only two survived: the apprentice, Tom Pearce and the young woman passenger, Eva Carmichael, who lost all of her family in the tragedy. Ten days after the LOCH ARD tragedy, salvage rights to the wreck were sold at auction for £2,120. Cargo valued at £3,000 was salvaged and placed on the beach, but most washed back into the sea when another storm developed. The wreck of LOCH ARD still lies at the base of Mutton Bird Island. Much of the cargo has now been salvaged and some was washed up into what is now known as LOCH ARD Gorge. Cargo and artefacts have also been illegally salvaged over many years before protective legislation was introduced. One of the most unlikely pieces of cargo to have survived the shipwreck was a Minton porcelain peacock - one of only nine in the world. The peacock was destined for the Melbourne International Exhibition in 1880. It had been well packed, which gave it adequate protection during the violent storm. Today, the Minton peacock can be seen at the Flagstaff Hill Maritime Museum in Warrnambool. From Australia's most dramatic shipwreck it has now become Australia's most valuable shipwreck artefact and is one of very few 'objects' on the Victorian State Heritage Register. Flagstaff Hill’s collection of artefacts from LOCH ARD is significant for being one of the largest collections of artefacts from this shipwreck in Victoria. It is significant for its association with the shipwreck, which is on the Victorian Heritage Register (VHR S417). The collection is significant because of the relationship between the objects, as together they have a high potential to interpret the story of the LOCH ARD. The LOCH ARD collection is archaeologically significant as the remains of a large international passenger and cargo ship. The LOCH ARD collection is historically significant for representing aspects of Victoria’s shipping history and its potential to interpret sub-theme 1.5 of Victoria’s Framework of Historical Themes (living with natural processes). The collection is also historically significant for its association with the LOCH ARD, which was one of the worst and best known shipwrecks in Victoria’s history. Calendar printed by Terang Express for December 1923 with picture of Loch Ard Gorge and survivors of wreck and also story of the episode. Has some large tears in it.flagstaff hill, warrnambool, shipwrecked coast, flagstaff hill maritime museum, maritime museum, shipwreck coast, flagstaff hill maritime village, great ocean road, loch line, loch ard, captain gibbs, eva carmichael, tom pearce, glenample station, mutton bird island, loch ard gorge, calendar, terang express -
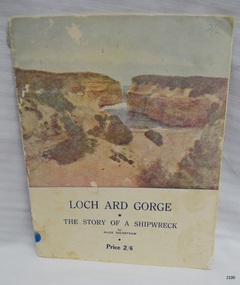 Flagstaff Hill Maritime Museum and Village
Book - Historical maritime, Terang Express, Loch Ard Gorge, 1954
HISTORY OF THE LOCH ARD The LOCH ARD belonged to the famous Loch Line which sailed many ships from England to Australia. Built in Glasgow by Barclay, Curdle and Co. in 1873, the LOCH ARD was a three-masted square rigged iron sailing ship. The ship measured 262ft 7" (79.87m) in length, 38ft (11.58m) in width, 23ft (7m) in depth and had a gross tonnage of 1693 tons. The LOCH ARD's main mast measured a massive 150ft (45.7m) in height. LOCH ARD made three trips to Australia and one trip to Calcutta before its final voyage. LOCH ARD left England on March 2, 1878, under the command of Captain Gibbs, a newly married, 29 year old. She was bound for Melbourne with a crew of 37, plus 17 passengers and a load of cargo. The general cargo reflected the affluence of Melbourne at the time. On board were straw hats, umbrella, perfumes, clay pipes, pianos, clocks, confectionary, linen and candles, as well as a heavier load of railway irons, cement, lead and copper. There were items included that intended for display in the Melbourne International Exhibition in 1880. The voyage to Port Phillip was long but uneventful. At 3am on June 1, 1878, Captain Gibbs was expecting to see land and the passengers were becoming excited as they prepared to view their new homeland in the early morning. But LOCH ARD was running into a fog which greatly reduced visibility. Captain Gibbs was becoming anxious as there was no sign of land or the Cape Otway lighthouse. At 4am the fog lifted. A man aloft announced that he could see breakers. The sheer cliffs of Victoria's west coast came into view, and Captain Gibbs realised that the ship was much closer to them than expected. He ordered as much sail to be set as time would permit and then attempted to steer the vessel out to sea. On coming head on into the wind, the ship lost momentum, the sails fell limp and LOCH ARD's bow swung back. Gibbs then ordered the anchors to be released in an attempt to hold its position. The anchors sank some 50 fathoms - but did not hold. By this time LOCH ARD was among the breakers and the tall cliffs of Mutton Bird Island rose behind the ship. Just half a mile from the coast, the ship's bow was suddenly pulled around by the anchor. The captain tried to tack out to sea, but the ship struck a reef at the base of Mutton Bird Island, near Port Campbell. Waves broke over the ship and the top deck was loosened from the hull. The masts and rigging came crashing down knocking passengers and crew overboard. When a lifeboat was finally launched, it crashed into the side of LOCH ARD and capsized. Tom Pearce, who had launched the boat, managed to cling to its overturned hull and shelter beneath it. He drifted out to sea and then on the flood tide came into what is now known as LOCH ARD Gorge. He swam to shore, bruised and dazed, and found a cave in which to shelter. Some of the crew stayed below deck to shelter from the falling rigging but drowned when the ship slipped off the reef into deeper water. Eva Carmichael had raced onto deck to find out what was happening only to be confronted by towering cliffs looming above the stricken ship. In all the chaos, Captain Gibbs grabbed Eva and said, "If you are saved Eva, let my dear wife know that I died like a sailor". That was the last Eva Carmichael saw of the captain. She was swept off the ship by a huge wave. Eva saw Tom Pearce on a small rocky beach and yelled to attract his attention. He dived in and swam to the exhausted woman and dragged her to shore. He took her to the cave and broke open case of brandy which had washed up on the beach. He opened a bottle to revive the unconscious woman. A few hours later Tom scaled a cliff in search of help. He followed hoof prints and came by chance upon two men from nearby Glenample Station three and a half miles away. In a state of exhaustion, he told the men of the tragedy. Tom returned to the gorge while the two men rode back to the station to get help. By the time they reached LOCH ARD Gorge, it was cold and dark. The two shipwreck survivors were taken to Glenample Station to recover. Eva stayed at the station for six weeks before returning to Ireland, this time by steamship. In Melbourne, Tom Pearce received a hero's welcome. He was presented with the first gold medal of the Royal Humane Society of Victoria and a £1000 cheque from the Victorian Government. Concerts were performed to honour the young man's bravery and to raise money for those who lost family in the LOCH ARD disaster. Of the 54 crew members and passengers on board, only two survived: the apprentice, Tom Pearce and the young woman passenger, Eva Carmichael, who lost all of her family in the tragedy. Ten days after the LOCH ARD tragedy, salvage rights to the wreck were sold at auction for £2,120. Cargo valued at £3,000 was salvaged and placed on the beach, but most washed back into the sea when another storm developed. The wreck of LOCH ARD still lies at the base of Mutton Bird Island. Much of the cargo has now been salvaged and some was washed up into what is now known as LOCH ARD Gorge. Cargo and artefacts have also been illegally salvaged over many years before protective legislation was introduced. One of the most unlikely pieces of cargo to have survived the shipwreck was a Minton porcelain peacock - one of only nine in the world. The peacock was destined for the Melbourne International Exhibition in 1880. It had been well packed, which gave it adequate protection during the violent storm. Today, the Minton peacock can be seen at the Flagstaff Hill Maritime Museum in Warrnambool. From Australia's most dramatic shipwreck it has now become Australia's most valuable shipwreck artefact and is one of very few 'objects' on the Victorian State Heritage Register. Flagstaff Hill’s collection of artefacts from LOCH ARD is significant for being one of the largest collections of artefacts from this shipwreck in Victoria. It is significant for its association with the shipwreck, which is on the Victorian Heritage Register (VHR S417). The collection is significant because of the relationship between the objects, as together they have a high potential to interpret the story of the LOCH ARD. The LOCH ARD collection is archaeologically significant as the remains of a large international passenger and cargo ship. The LOCH ARD collection is historically significant for representing aspects of Victoria’s shipping history and its potential to interpret sub-theme 1.5 of Victoria’s Framework of Historical Themes (living with natural processes). The collection is also historically significant for its association with the LOCH ARD, which was one of the worst and best known shipwrecks in Victoria’s history. Book, Loch Ard Gorge: The Story of a Shipwreck by Alice Goldstraw. First published 1948, Third printing November 1954. Inscription inside front cover in blue pen, signed by the author. Soft covered book containing the story of the wreck of the Loch Ard, written in poetry. Each page has a decorative border. One page has photographs, black and white, of people and the Loch Ard Gorge cavesInside front cover, script in blue ink "To Mrs Slade, with kind regards, from Alice Goldstraw"flagstaff hill, warrnambool, shipwrecked coast, flagstaff hill maritime museum, maritime museum, shipwreck coast, flagstaff hill maritime village, great ocean road, loch line, loch ard, captain gibbs, eva carmichael, tom pearce, glenample station, mutton bird island, loch ard gorge, the story of a shipwreck, book, alice goldstraw, terang express press, loch ard gorge whipwreck, ship loch ard -
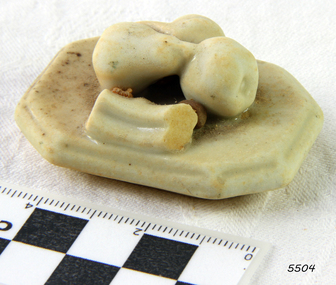 Flagstaff Hill Maritime Museum and Village
Lid
Ref: LA 2 29 274 HISTORY OF THE LOCH ARD The LOCH ARD belonged to the famous Loch Line which sailed many ships from England to Australia. Built in Glasgow by Barclay, Curdle and Co. in 1873, the LOCH ARD was a three-masted square rigged iron sailing ship. The ship measured 262ft 7" (79.87m) in length, 38ft (11.58m) in width, 23ft (7m) in depth and had a gross tonnage of 1693 tons. The LOCH ARD's main mast measured a massive 150ft (45.7m) in height. LOCH ARD made three trips to Australia and one trip to Calcutta before its final voyage. LOCH ARD left England on March 2, 1878, under the command of Captain Gibbs, a newly married, 29 year old. She was bound for Melbourne with a crew of 37, plus 17 passengers and a load of cargo. The general cargo reflected the affluence of Melbourne at the time. On board were straw hats, umbrella, perfumes, clay pipes, pianos, clocks, confectionary, linen and candles, as well as a heavier load of railway irons, cement, lead and copper. There were items included that intended for display in the Melbourne International Exhibition in 1880. The voyage to Port Phillip was long but uneventful. At 3am on June 1, 1878, Captain Gibbs was expecting to see land and the passengers were becoming excited as they prepared to view their new homeland in the early morning. But LOCH ARD was running into a fog which greatly reduced visibility. Captain Gibbs was becoming anxious as there was no sign of land or the Cape Otway lighthouse. At 4am the fog lifted. A man aloft announced that he could see breakers. The sheer cliffs of Victoria's west coast came into view, and Captain Gibbs realised that the ship was much closer to them than expected. He ordered as much sail to be set as time would permit and then attempted to steer the vessel out to sea. On coming head on into the wind, the ship lost momentum, the sails fell limp and LOCH ARD's bow swung back. Gibbs then ordered the anchors to be released in an attempt to hold its position. The anchors sank some 50 fathoms - but did not hold. By this time LOCH ARD was among the breakers and the tall cliffs of Mutton Bird Island rose behind the ship. Just half a mile from the coast, the ship's bow was suddenly pulled around by the anchor. The captain tried to tack out to sea, but the ship struck a reef at the base of Mutton Bird Island, near Port Campbell. Waves broke over the ship and the top deck was loosened from the hull. The masts and rigging came crashing down knocking passengers and crew overboard. When a lifeboat was finally launched, it crashed into the side of LOCH ARD and capsized. Tom Pearce, who had launched the boat, managed to cling to its overturned hull and shelter beneath it. He drifted out to sea and then on the flood tide came into what is now known as LOCH ARD Gorge. He swam to shore, bruised and dazed, and found a cave in which to shelter. Some of the crew stayed below deck to shelter from the falling rigging but drowned when the ship slipped off the reef into deeper water. Eva Carmichael had raced onto deck to find out what was happening only to be confronted by towering cliffs looming above the stricken ship. In all the chaos, Captain Gibbs grabbed Eva and said, "If you are saved Eva, let my dear wife know that I died like a sailor". That was the last Eva Carmichael saw of the captain. She was swept off the ship by a huge wave. Eva saw Tom Pearce on a small rocky beach and yelled to attract his attention. He dived in and swam to the exhausted woman and dragged her to shore. He took her to the cave and broke open case of brandy which had washed up on the beach. He opened a bottle to revive the unconscious woman. A few hours later Tom scaled a cliff in search of help. He followed hoof prints and came by chance upon two men from nearby Glenample Station three and a half miles away. In a state of exhaustion, he told the men of the tragedy. Tom returned to the gorge while the two men rode back to the station to get help. By the time they reached LOCH ARD Gorge, it was cold and dark. The two shipwreck survivors were taken to Glenample Station to recover. Eva stayed at the station for six weeks before returning to Ireland, this time by steamship. In Melbourne, Tom Pearce received a hero's welcome. He was presented with the first gold medal of the Royal Humane Society of Victoria and a £1000 cheque from the Victorian Government. Concerts were performed to honour the young man's bravery and to raise money for those who lost family in the LOCH ARD disaster. Of the 54 crew members and passengers on board, only two survived: the apprentice, Tom Pearce and the young woman passenger, Eva Carmichael, who lost all of her family in the tragedy. Ten days after the LOCH ARD tragedy, salvage rights to the wreck were sold at auction for £2,120. Cargo valued at £3,000 was salvaged and placed on the beach, but most washed back into the sea when another storm developed. The wreck of LOCH ARD still lies at the base of Mutton Bird Island. Much of the cargo has now been salvaged and some was washed up into what is now known as LOCH ARD Gorge. Cargo and artefacts have also been illegally salvaged over many years before protective legislation was introduced. One of the most unlikely pieces of cargo to have survived the shipwreck was a Minton porcelain peacock - one of only nine in the world. The peacock was destined for the Melbourne International Exhibition in 1880. It had been well packed, which gave it adequate protection during the violent storm. Today, the Minton peacock can be seen at the Flagstaff Hill Maritime Museum in Warrnambool. From Australia's most dramatic shipwreck it has now become Australia's most valuable shipwreck artefact and is one of very few 'objects' on the Victorian State Heritage Register. Flagstaff Hill’s collection of artefacts from LOCH ARD is significant for being one of the largest collections of artefacts from this shipwreck in Victoria. It is significant for its association with the shipwreck, which is on the Victorian Heritage Register (VHR S417). The collection is significant because of the relationship between the objects, as together they have a high potential to interpret the story of the LOCH ARD. The LOCH ARD collection is archaeologically significant as the remains of a large international passenger and cargo ship. The LOCH ARD collection is historically significant for representing aspects of Victoria’s shipping history and its potential to interpret sub-theme 1.5 of Victoria’s Framework of Historical Themes (living with natural processes). The collection is also historically significant for its association with the LOCH ARD, which was one of the worst and best known shipwrecks in Victoria’s history. Lid from child's tea set. Porcelain. Lid has small chip and some slight iron stains. Recovered from the wreck of the Loch Ard. Artefact reg No LA/16.flagstaff hill, warrnambool, shipwrecked-coast, flagstaff-hill, flagstaff-hill-maritime-museum, maritime-museum, shipwreck-coast, flagstaff-hill-maritime-village -
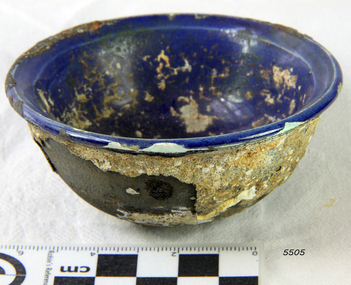 Flagstaff Hill Maritime Museum and Village
Deflector
HISTORY OF THE LOCH ARD The LOCH ARD belonged to the famous Loch Line which sailed many ships from England to Australia. Built in Glasgow by Barclay, Curdle and Co. in 1873, the LOCH ARD was a three-masted square rigged iron sailing ship. The ship measured 262ft 7" (79.87m) in length, 38ft (11.58m) in width, 23ft (7m) in depth and had a gross tonnage of 1693 tons. The LOCH ARD's main mast measured a massive 150ft (45.7m) in height. LOCH ARD made three trips to Australia and one trip to Calcutta before its final voyage. LOCH ARD left England on March 2, 1878, under the command of Captain Gibbs, a newly married, 29 year old. She was bound for Melbourne with a crew of 37, plus 17 passengers and a load of cargo. The general cargo reflected the affluence of Melbourne at the time. On board were straw hats, umbrella, perfumes, clay pipes, pianos, clocks, confectionary, linen and candles, as well as a heavier load of railway irons, cement, lead and copper. There were items included that intended for display in the Melbourne International Exhibition in 1880. The voyage to Port Phillip was long but uneventful. At 3am on June 1, 1878, Captain Gibbs was expecting to see land and the passengers were becoming excited as they prepared to view their new homeland in the early morning. But LOCH ARD was running into a fog which greatly reduced visibility. Captain Gibbs was becoming anxious as there was no sign of land or the Cape Otway lighthouse. At 4am the fog lifted. A man aloft announced that he could see breakers. The sheer cliffs of Victoria's west coast came into view, and Captain Gibbs realised that the ship was much closer to them than expected. He ordered as much sail to be set as time would permit and then attempted to steer the vessel out to sea. On coming head on into the wind, the ship lost momentum, the sails fell limp and LOCH ARD's bow swung back. Gibbs then ordered the anchors to be released in an attempt to hold its position. The anchors sank some 50 fathoms - but did not hold. By this time LOCH ARD was among the breakers and the tall cliffs of Mutton Bird Island rose behind the ship. Just half a mile from the coast, the ship's bow was suddenly pulled around by the anchor. The captain tried to tack out to sea, but the ship struck a reef at the base of Mutton Bird Island, near Port Campbell. Waves broke over the ship and the top deck was loosened from the hull. The masts and rigging came crashing down knocking passengers and crew overboard. When a lifeboat was finally launched, it crashed into the side of LOCH ARD and capsized. Tom Pearce, who had launched the boat, managed to cling to its overturned hull and shelter beneath it. He drifted out to sea and then on the flood tide came into what is now known as LOCH ARD Gorge. He swam to shore, bruised and dazed, and found a cave in which to shelter. Some of the crew stayed below deck to shelter from the falling rigging but drowned when the ship slipped off the reef into deeper water. Eva Carmichael had raced onto deck to find out what was happening only to be confronted by towering cliffs looming above the stricken ship. In all the chaos, Captain Gibbs grabbed Eva and said, "If you are saved Eva, let my dear wife know that I died like a sailor". That was the last Eva Carmichael saw of the captain. She was swept off the ship by a huge wave. Eva saw Tom Pearce on a small rocky beach and yelled to attract his attention. He dived in and swam to the exhausted woman and dragged her to shore. He took her to the cave and broke open case of brandy which had washed up on the beach. He opened a bottle to revive the unconscious woman. A few hours later Tom scaled a cliff in search of help. He followed hoof prints and came by chance upon two men from nearby Glenample Station three and a half miles away. In a state of exhaustion, he told the men of the tragedy. Tom returned to the gorge while the two men rode back to the station to get help. By the time they reached LOCH ARD Gorge, it was cold and dark. The two shipwreck survivors were taken to Glenample Station to recover. Eva stayed at the station for six weeks before returning to Ireland, this time by steamship. In Melbourne, Tom Pearce received a hero's welcome. He was presented with the first gold medal of the Royal Humane Society of Victoria and a £1000 cheque from the Victorian Government. Concerts were performed to honour the young man's bravery and to raise money for those who lost family in the LOCH ARD disaster. Of the 54 crew members and passengers on board, only two survived: the apprentice, Tom Pearce and the young woman passenger, Eva Carmichael, who lost all of her family in the tragedy. Ten days after the LOCH ARD tragedy, salvage rights to the wreck were sold at auction for £2,120. Cargo valued at £3,000 was salvaged and placed on the beach, but most washed back into the sea when another storm developed. The wreck of LOCH ARD still lies at the base of Mutton Bird Island. Much of the cargo has now been salvaged and some was washed up into what is now known as LOCH ARD Gorge. Cargo and artefacts have also been illegally salvaged over many years before protective legislation was introduced. One of the most unlikely pieces of cargo to have survived the shipwreck was a Minton porcelain peacock - one of only nine in the world. The peacock was destined for the Melbourne International Exhibition in 1880. It had been well packed, which gave it adequate protection during the violent storm. Today, the Minton peacock can be seen at the Flagstaff Hill Maritime Museum in Warrnambool. From Australia's most dramatic shipwreck it has now become Australia's most valuable shipwreck artefact and is one of very few 'objects' on the Victorian State Heritage Register. Flagstaff Hill’s collection of artefacts from LOCH ARD is significant for being one of the largest collections of artefacts from this shipwreck in Victoria. It is significant for its association with the shipwreck, which is on the Victorian Heritage Register (VHR S417). The collection is significant because of the relationship between the objects, as together they have a high potential to interpret the story of the LOCH ARD. The LOCH ARD collection is archaeologically significant as the remains of a large international passenger and cargo ship. The LOCH ARD collection is historically significant for representing aspects of Victoria’s shipping history and its potential to interpret sub-theme 1.5 of Victoria’s Framework of Historical Themes (living with natural processes). The collection is also historically significant for its association with the LOCH ARD, which was one of the worst and best known shipwrecks in Victoria’s history. Small Porcelain Heat Deflector from a kero lamp,deflector is blue inside. Outside has some encrustation. Artefact reg no LA/15. Recovered from the wreck of the Loch Ard.flagstaff hill, warrnambool, shipwrecked coast, flagstaff hill maritime museum, maritime museum, shipwreck coast, flagstaff hill maritime village, great ocean road, loch line, loch ard, captain gibbs, eva carmichael, tom pearce, glenample station, mutton bird island, loch ard gorge, porcelain heat deflector, heat deflector -
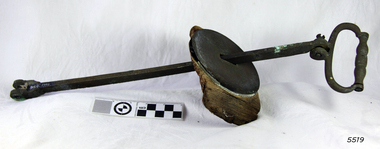 Flagstaff Hill Maritime Museum and Village
Pump
HISTORY OF THE LOCH ARD The LOCH ARD belonged to the famous Loch Line which sailed many ships from England to Australia. Built in Glasgow by Barclay, Curdle and Co. in 1873, the LOCH ARD was a three-masted square rigged iron sailing ship. The ship measured 262ft 7" (79.87m) in length, 38ft (11.58m) in width, 23ft (7m) in depth and had a gross tonnage of 1693 tons. The LOCH ARD's main mast measured a massive 150ft (45.7m) in height. LOCH ARD made three trips to Australia and one trip to Calcutta before its final voyage. LOCH ARD left England on March 2, 1878, under the command of Captain Gibbs, a newly married, 29 year old. She was bound for Melbourne with a crew of 37, plus 17 passengers and a load of cargo. The general cargo reflected the affluence of Melbourne at the time. On board were straw hats, umbrella, perfumes, clay pipes, pianos, clocks, confectionary, linen and candles, as well as a heavier load of railway irons, cement, lead and copper. There were items included that intended for display in the Melbourne International Exhibition in 1880. The voyage to Port Phillip was long but uneventful. At 3am on June 1, 1878, Captain Gibbs was expecting to see land and the passengers were becoming excited as they prepared to view their new homeland in the early morning. But LOCH ARD was running into a fog which greatly reduced visibility. Captain Gibbs was becoming anxious as there was no sign of land or the Cape Otway lighthouse. At 4am the fog lifted. A man aloft announced that he could see breakers. The sheer cliffs of Victoria's west coast came into view, and Captain Gibbs realised that the ship was much closer to them than expected. He ordered as much sail to be set as time would permit and then attempted to steer the vessel out to sea. On coming head on into the wind, the ship lost momentum, the sails fell limp and LOCH ARD's bow swung back. Gibbs then ordered the anchors to be released in an attempt to hold its position. The anchors sank some 50 fathoms - but did not hold. By this time LOCH ARD was among the breakers and the tall cliffs of Mutton Bird Island rose behind the ship. Just half a mile from the coast, the ship's bow was suddenly pulled around by the anchor. The captain tried to tack out to sea, but the ship struck a reef at the base of Mutton Bird Island, near Port Campbell. Waves broke over the ship and the top deck was loosened from the hull. The masts and rigging came crashing down knocking passengers and crew overboard. When a lifeboat was finally launched, it crashed into the side of LOCH ARD and capsized. Tom Pearce, who had launched the boat, managed to cling to its overturned hull and shelter beneath it. He drifted out to sea and then on the flood tide came into what is now known as LOCH ARD Gorge. He swam to shore, bruised and dazed, and found a cave in which to shelter. Some of the crew stayed below deck to shelter from the falling rigging but drowned when the ship slipped off the reef into deeper water. Eva Carmichael had raced onto deck to find out what was happening only to be confronted by towering cliffs looming above the stricken ship. In all the chaos, Captain Gibbs grabbed Eva and said, "If you are saved Eva, let my dear wife know that I died like a sailor". That was the last Eva Carmichael saw of the captain. She was swept off the ship by a huge wave. Eva saw Tom Pearce on a small rocky beach and yelled to attract his attention. He dived in and swam to the exhausted woman and dragged her to shore. He took her to the cave and broke open case of brandy which had washed up on the beach. He opened a bottle to revive the unconscious woman. A few hours later Tom scaled a cliff in search of help. He followed hoof prints and came by chance upon two men from nearby Glenample Station three and a half miles away. In a state of exhaustion, he told the men of the tragedy. Tom returned to the gorge while the two men rode back to the station to get help. By the time they reached LOCH ARD Gorge, it was cold and dark. The two shipwreck survivors were taken to Glenample Station to recover. Eva stayed at the station for six weeks before returning to Ireland, this time by steamship. In Melbourne, Tom Pearce received a hero's welcome. He was presented with the first gold medal of the Royal Humane Society of Victoria and a £1000 cheque from the Victorian Government. Concerts were performed to honour the young man's bravery and to raise money for those who lost family in the LOCH ARD disaster. Of the 54 crew members and passengers on board, only two survived: the apprentice, Tom Pearce and the young woman passenger, Eva Carmichael, who lost all of her family in the tragedy. Ten days after the LOCH ARD tragedy, salvage rights to the wreck were sold at auction for £2,120. Cargo valued at £3,000 was salvaged and placed on the beach, but most washed back into the sea when another storm developed. The wreck of LOCH ARD still lies at the base of Mutton Bird Island. Much of the cargo has now been salvaged and some was washed up into what is now known as LOCH ARD Gorge. Cargo and artefacts have also been illegally salvaged over many years before protective legislation was introduced. One of the most unlikely pieces of cargo to have survived the shipwreck was a Minton porcelain peacock - one of only nine in the world. The peacock was destined for the Melbourne International Exhibition in 1880. It had been well packed, which gave it adequate protection during the violent storm. Today, the Minton peacock can be seen at the Flagstaff Hill Maritime Museum in Warrnambool. From Australia's most dramatic shipwreck it has now become Australia's most valuable shipwreck artefact and is one of very few 'objects' on the Victorian State Heritage Register. Flagstaff Hill’s collection of artefacts from LOCH ARD is significant for being one of the largest collections of artefacts from this shipwreck in Victoria. It is significant for its association with the shipwreck, which is on the Victorian Heritage Register (VHR S417). The collection is significant because of the relationship between the objects, as together they have a high potential to interpret the story of the LOCH ARD. The LOCH ARD collection is archaeologically significant as the remains of a large international passenger and cargo ship. The LOCH ARD collection is historically significant for representing aspects of Victoria’s shipping history and its potential to interpret sub-theme 1.5 of Victoria’s Framework of Historical Themes (living with natural processes). The collection is also historically significant for its association with the LOCH ARD, which was one of the worst and best known shipwrecks in Victoria’s history. Part of a pump system. Has been attached to a piece of wood. Possibly a cistern plunger. From the Loch Ard.flagstaff hill, warrnambool, shipwrecked coast, flagstaff hill maritime museum, maritime museum, shipwreck coast, flagstaff hill maritime village, great ocean road, loch line, loch ard, captain gibbs, eva carmichael, tom pearce, glenample station, mutton bird island, loch ard gorge, pump system, pump -
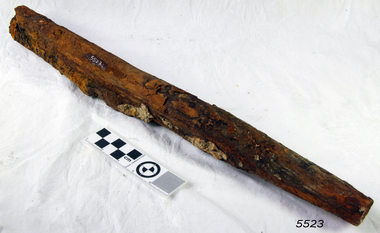 Flagstaff Hill Maritime Museum and Village
Handle
Ref: LA 6 67 311 HISTORY OF THE LOCH ARD The LOCH ARD belonged to the famous Loch Line which sailed many ships from England to Australia. Built in Glasgow by Barclay, Curdle and Co. in 1873, the LOCH ARD was a three-masted square rigged iron sailing ship. The ship measured 262ft 7" (79.87m) in length, 38ft (11.58m) in width, 23ft (7m) in depth and had a gross tonnage of 1693 tons. The LOCH ARD's main mast measured a massive 150ft (45.7m) in height. LOCH ARD made three trips to Australia and one trip to Calcutta before its final voyage. LOCH ARD left England on March 2, 1878, under the command of Captain Gibbs, a newly married, 29 year old. She was bound for Melbourne with a crew of 37, plus 17 passengers and a load of cargo. The general cargo reflected the affluence of Melbourne at the time. On board were straw hats, umbrella, perfumes, clay pipes, pianos, clocks, confectionary, linen and candles, as well as a heavier load of railway irons, cement, lead and copper. There were items included that intended for display in the Melbourne International Exhibition in 1880. The voyage to Port Phillip was long but uneventful. At 3am on June 1, 1878, Captain Gibbs was expecting to see land and the passengers were becoming excited as they prepared to view their new homeland in the early morning. But LOCH ARD was running into a fog which greatly reduced visibility. Captain Gibbs was becoming anxious as there was no sign of land or the Cape Otway lighthouse. At 4am the fog lifted. A man aloft announced that he could see breakers. The sheer cliffs of Victoria's west coast came into view, and Captain Gibbs realised that the ship was much closer to them than expected. He ordered as much sail to be set as time would permit and then attempted to steer the vessel out to sea. On coming head on into the wind, the ship lost momentum, the sails fell limp and LOCH ARD's bow swung back. Gibbs then ordered the anchors to be released in an attempt to hold its position. The anchors sank some 50 fathoms - but did not hold. By this time LOCH ARD was among the breakers and the tall cliffs of Mutton Bird Island rose behind the ship. Just half a mile from the coast, the ship's bow was suddenly pulled around by the anchor. The captain tried to tack out to sea, but the ship struck a reef at the base of Mutton Bird Island, near Port Campbell. Waves broke over the ship and the top deck was loosened from the hull. The masts and rigging came crashing down knocking passengers and crew overboard. When a lifeboat was finally launched, it crashed into the side of LOCH ARD and capsized. Tom Pearce, who had launched the boat, managed to cling to its overturned hull and shelter beneath it. He drifted out to sea and then on the flood tide came into what is now known as LOCH ARD Gorge. He swam to shore, bruised and dazed, and found a cave in which to shelter. Some of the crew stayed below deck to shelter from the falling rigging but drowned when the ship slipped off the reef into deeper water. Eva Carmichael had raced onto deck to find out what was happening only to be confronted by towering cliffs looming above the stricken ship. In all the chaos, Captain Gibbs grabbed Eva and said, "If you are saved Eva, let my dear wife know that I died like a sailor". That was the last Eva Carmichael saw of the captain. She was swept off the ship by a huge wave. Eva saw Tom Pearce on a small rocky beach and yelled to attract his attention. He dived in and swam to the exhausted woman and dragged her to shore. He took her to the cave and broke open case of brandy which had washed up on the beach. He opened a bottle to revive the unconscious woman. A few hours later Tom scaled a cliff in search of help. He followed hoof prints and came by chance upon two men from nearby Glenample Station three and a half miles away. In a state of exhaustion, he told the men of the tragedy. Tom returned to the gorge while the two men rode back to the station to get help. By the time they reached LOCH ARD Gorge, it was cold and dark. The two shipwreck survivors were taken to Glenample Station to recover. Eva stayed at the station for six weeks before returning to Ireland, this time by steamship. In Melbourne, Tom Pearce received a hero's welcome. He was presented with the first gold medal of the Royal Humane Society of Victoria and a £1000 cheque from the Victorian Government. Concerts were performed to honour the young man's bravery and to raise money for those who lost family in the LOCH ARD disaster. Of the 54 crew members and passengers on board, only two survived: the apprentice, Tom Pearce and the young woman passenger, Eva Carmichael, who lost all of her family in the tragedy. Ten days after the LOCH ARD tragedy, salvage rights to the wreck were sold at auction for £2,120. Cargo valued at £3,000 was salvaged and placed on the beach, but most washed back into the sea when another storm developed. The wreck of LOCH ARD still lies at the base of Mutton Bird Island. Much of the cargo has now been salvaged and some was washed up into what is now known as LOCH ARD Gorge. Cargo and artefacts have also been illegally salvaged over many years before protective legislation was introduced. One of the most unlikely pieces of cargo to have survived the shipwreck was a Minton porcelain peacock - one of only nine in the world. The peacock was destined for the Melbourne International Exhibition in 1880. It had been well packed, which gave it adequate protection during the violent storm. Today, the Minton peacock can be seen at the Flagstaff Hill Maritime Museum in Warrnambool. From Australia's most dramatic shipwreck it has now become Australia's most valuable shipwreck artefact and is one of very few 'objects' on the Victorian State Heritage Register. Flagstaff Hill’s collection of artefacts from LOCH ARD is significant for being one of the largest collections of artefacts from this shipwreck in Victoria. It is significant for its association with the shipwreck, which is on the Victorian Heritage Register (VHR S417). The collection is significant because of the relationship between the objects, as together they have a high potential to interpret the story of the LOCH ARD. The LOCH ARD collection is archaeologically significant as the remains of a large international passenger and cargo ship. The LOCH ARD collection is historically significant for representing aspects of Victoria’s shipping history and its potential to interpret sub-theme 1.5 of Victoria’s Framework of Historical Themes (living with natural processes). The collection is also historically significant for its association with Shovel handle. Has pieces of iron and concretion visible. Artefact Reg No LA/42. Recovered from the wreck of the Loch Ard.flagstaff hill, warrnambool, shipwrecked coast, flagstaff hill maritime museum, maritime museum, shipwreck coast, flagstaff hill maritime village, great ocean road, loch line, loch ard, captain gibbs, eva carmichael, tom pearce, glenample station, mutton bird island, loch ard gorge, shovel handle