Showing 692 items
matching tramway crossings
-
 Melbourne Tram Museum
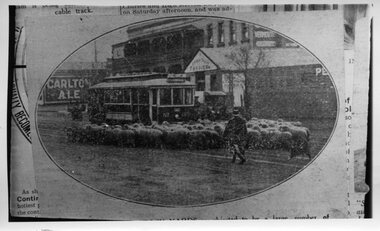
Photograph - Black and White - MMTB M Class tram 185 - Newspaper photo, MMTB M Class Tram 125 in Newmarket - Newspaper photo, Early 1920s
Image shows sheep crossing Racecourse Rd hindering a travelling tram M185. Has either the Newmarket Hotel or the Pastrol Hotel in the background.Early days of effect of markets on tramways MMTB M class tram 185 in Racecourse Road Newmarket, delayed by sheep neat the Saleyards.tramways, trams, m class trams, sheep, racecourse rd, tram 185, hotels -
 Ballarat Tramway Museum
Slide - Set of 7 - Lydiard Street level crossing and tram terminus, David Verrier, 21-11-2000
Set of seven slides taken during the 2000 COTMA Conference visit to the Ballarat Tramway Museum depot on 21-11-2022 1 - Former Lydiard St North terminus looking south 2 - Ballarat Station with the temporarily closed Lydiard St level crossing. 3 - Ballarat Station with the temporarily closed Lydiard St level crossing. 4 - Ballarat Station good shed looking east 5 - Lydiard St level crossing with G521 on freight leaving 6 - Lydiard St level crossing with G521 on freight leaving 7 - Train on level crossingYields information about the Lydiard St Nth terminus in 2000 and the level crossing.Set of seven Kodak colour slides - white plastic mountEach slide has details written on it.ballarat, specials, cotma, lydiard st north, level crossing, g 521, railways -
 Melbourne Tram Museum
slide - Colour - Melbourne Trams, David Verrier, August 1989
1 - W7 1033, South Melbourne / St Kilda terminus in Park St. showing route 10. Has Bank of Melbourne and Estate Mortgage adverts. 2 - B2 2012 (route 96) , Fitzroy Street, St Kilda 3 - SW6 858 (route 16), Fitzroy St St Kilda. Has Bank of Melbourne adverts. 4 - Elizabeth St terminus from Flinders Lane, looking south. 5 - Z3 156 (route 19), arriving Elizabeth St terminus at Flinders St 6 - Z3 176 crossing Park St, Parkville, West Coburg, route 68. 7 - Z3 217 near zoo, about to pass under the railway over bridge - route 68 8 - Z3 129, ditto inbound. Yields information about Melbourne tram operations in Sept 1999Set of eight white / grey plastic slides, marked "CS System" and date stamped 08/89tramways, z3 class, b2 class, park st, south melbourne beach, route 10, w7 class, tram 1033, tram 2012, fitzroy st, tram 858, route 16, route 96, elizabeth street, flinders st, tram 156, route 19, tram 176, parkville, route 68, tram 217, tram 129 -
 Ballarat Tramway Museum
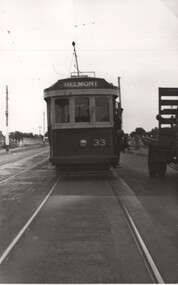
Photograph - Front of Geelong 33, Charles Craig, 29-3-1948
Photo shows the front of Geelong bogie tram No. 33, possibly at a crossing loop on the Belmont line.Yields information about the AETA's first Geelong tour in 1948 and the trams being operated on that day.Black and white photograph of Geelong No. 33tramways, trams, sec tramways, geelong, tram 33 -
 Melbourne Tram Museum
Photograph - Black and White - W6 965 reversing at Elsternwick, John Alfred
... to replace the Elsternwick level crossing. Dated 2-10-1960. Yields ...Photo shows - W6 965 (route 4, City) reversing at Elsternwick, using the Point Ormond leg of the triangle of the intersection at the intersection with Brighton Road and Glenhuntly Rd, due to the work to replace the Elsternwick level crossing. Dated 2-10-1960.Yields information about alterations to tram services during a level crossing removal project.Photograph - Black and White - W6 965 reversing at ElsternwickHas details typed on rear, date stamp and John Alfred Stamp. tramways, tramcars, w6 class, elsternwick, brighton road, glenhuntly road, tram 965, route 4 -
 Melbourne Tram Museum
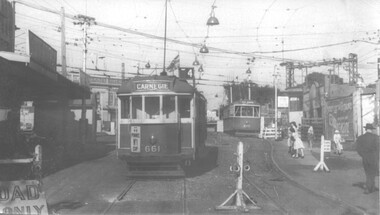
Photograph - Black and White - trams 661 and 675 Elsternwick, John Alfred, 1960
... during a level crossing removal project. tramways tramcars ...Black and white photograph of trams W3 661 (Route 4 Carnegie) and X2 675 (Point Ormond) , Glenhuntly Road, Elsternwick Station, during the lowering of the railway line, 1960. Photo by John Alfred. Yields information about alterations to tram services during a level crossing removal project.Photograph - Black and White - trams 661 and 675 ElsternwickHas details handwritten on rear, and John Alfred Stamp. tramways, tramcars, glenhuntly rd, level crossing, elsternwick, tram 661, tram 675, w3 class, x2 class, point ormond -
 Ballarat Tramway Museum
Document - Manuscript, Peter J Barry, "Signalling and Operations on the Tramway System in Bendigo", April 1990
Draft of an article with notes/additions by Keith Kiings on the signalling system and tramcar operations in Bendigo. Looks at the basic services, crossing loops, signalling, following movements (Bendigo used a white disc on the tram to indicate a following tram, Ballarat did not use this system), short workings, reversals, observations of actual workings. Includes a map drawn by Keith Kings in 1972. Published in the September 1990 issue of Somersault, by the Signalling Record Society of Victoria.Yields information about the operation of the Bendigo tramway system using the Forest City Signalling system.Six A4 pages of a draft of an article by Peter Barry and correspondence to Keith Kings re "Signalling and Operations on the Tramway System in Bendigo, April 1990.tramways, trams, bendigo, signalling, forest city, operations, crossing loops, srsv -
 Ballarat Tramway Museum
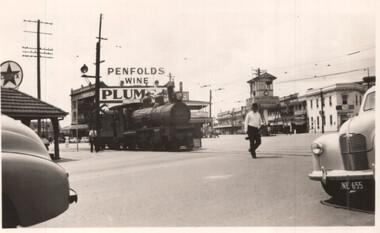
Photograph - QGR locomotive at Woolloongabba Brisbane, Keith Kings, 10/1/1951
Wal Jack swapped photographs with his correspondents. This photo by Keith Kings, a railway photograph of QGR locomotive 748 crossing the complex arrangements of tracks at Woolloongabba - three tram tracks, one trolley bus route. The photographer noted that trains could block all tram lines at times. Trains were always proceeded by a man carrying a red flag and ringing a bell. Has the tramway signal box in the background and a large Penfolds Wines advert on a building, a Caltex service station and an advert for Plume petrol.Demonstrates a photograph that would have been sent to Wal Jack by Keith Kings.Black and white photograph of QGR locomotive 748Has extensive details of the photograph on the rear. Keith Kings photo number E(k)(vii)letter, wal jack, keith kings, qgr, railways, woolloongabba -
 Ballarat Tramway Museum
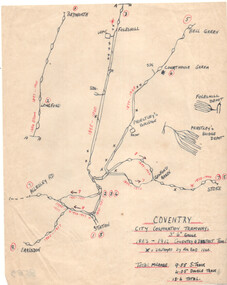
Drawing, Coventry City Corp Tramways
Wal Jack had an extensive range of correspondents throughout Australia and the world who often provided him with detailed drawings and notes on various tramway systems. Drawing shows the various lines, crossing loops, depots, routes with numbers and the location of bomb damage during 1940 air raids. The gauge of the system was 3'6". The Wikipedia reference reports that the system was closed as a result of extensive damage during the air raids. Not known who prepared the drawing.Yields information about Wal Jack's correspondents and their extensive work.Drawing - red and black ink on quarto paper, Coventry tramway system.letters, wal jack, drawings, maps, coventry, uk. -
 Melbourne Tram Museum
Document - Report, "Power supply for Victorian Railways Electric Street Railways"
Report details the history of the power supply for the Victorian Railways, electric street railways or tramways. Looks at the costs, equipment purchased, operation, and construction. Compiled from original VR documents, with photos. Includes the Elwood depot fire of 1907, Covers the provision of power for Sandringham tramway. Has drawings of the main switchboard layouts, the crossing of the St Kilda - Brighton tramway by the MMTB tramways. Author unknown.Yields information about the provision of the power supply for VR Trams.Report 50 x A4 pages - photocopied from an original document. trams, railways, vr trams, sandringham, st kilda brighton electric tramway, power supply, elwood depot, elwood substation, substations -
 Ballarat Tramway Museum
Slide - Tram 28 Victoria and Humfray Streets, Richard Jones, Dec. 1969
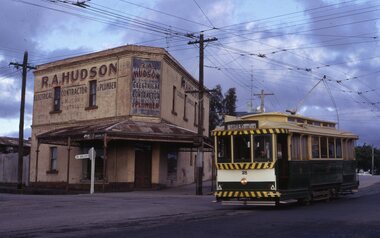
Image shows Ballarat 28 descending the hill in Victoria St crossing over Humffray St with R A Hudson Electrical Contractor and Plumbers building in the background. A former hotel. The tram has the destination of Gardens via Sturt St West.Yields information about the corner of Humffray and Victoria Streets Dec. 1969Digital image of a Kodachrome slideballarat, trams, tramways, tram 28, victoria st, humffray st -
 Melbourne Tram Museum
Photograph - Black and White - Flinders and Market Streets H crossing
... of Market and Flinders Street Melbourne. tramways trams H crossing ...Photograph shows the H crossing (where two sets of tracks cross each other) at the intersection of Market St and Flinders St which consisted in the north - south direction cable tram slot rails. Date of removal and replacement to be determined. Date and photographer not recorded.Yields information about H crossing at the intersection of Market and Flinders Street Melbourne.Black and White - Flinders and Market Streets H crossingtramways, trams, h crossing, cable trams, flinders street, market street -
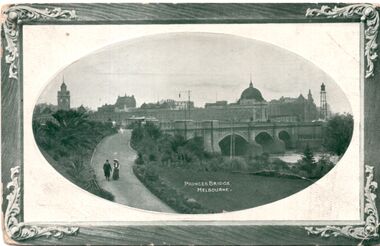 Melbourne Tram Museum
Postcard, Marlborough Art Series, Princes Bridge Melbourne, 1910
Photograph of Princes bridge Melbourne with one cable tram set crossing. In the background is the then new Flinders Street station building. Note the clock on the right hand side of the photograph that was later transferred to Spencer Street station. Yields information about Princes Bridge in 1910.postcard - decorative border with a photo of Princes Bridge within an oval - embossed. On the rear is a letter dated 21/12/1910. Card by Marlborough Art Series.See note on rear.tramways, trams, yarra river, princes bridge, cable trams, flinders street station, clocks -
 Ballarat Tramway Museum
Slide - Set of three slides - Sebastopol line, Paul Jenkins, September 1971
Set of three colour slides showing Ballarat tram 12 inbound in Albert St Sebastopol. The 3rd slides shows the tram crossing the road.Demonstrates tram operations on the Sebastopol line prior to closure.Set of three Kodachrome cardboard slides."Last Tram"tramways, ballarat, trams, tram 12, albert st., sebastopol -
 Melbourne Tram Museum
Negative - Copy - Flinders St Station and trams, 4-9-1926
Copy negative of a photograph of Flinders St station building, at Swanston St with two W class trams crossing Flinders St, a cable tram in Flinders St and a horse drawn cab. The Station is advertising Dried Fruits Week and Pasteurised Milk is "Safe" Milk. The top of the negative has written in ink "Flinders St Stn Melbne 4-9-26" . The Swanston cable tram was replaced by an electric tram in Jan. 1926 and Flinders St cable trams during 1927.Yields information about Flinders St station during 1926.Copy negative of a black and white photographtramcars, tramways, flinders st station, flinders st, swanston st, w class, cable trams, milk, dried fruit -
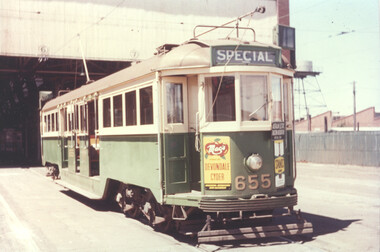 Melbourne Tram Museum
Photograph - Set of five colour prints - last day of Footscary - AETA tour, 10/2/1962
Colour prints show the trams used by the AETA (Australian Electric Traction Association) on 10/2/1962 to mark the closure of the local routes at Footscray. 1 - W3 655 at South Melbourne depot 2 - W3 655 shunting at Moonee Ponds Junction 3 - W4 670 followed by W3 655 crossing the Maribyrnong Road Bridge. 4 - The two trams at Footscray Station 5 - At Footscray tram depot with local cars. See item 3992 for other photographs. Yields information about the AETA tour to mark the closure of the Footscray local system. Set of five Colour print on Kodak Royal paper.trams, tramways, w3 class, w4 class, tram 655, tram 670, footscray, maribyrnong road, moonee ponds junction, south melbourne depot -
 Ballarat Tramway Museum
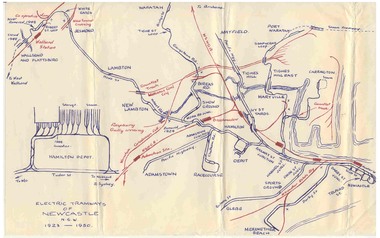
Map, Ken McCarthy, Electric Tramways of Newcastle 1923 - 1950, c1960
Hand drawn red and blue biro map of Newcastle electric tram lines - period 1923 - 1950, showing principal railway lines, tram tracks, crossovers depot layout, level crossings on plain foolscap paper.trams, tramways, newcastle, steam trams, trams, map -
 Ballarat Tramway Museum
Photograph - Colour Photograph/s - set of 28, Warren Doubleday, 11/03/2002 12:00:00 AM
Set of 28 photographs of the operation of the BTM during the Begonia Festival, including the loading of the Horse Tram for Melbourne on Sunday 10/3/2002, operation in Melbourne on 11/3/2002 and reloading in Bourke St. Taken by Warren Doubleday, on Kodak paper. 2013.1 - Tram 671, Wendouree Parade, 10/3/2002 at Depot Junction .2 - 33 at Loop .3 - 40 and 33 south of the loop, heading for Carlton St. .4 - ditto .5 - 671 returning to the loop from St. Aidans Drive .6 - 40 returning to the loop from Carlton St. .7 - 33 ditto .8 - Loading horse tram at Depot Junction - Alastair Reither .9 - ditto .10 - in St. Kilda Road, 11/3/2002 at about 7.30am .11 - ditto .12 - Tram in Moomba parade, 11/3/2002 - Reg Smith, Len Millar - horse Bear. .13 - ditto .14 - ditto .15 - ditto, after passing with the Ned Kelly's. .16 - ditto - and John Clowes on rear platform .17 - the line up near Bourke St. with V214 behind the horse tram - "Tram Stop Ahead" sign .18 - the line up from Bourke St. with Hawthorn 8 alongside. .19 - Being photographed - Arthur Cook, Roma Cook, Merle Clowes and John Clowes with other visitors .20 - ditto .21 - Malcolm tram, and BTM ten in the background .22 - BTM and Sydney Tramway Museum tent in the City Square area. .23 - Pushing the horse tram across Bourke St. - John Clowes. .24 - Loaded back on the Crane Heavy Haulage (Associated Towing) truck, looking north along Swanston St. .25 - ditto .26 - ditto, general scene in Swanston St. .27 - The towing truck and tram .28 - Hawthorn 8 and Milan 1692 crossing Bourke St. Negatives held on file with documents list.horse trams, depot junction, moomba, gardens loop, swanston st, tram 1, tram 33, tram 40, tram 671, tram 8, tram 214, tram 1692 -
 Ballarat Tramway Museum
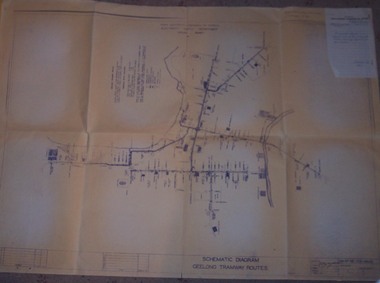
Drawing, State Electricity Commission of Victoria (SECV), "Schematic Diagram Geelong Tramway Routes", 1953
The drawing is very detailed showing streets, cross streets, route, loops, schools, woollen mills, ovals, sections, track phones, stops, route and track miles, pedestrian crossings, railway stations and notes on through route mileages.Print of a drawing showing in very good detail, the schematic layout of the Geelong Tram system. Produced in 1953 and sent to Tramway Supt. in 1970 for his records. Gives very detailed information on another SEC tramway system.Dyeline print of SEC Drawing No. GE-T13-8829, titled "Schematic Diagram Geelong Tramway Routes". Drawing prepared 27/8/1953. Stapled to the top right hand corner of the sheet is a SEC memo form from finance section, distribution services to the Dept. Tramway Superintendent, Ballarat, dated 6-2-1970 forwarding Les Denmead the plan. Was unstapled during the 1/2008 copying of the drawing. On top right hand corner of drawing, "Ballarat Tramway Preservation Society Catalogue No. 605" in ink and on rear in two places "Geelong Tramways" and one "BTPS 605"geelong, map, track layout, tram stops -
 Ballarat Tramway Museum
Photograph - Digital image, Peter Bruce, "No. 26 Sturt and Grenville", 1970s
Yields information about the bottom end of Sturt St and the Victoria St route.Digital image, black and white, of No. 26, at the bottom of the Sturt St hill prior to crossing Grenville St, enroute to Victoria St. Note the conductor talking to the driver. Owen Williams, ANZ and Crockers in the view. Photo taken by Peter Bruce 1970's and 1971, prior to the closure of the Ballarat tramway system. Peter's Title of image: "No. 26 Sturt and Grenville"trams, tramways, sturt st, grenville st, victoria st, tram 26 -
 Ballarat Tramway Museum
Photograph - Digital image Set of 3, Peter Bruce, 1970s
Yields information about the highway crossing Albert St Sebastopol from both sides.Digital image, black and white, set of three images of No. 41 crossing Albert St Sebastopol. .1 - No. 41 southbound, before crossing Albert St. .2 - ditto, after crossing Albert St .3 - No. 41 on return, north bound. Note the pole with directions for Mt Clean, Sebastopol Gun Club. Photo taken by Peter Bruce 1970's and 1971, prior to the closure of the Ballarat tramway system. Peter's Title of image: "No. 41 at the Highway"trams, tramways, albert st, sebastopol, tram 41 -
 Ballarat Tramway Museum
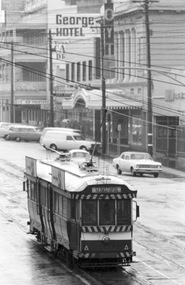
Photograph - Digital image, Peter Bruce, "No. 41 Mair St", 1970s
Yields information about Lydiard St between Mair and Sturt St.Digital image, black and white, of No. 41 southbound in Lydiard St after crossing Mair St with the George Hotel and Hoyts theatre in the background. The tram has the destination of Sebastopol. Photo taken by Peter Bruce 1970's and 1971, prior to the closure of the Ballarat tramway system. Peter's Title of image: "No. 41 Mair St"trams, tramways, mair st, lydiard st nth, tram 41 -
 Ballarat Tramway Museum
Photograph - Digital image Set of 11, Stuart Loddington, 10 images of Ballarat trams prior to closure, 1971
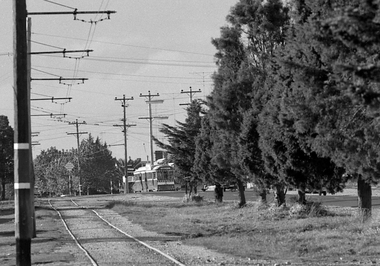
... system. Trams tramways Ballarat Level Crossings Buninyong Railway ...Yields information about Ballarat Tramways and trams prior to the closure of the tramway system.Set of 11 digital images, comprising 1 donation text image and 10 images of Ballarat trams prior to closure, scanned from original slides by Stuart Lodington, 1971 prior to closure of the system. .1 - Donation text slide. .2 - No. 26 southbound in Lydiard St North, with the Ballarat Railway Station level crossing gates in the background. .3 - No. 27 and 30 crossing at Bell St Loop, Skipton St. (see also btm4976i4) .4 - No. 17 Wendouree Parade, near Gardens Loop .5 - Single truck tram at Victoria St terminus, taken from the west side of the Buninyong Rail line bridge, with CRB Roadwork sign, Eureka Caravan Park and Meagher Hotel in the background, possibly No. 11, see entry for .10 .6 - No. 12 and 30 crossing at the Urquhart St Loop, Drummond St South. .7 - No. 12 westbound in Sturt St, with Grenville St in the background. .8 - No. 17 at Gardens Loop with the Trolley pole being reversed. .9 - No. 30, Lydiard St North with Reid's Palace building in the background. .10 - No. 11 passing over the Buninyong rail line bridge, with Gardens via Sturt St West and a Twin Lakes sign. Has a number of children alongside the driver. .11 - No. 21 heading northbound in Wendouree Parade, Gardens, just to the north of the now BTM depot junction.trams, tramways, ballarat, level crossings, buninyong railway, lydiard st north, bell st, victoria st, wendouree parade, gardens, drummond st, sturt st, tram 26, tram 27, tram 30, tram 17, tram 12, tram 21, tram 11 -
 Ballarat Tramway Museum
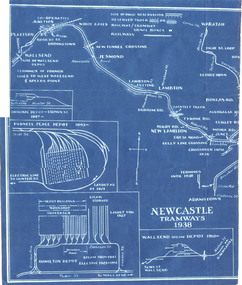
Drawing, "Newcastle Tramways 1938", 1938
Blue print drawings titled ""Newcastle Tramways 1938" printed on two sheets showing the track layout for the Newcastle Tramways in 1938 Has depot layouts, railway crossings, street names and major waterways. From the Wal Jack Collection. No details of made them.wal jack, newcastle, track layout -
 Ballarat Tramway Museum
Drawing, "Sydney Tramways 1948", 1948
Set of four Blueprint drawings titled ""Sydney Tramways 1948" showing the track layout for the Sydney Tramways. Has depot layouts, railway crossings, street names and major waterways. Does not show the Manly tramway system. From the Wal Jack Collection. No details of who made them.wal jack, sydney, track layout -
 Ballarat Tramway Museum
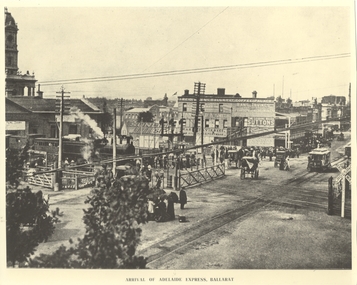
Photograph - Black & White Photograph/s, Lydidard St level crossing and a picnic train, c1905 to 1906
... the Lydiard St level crossing. trams tramways Railway Station Lydiard ...Yields information about the Lydiard St level crossing.Black and white photograph of No. ESCo No. 10 about to cross the Lydiard St level crossing. Photo has the title of "Arrival of Adelaide Express, Ballarat", which is not correct for the trains consist - more like a picnic special - this photo has been written up somewhere. D class loco, with two six wheel carriages behind the locomotive. Group of women with umbrellas (sun) waiting for the tram. Horse drawn carts, interlocked gates, signals prior to resignalling of the post and railway level crossing signs. In the background is Reids Coffee Palace, advertising Sunlight soap, Suttons Music, Pearson's Hard soap, Hans Irvines Champion Wines and Standard & Smith.trams, tramways, railway station, lydiard st north, reids coffee palace, esco, tram 10 -
 Ballarat Tramway Museum
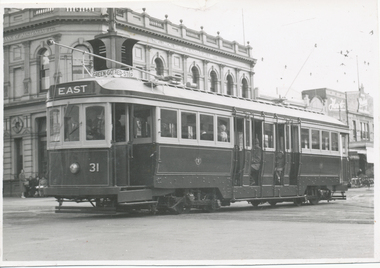
Photograph - Black & White Photograph/s, 13/05/1947 12:00:00 AM
Black and White print contained within the Wal Jack Bendigo and Geelong Album, see Reg Item 5003 for more details. Photo of Car No. 31, crossing Ryrie and Moorabool Streets, first bogie to run in Geelong. Photo taken 13-5-1947. The tram has the destination of East. In the background is "The Union Bank of Australia. Limited". Above the front of the tram is a set of "Bar" traffic lights with signage "Green - Go - Red - Stop" No details on photographer. Has the Union Bank of Australia. Limited building in the background.trams, tramways, geelong, ryrie st, moorabool st, bogie trams, traffic lights, tram 31 -
 Ballarat Tramway Museum
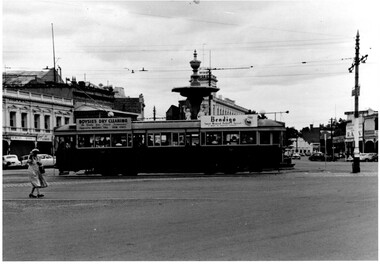
Photograph - Black & White Photograph/s, Bendigo 18 crossing Charing Cross, late 1950's
Black and White photograph, of Bendigo 18 crossing Charing Cross en route to Eaglehawk. Has roof ads for Boysies Dry Cleaning and Bendigo Sweet Mustard, Pickles spread. In the background is the fountain, Club Hotel, RACV and Neilors Wines Hotel? Printed on Fujicolour paper. Two copies held. "TMSV Sales" stamp on rear. On rear of in ink "PM & MM E45 = Bend 18" trams, tramways, bendigo, charing cross, tram 18 -
 Ballarat Tramway Museum
Slide - 27 mm sq slide/s - set of 9 - Victoria St and crews, Lilian Butler, Aug. 1971
Yields information about the streetscapes of Ballarat on the Gardens to Victoria St route and in particular buildings and people that crewed the trams.Set of nine Colour 27 x 27 mm slide in a Kodachrome cardboard mount. .1 - R. Williams (Motorman) and Danny Powell (badge 30) standing in front of a tram at Victoria St. The tram has the destination of Gardens via Sturt St West. .2 - view of No. 113 Victoria St - now Ardenlee B&B. .3 - Sunshine Biscuit Factory .4 - Mack's Hotel .5 - Stones Corner - intersection of Victoria and Mt Pleasant routes .6 - Crossing Grenville St .7 - No. 30 at the City terminus, Lydiard St with Racey's and the SEC office in the background. .8 - as for .5, but looking east with the Caltex service station in the background. .9 - No. 30 at the Victoria St terminus. Slide mount date August 1971. Photo from the collection of Lilian Butler.ballarat, tramways, trams, victoria st, bridge st, stones corner, tram 30 -
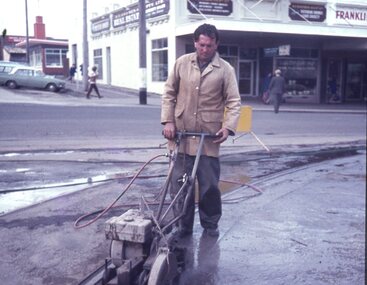 Ballarat Tramway Museum
Slide - 27 mm sq slide/s - set of 7 - track removal, Lilian Butler, c1971 to 1972
Series of 7 photos showing track removal following the closure of the Ballarat Tram system.Yields information about the removal of the tram tracks in the city area.Set of 7 colour slides - 1 x Agfa blue and white plastic slide mount, 4 Hanimex cardboard mounts and 2 Kodachrome cardboard mounts of track removal works in Ballarat, c1971 to 1972 .1 - Saw cutting the road pavement at the Dawson St Crossover. .2 - Rolling the crushed rock pavement in Sturt St after track removal - near Doveton St. .3 - Track repairs or starting to remove the railway crossing at Lydiard St North - has an SEC truck in the background and the Kennedy Murray Pty Ltd General Carriers building in the background. .4 - commencing work on the Dawson St Crossover removal with St Patrick's Cathedral in the background. .5 - as for .2 .6 - L. G. Pearce excavating track near Dawson St. .7 - ditto Photo from the collection of Lilian Butler. ballarat, tramways, trams, track removal, dawson st, trackwork, sturt st, level crossings, lydiard st north