Showing 1324 items matching "tram terminus"
-
 Ballarat Tramway Museum
Photograph - Black & White Photograph/s, Richard Gilbert, c1976
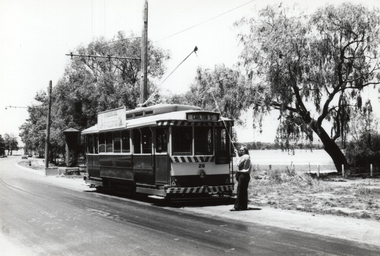
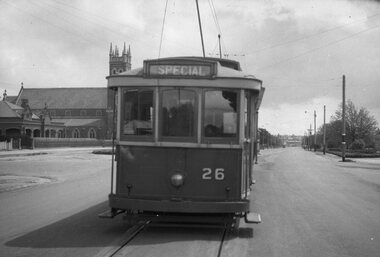
... the trolley pole on No. 26 at the St Aidans drive terminus c1976... terminus prior to closure. Trams tramways BTPS St Aidans Drive tram ...Has a strong association with Richard Gilbert and yields information about the St Aidans Drive terminus prior to closure. Black and white photograph of Richard Gilbert reversing the trolley pole on No. 26 at the St Aidans drive terminus c1976. The tram has been fitted with a blind extension showing Carlton St. trams, tramways, btps, st aidans drive, tram 26 -
 Ballarat Tramway Museum
Negative, Wal Jack, late 1930's
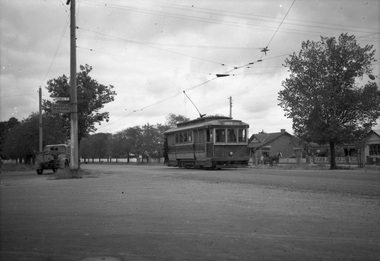
... Ballarat 's tram operations and the Victoria St terminus. Trams ...Yields information about Ballarat 's tram operations and the Victoria St terminus.Negative and Digital image of the Wal Jack Ballarat Negative file of No. 20 at the Victoria St terminus. A crewman is about to step from the car. In the distance is a horse drawn cart delivering - possibly bread or milk. The tram has the destination of Gardens via St west. The trolley pole is yet to be turned. Shows the overhead arrangements. trams, tramways, victoria st, horse drawn vehicle, tram 20 -
 Ballarat Tramway Museum
Photograph - Colour Photograph/s - mounted, 17/02/2003 12:00:00 AM
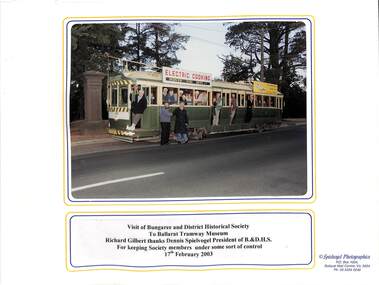
Colour photograph, mounted in a white card board folder with a title block. Title - "Visit of the Bungaree and District Historical Society to the Ballarat Tramway Museum". Group photo of the tour group looking out the windows of No. 40 at the Carlton St terminus. Taken 17/2/2003. Has Richard Gilbert and Dennis Spielvogel in front of the tram. Produced by Spielvogel Photographic.trams, tramways, btm, tram tours, carlton st, bungaree historical society -
 Ballarat Tramway Museum
Photograph - Digital image, John Ward, 18/08/1971 12:00:00 AM
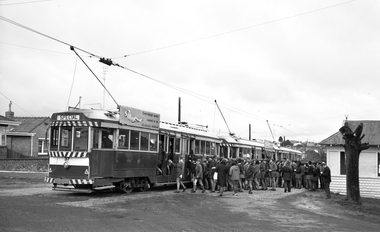
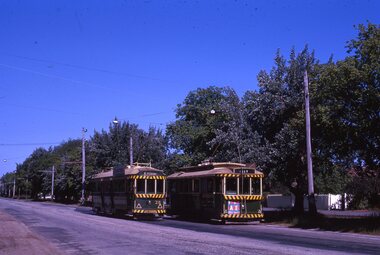
Yields information about the use of trams for school tours prior to closure of the Ballarat system.Digital image of trams 37, 41 and 40 loading school children at the Lydiard St North on a tour prior to the closure of the tramway. Photo by John Ward 18 August 1971. Slide title "04678 180871 7169-G SECV bogie trams 37, 41 & 40 with school children terminus Lydiard St North Ballarat Vic"trams, tramways, schools, tours, special trams, lydiard st north, tram 37, tram 41, tram 40 -
 Ballarat Tramway Museum
Photograph - Digital image, John Ward, 1/02/1971 12:00:00 AM
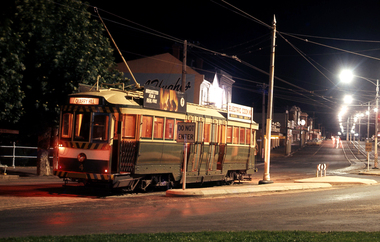
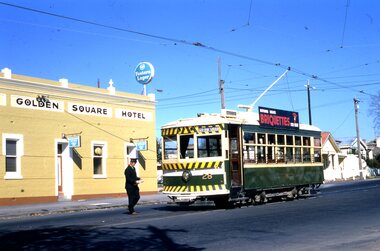
... Digital image of Bendigo 4 at the Eaglehawk terminus... at the Eaglehawk terminus at night. Tram has the destination of Quarry Hill ...Digital image of Bendigo 4 at the Eaglehawk terminus at night. Tram has the destination of Quarry Hill and has two SEC roof adverts, including one for briquettes. Photo is looking along High St Eaglehawk. Photo by John Ward 1 February 1971 Slide title "00816 010271 SEC bogie tram 4 night time at terminus Eaglehawk Bendigo"trams, tramways, bendigo, eaglehawk, high st, night photo, tram 4 -
 Ballarat Tramway Museum
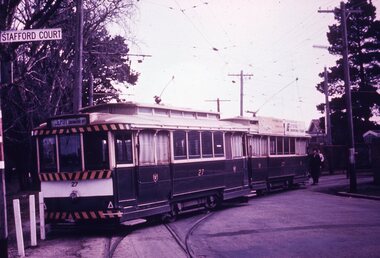
Photograph - Black & White Photograph/s, Andrew Howlett, c1971
... the appearance of the Lydiard St North terminus. Trams tramways Lydiard ...Yields information about the appearance of the Lydiard St North terminus.Black and White photograph print of tram 27 at the Lydiard St North terminus, looking towards the Cemetery. Tram has the destination of Sebastopol and has a Twin Lakes sign.trams, tramways, lydiard st north, cemetery, tram 27 -
 Ballarat Tramway Museum
Photograph - Black & White Photograph/s, Andrew Howlett?, c1971
Yields information about the appearance and operation of the main tram stop in the City in Sturt St prior to closure.Black and White photograph print of tram 42 and another bogie car at the City terminus, south side of Sturt St, c1971. Tram has the destination of Sebastopol. The Ballarat Post Office is in the view.trams, tramways, sturt st, tram 42 -
 Ballarat Tramway Museum
Negative, Wal Jack, 14/03/1949 12:00:00 AM
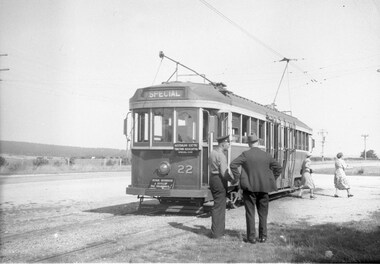
... and the appearance of the Sebastopol terminus. Trams tramways AETA Tours ...Yields information about the use of the bogie cars on a tour for the AETA and the appearance of the Sebastopol terminus.Negative and Digital image of the Wal Jack Ballarat Negative file of No. 22 at the Sebastopol terminus running an AETA special, mid to late 1940's. Note the lack of housing behind the tram. Dated by G.Cleak - 14.3.1949 - Labour Day. Reg item 6764 has a photo of No. 22 at the depot.trams, tramways, aeta, tours, sebastopol, tram 22 -
 Ballarat Tramway Museum
Negative, Wal Jack, late 1945 early 1946
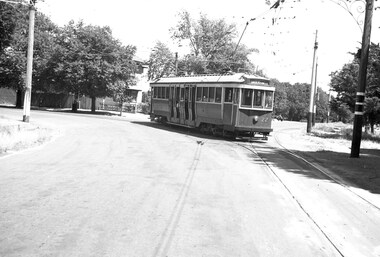
Yields information about the appearance of the ex Melbourne bogie trams during the initial period of operations in Ballarat and the appearance of the View point terminus. Rare view showing the sunblinds drawn.Negative and Digital image of the Wal Jack Ballarat Negative file of bogie car, 22 turning from Wendouree Parade into Macarthur St, View Point, late 1945 or early 1946 - tram has the destination of Gardens via Sturt St West (incorrect). Tram appears to have most of the windows open and the sunshades drawn.trams, tramways, wendouree parade, macarthur st, view point, tram 22 -
 Ballarat Tramway Museum
Negative, Wal Jack, mid to late 1940's
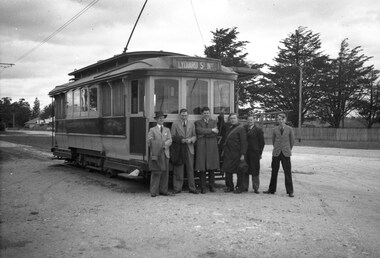
Has a strong association with those people featured in the photograph - a possible private tour group, c1946/47.Negative and Digital image of the Wal Jack Ballarat Negative file of six tramway enthusiasts standing at the end of either No. 17 or 27 at the Sebastopol terminus, mid to late 1940's. The Tower truck is alongside the tram. The second person from the left as advised by Paul Nicholson 26/3/2020 is Mike Ronald, centre is possibly David Burke, 4th person from the left is Noel Gipps or Leon Marshall Wood, Richard Gilchrist and the person on the left could be Ronald E Murray from NSW See Reg item 7602 for the same group on No. 33 at the depot.trams, tramways, sebastopol, enthusiasts, tours, tram 27? tram 17? -
 Ballarat Tramway Museum
Slide - 35mm slide/s, Robert Thomson, 21/04/1962 12:00:00 AM
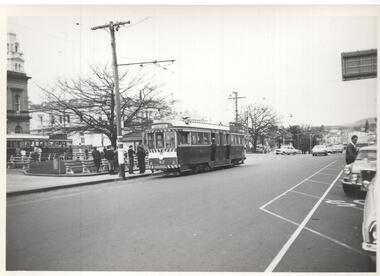
Yields information about Ballarat's trams during 1964 and the Victoria St terminus and an AETA Convention tour.Kodachrome cardboard mount, colour slide of trams 18 and 37 at the Victoria St terminus, during the AETA Convention tour of 21-4-1962. Tram, 18 has adverts for The Age, Lancashire's store at 94-98 Bridge St and a Whites Florist and No. 37 and SEC Electric Cooking advert and the AETA tour sign."AETA Convention 21-4-62" in ink.tramways, trams, victoria st, aeta, aeta tour, tram 18, tram 37 -
 Ballarat Tramway Museum
Slide - 35mm slide/s, Robert Thomson, 21/04/1962 12:00:00 AM
Yields information about Ballarat's trams during 1964 and the Lydiard St North terminus and an AETA Convention tour.Kodachrome cardboard mount, colour slide of trams 18 at the Lydiard St North terminus, running a Special service."AETA Convention 21-4-62" in ink.tramways, trams, lydiard st north, aeta, aeta tour, tram 18 -
 Ballarat Tramway Museum
Slide - 35mm slide/s, Robert Thomson?, 27/03/1964 12:00:00 AM
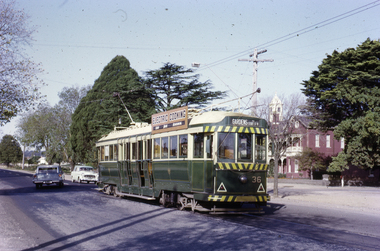
Yields information about Ballarat's trams during 1964 and the Victoria St terminus. Has the Orphanage in the background.Ilford cardboard mount, colour slide of No. 36 at the Victoria St terminus, 27.3.1964 with the original orphanage building in the background. Tram has the destination of Gardens via Sturt St west and an electric cooking roof advert."Bogie 36. Victoria St ter. No. 38, 27.3.64" in ink."tramways, trams, carlton st loop, tram 36 -
 Ballarat Tramway Museum
Slide - 35mm slide/s, Robert Thomson, c1964
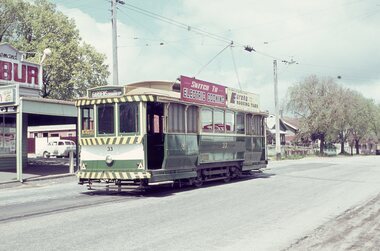
... Ballarat's trams during 1964c, the Mt Pleasant terminus. Tramways ...Yields information about Ballarat's trams during 1964c, the Mt Pleasant terminus.AGFA blue / white plastic mount, colour slide of No. 33 at the Mt Pleasant terminus, c1964. In the background are the shops advertising Robur Tea, Women's Weekly, The Age, and coca Cola. The tram has a Twin Lakes sign. image i2 - cleaned up by PCW - 22-9-2022tramways, trams, mt pleasant, barkly st, tram 33 -
 Ballarat Tramway Museum
Slide - 35mm slide/s, Robert Thomson, c1966
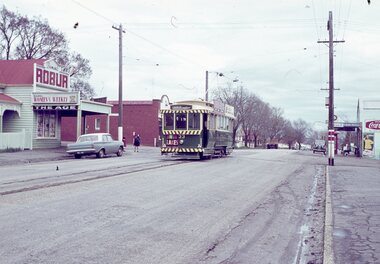
... Ballarat's trams during 1966c, the Mt Pleasant terminus. Tramways ...Yields information about Ballarat's trams during 1966c, the Mt Pleasant terminus.AGFA blue / white plastic mount, colour slide of No. 33 at the Mt Pleasant terminus, c1966 - still has the white on black destination roll. In the background are the shops advertising Robur Tea, Women's Weekly, The Age, and Coca Cola. The tram has Eureka Roofing and Electric Cooking roof adverts.tramways, trams, mt pleasant, barkly st, tram 33 -
 Ballarat Tramway Museum
Slide - 35mm slide/s, Robert Thomson, c1966
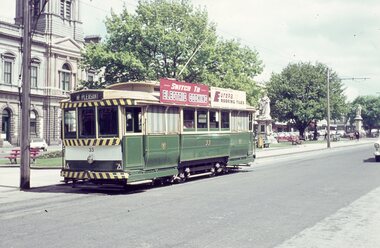
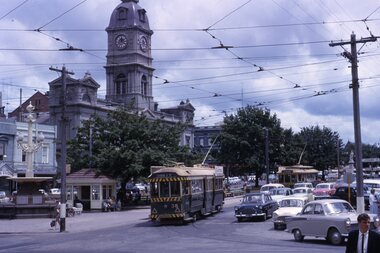
... Ballarat's trams during c1966 and the City terminus. Tramways trams ...Yields information about Ballarat's trams during c1966 and the City terminus.AGFA blue / white plastic mount, colour slide of No. 33, c1966, in Sturt St at the City or Lydiard St North stop. The Town Hall is in the background. Tram has the destination of Mt Pleasant and has the white on black destination roll. Has roof adverts for Electric Cooking and Eureka Roofing Tiles.tramways, trams, sturt st, town hall, tram 33 -
 Ballarat Tramway Museum
Negative, Wal Jack, late 1940's?
... the Victoria St terminus and the trams used. Trams tramways Victoria St ...Yields information about the Victoria St terminus and the trams used.Negative and Digital image of the Wal Jack Ballarat Negative file of No. 26 west bound (showing Special) nearing the King St Loop in Victoria St. There is another tram in front of 26 and another tram in the loop. Has the St Alipius church in background. See Reg Item 7645 - likely to have been taken at the same time.trams, tramways, victoria st, king st, tram 26 -
 Ballarat Tramway Museum
Photograph - Colour Photograph/s, Austin Brehaut, Mar. 1999
Set of 23 photographs taken by Austin Brehaut during March and April 1999 of power poles along the former tram routes that still have signs of the former tram stops. An accompanying note (scanned) written by Austin Brehaut is reproduced below in Other Information - see related documents. 1096.1 - Sturt St at Doveton St., south (down) side. .2 - Drummond St. Sth (east side) outside St. Patrick's School between Dana and Eyre St. .3 - Drummond St. Sth, cnr Urquhart St. (east side) .4 - Drummond St. Sth, cnr South St. (east side) .5 - Drummond St. Sth, cnr Sebastopol St. (east side) .6 - Drummond St. Sth, cnr Latrobe St. (east side) .7 - Drummond St. Sth, cnr Darling St. .8 - Sturt St. cnr Ripon St. (North East side) .9 - Ripon St. Nth, cnr Sussex St. .10 - Ripon St. Nth, cnr Mair St. (South West Corner) .11 - Ripon St. Nth, cnr Mair St. (North East Corner) .12 - Macarthur St. cnr Burbank St. (up side) .13 - Lydiard St. Nth, cnr Clarendon St. (east side) .14 - Lydiard St. Nth, cnr Howard St. (west side) .15 - Lydiard St. Nth, cnr Gregory St. (west side) .16 - Lydiard St. Nth, cnr Howitt St. (west side) .17 - Lydiard St. Nth, near Walker St., (east side) .18 - Lydiard St. Nth, cnr Landsborough St. (east side) .19 - Barkly St. cnr Main Road (up side) .20 - Barkly St. near Haymes Cres (down side) .21 - Barkly St., near Young St. (down side) .22 - Barkly St, Cameron St (up side) .23 - Barkly St., at Cobden St. terminus (west side) .1 - April 99, .2 > .10, 9/3/99, .11 > .18 - March 1999, .19 > .23 - April 1999. See also Reg. Item 768.1 > 768.6 for another group of tram stop photos in Drummond St. in 1997. On Fujifilm paper.On rear of each photo in blue ink is location at date at the top of the photo and in the bottom right hand corner - initials "APB"tram stops, power poles, barkly st., lydiard st. nth, ripon st., sturt st., drummond st. sth -
 Ballarat Tramway Museum
Slide - 35mm slide/s - set of 7, Noel Simons, 22/11/1962 12:00:00 AM
Set of 7 Kodachrome transparencies taken on 22/11/1962. 1161.1 - trams 38 and 20 in Sturt St. West at the Russell St. loop. No. 20 has possibly terminated and is showing "CITY" while 38 is showing "Mt Pleasant" Both trams fitted with dash canopy lighting, but no large white stripe. 20 has a Twin Lakes sign. 1161.2 - tram 33 just before Gardens Loop in Wendouree Parade, with destination of "Victoria St." Has a Twin Lakes sign. 1161.3 - tram 39 at corner of Lydiard St. North and Sturt St. with Post Office in background. 1161.4 - tram 40 turning from Sturt St into Lydiard St. North with Post Office in background and showing destination of Lydiard St. North. A blue Holden with red stripes for the Radio Cabs co. is in the foreground, along with pedestrians. 1161.5 - tram 41 in Sturt St. at the City terminus, showing destination of Mt Pleasant with Post Office and ANZ Bank buildings in background. Numerous people waiting on the seats at the tram stop. 1161.6 - tram 13 in Sturt St. near Doveton St. showing destination of Bell St. Many cars and pedestrians on the south side of Sturt St. Note the Austin motor car by the tram showing a stop signal. Tram 13 has a Twin Lakes sign. 1161.7 - trams 13, 26, and 39 in the City Loop near Bridge St. Has Morseheads and Grenville St. tram shelter in the background.1161.1 - "38 and 20 crossing in Sturt St. Ballarat near Russell Street" - in blue and black ink. The "Russell St" is a later addition, over white out. 1161.2 - "33 near Botanic Gardens terminus, Wendouree Parade, Ballarat" 1161.3 - "No. 39 in Lydiard St. Ballarat at Cnr. of Sturt St." 1161.4 - "No. 40 entering Lydiard St. from Sturt St. Ballarat" 1161.5 - "No. 41 in Sturt St. Ballarat at cnr of Lydiard St." 1161.6 - "No. 13 in Sturt St. Ballarat, at Cnr. of Doveton St." 1161.7 - "Nos. 13, 26, and 39 in Sturt St. Ballarat near Bridge St." All have date stamp of "22 Nov. 1962" in purple ink. All black ink unless otherwise noted.tramways, trams, ballarat, sturt st. west, wendouree parade, lydiard st., city loop, taxis, radio cabs, tram 13, tram 20, tram 26, tram 33, tram 38, tram 39, tram 40, tram 41 -
 Ballarat Tramway Museum
Slide - 35mm slide/s - set of 14, Noel Simons, 23/11/1962 12:00:00 AM
Set of 14 Kodachrome transparencies taken on 23/11/1962. 1162.1 - tram 38 turning into Lydiard St. North from Sturt St. with tram 20 in background. Many motor vehicles in photo. 1162.2 - as above, but a minute of so later. Has Mutual Life building in background as well as Town Hall. 1162.3 - No. 40 entering Albert St. from Skipton St. outbound to Sebastopol. 1162.4 - No. 40 near start of side of the road running in Albert St. heading to Sebastopol. 1162.5 - No. 40 at the City terminus, on the South side of Sturt St. Has Town Hall and other buildings along the south side of Sturt St. in the background. 1162.6 - No. 40 at Sebastopol terminus - shows arrangement of the signs at the terminus. 1162.7 - No. 40 and No. 38 crossing at loop between Sayle and Grey St. No. 40 inbound. 1162.8 - No. 40 turning from Drummond St. South to Sturt St. at Hospital Corner with Southern Cross Hotel in background. 1162.9 - No. 18 in Wendouree Parade near Forest St. heading east with destination of "Victoria St." 1162.10 - Nos 41 and 39 at Depot Junction. Both trams have SEC ads. 1162.11 - No. 39 turning into the depot from Wendouree Parade - showing destination of "Gardens via Drummond Nth" 1162.12- No. 17 at Lydiard St. North terminus, showing destination of "Grey St. Sebas". Has a Twin Lakes sign 1162.13 - ditto, but with trolley pole turned around. Has SEC Briquettes roof ad and Whitehorse whiskey ad on rear dash panel. 1162.14 - No. 40 outbound to Sebastopol crossing Albert St. 1162.1 -"Nos. 38 and 20 in Sturt St. Ballarat at corner of Lydiard St." 1162.2 - "No. 38 turns into Lydiard St. as No. 20 waits at stop in Sturt St. Ballarat" 1162.3 - "No. 40 entering Albert St. from Skipton St. Redan on Sebastopol route." 1162.4 - "No 40 at beginning of reserved track on Sebastopol route, Albert St. Redan." 1162.5 - "No. 40 in Sturt St. Ballarat near cnr. of Armstrong St." 1162.6 - "No. 40 at Sebastopol terminus" 1162.7 - "No. 38 and 40 crossing at Sayle St. Loop on Albert St. reserved track, Sebastopol route" 1162.8 - "No. 40 turning into Sturt St. from Drummond St." 1162.9 - "No. 18 in Wendouree Pde. Ballarat near tramway depot" 1162.10 - "No. 41 and 39 outside Ballarat tramway depot, Lake Wendouree in background" 1162.11 - "No. 39 entering tramway depot from Wendouree Parade, Ballarat" 1162.12 - "No 17 at Lydiard St. North terminus, Ballarat North" 1162.13 - "No 17 at Lydiard St. North terminus, Ballarat North" 1162.14 - "No. 40 crossing Albert St. Sebastopol as reserved track switches from left to right of road" All have date stamp of "23 Nov. 1962" in purple ink. All black ink unless otherwise noted.tramways, trams, ballarat, albert st., sturt st., sebastopol, grey st., hospital corner, wendouree parade, depot junction, lydiard st. north, tram 17, tram 18, tram 20, tram 38, tram 39, tram 40, tram 41 -
 Ballarat Tramway Museum
Slide - 35mm slide/s - set of 2, Noel Simons, Nov. 1970
Set of 2 Kodak Ready-mount with slides made from the Association of Railway Enthusiast Provincial Tramways film strip. 1166.1 - No. 31 at the View Point terminus, corner of Wendouree Parade and Macarthur St., shows tram and section arrangements on poles. Also has SEC tramway shelter alongside stop. Tram has destination of "View Point" 1166.2 - No. 38 crossing Albert St. en route to Sebastopol.1166.1 - "No. 21 at View Point terminus. Line of left is that for cars on "Gardens via Drummond St. Nth" route." 1166.2 - "No. 38 crossing Albert St. near Sebastopol terminus" All have date stamp of "Nov. 1970" in blue ink. Writing in blue ink.tramways, trams, view point, wendouree parade, albert st, sebastopol, tram 21, tram 38 -
 Ballarat Tramway Museum
Slide - 35mm slide/s - set of 13, Noel Simons, 28/04/1971 12:00:00 AM
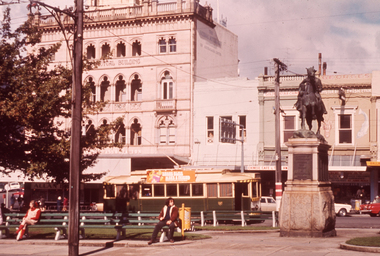
Set of 13 transparencies taken on 28/4/1971 on PAKON mounts. 1168.1 - No. 21 at City terminus - taken from North side of street. Has Boer War statue on right side and National Mutual building in the background. 1168.2 - No. 34 with destination "Sebastopol" in Sturt St., outside Town Hall, with National Mutual building in background. 1168.3 - No. 18 at corner of Sturt and Lydiard Sts with National Mutual building and Craigs Hotel in background. 1168.4 - 18 at intersection of Sturt and Dawson St. 1168.5 - No. 30 at intersection of Armstrong St and Sturt St. with Fletcher Jones building in background. 1168.6 - No. 14 at City Terminus, showing destination of "Victoria St." with Town Hall in the background. 1168.7 - No. 11 bound for Mt Pleasant, opposite Titanic Bandstand in Sturt St. Has a Twin Lakes advertisement on the front dash panel and an unknown roof advertisement. 1168.8 - No. 21 at bottom of Sturt St. approaching the Grenville St. junction, with Dickins Food Store and the Spot Cafe in the background. Tram has destination of "Victoria St". and a roof advertisement for a cigarette? company. 1168.9 - No. 26 and three other trams in City Loop, looking west along Sturt St., just after a heavy hail storm. 1168.10 - No. 21 at the intersection of Sturt St and Dawson St. with Golden City Hotel and the Ritzy Cafe in the background. Can see the Dawson St. crossover track, just after a heavy hail storm. 1168.11 - No. 21 and three other trams at City Loop looking east along the south side of Sturt St. See also image 1168i1a - cleaned up and edited by Peter Waugh April 2024 - used in the April 2024 issue of Fares Please. 1168.12 - No. 14 entering the South side of Sturt St. from Bridge St. with Dickins Store in the background and the Grenville St. shelter alongside the tram. 1168.13 - No. 37 at Sturt and Dawson St., eastbound, showing "Lydiard St. Nth" Has SEC roof advertisement on the side of the tram.1168.1 -"Sturt & Lydiard Sts" 1168.2 - "Town Hall" 1168.3 - "Sturt St & Dawson Sts" 1168.4 - "Sturt and Lydiard Sts" 1168.5 - "Sturt St." 1168.6 - "Sturt and Lydiard Sts" 1168.7 - "Sturt St." 1168.8 - "Bridge St." 1168.9 - "City Loop" 1168.10 -"Dawson & Sturt Sts." 1168.11 - "City Loop" 1168.12 - "Bridge St." All have date stamp of "28 Apr 1971" in purple ink on base. All blue ink unless otherwise noted.tramways, trams, town hall, sturt st., dawson st, armstrong st., grenville st, bridge st., titanic bandstand, tram 11, tram 14, tram 18, tram 21, tram 26, tram 30, tram 34, tram 37 -
 Ballarat Tramway Museum
Slide - 35mm slide/s - set of 9, Noel Simons, Sept. 1971
Set of 9 Kodak Ready-mount with slides made from the Association of Railway Enthusiast Provincial Tramways film strip. Reference Item 2560 details the ARE Film Strip, and provide references to other slides. See also Reg. item 1164. 1174.9 on plain white mount. 1174.1 - Tram 40 North bound for Lydiard St. North at the Railway Gates, with the gates closed. Tram carrying a heavy load of passengers. Railway station building and car park in background. Taken from the signal box. 1174.2 - Tram 12 bound for Gardens, photographed across the median strip plantation near Dawson St. Image i2a - adjusted 9/2021 to remove colour cast. 1174.3 - Tram 43 in bound along Wendouree Parade near Barrett Ave, passing a former tram stop and with "Warning Oncoming Trams" sign mounted on an adjacent pole. See also Reg. item 1172.1 for a photo taken in May 1971. This photo taken after the closure of the Victoria St. line, as the tram stop has been painted out. 1174.4 - Looking along the track to Sebastopol terminus on the west side of Albert St. - telephoto shot showing bogie tram in the far distance. Shows the nature of the track, poles, tram stop frequency and in the fare distance the terminus. Also show the trees that used to be along this section of the track. 1174.5 - No. 42 showing "Special" in Macarthur St. approaching Drummond St. north. Photo taken from under the verandah of a shop on the south side of the street that were many years later to become the Tramcar Restaurant. Note metal fence to cemetery. 1174.6 - Nos. 21 (Sebastopol) crossing 14 (Lydiard St. Nth) at the loop between Sayle and Grey St. Photo taken looking south. 1174.7 - No. 12 bound for Mt Pleasant, in Bridge St. about to stop at the junction for the two routes. Telephoto photo looking west along Bridge St. with many cars in the photo. Very few people on the street itself. 1174.8 - No. 30 and 17 at the City Terminus, on the north side of Sturt St. Taken from the Post Office corner with the Town Hall in the background. 1174.9 - No. 39 inbound along Sturt St. West. with many cars on the road. Bus stop on a pole on the other side of the road.1174.1 - "No. 40 on Lydiard St. North service waits at the level crossing at Ballarat Railway Station." 1174.2 - "No. 12 bound for 'Gardens' seen across the centre plantation in Sturt St." 1174.3 - "Barrett Ave." 1174.4 - "The Sebastopol route near the terminus" 1174.6 - "Nos. 21 and 14 crossing at Sayle St. Loop on Sebastopol route" 1174.7 - "No. 12 at Eastern end of Bridge St." 1174.8 - "Nos. 30 and 17 in Sturt St. at Cnr of Lydiard St." 1174.9 - "No. 39 City bound from 'Gardens" in Sturt St. West" All have date stamp of "Sep 1971" in black ink. Writing in blue ink.tramways, trams, lydiard st. nth, railway crossing, sturt st, wendouree parade, sebastopol, macarthur st., bridge st., sturt st. west, tram 12, tram 14, tram 17, tram 21, tram 30, tram 39, tram 40, tram 42, tram 43 -
 Ballarat Tramway Museum
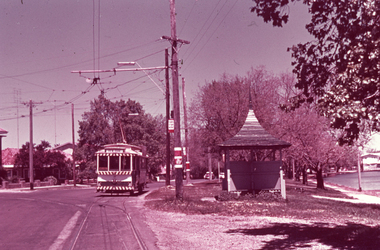
Slide - 35mm slide/s - set of 7, Noel Simons, 1970's
... St and Sturt St., at city terminus showing "Special" and tram... and Sturt St., at city terminus showing "Special" and tram 35 ...Set of 7 transparencies taken undated (appear to be 1970 or 71) on PAKON mounts. Also possibly copy slides as quality is poorish. 1175.1 - No. 27 has derailed at Depot, across Wendouree Parade, and No. 33 appears to be about to try and tow it back on. Wendouree Parade totally blocked. Adjacent pole has tram stop sign and has "Stafford Court" street sign mounted on it. 1175.2 - No. 43 at corner of Drummond St. South and Dana Street, with destination Lydiard St. North. 1175.3 - No. 42 (Mt Pleasant) and 21 (Gardens via Sturt St. West) crossing at Gardens Loop. 1175.4 - No. 42 bound for Lydiard St. Nth at intersection with Macarthur St. Shows the retaining wall for the cutting on the east side of Lydiard St. Nth. 1175.5 - No. 43 at corner of Lydiard St and Sturt St., at city terminus showing "Special" and tram 35 adjacent to Post Office in Lydiard St. Nth. Photo shows the small tram stop pole at this location and Post Office building. 1175.6 - No. 39 and 26 and 27 at the Mt Pleasant terminus. Near closure as a bus stop sign has been positioned on the west side of the road. No. 39 showing destination of "Gardens via Sturt St. West" 1175.7 - Nos 21 and 34 crossing at the Grant St. loop in Barkly St. 21 has destination of Mt Pleasant, while 34, - Gardens via Sturt St. West"All information on typed small white labels, on the top of the slides using black ink. 1175.1 - "27 derailed and 33 at depot" 1175.2 - "43 at cnr Drummond & Dana Sts" 1175.3 - "21 and 42 Gardens Terminus" 1175.4 - "42 at cnr Macarthur & Lydiard" 1175.5 - "43 & 35 at Post Office" 1175.6 - "39, 26 and 27 at Mt Pleasant" 1175.7 - "21 & 34 at Grant St"tramways, trams, wendouree parade, depot, accidents, derailments, drummond st. sth, gardens loop, post office, mt pleasant, grant st., tram 21, tram 26, tram 27, tram 33, tram 35, tram 42, tram 43 -
 Ballarat Tramway Museum
Slide - 35mm slide/s, Noel Simons, 21/11/1962 12:00:00 AM
Set of 6 transparencies taken on 21/11/1962 on Kodak mounts. 1189.1 - Bendigo No.11 at Quarry Hill terminus. Photo taken looking in along the route. Tram has destination of North Bendigo. 1189.2 - No. 21 in Pall Mall bound for North Bendigo. Tram has roof ads for Mamouney's furniture and SEC. In the background are the National Bank building, Dad and Dave's Cafe and the Beehive Buildings and the London Pharmacy. 1189.3 - No. 2 in Mitchell St, just after crossing over railway bridge. Photo taken after tram has passed photographer. Has what appears to be an SEC road works crew in the background. Has destination of Quarry Hill. 1189.4 - No. 17 climbing Mitchell St. on the start of the single track section, just before crossing the railway bridge. Has destination of Quarry Hill and the large Maples building sign in the background. 1189.5 - as for 1189.4 but after tram has passed photographer. Has an Ilford film roof ad and an SEC roof ad. Railway bridge in the background. 1189.6 - No. 21 at Charing Cross with passengers boarding. Tram has destination of North Bendigo and roof ads for SEC 'Electric Cooking' and Sandhurst Milk. In background are the buildings on the south side of High St. Also has a SEC worker in white overalls sweeping the track.Information written on in black ink and date stamped on purple ink. 1189.1 - "Birney car No. 11 in High St. Bendigo at Golden Square terminus" 1189.2 - "No. 21 in Pall Mall Bendigo near Charing Cross" 1189.3 - "No. 2 in Mitchell St. Bendigo, just after crossing bridge over railway line (Quarry Hill route)" 1189.4 - "No. 17 in Mitchell St. Bendigo, climbing the hill the bridge over the railway line. (Quarry Hill route)" 1189.5 - "No. 17 in Mitchell St., Bendigo approaching bridge over Railway line (Quarry Hill route)" 1189.6 - "No. 21 at Charing Cross, Bendigo"tramways, trams, bendigo, golden square, pall mall, mitchell st., quarry hill, tram 2, tram 11, tram 17, tram 21 -
 Ballarat Tramway Museum
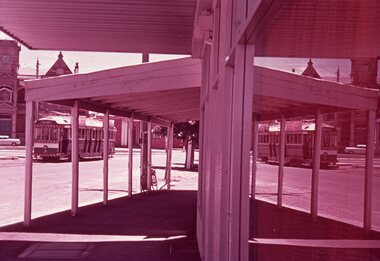
Slide - 35mm slide/s, Noel Simons, Dec. 1971
One slide on a Kodak Ready Mount made from the Association of Railway Enthusiast Provincial Tramways film strip, during December 1971 of Bendigo No. 3 at Eaglehawk terminus with its reflection in a shop window looking through a multi post verandah. Has the Eaglehawk Town Hall in the background."No. 3 and its reflection at Eaglehawk terminus" and "Dec 1971" in purple ink using a hand stamp.tramways, trams, eaglehawk, bendigo, tram 3 -
 Ballarat Tramway Museum
Slide - 35mm slide/s - set of 24, Noel Simons, 20/05/1971 12:00:00 AM
Set of 24 transparencies taken on 20/5/1971 on Kodak mounts. 1195.1 - Bendigo 19 arriving at Charing Cross en route to North Bendigo with Fountain Plaza and the City Family Hotel in the background. No. 19 has two roof ads for the SEC. -'Electricity better for cooking' and 'Everything's under control in my all electric kitchen' 1195.2 - as above, but standing at the Charing cross stop, with the Beehive Stores and other buildings along the east side of Pall Mall in the background. 1195.3 - No 21 ex Golden Square crossing View St. trackwork in front of No. 25 waiting to depart for Quarry Hill. No.21 has two roof ads (as for No.19 in 1195.1) and No.25 has one SEC roof ad and another. Ezywalkin sign in the background, and Fountain Plaza. 1195.4 - as for 1195.3, but after 21 has arrived and 25 left for Quarry Hill. Has Ezywalkin store and the Beehive store in the background. 1195.5 - No. 5 at the Eaglehawk terminus. Photo taken with a cannon in foreground looking along High St. Eaglehawk. Has shops on the west side of High St. in the background. 1195.6 - No. 5 at the Eaglehawk terminus, close up of the rear of the tram - note tow bar arrangement. Has destination of Quarry Hill. 1195.7-Nos.25 and 5 crossing at the Thorpe St. Loop, California Gully. No. 25 bound for Eaglehawk (has SEC Briquette and electric cooking roof ads) and 5 en route for Quarry Hill with a SEC and Cinzano roof ad. 1195.8 - as for 1195.7, but after trams have passed each other. Has Borough Auto Service building in the background. 1195.9 - No. 5 in Mt Korong Road, towards Bamard Street, photo taken after tram has passed photographer. 1195.10 - No. 30 at the Golden Square terminus with the Milk Bar on the right hand side of the photograph. 1195.11 - No. 30 inbound at Fire Station Loop, High St. Golden Square. Has old fire station in the background. Passengers are boarding the tramcar. 1195.12 - No. 30 in High St, bound for North Bendigo between Vine and Wattle Streets. 1195.13 - No. 5 bound for Eaglehawk waits at Iron Bark Gully Loop, at Hayes St. 1195.14 - No. 5 and No. 2 crossing at Iron Bark Gully Loop. 1195.15 - No. 5 bound for Eaglehawk leaving the Manchester Loop, Long gully. 1195.16 - No. 5 passing William Street, Long Gully en route to Eaglehawk. 1195.17 - No. 5 just before the California Gully Crossing Loop. 1195.18 - Nos. 5 and 26 crossing at California Gully crossing Loop. No. 5 heading to Eaglehawk, 26, Quarry Hill. 1195.19 - No. 5 in High St. Eaglehawk with Bob Moyle's Victoria Hotel and the TAB in the background. 1195.20 - No. 5 in High St. Eaglehawk approaching the terminus. Photo taken after the tram has passed the photographer. Has Foodland store and J. Best Fruit supply in the background, along with Eaglehawk Town Hall. 1195.21 - No. 5 at the Eaglehawk terminus, photo taken along seldom used track along High St. 1195.22 - as for 1195.22 - but at the very end of the track. 1195.23 - No. 5 en route for Quarry Hill climbs High St. Eaglehawk with the Victoria Hotel and Eaglehawk Town Hall in the background. 1195.24 - No. 5 and 25 crossing at Jobs Gully Loop. Note 25 has a black on white destination roll, while No. 5 has a white on black destination roll. Information written on in black ink and date stamped on purple ink. 1195.1 - "No. 19 arrives at Charing Cross Bendigo from Golden Square" 1195.2 - "No. 19 about to leave Charing Cross for North Bendigo" 1195.3 - "No. 25 awaiting departure for Quarry Hill, watches No. 21 arrive at Charring Cross from Golden Square" 1195.4 - "No. 21 on North Bendigo service and No. 25 on Quarry Hill run await departure at Charing Cross" 1195.5 - "No. 5 at Eaglehawk terminus" 1195.6 - "No. 5 at Eaglehawk terminus" 1195.7 - "Nos. 5 and 25 crossing at Thorpe St. Loop, California". 1195.8 - "Nos. 25 and 5 crossing Thorpe St. Loop, California Gully". 1195.9 - "No. 5 descending Mt Korong Rd. towards Bamard St." 1195.10 - "Birney car No. 30 at Golden Square terminus" 1195.11 - "Birney car No. 30 in High Street near Thistle Street (Fire Station Loop)" 1195.12 - "No. 30 in High St. between vine and Wattle Streets" 1195.13 - "No. 25 at Hayes Street Loop Iron Bark". 1195.14 - "Nos. 2 and 5 crossing at Hayes Street Loop Iron Bark" 1195.15 - "No. 5 at Manchester Loop opposite Havilah Road, Long Gully" 1195.16 - "No. 5 passing William Street, Long Gully". 1195.17 - "No. 5 at California Gully" 1195,18 - "Nos. 26 and 5 at Thorpe St. Loop, California Gully". 1195.19 - "No. 5 in High St. Eaglehawk". 1195.20 - "No. 5 approaching Eaglehawk terminus" 1195.21 - "No. 5 at Eaglehawk terminus" 1195.22 - "No. 5 at Eaglehawk terminus" 1195.23 - "No. 5 in High St. Eaglehawk" tramways, trams, bendigo, charing cross, eaglehawk, california gully, golden square, iron bark gully, jobs gully, tram 2, tram 5, tram 19, tram 21, tram 25, tram 26, tram 30 -
 Ballarat Tramway Museum
Slide - 35mm slide/s - set of 20, Noel Simons, 21/05/1971 12:00:00 AM
Set of 20 transparencies taken on 21/5/1971 on Kodak mounts. 1197.1 - Bendigo No. 5 en route to Eaglehawk at Creeth St Long Gully. Tram has a SEC roof ad and Cinzano roof ad. 1197.2 - No 5 approaching Needle Loop between Long Gully and California Gully. On left hand side is the City of Bendigo sign, indicating city boundary. 1197.3 - As for 1197.2 but actually entering loop. Photo taken after tram has passed photographer. 1197.4 - No. 26 bound for Eaglehawk descending the railway bridge near Eaglehawk, at Jobs Gully. 1197.5 - as for 1197.4, but after crossing bridge, now ascending a hill. Photo taken after tram has passed photographer. 1197.6 - No. 26 climbing High St. hill Eaglehawk, nearing end of Double track, bound for Quarry Hill. Shows centre of the road poles. 1197.7 - As for 1197.6, with tram entering single track section. Photo taken after tram has passed photographer. Has a BP service station in the background. 1197.8 - No. 26 (bound for Quarry Hill) crossing No. 17 (Eaglehawk) at Job's Gully Loop. 1197.9 - No. 17 climbing railway bridge at Job's Gully, en route to Eaglehawk. Photo taken after tram has passed photographer. 1197.10 - No.26 bound for Quarry Hill, leaving Long Gully Loop? Has the Creeth St. church in l197.l in the far background. Photo taken after tram has passed photographer. 1197.11 - Tramway Point work at the northern end of Long Gully Loop. 1197.12 - No. 17 en route for Quarry Hill turning into View St. from Bamard St. Tram has SEC roof ads "Everything fine in my all electric Kitchen' and 'Electric Cooking is Matchless'. 1197.13 - as for 1197.12, but tram has turned into View St and about to enter the double line track. Photo taken after tram has passed photographer. 1197.14 - No. 21 enters Nolan St after turning from MacRae St. en route to Bendigo. Note sign on its own post noting tram turns "Beware Tram Turns" and stop sign on adjacent pole "Trams stop on Request". No. 21 has two SEC roof ads. 1197.15 - No. 21 in Nolan St. after turning from Bridge St. (White Hills Road). Note signal light for Bridge St. loop on pole corner of street. Photo taken after tram has passed photographer. 1197.16 - No. 2 bound for Eaglehawk at unknown location. 1197.17 - Tram stop sign on a pole "CARS STOP BY REQUEST" 1197.18 - No. 5 in Carpenter St.? en route to Quarry Hill. 1197.19 - No. 28 has just arrive at Golden Square terminus, passengers are disembarking and the trolley pole is being turned. Golden Square Hotel in the background. 1197.20 - No. 28 at Golden Square terminus. Has a "Nothing beats Briquettes for hear roof ad. Information written on in black ink and date stamped on purple ink. 1197.1 - "No. 5 at Creeth St. Long Gully" 1197.2 - "No. 5 approaching Needle Loop between Long Gully and California Gully" 1197.3 - "No. 5 at Needle Loop between Long Gully and California Gully" 1197.4 - "No. 26 crossing railway bridge at Job's Gully near Eaglehawk" 1197.5 - "No. 26 just after crossing railway bridge at Job's Gully near Eaglehawk/ 1197.6 - "No. 26 in High St. Eaglehawk" 1197.7 - "No. 26 at end of double track in High St. Eaglehawk" 1197.8 - "Nos. 26 and 17 crossing at Job's Gully Loop" 1197.9 - "No. 17 crossing railway bridge at Job's Gully near Eaglehawk". 1197.10 - "No. 26 at Long Gully" 1197.11 - 'Northern end of points at Long Gully Loop". 1197.12 - "No. 17 turning into View St. from Bamard St. Bendigo". 1197.13 -'No. 17 at beginning of double track in View St. after leaving Bamard St. Bendigo. 1197.14 - "No. 21 enters Nolan St. from MacRae St. Bendigo." 1197.15 - "No. 21 in Nolan St. Bendigo just after leaving White Hills Road." 1197.16 - "No. 2" 1197.18 - "No. 5" 1197.19 - "Birney car No. 28 at Golden Square Terminus" 1197.20 "Birney car No. 28 at Golden Square Terminus" tramways, trams, bendigo, long gully, railway bridge, jobs gully, trackwork, nolan st, quarry hill, tram stops, golden square, tram 2, tram 5, tram 17, tram 21, tram 26, tram 28 -
 Ballarat Tramway Museum
Slide - 35mm slide/s - set of 2, Noel Simons, 21/05/1971 12:00:00 AM
Set of 2 transparencies taken on 21/5/1971 on Kodak mounts. 1198.1 - Bendigo No. 28 at the Golden Square terminus with the Golden Square Hotel in the background. Driver walking across road to join tram. Tram has a SEC briquettes roof ad. 1198.2 - as for 1198.1 - but further back showing nature of the terminus and the Calder Highway or High St. behind the tram. Information written on in black ink and date stamped on purple ink. 1198.1 - "Birney car No. 28 at Golden Square terminus". 1198.2 - "Birney car No. 28 at Golden Square terminus" tramways, trams, bendigo, golden square, high st., tram 28 -
 Ballarat Tramway Museum
Slide - 35mm slide/s - set of 13, Noel Simons, 24/05/1971 12:00:00 AM
Set of 13 transparencies taken on 24/5/1971 on Kodak mounts. 1200.1 - No. 7 en route to Golden Square turning from Bridge St. into Nolan St. Photo taken after tram has passed photographer. Tram has a briquettes roof ad. 1200.2 - No. 21 in McCrae St. just before Nolan St. Photo taken after tram has passed photographer. 1200.3 - No. 7 in Nolan St at corner with McCrae St. Passenger boarding tram at a tram stop. 1200.4 - No 7 turning from Nolan into McCrae St. with Golden Fleece service station in background. 1200.5 - No. 7 in Thunder St en route to North Bendigo. Photo taken after tram has passed photographer. 1200.6 - No. 5 en route to Eaglehawk just after leaving Needle Loop between Long Gully and California Gully. 1200.7 - No. 5 at the start of the double track in High St. Eaglehawk. 1200.8 - No. 5 at Eaglehawk terminus showing "Depot" with Leo A Hughes Photographer advertisement on building in background. 1200.9 - No. 5 at Eaglehawk terminus. Has two SEC roof ads 'Everything's fine in my all electric kitchen' and 'Electricity best for cooking'. 1200.10 - No. 5 at Eaglehawk terminus, with canon, war memorial outside Town Hall and Leo A Hughes Photographer advertisement on building in background. 1200.11 - No. 5 in McCrae St. about to enter Arnold St. and depot. Tram showing depot, has driver changing points. 1200.12 - No. 5 in Arnold St. Photo taken looking up the centre of the access track - shows the overhead at depot junction. 1200.13 - Depot entrance with signage at depot entrance and depot building in background.Information written on in black ink and date stamped on purple ink. 1200.1 - "No. 7 entering Nolan St. from Bridge St." 1200.2 -"No. 21 in McRae St. about to turn into Nolan St." 1200.3 - "No. 7 in Nolan St. at corner of McRae St." 1200.4 - "No. 7 turning from Nolan St. into McRae St." 1200.5 - "No. 7 in Thunder St. just after turning from Caledonia St." 1200.6 - "No. 5 just after leaving Needle Loop between Long Gully and California Gully. 1200.7 - "No. 5 in High St. Eaglehawk at start of double track." 1200.8 - "No. 5 at Eaglehawk terminus" 1200.9 - "No. 5 at Eaglehawk terminus" 1200.10 - "No. 5 at Eaglehawk terminus."\ 1200.11 - "No. 5 in McCrae St. about to enter Arnold St." 1200.12 - "No. 5 in Arnold St." 1200.13 - "Entrance to Bendigo Tram Depot, No. 5 running into shed."tramways, trams, bendigo, mccrae st, north bendigo, california gully, eaglehawk, depot, tram 5, tram 7, tram 21