Showing 5980 items
matching s. white
-
 Ballarat Tramway Museum
Slide - 35mm slide/s, c1962
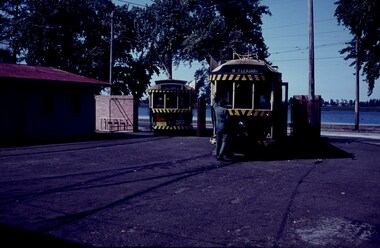
Trams 12 and 35 on depot fan, 12 with Victoria St. destination, 35 with Mt Pleasant. Photo taken from within depot looking towards lake. Both trams have been fitted with lights, but not enlarged white strip on front dash. c1962'C' in blue inktramways, trams, depot, wendouree parade, tram 12, tram 35 -
 Ballarat Tramway Museum
Slide - 35mm slide/s, c1962
Tram 14 in Wendouree Parade with lake in background, possibly near depot on a sunny afternoon. Tram has been fitted with marker lights, but not enlarged white strip on front dash.'D' in blue inktramways, trams, wendouree parade, tram 14 -
 Ballarat Tramway Museum
Slide - 35mm slide/s, c1962
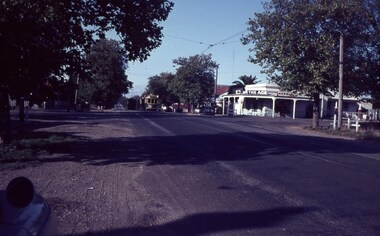
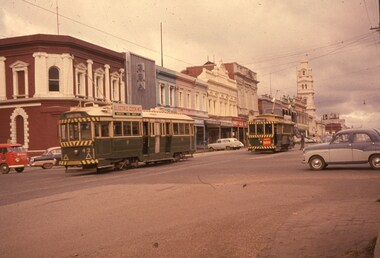
Distant photograph of three trams crossing at the Urquhart St. loop, Drummond St. south, two inbound, one outbound. Trams have lights, but not enlarged white strip on front dash. Bluestone milk bar on SW corner of photograph. See Reg Item 7762 for a photo taken at the same time - note the car mirror.'E' in blue inktramways, trams, urquhart st., drummond st. sth -
 Ballarat Tramway Museum
Slide - 35mm slide/s, c1962
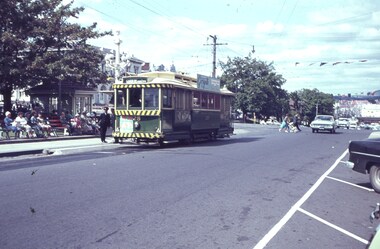
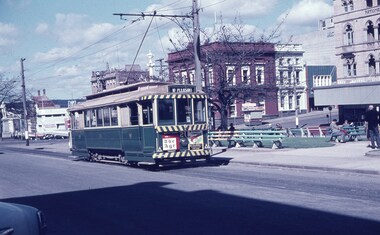
Tram 28 at the intersection of Sturt and Lydiard Streets, with destination Gardens via Sturt St. West, two inspectors by tram, many people sitting on park benches in centre median strip. Tram with lights, but small white strip, has early 'Twin Lakes' sign on front of tram.'F' in blue inktramways, trams, sturt st, tramway centre, lydiard st, tram 28 -
 Ballarat Tramway Museum
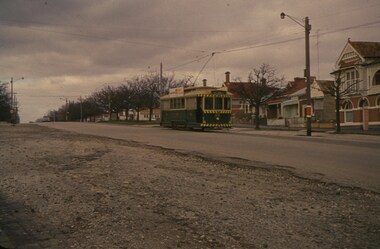
Slide - 35mm slide/s, Wal Jack, 26/06/1962 12:00:00 AM
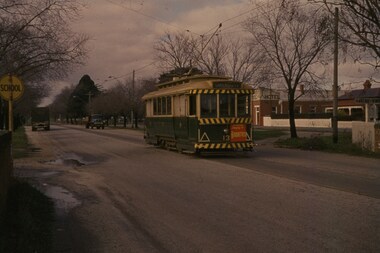
Tram 13 approaching Victoria St. terminus, taken from Buninyong railway overbridge, with 13 travelling away from photographer. Two trucks in background. Tram has been fitted with lights, but not the larger white strip. Taken on 26.6.62. With Meagher's Hotel in background.'SEC Ballarat, No. 13, Victoria St, near terminus, Ballarat East, 26-6-62' in blue ink, and on reverse side, 'W.Jack photo' in blue ink.tramways, trams, victoria st., tram 13 -
 Ballarat Tramway Museum
Slide - 35mm slide/s, 1968
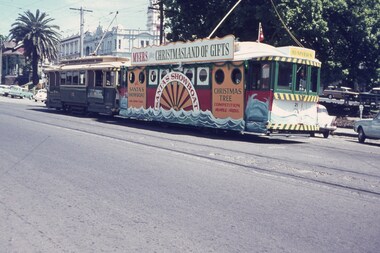
Trams 12 and 21 as Myer's Christmas tram in City Loop. Photographed from south side of Sturt St. looking towards Post Office. Trams have both been fitted with lights, and have large white strip on front dash. Tram 21 has been made up as 'Santa's Showboat' and has red ensign flag on roof. Photo taken during the 1968 Christmas season. See Date advised by Alan Bradley, 15/3/03Niltramways, trams, santa tram, myers, decorated trams, city loop, tram 12, tram 21 -
 Ballarat Tramway Museum
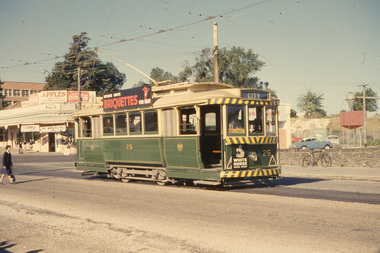
Slide - 35mm slide/s, Wal Jack, 1964?
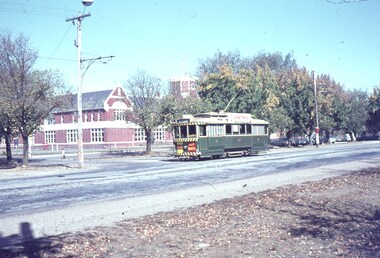
Photo of Ballarat tram No. 33 travelling towards City in Sturt St. West at Murray St. Ballarat College buildings in background. Fitted with lights, but small white stripe under canopy lights. Has Castrol ad on roof and two ads on front, one for briquettes the other 60/40 dancing at Civic Hall. Has destination of 'Mt. Pleasant.''Ballarat No. 33, Sturt St. at Murray St. 64' in black inktramways, trams, sturt st west, tram 33 -
 Ballarat Tramway Museum
Slide - 35mm slide/s, Wal Jack, 11/03/1964 12:00:00 AM
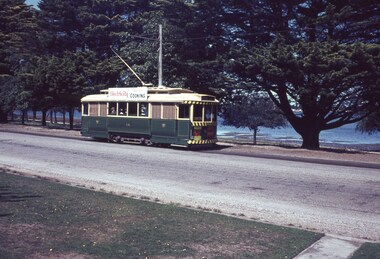
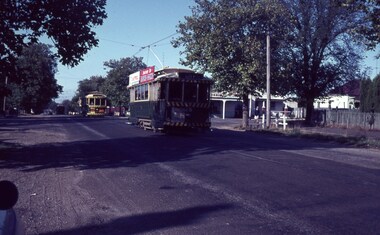
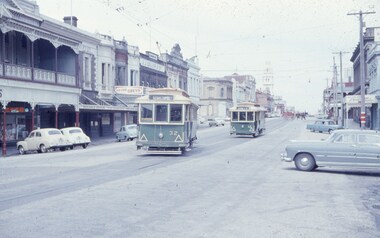
Photo of Ballarat trams 28, 14, 42 en route to City and 38 in background going to Sebastopol, Drummond St. South, just north of Urquhart St., 11-3-1964. Trams 28 and 14 have small white stripe under dash canopy lights. 28 fitted with Castrol and 'Switch to electric cooking' ads, 14 has ads as well.'Ballarat Trams No. 28, 14, 42 to city, 38 Sebastopol. Drummond St. South, 11-3-64.' in blue inktramways, trams, drummond st. sth, sebastopol, tram 28, tram 14, tram 42 -
 Ballarat Tramway Museum
Slide - 35mm slide/s, Wal Jack, 11/03/1964 12:00:00 AM
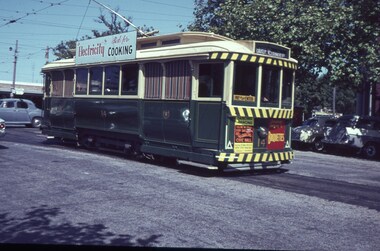
Photo of Ballarat No. 14, just north of Sturt St in Drummond St. north, with destination of 'Gardens via Drummond North'. Tram fitted with 'Electricity best for cooking' roof ad and briquettes and 60/40 dancing at Civic Hall ads on front of tram. Photo taken 11-3-64. Tram fitted with small white stripe. At Hospital Corner'Ballarat No. 14, Drummond St. Nth, 11-3-64'tramways, trams, drummond st. nth, hospital corner, tram 14 -
 Ballarat Tramway Museum
Slide - 35mm slide/s, Wal Jack, 10/03/1964 12:00:00 AM
Photo of Ballarat No. 13 crossing Sturt St. from Sebastopol, with 'City' destination. Tram fitted with small white stripe under dash canopy lights. Twin Lakes ad on front of tram. 'The Southern Cross Hotel' building in pink paint in background. Photo taken on 10-3-1964.'Ballarat, #13 at corner Sturt and Drummond Sts, 10th March '64' in blue inktramways, trams, drummond st., sturt st., tram 13 -
 Ballarat Tramway Museum
Slide - 35mm slide/s, Wal Jack, 23/02/1963 12:00:00 AM
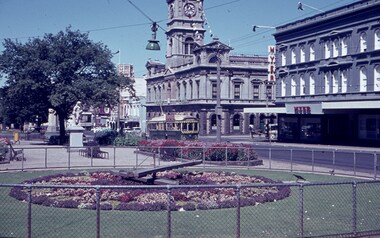
Photo with Ballarat tram No. 38 in background, floral clock in foreground, Ballarat Town Hall with Begonia Festival sign on Sturt Street face, Myers building and a horse drawn cart about to cross Sturt St. Tram fitted with large triangles, dash canopy lights and small white stripe. 23/2/1963'SEC Ballarat, No. 38, Floral clock and Sturt St. 23/2/63' in blue inktramways, trams, sturt st, floral clock, town hall, tram 38 -
 Ballarat Tramway Museum
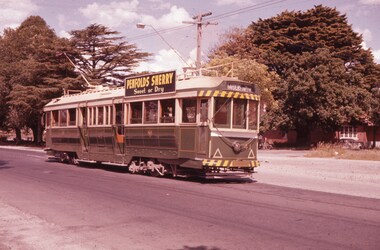
Slide - 35mm slide/s, Wal Jack, 4/11/1961 12:00:00 AM
Photo of Ballarat No. 41, derailed in Barkly St. Ballarat near main road on 4-11-1961. Image is going red. Tram fitted with dash canopy lights, small white stripe, large triangles. Penfold Sherry ad on roof. Numerous markings on road surface of previous? derailments. Note advertisement hoardings in background of photo, one featuring an ad for Penfolds. Tram has a destination of 'Mt. Pleasant.''SEC Ballarat No. 41 derailed in Barkly St. near Main Road, 4-11-61 1.40pm' in blue ink.tramways, trams, barkly st., derailments, accidents, mt. pleasant, tram 41 -
 Ballarat Tramway Museum
Slide - 35mm slide/s, Wal Jack, 26/06/1962 12:00:00 AM
Photo of Ballarat No. 20 climbing Victoria St. hill from Bakery Hill, 26-6-1962. Tram fitted with dash canopy lights, small white stripe, small triangles. Western highway narrow seal, one motor car in distance, Darkish photo, grainy.SEC Ballarat No. 20 in Victoria St. 26-6-62' in blue ink.tramways, trams, victoria st., tram 20 -
 Ballarat Tramway Museum
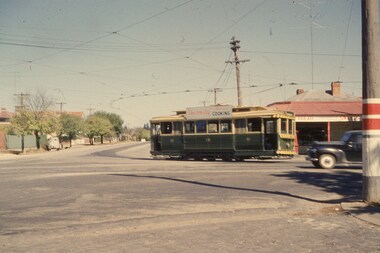
Slide - 35mm slide/s, Wal Jack, 23/03/1962 12:00:00 AM
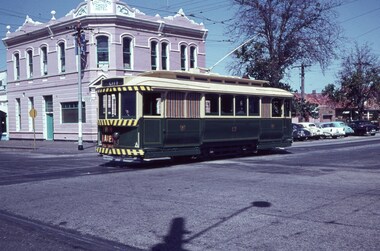
Photo of No. 18 turning from MacArthur St. into Drummond St. north, taken from north west corner. Side on view of 18. Tram fitted with dash canopy lighting and SEC ad on roof. Adjacent to photographer is a compulsory tram stop painted on a pole with a white painted over section below it. Photo taken on 23-3-1962.'SEC Ballarat, No. 18 in Macarthur St., turning into Drummond St. 23-3-62' in blue inktramways, trams, macarthur st., drummond st., tram 18 -
 Ballarat Tramway Museum
Slide - 35mm slide/s, Wal Jack, 7/04/1962 12:00:00 AM
Photo of 10 trams in Lydiard St., with No. 20 at north end for Australian Railway Historical Society visit on 7-4-1962. Taken from west side of Lydiard St. looking south. Photo includes Vauxhall and Morris built cars. No. 20 fitted with dash canopy lights, small white strip, and has an ad for 'The Age' on front panel. Destination shown is 'Special'. Photo is over exposed.'SEC Ballarat ARHS Specials, 10 trams in Lydiard St. Nth. 7/4/62.' in blue ink.tramways, trams, lydiard st., specials, arhs, tram 20 -
 Ballarat Tramway Museum
Slide - 35mm slide/s, Wal Jack, 23/01/1961 12:00:00 AM
Photo of No. 17 in Wendouree Parade (east side of Lake) showing 'View Point'. Looking across lake foreshore, at rear of tram. Tram not yet fitted with dash canopy lights, but small white stripe has been painted as has the tiger stripes on the bumper and the roof of the tram. Has ads for 'The Age' and 'Bourne Liquid Plastics'. Car number positioned under headlight. Slide going red, Taken on 23-1-61.'SEC Ballarat, No. 17 Wendouree Parade, View Point Line, 23-1-61' in blue ink and 'W.Jack' in purple ink stamp.tramways, trams, view point, wendouree parade, dash canopy lights, tram 17 -
 Ballarat Tramway Museum
Slide - 35mm slide/s, Wal Jack, 26/12/1960 12:00:00 AM
Photo of tram No. 38 in Sturt St. at Lydiard St. in transition of having dash canopy lighting fitted. Tiger stripes on bumper bars, and white stripe under windscreen. Has large reflective tri-angles. Has Castrol Ad on roof of tram. In background is old Commonwealth bank building, Mutual Life Association building. On tram stop pole is section sign, 'Cars stop here' sign and it is painted as a compulsory stop. Taken 26-12-1960.SEC Ballarat No. 38 in Sturt St. 26-12-60' in blue ink and 'W.Jack' stamped in purple inktramways, trams, sturt st., dash canopy lights, tram stops, tram 38 -
 Ballarat Tramway Museum
Slide - 35mm slide/s, Wal Jack, 26/12/1960 12:00:00 AM
Photo of No. 13 crossing Sturt St. from Lydiard St. with Post Office in background. Tram in transition of fitting dash canopy lights. Has been painted with tiger stripes and white stripe under windows. Tram has an auxiliary board on front, conductor swapping doors over, Has 'The Age' on front panel, number by side of headlight, large reflective tape triangles. Also has 'Georgille' roof ad. Taken on 26-12-1960.'SEC Ballarat Tramways, No. 13 from Lydiard St. turning into Sturt St. 26-12-60' in blue ink and 'W.Jack' stamped in purple inktramways, trams, lydiard st., post office, sturt st, tram 13 -
 Ballarat Tramway Museum
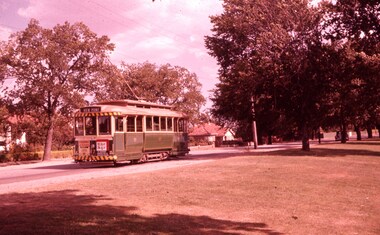
Photograph - Black and White photograph - laminated, Jim Parker, early 1960s
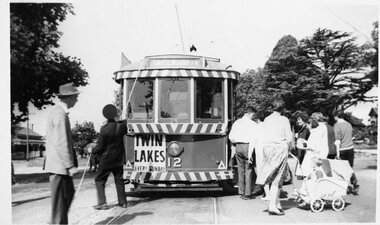
Photograph of SEC No. 12, with dash canopy lighting, but small white stripe, at Victoria St. terminus in early 1960's. Conductor turning pole, with a large number of passengers about to board, including one pram. On a Sunday afternoon? Tram has a 'Twin Lakes, every Sunday' sign on front. Large trees in background. Image on data base file, made from digital photo of photo 22/6/02, replaced with hi res scan of neg 9-5-2020. trams, tramways, ballarat, secv, victoria st., tram 12 -
 Ballarat Tramway Museum
Slide - 35mm slide/s, Wal Jack, 16/01/1961 12:00:00 AM
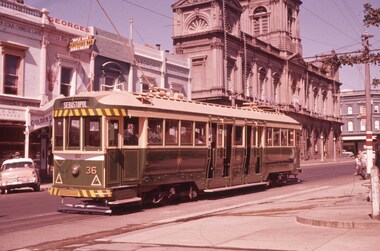
Ballarat tram 36 in Sturt St, at Lydiard St, with tram stop in foreground. Town Hall and Myers in background. Tram has large white triangles, and painted with the white strip under the windows, but lights yet to be fitted. Has destination of Sebastopol. Tram looks recently repainted.'SEC Ballarat, No. 36, Sturt St. Ballarat, 16-1-61' in blue ink and 'W.Jack' stamped onto slidetramways, trams, ballarat, sturt st, tram 36 -
 Ballarat Tramway Museum
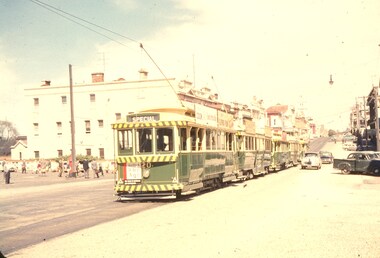
Slide - 35mm slide/s, Keith Kings, 8/03/1954 12:00:00 AM
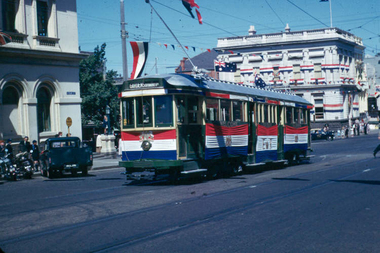
Yields information about the Ballarat's bogie trams, in particular No. 38 that was decorated for the Royal visit in 1954.Ballarat tram No. 38 decorated for Visit of Queen Elizabeth II to Ballarat, during 1954, about to turn from Lydiard St. into Sturt. St. Has destination of Gardens via Drummond Nth. Decorated with Red, White and Blue cloth on front and sides of cars and over windows and other Royal motifs. It background is Commonwealth Bank building, decorated with banners. Basic colour of building is white. Photo by Keith Kings. See also Reg. Item 1896 for a black and white side on photo/postcard and Reg Item 3862. image i2 - very hi res. .3 - clean up and straighten up by Peter Waugh 21-9-2022'K.S.Kings No. ..' stamped on, and 'TC6, K(k)(11), Ballarat bogie 38, decorated for Royal visit, Lydiard St at Sturt St, 8/3/54, 1/50 at f3' in blue ink.tramways, trams, ballarat, royal visit, decorated trams, lydiard st, sturt st, tram 38 -
 Ballarat Tramway Museum
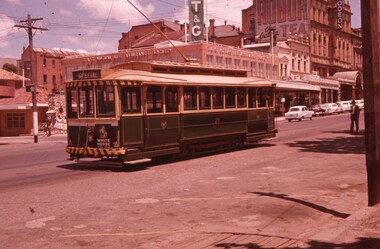
Slide - 35mm slide/s, Wal Jack, 5/01/1962 12:00:00 AM
Ballarat No. 31 covered on below windows with posters for Morton's Circus, ads for 'To-Nite'. Has Castrol and footrest shoes? roof ads. Tram travelling down Lydiard St, towards station, just left Seymour St. loop, following another bogie car. Both trams have dash canopy lights with small white strip. No. 31 showing 'SPECIAL' on destination.SEC Ballarat No. 31 with Morton's Circus Posters, Lydiard St. North, 5/1/62' in blue inktramways, trams, ballarat, morton's circus, lydiard st., seymour st. loop, tram 31 -
 Ballarat Tramway Museum
Slide - 35mm slide/s, Wal Jack, 26/12/1960 12:00:00 AM
Ballarat tram No. 41 at Victoria St. terminus, 26-12-1960. Tram has been painted with small white strip under drivers windows prior to putting lights on. Has large triangles on front. Showing Gardens via Sturt St. West on destination. Has Penfolds Sherry Ad.'SEC Ballarat No. 41, Victoria St. terminus, 26-12-1960' in blue ink and 'W.Jack' stamped on.tramways, trams, ballarat, victoria st., tram 41 -
 Ballarat Tramway Museum
Slide - 35mm slide/s, Wal Jack, 26/08/1961 12:00:00 AM
Ballarat Tram No. 37, about to enter Bridge St, at bottom of Sturt St. hill, with Mt. Pleasant destination, 26-8-1961. Has been fitted with dash canopy lights. Has small white triangles on front dashes. In background is Union Hotel and other shops on South side of Sturt St.'SEC Ballarat No. 37, Sturt St., 26-8-61'tramways, trams, ballarat, sturt st, tram 37 -
 Ballarat Tramway Museum
Slide - 35mm slide/s, Wal Jack, 2/01/1961 12:00:00 AM
Ballarat No. 21 in City Loop, 2-1-61. Tram has been painted with small white strip under headlights, pending dash canopy lights. Slide dark, sun directly overhead. Has T&G buildings, Odeon Theatre in background along with some cars.'SEC Ballarat Tramways, No. 21, ex Adelaide A10, Sturt St. loop, 2-1-61' in blue ink, and 'W.Jack' stamped on.tramways, trams, ballarat, city loop, tram 21 -
 Ballarat Tramway Museum
Slide - 35mm slide/s, Wal Jack, 23/03/1962 12:00:00 AM
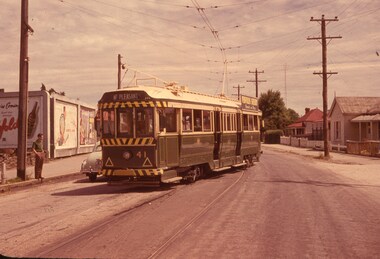
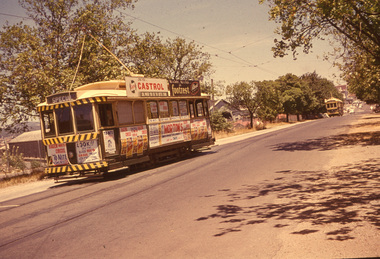
Ballarat Tram No. 26, in Barkly St, near Main St. - 23.3.1962. Tram has dash canopy lighting, but small white strip. Has large briquettes roof ad and White Horse scotch whiskey ad on front. In back is vacant block and land and corner store. Young lady walking across the road to catch the tram.'SEC Ballarat, No. 26 in Barkly St. near Main St., Ballarat East, 23/3/62' in blue ink.tramways, trams, ballarat, barkly st, tram 26 -
 Ballarat Tramway Museum
Slide - 35mm slide/s, Wal Jack, 13/07/1962 12:00:00 AM
Ballarat trams 43 and 27 in Lydiard St. North, at Mair St. 13-7-1962. Tram 43 heading south has Electric Cooking roof ad, 27 heading north, with briquettes ad on front of tram, and a roof ad. Has buildings of the east side of Lydiard St. in background looking towards Post Office. Quite a number of motor cars in photo. Both trams have dash canopy lights, but small white strip.'SEC Ballarat, Nos. 43 & 27 in Lydiard St. North 13-7-62' on one side and 'W.Jack Photo' on reverse, all in blue inktramways, trams, ballarat, lydiard st. nth, mair st, tram 43, tram 27 -
 Ballarat Tramway Museum
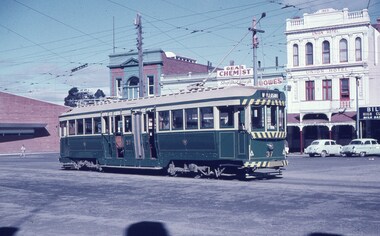
Slide - 35mm slide/s, Wal Jack, 10/09/1961 12:00:00 AM
Ballarat No. 21 at corner of Lydiard St and Sturt St, 10-9-1961. No. 21 has dash canopy lights, small white strip, ads for The Age and Mutual Homes on front panel and destination of Mt. Pleasant. Old Commonwealth bank building in background, National Mutual Life building, Odeon theatre sign, people on seats in centre median strip.'SEC Ballarat, No. 21 (ex MTTT 10), Sturt St 10-9-1961' in blue inktramways, trams, ballarat, sturt st, tramway centre, lydiard st, tram 21 -
 Ballarat Tramway Museum
Slide - 35mm slide/s, Keith Kings, 28/02/1962 12:00:00 AM
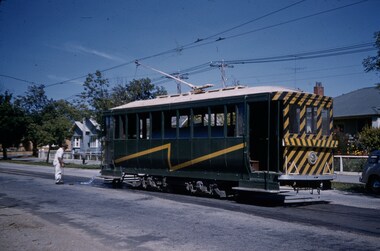
Ballarat Scrubber car, in Drummond St. North, 28.2.1962, flushing track drains at Duncan St. loop. Workman in white at rear of tram, parked at entry to loop. Photo by Keith Kings.'K.S.Kings No.' stamped onto slide' 'H(w)(369), 1/250, f11, 28/2/62, Ballarat, Scrubber flushing track drains at loop on Drummond St. Nth.' in blue ink.tramways, trams, ballarat, drummond st. nth, scrubber tram, maintenance, scrubber -
 Ballarat Tramway Museum
Slide - 35mm slide/s, Wal Jack, 30/03/1959 12:00:00 AM
Ballarat tram 12 waits at end of double track section in Lydiard St. Nth for 32, heading for Sebastopol to leave single line section, by Reid's Coffee Palace, 30-3-1959. Photo a bit over exposed. Has horse drawn cart in background and numerous parked cars. Both trams have large white triangles on the front dashes.'SEC Ballarat, Nos 32 and 12, Lydiard St. Nth, 30-3-1959, W.Jack Photo' in blue ink.tramways, trams, ballarat, lydiard st. nth, mair st, tram 32, tram 12