Showing 1573 items
matching garden show
-
 Ballarat Tramway Museum
Photograph - Digital image, c1885
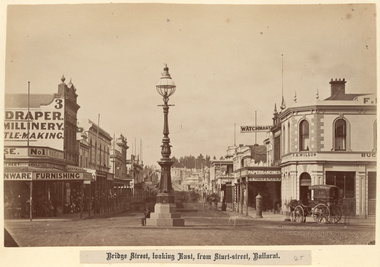
Yields information about the appearance of the intersection of Grenville and Bridge St prior to the opening of the horse tram service.Digital image of Bridge St looking east from the intersection of Sturt and Grenville St Ballarat, prior to the construction of the horse tram line, c1885. Shows the NE corner prior to the construction of the Nichol and Alan Building. Has the W. M. Bean? store on the corner, F. B. Wilson, Bucks Head Hotel, a paper hangings supplier, watchmaker and other stores. Postcard or image has title "Bridge St, looking East from Sturt St, Ballarat"trams, tramways, bridge st, grenville st, sturt st -
 Ballarat Tramway Museum
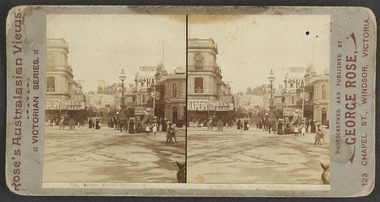
Photograph - Digital image, Rose Stereograph Co, c1895?
Yields information about the appearance of the intersection of Grenville and Bridge St following the introduction of the horse trams and the terminal arrangements.Digital image from the State Library of Victoria website image No. H92.291/24, a Rose series stereo photograph showing a horse tram just after off loading at the Grenville St terminus. Shows the view along Bridge St with the Nicholl and Allan store, Bucks Head hotel, Reed Chemist and C. Morris Hatter sign. C1895? Has a number of people in the view. The horses are being "run around the tram". Tram has the destination of "Convent", could be No. 6 or 5. See image btm7019i2.pdf for the SLV link - correct as of 31-12-17. See image i3 for a more detailed photograph.trams, tramways, bridge st, grenville st, sturt st, horse trams, stereo photograph, tram 5 of 6? -
 Ballarat Tramway Museum
Photograph - Digital image, Charles Rudd, c1890?
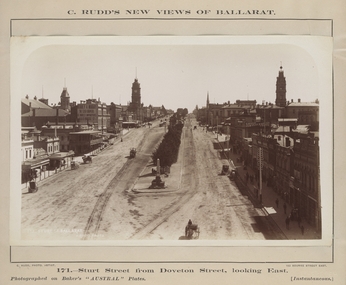
Yields information about the appearance of Sturt St following the introduction of the horse trams.Digital image from the State Library of Victoria website image No. H39558/12, a Charles Rudd photograph showing a view from the Nicholl and Alan building looking west along Sturt St. Shows the buildings along either side of Sturt St and a horse tram descending the hill. Very little other traffic in the photograph. Has signs for "C. Huck - The Queen's studio photo" and "Morrey and Murray", the Cash Drapers on the Ballarat Mechanics Institute building. Note the caption of the photograph is incorrect. See image btm7019i2.pdf for the SLV link - correct as of 31-12-17. See image i2 for a more detailed photograph.trams, tramways, grenville st, sturt st, horse trams -
 Ballarat Tramway Museum
Photograph - Digital image, Charles Rudd, c1890?
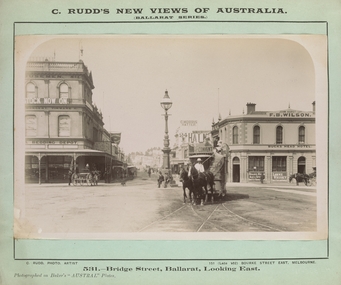
Yields information about the appearance of the intersection of Grenville and Bridge St following the introduction of the horse trams and the terminal arrangements.Digital image from the State Library of Victoria website image No. H39358/11, showing a horse tram departing the Grenville St terminus. Shows the view along Bridge St with the Nicholl and Allan store, Bucks Head hotel, and C. Morris Hatter sign. C1890? Tram has the destination of "Convent", with a number of people on the upper deck. See image btm7019i2.pdf for the SLV link - correct as of 31-12-17. See image i3 for a more detailed photograph.trams, tramways, bridge st, grenville st, sturt st, horse trams -
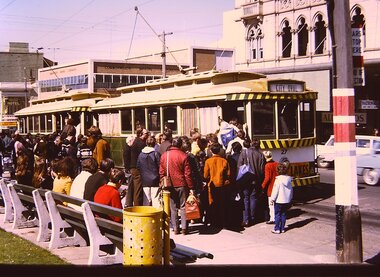 Ballarat Tramway Museum
Photograph - Digital image Set of 2, Chris Phillips, c1970
Yields information about the City terminus on the south side of Sturt St and the passenger traffic prior to closure of the system. Shows many people boarding the tram.Set of two digital images of trams at the City terminus on the south side of Sturt St, c1970. and corner with Lydiard St. .1 - No. 27 and another single trucker loading large crowds of passengers at the tram stop. No. 27 has the destination of City Oval. In the background is the Commonwealth Bank building. The tram has a Twin Lakes sign. .2 - Four trams at the same stop, from rear - 12, 43, 26 and ?. No. 12 has the destination of Sebastopol and has a Twin Lakes sign. Has the Town Hall in the background and the ESCo pillar cabinet on the corner.trams, tramways, sturt st, city oval, city, lydiard st, electrical switching, electrical equipment, esco, tram 27, tram 12, tram 43, tram 26 -
 Ballarat Tramway Museum
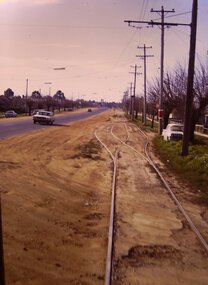
Photograph - Digital image Set of 2, Chris Phillips, c1971
Yields information about the tram track in Albert St Sebastopol and its appearance.Set of two digital images of the tram track in Albert St Sebastopol c1971 by Chris Phillips. .1 - looking north in Albert St at the Grey St loop - shows the road conditions and poles along with the tram stop. .2 - possibly looking north on the western side of Albert St with two men about to board the tram with cameras in hand. Has a "Waller" name on building in background.trams, tramways, sebastopol, albert st, grey st loop -
 Ballarat Tramway Museum
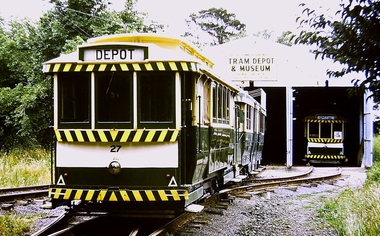
Photograph - Digital image, Chris Phillips, c1975
Yields information about the BTPS depot c1975 and its surrounds.Digital image of No. 27, 38 and 14 on the BTPS Depot fan c1975. Shows the track layout prior to landscaping and the long grass on the south side.trams, tramways, btps, depot, tram 27, tram 38, tram 14 -
 Ballarat Tramway Museum
Photograph - Digital image Set of 7, Chris Phillips, early 1960's
Yields information about tramway operations in Sturt St c1970.Set of 7 digital images of trams in Sturt St, c1970 - Photos by Chris Phillips. .1 - No. 26, in bound near Armstrong St - destination of Mt Pleasant St. Has the Commercial Bank of Australia building in the background - CBC .2 - No. 26 in bound to City, near Hospital Corner. .3 - No. 17 near the Doveton St intersection, has a roof advert "Make Bliss Not Love". Has the State Savings Bank, CAGA Finance, CBC bank buildings in the background. .4 - No. 12 in bound with the destination of Gardens via Sturt St West, at the corner of Dawson and Sturt St. Shows the tram stop. Has the R. E. Hayden Real Estate building in the background. .5 - No. 39 inbound at Hospital corner. .6 - No. 39 at the City terminus with the Post Office in the background. .7 - No. 43 outbound to the Gardens Via Sturt St west near Drummond St. Has the Marshall battery centre, Morris Ellis & Sons, Pope Mowers and The Ballarat Modern Diary in the background. Also a sign for AWA car radio.trams, tramways, sturt st, hospital corner, doveton st, dawson st, tram stops, tram 26, tram 17, tram 12, tram 39 -
 Ballarat Tramway Museum
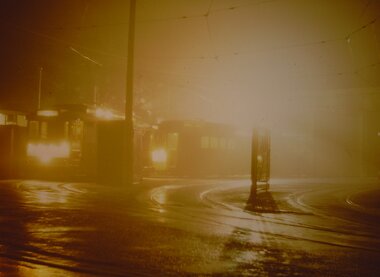
Photograph - Digital image, Chris Phillips, c1970
Yields information about the SEC depot on a wet evening or night.Digital image the SEC Depot in Wendouree Parade, looking at the depot on a wet evening night. Shows two trams on the depot fan. Photo c1970.trams, tramways, depot, secv, night photo -
 Ballarat Tramway Museum
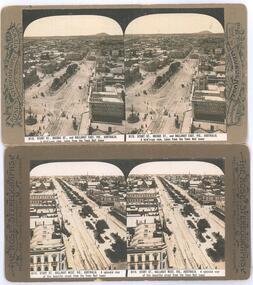
Photograph - Black & White Photograph/s, Rose Stereograph Co, c1905
Yields information about the appearance of the intersection of Sturt and Lydiard St and Sturt St itself looking west, showing the tram track arrangements.Photographic reproduction - sepia coloured of two stereo pair images with details on the sides. Originals made by the Rose Stereoscopic of Melbourne. Printed on A4 size ink-jet printer. Set of two: 1 - Sturt St and the Lydiard St intersection, electric trams looking east from the Town Hall. Shows Mount Warrenheip. Shows the roof of a tram in the bottom edge and a tram in Bridge St. Has the National Mutual building in the view, advertising the Commercial Union Fire (insurance) and Doepel and Chandler. Another building advertiser is "Carlton Ales" Image No. 8112 2 - Sturt St looking west from the Town Hall tower. Has one tram in the distance. Shows the layout of the Sturt St central median strip.trams, tramways, sturt st, lydiard st, stereo photograph, grenville st, esco, bridge st, town hall -
 Ballarat Tramway Museum
Photograph - Digital image, John Henry Harvey, c1900
Yields information about the appearance of the intersection of Grenville and Bridge St following the introduction of the horse trams and the terminal arrangements.Digital image from the State Library of Victoria website image No. H86.76/17, a series stereo photograph showing the horse tram track from the Bucks Head Hotel at Grenville and Sturt Streets. Shows the muddy nature of the intersection. Has the buildings on the north side of Sturt St in the view. Photograph by John Henry Harvey, c1900. trams, tramways, bridge st, grenville st, sturt st, horse trams, stereo photograph -
 Ballarat Tramway Museum
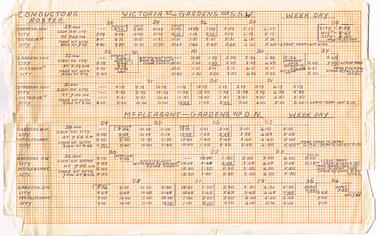
Document - Roster, State Electricity Commission of Victoria (SECV), "Conductors Roster", Mar. 1970
Demonstrates aspects of the Ballarat Tramways management system of Conductors rosters interfacing with Drivers during the last full period of operation of the tramway from March 1970. Shows the services and how the various run or crew tables were arranged in relation to the overall timetable.Handwritten sheet on graph paper for the Conductors Weekdays Rosters for the arrangement on Mt Pleasant - Gardens and Victoria St - Gardens. Gives the various run numbers, sign on location, trip take times, notes on what to do with trams, sign off times, interface with other runs. Shows the full service where conductors were used and how the various run or crew tables were arranged. Undated, could be c March 1970. See 3428 for other conductors rosters and See Reg item 3429 for Drivers table.trams, tramways, timetables, sec, ballarat, crews, conductors, rosters -
 Ballarat Tramway Museum
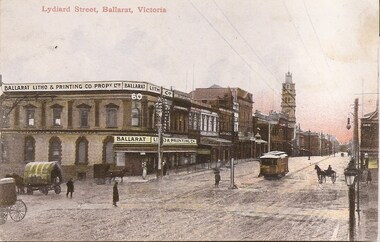
Postcard, Ballarat Litho & Printing Co, Lydiard St North, 1905
Yields information about the corner of Mair and Lydiard St soon after the Ballarat Electric Tramway opened.Digital Image of and ESCo tram north bound in Lydiard St North, at the intersection with Mair St. Shows the Ballarat Litho and Printing Co Propy Ltd building on the corner. Note the centre poles and the pole in the middle of the intersection. Has a number of horse drawn vehicles. Photo taken soon after opening as the destination sign is on the dash panel. From the Facebook group of old time photographs of yesterday. Titled "Lydiard St Ballarat Victoria"trams, tramways, mair st, lydiard st north, esco, postcards -
 Ballarat Tramway Museum
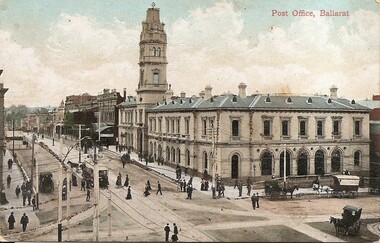
Postcard, ESCo tram north bound in Lydiard St North
Yields information about the corner of Sturt St and Lydiard St soon after the Ballarat Electric Tramway opened.Digital Image of and ESCo tram north bound in Lydiard St North, at the intersection with Sturt St. Shows the Ballarat Post Office and other buildings in Lydiard St. Note the centre poles the new tram tracks. Photo taken soon after opening as the destination sign is on the dash panel. There are a number of lines of dark brown piles of earth? Work still being undertaken. Titled "Post Office Ballarat". From the Facebook group of old time photographs of yesterday.trams, tramways, sturt st, lydiard st north, esco, postcards -
 Ballarat Tramway Museum
Photograph - Black & White Photograph/s, Lee A Ratten, 6/06/1928 12:00:00 AM
Black and white photograph of Bendigo No. 9 Pall Mall 6/6/1928 at the intersection with Mitchell St, Charing Cross with the City Club Hotel in the background. Behind No. 9 is No. 12 or 18? No. 9 has a roof advertisement for Lyric Lightning. On the left hand side is a horse drawn cart and shows a verandah on the building on the North East corner of the intersection. On the rear of copy 1 has the photo stamp of Lee A Ratten of 51 Cotham Road Kew. On the second print is a hand written note which matches the writing of Lee Ratten. trams, tramways, bendigo, pall mall, charing cross, tram 9 -
 Ballarat Tramway Museum
Postcard - Set of 6 and background card, Ken Flood, "Launceston Municipal Tramways"
The Postcards show trams of Launceston which operated from 1911 to 1952, published by International Railway Postcards of Launceston. The background card gives a short history of Launceston trams and the reproduction of two tickets. 1 - Postcard 1 - No. 11 leads a line up of cars in Elphin Road - Ken Flood 6-3-1948 2 - No 27, Mumford St loop - Ken Flood - 9-10-1948 3 - No. 24 Wellington St, photo Ken Flood, 26-2-1949 4 - No. 9 turns from George St into Cameron St - 25-9-1948 - Photo Ken Flood 5 - No. 26 - Talbot Road terminus - 1-11-1948 - Ken Flood 6 - No. 9 Elphin Road, 13-10-1948 - Ken Flood Yields information about Launceston trams, the Museum having No 14 on display, No. 14 from 2022.Set of 6 black and white postcards and a story card. Each have a caption on the rear and a place for a stamp and address.launceston, tramways, tramcars -
 Ballarat Tramway Museum
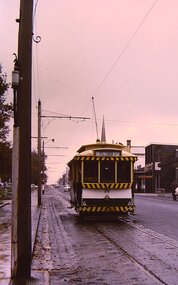
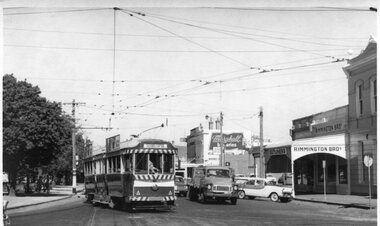
Photograph - Black and White - tram 41 - Hospital Corner, A T Miles, 30/1/1968
Black and White - tram 41 (Sebastopol) turning from Sturt St into Drummond St South. Has the "Cars Stop Here", and "End of Section" signs on a pole on the left hand side of the photograph. In the background is Rimmington Bros Butchers, J A Malpass and a sign for Marshall batteries. Shows the driver looking back through the windows for traffic. Taken by A T Miles 30/1/1968.Yields information about the intersection of Sturt St and Drummond St - Hospital Corner.Photograph - black and white print with notes on rear. A T Miles stamp and location and date notes.tramways, trams, tram 41, hospital corner, sturt st, drummond st south -
 Ballarat Tramway Museum
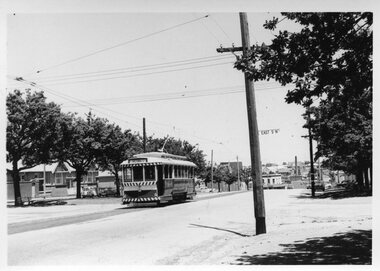
Photograph - Black and White - tram 17 Victoria St and East St, A T Miles, 30/1/1968
Black and White - tram 17 (Victoria St) at the intersection with East St, looking west. Shows the curve in Victoria St, just before the descent to Bridge St, Taken by A T Miles 30/1/1968.Yields information about the Victoria St route.Photograph - black and white print with notes on rear. Printed on Ilford paper.A T Miles stamp and location and date notes.tramways, trams, tram 17, victoria st, east st -
 Ballarat Tramway Museum
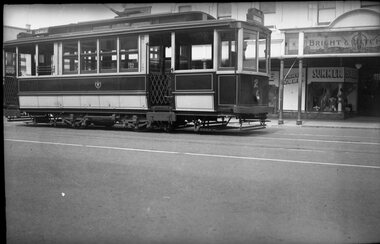
Photograph - Geelong 2 Moorabool St, Arthur Atkins, Oct. 1941
Photograph shows Geelong 2 after it has been enclosed at the ends converting it to a one-man tram in 1935. The reference provides dates for this appearance. The tram is on display at the Ballarat Tramway Museum in the appearance prior to the change to the one-man version. In the background is the Bright and Hitchcocks store. Photo by Arthur Atkins Oct. 1941Yields information about Geelong 2 after its conversion to a one man tram and Bright & Hitchcocks store.Photograph print and negative in brown paper envelope.Print has "Geelong" in blue ink along the bottom edge.tramways, tramcar, geelong, tram 2, moorabool st, bright & hitchcocks -
 Ballarat Tramway Museum
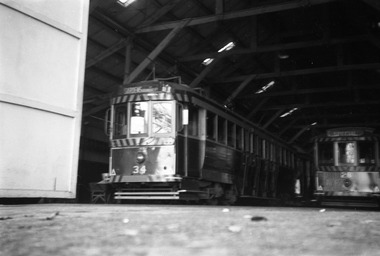
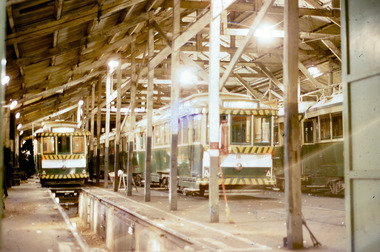
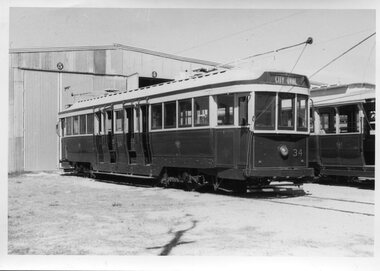
Photograph - Digital Image, Peter Knife, SEC 34 and 28 in Depot, May 1963
Digital image of SEC 34 and 28 in Depot. Shows the roof structure of the depot. Note the wheel barrow to the left of tram 34 containing sand for the trams. Photo by Peter Knife May 1963,Yields information about Ballarat's trams and the SEC depot in 1963.Digital image of a black and white negativetramways, tramcars, ballarat, tram 34, sec depot, tram 28 -
 Ballarat Tramway Museum
Photograph - Digital Image, Peter Knife, Night scene - tram depot Wendouree Parade, 31/3/1971
Digital image of the SEC Depot Wendouree Parade at night with trams 27, 18 and 34 inside the depot. Shows the depot roof structure as well as some of the interior features. Photo by Peter Knife 31/3/1971.Yields information about the interior of the SEC tram depot.Digital image of a colour slide.tramways, tramcars, ballarat, depot, tram 27, tram 18, tram 34 -
 Ballarat Tramway Museum
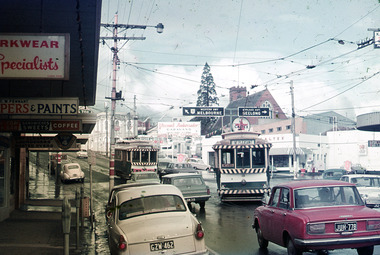
Photograph - Digital Image, Peter Knife, Trams 18 and 17 - Stones Corner, 24/7/1971
Digital image of Trams 17 (ex Victoria St) crossing tram 18 (Mt Pleasant) at Stones Corner - the intersection of Bridge St, Victoria St and Main Road. Shows a busy and somewhat congested intersection. In the background are the Caltex Service Station, a clothing shop, paint shop, dry cleaners and parking meters. Photo by Peter Knife 24/7/1971.Yields information about tram operations in Ballarat, some two months before closure of the SEC operated tram system.Digital image of a colour slide.tramways, tramcars, ballarat, tram 17, tram 18, bridge st, stones corner -
 Ballarat Tramway Museum
Photograph - Digital Image, Peter Knife, BTM Tram 18 Depot Junction, 19/4/2014
Set of three colour images of BTM tram 18 running in at the end of an operating day. The first image shows the driver at the rear of the tramcar and the next two of the tram crossing Wendouree Parade into the depot. This location was rebuilt during November and December 2014 and the road moved to the west for bicycle safety. Photo by Peter Knife 19/4/2014.Yields information about Ballarat Tramway Museum operations in Wendouree Parade and tram 18Set of three Digital images of colour slides.tramways, tramcars, btm, wendouree parade., depot junction, tram 18 -
 Ballarat Tramway Museum
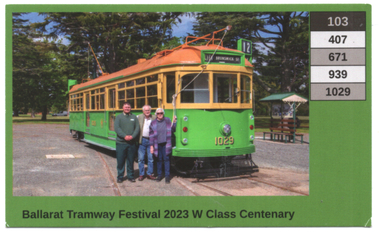
Ephemera - ticket, 2023 W Class Centenary, 18-11-2023
Printed for use on the 18/11/2023 Ballarat Tramway Festival as a ticket for the 2023 W Class Centenary. Has on the rear an advertisement for the Daylesford Show the following weekend. Features W7 1029 on the depot fan. Has spaces for punching the ticket on the top right hand side for trams 103, 407, 671, 939 and 1029.Demonstrates a BTM Event ticket to celebrate the W class Centenary.Ticket - printed on card full colour both sides. Two copies held.btm, tram 1029, events, w class -
 Ballarat Tramway Museum
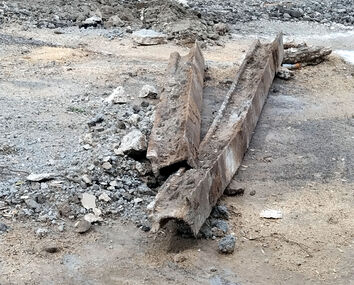
Document, City of Ballarat, "Statement regarding tram tracks at Bridge Mall", 21-11-2023
The two items concern the work being undertaken at the time by the City of Ballarat to reconstruct Bridge St Mall. The City of Ballarat notes the archaeological significance of the works. The photograph shows some of the rail being excavated. Understood that the work is being done in four stages.Demonstrates the work to return road traffic to Bridge St BallaratReport downloaded from the City of Ballarat website - 21-11-2023 and digital image from [email protected] received by email 21-11-2023bridge st, bridge mall, city of ballarat, roadworks -
 Ballarat Tramway Museum
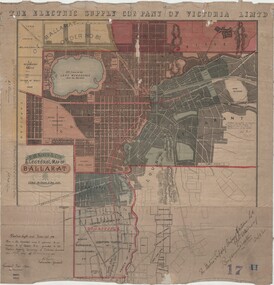
Map, Electric Supply Co. of Vic (ESCo), Ballarat Electoral Map - ESCo, 1900
Document prepared by the Electric Supply Co of Victoria, as part of an order under the Electric Light and Power Act 1896, section 5 of order No. 17 granted to company. Dated 19/2/1901 and signed by the Postmaster-General. Shows the order area being parts of the City of Ballaarat, Sebastopol and Ballarat East. Shows the street names, boundaries, principal power line routes, land reserves, parks, mine locations, railways and Lake Wendouree. Signed by R L Williams Town Clerk City of Ballarat, J R Hall for the Borough of Sebastopol, and John Gent for the Town of Ballarat EastYields information about the power supply to the Ballarat area.Cloth backed paper map, coloured and marked up as exhibit 17.Notes in ink including the signature of Benjamin Deakin 24/9/00 and certified by the three involved municipal Town Clerks.ballarat power supply, esco, electric supply co of victoria, city of ballaarat, east ballarat, sebastopol, orders, power lines, power supply -
 Ballarat Tramway Museum
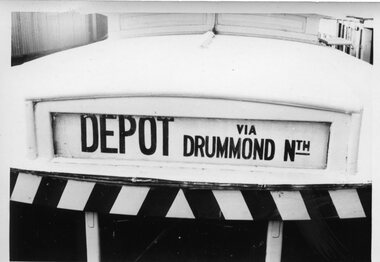
Photograph, Destination "Depot via Drummond Nth"
Close up of a single trucker - Destination sign "Depot via Drummond Nth", shows the layout of the sign.Demonstrates the layout of a Ballarat tramcar destination.Black and white photograph printOn rear in ink "Ballarat"trams, tramways, ballarat, destinations, depot, drummond st nth -
 Ballarat Tramway Museum
Photograph, Tramway Museum Society of Victoria (TMSV), Bendigo Birney 28 - bridgework, 1965
Photo shows Bendigo 28 decorated for the 75th anniversary of Bendigo trams (1890 to 1965) crossing temporary track at Charing Cross during the reconstruction of the Bendigo Creek bridge during early 1965 - see Electric Traction Vol. 20, No. 6, June 1965. The front cover has a photo by H R Clark of the decorated car. The photo shows the method of supporting the rails during the work prior to completion of concreting. Yields inforamation about bridge reconstruction in Bendigo and their 75th anniversary.Black and white photograph printTMSV Shop stamptrams, tramways, bendigo, birney, tram 28, bridgeworks, charing cross, 75th anniversary -
 Ballarat Tramway Museum
Photograph, Tramway Museum Society of Victoria (TMSV), Ballarat 34 at St Kilda Tramway Museum, 1972c
Photo shows Ballarat 34 at the Australian Electric Traction Museum (AETM) at St Kilda Adelaide. Standing in front of the AETM's depot, showing the destination of City Oval. Behind the tram is Ballarat 21. Yields information about Ballarat 34 soon after its arrival in Adelaide and removal of the dash canopy lighting.Black and white photograph printTMSV Shop stamptrams, tramways, tram 34, aetm, st kilda tramway museum, adelaide -
 Ballarat Tramway Museum
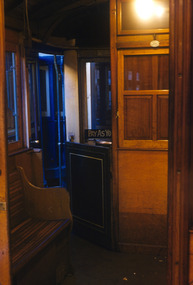
Photograph - Digital Image, Keith Kings, Geelong Pengelley interior, 1955
Digital image of a Photograph of the interior of one of Pengelley-built trramcars that operated in Geelong. Photo by Keith Kings. Shows the door arrangements and the location of a builders plate.Yields information about Geelong tramcars that were built by Pengelley of Adelaide.Digital image of a colour slide - Keith Kings K(f)(83)trams, tramways, geelong, pengelley